
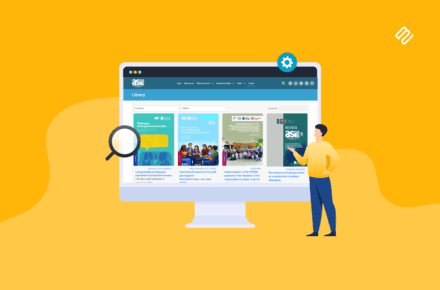


Discover the best WooCommerce role-based pricing plugins and how to use them to charge unique prices to different groups of users. We'll look at two types of role-based pricing for WooCommerce and which one is right for your store.
Out of the box, WooCommerce lets you add a regular price and a sale price for each product. There are no built-in role-based pricing options.
Luckily, there are several plugins available to add role-based pricing for WooCommerce. In this article, we will explore two of the best:
- WooCommerce Discount Manager - Create a wide range of discounts and pricing rules, and select which roles - or even individual user accounts - they are available for.
- WooCommerce Wholesale Pro - Offer flexible role-based pricing specifically for wholesale or B2B stores.
Keep reading to learn how to use each of these WooCommerce role-based pricing plugins to add user group discounts to your store. Whichever plugin you choose, you'll learn how to create multiple user roles and charge role-based pricing. Each user sees the same products, with the correct pricing for their customer group 🪄
Why do you need WooCommerce role-based pricing?
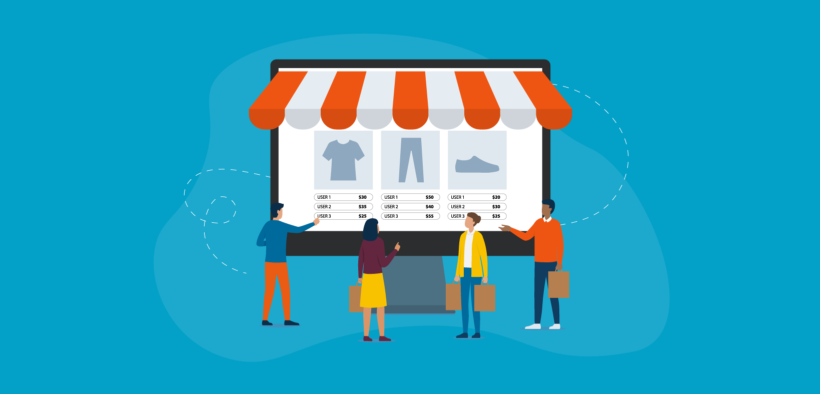
If you sell products to separate groups of customers – such as retail customers and wholesale customers – then you probably need WooCommerce role-based pricing. This is the easiest way to set up customer-specific pricing, in which pricing changes based on a logged in user's role.
Here are some example scenarios where setting WooCommerce prices by user role could save you a lot of time and back-end store management:
- You sell to both retail customers and wholesale buyersIf you sell to B2B and B2C customers, then you can sell the same product at different prices without having to duplicate products.
- You sell products to members on various membership subscription plansIf you’re running a membership site, you might consider offering members on higher-priced subscription tiers a larger discount on purchases. This is also great for offering discounts to specific customer groups.
- You want to hide prices from your public-facing storePerhaps you only allow registered buyers to see prices or purchase. You can do this by hiding prices until login. This way, guest users will have to create an account and become registered users to view product prices.
Implementing role-based pricing also helps with profitability optimization. By carefully structuring discounts for different customer segments, you can maximize your profit margins while still offering competitive pricing. For example, offering higher discounts to bulk buyers can reduce inventory holding costs and improve overall profitability, while maintaining higher margins on retail sales.
These are just some of the reasons why you might need role-based pricing in WooCommerce. Next, I'll tell you how to set it up using the two dynamic pricing WordPress plugins plugins I mentioned above.
Method 1: Use Discount Manager to set up WooCommerce discounts by user role
WooCommerce Discount Manager is my favorite WooCommerce role-based pricing plugin because it's so flexible and suitable for any use case or industry.
Essentially, you should use this plugin for all ecommerce sites except for wholesale stores. For wholesale, skip to Method 2 which is specific to that use case.
Discount Manager is an incredibly flexible discount plugin for WooCommerce. It lets you create absolutely any type of discount or pricing deal, and choose which user role(s) it applies to.
Here's a quick overview of what you get with this role-based pricing plugin:
- Choice of 6 discount types including fixed or percentage pricing, bulk pricing, tiered pricing, free products (including buy-one-get-one-free), discounts based on order value, and more.
- Either run each discount storewide on all products, or restrict it to specific categories or even individual products.
- Choose which user roles each discount applies to so that only logged in users with that role can see the special pricing.
- Run sales for new customers only by creating discounts for the 'guest' user role.
- Schedule each role-based pricing rule to start and end on a specific date.
- Display unique text or other information to display on product pages for users with the correct role.
Next, I'll show you how to set up WooCommerce role-based pricing with the Discount Manager plugin.
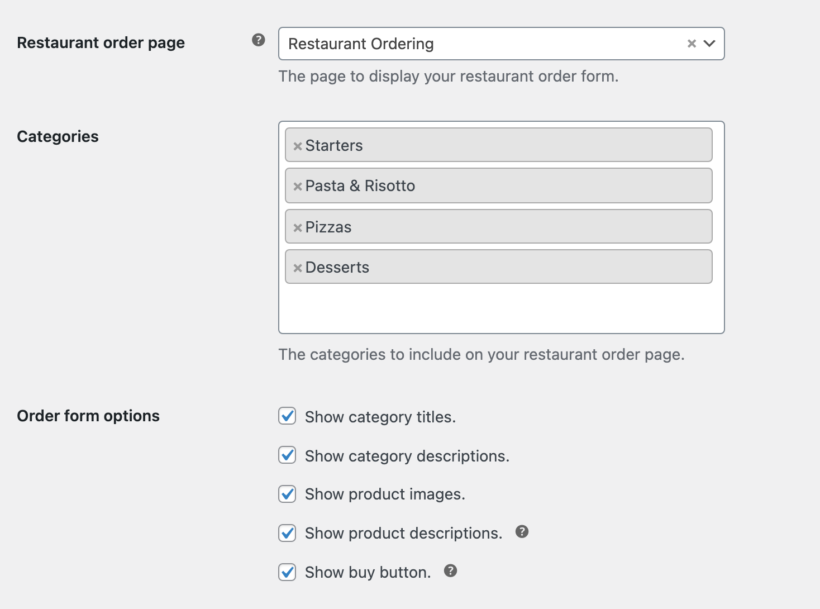
#1. Create your user roles (optional)
The first step is to add any extra roles that you need. WordPress itself comes with a range of built-in user roles, such as subscriber and contributor. WooCommerce adds some additional roles, such as customer and store manager. If these aren't enough, then it's easy to create additional roles.
I recommend the free User Role Editor plugin for this. Simply install the plugin and clone the 'customer' role to create as many new ones as you like.
#2. Set up role-based pricing and discounts
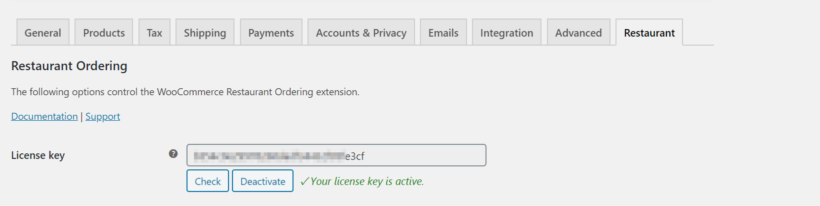
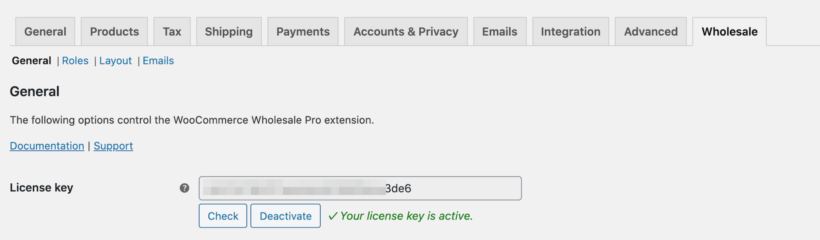
- Get the plugin, save the zip file to your computer, and copy the license key from your confirmation email.
- Install and activate the plugin on your WordPress site.
- Activate your license key in the setup wizard.
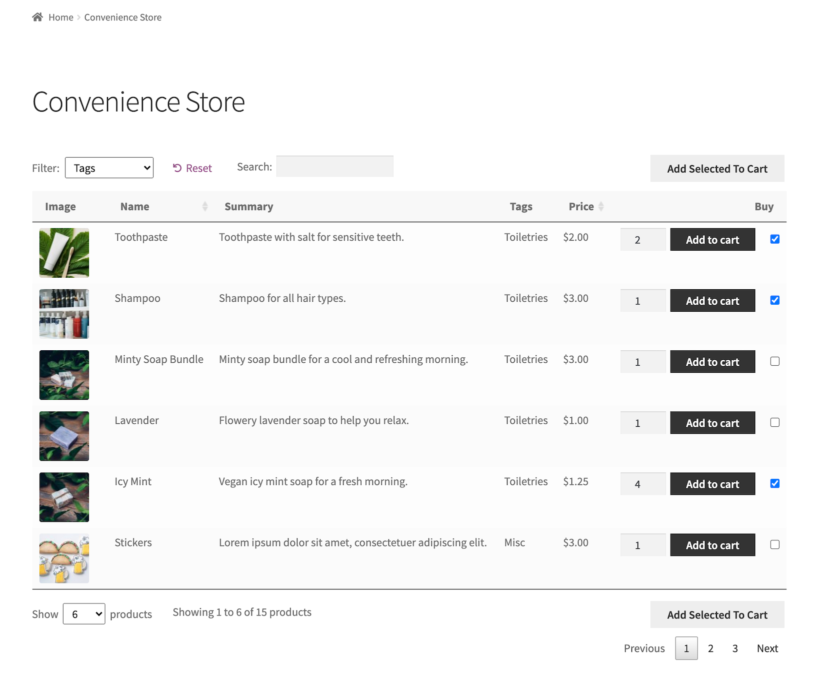
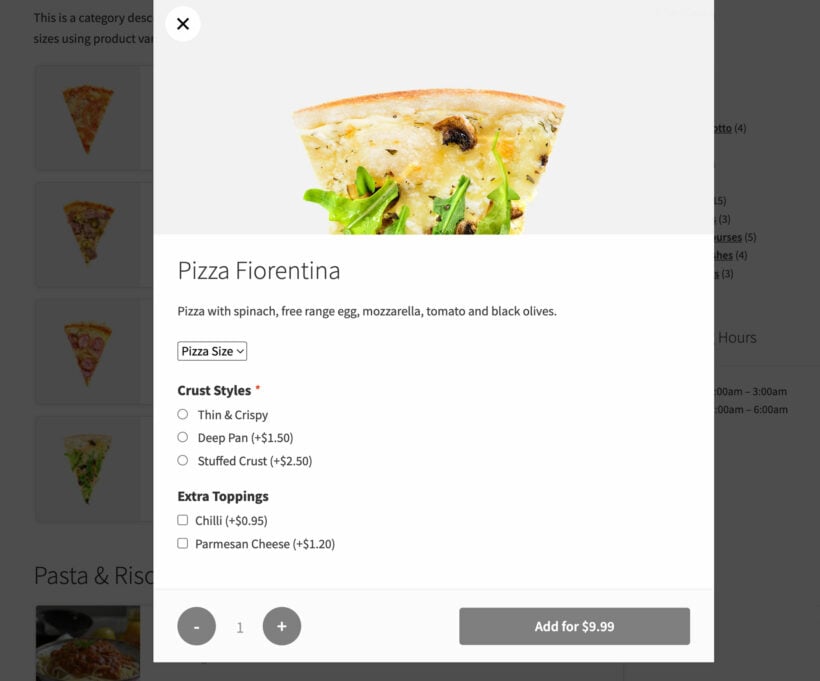
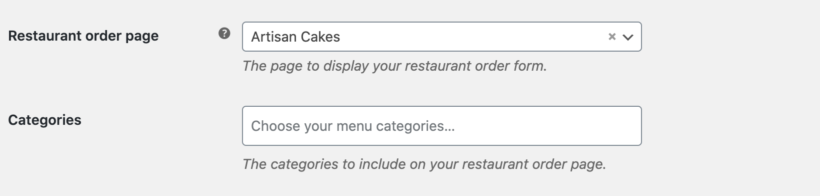
- Next, go to Marketing → Discounts and click 'Add Discount'.
- A popup will appear asking you to choose which type of role-based pricing you'd like to set up. There are examples on the right-hand side to help you decide.
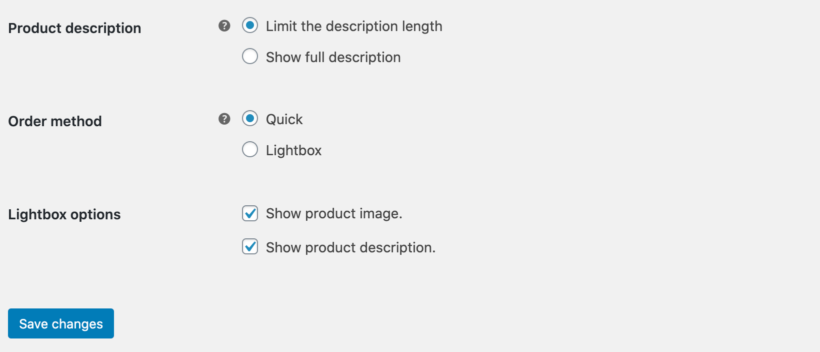
- Next, enter the information for the role-based discount. This includes:
- Add a name to help you identify the pricing rule in the WordPress admin, e.g. "Role-based pricing for silver users".
- Select which products or categories you want the role-based pricing to apply to.
- Enter the details of the discount. The exact options will depend on what type of role-based pricing you're creating.
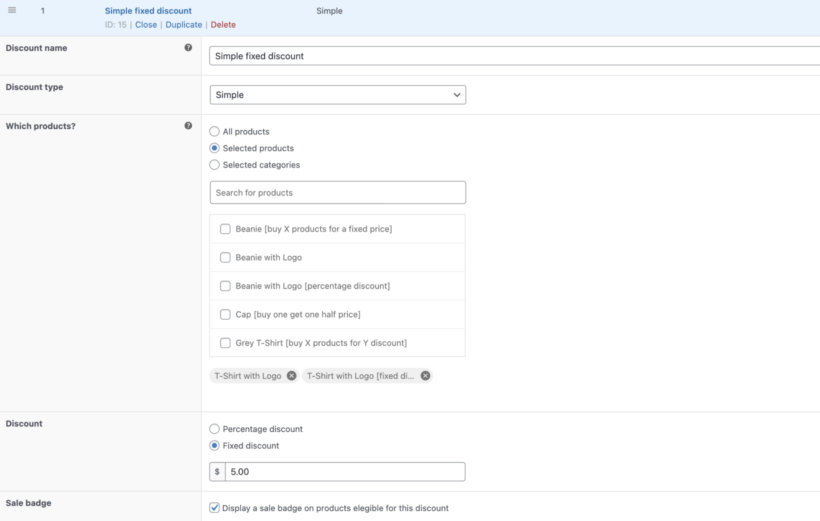
- Now click 'Selected roles' and choose one or more that the will be applied to.
- Use the 'Availability' section to schedule the pricing rule, if required.
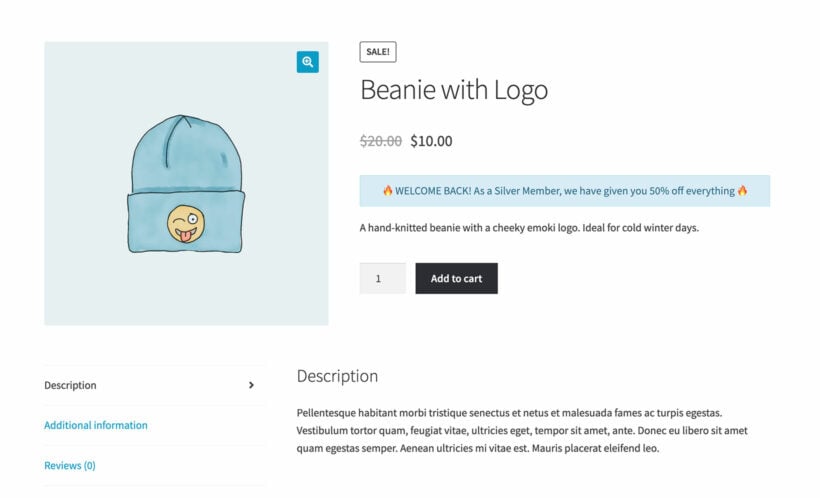
- The 'Product page content' field is an opportunity to display role-based information on the WooCommerce product page. Feel free to enter any fancy styles from your theme, add emojis etc. For example, you might enter: "🔥 WELCOME BACK! As a Silver Member, we have given you 50% off everything 🔥"
- Select a location for the product page content from the dropdown. For example, you can display it at the top of the page or above the add to cart button.
- Finally, you can add some text which appears at the top of the cart page. This is a nice way to remind people they're getting special pricing.
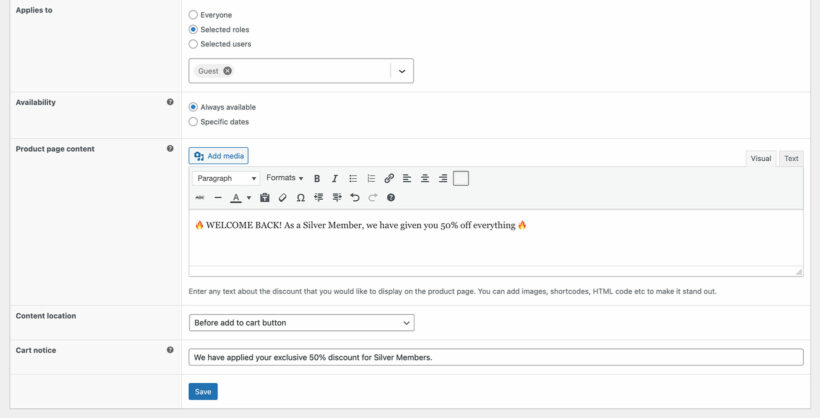
- Finally, click 'Save'.
Repeat these steps to add as many role-based pricing roles as you like to WooCommerce, each one unique.
Further reading: Top tips on perfecting your discount strategy.
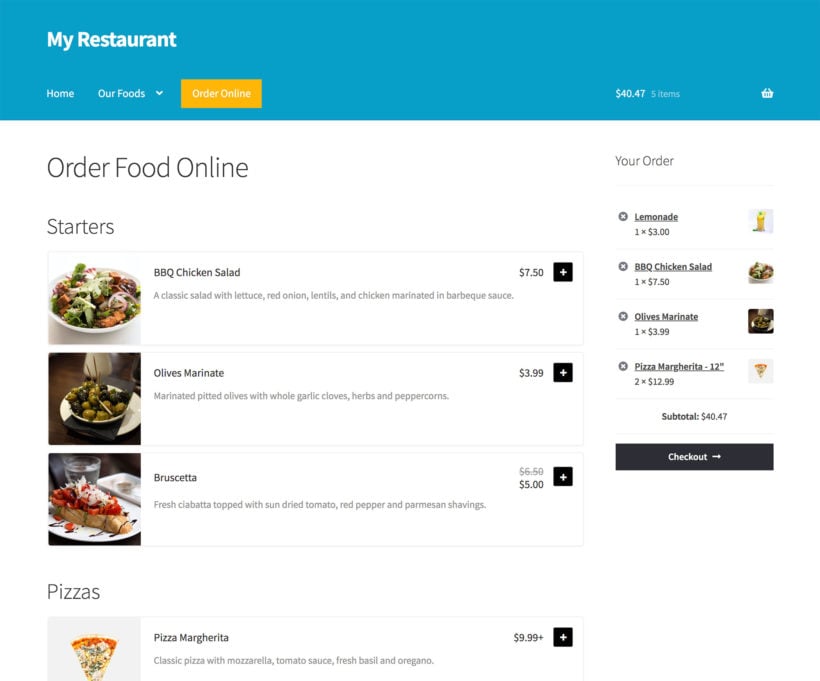
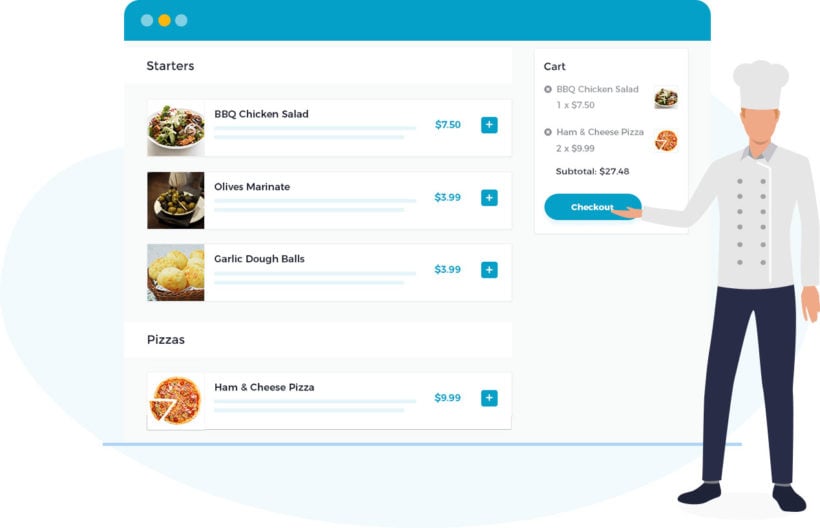
How it looks on the front end
When a user logs into their account on your WooCommerce site, they will see the correct pricing for their role. They will also see any additional messages that you set up for them, such as product page content or a cart notice.
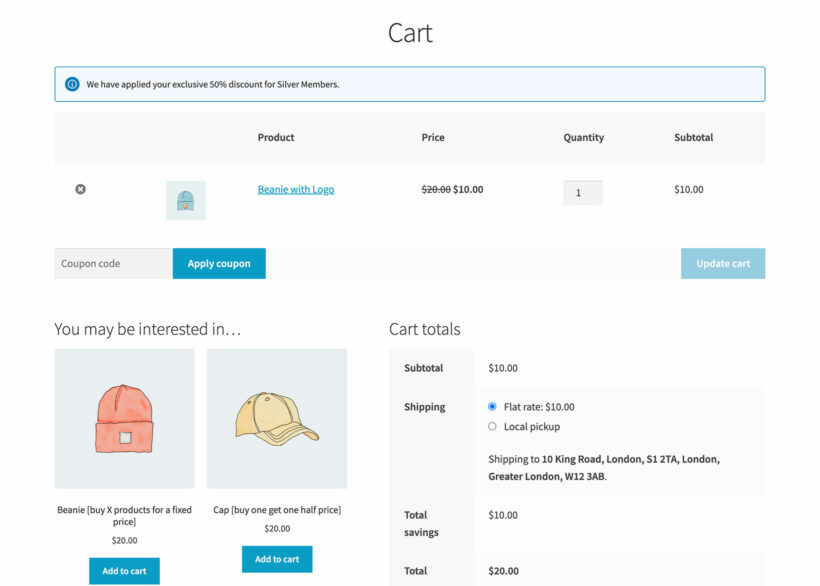
Of course, users with another role (or logged out users and guests) will continue to see your regular pricing. Only logged in users with the correct roles will ever know that your WooCommerce store offers role-based pricing 🤫
Advanced pricing features for role-based discounts
Beyond the basic role-based pricing functionality, modern WooCommerce discount plugins offer several advanced features:
- Scheduled promotions: Set start and end dates for your role-based pricing rules, allowing you to run time-limited offers automatically.
- Inventory threshold controls: Configure discounts to automatically disable when stock levels fall below a specified amount, helping you protect margins on low-inventory items.
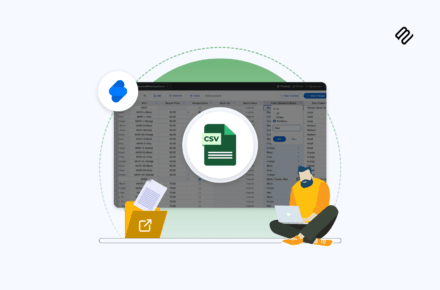
- Bulk price import via CSV: For stores with many products, you can import role-based pricing in bulk using CSV files, saving significant time over manual configuration.
These advanced features help you create more sophisticated pricing strategies while automating much of the management process.
Method 2: Create role-based wholesale discounts with Wholesale Pro
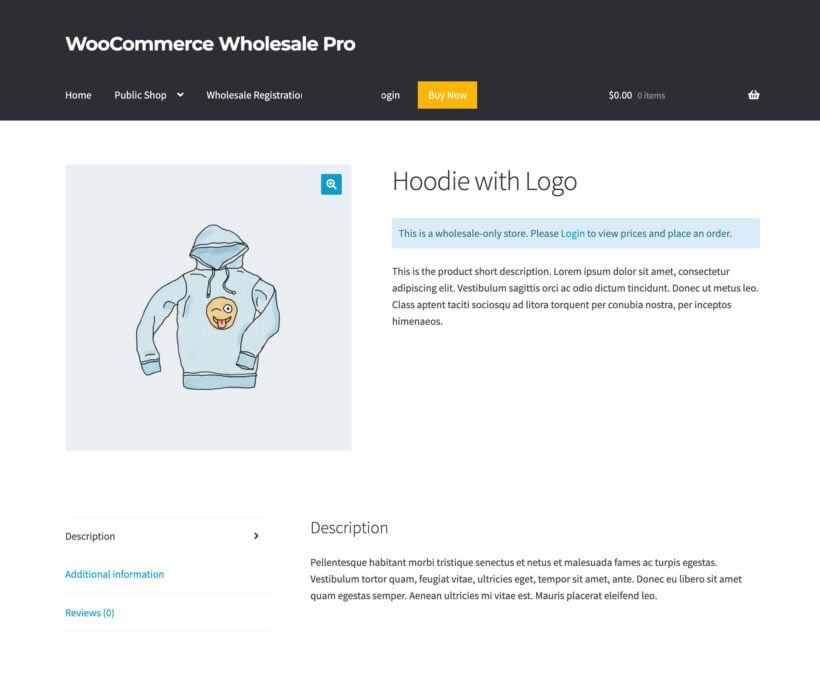
The WooCommerce Wholesale Pro plugin is a role-based pricing plugin designed for a specific use case: trade sales. It lets store owners create a wholesale store which runs alongside their main public-facing shop. When wholesale users log into their account, they receive special role-based pricing - while standard customers continue to see your regular pricing.
Here's a quick overview of what you get with this role-based pricing plugin:
- Create an unlimited number of wholesale user roles, each with its own pricing.
- 3 types of role-based pricing: global percentage discounts, category percentage discounts, or manually set role-based prices for specific products or variations.
- Customizable wholesale registration and login forms (with the ability to hold new accounts for moderation by an administrator before they can start shopping).
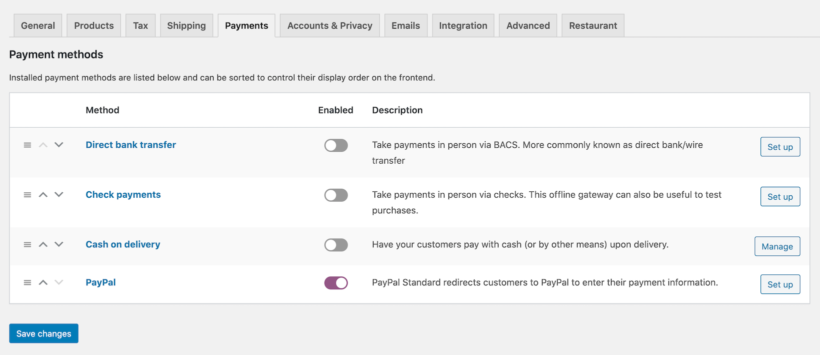
- Role-based payment options, so that you can offer special B2B payment gateways to wholesale users.
- Role-based shipping options, which you can use to offer different shipping methods to regular and wholesale buyers.
- Separate tax settings for each wholesale role, so you can charge role-based tax depending on their location or tax status.
- Use it with its sister plugin - WooCommerce Product Table - to create quick wholesale order forms.
As you can see, Wholesale Pro is a fully featured wholesale plugin for WooCommerce. It has everything you need to run a successful wholesale store, with wholesale role-based pricing at its foundation.
Next, I'll tell you how to set it up.
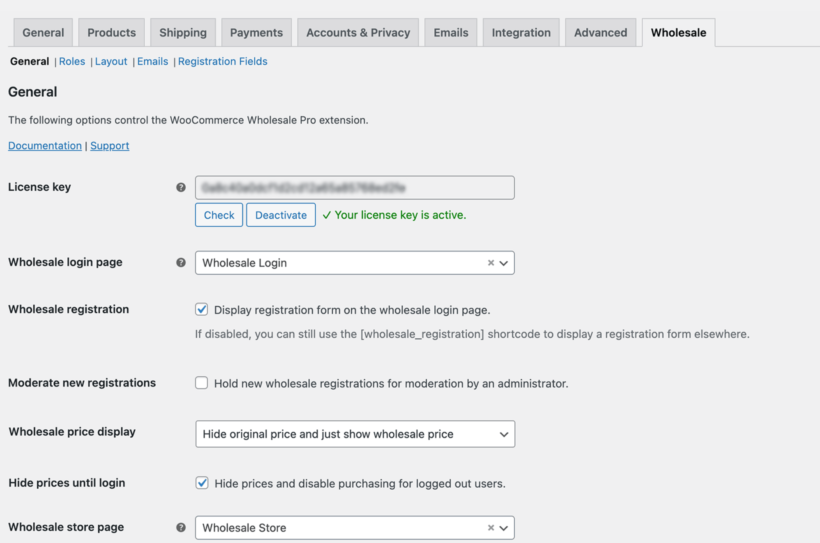
Set up WooCommerce Wholesale Pro for role-based pricing
- Get the WooCommerce Wholesale Pro plugin and install and activate it on your WordPress site.
- The plugin setup wizard will open automatically. Use it to set up the main settings for your wholesale store.
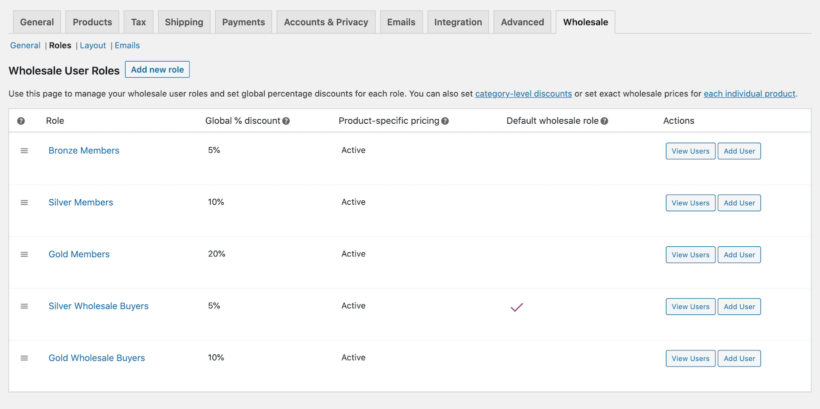
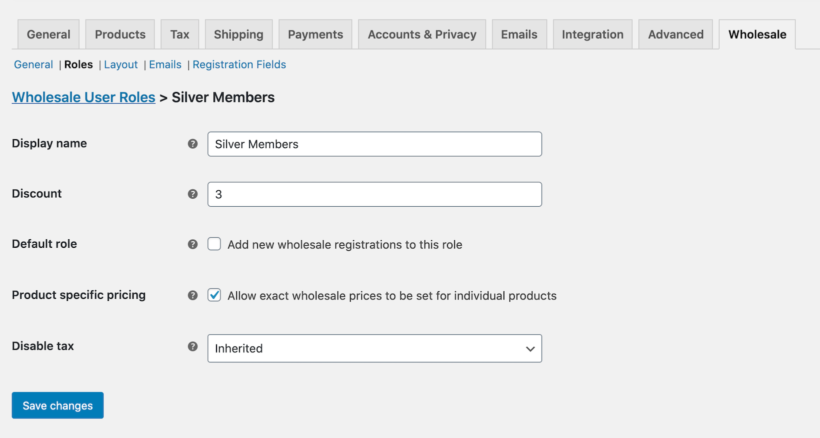
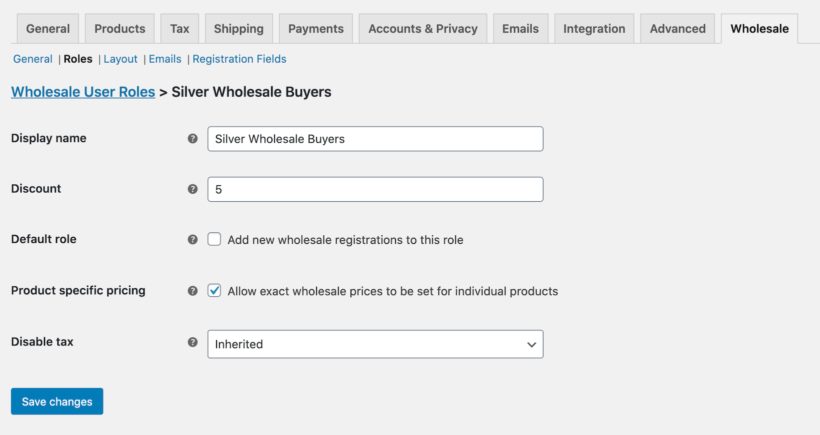
- Next, add as many user roles as you like:
- Head over to WooCommerce → Settings → Wholesale → Roles from the WordPress admin panel.
- Click the Add new role button. Enter the display name and percentage role-based discount you’d like to offer users.
- Click the Save changes button to continue.
Once you've created a role for each pricing group, you can use WooCommerce Wholesale Pro to add 3 types of role-based pricing:
- Create global percentage discounts
- Create category percentage discounts
- Set exact prices for individual products
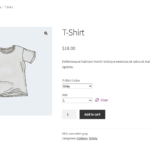
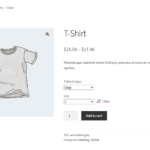
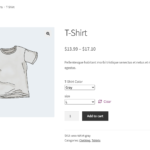
Create global percentage discounts
Creating global percentage discounts is useful if you want to offer a specific user role a flat percentage discount on all products. For example, you can use this to give wholesale customers a 5% discount on their orders while retail customers pay the full amount.
You can also use it to offer members on specific subscription plans a percentage discount on all purchases. For example, Silver Members qualify for a 3% discount whereas Gold Members qualify for a 5% discount.
To set up global role-based pricing in WooCommerce, head back toWooCommerce → Settings → Wholesale → Roles and add a percentage discount for each role:
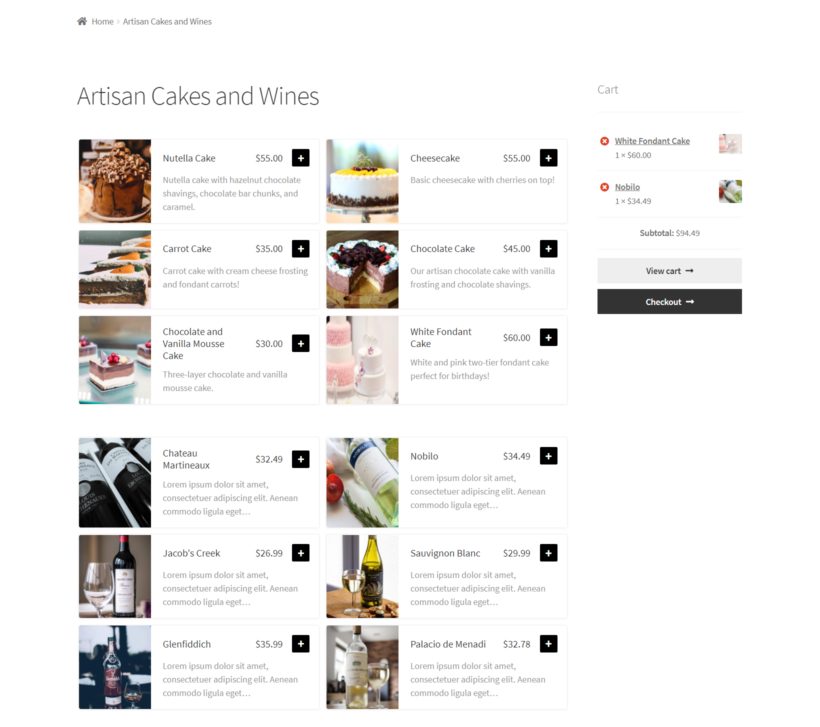
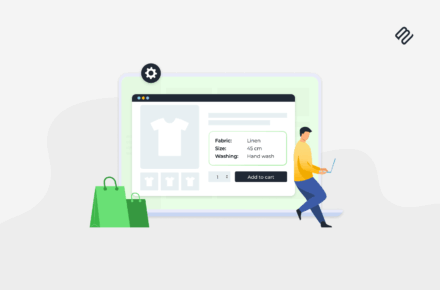
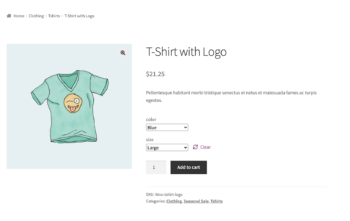
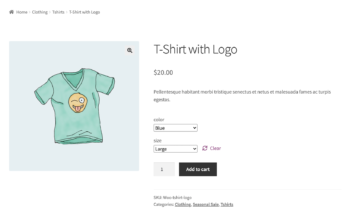
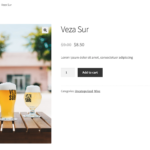
Your product page will look something like this to different customers:

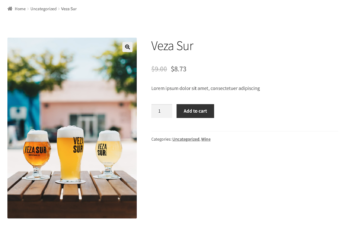
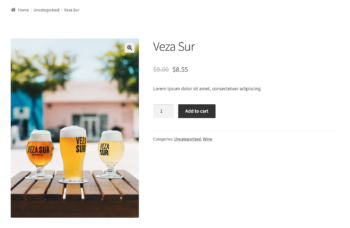
Notice how the product page display price changes depending on the customer’s user role.
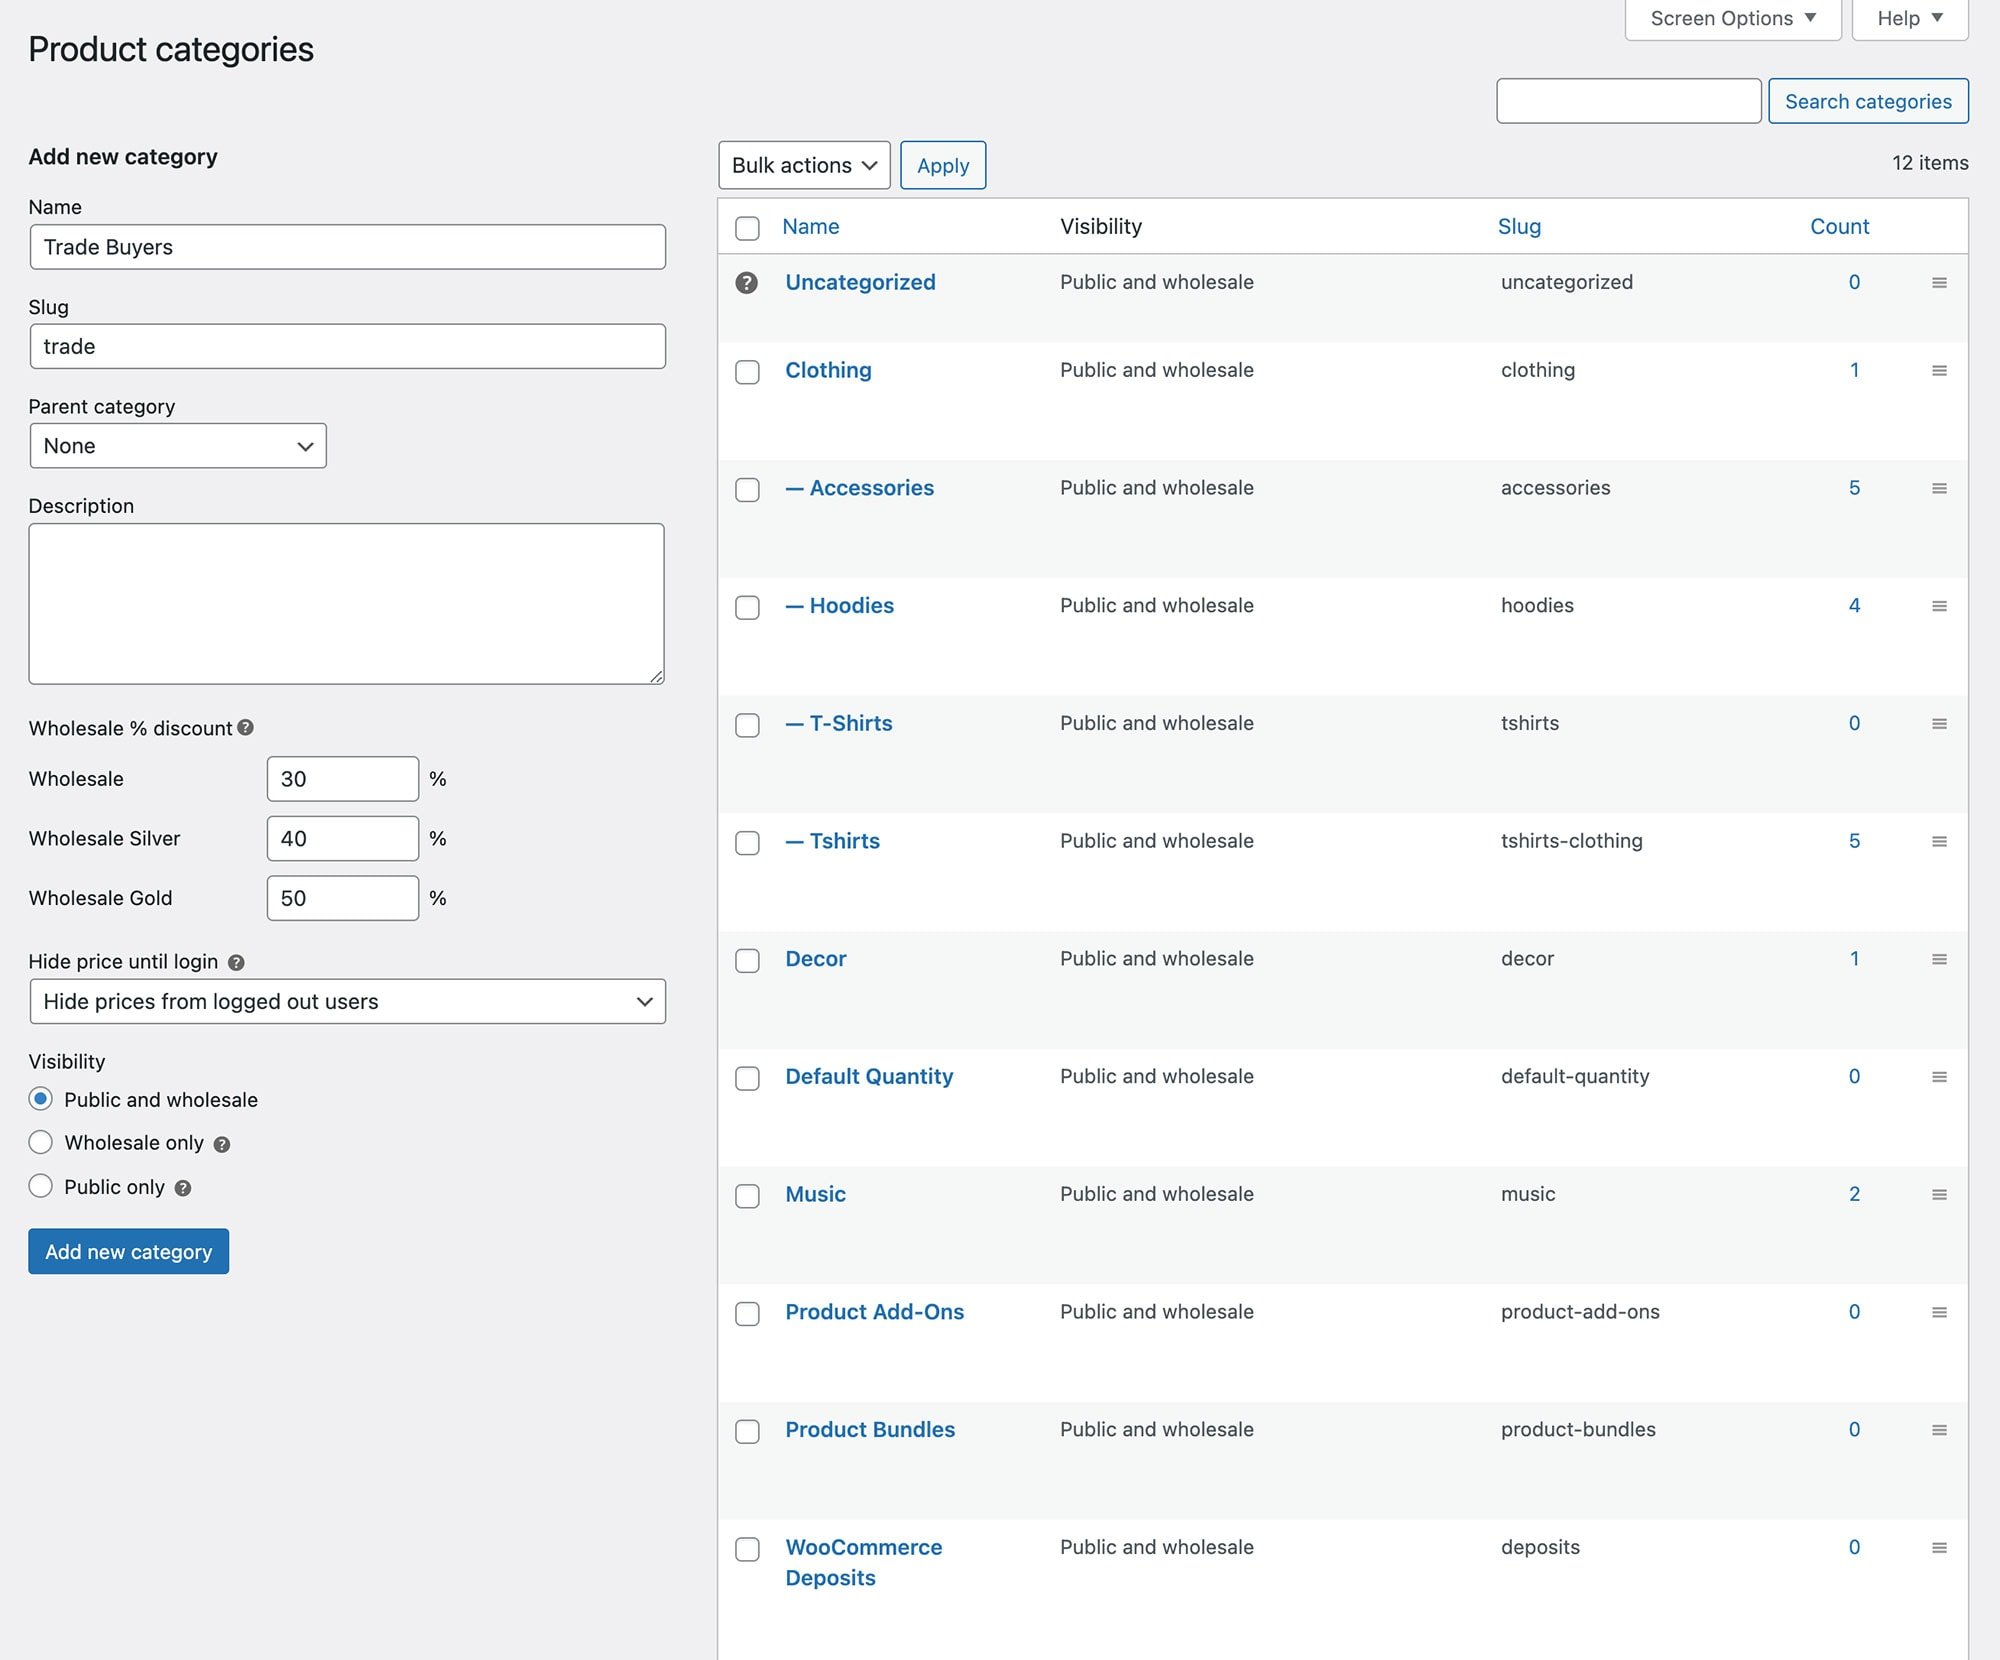
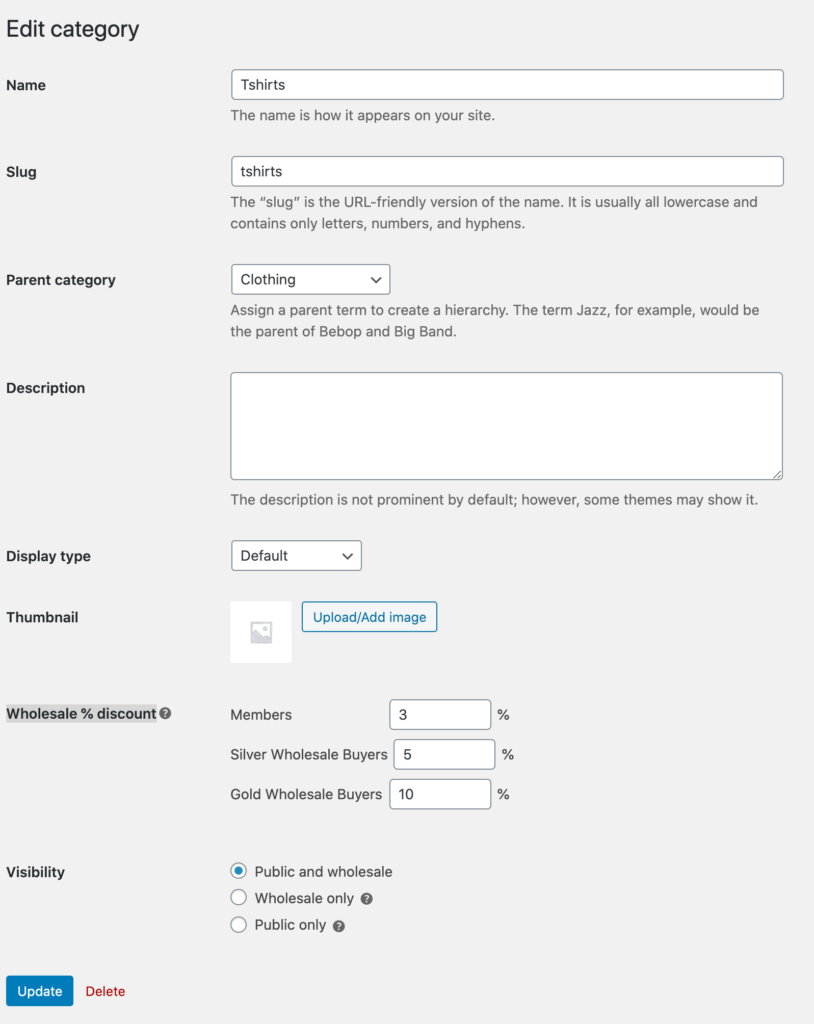
Create category percentage discounts
Some WooCommerce store owners might benefit from creating category percentage discounts. This way, you can offer certain types of users a separate discount for each WooCommerce category.
For example, you might want to offer Silver Members a 15% discount and Gold Members a 20% discount on products in the Seasonal Sale category. These discounts might be bigger than the reductions in your year-round categories.
Here’s what you need to do to set this up in your online store:
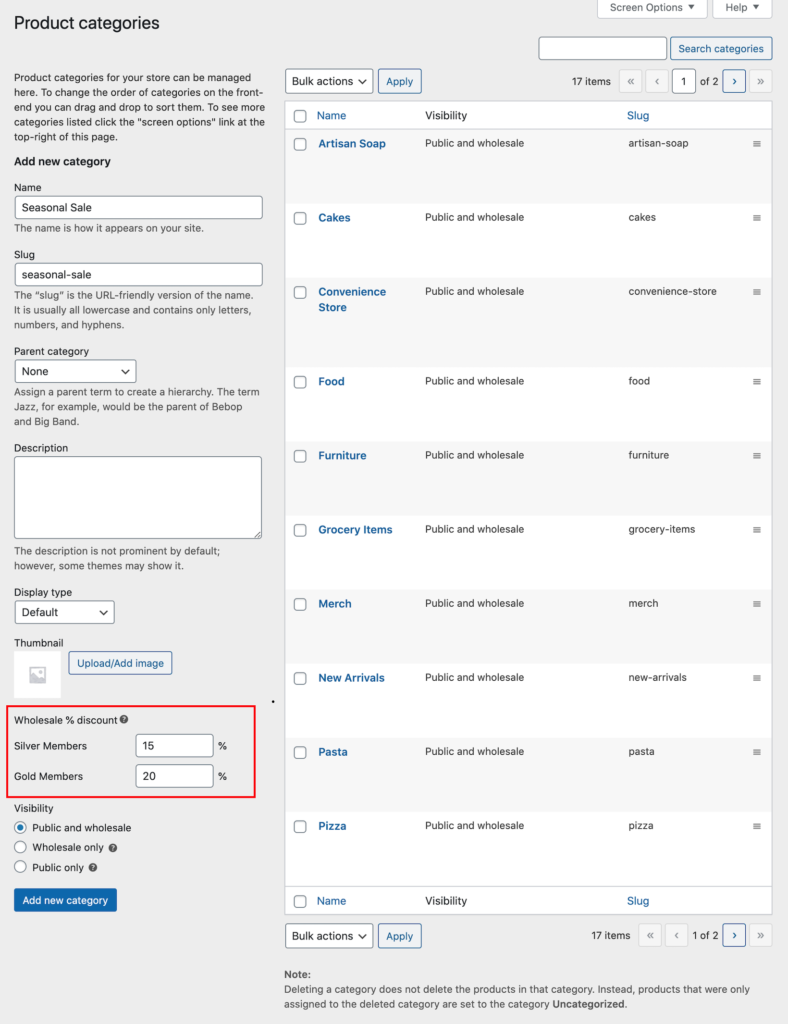
- From the WordPress admin panel, navigate to Products → Categories.
- Edit the product category you’d like to set category percentage discounts for or create a new product category.
- Use the Wholesale % discount option to set the category percentage product prices by user roles for WooCommerce.
- Click the Update button.
In addition to this, you can also make product categories visible to only wholesale users, only guest users, or both wholesale users and guest users. This is an easy way to hide specific products from your public-facing site.
Set exact prices for individual products or variations
There are plenty of scenarios where you might want to set exact prices for specific products instead of offering percentage discounts.
This is possible with the WooCommerce Wholesale Pro plugin. You can use it to set exact wholesale prices for individual products. The best part is that it works for simple products and products with variations.
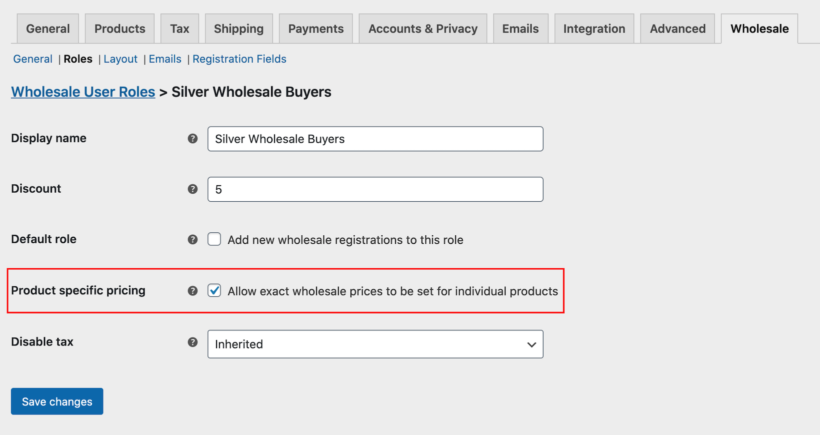
Here’s how you can set exact prices for individual WooCommerce products:

- Head over to WooCommerce → Settings → Wholesale → Roles from the WordPress admin panel.
- Edit the user role you’d like to enable exact prices for.
- Tick the checkbox next to the Product specific pricing option.
- Click the Save changes button to continue.
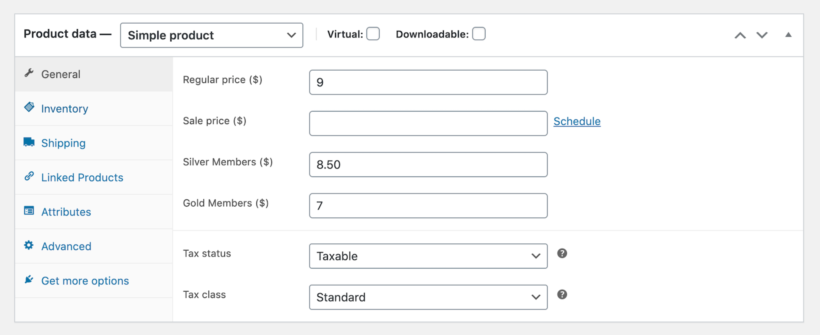
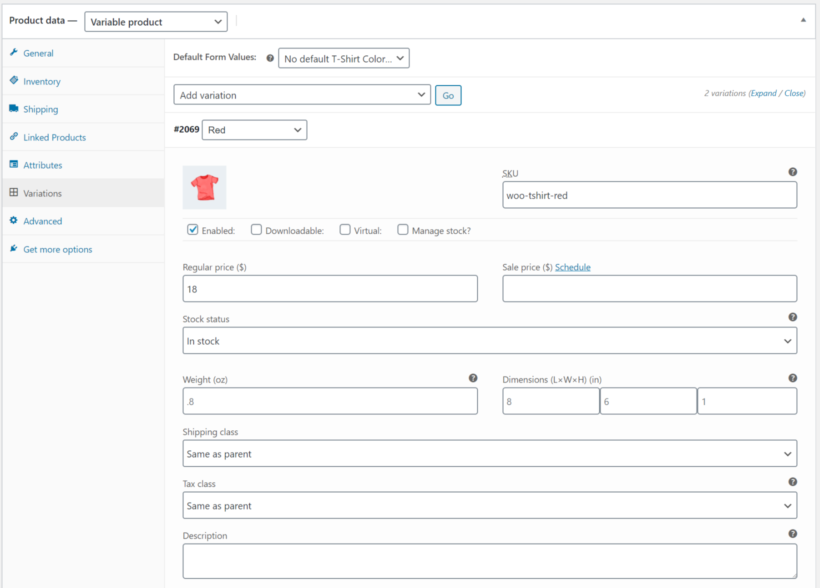
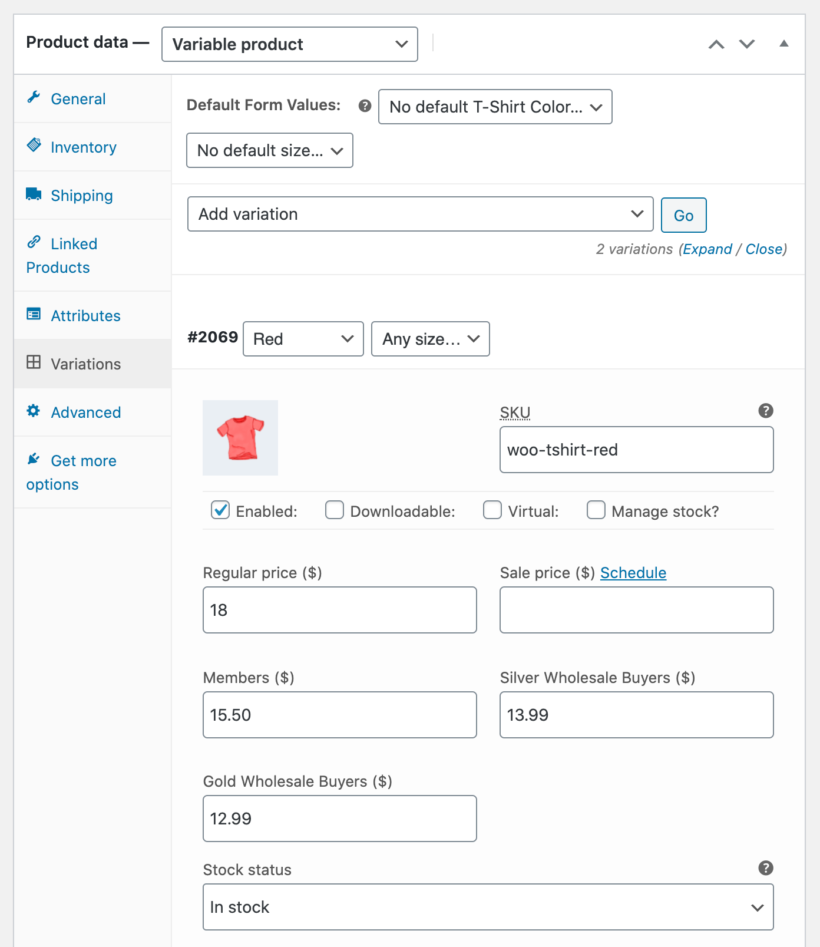
Now you can set the per-product pricing for each role:
- Edit the product or variation that you’d like to set custom prices for.
- Scroll down to the Product data section and set the exact product prices by user roles for WooCommerce. This also works for variable products.
- Click the Update button to continue.

While we've covered two excellent solutions above (WooCommerce Discount Manager and WooCommerce Wholesale Pro), there are other popular plugins worth considering:
- WholesaleXThis plugin offers dynamic rules for automated wholesale pricing and lets you change prices based on user roles. It features bulk customer pricing, coupon discounts, and dynamic pricing all in one solution.
- YITH WooCommerce Role Based PricesThis solution allows you to increase or decrease product prices according to user role, apply role-based price rules to specific products, categories or tags, and even hide prices or the 'Add to Cart' button from unregistered users.
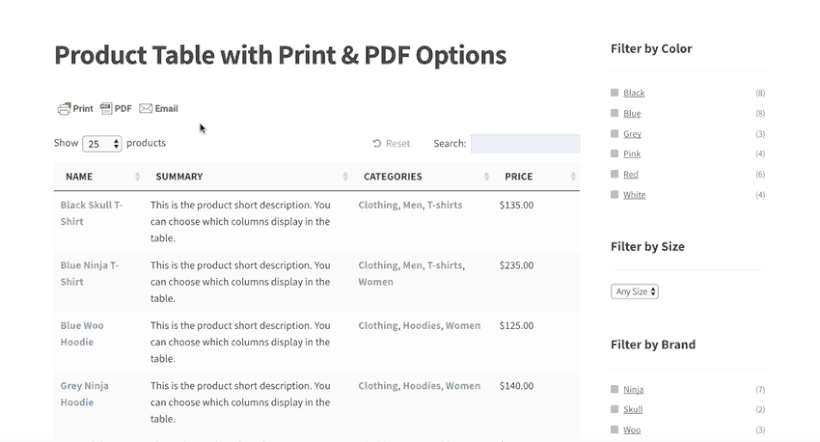
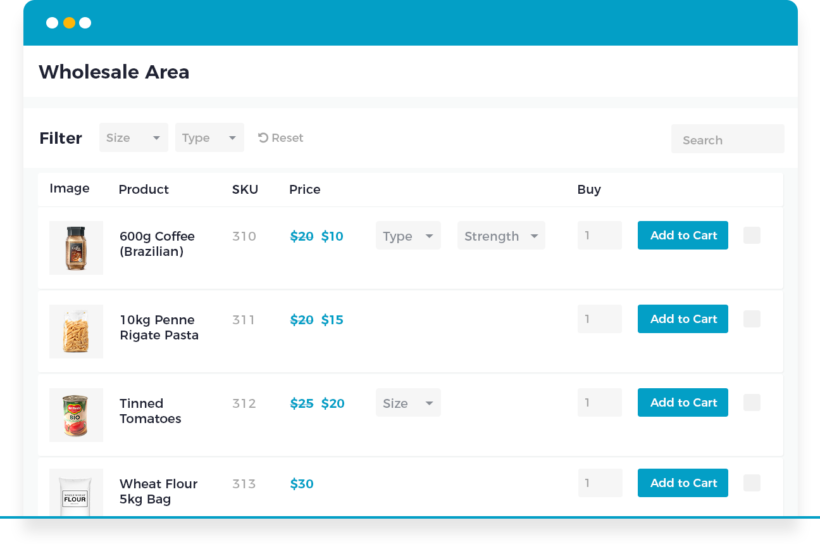
Bonus: Show WooCommerce role-based pricing in a table layout
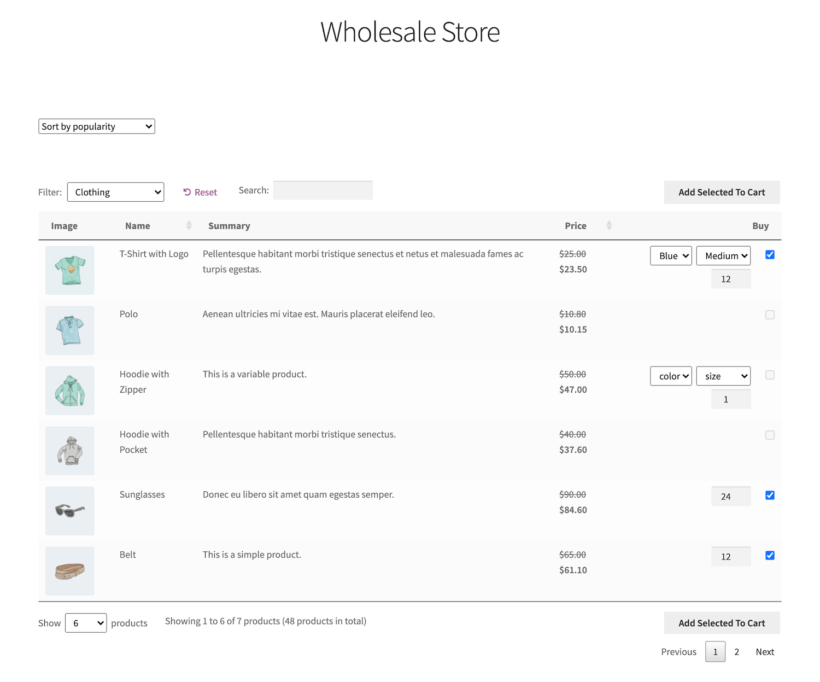
One of the key benefits of using the WooCommerce Wholesale Pro plugin for setting up WooCommerce price by user role is that you can list products in a table layout. For this, you’ll need to get the WooCommerce Product Table plugin which integrates seamlessly with WooCommerce Wholesale Pro.
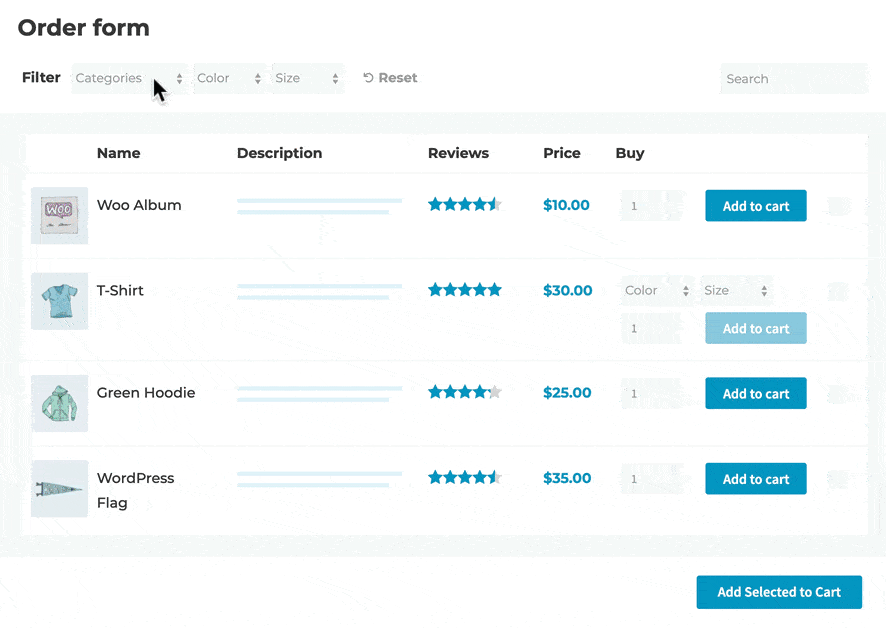
Using the WooCommerce Wholesale Pro plugin with WooCommerce Product Table, you can create quick, one-page order forms that display role-based pricing as well as other product details (such as product ID, image, and description). For example, you can use this to make it easier for wholesale customers to add products to their shopping cart without having to click the add to cart button for each one and quickly and proceed to the checkout page.
Wholesale customers will see wholesale pricing in the table layout and they can simply use the checkboxes to select all of the products they’d like to purchase and add to cart in one go.
To save money, get WooCommerce Product Table in a bundle when you buy WooCommerce Wholesale Pro.
FAQ
What are WooCommerce customer groups?
WooCommerce customer groups are a way of grouping customers into multiple categories, for example in order to charge special pricing or show hidden products.
The most common way to group customers is with the user roles that come with WordPress itself. You can use free plugins like User Role Editor to create additional roles and use them to group customers, for example in order to create role-based discounts with WooCommerce Discount Manager. Or if you use WooCommerce Wholesale Pro then it creates additional user roles for you.
Why should I create multiple user groups in WooCommerce?
You should create multiple user groups if you want elements of your ecommerce store to change depending on the type of user. For the purposes of this article, we have focussed on WooCommerce role-based pricing. However, you might equally create multiple user groups in order to sell user-specific products or show role-based payment and shipping options.
How many customer groups can WooCommerce handle?
WooCommerce can handle an unlimited number of user roles. Simply use a plugin to create as many user roles as you need, and use these to tailor the buying experience for each of your WooCommerce customer groups.
Set up WooCommerce role-based pricing
In this article, we've explored several fantastic role-based pricing plugins for WooCommerce, each suited to different types of stores. Here's a quick comparison to help you decide which one is right for you:
| Plugin | Best for | Key features |
|---|---|---|
| Discount Manager | General ecommerce stores | Flexible discount types, category/product-specific rules, scheduled promotions |
| Wholesale Pro | B2B and wholesale stores | Wholesale-specific features, role-based payment/shipping, tax settings |
| WholesaleX | Stores needing dynamic rules | Automated wholesale pricing, dynamic rules, bulk customer pricing |
| YITH Role Based Prices | Stores needing granular control | Price visibility controls, custom messages, variation pricing |
Whichever plugin you use, you can easily add WooCommerce role-based pricing to your store. Each logged-in user will see the correct pricing for their role 🚀


 Since B2B customers are normally registered companies, you might want to