Shopify B2B without an app: A complete setup guide for 2026
Confused about how to set up Shopify's new native B2B features? I've figured it out and provided full instructions so you don't have to!
On April 2nd, 2026, Shopify expanded its B2B features to be available to all plans. Previously, these had only been available to Enterprise customers on the Plus plan. That's excellent news for the merchant; however, I discovered that the documentation has not yet been fully updated, and setting up a B2B store is currently quite confusing.
As a result, I spent some time experimenting with the features and writing proper documentation on how to set everything up step-by-step. I also discovered some important gaps in the new B2B features, which will be filled by our upcoming Barn2 Wholesale & B2B app. You can sign up to be notified when it's launched.
What B2B features are available in Shopify Core?
First, let's be clear about what the new B2B features in Shopify are and what's included in your plan.
Whats included:
- All paid plans get company profiles, catalogs, volume pricing, and payment terms.
In case you're wondering what a "Catalog" is (as I did!), it's a way to give different B2B and wholesale discounts to different companies. Think of it as a "Pricing catalog".
Not included:
- You can only create 3 catalogs. (This is unlimited for Plus stores.)
- By default, some features such as discount codes and abandoned checkout emails for B2B merchants are disabled. You can activate them by contacting Shopify support, but this will activate them for all customers, not just wholesale buyers. You need an app for more fine-grained control.
- You don't get other features which are useful for wholesale stores, such as B2B registration forms with approval and moderation workflows, B2B-only shipping options, or B2B-friendly quick order forms, etc. You need an app for that.
- Ease of use! If you want to give different wholesale prices to different companies then it's incredibly fiddly to set up (but I'll explain how below).
The 3-catalog limit is the first ceiling that I expect most merchants to hit, especially since it applies across all markets combined, not per market. However, if your B2B needs are quite simple, then Shopify's new wholesale features are ideal.
How to structure B2B in Shopify
Shopify's native B2B features are structured around three main concepts: companies, catalogs, and markets.
- Companies are your wholesale customers. Every business that purchases from you on a B2B basis needs to be set up as a company in Shopify, with individual users added for each person who will be placing orders.
- Catalogs define the pricing. Each catalog sets a pricing structure for a group of products - for example, a 20% discount across everything, or fixed prices per variant. You can also set quantity rules and volume pricing at the catalog level.
- Markets are how you group companies together and connect them to a catalog. If you want different pricing tiers for different customers, you create a separate market for each tier and assign one catalog to it. For example:
- Bronze market → 10% discount catalog
- Silver market → 20% discount catalog
- Gold market → 30% discount catalog
Any company you add to the Bronze market gets Bronze pricing, any company in Silver gets Silver pricing, and so on.
A few important limitations on the Basic, Grow, and Advanced plans:
- You can have a maximum of 3 active catalogs across all your B2B markets, so 3 pricing tiers maximum.
- Catalogs can only be assigned to markets, not to individual companies (that's a Plus-only feature).
- Payment terms (Net 30, Net 60, etc.) are set at the company level rather than the catalog level, so you can vary these per customer regardless of which market they're in.
If you need more than 3 pricing tiers, or individually negotiated pricing per company, you'll need either Shopify Plus or a third-party app.
How to set up a B2B store on Shopify without an app
Next, I'll walk you through the process of using Shopify's new B2B features to set up a simple wholesale area with B2B discounts and payment terms. We'll start by creating a single B2B company with a market and price catalog. After that, I'll show you how to add additional ones.
Step 1: Create a company
The first step is to create companies which the wholesale pricing catalog will be used for.
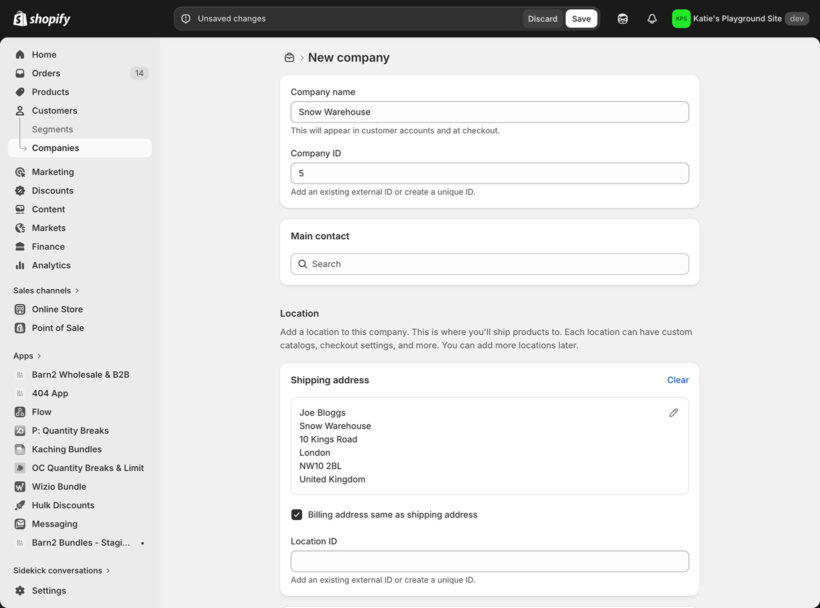
- From your Shopify admin, go to Customers → Companies.
- Click 'Add company'.
- Enter a company name (visible to customers when they log in).
- Enter a company ID.
- Select or create a user who works at the company. For example, if you are adding a new B2B buyer to your Shopify store, then enter their contact details here if they don't already have an account. This will link them to the company.
- Enter the company's address.
- Leave the Market and Catalog options blank for now - we'll create and assign these in steps 2 and 3.
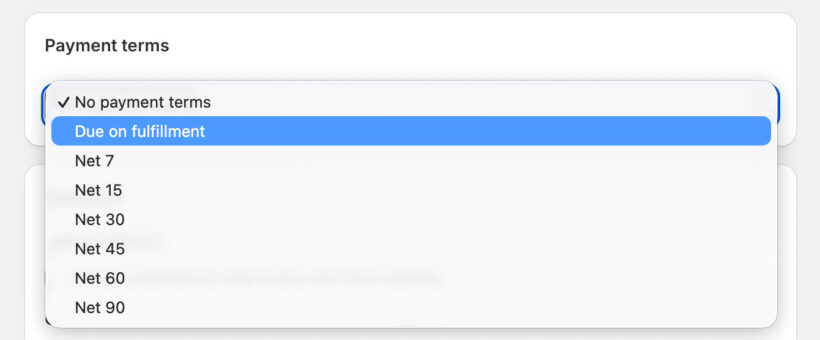
- Optionally use the Payment terms section to select the payment terms for the company, such as "Net 30" (i.e. pay within 30 days, with an optional setting to require a deposit on orders created at checkout). "No payment terms" means that they must make payment via the Shopify checkbox at the time of ordering, just like your non-B2B customers. For testing, "Due on fulfilment" is simplest.
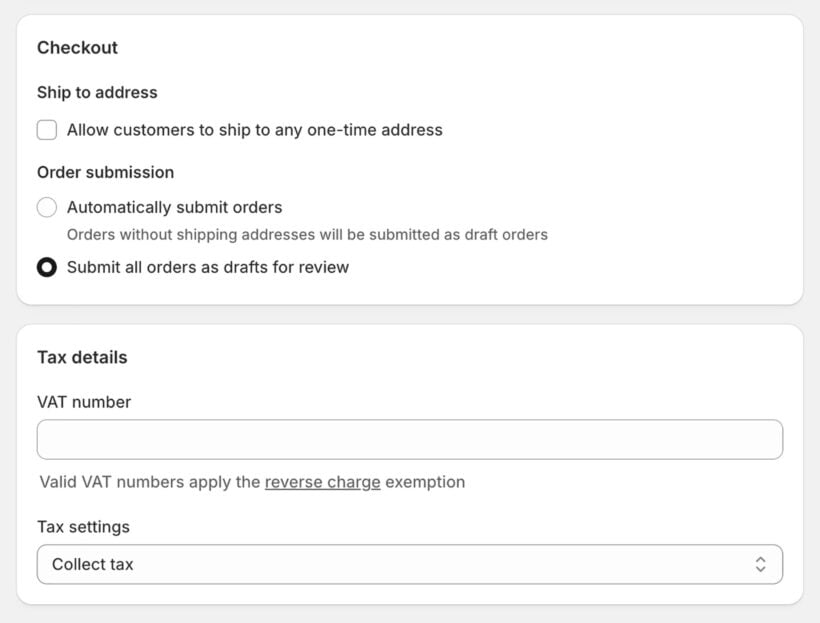
- Choose whether you'd like to manually approve each of the company's orders.
- Enter the company's validated VAT number (if applicable) and choose how they'll be charged tax.
Step 2: Create a B2B market
Next, you need to create a market which will be used for your B2B catalogs. You need to do this even if you've already created markets for your normal customers.
- Go to Settings → Markets.
- Click the 'Add market' button.
- Give it a name (e.g. "Wholesale" or "B2B Markets").
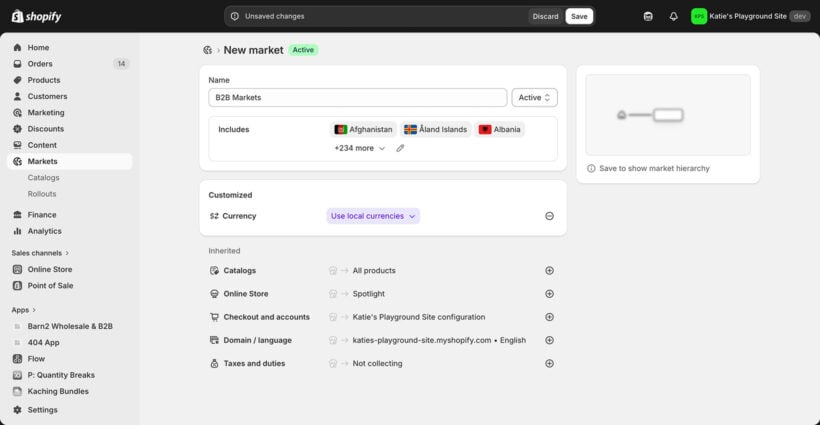
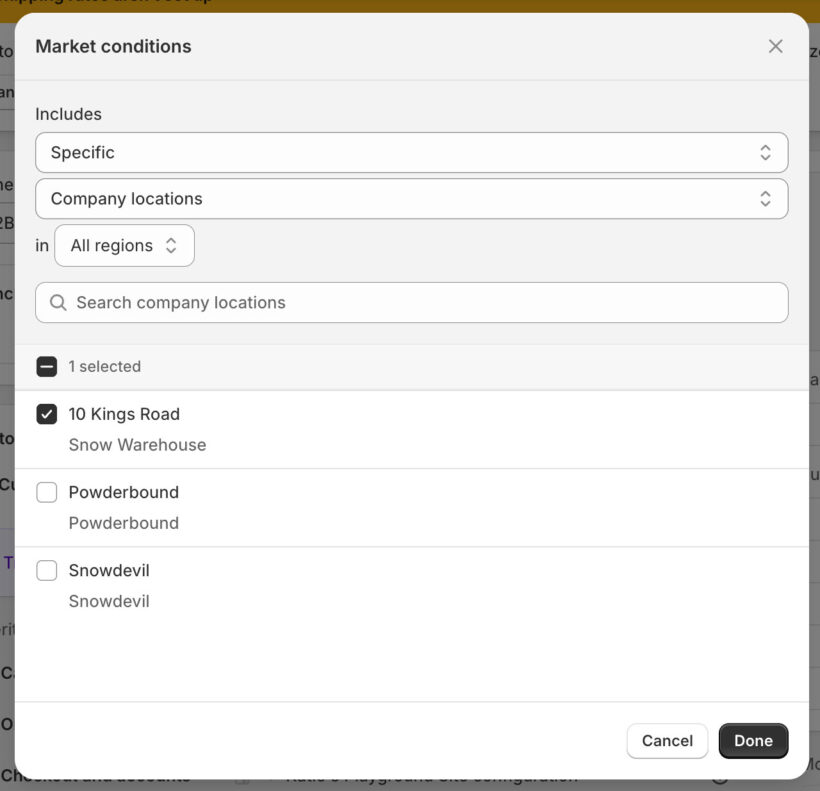
- Click 'Includes' and select the relevant countries.
- Also select "All company locations in all regions". This means that new companies will automatically be added to the market when you create them in future.
Step 3: Create a B2B catalog
The next step is to create up to three catalogs, which will be used to create different tiers of wholesale pricing and choose which products and markets they will be used for.
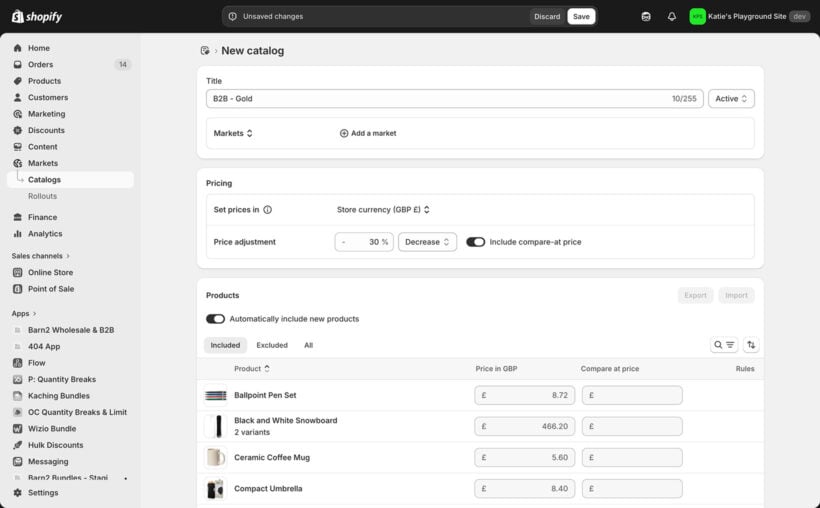
- In the Shopify admin, go to Markets → Catalogs.
- Click 'Create catalog'.
- Add a descriptive name for the catalog (only you will see this).
- Select the B2B market you created in step 2.
- Use the pricing section to set the appropriate wholesale pricing for the catalog. You can:
- Choose the currency.
- Enter a percentage price adjustment that the product pricing will be increased or decreased by. For example, if you enter a 30% decrease, then users from companies that this catalog is applied to will receive a 30% discount compared to standard customers.
- By default, when you apply a percentage price adjustment, that adjustment is also applied to the compare-at price that you have set for your products. The 'Include compare-at price' toggle switches from automatic to manual, allowing you to set compare-at prices for the new catalog yourself, per product.
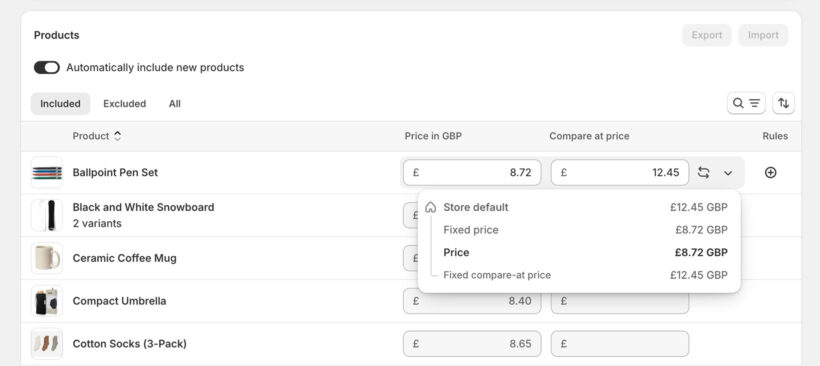
- Lower down the page, you'll see a list of all products. Use this to control which products the catalog pricing will be used for, and override the percentage discount for individual products or variants as needed:
- Use the "Automatically include new products" Toggle to apply the wholesale pricing to new products that are added to your store in future.
- To select specific products which will not receive any type of wholesale pricing, select them and click 'Exclude from catalog'.
- Optionally use the 'Included' tab to Manually enter an exact B2B price to be charged for specific products or variants, overriding the percentage change you set above.
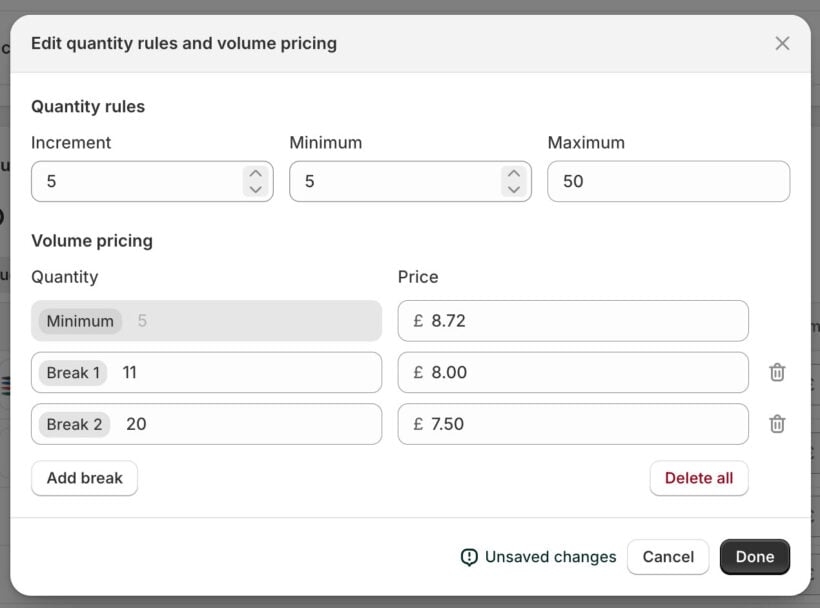
- To set minimum quantities, maximum quantities and quantity pricing breaks, hover over a product and click the "+" icon that appears in the Rules column.
Warning: If you assign multiple catalogs to the same company location, and they include the same product at different prices, your B2B store will display the lowest price for that item. This is worth knowing if you create multiple catalogs.
A quick tip for larger stores: Your B2B catalogs apply percentage discounts on top of each product's base price, so it pays to keep that base pricing accurate. A spreadsheet-style bulk editor like Setary lets you update prices, compare-at prices, cost per item, inventory and tags across your whole catalog at once, which is much quicker than editing products one at a time.
Step 4 (optional): Add more users to the company
To add more people who can place orders on behalf of the company:
- Go to Customers → Companies.
- Click 'Add customer'.
- Either select an existing user from your store or add a new one.
- Choose whether the customer can receive marketing emails and whether you would like them to receive an email notifying them that they can now order from your wholesale store. There's a helpful link to preview the email before sending.
Step 5 (optional): Control product visibility
Many B2B stores want wholesale-only and public-only (DTC) products. You can achieve different scenarios for individual products as follows:
- Make a product visible to everyone (B2B and DTC) - publish to Online Store, don't exclude it from any catalogs.
- Show a product to B2B only, and hide it from DTC - publish to Online Store and B2B catalog(s), then exclude from all Region catalogs.
It's not possible to make products visible to public/DTC users only, while hiding them from B2B users. B2B users will see all public products at their retail prices, without any wholesale pricing. To hide public products from B2B users, you'll need an app. You'll also need an app in order to select entire collections of products and control their visibility together.
Step 6: Test your B2B store setup
Finally, log in as a B2B user and test that everything's working as expected. You should see this:
- The correct B2B pricing for all products which are in the catalog that you assigned to the user's company.
- When browsing your shop pages, they should see:
- Products in their catalog, at catalog pricing.
- All other published products on the store, at regular retail pricing.
Step 7: Adding additional companies and wholesale pricing tiers
Now you've got everything working correctly for one B2B company. I'll tell you how to add more:
- First go to Markets → Create new and create one or two additional markets, just like we did in step 3 above.
- Next, go to Markets → Catalogs and create a new catalog for the market you just created, as we did in step 2 above.
- To add additional companies, go to Customers → Companies and add as many as you like, selecting the appropriate market and catalog for each.
Remember, if you're not on Shopify Plus then each market can only be connected to one catalog, with a maximum of three catalogs in total.
Limitations of Shopify's built-in B2B features
As we've seen, you can use the new Shopify B2B features to create a fully functional wholesale store. However, it's quite fiddly to set up, with a complicated relationship between markets, catalogs, companies, and users. There are also quite a few specific limitations you should be aware of:
- Maximum of 3 B2B pricing catalogs.
- You can only set quantity breaks for each product or variant individually, which is time-consuming to set up compared to doing this for entire catalogs at once.
- Shopify doesn't display the available quantity pricing breaks on the product page, which is important to encourage B2B buyers to purchase in bigger quantities and increase your average order value.
- It's not easy for companies to register via your Shopify site - either they have to contact you and then you add them manually, or you can add a basic request form using the free Shopify Forms app. Either way, there's no built-in self-registration workflow.
- Your store pages will use the same layouts for B2B and normal customers. This creates a suboptimal experience for B2B buyers who already know what they want to buy and need a faster way to select products and add to the cart in bulk.
- You can't offer different shipping methods to standard and B2B users.
- It's not possible to hide public products from B2B users. They will continue seeing these products, but at the regular pricing with no B2B discounts.
- There's no way to control visibility for products in bulk, for example by selecting an entire collection.
- Set tax settings or payment terms for entire company groups - you can only do this at the company level, so you have to redo the work for every company you add.
Fill the gaps with Barn2 Wholesale & B2B
As you've seen from the limitations above, Shopify's native B2B features work well for simple wholesale setups - but they hit a ceiling quickly. If you need more than 3 pricing tiers, a self-serve registration flow, B2B-specific shipping options, or a better buying experience for your wholesale customers, you'll need an app to fill the gaps.
That's exactly what we're building Barn2 Wholesale & B2B to do - a complete wholesale solution for any Shopify plan, designed specifically around the limitations of Shopify's native offering.
Want to know when it launches? Sign up now and we'll let you know as soon as it's available. Early access subscribers will get an exclusive discount.