Managing product data in WooCommerce: A comprehensive guide

This is the complete guide to WooCommerce product data. You'll learn how to add default and custom product data to your store. I'll also cover actionable strategies and tips to boost your sales, revenue and user experience (UX), using product data.
Quick question: are you a store owner wondering, "What is product data in WooCommerce?" or "How do I set up product data in WooCommerce?"
Customers who shop online need information to determine whether your products meet their requirements, and product data is the way to convince them.
In this detailed guide, I'll show you how to:
- Add and manage the default product data available within WooCommerce.
- Add extra product data with the Easy Post Types and Fields plugin.
- Use plugins like WooCommerce Product Filters, Product Table, and Product Tabs to display product data in a way that boosts sales and customer satisfaction.
- Edit large amounts of product data in bulk with the Setary app.
Don't worry, all the steps are code-free. So, you can easily follow along even if you're not familiar with HTML or CSS.
Ready for a deep dive into WooCommerce product data? Let's get started!
What is product data in WooCommerce?
In WooCommerce, product data refers to all the essential information and attributes associated with the products in your online store. It describes, categorizes, and displays your products to customers browsing through your store and helps search engines crawl and index products.
Product data includes details like product title, long and short description, price, SKU (stock keeping unit), weight, dimensions, stock status, stock quantity, and other attributes.
Note that even though 'product data' and 'product information' technically mean the same thing, many WooCommerce store owners and developers tend to define them differently.
What is the difference between product data and product information?
Most store owners and developers consider product data a product's technical and functional attributes. Its purpose is:
- To help WooCommerce understand how to manage your store's inventory, pricing, and order processing on the back end, and;
- To accurately display products on the front end.
On the other hand, product information is descriptive content that helps customers understand your products and supports your marketing and sales efforts. For instance, product descriptions, images, customer reviews, ratings, and other details customers see while shopping in your ecommerce store.
Why is WooCommerce product data important?
Before we look at how to manage product data, let's look at why it's essential for every WooCommerce store:
- Product discoverability: When customers visit your store, product data lets them easily search for products, filter through results, and quickly find what they're looking for. For instance, if you sell sneakers, adding relevant product attributes like size, color, and style ensures that customers can easily find their perfect pair of shoes.
- Boost sales: Detailed product data, such as accurate product titles, descriptions, specifications, etc., gives customers a clear understanding of your products. This, in turn, increases the chances of them buying from you.
- Search engine optimization (SEO): Well-structured and optimized product data - titles, descriptions, attributes, etc. - is necessary for your products to appear in organic search engine results. For example, let's imagine that you sell organic skincare products. Using keywords like "natural," "chemical-free," and "cruelty-free" (if relevant) in product data can drive targeted organic traffic from customers searching for these terms.
- Reporting and analytics: You need product data to create WooCommerce reports to track and monitor your store's performance. Product data can help you identify your top-selling products and plan marketing activities around them. You can also spot slow-moving inventory and decide whether to discount or promote those products.
- Customer support: Adding accurate data reduces the number of questions your business gets from customers wanting to confirm product details. This reduces costs and reduces the burden on your customer support team.
How to add built-in WooCommerce product data
WooCommerce provides plenty of default fields and taxonomies within tabs that let you add data to each product. Let's look at how to add data to a product using the built-in options:
- Go to your WordPress admin dashboard and navigate to WooCommerce → Products → All Products. Note: This section contains most of the settings to add, edit, and manage product data.
- Hover over the product you want to update and click 'Edit'.
- Here, you'll find multiple tabs where you can add product data: Product title, Product long description, Product image, Product gallery, Product categories, Product tags, Product data metabox, Product short description, and Reviews.

Here's an overview of each tab and how to add product data.
Product title
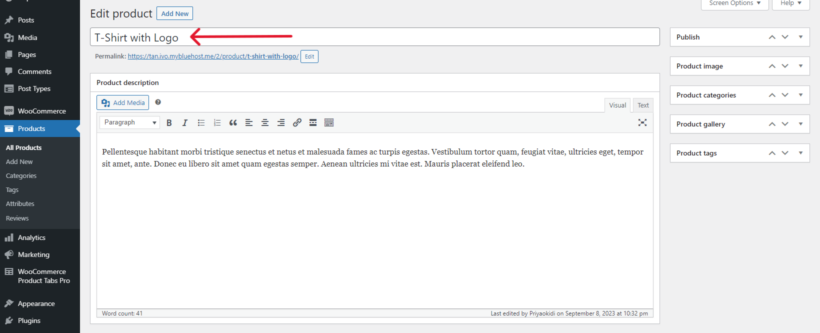
This is where you enter the name of your product. It should be clear, concise, and descriptive to help customers understand what you sell.
Product long description
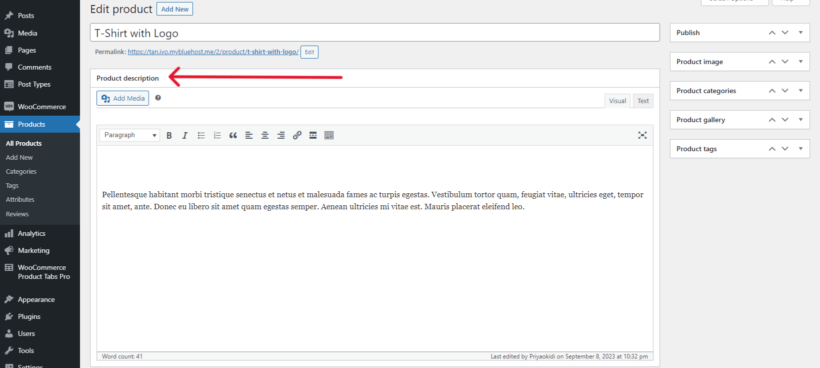
Here, you need to provide a detailed and comprehensive description of your product. Use this tab to highlight the product's specifications, features, benefits, unique selling points, and other relevant details to engage customers and persuade them to buy.
Product data meta box

This tab is where you configure the fundamental settings for each product, so it's probably the most important.
The product data metabox allows you to set essential details such as the product type (simple, variable, etc.), regular price, sale price, manage stock status (in stock, out of stock, on back order), SKU, shipping information, and variations (if applicable). You can also configure product attributes and variations here.
Let's take a closer look at each section.
Product types
By default, WooCommerce lets you add four types of products: simple, variable, grouped, and external/affiliate. You'll find the options within the dropdown menu at the top of the meta box:
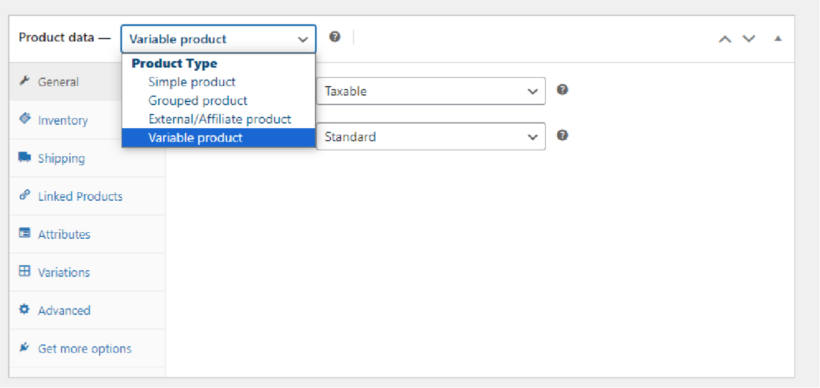
- Simple product: A simple product is a standalone item that has no variations in size, color, or other attributes - for instance, a t-shirt in one size and color.
- Variable product: A variable product is one where customers can choose different options or variations, such as size, color, or other attributes, before adding it to their cart - for example, a t-shirt in various sizes and colors.
- Grouped product: Grouped products allow you to bundle multiple simple or variable products together as a package deal. For instance, if you sell individual books, you can group them to create a book set.
- External/affiliate product: External or affiliate products aren't stored on your WooCommerce site. Instead, you'll add an 'Add to cart' button and link to an external site where customers can place their orders - perfect for affiliate or drop shipping websites.
After you've selected the core product type, WooCommerce lets you modify them further to specify whether they are:
- Virtual: Digital products that don't require shipping.
- Downloadable: Digital files like software, music, PDF documents, etc., that customers can download after placing their orders.
In this tutorial, I'll add data to a variable product. The steps to add product data are essentially the same for other types of products, except for a few extra options.
How to update the product data meta box
Once you've selected a product type, it's time to update the details in each tab of the product data meta box.
General
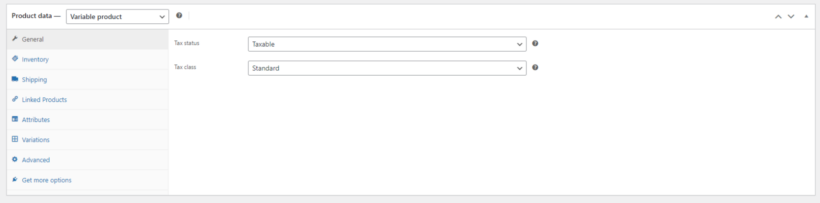
Here, you can specify whether your product is taxable or tax-exempt and assign a tax class if needed. This ensures that WooCommerce applies the appropriate taxes during checkout.
Inventory
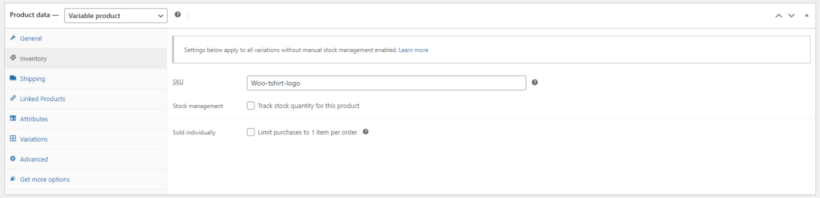
The inventory tab helps you manage the stock level for each product. You get a lot of options, including:
- SKU: This is a unique identification number for each product - helpful in tracking product variations and inventory management.
- Stock management: If you don't check the 'Track stock quantity for this product' checkbox, you'll have to manually update the stock details for this product. However, if you tick the checkbox, WooCommerce automatically tracks and updates it.
- Quantity: Set the available stock quantity if you are tracking inventory. If you've ticked the checkbox above, WooCommerce will automatically adjust this number as customers make purchases.
- Allow backorders: Select the appropriate option based on the specific product.
- Low stock threshold: This sends you notifications when the product's stock falls below the specified level.
- Sold individually: Enabling this option ensures that customers can only purchase one unit of the product per order, regardless of the quantity entered.
Shipping
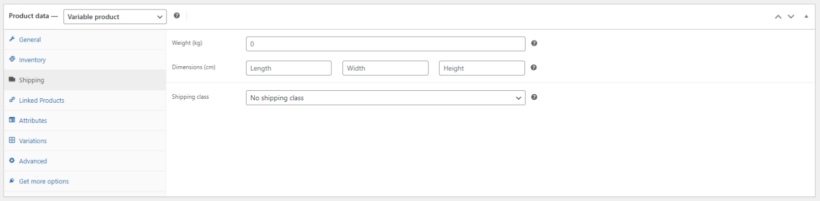
The "Shipping" tab allows you to configure shipping-related details for your product. The settings you see here are based on your store's shipping zones.
First, specify the product's weight and dimensions to ensure that WooCommerce calculates shipping costs correctly. Then, assign the product to a specific shipping class if you have different shipping rates or methods for different product groups.
Related reading: Complete guide to WooCommerce shipping.
Linked products
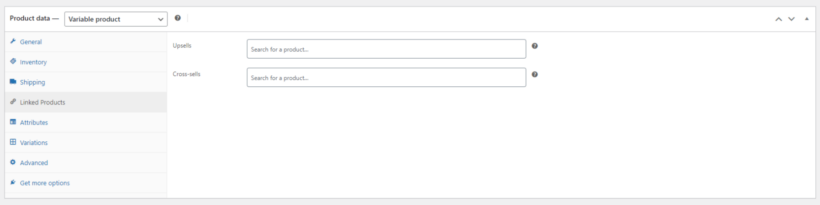
WooCommerce lets you add product recommendations to the product pages. Type in the name of the product to be recommended in the appropriate field to add:
- Upsells: AKA higher-priced or upgraded products.
- Cross-sells: AKA complementary or related products.
Attributes
Product attributes are characteristics like size, color, and material that differentiate products within the same category. They help customers filter by product attribute and select the product variations they want.
You can add product attributes in 2 ways:
- Globally
- Per product
Global attributes
Global attributes are characteristics that are common across multiple products. They are called "global" because once you create them, you can reuse them across multiple products.
If you have multiple products that share a common attribute, such as different clothing items available in the same colors or sizes, it's a good idea to create global attributes. This saves you time and reduces the manual task of creating attributes individually.
Steps to add global product attributes
Follow these steps to add global attributes in WooCommerce:
- Navigate to WooCommerce → Products → Attributes in your dashboard.

- Fill in the details for the attribute:
- Name: You can use any name you want. However, I recommend that you keep it simple and descriptive (e.g., "Size" or "Color") as customers will see this on the front end too.
- Slug: Type in a slug for search engines to crawl.
- Enable archives: This option controls whether WooCommerce will create a dedicated page for this attribute. It's useful for customers to browse products by attribute.
- Click on 'Add attribute' near the bottom of the page.
- Go to the top right section of the same page once your attribute is created and select 'configure terms' for the attribute you just added.
- Under the "Configure terms" section, add the terms. For instance, you can add large, medium, and small for the "Size" attribute. Repeat until you've added all relevant terms.
That's it. You've successfully added attributes globally! In the next section, I'll show you how to assign the attributes you just created to individual products.
Product-specific attributes
Product-specific attributes allow you to provide additional information about a particular product, such as its unique features, materials used, etc.
Steps to add product-specific attributes
- Open up the product page of the product you want to add the attribute.
- Scroll down to the 'Product data' module and click the 'Attributes' tab.

- To add a global attribute that you created in the previous step, click on the 'Add existing' dropdown and select an appropriate attribute.
- Click on "Add new" to create a new attribute specific to this product. Fill out the details, i.e., name and values. For example, if your store sells jewelry, you can add:
- Attribute name: Customization Options.
- Values: Engraving, Color Choice, Size Options, etc.
- Save your attributes.
Variations tab
Here, we'll combine the attributes we added in the previous step to create product variations. There are two main methods to add variations: manually and automatically.
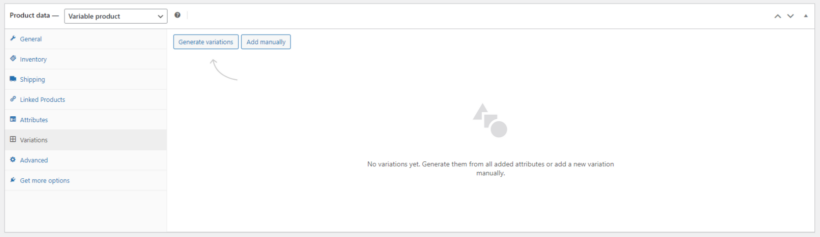
Steps to add variations automatically
- Select 'Generate variations'. WooCommerce will automatically generate combinations of the attributes you previously created to create variations.
- Next, review and adjust the details for each variation as needed. Set a product image, regular and sale prices, stock, shipping, and tax details.
Steps to add variations manually
- Click the "Add manually" button.
- Select the appropriate attributes for the variation from the dropdown menu.
- Click on the 'Edit' button and then configure the variation details. Add a product image, regular and sale prices, stock details, shipping details, and tax details.
- Repeat the steps to create more variations if needed.
- Click on 'Save changes' to add the variation.
Advanced tab
The "Advanced" tab has extra optional settings. Here, you can:
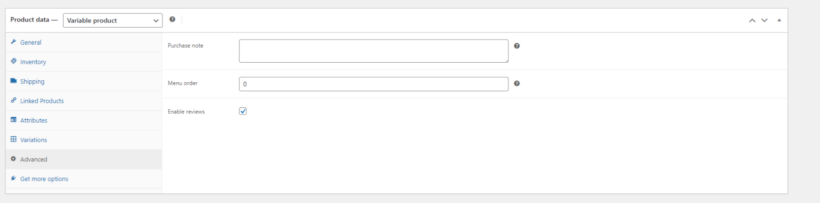
- Add a purchase note that customers will see after buying the product, for instance, to provide additional instructions or information.
- Set the order in which this product appears in product lists and menus, for instance, on the 'shop' and 'archive' pages.
- Enable customer reviews specifically for this product. If you want to collect reviews for some products but not others, you can control it here.
Product short description

The short description is shown next to the product title and image on the 'shop' or 'category' pages. It should be a quick summary of the product to give customers a brief overview before they click to view more details.
Reviews

The "Reviews" tab displays customer reviews and ratings for the product.
Product image
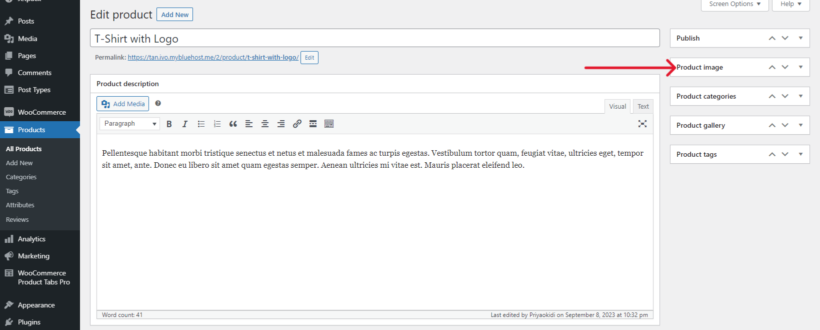
This tab is where you upload the main product image, which is usually displayed prominently on product pages and in search results.
Product gallery
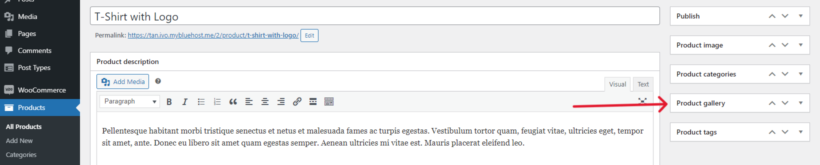
Here, you can add multiple images to show customers a detailed view of your product from different angles or contexts.
Product categories
Product categories allow you to group products into broad, structured categories to help customers better navigate your store.
Categories are hierarchical - you can create parent categories and assign subcategories to them. For example, if you run a clothing store, you can create main categories like "Men's clothing" and "Women's clothing" and subcategories like "T-shirts", "Jeans", and "Dresses."
Related reading: How to set up filtering by category in WooCommerce: Complete Guide (2023)
Steps to add product categories
- Go to Products → Categories.
- Fill out the following details:
-
- Name: Enter the name of your new product category, like electronics, clothing, books, etc.

- Slug: Type in the slug for the category to help search engines crawl and index your site.
- Parent: If you previously created a parent category and want to add a subcategory under it, select the parent category from the dropdown menu. If this is the first time you're creating the category, this will be 'None' by default.
- Description: Add a description for the category. This setting is optional.
- Display type: Choose how you want products displayed within this category. You can choose "Default" or "Subcategories." This affects the category archive page's layout.
- Next, add an image thumbnail for the category by clicking the "Upload/Add image" button. This is optional.
- Click the "Add New Category" button to create the new product category.
- Rinse and repeat as you prefer.
- Name: Enter the name of your new product category, like electronics, clothing, books, etc.
To assign categories to products
- Open the "Product categories" tab within the 'Edit Product' page.

- Select the appropriate category checkboxes to assign the product to one or more categories.
- Scroll to the top and click on 'Update' to save your changes.
Product tags
Product tags enable you to add descriptive keywords or phrases to products to help customers find similar or related products. Unlike categories, tags don't have a hierarchical structure, so you can use multiple tags for each product. Customers can use tags to filter your products.
Tags help add attributes or characteristics to products that may not fit into the categories. For instance, if your store sells beauty products, you can use tags like "organic," "sale," or "summer collection" to describe your products.
Steps to add product tags
- Go to Products → Tags.
- Fill out the following details:
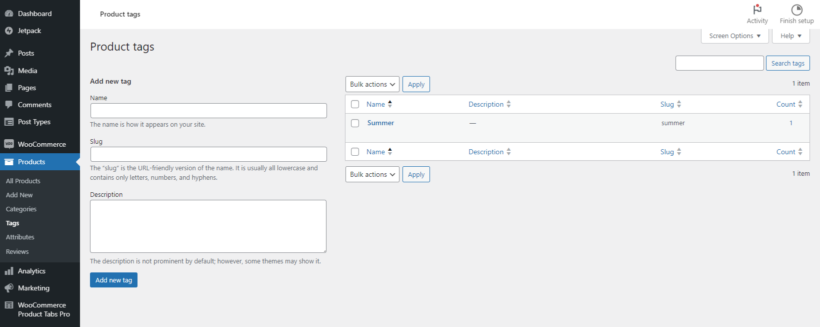
-
- Name: Type in the name of your new product tag. For example, if you sell clothes, you can add tags like 'summer collection', 'sale', or 'just arrived'.
- Slug: Enter the slug for the tag. This helps search engines crawl and index your site.
- Description: Optionally, you can describe the tag.
- Click on the 'Add New Tag' button to create the new product tag.
- Rinse and repeat as needed.
To assign tags to products
- Open the "Product tags" tab within the 'Edit Product' page.
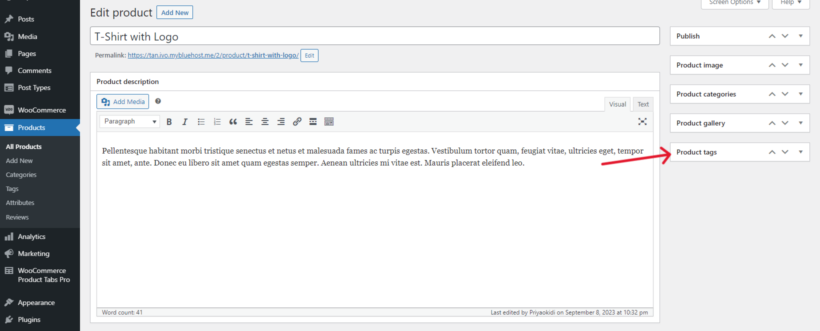
- You'll see an input field where you can type in tags. Simply enter one or more tags, separating them with commas.
- Scroll to the top and click on 'update' to save your changes.
Adding extra product data to WooCommerce
In WooCommerce, product data is grouped into fields and taxonomies:
- Fields, aka the predefined product details like the product name, price, SKU, stock status, weight, dimensions, etc.
- Taxonomies, aka product attributes, categories and tags, used to organize and group products based on their characteristics.
As we've seen above, WooCommerce includes a lot of standard fields and taxonomies. But what if you want to add extra fields and taxonomies to your store that aren't available within WooCommerce by default?
To illustrate this, here are two scenarios of WooCommerce stores that need:
- Custom fields: This store sells skincare products and wants to list ingredients in each product to comply with regulations and assure customers that their products don't contain allergens. They will need to add custom fields to show the product components.
- Custom taxonomies: This WooCommerce offers a huge range of automotive parts from various manufacturers and want to create a proper organization system based on these brands. They can create a custom taxonomy called "Brand" or "Manufacturer" to categorize products and allow customers to easily filter and browse products based on their preferred brands.
That's where Easy Post Types and Fields comes in.
This is a powerful, free WooCommerce plugin that lets you add extra custom fields and taxonomies to your online store.
How to add custom fields to products
- Navigate to Plugins → Add New in your WordPress dashboard.
- Search for the 'Easy Post Types and Fields' plugin by Barn2 Plugins.
- Install the plugin and activate it. You don't need to create a new post type, so skip the setup wizard.
- In your WordPress dashboard, go to Post Types → Other Post Types.

- Locate the 'Products' post type and select Custom Fields → Add New.

- Add as many fields as you need. Make sure you note down the name of each custom field, as you'll need this information later.
- Go back to the 'Edit product' page. Here, you'll find the custom field you just added, and you can now fill in the details.
Related tutorial: WooCommerce custom fields: How to create & display.
How to add custom taxonomies
- Go to Post Types → Manage → Other Post Types in your WordPress dashboard.
- Locate the 'Products' post type and select Taxonomies → Add New.
- Now, update the custom taxonomy details:
- Add plural and singular names.
- Update the taxonomy slug.
- Tick the checkbox to select whether you want the custom taxonomy to be hierarchical or not. Remember,
- Hierarchical taxonomies are similar to the default product categories, i.e., they allow you to create nested parent and child categories.
- Non-hierarchical taxonomies are similar to tags, i.e., you can't nest them or create sub-tags.
- Click 'Add taxonomy'.
That's it! If you go back to edit any product page, you'll find the custom taxonomy you added below the 'categories' and 'tags' tabs.
Related tutorial: WooCommerce custom taxonomies - the easy way to display extra product data & filters.
Translating WooCommerce product data
If you sell products to customers based in different countries, you may need to add multilingual capabilities to your WooCommerce website to translate product data. WooCommerce won't automatically translate products for you. You'll need to use a plugin like WeGlot or TranslatePress, which provide:
- Automatic translation: They integrate with machine translation providers like Google Translate, Microsoft, or DeepL to translate every product and page on your site. This is especially useful if you have a large number of products.
- Manual editing: Automatic translations may not always be perfect, so they allow you to manually edit them to ensure you're 100% happy.
- Support for product variations: They translate variation-specific product data, which is crucial if you sell variable products, e.g., products with different sizes or colors.
- SEO-friendly: To help your website rank well organically, they follow multilingual SEO best practices, like translated metadata, hreflang tags, and language-specific URLs.
- Keep product data consistent: They use standard templates and formats for product titles, descriptions, attributes, etc., to ensure a cohesive shopping experience on your site.
Best of all, WeGlot and TranslatePress are super easy to use and translate content into 110+ languages.
How to leverage WooCommerce product data to boost sales
So far, we've looked at how to add product data to your WooCommerce store with default and custom fields and taxonomies. Now, let's look at how to configure your store's product data to boost sales and revenue.
Top-performing WooCommerce stores use these approaches:
- Add advanced data filters using WooCommerce Product Filters to let customers find products based on data.
- Organize and display product data well using WooCommerce Product Table and WooCommerce Product Tabs.
Let's look at each approach in turn.
Approach 1: Letting customers find products based on data
How you structure and display products can significantly impact the customers' experience on your WooCommerce store.
Here are some tips for structuring your store well:
Create clear categories
Start by defining product categories based on the types of products that you sell. For instance, if you sell clothing, you might want to create categories like "Men's Clothing", "Women's Clothing", "Accessories", etc.
Follow a logical hierarchy
WooCommerce allows you to create hierarchical categories, which means you can have parent and child categories. Avoid adding too many categories, as it can overwhelm users. Instead, nest subcategories with the main categories to organize products better. To continue with the above example, If you sell clothes, "Men's Clothing" can be a parent category with child categories like "T-shirts," "Jeans," and "Jackets."
Assign products to categories
When adding or editing a product in WooCommerce, make sure to assign it to the appropriate category and sub-categories so customers can actually use them to find the products they want.
Add main product categories to your website's navigation menus
The benefit of doing this is that it makes it easy for shoppers to navigate to specific products directly from the menu. This is optional, depending on your site's architecture.
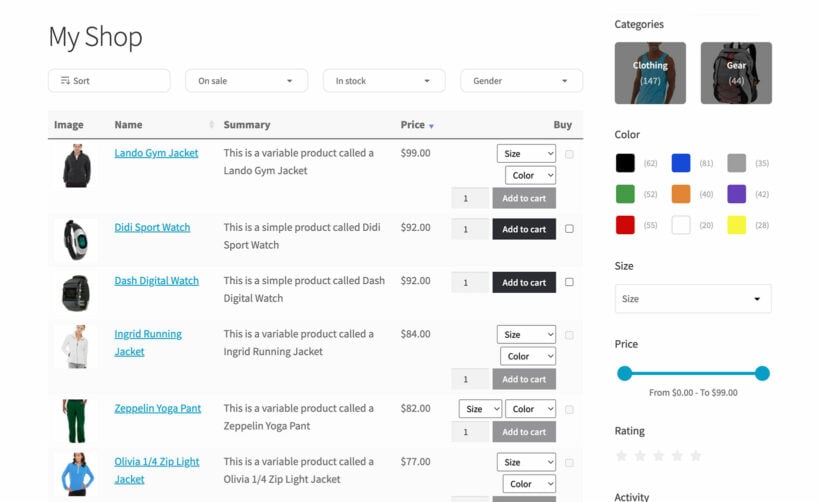
Use advanced product filtering options
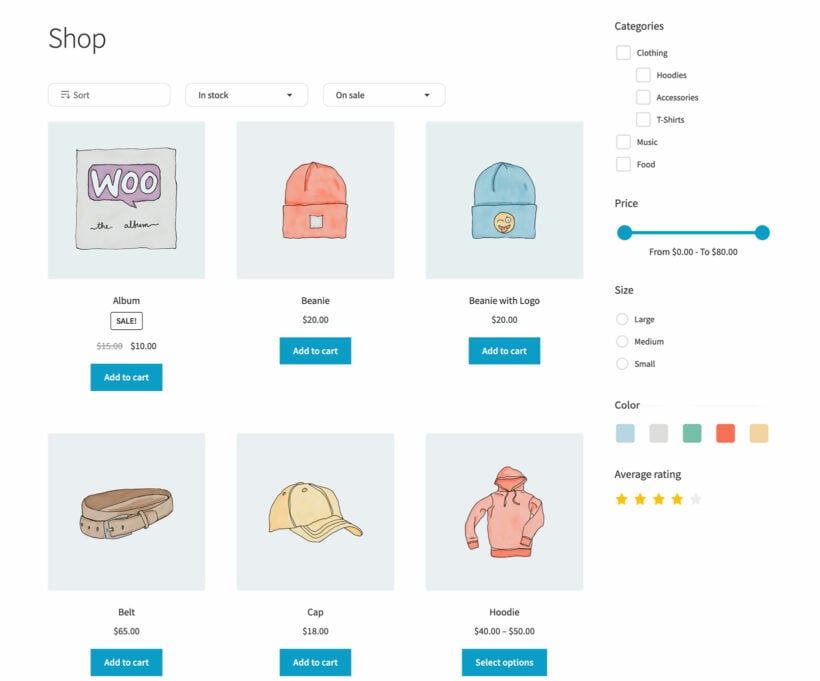
The default WooCommerce filtering and sorting options are pretty basic. For context, here's how they look on a test WooCommerce site:
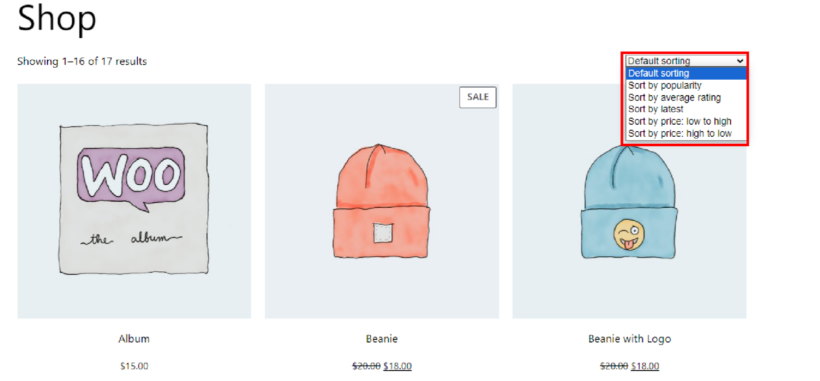
As you can see from the screenshot above, they aren't really useful for shoppers to find the products they want.
WooCommerce Product Filters is an easy-to-use plugin that upgrades the default filters with powerful sorting and filtering options. It lets customers filter products by price, category, attributes, on sale, rating, color, stock level, taxonomy, and more.
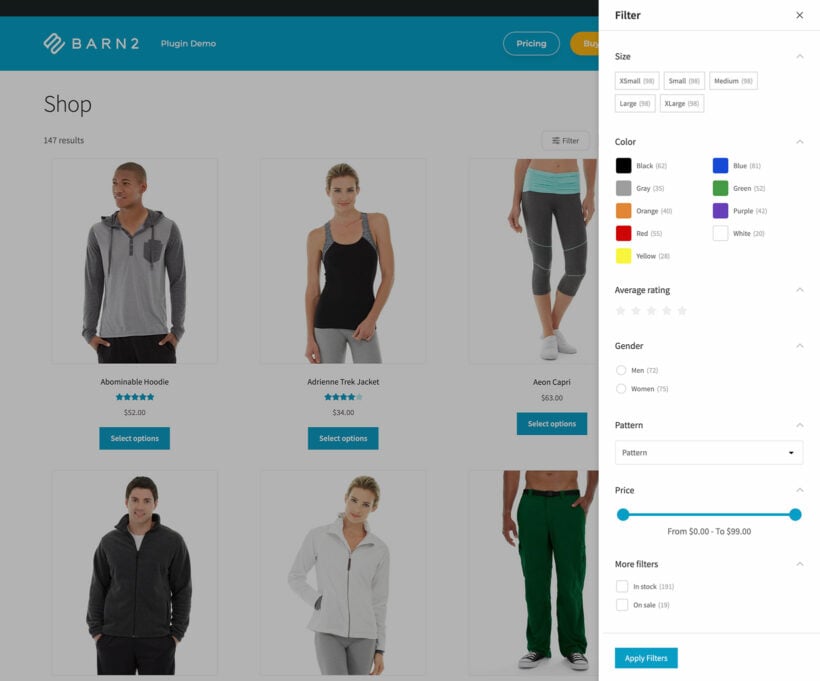
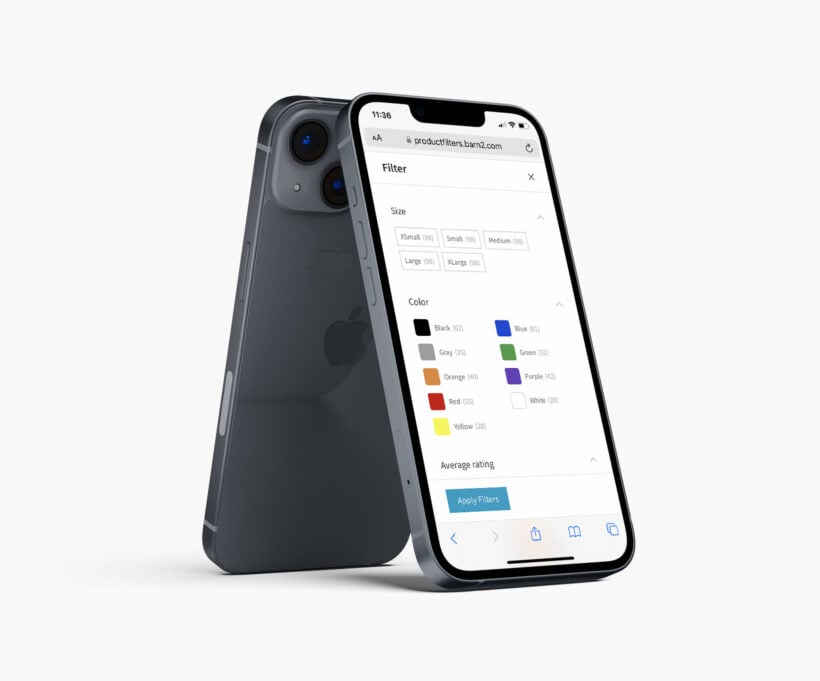
Here are some examples of the advanced filters WooCommerce Product Filters adds on a demo WooCommerce website.
- Filters above the 'Shop' and sidebar widget.
- Display filters using a slide-out panel
- Mobile view of the advanced filters.
Approach 2: Advanced strategies for displaying WooCommerce product data
WooCommerce is a powerful platform. However, there are some fundamental limitations to how it displays product data on the default archive pages, like 'shop' and 'category' pages and the single product pages.
Limitations of the default method of displaying product data on the archive pages
- It doesn't show enough product details: The default WooCommerce shop and category pages typically only display product name, price, and a short description followed by the 'Add to cart' button. While this is enough for some stores, it simply doesn't work for others and could lead to lost sales.
- Its filtering and sorting options are pretty basic: I covered this earlier, but it's worth repeating. The default filtering and sorting options are not helpful for many stores.
- Scrolling and load times: The default WooCommerce layout was designed to display only 12-16 products. Showing more products can make it look cluttered and lead to slower load times and a less user-friendly experience.
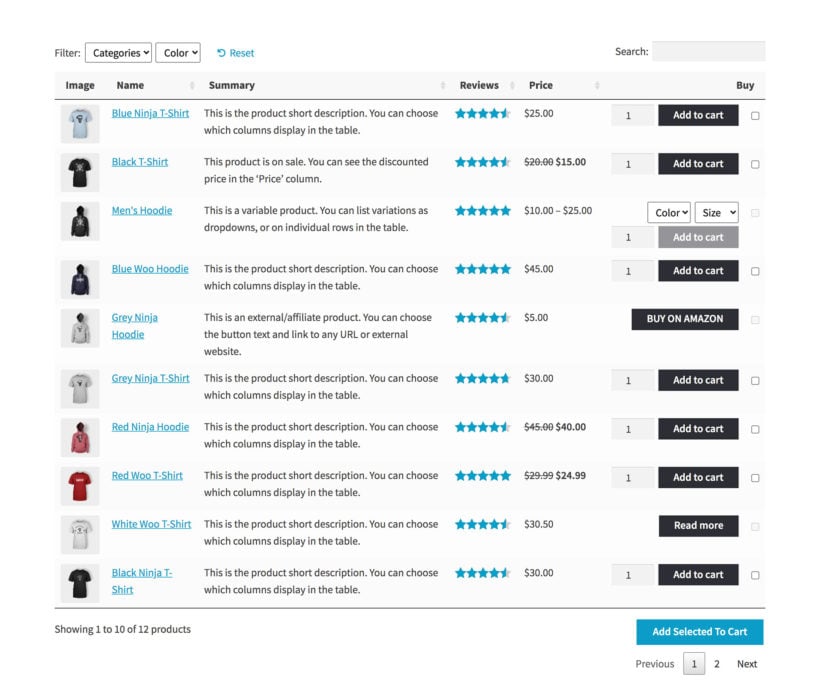
Many store owners use WooCommerce Product Table to fix this. WooCommerce Product Table is an advanced plugin that displays products and relevant product data in a tabular format on your site.
Here's are examples of how it looks on the front end of a demo WooCommerce store:
Benefits of displaying product data with WooCommerce Product Table
- Show detailed product data: Showcasing product data in a table format allows you to display product images, descriptions, prices, variations, and other details in an organized and structured manner.

- Better shopping experience: WooCommerce Product Table makes it easy for shoppers to compare products side by side. They can quickly scan and filter products based on specific categories, attributes, etc. This results in a more pleasant shopping experience.
- More customization options: The plugin gives you greater control over how your product data is presented to customers. For instance, you can customize columns, headers, and styling to match your brand and design preferences.
- Advanced filtering and sorting: It has in-built filtering and sorting options, similar to those in WooCommerce Product Filters, to help shoppers quickly find the products they want.
- Fast loading: It comes with WooCommerce AJAX filters and lazy loading. You can list hundreds or thousands of products in the product table, and it will still load super fast.
Example use-cases
WooCommerce Product Table is perfect for stores that want to organize and present products and product data in a way that streamlines the shopping experience. Here are just a few examples:
- Electronics stores: They typically sell a wide range of products like smartphones, laptops, cameras, and accessories. Displaying product data in a table allows customers to compare technical specifications for different products like screen size, resolution, connectivity, etc.
- Bookstores: Bookstores usually stock a variety of books across different genres. Organizing books in a product table makes it easier for shoppers to filter and sort by author, genre, publication date, book titles, price, and more.
- Wholesale furniture stores: With a product table, shoppers can view and compare product dimensions, materials, colors, and prices. And since the WooCommerce Product Table has an 'Add to cart' button, they can complete their orders quickly.
Display extra data in a custom tab on the product page
The default WooCommerce product page lets you display product data like price, long and short descriptions, images, etc. Unfortunately, this isn't sufficient for stores that need to present comprehensive product details, such as specifications, features, care instructions, or reviews, in an organized manner.
So how do you fix this?
By using WooCommerce Product Tabs to add extra tabs to the product page to organize and present product data efficiently.
There are several benefits of using a WooCommerce tab manager plugin:
- Comprehensive product details: Extra tabs allow you to share technical specifications, dimensions, care instructions, etc., and other relevant product data.
- Better shopping experience: Adding custom tabs prevents information overload on the main product page and keeps it 'clean' and user-friendly. Customers can easily navigate to the specific details they're interested in.
Here are some ideas on how to use WooCommerce Product Tabs to add extra data to your product pages:
- To add product specification details.
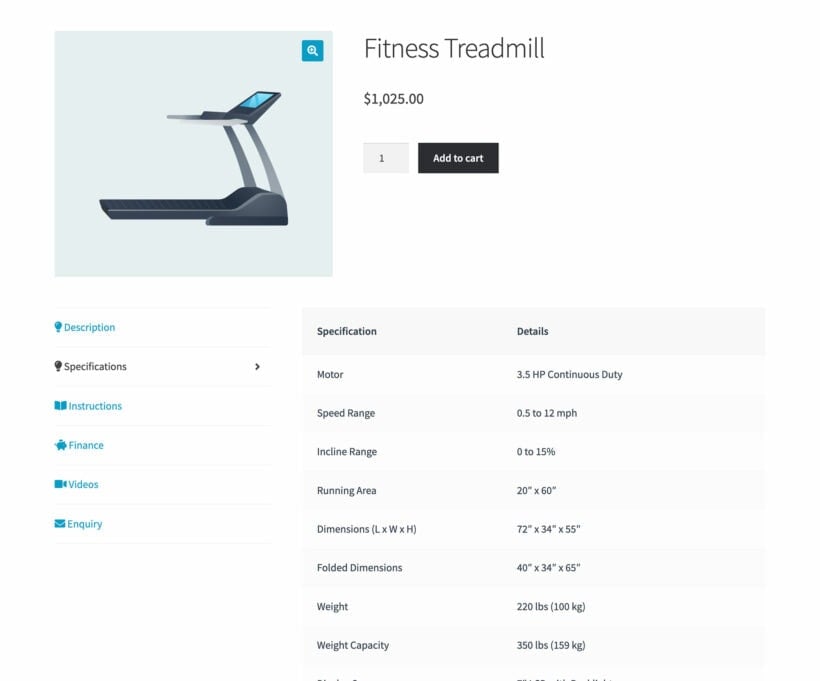
- Use videos to showcase products in action.

- To add directions to your store's physical location.

How to edit product data in bulk
By now, you know how to add and display a wide range of WooCommerce product data. But what if you want to add or edit large amounts of product data in bulk?
The bulk editing features in WooCommerce itself are pretty limited. As a result, you can save a lot of time by using a bulk product editor such as Setary.
Setary provides a bulk editing spreadsheet containing all your product data. It also lets you filter products by different types of data and quickly apply bulk actions to them. For example, you might filter for all In Stock products with a "Blue" attribute and decrease all their prices by 10%.

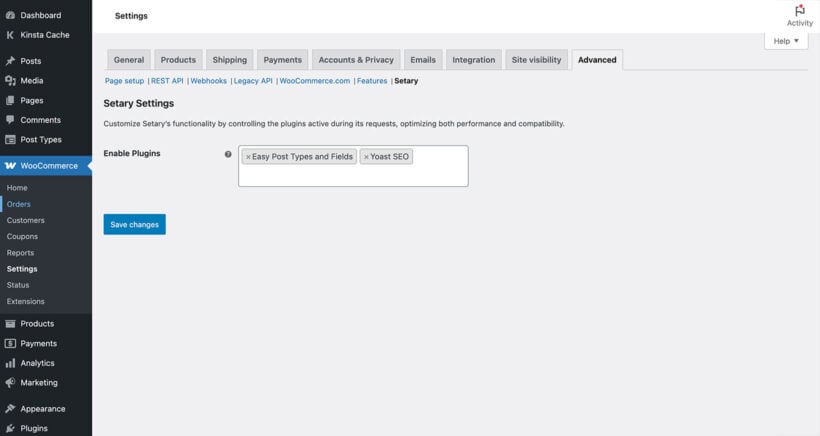
If you've used additional plugins to add product data, such as custom field plugins or ACF, then you need to tell Setary to include its data in the spreadsheet. To do this, go to the Setary settings and select whichever WooCommerce product data plugins you're using:
Take control of your WooCommerce product data
There's a lot to learn when it comes to adding and managing WooCommerce product data. In addition to using the default fields and taxonomies, these plugins will help you take control of your store's product data:
- Easy Post Types and Fields - Adds custom fields and taxonomies so you can add extra product data.
- WooCommerce Product Filters - Replaces the basic WooCommerce filters with powerful filters.
- Product Table - List products in a table containing any type of product data.
- Product Tabs - Display extra data in custom tabs on the WooCommerce product page.
- Setary - Quickly edit large amounts of product data in bulk.
Think about the types of data that will help to sell the products in your store. Armed with this knowledge, combine the above plugins as needed to give customers the information they need to make a purchase.