How to easily create storewide sales with WooCommerce
A WooCommerce storewide sale, as the name indicates, is when store owners offer a discount on all (or nearly all) of the products in their store. It’s a great way to attract new customers to your ecommerce store and encourage people to buy from you.
WooCommerce on its own lets you add sale prices for individual products. However, it doesn't offer a way to add global sale prices. This means that if you have a large product catalog, then setting up sales prices on every product can take up a lot of time.
The good news is that you can easily run storewide sales in your store with the WooCommerce Discount Manager plugin. Keep reading to learn how it works, and how you can use it to run a WooCommerce sitewide sale.
Introducing WooCommerce Discount Manager: The ultimate storewide sales plugin
WooCommerce Discount Manager lets you set up storewide discounts on your online store. It’s perfect for running Black Friday, Cyber Monday, or other flash sales on any WordPress site.
As the most flexible discount plugin on the market, it has everything you need to run a global WooCommerce sale:
- 6 discount types - Create fixed discount amount or percentage sitewide sales, buy-one-get-one-free (BOGO) deals, better deals for higher spending customers, and more.
- Scheduled sales - Schedule the start and end date for your WooCommerce sitewide sale in advance. This saves you time and avoids user error.
- Run sales for new customers only - Select which user role can access your global sale prices. For example, select 'guest' to offer sale prices to new customers only.
- Exclude products from the sitewide sale - While a storewide sale usually applies to all your products, there are exceptions. The plugin lets you exclude specific products or categories from the sale, for example those with lower profit margins.
- Promote the sale on the front end - Unlike most discount plugins, WooCommerce Discount Manager lets you draw attention to your sale prices by displaying banners and tiered pricing tables on single product pages.
- Add urgency to the cart page - You can display a notice on the cart page to remind customers that the sale prices have been applied, and that they must complete the checkout before the sale ends.
The plugin is easy to configure. All you have to do is create a discount, choose how you want it to work, and set it as a global storewide sale. WooCommerce Sitewide Sales also lets you create a custom sale message that you can display on your store before the sale begins, while it’s running, and when it ends. This adds dynamic pricing to your site, charging different prices during the sitewide sale.
As you can see, this WooCommerce storewide saless plugin makes it incredibly easy to offer fixed amount or percentage discounts on your entire product catalog in a few simple steps. As a result, you can attract more customers to your store, boost sales, and move old inventory.
Tutorial: How to create a WooCommerce sitewide sale
In this tutorial, we’ll show you exactly how to set up a WooCommerce storewide sale. Watch the video, or follow the written instructions below:
Step 1: Install WooCommerce Discount Manager
Make sure you have the WooCommerce plugin installed and activated on your WordPress site. Next, get WooCommerce Discount Manager and install it on your WordPress site. Activate your license key in the setup wizard.
Step 2: Create a storewide sale
- To create a storewide sale, go to Marketing → Discounts and click the Add New button.
- Choose from the types of discounts listed in the popup. There are 6 to choose from:
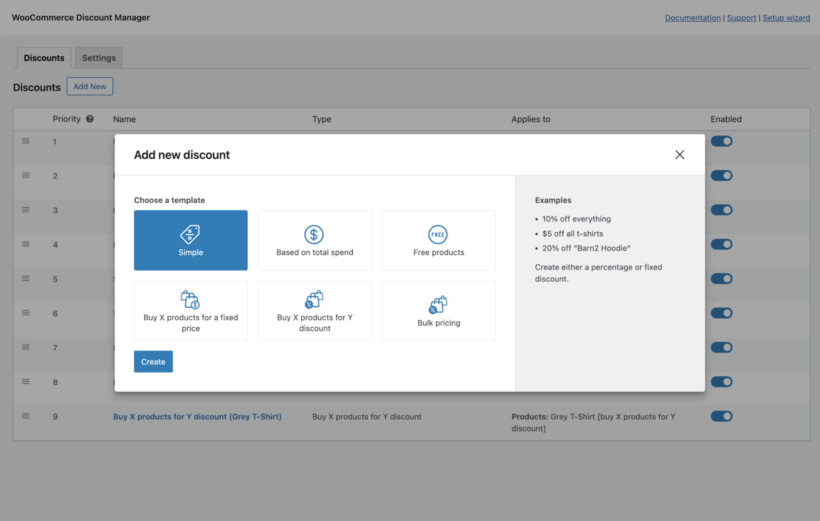
- Add a name for the discount, such as "Black Friday Sitewide Sale". This is only used in the WordPress dashboard.
- Next, select "All products" to run the sale storewide. If you need to exclude any products or categories then you can do this lower down the page.
- The options below will change depending on the type of storewide sale you're creating. Use them to set the sale price and any other discount rules:

- Set the start and end date for the global sale.
Step 3: Display the sale
Still on the 'Add Discount' page, the next options lets you display information about the WooCommerce storewide sale on the front end of your WordPress site:
Product page content
This field lets you add any information that you'd like to display on product pages. This is a good opportunity to draw attention to the sale and create a sentence of urgency.
You can add whatever you like here. To make it stand out nicely, I recommend using any shortcodes or boxes that come with your theme, adding emojis, etc.
Use the 'Content location' option to choose where on the product page you'd like the sitewide sale information to appear.
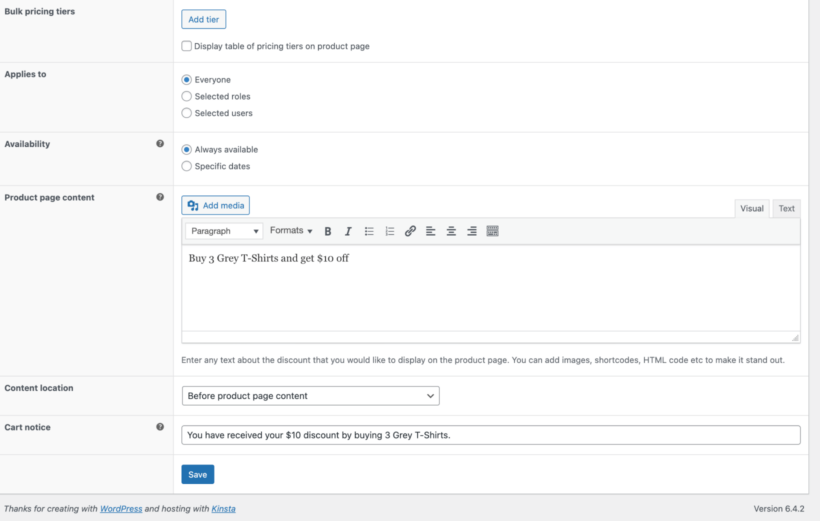
Cart notice
In addition to the product page content, you can add a text-based notice which will appear in a box at the top of the cart page. To give your WooCommerce storewide sale an extra boost, I recommend using it for either or both of these purposes:
- Reassure customers that the sale price has been applied. For example, you could write: "Congratulations! The 50% discount from our sitewide sale has been applied."
- Add urgency by advising customers to check out before the sale ends. For example, you might write: "Urgent notice: Complete your order before Monday 31st November before our Black Friday sale ends."
Related tutorial: How to put WooCommerce products on sale.
Step 4: Add additional discounts (optional)
So far, we've added one sale price which will be used throughout your store. If that's all you need, then skip to Step 5.
However, the WooCommerce Discount Manager also lets you apply different discount rules to different products. This gives you an opportunity to create a more advanced sitewide sale. For example, you might like to add higher discounts to products that you particularly want to promote.
To add additional sale prices, simply repeat steps 2 and 3 as many times as you like. Each time, set up the sale prices differently and select different products or categories.
Step 5: Preview and test the global sale
Now you've set up the WooCommerce sitewide sale, it's time to preview it on the front end. Obviously, you might need to temporarily disable the sale start date in order to see it (you can do this on a staging site).
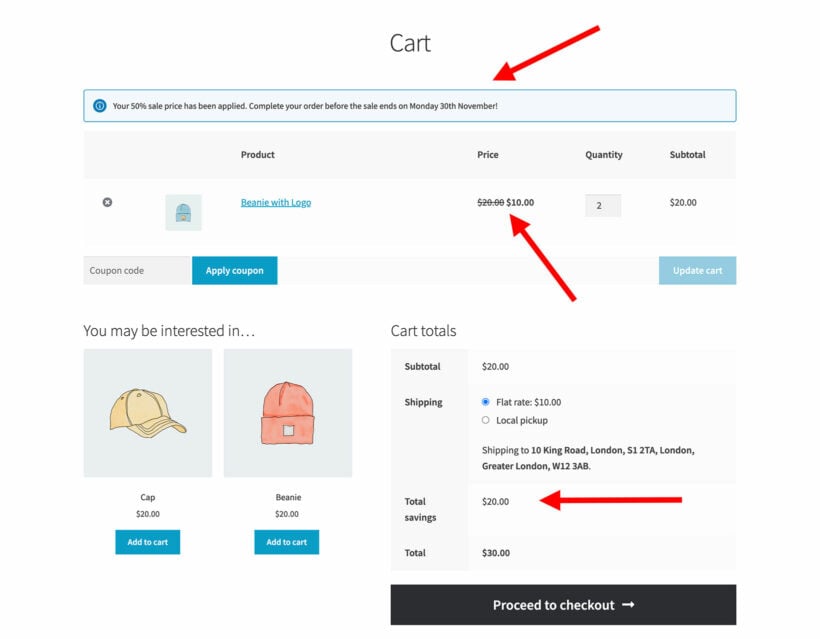
When customers visit the cart page, it will look something like the screenshot below:
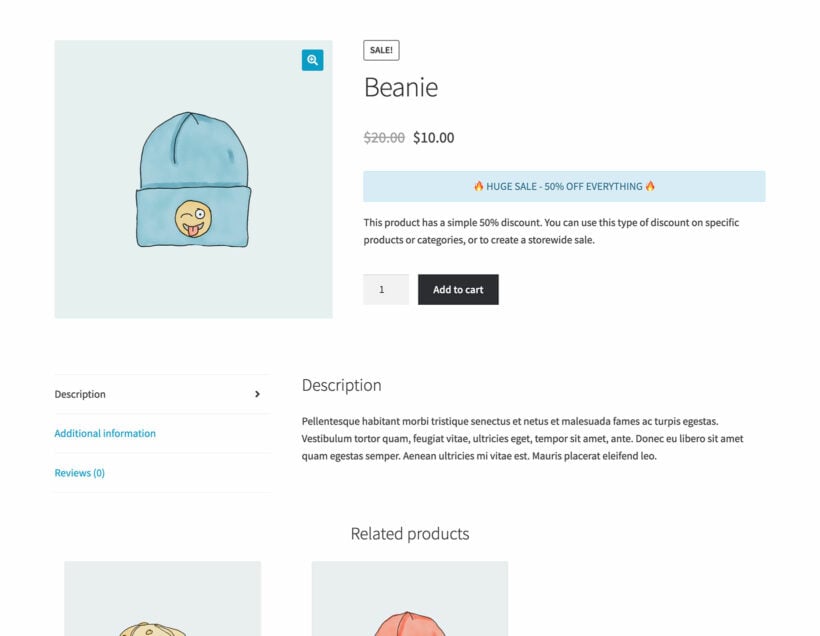
Simple fixed or percentage discounts show with the price crossed out and the sale price alongside. More complex discount types are calculated on the cart page and don't cross out the price, but they still display the product page content.
Now add some products to your cart and proceed to the cart page. You will see the cart notice you added, plus the subtotal and amount saved in the locations shown below:
Step 6: Display sale information on the main shop page or a dedicated sales page (optional)
So far, you've learned how to create a WooCommerce storewide sale and display information about it on product pages and in the cart. But what if you want to display the product page content on your main product listing pages, too? Or what if you want to create a separate WooCommerce sales page listing all the on-sale items?
You can do this by using WooCommerce Discount Manager alongside its sister plugin, WooCommerce Product Table. This replaces your usual store layout with a quick order form layout, in the style of a product table:
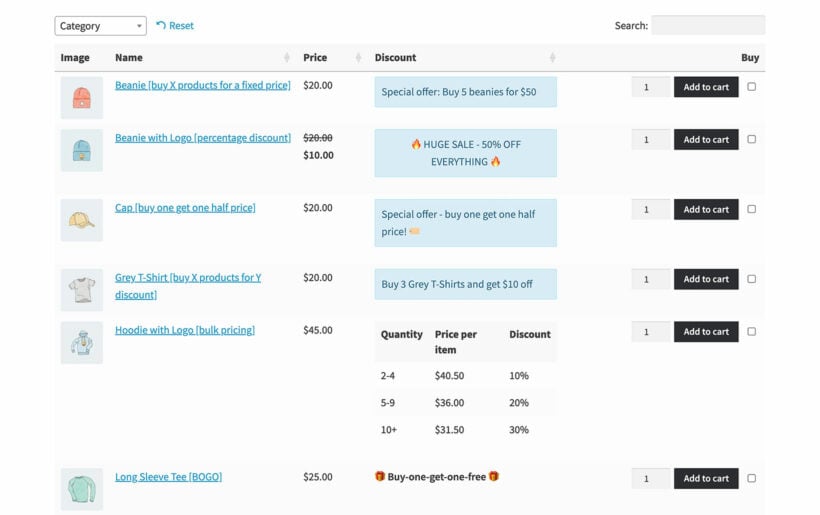
As you can see from this screenshot, a product table is a much more structured way to display products on your shop and category pages. You can choose which columns of information to display about each product, including a column which displays information about the discount for each product.
The product table also makes it quicker and easier for customers to find what they're looking for. The filter dropdowns and instant AJAX-powered search box above the table are ideal for this.
You can implement the product table layout as follows:
- Get WooCommerce Product Table and install it on your WordPress site.
- Activate your license key in the setup wizard.
- On the 'Where would you like to display the table?' page, select all the pages where you'd like to use it.
- On the 'Columns' page of the wizard, choose what information you'd like to display about each product. Make sure you include the 'Discount details' column.
Promoting your WooCommerce storewide sales
Setting up a sitewide sale in WooCommerce is just the first step to running a successful sale. To get the most out of it, you have to promote the sale.
For most store owners, the primary goal of a storewide sale is to increase sales and market reach. With this in mind, there are plenty of effective marketing strategies you can use to promote your global sales:
- Social media. Use social media ads and posts to get the word out about your storewide sale to new and existing customers.
- Email marketing. Before running the sale, send out an email broadcast to your list letting them know the sitewide sale details. Be sure to mention when the sale begins and ends, and if customers need to enter a WooCommerce coupon code to avail discounted prices. (Tip: It's generally better to set up discounts with WooCommerce Discount Manager as customers don't need to add coupon to the checkout.)
- Website banners. You can create website banners to let site visitors know you’re running a global sale. Mention the bulk price discount customers can expect to get (e.g. 10% off on entire stock) to encourage them to visit the shop page.
- Special offers page. Create a Special Offers page to list all of your on-sale product categories in WooCommerce. This makes it easy for customers to quickly find the specific products that are selling at a discounted price. Even if you're running a storewide sale, this is still a good opportunity to highlight specific products. For example, you could:
- List products that you're particularly keen to sell (e.g. higher margin, newer products, or products where you need to clear some stock).
- Display the products with the biggest discounts.
Start running storewide sales today 🔥
Running storewide sales on your WooCommerce store is a great way to increase your market exposure, attract new customers, boost conversions, and generate more revenue.
The WooCommerce Discount Manager plugin makes it easy to create sitewide sales. As well as letting you add a range of flexible discounts, you can schedule your sales and even display prominent information about them.
It comes with a full 30-day money back guarantee, so you can try it on your site risk-free. It also comes with in-depth documentation and an expert support team to help you get up and running.
Ready to create a WooCommerce storewide sale? Get the Discount Manager plugin today!