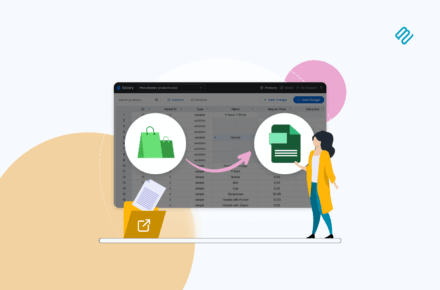
Our latest WordPress plugin - WooCommerce Bulk Variations - is launched today! It's the easy way to list product variations in an instant matrix layout. Your customers will love ordering multiple variations at once!
Our existing WooCommerce Product Table plugin is popular for listing variations in a table layout - either with variation dropdowns, or with each variation on its own row in the table. Lots of our customers have also asked for a way to display variations in a matrix or grid. We have built WooCommerce Bulk Variations to do exactly that!
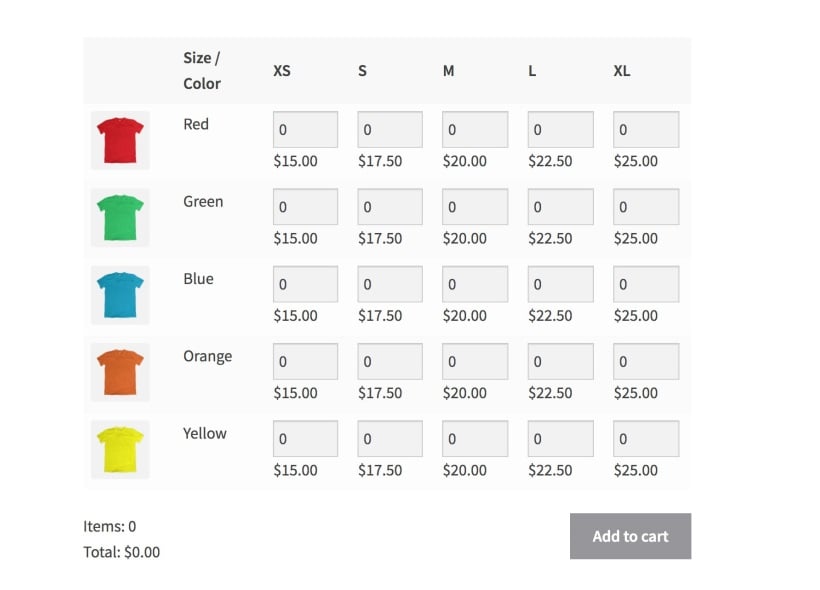
It takes your variations and lists them in a matrix-style grid format. Each product attribute is listed as one of the axis of the grid. For example, you might list the 'Size' attribute horizontally as columns, and the 'Color' attribute' vertically as rows.
WooCommerce Bulk Variations lets you create 2 types of variations matrix:
Bulk variations order form Add a quantity box for each variation. Customers can enter the quantity of each variation they require, and add everything to the cart at once. This is much faster than the variation dropdowns that come with WooCommerce itself, where you have to select each variation individually.
WooCommerce price grid Disable the quantity boxes and create a read-only variation price grid, displaying the price of each variation without add to cart buttons.
Bulk variations order form
#1: Read-only price matrix
You can enable the variations matrix globally for all eligible products, or you can enable it per-product. The plugin also comes with a shortcode which you can use to insert a variations grid for a specific product anywhere on your site. This is useful if you want to display the grid on a different part of the product page, or on other pages or posts.
The grid is fully customizable. For example, you can choose whether or not to include an image column displaying the variation images.
WooCommerce Bulk Variations will benefit any online store that needs a quicker way to buy variations. For example:
WooCommerce wholesale stores If you sell to the trade and your wholesalers like to buy variations in bulk, then you need a bulk variations form. (Tip: If that's you, then you can use it with our other plugin - WooCommerce Wholesale Pro!)
E-commerce clothes shops If you sell clothes online, then customers can bulk order sizes more quickly by choosing the sizes and colors from a variations matrix.
Food order forms Some foods, such as pizzas, have lots of options (e.g. size and toppings). A food variations order form lists the options in a clear grid. This makes it easy for customers to select quantities and buy.
Products sold by weight If you use variations to sell different weight options of a product, then customers can mix and match from the grid to get the required weight.
Products with two dimensions If the price of a product changes depending on the width and length, then you can set up these options as variations and display them in a grid with the width on one axis, and height on the length.
Technical products with two types of optionA variations grid is perfect for selling technical products that don't require large images. This could be printer ink, spray paint, or electronic gadgets.
Whatever you're selling, if you need a quick way for customers to order multiple sizes or other options at once without having to list each attribute separately, then WooCommerce Bulk Variations is for you.
Can I use it with other Barn2 plugins?
We've integrated WooCommerce Bulk Variations with our other plugins wherever possible. For example, you can:
Display it on pages or quick view lightboxes that are linked to from your product tables.
We've also tested it with various third party plugins such as WooCommerce Subscriptions and Minimum/Maximum Quantities. You can read about these on our list of compatible plugins.
Can I list multiple products in the variations grid?
Each variations grid lists the variations for one product. If you want to create an order form containing more than one variable product, then you need WooCommerce Product Table instead, which provides 2 ways to list variations for multiple products.
Where to get the plugin
WooCommerce Bulk Variations is available now. It comes fully backed by our 30-day money back guarantee. Get it today and see how the matrix can transform your own website!
We’ve got your back. Your purchase is covered by our no-risk 30 day money back guarantee. If for any reason you’re not completely happy with the plugin, you’re entitled to a full refund up to 30 days from your original purchase. No questions asked.
As an online business owner, there are many scenarios where you might need to sell by weight in WooCommerce. For example, you might sell fruits and vegetables from your farm, purchase dry fruits and nuts in bulk for resale, or grow various herbs - all of which need WooCommerce weight-based pricing.
Lots of store owners wonder: "How do I sell a product by weight in WooCommerce?" That's because it’s not immediately obvious how to use WooCommerce to sell by weight. The good news is that, with the right WooCommerce plugins, you can easily start selling products by weight.
In this article, we’ll walk you through two different ways to use WooCommerce to list products in a way that allows you to sell by weight. The methods we cover in this tutorial work equally well if you’re selling by other types of measurement such as volume, size, width, length, or dimensions.
Let's get started ⚖️
Why you might need to sell by weight in WooCommerce
There are several different types of products that store owners typically sell by weight. Here are a few examples:
Fruits
Vegetables
Dry fruits
Nuts
Flour, lentils, and beans
Meat
Store owners set the products up in a way that each product has a price per unit weight. For example, this could be in grams, ounces, or pounds. Customers can simply select the number of, say, grams they’d like to purchase of the product and proceed to checkout to place their order.
As an e-commerce store owner, you can sell by weight in WooCommerce with the right combination of plugins.
Two ways to sell by weight in WooCommerce
There are two different ways to sell by weight in WooCommerce:
Choose Method 1 if you need WooCommerce weight-based pricing with more flexible options. For example, if you want to sell different types of flour by the kilogram, you could simply add your product prices by weight instead of selling by quantity.
Alternatively, you can go with Method 2 to keep things simple and add each weight option as a separate variation. This is particularly useful for store owners that sell items at different weight quantities. For example, if you have three different weight options – 500 grams, 1 kilogram, and 5 kilograms. You would add products as variable products in WooCommerce.
Method 1: Price products by weight
Method 2: Add each weight option as a variation
Keep reading to learn more about each method and how to set it up.
Method 1: Price products by weight
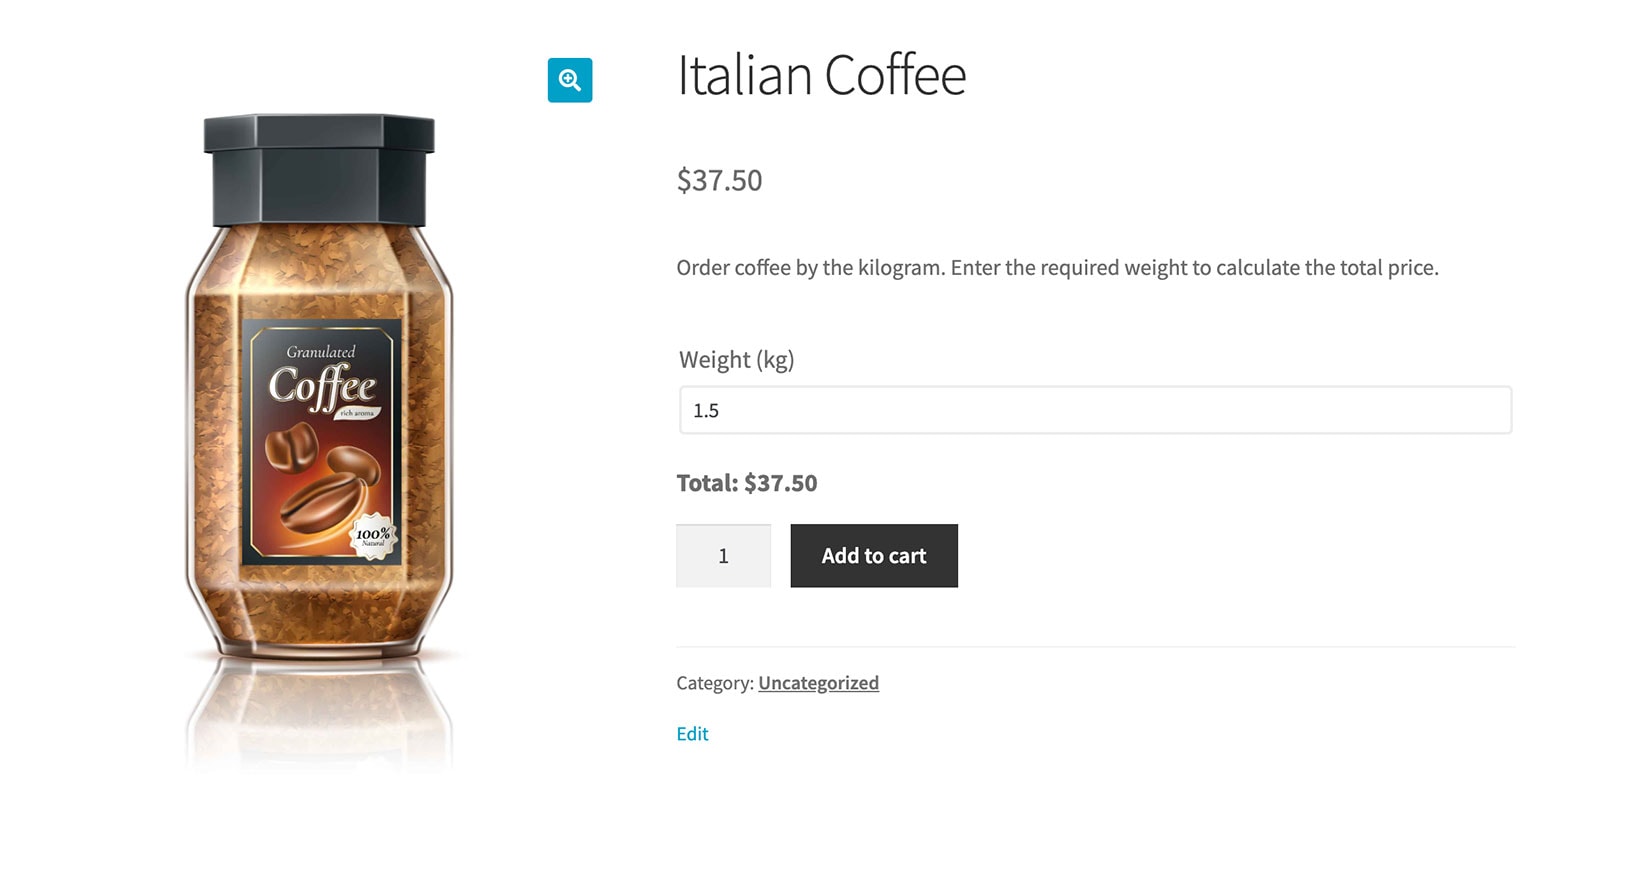
It's surprisingly easy to set up WooCommerce weight-based pricing. It works by replacing the standard quantity field with a weight input field. This lets you sell products by weight instead of quantity, like this:
A product sold by the kilogram
The great thing about this method is that it also supports decimal quantities, and minimum and maximum quantities. For example, you can allow customers to order coffee in any decimal value between 1 and 10kg.
You can do this with the WooCommerce Product Options plugin, which lets you replace the standard quantity field with custom product options. These offer more flexibility, such as the ability to order decimal quantities and display the weight on the product page.
How to add a product weight field to the product page
Step 1: Set up the product
First, you need to disable the quantity field on the main page, and enter the price for one unit of weight:
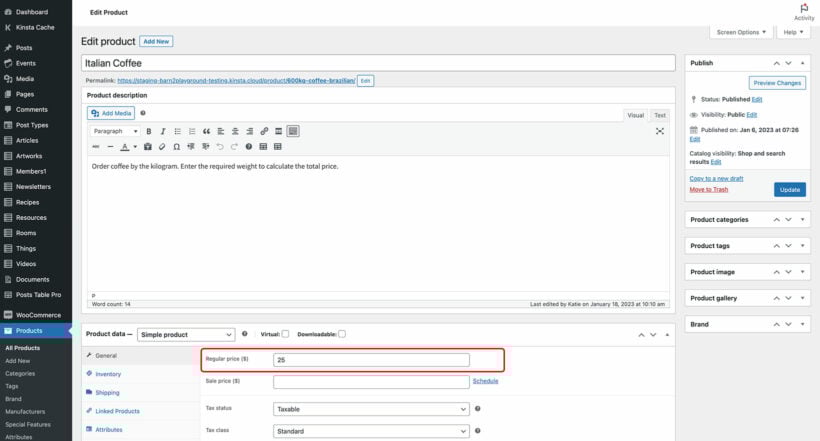
Go to the 'Products' section of the WordPress admin and open the 'Edit product' page.
Find the 'Product data' section and enter the basic product price. For example, if you are selling by kg then you should enter the cost for 1kg.
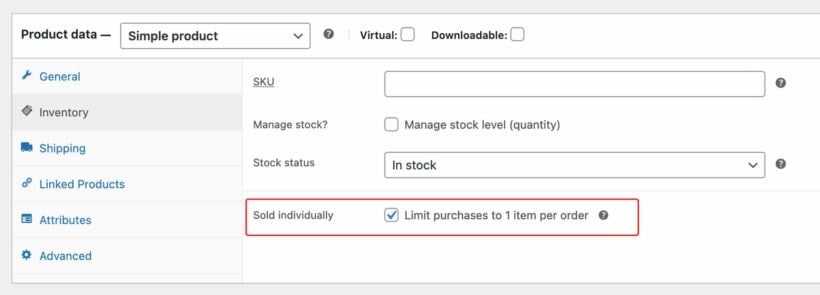
Next, go to the 'Inventory' tab and tick the 'Limit purchases to 1 item per order' box. This hides the product quantity field. You need to do this because you'll be selling by weight rather than quantity. (We'll be adding a weight field in the next section.)
Create a Options Group which you'll use to add the weight field, plus any other options you want to add to the product.
Choose which products/categories you want to display the weight field on, or leave it to appear globally on all products.
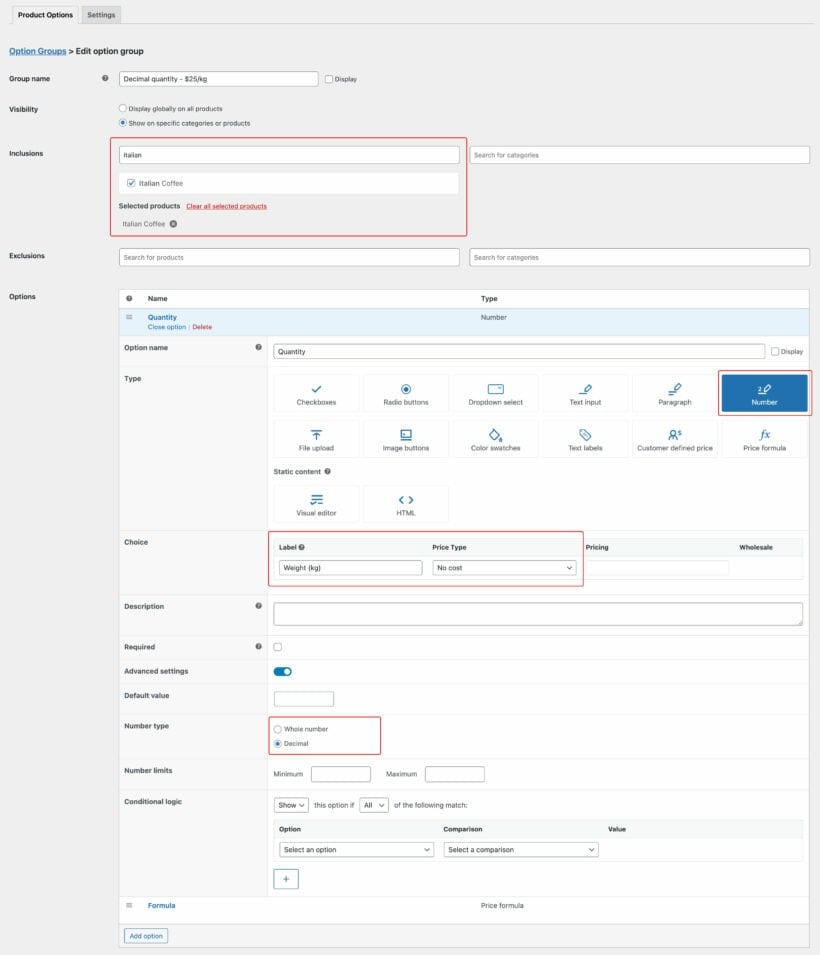
Click 'Add Option' and select the 'Number' field type.
Enter a name for the weight field (e.g. "Weight") and untick the 'Display' box next to it.
Underneath in the 'Choices' section, enter the label which will appear next to the weight field (e.g "Weight in kilograms"). Leave "No cost" selected for the price because we'll be a proper price formula in a minute, instead of adding a static price here.
Set the field to 'Required' to force customers to enter a weight.
Next, open the 'Advanced settings' to display some additional options:
If you want customers to be able to select partial weights (e.g. 1.5kg) then use the 'Decimal' number type to allow this.
Set a minimum and maximum weight that customers can enter, if needed.
Save the option group.
Step 3: Add the weight-based pricing to WooCommerce
Now you've added the weight field, you need to create a price formula which will calculate the weight-based pricing:
In the same Option Group that you created in Step 2, click 'Add option' again and select 'Price formula' this time.
Add a name for the option, such as "Weight calculation", and untick the 'Display' box again.
Select the Price Formula option type.
Create a price formula which will calculate the price based on the weight that the customer enters. To do this, click on the name of the number field which appears underneath the 'Formula' field, and also the 'Price' field which will retrieve the price for 1 unit of weight which you entered in Step 1. Enter the multiplication symbol between the two variables so that the formula looks something like: [Weight] * [product_price]. Use mathematical operators, brackets etc. to add extra complexity to the formula as needed.
Use the 'Price display suffix' field to enter some text to indicate that the main price you entered for the product is based on weight. For example, if you entered the price for 1kg on the 'Edit product' screen then you should enter "per kilogram" or "per kg" to make this clear to customers. This will appear after the price for 1kg at the top of the product page.
Finally, visit a product page and test the pricing by weight. Enter a number in the weight field and make sure the correct price is shown below. Keep making changes until you're completely happy.
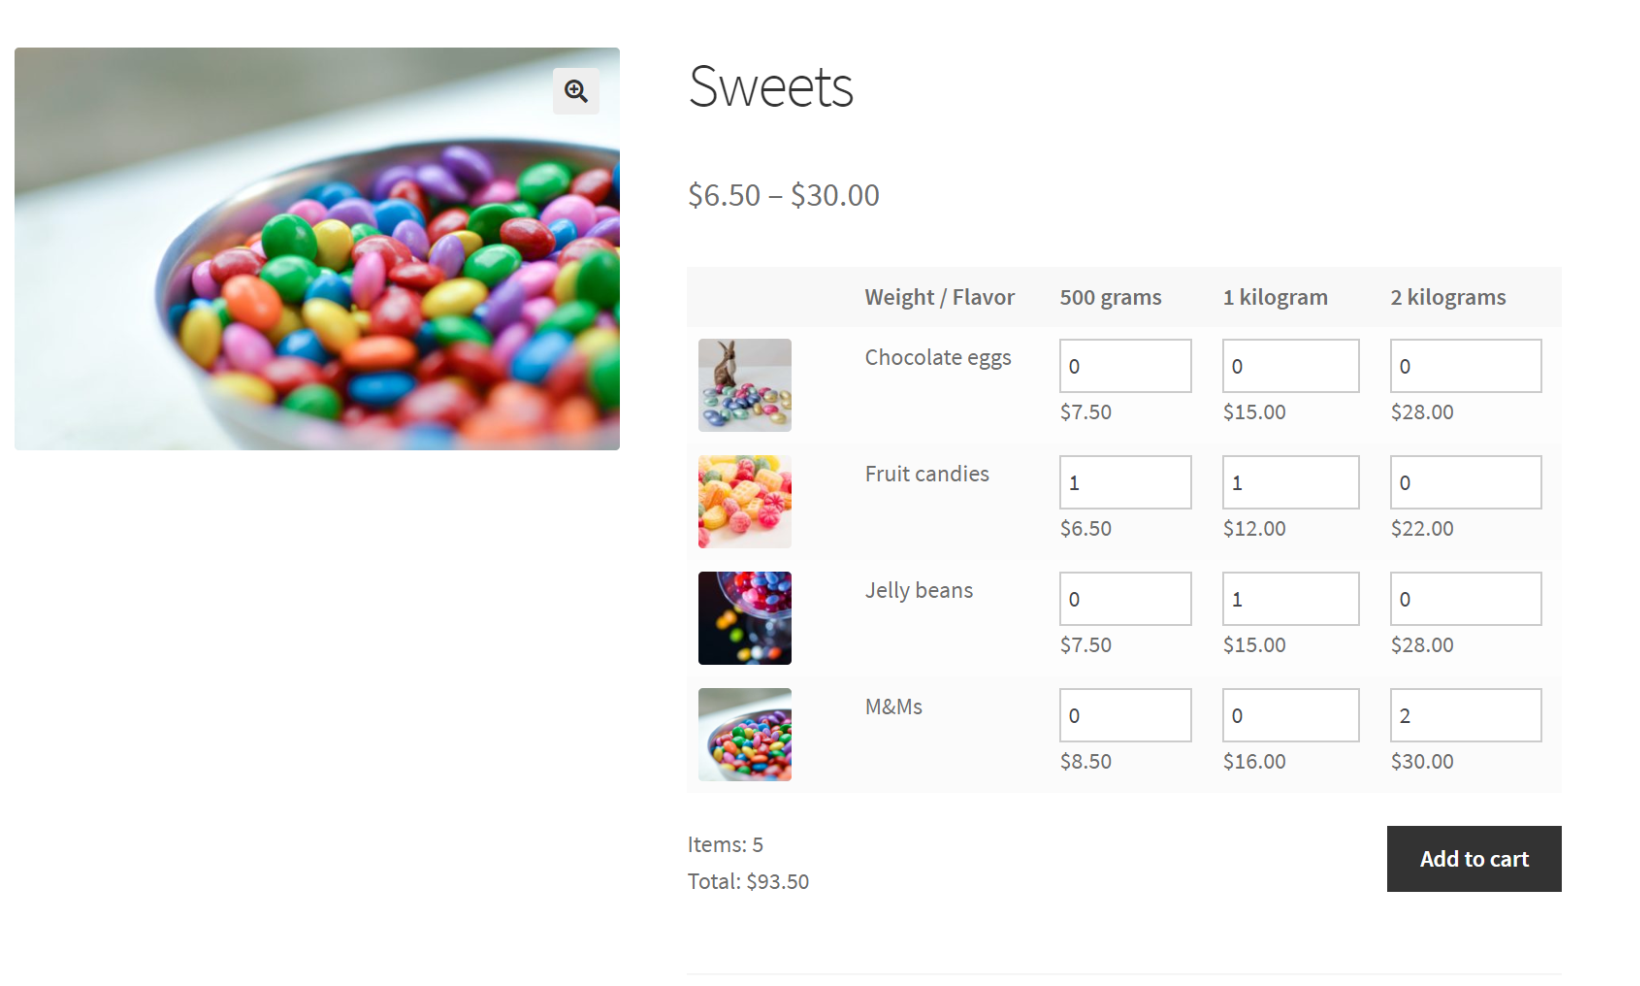
Customers can enter the required quantity of each option and order the exact amount they want. They can mix and match multiple variations to reach the total weight volume they require.
For example, let’s say you’d like to sell sweets online. You might set up the following weight options as variations to sell by weight in WooCommerce:
500 grams
1 kilogram
2 kilograms
So, if a customer would like to purchase 1.5 kilograms of sweets, they could add the 500 grams variation and the 1-kilogram variation to their shopping cart at the same time and proceed to the checkout page. In this way, the plugin supports custom weight measurements. You just need to create a variation for each possible step within the price range.
Activate your license key in the plugin setup wizard, which will open automatically.
Next, go to Products → Add New and create a WooCommerce product which you will sell by weight.
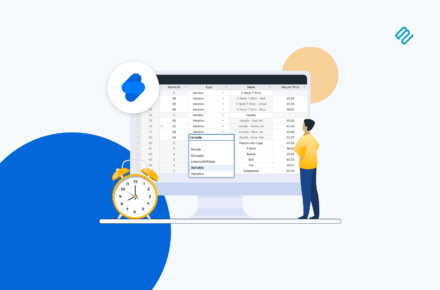
Go to Product Data → Attributes and add all the attributes that you would like customers to select from. For example, in the case of sweets, this may be flavor and weight. Enter all the possible options for each attribute, such as all the different weights that you sell in. Tick the 'Use for variations' box for each attribute, then click 'Save attributes'.
Open the 'Variations' tab underneath and click 'Generate variations'. This will create a variation for each combination of attributes. Go through each one and enter a price, add an image, and so on. (Tip: Use the filters above the list of variations to quickly select multiple variations and apply the same changes to each one.)
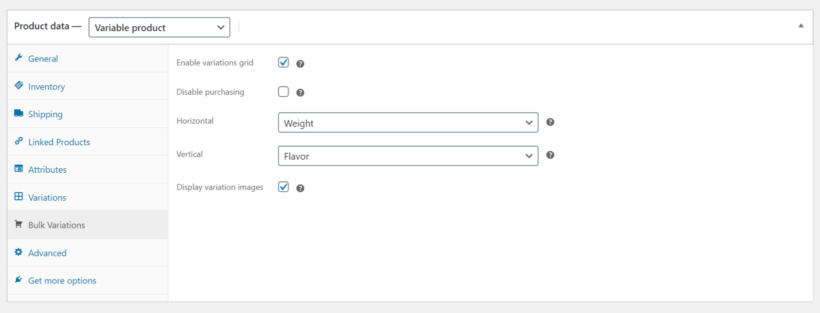
Now open the 'Bulk Variations' tab and configure the following settings:
Make sure the Enable variations grid checkbox is ticked.
Set the Horizontal option to the attribute you want to display in columns for the variations grid.
Set the Vertical option to the attribute you want to display in rows for the variations grid.
Make sure the Display variation images checkbox is ticked.
Click the Publish button to add the product to your store.
On the front-end, the WooCommerce Bulk Variations plugin will display the variations along two dimensions in a grid with all the weight options.
Bonus: Selling by weight on the main Shop page
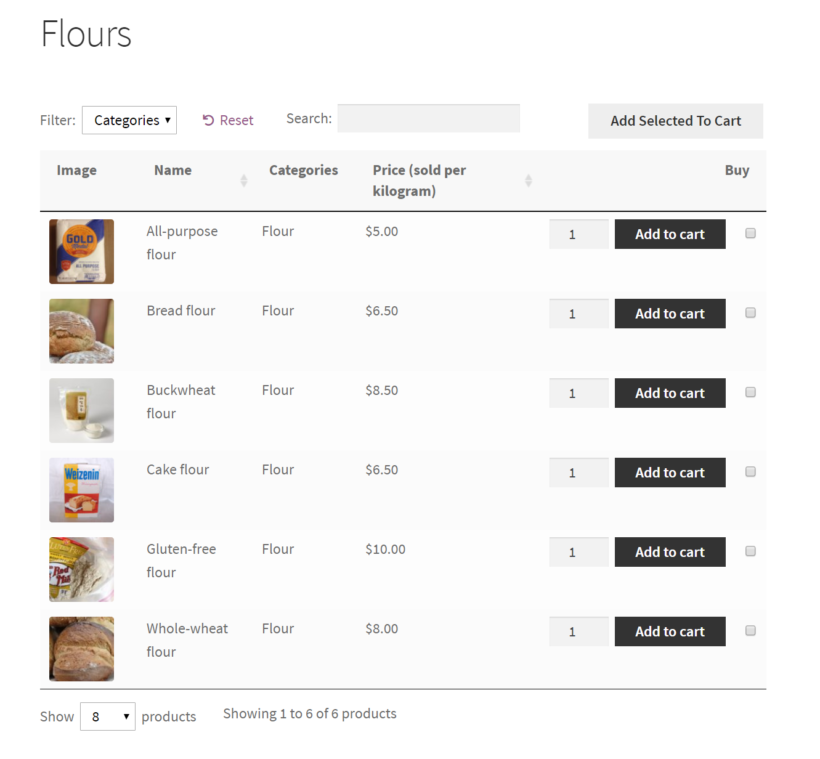
Both methods for selling WooCommerce products by weight focus on what it looks like on the single product page. For even more convenience, you can use WooCommerce Bulk Variations or WooCommerce Product Options with our other plugin, WooCommerce Product Table. This displays products in a much clearer layout on the main Shop page, like this:
This makes it very clear to customers that the products are priced by weight. That's because we have renamed the 'Price' column in the table to clearly show that each price is based on weight, rather than by quantity.
Be sure to check out the How to sell by weight guidelines in the WooCommerce Product Table plugin documentation.
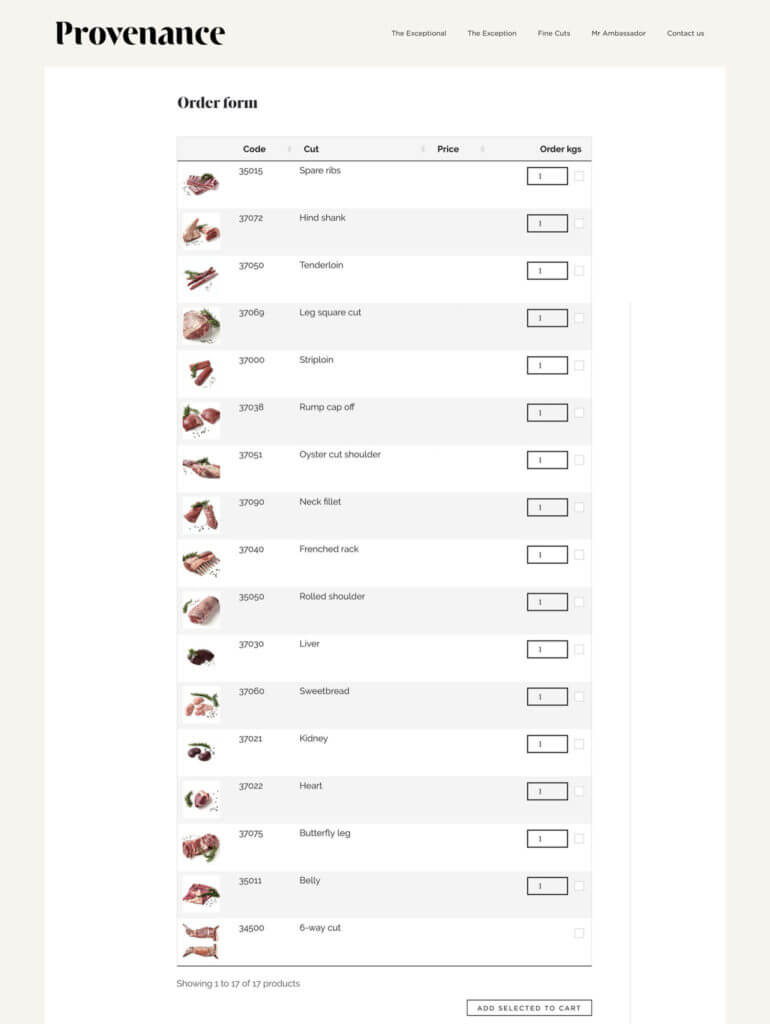
Case study: Provenance Meat
Selling by weight is particularly useful if you’re selling meat. It gives customers full flexibility to place orders based on the exact amount they’d like to purchase whether it’s 1.5 kilograms or 1.675 kilograms. Here's an example of how Provenance Meat uses WooCommerce Product Table:
Start selling WooCommerce products by weight
In this tutorial, we've looked at several methods for selling by weight in WooCommerce. Read about each one, and choose the combination of plugins that best suits your needs:
WooCommerce Product Options - Replace the standard WooCommerce quantity field with a purpose-built weight field. It supports decimal quantities, min/max quantities and more, making it ideal for selling by weight.
WooCommerce Bulk Variations - Create a variation for each weight option, and display them in a user-friendly order form on the single product page.
Both plugins come with a full 30-day money back guarantee. Try out your chosen plugin and start selling by weight today!
The possibility for virtual eateries or "ghost kitchens" has dramatically grown as internet usage has increased. Fortunately, you can set up and run a virtual restaurant in WordPress quickly and easily.
In this complete guide, you will learn how to build your own virtual restaurant website, which you will own 100%. This will save you lots of money compared to using a hosted restaurant ordering system such as Uber Eats, Grubhub, or DoorDash.
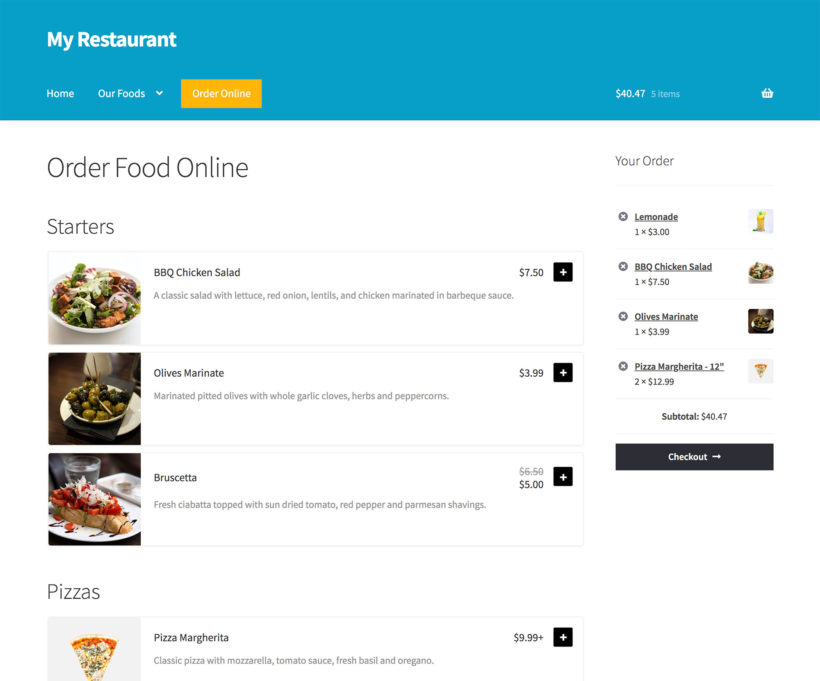
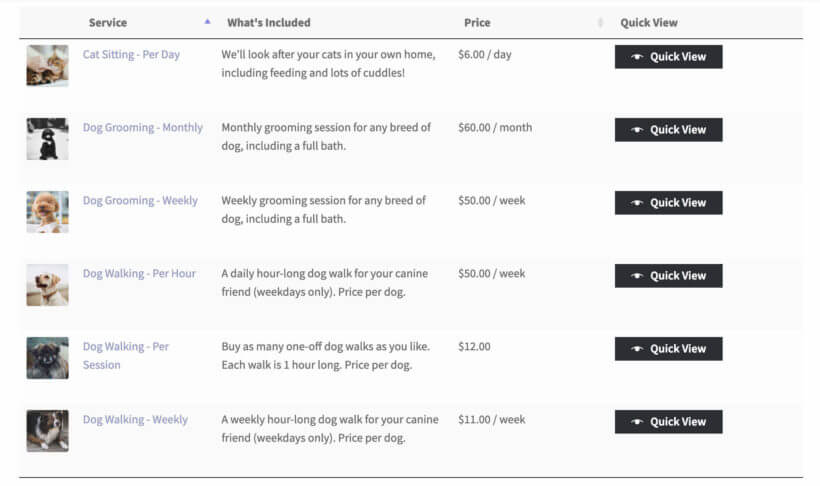
We’ll show you how to set up a virtual restaurant in WordPress using the WooCommerce Restaurant Ordering plugin. It only takes 10 minutes and by the time you're done, your virtual restaurant site will look something like this:
What is a virtual restaurant?
Most people place an emphasis on both quality and convenience. These are services that a virtual restaurant can easily offer if it is set up on the appropriate principles and adheres to the suggested procedures for serving its customers. At times, this has been the only way to keep their business running and continue trading.
A virtual restaurant (also called a ghost kitchen, ghost restaurant, or cloud kitchen) is a restaurant that offers delivery options only. Generally speaking, virtual restaurant services are facilitated through web apps and third-party delivery companies like the Postmates food delivery app. However, you can also create a virtual restaurant website with WordPress and WooCommerce.
This restaurant concept is hugely popular in most large cities like New York, Los Angeles, and Chicago. Kitchen United, for example, is a popular virtual kitchen and restaurant brand.
This foodservice business model allows restaurateurs to cut down on traditional expenses that come with offering a dine-in experience. In fact, adapting the virtual restaurant or ghost kitchen approach helped several restaurant businesses stay operational during the global coronavirus crisis. Now it's here to stay.
How does a virtual restaurant work?
Customers can go to the restaurant’s website to view menus and place their orders online. Once a customer places their order, the virtual restaurant kitchen is immediately notified, and kitchen staff begins preparing the order.
The establishment then delivers the food directly to the customer or uses a third-party food delivery service to deliver the meal to the customer’s location. Some virtual restaurants offer both online payment options and cash on delivery. Once the food is delivered, patrons can enjoy it in their own dining room.
Benefits of online-only restaurants
As compared to the traditional restaurant business model, virtual restaurants have their own set of benefits.
For starters, restaurant owners can mitigate the costs associated with finding an ample restaurant space with room for dining in and instead use that budget to create a kitchen that focuses on improving food preparation processes. Additionally, you can also opt for a shared kitchen setup.
In addition to this, virtual restaurant owners can change their menu items whenever they’d like. This is especially useful if a particular ingredient becomes unavailable or is temporarily inaccessible. This also means that you can experiment with your menu and swap out dishes that aren’t popular with your customer base.
Not to mention, studies indicate that customers favor home-delivery dining options, which makes a strong case for setting up a virtual restaurant.
Types of food that sell best from virtual restaurants
One of the key benefits of running a virtual restaurant is that you can use the wealth of dynamic customer data available to you to your advantage. For example, you might search for the different types of foods and meals that sell best from virtual restaurants and pizzerias in your area on Google.
Here are some popular examples:
Chinese and Japanese food – sushi, noodles, spring rolls
Pizza – make your own pizza with different toppings and crust sizes
Mediterranean food – shawarmas and Greek salad
Fast-casual food – burgers, sliders, wraps, fried chicken, and fries
How to set up and run a virtual restaurant
The first thing you need to do is set up an attractive, easy-to-use website for your virtual restaurant complete with an order form and delivery slots.
For this, we recommend using WordPress and WooCommerce, so you have full ownership of your virtual restaurant website. This isn’t possible with a hosted solution like Uber Eats, Deliveroo, and Just Eat.
If you don’t already have a WordPress website, you’ll need to choose a hosting company to make your website available to patrons. We recommend going with a reliable web hosting provider like Kinsta.
If you don’t already have a WordPress website set up, you’ll need to create one on a hosting account. We recommend Kinsta as they’re a managed WordPress host that’s perfect for running a website for your virtual restaurant.
The best part is that you can install WordPress directly from your Kinsta account. Once you’ve entered your domain name, location, and site title, you can configure your login credentials and install WooCommerce to enable e-commerce features.
The WooCommerce Setup Wizard is incredibly intuitive and walks you through the process of setting up e-commerce features for your virtual restaurant website. Since you’ll be offering food delivery options, it’s important to configure your shipping zones and delivery areas carefully.
If you deliver food to a single area and charge the same delivery costs then you only need to create one shipping zone. However, if you’re going to deliver food to multiple areas and charge different costs depending on the area, you’ll need to create multiple shipping zones.
WooCommerce lets you choose from three different delivery options including flat rate, free shipping, and local pickup.
Later, I'll also show you how to add delivery slots and opening hours for your virtual restaurant.
Step #2: Add a food menu
The next step is to add each food item as an individual WooCommerce product. To keep things organized, start by creating different categories for your menu items similar to how you’d do it on a paper menu. For example, your categories might be Starters, Main Courses, and Desserts.
Once that’s done, head over to Products →Add New from the WordPress admin panel to add each food as a product. At the bare minimum, you should enter a title, brief description, image, and price of the food item. Select the appropriate category for the food item. Consider adding nutritional information and allergens to the product description.
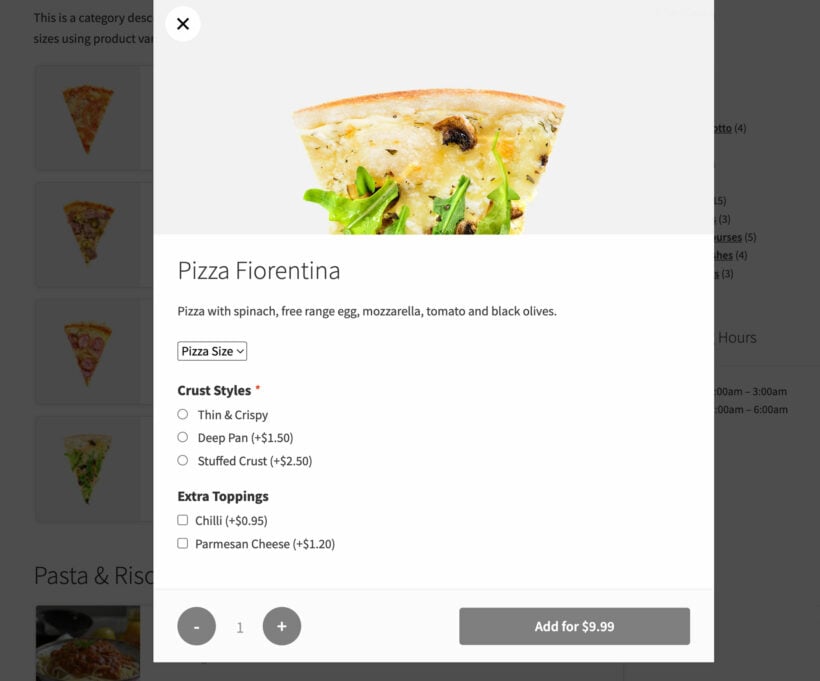
If you’re thinking of selling make your own pizzas or need a way to offer a choice of options for a dish, you’ll need to create a variable product or add-on fields. Variations let customers choose from a dropdown, whereas add-ons are great for selling optional extras such as pizza toppings or sandwich fillings.
Customers can choose variations and add-ons from a lightbox
Step #3: Create a food order form using WooCommerce Restaurant Ordering
To let customers place orders, you’ll need to create an order form using the WooCommerce Restaurant Ordering plugin. You’ll receive the plugin files and license key in an email.
Install the plugin to your WordPress website and activate it.
Next, head over to WooCommerce→Settings→Products→Product table from the WordPress dashboard and activate the plugin license.
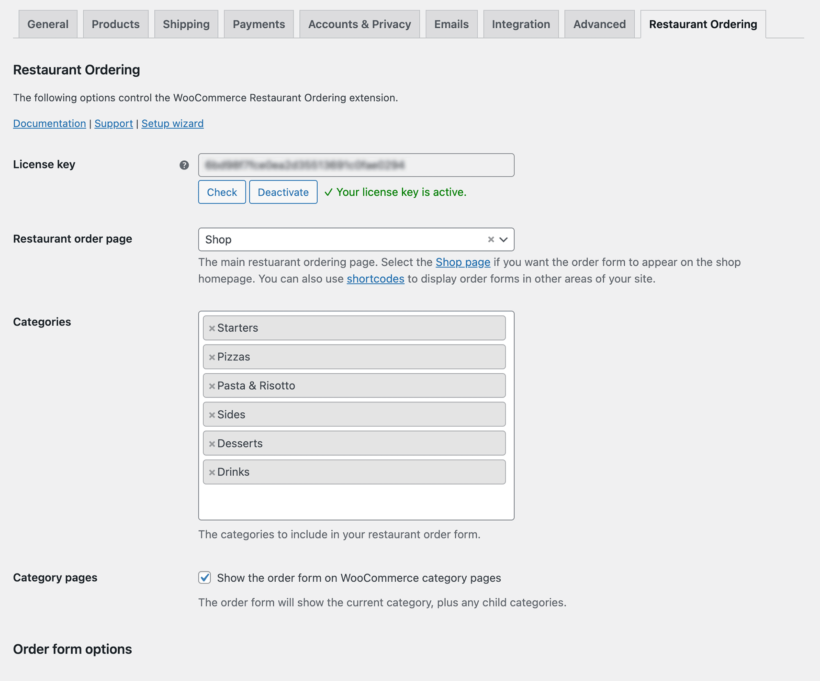
Now, go through the different settings available with the WooCommerce Restaurant Ordering plugin to configure your food order form. This includes adding opening hours. You can ignore these if your virtual WooCommerce restaurant is open 24/7. But if you only want to accept orders while you're open, then this is a must.
Control your virtual restaurant order system on the plugin settings page
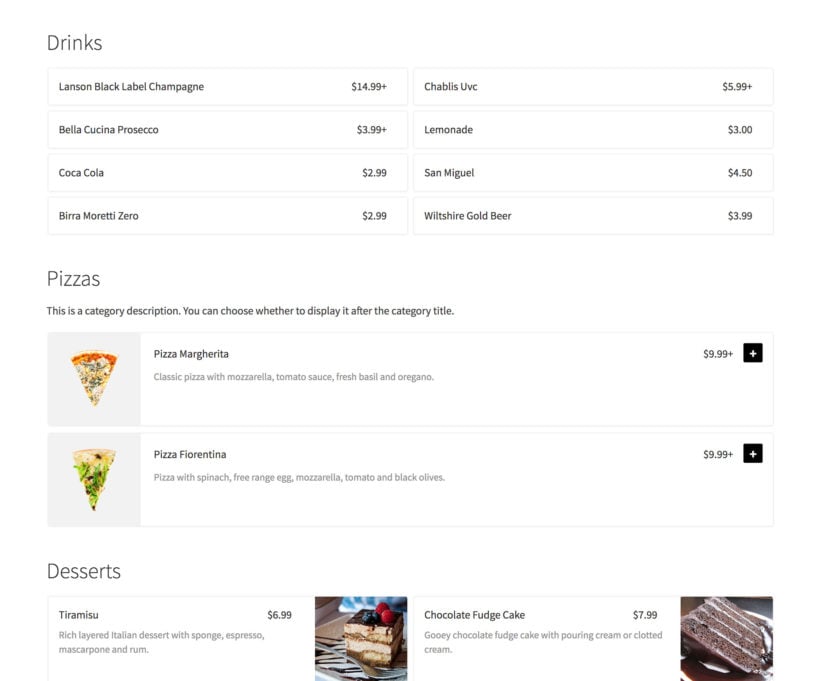
Finally, go to the list of Pages in the WordPress admin and find the page called 'Restaurant Ordering'. Rename this to whatever you like, e.g. 'Order Food Online'. This page lists all the food products that you added in step 2, divided by category:
Your main restaurant ordering page is created automatically
If you'd rather list different categories on different pages, then you can do that using the restaurant ordering shortcode.
Use the shortcode if you need different settings for each category
Add a cart
Most virtual restaurants display a cart on the food ordering page. This shows the items in your order and makes it easy to click through to the checkout.
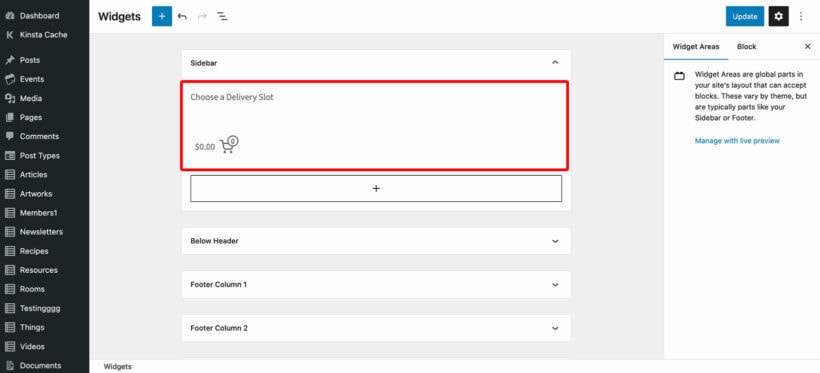
The easiest way to do this is to add a sidebar to the restaurant ordering page. Most themes come with page templates that include a sidebar. You can then go to Appearance → Widgets and add the 'Cart' widget to the sidebar.
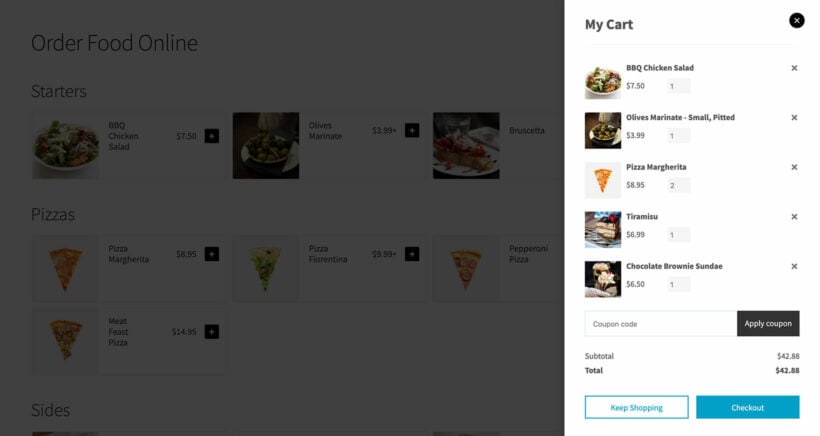
If you don't want a sidebar and prefer to keep your page full-width, then you can add a floating popup cart using the WooCommerce Fast Cart plugin.
Add a floating side cart with WooCommerce Fast Cart
Step #4: Set opening hours and delivery times
If you’re offering food delivery options at your virtual restaurant, you’ll need an easy way to manage customer expectations and delivery orders. You can do this with the WooCommerce Opening Hours and Delivery Times plugin.
Once you have this WordPress restaurant plugin installed and activated on your website, follow the plugin’s instructions to configure your opening hours, delivery dates and time slots. Here are some of the main features you’ll want to use for your virtual restaurant site:
Delivery dates and time slots – You can add delivery slots based on the way you choose to structure food deliveries.
Maximum number of deliveries per time slot – This option lets you better manage kitchen capacity by adding a limit to the number of delivery orders per slot.
If you’re looking for ways to keep your restaurant running with minimal costs, consider setting up a virtual restaurant (or ghost restaurant) that serves solely as a delivery base or offers takeout. You can do this whether you have a physical restaurant or not. Virtual restaurants are hugely popular in the restaurant industry.
Start by installing the WooCommerce plugin on your WordPress website. Next, add food items as individual products in WooCommerce. Finally, use the WooCommerce Restaurant Ordering and WooCommerce Opening Hours and Delivery Times plugins to create a front-end order form with a table of available delivery time slots.
Ready to set up your virtual restaurant and grow your bottom line? Get WooCommerce Restaurant Ordering today!
The coronavirus crisis has had a huge impact on e-commerce stores. WooCommerce store owners have suddenly faced large numbers of out of stock products, and difficulties ordering supplies. However, even though stock problems due to COVID-19 are out of your control, there's still plenty you can do to keep customers happy.
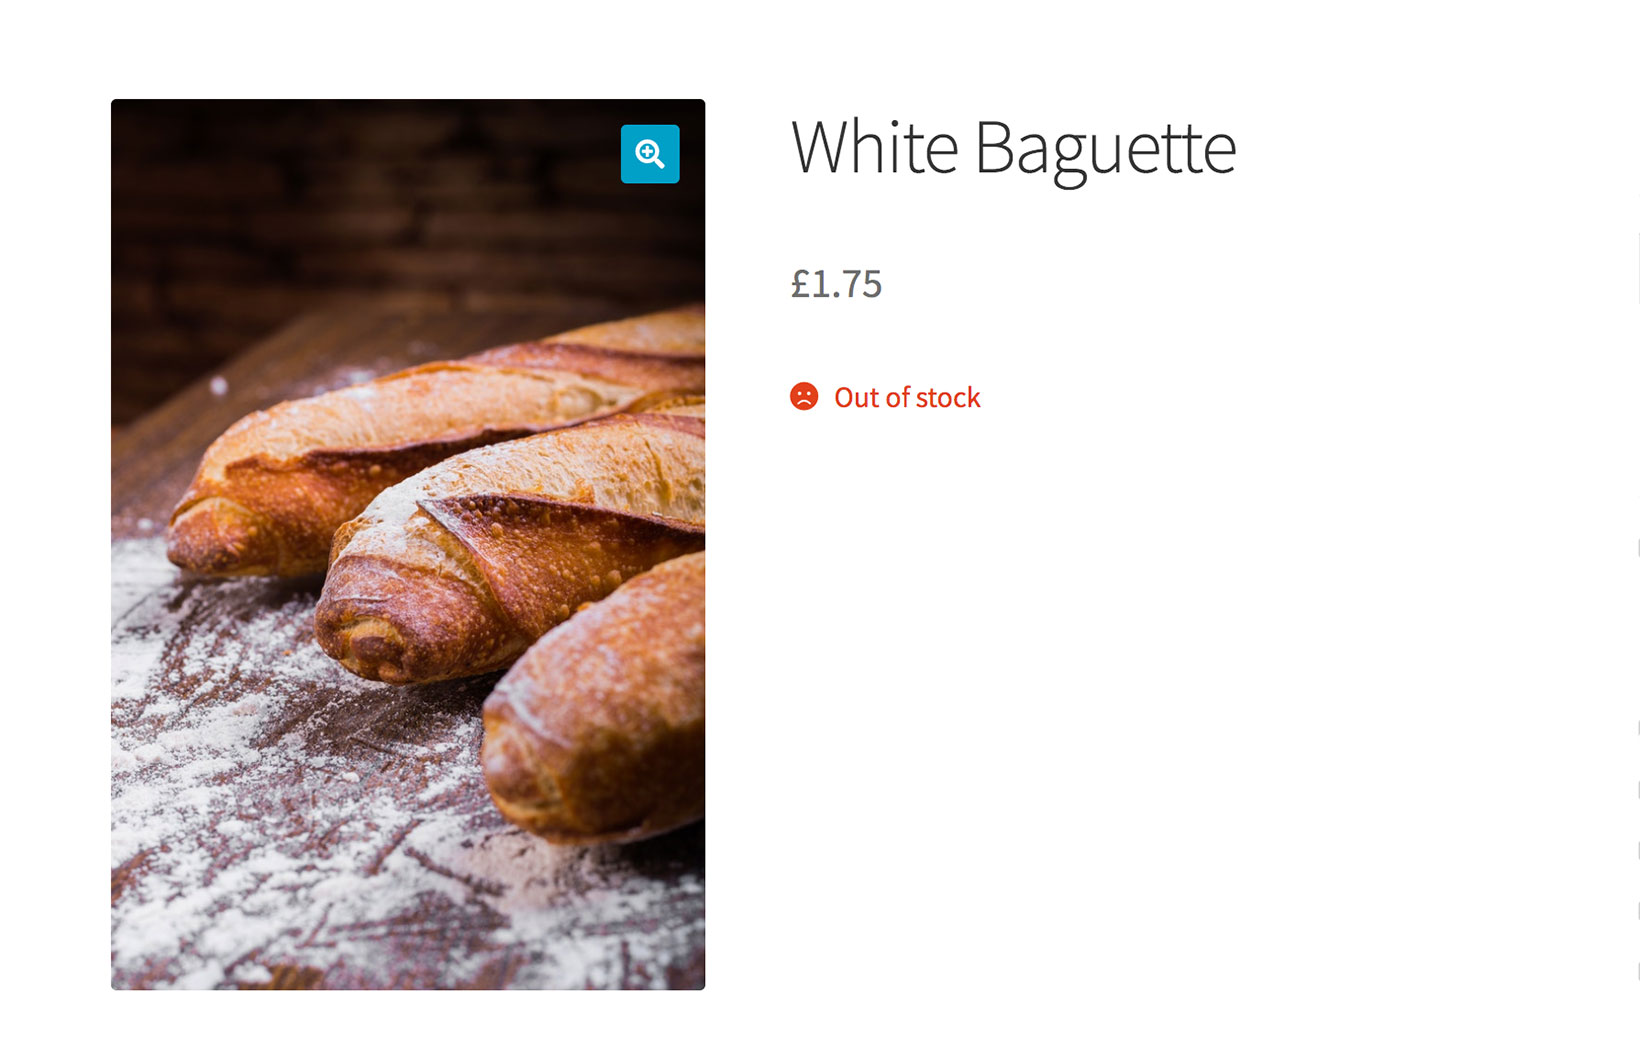
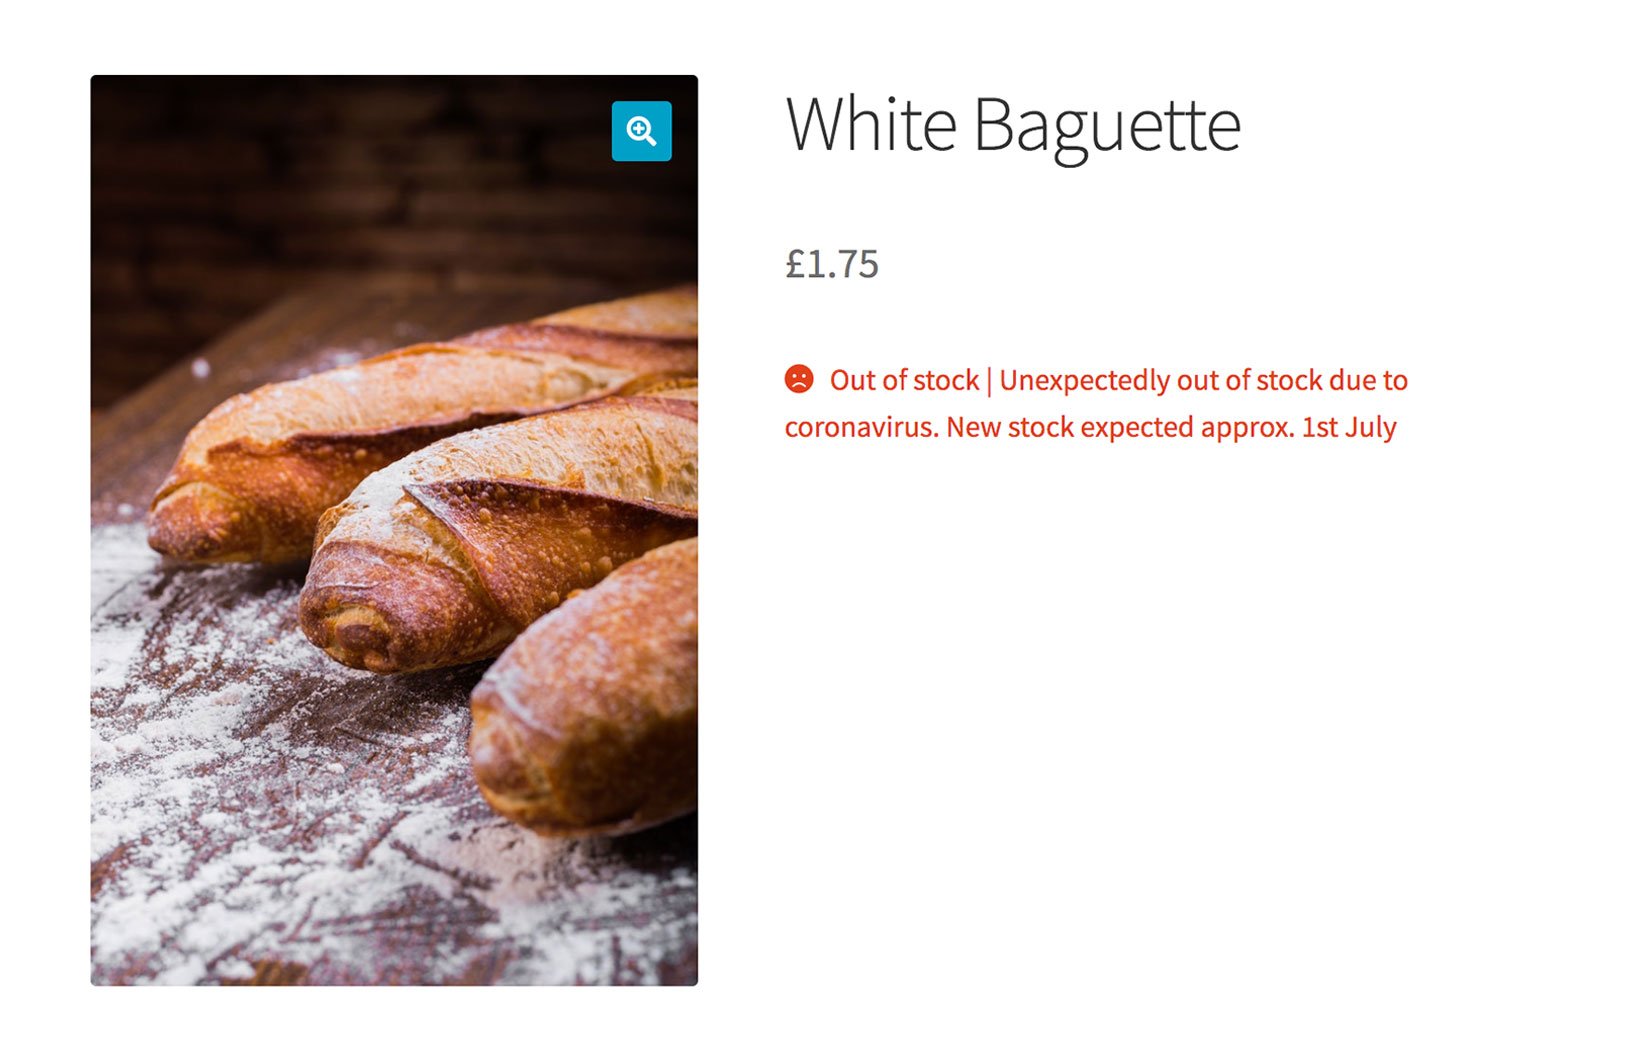
Think about it from the customer's perspective. You've visited an e-commerce website, but the product you need is out of stock. Which of these messages would you prefer to see?
Default out of stock message - not helpful!
WooCommerce Lead Time plugin - adds a helpful message to non-stock products
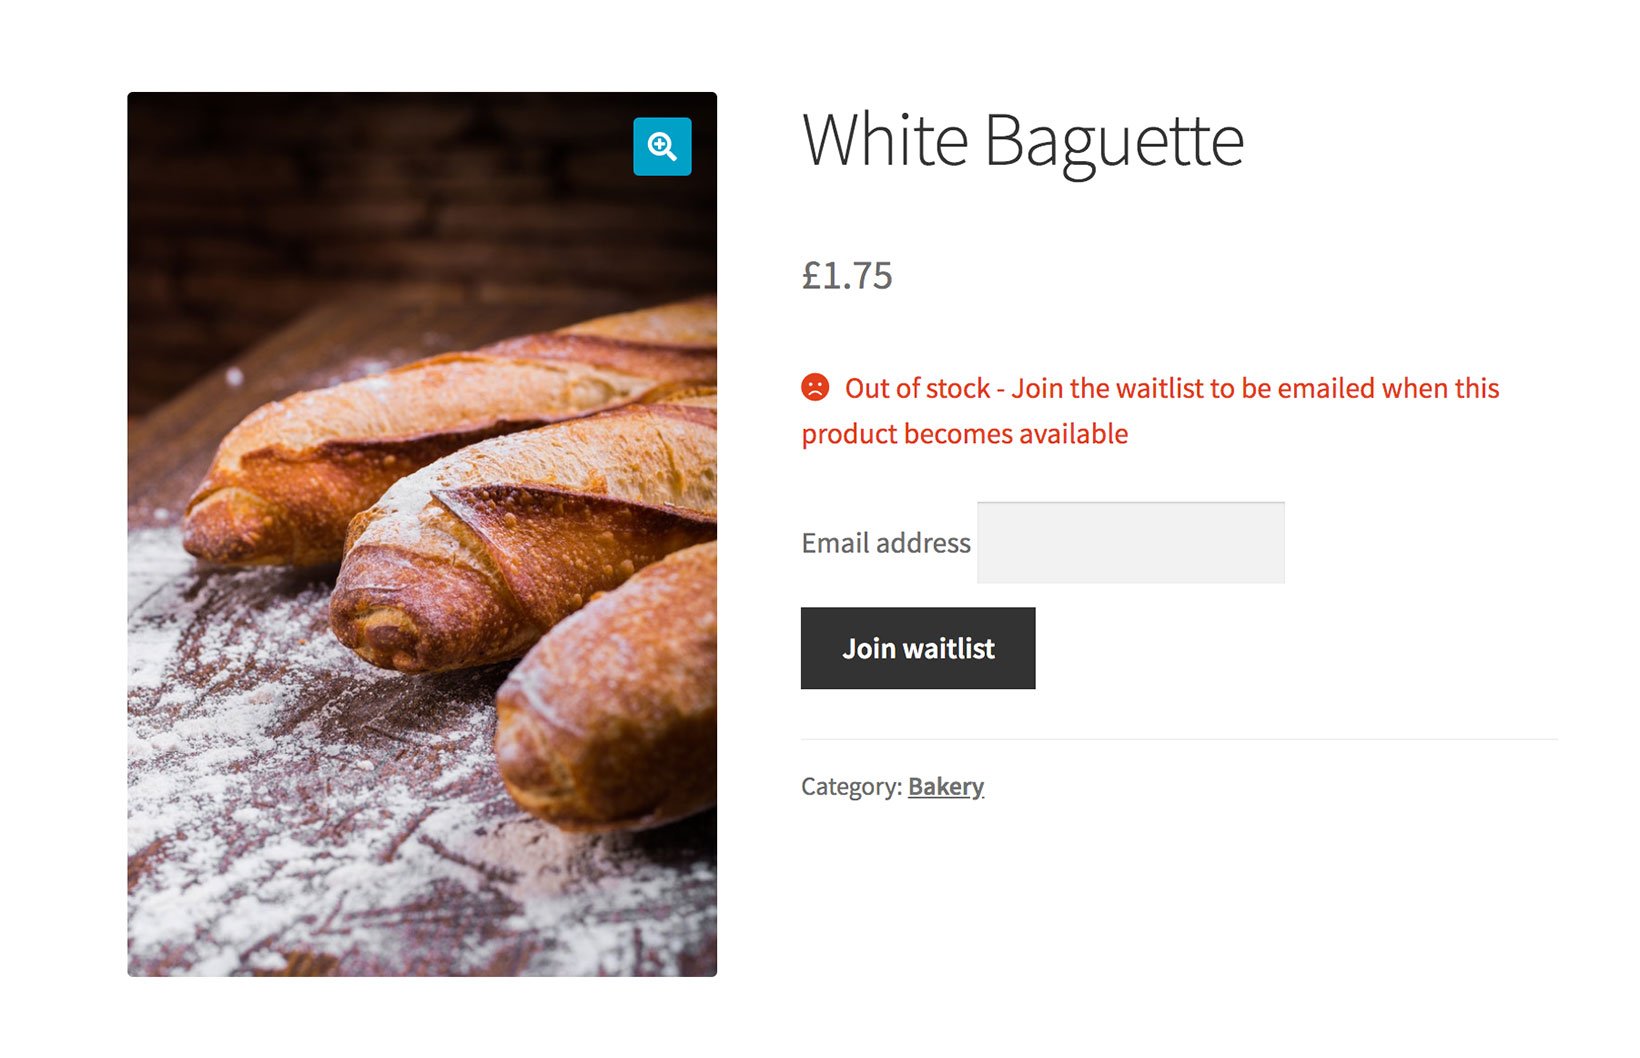
WooCommerce Waitlist plugin - adds an 'Email when back in stock' option
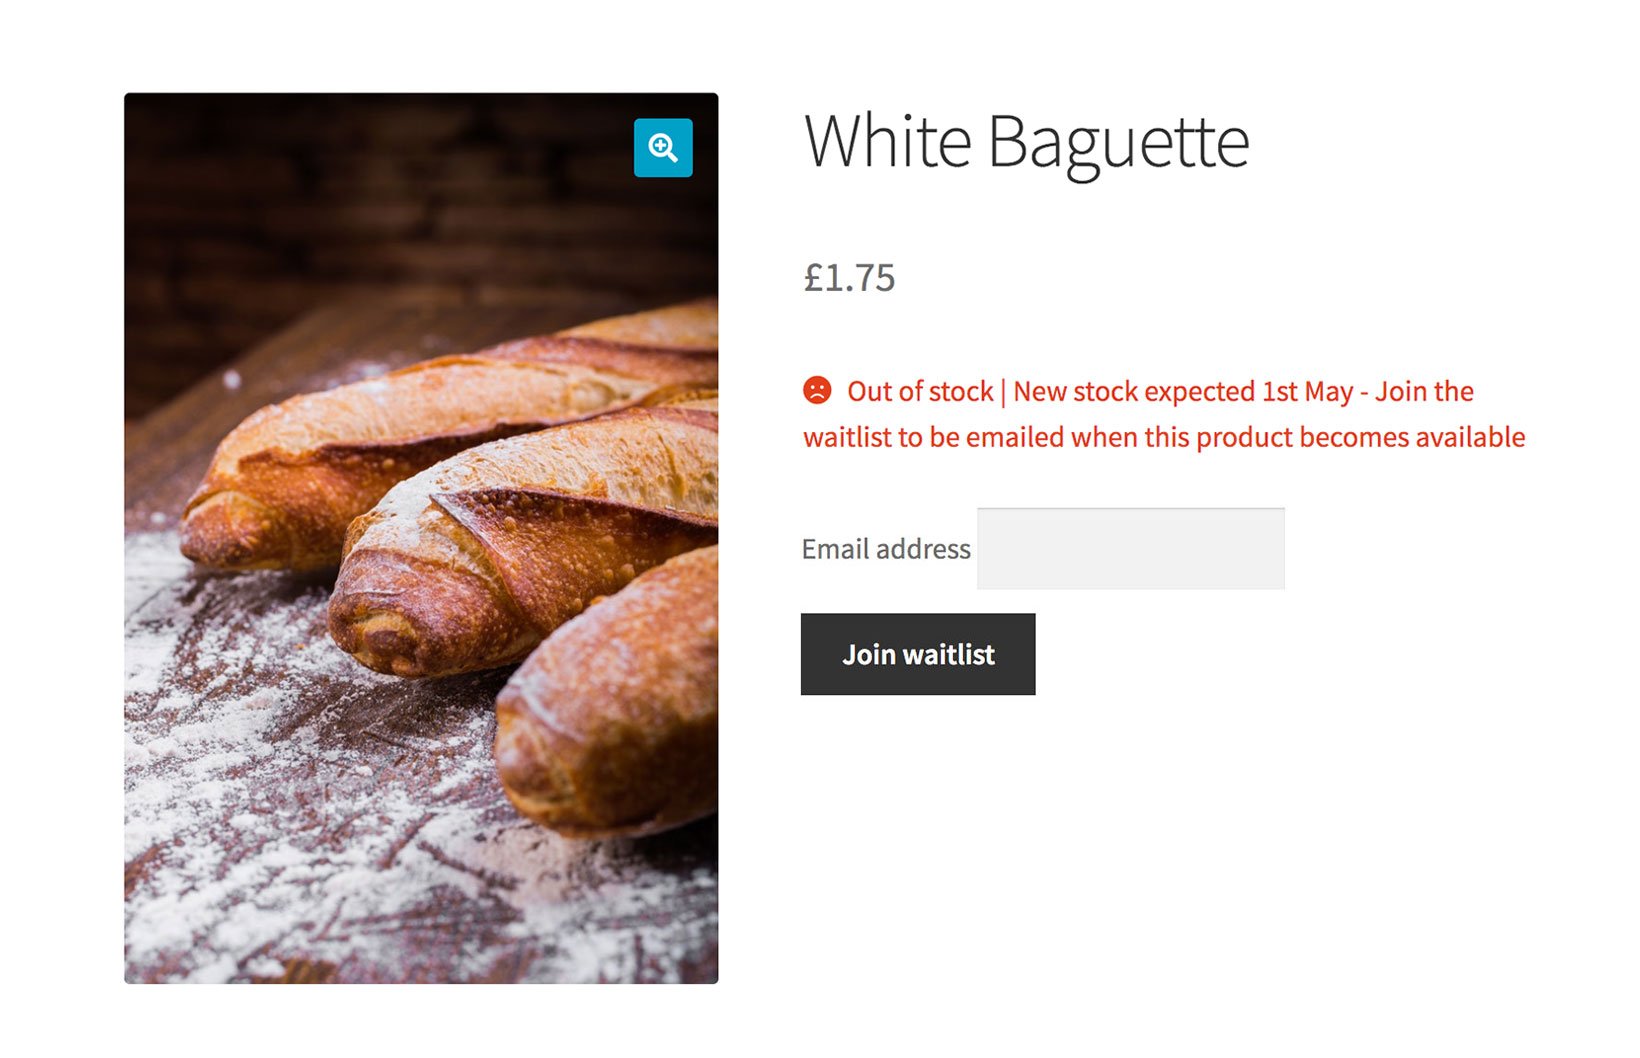
Use both plugins together - even better!
How frustrated would you feel to see an 'Out of stock' message without any further information? The customer wants to know when the product will be back in stock - this helps them to decide whether to shop elsewhere. And if you don't have this information, then they need you to notify them when the product is back in stock.
Fortunately, there are some excellent WooCommerce plugins that can improve the way you handle temporarily out of stock products and variations. You can these as standalone solutions, or you can combine them and use the plugins together.
#1 - Add a notice to temporarily out of stock products
The WooCommerce Lead Time plugin lets you add a custom text message which appears next to the stock information on the product page. You can add the same message for all products, or you can add a custom message for each product.
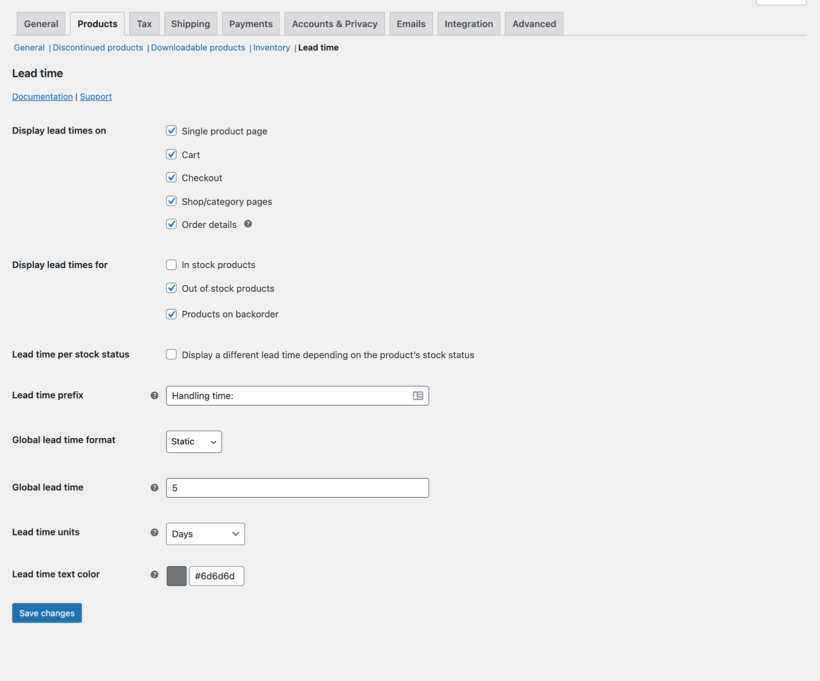
Go to WooCommerce → Settings → Products → Lead time.
Activate your license key (you'll receive this in the order confirmation email) and choose the plugin settings:
Tick the boxes to display the message on backorder and/or out of stock products only.
If you like, enter a prefix to appear before the lead time text for each product (e.g. you might set this as 'Stock expected on:'
If you want to show the same message for all out of stock products, then enter a global lead time.
Save your changes.
Set a global lead time and wording on the settings page
If you've entered a global lead time message, then this will appear for all products with the stock statuses that you selected on the settings page. Alternatively, you can add a different message for each product on the 'Edit Product' screen under Product Data → Inventory.
If you know when the product will be back in stock, choose the 'Dynamic' lead time option. This lets you select the expected availability date from a calendar. The WooCommerce Lead Time plugin will then display a countdown displaying the number of days or weeks until the product will be back in stock.
Alternatively, enter a static lead time with whatever text you want to display on the page.
#2 - Add a WooCommerce email when back in stock plugin
The YITH WooCommerce Waiting List plugin displays an email field and 'Join waitlist' button for out of stock products. Customers can enter their email address to receive an email when the product is available again.
A 'Notify me back in stock' WordPress plugin an excellent way to avoid losing their business. They're less likely to buy from your competitors because they know they will hear from you when the product is back in stock.
Of course, you can provide an even better experience for your customers by providing helpful information about when the product is due back in stock, and by allowing them to sign up to be notified.
The two plugins work perfectly together - you can use WooCommerce Lead Time to add the availability notice, and WooCommerce Waitlist for the email signup:
Can I just un-publish unavailable products?
No, absolutely not! If your search engine position is important for your store, then you should leave out of stock products online.
Unpublishing them will affect your SEO by temporarily removing them from search results - and it may not be easy to regain your previous ranking for the product. It's better for SEO to keep the products online, while providing clear and helpful information to your customers using the tips in this article.
This will help to retain your search engine position, while minimizing the number of lost sales for you. After all, if customers can see the products and sign up to be notified when they become available, then you may not have lost the sale after all.
Discontinued products
Before we finish, it's worth mentioning that there's a difference between products which are temporarily and permanently out of stock. The advice about is about temporarily out of stock products which will become available again soon.
The situation is very different for end-of-life products which will never come back into stock:
Customers need to know that the product will never be available again.
You don't want to lose the SEO value of your discontinued product pages.
Store owners need to view and manage discontinued products separately from out of stock products in the WordPress admin and stock reports.
The WooCommerce Discontinued Products plugin is the perfect solution for managing end-of-life products. Use it for permanently out of stock products, while using the advise from earlier in this article for products which will be available again soon.
Where to get the plugins
There's plenty you can do to help your customers when products are unexpectedly and temporarily out of stock. You can:
Display a helpful message on the product page, which only appears for out of stock products - get WooCommerce Lead Time.
Add an 'Email when back in stock' waitlist feature to notify customers about future availability - Get WooCommerce Waiting List.
Improving your out of stock messaging won't change the world, but it's one small step that you can take to help people to get the supplies they need during the coronavirus crisis.
If you sell to wholesale buyers or stock variable products, a WooCommerce price matrix can help you list product variations in a grid or matrix layout. This makes it easier for customers to view variations at a glance, see pricing, and quickly add variations to their shopping cart.
In this article, we’ll take a closer look at what a WooCommerce price matrix is and how you can use it to list product variations in a variety of different ways using WooCommerce Bulk Variations. We’ll also share some examples of products you can list in a WooCommerce price matrix.
What is a WooCommerce price matrix?
A WooCommerce price matrix lets you list WooCommerce product variations in a grid or matrix layout instead of a simple price list. There are 3 easy ways to list variations in WooCommerce:
Price matrix - list all the prices for a specific variable product.
Variations order form matrix - list all the variations for a specific product with quantity boxes and add to cart button.
What sort of products should you list in a WooCommerce price matrix?
A WooCommerce price matrix is perfect for listing products that have one or two variation attributes (e.g. 'size' and 'color'). The price matrix makes it easy for customers to see the available variations at a glance and make an informed buying decision. One attribute (e.g. 'size') appears along the horizontal axis of the matrix, and the other attribute (e.g. 'color) appears along the vertical axis, with the variations in the middle.
Here are some examples:
Clothes (such as t-shirts) and shoes available in different colors and sizes.
Furniture with color and material variation attributes.
Tech products (like smartphones) with color and storage variations.
Printer inks with compatible printer models and ink color variations.
Custom jewelry with metal and stone variations.
Put simply, if you sell products that have one or two variation attributes, listing them in a WooCommerce price matrix is the best way to increase variation visibility and make it easier for customers to quickly purchase variations in bulk.
And the great news is that you can do this in minutes with the WooCommerce Bulk Variations plugin.
If you want to list prices for more than one product in the same matrix, then you'll need the WooCommerce Product Table plugin instead.
Different ways to list variations in WooCommerce
Here, we’ll step through some of the different ways you can list variations on your store using WooCommerce plugins:
#1: Price matrix
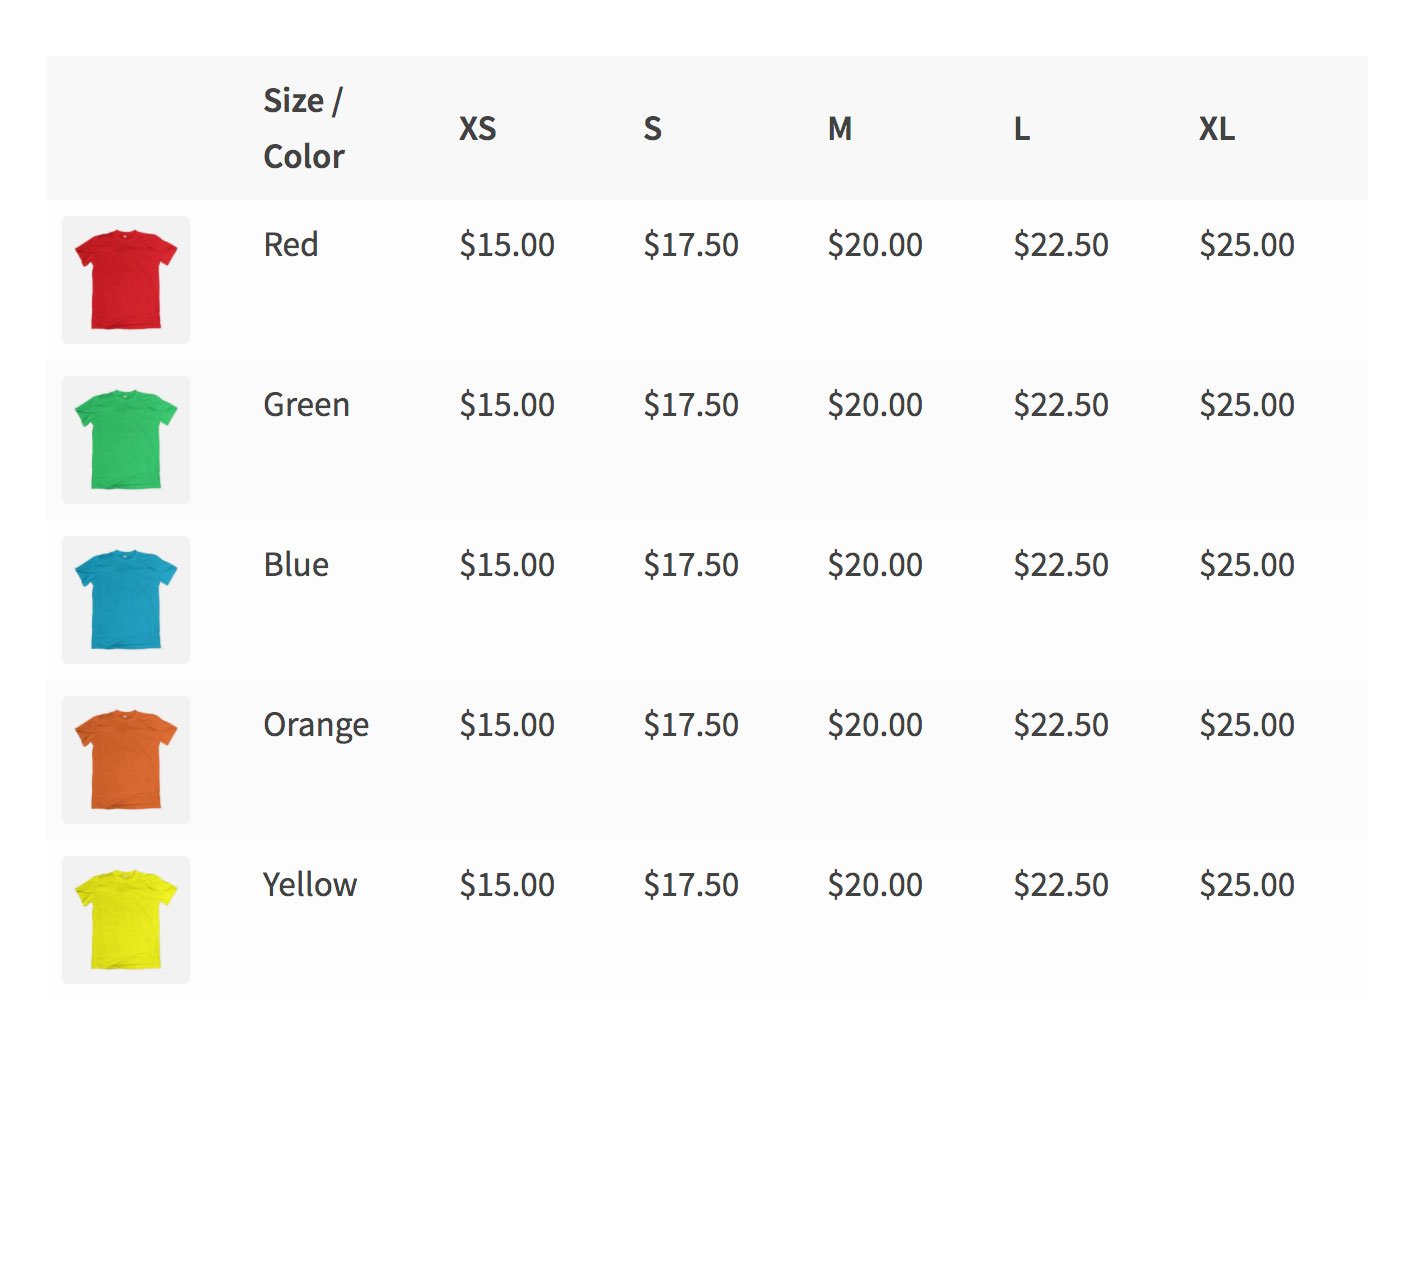
A WooCommerce price matrix simply displays the variation’s product price in a grid or matrix layout. This is perfect for creating a price matrix in WooCommerce for displaying product variation information only without giving customers the option to purchase directly from the matrix.
For example, you might want to display a price matrix in the short description on the single product page, with the usual variation dropdowns and add to cart button underneath.
The product variations in a price matrix layout are listed in a grid or matrix with a separate price for each variation, without a quantity box.
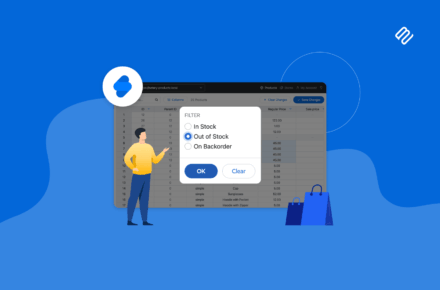
From the Product data section on the Edit Product screen, navigate to the Bulk Variations tab and tick the checkbox next to the Enable bulk variations grid.
Tick Disable purchasing.
Select the variation attributes to display in the Columns and Rows of the price matrix using dropdowns.
Tip: You can also enable the variations grid for individual products, or use a shortcode to insert it anywhere on your site.
#2: Variations matrix layout
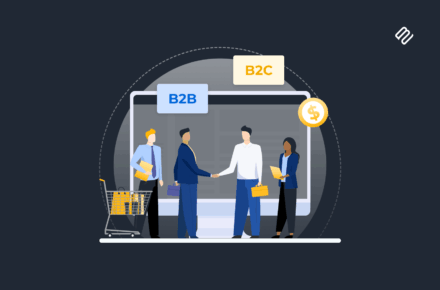
If you sell to wholesale buyers, then you might consider displaying quantity selectors in the matrix along with pricing information. This way, customers can quickly enter the number of each variation they’d like to purchase and add multiple variations to their cart in one go.
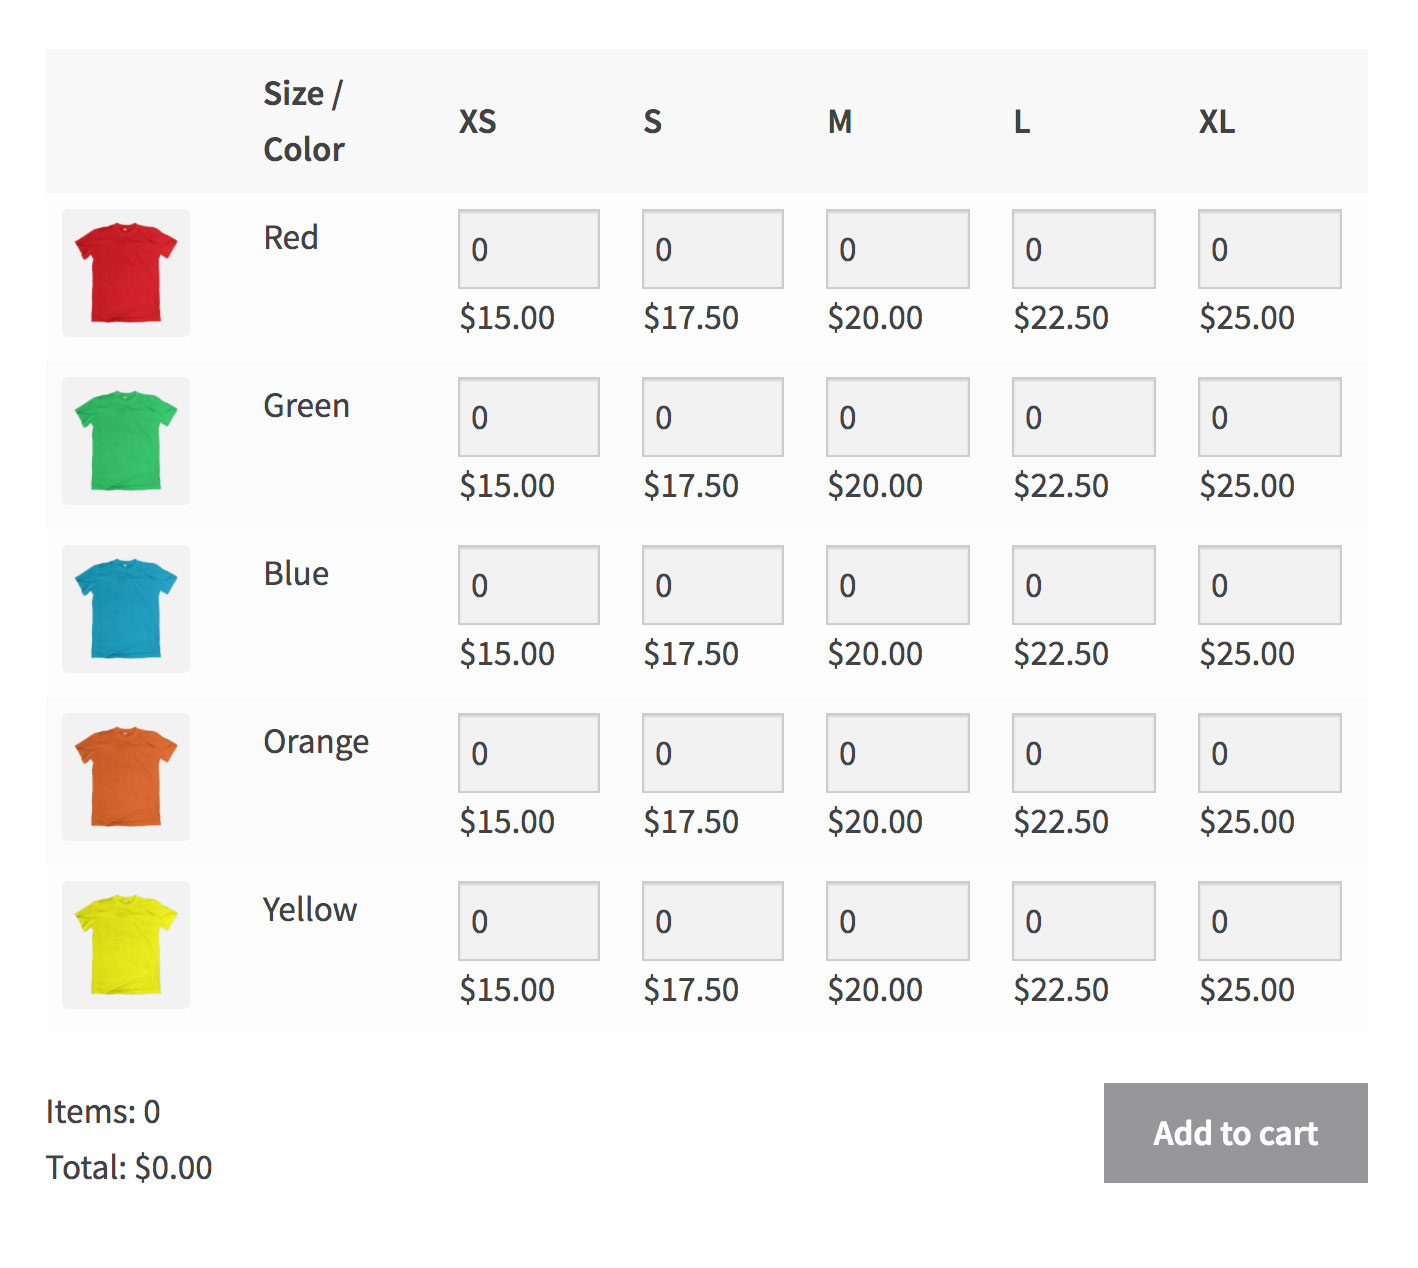
With WooCommerce Bulk Variations, the product variations are displayed in a matrix-style grid with a separate quantity box for each one along with pricing information. Customers simply enter the quantity they wish to purchase for each variation and click a single Add to Cart button to add selected variations to the cart at once.
Here’s how you can set up a variations matrix layout using WooCommerce Bulk Variations:
From the Product data section on the Edit Product screen, navigate to the Bulk Variations tab and tick the checkbox next to the Enable bulk variations grid
Make sure that the Disable purchasing checkbox is unticked.
Select the variation attributes to display in the Columns and Rows of the price matrix using dropdowns.
#3: Product table layout
With WooCommerce Bulk Variations, if you want to list the prices for more than one product on the same page, then you can use a shortcode to add as many matrixes as you like. There will be one price matrix for each product.
If you need to list prices for multiple WooCommerce products in the same matrix, then you'll need the WooCommerce Product Table plugin instead. This lists the prices for simple or variable products with one product on each row of the table. For variable products, you can either list each variation on its own row, or you can have one product per row with variation dropdowns.
I expect you've noticed that it takes forever to edit the prices, images etc. of variations in WooCommerce. For example, let's say that a t-shirt shop has 15 variations in the 'Large' size and wants to change all their prices to $50. To do this, the store owner has to edit each of the 15 variations individually.
You can save lots of time by using the bulk management features that come with the WooCommerce Bulk Variations plugin. These let you select specific variations and apply bulk actions to them together.
If you've followed Method 1 or 2 of this tutorial then you have already installed WooCommerce Bulk Variations. Go right ahead and use its variation management features.
If you're using Method 3 then you can still use WooCommerce Bulk Variations to bulk-edit variations. The only difference is that you will also be using WooCommerce Product Table to display the variations. As a result, you need 2 plugins in total. One for the front end, and one for the back end.
Where to get the WooCommerce price matrix plugin
Listing WooCommerce product variations in a matrix makes it quick and easy to see the price of each variation. Depending on which variable products you’re selling, you might create a:
Price matrix for WooCommerce products
Variations matrix layout
List variations in a pricing table
List variable products in a table with dropdowns
Ready to create a price matrix for your WooCommerce products? Install the WooCommerce Bulk Variations plugin today!
If your business or organisation needs help selling online during the COVID-19 crisis, or you're actively helping with the pandemic - e.g. distributing food or medical supplies - then we're offering a free plugin or extended licenses to help you setup as fast as possible.
As millions of people worldwide isolate themselves to restrict the spread of COVID-19, going to the shops is no longer a safe option. Instead, they're forced to buy essential supplies online and have them delivered to their homes.
Many businesses still rely on face-to-face contact. From corner shops, bakeries and local delis, to take away and fast food outlets, many are now feeling a steep drop-off in customer demand. In addition, there may be many outlets such as local pharmacies, chemists, and suppliers of medical items that don't currently operate online but could do so.
To continue trading - and ensure that their customers can receive essential food and medical supplies - many businesses need a fast and simple way to sell online.
Apply for a free plugin
If your business needs to get online quickly in order to provide essential items or services to help with Coronavirus, please get in touch below letting us know what you need. Examples of what we can provide:
Extended license options to cover multiple sites under a single license key.
Free/extended licenses will be valid for 4 months until 31st July 2020. If the coronavirus crisis is still ongoing at that point, please get in touch again and we will extend your license.
The free plugin offer has now closed.
Online selling tutorial
The following guidance is aimed at businesses that need to start selling online; and for agencies that are helping businesses to do this. It will tell you:
How to sell your products or services online - don't worry, you don't need any technical expertise. You'll learn how to create a website taking online payments, and have products delivered locally, or by using other delivery services.
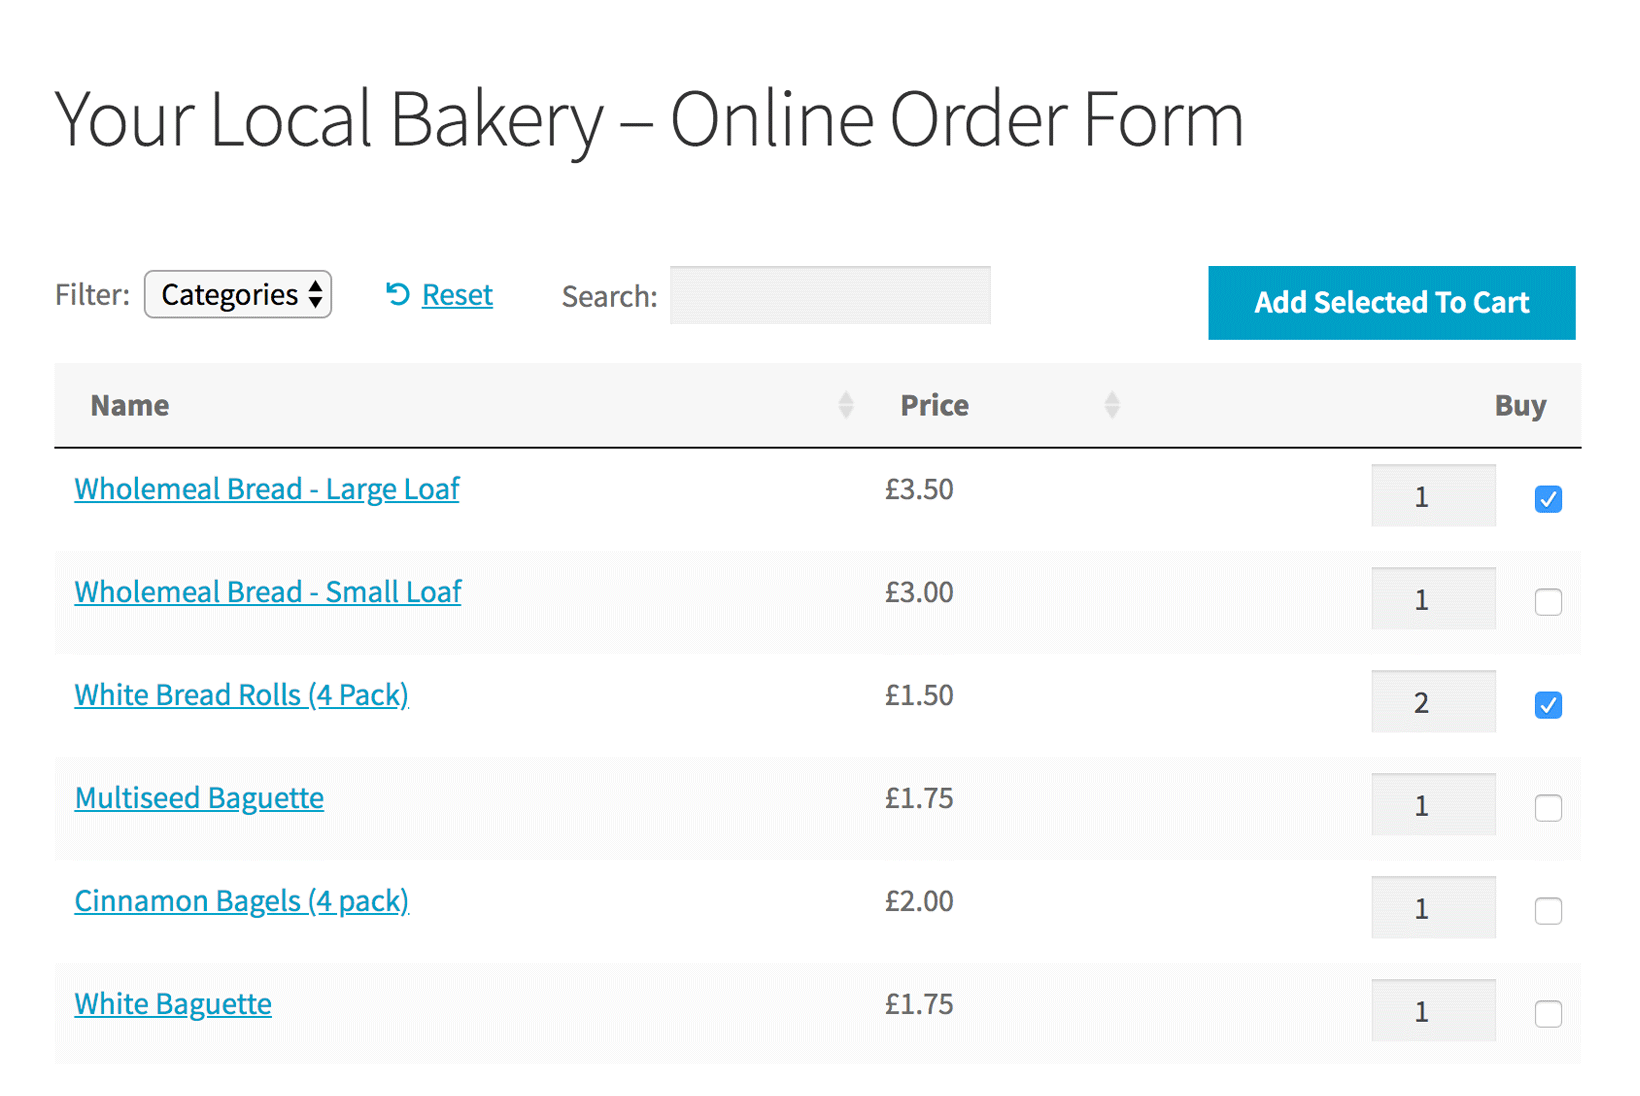
How to list your products in a quick one-page order form, making it really easy for customers to select products and order online.
What you need
To start selling online for the first time you'll need:
WordPress - this is a content management system which powers your site and makes it easy to create pages, add images, etc. WordPress is free, but you'll need to pay for a domain name (website address) and web hosting. If you need web hosting, we recommend Kinsta who provide fully-managed WordPress hosting (they host this site). Their Starter plan starts at $30/month and WordPress comes pre-installed so you don't need to do this yourself.
WooCommerce - this is a free plugin that turns your website into a fully featured e-commerce store. It lets you add products, set up payment gateways, add shipping options, etc.
WordPress theme - this provides the design of your site (i.e. how it looks). I strongly recommend the Storefront theme because it's free, easy to use, and built by the same people as WooCommerce itself. It's clean and simple so ideal for any business wanting selling online.
WooCommerce Product Table - this lists your products in a quick one-page order form. Your customers can easily view all your products, select the ones they want, and add them to the cart in one click. It's the perfect way to present products that you have previously sold face-to-face. WooCommerce Product Table is a premium plugin, and we're offering free copies to those helping with the Coronavirus pandemic.
Create your online store
1. Install WordPress and WooCommerce
The first step is to get your overall website set up. Rather than reinventing the wheel, I recommend that you follow WPBeginner's excellent tutorial: WooCommerce Made Simple: A Step-by-Step Tutorial. This covers the overall setup of your store, including payment and delivery options.
When you run the WooCommerce setup wizard as part of this tutorial, you'll have to make some decisions about how you want your online store to work. If you're setting up a quick online store during the coronavirus outbreak, then I recommend the following:
Online payment optionsChoose payment options that will be easy for your customers, such as PayPal - that is the quickest and easiest to set up, both for you and your customers. You can add more than one payment option, so you might also want to enable the 'Cash on delivery' payment gateway when you run the WooCommerce setup wizard. However, consider how you will get cash from your customers while still respecting their need for social isolation and minimal contact.
Shipping options WooCommerce lets you add one or more delivery options for your customers to choose from. You can also create shipping zones to restrict the area that you will deliver to - for example, if you're a local business (e.g. a convenience store, grocer or butcher) and will only deliver to certain zip/post code areas. The shipping options are:
Flat rate - this is the most common shipping method, and lets you charge a flat amount for each purchase.
Free shipping - choose this if you don't plan to charge for shipping. To help your customers and keep your business going during the coronavirus crisis, consider offering free shipping in your local area, and charging for deliveries further afield.
Local pickup - you may want to activate this in future, but it's probably not relevant during the coronavirus lock-down.
Once you've finished installing WooCommerce, close WPBeginner's tutorial and return here for step 2.
2. Add your store's inventory
Next, you need to add your inventory as WooCommerce products. This may take a while if you have lots of products (e.g. a convenience store or medical supplies company). However, you'll speed up after the first few.
Tip: WooCommerce also has an import tool, so you could use this if you have too many products to add manually.
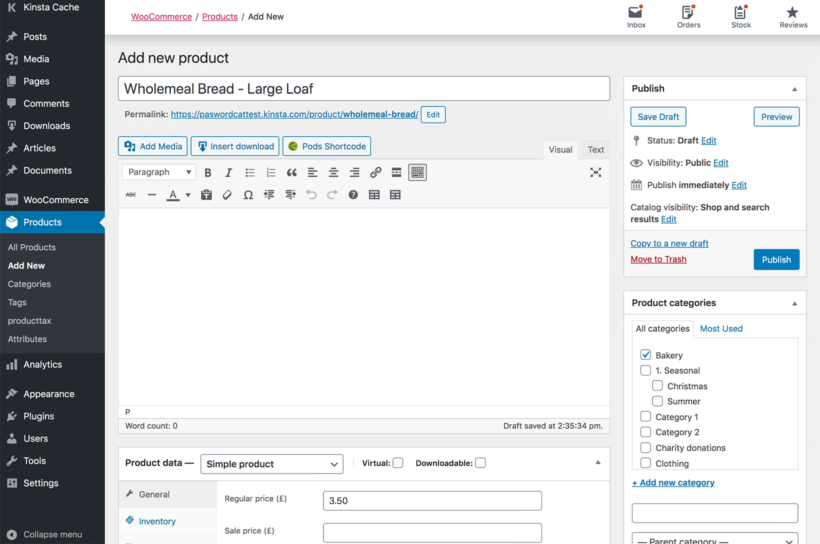
Log into the WordPress admin and click Products → Add New.
Add the product title at the top of the page.
Add a product category on the right hand side of the page.
Scroll down to the Product Data section and add a price.
If you sell different versions of the same product (e.g. a Large and Small loaf of bread), then it's easiest to add each option as a separate product. WooCommerce also comes with variable products and you can use these for the product options if you prefer.
You can add plenty more information about your products, such as description (useful for listing ingredients, allergens etc.), image, etc. However, if you need to quickly start selling online during the coronavirus pandemic, then I suggest keeping it simple. Just add the essential information about each product, and you can always add more later.
3. Create a quick order form
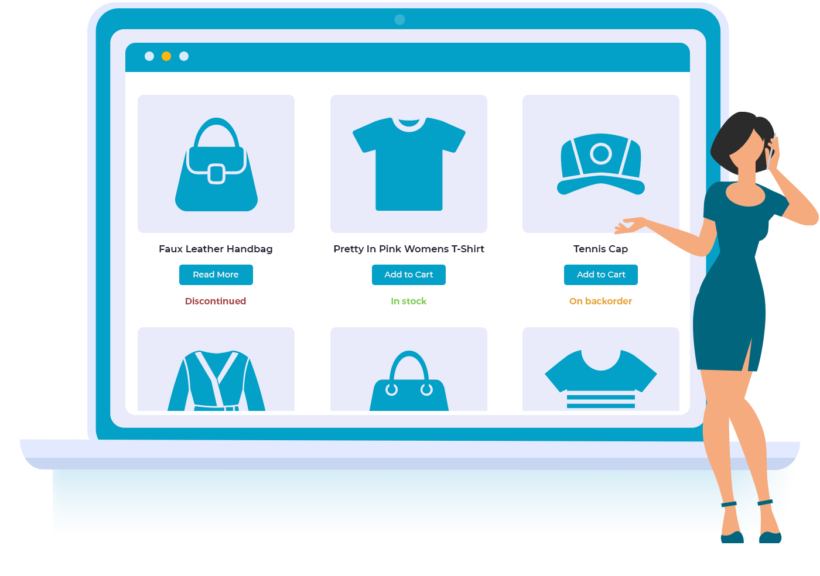
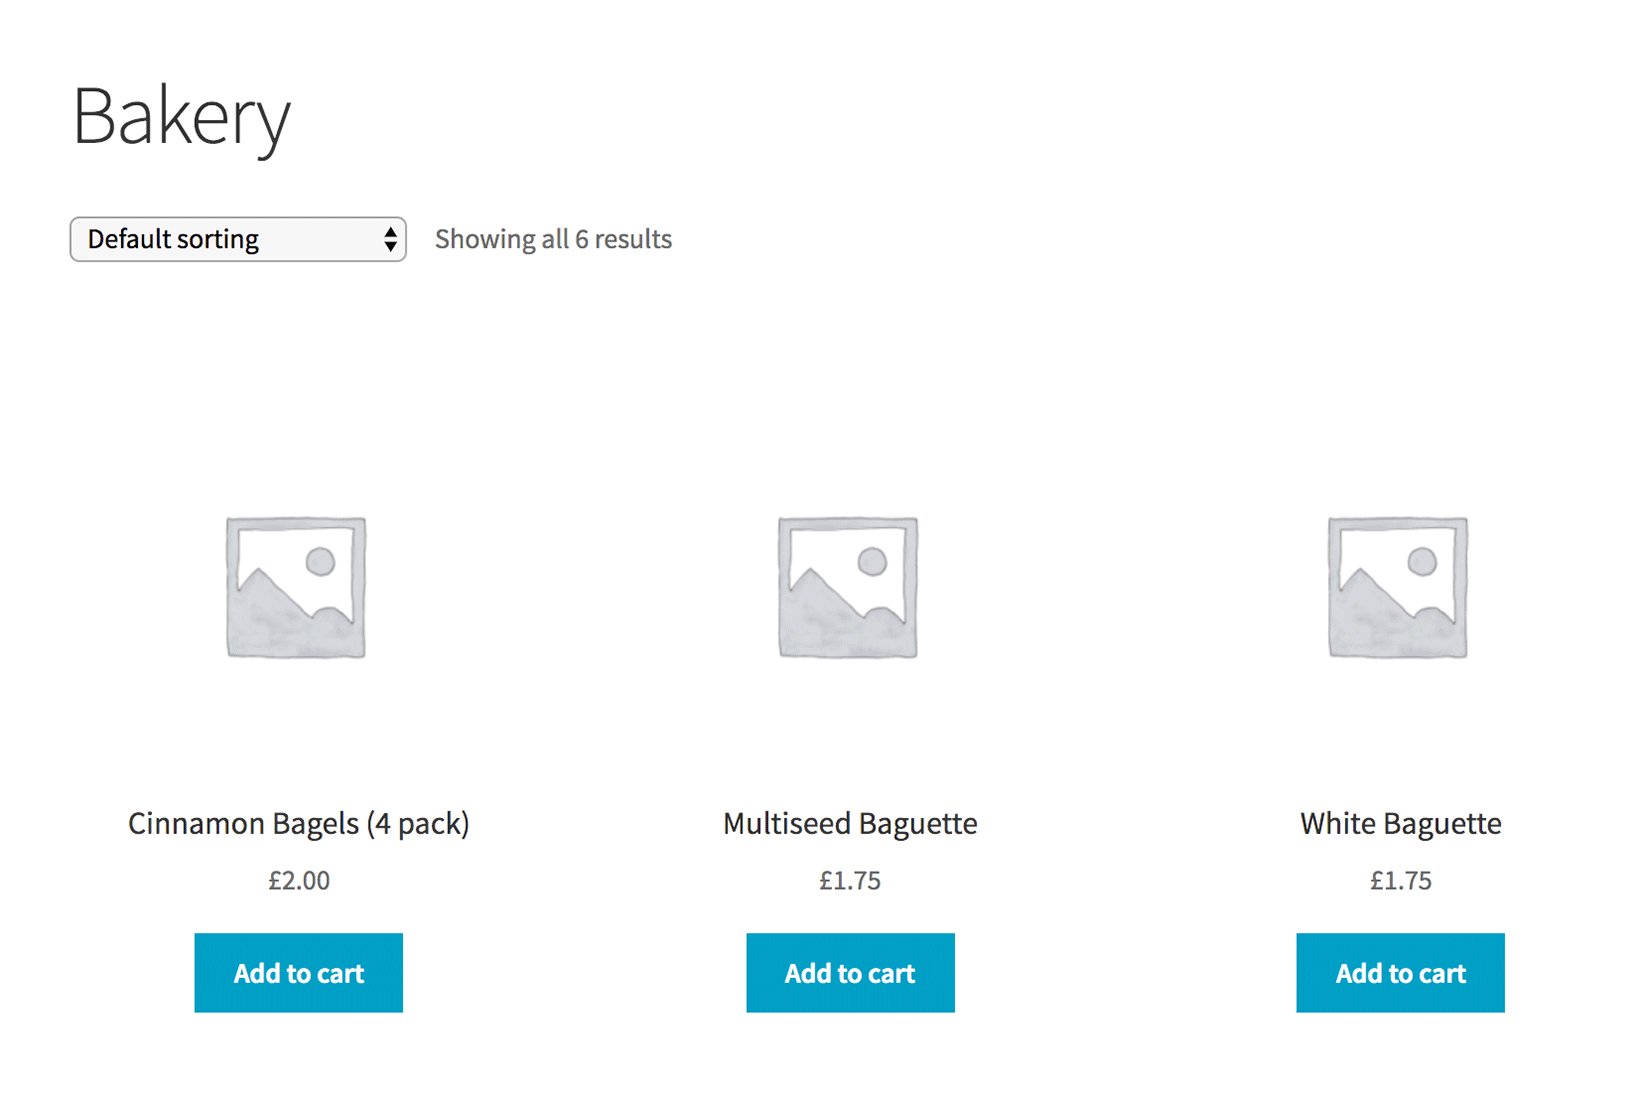
If you just follow steps 1 and 2 (above), then your products will be listed in a grid layout. This layout is mostly designed for selling products with big images, where customers will spend their time browsing - for example, online clothes stores. If you're setting up a quick online store during the coronavirus crisis, that's not what you want.
Default store layout - not ideal!
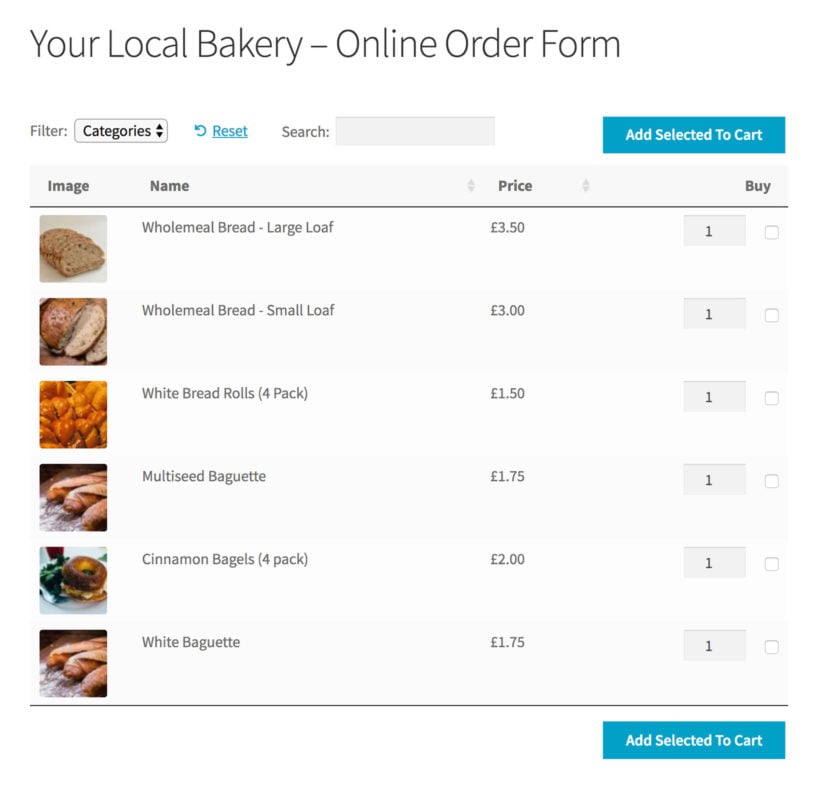
Instead, you need to list products in a quick one-page order form. Customers can instantly view all your products, tick the ones they require, and add them all to the cart. You can do this by installing the WooCommerce Product Table plugin.
If you like, you can add extra columns of information and images to the product table. However, if you need to start selling online quickly, then I suggest keeping it to a minimum.
If your business is selling products or service that are actively helping people to cope with the coronavirus outbreak, please contact us below for a free copy.
How to set up WooCommerce Product Table
Install the plugin and activate it using the license key from your Getting Started email. You can do this on WooCommerce → Settings → Products → Product tables.
Go through the settings and choose how you want your order form to operate. I recommend the following:
Table display - tick box of these boxes to enable the product table layout throughout your online store.
Columns - paste the following into this box: name,price,add-to-cart
Product links - type none here. This keeps your store simple, as you don't need to worry about having a separate page for each product.
Add to cart button - select either 'Checkbox' or 'Button and checkbox'. The checkboxes are important to allow your customers to tick multiple products at once, and quickly add them all to the cart.
Product filters - type categories into this box. This will add a filter dropdown of your product categories, so that customers can quickly view products from a specific category only (e.g. bread).
Of course, WooCommerce Product Table has many more options than this - but our aim today is to help you start selling quickly and easily. If you want to make your store more sophisticated, feel free to browse the full list of 50+ options.
Add a link to your shop
Finally, it's time to publish your website and direct people to your shop page!
Go to the list of 'Pages' section of the WordPress admin and find the page with 'Shop' after its name. This is your main shop page - remember this for the next step!
Now go to Appearance → Menus. Find the shop page in the list of pages on the left, click on it and click 'Add to menu'. This will add it to the menu on the right, so save the menu.
Now, the main menu on your site will include a link to the shop page which lists all your products.
If you like, then you can create more complex navigation structure by adding links to your category pages etc. But to get your business online as quickly as possible, the only essential page is the shop page.
Customers can visit this page, filter by category, select the products they want to buy, add them to the cart and complete their purchase using the WooCommerce checkout. You will receive an email notifying you of their order, so that you can take care of delivery.
Next steps
We understand the problems that the Coronavirus crisis has caused for businesses all over the world. Hopefully this article will help in some small way and keep the wheels turning. If you're helping with the coronavirus effort, please get in touch if you need any further advice or help with anything in this article or to request a free copy of one of our plugins.
Version 2.5.2 of WooCommerce Product Table is now available. As well as compatibility with version 4.0 of WooCommerce, it contains an exciting new feature - an easy way to automatically use the product table layout on your shop and category pages!
Until now, most people used a shortcode to add tables to any normal page on their WordPress site. The shortcode is great (with over 50 options!) and will continue to be available. However, there was no easy way to automatically replace the default layouts on your WooCommerce shop and category pages with product tables. To do that, you had to download a PHP file from the plugin knowledge base and upload this to your child theme.
In the new version of WooCommerce Product Table, you can do this in seconds - there's no need to modify template files!
Since publishing this article. we've added a table builder to WooCommerce Product Table. This makes it even easier to show product tables on your shop, category and other shop pages than the old method described in this article!
How to use the new feature
You'll find two new options on the WooCommerce Product Table plugin settings page:
The first option adds the product table layout to the main shop page in WooCommerce. The second option adds product tables to all your category pages. You can use them alone or together - for example, if you want to use the default layout on your storefront and product tables on the category pages.
If your shop and category pages normally have a left or right sidebar, then the sidebar will still appear when you switch to the product table layout. Similarly, if the shop is normally full-width then it will remain full-width when you activate the product table layout. You can change this using the options in your theme.
Note: Since this article was written, we have significantly improved this feature. You can now select exactly which templates to display WooCommerce product tables on in the WooCommerce product table builder. Here's a video on how to set it up:
Where to get the plugin
If you're already using WooCommerce Product Table, you can update to version 2.5.2 from the WordPress Dashboard. Otherwise, get the plugin today and transform your shop and category pages - the easy way!
Companies that sell subscription boxes ship products to their customers at regular intervals for a recurring fee. In other words, customers sign up for a subscription to receive a package of goods, say, once a month. As an online business owner, you can create and sell a WooCommerce subscription box through your WordPress website.
WooCommerce subscription boxes are a great way to build a stable business because they allow sellers to generate predictable recurring revenue. Once you set a price for your subscription box, you’ll know exactly how much you’ll earn based on the number of subscribers you have.
In this article, we’ll show you how to create a subscription box website on WooCommerce in two different ways - both using the WooCommerce Product Table plugin. You can choose to sell WooCommerce subscription boxes with pre-defined content or set up a build-your-box type of subscription box.
But before we begin, let’s take a look at some examples of subscription boxes and how to get started planning your WooCommerce subscription box business.
Examples of WooCommerce subscription boxes
When it comes to selling WooCommerce subscription boxes, there are a few different things you need to consider. First, you have to decide what sort of subscription boxes you’ll be selling.
Here are some popular examples:
Vegetable boxes. These can be curated or create-your-own style subscription boxes that contain farm-fresh vegetables. Curated boxes typically contain a selection of seasonal vegetables whereas custom subscription boxes give customers the option to choose which vegetables they’d like to add.
Cosmetics boxes. These are typically personalized subscription boxes that include a variety of cosmetics products such as foundation, lipstick, eyeliner, and mascara. Since cosmetics are long-lasting products, you can sell them at three-month (quarterly) intervals.
Snack packs. Snack packs are incredibly popular with customers. You can sell all sorts of snacks – fitness snacks, healthy snacks, oriental snacks, candy packs, organic snacks, or gluten-free snacks.
Coffee deliveries. Coffee subscription boxes are typically personalized subscription boxes that let customers choose their preferred coffee brand, bag size, creamer, and filter options.
Shaving supplies. These typically include razors, wipes, shaving creams, and other toiletries that are replenished on a monthly basis. Dollar Shave Club is a great example of a subscription box service.
Hand-curated wines and beers. Customers can subscribe to a hand-curated wine or beer crate that contains an assortment of bottles.
Monthly subscription boxes are pretty common though the interval depends entirely on the type of products you’re selling. For example, if you sell vegetable boxes or fitness bars, you might consider offering one-week and two-week replenishment options. And if you’re selling beauty products (like razors or toiletries), you might offer a bi-monthly or monthly replenishment option.
Planning your WooCommerce subscription box business
Before you begin designing your WooCommerce subscription box store, it’s important to take a step back and plan out the subscription model.
If you’re just starting out, the most profitable (and efficient) way to sell subscription boxes is to offer one or more options with predefined contents. The reason is that it saves you time on packing. Put simply, your subscription box becomes a product rather than a service.
However, when your subscription box business starts to take off, you can also consider offering build-a-box style subscriptions. This allows customers to select the products they’d like to add to their subscription box from a list of available items. Then, the custom subscription box company fills each pack individually and ships it to the customer.
As we mentioned above, in this tutorial, we’ll show you how you can create both types of subscription boxes:
Predefined subscription boxes where you ship the same box to all of your customers
Mix and match subscription boxes where customers select the contents of their weekly (or monthly) box
In both cases, customers will receive their selected subscription boxes on a regular basis.
With the right plugins, WooCommerce is the perfect e-commerce platform for selling subscription boxes through your WordPress site. The main idea behind both approaches is the same. You want to create a custom subscription box order form that presents available options to customers and lets them choose their subscription box. We’ll show you how you can create an order form using the WooCommerce Product Table plugin.
Method #1: How to sell WooCommerce subscription boxes with predefined contents
If you’re just starting out, you might want to sell WooCommerce subscription boxes with predefined contents. For this, you’ll need a way to set up an order form in WooCommerce and accept recurring payments from customers (i.e. subscribers).
Selling WooCommerce subscription boxes with pre-defined contents
WooCommerce Subscriptions allows you to sell products on a daily, weekly, monthly, or annual basis. This way, customers will be billed automatically at their chosen intervals using the selected payment gateway (such as PayPal or Stripe). In addition to this, it offers advanced features like free-trials and one-time sign-up fees.
The WooCommerce Product Table plugin lets you create a searchable, sortable order form with filter options. This makes it easy for customers to see important subscription box details at a glance and make their selection. You can use it to:
Show extra data about each subscription box in a column directly in the order form. This way, customers don’t have to click through to the single product page to learn more about each subscription box.
Display add to cart buttons in the product table so customers can set the quantity, add the subscription box to their cart, and proceed to checkout.
Add filter options directly above the AJAX-based table so customers can quickly find the subscription products they’re looking for.
To take things further, you can integrate WooCommerce Product Table with WooCommerce Quick View Pro which allows you to showcase your subscription box (and its contents) in quick view lightboxes. This allows you to deliver a better shopping experience and make it easier for prospective subscribers to make a buying decision faster.
Handling variable subscriptions
WooCommerce Quick View Pro is also great for online store owners that need to sell variable subscription products. Instead of adding an add to cart column to your product table, you can add quick view buttons. Customers can then click on the button to select variations and purchase variable subscriptions.
Method #2: How to sell build-a-box WooCommerce subscription boxes
Selling mix and match WooCommerce subscription boxes gives customers the option to choose their own products. You can implement this in 2 different ways, depending on whether you want customers to choose the same products to receive each time; or whether you want them to be able to change their order each week.
Let customers choose their regular products
First, we'll look at an easy way to let customers choose which products to include in their regular subscription. They choose their products as part of setting up the subscription, and then receive the same products each time.
Typically, the process goes something like this:
Customers start by choosing a box size. For example, if you’re selling a vegetable subscription box you can have two sizes – Small and Large. This lets you set a base price for your subscription box.
Next, customers can choose their subscription box contents using an order form. They can select as many products as they’d like, choose variations, and set quantities. Once that’s done, they can add all products in one go.
Optionally, customers can choose any finishing touches such as decorative filling. For example, if you sell snack subscription boxes, you can let customers choose between shredded crinkle paper filling or packing peanuts.
Finally, the proceed to checkout and select a payment method such as PayPal, Stripe, or credit card.
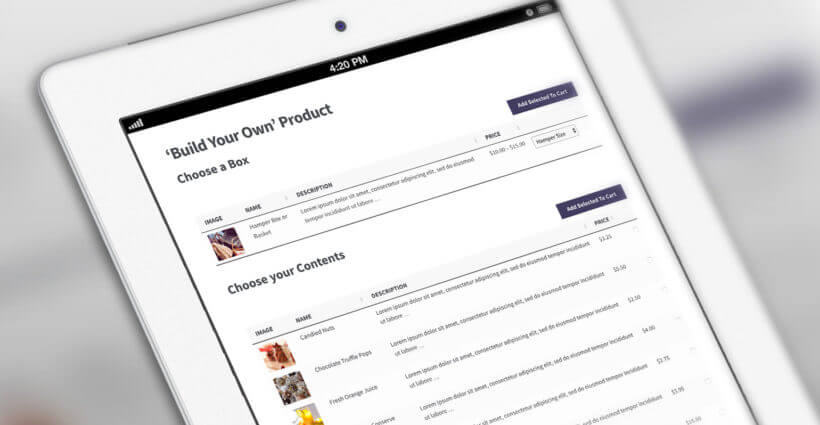
Check out the complete tutorial on how to sell build your own products for detailed instructions.
I am not a developer and have built my own site and wanted to offer a 'build your own hamper' service. This plug in works brilliantly and I had it up and running really quickly. It is particularly helpful that it works with variable products. And I love the demo video - very very helpful. There is tons of easy to search documentation that helped me with pretty much all the questions I have. I highly recommend this plug-in, especially if you are a website-building novice!
Allow subscribers to change their order each week/month
What if you want customers to be able to change which products are included in their regular subscription; or to choose which products to receive each time? For example, if you're selling a recipe box subscriptions (like Hello Fresh, Blue Apron, etc.), then subscribers need to be able to choose their recipes each week.
This is a more complex requirement, but you can achieve it by combining several plugins. They are all plugins from reputable companies which work well together:
Use the WooCommerce Subscriptions plugin to sell your subscriptions. For example, you might have a product called ‘Weekly Recipe Box – 3 Recipes’ (with variations to choose the number of people per recipe). This would set up recurring billing for a fixed payment amount every week.
In a private area on your WordPress website (which you can create with our WooCommerce Protected Categories plugin), you should add the products for the customer to choose from. These might always be the same products, or they might change each week. You can then use WooCommerce Quantity Manager to restrict how many products your subscribers can order from that category. If you set the price for each product to 0.00, then they can order their products each time without paying any extra. Alternatively, you can charge surcharges for higher value products by adding this as the product price. The subscriber will be charged this when they complete the WooCommerce checkout to confirm their products for that week.
Finally, you can use the Follow Ups plugin to automatically send a weekly email reminder. Include information about how to access the hidden category containing the available products, and the deadline for confirming their products.
Each week, the customer will log into their account, view the hidden category, select them from the product table, and check out to confirm their selection. Unless they have ordered surcharge products, they won't be charged for this because the payment comes from their weekly subscription instead.
As with all subscription boxes, if the customer forgets to confirm their products for the week, then you will select the box contents for them based on their preferences.
Advanced features
When selling subscription boxes, there are various advanced features you can add to your e-commerce store. This can help you deliver a better shopping experience to customers.
How to allow customers to choose the shipping frequency
One of the most important aspects of selling WooCommerce subscription boxes is letting customers choose the shipping frequency. This means how often they want to receive it.
As we mentioned above, most subscription boxes are sold on a monthly basis. However, some sservices let customers set their own shipping frequency. For example, if you sell vegetable boxes or snacks, you might want to give customers the option to receive a new one every week or every two weeks.
The easiest way to let customers choose the shipping frequency is by creating a variable subscription with the different options available as variations. For example, your variations might be a weekly variation, a bi-monthly variation, and a monthly variation.
How to allow customers to choose their billing frequency
Depending on the sorts of subscription boxes you sell, you might want to let customers choose their billing frequency. For this, you will need to set up a billing schedule.
This is great for when you want to give customers more payment options. You can also leverage this to offer special discounts to customers who pay for their subscription boxes months in advance.
You can set this up in WooCommerce by offering different billing frequencies as subscription box variations. For example, your variations might be weekly, monthly, or six months at a time. To incentivize customers to pay for six months at a time, you could offer that variation at a 10% discount. Then, customers can choose to pay using the preferred payment gateway.
How to choose which day of the week to receive your order
If you sell vegetable subscription boxes or recipe boxes, you might want to let customers choose which day(s) of the week to receive their order. For example, customers subscribed to your vegetable box might want to receive a new delivery every Wednesday.
You can use the Checkout Field Editor plugin to collect this information from customers on the checkout page.
How to add a delivery note
Many times, customers want to leave some sort of delivery note for the delivery driver. This allows them to make special requests or provide delivery instructions. The easiest way to let customers leave a delivery note with their subscription box order is by using the Checkout Field Editor plugin. This way, you can collect this information from customers on the checkout page.
How to set up gift subscriptions
If you want to be able to let customers send subscription boxes as gifts to their friends and family, you might consider setting up gift subscriptions. For this, you would need to create special gift subscription boxes with limited-time subscription periods.
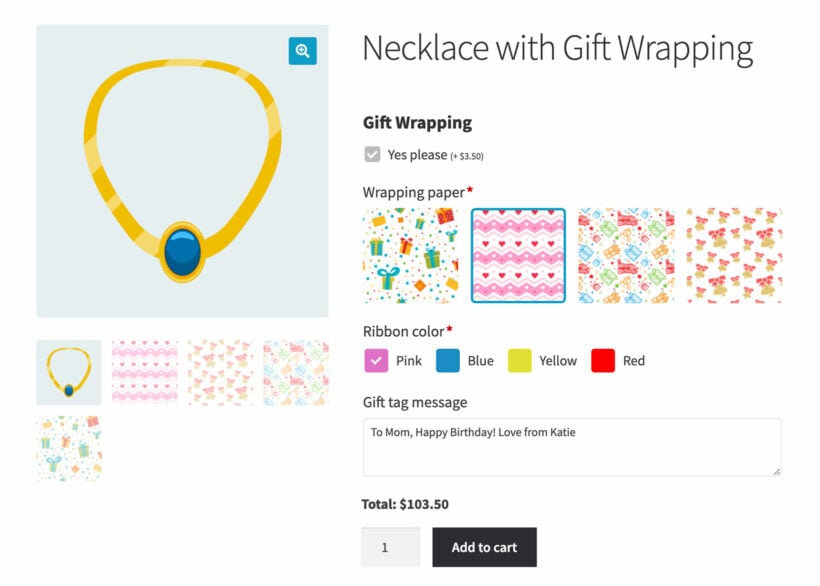
Use the Product Options plugin to add a gift message field to the product.
A product with gift wrapping options added using the WooCommerce Product Options add-on
Use the standard WooCommerce checkout form to collect a different billing and shipping address. The customer would enter the recipient’s address into the shipping address fields. This way, the subscription box will be delivered to the gift receiver.
Bonus: reducing customer churn rates and boosting retention
Although subscription boxes can have predictable recurring revenue streams, they can also have high customer churn. In fact, more than a third of customers cancel their subscriptions in less than three months and more than half cancel within six months.
As a savvy business owner, you can cut down on customer churn by offering discounts to customers who sign up for a longer-term subscription. For example, you could offer a 10% discount to subscribers who opt for the yearly subscription instead of the monthly subscription. You can use the WooCommerce Subscriptions plugin to offer a variety of subscription options. This can help you reduce customer churn rates and boost retention.
Where to get the plugins
If you’re looking to launch a successful e-commerce business, a subscription box service business model that generates recurring revenue is the way to go. It’s more profitable and efficient than selling one-off products through your WooCommerce store. Done right, selling subscription boxes can help you increase your average order value and boost sales.
Using the WooCommerce Product Table plugin for WordPress, you can sell WooCommerce subscription boxes with predefined content or with flexible mix and match options. And to take things to the next level, you can use a variety of other WooCommerce plugins to integrate advanced options.
Ready to start generating recurring revenue selling WooCommerce subscription boxes? Get the WooCommerce Product Table subscription plugin today!
WooCommerce downloads have opened up a whole new world for online stores, enabling them to sell not only physical products but also digital products like music, images, e-books, and software.
E-commerce stores allow you to reach out and deliver products to customers the instant they make payment, whereas selling physical products often means losing a significant share of your sales – paying shipping, manufacturing, and distribution costs. This is where selling virtual products using WooCommerce is significantly more profitable for merchants.
Since WooCommerce provides shipping options, many people assume that WooCommerce is only for selling physical products.
So, can WooCommerce do digital downloads? Yes, it can - with a few tweaks, WooCommerce is just as good for selling virtual (or digital) products as it is for physical products.
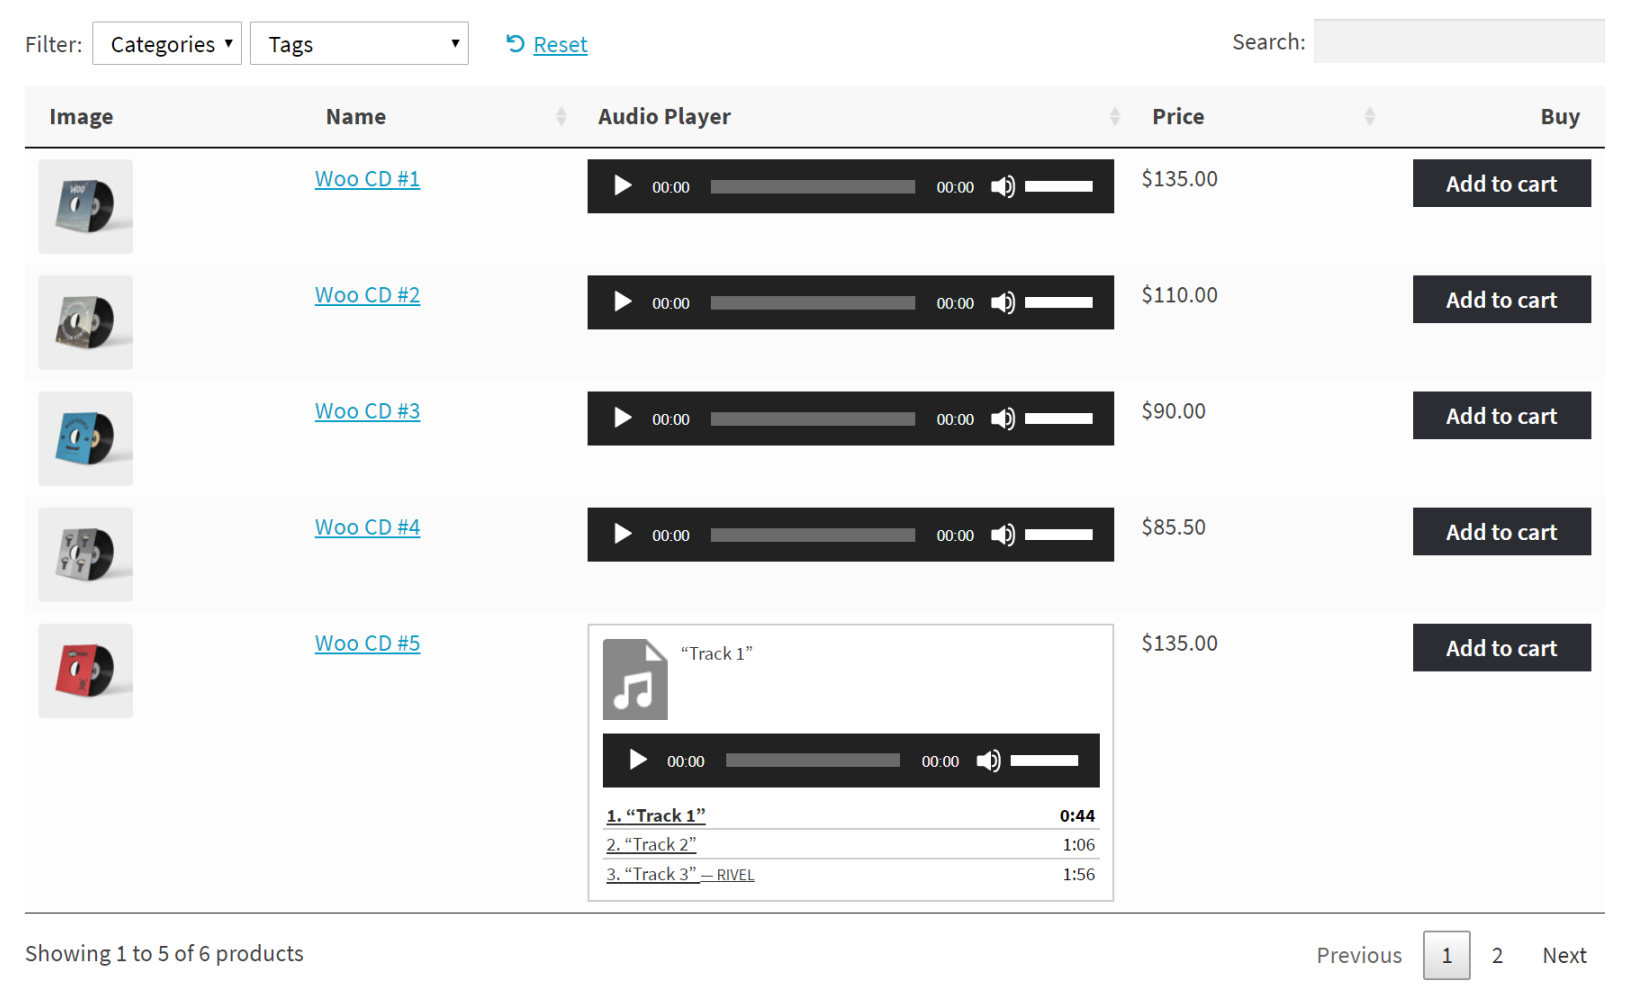
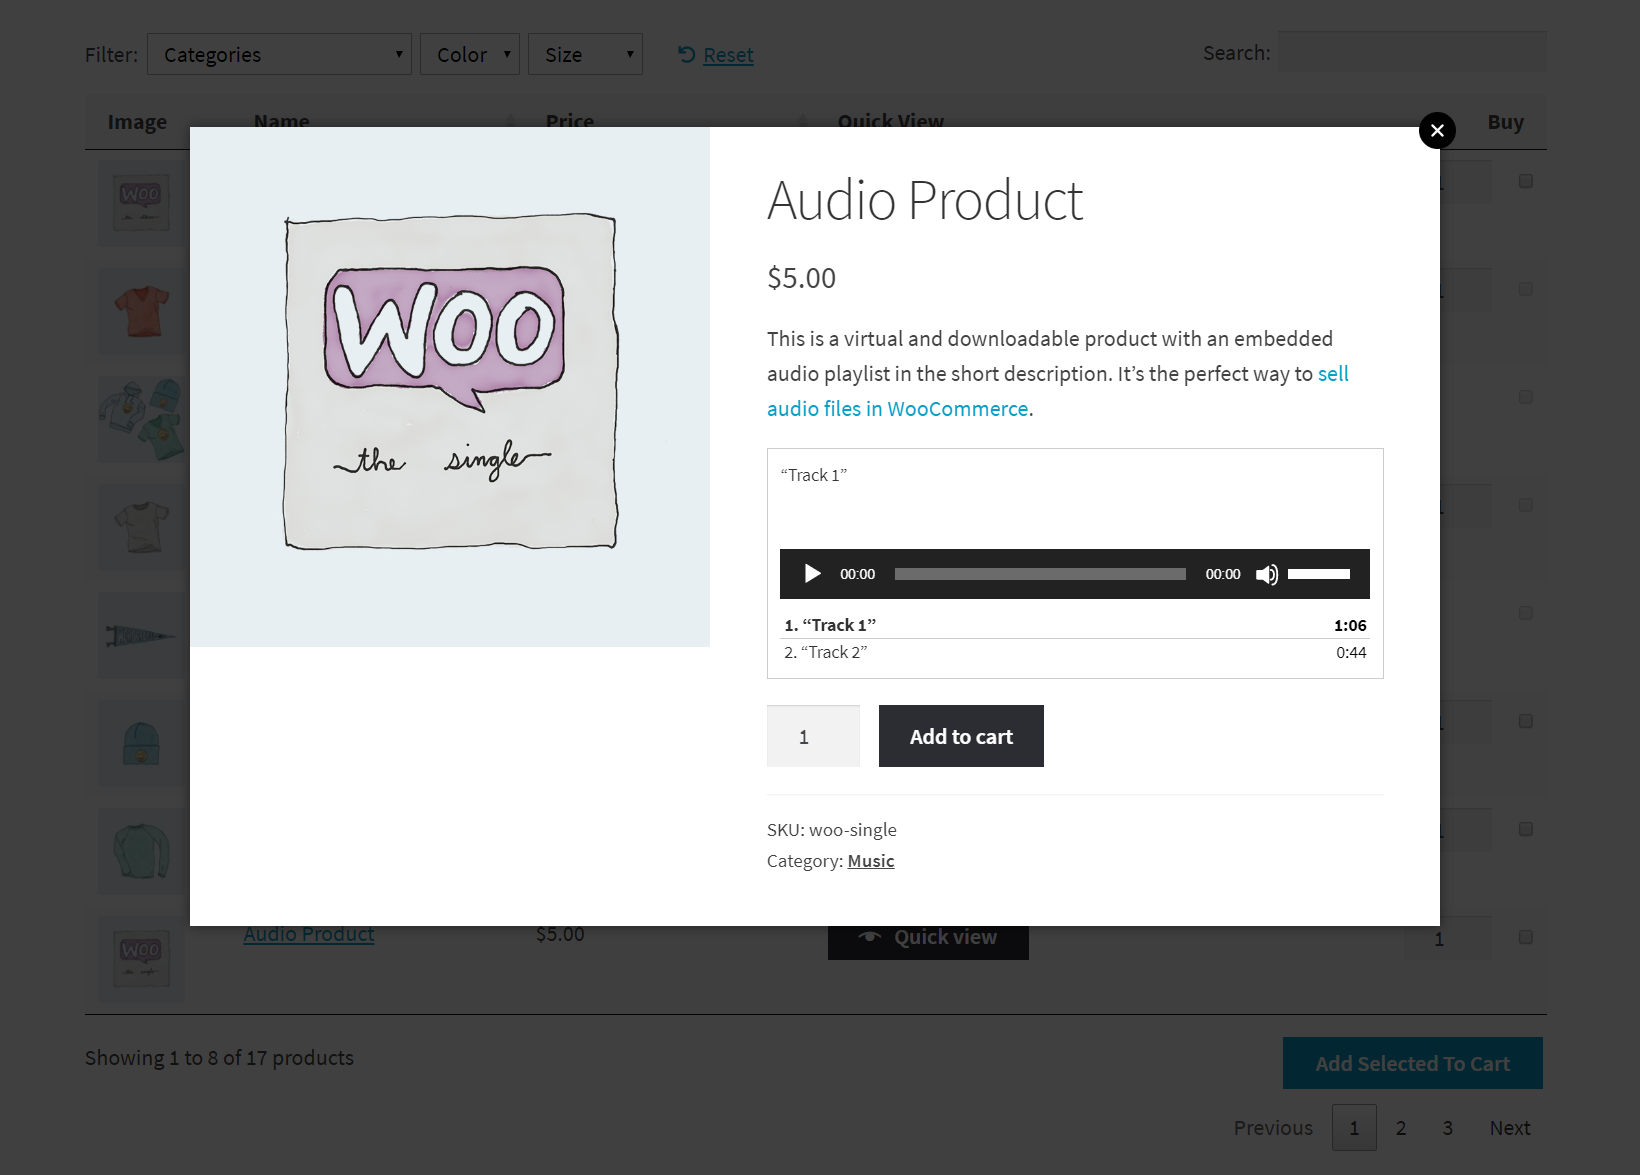
In this tutorial, we'll cover everything you need to know about virtual products in WooCommerce. We'll also explain how you can start selling them through your online site as a store owner using WooCommerce Product Table. It will look something like this:
If you're looking for standalone plugin solutions to offer digital downloads and subscriptions on your WooCommerce store, click here. Otherwise, read on to find out how to set up digital downloads natively in WooCommerce, and showcase them in a table view
Importance of digital downloads in e-commerce
Digital downloads have become increasingly popular in e-commerce platforms, and WooCommerce downloads offer many advantages for online businesses. Here are some of the key reasons why digital downloads are important in e-commerce:
Increased accessibility: Digital downloads allow customers to access products instantly, without waiting for shipping or delivery. This convenience can improve customer satisfaction and boost sales.
Lower costs: Unlike physical products, digital products don't require inventory management or shipping, which can significantly reduce costs for online businesses. This can also lead to higher profit margins.
Greater scalability: With digital products, there are no limits on the number of products that can be sold, as there are no physical constraints like storage space or shipping logistics.
Global reach: WooCommerce downloads enable businesses to reach a wider audience, as digital products can be sold to customers anywhere in the world, without the need for international shipping.
Enhanced customer experience: Digital downloads offer a seamless and efficient purchasing experience for customers, allowing them to quickly and easily access their products.
WooCommerce is a highly versatile platform for selling digital products, and its true power comes from third-party plugins. With the right extensions, store owners can add licensing, subscriptions, memberships, and more to create a fully customized digital sales experience.
Read on or watch our video tutorial to get started with selling digital download products on WooCommerce.
What are WooCommerce virtual products?
WooCommerce digital products are virtual or downloadable items sold electronically through an online store. Virtual products cannot be physically shipped and include services like online courses or subscriptions. Downloadable products are digital files customers can access after purchase, such as eBooks or software.
With WooCommerce virtual products, you don't have to worry about maintaining your inventory or running out of stock with digital products, as they mainly comprise files stored on your web server. This means you're selling the same files time and again.
Moreover, virtual products in WooCommerce don't require customization of any kind. In contrast, physical products often require you to change their color, size, or any other attribute.
Types of virtual products
Virtual products are intangible items that cannot be shipped, such as memberships or services. Downloadable products are digital files customers can download after purchase, such as music, software, or documents. Products can be both virtual and downloadable - for example, software applications that are not shipped but delivered as downloadable files.
If you're new to the virtual product space, you might be wondering what sort of virtual products you can sell using WooCommerce. Here's a quick list of some of the most common types of virtual products online stores sell:
E-books: Digital publications including guides, how-to manuals, and recipe collections
Video content: Online courses, training programs, and educational materials
Software: Web applications, game modifications, plugins, and productivity tools
Audio files: Music tracks, podcasts, audiobooks, and sound effects
Graphics: Icon packs, font collections, design templates, and photography (including those who sell photos in WooCommerce)
Documents:Printables, reports, checklists, and business templates
The great thing about WooCommerce downloadable products is that they are sustainable and can easily be replicated.
How to create digital and virtual products
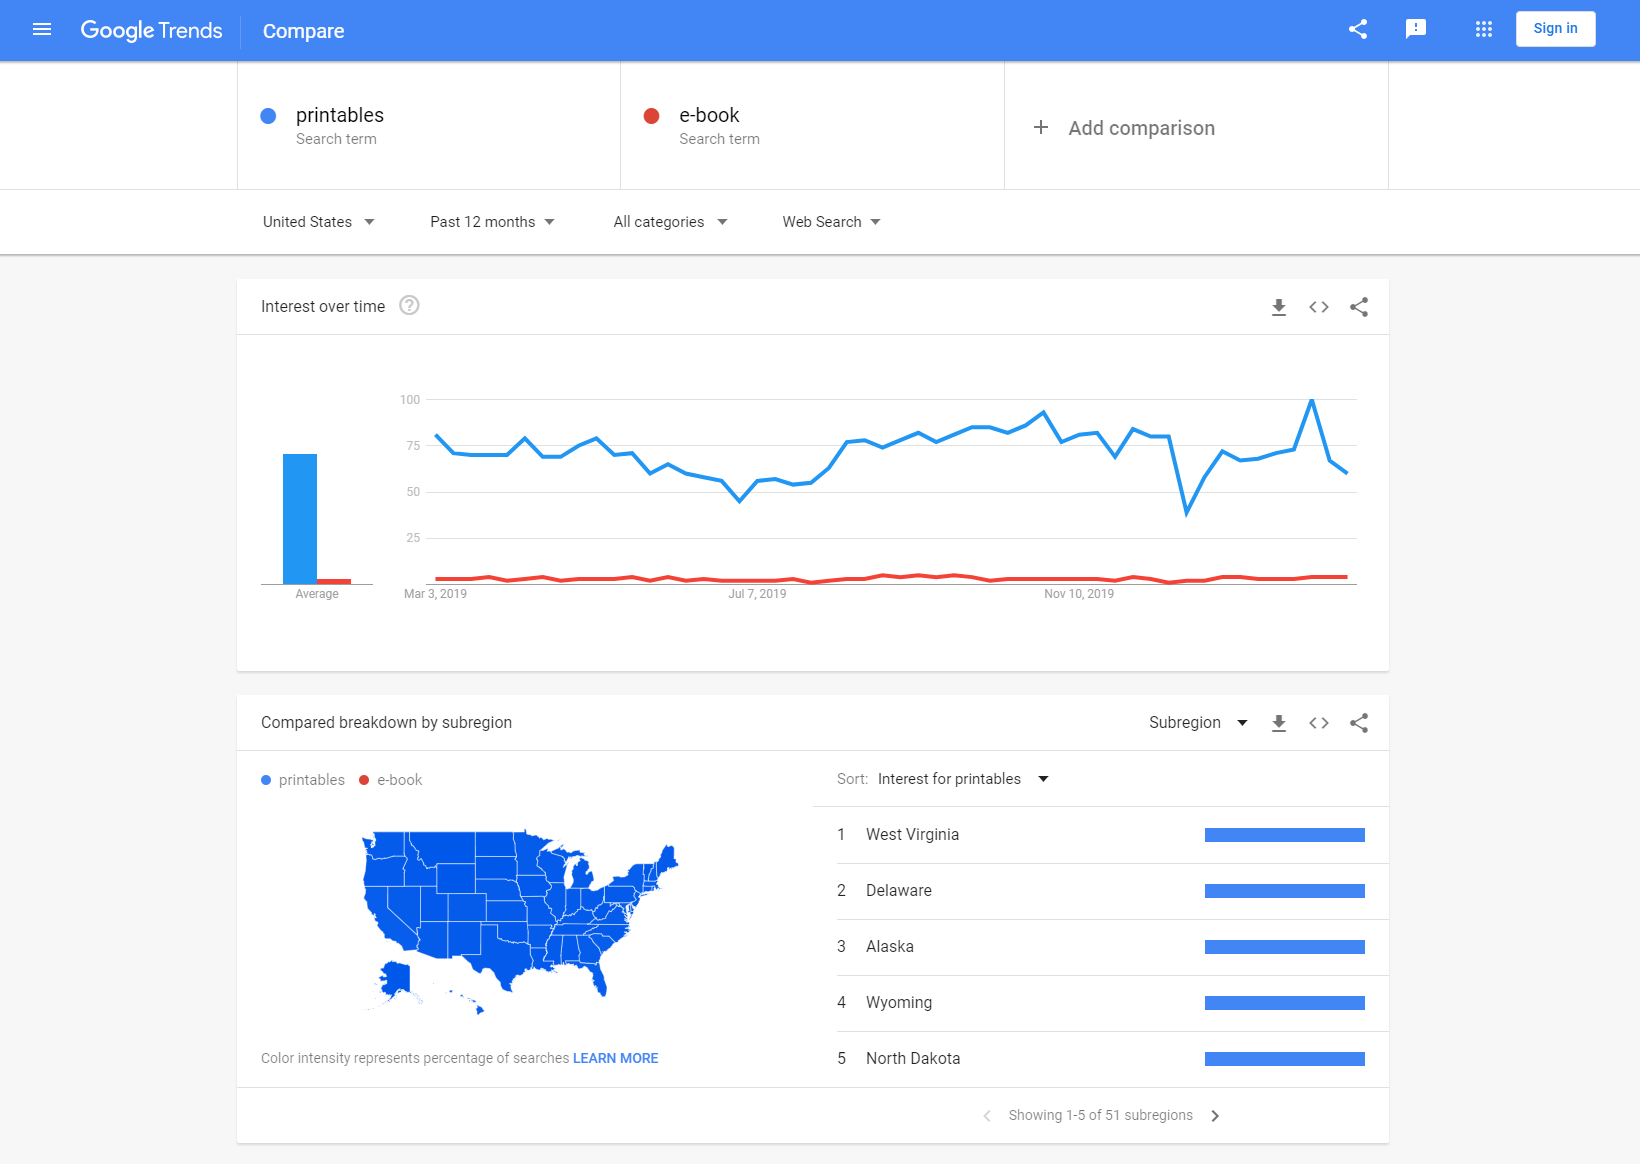
Before you begin creating the product, it's a good idea to take a step back and gauge product demand. Research product demand using Google Trends for your chosen topic. Analyze existing competition to understand market expectations and quality standards. Select appropriate creation tools like Canva for printables or Audacity for audio. Create your digital product following industry best practices for your format.
If you have multiple ideas for virtual products, you can compare them to see which one has a higher demand. Once you've decided on a virtual product to sell, run a few Google searches to see who else is selling similar virtual products. This will help you get a better idea of the sort of quality people expect and the keywords they're using to search for these products.
Step-by-step guide on setting up WooCommerce pages to sell digital products
Here's what you need to do to start selling virtual products using WooCommerce.
Step 1: WooCommerce plugin installation and settings configuration
Install WooCommerce plugin from WordPress → Plugins → Add New. Navigate to WooCommerce → Settings → Products → Downloadable Products. Enable digital product settings and configure download options. Set up payment gateways suitable for digital transactions. Configure email templates for download link delivery.
Once the plugin has been activated, create the WooCommerce pages. Next, configure the plugin settings for digital products that you want to sell from your WordPress website. To do this, log into your WordPress admin panel and navigate to WooCommerce → Settings. From there, you'll be able to see an option Configure WooCommerce Settings for Digital Products - click on it and update the following settings:
General settings tab – Limit the downloadable items purchase quantity to 1
Inventory settings tab – Disable stock management
Shipping settings tab – Disable shipping
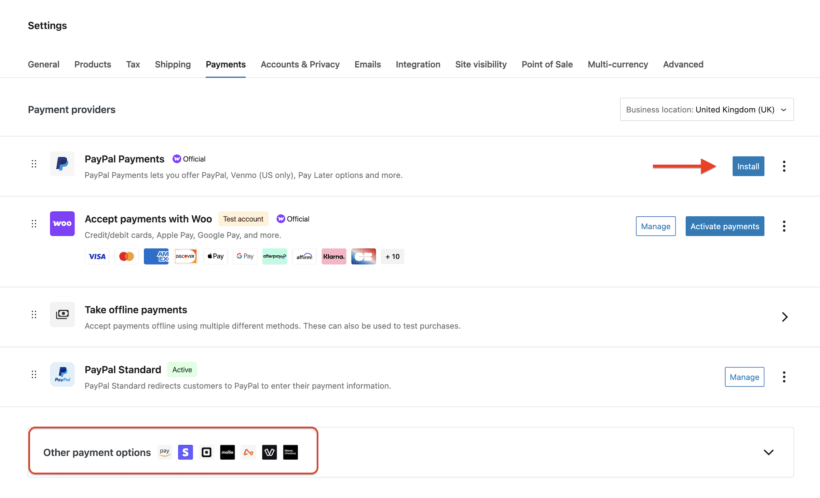
Payment Gateways settings tab – Disable the payment options: Direct Bank Transfer and Cheque Payment. Enable the PayPal payment option and enter your PayPal email address
Emails settings tab – Configure your order notification settings and customize your chosen WooCommerce email templates
Step 2: Product categories creation
When setting up your online store with WooCommerce, it's important to have a clear and organized structure in place for your products. One way to achieve this is by setting up product categories before adding products. By creating categories, you can group related products together, making it easier for customers to navigate and find what they're looking for.
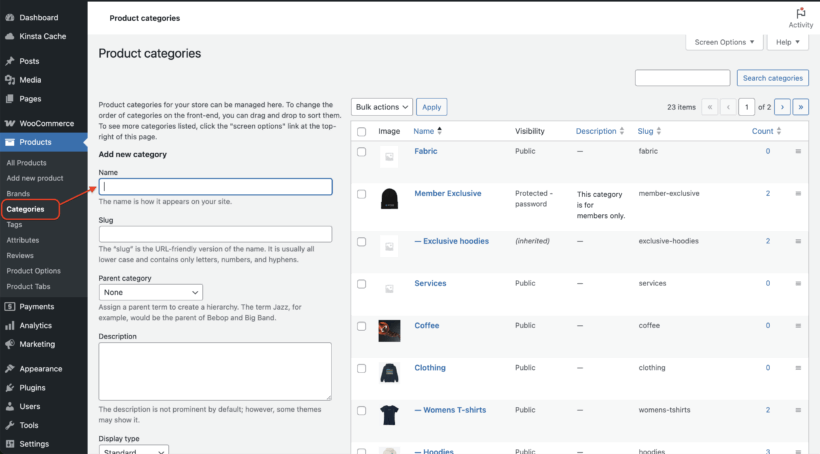
To set up product categories in WooCommerce, go to Products → Categories in the WordPress admin. From there, you can add new categories, edit existing ones, and assign products to specific categories.
How to add new product categories.
When creating categories, it's important to keep your target audience in mind and think about how they would search for and navigate your products. You may want to consider creating broad categories that encompass a range of products, as well as more specific subcategories for niche or specialized products.
In addition to improving the user experience for your customers, setting up product categories can also make it easier to manage your inventory and track sales data. With a clear and organized structure in place, you can more effectively analyze which categories and products are performing well and adjust your marketing and sales strategies accordingly. So before adding products to your WooCommerce store, take the time to set up product categories and create a strong foundation for your online store.
Step 3: Addition of virtual products in WooCommerce
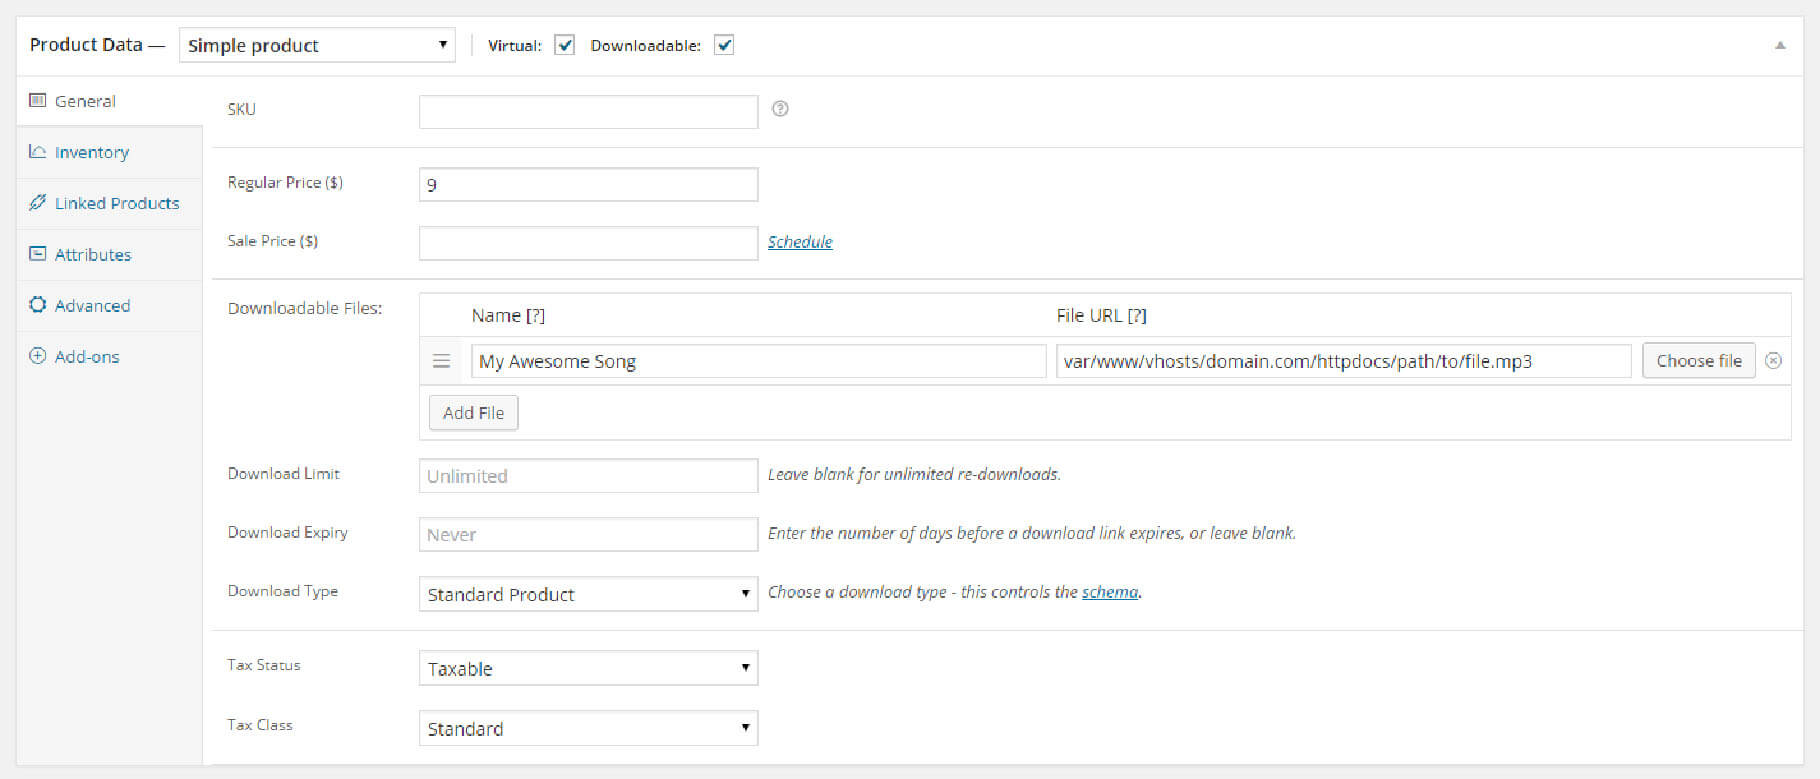
Go to Products → Add New to create a digital product. Select Simple Product from the Product data dropdown. Check both Virtual and Downloadable checkboxes. Upload your digital file using the File Path upload option. Set download limits and expiration dates as needed.
In the third step, you will need to add your digital products (that you need to make available for download). Clicking on the Add Product option will redirect you to the product creation form. Fill in the below fields:
Title
Long product description
Short description
Select the product category
Set a featured image
Insert additional thumbnail images (if necessary)
Price
In order to make your digital products downloadable, scroll down to the Product data section and do the following:
From the Product data metabox, choose the Simple Product option from the drop-down. Check both the Virtual and Downloadable check-boxes, as shown in the below screenshot:
Next, assign a value to the Regular Price field. From the Downloadable Files path, click on the Upload a File option and copy the Link URL. Click on the Save Changes button, then paste the URL of the digital product you've just uploaded into the File Path field.
If required, you can choose to set a download expiry date for the product download link. This will stop the products from getting downloaded after the link expires.
Protecting your digital products from unauthorized access
Digital product security prevents unauthorized sharing and protects intellectual property rights. WooCommerce provides built-in security features to safeguard your downloadable files from unauthorized access.
WooCommerce offers three file download methods to protect your digital products. The Force Downloads method serves files through PHP, completely hiding the file URL from customers. The X-Accel-Redirect/X-Sendfile option uses server-level protection for better performance with large files. These methods are more secure than the basic Redirect option, which exposes the actual file URL.
Access control features include the "Downloads require login" setting, which restricts downloads to registered customers only. WooCommerce generates unique filename strings that make URLs difficult to guess or share. Download limits and expiration dates prevent excessive sharing of your digital products.
To configure these security settings, navigate to WooCommerce → Settings → Products → Downloadable Products. Enable "Downloads require login" and select either Force Downloads or X-Accel-Redirect as your file download method. Set appropriate download limits and expiry times based on your product type.
For enhanced protection beyond WooCommerce defaults, consider third-party security plugins. Plugins like "Prevent Direct Access Gold" provide complete file blocking and advanced access control features. These solutions add extra layers of security by moving files outside the web-accessible directory and implementing sophisticated permission systems.
Configuring payment gateways for digital products
Payment gateways for digital products are payment processors that provide instant transaction confirmation. Certain gateways work better for digital products because they offer immediate payment verification and automated order completion.
PayPal provides instant payment confirmation ideal for digital product delivery. Stripe integration offers excellent support for recurring payments and subscription products. Other WooCommerce-compatible gateways like Square and Authorize.net also support instant digital delivery. These gateways focus on immediate payment processing essential for automated downloads.
To configure payment gateways, navigate to WooCommerce → Settings → Payments. Enable your preferred instant payment methods like PayPal or Stripe. Enter API credentials for each gateway following their setup wizards. Test transactions in sandbox mode before switching to live payments.
For digital products, disable payment methods that delay order completion. Bank transfers and check payments prevent instant download access. Manual payment methods create poor customer experience for digital products. Configure your store to only accept instant payment methods that trigger automatic download delivery upon successful payment confirmation.
Understanding the order process
Customer completes payment through selected payment gateway. WooCommerce automatically grants download access after payment confirmation. Download links appear on the order confirmation page immediately. Email notification with download links sends to customer's email address. Customer can access downloads through My Account → Downloads section.
When a customer makes a payment via PayPal, any one of the following things can happen:
If all the items (or products) in the order are downloadable and virtual, then the order will complete
Or else, the order will continue processing till the time you change it
After completion of the order, or when the Grant access to downloadable products after the payment option is enabled, the user who has purchased the products will receive the download links for the purchased products on the order received page, receive email notification that contains the download links, and be able to see the download links once they are logged into their My Account page.
Get more sales with WooCommerce Product Tables
Your store can be reasonably successful if you set it up with the built-in layouts that come with WooCommerce and your theme. For greater success, it's worth doing some work to optimize your WooCommerce conversion rate.
The WooCommerce Product Table plugin gives you lots of flexibility about how to display your products. It lists products in a table and you can choose from dozens of options about how to present the table and what data to include. This can help to increase your sales and make your store more successful.
Case study: digital event tickets
Dare to Date uses WooCommerce Product Table to list upcoming events in a neat and organized front-end table layout. Event-goers can search for events based on the type of event, location, gender, and age.
How to list virtual products using WooCommerce Product Table
The key benefit of listing virtual products using WooCommerce Product Table is that it makes it easier for customers to find what they're looking for.
Generally speaking, virtual products aren't image-centric. What this means is that they don't require the large images that physical products do. For this reason, the default WooCommerce store layout isn't ideal for selling WooCommerce downloadable products.
If you're selling lots of virtual products, showcasing them in a product table layout is the best option. Using the WooCommerce Product Table plugin, you can choose which columns to show in the front-end table layout.
For example, if you sell audio tracks, you might include columns for product image, SKU, product name, sale price, download limit, and add to cart button (or checkbox). To boost sales, you could even include an embedded audio player column which gives customers a quick preview of the audio track.
WooCommerce Product Table lets you embed video and audio content directly in the table layout. You can also choose to add a search bar and filter options to make it easier for customers to find what they're looking for.
Use WooCommerce Quick View Pro to provide additional product details
You can use WooCommerce Product Table with the WooCommerce Quick View Pro plugin to provide even more information about each virtual product. This is especially useful if you're selling WooCommerce downloadable variable products with variations.
Customers can simply click the quick view button in the product table to view additional product details in a lightbox. They can also set purchase options and add the types of products to the cart directly from the quick-view lightbox. The key benefit of using WooCommerce Quick View Pro is that customers don't have to navigate to a single product page.
You can use WooCommerce Product Table with the WooCommerce Quick View Pro plugin to provide even more information about each virtual product. Additionally, if you're looking to add or allow customers to attach PDFs to your WooCommerce products, we have a comprehensive guide that will take you through the process step-by-step. This is especially useful if you're selling WooCommerce downloadable variable products with variations.
How to make digital products private with WooCommerce Protected Categories
Depending on the types of virtual products you're selling, you might need a way to make them private.
For example, you might need to sell private WooCommerce downloadable products that are unique to individual customers or clients. This could be an album from a photoshoot you did for a client's birthday party or wedding.
Or you might want to make certain virtual products in WooCommerce only available to registered members. For instance, you might want to sell guides, reports, or printables to members only through your membership site's merch store.
In addition to setting up your store to sell digital products, if you're looking to enhance your product pages by adding downloadable PDFs or allowing customers to upload their own PDFs during the purchase process, check out our guide on how to attach PDF files to your WooCommerce products.
How to send digital or virtual products to the client
One of the most important aspects of selling virtual products in WooCommerce is getting downloadable goods over to the customer. Of course, customers can always download them directly from your site after checkout page. However, if you need a way to send virtual products to your clients you can:
Use the downloadable product type to automatically send a file or file url to the customer's email after they complete their purchase. This way, they can download the files directly from their inbox. To ensure these critical transaction emails don't get blocked, it is vital to monitor your Spamhaus email deliverability report, as being flagged on a major blacklist will prevent your customers from receiving their purchases.
Alternatively, you can use the Follow-Ups plugin to send an email containing information that explains the next steps. For example, this might contain event tickets, image file downloads, or details of how to access to WooCommerce downloadable products.
Customizing the digital download experience for customers
Offering paid or free digital downloads can be a great way to attract new customers and build brand awareness. However, to truly stand out and provide a great user experience, it's important to customize the digital download experience for your customers. Here are some tips on how to do this:
Personalize the download page: Instead of a generic download page, create a customized shop page for your customers that features your branding and provides additional information about your products and services. This can help build trust with your customers and encourage them to explore your website further.
Add social sharing buttons: Encourage customers to share your paid or free digital downloads with their friends and followers by adding social sharing buttons to the download page. This can help increase your reach and attract new customers to your website.
Collect customer data: While offering free digital downloads can be a great way to attract new customers, it's also important to collect data from those who download your products. This can include their name, email address, and other relevant information that can help you personalize your marketing efforts and improve the customer experience.
Follow up with customers: After a customer downloads a paid or free product from your website, consider following up with them to thank them for their interest and provide additional information about your products and services. This can help build a relationship with your customers and encourage them to make a purchase in the future.
Offer additional free resources: To further engage your customers and provide value, consider offering additional free resources such as e-books, tutorials, or templates. This can help position your brand as an authority in your industry and attract more customers to your website.
Promoting digital downloads on your WooCommerce store
To maximize the impact of your paid or free downloads, it's important to promote them effectively. Here are some tips for promoting digital downloads on your WooCommerce store:
Homepage highlighting: Feature digital products prominently on your main page. Make sure your downloads are prominently displayed on your homepage so that visitors can easily find them. You can use eye-catching graphics and headlines to draw attention to your downloads and encourage visitors to explore your website further.
Email marketing: Send targeted campaigns promoting download products to subscribers. If you have a mailing list of subscribers, consider sending out a targeted email promoting your paid and free downloads. You can also segment your list based on interests or previous purchases to ensure that your message is relevant to each recipient.
Social media: Share product previews and testimonials across social platforms. Social media can be a powerful tool for promoting your downloads. Consider creating eye-catching graphics or videos that showcase your paid and free downloads and share them on your social media channels. You can also use hashtags and targeted ads to reach new audiences.
Influencer partnerships: Collaborate with industry experts for product promotion. Partnering with influencers in your industry can be a great way to reach new audiences and promote your downloads. Consider reaching out to influencers who have a following that aligns with your target audience and offering them a free download in exchange for promotion.
Exclusive offerings: Provide subscriber-only downloads to build mailing lists. To incentivize customers to sign up for your mailing list or follow you on social media, consider offering exclusive free downloads that are only available to subscribers or followers.
Standalone plugins to enable digital downloads on your WooCommerce store
There are number of useful digital download plugins available for WooCommerce. Consider adding one from the list below to speed things up for you and your customers.
1. Ultimate Downloadable Products for WooCommerce
Ultimate Downloadable Products for WooCommerce makes it easy to showcase downloadable files directly on product pages. Perfect for selling digital products, this plugin helps you provide a clear preview of what customers will receive after purchase, improving transparency and boosting sales.
Pros & cons:
Comprehensive free version available with optional pro features
5 star rating from users (at the time of writing)
Very limited user base
2. Digital Goods for WooCommerce Checkout
The Digital Download Goods Checkout plugin helps to remove unnecessary fields from the checkout page and make the process smooth and easy for customers. For example, if you are selling digital products then you might not need customer's billing and shipping address.
Pros & cons:
You can sell various types of downloads. For example pdf, ebook, photo, music, video, audio, mp3, etc
Includes a "quick checkout" button
Limited features in the lite version
3. WooCommerce Subscription Downloads
WooCommerce Subscription Downloads enables you to offer downloadable products to your subscribers, while maintaining individual listings for each of your downloadable products, having them sold individually via your store, as well as via the subscription.
Pros & cons:
Quick and easy configuration
Adds a 'Subscriptions' field to the product data meta box
No free version available
No reviews from users are displayed (at the time of writing)
Bonus: selling digital subscription products with WooCommerce Subscriptions
One of the most popular types of virtual products is memberships and subscriptions. Selling subscription products is a great way to generate recurring revenue.
You can use WooCommerce with the official YITH WooCommerce Subscriptions add-on to sell digital subscription products through your online store. This helps you set up an ongoing payment plan for your products or services.
Check out the complete instructions for selling subscription products using WooCommerce.
Start selling virtual products using WooCommerce
Apart from setting up any standard website or blog, there are so many things that you can do with WordPress.
In this post, we have discussed how you can easily sell digital products through your WordPress e-commerce website, thanks to the WooCommerce plugin and WooCommerce Product Table. Hopefully reading this will help you learn about the basics of how you can sell digital products by setting up WooCommerce pages.