Revamping the WooCommerce price range: A comprehensive tutorial

If you want to change the default WooCommerce price range format for product variations, this detailed tutorial is for you. Here, you'll learn how to update the standard price range format to list prices for all variants, show only the lowest price, use custom formats, and much more.
Do you want to adjust how prices for variable products are displayed on your WooCommerce store?
The way prices are displayed - especially for variable products - can significantly impact your WooCommerce store's bottom line. Unfortunately, the standard WooCommerce variation price display on the 'Shop' and single product pages isn't ideal for most online stores. It can confuse customers and hurt your store's sales and revenue 😧
Thankfully, it's easy to fix this with WooCommerce Variation Prices.

WooCommerce Variation Prices is a powerful plugin that lets you replace the standard price range format for variable products to whatever suits your store. You can use it to:
- Change the default variation price range.
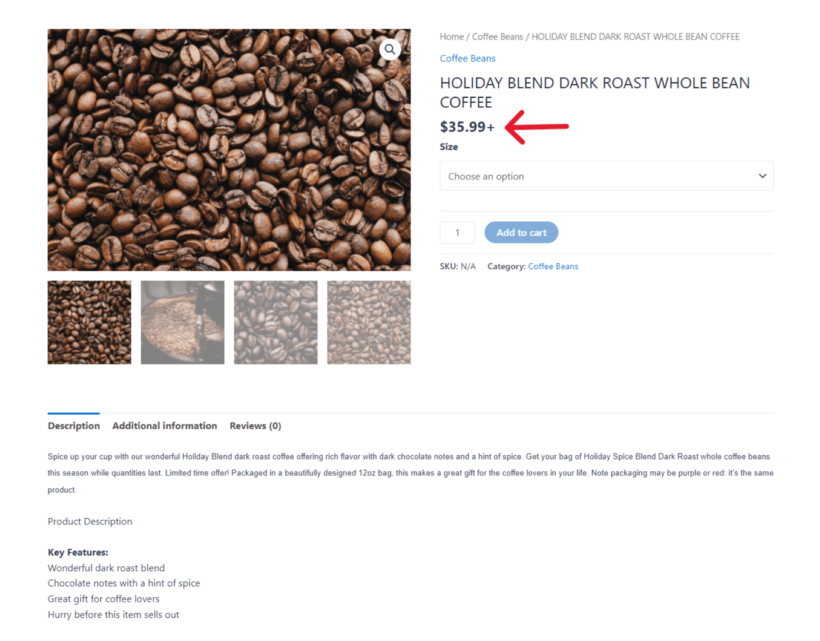
- Show only the cheapest variation price, e.g., “From $15” or “$15+”.
- Show prices for all variants immediately.
- Hide prices until shoppers select a specific variation.
- Automatically update the product price when a product variant is selected.
The best part? It takes less than five minutes to set it up. No need to mess with your functions.php file, or add html, CSS or custom code snippets to your site.
To begin, let's explore the default WooCommerce price range format and its limitations.
What is the default WooCommerce price range format?
By default, WooCommerce shows the prices for product variations in the minimum and maximum format. For example, if a product variant is priced between $20 and $60, the price will be "from $20 to $60".
For context, here's how the default price range for WooCommerce variable products looks on the single product page of a website. As you can see, the lowest price is that of the cheapest product variant, while the highest price is the most expensive one.

Unfortunately, displaying the price range like this isn't ideal for most WooCommerce sites. Below, we'll explore why.
Limitations of the default WooCommerce price range format
Here are a few reasons why showing variation prices as a range isn't ideal for most sites (and some ideas on how to fix it):
Displaying the higher range can discourage price-sensitive shoppers from browsing
When you show the entire price range, shoppers are immediately drawn to the highest price within the range, especially when there's a wide margin. For instance, if the product variation prices are $20 to $200, the $200 maximum price becomes super-prominent.
Shoppers who are generally price-sensitive might assume that the prices are on the higher end of the range. Ultimately, they may decide not to explore the product variations in detail.
The result? Lower click-through rates and conversion rates.
A simple fix is to display prices as "From $20" or "$20+". This can alleviate concerns about cost and encourage customers to browse and check out product variants.
Shoppers are unclear about what they'll have to pay
UX research shows that customers shopping online like to easily compare prices without navigating through multiple steps to find the exact cost.
Unfortunately, by default, WooCommerce doesn't show the exact price for a price range until shoppers select the specific product variant.
If this hurts sales in your store, you can fix it by clearly displaying the price of each variant so shoppers can see what they'll pay upfront.
Not ideal for some types of products (e.g., products sold by weight)
Products sold by weight often have variations in size or quantity that directly impact the final price, so using a broad price range doesn't do justice here. Customers can't instantly tell why the prices differ and may feel like you're trying to rip them off. (The same thing goes for products with lots of add-on options).
For example, a bag of coffee beans may come in various weights, say 2.25 lbs, 5 lbs, or 10 lbs, each with a different price per unit of weight. In this case, listing all the variation prices might be better so shoppers can immediately see how the price changes based on the weight they purchase.
Psychology-backed strategies to change the default WooCommerce price range
Customers' perception of pricing has a powerful effect on whether or not they make a purchase. For that reason, it's important to display prices in a way that will appeal to customers and present prices in a positive way.
Katie KeithCEO, Barn2 Plugins
Here are the top three psychology-backed strategies and ideas for how to implement in your store:
- Price anchoring
- Decoy pricing
- Charm and odd-even pricing
We'll discuss them in detail below, plus some ideas on how to apply these strategies to present prices to customers.
Price anchoring
Shoppers tend to perceive pricing relatively. With price anchoring, you strategically set a high initial price - aka the anchor - to make subsequent, lower prices seem more reasonable and appealing to customers.
One of the most famous examples of price anchoring is Steve Jobs's introduction of the iPad (video linked below). Notice how he anchors people to $999, so it seemed like a terrific deal when he later revealed the price as starting from $499.
Anchoring prices are so powerful because they provide a reference point for how people evaluate the value of your products.
A quick note: Stores that show regular and discounted prices side-by-side follow the same principle. For example, if the main price is "$100" and sale price is "$89".
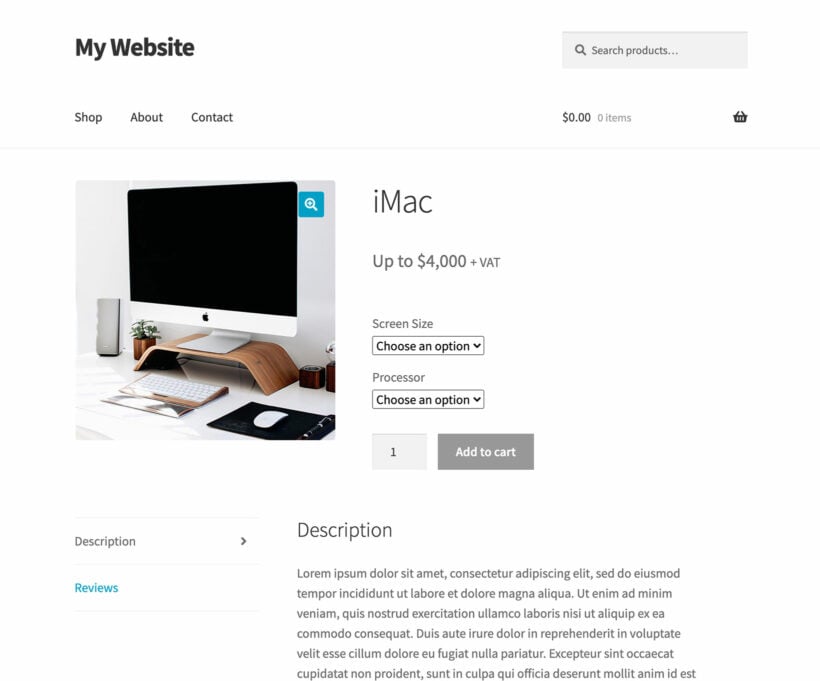
The price anchoring strategy is most suitable for luxury/premium products and stores where customers expect the regular prices to be on the higher end of the scale. Showing a variable product price range as "Up to $4,000" can make it seem more attractive.
If you sell to products that typically cost little, anchoring may not be an effective pricing strategy.
Decoy effect
With decoy pricing, you strategically introduce an unappealing product variant price (the decoy) to make the other options look more attractive. This approach influences shoppers to choose specific variants in line with your business goals.
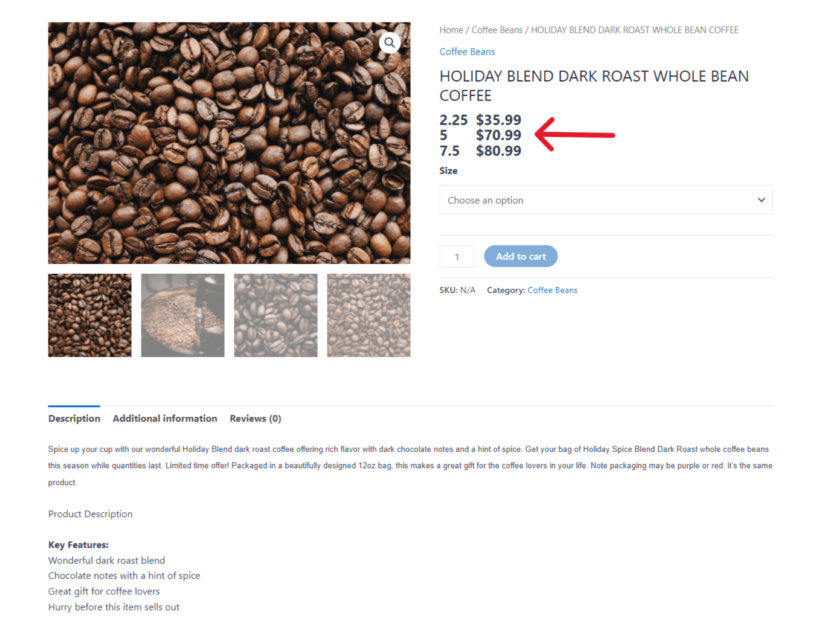
So if your ecommerce site sells beans in various weights, you can create a WooCommerce price list of your prices like:
- 2.25 lbs - $35.99
- 5 lbs - $70.99
- 7.5 lbs - $80.99
Here, the 5-pound bag of coffee beans is a decoy. It's a visibly worse deal than the 7.5 pound deal, encouraging an upsell.
Note: A few shoppers might still buy the 5 lbs for $74.99. But most will opt for the 7.5 lbs for $85.99 offer.
Charm and odd-even pricing
Have you ever seen prices ending in odd numbers like $49.99 or $10.99? That's the charm and odd-even pricing strategy in action.
Odd-ending prices create a sense of a bargain and make customers feel like they're getting tremendous value for a low amount.
For example, pricing a subscription service at $9.99/month instead of $10/month. Although the price is practically the same, most customers immediately think, "It's less than ten dollars. What a bargain!"
These are just a few ideas on how to boost sales by changing how your prices are displayed on your site. Of course, every store is different, so you might need to adjust the strategy based on your business. What's great about the WooCommerce Variation Prices plugin is that you can easily customize it for your specific use case.
Let's look at how it works.
Introducing the WooCommerce Variation Prices plugin
WooCommerce Variation Prices lets you control how price ranges are shown to customers. For example, you can choose to:
- Only show the lowest price, e.g., 'Starting at $25' or 'From $25'.
- Only show the highest price, e.g., 'Up to $25' or 'From $25'.
- Hide prices until the shopper selects a variant.
- Show prices for all the variants, e.g., “Version 1 - $45; Version 2 - $75; Version 3 - $95”.
- Replace the dash with another range separator, e.g., '$25 to $95' or '$25 / $95 ' instead of '$25 - $95'.
- Create custom price templates to show prices any other way you prefer.
WooCommerce Price Variations lets you change how prices are displayed on the single product page and the archive pages, i.e., 'Shop' and 'Category' pages. So you can show prices in the way that best suits your product variants and boosts sales.
Let's look at how to set it up in your store.
How do I change the price range in WooCommerce?
Follow these simple steps to set up and use WooCommerce Variation Prices on your website:
Install and configure the plugin
- Purchase the WooCommerce Variation Prices plugin.
- Download a zip copy of the plugin to your computer.
- From your WordPress dashboard, navigate to Plugins → Add New to upload the plugin to your website.
- Click on Upload Plugin → Install Now → Activate.
Configure the price range format
As soon as you install this WooCommerce plugin, its setup wizard takes you through the steps to configure your plugin in less than five minutes. You'll find the same settings at WooCommerce → Settings → Products → Variation Prices.
- Enter your license key and select 'Check' to complete the activation process.
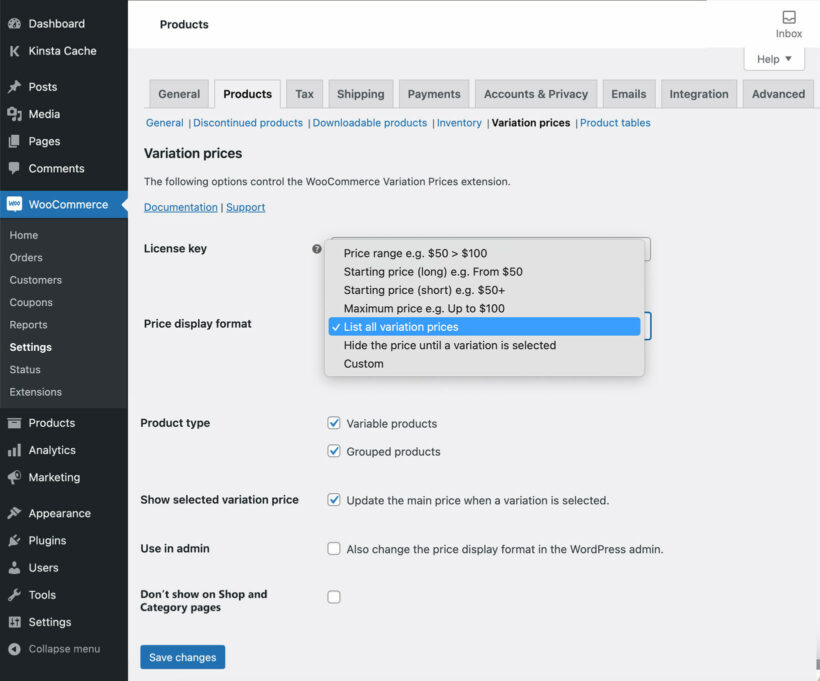
- The 'Price Display Format' dropdown includes various options to show the price range. Note that the option you select here determines the next set of options. So, if you use the default price range, your next option will be the separator. And if you select a custom range display, you’ll have boxes to set your preferences. The options are:
- Price range - The default WooCommerce price range separator. However, you can replace the range separator.
- Starting price (long) - Shown as “From
[min_price]”, e.g., 'From $10'. - Starting price (short) - Shows the lowest price with a plus sign, e.g., '$10+'.
- Maximum price - Shown as 'Up to
[max_price]', e.g., 'Up to $100'. - List all variation prices - Shows the name and prices of all the variants.
- Custom - You can create custom price templates to show prices any way you prefer.
- Choose whether you want the price range format to apply to variable products, grouped products, or both product types.
- Tick the 'Hide the price until a variation is selected' option if you want to hide prices until shoppers select a product variant.
- Select the 'Show selected variation price' checkbox to instantly update the price on the single product page when customers select the specific variant.
- Finally, tick the 'Disable on Shop page' checkbox to show the default price range format on your store's 'Shop' and 'Category' pages.
- Save the settings.
That's about it! Now head to your site's front-end to check out the update price range format.
Tips to successfully implement price range strategies in your WooCommerce store
There are a ton of pricing strategies. Earlier, we looked at how to use price anchoring, the decoy effect, and charm and odd-even pricing to improve how price ranges are displayed on your online store.
Now, you might be wondering, which is the best pricing strategy?
The answer is that it depends. What works for one WooCommerce store may not work for another.
Also, seasoned store owners know that although pricing is a critical factor that influences buying decisions, it's not the only one. This means it may not be clear if changing how prices are displayed on your site changes your bottom line.
So, how will you decide on the best pricing strategy for your store?
Enter: A/B tests.
In the context of pricing, A/B tests (or split tests) are a type of marketing experiment where you show two or more versions of a price to different segments of customers at the same time. Afterward, you can compare which version performs better and choose the better-performing one.
So you can create two otherwise identical versions of a product listing using A/B testing software like VWO (they also offer a free plan) and see how they perform. Then, discard the poor-performing version and use the winning one.
Conducting split tests gives you the data needed to make business decisions instead of relying on guesswork.
Next steps: Improve your pricing display with WooCommerce Variation Prices
The default way of showing price ranges for variable products isn't ideal for most WooCommerce stores.
WooCommerce Variation Prices lets you easily control how your price ranges are shown and boosts your store's revenue and profits. You can use it to:
- Only show the minimum price. For example, 'Starting at $15' or 'From $15'.
- Only show the maximum price. For instance, 'Up to $25' or 'From $25'.
- Show prices for all the variants. For example, “Variant 1 - $15; Variant 2 - $25; Variant 3 - $30”.
- Hide prices until the shopper selects a product variant.
- Change the default dash separator. For example, '$15 to $55' or '$15 / $55 ' instead of the default '$25 - $95'.
- Use custom pricing templates to display prices however you prefer.
Get WooCommerce Variation Prices and customize your store's price range display today!