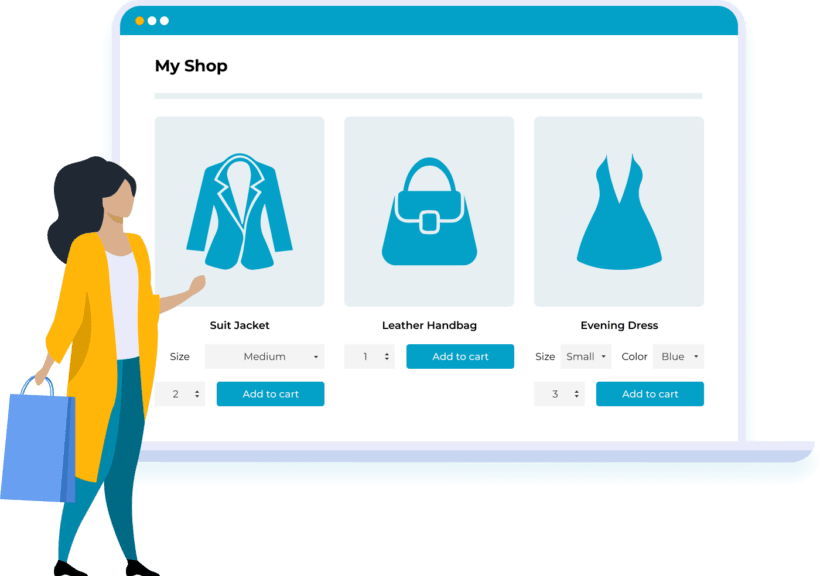
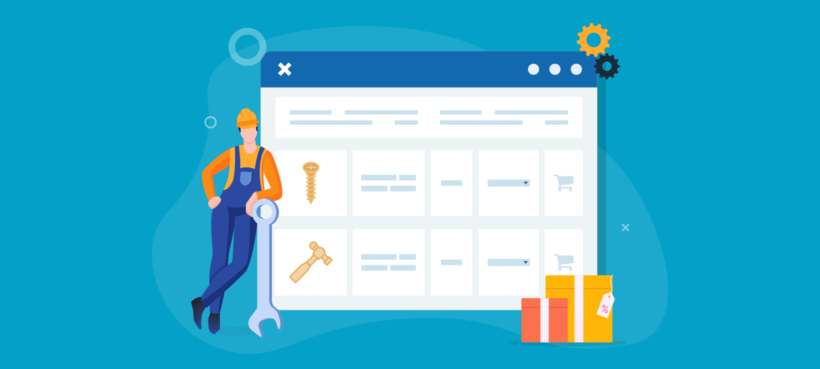
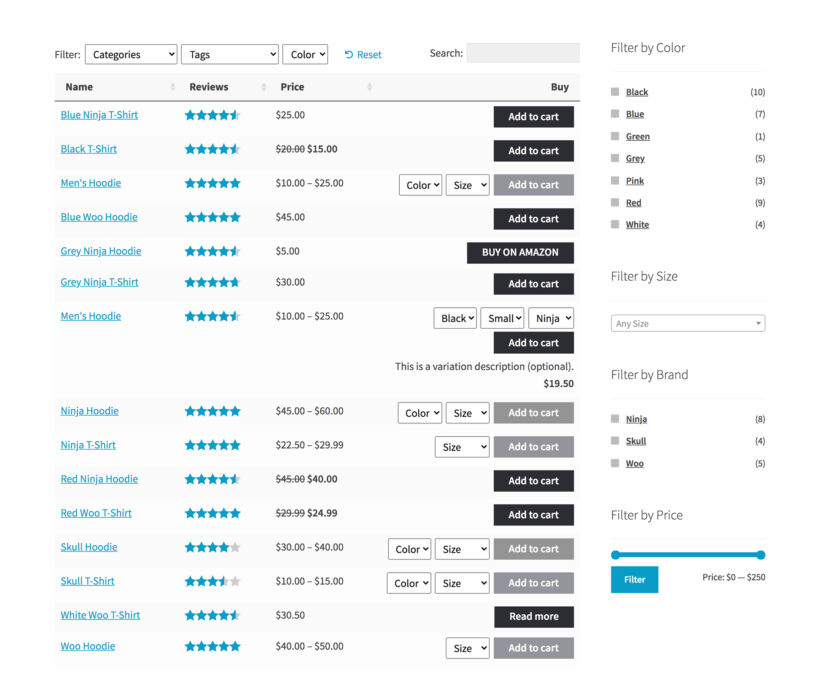
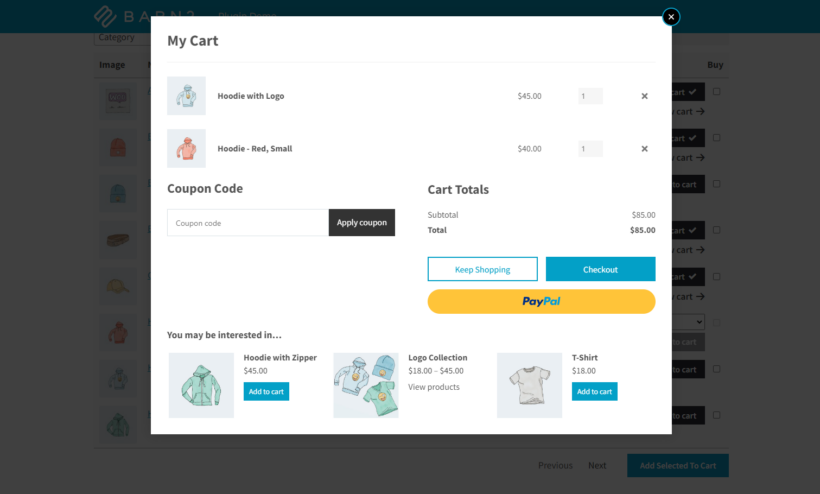
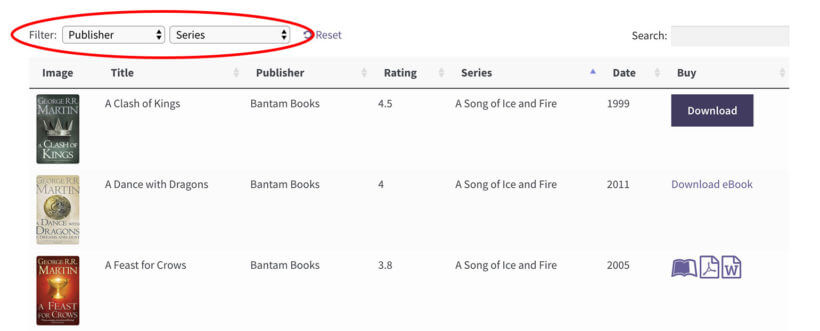
If you're looking for a way to increase sales on your WordPress e-commerce website, it's time to consider a bulk add to cart WooCommerce plugin.
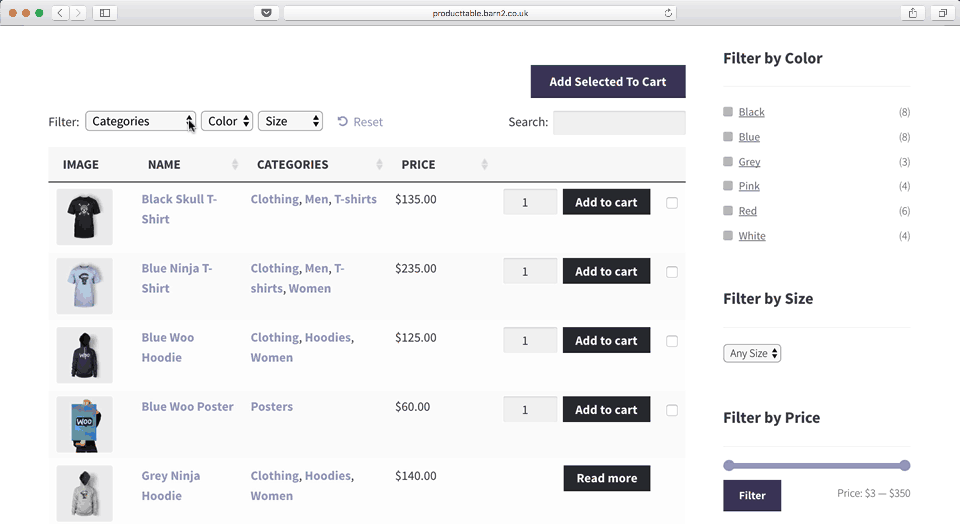
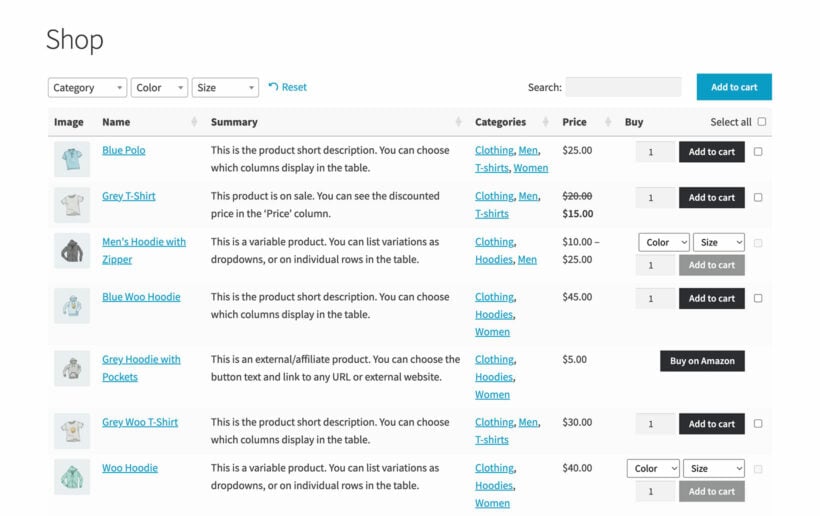
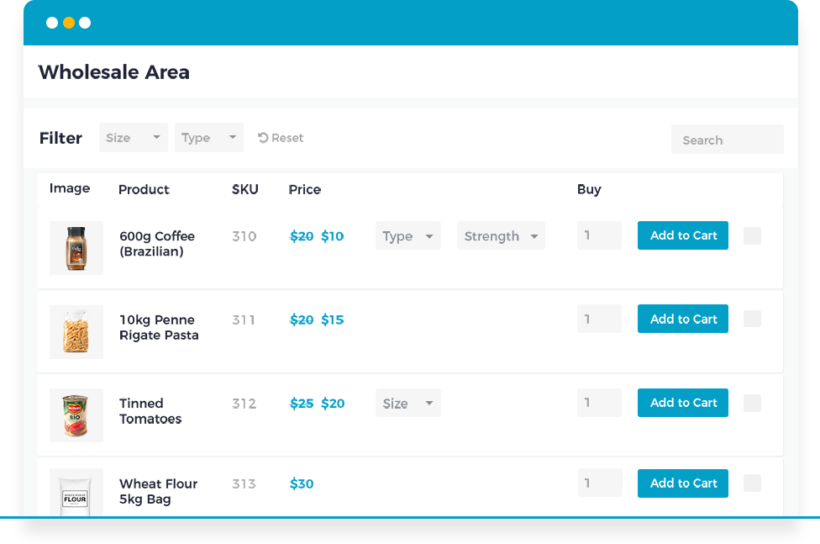
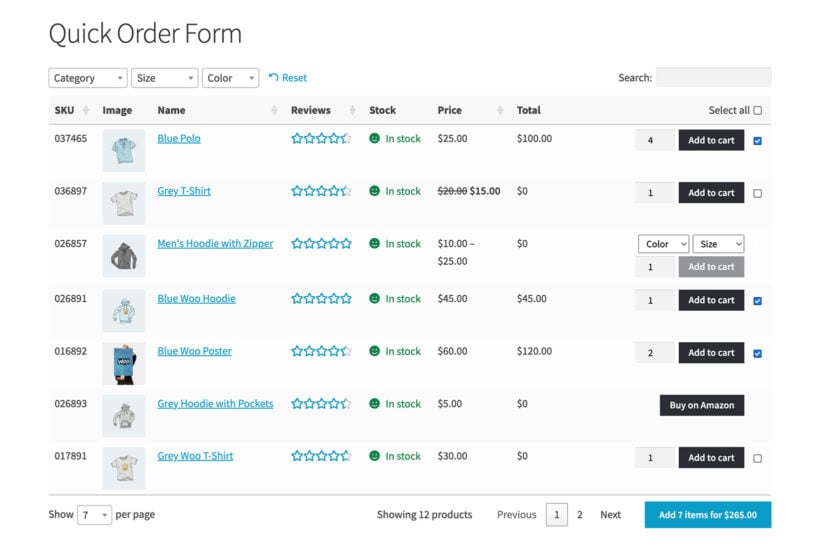
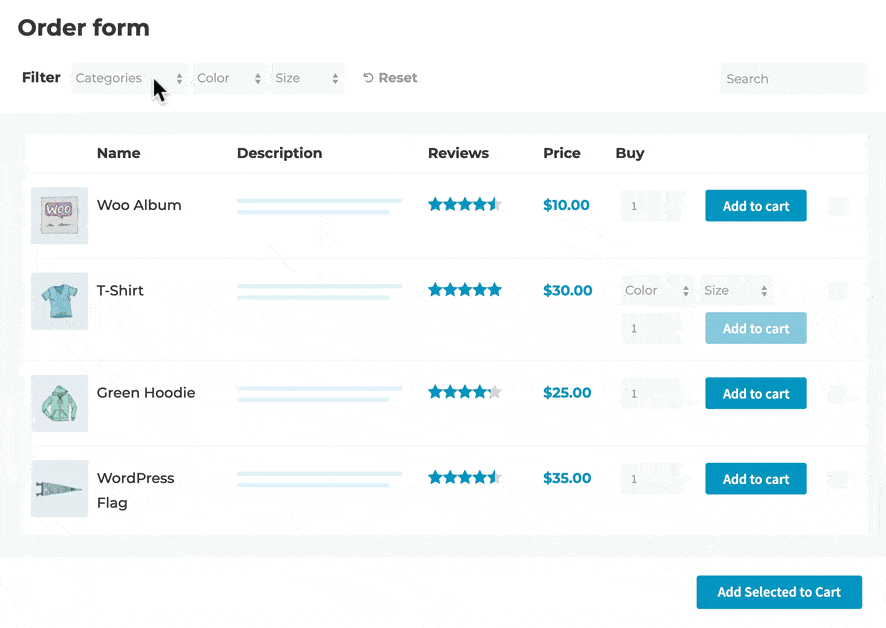
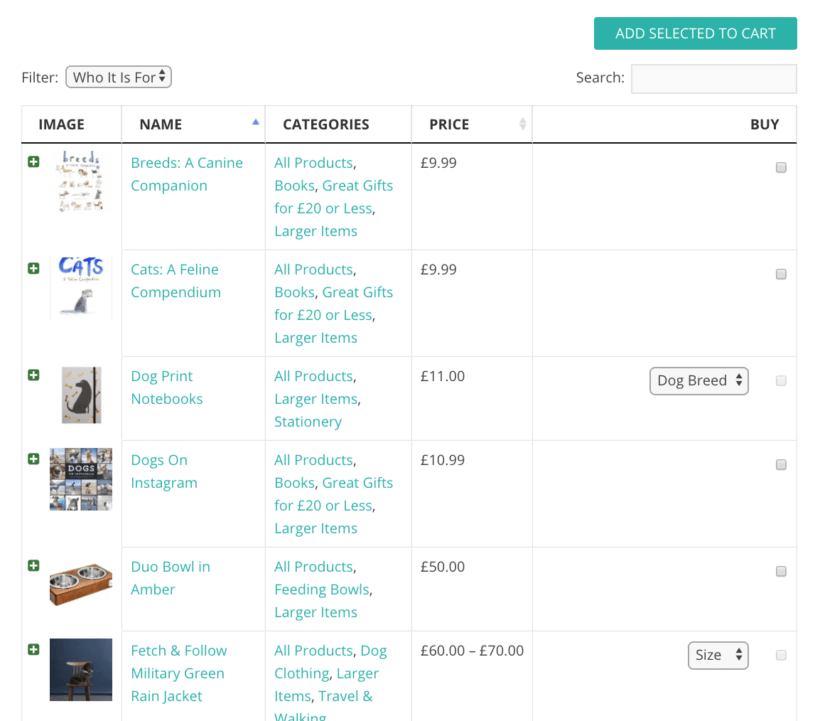
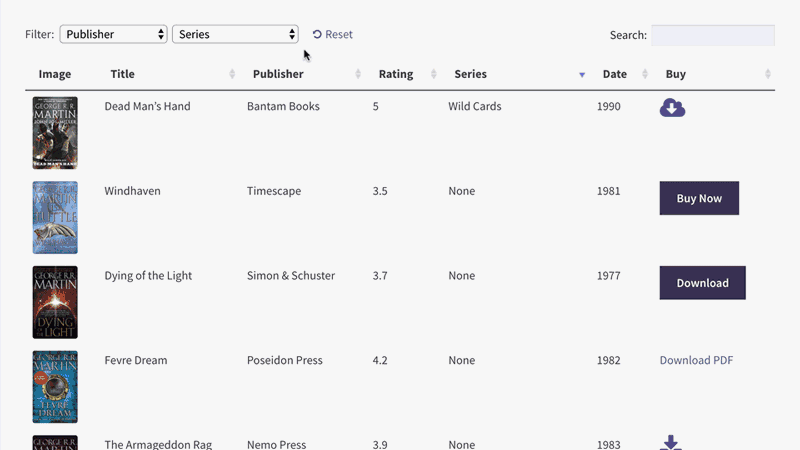
Customers can buy more quickly by adding multiple products to the cart at once. They simply tick a checkbox next to each product and click a button to add them all to the cart:
It's the perfect way to increase your WooCommerce store's conversions.
Today, I'm going to tell you how to use our popular WooCommerce Product Table plugin to add bulk add to cart buttons in WooCommerce.
Let's get started!
What is the bulk add to cart WooCommerce plugin?
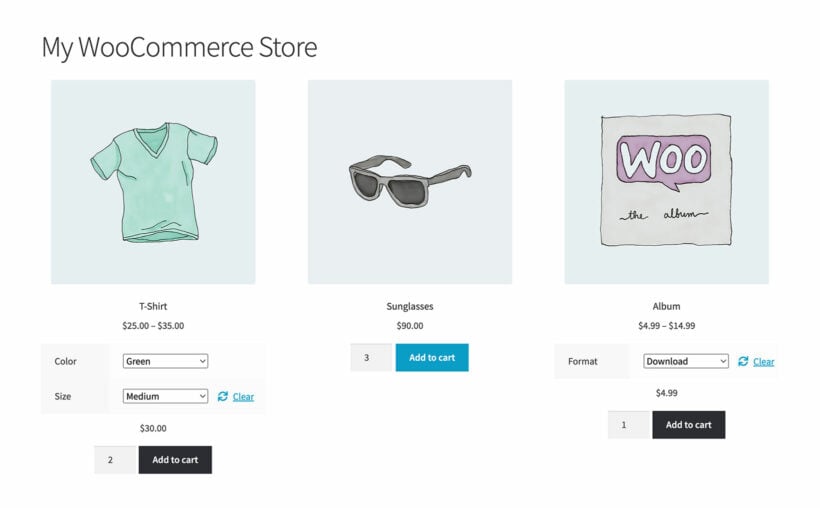
WooCommerce Product Table is our bestselling WordPress plugin and works perfectly as a bulk add to cart plugin.
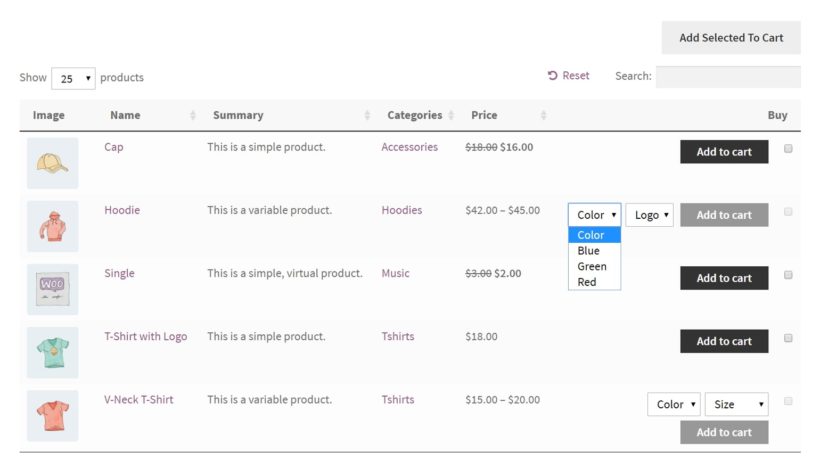
It lists products in a customizable table layout, with a tick box next to each item. There will be an 'Add Selected to Cart' button above and/or below your product tables.
You can create a single product table listing all your products with bulk add to cart checkboxes. Or you can create tables listing specific products only (e.g. by category). There are options to add tables anywhere on your site, or to replace the default layouts on the main Woo shop and category pages.
You can configure pretty much any aspect of your product tables. For example, you can choose which columns of product data display in the table. You can choose whether or not to show quantity selectors and product variations in the table. It's even possible to control how the table and quick add to cart buttons behave responsively on mobiles and tablets.
Here are just a few of the benefits of using bulk add to cart buttons:
Help site users find and add products to cart faster
Make it easier to add products to cart in bulk
Potentially increase conversion rate
Simplify and streamline the buying process
How to add bulk add to cart buttons in WooCommerce
First, get WooCommerce Product Table and install it on your WP website. I'm assuming that you've already got a website with WooCommerce setup and some products.
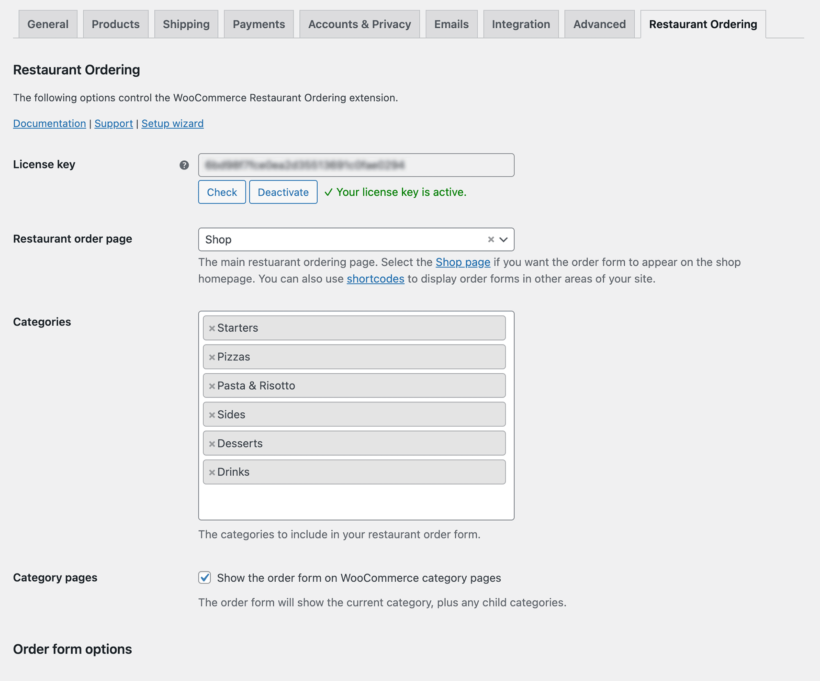
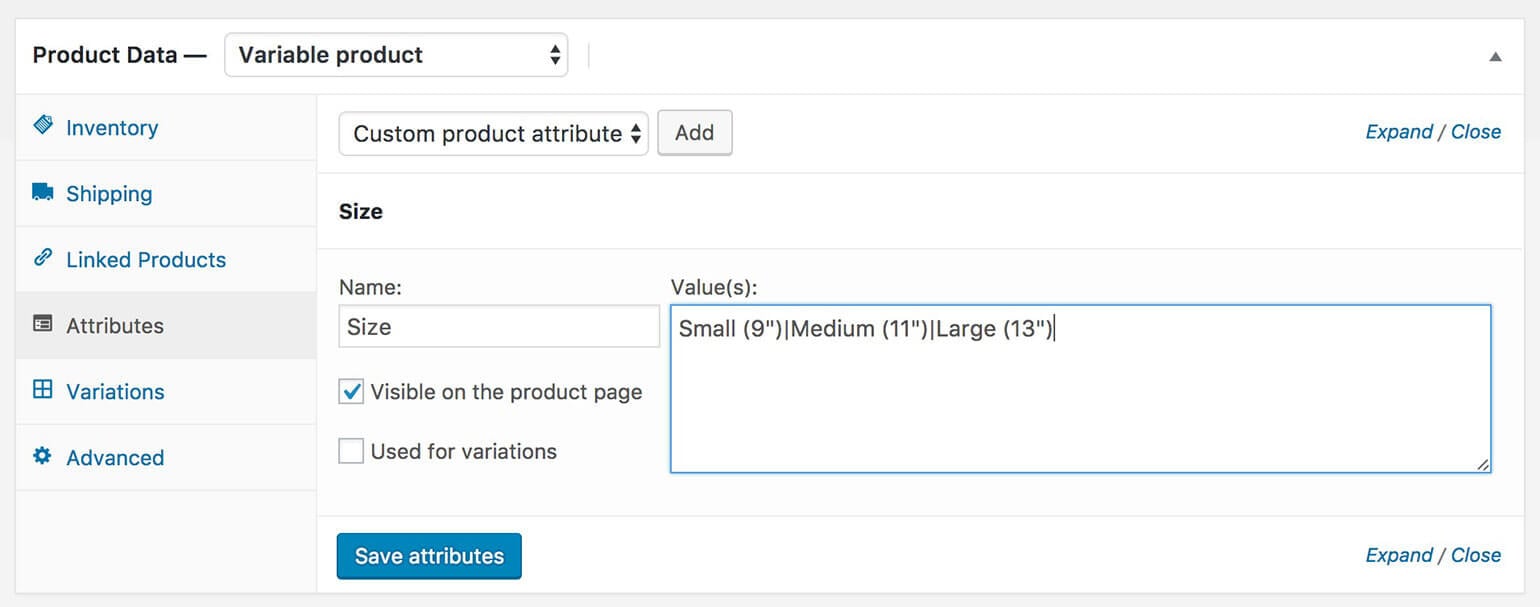
Go to Products → Product Tables.
Next, paste your license key from the confirmation email, and set up your table as required.
On the 'Add to Cart button' page, choose the 'Checkbox only' style to display a bulk add to cart checkbox next to each product. Choose 'Button and checkbox' if you want a add to cart button AND bulk tick boxes.
Now it's time to display the table on your site. There are 3 ways to do this:
The table builder lets you select one or more shop templates to display the table. For example, you can enable tables on shop and category pages.
Add a 'Product Table' Gutenberg block to a page and select the name of your table.
Add the shortcode [product_table id="1"] to the page. Replace "1" with the actual ID of your table on
Products → Product Tables.
Finally, view the page and you'll see your tables with WC bulk add to cart checkboxes next to each product.
Get the most out of quick add to cart options
The whole point of a bulk add to cart Woo plugin is to make it quicker for people to buy from you. With that in mind, I'll give you some tips on how to encourage customers to add bulk products to the cart. Use these to get more sales by encouraging each customer to buy more products.
Are customers likely to add products to the cart in bulk?
First, you need to decide whether the products you sell will benefit from quick buy options such as a bulk add to cart WooCommerce plugin. Multi-select checkboxes are a major asset to many WooCommerce stores (including wholesale WooCommerce stores). However, they're not for everyone.
Customers are more likely to add products to the cart in bulk when you're selling relatively small, low-cost items; or products that are designed to be used together.
Examples of products that benefit from quick add to cart checkboxes
Low cost products
Low cost products sell better with a bulk add to cart WooCommerce plugin. This applies to any store where each product isn't a major buying decision with low value products. For example, stationery, cosmetics and make-up, food and drink, gifts and toys.
Subtle improvements like quick buy checkboxes can convince them to buy more. Further encourage this with postage discounts for bulk items, or quantity-based bulk discounts.
Make sure your customers know they can save money, and use a bulk add to cart WooCommerce plugin to make it quick and easy.
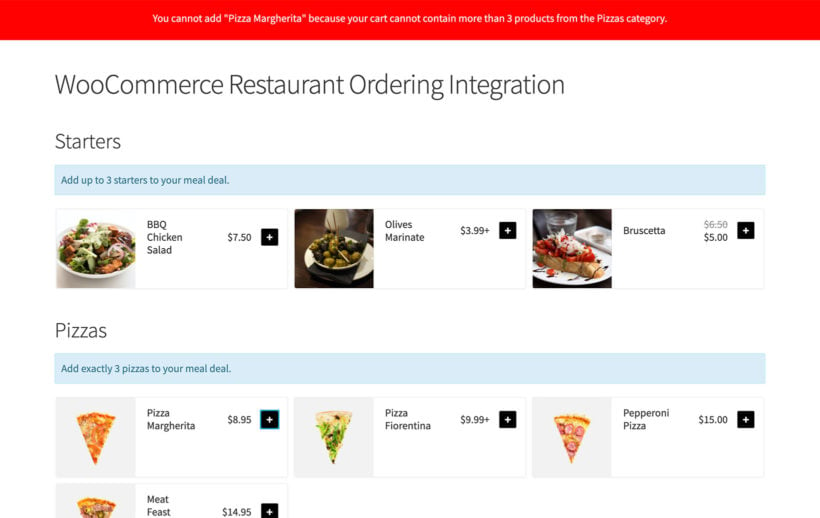
Build a box
WooCommerce Product Table is popular for selling build-your-own products such as gift hampers or wine boxes.
The box contents are listed in a table. Customers use the quick add to cart buttons to bulk select the box contents. Once they've ticked the required items, they add all selected products to the cart at once.
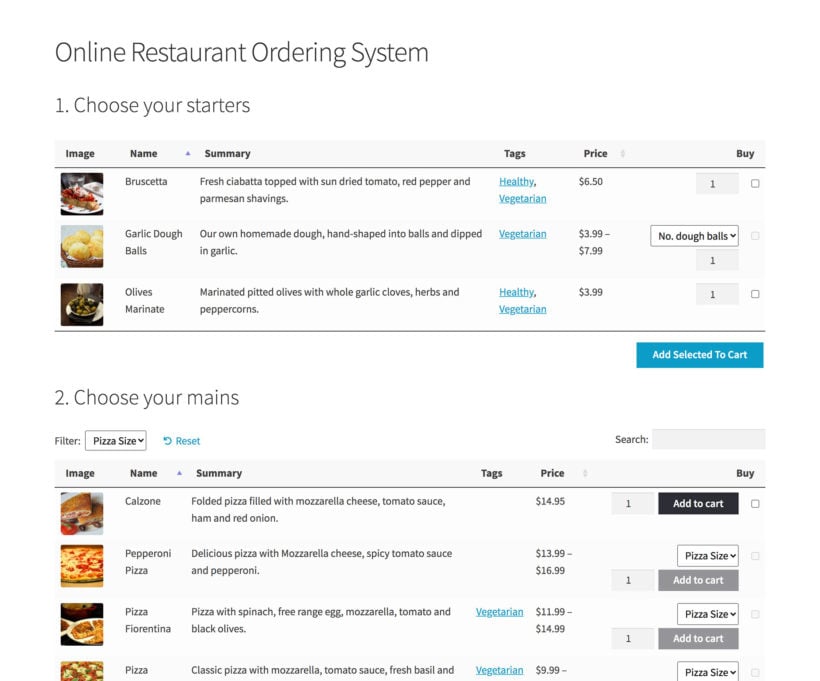
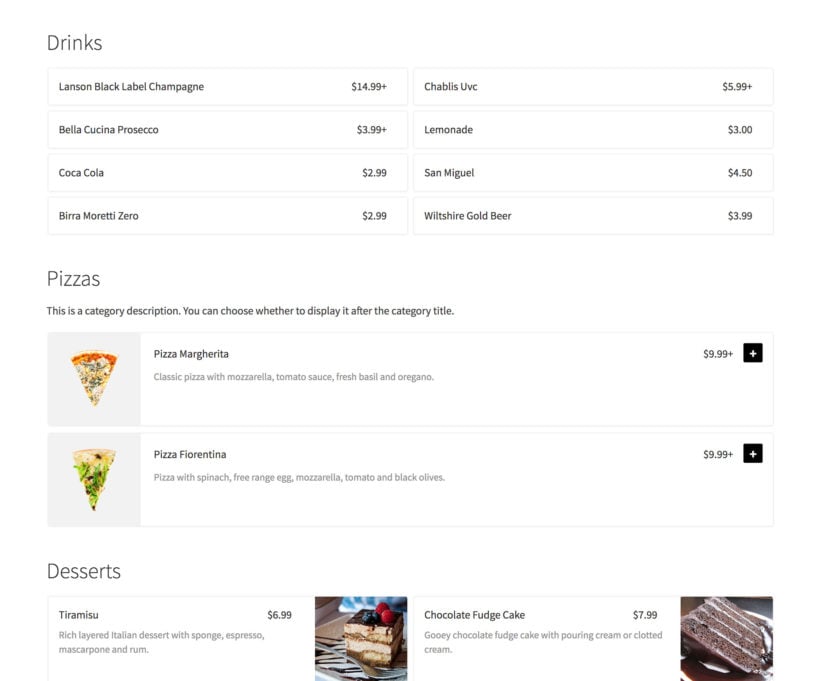
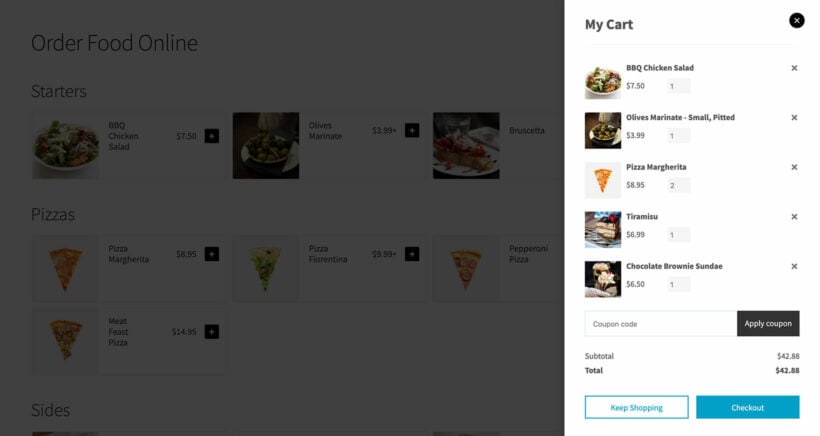
They add their restaurant menu to a single page, with a separate product table for each section (e.g. starters, mains, sides). Each product table has bulk add to cart buttons with an 'Add Selected to Cart' button.
Customers tick all the food options from one table, add them to the cart in a single click, and then choose items from the next table. This is much quicker than clicking individual add to cart buttons for every product.
Related products and sets
If you're selling products designed to be used together, then WooCommerce bulk add to cart buttons will make the process more user-friendly. Perhaps you're selling kitchen units where customers choose their own combination from a set of items such as worktops, cabinets and doors.
Customers need to plan their entire purchase before adding to the cart. When they're ready to order, WooCommerce bulk buy checkboxes make it much quicker to buy.
Case study - using a WooCommerce add to cart plugin to sell items in bulk
Darren Bowen Photography sells a range of products printed with Darren’s unique artwork. To help customers quickly buy products there are two bulk ordering pages powered by WooCommerce Product Table. One for mugs and the other for iPad smart covers.
To buy in bulk, you simply select the quantities and use the “add to cart” function or check the “buy it” box. Once you’ve put everything you need in the cart, you can check your order before making your payment. And to keep things simple, there's an easy to use one-click checkout system.
Keep reading to learn how to add similar WooCommerce bulk order forms to your own site.
Which WooCommerce products don't need bulk add to cart buttons?
As you can see, many types of product will sell best with a plugin that provides quick buy options. However, a bulk add to cart WooCommerce plugin isn't going to help you with major purchases such as selling furniture online. If each purchase is a major decision for the customer, then adding quick check boxes won't really encourage them to buy more.
Think about whether the types of product in your store lend themselves to a quick bulk add to cart format.
Show important buying information in the table
There's no point having a WooCommerce bulk add to cart plugin if customers still need to visit the single product page before they buy. The whole purpose of the quick add to cart checkboxes is to allow customers to add products in bulk directly form the main shop or product listings page.
This means that your WooCommerce product tables need to contain all the information that is needed to make purchasing decisions. You can do this by choosing which columns appear in the product table.
Joseph uses the WooCommerce Product Table plugin to include a quantity field in his product table:
This plugin is absolutely fantastic. I have been looking for a plugin just like this for a while now. I so glad I discovered this one. I wanted a quick, nice way to have my many products listed in a table with a quantity field and an add to cart button. This plugin was the answer. I love the way you can customize the table to include only the columns you want and how you can order the table by a specific column. I would totally recommend this plugin.
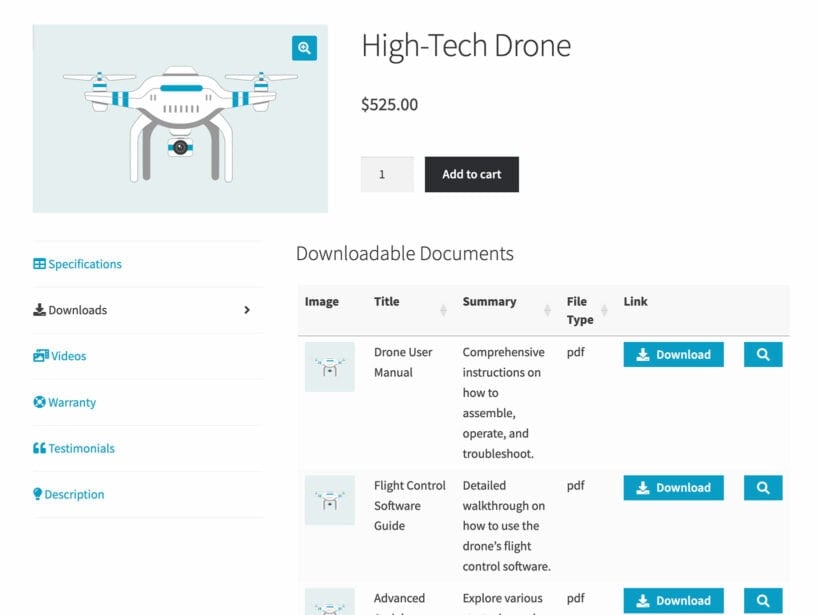
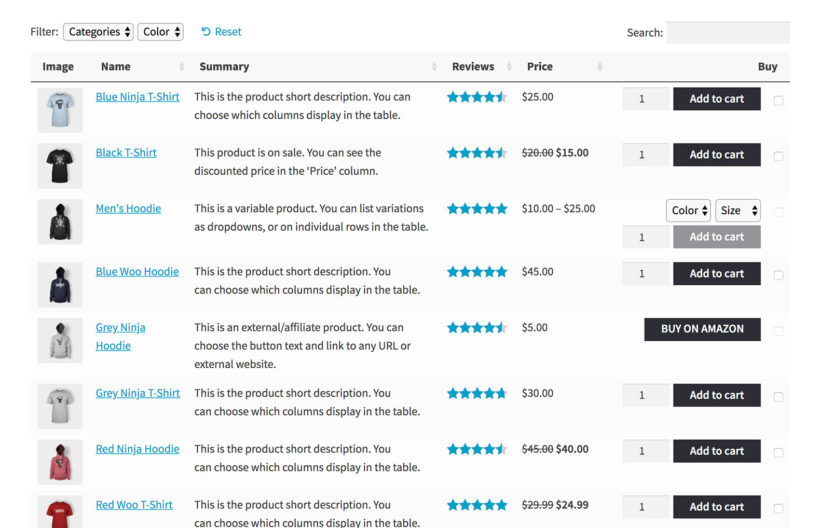
The WooCommerce Product Table plugin supports all the standard product data that WooCommerce stores. Read the full list of available columns and choose your columns wisely. Add the product data that will actively encourage customers to buy without clicking elsewhere. You can even add extra data such as custom fields and taxonomies. These are ideal for adding any further information or downloadable documents that will help customers to reach a quick buying decision.
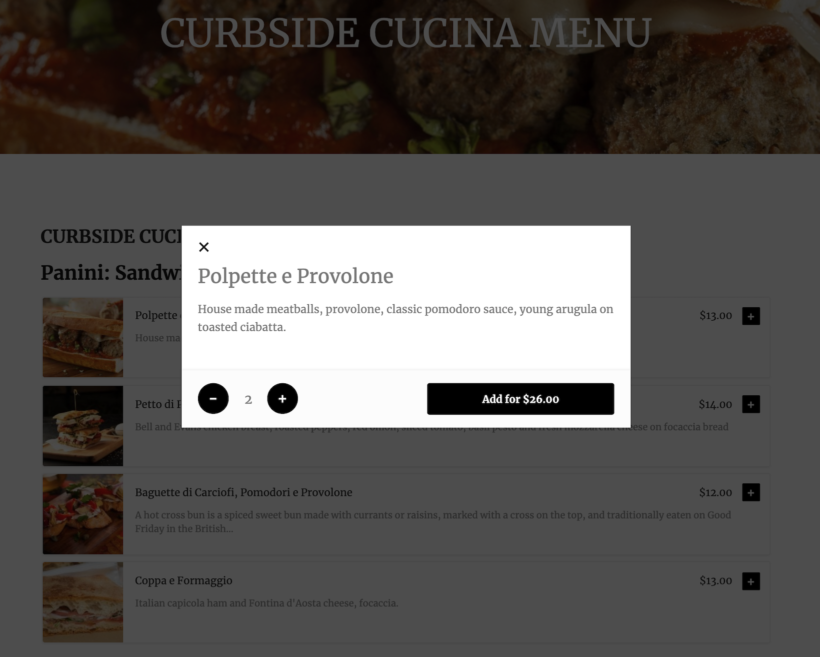
Add a quantity picker and variations
Customers will only use the plugin's bulk add to cart checkboxes if they can select product options directly from the product table view. This means that you need to make these options available alongside the quick add to cart buttons. This includes:
Activate the quantity selector on the WooCommerce Product Table plugin settings page. This lets customers choose a quantity before selecting the product and adding it to the cart.
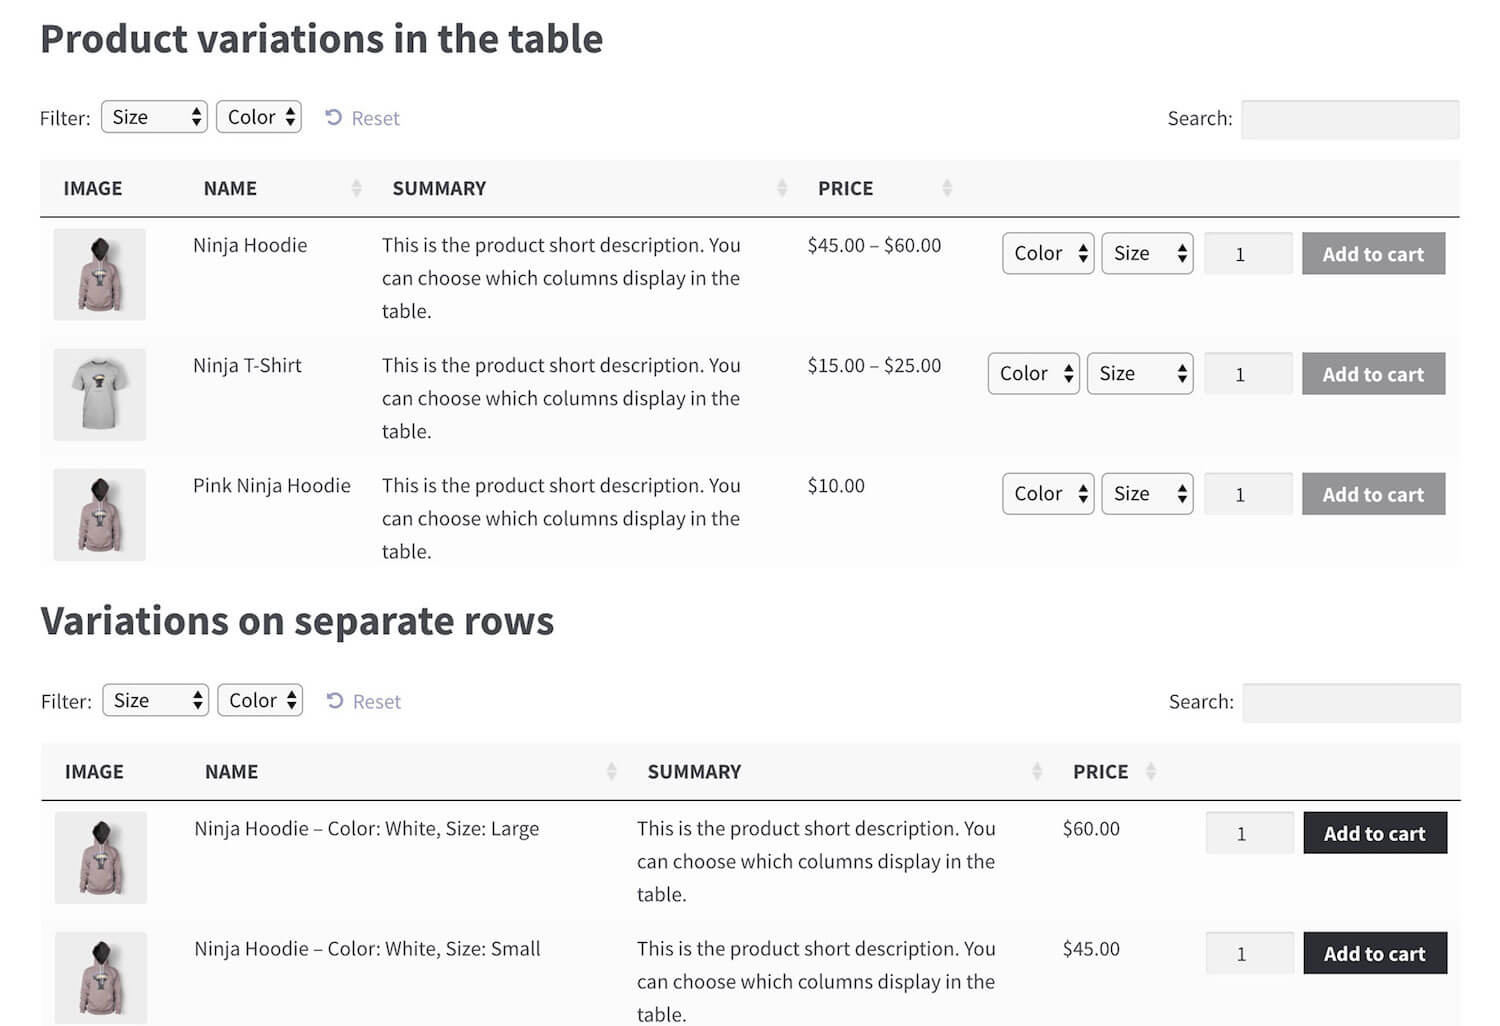
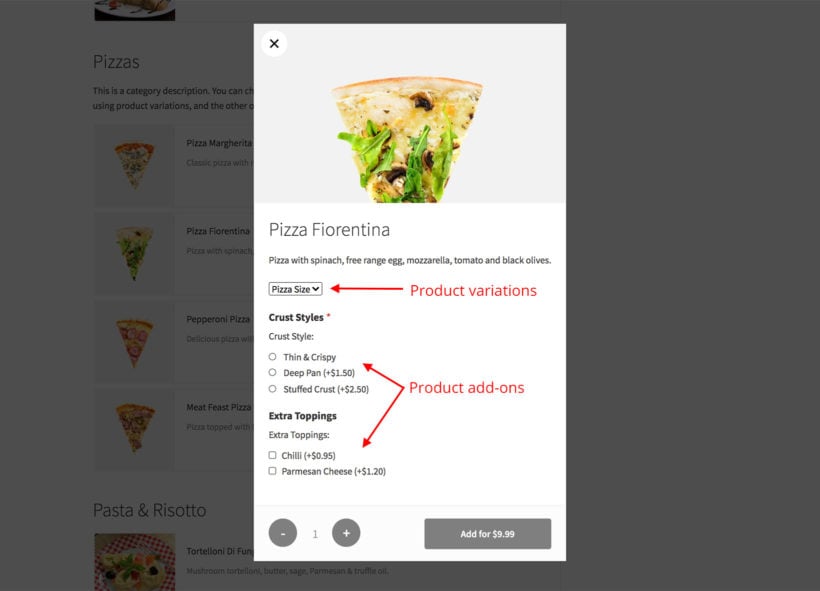
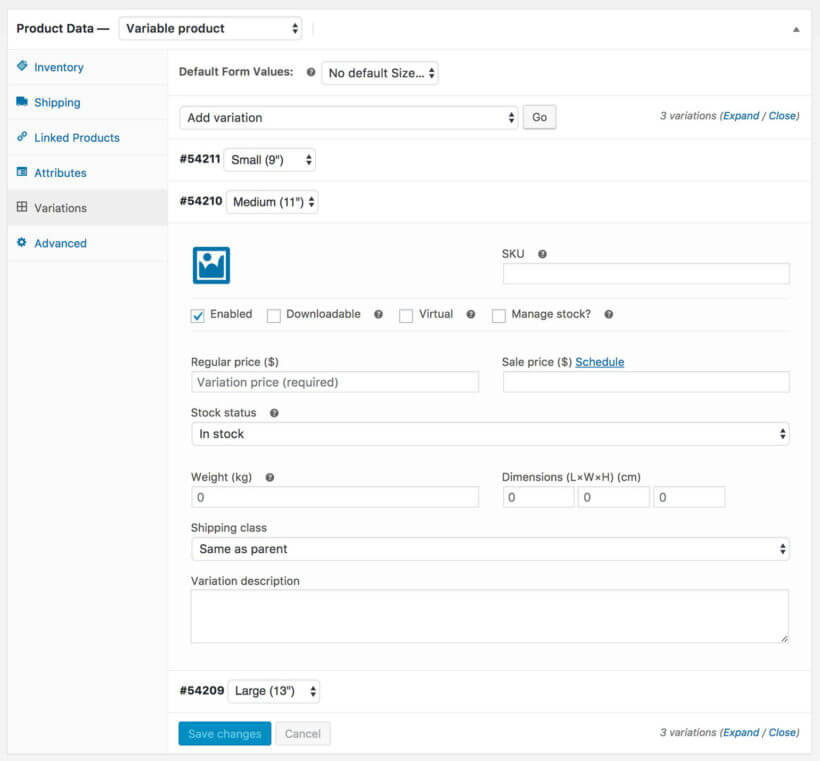
Use one of the options to show variable products in the product table. You can show product variations as dropdown lists next to the bulk add to cart boxes. Alternatively, each variation can have its own row in the product table with a separate add to cart checkbox for each one.
If you're using the WooCommerce Product Options plugin with WooCommerce Product Table, then extra product options will appear next to the bulk add to cart check boxes. These two plugins work perfectly together, so this is a good way to add extra product options if variable products aren't right for you. For example, you can add extra options as checkboxes and radio buttons, or even add text fields where customers can add a personal message for each product. All this works directly on the product listing page, so customers can choose their options and add products to the cart in bulk.
Help customers find products faster
Built-in options
Bulk add to cart buttons are just one way to speed up the buying process in WooCommerce. It works because products become more visible, faster. The WooCommerce Product Table plugin comes with plenty of features to help customers find products more easily. All these improvements work together to truly improve your sales and increase conversions.
For example, add filter dropdowns or filter widgets to let customers quickly refine the list of products. They can choose their filters, view a list of products they're interested in, tick the boxes and add products to the cart in bulk. Keyword search above the product table offers another way to do this.
Performance and page load time is also important. If you have lots of products, you can use the lazy load option to load fewer products at a time. Lazy load lets you list hundreds or even thousands of products in a table. It minimizes load time and avoids potential speed and performance issues.
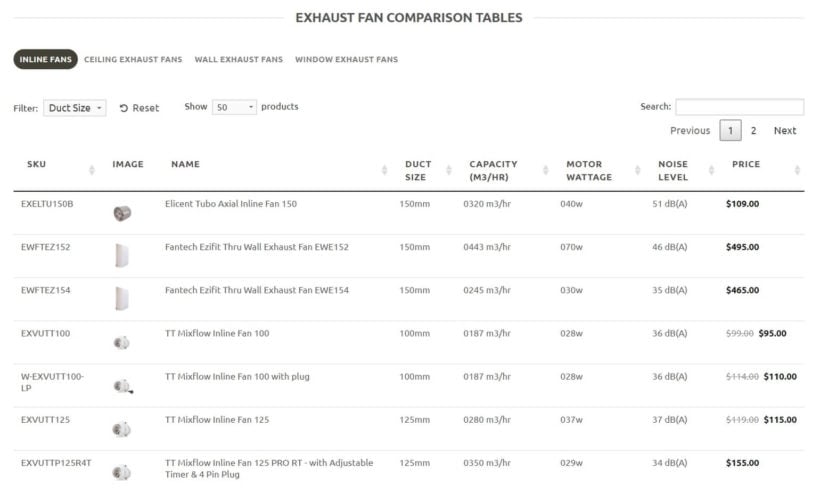
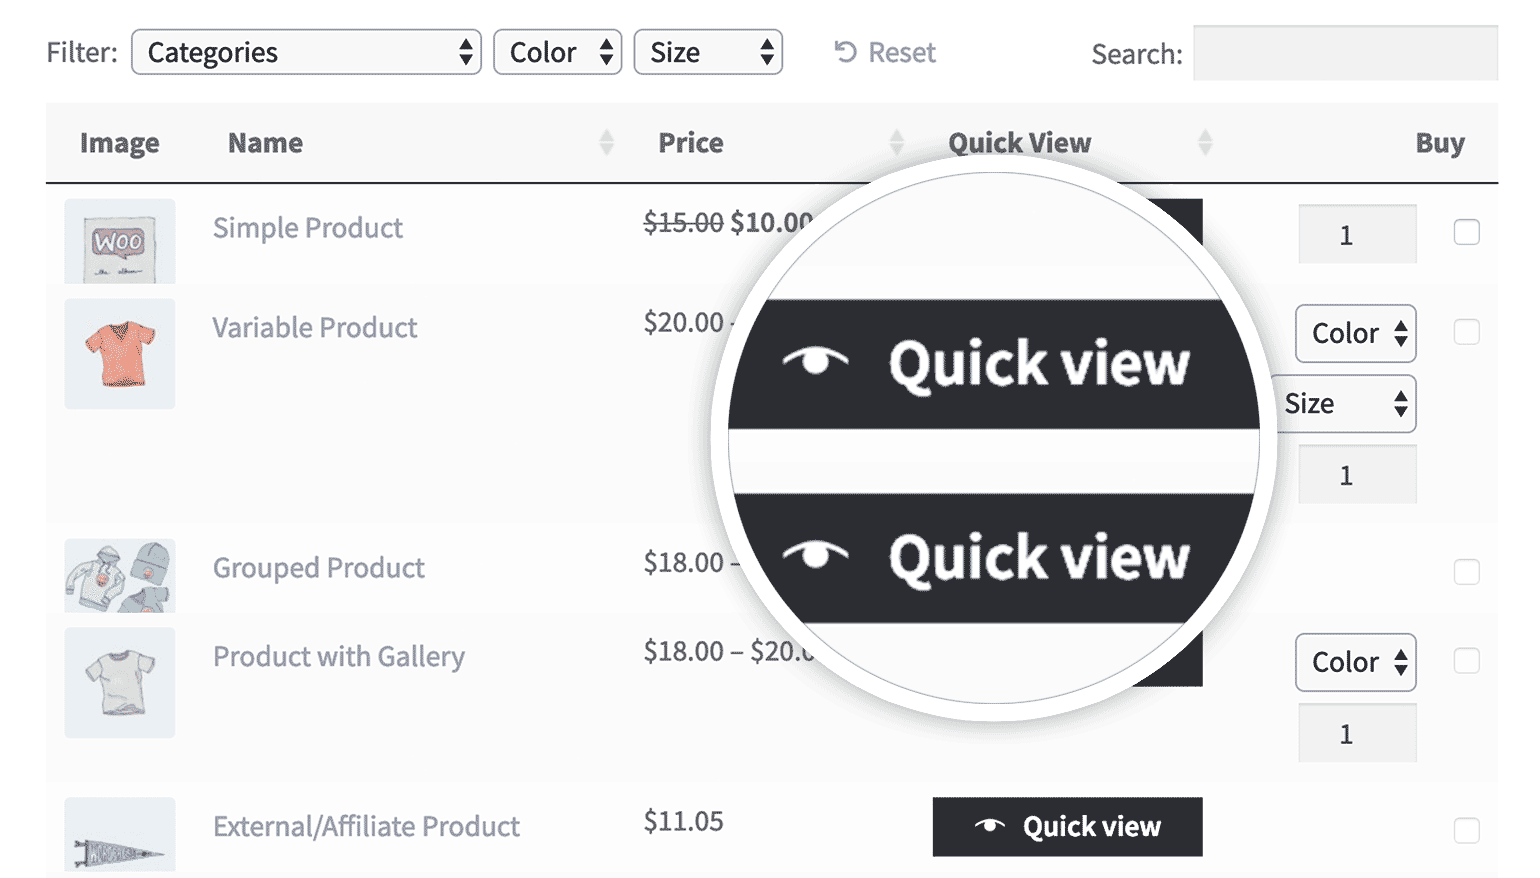
Advanced filtering plugin
For stores that need bulk add to cart options with more advanced filtering, you can use WooCommerce Product Table with its sister plugin - WooCommerce Product Filters. This adds even more sophisticated filters to your bulk order forms, as you can see in the screenshot above.
Bonus tip #1 - force customers to buy in bulk
The Product Table plugin makes it easy for customers to add bulk quantities and add several products to the cart at once. However, customers can still buy small quantities if they want.
If you only want to receive bulk orders, then you need to use WooCommerce Product Table with a minimum quantity plugin. It is designed to work alongside the Quantity Manager plugin, which lets you set different types of WooCommerce minimum quantity rules.
For example, you can set a minimum order quantity or value to prevent customers from placing small orders. Alternatively, you can set minimum quantities for the whole order or per category, product or variation.
Either way, WooCommerce Quantity Manager helps you to guarantee your profit margins by stopping customers from placing non-bulk orders.
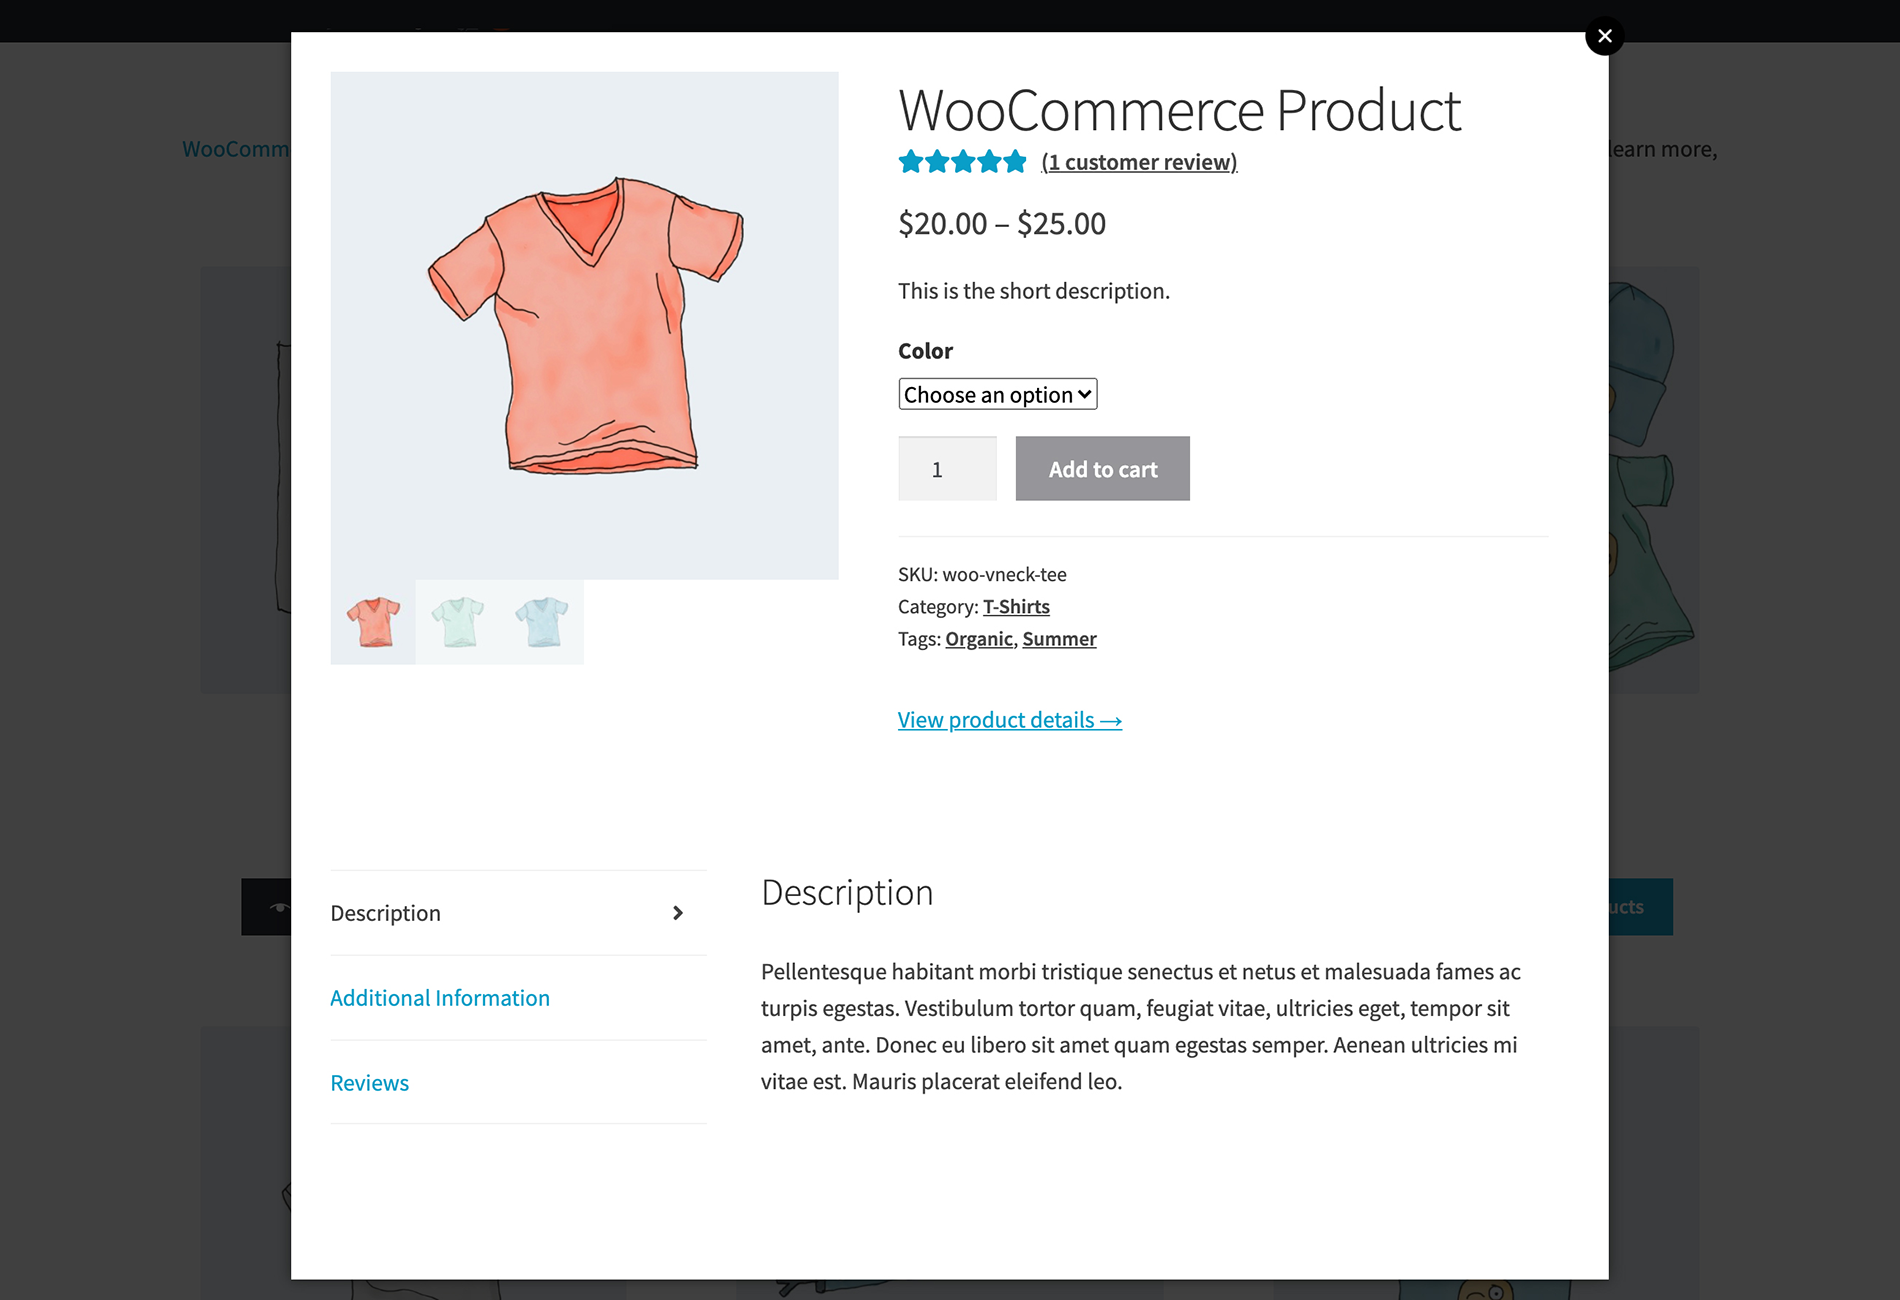
Bonus tip #2 - add quick view links to your product tables
Bulk add to cart plugins are all about helping customers to buy as quickly as possible. So what happens if you have too much information, or too many product options, to fit in the product table? Obviously, you don't want customers to have to visit the single product page. After all, this would slow down the buying process and defeat the purpose.
Instead, you can enhance your product tables with the WooCommerce Quick View Pro plugin. This handy plugin works hand-in-hand with WooCommerce Product Table and your bulk add to cart buttons. It adds quick view buttons or links to the product tables. Customers can view more product information and purchase options in a quick view lightbox. They can then either select variations and add to the cart directly in the popup, or they can quickly close it and use the bulk add to cart buttons in the product table.
Bonus tip #3 - a quick popup cart
Adding products to the cart in bulk lets customers order more quickly and easily. However, they can still lose time completing the standard multi-page WooCommerce cart and checkout.
To optimize the second half of the customer purchase process, I recommend installing WooCommerce Fast Cart. This plugin displays the WooCommerce cart and checkout in a popup after customers add products to the cart in bulk. They can complete their order from directly within the popup. This is so much faster than having to visit several pages after adding products to the cart.
Install WooCommerce Fast Cart for an on-page cart and checkout.
Now you can create your own WooCommerce bulk add to cart buttons!
Now you know everything about how to use a bulk add to cart WooCommerce plugin. It's the easy way for customers to add more than one products to the cart at once. As you have seen, it will really speed up the buying process on your store.
Research shows that faster customers can use an e-commerce shop, the higher your conversion rate and sales will be. Test the add to cart checkboxes on our WooCommerce quick order form demo. Get the plugin today and add bulk add to cart buttons to your WooCommerce store straight away!
Whether you're looking for a WooCommerce catalog mode plugin that displays products without purchase options, or lists them in a catalog-style format, we've got you covered. In this complete guide, I'll show you how to create both types of WooCommerce product catalog.
The phrase "WooCommerce catalog mode" can be a bit confusing. That's because people use it to refer to different things:
Catalog mode definition 1: Showing products in an online store without ecommerce functionality - either globally or so that certain user groups can view but not purchase.
Catalog mode definition 2: Displaying products in a structured table-based layout which replicates traditional printed product catalogs.
Whichever type of WooCommerce product catalog you want to create, I'll show you how to do it.
We'll use the YITH WooCommerce Catalog Mode plugin to achieve definition 1; and WooCommerce Product Table for definition 2. You can either use them alone, or together if you want to list products in a structured table with purchasing disabled. Either way, you can easily put your store in catalog mode without writing any custom PHP or CSS.
A structured WooCommerce product catalog created with the Product Table plugin
Option 1: Put WooCommerce in catalog mode with purchasing disabled
This definition of catalog mode involves creating a WooCommerce store in which products are available for everyone to view, but not everyone can purchase them. You might disable purchasing for all users, or guest users without an account.
For example, many WooCommerce wholesale-only stores like public users to be able to browse their full product catalog, but only approved wholesalers can purchase. Alternatively, you might want to disable online ordering if customers can only buy from you in person or over the phone.
Next, I'll tell you about a choice of 2 excellent plugins which you can use to put WooCommerce into catalog-only mode.
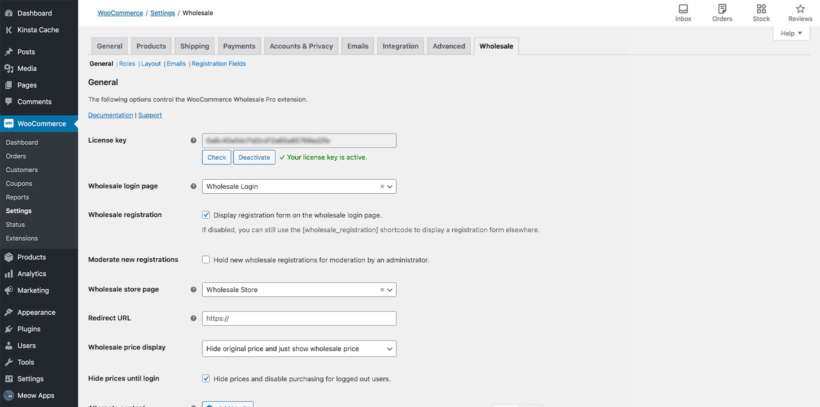
WooCommerce Wholesale Pro
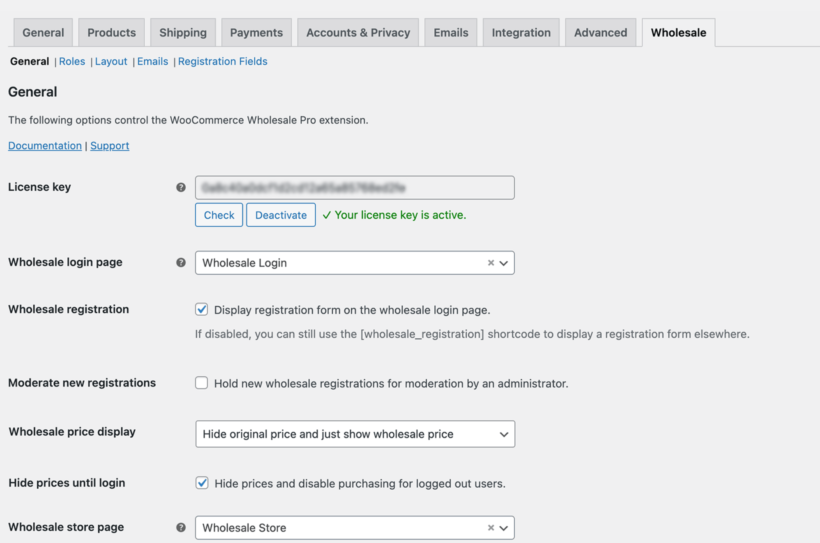
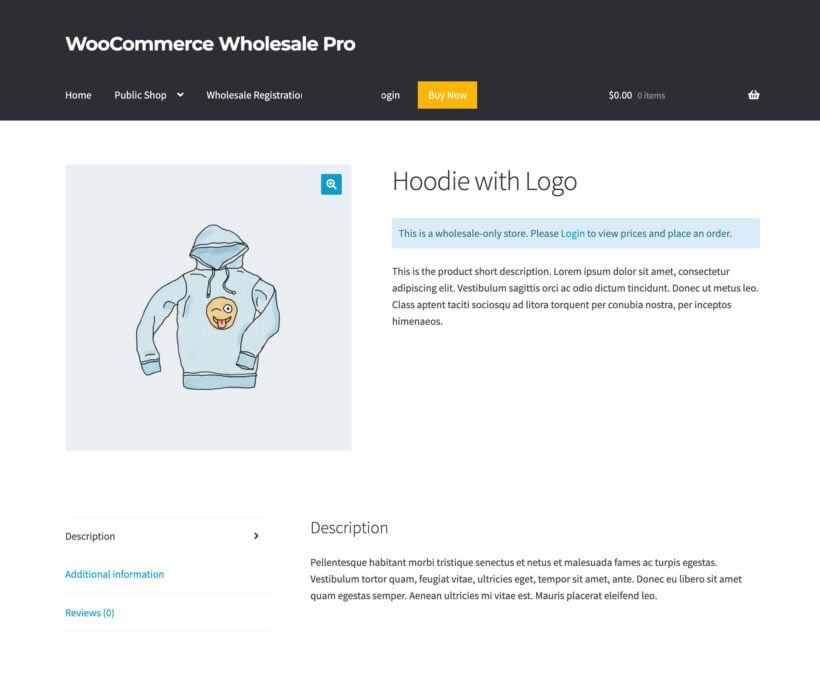
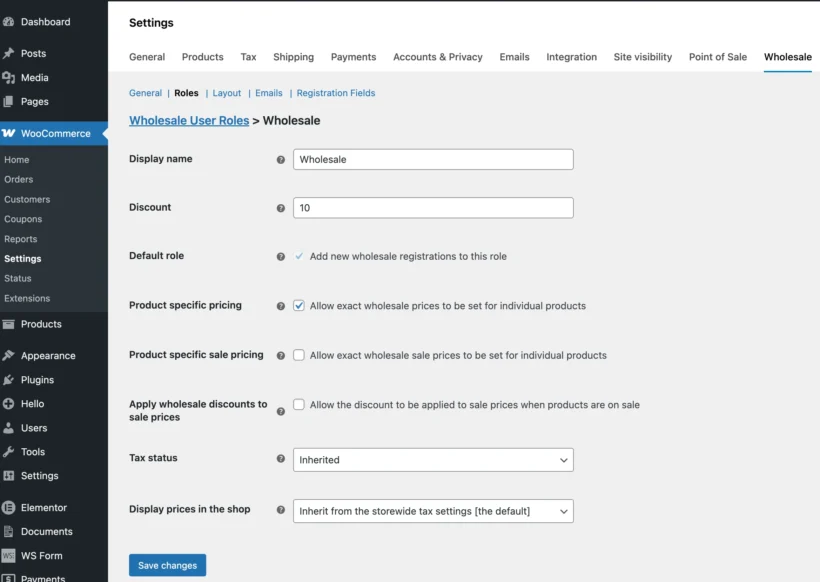
If you're running a wholesale store, then WooCommerce Wholesale Pro has everything you need. It has a 'Hide Price Until Login' feature which puts the store into catalog mode for all logged out users. When they log into their account, the prices become visible and people can purchase the products.
This is how to set it up:
Purchase and install WooCommerce Wholesale Pro on your WordPress site.
Go to WooCommerce → Settings → Wholesale.
Enable the 'Hide prices until login' checkbox.
When wholesale users log into their account, they will see the products with prices and add to cart buttons as usual. Everyone else will see the products listed without prices or buy buttons. You can optionally display a notice which non-wholesale users will see, like this:
For non-wholesale stores, the YITH WooCommerce Catalog Mode plugin offers an excellent way to put stores in catalog mode.
It disables the ability for some or all of your customers to order from your WooCommerce store. The products are listed in catalog-only format, without the usual ecommerce functions.
The free plugin is perfect for testing out the waters. The premium version has lots of extra features. For example, it lets you enable catalog mode for users without an account only:
Head over to YITH → Catalog Mode in the WordPress admin dashboard.
From the Settings tab, configure the following plugin settings:
Make sure the checkbox next to Enable YITH WooCommerce Catalog Mode is ticked.
Tick the checkbox next to the Hide in product detail page option.
Tick the checkbox next to the Hide in other shop pages option.
Optionally, you can choose to tick the checkbox next to the Hide and disable “Cart” page, “Checkout” page and all “Add to Cart” buttons. This essentially lets you remove e-commerce features (i.e. cart and checkout pages) from your WooCommerce store.
Customers can see your WooCommerce products listed in catalog mode, without an option to buy. Once they click on a product, they will be redirected to the single product page. Alternatively, you can choose to redirect them to a custom URL.
The YITH catalog mode plugin removes add to cart buttons and prices from single product pages. This means customers won’t be able to add products to cart from the product table or from the single product page. However, they can view all product details from individual product pages. Of course, it also disables the cart and checkout pages.
Option 2: Create an interactive catalog with WooCommerce Product Table
Now, we get to the second definition of "WooCommerce catalog mode". This refers to displaying your products in a structured catalog layout, similar to a printed product catalog. We'll do this using the WooCommerce Product Table plugin.
WooCommerce Product Table is incredibly flexible. You can choose what product data to display, change the sort order, and much more. You can list products in a fully functional catalog-style order form like this:
Alternatively, you can list products without prices, add to cart buttons or links to the single product page like this:
Either way, this type of WooCommerce catalog plugin is ideal for creating a 1-page view listing some or all of your products. It makes it easy for customers to sort products and find what they're looking for.
A catalog layout displays products in a neater and more compact way to the default Woo store layout. This makes it possible to display more products per page, so customers can view them all together. It's perfect if you need a larger WC product catalog table, for example if 100's or 1,000's of products.
This type of product catalog layout has many possible uses, such as:
WooCommerce order form - Your product catalog can include Add to Cart buttons or tick boxes to add multiple products to the cart. This lets it double as a fully functional order form for WooCommerce. Or you can hide the add to cart facility to create a read-only WooCommerce catalog.
Product directory - A product catalog can also function as a complete WooCommerce directory, with large numbers of products listed in an easy-to-find format.
WooCommerce wholesale- Use it with the WooCommerce Wholesale Pro plugin to list all your wholesale products in a structured catalog layout to help trade users quickly find and order their products.
1. Setting up a product catalog table
Next, I'll show you how to list products in a table-based catalog. This is all about the layout, and doesn't affect whether or not people can purchase your products. (However, you can do this by choosing not to include an add to cart column in the table and by disabling the links to the product page.)
Watch this video about how to add a catalog-style table to your site, or read the instructions below:
Go to Products → Product Tables → Add New to launch the table builder.
On the first page, choose whether you want to enable the product catalog view for your main shop pages, or add the catalog manually to another page.
You can then use page 2 to either select which shop pages to display the catalog on; or to select which products to include in the catalog.
2. Customizing the catalog display
The next step of the product table builder lets you choose which product data to include in the catalog. Add columns as needed:
If you want your products to be purchasable from the catalog page, then include an Add to Cart column.
You can also edit each column name. Disable the 'Show column heading' toggle to prevent people from clicking through to single product pages. This is a good idea if you're using WooCommerce Product Table as a read-only catalog, as single product pages contain 'Buy' buttons. (Tip: If you want to use catalog-only mode and single product pages, then use WooCommerce Product Table together with YITH WooCommerce Catalog Mode. This disables the add to cart buttons from the single product page, too.)
3. Adding search and filter
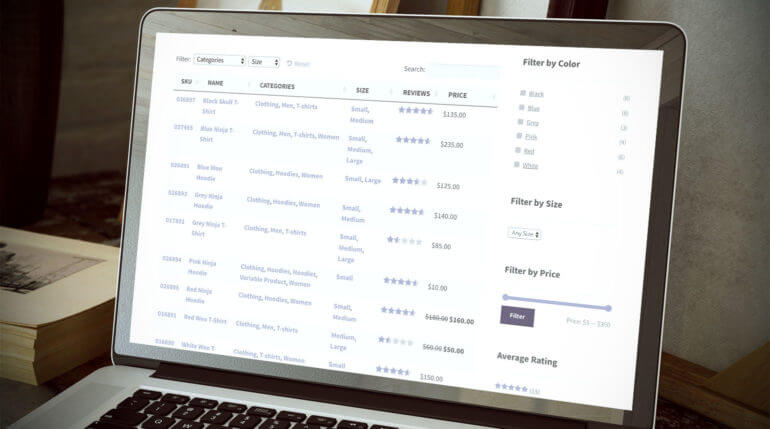
The 'Search & sort' step of the table builder lets you add filters which appear above the WooCommerce product catalog. Add filters if you'll be displaying lots of products on the same page of the catalog:
Tip: The product catalog plugin also supports all the WooCommerce filter widgets. These include a widget to show the active filters, a layered nav filter listing product attributes, a price slider and ratings filter:
4. Add the WooCommerce product catalog to a page
Ignore this step if you already enabled the product catalog on your main shop pages.
Now, go to the page where you want to display the WooCommerce product catalog. Add a 'Product Table' block. Or, if you're not using the WordPress block editor, then get a shortcode from Products → Product Tables and insert that instead.
Publish the page and click View Page to see your WooCommerce catalog table. You'll see a dynamic catalog listing all your WooCommerce products.
Example without online purchasing:
Example with online purchasing:
Advanced catalog features
Role-based pricing
Lots of stores that use catalog mode like to charge different prices to different types of user. Wholesale stores can use the WooCommerce Wholesale Pro plugin for this, which we discussed earlier. Alternatively, other types of store might prefer the WooCommerce Discount Manager plugin. This provides a wide range of discounts and deals which you can create for specific user roles only.
Other stores that use catalog mode need a way for customers to request a quote. That way, they can disable purchasing while allowing customers to request pricing and then order later.
Before we finish, I should mention that there's actually a third definition of WooCommerce catalog mode. It involves creating a WooCommerce PDF catalog, which lists downloadable PDF documents on the product page.
This is a different type of product catalog because it involves listing PDF's in a catalog, instead of listing actual products. You can easily do this by installing the Document Library Pro plugin. Upload your PDF's, categorize or tag them based on which products you'll display them on, and then insert the appropriate WooCommerce PDF catalog into the product description.
To make the best use of space on the product page, it's best to add the PDF library to a dedicated 'Downloads' tab on the product page. You can do this with the WooCommerce Product Tabs plugin, just like we did in this screenshot:
Next steps: Get started with WooCommerce catalog mode
In this tutorial, I have shown you 2 ways to create a WooCommerce product catalog:
Alternatively (or as well!), use WooCommerce Product Table to list products in a structured table, either with or without online purchasing.
Whichever type of catalog mode you're adding to WooCommerce, follow the above instructions to get up and running in no time 🚀
Discover the best free and premium WooCommerce custom add to cart button plugins, and how to choose the right one for your store.
One of the most important features of any e-commerce store is the "add to cart" button, which allows customers to easily add items to their shopping cart and continue shopping. While WooCommerce offers a default add to cart button, many businesses may want to customize this button to appeal to their customers more effectively. In this article, I will explore the best free and pro plugins available for customizing the WooCommerce add to cart button. I'll also help you choose the one that's right for your business.
To give you plenty of options, I'll focus on three plugins which take different approaches to customizing the add to cart button:
WooCommerce Custom Add to Cart Button (free plugin) - Change the 'Add to Cart' button text, replace the add to cart text with an icon, or add an icon alongside the button text.
Express Shop Page (premium plugins) - Extend the add to cart button on the shop page by adding quantity and variation pickers.
WooCommerce Product Table (premium plugin) - Make it quicker and easier to add products to the cart by listing them in a fast one-page order form. It comes complete with multiple add to cart buttons, quantity fields and variation pickers for true one-page shopping. Use it alone or with the free WooCommerce Custom Add to Cart Button plugin.
Keep reading to learn more about these options, and choose which one(s) to install on your store for the best results.
Why customize the WooCommerce add to cart button?
There are lots of reasons why store owners might want an option in WooCommerce to upgrade the add to cart button.
For example:
Do you feel that the 'add to cart' text wording doesn't quite fit with your brand? For example, a lot of WooCommerce store in the UK change the button text to 'add to basket'. Think about what custom add to cart text would work better for you.
Are you using another plugin to change the function of the WooCommerce add to cart button? This could be through a course bookings plugin, events plugin, add to quote plugin, etc. If so, you might want to reword the Add to Cart text with something more relevant, such as 'Buy Now', 'Enrol Now', 'Book a Place', 'Add to Quote' or 'Make an Enquiry'.
Are your customers frustrated by the basic add to cart buttons on the Shop page, which don't let you change quantities or choose variations? If so, then you might want to extend these using a plugin like WooCommerce Express Shop Page. This brings all the usual product options onto the shop page, instead of having standalone add to cart buttons.
If you've used our Product Table plugin to create a WooCommerce order form, then you might want to remove the Add to Cart text and replace it with a simple cart icon for each product.
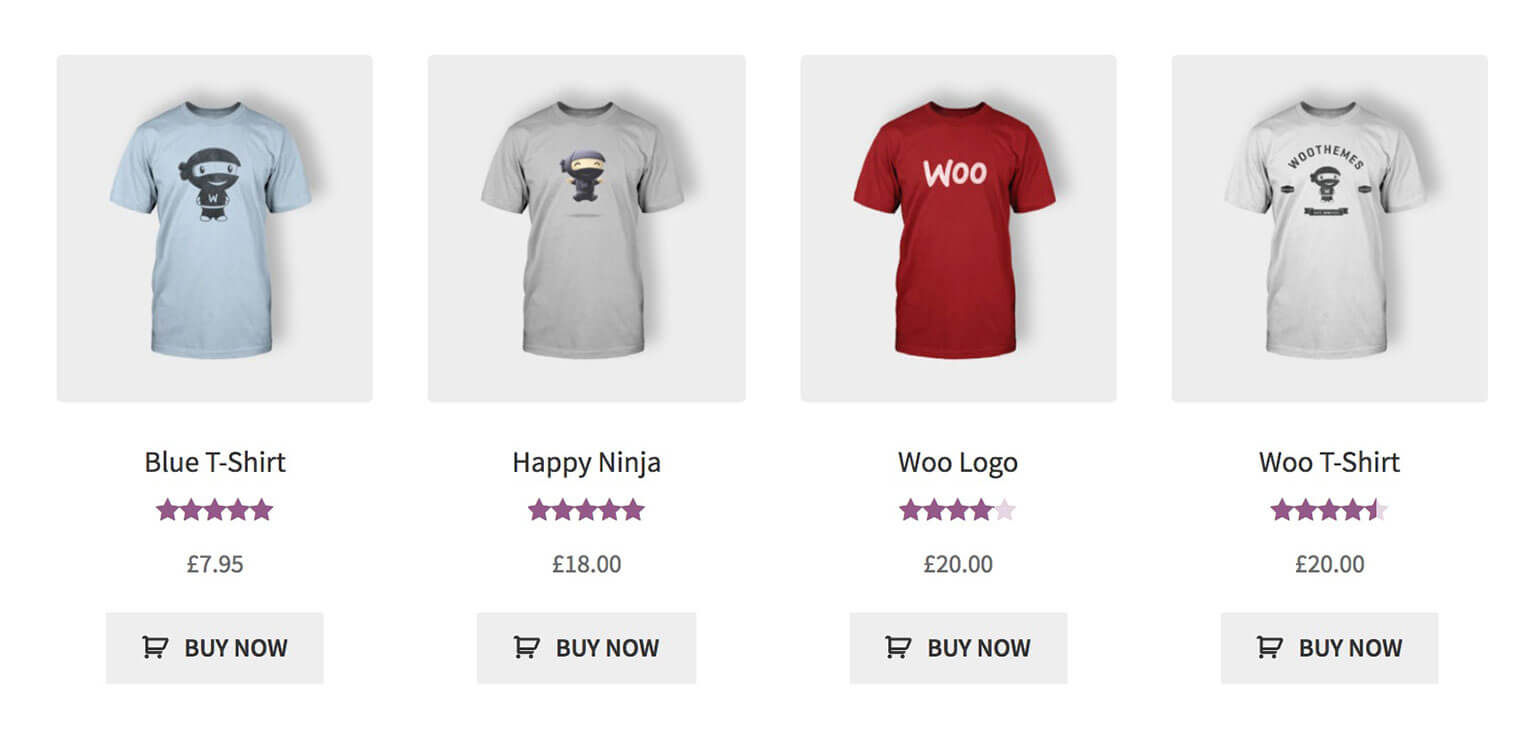
A website using the free Custom Add to Cart Button plugin with WooCommerce Product Table
Or maybe you just want to change the capitalization of the add to cart text, for example from lowercase to uppercase or vice versa.
Whatever your reason for wanting to change the add to cart link in WooCommerce, you can do it with the free WooCommerce Custom Add to Cart Button plugin.
Option 1: Change the add to cart text and add an icon
WooCommerce Custom Add to Cart Button is a 100% free WordPress plugin for customizing the add to cart button. It comes with all the essential features for customizing the WooCommerce add to cart button text and adding a cart icon:
Change the wording of the WooCommerce add to cart button text.
Add a high definition (retina) WooCommerce cart icon alongside the text.
Hide the add to cart text and just have an icon.
It's super-simple and lightweight, so it won't weigh down your site.
Here are some examples of the plugin in action:
'BUY NOW' text with cart icon
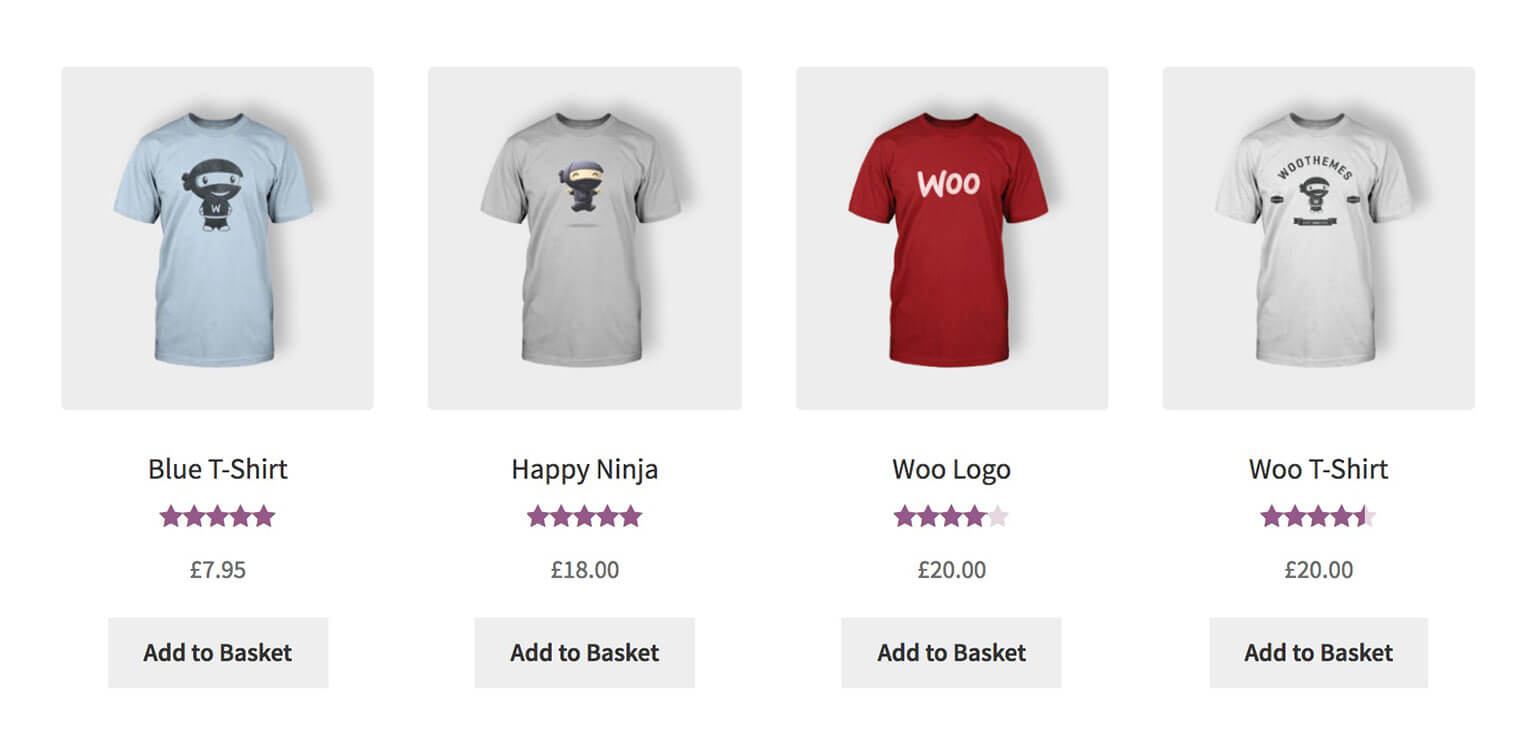
'Add to Basket' button text
Integration with the WooCommerce Product Table plugin with cart icons
How to create WooCommerce custom add to cart buttons
Log into the WordPress Dashboard and go to Plugins → Add New.
Search for 'WooCommerce Custom Add to Cart Button'.
Install and activate the plugin of this name by Barn2 Media.
Go to Appearance → Customizer → WooCommerce → Add to Cart. Here, choose the options for your custom WooCommerce add to cart buttons.
Option 2: Add quantity and variation pickers to the Shop page add to cart button
WooCommerce puts add to cart buttons on your main product listing pages, such as the main Shop page and your category pages. However, these are pretty useless as they come! That's because clicking the add to cart button only adds 1 of each product to the cart - there's no way to choose a quantity. It's even worse for variable products, which show a 'Select options' button linking to the single product page.
It's much better to allow customers to choose quantities and variations directly on your Shop and category pages.
Fortunately, you can easily do this with the WooCommerce Express Shop Page plugin. It adds variation dropdowns and quantity pickers to the shop page like this:
As you can see, customizing the basic add to cart button in this way makes it much easier to add products to the cart.
Option 3: Create one-page order forms with custom add to cart buttons
So far, we've discovered two plugins for customizing the WooCommerce add to cart button. These create a custom button without changing the overall layout of your products.
The WooCommerce Product Table plugin takes things to the next level. It takes your products and displays them in a quick one-page order form for faster shopping.
WooCommerce Product Table is a powerful solution for taking your custom add to cart buttons to the next level. This plugin offers a unique approach to product displays by creating a table format. This allows customers to purchase products directly from the main shop page. As a result, there's no need to click through to individual product pages.
Why should I use custom add to cart buttons in a product table?
Product tables are a good addition to your store because:
There are a variety of purchasing options. These include the ability to select product variation and choose quantities. As a result, customers can quickly add products to the cart directly from the order form. This enhances the customer experience by streamlining the purchasing process. It also helps to increase conversions by reducing the number of clicks required to make a purchase.
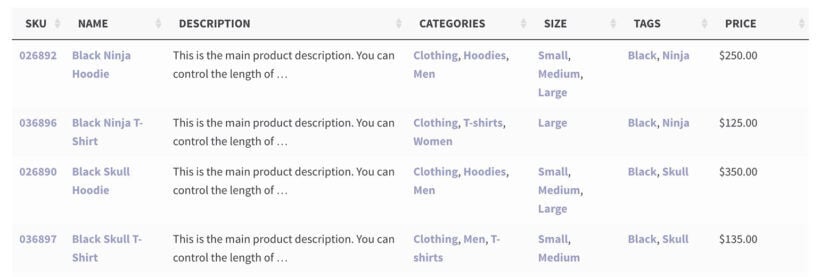
You can also add WooCommerce custom fields to the product table, such as SKU, weight, and dimensions. Add multiple columns to provide customers with additional information.
It is highly customizable, with a range of options to control the appearance and functionality of the product table. You can choose which columns to display in the table, enable filters and sorting, and even add product search functionality.
As you can see, this gives you a lot of conversion-boosting flexibility compared the default WooCommerce shop page. Bringing the full range of add to cart options to the main shop page can help to increase conversions. The end result: driving more sales for your business.
Which WooCommerce add to cart plugin should I use?
In conclusion, customizing the WooCommerce add to cart button is a crucial step in improving the shopping experience for your customers. By using the free WooCommerce Custom Add to Cart Button plugin, you can easily change the button text and add an icon, helping to improve the design and functionality of your website.
Additionally, the WooCommerce Product Table plugin takes things one step further by bringing the full range of add to cart options directly onto the shop page. This allows customers to purchase products without having to navigate to individual product pages.
While each of these plugins offers its own unique set of features, they work best when used together. Combine them to create a highly customized and streamlined shopping experience for your customers. This will help to conversions and drive more sales for your business.
So why wait? Try them out today and see the difference they can make for your WooCommerce store!
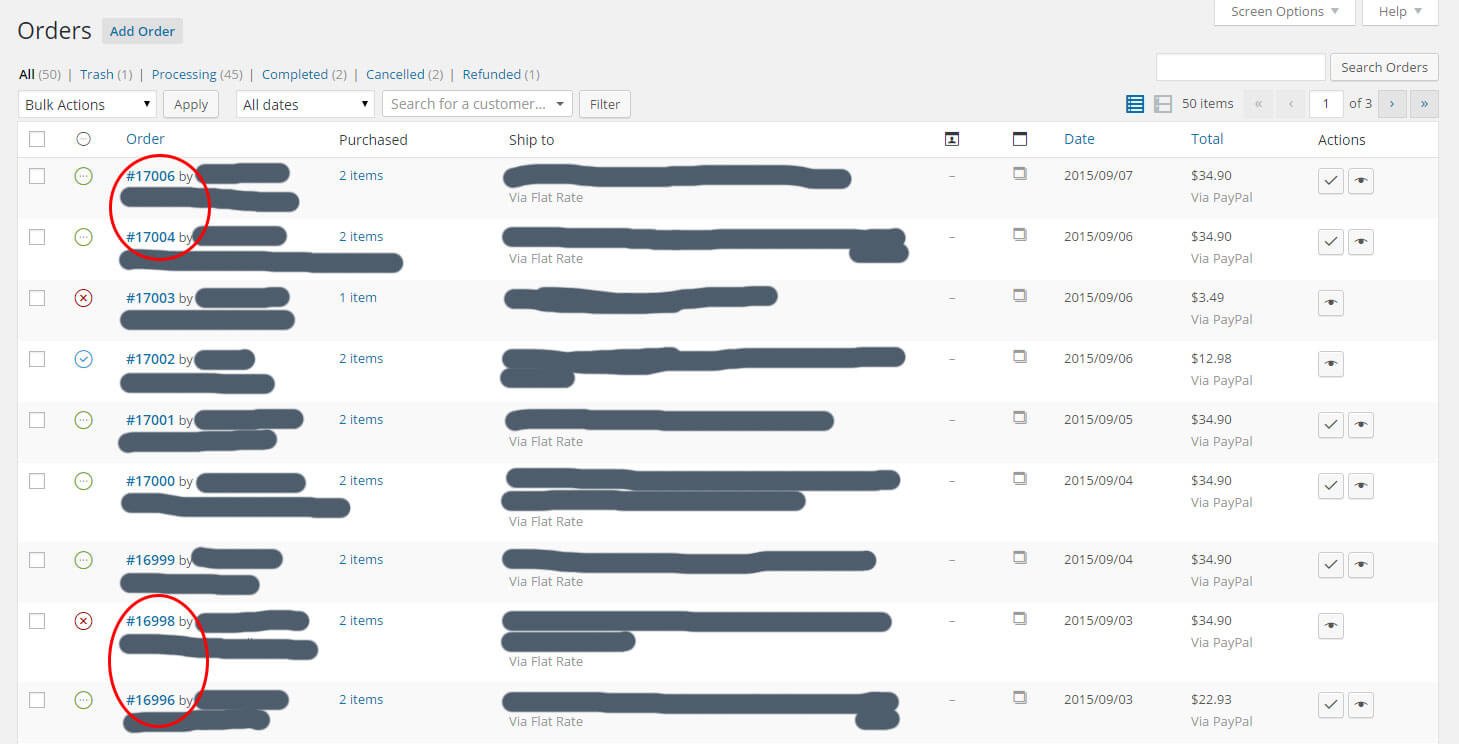
One of our WordPress clients was recently concerned that there were gaps in the ID numbers of the orders on her WooCommerce website.
At first, I assumed that the missing order numbers were due to some test orders that we had deleted as part of the web design process. However, it kept happening so we investigated and discovered a simple plugin to fix the problem.
Why are my WooCommerce order numbers not sequential?
The answer is fairly obvious if you know how WordPress works behind the scenes. However it wasn't obvious to me - and millions of people use WooCommerce, so I'm sure I wasn't alone. I'm writing this post for anyone who is wondering about missing order numbers on their WooCommerce website.
Gaps in WooCommerce order numbers are not caused by a bug or error with the website. In fact, order numbers are not supposed to be sequential.
The way it works is that EVERY item in the WordPress database is given a unique ID number, which is allocated sequentially. This includes orders, pages, posts, images etc. so the numbers are not just used for orders.
For example, someone may place an order which is assigned the ID 17004 and then you might add a new post which is given the ID 17005. The next person who places an order will be assigned the ID 17006, so 17005 will look like a missing order number. It's not a missing order number - 17005 has simply been used for a post instead of an order.
This means that looking at the order numbers is not a good way to track your WooCommerce orders.
What's the alternative?
The WooCommerce Sequential Order Numbers plugin fixes the problem. It allocates custom order numbers to your WooCommerce orders. These are sequential - with no gaps - as they're not used for anything else. They work by creating a dedicated 'order number' field in the database which is separate from the WordPress ID.
This simply plugin is really handy if you want your WooCommerce orders to be sequential.
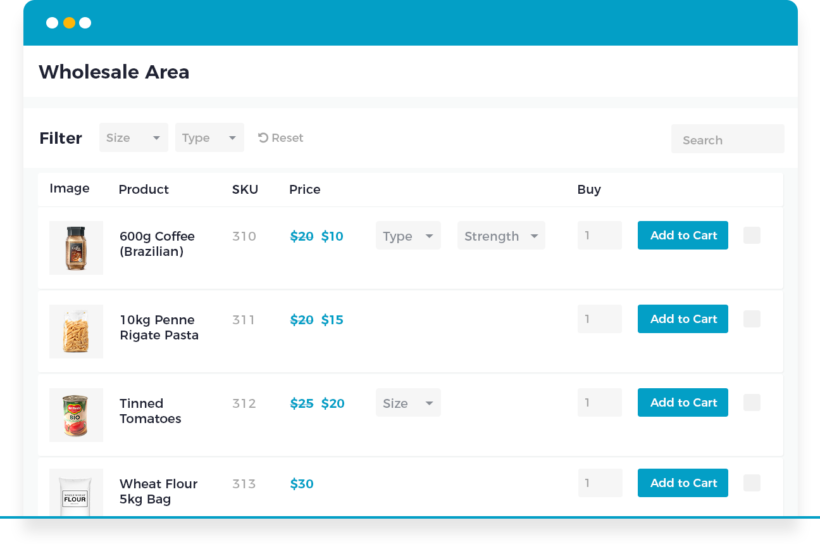
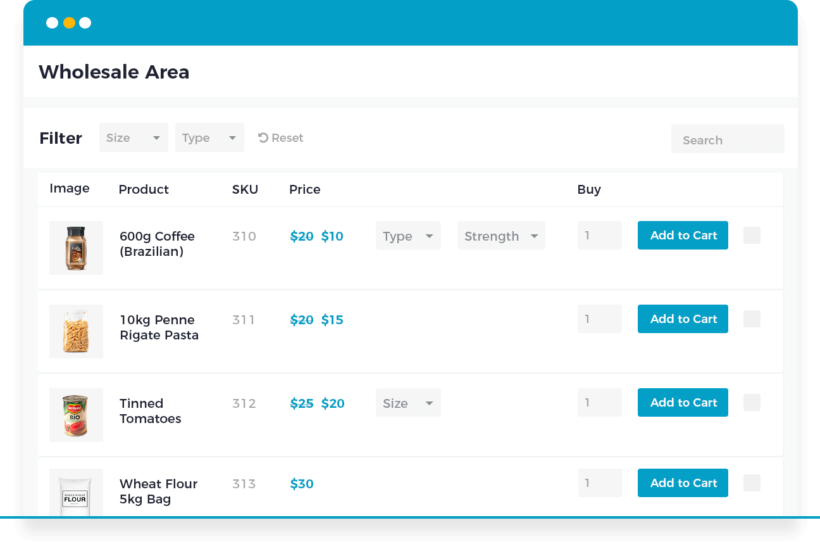
In this article, you'll learn how to use the best WordPress plugins to build a WooCommerce wholesale order form. It's easy to set up, and you can put your B2B wholesale order forms within a private area for approved wholesale buyers.
If you run a WooCommerce wholesale or role-based store, your customers need to see the correct products and prices for their wholesale status or group. Wholesale customers also benefit from a tabular view of all the products available to them.
You can get this by using our wholesale suite of plugins - WooCommerce Wholesale Pro which adds wholesale registration and pricing control to your store (without affecting your public-facing shop); and WooCommerce Product Table for adding quick wholesale order forms.
The best wholesale order form plugin
WooCommerce Product Table takes your wholesale products displays them in a table. When used alongside WooCommerce Wholesale Pro, it's the perfect format for a WooCommerce wholesale ordering form plugin.
You can choose which columns are displayed in the order form. You can even add filters based on categories, tags, variations etc. There are over 50 options for you to experiment with.
What’s great is that customers can select multiple products from the WooCommerce wholesale order form and click "Add Selected to cart". This is a handy feature for wholesale buyers, most of whom will be making a bulk purchase and want to buy quickly.
How to set up an order form with WooCommerce Wholesale Pro
You can create a wholesale order form for WooCommerce in just a few minutes. Either watch this video tutorial, or follow the written instructions below.
Step 1: Install and activate both wholesale plugins
Download the plugin zip files and take note of your license key for activation.
On your WordPress dashboard, go to Plugins - Add New Plugin.
Use the Upload Plugin option and add a zip file, install and activate each plugin by repeating this step.
In the setup wizard for each plugin you can enter your license key to complete the activation.
Step 2: Set up your wholesale store
First, go to WooCommerce → Settings → Wholesale and set up your wholesale store as needed. Read this guide for or a more extensive tutorial about wholesale store setup. Here's a quick preview of what the plugin can do:
Set a global wholesale discount.
Edit the wholesale login page.
Change the privacy settings of wholesale categories.
Step 3: Create a product table for your quick order form
Next, go to Products → Product Tables → Add New. Use the table builder to set up the table which will appear on your wholesale store pages.
At the start of the table builder, select the option to "Display on a shop page".
Then in the following step select "Wholesale store" from the listed options.
Choose which products will be included in the quick order form.
Set up the columns for your table, consider what information is most vital to your customers and leave out redundant information if possible. For a wholesale store it's often helpful to include the SKU and additional pricing information such as the "Total" column.
Use your preferred "Add to Cart" method, there's a choice of buttons or checkboxes, or both can be enabled at the same time. Enabling quantity pickers, and using dropdown lists for variations are also recommended.
Search and filter settings are also very useful to set up. Include category and tag filters at a minimum.
For stores with thousands of listed products "Lazy Load" can be enabled to help improve performance.
After saving these settings you can visit your wholesale shop page to test out the table. If you need to change anything you can return to Products → Product Tables then find and edit the table you already created.
Now, when a wholesale user logs into their account, they will see the products listed in the WooCommerce wholesale order form:
Normal retail customers will continue to see the default store layouts. (Tip: If you want to use the order form layout for public customers too, then you can enable it throughout your store on the WooCommerce Product Table plugin settings page.)
You may want add even more functionality to your wholesale shop such as bulk ordering, which is why we created this list of 8 WooCommerce B2B plugins with bulk order features.
Bonus tip - Add quick view to your WooCommerce wholesale order form
You can make a wholesale order form even more user-friendly by adding quick view options:
Add your license key to the plugin settings page at WooCommerce → Settings → Products → Quick view.
Use the settings on this page to control the content of your wholesale quick view lightboxes.
Now go to WooCommerce → Settings → Products → Quick view and change the following options:
If you wish to add a quick view column to the table, add quick-view to the list of columns.
If you want people to be able to open the lightbox by clicking on a product name, click the 'Replace all links to product page with quick view' option near the bottom of the page.
If you want the image column to open the quick view too, then you will need to disable the image lightbox option further up the page.
Add wholesale order forms to WooCommerce today!
As you can see, it's really easy to use our suite of wholesale plugins to add a private B2B area with wholesale order forms. You can use them to make your whole store private, or run them as a hidden area alongside your public retail shop.
Quick to set up and easy to use
Flexible customization options
Full documentation and support (absolutely no way to get it wrong!)
Written and video tutorials
Love it or your money back!
Let us know in the comments how you use the WooCommerce wholesale ordering plugins in this tutorial. I'd love to hear from you.
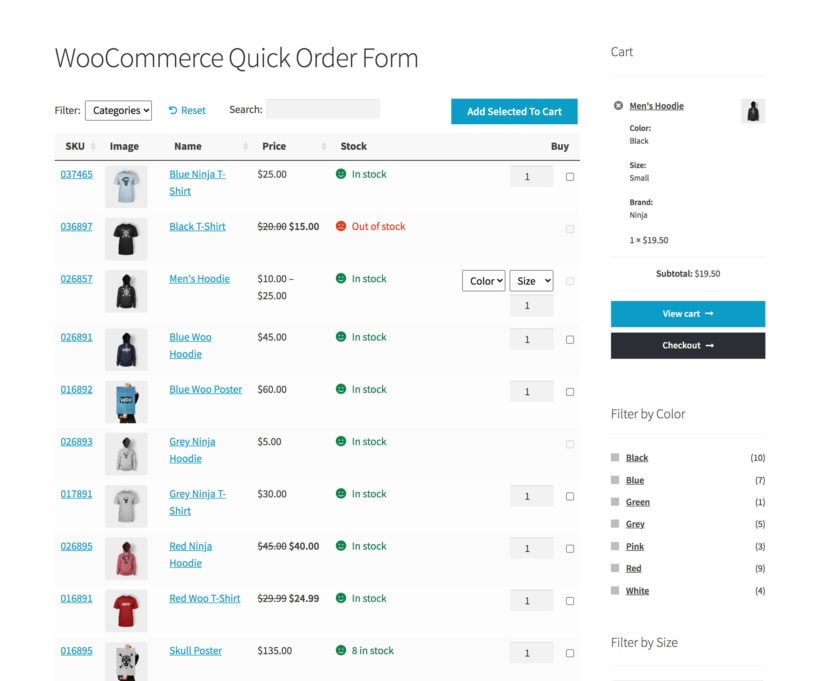
Have you ever noticed how long it takes to add products to the cart in WooCommerce? Customers have to visit a separate page for each product so that they can select quantities, choose variations etc. You can speed up the customer journey by adding a quick WooCommerce bulk order form to your website. To do it, simply install a WooCommerce order form plugin.
Order forms allow customers to view and compare a longer list of products than the traditional WooCommerce layout. For lots of stores, an order form fits aligns better with how customers browse and buy products. They can see everything on one page, compare products and make quick buying decisions. This encourages more sales by enabling customers to shop quickly and efficiently.
WooCommerce Product Table is the perfect way to create a quick order form. In fact, people keep telling me it's the best WooCommerce order form plugin around! We've built a quick order form demo so you can see how it works – go ahead and have a play.
Of course, an order form layout isn't for everyone. In this post we'll help you choose between using a WooCommerce order form plugin and the standard WooCommerce shop layout, so you can rest assured you're creating the ideal product layout for your store. Once you've learned all about WC order forms, I'll provide step-by-step instructions plus a video tutorial on exactly how to set it up.
What is a WooCommerce order form?
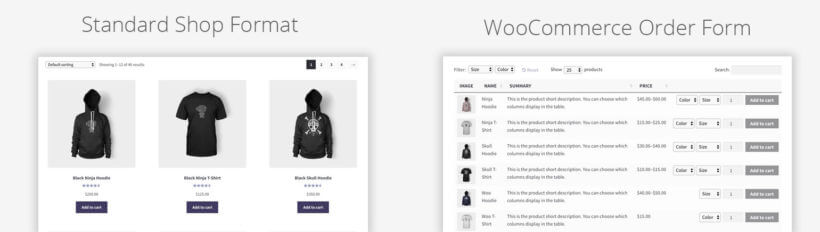
By default, WooCommerce displays e-commerce products in a standard format, with each product occupying a relatively large amount of space.
This typical store layout has a grid format with 3 or 4 products per row. Each will have a large featured image, a title, a short description, a price, and an Add to Cart button. Customers click through to a single product page to read more information before adding the item to their shopping cart:
A WooCommerce order form is an alternative way to list products. Presented in a structured table format, each product takes up a single row in the table, and product images are much smaller. The layout is far more compact and often includes extra features, such as sort options and filters. The screenshot below shows what you can create:
An order form plugin lets you list many more products on a single page than you could in the default WooCommerce store layout. And, instead of clicking through to the single product page, customers can select variations, specify a quantity and add their chosen items to the cart – all directly from the order form.
Boosting sales with an alternative layout
Both the traditional category layout and order form view use the Woo cart and checkout. Once a customer has chosen their products, the process for placing an order is identical.
The real difference is how the products are presented in the first place. This is a key part of the buying process: it's the point when customers are exploring your products and making buying decisions. The layout has a big impact on your sales and conversion rates, so it's vital to choose the right layout for your products.
Comparing the two layout options for listing WooCommerce products, you can see how a WooCommerce order form plugin (or WooCommerce bulk order form plugin) makes much better use of space than a traditional store layout:
Using the product table, you'll fit twice as many products into the same amount of space. Because of the compact layout, it's also possible to fit in plenty of extra features, including filter dropdowns, a search box, sorting, and the ability to select quantities and variations. This is why we often refer to it as a WooCommerce bulk order form – because it's so much easier to order higher quantities.
What sort of websites need a WooCommerce order form plugin?
While the standard WooCommerce shop format is great for some stores, there are many cases when an order form gives customers a better buying experience.
A WooCommerce order form plugin is ideally suited to stores where customers don't want to hang around browsing, but instead want to quickly choose from a list of products. Let customers add multiple products to their carts from a quick one-page order form.
How to create a WooCommerce order form
Watch this video tutorial below to learn how to create a order form in WooCommerce. You can watch me create the exact order form shown on the demo site then create your own on your WooCommerce site! Alternatively, read the quick setup guide or the step-by-step written instructions below the video:
The table builder helps you to create your first WooCommerce order form step by step. You can either create 1 order form listing all your products, or multiple order forms listing different products. Alternatively, you can enable the order form layout on your main shop pages instead of creating them one-by-one.
The table builder will open when you first activate the plugin. You can also open it later on via Products → Product Tables.
2a. Decide how to add the order form
Page 1 of the table builder lets you choose which method you'll use to display the WooCommerce order form on your site:
Add it to a page using a block or shortcode - Do this if you want to create order forms which don't affect your main shop pages.
Display on a shop page - Do this if you want to enable the WooCommerce order form layout throughout your store.
On the following page, you can then choose exactly which products to display in the WooCommerce order form.
2b. Choose what data to display in the order form
The 'Column' page lets you control which columns appear in the order form. You can display various data about your products including SKU, ID, name, description, short description, date, categories, tags, image, reviews, stock, weight, dimensions, price and buy button. The plugin supports product attributes and custom fields as separate columns in the table, e.g. size or color.
2c. Customize the add to cart column of the order form
The 'Buy' column is one of the most important parts of your WooCommerce order form. Configured correctly, you can use it to subtly encourage customers to spend more.
You can choose whether the 'Buy' column includes product variations and quantity picker, or whether you want customers to click through to the single product page to view the variations. And if you're using the Product Options plugin to add extra product add-ons, then these will appear in the order form too.
You can also choose whether to have normal add to cart buttons, multi-select checkboxes, or both.
Tip: The plugin settings page at Products → Product Tables → Settings also lets you customize the add to cart button wording. For example, you could reword it to 'Buy' to save space in the WooCommerce order form.
Use filters to help customers find your products
The WooCommerce order form can include filter dropdowns above or filter widgets alongside the table. This lets customers filter by category or product categories, tag or attribute. You can either include all possible filters or choose specific ones to appear.
Here's an example of the filters that come with the order forms in Product Table:
Change the sort order of the products in the order form
You can also choose how the products on the order form are sorted by default. Customers can also sort the products by clicking on a column header.
Use lazy load to improve performance in big order forms
The lazy load option speeds up the order form load time for WooCommerce stores with many products. This uses Ajax to load products one page at a time, so if you have thousands of products then this makes a big difference.
Step 3: Create an order form page(s)
(Note: Ignore this step if you selected for the order form to appear on your main shop pages.)
Copy the product table shortcode from the final stage of the table builder.
Create a new page which you will use for your order form.
Add any content that you like to the page. For example, you can add text or other content above and below the order form. You can also add subheadings (e.g. one for each category) and insert a different order form after each one.
Go to the part of the page where you wish to add a WooCommerce form. Add the shortcode that you copied above, or insert a 'Product Table' block using the WordPress block editor.
Publish the page and view it.
On your WooCommerce order form page, you'll see all your products listed in a neat table layout.
If you want to create multiple order forms - either on the same page or multiple pages - then that's fine too. Just create multiple tables, each one listing different pages. You can then insert multiple blocks or shortcodes to list them as needed.
Step 4: Add bonus features to your order forms
Now we've looked at the essential features for a WooCommerce order form, I'm going to tell you how to supercharge it even further. You can do this by using other plugins to add bonus functionality.
Add an on-page popup cart and checkout
A WooCommerce order form is all about bringing the shopping experience to a single page. For this reason, it makes sense to also bring the cart and checkout experience to the same page!
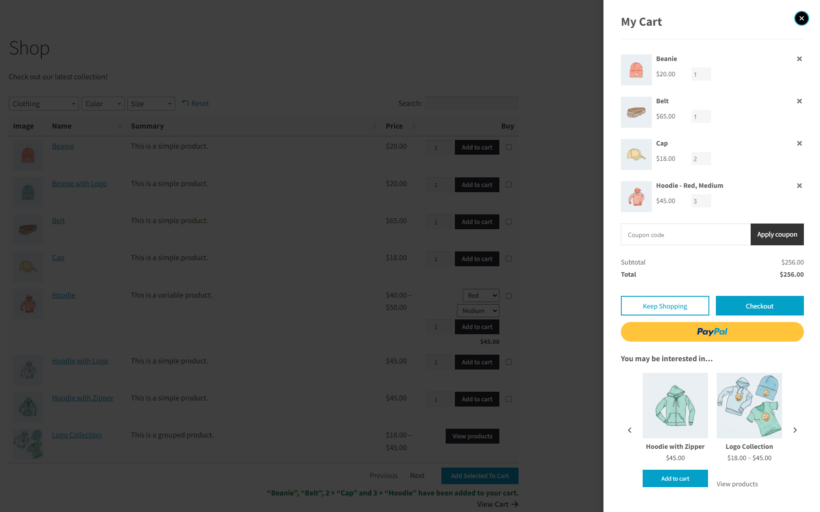
You can achieve this by adding a cart popup plugin to the order form page. The Fast Cart plugin is designed to work alongside your WooCommerce order form like this:
And also this:
Either use it as a popup cart, or skip the cart and open the checkout as soon as customers add products to their cart from the order form. That's the quickest way to shop because customers can add products and complete their order from the same page!
Add product quick view
Your order form can contain various columns of information about your products. However, you may want to display extra information that won't fit in the order form layout. Or you may want to sell product variations or other options without cluttering up the order form page.
You can solve this dilemma by using WooCommerce Product Table with the WooCommerce Quick View Pro plugin. This adds quick view buttons or links, which open extra product information and purchase options in a user-friendly lightbox window. It's a great way to show extra information without taking customers away from the order form.
Disable the WooCommerce single product page
By default, customers can click on a product title or image in the order form to view a separate page for each product. Most product order forms don't need this feature. You can disable these links if needed so that the only way to view a product is on the order form page - especially if you're using quick view instead.
Add additional fields and custom fields to the order form
WooCommerce Product Table makes it easy to add additional fields to your order form. This is useful if you need to add media such as PDFs with more information about a product, or you just need other meta information.
Since publishing this article, some of our customers have asked about how to create a printable order form. The idea of this is that customers can print the order form on paper and fill it in manually. They can then post it to place the order the old-fashioned way.
In response, we've created a separate tutorial on how to create a printable order form.
What types of product sell best in a quick order form?
Now we've learned how to use the best WooCommerce order form plugin, let's consider when to use one. After all, all products are different and some lend themselves to the order form layout better than others.
Let's take a look at some examples of when an order form layout is the best way to go:
WooCommerce wholesale order form
Trade customers typically make regular orders of products they're already familiar with. They don't want to spend ages browsing multiple product pages.
A compact wholesale order form lets them quickly select multiple products and instantly add to cart. This is more efficient than a more traditional WooCommerce product layout, which is too visual and spaced out.
For best results, use WooCommerce Product Table together with its sister plugin WooCommerce Wholesale Pro. Which adds other B2B functionality like wholesale registration and pricing. You can choose whether to enable the order form view for all customers, or just b2b users.
Large product directory
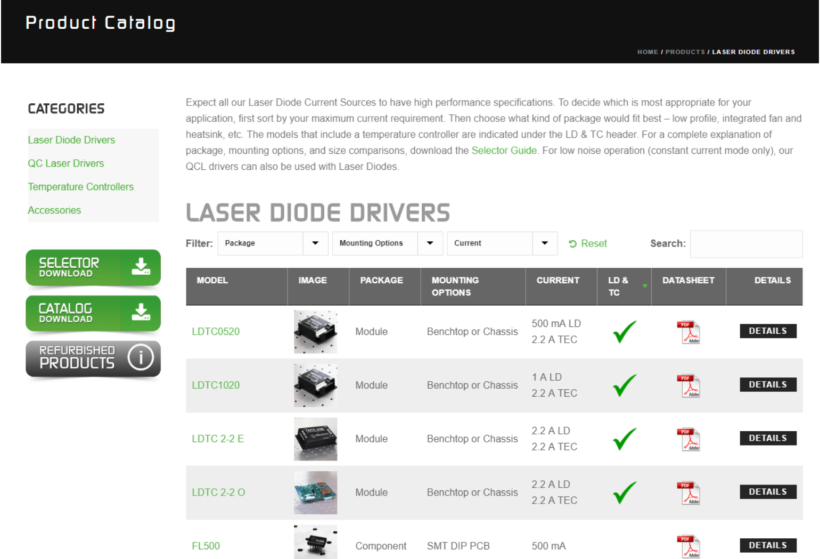
A lot of our WooCommerce Product Table plugin users have HUGE e-commerce stores with thousands of products. A WooCommerce directory plugin is a good way to list large numbers of products in a directory structure.
For example, one website uses WooCommerce Product Table to display thousands of ball bearings for sale. Customers can use the filters to find the type of ball bearing they require based on product attributes such as size and color. They can then tick the products they want, add to cart and buy online. This would be a cumbersome process using the traditional WooCommerce shop layout. Not to mention that large pictures of ball bearings aren't necessary! Check out our tutorial on how to create a WooCommerce product catalogue.
Here's a review from a customer who's increased sales by using Product Table to list thousands of products in a quick order form:
I needed a simple table to display thousands of products in table form and this plugin did the trick. Plus, it is super simple for the customer to select many items at one time. Before I installed I was lucky to get orders with three items, now I AVERAGE ten products per order. Support is also really good too. I highly recommend this plugin.
WooCommerce bulk order form
Similar to a wholesale order form, a WooCommerce bulk order form is useful for ordering large quantities of products. If a customer is buying products in bulk, they won't want to browse through the standard WC layout. A product table is perfect as a bulk order form because they can quickly order as many products as they like.
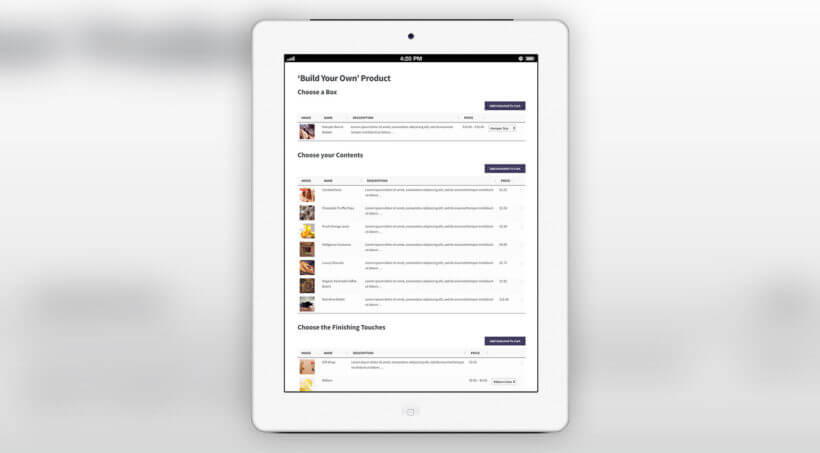
'Build your own product' configurator
Lots of WooCommerce websites let customers choose multiple items from a list to build a box, create their own pizza, build a luxury hamper, or similar. Customers can select items from a list and add them all to a cart with a single click. An order form is ideal for this 'build a product' format or product configurator.
Case study – using an order form plugin to sell hampers
Barks and Squeaks is an online store selling gifts and treats for fur buddies and their owners. As well as offering individual products, the Barks and Squeaks store sells hampers. To do this, they've created an order form using our WooCommerce Product Table plugin. This enables customers to quickly pack a hamper full of lots of products, without changing pages:
Which WooCommerce stores don't need a quick order form?
As you can see, a WooCommerce order form plugin is the right choice for lots of stores, but it isn't for everyone.
If you answer 'Yes' to any of the following questions, it's worth considering whether the standard WooCommerce shop format is a better fit:
Does your store only have a few products?
Do you sell highly visual products that will benefit from big images or multiple images?
Do customers need to spend a long time reading detailed information about your products before deciding to buy?
As an example, imagine you own an online boutique clothing store. Think about how your customers would use your store. Big images will definitely play a crucial role in encouraging sales. Your customers will also be happy to take their time browsing items and reading detailed product information. They may then go on to make a considered purchase of one, two, or perhaps a few items.
With a WooCommerce order form, customers can click through to a single page for full product information. You can also increase the size of the product images for a more visual table:
But ultimately, deciding on the right layout to use comes down to which one best suits your particular customers. With smaller purchase quantities and less need for quick purchases, your imaginary boutique clothing store is likely to benefit from the highly visual layout characteristic of the standard WooCommerce shop format.
Create a quick WooCommerce order form today 🚀
How your customers want to shop should dictate your store's product layout. The default WooCommerce shop layout works for customers who are happy to take their time browsing images and reading descriptions. But, when your customers need to buy multiple items quickly, a WooCommerce order form plugin is a much better solution.
We'd love to see your WooCommerce form – share your website in the comments below. We might even link to it from the WooCommerce Product Table showcase!
Whether you're starting a wholesale business or adding a B2B area to an existing store, this complete guide covers WooCommerce wholesale pricing - including a plugin comparison and full step-by-step setup tutorial.
WooCommerce is great for creating an ecommerce site, but it doesn't distinguish between retail and wholesale customers. That's no good because B2B buyers have different needs from other customers. As well as needing wholesale pricing and discounts, they're already familiar with your products and want a quicker, easier way to buy.
The problem is: How can a company like yours create a wholesale website without affecting the experience for normal public customers?
Luckily, there's an easy solution - which we'll cover in this complete step-by-step guide on how to create a WooCommerce wholesale website. Keep reading if:
You're looking to start a wholesale business or expand your existing business and tap into the wholesale market.
You currently sell wholesale products through manual orders and want to automate this with a wholesale ecommerce store.
There's already a wholesale ordering plugin on your website, but it doesn't fully meet your needs.
Plugins like WooCommerce Wholesale Pro enable hybrid stores, running retail and wholesale simultaneously from one website. Retail customers see public pricing while wholesale users access private discounted pricing.
This tutorial will take you through the process of creating a wholesale website from scratch. You will learn how to:
Add a WooCommerce wholesale area to your existing online store (without changing anything for retail customers).
Create a 100% private wholesale-only online WooCommerce store.
Add a wide range of B2B features - including wholesale registration forms, pricing, custom user roles, and choosing which products to show in the WooCommerce wholesale and/or retail areas.
Grow your wholesale revenue by adding quick one-page order forms, designed specifically for wholesale.
Add a range of bonus features to make the wholesale buying experience even better.
By the end, you will have a fully functional WooCommerce wholesale website.
And the best part? You can set it up in 15 minutes, then sit back and let it do all the work for you. It's way faster and way cheaper so you can start selling your wholesale products today!
Your complete guide to creating a WooCommerce wholesale ordering store
This step-by-step guide will show you how to use the WooCommerce Wholesale Pro WordPress plugin to create a wholesale website. We'll cover all the essential features:
How to create a private wholesale areaDiscover the easy way to restrict access to your WooCommerce wholesale ordering store. You can either create a completely hidden B2B store; or a public retail WooCommerce store with private wholesale area. It comes with everything you need including unlimited wholesale user roles and user registration (with or without moderation). You can also choose which products to show in the public and/or wholesale stores.
Set wholesale pricing and discountsNearly all WooCommerce wholesale websites need to charge different retail prices and wholesale prices. What's more, many also need to charge different wholesale pricing to different groups of wholesale users. I'll show you how to add 3 different types of WooCommerce wholesale pricing.
Create user-friendly wholesale layouts and order formsFinally, you'll learn how to list products in an easy-to-use WooCommerce wholesale ordering form. B2B customers don't want to browse through multiple pages or look at big images, so a wholesale quick re-order list is a must.
At the end of this tutorial, you will know how to create a WooCommerce wholesale website with all these amazing features. It's easier to set up than other WooCommerce wholesale plugins or WordPress membership plugins. You'll have everything you need to create a wholesale website today.
This guide is also beginner friendly, which is perfect for anyone learning how to start a wholesale business or sell wholesale products for the first time.
Create a WooCommerce wholesale website in 15 minutes
Here's the complete setup process in brief - if you follow these steps, you can have a working WooCommerce wholesale website in around 15 minutes:
Install WooCommerce Wholesale Pro and it automatically creates your wholesale area (Section 2a).
Configure wholesale user roles and registration settings (Section 2d).
Set your pricing: global discount, category-level, or product-specific rates (Section 3).
Control product visibility - hide products from retail customers or wholesale users (Section 2e).
Add bulk order forms using the WooCommerce Product Table bundle (Section 4).
If you haven't already done so, then you need to create a WordPress website with a domain name. You should also install the WooCommerce plugin on it. (If you don't know how, check out this guide on How do I set up a WooCommerce shop?) Add some products to get started. At this stage, all your products will be publicly available and presented in the default layout.
Keep reading to learn how to add a hidden WooCommerce wholesale area.
How wholesale websites work
A wholesale website displays different pricing to different customer groups, showing the same products at different prices based on who is logged in. It uses role-based access control so that the same WooCommerce store serves both retail and wholesale audiences without requiring separate sites. Product visibility, WooCommerce wholesale pricing, shipping methods, and payment options all adjust automatically based on the logged-in user's role.
Choose your WooCommerce wholesale pricing plugin
Several good WooCommerce wholesale plugins exist, each with different technical approaches and feature sets. Choosing the right one depends on your specific B2B requirements. This guide focuses on WooCommerce Wholesale Pro, but the comparison below should help you weigh up your options first.
WooCommerce Wholesale Pro stands out for a few specific reasons. First, it automatically creates a wholesale user role, a Wholesale Store page, and a Wholesale Login page the moment you activate it - no manual page creation needed. Second, it has built-in role-based shipping and payment restrictions, whereas some competitors require third-party integrations for this. Third, it integrates seamlessly with WooCommerce Product Table for bulk order forms (available as a bundle on the Wholesale Pro sales page).
The rest of this guide covers WooCommerce Wholesale Pro in detail. Most steps apply to similar plugins with minor variations.
2. Create a private WooCommerce wholesale ordering area
Firstly, you need to create a wholesale WooCommerce store which is hidden from public view so that only approved wholesale customers can access it. You might choose to set up a standard online retail WooCommerce store with a separate private wholesale area. Or you can even have a 100% hidden WooCommerce wholesale ordering store that no one else knows exists!
You can do all of this with WooCommerce Wholesale Pro. You'll learn how to use this WooCommerce wholesale plugin to add:
User roles - create additional wholesale custom user roles.
Wholesale products - you can either use the same products in the public and wholesale areas (with special pricing and order forms for wholesale users, of course); or you can have completely different products for retail and wholesale.
Menu links - set up the wholesale website navigation.
All these steps are optional, so you can stick with the default options to set up the WooCommerce wholesale area even more quickly.
2a. Install the WooCommerce wholesale plugin
To get started, buy the WooCommerce Wholesale Pro plugin. Install and activate the plugin, then add your license key using the instructions in the confirmation email.
As soon as you do this, the plugin will automatically create a wholesale user role, a Wholesale Store page, and a Wholesale Login page.
Your WooCommerce wholesale website is now 90% set up, and you haven't even done anything yet!
2b. Set up wholesale registration (optional)
Next, log into the WordPress Dashboard and go to WooCommerce → Settings → Wholesale → General. Choose whether or not to allow new users to register for the wholesale store:
If you enable wholesale registration, then:
The Wholesale Login page will also include a registration form.
You can choose whether new wholesalers can access the wholesale area immediately, or whether their customer account will be held for moderation by an administrator first.
If you disable wholesale registration, then you can still add wholesalers manually via the WordPress admin.
2c. Edit your wholesale registration emails (optional)
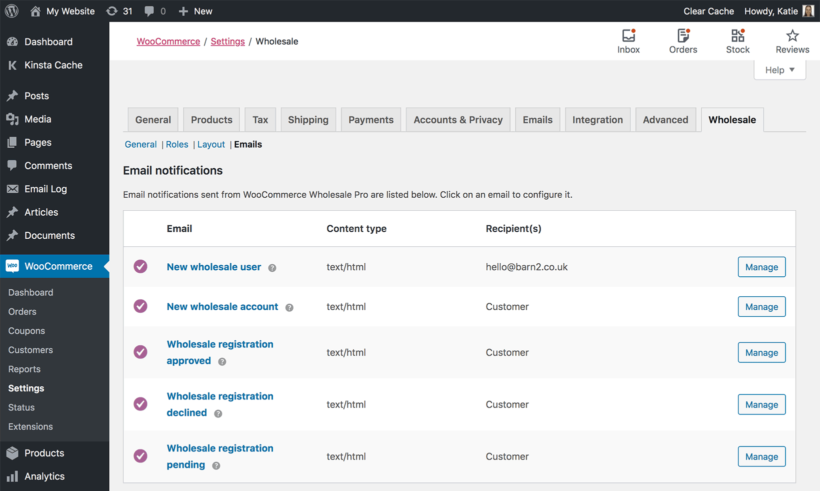
The WooCommerce wholesale plugin comes with a range of emails for each stage of the wholesale registration process:
When you install the wholesale plugin, these emails will be pre-populated with suitable wording. You can easily edit the emails at WooCommerce → Settings → Wholesale → Roles if required.
Once registered, wholesale users will receive the same emails as your normal customers. These are provided by WooCommerce rather than the wholesale plugin.
2d. Add extra wholesale user roles (optional)
The WooCommerce wholesale plugin automatically creates one wholesale user role. If you want to charge different wholesale prices to different wholesale users, then you need to create a separate user role for each group.
You can easily do this at WooCommerce → Settings → Wholesale → Roles:
If you enabled wholesale registration, then new wholesalers will be added to the default wholesale user role. You can then change their user role manually (for example, when you approve their account).
If you add new wholesale users manually via Users → Add New in the WordPress admin, then you can select the appropriate wholesale user role from the 'Roles' dropdown.
2e. Control the visibility of your WooCommerce wholesale products (optional)
By default, all the products in your WooCommerce wholesale store are available to everyone. Public users and normal customers see the standard price for each product, while wholesale users see the correct price for their role.
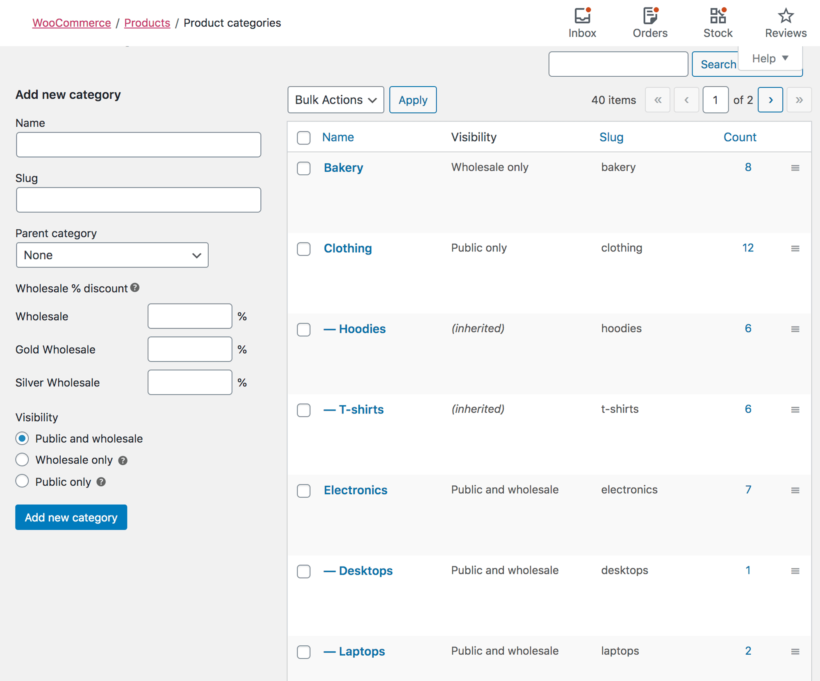
If you prefer, you can choose whether each category of products is visible to public users or wholesalers only. You can easily do this under Products → Categories:
This lets you sell different products or SKUs to retail and wholesale buyers.
Tip: If you need more advanced visibility options - for example, to restrict products to individual users or specific wholesale user roles - then you can do this by using WooCommerce Wholesale Pro with our other plugin, WooCommerce Protected Categories.
2f. Set up the wholesale website navigation
Finally, you need to structure your wholesale website so that people can easily find their way around. This only takes a minute:
Link to the wholesale login pageSome WooCommerce wholesale websites add a wholesale login link to their public website, while others keep this private. You can add a link to the 'Wholesale Login' page to your menu or anywhere else on your site (e.g. the footer). Or if you want to hide the fact that you have a wholesale store, then you can send a link to the Wholesale Login page to your distributors (e.g. in the email to new wholesale users). Retail customers will never know there's a hidden wholesale area.
Edit your navigation menuThe WooCommerce Wholesale Pro plugin cleverly shows and hides your menu links so that each user only sees pages they have access to. Make sure the main menu on your site contains all the required links for both the public and wholesale users. Each one will only see the correct links for them. For example, public visitors or normal customers will see the link to the Wholesale Login page, but they won't see any other links to wholesale-only content. If they log in as a wholesale user, the menu changes to hide public-only links and show the wholesale-only content instead.
3. Set up wholesale pricing and discounts
WooCommerce wholesale pricing allows store owners to offer discounted rates to B2B clients, usually implemented via plugins. It works by creating specific user roles (such as "Wholesale Buyer") and assigning role-based or quantity-tiered pricing to each. Plugins like WooCommerce Wholesale Pro also enable automated tax exemption, minimum order requirements, and wholesale-only product visibility.
When you create a wholesale website with WooCommerce Wholesale Pro, there are 3 ways to set WooCommerce wholesale pricing:
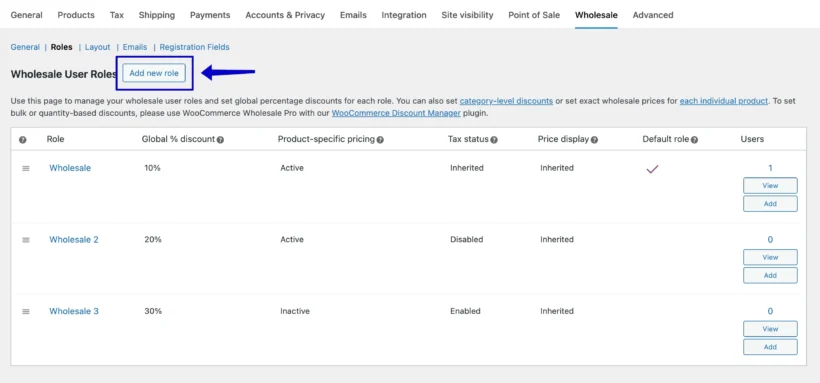
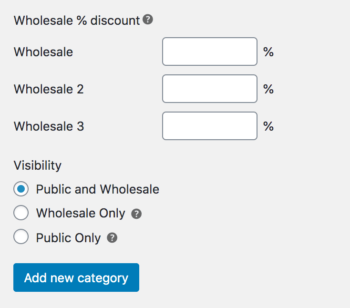
Global discount: Apply a set percentage discount to all products for wholesale users. Set this at WooCommerce → Settings → Wholesale → Roles. Overridden by category or product-specific pricing when those are set.
Product/category level: Set custom prices or percentage discounts for specific products or categories. Configure at Products → Categories or edit individual products using the 'Wholesale Price' field. Overrides the global discount; itself overridden by product-specific pricing when both exist.
Tiered pricing: Offer lower prices based on higher quantities purchased (e.g. buy 50+ units for 20% off). This requires the separate WooCommerce Discount Manager plugin, which works alongside role-based pricing for quantity discounts.
An example of setting product-specific wholesale pricing for a variable product
Logged-in wholesale users will see the correct product pricing for their user role. The main price will appear crossed out, and the wholesale price will appear alongside.
If the product is also visible to guest users and non-wholesale user roles, then they will see the standard price as usual. Your WooCommerce wholesale pricing will remain secure and only wholesale users will ever be able to see it.
You can combine the different types of wholesale pricing as required, and the plugin will always show the correct price. For example, if you set a global, category-level, and individual product discount then wholesalers will just see the individual product discount. If there is no product-specific wholesale price then wholesalers will see the category discount, and so on.
How to set wholesale prices on your WooCommerce store
3a. Add a global wholesale price
Go to WooCommerce → Settings → Wholesale → Roles.
Click to edit each wholesale role.
Add a whole number in the global discount field. This percentage will be deducted from all products, unless it is overridden by a category or product-specific wholesale price.
3b. Add category wholesale pricing
Go to Products → Categories.
Either add a new category or edit an existing one.
Add a whole number for each wholesale role. This will be deducted as a percentage discount off all the product pages (except for products where you set an exact wholesale price).
On this screen, you can also hide the category from public or wholesale users if required.
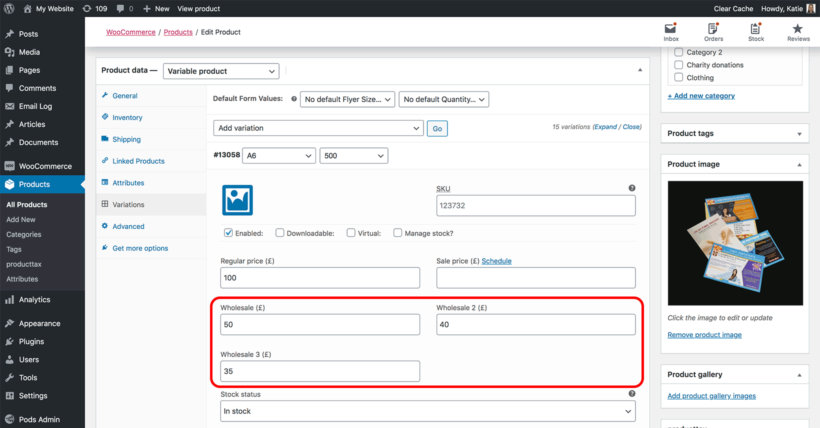
3c. Add exact wholesale product prices
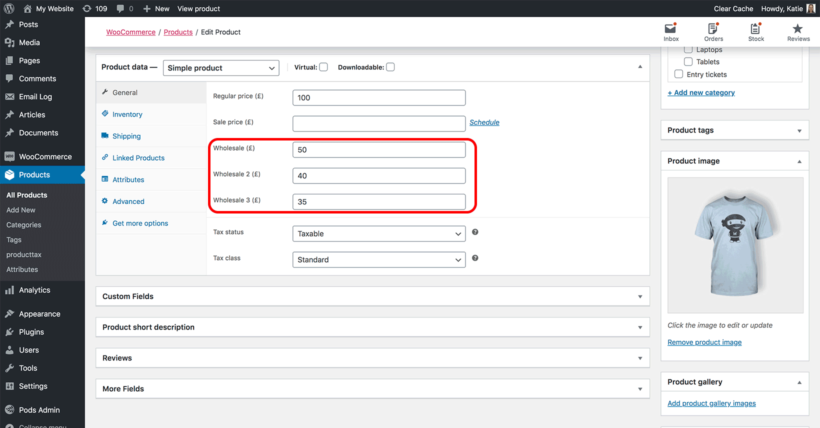
Go to the main Products list in the WordPress admin and click on the product you want to add an exact wholesale price for.
On the 'Edit Product' screen, scroll down to the 'Product Data' section. For simple products, go to the 'General' tab and add an exact price (not a percentage discount) for each wholesale user role. For variable products, go to the 'Variations' tab and enter an exact wholesale price per variation.
3d. Set up tax exemptions for wholesale users
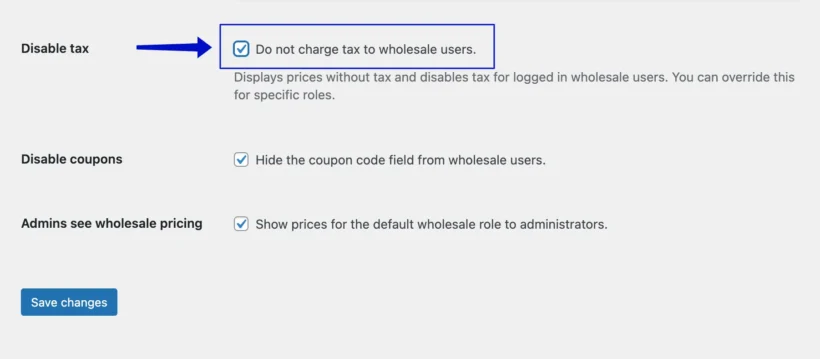
Tax exemptions automatically remove sales tax for wholesale users at checkout. This is common for B2B customers with resale certificates, who shouldn't be charged sales tax on goods they're purchasing for resale.
To enable tax exemptions in WooCommerce Wholesale Pro:
Go to WooCommerce → Settings → Wholesale → General.
Locate the 'Disable Tax' option (this requires tax to be enabled globally in WooCommerce).
Check the box to disable tax for wholesale users.
Click 'Save Changes'.
Retail customers will continue to be charged tax normally.
How to disable tax for wholesale users
Tax exemption is a built-in feature of WooCommerce Wholesale Pro, so no separate plugin is needed. You can also configure per-role tax settings for more advanced setups where different wholesale tiers have different tax rules. For more detailed information, see the complete guide to WooCommerce tax exemptions.
4. Create user-friendly wholesale layouts & order forms
So far we've covered how to protect your wholesale area from public users and how to set wholesale pricing. But that's only half the journey to creating a WooCommerce wholesale website.
The other half is the layout of your wholesale area. This is more to do with user experience and growing your wholesale sales rather than functionality.
There's little point having a private wholesalers section if it's clunky and difficult to use, or if it looks identical to your retail shop. You need to ensure that you're offering a visually different experience that's better catered to the needs of wholesalers.
Public ecommerce shops tend to use a standard layout with large product images and basic information. This retail-style layout isn't suitable for most WooCommerce wholesale stores. But strangely, nearly all WooCommerce wholesale plugins neglect this important fact, and leave the wholesale ecommerce area looking the same as the public shop.
To fix the problem, WooCommerce Wholesale Pro is designed to work alongside its sister plugin - WooCommerce Product Table.
WooCommerce Product Table offers a wholesale-friendly order form layout
Products are listed in a responsive, space-saving grid or tabular layout with extra product data and instant purchase options.
A product table wholesale layout provides an easy way for B2B customers to re-order their regular products. Customers see all the information at a glance, select quantities and variations, and can quickly re-order from a single page.
I used another plugin suite to set up the wholesale area and it worked great except the Wholesale Order Form wasn't flexible enough for my client's needs. Wholesale Product Table to the rescue. It was much more flexible and customizable and support answered my questions quickly and was great to work with.
Launch the product table builder via Products → Product Table → Add New.
On the first page, select the 'Shop pages' option, then on the following page select the 'Wholesale Store' page template to display the product table.
On the remaining pages, choose the default settings for your wholesale order forms. You can customize every detail of your tables, from the styling to the table columns, filters, and sort order.
Now when wholesale users access your site, they will see the products displayed in the order form layout. Your normal customers will continue seeing your default store layout, unless you create product tables for those page templates too (e.g. the main shop page).
4b. Getting more sales from your wholesale product tables
Choose what to display in your wholesale order form
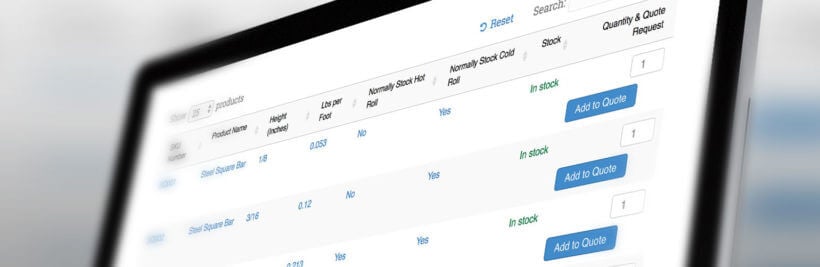
ColumnsThe table can contain various columns. It supports all the main WooCommerce data fields (title, description, categories, product attributes, tags, stock, etc.). You can also add extra product data through custom fields and taxonomies.
"Add to cart" buttonsBy including add to cart buttons, wholesale customers order online directly from the product table view. Choose whether to include a quantity selector and product variations. You can also create further options using the Product Options plugin. This way, you can create a wholesale order form for easy bulk ordering and quick re-ordering.
Wholesale enquiry formsYou can replace the add to cart column with wholesale enquiry buttons. By adding buttons or links to the wholesale table, users can click through to a separate page with an enquiry form (created using a WordPress contact form plugin). Alternatively, use WooCommerce Product Table with a Request a Quote plugin.
Downloadable documentsLots of wholesale websites provide downloadable files with technical product information. This is useful for downloadable promotional materials, specification documents, and similar resources. You can add a column with an icon, button, or text for each product linking to a downloadable PDF or similar.
Search, sort & filtersUse filters to help wholesale buyers find products quickly and easily.
4c. Use quick view to speed up wholesale ordering
Add quick view buttons or links to the wholesale order form.
Use product tables with our WooCommerce Quick View Pro plugin
By now, you know how to create a WooCommerce wholesale website order form. But what if you want to show even more information or purchase options, without taking wholesale users to a separate page for each product?
You can do this by adding the WooCommerce Quick View Pro plugin. This wholesale quick view plugin lets you add quick view links or buttons to the order form. Trade customers can view extra product information, choose variations, and add to the cart from a quick view lightbox.
Once they have made their selections, they immediately return to the wholesale order form where they can add more products to their order. It's much quicker than buying from a separate product page.
There are lots of ways to tailor the quick view lightbox to your WooCommerce wholesale website. For example:
Choose whether or not to include images in the quick view popup. Many wholesale websites sell non-visual products, so there's no need to distract buyers with big images.
Decide whether to include quick view buttons, or just let customers open the lightbox by clicking the product name or image.
Change the wording of the Quick View button (e.g. to 'Configure Options', 'Read More', or 'Customize Product').
Choose which information to display in the wholesale lightbox.
5. Test your WooCommerce wholesale website
Now you've set up the WooCommerce wholesale plugin. It's also important to test the experience for both public and wholesale-specific users.
Log out and visit the shop as a guest. Can you see the correct products and pricing?
Now log in as a wholesale user. Again, can you see the correct products and pricing? Are the menu links intuitive, and can you see the wholesale order form layout (if you're using WooCommerce Product Table)?
Go back to the plugin settings and continue tweaking your wholesale website until it's perfect.
6. Add wholesale users to your WooCommerce store
Once you've finished testing the WooCommerce wholesale plugin, it's time to start adding wholesale users.
If you have enabled wholesale registration, then people can register for an account on the Wholesale Login page. You might also want to add wholesale users yourself. There are a few ways to do this:
Add wholesale users manuallyCreate a user account (Users → Add New) in the WordPress Dashboard for each wholesale user. Assign them to one of your wholesale roles.
Convert existing customers to wholesaleIf you want to convert an existing customer to wholesale, then you can easily do this by editing their account and choosing a wholesale user role from the 'Roles' dropdown.
Bulk import themIf you're migrating from another B2B plugin or ecommerce system and have a lot of wholesale users to import, then we have provided instructions on how to do this.
Whichever method you use to add them, your B2B ecommerce users can log into their account and access the private WooCommerce wholesale area. Guests and other user roles will never know it exists!
Bonus tips
Hide prices from non-wholesale users
Perhaps you have a wholesale-only store where you want the public to be able to browse the products, but not see the wholesale pricing. You can do this by enabling the 'Hide Prices Until Login' feature in WooCommerce Wholesale Pro.
This will hide the prices and add to cart buttons from logged out users. When non-wholesalers visit your store, they can browse products as usual, but the prices and purchase options will remain hidden.
Add wholesale-only payment methods
As we discussed earlier, wholesale buyers often have fundamentally different needs from normal retail customers. After all, wholesalers are regular customers who are buying in bulk, rather than browsing for their own personal use.
As a result, many WooCommerce wholesale websites need to offer different payment methods for each type of user. For example:
Imagine that you want to offer PayPal to retail customers but not wholesale buyers due to the high PayPal fees.
Maybe you want wholesale customers to pay by invoice or bank transfer/BACS, while requiring instant online payment from regular customers.
The solution is to use the role-based payments feature in WooCommerce Wholesale Pro:
Go to WooCommerce → Settings → Payments.
First, make sure you have added all the payment methods that you will be offering, such as PayPal, credit card, invoice, etc.
Next, find the 'Payment Roles' page.
For each payment method on your store, select which user role(s) it will be available to.
Once you've done that, guests and normal customers will only see the payment gateways available to their role. Similarly, wholesale buyers will only see the payment methods for their role.
Create wholesale-only shipping methods
Shipping products to wholesale customers can be very different to shipping retail orders. That's because wholesale orders tend to be in bulk and involve much larger quantities. As a result, you may want to offer different shipping methods and costs to each type of customer.
For example:
Lots of online shops offer flat rate shipping costs or free shipping to retail customers. In contrast, they're more likely to cover their costs by offering weight-based shipping to wholesale buyers using a plugin like YITH Product Shipping.
In addition, some WooCommerce wholesale websites offer free shipping to their highest tier of wholesale users. This might be buyers with the highest historical sales, as offering free shipping is a way to reward them for their loyalty.
In the WordPress Dashboard, go to WooCommerce → Settings → Shipping.
Add all the different shipping methods and costs that you require for each shipping zone.
Now go to the 'Shipping Roles' tab within the same section.
Use the options on the page to choose which shipping methods will be available to each user role. Select different shipping methods for retail and wholesale customers.
Or if you don't want to worry about shipping to wholesale users, consider a dropshipping arrangement where a third party handles order fulfilment.
Ready to create a wholesale website in less than 15 minutes?
If you've been wondering "How long does it take to create a wholesale website?" then I hope this tutorial has given you the answer.
WooCommerce Wholesale Pro is a plug-and-play solution to help store owners and developers create a professional wholesale area in minutes. It's the best WooCommerce B2B plugin for online store owners that want to sell to different types of customers.
No technical knowledge is needed. Just follow the instructions in this tutorial, and you'll be up and running in no time.
WooCommerce wholesale plugin with quick plug-and-play setup.
In-depth documentation and video tutorials showing you every step and every click (absolutely no way to get it wrong!).
Technical support is available if you need any help.
Zero-risk 30-day money back guarantee. Love it or get a full refund!
Get the WooCommerce B2B plugin here, and start taking wholesale orders TODAY 🚀
FAQ
1. What is a wholesale website?
A wholesale website is an online shop in which part or all of the ecommerce area is restricted to B2B (business-to-business) buyers. These buyers are typically resellers of your products. They need to buy the products at discounted trade prices so that they can mark them up when selling them to their own customers.
A wholesale ecommerce website may also have a public shop for retail customers. These public customers cannot see wholesale prices.
2. Why create a wholesale website?
You should create a wholesale website if you want resellers to be able to purchase at trade prices. Of course, you can avoid this by taking wholesale orders manually over the phone. However, it's far more efficient to let them do it themselves on your website.
This will help to grow the wholesale side of your business because it is more convenient for buyers, as well as freeing you up for more important tasks. A wholesale website can be tailored specifically to the needs of wholesale buyers, without affecting the public-facing shop. This helps to build loyalty to your brand and ensure that they continue selling your products for many years.
A dedicated wholesale order form provides a much faster buying experience
3. Can I showcase my offerings to both wholesale and retail customers?
Absolutely. When you use WooCommerce Wholesale Pro to create a wholesale website, you can sell the same products to different customers at different prices. Each customer sees the correct pricing for their role, so there's no duplication.
If you're looking to create a food delivery or takeaway service for your restaurant, WooCommerce for restaurants is a great solution. With a WordPress food delivery plugin, setting up an online ordering system on your website is easy. Keep reading to learn how to create a seamless online ordering experience.
In this tutorial, you'll discover how to create a restaurant ordering system using WooCommerce for restaurants. Restaurants can greatly benefit from having an online food ordering system because:
It allows customers to place their orders directly from the restaurant's website, saving them time and effort.
Best online ordering for restaurants can also help manage their orders more efficiently and reduce the workload on their staff.
Whether you're a seasoned WooCommerce user or just starting out, I'll show you how to set up a restaurant ordering system step by step. By the end, you will have a fully functional WooCommerce food ordering system. It will allow customers to place their orders, select pickup or delivery options, and make payments securely.
And the best part?
Your WooCommerce for restaurants ordering system will be 100% yours. You own your data, and you get to keep 100% of your profits.
Sound good? Let’s get started!
Why a WooCommerce for restaurants plugin is the best (and cheapest) way to take food orders online
Before we dive into the tutorial, let's look at why a WooCommerce food plugin for restaurants is the best option for taking food orders.
Many restaurants use hosted third-party services like Just Eat, Uber Eats, Deliveroo and Grubhub. By listing your restaurant with these platforms, you have access to a huge market of potential online food delivery customers. However, it’s not ideal for everyone.
Here's why:
No hidden charges - Hosted platforms take a big cut of the revenue from your online restaurant orders. For example, Just Eat takes 14% at the time of writing. Whilst they have a massive user base, you're competing with other restaurants on the same platform. It's easy for your restaurant to get lost.
Huge range of plugins available for site customization - With hosted platforms, you have no control over the functionality of your online restaurant ordering system. In contrast, you can infinitely customize a WooCommerce restaurant ordering system. Do this by installing themes, plugins, or even writing your own custom code.
Scalability of WooCommerce - As the world's leading ecommerce system, you can use WooCommerce to run restaurant ordering systems containing hundreds, thousands or even millions of items.
SEO capabilities - Since restaurant ordering will take place on your own WooCommerce store, you have full control over its marketing. You can build the authority of your restaurants' domain name over time, creating a valuable assets for your business.
Better checkout experience - The WooCommerce checkout is optimized for conversions and you can customize it further using plugins. For example, you can allow customers to choose a delivery or collection time slot, or let customers check out in a popup.
Payment flexibility - WooCommerce integrates with every payment gateway you can think of - PayPal, credit card, cash, etc. You're not restricted to the ones provided by a specific platform.
You own your data - As with any hosted system, closed platforms have full control over your customer data. With WooCommerce, you own it.
Advanced tracking and analytics - As the site owner, you have full access to your data. WooCommerce contains useful sales reports and you can enhance this by adding plugins.
What you'll learn
If you’re looking for a low-cost Just Eat alternative without the fees, this tutorial will teach how you to create a bespoke online food ordering system.
We'll do it using a WordPress food delivery plugin. This means that you don't have to worry about the problems of affiliating to a third-party platform. In addition, having a WooCommerce for restaurants food ordering system on your main restaurant website looks more professional. It encourages customers to spend more time on your site, building loyalty.
What will my WooCommerce for restaurants ordering system cost?
There are financial advantages to getting a WordPress site for your restaurant. Almost all of the costs are fixed one-off, upfront fees. As a result, rather than losing a percentage of every sale, the benefit improves with every order you receive. You start saving money almost immediately.
These are the costs of building the food ordering website described in this tutorial:
WordPress content management system – free of charge.
WordPress theme – free of charge (you could buy a premium WooCommerce restaurant theme for ~$65, but this tutorial will show you how to add the best online ordering for restaurants website using a free theme).
Ongoing web hosting – web hosting comes at all different price points to suit any size of business. We recommend Kinsta's premium WordPress hosting. This is ideal for an ecommerce website with an online restaurant ordering system. For lower budgets, SiteGround is also good.
Payment processor fees – if offer online payment methods (which isn’t essential) then your payment gateway will take a percentage of the fees. This is normally a few percent - much cheaper than Just Eat’s 14%.
As you can see, setting up a WordPress food delivery system plugin yourself is far cheaper than using a third-party platform such as Just Eat.
Still not convinced? Let me show you how simple it is to set up a WooCommerce for restaurants ordering system.
Should I create a DIY WordPress food delivery website, or hire a developer?
Below, I'm going to tell you how to create a WooCommerce for restaurants ordering website using a simple WordPress food delivery plugin. This is a great option and you don't need any technical know-how.
If you'd rather have someone else set up the website for you, just forward this tutorial to any WordPress developer.
To build your own WooCommerce for restaurant order system, keep reading and I'll show you how.
How to create a WooCommerce for restaurant ordering website
In this video tutorial, you can watch me create a restaurant online food ordering system. Build yours alongside me, or read the written tutorial below.
The following tutorial covers every step of setting up a WooCommerce restaurant website:
Create a WordPress websiteWordPress is the world's web building platform. It powers your overall website and makes it easy to add pages and edit content.
Install WooCommerceWooCommerce is the world’s top e-commerce platform, powering over 41% of online stores. We'll use WooCommerce to add products and categories and take payments online (including PayPal and credit card). We'll also use it to add delivery and collection.
Install WooCommerce Restaurant OrderingThis plugin converts your WooCommerce store into a fully-fledged food ordering system. It displays your products in a user-friendly one-page restaurant ordering system. That way, customers can browse, pick, and customize their orders. It also lets you set opening times and prevent ordering when you're closed.
Add options to your food productsI'll show you 2 easy ways to add extra options for your food items, such as size choices or selling pizza toppings.
Delivery and collectionWe'll discover how to add a range of delivery and collection options.
Bonus tipsFinally, I'll share some extra tips on perfecting your WooCommerce restaurant ordering system. This includes accepting tips online to increase your average order value; selling discounted meal deals; and online ordering for multiple restaurant chains.
1. Create a WordPress website
This tutorial assumes that you already have a WordPress website for your restaurant. If not, there are loads of online resources to help you get started with WordPress.
Since this tutorial is aimed at non-coders, I recommend using a WooCommerce-ready theme for the design of your website. The screenshots in this article were all created using Storefront. This is a high-quality, free WP theme from the makers of WooCommerce. If you prefer, then you can use a WooCommerce restaurant theme such as Delicio.
The WooCommerce Restaurant Ordering plugin with the Delicio theme
2. Install and set up WooCommerce
Once you’ve got a WP website with a WooCommerce-ready theme installed, it's time to install WooCommerce. This will be the core of your online restaurant food ordering system and the basis for installing your WordPress food delivery system plugin. It provides behind-the-scenes e-commerce features such as the shopping cart, checkout, and online payments.
Log into the WordPress dashboard for your website.
Go to Plugins → Add New.
Search for 'WooCommerce', and install and activate the plugin.
A button will appear towards the top of the WordPress admin prompting you to enter the WooCommerce setup wizard. Go through the wizard and enter your currency, tax details, etc. (Ignore shipping as we'll do this in step 5). Tell the wizard to create the basic pages needed for WooCommerce such as Shop, Cart, and Checkout.
In the payment options section of the setup wizard, choose 'PayPal Payments Standard' and enter your PayPal email address. This is the quickest way to get started and you can always set up other payment options later. If you don’t want to take online payments, select 'Cash on delivery' and your restaurant staff or delivery drivers can take payment instead. To take credit/debit card payments without PayPal, then select 'Stripe' and follow the onscreen instructions.
2b. Create product categories for your restaurant menu
Most restaurant menus are divided into sections: Starters, Pizza, Salads, Desserts, Drinks, and so on. You need to create a separate WooCommerce product category for each section of your restaurant menu:
Look at how your food delivery menu is structured and write a list of categories.
In the WordPress admin, go to Products → Categories.
In the 'Add New Product Category' section on the left, create a category for each section on your online menu. Add a Name and Slug, plus a description if you want to display some introductory text for the category on the food order form.
Click the blue 'Add New Product Category' button.
The WooCommerce product categories you’ve just created for your menu will appear in a list on the right-hand side of the page.
2c. Add each dish or meal as a WooCommerce product
Next, add each food from your restaurant menu as a WooCommerce product.
In the WordPress admin, go to Products → Add New. Add the information highlighted in the screenshot below:
Title – The name of the dish to appear in the online restaurant ordering system.
Long Description (optional) – This can appear in the lightbox popup for each food (if you enable lightboxes in step 3). It's ideal for listing allergens and nutritional information.
Product Data – Choose a product type. If your restaurant only offers 1 version of the dish then choose 'Simple Product' and add the price. If you offer choices (e.g. Small, Medium, and Large), choose 'Variable Product' and add the remaining information in step 4.
Product Short Description (optional) – Use this to display extra information about the meal. This can appear on your one-page restaurant order form. It's a good place to list nutritional symbols, such as "GF, VG" for a dish that is Gluten Free and Vegan.
Product Categories – Tick the menu category that the food should appear in. (WooCommerce lets you select multiple categories but most online restaurant ordering systems would have 1 category for each food, just like a printed menu.)
Product Image (optional) – Click 'Add Featured Image' and upload a picture of the food. Restaurant food photography is a skill and it’s worth getting this done professionally. If your online restaurant order form will have small images then keep the file sizes small.
Publish – Click the blue 'Publish' button.
3. Install WooCommerce Restaurant Ordering
By now you've set up WooCommerce, added your dishes and structured them into the sections on your restaurant menu. Next, it's time to create a one-page food order form so that hungry customers can quickly build their meals and order online.
We'll do this using the powerful WooCommerce Restaurant Ordering plugin. WooCommerce provides its own layouts but they're not suitable for an online food ordering system. As a WordPress food delivery plugin, WooCommerce for Restaurant Ordering lists your menu in a one-page order form which is perfect for food ordering.
Download the plugin files and copy your license key from the order confirmation page or email.
In the WordPress admin, go to Plugins → Add New → Upload.
Upload the zip file for WooCommerce Restaurant Ordering and activate the plugin.
Go to WooCommerce → Settings → Restaurant and enter your license key. Here, you can also choose the default settings for your restaurant food order forms. Use these to configure the order forms. Also add opening times so that people can only order food while you're open.
3b. View your restaurant ordering page
When you activated WooCommerce Restaurant Ordering, the plugin automatically created a one-page food ordering system for you. This lists all your food products, divided by category.
Find the page under the Pages section of the WordPress admin, and see how it looks!
These are just some of the many ways you can list foods with WooCommerce Restaurant Ordering
Next, you need an easy way for customers to review and complete their restaurant orders. The best way to do this is to install the WooCommerce Fast Cart plugin. This adds a floating cart popup so that customers can make changes, enter their details and check out without leaving the page. It's really flexible and you can choose whether to open the popup automatically as soon as customers add foods to their order or to display a clickable floating cart icon instead.
A website using WooCommerce Restaurant Ordering with the Fast Cart plugin.
2c. Create more food order forms (optional)
So far, you've learned how to use the default restaurant ordering page, which lists all your foods by category. If you need more flexibility, then you can also create food order forms individually.
You can do this by adding a [restaurant_ordering] shortcode anywhere on your site. Use the shortcode options to choose which categories to include, and customize the settings. This might be useful if:
You're listing foods on more than one page of your website, for example with one page per category.
You'd like to use different settings for each food order form, such as showing images or descriptions for some categories and not others.
4. Add options to your food products
If you only offer 1 version of each dish, you can ignore this section. If you want to give customers a choice – for example to choose a size or select pizza toppings – then you need product variations or add-ons.
Variable products are built into WooCommerce. You can list each type of variation as a dropdown list alongside each product in your online restaurant ordering system. Customers can select 1 variation from each list.
If you want customers to be able to make multiple selections, then you need add-ons instead. You can add more flexible options with the WooCommerce Product Options plugin. It works perfectly with WooCommerce Restaurant Ordering plugin we're using for the food order system. You can use it to add checkboxes, radio buttons, multi-select dropdowns, text input fields where the customer can type a special message, and more. For example, a WooCommerce pizza restaurant will need Product Options so that customers can order as many extra toppings as they like.
An example of a pizza with product variations for Pizza Size, and add-ons for Crust Style and Extra Toppings.
Next, I'll show you how to add both types of extra product options. You can use them separately or together in your WooCommerce restaurant ordering system.
Adding product variations
Select 'Variable product' in the 'Product Data' section of the 'Add/Edit Product' page.
Go to the 'Attributes' tab, add the product information that customers will be choosing between, and tick 'Used for variations'.
Go to the 'Variations' tab.
Either select 'Create variations from all attributes' from the dropdown, or add each variation individually and click 'Go'.
Click the little triangle arrow that appears when you hover over a variation and add the variation price and any other information.
Finally, click 'Save changes'. When customers click on food in the restaurant order form, they can choose the variations from a lightbox before adding it to the cart.
Go to Products → Product Options in the WordPress admin.
Add as many options as you like, structured into groups.
When customers click on a food product in your WooCommerce restaurant order form, the add-ons will appear for them to select in a lightbox.
5. Set up delivery, collection and delivery time slots
WooCommerce offers lots of delivery options, which are perfect for restaurants. The free WooCommerce plugin lets you set up delivery areas and delivery or collection options. You can also use an additional plugin to let customers choose a specific delivery time or collection slot.
5a. Delivery areas and options
You can find these in the WooCommerce → Settings → Shipping section of the WordPress admin.
Here are some suggested shipping options that are useful for online restaurant ordering:
Shipping zonesCreate one or more shipping zones for your different delivery areas. For example, if you offer free shipping for certain zip codes and charge for delivery in other areas, then set up 2 shipping zones. If you also offer collection, add a third shipping zone so that people can 'click and collect' wherever they live.
Shipping optionsAdd one or more delivery options for each shipping zone. For example, your 'Local Delivery Area' shipping zone might have a 'Free Delivery' option for orders over $20, a $5 'Flat Rate' option for lower value orders, and a 'Local Pickup' option for customers wishing to collect their takeout meal.
An example of WooCommerce delivery options for a typical restaurant
Let customers check the delivery area before they start ordering
To make your online restaurant ordering system more user-friendly, I recommend adding details of your delivery area elsewhere on your site. Here are some ideas on how you can do this:
Add a 'Delivery Area' page to your restaurant website.
If your website has a sidebar (right or left column), add a widget about your restaurant's delivery area. Or even better, add a custom Google map showing your online food delivery area.
Install the Woo Delivery Area Pro plugin so that customers can check they're in your delivery area before they start building their meal.
5b. Delivery time slots
Some restaurants like to deliver their online orders as soon as they're ready. Others let customers order in advance and choose a specific time slot. As a restaurant, you might want to take up to 5 online food orders in each half-hour period, and make sure they order at least 15 minutes in advance of their time slot. You can do this with the WooCommerce Opening Hours & Chosen Times plugin.
This excellent plugin lets customers choose a delivery date and time slot, subject to your restaurant's opening hours and capacity. You can restrict the number of bookings per time slot. You can specify how long customers must place their orders before their time slot, giving the kitchen plenty of time to prepare the meal.
6. Bonus tips
Before we finish, I'll share some more top tips for perfecting your WooCommerce restaurant ordering system. You'll learn how to accept tips online, sell meal deals, and more. If you operate a chain of restaurants, then you'll also learn how to adapt this tutorial to set up the best online ordering for restaurants for multiple sites.
Encourage customers to leave a tip
All over the world, restaurant customers expect to leave a tip. Don't miss out just because you're selling online! You can add tipping to your WooCommerce restaurant website using the WooCommerce Donation Or Tip On Cart And Checkout plugin.
This handy plugin adds a 'Tip' field to the WooCommerce checkout page. Customers can enter the value of their tip, significantly increasing your average order value.
Most restaurant customers add a tip of 10-15% of the total order value, depending on your country. Use the plugin to set a default tip as a percentage of the order value. To encourage bigger tips, set the default tip at the upper end of the usual amount in your country. Customers can then override the suggested tip as required.
Manage your delivery drivers
Most WooCommerce restaurant ordering systems use local drivers to deliver the orders.
You can manage your delivery drivers outside of the website. Alternatively, you can save time with the free Delivery Drivers for WooCommerce plugin. This WordPress plugin automates many of the manual tasks, connecting your drivers with your online systems and the customer.
Sell restaurant meal deals
Lots of WooCommerce for restaurants websites provide special offers and meal deals. These are fantastic incentives to encourage customers to buy more.
Use WooCommerce for restaurants ordering with the Quantity Manager plugin to control how many items customers can buy from each category. For example, you might sell a meal deal for two people where they can buy 2 starters, 2 mains, and spend up to $15 on side dishes.
You can also use the official WooCommerce Dynamic Pricing plugin to create restaurant deals and special offers. For example, you can create buy one get one free (BOGOF) meal deals, or buy one pizza and get 50% off your second one. These deals can be global or specific to a category, so you can offer deals on pizzas or sandwiches while keeping the side dishes and desserts at full price, and so on.
Mobile ordering for restaurants
WooCommerce doesn't come with a mobile app for customers to order via their smartphones. However, most WordPress themes are fully responsive, which means they're mobile-friendly and look great on any device.
This means that your customers can view your foods and order from your restaurant online using their device of choice - no need to worry about setting up a separate mobile app!
Managing orders in your WooCommerce for restaurants' food ordering system
There are many ways to manage the online food orders that your restaurant receives in WooCommerce:
Email notification of new restaurant orders
When you receive an order, you will receive an email notification from WooCommerce. Your kitchen staff can monitor this email address and be notified as soon as an order arrives.
If you have a busy restaurant with many online orders, then keep the WordPress admin open on your screen during your restaurant opening hours. Train your staff to refresh the WooCommerce → Orders page regularly so they can take action as soon as a food delivery order is received.
WooCommerce for restaurants mobile app
The official WooCommerce iOS mobile app lets you view and manage restaurant orders from any Apple iPhone or iPad. It's often more convenient for restaurant owners and staff to use mobiles or tablets than desktop computers.
Auto-print new food orders to the kitchen
You can integrate your WooCommerce for restaurants' food ordering system with a GPRS printer. This will automatically print new online restaurant orders as soon as they're received. We recommend the WooCommerce Automatic Order Printing plugin.
Receive an alert when you receive a WooCommerce for restaurants order
Use YITH WooCommerce Desktop Notifications to automatically play a sound alert on your desktop computer, laptop, or tablet whenever you receive a new order.
If you'd rather receive a text when you receive a new order from your WooCommerce for restaurant website, try the SMS Alert Order Notifications plugin. You can also use the Twilio SMS Notifications plugin to send the customer a text when their order is ready.
WooCommerce can be integrated with many external systems. If you're using a specific system to manage your restaurant orders, look up how this can be integrated with WooCommerce.
Think creatively and you'll be surprised how easy it is to integrate your WooCommerce for restaurant ordering system with your existing kitchen processes.
Online ordering for multiple restaurants
So far, we've talked about creating a WooCommerce restaurant ordering system for a single location, using a WordPress food delivery plugin. With a couple of tweaks, you can extend this to take orders for multiple restaurants or entire restaurant chains. There are 2 ways to achieve this:
Method 1 – WordPress multisite, with a separate site for each restaurant
You may want to keep your WooCommerce for restaurants really separate, with unique content for each one (e.g. a different homepage, about page and contact us). If so, you can use WordPress multisite to create a separate sub-site for each restaurant in the chain. This is better than having completely separate websites because you get the best of both worlds: a single WordPress food delivery plugin installation with shared hosting and maintenance costs; with unique content for each restaurant.
WooCommerce for restaurant ordering will be active on each site. However, each site will have its own set of products and order notification settings, avoiding any crossover.
Method 2 – Single website, with separate categories & order notifications for each restaurant
A simpler option is to take orders for each restaurant from your main WordPress website. There are two ways you can do this:
Create separate product categories for each restaurant. On the online food ordering system page for each restaurant, use WooCommerce Restaurant Ordering to list products from the appropriate categories.
Alternatively, use either the official Product Vendors add-on or the Dokan Multivendor plugin to add products from multiple vendors (treat each restaurant as a separate vendor). Each vendor has their own product categories. Enable the 'Category pages' option in WooCommerce Restaurant Ordering and the beautiful food order form layout will be used for each vendor's products.
Whichever method you choose, you can use the WooCommerce Multiple Email Recipients Notifications plugin to send order notifications to a different email address depending on which category the customer has ordered from. This lets you ensure that the new order emails are sent to the correct restaurant. As a result, your entire WooCommerce restaurant online food ordering system remains on a single website - while taking orders from multiple restaurants.
Case study: Online Ordering for Ciao Italia
Ciao Italia is an Italian restaurant in the US that started offering curbside pickup to its customers during the COVID-19 pandemic. They use our WooCommerce Restaurant Ordering plugin to let customers place their orders online from home.
The restaurant displays its entire menu (including food, beverages, and a gift card) on a one-page order form. It does this by sorting the food items under different categories and displaying all of the categories on the menu page. Customers can simply click the (+) icon to add food items to the cart. When a customer adds an item to their cart, they see additional purchasing options in a lightbox.
For example, you can use the lightbox to choose the quantity of food or beverages. If you're buying a gift card, then you can choose the value in any denomination. (Tip: They sell gift cards using the 'Customer Defined Price' option in the Product Add-Ons plugin.)
The one-page food order form makes it quick and easy for customers to place their orders and proceed to the checkout page.
Adam Tracksler from Bryce Creative developed the website. He was delighted with WooCommerce Restaurant Ordering:
In today’s environment of having to act nimbly for clients, the WooCommerce Restaurant Ordering plugin is the perfect solution for getting a website running quickly. We were able to launch on day one with the help of this plugin. It took all the heavy lifting out of the equation and let us focus on design. If you are debating whether or not this is the solution for getting a restaurant going — look no further, this is the plugin you want. The support is also top-notch!
Want to set up online ordering for your restaurant in 15 minutes?
And there you have it! If you follow all the steps in this tutorial then you can create a complete online food ordering system with an easy-to-use WordPress food delivery plugin.
You've learned how to install and set up the WooCommerce platform to handle all of your menu's food products. You've also seen how you can use the WooCommerce Restaurant Ordering plugin to create customizable food order forms. Customers can choose their selections from each customer, and then place their order and pay online.
By using a WordPress food delivery plugin and WooCommerce as an alternative to Just Eat or other systems, your restaurant can save many thousands of dollars or pounds. It's easy to set up, easy to manage and will look really professional.
Easy plug-and-play setup.
Comes with full support and expert advice.
30-day money back guarantee - love it or your money back!
If you're looking for a WordPress eBook plugin, you've come to the right place. This is the complete guide to listing and selling digital eBooks in WordPress. I'll show you how to choose the right WordPress eBook plugin for your site - whether you want an eBook library plugin with downloadable PDF's, or an eBook store plugin with e-commerce.
In this article, I'll teach you about 3 methods for creating a WordPress digital eBook library. Each method uses one of our table-based WordPress eBook plugins, and I'll recommend the best plugin for your needs. The plugins are ideal for creating a WordPress eBook library (like Scribd) or eBook store. The eBooks are listed in a searchable, sortable table layout with filters.
Jump straight to the instructions for the method you need:
Method 1 - Create an eBook library with downloadable or embedded books
This is a non-ecommerce option, as people can read eBooks online or download the eBooks. You can add any eBook file type, such as PDF, EPUB, MOBI or Kindle. People can then add them to their e-readers (like Kindle or NOOK) or smartphone (Apple or Android device). It's suitable for lists of free eBooks, or eBook membership sites (i.e. an ebook subscription service) where you sell subscriptions giving access to your downloadable WordPress eBook library.
Methods 2 and 3 - Build an e-commerce eBook library
This is a full e-commerce option, where people can view your eBooks in a searchable table and purchase each one individually. They will then receive a protected eBook download link that they can add to their library e.g. in Amazon Kindle or Barnes & Noble NOOK ebook readers. You can choose between two popular WordPress eBook store plugins: WooCommerce and Easy Digital Downloads.
Perfecting your eBook library
Whichever method you follow, use this section to add the finishing touches that will make your eBook digital library a success. I'll show you how to create filters to make your eBooks easier to find, plus extras such as adding embedded audio players or flipbooks to a WordPress audiobook library. You'll even learn how to create a private members-only ebook library that is hidden from public view.
Choosing a WordPress eBook plugin
Our WordPress eBook plugins are ideal because you can list lots of digital books on each page. Users don't have to waste time scrolling through multiple pages. You can even include extra data about each eBook such as the author, blurb, image, publisher, year - whatever you like! This also improves search engine rankings in Google.
Your users can quickly search, sort and filter the list to find an eBook they're interested in. They can then either click to download a WordPress eBook PDF or other format such as EPUB or MOBI (depending on the device they're using such as a Kindle, NOOK, or an Apple/Android device like an iPad or iPhone). Or if you're using an e-commerce plugin, then they can add eBooks to the cart directly from the table of eBooks.
I'll recommend a suitable WordPress eBook plugin in the relevant sections of this tutorial. Read about the method you're interested in, and I'll tell you how to set it up and which WordPress eBook store plugins to use.
Let's get started!
What can you sell with a WordPress or WooCommerce eBook plugin?
People use the term 'eBook' to mean lots of different things. In a nutshell, an e-book refers to any book or other document that you download and read electronically, or read online. It doesn't refer to printed books, or web content that you read directly on a website.
This includes:
Type of book - fiction or non-fiction, science fiction, storybook, thrillers, textbooks.
Other ebook formats - music manuscripts, poetry, songbooks.
It's a diverse list, but what they all have in common is that they are downloadable and read on a computer, table or smartphone. That's what makes them an eBook.
Now we know what we're talking about, let's dive right in and learn how to create a WordPress eBook library like Scribd.
Method 1 - Create a WordPress eBook library with downloadable eBooks
Method 1 is about creating a digital library of eBooks similar to Scribd. It uses our Document Library Pro plugin to create a searchable, filterable table listing your eBooks.
This method is ideal if you want to create a WordPress eBook library with downloadable eBook links. Users can find a digital book and click to download it as an eBook PDF or whatever format you decide to use. It's suitable for free digital eBook libraries, and WordPress membership sites where people are given access to a protected eBook library e.g. ebooks with DRM.
Method 1 is NOT suitable if you want to sell each eBook individually - you'll need a WordPress eBook store plugin as well as an e-commerce plugin for that. If this is what you need then jump to Method 2 instead.
First, install Document Library Pro and use it to add your eBooks to WordPress. This is really easy because the plugin creates a dedicated 'Documents' section to the WordPress admin. In your case, 'Documents' are actually 'eBooks'!
Add each eBook as a separate 'Document':
Go to the Documents → Add New page.
Use the 'Document Links' section to upload the eBook. Alternatively, if it's hosted elsewhere (e.g. on Amazon Kindle), then you can add the URL here. Either way, users can click on a button in the eBook library to access the eBook.
Add the information that you want to display about each eBook:
Title - add the eBook title.
Categories and tags - add any categories or tags that will let people sort and filter the eBook in the digital library.
Featured Image - upload an image, if you're planning to include these in the WordPress eBook library. This will probably be an image of the eBook front cover or author, similar to how ebook retailers like Amazon (United States) or Kobo (Canada) do it.
Excerpt - Use this to add the eBook's blurb or description. The WordPress eBook plugin can include this as a column in the table.
Content - Use this to add any extra information that you want to display in the eBook library. In the bonus section later in this tutorial, I'll also show you how to embed eBooks directly into the content field so that people can read them online.
Adding eBooks in bulk
If you have too many eBooks to add manually, that's fine. Document Library Pro provides several ways to import eBooks in bulk.
Create any extra fields for your eBook library
If you need to include any additional fields in your eBook then you can do this by creating custom fields and taxonomies. As a general rule, use custom fields for storing unique data about each eBook such as ISBN number or barcode. Use taxonomies for filterable data such as topic, publisher, year or author. For example, you might create a taxonomy that marks bestsellers or ebooks with DRM. This way, customers can easily sort them by new releases, popular ebooks, or DRM-free ebooks.
Once you've created the extra fields for your eBook post type, you can add the data for each eBook. You can list all these extra fields in the digital library using the WordPress eBook plugin - which brings us to Step 2...
Step 2 - Use the WordPress eBook plugin to list eBooks in a table
By now, you've added your eBooks to WordPress. Great! Now comes the fun part - it's time to create your WordPress eBook library similar to the Kindle store.
Navigate to the 'Pages' area in the WordPress admin and find a page named 'Document Library'. Change the name and permalink to something related to eBooks, such as 'eBook Library'.
Next, view the page and you'll see the first draft of your WordPress eBook library.
It looks pretty good straight out of the box, and you can use the plugin settings page to fine-tune it as needed. For example, you can change how the download links work, and which columns appear in the table.
If you've structured the eBook library into categories, then you can also enable the 'Folders' option. This will list each eBook category separately. Users can click on a category name (i.e. a folder) to view the eBooks from that category.
That's everything you need for a professional-looking WordPress eBook library. If you want to make any further changes to it, skip to the section on Perfecting your eBook Library.
Sell membership access or add ebook subscription service to your WordPress eBook library
So far, I've shown you how to create a table of eBooks that is available for everyone to access. If you don't want this, then there are a few WordPress plugins to protect your eBook library and restrict it from public view. Here are 3 suggestions of how you can achieve this.
Hide the eBook library with Password Protected Categories
Our WordPress Password Protected Categories plugin lets you put all your eBooks in a category and password protect that category. This will password protect your eBook digital library so that only people with the password can access it.
Use Groups to restrict access to authorized users only
The free Groups WordPress plugin is an easy-to-use free WordPress membership plugin. It offers an easy way to create 'hidden' areas of your website that only logged in users with access to the appropriate 'Group' can access.
This method is useful to making a WordPress eBook library available to pre-approved people only similar to Kindle Unlimited. For example, you might want to make it available to members of your organization, employees, or book club. Each person needs to have a user account on your WordPress website. You need to give each person access to the eBook Library Group manually. (If you want to sell access to the eBook library then you can still use the Groups plugin - but you'll also need some extra plugins which I'll cover in the next section.)
Install the Groups plugin, create your eBook library as described above, and create a Group called 'eBook Library' or similar. Go to to the eBook library page with the product table and restrict it to members of the eBook Library Group.
To give people access to the eBook library, you need to add them as users in WordPress (Users → Add New). Select the eBook Library Group from the dropdown on the Add/Edit User page. When they log into their account, they will be able to access the protected eBook library.
Use the Groups plugin documentation to make further changes. For example, you can create a message that will appear when unauthorized users try to access the hidden eBook library.
Sell subscriptions to your WordPress eBook library
You can sell access to the eBook library using the WooCommerce plugin with the Groups for WooCommerce add-on - plus Subscriptions if you want to take regular payments. This builds on the 'Groups' method in the previous section by integrating the hidden eBook library with the world leading e-commerce plugin and the ability for people to subscribe online.
Some tips on which combination of plugins to use:
If you want people to make a one-off payment to your eBook library then you can do this using Groups, WooCommerce and Groups for WooCommerce. Sell access to the eBook Library Group as a product in WooCommerce, so that people can buy it on your website.
If you want people to make an ongoing subscription to the digital eBook library, then you'll also need the Subscriptions plugin. You still need to sell access to the eBook Library Group using WooCommerce, but buying this product will sign people up to an ongoing subscription. This is similar to the Kindle Unlimited implementation. Payment will be taken regularly (e.g. using PayPal or Stripe) so that the customer can continue accessing the eBook library. If they ever cancel the subscription then their access to the Group will be revoked.
Method 2 - Build an e-commerce eBook library
Method 1 showed you how to create a downloadable eBook library - either public, or restricted to specific people. In Method 2, I'll tell you about WordPress eBook plugins for selling eBooks individually. With these plugins, people can view a table listing all your eBooks. They can then choose to buy specific eBooks from the list. This is a full e-commerce solution - customers can pay for their eBooks online and receive the downloadable eBooks via a secure link.
There are 2 free WordPress e-commerce plugins that are ideal for selling eBooks:
Easy Digital Downloads - EDD is famous for selling digital products such as eBooks. Coupled with a table-based plugin for displaying your eBooks, it's the perfect way to create an e-commerce eBook library.
WooCommerce - Powering over 41% of all online shops, you can use WooCommerce to sell anything online - including eBooks. Like Easy Digital Downloads, the default WooCommerce store layouts aren't really suitable for eBooks. However, you can use it with a table-based WordPress eBook store plugin to create the perfect layout, complete with Buy buttons.
You can also use other e-commerce plugins such as WP ecommerce. I haven't featured them all in this article, but they all work with Posts Table Pro for listing your eBooks.
I'll tell you how to create a WordPress eBook library using both of these e-commerce plugins. The method is slightly different for each, so we'll start with Easy Digital Downloads and then move on to WooCommerce.
Create an Easy Digital Downloads eBook store
Easy Digital Downloads works perfectly with our Posts Table Pro plugin - use them together to build a fantastic eBook store. Your eBooks will be listed in a table layout with buy buttons.
People can read about the eBooks in the table, and add as many as they like to the cart. They can then click through to the Easy Digital Downloads checkout and pay online. Once the order is complete, Easy Digital Downloads will send them a secure link to download the eBook in whatever format you've uploaded (PDF, EPUB, MOBI etc.).
Add each eBook as a separate downloadable product via Downloads → Add New.
Next, create a new page (Pages → Add New) which you'll use as your main eBook store page.
Finally, follow the steps in our other tutorial about how to create Easy Digital Downloads table layouts. This covers everything you need to know to create an amazing eBook store layout using Posts Table Pro. You can create a single table listing all your eBooks, or multiple tables listing eBooks from different categories. There are over 50 options, so go through the tutorial and create the perfect eBook store.
Easy Digital Downloads tip: If you're selling eBooks then you must charge European VAT to customers in the EU. You can easily do this with the Easy Digital Downloads EU VAT plugin.
Build a WooCommerce eBook store
As a WordPress website owner, another way to sell ebooks is through WooCommerce. You can use the WooCommerce plugin to create an ebook subscription site or ebook store. Paired with the right WooCommerce ebook plugin, this e-commerce plugin is perfect for selling digital products (or digital downloads) like ebooks.
The way it works is that you'll add each eBook as a separate WooCommerce product. You'll then use the WooCommerce Product Table to list the eBooks in a searchable table with filters. As with the Easy Digital Downloads eBook store plugin, you can list all your eBooks in a single table or create separate tables for each category. Either way, it's easy for customers to find your eBooks, pay online, and receive a secure download link via email.
First install the free WooCommerce plugin. Use the WooCommerce setup wizard and documentation to set up your standard store pages, tax settings, payment gateways (e.g. PayPal and/or Stripe for credit and debit card payments), etc.
Next, add each eBook as a product (Products → Add New). Choose the 'Downloadable' product type in the Product Data section of the page. This will open up some extra options for you to add the downloadable eBook file(s) in whichever format you choose. This might be PDF, MOBI, EPUB or similar.
Finally, create a new page (Pages → Add New) which will be used for your eBook store. Use the WooCommerce Product Table knowledge base to list your eBooks in a table layout with all the information you want to display. It's really flexible and you can even store extra data about your eBooks using product attributes, custom fields and taxonomies. If you want to offer different price options then you can use variable products for this. Each price option will appear as a variation dropdown list next the add to cart button.
Perfecting your eBook library
Whichever of the above WordPress eBook plugins you use, don't forget to add the finishing touches.
Adding filters to the eBook library
The most important extra features that you need to add are filters. You can add filter dropdowns above the eBook library for various options including categories, tags and any custom taxonomy.
If you're using WooCommerce Product Table then you can also add attribute/variation filters above the table, and filter sidebar widgets. All of these will increase your eBook sales by making them easier for people.
Embed eBooks to read online
So far, we've assumed that people will download the eBooks to their computer. Perhaps you don't want this - or perhaps you want to provide an online preview of the eBook before people download the eBook.
When you add the eBook - either as a document or an e-commerce plugin, depending on which method in this tutorial you've used - you need to embed it in the main content field/description.
There are lots of service that let you embed eBooks into WordPress, and they will all work with the plugins in this tutorial. For example:
Use a flipbook plugin such as FlipSnack to embed a page turning flipbook.
Or use the free PDF Embedder plugin to embed a PDF in WordPress.
Either way, people will be able to view the eBook and read it online. However, they won't be able to download it unless you have separately provided a download link.
Add embedded audio and video players
If you're selling audio books or have a promotional video, then you can embed media players directly into the main eBook library page. For example, you might be creating a WordPress audio book library and want to include MP3 players for your audio books.
To do this, add an embedded audio or video player directly into any of the text fields in your eBook library (such as the main content area or a custom field).
Go to the plugin settings page and tick the 'Shortcodes' option. This tells the WordPress eBook library plugin to render the embedded media player properly, instead of just as plain text.
Next, your visitors will be able to listen to audio tracks or watch video directly from the main eBook library page.
Add quick view buttons
Add buttons to show extra images, the blurb, and more in a quick view lightbox.
Add buttons to show extra images, the blurb, and more in a quick view lightbox.
If you're building a WooCommerce eBook store, then you can enhance your book lists with the WooCommerce Quick View Pro plugin. This handy plugin adds 'quick view' buttons (which you can rename to anything you like) to your eBook library pages. Customers click these buttons to view more information about your eBooks in a lightbox, without having to visit the single product page.
Here are some examples of how you can use quick view to improve your WooCommerce eBook library:
Upload multiple images to the product gallery, and display these in the quick view lightbox. Use the images to preview different pages from your eBook, just like Amazon's 'Look inside' feature or Kobo's 'Preview Now' feature.
Add the blurb from the back of your eBook to the product short description, and display this in the quick view.
Sell product variations (e.g. different eBook file formats or printed book options) in the quick view.
The perfect WordPress or WooCommerce ebook library
These WordPress eBook plugins come with over 50 options for changing how the eBooks are listed in the library. Choose whichever plugin best meets your needs:
Use Document Library Pro to create a non-ecommerce eBook library where people can view and download eBooks, but not make purchases.
Use Posts Table Pro if you're using Easy Digital Downloads to sell eBooks.
Think about which eBook plugin will help you list your eBooks even more effectively. Spend some time experimenting to find the right combination of options, and make your WordPress eBook library a big success.


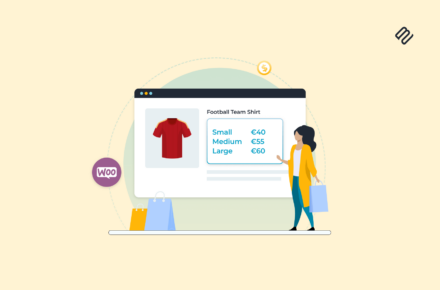
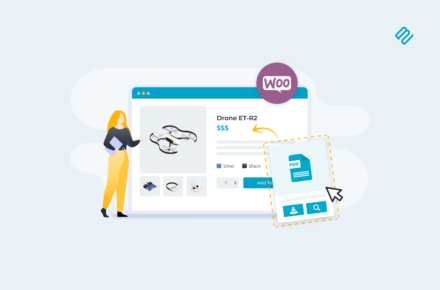

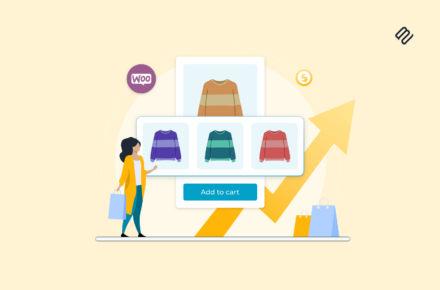


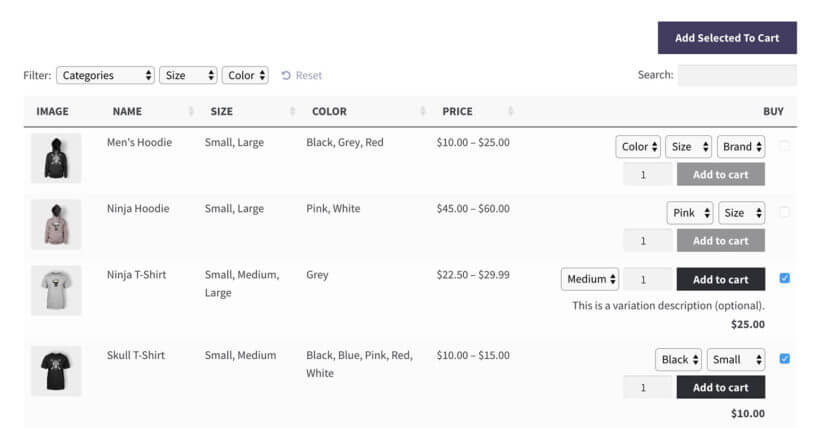
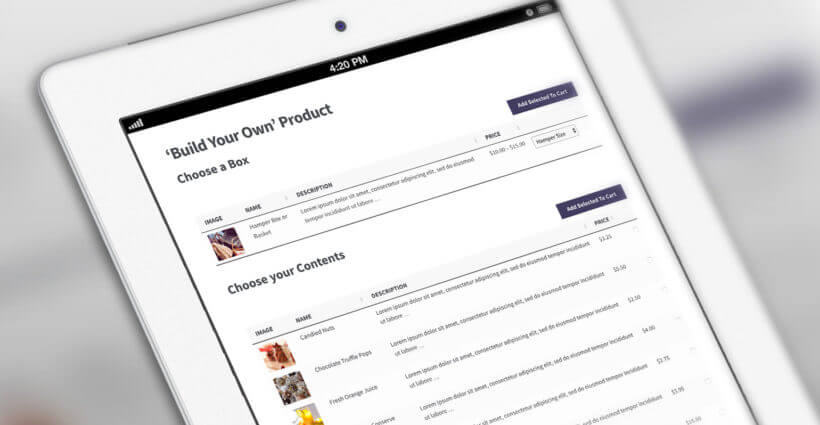
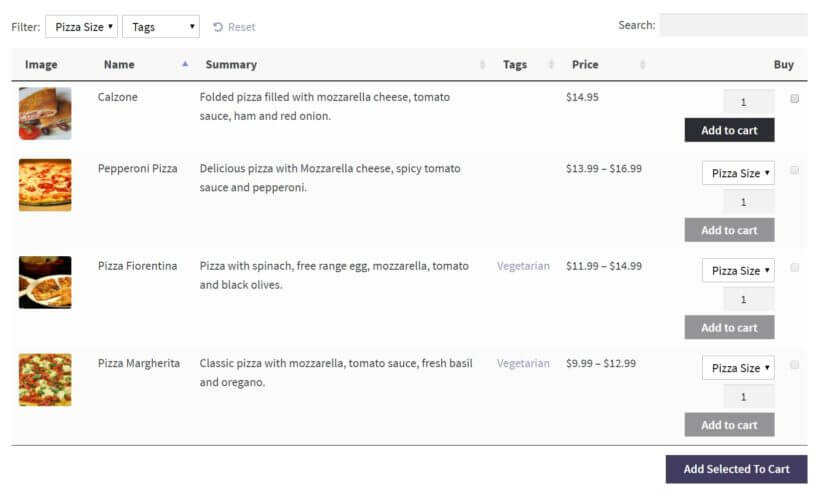
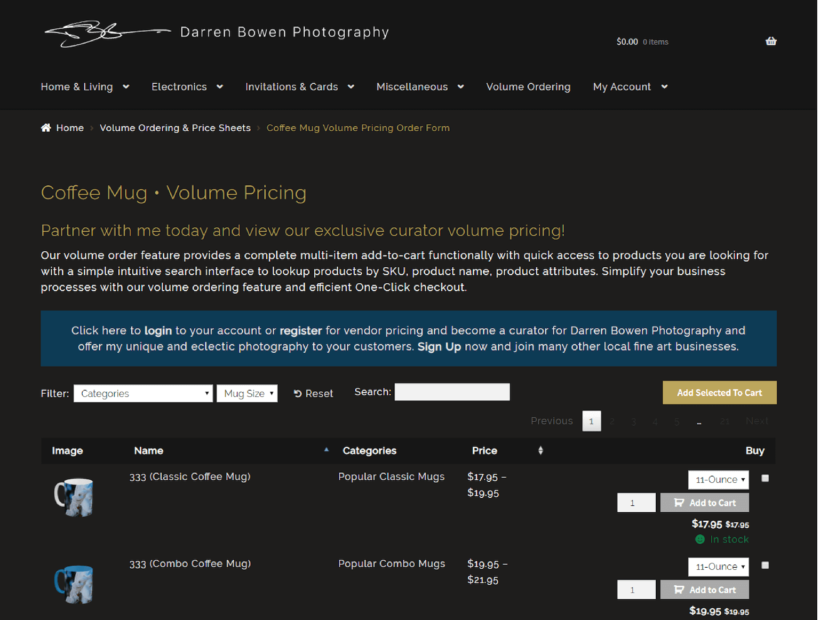
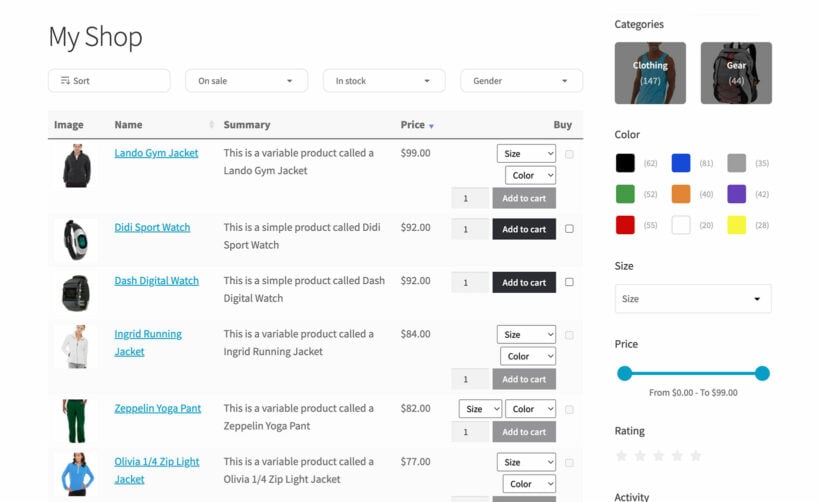
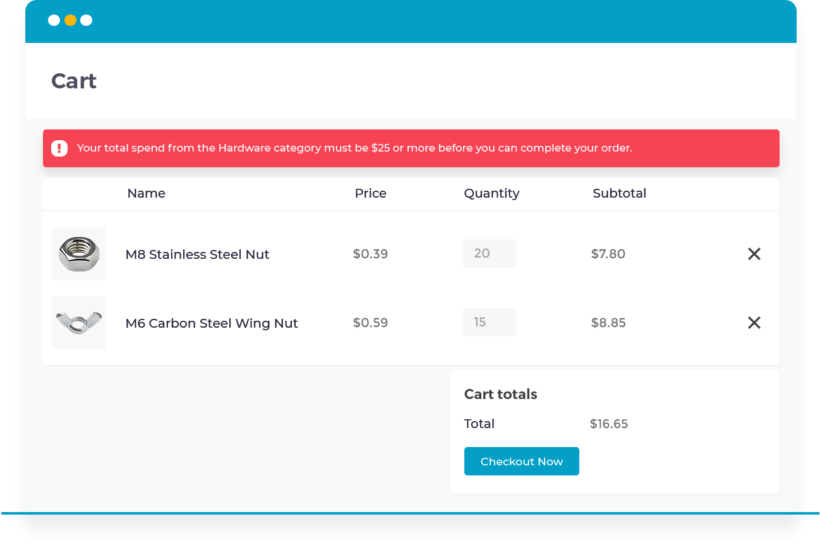
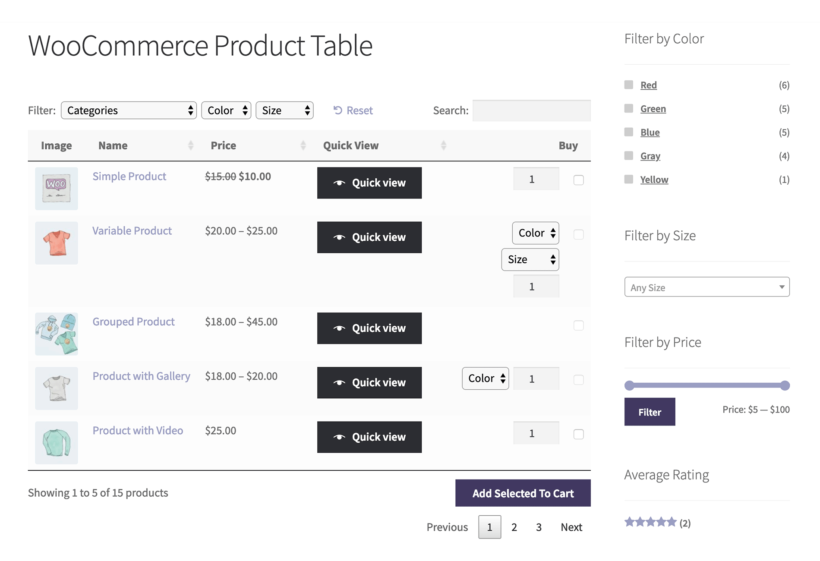
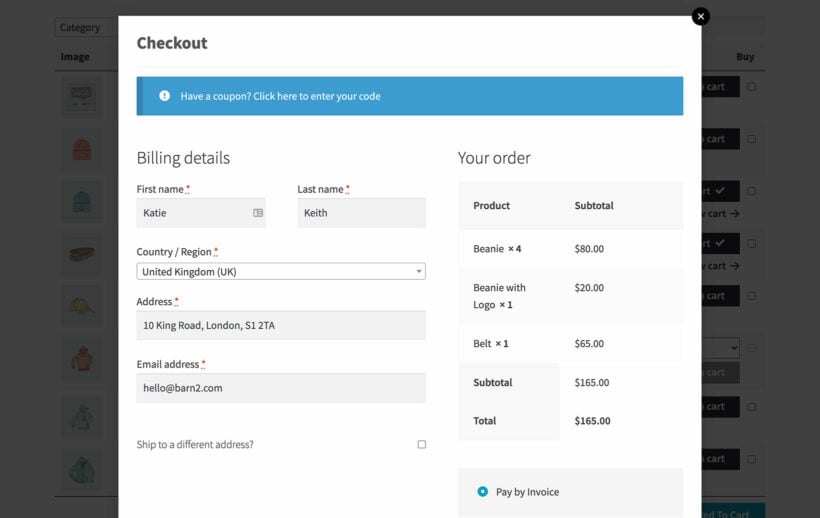
 The phrase "WooCommerce catalog mode" can be a bit confusing. That's because people use it to refer to different things: