Transparent delivery: How to add a WooCommerce zip code checker to product pages

Do you want to allow your customers to check available shipping options, estimated delivery dates, and other delivery-related details before adding products to the cart? This in-depth tutorial is for you. Here, we'll show you step-by-step how to add a WooCommerce zip code checker to product pages.
Would you like to add a zip code / postcode checker to your WooCommerce store?
Online shoppers want know delivery-related information upfront, such as:
- Whether or not the products they want to buy can be delivered to their location.
- Available shipping methods and costs.
- When they can expect to receive their order.
To make this information easily available to customers, you need a zip code checker. In this guide, we'll show you how to add a WooCommerce zip code checker anywhere on your ecommerce store. You'll also learn how to use WooCommerce shipping zones to control which zip codes you'll ship to and what it costs.
We'll do it using the WooCommerce Shipping Calculator plugin. This easy-to-use plugin lets customers enter their zip code to check the delivery options on your product pages (plus other locations throughout your store). The calculator will confirm whether you deliver to their postcode area, and display the available shipping methods and rates.
What is a WooCommerce zip code checker?
A zip code checker (also known as a postcode checker or a pin code checker) allows customers to type in their zip codes and check if your store can deliver a specific product to their location. It also confirms the shipping cost to their zip code area.
Zip code checkers work by mapping customers' zip codes against your store's shipping zones and rules. If a customer enters a valid zip code that corresponds to a specific geographical area your store delivers to, then it shows them the relevant delivery details.
If no matching shipping zone is found, the zip code checker will inform the customer that there are no available shipping methods for their address.
WooCommerce postcode checkers are also essential for address validation in the checkout process. They ensure that customers enter the correct zip codes and prevent failed deliveries or other logistical issues.
How the default WooCommerce zip code checker works
It's crucial for every ecommerce site to set up their shipping capabilities properly. WooCommerce comes with a basic zip code checker, which I'll show you how to use in the next section.
However, the zip code checker functionality built into WooCommerce has a fundamental limitation: it only appears on the cart page or checkout page.
The location of the default zip code checker forces customers to add products to their carts and navigate all the way to the WooCommerce cart and checkout pages just to check whether or not your store can deliver to them.
This limitation can be frustrating and confusing for customers and can have negative impacts on your store for the following reasons:
- Creates extra friction in the buying journey. Customers expect you to provide them with shipping-related information upfront. As a result, not sharing it with them can result in a poor user experience (UX) on your site.
- Lost sales and revenue. Many customers won't even bother adding products to their carts without knowing if your store delivers to them or not, or the estimated delivery timeframe. Think about how many sales your store loses because of situations like these.
- More abandoned carts. If customers only add products to their cart to check if you will deliver to their zip code, then they will abandon their cart if the answer is no. This will inevitably lead to an increase in your store's cart abandonment rate.
As you can see, just using the built-in WooCommerce zip code checker isn't enough. You need to use this alongside the WooCommerce Shipping Calculator plugin to add a zip code checker to product pages and other parts of your store.
Next, I'll tell you how to set all of this up.
Tutorial: Add a zip code checker to WooCommerce product pages
Step 1: Set up your WooCommerce delivery area
WooCommerce includes a feature called shipping zones. WooCommerce shipping zones allow store owners to define the specific areas you deliver to. You use the shipping zone settings to set up your store's shipping methods and prices.
Essentially, shipping zones in WooCommerce are the different geographical areas where your store delivers products to. There's no limit to the number of WooCommerce shipping zones you can create. Each zone you add can be as broad or as specific as you like. For instance:
- You can create one zone for your whole delivery area. Let's imagine that your store is located in the US and you offer nationwide delivery. You can choose to create one zone for the entire country.
- Alternatively, you can choose to create multiple zones. Imagine that you're a restaurant that offers free delivery to certain zip codes, and paid delivery to other zip codes within a certain distance or radius. To do this, you would create two shipping zones: one for the free delivery zip codes, and one for the zip codes where you charge for delivery.
When customers type their postcode into the zip code checker, WooCommerce displays the shipping methods and rates for their zone. Because you can only deliver products to customers located in zip codes within your zone, it's essential to set this up correctly.
First, enable shipping in WooCommerce
- Log into your WordPress dashboard to get started.
- Go to WooCommerce → Settings → General within your dashboard.

- Scroll down and find the "General Options" section of the page.
- Choose a "Shipping location(s)" option from the dropdown menu. Make sure that "Disable shipping & shipping calculations" isn't selected because this will hide the shipping settings that you need later in this tutorial!
- Finally, scroll to the bottom of the screen and click "Save changes" to apply your settings.
Next, create and configure your shipping zones
- Still in the WordPress backend, go to WooCommerce → Settings → Shipping → Shipping zones.

- Click on the "Add Shipping Zone" button to create a new zone.
- Next, name your zone. Customers won't see this name, but it's best to use a simple and descriptive name so that it's easy for you to identify.
- Now, select the regions that your online store delivers to, i.e. countries, states, or zip codes within your zone.
- Select the "Save changes" option to apply your settings.
- To create additional zones, simply keep clicking "Add New' to repeat the steps above.
Disable the "Rest of the world" zone
"Locations not covered by your other zones" is a default shipping zone that WooCommerce creates to add all the regions that aren't explicitly included in the shipping zones you created.
Since you're adding a zip code checker to WooCommerce, I'm assuming that you only ship to certain areas. As a result, you probably want to prevent customers located outside of your main shipping zones from placing orders.
To do this, simply make sure that there are no shipping methods set up for this zone. This effectively turns off the "Rest of the world" zone and prevents customers from placing orders you can't fulfil.

- Confirm that there are shipping methods for this zone. The "Shipping method(s)" should show the "No shipping methods offered to this zone" text, as in the above screenshot.
- If shipping methods are set up, click on the "Locations not covered by your other zones" link.
- Hover over the shipping method and select "Delete". Repeat the same steps until you've deleted all the shipping methods.

- Finally, select "Save changes" to apply the settings, and the "Rest of the world" zone will no longer be active.
Once you've done this, then if a customer types in a zip code that is located in an area without shipping methods, WooCommerce will inform them that shipping isn't available for their location.
That's it. Your WooCommerce delivery area is all set up!
Further reading: WooCommerce shipping zone setup guide: Step-by-step.
Step 2: Add a zip code checker to WooCommerce product pages
As I explained earlier, WooCommerce's default zip code checker only appears on the checkout page. (And it can also appear on the cart page if you enable it in WooCommerce → Settings → Shipping → Shipping options.) However, that's not much use!
It's much better to allow customers to enter their zip code to see the shipping options before adding products to their cart 🙃. And that's where the Shipping Calculator WooCommerce plugin comes in.
WooCommerce Shipping Calculator:
- Adds a zip code checker to your chosen location on the product page - exactly where customers want to see this information.
- It also comes with a shortcode which you can use to add a zip code checked to other parts of your site. For example, you could use it to create a 'Check delivery area' sidebar widget which appears on the shop page and throughout your store.
This allows customers to easily check whether your store delivers to their area. It also shows the available shipping methods and rates, without them having to navigate to the WooCommerce checkout screen or contact customer support.
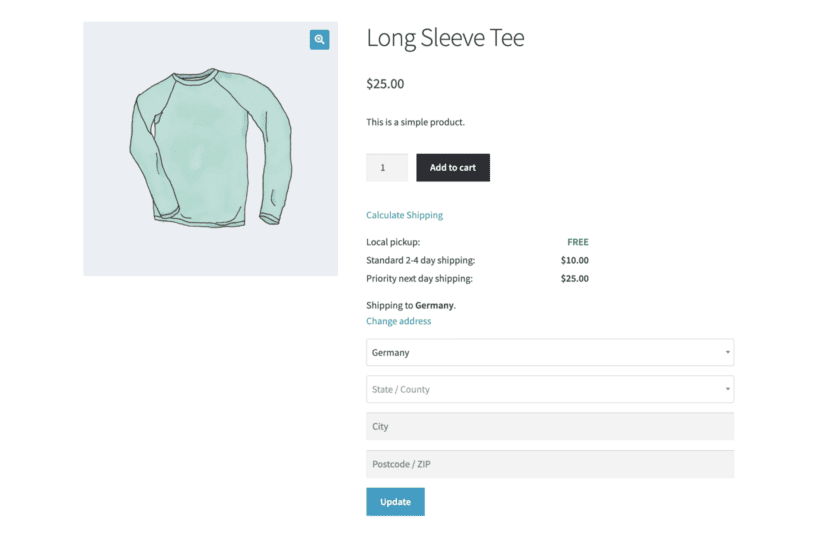
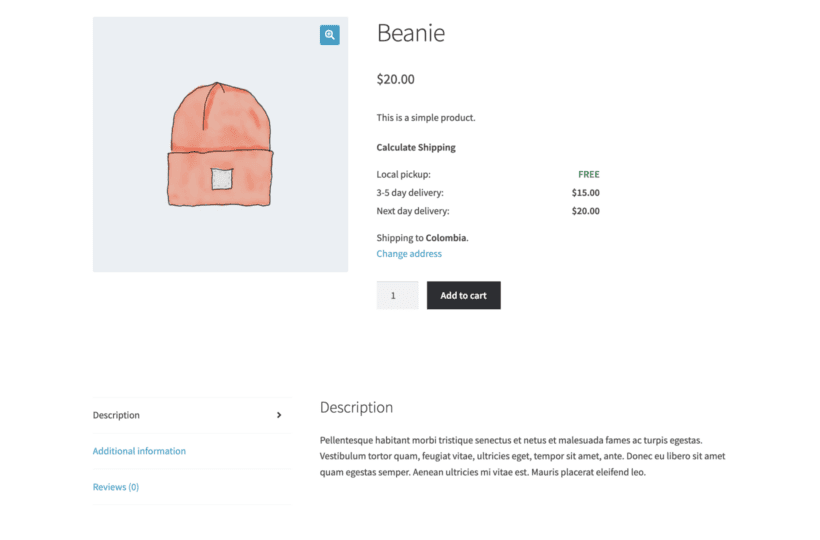
To give you a better idea of how this looks on a WooCommerce store, here's the zip code checker on a demo product page showing the available shipping options:
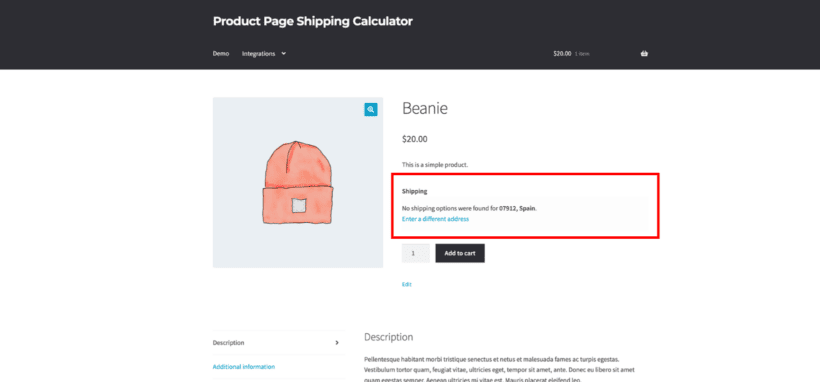
If the customer is located outside your store's delivery area, the zip code checker will display a message stating there are no available delivery options. For example:
Customers can choose to enter a different zip code into the zip code checker. The plugin will automatically recheck and show the updated delivery information. For example, they might do this if you don't deliver to their zip code and they want the order to be sent to a friend or family member, or their workplace.
Setup instructions
- Purchase and install the WooCommerce Shipping Calculator plugin. You'll find the plugin files and your license key in the order confirmation email.
- After activating the plugin, the setup wizard will open. Use this to choose where to display the zip code checker on product pages. If you'd rather add the zip code checker to a different location, such as a sidebar widget, then skip this step. I'll show you how to add it to other locations in a minute.
- Depending on which position you select for the zip code checker, you might also find an option to change the button text.
Optional: Add the WooCommerce zip code checker to other locations
While product pages are a sensible place to display a zip code checker, there are plenty of other valid locations too. For example, if your WordPress site has a global sidebar then it can be a good idea to add the zip code checker there.
To do this:
- Go to wherever you normally manage your site's sidebar. This is generally Appearance → Widgets, but depends on your theme and page builder.
- Add a text or HTML widget, or a Shortcode block (again, depending on what sort of page builder you have on your site). Add the shortcode
[shipping_calculator]to it.
And that's it! Your store will now display a WooCommerce zip code checker in whichever location you chose to add it. Customers can enter their zip code and whether whether you deliver to their area, plus available shipping methods and costs.
Test it out on the frontend and make sure the user experience is fast and intuitive for customers. It works on all types of products including single products, variable products, and so on.
Why add a zip code checker to WooCommerce product pages?
The primary purpose of the WooCommerce postcode checker is to let customers check whether they are within your delivery area or not before they add products to their carts. But why is it important, and how does it help your store?
Before we finish, we'll look at a few key benefits of adding a zip code checker to Woo product pages:
Builds trust with customers
The first benefit sounds a bit basic but is probably one of the most important. Customers expect you to provide transparent delivery options upfront, and not providing this can damage their trust and perception of your business.
Reduced cart abandonment
Cart abandonment is a severe problem for many ecommerce stores. We touched on this earlier, but it's worth mentioning again. The longer the buying process, the more likely customers will lose interest or get distracted before they get to the checkout stage. This leads to a higher cart abandonment rate for your store.
Better experience for your customers
It's better to let customers enter their zip code and check whether they are within your delivery area right on the product page instead of giving them the bad news after they've spent time and effort to click through to the checkout fields to complete their order. Even if you can't deliver to them, you'll have saved their time and effort, which provides a better experience overall.
Boost sales and conversion rates
You already know that many customers abandon their carts when they find that you don't deliver to them. But what about the customers who don't even bother adding products to their cart because they couldn't find out whether your store delivers to them or not? Moving the zip checker on the product page helps convert customers who are uncertain about your store's delivery process and encourages customers to complete their purchases confidently.
Reduction in the number of customer inquiries regarding delivery
Some customers may prefer to contact your support team to ask for delivery information. Being upfront and transparent with your store's delivery information can significantly reduce the number of inquiries from customers related to delivery eligibility. Reduced customer support inquiries frees up your customer support team's time, enhances the overall efficiency, and helps your business save money.
Add a postcode checker to WooCommerce today!
Nothing is more frustrating for shoppers than discovering at the checkout stage that their location is not eligible for delivery. Adding a zip code checker to your store's product pages helps you build trust, provide a better overall customer experience, and boost your sales and revenue.
You can't add a zip code checker to the product pages using WooCommerce on its own, so you'll need to use an add-on plugin.
Shipping Calculator is the best WooCommerce zip code checker plugin. It lets you add the zip code checker to 7+ locations on your store's product pages, or anywhere else in your store. That way, customers can easily confirm whether you deliver to them. Plus, it shows customers other important delivery details like the shipping methods and rates.
Get the WooCommerce Shipping Calculator plugin today!
2 Comments
Excellent It improves customer experience and also reduces potential frustrations and order cancellations.
Hi, Noshaba. Thank you for the kind words about our new WooCommerce Shipping Calculator plugin! Please let us know if you have any questions, via our dedicated Support Center. You can also browse our plugin's detailed and extensive Knowledge Base articles for quick reference. Cheers.