Creating a seamless tipping experience in WooCommerce: An easy guide
Tipping has been an established practice at physical stores for a long time and is now becoming part of the online shopping experience too. In this in-depth tutorial, I'll outline the steps to add a tip option at checkout in WooCommerce — zero PHP, CSS, or HTML expertise required.
Do you want to add a tip option at checkout in WooCommerce?
E-tipping is increasingly popular and effective. For example, a Forbes 2023 digital survey found that 65% of people tip at least 11% more when using digital methods compared to cash.
Allowing customers to leave a tip while placing their orders is an excellent way to let customers show their appreciation for your business. Plus, because tips are usually passed on to your staff, they serve as extra motivation for them to provide great service to customers.
In this guide, I'll show you step-by-step how to use the powerful WooCommerce Checkout Manager plugin by QuadLayers to add the tipping feature. We'll use it alongside the WooCommerce Fast Cart plugin to create a faster and smoother checkout experience that will help to improve conversions.

Let's kick off with a quick overview of both plugins and how they work.
The best plugins to add a tip option at checkout in WooCommerce
The WooCommerce Checkout Manager and WooCommerce Fast Cart plugins work seamlessly together. They enable you to add a digital tip jar and create a custom, streamlined checkout experience.
Here's a bit more about each plugin together with their standout features.
WooCommerce Checkout Manager

WooCommerce Checkout Manager is a popular plugin that allows you to add, edit, remove, and rearrange fields on the checkout page. With it, you can customize the checkout fields in your WooCommerce store to collect tips along with various kinds of details.
Here’s a breakdown of its key features:
- Tipping field: You can create various styles of tip fields, for example radio buttons allowing customers to choose different tip amounts. The tips will automatically be calculated in the order total.
- Fixed or percentage tips: You can configure the price field to collect a fixed tip amount, or a percentage of the cart or order subtotal.
- Conditional logic: It lets you conditional logic to denote whether to display the tipping field conditionally based on user roles, customers' cart contents, and product specifications. For example, you could add an "Add a tip" checkbox which opens to reveal a choice of tip amounts.
- Tip field position: You can choose exactly where the tipping field appears on the checkout page. For instance, place it right before the “Place Order” button or elsewhere in the checkout.
- Tip field styling and labels: You can use custom labels, placeholders, and descriptions to personalize the tipping option. This enables you to customize the tip field to match other elements on the checkout page and add persuasive copy to nudge customers toward leaving a tip.
- Simplify the checkout: As well as adding a tip field, this is a fully featured checkout plugin. This means that you can add extra checkout fields, remove unnecessary fields, etc.
WooCommerce Fast Cart

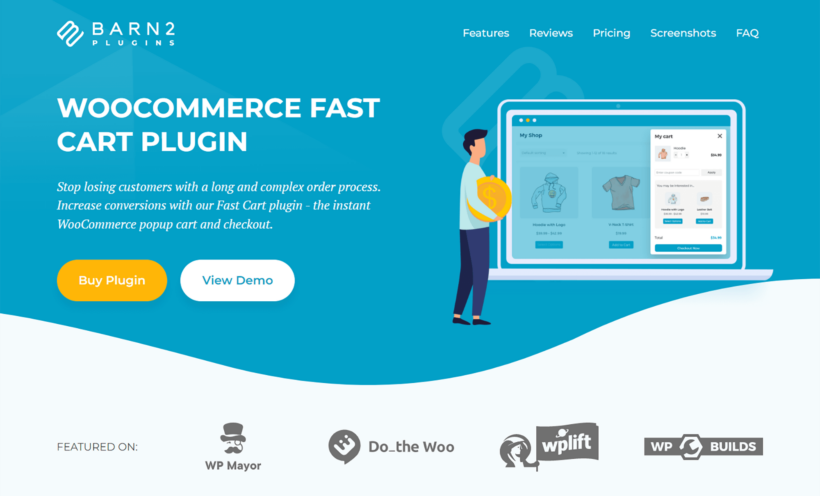
WooCommerce Fast Cart creates a streamlined, distraction-free checkout process that keeps customers focused on completing their purchases. It condenses the cart and checkout pages into a sleek modal window. Customers can access it from any page on your site and quickly complete checkout.

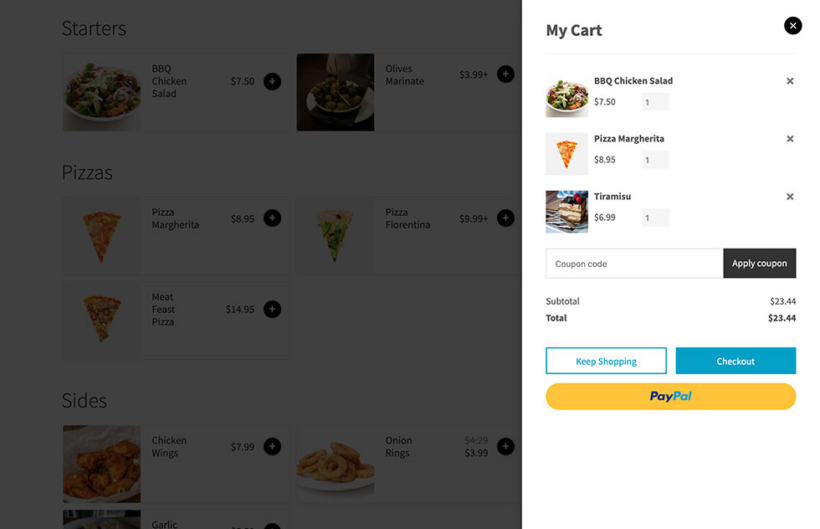
The fast cart modal appears when customers add items to their cart. Customers can then view their shopping carts, make adjustments, and place their orders without ever leaving the current page — no page reloads and no additional steps.
- Built-in upselling option: You can display complementary or related items alongside the checkout fields in the fast cart modal. This nudges customers to add more products to their carts without having to navigate away from the checkout or disrupting the buying flow.
- Editable quantities and real-time cart updates: It allows customers to modify quantities, remove items, or even switch between products within the popup. Plus, these changes are updated in real time so customers can finalize their cart and proceed to checkout without needing to reload the page.
- Express checkout options: WooCommerce Fast Cart integrates well with payment gateways like PayPal and Stripe. This lets you add express checkout buttons right in the cart modal. This feature saves customers time and reduces friction as it allows them to choose one-click payment options without needing to manually enter their information.
- Customizable design: It comes with customizable styling options so you can tweak the fast cart popup as you wish. You can adjust the colors of the cart icon, cart count text, checkout button text, and more.
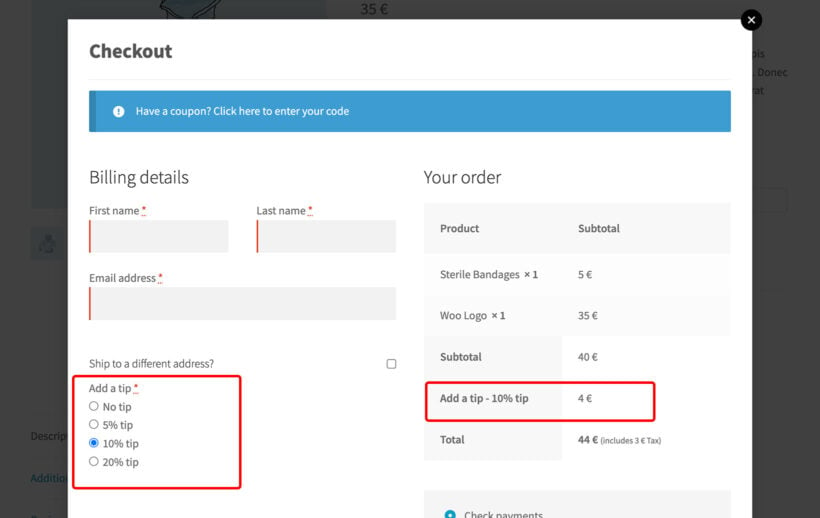
When you use WooCommerce Fast Cart with the WooCommerce Checkout Manager plugin, the tip fields you have added appear in the popup checkout:

How do I add a tip in WooCommerce checkout?
Here, I'll walk you through the steps to set up a tipping option in the checkout of a WooCommerce store and speed up the checkout using WooCommerce Checkout Manager and WooCommerce Fast Cart.
Let's get started.
Step 1: Add a tipping field to the WooCommerce checkout
- Get the Pro version of the WooCommerce Checkout Manager plugin. (The free plugin can't add a price to your checkout fields, which you need in order to collect tips.)
- In your site's admin, go to WooCommerce → Checkout → Additional.
- Click 'Add New Field'.
- Select the 'Radio' field type and add a helpful label like "Add a tip":

- Go to the 'Options' tab and add a new option for each radio button. I recommend adding a 'No tip' option with no price, and a choice of percentage amounts. Set the % price for each tip option. Set a realistic option as the default - this will encourage more customers to tip.

- Once you’re done, click 'Save' to apply the settings.
Step 2: Add a tipping field to the WooCommerce Fast Cart
Now it's time to install the WooCommerce Fast Cart plugin so that customers can review their order, choose a tip amount and complete their purchase in an on-page popup. As we saw earlier, this can make a big difference to your store's conversion rate.
- Get the WooCommerce Fast Cart plugin, then install and activate it on your site.
- Navigate to WooCommerce → Settings → Fast Cart in your site's dashboard and initiate the setup wizard.
- Choose your preferred layout and display style for the fast cart. You can show it as a side widget, or as a central pop-up to make it more noticeable.

- If you want the fast cart to open automatically when customers add items, enable the Auto Open option by checking the box.

- Select the screen position for the floating cart icon — top, bottom, or center. If you’d rather not display the icon, set this option to Hidden.
- Decide whether to show only the cart, only checkout, or both in the fast cart. For the best user experience, I’d recommend selecting both to streamline the entire checkout process.

- On the Cart page, denote the type of content to be shown in the quick cart. Options include product images, prices, quantity selectors, subtotals, cross-sells, delete buttons, coupons, shipping details, and a “Keep Shopping” button.

- Tick the Replace Cart Page and Replace Checkout Page checkboxes if you want customers to use the fast cart instead of the default WooCommerce cart and checkout pages.

- Add additional Barn2 plugins as needed.

- Hit "Finish setup" to save your settings and apply the changes.
That's it! You've successfully added a tip option at checkout in WooCommerce! It'll look something like this in the mini cart:

Additional optional settings
By default, WooCommerce Fast Cart inherits and uses your theme’s design and styling. But you can adjust them to match your store’s branding:
- Navigate to WooCommerce → Settings → Fast Cart in your site's dashboard.
- Go to the Design section.
- From here, you can set custom colors for various elements, including the cart icon color, button background, item count text, item count background, checkout button text, and checkout button background.
How to design a tipping experience that matches your brand
Setting up tipping thoughtfully enhances customers' experience and makes it more likely for them to leave meaningful tips. These principles will help you tailor your store's tipping experience to match the rest of your brand and (hopefully) encourage customers to tip more.
Customize the title and description of the tip field
Make sure you use copy in the tipping section that's in line with your brand voice, whether it's professional, playful, casual, or something else. For example, if you run a restaurant that offers delivery options, you might say something like "Add a little extra for our team’s exceptional service." Whereas, it might be more appropriate for an eco-conscious brand to say "Support our mission with a tip."
Use a specific tipping format
The format in which the tip request is presented can impact its effectiveness. The most common ways to showcase tip options are as:
- Fixed amounts like $1, $3, or $5.
- Percentages of the subtotal or cart total, for example, 10%, 15%, or 20%.
- Custom amount where customers type in their tip amount. This can work as an additional option to percentage or fixed buttons, especially for customers who prefer more flexibility.
Pro tip: You can use a combination of percentages and custom amounts or fixed amounts and custom amounts. But, avoid combining both percentage and fixed amounts as it can cause delays in the checkout process due to customers pausing to think about the tip amount.
Style the tip field
Match the styling and design of the tip section to the theme of the checkout page. Make sure you use similar fonts, colors, and button styles to ensure it doesn't look out of place on the checkout page.
Tips to optimize the tipping experience in WooCommerce
Once you've implemented the principles we discussed in the previous section, these tips will help you take your store's tipping experience to the next level:
Add the tip field to a prominent location
Where on the page you place the tipping option matters. Ideally, you should position it where it’s easy for customers to find and naturally part of the checkout flow — for example, just above or near the payment button. If you place it at the top of the page before customers see the total order amount or below the payment button, it will likely be overlooked.
Provide a range of pre-set tipping options
The less mental load customers spend while shopping on your WooCommerce store, the better. To reduce this, offer multiple preset tipping choices like 10%, 15%, and 20% or flat amounts like $2, $5, and $10. Having a range of preset options makes it easier for customers to decide to tip. Also, it can encourage higher tipping amounts since customers are prompted with convenient one-click choices rather than needing to type in an amount.
Add relevant icons or emojis
Adding a small icon or emoji (preferably one that matches your brand) can spotlight the tipping section and delight customers. For instance, a coffee shop could use a coffee cup emoji ☕, or a pet grooming business could use a paw print 🐾. It is a small touch that helps make the tipping option feel friendly and on-brand.
Provide clear options for no tip
By definition, tipping is optional. So make it easy for customers who prefer not to tip to do so. Make sure there's an easy “No Tip” option, clearly labeled, so customers don’t feel pressured. You can place it as an equal option alongside other tipping choices so customers feel in control of their decisions.
Acknowledge and thank customers post-purchase
A simple thank-you message after a tip can go a long way towards strengthening the customer relationship. Consider adding a thank-you note on the order confirmation page or sending an automated thank-you email to customers who chose to leave a tip.
What to look for in a WooCommerce tipping plugin
Here’s a rundown of the most important features to look for in a high-quality plugin to add a tip option at checkout in WooCommerce:
Customizable tip option
Your chosen plugin should you to present preset tipping amounts (like $5, $10, $20, etc.) and allow customers to enter custom tip amounts. Make sure it also allows you to customize the language, label, and position of the tip field. For example, you should be able to add custom copy describing the tip, such as “Add a Tip” to “Support Our Team”, or whatever else better suits your brand voice.
Ease of integration with your checkout flow
You don’t want a tipping option that disrupts the checkout process and causes customers to abandon their carts in confusion. Make sure the plugin allows you to denote where to place the tipping field on the checkout page. This way, you can place it intuitively within the flow, like directly above the “Place Order” button, without causing any friction for users.
Compatibility with checkout-related plugins
Opt for a tip plugin that works seamlessly with your payment gateways (Stripe, PayPal, WooCommerce Payments, etc.). It should also work well with multi-currency or language plugins, as well as checkout optimization plugins like WooCommerce Fast Cart that you’ve got installed. For example, if you sell to customers located internationally, you want the tip amount to adjust to local currencies or display correctly in multilingual setups.
Styling and customization
Make sure the plugin offers styling options that enable you to match the tipping field to your store’s design. You should be able to adjust colors, and fonts, and add icons and emojis next to the tip field.
Reliable support and regular updates
Adding a tip impacts your store's checkout flow and customer experience. So it's doubly important to be able to get high-quality support when needed. Make sure your chosen tipping plugin offers comprehensive documentation and dependable customer support. This makes it easy for you to get quick assistance, if needed. Plus, it should receive regular updates to ensure that it continues to work as it should over the long term.
Value for money
The range of features included should match the price. Ideally, you should opt for plugins that include advanced features that can enhance your tipping setup and overall checkout experience. Think: a wide range of field types, conditional logic, custom styling options, etc.
Elevate your WooCommerce store with a seamless tipping experience
While tipping has been the norm for various kinds of physical stores for decades, online businesses are just catching up to collecting tips.
If you run a service-oriented business, allowing customers to leave a tip while placing their orders can increase your store's average order value and reward your employees for delivering quality service.
By default, WooCommerce doesn't provide the option to add a tip option at checkout. However, you can easily add this with the help of a plugin.
In this post, I've shown you how to add a tip option and speed up your store's checkout by combining the powerful Checkout Manager and WooCommerce Fast Cart plugins.
- WooCommerce Checkout Manager: This plugin lets you add a fixed or percentage-based tip tipping field to your desired location on the checkout page. The tip amount will be accurately calculated in the order total. Plus, you can use conditional logic to specify whether the tip field is shown to customers based on their cart contents, user role, or product specifications.
- WooCommerce Fast Cart: This plugin lets you streamline the checkout process and remove distractions to keep customers focused on completing their purchases. It replaces the default cart and checkout pages with a sleek modal window that customers can access from any page on your site, make adjustments, and place their orders quickly.
Get started with adding tip fields to the WooCommerce checkout today!
