3. Adding and importing documents
The Document Library Pro plugin provides 4 ways to add documents:
- Add documents manually
- Upload files direct to Media Library
- Bulk import documents
- Upload documents from the front end
Add documents manually
The process for adding a document is similar to creating a page or post in WordPress:
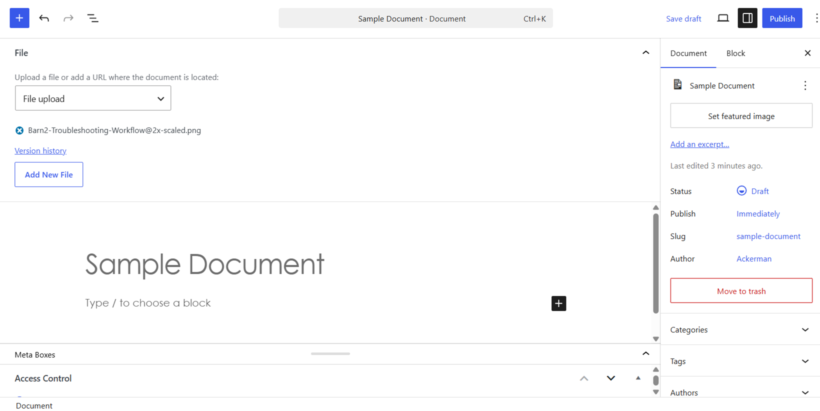
- Go to Document Library → Add New.
- Complete all the fields of information that you wish to display about your documents:
- Title (required) - The title of the document.
- File (optional) - Upload a file or add a URL where the document is located. Choose from 3 link options:
- None - Use this if you have added the full document to the content field, and do not wish to link to a downloadable file or another URL.
- File Upload - Use the ‘Add Media’ button to upload a file. This will be attached to the document as a downloadable file.
- File URL - If you wish to link to a separate web page on your website or any third party site, then enter the full URL here. For example: https://google.com (learn more).
- Document Content (optional) - Use this field for a description of the document, or to add the full content of the document if you want it to be available online without having to download it. Supports all standard WordPress formatting options, shortcodes and embedded audio/video players.
- Excerpt (optional) - Add a brief summary of the document.
- Custom fields - Use this section to add any additional text fields that you would like to display in the document library. For information about how to display them, please see our article on custom fields and taxonomies.
- Expire - Select a date if you would like the document to be removed from the library and set to 'Draft' status on a specific date.
- Document categories (optional) - Create categories for your documents. Note: These are separate from post categories and will only be used for your documents.
- Document tags (optional) - Use tags to make your documents easier to find. Note: These are separate from post categories and will only be used for your documents.
- File size - If you have uploaded a document directly then this will be greyed out and calculated automatically. If you are linking to a third party URL from the 'Document Link' field then you can enter the file size manually, for example if you are linking to a file that is hosted on Dropbox. Enter the file size in any format you like, e.g 2.5MB.
- Document author (optional) - Enter the author of the document if you wish to display this in the library or allow users to filter by author. (Note: This is different from the WordPress user who added the document.)
- Featured image (optional) - Upload an image if you wish to include an image column in the document library. (Note: For image and PDF files, Document Library Pro will attempt to auto-generate a featured image based on the first page of the attached file.)
- If you have added custom fields or taxonomies to the documents post type then these will appear too. (Learn how here.)
Whichever fields you complete will appear on the single document page. You can also include any or all of these fields as columns on the main document library page.
If any of the above fields are missing and you wish to use them, then please make sure they are enabled on the settings page.
Convert Media Library files?
If your document files (e.g. PDF's) are already in the WordPress Media Library then you can convert them into documents in order to display them in the document library:
- Go to Media in the WordPress admin.
- Use the icon above the list of media files to make sure you are viewing the Media Library as a list rather than a grid.
- Select the files that you wish to display in the document library.
- Open the 'Bulk actions' dropdown above the list of files, and select 'Add to document library'.
- You will see a success message with a link to edit the newly created document post, which will appear in your document library. You can use this page to add further information about each document via the Documents section of the WordPress admin. If you don't add further information then the filename will appear in the total column of the document library, and users will be able to click to download the file.

Direct file upload
You can use drag and drop to upload one or more files directly to the WordPress Media Library:
- Go to Documents → Import.
- Go to the 'Drag and drop file upload' section.
- Drag and drop one or more files within the dotted lines, and wait for them to upload.

Note: You can only upload file types that are supported by your WordPress installation.
Once uploaded, the following will happen for each file:
- A document post will be created, which you can find on the main Document Library page in the WordPress admin. The filename will be used to create the document title, so we recommend giving each file a suitable name before uploading it. You can then edit each document to add extra information, as required.
- When the document name is created, it will be the same as the filename, but the file extension, spaces, dashes and hyphens are removed. The case and spaces in the filename are preserved, and dashes are replaced with spaces.
- The file will be tagged as a 'Document' within the Media Library so that you can use the 'Type' dropdown to view document files only.

Bulk import documents
If you wish to bulk import documents with additional information about each one, then you can import them from a CSV file:
a. Add your document fields
First, you need to make sure that your document library is set up with all the fields that you will be importing. You can do this by enabling the relevant fields on the settings page and by creating any additional custom fields that you require.
b. Prepare the CSV file
Next, you should create a CSV file containing all the data about each document. You can do this using any spreadsheet software such as Microsoft Excel, iOS Pages, or Google Sheets - create the file and use the 'Save As' option to select the .csv file type.
Each document library field should be stored as a column in the CSV file. Add each document as a separate row in the CSV file, and include a header row.

It is essential that the format of your CSV file is correct. Some tips:
- Download our sample CSV file (right-click and save it to your computer) and open it in a spreadsheet program such as Excel. The sample CSV assumes that you are using all the default fields, plus 2 custom fields. You should edit the columns to delete any you don't need, and add any additional custom fields. Also delete the sample documents from our CSV file (rows 2-4) - these are simply intended to show you how to format the data for each field type. It's fine to import the same documents if you like, but remember to delete them before launching your finished document library! All fields apart from 'title' are optional:
- Name - This is the name of the document and will appear in the 'title' column of the document library and at the top of the single document page.
- Categories - The names of your document categories (not the slugs). If the categories already exist on your website then the documents will be added to the existing categories, otherwise new categories will be created. Use > to indicate parent/child category structures, as shown in row 2 of the sample CSV. (Note: When you specify parent/child categories, the document will be added to the child category but not the parent.)Due to how CSV files work, if you are listing multiple categories within the same cell then you need to present it using either of these methods:
- Enclose the list of categories within the cell with double quotes (e.g. "articles, resources").
- Use
,instead of a true comma (e.g. "articles , resources").
- Tags - Enter the names of your document tags (not the slugs). If the categories already exist on your website then the documents will be added to the existing tags, otherwise new categories will be created.
- Document Authors - Enter the names of your document authors that you wish to display in the document library, in the format that you want to display the names.
- File URL - If you want to upload the document file directly to your Media Library then enter its URL here. The URL must link to the file itself and not a webpage, e.g. https://www.website.com/my-file.pdf.
- Direct URL - Enter a URL here (e.g. https://google.com) if you want to link to a document in a third party location, instead of uploading it directly to your Media Library - for example, if the document is a YouTube video then you would add the YouTube link here.
- Featured Image URL - If you want to include an image of each document (either in the 'image' column of the document library or on the single document page) then add the URL of its current location here. This must be an image file type which is supported by your WordPress installation such as PNG or JPG. It will then be uploaded to the Media Library and set as the featured image for the document.
- File Size - You only need to import the file sizes if you are linking to externally hosted documents, e.g. on Dropbox. If you are uploading documents directly to the Media Library then the file size will be calculated automatically.
- Excerpt - Enter text or HTML if you wish to include a document excerpt.
- Content - Enter text or HTML if you wish to include more in-depth content for the document. This might be a longer description or the full content of the document.
- Published - Enter 'TRUE' to publish the document as soon as it is uploaded; or 'FALSE' if you wish to save it as a draft so that you can make any changes before publishing it manually.
- Custom fields - All custom fields created by Advanced Custom Fields or Easy Post Types and Fields that are assigned to the document post types will appear in the options list, so that you can map them to the desired CSV column.
- Custom taxonomies - All custom taxonomies that are associated with the document post types will appear in the options list, so that you can map them with the desired CSV column..
- cf: If you have created custom fields for your documents from plugins other than the ones mention above, then you should add each one as a separate column, as in the sample CSV. Add cf: before the custom field name in the header row.
- tax: If you have created custom taxonomies for your documents then you can also add each one as a separate column, as in the sample CSV. Add tax: before the custom taxonomy name/slug or label in the header row.
- Create a test CSV file containing 1 document and upload this first, as a test. You can then repeat the test until you are happy with the results, before doing the full upload.
Note: It doesn't matter whether the column headers in the CSV file are the same as the field names in your document library, as you will match them up as part of the import.
c. Upload the CSV file
- Go to Document Library → Import.
- Go to the 'CSV upload' section and click 'Import CSV'.
- On the 'Import documents from a CSV file' page, use the 'Choose file' button to select the CSV file and click 'Continue'.

- On the 'Map CSV fields to documents' page, match each of the columns from the CSV file to the fields that are used for the document custom post type. This ensures that the data is imported to the correct document library fields. Document Library Pro will try to do this automatically based on the header row of your CSV file, and you can manually change the selections as needed.

- Click 'Run the importer'.
- This will import the documents and attached files to your WordPress site. You will then see a success message with a link to edit the documents.


Upload documents from the front end
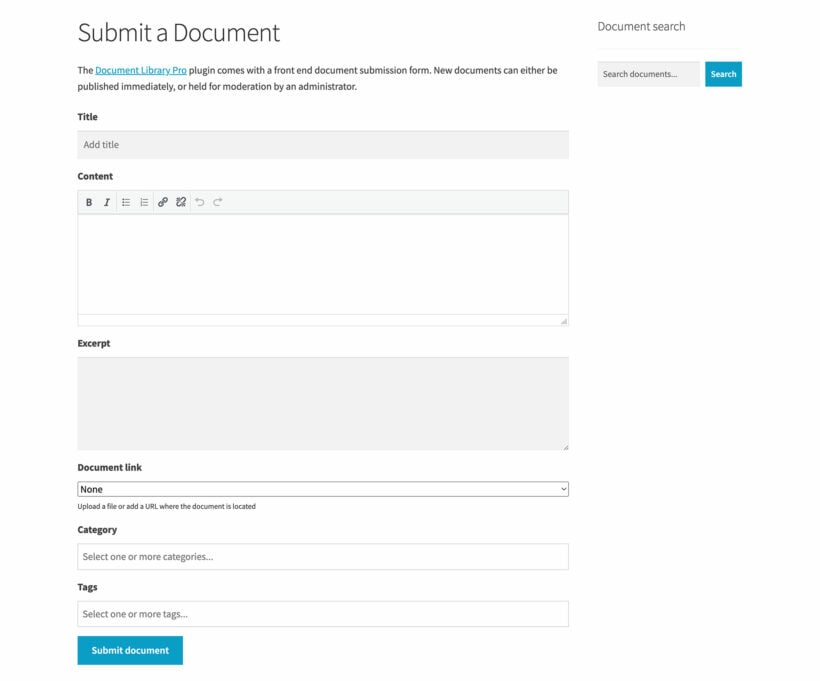
Document Library Pro also comes with a shortcode which you can use to insert a 'Submit document' form anywhere on your website. To add the form, simply create a page and add the shortode: [dlp_submission_form]
The form will contain all the fields which are enabled for your documents, such as the title, excerpt, author, any custom fields and taxonomies that you have added to the documents post type, and so on.
Important: Custom fields and taxonomies must be added to the Documents post type (for example, using Barn2 Easy Post Types & Fields or Advanced Custom Fields). Custom fields or metadata added only to individual documents are not supported, as they are not registered globally for the post type and therefore cannot be included in the form.
Moderating new documents
We recommend enabling moderation for new document submissions unless you can absolutely trust the people who are submitting the documents. This holds new documents for approval by an administrator before they are added to the document library. The administrator receives an email notifying them that a document has been added which needs approval.
How to send the emails to a different address
While Document Library Pro doesn't provide an option to send the notification of newly submitted documents to a different email address, there are two ways to do this:
Option 1 - Use Document Library Pro Power Pack
Our recommended solution is to use the independently developed Document Library Pro Power Pack plugin. Its 'Additional Notification Emails' setting allows you to enter additional recipients who will receive the moderation email as well as the administrator.
When combined with Power Pack’s 'Enhanced Moderation Email' feature, your moderation team can also see additional document information without having to log in.
Option 2 - Auto-forward the email
Alternatively, you can set up a filter to auto-forward the moderation emails to another address. You can either do this directly in your email account (e.g. Gmail) or using an automation tool like Zapier.
Lifewire have provided a helpful tutorial on how to set up Gmail filters to forward specific emails to a different address. For example, in this scenario the person with the main administrator address for your website would log into their email and create a filter which will forward all of the new document submission emails to the other address. When setting up the filter, you should enter enough information to allow it to target the emails from Document Library Pro and to ignore other types of email. For example, you can do this by adding the sender address, email subject, a few words of the email content, and so on.
How to edit or translate the emails
Document Library Pro sends an email to the administrator (as set in Settings → General) whenever a new document is added via the front end form. You can use string translation edit the content of the email or translate it into another language. For details, please see the article on translating Document Library Pro.
Protecting the document submission page
By default, the page containing the 'Upload document' form will be public so that anyone can submit a document.
To make the form more secure, it contains an anti-spam honeypot to stop bot submissions. The developer documentation also contains filters which you can use to limit the maximum size of files which can be uploaded through the form.
For security reasons, we strongly recommend restricting access to the page containing the form so that only pre-approved people can add documents. This is because as with any type of online form, Document Library Pro can't control what file type the user adds to the 'Custom URL' field or what they link to, and it also can't scan the uploaded documents for viruses.
If you want the form to be public then you should always enable moderation. That way, you can check that each submission is legitimate and test for any problems before the document is added to the library.
How to customize the form
The front end document upload form will display all the fields which store information about your documents. If you need to customize it - for example to change the layout or hide certain fields - then there are several ways to do this:
Option 1 - Use Document Library Pro Power Pack
The independently developed Document Library Pro Power Pack plugin gives you even more control over the front end document submission form, including the ability to hide form fields.
Option 2 - Use a WordPress form plugin
For more advanced forms - for example, with different layouts or conditional logic - you can create your own bespoke document upload form using the Gravity Forms plugin.
Read our tutorial about how to set this up.
How to edit the field labels
Document Library Pro doesn't provide a way to customize the field names on the front end document submission form. If you'd like to change this - for example to reword "Excerpt" to "Description" - then you can use one of these methods:
- Use the free Loco Translate plugin to change the text.
- Use the filter hook document_library_pro_form_fields from our developer documentation.
FAQ
How can I export documents?
Sometimes, you might want to export documents - for example, in order to move them from one site to another. You can do this and then re-import them to another site as follows:
- In the WordPress admin for the original site, go to Tools → Export, download the WordPress Installer.
- Select the 'Documents' post type and click the 'Download Export File' button to save an XML file to your computer.
- In the WordPress admin for the site that you want to import the documents to, go to Tools → Import and download the WordPress Installer. Next, click 'Run Importer' and select the XML file.
- Select which author (i.e. WordPress user on your site) the documents should be attributed to.
- If your documents contain featured images then tick the "Download and import file attachments" box, then click the Submit button to import the documents.
Can I upload documents using FTP?
Yes, although this is less straightforward than simply using drag and drop method which is built into Document Library Pro. That's because FTP only adds the documents to your website's file system and not the database, and they need to be in the database in order to appear in the document library.
Use the following instructions to overcome this issue and add documents via FTP:
- First, add the document files to the uploads directory where your Media Library files are stored (.../wp-content/uploads/). For more details, see WPBeginner's article about How to Bulk Upload WordPress Media Files using FTP.
- Finally, convert the files into Documents so that they can be displayed in the document library.
How can I update and replace documents?
The import tool in Document Library Pro is only for adding new documents and can't be used to update the data in existing ones. Please see our separate article for advice about updating your documents in future.
Display your documents
Now you've added some documents, it's time to start displaying them on your website.