How does the single document page work?
Whenever you add a document using the Document Library Pro plugin, an individual page is automatically created for that document.
The links to this page are disabled in the front end by default, allowing you to choose whether or not to enable them.
Page layout and content
Document Library Pro creates 3 layouts for you to choose from. You can customize these using the WordPress block editor or create your own.
The only parts of the single document page which are not controlled by the layout are the featured image and comments, because the location of these is determined by your theme. You can show or hide these on the single document settings page at Documents → Settings → Single Document. All other content, such as the file size, file type and download buttons, are controlled by the layout. (Note: You can also add a 'Featured Image' block directly to the layout, which gives you more flexibility than allowing your theme to control the location.)
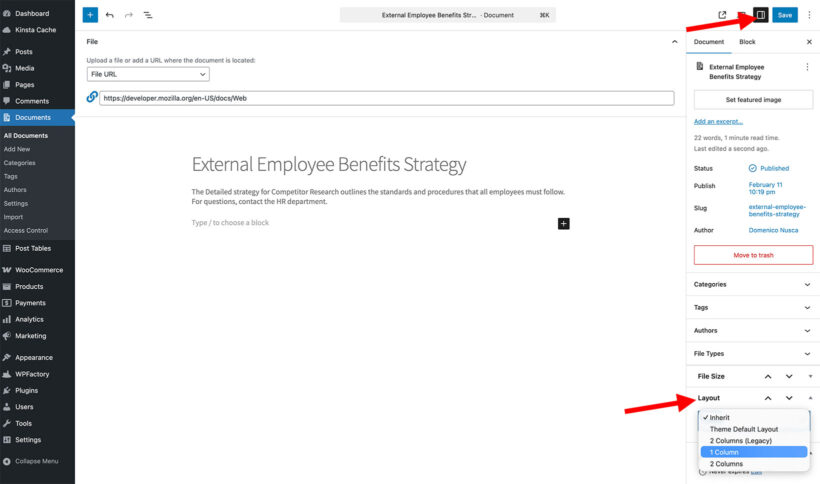
Pre-built layouts
-

- 1 Column Layout
-
- 2 Column Layout

Choose from:
- Theme Default Layout - The document library page will use the same layout as your default template which is used for your blog posts etc.
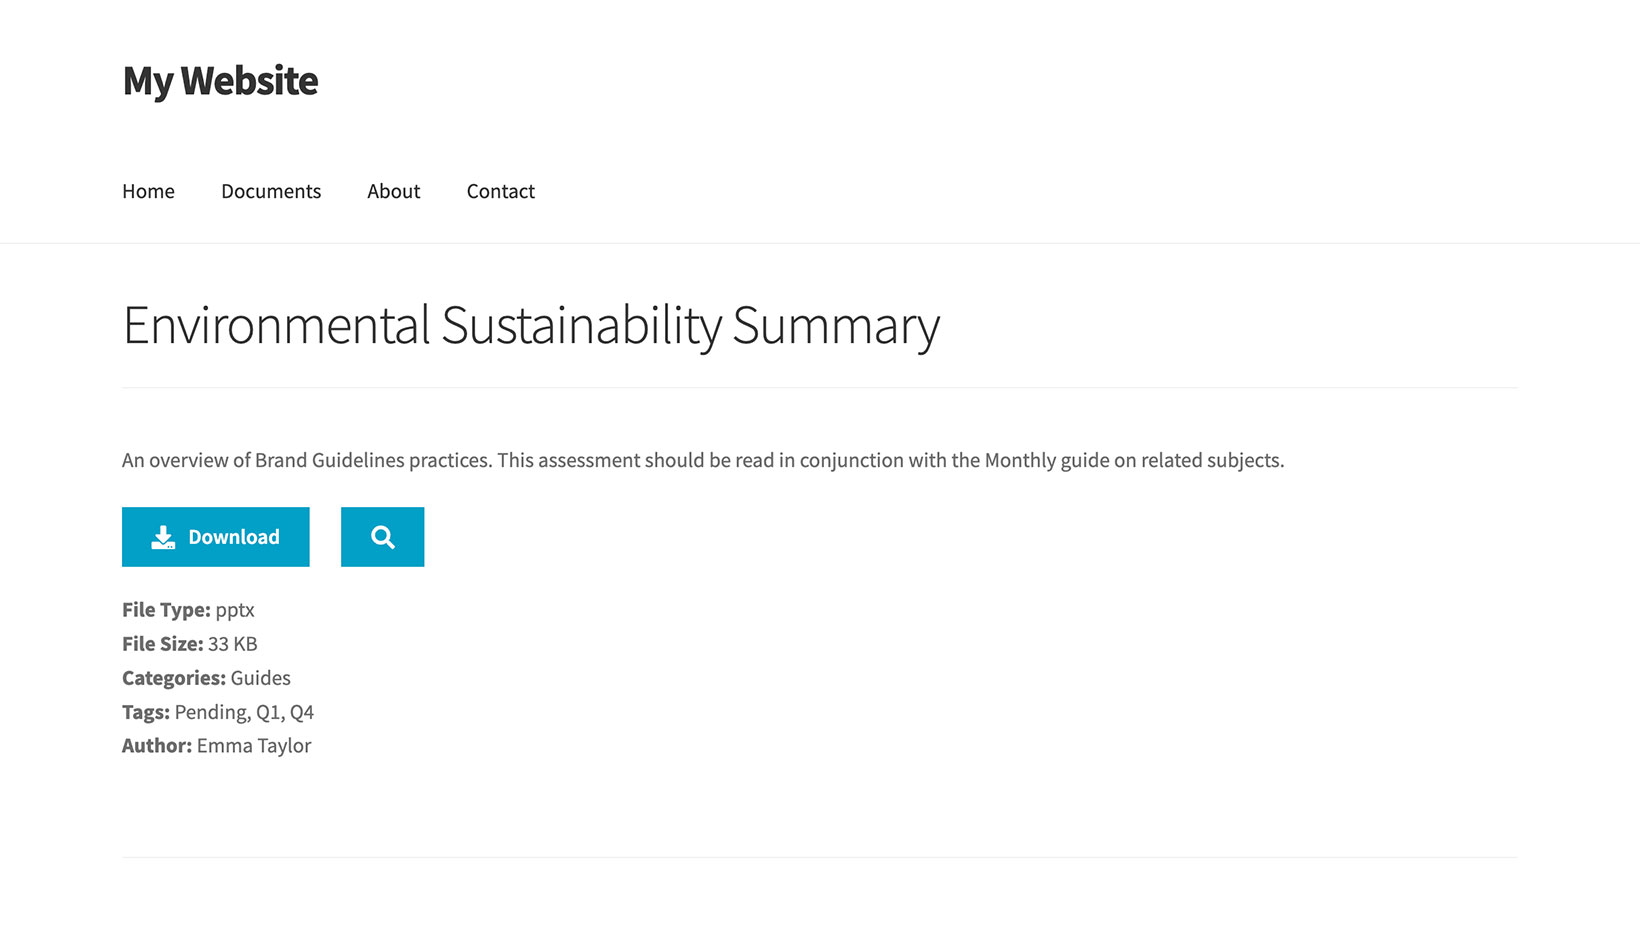
- 1 Column - All the content of the single document page is displayed as one column, with the title at the top followed by the document content (if used) and then the download button etc.
- 2 Columns - The single document page is displayed as two columns with the title and document content on the left and other fields such as the download button and file size on the right. We only recommend selecting this layout if you plan to enter content in the main content field for the document. If you will simply be adding a document title and download button, then the 1 Column layout avoids having empty space on the left.
- Legacy Template - This only appears if you installed Document Library Pro prior to 16 April 2026. It ensures backwards compatibility for people who use the single document page before we added support for the WordPress block editor. If you're using this template and want more flexibility, then you can either edit it or select one of the other templates.
Editing layouts
To edit any of the existing layouts, select that layout and click the 'Edit Layout' button. this will open the layout in the WordPress pattern editor.
All available fields are visible by default and you can reposition, remove them etc. as needed.
Creating your own layouts
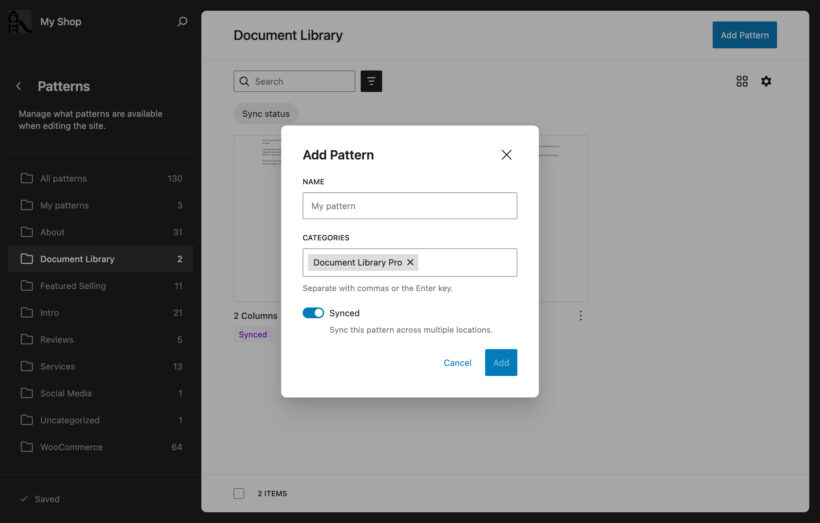
You can also create your own layouts in the WordPress pattern editor. Go to Patterns → Document Library and create new patterns (i.e. layouts) as needed:
- Click ‘Add Pattern’.
- Enter a name for the layout.
- Select the ‘Document Library’ category so that the new layout can be used for documents.
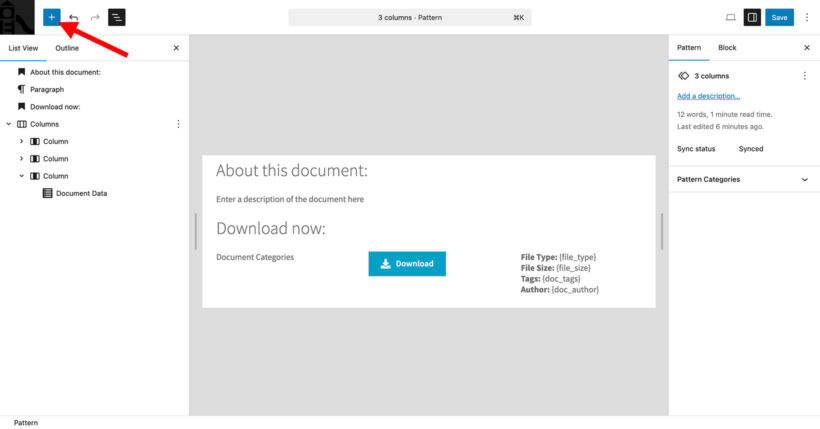
- Use the WordPress block editor to create the new layout and add all the blocks you require. Some tips:
- Click the + icon at the top left of the page to add a new block.
- Use the 'Columns' block to structure the page into multiple columns.
- Add a new block and search for 'Document' to find all the blocks provided by Document Library Pro. These allow you to insert the document data, buttons, etc.
After you click Save, the new layout will appear:
- In the list of layouts at Documents → Settings → Single Document so that you can use it as the default for all your documents.
- In the Layouts dropdown on the Edit screen for each individual document.
Using different layouts for different documents
If you wish to use different layout templates for different documents then you can do so as follows:
- Go to Documents → Settings → Single Document.
- Click the 'View All Layouts' button and add/edit as many patterns (i.e. layouts) as you like.
- Back on Documents → Settings → Single Document, ensure that the layout you will use most often is selected from the drop down. This will be the default layout.
- Finally, go to the main Documents page in the admin, click to edit each individual document, and use the ‘Layout’ dropdown in the 'Document' tab in the right hand column to change the layout.
Available fields
You can display the following information on the single document page:
| Details | How it's added | Optional? | |
|---|---|---|---|
| Document title | The name of the document | Automatic | No |
| Document content | The main description for the document | Content block. Leave empty to hide | No |
| Featured image | The document's featured image | Documents → Settings → Single Document | Yes |
| Document Download Button | A link to access the document | Document Download Button block | Yes |
| Document Preview Button | A link to preview the document | Document Preview Button block | Yes |
| Categories | The categories associated with the document | Document Data block | Yes |
| Tags | The tags associated with the document | Document Data block | Yes |
| Author | The name of the document author | Document Data block | Yes |
| File size | The size of the file | Document Data block | Yes |
| File type | The file format | Document Data block | Yes |
| Filename | The file name | Document Data block | Yes |
| Custom fields | Any custom fields which you have added to the document. | Document Data block | Yes |
| Download count | The number of times the document has been downloaded | Document Data block | Yes |
| Comments | Shows comments at the bottom of the page | Documents → Settings → Single Document | Yes |
Note: The above table doesn't include fields which are part of WordPress itself, such as the document published and modified dates. To add these to the page, click the + icon to add a new block and search for the relevant WordPress block such as "Published date".
How to access the single document page
For users
To allow users to access the single document page you need to enable a link to it from your main libraries:
- From the table layout
- Go to Documents → Settings → Display and find the 'Table' section.
- Click the pencil icon next to either the ID, title or image column.
- Enable the 'Add a link' toggle and select the 'To the single document page' radio button.
- From the grid layout - Links in the title or image fields will go to the single document page.
- Go to Documents → Settings → Display and find the 'Grid' section.
- Find the 'Clickable fields' option and enter 'title' or 'image' in the list of clickable fields (e.g. entering
image, titlewould add links to the image and title fields in the grid).
For admins
You can access the page for each document as follows:
- From the front end - If links to the single document page are enabled (see above), then you can click on any document in the library to access it.
- From the WordPress admin - Click on the Documents link in the left of the WordPress admin, hover over a document and click the 'View' link. This will work even if links are disabled on the front end.
How to restyle the single document page
The overall styling for the page comes from your theme. You can customize the styling of the individual blocks within the single document page by following the instructions in our separate article.
FAQ
Can I disable the single document page?
The links to the single document page are disabled by default.
If you don't want to use the single document page, then you should set the Link Destination option to 'direct' and set the clickable fields option to 'none'. This means that users will be taken directly to the document download link (or other URL if you have entered a custom link for the document), instead of being taken to the single document page first.
Can I add sidebar widgets?
Yes - the page layout is controlled by the WordPress block editor which supports widgets. simply click the + icon to add a new block and select the required widget.
Can I change the width of the sidebar?
Where possible, Document Library Pro will display the document details in the sidebar which is provided by your theme. This means that this section will be the same width as the other sidebars on your site.
If your theme doesn't provide a sidebar then Document Library Pro will display the document details as a floating box on the right of the document content. You would need to use custom CSS to change the width of this.
Can I change the permalink structure?
You can change the permalink structure of your document library from General settings → Document Slug. Learn more about changing the document slug.
Can I display custom taxonomies?
Currently, Document Library Pro provides options to display custom taxonomies in the document library table, but not on the single document page. You (or your developer) would need to modify the template to do this.
If you would like us to add this as an option, please send us a feature request. We are currently monitoring the demand to help us decide whether to add it in future.
A large image or date is appearing at the top of the page!
The default template in most themes displays the featured image full-width at the top of the page. to disable this on the single document page, go to Documents → Settings → Single Document and untick 'Featured Image'.