Document library image options
The Document Library Pro plugin fully supports images, and you can include an image of each document if you like. These can appear on the main document library page, and also on the individual page for each document.
For example, you can use images to:
- Manually add file type icons, which might be needed if you have set up the document link field to display a button or text link instead of an icon.
- Add a screenshot of the front cover of the document to provide a preview before people download it.
- Upload any other type of image to represent the document.
How to add featured images to documents
Automatic featured images
Where possible, Document Library Pro will automatically create the featured image for your image and PDF files. For PDF's, the image will be the first page of the document. The image is only added when you first create a document, and if you replace the file in future then you will need to manually change the featured image if needed.
If you don't want to use this then you can either:
- Remove the featured image from the 'Edit Document' screen.
- Not include images in your document library content or on the single document page.
- Manually replace the default featured image with another image of your choice.
Please note that there are some website environments that do not support the auto-generated featured images. You can test whether the auto-image creation is working as follows:
- Upload a PDF file to the Media Library.
- Verify that a preview thumbnail is generated for the item in the Media Library.
If it isn't working then you can ask your host to enable Imagick, which is needed for the auto-generated featured images. Some hosts don't enable this by default, for example SiteGround (see help article), InstaWP and TasteWP, so you can ask them.
If your environment still can't auto-generate the featured images then you will need to add them manually.
Adding images manually
You can manually set a Featured Image when adding a document. If you want to display the same image for each document then you can use the free Default Featured Image plugin.
Images in the document grid layout
The grid layout is designed to work best with square images.
If you have enabled the 'Image' field in the grid layout then it will show the document's featured image if there is one. If there is no image then the file type icon will show instead. For the grid layout, we recommend adding images at least 800px wide - and ideally at least 1024x wide. This ensures that there is no extra space to the left and right of the image, regardless of the number of columns in the grid.
Image size
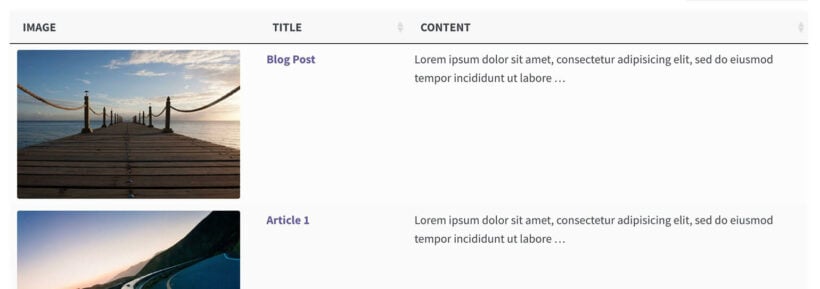
Table layout only
The Image size option controls the size of the featured image if you have included an image column in the table.
The default image size is 70x70 pixels. You can use a width × height value in pixels or any standard WordPress image size such as thumbnail, medium, large, etc.
If you specify only one number, this is used for both the width and height. You can include px after the number to indicate the number of pixels, or omit it - so 70px is the same as 70.
My images are displaying in the wrong size
Image sizing is very complex in WordPress, and can have unexpected results. A few tips:
- Your images must be the correct proportion for your chosen image size. For example, if your images are square and you set the image size to 50x40 then the images will still appear square.
- If you're using the built-in image sizes (e.g. thumbnail, medium or large) then you can check their sizes in Settings → Media.
- The column widths may be overriding your image sizes. For example, if you have set a fixed width for the image column and a specific image size then these options may conflict.
- If you're really struggling to get your images the correct size in the table then you can resize the original image to the correct size.
The table is loading bigger images than it needs to
If you set a custom image size, WordPress will look for a registered image size that either matches this exactly or shares the same aspect ratio.
For example, let's say you set the image size to 50x100, and your site has a registered image size of 100x200 but none that matches exactly. In this case, the aspect ratio is correct so the 100x200 image will be loaded behind the scenes, and displayed at 50x100 in the table.
If there is no registered image size with the same aspect ratio then the image will be displayed as the correct size in the front end, but the full size image will be loaded in the background. This could slow down your tables.
You can use any of the following methods to prevent this from happening:
- Instead of setting a custom image size, use one of the registered image sizes which are listed under Settings → Media (e.g. thumbnail or medium).
- Go to Settings → Media and edit one of your existing image sizes to match the aspect ratio of the images in the table, and then regenerate your thumbnails to update all the existing images. (Warning: This will also change any images that use this size elsewhere on your site.)
- Register an additional image size which matches the image sizes that you want to display in the table. Again, you will then need to regenerate your thumbnails to create a version of all your existing existing images in the new size.
Image lightbox
If you use the image column in Document Library Pro, the image will open in a lightbox when someone clicks on the image.

The lightbox uses the Photoswipe library and is enabled by default. If you would like to disable the lightbox feature, you can untick this option on the plugin settings page:
Can I change or restyle the image lightbox?
The lightbox uses the Photoswipe library. Unfortunately there are no options to customize this, but you can achieve this by adding additional CSS to your site.
Linking to the document page from the image column
If you would like the image to be clickable and take the user to the single document page, you need to disable the lightbox as described above. Once you've done this, the image column will instead link to the relevant single document page - see the links article for more details.
How to remove images from the table
If you don't want to include images in the table at all, then you can delete the image column from the list of table fields. Please see the article about editing columns in the table.