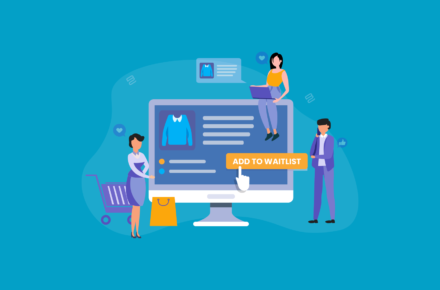
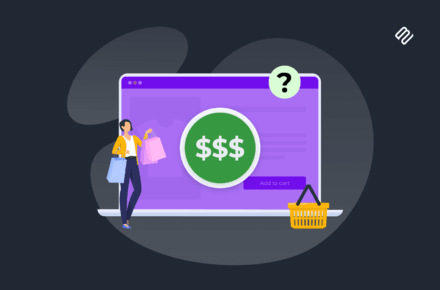
Do you know what’s the single BIGGEST factor influencing customer purchasing decisions? It’s the product price. That's why you need to add a WooCommerce price filter to your store.
Studies show that pricing has a significant impact on the buying behavior of consumers. Yet, the price filter in WooCommerce itself isn’t good enough to help customers find products within their budget. It lets customers sort the product catalog in two ways: Price High to Low or Price Low to High.
As a consumer, I’m sure you can understand how this isn’t nearly as user-friendly as a price filter that lets customers set a price range i.e. minimum order amount or maximum price value.
Keep reading to discover the best way to add a WooCommerce price filter to your online store.
Why do all online stores need a WooCommerce price filter plugin?
A customer browsing your product catalog should be able to sort it by price. This way, they can quickly see items sorted by their product price – either low to high or high to low. It makes it easier for customers to find what they’re looking for.
Think about the last time you visited a major e-commerce store to buy something. If you’re like most people, I’ll bet the first thing you did was sort all products by price.
According to Prisync, 60% of consumers consider pricing to be the very first criteria on their buying decision. And the most important store features driving the purchase decision (80%) is competitive pricing.
The problem with filtering products by price in WooCommerce
The WooCommerce plugin provides a price widget out of the box. However, it’s not really fit for purpose because:
It doesn’t use AJAX. This means that the page reloads every time a customer selects something from the price filter. That is a very poor user experience if they are filtering for multiple items at once, or if they are already part-way down the page.
Limited display options. The price widget only appears in the sidebar widget area and not above the list of products.
It’s quite fiddly to use. The WooCommerce price widget isn’t very intuitive from a technical standpoint.
In addition to all of this, the other filters that come with WooCommerce are also very limited. For example, you can’t display a category filter above your WooCommerce price filter. It makes sense to plan all your filters together to create the best possible experience for customers, so this is a big limitation.
The perfect WooCommerce price filter plugin
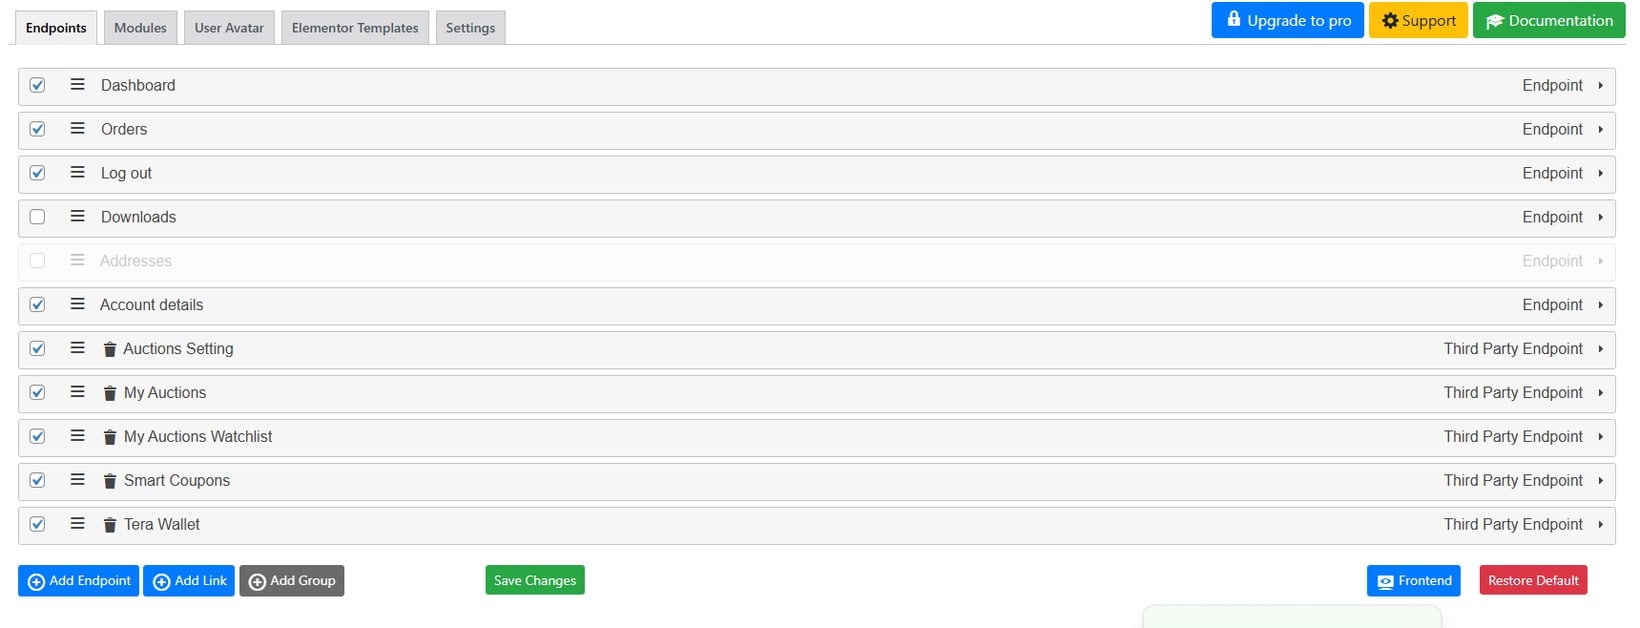
WooCommerce Product Filters is a price filter plugin that lets you create individual price filters, structure them into logical groups, and display them anywhere on your online store.
Key features
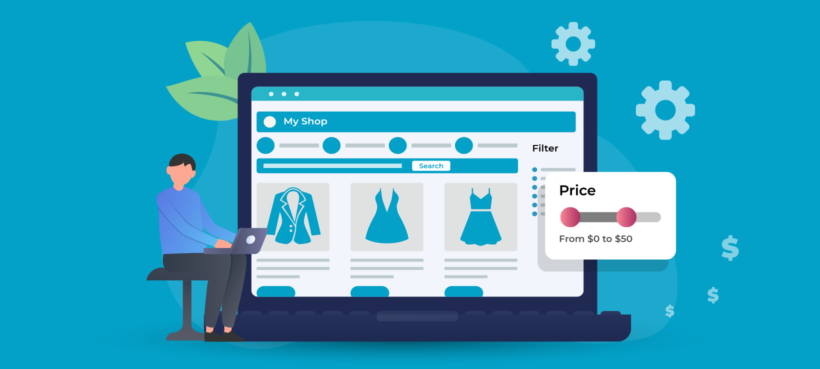
It’s an advanced price filter that lets you display a price slider. Customers can use it to set a low and high price to filter the product catalog by. This way, they can set a price range (minimum price value and a maximum price value) to quickly find products within their budget.
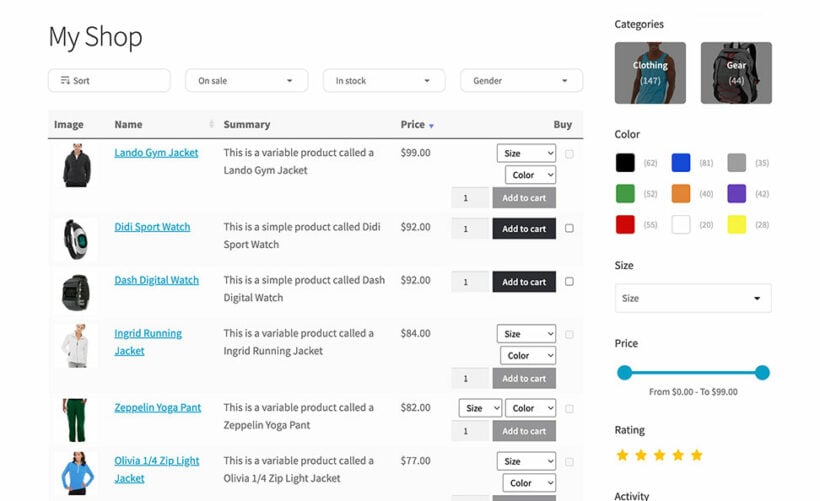
Unlike the WooCommerce price widget, the price filter can appear either above the list of products or in a left (or right) sidebar on the page.
You can choose between two different filter behavior options: instant AJAX or button click. If you go with the AJAX option, the product catalog will update without a page refresh when the customer sets the price filter to show relevant products only. On the flip side, if you choose the button click option then the user will have to click the Apply Filters button to see the filtered list of products.
And it's not just a price filter plugin!
WooCommerce Product Filters also lets you add a Product sort dropdown to your shop pages. This allows users to sort the product catalog by price. The product sort dropdown can appear above the list of products or in the sidebar.
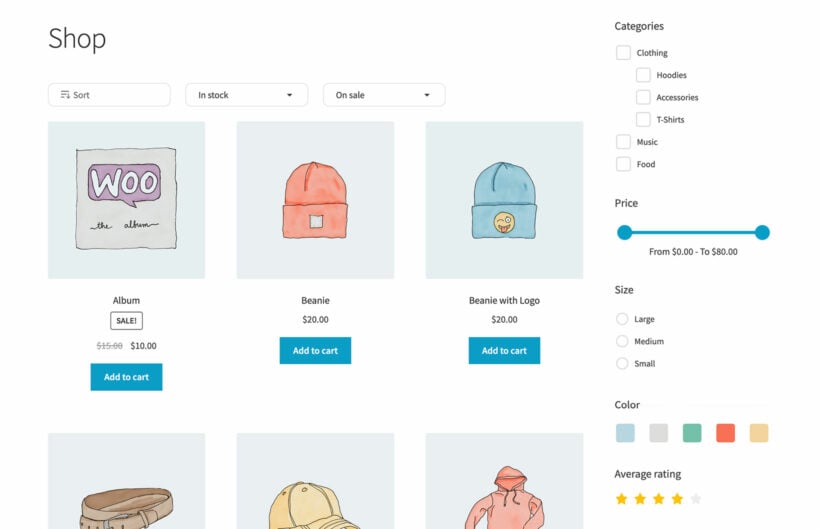
In addition to a robust price filter, the WooCommerce Product Filters plugin also lets you create filters for categories, attributes, colors, tags, custom taxonomies, ratings, stock status, and on-sale products. This way, you can let users filter products in a variety of different ways.
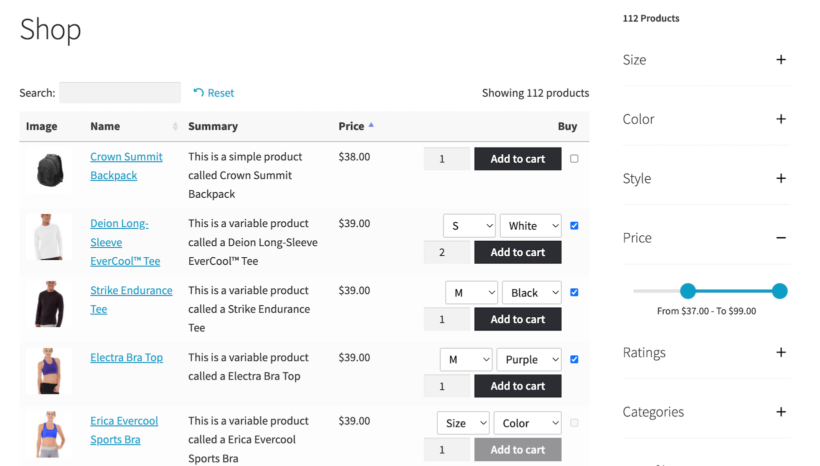
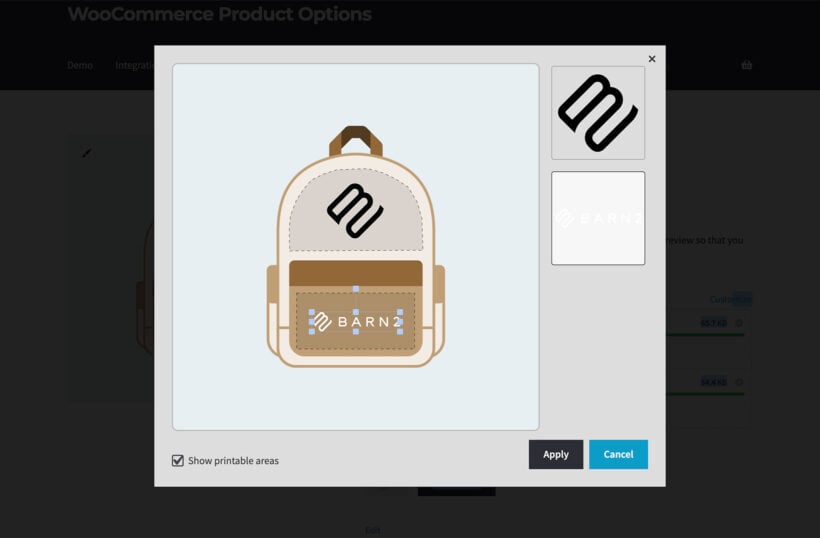
Combining a price filter widget with other filter types (like dropdowns, checkboxes, or radio buttons) makes it easier for customers to find exactly what they’re looking for and get to the correct product page faster. For example, if someone is looking for a red t-shirt between $15 to $25, they can quickly filter products to see only those products that fit those specifications:
Tutorial: how to add a WooCommerce price filter to your store
Here, we'll show you step-by-step how to add a price filter to your online store using the WooCommerce Product Filters plugin.
Step #1: Install the WooCommerce Product Filters plugin
Get the WooCommerce Product Filters plugin and install it on your WordPress site. You'll receive a license key and the plugin files in a confirmation email. Activate the license key in the plugin setup wizard and configure how you want the filters to behave.
Click the Save changes button to continue.
Step #2: Create a price filter
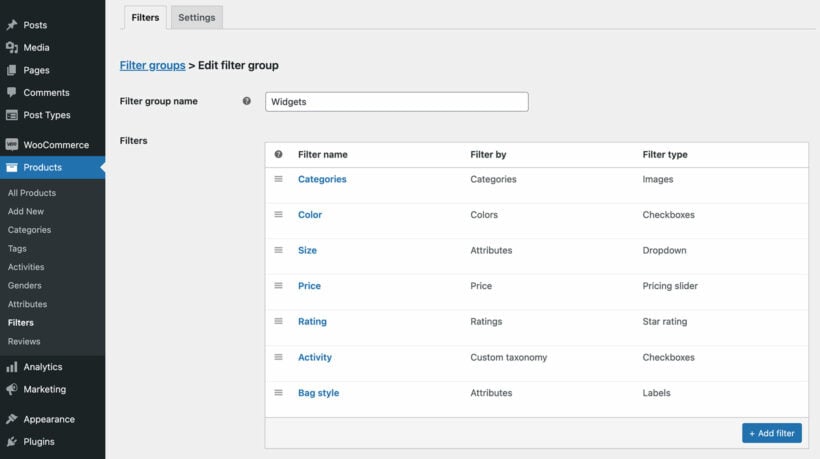
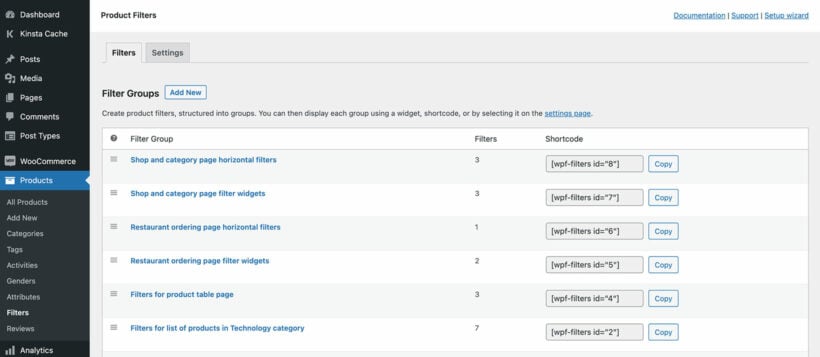
To create a price filter, head over to Products → Filters. Click on the filter group that you want to add the WooCommerce price filter to, and fill in the information on the Add new filter form.
You can set a filter name, select the data the filter will use, select the filter type (dropdown, checkbox, radio button, etc...), and assign it to a group. The WooCommerce Product Filters plugin lets you create as many filters as you'd like. So, you can combine the price filter with other filters such as product categories, attributes, tags, colors, ratings, stock status, and more.
Add as many filters as you like, including a WooCommerce price range filter
Step #3: Add the price filter to a page
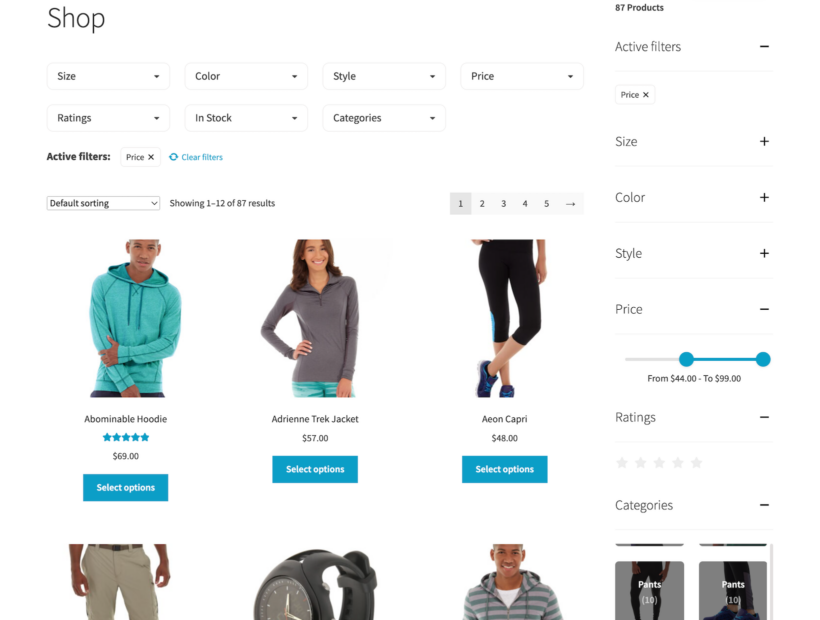
The WooCommerce Product Filters plugin comes with an option that lets you automatically a selected filter group above the products on your main shop pages. You can select this in the setup wizard or in Products → Filters → Settings.
This will show all filters in a horizontal layout above the list of products on the shop page and archive pages. To use the price filter, customers open the 'Price' dropdown and use the slider to select a low and high price.
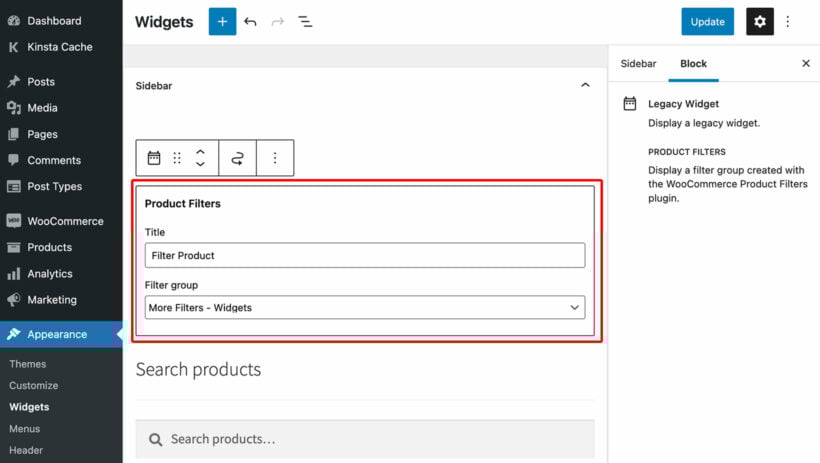
Each filter group also has a shortcode which you can use to insert the price filter (and other filters) anywhere in your store. This is useful if you create custom lists of products. Examples of this might include pages built using Elementor or Gutenberg.
Copy the WooCommerce price filter shortcode and insert it wherever you list products
Bonus: list products in a table view with price filter
The WooCommerce Product Table plugin lets you list products in a neat and organized table layout that works just like an order form. Customers can add multiple products and variations to their cart in one click.
The WooCommerce Product Table plugin also lets customers find products with instant product search and sort. It’s the perfect addition to WooCommerce Product Filters. You can use both of these plugins on your WordPress site to create the best possible price filtering experience for customers. For example, you might create a WooCommerce price list complete with price filters.
You can use WooCommerce Product Table to create one-page order forms so that customers can view and select products quickly and use WooCommerce Product Filters to add stylish price filters which refine the products in the table by price.
This is especially useful for stores that sell lots of products (like wholesale stores) as well as stores that sell products that are better suited to a table layout (like restaurants or hardware stores).
With WooCommerce Product Table, customers can also click on the price column in the table to sort products by price in either ascending (i.e. price low to high) or descending order (i.e. price high to low).
As a store owner, you can use the WooCommerce Product Table plugin to insert lists of products anywhere on your WordPress site, complete with a robust WooCommerce price filter. So, it’s not just for the shop and category pages.
WooCommerce price filter plugin
Price has (and probably always will have) a significant impact on the buying behavior of consumers. Since the price widget that comes with WooCommerce out of the box is pretty limited, you’re better off using a WooCommerce price filter plugin like WooCommerce Product Filters.
WooCommerce Product Filters lets you:
Add an advanced price filter anywhere on your WooCommerce store.
Have the price filter appear above the list of products or in a sidebar.
Choose to go with instant AJAX functionality or button click.
Use the product sort dropdown to let customers sort products by price.
Combine the price filter with a variety of other filters including categories, attributes, colors, tags, custom taxonomies, ratings, stock status, and on-sale products.
In addition to this, you can combine the WooCommerce Product Filters plugin with the WooCommerce Product Table plugin to list products in a one-page order form layout with price filters. It works seamlessly with just about every WordPress theme and page builder including Elementor.
Ready to add an advanced WooCommerce price filter to your online store? Get WooCommerce Product Filters today!
Not sure how to set up advanced faceted search on your WordPress site? Not even sure what faceted filters are? Although WordPress comes with a basic search out of the box, it doesn’t pull up the most relevant results. Keep reading to discover how to supercharge your store's search and filtering.
WordPress sites are a unique world of their own. You might publish all sorts of content - posts, products, and so on. However, visitors hardly ever know what to search for. What if they type the wrong thing and don't find what they need?
The solution is to set up smart search options, such as advanced faceted search and filtering. The right search features are more attuned to online shopping and anticipate your customer's needs, helping them to find what they want more easily.
In this complete guide, I’m going to explain what WordPress faceted search is and why it can make such a huge difference to sales in your store. I’ll also share the best WordPress faceted search plugin, both for filtering products or any other type of information. Finally, you'll learn step-by-step how to set it up.
What is WordPress faceted search?
Faceted search enables users to filter what they’re looking for by different criteria. They can narrow down their selection and quickly find specific items in your online store or website.
Think of facets as categories or attributes that the information on your WordPress site can be grouped into and filtered by. Here are a few examples:
Computer hardware stores that sell products like SSDs might have different facets for platform support, capacity, connection type, and compatible devices.
A WordPress blog might have facets to help users to find the type of posts they're looking for.
Stores that sell clothes often have facets for color, fabric, occasion, and size.
Stores that sell cookware have facets for material, price, and color.
This way, customers can quickly make their selection and find exactly what they’re looking for.
Facets vs filters vs search: what’s the difference?
The problem with a regular search bar is that users often don’t know what to search for. This is especially true if this is their first time visiting your website.
In addition to this, search results don’t offer support for typos, errors, or common keyword synonyms. For example, a customer might want to purchase a red t-shirt from your e-commerce store. But, if you’ve named the product Crimson T-shirt, it won’t appear in the search results.
Filtered search is when customers can use a filter dropdown or other types of filter to narrow down their search results. So, following our example, a customer might select T-shirts using the category filter to view all t-shirt products.
Faceted search is similar to filters but they’re different search methods. With faceted search, customers see a logical interface that helps them quickly find what they’re looking for. Following our example from above, customers could set the Type facet to T-shirtand the Color facet to Crimson.
These are the main differences between facets and filters:
Narrowing down search results. Regular filters let users narrow down search results one at a time. Faceted filters use multiple filters that can be applied at once. This way, users can quickly find what they’re looking for.
Filtering results based on different attributes. With faceted filters, you can create filters based on different product attributes. This is also a great way to use keywords in your faceted search.
Improving website structure. With faceted filters, users are more likely to find exactly what they’re looking for rather, even if you have a huge site. For example, if you sell hardware goods like nuts and bolts of different sizes, faceted filters will improve the product catalog structure and make it easy for customers to find the exact product quickly.
To sum it up, faceted filters let users narrow down search results based on the exact information they're looking for. Unlike basic filtering, WordPress advanced faceted search lets users select multiple pieces of data. These drill down the results, only displaying relevant items.
Which WordPress sites need advanced faceted search?
Before we get into which types of WordPress sites need advanced faceted search, let’s quickly step through some important statistics.
Users notice and complain in the rare cases when facets are absent. These days, ecommerce sites without faceted search are the exception, rather than the rule.
The same study found that 27% of search failures were a result of not being able to find suitable items on stores, even though at least one matching product was available.
The Nielsen Norman Group also reports that in 2000, only 64% of all in-site searches were ultimately successful. In 2011, this increased to 74% and, in 2017, a whopping 92% of all in-site searches were successful.
While the statistics are particularly significant for e-commerce stores, the same principles apply to any type of WordPress site. Basically, if you have lots of data for users to sift through, then you need a WordPress advanced faceted search plugin.
What about faceted filters in WooCommerce?
WooCommerce is the world's biggest e-commerce plugin, but surprisingly few stores use facets for their in-site search. That's because the filters that come with WooCommerce out of the box are pretty basic.
A WooCommerce faceted search plugin is essential for stores that sell dozens, hundreds, or thousands of products. Customers will benefit from being able to select specific product attributes to narrow down their selection.
Let’s look at some examples:
Clothing stores. Stores that sell apparel can set up facets for type, fabric, size, fit, color, and price.
Hardware stores. Stores that sell products like fasteners, nuts and bolts, screws, locks, hinges, power tools, and plumbing supplies can use facets for availability, department, dimensions, and ratings.
Furniture stores. Furniture stores might consider creating facets for attributes like color, price, width, height, and type.
As you can see, faceted filters make it easy for customers to narrow down the options and find what they’re looking for. Stores that sell a medium or large number of products can benefit from speeding up the browsing experience.
What is the best WordPress advanced faceted search plugin?
Next, it's time to discover the best plugins for adding advanced facets to WordPress. I recommend a different plugin depending on whether you're adding faceted search to a WooCommerce store or to a general WordPress site:
Adding faceted search to a WooCommerce store - Without doubt, WooCommerce Product Filters is the best advanced faceted search plugin for e-commerce stores. It comes with a huge range of facet styles and types, and everything else you need.
Adding facets to a general WordPress site - If you're adding facets to any other type of website content (resources, blog posts, members, etc.) then Posts Table Pro is the plugin for you. It takes any type of information from your website and displays in an instant table - complete with advanced faceted search filters, AJAX-powered keyword search, and more.
Best for e-commerce: WooCommerce Product Filters
WooCommerce Product Filters is the best advanced faceted search plugin for WooCommerce. As well as having all the faceted filters you could need, it has clever logic built-in to avoid frustration and ensure that customers always see results.
This is achieved by never showing empty filter options. In other words, customers will see faceted filters for available products only. The plugin also provides the option to display the number of products within each option so that customers will naturally stop choosing options when the number of results gets too low.
Types of filters to include in the faceted search
Now that we’ve chosen an e-commerce faceted search plugin, the next step is to plan the sort of data that you want to help customers search by.
The faceted search plugin gives you the following options:
Categories - Essential for stores that sell lots of different types of products. Customers can select the facet for the type of product they’re looking for e.g. Tops, Dresses, Pants, or Shoes.
Attributes - Product attributes – like size, weight, dimensions – are important for stores that sell products like hardware goods or furniture.
Colors - Stores that sell apparel, furniture, or cookware can help customers quickly find products by color using this facet.
Tags - Depending on how you’ve set up product tags, you might want to let customers select tag facets to narrow down their search.
Custom taxonomy - You can use the custom taxonomy facet if you’ve created custom taxonomies to better organize your products. For example, if you sell products by different brands, you can make it easy for customers to find the exact product they’re looking for.
Price - A price facet is beneficial for almost every type of e-commerce store. It lets customers set the price range and filter out less expensive (or more expensive) items.
Ratings - Setting up a ratings faceted filter on your store makes it easy for customers to find high-quality products. It’s also a good way to use social proof on your online store.
In stock - This is perfect for stores that sell out quickly. For example, hardware stores and furniture stores often have some products in stock while others are on backorder or temporarily out of stock. This faceted filter lets customers only view the products that are in stock.
On sale - Customers can select this facet to only view products that are on sale.
What the faceted filters look like in your store
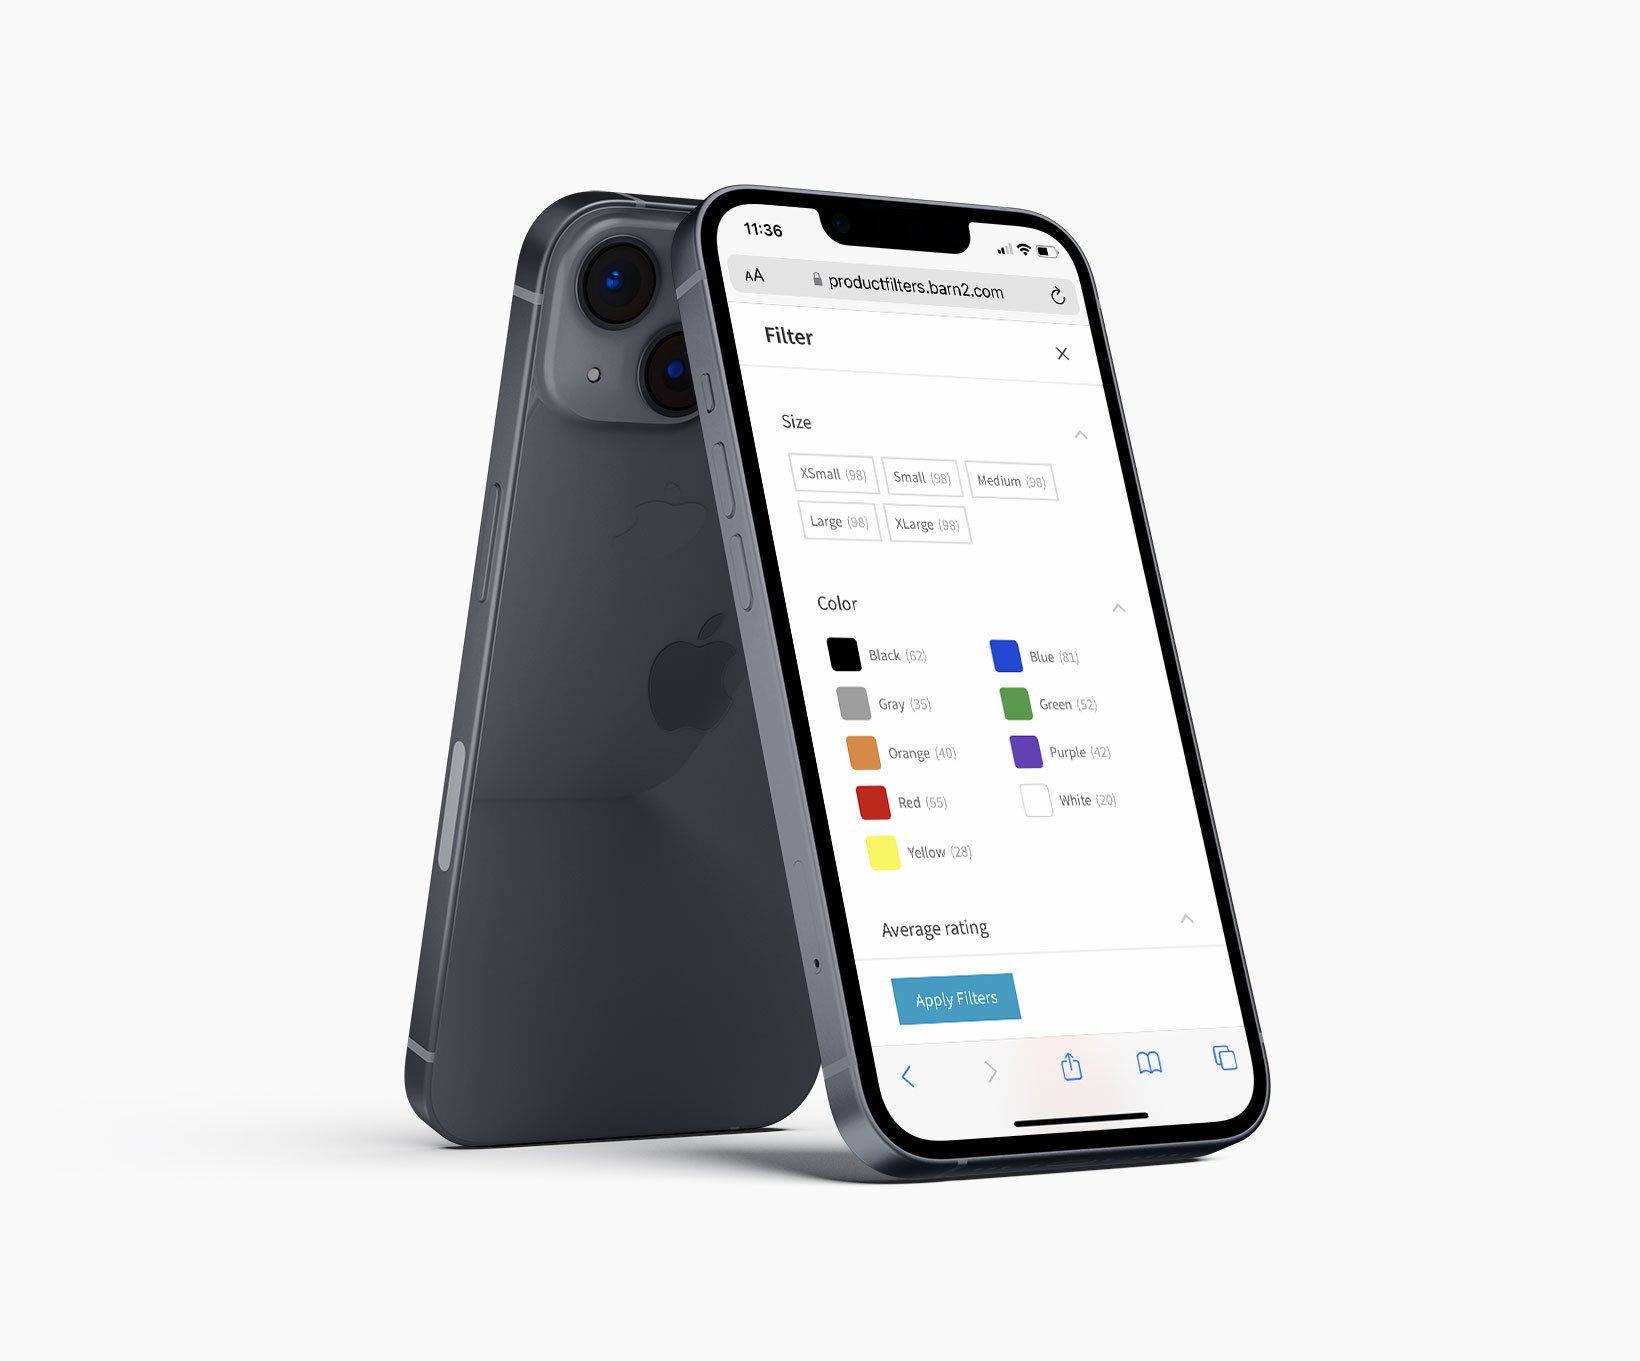
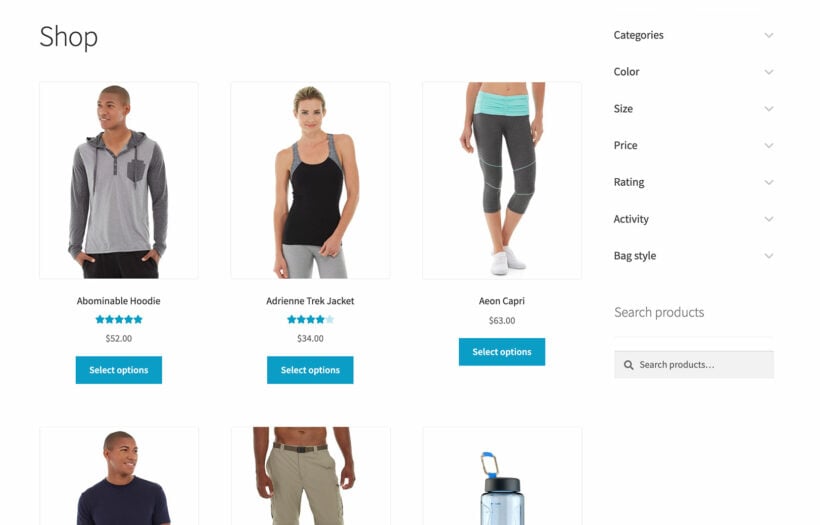
Once you've installed the plugin, it only takes a few minutes to add advanced faceted search filters to your store. The end result will be something like this on desktop:
And either this or this on mobile, depending on how you set it up for mobile users:
Show search facets above your mobile store
Mobile users view filters in a mobile-friendly slide-out panel
Either way, it's the perfect way to add advanced faceted search to an e-commerce store!
How to add WordPress faceted filters to your store
Here’s what you need to do to set up advanced faceted filters search:
Step #1: Install Product Filters
Get the Product Filters plugin if you haven’t done so already. Install and activate it on your WordPress site.
Step #2: Configure the faceted filters
The setup wizard will open next. Enter your license key and choose how you want your faceted filters to behave. Here's some more information about the main settings.
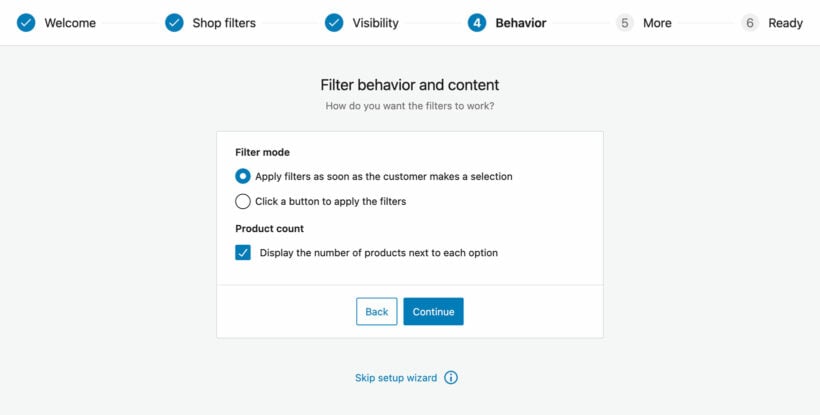
Filter behavior and content
You can set the Filter mode option to either Instant or Button click. By default, it’s set to instantly update the list of products using AJAX as soon as the customer selects an item from any of the filters. Use this if you want AJAX faceted filters in your store.
The Product Filters plugin also gives you the option to display the total product count next to each option. You can set this using the Product count option.
Filter visibility
Use this option to show selected filter groups on the shop page, category pages, and product tag archives. Optionally, you can disable this option if you want to add filters to pages manually or display filters in a sidebar.
The plugin lets you hide all faceted filters by default. If you enable this option, customers won’t see the filters when the page first loads. They’ll need to click a button to view the faceted filters and refine their search. This is perfect for hiding filters on mobile devices.
Finally, you can change the Show filters button text and display faceted filters in a slide-out panel instead of directly on the page.
Toggle filters
Facets with the filters toggled to closed
This option lets you add a an open/close arrow to the right of each filter heading. Customers can click it to open/close faceted filters. If you have a small number of filters, you should leave this option set to Open. However, if you have tons of filters on the page, you should set it to Closed to save space on the page.
Step #3: Create faceted filters
WooCommerce Product Filters lets you create all sorts of faceted filters for your online store. Depending on the types of products you sell, you can use any combination of the available filters to enhance the search and browsing experience of your store.
Think about the best way to present each filter on your product catalog pages. You can use dropdowns, radio buttons, color swatches, images, or checkboxes. The aim is to make things as easy as possible for customers so that they intuitively select the options they want and perform an advanced faceted search without having to think.
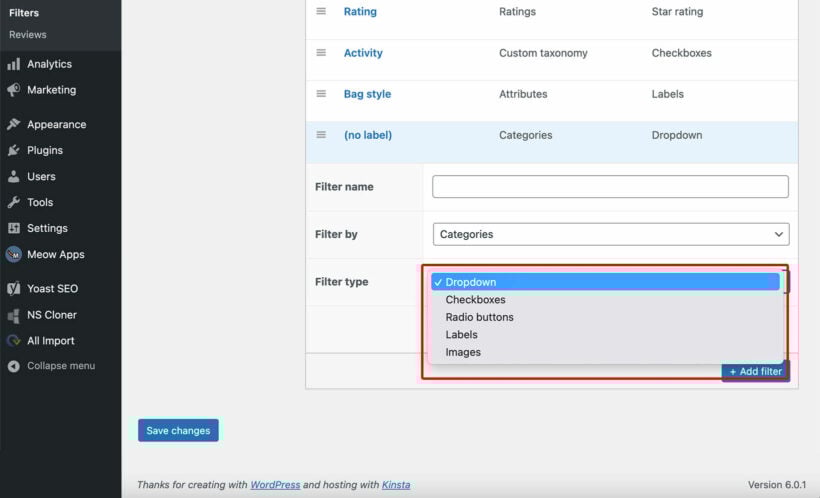
Next, go to Products → Filtersin the WordPress admin. You'll see a default filter group containing some popular facets. Either edit this, or great your own.
Whichever you do, fill in the details to add a new filter. You can set the name, filter by, filter type, and assign to group options. Repeat this step to create as many facets as you’d like.
Best advanced faceted search plugin for other types of website content: Posts Table Pro
So far, we've discovered the best faceted search plugin for e-commerce. But what if you want to add faceted search for other types of information on your website, instead of products? That's when you need Posts Table Pro.
Posts Table Pro is a dynamic WordPress table plugin which creates instant tables of any type of information from your website. This might be your normal WordPress pages and posts, or any custom post type (consultants, members, articles, resources, audio files, videos, etc.).
The table makes it super-simple for your users to find the information they're looking for. For example, it has:
Advanced faceted search filter dropdowns, which appear above the table. Users can select information from multiple dropdowns to drill down their search and combine multiple facets.
AJAX-powered search box to the top right of the table. With this, users can enter a keyword and search for absolutely anything.
Easy column sorting so that users can re-order the list by any column.
Types of faceted search available in Posts Table Pro
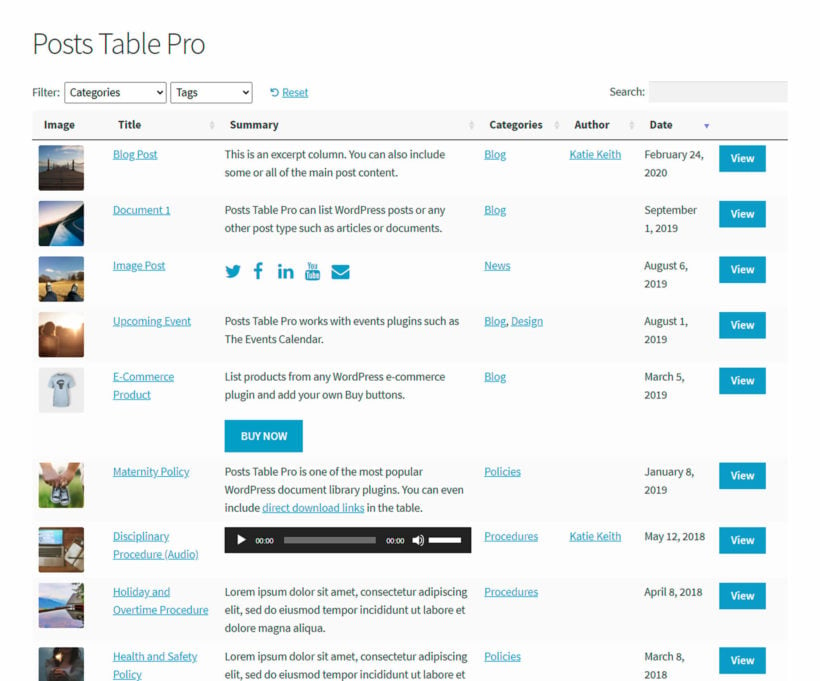
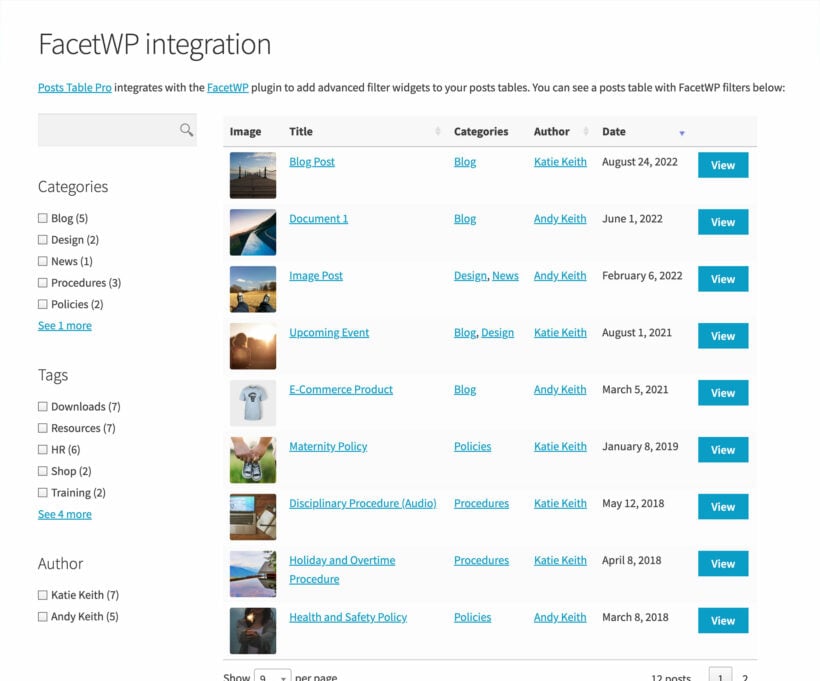
The faceted filter dropdowns which are built into Posts Table Pro look like this (depending on your theme):
Posts Table Pro comes with faceted filter dropdowns, plus a keyword search
And if you want other types of facet, such as filter widgets and checkboxes, then you can use Posts Table Pro with the FacetWP plugin. This adds filter widgets alongside the table, like this:
Tutorial: How to set up advanced faceted search with Posts Table Pro
It's easy to install Posts Table Pro and start adding facets:
The setup wizard will open. Follow the steps to choose how you want your tables to look and behave.
On the filtering page, follow the instructions to add filter dropdowns to the table.
Alternatively, if you want to use Posts Table Pro with the FacetWP plugin, then you can read the documentation on how to use the two plugins together. Either way, you'll be adding advanced faceted search to your WordPress site in no time!
Where to get the plugins
Implementing seamless in-site search becomes significantly easier with faceted filters. It's super-quick for users to find what they're looking for based on the information they're interested in. This saves them time, making them more likely to convert - whether you want them to buy your products, subscribe to your blog, or something else.
Which is the best WordPress advanced faceted search plugin depends on the sort of information you want to filter by:
Use WooCommerce Product Filters to add faceted search to your online store and give customers plenty of options to narrow down their search.
Or use Posts Table Pro to add advanced facets for any other information on your WordPress site.
Ready to set up an advanced faceted search solution? Get the plugin today!
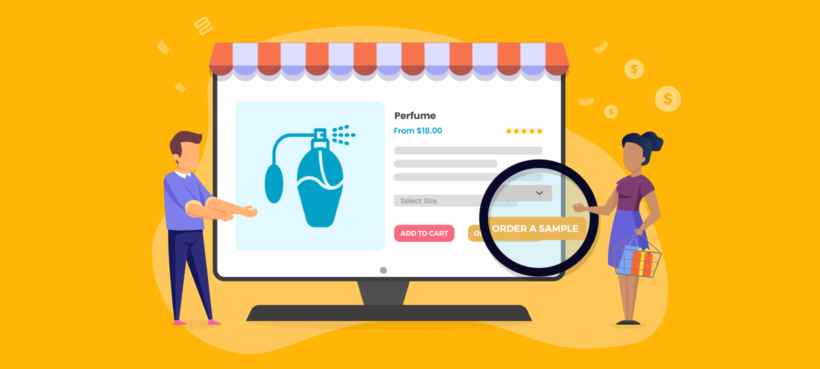
Product sampling marketing is a major strategy which businesses use to boost conversion rates and brand awareness at face-to-face events. But did you know that you can do it in your WooCommerce store too?
Are you looking for an effective way to acquire new customers in your WooCommerce online store? In that case, you may want to consider offering your store visitors free samples of your product. Product sampling marketing gets products in a prospective buyer's hands at no cost to them.
When shopping, most people prefer to buy familiar products to minimize the risk of making a bad purchase decision. If you're a completely new brand, getting the buyer to try out your product can be very difficult. This is particularly true if there's a lot of competition in your industry.
To help buyers overcome this fear, marketers use the product sampling marketing technique to give them a feel of their product. This strategy has proven highly successful over the years. According to a Product Sampling Study report, 35% of the people who tried out a product bought the product that same day.
Product sampling is not only good for new businesses looking to increase sales and brand awareness. Established brands can also use it to get people who have heard about their products to commit to a purchase.
In this article, we'll cover everything you need to know about using product sampling marketing in WooCommerce. We'll bring it to life using some e-commerce product sampling marketing examples. You'll discover how to bring it to your store using the WooCommerce Product Sample plugin. At the end, you'll have everything you need to create a free sample marketing strategy to take your sales to the next level.
Can product sampling form part of your online e-commerce strategy?
Traditionally, marketers are more familiar with offline product sampling, especially at face-to-face events and activities. In this case, businesses employ store sampling experts and brand ambassadors who ensure that passers-by or invited guests get a great feel of their product. It could be as simple as offering a scoop of a dairy product. Or as intriguing as inviting a window shopper to test-drive a luxury car.
As a WooCommerce store owner, you'd be delighted to learn that you can use these same successful product sampling marketing techniques too. Online product sampling is an experiential marketing strategy that is becoming increasingly popular. In fact, it has the potential to generate more results than offline product sampling due to the increased market size.
Unlike offline sampling, setting up an online sampling procedure doesn't require significant capital commitment. Once the sampling experience has been added to WooCommerce, you won't need to deal with staffing issues or negotiate with physical shopping centers or supermarkets. This is highly cost-effective and results in a higher return-on-investment (ROI).
E-commerce product sampling also has a better tracking system that you can use to measure your products. An effective product sampling strategy backed by top-notch site analytics provides you with important insights to improve your business. Similarly, you can advertise your sampling campaign on multiple platforms like social media, influencer markets, and Google AdWords.
When marketing a new product, getting desired results often requires more than conventional marketing techniques. One of the most effective ways to beat the competition is to allow consumers to try your products. The psychology behind this technique leverages typical consumer behavior to create a win-win situation for you and the buyer.
Here are some of the reasons why product sampling marketing is so effective:
Product sampling gets potential customers to experience your product and eliminate risk aversion. Buyers would be happy to use a product they aren't familiar with at a lower cost or no cost at all.
It gets your target audience thinking about your product.
It can be a great way to build customer loyalty. Many consumers perceive a free WooCommerce product or discounted sample as a kind gesture. You can use this to leave a good first impression on the customer.
It's an effective way to beat the competition. Most online retailers aren't using this technique yet. You can use product sampling to establish your brand presence quickly.
No doubt, there are lots of conversion and brand awareness opportunities in online product sampling marketing.
But how can you bring these benefits to your WooCommerce store?
Introducing WooCommerce Product Sample
Are you looking for the best way to get your products into the customer's hands and boost acquisition? WooCommerce Product Sample is the best WordPress product sampling marketing plugin on the market. It adds product sampling marketing to your store, making buyers much more likely to purchase the full product.
Using this plugin, you can either offer completely free products or let the customer get samples at a discounted price. You can also choose to charge a delivery fee or ship the sample for free.
Here are some of the key features that make WooCommerce Product Sample so powerful:
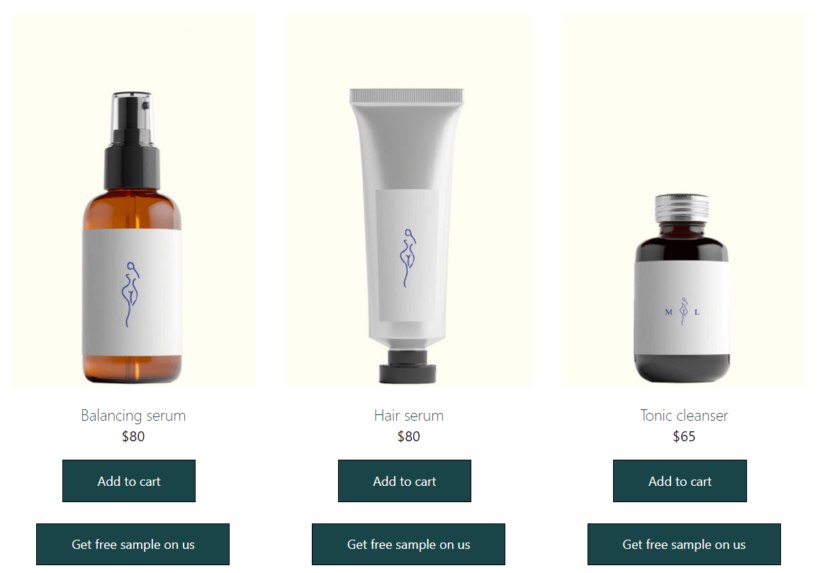
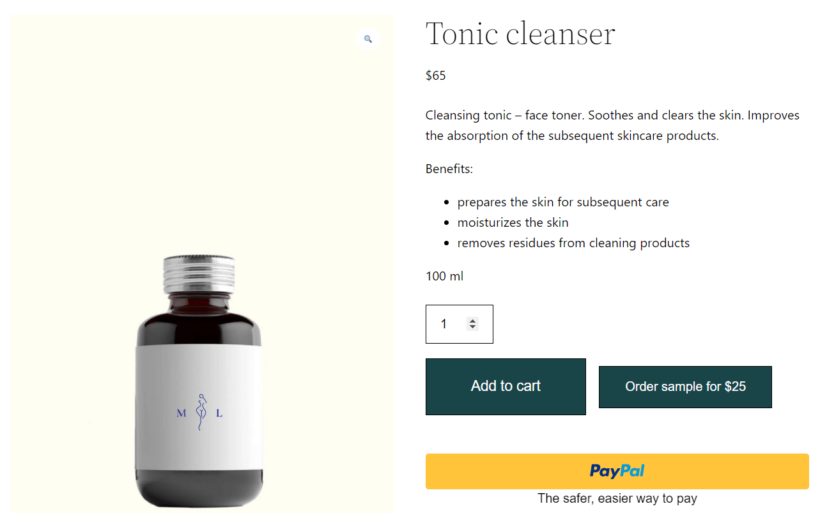
Free and paid samples for all or some of your productsOffer your customers samples of your products at either a discounted or zero cost. You can enable these samples for individual products, product variations, product categories, or all products sitewide.
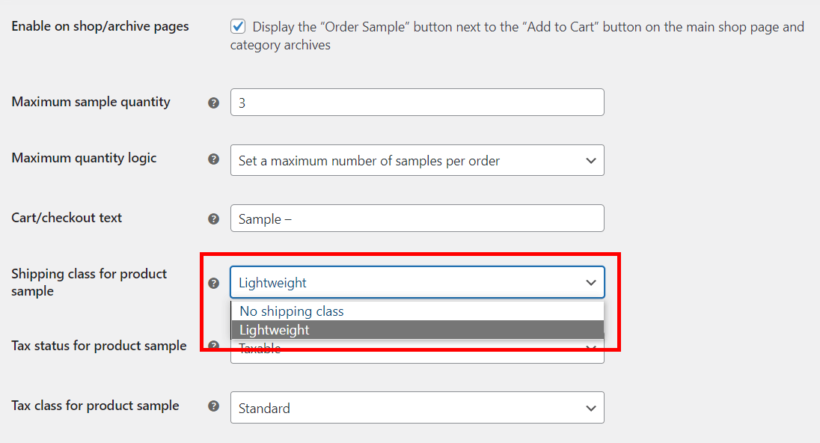
Full control over your product sampling campaignDetermine the price of the WooCommerce free samples, their shipping and tax classes, and also manage unique stock for samples only. You can also decide where to place the 'Order Sample' button on your shop, product, and category pages.
Set a maximum order quantity for samplesSet a sample order quantity threshold to prevent customers from emptying your inventory. This helps your business to maintain profitability.
Send follow-up emails to remind your customers to buyAfter getting a feel of your product, customers become more open to making a real purchase. This plugin is the only WooCommerce product sample plugin sends automated emails reminding your customers to get the full product.
Before we show you how to use WooCommerce Product Sample, let's share a few product sampling examples.
Product sampling marketing examples
To get an idea of how businesses use product sampling marketing techniques online, we'll briefly share 3 use cases we've seen in the past:
Boosting awareness during new product launchesAccording to PowerReviews research, 72% of the customers of online grocery stores are more likely to buy a product that has reviews. One of the easiest ways to generate these reviews for a new product line is to offer free samples. This technique also works efficiently for products in other categories too.
Generating fresh reviews from new and existing customers Reviews aren't useful for new products only. Google and other search engines love fresh content. You can always boost your product pages' SEO ranking by using product sampling to drive an organic flow of content consistently. The report referenced above also reveals that sampling programs have the highest review completion rate in any industry—86%.
Moving a seasonal product's inventorySelling products that will only be available for a limited period can be challenging. You can combine product sampling with your other marketing techniques to move a particular product's inventory faster.
As you can see, each of these product sampling marketing examples works excellently in nearly any e-commerce niche. It's ideal for consumer products like fashion and apparel, entertainment, personal care, homeware, electronics, and other industries too.
If I allow free sampling online, will I lose out on postage?
You do not have to lose out on postage when you allow free sampling online.
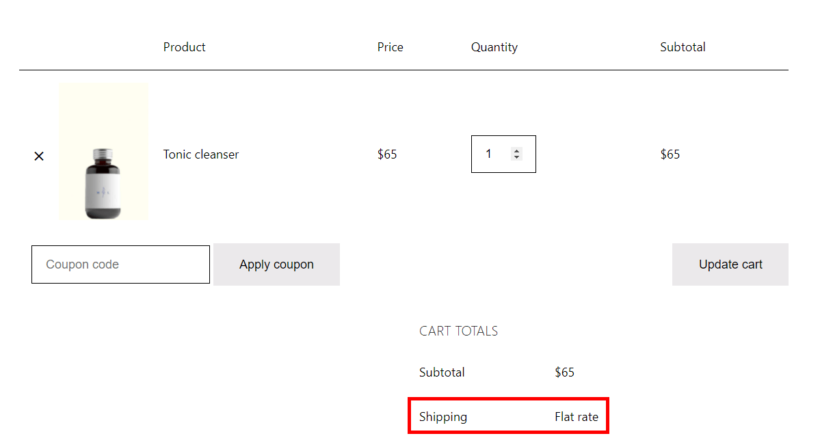
When offering free sampling in your WooCommerce store, the Product Sample plugin allows you to decide who pays for shipping. You set the price for product samples separately from the shipping cost. You can set a shipping cost for the products by assigning them to a shipping class.
In terms of product pricing, you can choose to either offer the product for free or charge a discounted fee. Similarly, you can charge the customer for postage only or offer them free shipping.
Charging for delivery allows you to maintain your capital advantage over offline product sampling where customers get the product in person.
In general, it's important to adopt a model that works best for the type of product you're selling and your business's profitability.
How to enable product sampling marketing in WooCommerce
You can enable product sampling marketing on your WooCommerce site by following these 4 simple steps.
Step 1: Install and activate WooCommerce Product Sample
Once you've completed your registration, you'll receive a license key and download link in your email. Next;
Log into your WordPress backend and go to Plugins → Add New → Upload Plugin.
Here, click Choose File and select the ZIP file you downloaded earlier. Then click Install Now followed by Activate Plugin.
Upon activation, you also need to enter the license key and click Activate.
Hooray! WooCommerce Product Sample is now active and ready for use.
Step 2: Configure the plugin global settings
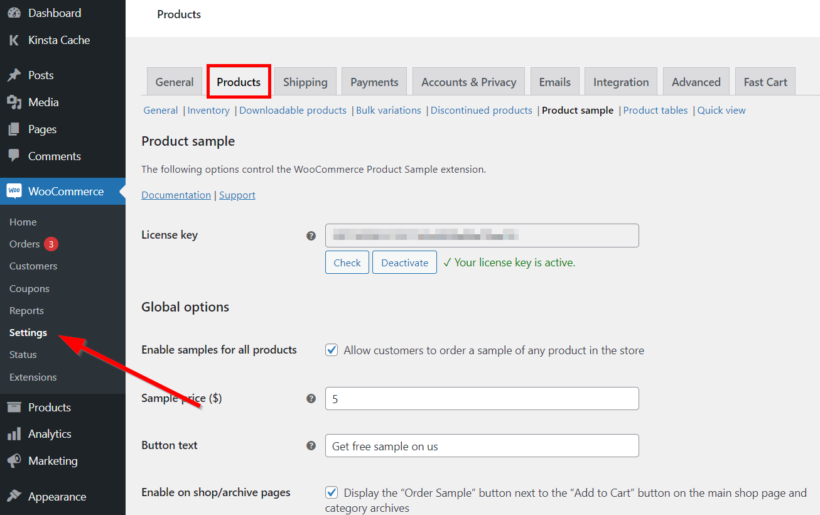
Now, it's time to set up a product sampling marketing campaign. You can do this by navigating to WooCommerce → Settings → Products → Product sample.
On this page, you'll be able to tweak all the global options available using the plugin.
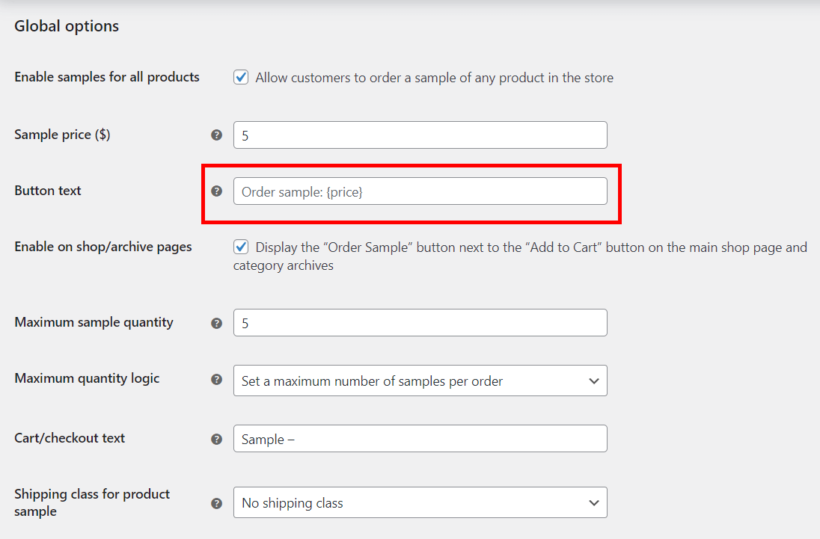
If you want to offer free samples for all your store products by default, check 'Enable samples for all products'. If you uncheck this box, samples will only be available for the products and product categories you configure individually.
On the same page, configure other elements like the sample price, button text, maximum sample quantity, shipping class, and a sample label. This label will be displayed before the name of the product when it's in the cart.
By default, the sample order button text is 'Order sample: {price}'. {price} is a placeholder for any value you enter in the 'Sample price' field above.
You can edit both the text and price fields as you wish. To offer completely free samples, add your text without the price placeholder.
Step 3: Adjust sample settings for individual products or categories
In certain cases, you may want to override the global settings for a particular product, product variation, or category. To do this, navigate to product or category settings.
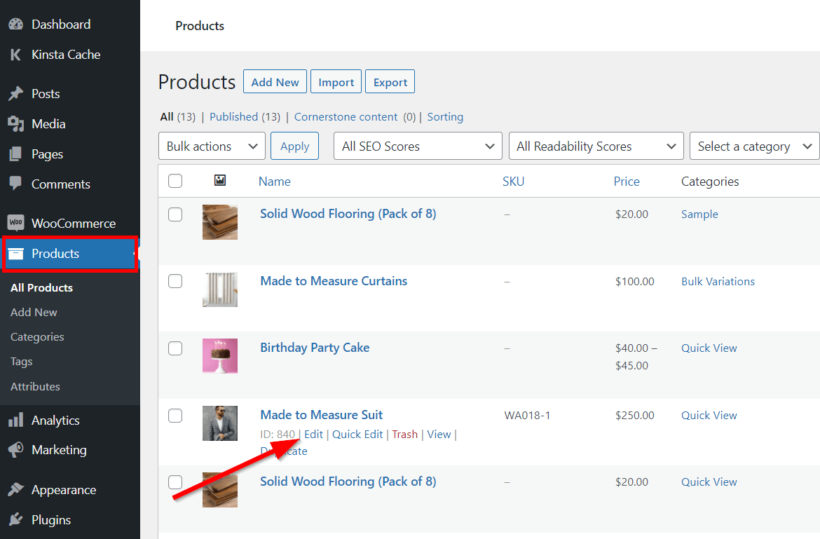
For example, you can go to Products and select the product you want to edit.
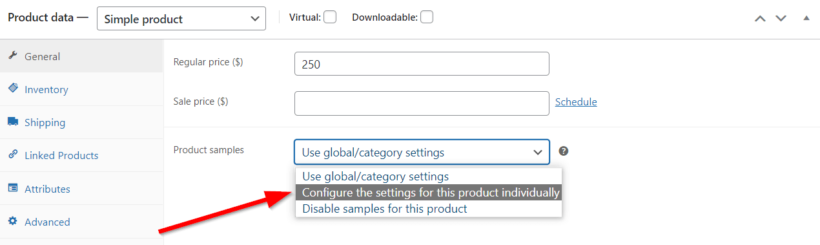
Next, scroll down to the 'Product data' section and open the 'Product samples' dropdown. Then select 'Configure the settings for this product individually'.
Now, you'll be able to enter a unique sample price. Otherwise, you can also disable samples for the product.
You can follow a similar procedure to override the global settings for a product variation or category.
Step 4: Customize the follow-up emails
The last step you want to take is to set up follow-up emails to remind your customers to buy the full product after testing out the sample.
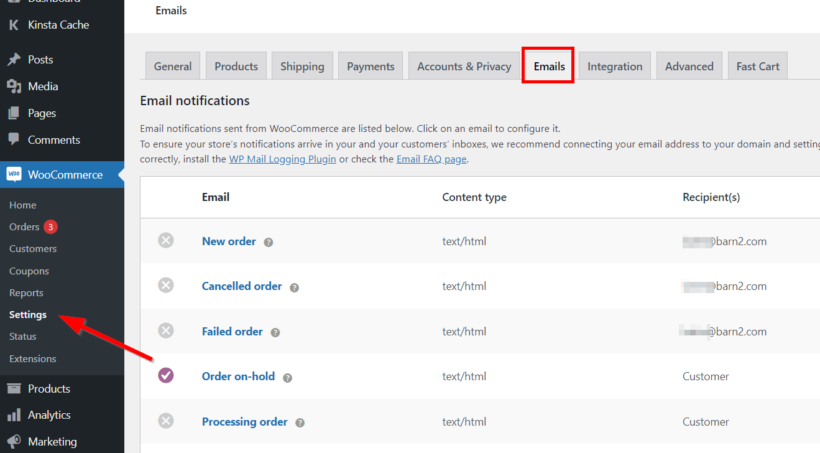
To do this, go to WooCommerce → Settings → Emails.
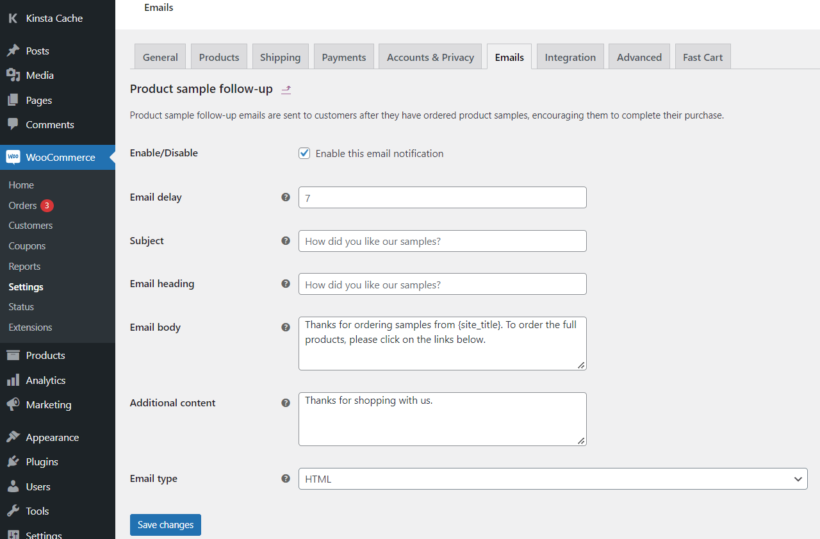
Click Manage next to 'Product sample follow-up'. Edit the necessary fields and click Save changes.
The 'Email delay' allows you to sent the number of days after which WooCommerce will send the reminder email automatically.
Where to get the plugin
Product sampling marketing is a powerful marketing strategy which WooCommerce store owners can use to efficiently drive sales, brand awareness, and customer acquisition. The technique is so effective because it helps customers overcome the initial fear of trying an unfamiliar product.
In this article, we've shown you how to use WooCommerce Product Sample effectively in WooCommerce. We've looked at some product sampling marketing examples and learned how to create a free sample marketing strategy.
Not it's time to install the plugin and put it into practice.
This amazing plugin allows you to:
Offer free or paid samples for all or some of your products
Gain full control over your product sampling campaign
Send follow-up emails to remind customers to buy the full product
Ready to launch your first product sampling marketing campaign in WooCommerce? You can start by getting your copy of WooCommerce Product Sample.
Did you know that you can increase conversions for your online store by auto-filling the customer’s address? All you have to do is set up Google address autocomplete in WooCommerce.
So, when customers start entering their address at the WooCommerce checkout, the autocomplete address form will provide auto-populate suggested results based on the user’s input. This can speed up checkout form completion by up to 30%!
By replacing the standard checkout with the WooCommerce Fast Cart plugin, you can boost conversions by allowing customers to review their selections and checkout in a popup cart without leaving the page. And, instead of entering their billing or shipping address manually, they can complete it with Google address autocomplete.
What is Google address autocomplete?
If you shop online, you’ve probably come across checkout forms that autocomplete your address as soon as you start typing it. It fills out the street address, city, zip code, state, and country fields automatically.
This is a feature of the Places library in Google’s Maps JavaScript API. As a result, it gives you access to addresses all over the world. In fact, it’s the type-ahead-search behavior of the Google Maps search field.
The WooCommerce Fast Cart plugin integrates with Google autocomplete to save customers even more time. Instead of manually entering their address and filling out all address fields, they can simply pick from the suggestions provided when they start typing their address.
It’s incredibly intuitive and speeds up the checkout process for customers too. And even better, customers are already familiar with Google address autocomplete.
What is WooCommerce Fast Cart?
The WooCommerce Fast Cart plugin adds a popup cart and checkout to your online store.
This makes it easy for customers to review their orders when they’re done shopping and place their orders without leaving the page. In addition to this, they can change quantities, remove items, and redeem discount codes from the popup cart.
The WooCommerce Fast Cart plugin supports WooCommerce’s product recommendation engine by displaying related products based on the products customers have added to their cart. This helps you increase the average order value and cross-sell to customers.
You can display the checkout within the mini popup cart and enable customers to checkout without leaving the page. In fact, this is the easiest way to speed up the checkout flow for your store. To take things to the next level, you can enable Google address autocomplete in WooCommerce to automatically fill out the address fields.
The WooCommerce Fast Cart plugin can be configured to display the popup cart either as a side cart on the right of the screen or in a larger lightbox in the middle of the screen.
Tutorial: how to set up WooCommerce autocomplete
Here’s what you need to do to set up Google address autocomplete in WooCommerce:
Step #1: Install the WooCommerce Fast Cart plugin
Get the WooCommerce Fast Cart plugin. Log into the WordPress admin area and then install and activate the WooCommerce Fast Cart plugin. Head over to WooCommerce → Extensions to activate the plugin’s license key.
Click the Save changes button to continue.
Step #2: Enable Google address autocomplete
Go to WooCommerce → Settings → Products → Fast cart to configure the plugin’s settings.
Enable the Allow fast checkout option and then tick the Enable address autocomplete checkbox which appears underneath it.
A text field called Google API key will apper underneath the checkbox. You need a Google API key to use Google address autocomplete in WooCommerce. This will allow your website to access the address data from Google’s API.
You can select other WooCommerce Fast Cart options as needed from the same screen. Here are some suggestions:
You can enable the Direct Checkout option if you want to skip the cart completely and allow customers to checkout without having to go through a cart stage first.
In addition, you can choose to auto-open the fast cart and checkout so that customers are prompted to complete their purchase without having to click on a floating cart icon first.
Step #3: Test the Google address autocomplete
Finally, test the fast cart feature on your WooCommerce store. First, make sure you’re not logged in. If you are logged in to your WordPress site, WooCommerce might already have your address stored which means it won’t need to use the Google address autocomplete feature.
Add a product to your shopping cart, open the popup checkout, and start typing your address.
Like magic, the Google address autocomplete will do the hard work for you and fill out the address fields!
Where to get the plugin
With Google address autocomplete in WooCommerce, you can speed up the checkout process on your store and minimize cart abandonment rates.
WooCommerce Fast Cart makes it incredibly easy to offer the fastest checkout experience complete with Google address autocomplete and direct checkout.
Ready to set up Google address autocomplete in WooCommerce? Get WooCommerce Fast Cart today!
Want to set up WooCommerce email notifications for customer orders and send them to multiple recipients?
Improving email communication for your business is crucial for nurturing leads. It enhances customer service and improves brand loyalty. The best way to do this is by using a WooCommerce email notifications plugin.
In this post, we’ll show you how to supercharge your WooCommerce email setup by:
Setting up the email notifications that come with WooCommerce itself.
Using WooCommerce email customizer plugins to add extra features. For example, they let you send email notifications to multiple recipients with total flexibility.
Why should you use email notifications for your WooCommerce site?
WooCommerce offers some basic email functionality out of the box. It automatically sends customers an email when their order moves from one order status to another.
Transactional emails are essential for communicating with customers about their orders. For instance, customers will automatically receive an email notification for any processing order or when the order has been shipped from your warehouse.
As a store owner, you also increase your business’s profitability by automating repetitive tasks such as sending customer order notifications. A WooCommerce email notifications plugin lets you automatically send order notifications to the appropriate contacts, team members, and suppliers. This way, everyone stays in the loop and knows what’s going on with the order.
Email notifications also play a huge role in protecting and recovering orders that would otherwise get lost. For instance, you will receive a notification when a customer cancels their order. This will prevent your team members from shipping out the order.
In addition, it helps stay in touch with leads and customers. This allows you to nurture them to convert and become a loyal audience. Since you know more about shoppers’ behavior, you can work towards delivering better user experiences.
Email notifications also offer a great way for you to engage with your customers and keep them interested in your product offerings. Therefore, this results in more sales and helps you generate more revenue for your business.
To improve email deliverability, many WooCommerce store owners also use SMTP plugins to help ensure transactional emails reach customers successfully.
How to set up and customize email notifications
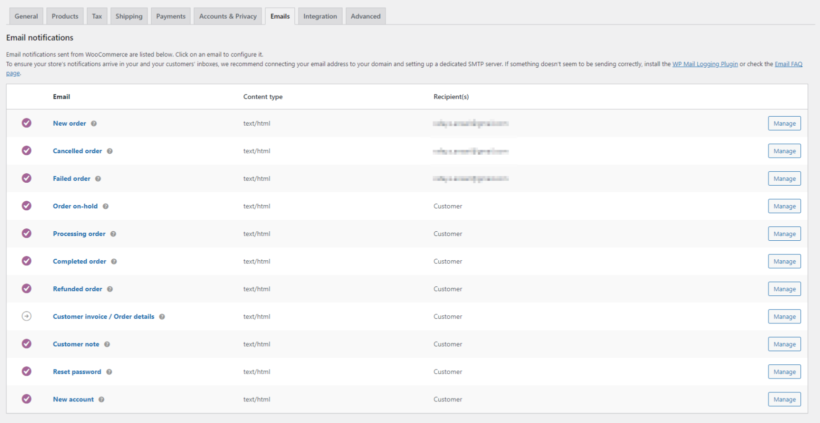
As we have seen, WooCommerce out of the box lets you set up and customize email notifications for your online store. These include emails for new orders, canceled orders, failed orders, refunds, processing orders, completed orders, and more.
Here’s a quick tutorial describing how to configure the standard WooCommerce email settings:
Install the WooCommerce plugin on your WordPress site.
Navigate to WooCommerce → Settings → Emails tab from the WordPress admin panel.
Click on the Manage button next to the email you want to edit and enter the recipient address.
You can also customize Email sender options to customize to sender information and the Email template. Email sender options include “From” name and “From“ address.
Click on the Save changes button to continue.
This is a pretty bare-bones email notifications system. Thankfully, there are lots of other ways you can improve your WooCommerce email and send advanced notifications.
What are WooCommerce email customizer plugins and why should you use them?
A WooCommerce email customizer plugin is a great way to make your email notifications more sophisticated. These plugins allow you to customize your emails in different ways - for example, to add additional email recipients to your customer order emails. This is useful especially if you have a team or you want to share the order details (like the order number, status, contents, or shipping class) with someone else.
However, with so many options available, it’s important to choose the right WooCommerce email customizer plugin. Let’s go over some of the best options available for WordPress websites:
1. WooCommerce Multiple Email Recipients
WooCommerce Multiple Email Recipients offers an all-in-one solution for managing and customizing email notifications for your online store. This means that you don’t have to worry about manually forwarding WooCommerce order emails to customers on time or suppliers. Instead, the plugin does all the work for you.
The WooCommerce Multiple Email Recipients plugin also lets you control and customize the recipients for all email notifications in your store. You can:
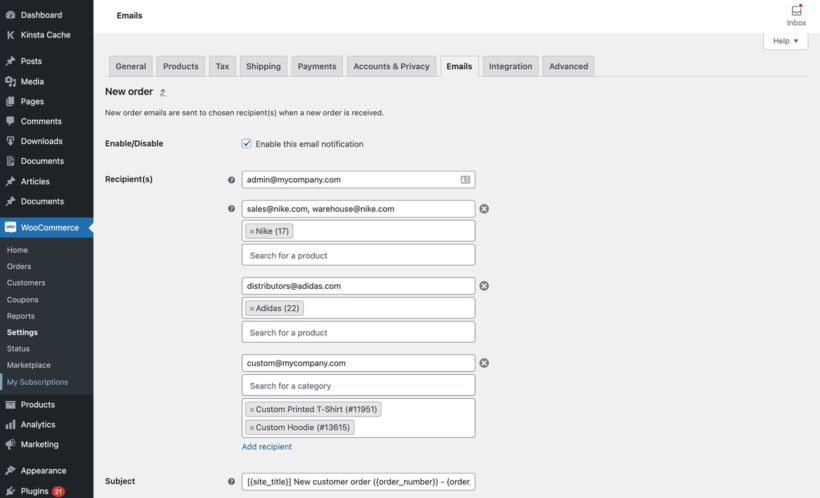
Store multiple email addresses per customerYou can select which email addresses of a specific customer you want to send notifications to as soon as they order from your WooCommerce site. You can also control the number of additional email recipient fields and display them on the account or checkout page – no need to set up a separate contact form. This helps you offer a more personalized shopping experience that’s unique to your brand. You can then send your WooCommerce emails to multiple recipients.
Include contacts such as the fulfillment center or the dropshipper in your list of email recipients. By sending new order notifications to the correct contacts automatically, they can ship the order with no manual input from you. WooCommerce Multiple Email Recipients lets you do this either globally or on a per-product or per-category basis.
The best part about the WooCommerce Multiple Email Recipients plugin is that it lets you choose which notification emails to send to the additional recipients. This is a great way to ensure that email notifications are automatically sent to the correct person, store, or supplier.
The WooCommerce Multiple Email Recipients plugin is also incredibly easy to configure and get started with. Here are step-by-step instructions explaining what you need to do:
A: Install and activate the WooCommerce Multiple Email Recipients plugin
Get the WooCommerce Multiple Email Recipients plugin and install it on your WooCommerce site. Once that’s done, navigate to WooCommerce → Settings → Products and click on the Multiple email recipients link.
Enter your license key and click on the Check button to validate it.
B: Configure plugin settings
You can set the number of customer email addresses allowed per customer using the text field next to Customer email addresses and enter the labels using the text fields below.
Click on the Save changes button to continue.
To add the additional emails per customer, simply navigate to the user edit page and add email addresses to the text fields. The plugin also adds the fields to the account page and checkout page where customers can enter multiple email addresses themselves.
You can also choose which emails to send to the additional customer addresses. To do this, navigate to WooCommerce → Settings → Emails and select the email you want to add extra recipients to. You can enable the extra recipients for the built-in customer emails, plus emails added by third party plugins. This includes emails created by WooCommerce Wholesale Pro, WooCommerce Subscriptions, WooCommerce Memberships, AutomateWoo, etc.
This will give you a more detailed customizer page, compared to the default one:
C: Edit WooCommerce email templates
So far, we have learned how to send WooCommerce email notifications to multiple customer addresses. Next, we'll learn how to add extra recipients to the admin emails which notify you of new orders received.
Like before, navigate to WooCommerce → Settings → Emails and select the email you want to add extra recipients to. However, this time select an admin email rather than a customer email:
You can set up multiple email recipients and send advanced notifications to specific recipients based on the product or category of the new order.
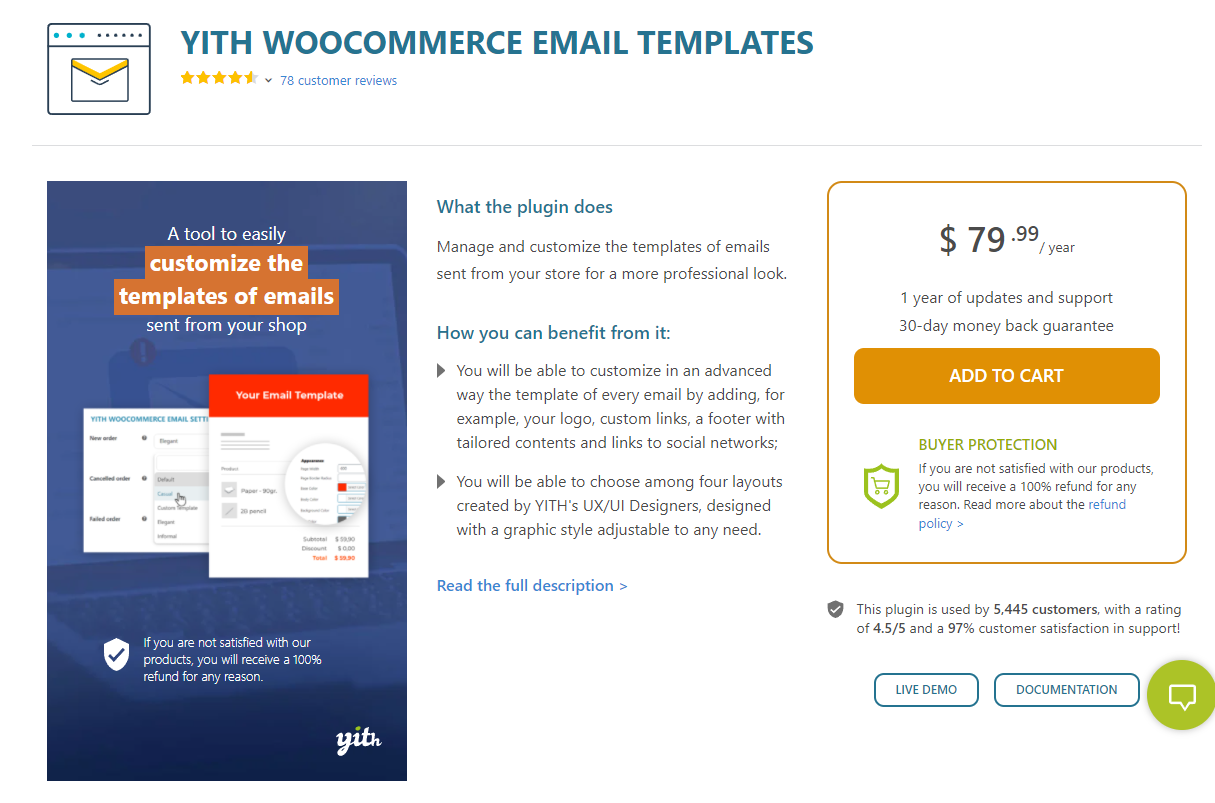
2. YITH WooCommerce Email Templates
YITH WooCommerce Email Templates is designed to customize the default emails in WooCommerce and give them a more professional look and feel. It works for both HTML and plain text email types. For example, you can add your store’s logo to the email header.
The plugin lets you style all default WooCommerce emails and gives you full control over how emails look to customers. You can start from four attractive pre-designed layouts including Default, Informal, Elegant, and Casual. In addition to this, you can also assign different templates for each kind of email and preview the template before finalizing it. It’s also a good idea to send a test email to a team member to make sure it looks fine in the inbox.
To sum it up, YITH WooCommerce Email Templates is a great plugin for changing the design of the built-in WooCommerce emails. The best part is that it’s fully compatible with the WooCommerce Multiple Email Recipients plugin by Barn2. This way, you can customize emails and add multiple email recipients for your emails using WooCommerce Multiple Email Recipients.
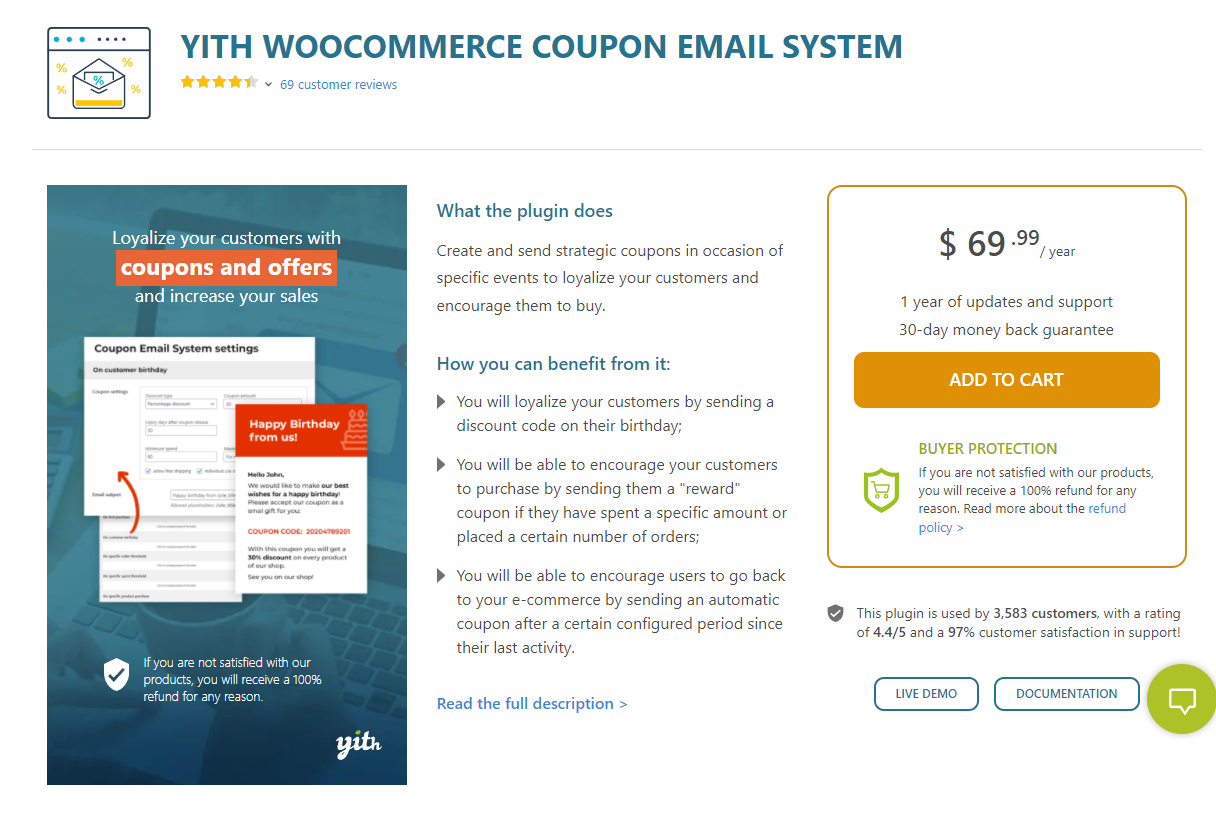
3. YITH WooCommerce Coupon Email System
The YITH WooCommerce Coupon Email System plugin lets you create custom WooCommerce coupons and send them directly to customers based on specific events. For instance, you can send a discount coupon if the customer exceeds a certain amount of new orders for a month or send a discount code to customers on their birthday.
This is a great way to build a loyal customer base and encourage them to make purchases from your store. Using the plugin, you can also send coupons to your customers after their first purchase, send coupons to newly registered users, or when users purchase a specific product from your store and let users redeem coupons on the checkout page of your WooCommerce site.
4. AutomateWoo
AutomateWoo is a WordPress plugin designed to automate your WooCommerce store management. Among its many features is powerful automation of your email notifications. You can use it to automate your WooCommerce email notifications to customers.
It's particularly useful for sending different emails to customers based on which products or categories they ordered. For example, if you have a WordPress membership site then you might want to send a 'Welcome' email when customers buy your 'Membership' product. Alternatively, you might want to send a set up follow-up emails to onboard new customers after buying your highest value product. Each email can contain instructions to the relevant product, targeted upsells to other related products they might be interested in, or anything else you want to say.
5. Mailchimp & MailOptin
Mailchimp is an all-in-one email marketing platform that offers one of the best solutions for creating and managing email marketing campaigns for your business.
You can use the MailOptin plugin to integrate Mailchimp email marketing campaigns onto your WooCommerce site. This way, Mailchimp works as an SMTP plugin for WooCommerce. It also lets you display opt-in forms anywhere on your website based on customer behavior and send automated emails based on events triggered by customers on your WooCommerce store.
The best part is that you won’t have to find a separate SMTP plugin for your e-commerce store.
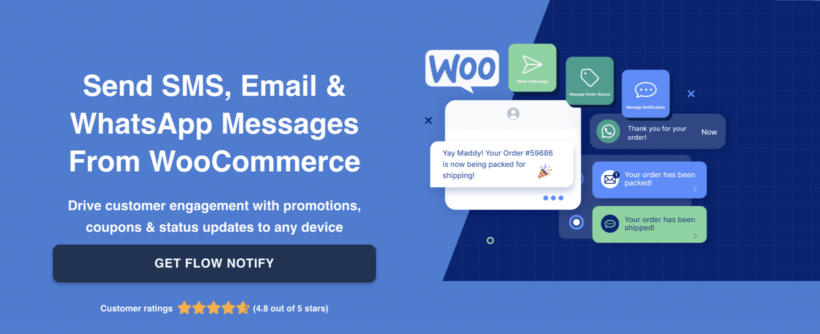
6. Flow Notify
Flow Notify is a powerful email notification plugin tailored for WooCommerce stores. As ecommerce platforms are shifting towards more user-centric approaches, Flow Notify prioritizes giving store owners the flexibility to create personalized email notifications that resonate with their audience.
One of the significant advantages of using Flow Notify is its intuitive drag-and-drop editor. It offers store owners the freedom to design emails that align with their brand's aesthetics without any coding necessary. Whether it's incorporating brand colors, custom images, or tailored content, the possibilities with Flow Notify are vast.
Beyond aesthetics, Flow Notify integrates seamlessly with WooCommerce, ensuring all transactional emails, from order confirmations to shipping alerts, are sent promptly and accurately. Moreover, the plugin provides valuable insights, tracking open rates, click-through rates, and other essential metrics to continuously optimize email performance. If you're aiming for an enhanced email notification experience that matches your brand's identity and provides actionable analytics, Flow Notify for WooCommerce is an excellent choice.
Tips to ensure your emails are always top-notch
Once you have all the plugins you need to automate your email marketing campaigns and manage email notifications better, all that’s left is to create your emails!
Let’s go over a few tips to ensure your emails are always up and running and are sending correctly. By following these tips, you can avoid the most common problems store owners run into with emails.
6 quick tips to send better WooCommerce emails
Send a test email. You always want to make sure your emails are delivered to the recipient. A great way to do this is by sending your team members a dummy or test order confirmation email. After that, they can confirm that the emails are being delivered properly and as intended.
Make sure emails are landing in the inbox. You also want to take note if your emails are landing in the inbox and not in the spam folder due to spam filters. This will prevent email providers from accidentally misplacing any emails from your WooCommerce store and ensure the recipient receives the email. In addition to this, you can also use an email with a different domain as your recipient address to ensure there’s no problem in sending the emails.
Test out payment gateways. Another important thing to check is the payment gateway functionality of your WooCommerce site. However, you need to make sure the payment gateways are working perfectly and your website supports them.
Enable transactional emails. It's important to enable transactional emails in WooCommerce. This will prevent emails from generating after a WooCommerce order is created on your store.
Purge your email list. Purge your email list regularly and only send emails to leads and customers that are interested. This also saves you time in chasing leads that are not actually interested in purchasing your product.
Make sure emails aren’t being blocked. Best practices suggest you should make sure your WordPress web host (hosting provider), plugins, or email servers are not blocking emails from being sent from your WooCommerce site.
Troubleshooting WooCommerce email setup problems
The most common problems come from your WooCommerce email setup. WordPress itself isn't great at sending emails. That's because it's a website platform rather than a platform for sending emails. Sure, it can send emails using the built-in PHP Mail function. However, this isn't ideal because it's not optimized for deliverability.
If you find that your emails aren't sending, then there are several steps you can take to troubleshoot this.
The first step is to improve your WooCommerce email setup by sending the emails through your actual email account rather than PHP Mail. With PHP Mail, WordPress is basically pretending that it's sending the emails from your address. However, the emails are actually coming directly from your WordPress site and not through your email account. Naturally, this makes them look less trustworthy and makes them more likely to get spammed.
It can be hard to tell whether an email has been spammed. Of course, the intended recipient can check their spam folder. However, that won't contain any emails which were spammed at the server level and never reached your mailbox.
To improve deliverability, you should use a third party email service like MailOptin, Mailgun, or a free plugin like WP Mail SMTP. Any of these will route your WordPress emails through your actual email address, making them much more deliverable.
Once you have improved your WooCommerce email setup in this way, re-test that the emails are sending reliable. If not, then it's time to troubleshoot further. For example, HubSpot have provided a useful guide on how to fix WordPress emails not sending.
Perfect your WooCommerce email notifications
Setting up and managing WooCommerce email notifications is essential if you’re looking to engage buyers and convert them into brand-loyal customers.
WooCommerce Multiple Email Recipients is the perfect plugin for sending email notifications to multiple people. It lets you add multiple recipient emails per customer and gives you the functionality to customize the default WooCommerce emails.
Ready to easily start setting up and managing WooCommerce email notifications on your WooCommerce site? Get WooCommerce Multiple Email Recipients today!
Are you manually managing products in your WooCommerce inventory? If so, then you’ll benefit from having a solid WooCommerce inventory management system. This will make it easier for you to manage your store in real-time, allowing you to manage your business much more efficiently.
The truth is that having a solid inventory management system can save you a lot of time and energy. This energy can then can be redirected to other areas of your business. As an ecommerce store owner, that should be music to your ears ☺️
In this article, I'll reveal the best WooCommerce inventory management plugins which can significantly improve your operations. This isn't a simple roundup post - instead, I'll share tools that transform different areas of inventory management, including:
Bulk edit tools for quickly updating product data and stock levels.
Tools to displaying more helpful inventory updates and stock information to customers.
And more!
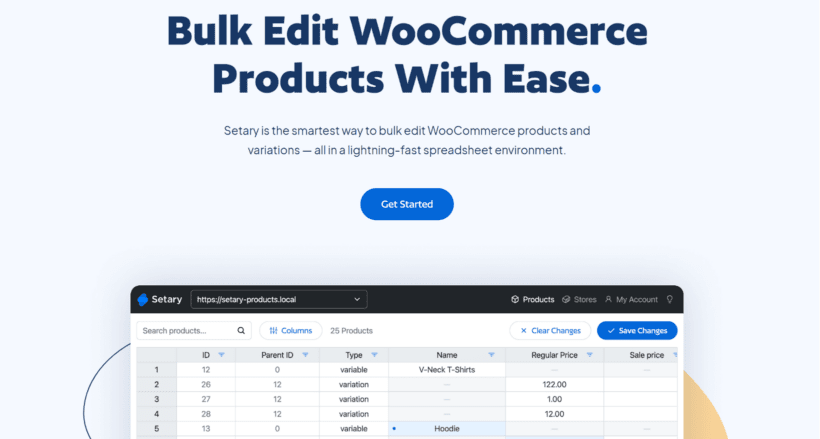
Short of time? Jump straight to our top recommendation for WooCommerce inventory management - the Setary bulk edit app.
Why do you need better inventory management?
If you’re handling your current inventory within the standard WooCommerce out-of-the-box package, you might run into some limitations. With the right WooCommerce inventory management system in place, you’ll gain some of the following benefits.
Save time spent on repetitive tasks
With a WooCommerce inventory management system, you can easily edit in bulk. This will shave hours off having to make changes and edit thousands of products manually.
You’ll be able to change your product’s prices (plus its variations), update stock levels, and add discounts in just a few clicks. Save yourself the repetitiveness and the countless product page visits!
Improved shopping experience
With a complete inventory management system, you can give your customers visibility of their favorite product’s stock status. They’ll have an easier time making a purchasing decision when they know exactly when their product will land at their front door. You’ll take the guesswork away and reduce their need to contact you for more information.
Reduced losses from bad inventory control
If you’re managing your inventory manually, you have a higher chance of making mistakes. A single mistake can snowball and create a huge dilemma for your store. If a stock level wasn’t set properly, it might take you hours to fix on top of it being a costly mistake.
Forecast and regulate inventory requirements
With an inventory management system, you can easily forecast your stock level so that you know exactly when you need to contact your vendors to make orders. You’ll have a better handle on your inventory requirements and foresee any challenges coming ahead of time.
How WooCommerce inventory management works by default
Before reaching for a plugin, it's worth understanding what WooCommerce can do out of the box. The native settings cover most basics; plugins are about doing those basics faster (bulk editing) or extending them in specific ways (lead times, low-stock alerts, multi-warehouse).
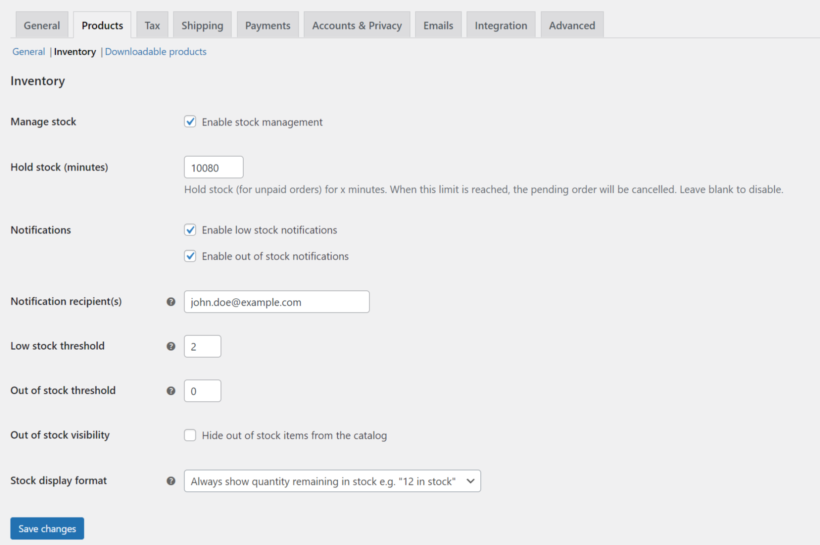
From your WordPress dashboard, go to WooCommerce → Settings → Products → Inventory to see the default settings:
The site-wide settings let you:
Enable or disable stock management altogether.
Set the low stock and out-of-stock thresholds.
Configure low-stock and out-of-stock email notifications.
Once site-wide settings are in place, inventory works slightly differently for each WooCommerce product type. The sections below cover the differences.
Managing inventory for simple products
A simple product is the most common type: one SKU, one stock level. Open the product in Products → All Products, scroll to the Product data box, and click the Inventory tab.
Tick "Track stock quantity for this product" and enter a number in the Stock quantity field. WooCommerce decrements this number automatically as customers buy and increments it when refunds process. Set the Stock status manually if you want to override what the quantity implies, and use the Low stock threshold to override the site-wide setting for this product specifically.
For products you sell without tracking exact units, leave stock management off and just toggle In stock / Out of stock as needed. This is the right choice for digital downloads, services, or anything where running out isn't a meaningful concern.
Managing inventory for variable products
Variable products (a T-shirt in three sizes and four colours, for example) track stock at the variation level rather than the parent product. Each variation has its own SKU and its own stock count.
Open the product, go to the Variations tab in the Product data box, expand each variation, and tick "Manage stock?" inside it. Enter the stock quantity for that specific size/colour combination. Repeat for every variation.
This is where the default WooCommerce experience starts to get tedious: a product with 12 variations means 12 separate stock fields to maintain. The bulk-edit options in the Variations tab cover some of this (you can set stock status for all variations at once), but for true bulk editing across many products, a plugin like Setary is faster.
Managing inventory for grouped products
Grouped products bundle several simple products under one parent listing, but stock is still tracked on each child product individually. The grouped parent itself has no stock count.
When a customer buys a grouped product, WooCommerce decrements the stock of each child product the customer added to the cart. The parent grouped product is treated as a category-style listing, not a SKU with its own inventory. If all the children go out of stock, the grouped parent stops accepting orders automatically.
Managing inventory for external and downloadable products
External (affiliate) products link out to another seller and don't track stock on your store at all. The Inventory tab is hidden for this product type because the inventory lives elsewhere.
Downloadable products (digital files, software) usually don't need stock management either. Leave the "Track stock quantity" tick-box unticked and the file remains available to every paying customer. If you want to limit the number of downloads per purchase or per customer, use the Limit downloads to and Download expiry fields on the General tab instead.
Bulk editing stock for many products
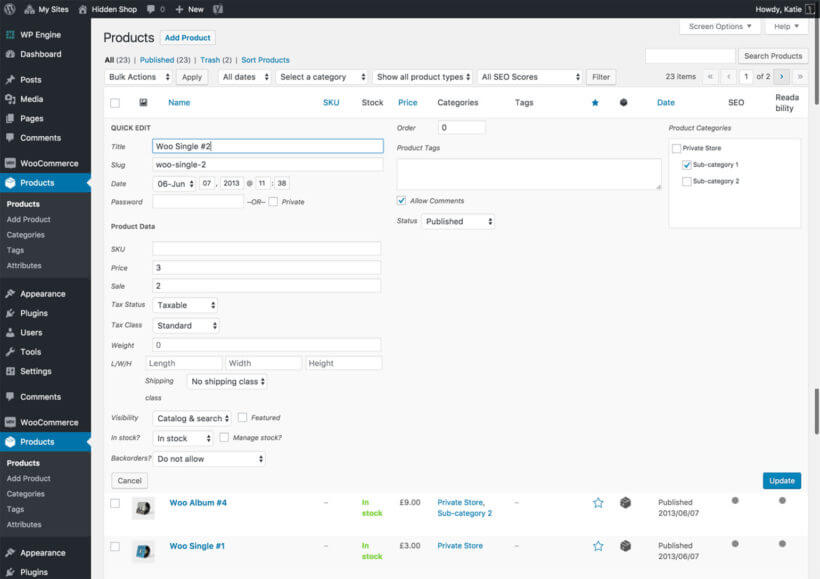
For changes that span more than a few products, the default Quick Edit (under Products → All Products, hover row, click Quick Edit) handles basic stock updates. Tick the box, enter a quantity, save. It's faster than opening each product, but still one row at a time.
The Bulk actions dropdown above the product list lets you change stock status (In stock / Out of stock) for many products at once, but it doesn't update the actual quantity. For real bulk stock-quantity edits across hundreds of products, a dedicated bulk-edit plugin is the only practical option (covered in the next section).
Gaps in the default WooCommerce inventory features
A few things WooCommerce doesn't do natively:
True bulk editing of stock quantities across products and variations.
Lead times displayed on the product page for back-ordered items.
Per-product low-stock thresholds tracked centrally (the per-product override exists, but there's no dashboard view of which products are below threshold).
Multi-warehouse or multi-location inventory tracking.
If any of these gaps matter for your store, the plugins below close them.
Which are the top WooCommerce inventory management plugins (and which is best)?
As with any other plugin, there are countless options out there on the market. How do you know which one is the best fit for your WooCommerce inventory needs? Keep reading to find out!
I'm going to make 2 recommendations for the best inventory management plugins. That's because they each serve a completely different purpose. After that, I'll reveal some alternate options which are also worth considering.
Setary (recommended for bulk inventory management)
If you're looking for a quick way to update your inventory in bulk, then Setary is the perfect solution. This bulk product editor provides everything you need to update literally any type of product data from a central interface. There's no need to visit multiple screens, and it can save you a huge amount of time.
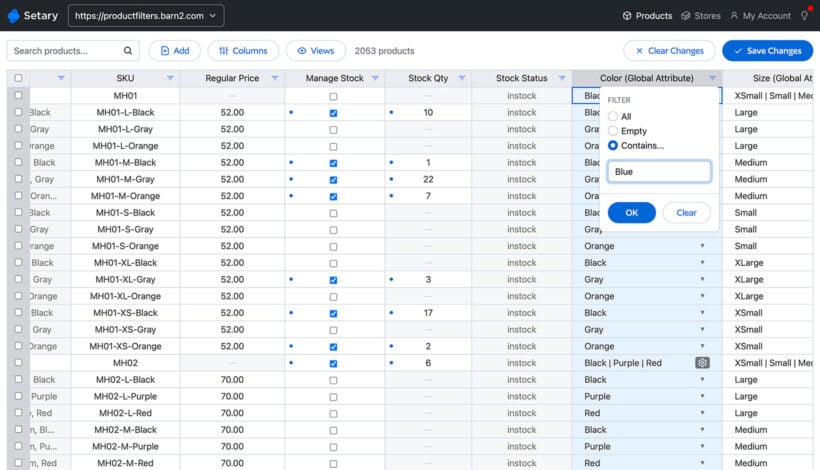
Choose which columns of product data to display in the spreadsheet. Includes product attributes, images, stock, categories, tags, and much more.
Edit any type of product data, including custom data added by plugins like ACF, custom fields or taxonomies.
Easily make stock updates, either by changing the stock status or entering the exact stock level.
Make inline changes directly in the spreadsheet, or select multiple products and apply bulk actions.
Quickly find the inventory you wish to edit by using the search box and advanced features.
Pre-save your favorite filter combinations to save time in future.
Works with all product types, including entire products and individual variations.
Add new products/variations by adding rows to the spreadsheet, or import them from CSV.
Manage inventory across multiple stores (either separate WooCommerce websites or WordPress multisites).
And as an added bonus, you can even use AI to improve your product descriptions 🪄
Unlike other bulk inventory management plugins, Setary is a hosted app which works outside of your WordPress site. That's great because you can manage your inventory in bulk without weighing down your site.
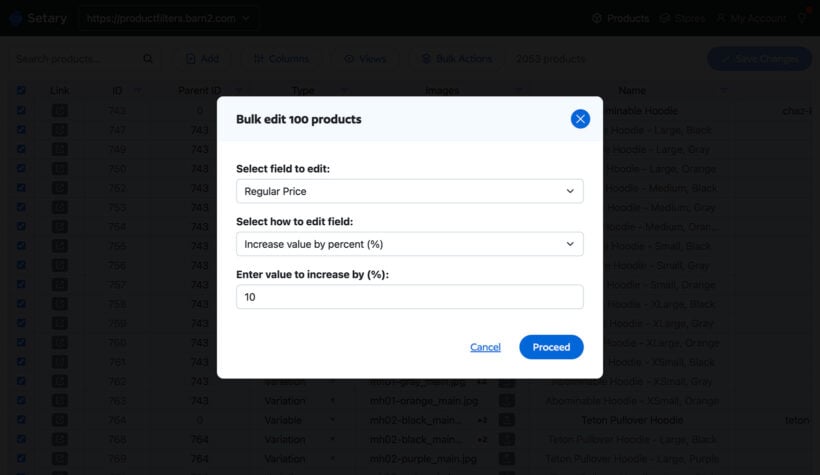
How to bulk edit your inventory with Setary
It only takes a couple of minutes to set up Setary. Once you've done that, you can access its bulk WooCommerce inventory management tool at any time to make quick changes to stock levels, product data, and more:
On the next screen, you'll be promoted to install the Setary helper plugin on your WordPress site.
Afterwards, return to the Setary website. Follow the instructions to enter your URL and link your store.
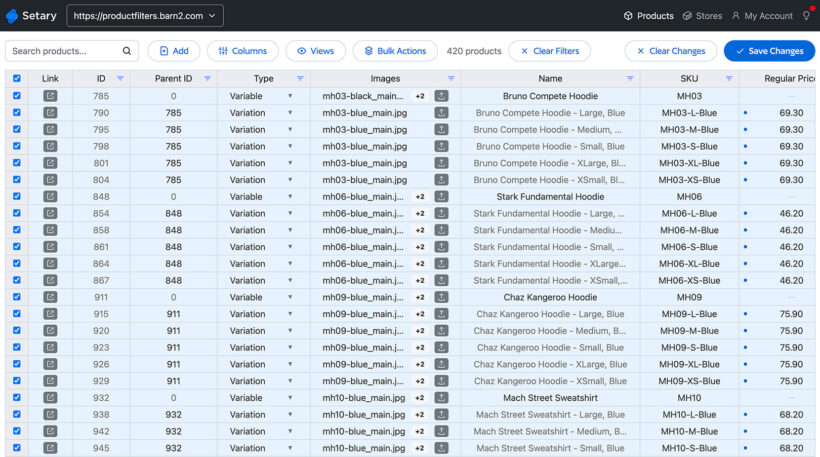
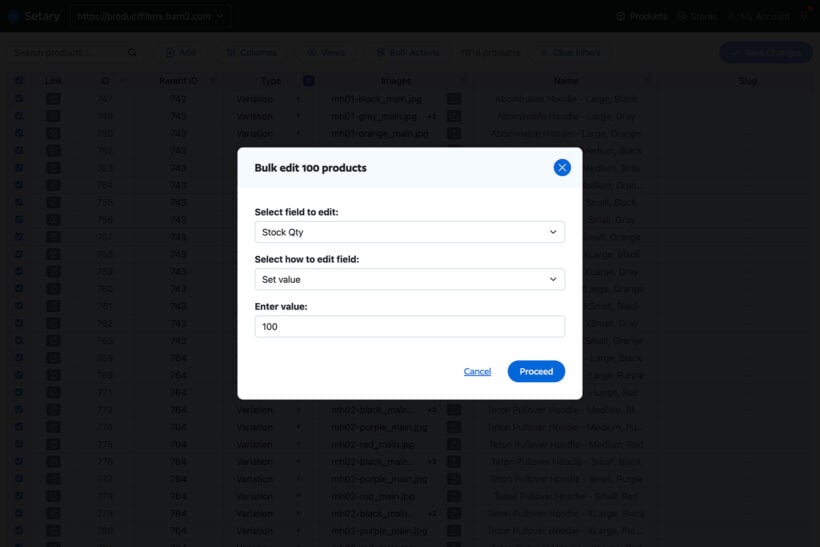
You'll see your WooCommerce store's inventory displayed in Setary's spreadsheet editor. Use the various options above the spreadsheet to show and hide columns, filter specific products, and make inline changes.
To bulk edit inventory items, select all the products/variations you want to update and then use the 'Bulk actions' Button.
After making changes to your WooCommerce inventory, you'll see them previewed in the spreadsheet. Check everything i correct and then click 'Save Changes' to apply them to your live site's inventory.
If you need a bulk editor for WooCommerce then there's no need to look any further than Setary. However, keep reading if you also want an easy way to display better information about inventory levels on your store's front end:
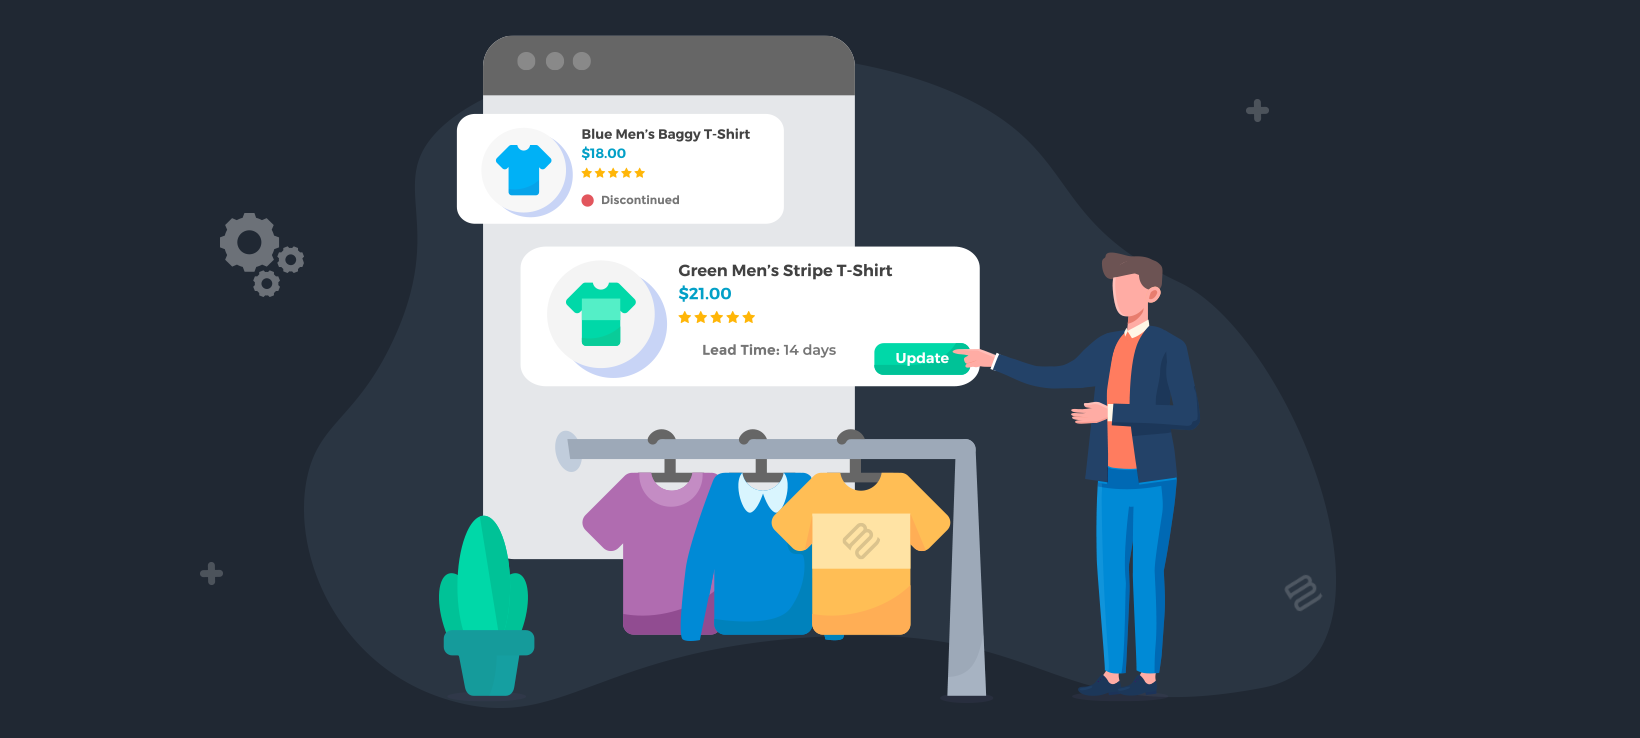
WooCommerce Lead Time (recommended for displaying inventory status updates on the front end)
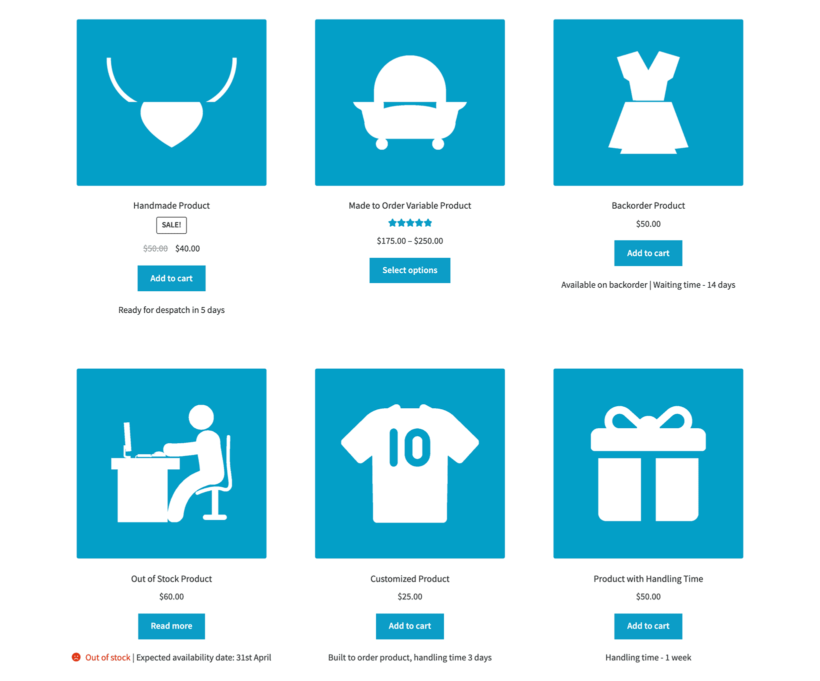
There’s nothing more important to a customer than knowing exactly when to expect delivery. Having a clear indication of that on your product page might be the deciding factor for their purchase.
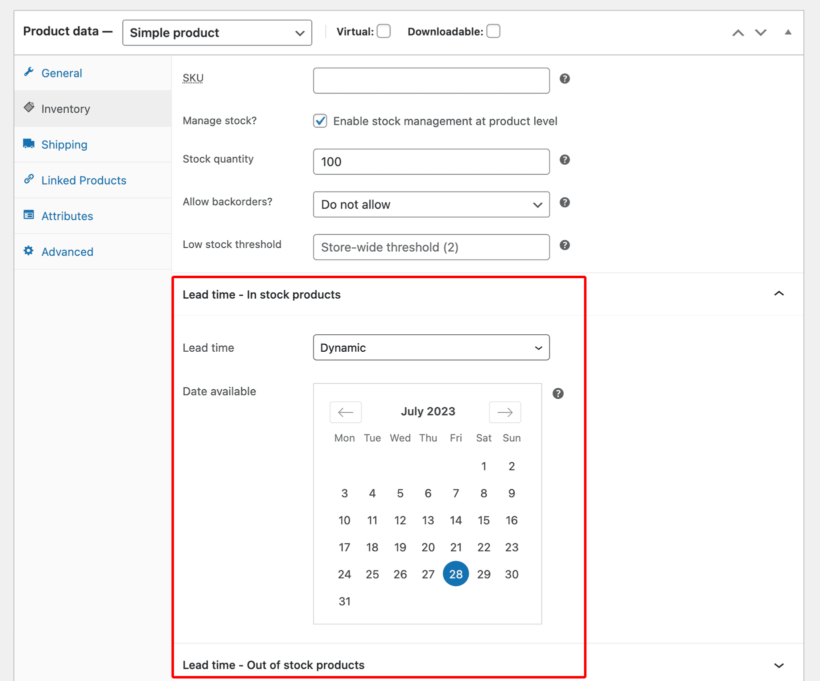
The WooCommerce Lead Time plugin is the only plugin that allows you to easily display the lead time for a product so that your customers know when it will ship.
Display the stock status and lead time for all your products globally, or set lead times at the category/product level.
Choose whether to show the lead time for in-stock, out-of-stock, and/or back-ordered items.
Display status lead times (e.g. "10 days handling time") 0r the exact time until stock arrives.
WooCommerce Lead Time is perfect for the following scenarios
Custom, made-to-order products
If you sell made-to-order, custom, or handmade products, then it’s useful for your customers to know exactly how long it will be until their product is ready. They might click away from your store for another alternative if they see an out-of-stock sign, as that would be the default option with your standard WooCommerce inventory options.
Show them the lead time on product, checkout, and category pages. You can set the processing time globally or at the product/variation/category level for a more specific target. You also don’t have to use the words “Lead Time” as you can customize to your business’s needs.
Non-stock products
If you have products that are non-stock items because you don’t keep track of their quantities, then you can skip setting the quantity level but still have them show up as available in the store for customers to purchase.
Out-of-stock products
For out-of-stock products, you’ll be able to display a message immediately when your product sells out. You can arrange for a separate lead time option for products that are in-stock, out-of-stock, or back-ordered as they all have different requirements.
To provide your customers with the best possible experience, let’s set up your WooCommerce inventory management system.
How to use WooCommerce Lead Time to provide better inventory information to customers
Get the plugin from the Barn2 website and then download the files to your computer.
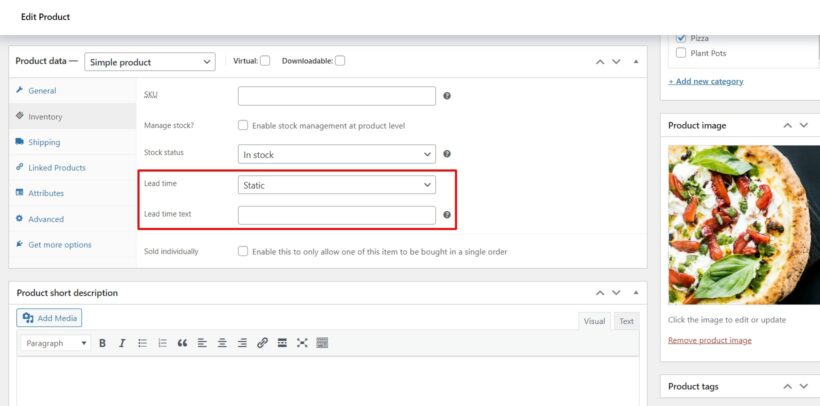
Go to your WordPress Dashboard → Plugins → Add New → Upload Plugin, and install and activate the plugin.
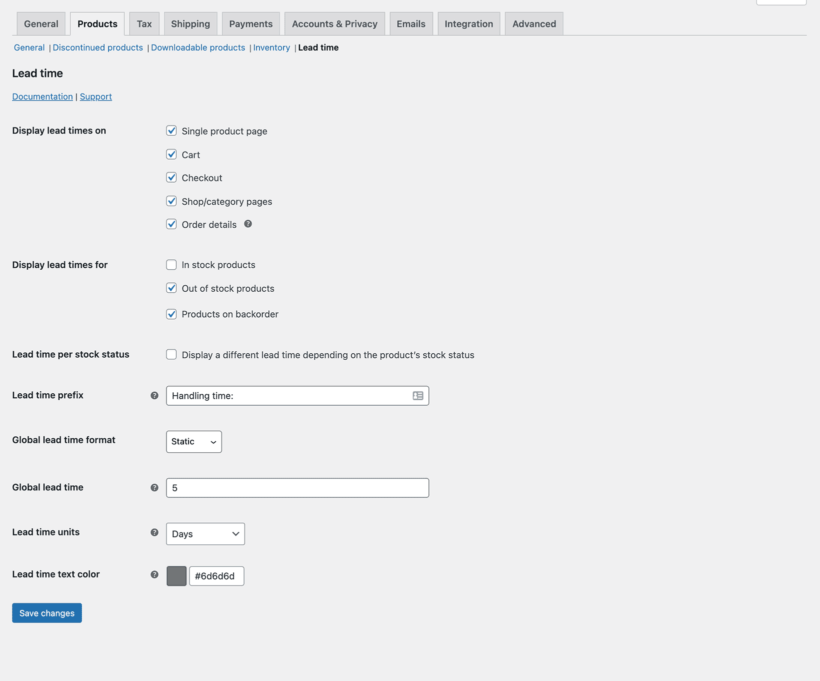
Enter your license key and choose your main settings in the plugin setup wizard. As part of this, you need to decide where to display your lead times. The options are:
Single product page
Cart
Checkout
Order details
Use the ‘Lead time prefix’ field to add the text which will appear in front of the lead time on product pages. For example, this might be "Waiting time" or "Handling time".
You can either show the same lead time for all stock statuses, or add different lead times for the following stock statuses:
In-stock products
Out-of-stock products
Product on backorder
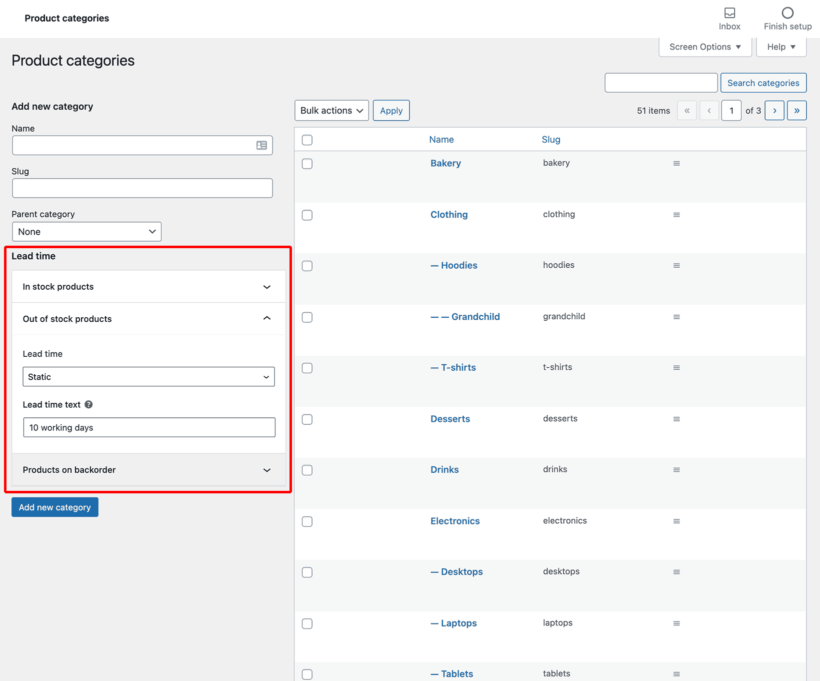
If you want to have the same lead time shown on all your product pages, then you can set that up here in the global lead time field in the setup wizard. If you want to set the lead time for each individual product/category/variation, then you can leave the global lead time field blank.
To set a different lead time per product/category/variation, enter it on the Edit Category or Edit Product screen.
Lead time format
The WooCommerce Lead Time plugin lets you display 2 types of lead time:
Dynamic lead timeUse this for out of stock products where you want to display the exact number of days until the product becomes available again. Use the calendar to select the date. Customers will see the number of days or weeks until they can expect the product.
Static lead timeUse this to display the lead time as fixed text, such as "Handling time: 7 days".
Other WooCommerce inventory management plugins worth considering
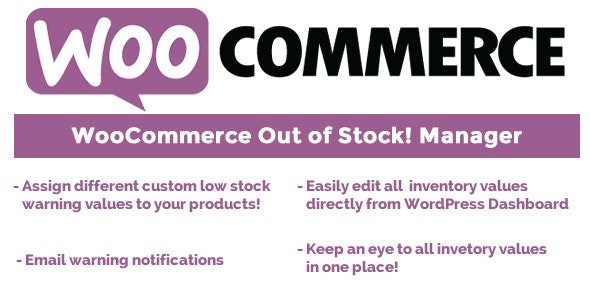
WooCommerce Out of Stock! Manager
WooCommerce Out of Stock! Manager will let you add threshold rules for your stock levels, with additional custom warnings so you’re alerted when a certain product stock falls below your assigned threshold. If you have a team managing the store, you can add them to be alerted of the warning.
Here are some of its other features:
First glance dashboard for better inventory overview and management.
Compatible with WPML.
Ability to customize the text on out-of-stock product pages.
Email notifications when your stock level is low.
Price: $16
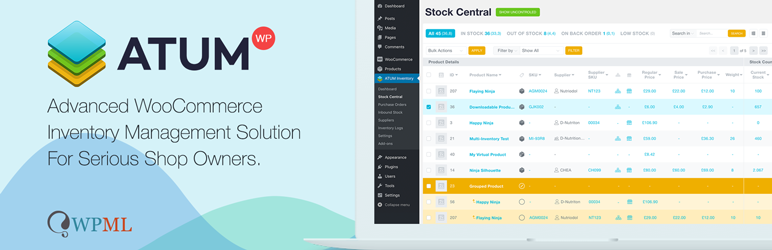
ATUM
ATUM is a free inventory management plugin that provides you with all the information you need at first glance to make decisions. It comes with an integrated dashboard so you can see the number of products you have in store, their prices, and so much more. You’ll have full control of your WooCommerce inventory which you can manage directly from the dashboard.
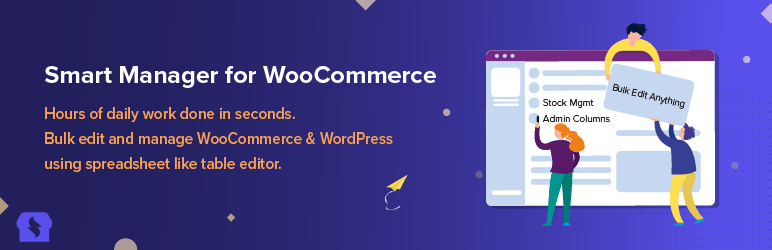
The Smart Manager plugin for WooCommerce is an inventory management plugin that lets you edit your products, orders, variations, and coupons in bulk with just one click. You can also control your online store’s stock level in an easy-to-use spreadsheet-like system for a more seamless and efficient process.
The pro version of this plugin gives you the additional functionality of batch updating, duplication of records, and the ability to edit multiple inline records in one click.
Here are some of its other features:
Advanced search capability.
Preview your images.
Sticky header for data management.
Export all your posts in CSV format.
Infinite scrolling.
Pricing: Free Version (Pro $149/yr)
Frequently asked questions about WooCommerce inventory management
Can I track stock at the variation level in WooCommerce?
Yes. WooCommerce supports variation-level stock natively. Open the variable product, go to the Variations tab in the Product data box, expand each variation, tick "Manage stock?" and set a quantity. Each variation then decrements independently as orders come in.
How do I hide out-of-stock products in WooCommerce?
Go to WooCommerce → Settings → Products → Inventory and tick "Hide out of stock items from the catalog". Out-of-stock products are removed from shop pages, category archives and search results automatically. They remain accessible via direct URL so back-in-stock notifications can still link to them.
How do I get low-stock notifications in WooCommerce?
Set the low-stock threshold under WooCommerce → Settings → Products → Inventory, then enter the email address for notifications in the same panel. WooCommerce sends an email when a product's stock drops to or below the threshold. For more granular alerts (per-product thresholds, Slack notifications, daily digest), the WooCommerce Out of Stock! Manager plugin covered above adds richer options.
Can WooCommerce handle multi-warehouse inventory?
Not natively. The default settings track one stock count per product. For multi-warehouse, multi-location or per-store inventory, you need an extension like ATUM or the official WooCommerce Multilocation Inventory Management plugin from the WooCommerce marketplace.
What's the difference between stock status and stock quantity?
Stock status is the In stock / Out of stock / On backorder flag that controls whether the product can be purchased. Stock quantity is the numeric count of units available. If you tick "Manage stock?" the status updates automatically based on the quantity; if you don't, you set the status manually.
An easy way to manage your WooCommerce inventory
Having the right WooCommerce inventory management system will save you a lot of time down the line and make your life easier as an online store owner. These are the best 2 plugins to streamline your inventory management:
Best for bulk inventory management - The Setary bulk editing app will save you time in managing your inventory from a central interface.
Best for displaying inventory updates on the front end - The WooCommerce Lead Time plugin is perfect for displaying clear information on your product pages about how long customers will be waiting to receive the product.
For best results, use Setary with WooCommerce Lead Time in order to make quick inventory updates in the back end, while displaying clear information to customers in the front end 🚀
If you’re looking to add a product builder to your online store, it simply can’t be done with WooCommerce as it comes. But if you want to allow customers to build custom products without having to add a huge number of variations, you can achieve this by installing the right plugin.
By the end of this article, you’ll know exactly how to add a product builder to WooCommerce. This will allow customers to build products using a simple and flexible interface.
But before we get into the detail, let’s consider why having a product builder is a must-have feature for your store. After that, I'll show you how to create a WooCommerce customizable product builder with the best plugin on the market:
Why you might want to use a product builder in WooCommerce
Imagine this: You sell shoes in WooCommerce. A customer lands on your product page and is excited about the shoe in front of them. They love the sneaker design, the material, and the price. Great! Except, the shoe laces are not in the color they like.
They’re struggling with the purchase because they know this color doesn’t particularly suit them or their personal preferences, but they can’t see other colors available (although you have more!). Without a proper product builder in your WooCommerce store, you might lose this potential customer.
If you fit into any of these categories then you’ll benefit from a product builder plugin
You sell build-your-own products
If you sell fully configurable products then you need a way to allow customers to configure them to their specifications. A custom built computer is an excellent example of this, as in the screenshot above.
Customers can make a range of technical decisions to build the computer step-by-step. They can select components, view the final price, and order online. That's much more efficient then making them phone you and order manually!
When a product has this many options, you don't have to show them all at once. You can split them into a step-by-step sequence, tabs, or a popup so customers work through the choices without facing one long form.
Customizable clothing or accessories
Let’s use a custom printed hoodie as an example of a customizable product. Lots of stores now sell personalized clothing, where customers can upload a file and configure the look of the product. With a product builder plugin, your customer will be able to seamlessly upload and preview their custom t-shirt or hoodie.
You sell customizable furniture
If you’re in the furniture business, you might want to offer your customers different fabric colors or leg combinations. If this is the case, you’ll likely want a visible representation of the final selected product rather than having them click through back and forth from dropdown selections.
You sell sports equipment
The tennis player that comes to your store to purchase a racket will want the ability to modify their grip and head size, as well as the racket’s weight, depending upon their level. You don’t want them leaving the product page to go search for these attributes on a separate screen.
If your products are configurable then you’ll need a WooCommerce product builder plugin to help you take your store to the next level.
Can't I just create a product builder using product variations?
Yes! You can do most of what I described above using product variations. However, the problem with variations is that each option will be displayed in a dropdown list. To purchase product variations, customers must select their chosen combination from a series of dropdowns. That's not a very visual way to configure a product, and won't present your site as very innovative or professional. It's also time-consuming for the customer compared to quickly ticking boxes for their required options, or clicking on images.
If you're using variable products then it's best to use it with a WooCommerce product builder plugin so that you can display the variations in more interactive ways.
Even so, sometimes you may want to create options directly in the product builder plugin instead of using variations. That's because:
It's time-consuming to create a variation for every possible combinationImagine that you're selling a tennis racket which has 3 grip settings, 5 head sizes and 4 weight options. To set this up as a variable product, you'd need to create 60 variations - each with its own price, stock information, image, and so on. What a nightmare!
You can only select one variation at a timeThis is a fundamental limitation of WooCommerce product variations, even if you're displaying them using a product builder plugin. The customer must select 1 item from each attribute, with no multi-select option. If you need multi-select, then variations aren't suitable.
Keep reading to discover the best plugin to solve these problems - whether or not you're using product variations.
Which is the best WooCommerce product builder plugin?
The WooCommerce Product Options plugin is perfect for creating a custom product configurator. It works by letting you add a huge range of options to your products, which are infinitely flexible and easy to set up and manage.
For example, you can add checkboxes, radio buttons, clickable images, color swatches, text buttons, file upload fields, text fields and more. Given the variety of options available, customers will enjoy building the product to their exact specification.
You can either create them directly in the plugin, or display existing variations using the styles provided by WooCommerce Product Options.
If the WooCommerce product builder lets customers upload an image for personalization, then you can also let them display a live preview of the finished product.
You can add extra prices and fees for each option in the product configurator. This adjusts the price as the customer configures their products, creating a completely custom product just for them. Alternatively, you can create a custom price calculator for more complex pricing rules.
How to add a custom product builder to WooCommerce
To use WooCommerce Product Options to create an interactive product builder, you need to add a series of extra options to your products.
First, get the plugin and install it on your WordPress site.
Next, go to Products → Product Options.
Create an option group and select the product(s) that you want the product builder to appear on.
Now add your first option to the builder. Choose what you want it to look like (checkboxes, dropdpwn lists, clickable images, etc.). Configure it as needed, for example to add prices, minimum/maximum quantities, or conditional logic so that it only appears when the customer selects a different option.
Repeat step 4 to add as many options as you like to the WooCommerce product builder.
Save the option group.
Now view the product that you just added the configurator to. You'll see a highly visual product configurator on the product page. Customers can select options one by one to build their custom product.
A customizable backpack built using WooCommerce Product Options
Create your WooCommerce product builder today
That’s it! You’re now ready to allow customers to create their own products in your WooCommerce store.
The only plugin you'll need is WooCommerce Product Options, which adds a range of customizable options to the product page. It's perfect for adding a wide range of visually appealing options to create an interactive product builder.
Set it up today and add infinite flexibility to your store 🛠️🛒
Keeping your WooCommerce stock levels accurate is essential—but doing it manually can be a serious headache. If you're looking for a faster, more scalable way to manage inventory, you're in the right place.
Managing stock in a WooCommerce store can quickly become overwhelming—especially if you're dealing with a large catalog of products. The default WooCommerce interface only lets you update stock statuses and quantities one product at a time, which is time-consuming and inefficient at scale.
Fortunately, there are better ways to manage this process. In this article, we’ll explore the most efficient way to bulk edit stock statuses and stock levels using the powerful Setary app. You'll learn how Setary’s spreadsheet-style interface makes it fast and easy to update your inventory across hundreds or even thousands of products.
I’ll also show you how to enhance your store’s stock messaging using the WooCommerce Lead Time plugin. This lets you display accurate lead times based on each product’s stock status—so your customers always know when to expect their order.
By the end of this guide, you'll have a complete solution for managing your stock efficiently and communicating clearly with your customers.
Why managing stock in WooCommerce is difficult
WooCommerce provides basic stock management tools, but they quickly become inefficient when you're working with multiple products. If you’ve ever tried to update stock statuses or quantities for more than a handful of items, you’ve likely run into some frustrating limitations.
By default, WooCommerce requires you to open and edit each product individually. That means going into the product editor, scrolling to the inventory section, updating the stock level or status, saving, and repeating the process for every product.
There’s no easy way to:
Quickly scan and compare stock levels across your product catalog.
If you regularly update stock statuses or inventory levels in WooCommerce, then Setary is a game-changer. The Setary app connects to your WooCommerce store and provides a fast, spreadsheet interface for editing product data and stock information in bulk. It also lets you select products based on various criteria and instantly apply bulk actions to them. You can update stock for entire products, or manage stock at variation level.
As you can imagine, using Setary is much easier than manually updating stock levels for individual products or wrestling with CSV imports. Everything takes place on one screen ☺️
Using Setary for WooCommerce stock management
Setary is designed specifically for WooCommerce users who need more control and efficiency when managing stock. It allows you to:
Instantly view all your products with key details like stock status, stock quantity, SKU, category, and more.
Filter and sort by stock status, product type, category, or any other type of product data. This makes it perfect for identifying low-stock or out-of-stock items.
Edit stock quantities and statuses inline, just like using Excel or Google Sheets.
Make bulk changes across hundreds (or thousands) of products in seconds.
Sync changes directly to your WooCommerce store, with no need for manual imports or exports.
Enable team members or clients to update stock information without needing access to the WordPress Dashboard.
What types of stores can benefit from Setary?
Setary is ideal for any WooCommerce store that needs to update stock information for multiple products at once. For example, this includes:
Large product catalogs – Save hours of time by editing products in bulk rather than one by one.
Dropshipping and multi-supplier stores – Quickly adjust stock levels when suppliers provide updates.
Retailers during sales events – Make quick stock adjustments before or after busy periods like Black Friday or seasonal promotions.
Warehouse or inventory managers – Keep WooCommerce in sync with physical stock counts.
Whether you run a small shop or a large-scale store, Setary can streamline your workflows and reduce manual admin.
How to get started with Setary
Setting up Setary is simple and only takes a few minutes:
Connect your WooCommerce store by installing the free Setary plugin and authorizing access. The setup wizard will guide you through this.
Launch the Setary dashboard to see your product data laid out in a familiar spreadsheet-style format.
Start editing! Click any cell to change stock quantities, toggle stock status between “In stock”, “Out of stock”, or “On backorder”, and apply changes across multiple rows instantly.
Use filters and bulk actions to target specific products, categories, or conditions—for example, everything in a certain category that’s out of stock.
You can change the stock status for each product, enable/disable the "Manage stock" setting, or enter exact stock quantities for each product. There are also plenty of bulk options which you can apply to all of the selected products at once. These include setting an exact stock value, increasing/decreasing stock quantities by an amount or percentage, and so on:
All changes are synced back to WooCommerce in real time, so your store stays accurate and up to date 💪
How to display stock information for WooCommerce products
As you can see, Setary transforms what used to be a tedious, manual process into something fast, intuitive, and scalable. However, it doesn't change how stock information is displayed to customers on the front end of your website. Next, we’ll look at how to take your stock management even further by displaying accurate lead times based on stock status. We'll do this with the WooCommerce Lead Time plugin.
There are plenty of reasons why store managers need to show the WooCommerce stock status on the front end:
To increase urgency by displaying the exact stock level for products with low stock.
What stock information can WooCommerce display?
Before we talk about the WooCommerce Lead Time plugin, I'll show you what you can do with WooCommerce as it comes.
WooCommerce lets you set the default stock display format, enable out of stock notifications, and set low stock thresholds. You can do this at WooCommerce → Settings → Products → Inventory:
Once you've done this, WooCommerce will displays the stock status on the single product page for each item. This will either be the status (e.g. "In stock") or the exact stock quantity (e.g. "10 in stock"). However, this isn't ideal because:
The customer only finds out about out-of-stock items AFTER they click on it. They're likely to give up and look elsewhere, instead of returning to the shop page to click on a different product.
They have no idea how long the product will take to arrive. Some products have longer lead times, for example, if they are made-to-order or bespoke. WooCommerce doesn't provide any information about this.
A better way to display WooCommerce stock information
The solution is to display WooCommerce stock status and other stock-related information on your main shop pages. You can easily do this with theWooCommerce Lead Time plugin, which lets you:
Show a clear message about when the customer can expect to receive each item.
It’s the perfect solution for selling custom, made-to-order, or non-stock products and to give customers the correct information before they make purchase orders. You get complete control over the WooCommerce stock status. As a result, you can increase transparency with your customers.
Here’s what you need to do to display the WooCommerce stock status in your store:
Step #1: Get the WooCommerce Lead Time plugin
Get WooCommerce Lead Time - you’ll receive the plugin files and license key by email.
Log into your WordPress website and install and activate the plugin. Go to WooCommerce → Settings → Products → Lead time from the WordPress admin. Enter your license key and click the Save changes button to continue.
Step #2: Display WooCommerce stock status and lead times
You can use WooCommerce Lead Time to show stock status information and lead times in prominent places in your e-commerce store. This includes the shop page, category pages, product pages, cart pages, and checkout pages. You can also set it up to show WooCommerce lead times in order detail emails.
By default, it’ll look something like this:
As you can see, WooCommerce Lead Time can display both the product stock status and lead time on the shop page and category pages. This way, customers can see which products are in stock before they click on them.
Doing this helps you enhance the shopping experience on your online store. Customers no longer have to click through to each product to find out if the product is available for purchase. With the WooCommerce Lead Time plugin, they can quickly see the product stock status at a glance when they’re browsing the shop page or category pages.
Alternative method: Display WooCommerce stock status in a product table
Another way to show WooCommerce lead times on the shop page or on category pages is by using theWooCommerce Product Table plugin. It lets you list products anywhere on your website. All you have to do is add a stock and lead_time column to the table:
Other columns you can display include SKUs, images, price, and add-to-cart buttons.
Step #3: Set the processing time
Using WooCommerce Lead Time, you can set the processing time globally or per category, simple product, or variation (variable products).
You can set the processing time globally by going to WooCommerce → Settings → Products → Lead time and entering the lead time in the Global lead time field.
To set the processing time on a product category basis, go to Products → Categories and choose either Static (enter static lead time text) or Dynamic (calculate the processing time dynamically) using the dropdown from the Lead time field.
WooCommerce Lead Time also lets you set the processing time for individual products (and variations). Open the product you want to set a processing time for in the Edit Product screen. Scroll down to the Product data section and click on the Inventory tab. From here, you can set the lead time for the product. You can also do this for variable products.
Step #4: Customize the lead time wording and text color
One of the best features of the WooCommerce Lead Time plugin is that it lets you customize the lead time wording and text color. This means that you can tweak it to get the exact look and feel you want.
For example, you might consider changing the custom status wording to something like:
To change the text color, go to the plugin’s settings page (WooCommerce → Settings → Products → Lead time) and use the Lead time text color option to select a new color.
The easy way to provide stock information to customers
Efficient stock management is crucial for running a successful WooCommerce store—especially as your product catalog grows. The default tools simply aren’t built for speed or scale, which is why a dedicated bulk editing solution makes all the difference.
Setary gives you the power to update stock statuses and quantities across your entire store in seconds. Its simple, spreadsheet-style interface and bulk edit forms save huge amounts of time and reduce errors.
To go a step further, the WooCommerce Lead Time plugin lets you communicate stock availability clearly to customers by displaying accurate lead times based on the current stock status.
Together, these tools offer a complete solution for managing and communicating inventory more effectively—keeping both your team and your customers informed.
The way you set up your WooCommerce account page shapes the post-purchase experience. With the right plugin, you can add custom tabs, exclusive content, and reorder links without writing code.
You're probably aware that your standard WooCommerce installation doesn't have a user-friendly way to add multiple pages or tabs to your My Account page.
If you're a store owner, the last thing on your mind is learning how to code to customize this area.
Customizing your WooCommerce My Account page doesn't have to be an ordeal. The right plugin makes the whole process simple. You can give customers up-to-date information, answers to their questions, and incentives to come back.
In this article, I'll show you why customizing the My Account page matters. Then I'll walk you through how to do it using a free plugin from the WordPress.org repository.
Why customize the My Account page in WooCommerce?
The out-of-the-box WooCommerce My Account page can feel uninspiring.
Your goal is to give customers outstanding service. That means putting the answers and resources they need within easy reach. FAQ content, instruction guides, and warranty details all belong here.
You don't want customers jumping through hoops to find answers. Customization solves this.
For example, you can add user guides, warranty information, or post-purchase upsells. You reduce after-sale friction so customers don't have to email support.
You can also personalize the experience. The default My Account page doesn't segment content by user role. With a customization plugin, you can show different tabs to different customer groups.
For example, if you run a membership site, members can see content that non-members don't. This keeps the account area relevant for each visitor.
So now we know why it's worth customizing your My Account page in WooCommerce. Next, let's look at the overall benefits.
By customizing the WooCommerce account page, you'll get the following benefits:
Reduced returns
If you add product instructions or guides to the account page, customers know exactly how to use the product. This reduces returns.
Physical products usually ship with paper guides. Add those same guides as downloads on the My Account page for easy access. Customers feel confident and are less likely to ask for a refund.
Opportunity for further sales
You can use the My Account page to offer existing customers coupons and discounts. Returning customers cost less to retain than new ones cost to acquire.
Add coupon shortcodes inside a custom tab. Customers will check back to see what new offers are available.
Increased loyalty
There are several ways customizing your My Account page builds loyalty.
First, easy-to-find information makes customers' lives easier after purchase. They don't need to contact support. Support contacts are expensive.
Second, exclusive coupons in the account area make loyal customers feel valued. They keep coming back.
Fewer customer service inquiries
A richer account page reduces support tickets. Customers find their own answers.
Add user guides for each product. Add an FAQ tab. Customers enjoy their product without needing to reach out.
Now that we know the benefits, let's add extra content to the My Account page using a free plugin.
You just customized your My Account page. The free SysBasics Customize My Account plugin makes a real difference to the customer experience without costing anything.
The sky's the limit. Create and customize as many tabs as you like. Your customers now have a one-stop place for everything they need.