WooCommerce filtering by color: A how-to guide for improved navigation
Looking to add color filters to a WooCommerce store? Read on to learn how to use the best WooCommerce filter by color plugin to create robust, visual color filters using swatches and color pickers.
Do you want to set up color filters that enable customers to browse product lists quicker and narrow down their search based on color? If so, then this guide has your back.
Here's an overview of what we'll cover:
- A rundown of WooCommerce's built-in color filters, and the types of color filter that you can create using plugins.
- How to create color filters in WooCommerce.
- Best practices for using WooCommerce color filters.
Plugin used in this guide
- WooCommerce Product Filters - The most powerful WooCommerce filter by color plugin. It lets you add eye-catching filters for any attribute, taxonomy, field, and other parameters, including color.
What does it mean to filter by color in Woocommerce?
In WooCommerce, filtering by color means letting shoppers narrow down product options based on color choices. It's an important feature for stores that sell items where color is an important factor in customers' purchase decisions. Think: clothes, accessories, home goods, etc.
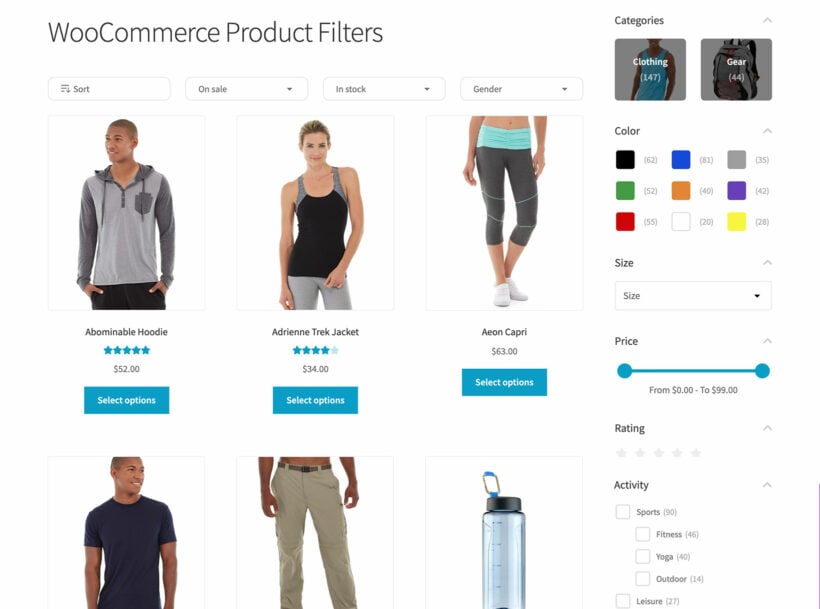
For example, let's say you run an online clothing store that sells t-shirts in various colors. A shopper looking for a red T-shirt would see the filter options, click on “Color” and select “Red". The page will then display only the t-shirts available in red.
This reduces the overwhelm caused by too many choices and helps shoppers find what they want faster, increasing the chances of a sale.
WooCommerce's default color filter options
Out of the box, WooCommerce enables you to create a "Color" attribute and create a text-based term for each color. It works like this:
- First, you create an attribute called 'Color' (Products → Attributes).
- Click 'Manage Terms' and add the names of all the colors. There's no way to select an actual color - you're simply listing the color names.
- Next, you select the appropriate color attribute(s) to each product or variation.
- Finally, you create the WooCommerce color filter either by:
- Inserting the "Filter by Attribute" Gutenberg Block anywhere on the page and then selecting "Color", or;
- Navigating to Appearance → Widgets and adding a 'Filter by attribute' widget, with "Color" selected.
The color filter will be displayed as basic checkboxes with text, like this:

But that's not good enough!
Although WooCommerce's default options for setting up color filters are straightforward, they have lots of limitations:
- Poor visual representation: By default, color filters are presented as checkboxes. Customers see text, not actual color swatches. This isn't ideal for visualizing color options, especially when it comes to displaying different shades or variations of the same color.
- It doesn't support multi-select: With the default setup, customers can only choose one color at a time. This restricts them from browsing efficiently and can cause frustration.
- It can lead to performance issues: The built-in color filters work fine on stores with a few products. However, on large stores with many products, the default filtering may load slowly.
- You can't customize mobile-specific product filters: The default color filter options work the same on mobile and desktop, which may not offer the most mobile-friendly user experience (UX).
- The page reloads with each filter: Since the default color filter is quite basic, it reloads the page every time the customer selects a color. More modern filtering software uses AJAX to avoid needing to reload the page, which is more professional and provides a better customer experience.
Because of these limitations, it's better to add WooCommerce filter by color options using a plugin like WooCommerce Product Filters.
Introducing the best WooCommerce filter by color plugin
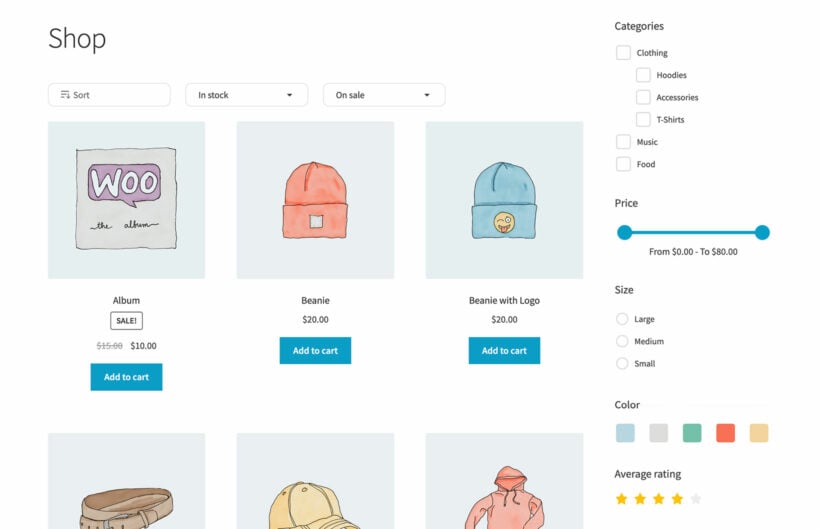
WooCommerce Product Filters is the most powerful WooCommerce filter by color plugin. It lets you add filters for any attribute, taxonomy, field, and other parameters, including color.
It is 100% code-free and easy to use, even for non-techy people.
The WooCommerce Product Filters plugin provides a simple interface to customize filter attributes. Once you've set up color filters on the backend, there are two ways to add them to your site:
- By ticking a box in the plugin's settings to show the color filters on Product Archive pages, such as Shop and Category pages.
- Using a simple shortcode to add the WooCommerce color filters anywhere else.
WooCommerce Product Filters inherits your theme's design and presents filters in three user-friendly options on the front end: either in the Sidebar, above the product list, or as a slide-out panel.
Overall, it provides a better user experience (UX) than WooCommerce's default color filters. It makes it quicker for shoppers to find products, which improves conversions.
With more purchases than ever occurring on a mobile device, it’s never been more important to make your products easily discoverable. You need a plugin that can provide you with powerful filters with an excellent user experience which most importantly makes products easy to find and purchase.
Simon HarperFounder, SRH Design
Benefits of WooCommerce Product Filters' color filters
Here are the benefits of using the Product Filters plugin to add WooCommerce filter by color options:
- Quick setup: You can set up the plugin and add color filters in minutes — no coding or prior technical experience needed.
- Multiple filter styles: It offers color swatches and image pickers so customers can see the actual representation of each color. For example, they can click on a color swatch or an image of the product in a particular color. Unlike checkboxes with text, visual filters are easier and more intuitive to choose from.
- Multiple-select filters: Customers can select multiple color options and other filters simultaneously. This is particularly useful for shoppers who are open to various color choices or looking for a range of colors. For instance, a customer shopping for summer clothes can select yellow, orange, and light blue all at once and see all relevant products in a single view.
- Super fast performance: It uses a unique indexing system to filter products instantly, even for huge product catalogs. Plus, it offers AJAX-based filtering which shows relevant products instantly without reloading the page. This means customers can apply color filters and see results immediately.
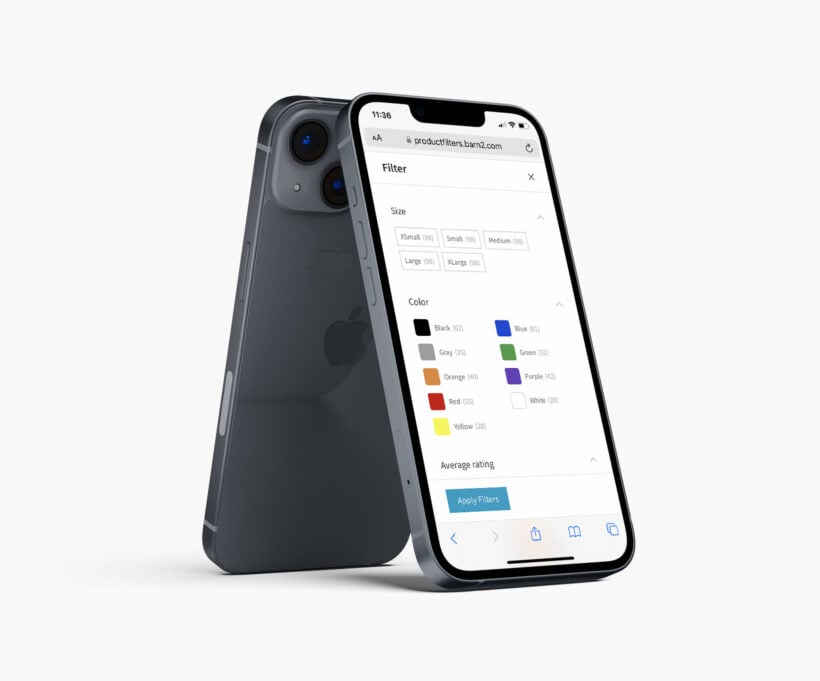
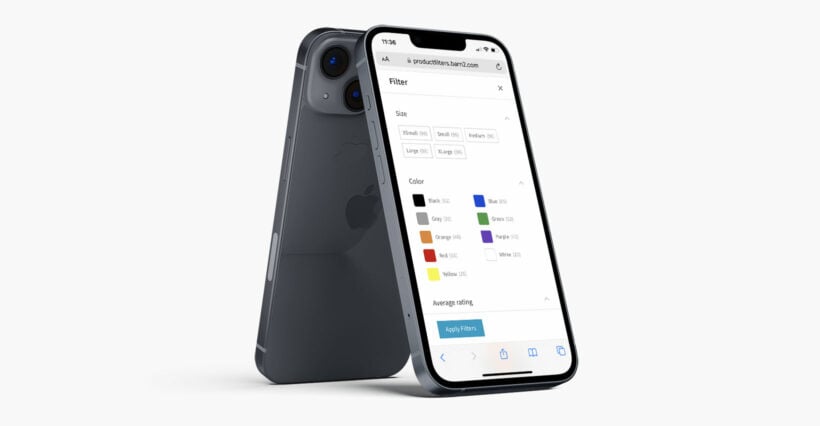
- Mobile-friendly filters: The filters appear differently on desktop and mobile. There's a slide-out panel for mobile users to ensure good user experience across all devices. This is crucial considering that over 50% of users prefer to shop using mobile devices.
- SEO benefits: There are unique URLs for each filter option, including color filters. This improves your store's visibility for color-specific product searches as search engines like Google can index these filtered results. You can also create direct links to pre-filtered product collections and use them for marketing campaigns or guiding customers to specific color ranges.
A quick note
In addition to color filters, WooCommerce Product Filters lets you add a search box along with filters for price, customer ratings, stock availability, product categories, taxonomies, other attributes like size, on sale items, and basically, any other parameter. Plus, you can use a wide array of styles, such as checkboxes, radio buttons, label clouds, etc., to style each filter option.
This means that you get more for your money, as it's a complete product filtering solution.
Setting up WooCommerce color filters with the Product Filter plugin
In this section, I'll show you how to add color filters to your online store using WooCommerce product Filters.
Step 1: Configure general plugin settings
First, we'll set up the core options for all the available product filters (including color filters). Follow these steps:
- Install and activate WooCommerce Product Filters on your WordPress site.
- Activate your license key in the setup wizard.
- If you'd like to add the color filter horizontally on top of products on your main shop pages, select 'default' on the 'Shop filters' page. If not, select "None".
- 'Filter visibility' lets you control how the filter is presented on desktop and tablet devices. You can decide between always showing filters or hiding them behind a reveal button.
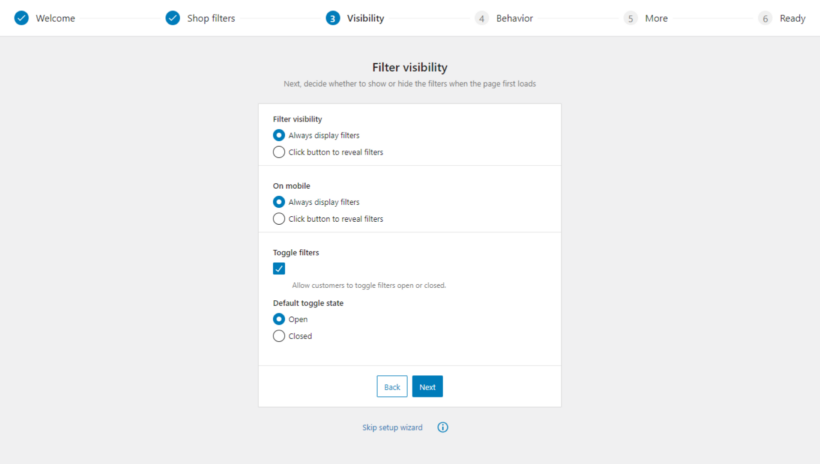
- 'On mobile' determines how the filters are displayed on mobile devices. Again, decide between always showing or hiding them behind a button.
- Select 'Toggle filters' to let customers open or close individual filters.
- Set the default state for the filter group (open or closed).
- 'Filter mode' determines if filters are applied automatically as soon as a customer selects them or if customers must click a button to apply them. I recommend letting customers select a button to apply filters, so they can select all the desired filters first.
- Next, enable the product count to show customers how many items match each filter option (also recommended).
- Lastly, click 'Manage filters' after completing the wizard.
Step 2: Add hex codes or images for each color
Next, define the colors that will appear in the filter. You can do this in Products → Attributes → Color → Manage Terms. (If you don't already have 'Color' attribute then you should create one and add all the colors as terms.)
Next, you either need to select a color or upload an image. This depends on whether you want to display the filter as color swatches or images showing products in different colors:
- Color swatchesUse the color picker to select a color for each term. You can use this tool to find hex the exact code for each color.
- Image filtersAdd an image to each term. For example, you might add an image of a blue t-shirt to the 'Blue' term.
Step 3: Add WooCommerce color filters
Now, it's time to create a WooCommerce filter by color:
- Go to Product → Filters in the WordPress dashboard.
- On the "Filter Groups" page, select "Add New" or edit the default group that the plugin has created for you.
- Enter a name for the filter group, then add your desired filters.
- To add a color filter:
- Select “Add Filter”.
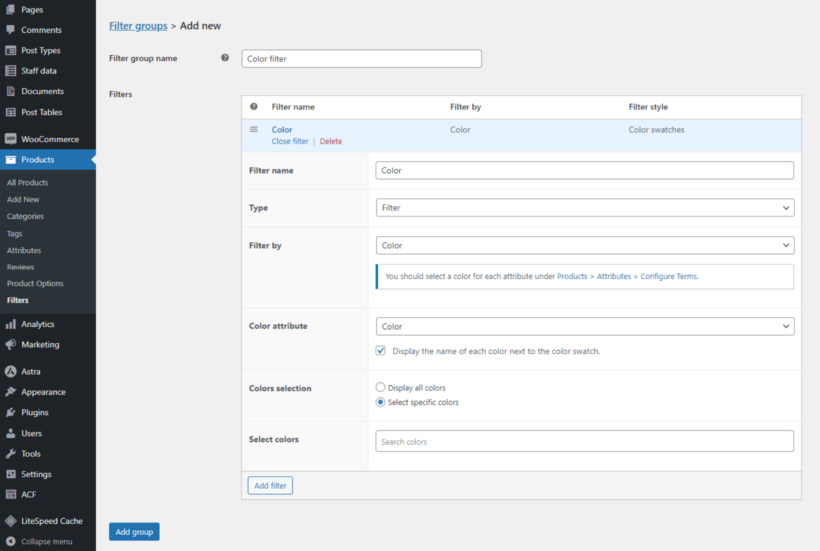
- Name the filter.
- From the "Type" dropdown, select "Filter".
- From the "Filter by" dropdown, select "Color" if you're creating color swatches, or "Images" if you uploaded an image to each term in the previous section.
- For color swatches, you can select the desired color attribute and decide whether to display the name of each color next to its swatch.
- Decide whether to display all colors or only specific ones.
- Select “Add Filter”.
- Repeat step 4 to add additional filters as needed, for example a category filter dropdown.
- Click on 'Save changes' once done.
Step 4: Showcase the color filter on the WooCommerce front end
WooCommerce Product Filters lets you show the color filters on your site's front end using a variety of methods. You can add filters to sidebars, on top of product lists, and anywhere else on your online store.
Let's look at each method in detail.
Method 1: To sidebars
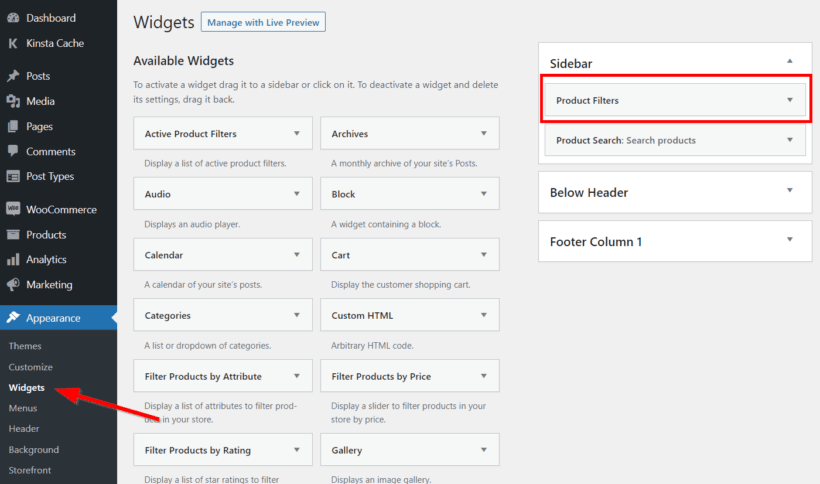
WooCommerce Product Filters adds a dedicated 'Product Filters' widget to your site so you can add filter groups to sidebar areas:
- Access your site's admin dashboard and navigate to Appearance → Widgets.
- Select the "+" sign from the sidebar section.
- Search for 'Product Filters' and select it.
- Then add an appropriate title and select the desired filter group.
- Hit "Update" once done.
Note: Your website probably doesn't have a sidebar on mobiles. Don't worry - WooCommerce Product Filters will display the filters to mobile users in a slick slide-out panel 😀
Method 2: Above product lists
If you selected a filter group to display on the 'Shop filters' page in step 1, then your color filters are already added to your site's front end and will appear horizontally on top of the product list. You don't need to do anything further to display the color filter on your site.
Method 3: Anywhere on your WooCommerce site
You can also use the following shortcode to display a filter group in any location on your site: [product_filters id="1"]
Using the REST API with WooCommerce Product Filters
Note: This section is aimed at WooCommerce developers only.
The REST API is a set of rules that allow different software systems to communicate with each other over the Internet. WooCommerce uses the REST API to enable external applications to interact with your store's data.
WooCommerce Product Filters uses the REST API to fetch product filter price data, terms, and batch indexing without directly querying the database and increasing server load. So as customers apply filters, it can make API calls to get updated product data quickly. It also caches API responses for frequently used filters which speeds up subsequent requests.
Here are the usable routes under the wcf/v1 namespace and the parameters the requests can accept.
start-batch-index
You can submit a POST request to this route to initiate batch indexing for all products. Parameters: None required.
indexer-status
You can submit a GET request to this route to verify the status of the batch indexing process. It will return 2 status messages:
- success: This denotes whether or not the GET request was successful.
- running: This denotes whether the indexing process is running or completed.
pricing
You can submit a POST request to this route to obtain the highest price for a given taxonomy term.
It accepts the following variables:
term_id: ID of the term.taxonomy:Taxonomy of the term
You can then submit a GET request to retrieve the list of terms for a taxonomy.
Best practices for using color filters in WooCommerce
- Use high-quality product images: Make sure the product images accurately represent the defined color. Mismatches between colors shown in the filters and actual product colors can lead to returns.
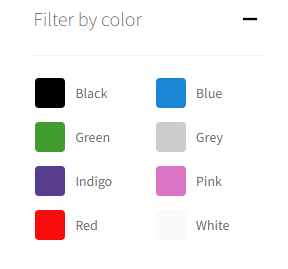 Set up visual filters: Text alone isn't ideal for showcasing shades accurately. Use the color swatch and image picker options (e.g. those available in WooCommerce Product Filters) to add visual filters. Make sure you use the correct hex codes for each color.
- Add clear, descriptive color names: Avoid confusing or overly creative color names. Stick to simple, descriptive names that customers can easily understand. For instance, instead of calling a shade "Sunset Bliss," call it "Orange". Also, if you offer multiple products in distinct shades of blue, specify them clearly as "Light Blue," "Navy Blue," and "Sky Blue."
- Group similar shades: Stores with too many color options can group similar shades together. This prevents overwhelming customers with too many choices in the filter interface. For example, instead of listing “Cherry Red,” “Crimson,” and “Scarlet” separately, you could group them all under “Red”.
- Place filters in a prominent location: Position the color filters where they are easy to find, such as on the sidebar or at the top of the product listing page. Customers should immediately see the color filter option without scrolling.
Create custom WooCommerce color filters today!
Color filters are essential for stores that sell products in multiple colors and where color is a key consideration in customers' purchasing decisions.
Although WooCommerce's built-in color filter options are pretty limited, you can easily add robust visual color filters using WooCommerce Product Filters.
WooCommerce Product Filters is the best WooCommerce filter by color plugin. It enables you to set up filters for any attribute, taxonomy, field, and other parameters, including color — no coding required.
You can use it to add color filters to your site's sidebar, on top of product lists, or anywhere else on your site. And you can set up mobile-specific filters so customers can enjoy browsing your store from whatever device they're on.
Get started with WooCommerce Product Filters today! Your purchase is backed by a 30-day money-back guarantee.