How to manage WooCommerce product image sizes
WooCommerce product image sizes control how your product photos display on the shop page, single product page and category pages. Get them wrong and the whole store looks unprofessional. Here's how to set them properly.
Product images do a lot of heavy lifting on a WooCommerce store. They're usually the largest assets on every shop and product page, so the sizes you set affect both how the store looks and how quickly it loads. WooCommerce's defaults aren't wrong, but they're a starting point - most stores benefit from setting their own values once they know what the theme expects.
I'll cover the default WooCommerce image sizes, the exact steps to change them in the Customizer, how to regenerate thumbnails afterwards, what to upload (JPEG vs PNG vs WebP), and how to create a quick order form with custom image sizes using WooCommerce Product Table.
What are the default WooCommerce product image sizes?
WooCommerce has two main image sizes that ship with a default install:
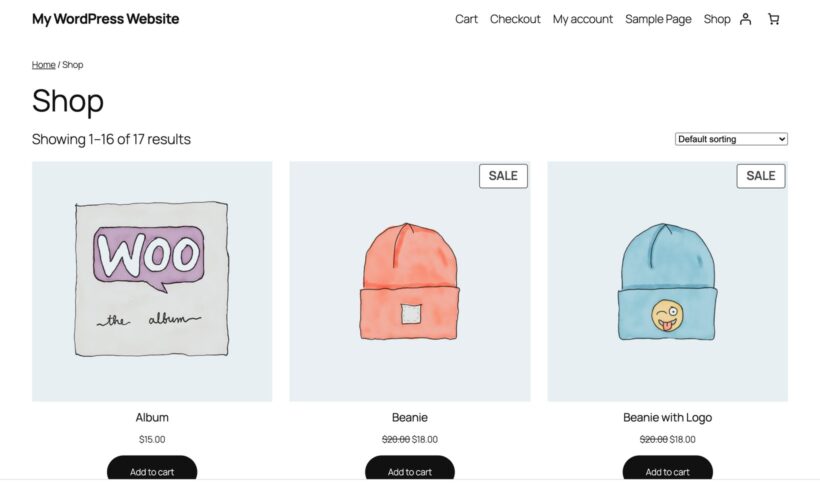
- Catalog/thumbnail image - 324 × 324 pixels by default. This is the size used on shop and category pages, in the related products grid, and as the category thumbnail.
- Single product image - 800 × 800 pixels by default. This is the size used for the main image on the product page.
These are the values WooCommerce will register if your theme doesn't override them. Many themes do override them - Astra, Kadence, GeneratePress and Blocksy all expose their own image size settings on top of WooCommerce's. If your theme has its own product image settings, they win.
When you change any of these settings, WooCommerce automatically regenerates the thumbnails in the background. The job runs as a scheduled task and can take a few minutes on a small store, longer on a store with thousands of products or variations.
How to change WooCommerce product image sizes in the Customizer
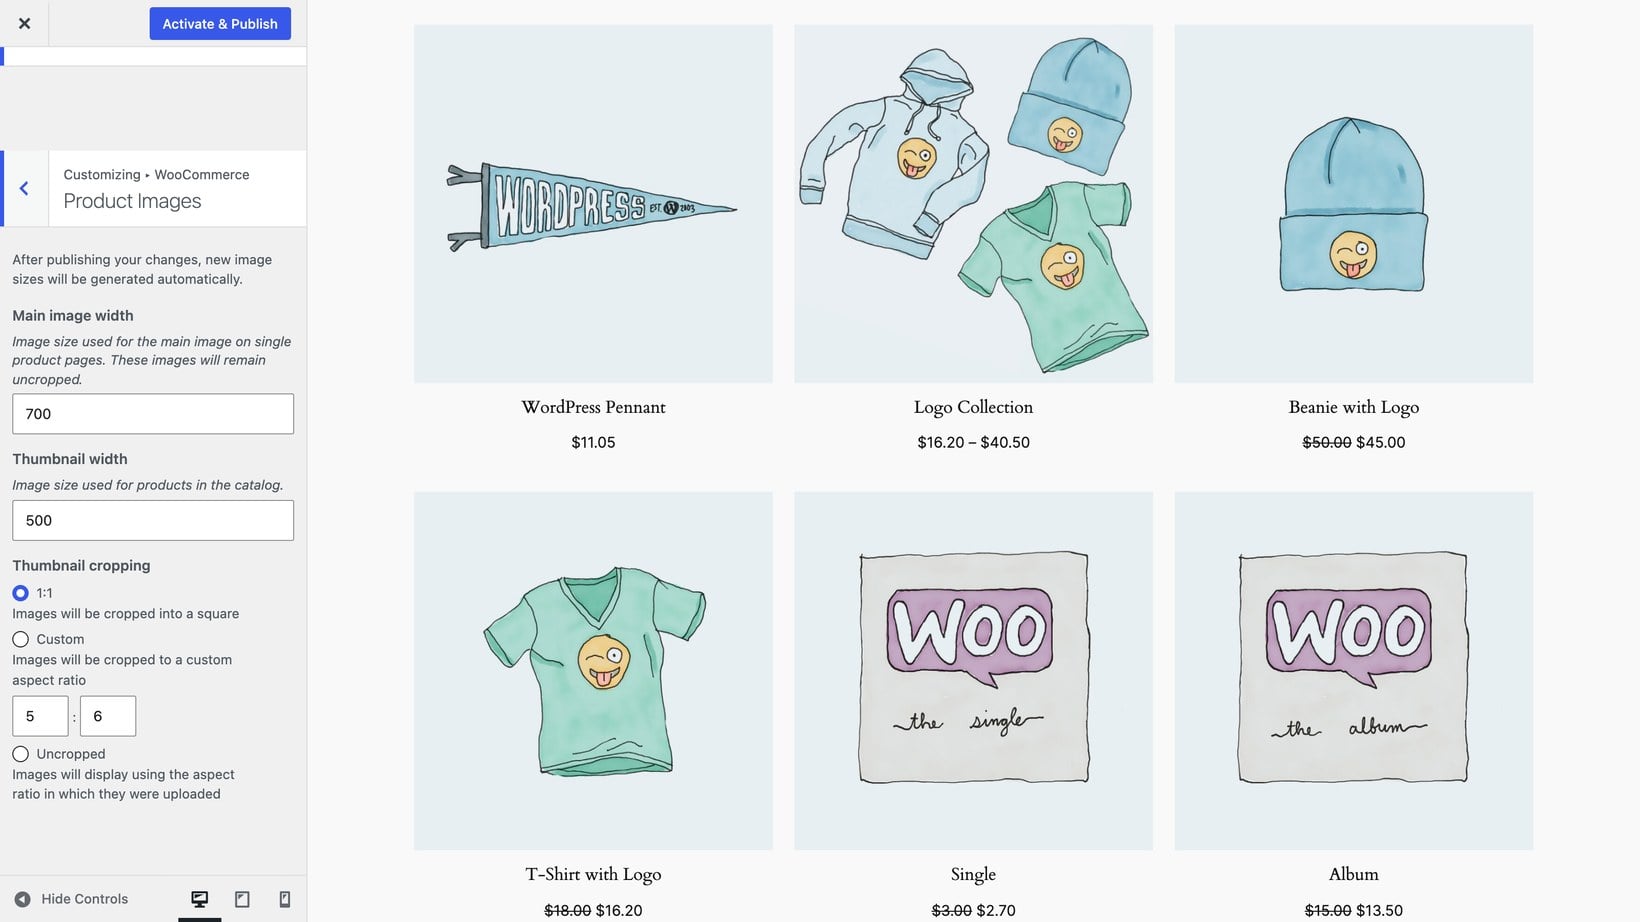
The standard place to control product image sizes is the WordPress Customizer. Go to Appearance → Customize → WooCommerce → Product Images. Different themes show different settings here, so your screen may not match the steps below exactly:
- Open the Customizer at Appearance → Customize.
- Click WooCommerce → Product Images in the left panel.
- If your theme shows it, set the Main image width - the width of the main image on the single product page. Height is calculated automatically from the uploaded image's aspect ratio.
- If your theme shows it, set the Thumbnail width - the width of product thumbnails on shop and category pages.
- Choose a Thumbnail cropping option (more on this below).
- Click Publish.
Themes handle image sizes in different ways. Some themes set the main and thumbnail widths for you, so the Customizer only shows the Thumbnail cropping option. If you do not see the width fields, that is normal. Your theme is setting those sizes, and you simply choose how thumbnails are cropped.
WooCommerce will start regenerating thumbnails in the background as soon as you publish. To check progress, go to WooCommerce → Status → Logs and look for entries beginning with wc-image-regeneration.
Thumbnail cropping options
The Thumbnail cropping setting controls the shape of the thumbnails on category and shop pages. There are three options:
- 1:1Thumbnails are cropped into perfect squares. The most popular option because it gives a uniform look across the shop page.
- CustomSet your own aspect ratio (for example 4:5 for a vertical product card or 16:9 for a wide one). Useful if your products are taller or wider than they are square.
- UncroppedEach thumbnail displays at the aspect ratio it was uploaded in. Avoid this unless every product image was photographed at exactly the same ratio, otherwise the shop page will look uneven.
The main featured image on the single product page is always uncropped - WooCommerce dropped the crop option for single product images several versions ago because users were complaining about important detail being chopped off.
How to regenerate thumbnails after changing image sizes
If you've changed image sizes but the old sizes are still showing on the front end, the thumbnail regeneration job either hasn't finished yet or didn't run. You can force it manually:
- Go to WooCommerce → Status → Tools.
- Scroll down to Regenerate shop thumbnails.
- Click the Regenerate button.
WooCommerce will queue every product image for regeneration. On a small store the job finishes in a couple of minutes; on a store with thousands of products it can take half an hour or more. The job runs in the background, so you don't have to keep the page open.
If you want a more powerful tool that handles all image sizes registered by WordPress (not just WooCommerce ones), the free Regenerate Thumbnails plugin by Alex Mills is the standard option. Install it, go to Tools → Regenerate Thumbnails and run it across all images.
The ideal image size to upload for WooCommerce products
The size you upload matters more than the size you display. WordPress generates smaller versions automatically, but it can't make a small image bigger without it looking soft.
The right upload size depends on what you sell and whether you use image zoom:
- Simple products with no zoom800-1000 pixels wide. Loads fast and looks crisp at the default 800px single product image size.
- Detailed products with image zoom1500-2000 pixels wide. The extra resolution gives customers a real reason to zoom in.
- High-resolution / retina displaysUpload at twice the display size (1600px for an 800px display) so retina screens render sharply. The retina image setup guide walks through this in detail.
- Avoid above 3000 pixelsSlows the page load, hurts Core Web Vitals and gives no visible benefit on a typical monitor.
A useful rule of thumb: pick the largest display size your single product image will ever be shown at (zoom, lightbox or main image), double it for retina, and upload at that size. Anything larger is wasted bytes.
Choosing the right image format: JPEG, PNG or WebP
The file format affects both quality and file size. There are three formats worth considering for WooCommerce product images:
- JPEG / JPGThe default for product photography. Small file size, broad browser support, lossy compression. Use for product photos with lots of colors and gradients.
- PNGLossless compression, supports transparency. Larger file sizes than JPEG. Use only when you need a transparent background (logos, isolated objects on a transparent canvas) or for screenshots and text-heavy images.
- WebPModern format with significantly smaller file sizes than JPEG at the same visual quality. Roughly 25-30% smaller than JPEG on average. Supported by every modern browser. The right default for new stores.
WordPress has supported uploading WebP files directly since version 5.8, so you can drop them into the media library without a plugin. If you want WordPress to serve WebP versions of existing JPEG and PNG uploads automatically, use a plugin like WebP Converter for Media or Smush.
AVIF is even newer and even smaller, but browser support is still patchy. For a production store today, WebP is the safer default.
Compressing images before upload
Even at the right dimensions, a raw camera or stock photo will be larger than it needs to be. Compress before you upload and your store stays fast.
There are two ways to do it:
- Compress manually with an online tool. TinyPNG handles JPEG, PNG and WebP for free up to a reasonable monthly limit. Squoosh from Google is another good option with side-by-side preview. Drag the image in, download the optimized version, upload to WooCommerce.
- Compress automatically with a plugin. Smush, ShortPixel and EWWW Image Optimizer all process uploads as they hit the media library. Set the plugin once and forget about it.
For a small store the manual approach is fine. For a store with regular product additions, install a plugin and let it run.
Setting image sizes in a WooCommerce product table
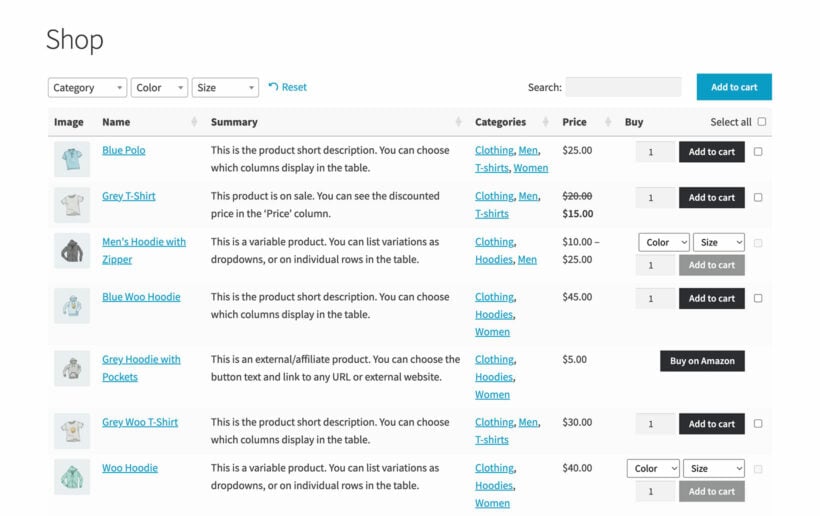
The Customizer settings only affect the standard WooCommerce shop layout - the grid of product cards. If you list products in a quick order form, a wholesale order form, or a one-page-checkout table, those layouts have their own image-size control. The same layouts let you list all variations of a variable product as separate, buyable rows.
The WooCommerce Product Table plugin includes an image_size shortcode parameter that overrides the Customizer settings on a per-table basis. The default in a product table is 70 × 70 pixels (much smaller than the catalog image, because a table needs to fit more products per row). You can change it to any pixel value or any standard WordPress image size:
image_size="50"- a 50 × 50 square.image_size="40x60"- a 40-wide-by-60-tall rectangle. Useful for portrait product photos.image_size="medium"- the WordPress "medium" registered size (300 × 300 by default).image_size="large"- the WordPress "large" registered size (1024 × 1024 by default).
The product table image options article in the Barn2 knowledge base has more detail on the available parameters and the common pitfalls (theme overrides, registered-size mismatches, column-width conflicts).
Common WooCommerce product image problems
Most product image issues come from one of four causes. The fixes:
- Images look blurryThe uploaded image is smaller than the display size, so WordPress is upscaling it. Re-upload at a larger resolution and regenerate thumbnails. The guide to improving WooCommerce product images covers this in more depth.
- Images display at different sizes on the shop pageThe Thumbnail cropping is set to "Uncropped" and your source images have different aspect ratios. Switch to 1:1 or a fixed custom ratio.
- Image size changes don't show upWordPress is still serving the old cached thumbnails. Run the thumbnail regeneration tool, then hard-refresh the front end.
- Images are cropped wrongEither the cropping ratio is set incorrectly, or your theme has its own image settings overriding WooCommerce. Switch to a default theme briefly to confirm, then fix the theme settings.
- Shop page is slow to loadThe source images are too large. Resize before uploading or install an image-optimization plugin.
Frequently asked questions about WooCommerce product image sizes
What are the best dimensions for WooCommerce product images?
For simple products without zoom, upload at 800-1000 pixels wide. For detailed products with zoom enabled, upload at 1500-2000 pixels wide. Avoid uploading anything wider than 3000 pixels - the file size hurts page speed and there's no visible benefit on a typical monitor.
How do I change WooCommerce image sizes without code?
Go to Appearance → Customize → WooCommerce → Product Images. Set the main image width, the thumbnail width and the thumbnail cropping ratio. Click Publish. WooCommerce regenerates the thumbnails automatically in the background.
What's the best file format for WooCommerce product images?
WebP is the best default for new stores - roughly 25-30% smaller than JPEG at the same visual quality, with full modern-browser support. JPEG is still fine for compatibility, and PNG is only needed when you require a transparent background.
How do I regenerate thumbnails in WooCommerce?
Go to WooCommerce → Status → Tools and click the Regenerate button next to "Regenerate shop thumbnails". The job runs in the background and can take a few minutes on a small store or longer on a large one. The free Regenerate Thumbnails plugin is a more flexible alternative if you want to regenerate every WordPress image size, not just the WooCommerce ones.
Can I set different image sizes for different parts of my WooCommerce store?
Yes. The Customizer controls the main shop and product pages. For product listings in tables or quick order forms, use a plugin like WooCommerce Product Table that lets you set a per-table image size via shortcode. Some themes also expose category-specific image controls.
Final thoughts
Getting WooCommerce product image sizes right is a small job with an outsized effect on how the store feels. Set the Customizer values to match your theme, upload at the right dimensions, pick WebP or compressed JPEG, and regenerate thumbnails after any change. For shop layouts beyond the standard grid - product tables, quick order forms, wholesale ordering - use a plugin with its own image-size control so each layout looks right on its own terms.
If your product images themselves need more work, the improving WooCommerce product images guide covers gallery upgrades, lightbox and hover effects.