Filter by stock status in WooCommerce: A how-to guide

In this tutorial, I'll show you how to set up WooCommerce to filter products by stock status. I'll also reveal three powerful strategies to boost your store's sales and revenue using stock status and stock level information.
As a WooCommerce store owner, you know firsthand that getting people to check out your online store costs a lot of time, effort, and resources. When customers visit your store, the last thing you want is for them to decide to buy a product, then find out that it is out of stock, and leave in frustration.
Unfortunately, WooCommerce itself doesn't provide a stock filter for customers to sort products by stock status. Your only options are to:
- Hide items that are temporarily out of stock, which can result in lost sales and reduced SEO traffic.
- Show products that are not in stock, which can frustrate customers.
Luckily, you can easily solve this problem with the best product filtering plugin.
With WooCommerce Product Filters, you can keep out-of-stock items visible on your store while providing an an in-stock filter which allows customers to hide out-of-stock products from the product list. This way, you don't lose out on sales and traffic from search engines or risk upsetting customers 😀

To take things a step further, I'll also show you how to use the WooCommerce Lead Time plugin to add stock information to the shop page. This will make things even clearer to your customers.
Ready to dive in? Let's start with the basics.
What does it mean to filter by stock status in WooCommerce?
WooCommerce provides different stock statuses for products, such as "In Stock," "Out of Stock," and "On Backorder." These statuses help customers know whether or not a product is available for immediate purchase.
Implementing a "Filter by Stock Status" option adds a filter to your store's product archive, Shop, and Category pages. Similar to enabling product filtering based on category, price, etc., customers can select their desired stock status. The page will dynamically update to display available products.
Allowing customers to streamline their product search is useful for many reasons:
- For products available for immediate purchase: Customers can speed up their shopping experience by filtering to show only items in stock.
- For products that are out of stock: Customers may want to create wishlists to bookmark for future purchases when they become available again.
By default, WooCommerce doesn't offer a filter by stock status, so there are two ways to add this to your store:
- By adding a custom code snippet to your site's HTML or theme's functions.php files (only recommended if you have expert-level WooCommerce development skills).
- Using a plugin like WooCommerce Product Filter.
This is a code-free tutorial, so we'll use the WooCommerce Product Filter plugin. Keep reading for the step-by-step guide to adding WooCommerce filter by stock status to your site.
Introducing the best plugin for filtering by stock status in WooCommerce
WooCommerce Product Filters is a powerful plugin that adds robust filtering capabilities to your ecommerce store. It lets shoppers filter products by stock status, category, attribute, price, taxonomy, customer ratings, and virtually anything else.
Plus, you can combine custom sets of filters, nest them hierarchically, and display them on the default Shop, Category, and Archive pages. You can also add them anywhere else on your website using shortcodes or a Gutenberg block or widget.
Key features
WooCommerce stock status filter
You can add a checkbox for shoppers to view only in-stock items and exclude products with other stock statuses.

Additional product filters
WooCommerce Product Filters is a fully-featured product filter plugin. It lets you add filters for attributes, colors, prices, categories, tags, product ratings, on-sale items, and virtually any other field or product data.
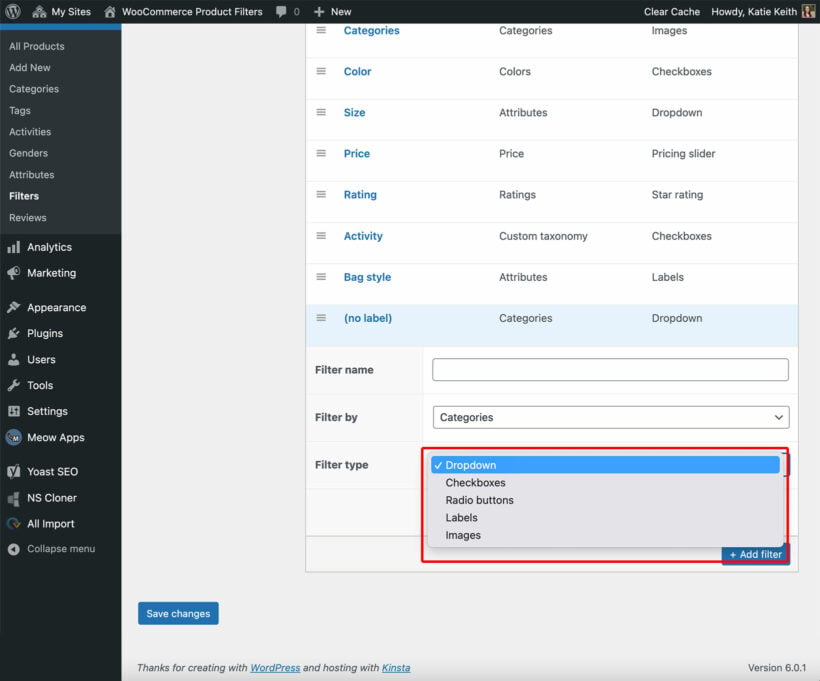
Numerous style options
The "In stock" filter always appears as an on-off toggle. However, the other types of product filter are available in a wide range of styles. This includes radio buttons, checkboxes, dropdowns, tag clouds/labels, and image or color filters.
Two default layouts
Depending on your preferences, you can showcase the filters above the product list and/or or as sidebar widgets. This is what the two positions look like:
Two filter visibility options
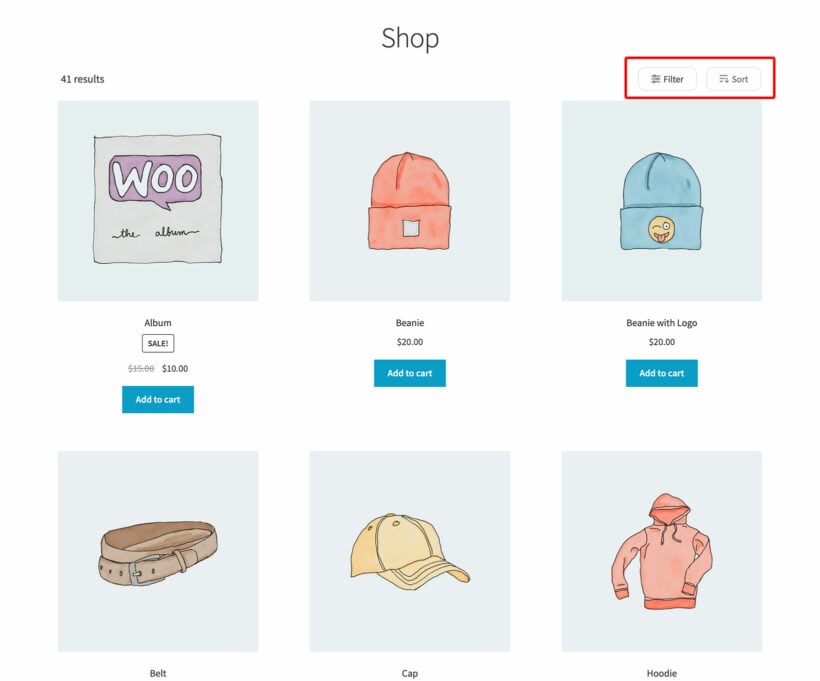
By default, filters are visible on the screen as soon as the page loads. Alternatively, you can hide them when the page loads and allow customers to click on a button to reveal the filters in a slide-out panel:
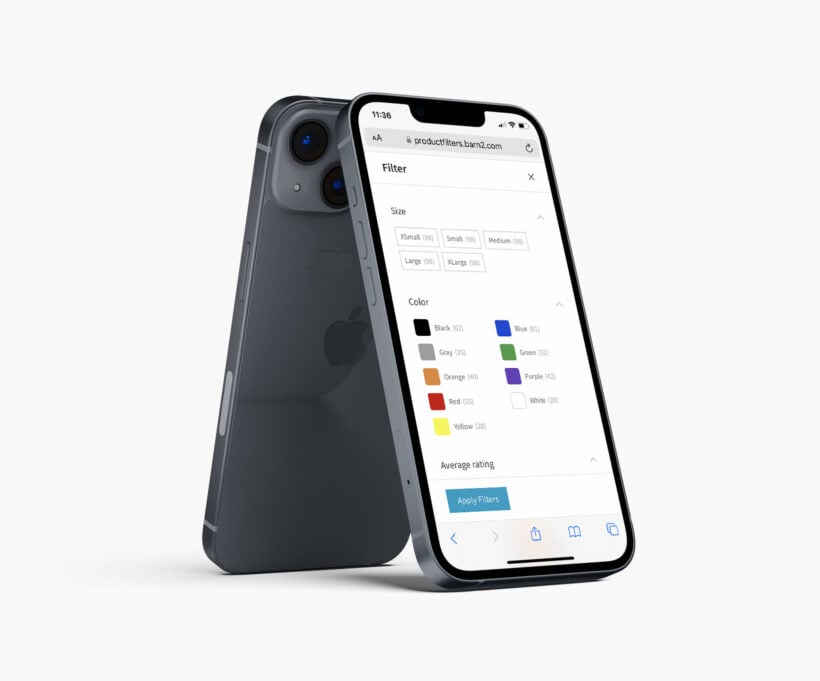
Separate filters for mobile versus desktop devices
This is my personal favorite feature. Considering that by 2027 62% of online shoppers are expected to shop from their mobile devices, WooCommerce Product Filters lets you tailor how the filters are presented to customers shopping on desktops versus mobiles:
How to allow customers to sort by stock status on key WooCommerce pages
The WooCommerce Product Filters plugin is pretty easy to use - the entire setup process takes less than ten minutes. Follow these steps to allow customers to sort by stock status on the WooCommerce category page or main shop page:
Install and activate the plugin
- Get the WooCommerce Product Filters plugin.
- Download the plugin's zip files to your computer.
- Log into your WordPress admin area and go to Plugins → Add New to upload the plugin to your website.
- Finally, click on Upload Plugin → Install Now → Activate.
- Enter your license key (you'll get this in the purchase confirmation email).
Create and manage filters
Once you've finished choosing your main settings in the setup wizard, you're ready to start creating filters:
- Go to Products → Filters.

- Click on 'Add new'.
- WooCommerce Product Filters lets you combine multiple filters and present them together as one group. Enter the name for the group in the 'Filter group name' field - for example, "Stock Status" or "Shop Filters". This will only be visible to WordPress admins on the site's back end.
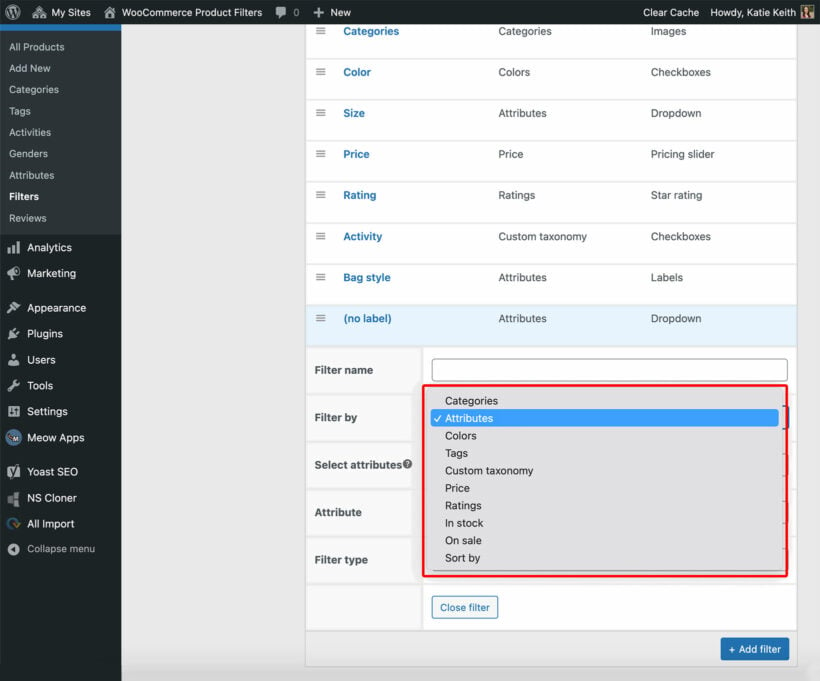
- Next, select the 'Add filter' option.
- In the 'Filter name' field, type in the label you want to appear at the top of the filter on your site's front end - for example, "Stock Status". This will be visible to your store's visitors.
- Select 'Filter' from the 'Type' dropdown.
- Select 'In stock' from the 'Filter type' dropdown.
- Click on the 'Add group' to save the filter group.
Note: As it's the focus of this article, I've only covered how to add the in-stock filter. Repeat steps 2-8 if you'd like to show additional filters with this stock status widget, e.g., for price, category, color, size, ratings, attributes, custom fields, custom taxonomies, etc. Check out this detailed article for a more in-depth guide.
Add filters to the front end
Once you've created the 'in-stock' filter, head to Products → Filters → Settings within your WordPress admin to make it visible on your site's front end.
To add the filter by stock status filter to your sidebar, simply add the 'Filter Group' widget. Alternatively, follow these steps to display the filters above the lists of products throughout your store:
- Select the name of the filter group you created earlier. Continuing with the previous steps, I'll select 'Stock Status'.

- Now scroll to the bottom of the page and save your settings.
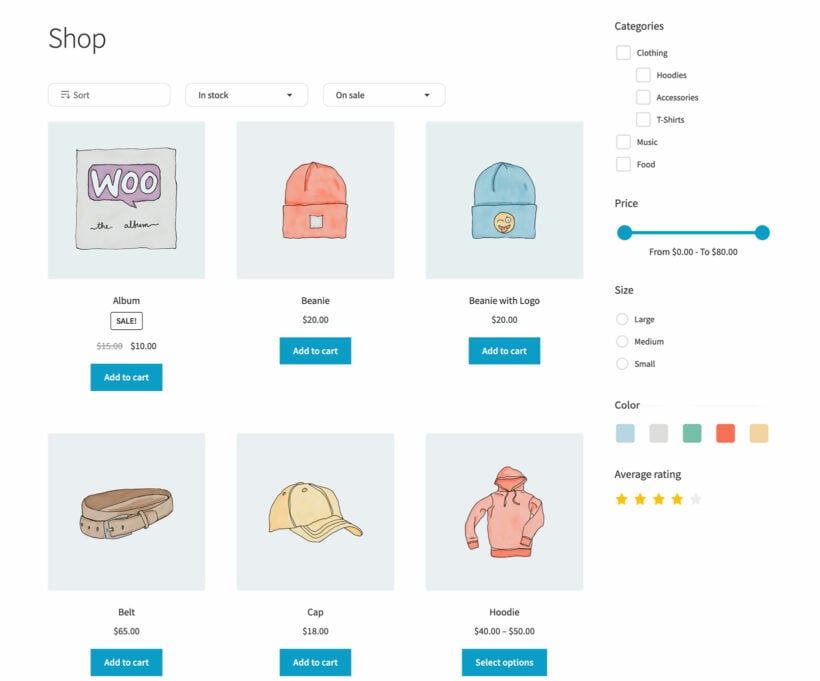
That's it! Head to the front end of your site for a preview of the product filters. The end result will look something like this:
Benefits of allowing customers to filter by stock level
If a customer finds an item they want to buy and then discovers it's out of stock, they're likely to leave your store and look elsewhere. Adding an In Stock filter to your store solves the problem and avoids a lot of frustration.
Katie KeithCEO, Barn2 Plugins
Here are the key benefits of adding the WooCommerce filter by stock status option to your site:
- Better customer experience (CX): Shoppers can filter out products that are out of stock. This makes the user experience smoother and more efficient.
- Increased customer satisfaction: It can be frustrating for customers to add out-of-stock items to their cart only to find out later during the shopping journey that the products are unavailable. Allowing customers to filter out products that aren't in stock first leads to better customer satisfaction.
- Higher conversion rates: Customers who specifically look for in-stock items have higher buying intent. Instead of overwhelming them with out-of-stock items, only showing products that are ready for immediate purchases makes them more likely to complete their purchases instantly.
- Increased sales and revenue: Highlighting the number of products in stock and their stock status can create a sense of urgency and nudge customers to place their orders quickly.
Customers appreciate transparency. Knowing the stock status upfront builds their trust and confidence in your business, as they can see each product's availability before deciding to learn more or place orders.
Bonus: Powerful strategies to boost sales with stock status and stock levels
Here are some simple yet powerful ways to use information about stock status and levels to boost your store's sales and revenue:
Allow customers to order "out of stock" items
While filtering by stock status allows customers to hide out of stock items, it also means that they can't order them. If you have plenty of equivalent products then you can be confident that customers will find an in-stock item they want. However, if each product is unique then hiding out of stock products could mean losing sales.
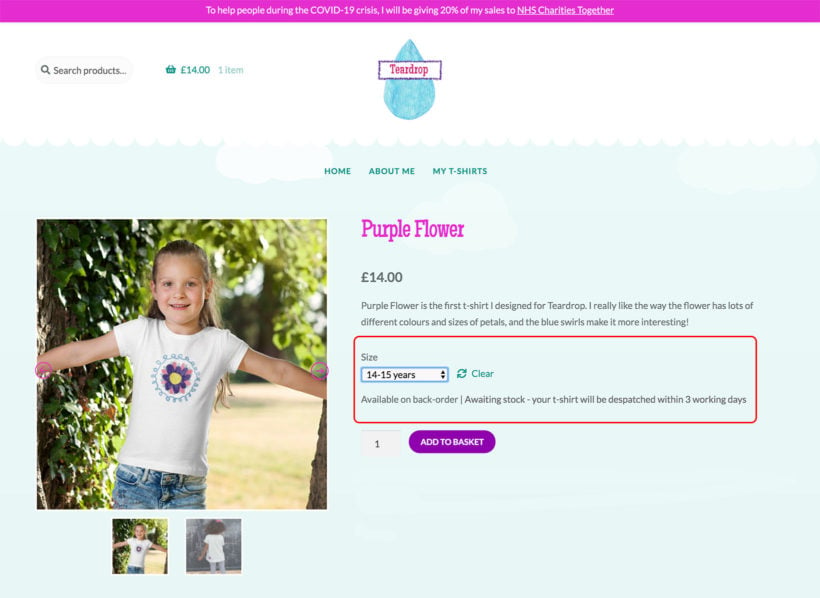
An excellent alternative is to set the products as on backorder and use the WooCommerce Lead Time plugin to clearly display when the product will be sent. You can display lead times based on the stock status, i.e., items in stock, on backorder, and out of stock. That way, customers can order the out of stock product while understanding that it won't be sent straight away.
You can even create a dedicated page to display WooCommerce backorder products, making things even clearer to the customer.
Enabling customers to place orders for items only available for custom orders or temporarily out of stock ensures you don't lose sales.
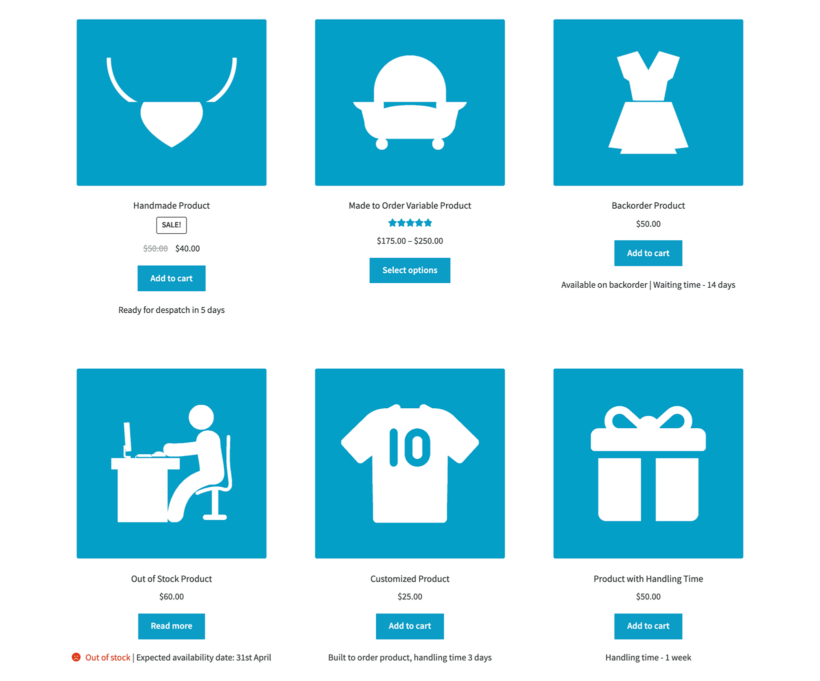
Here's an example showing the stock details on the main Shop page with static text:
Here's what it looks like on the cart page:

Enable back-in-stock notifications
Instead of buying items on backorder, some customers might prefer to wait until it's back in stock before placing their orders. To make it easier for those customers (and ensure you don't lose sales), you can collect their emails to add them to a WooCommerce waitlist and notify them when you've restocked their desired products.
A side benefit of enabling out-of-stock notifications is that it can help build your business's email marketing list.
Check out our full tutorial on setting up a "Back in Stock" notification for instructions on how to set it up on your site.
Add a WooCommerce filter by stock status to your store today!
In this tutorial, I've shown you how to add the WooCommerce filter by stock status to your site with WooCommerce Product Filters.
The WooCommerce Product Filters plugin lets you set up stock status filters to enhance customers' shopping experience, speed up the ordering experience, and ultimately boost sales. With it, you can:
- Allow customers to filter out products that are not in stock while shopping on your site's shop, category, and other archive pages.
- Add filter options for categories, tags, product attributes, colors, price range, product ratings, and virtually anything to streamline customers' ordering experience further.
- Present the filters using dropdowns, radio buttons, checkboxes, tag clouds, labels, and image or color swatches.
- Showcase a different set of filters for desktop and mobile shoppers for the optimum experience.
- Showcase the filters on top of the product list or as sidebar widgets for better visual representation.
- Lots more.
PS: Want to boost your WooCommerce store's sales and revenue further? Combine Product Filters with WooCommerce Lead Time and build trust by displaying stock information directly on the shop page 🚀