How to manage WooCommerce variation stock across your product range

WooCommerce has various options for managing stock at variation level. It lets you set the stock status or manage stock by setting stock quantity, allowing backorders, and setting a low stock threshold. However, WooCommerce's options to manage stock at variation levels aren't perfect for all stores.
In this article, we’ll learn how to use the core WooCommerce features for variation stock control. We'll also discover the best to manage and display stock for product variations. These will allow you to:
- Easily manage variation stock in bulk, instead of having to make manual stock updates per product.
- Show variation stock information directly on WooCommerce product, shop and category pages.
- Display a lead time or waiting time for each variation.
How to use WooCommerce to manage stock at variation level
WooCommerce has some built-in options to manage stock for variable products (as well as simple products) on your online store. These are pretty basic and I'll share some tools for improving on them in a minute. However, first look at what you can do in WooCommerce as it comes.
- To enable the default stock management feature, simply navigate to WooCommerce → Settings → Products and clicking on the Inventory link from the top:

- Enable the Manage stock checkbox and set basic stock management settings. You can select the low stock level display and set a low stock threshold. This lets you show or hide out-of-stock variations. And, whenever a specific product variation is low on stock, a notification will be sent to the store manager about the stock level.
In addition to this, WooCommerce also lets you manage stock at the product variation level. To do this:
- Navigate to the variable product’s edit page. Then click on the Variations tab under the Product data meta box.
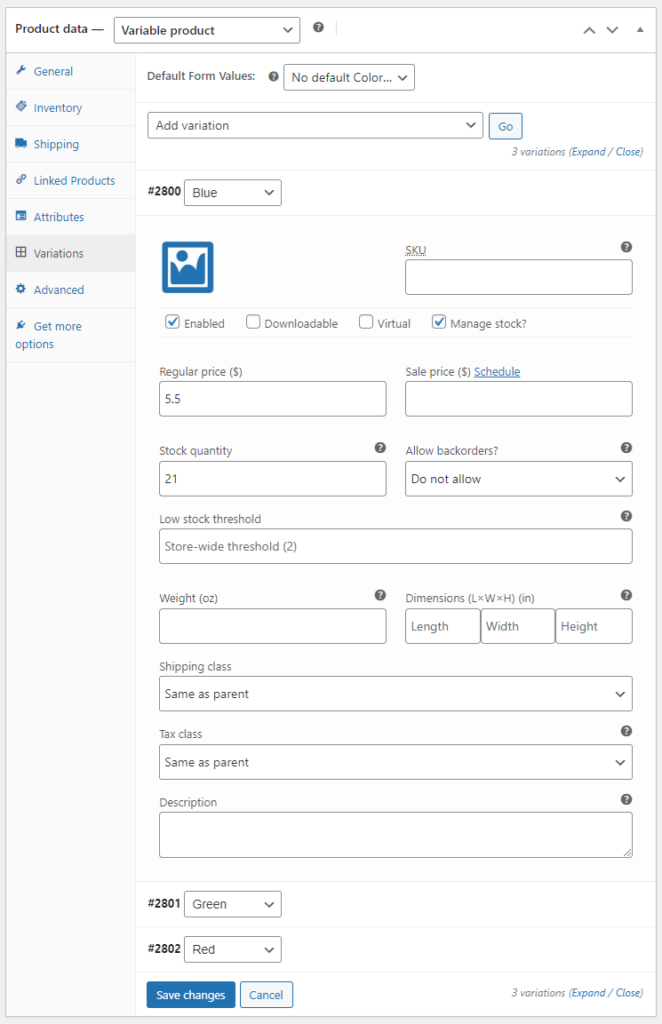
- From here, you can choose the variation you want to manage stock for and tick the Manage stock? checkbox to view the Stock quantity field. You can manage stock for each variation following this method and click on the Save changes button once you’re done.
- This displays a stock status on the front-end when customers select the product variation they’d like to purchase.
3 ways to better display and manage stock at variation level
While WooCommerce lets you display stock information for product variations, it's not ideal. Here’s why:
- There's no way to bulk edit variation stock - you have to do it individually for each product, which takes forever 😫
- WooCommerce only displays stock status after a customer selects a variation from the variation dropdown menu on the product page. This means your customers have to select a variation before they find out if it’s in stock or not, which wastes their time. WooCommerce doesn’t do anything helpful like grey out out-of-stock variations to help shoppers identify out-of-stock variations. The only alternative is to hide out of stock variations completely. However, this may lead customers to believe you don’t sell the variation, so they won’t check back later.
- The product pages only display the stock status or number of items in stock. It's not possible to add relevant information about lead times or waiting times.

As you can imagine, these issues cause frustration for both merchants and customers. Luckily, you can easily solve them by installing the best WooCommerce variation stock plugins. I'll tell you about them next.
Manage stock at variation level in bulk
As we saw earlier, it's very time-consuming to change stock settings and add stock quantities to each product individually. It's much better to install a WooCommerce bulk edit plugin and do it from a central interface.
Setary is by far the best option for this. This bulk stock editor provides a spreadsheet-style interface for updating stock and other types of product data. You can quickly manage variation stock either inline or by selecting multiple variations and performing bulk actions.
First, you view all variations in the spreadsheet and use the search and filters to find specific ones. For example, you can view all variations with a particular attribute like this:
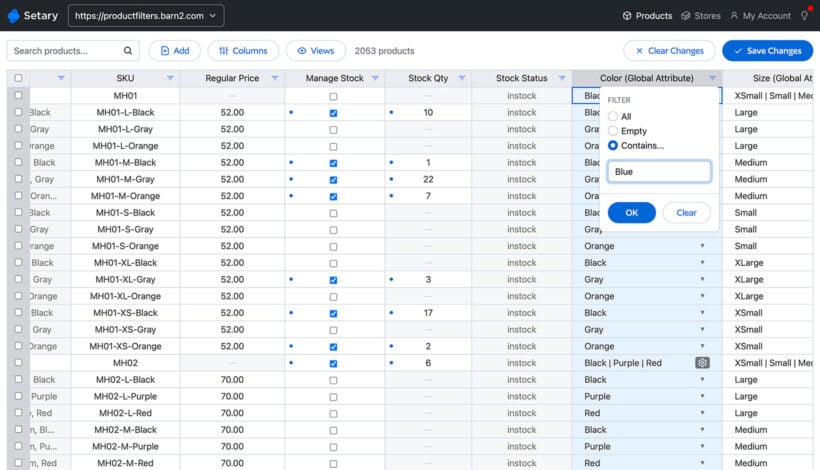
You can then make the changes inline - as shown above - or apply bulk actions like this:
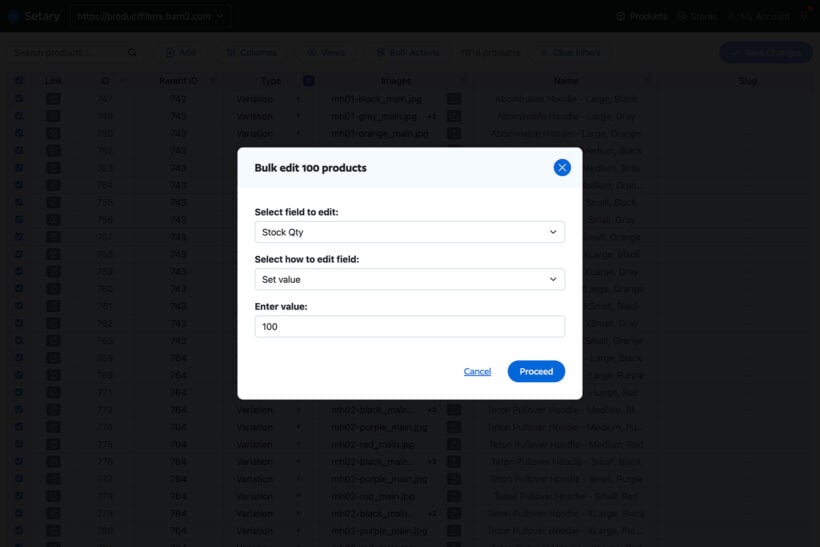
As well as setting individual stock levels, you can edit other stock-related data. For example, you can mark each variation as "In stock", "Out of stock" or "On backorder", or enable the "Manage stock" checkbox.
If you're looking for a faster way to manage stock at variation level in WooCommerce, then Setary will save you a huge amount of time.
List variations in a quick order form with stock information
So far, you're learned how to bulk update variation stock in WooCommerce. Next, let's look at ways to improve how variation stock is displayed in the front end.
The WooCommerce Bulk Variations plugin creates quick order forms which replace the standard variation dropdowns on the single product page. This provides customers with essential information about variations without needing to select an option first.

You can choose to include stock information in the bulk variations order form for each product. This can either be the exact stock quantity for each product, or just the stock status. It also greys out of stock variations to make it clear to customers when a variant is unavailable.
As well as the front end order form, WooCommerce Bulk Variations also makes it easier to manage variations for each product. It does this by adding filters and extra bulk actions to the Add/Edit Product screen:
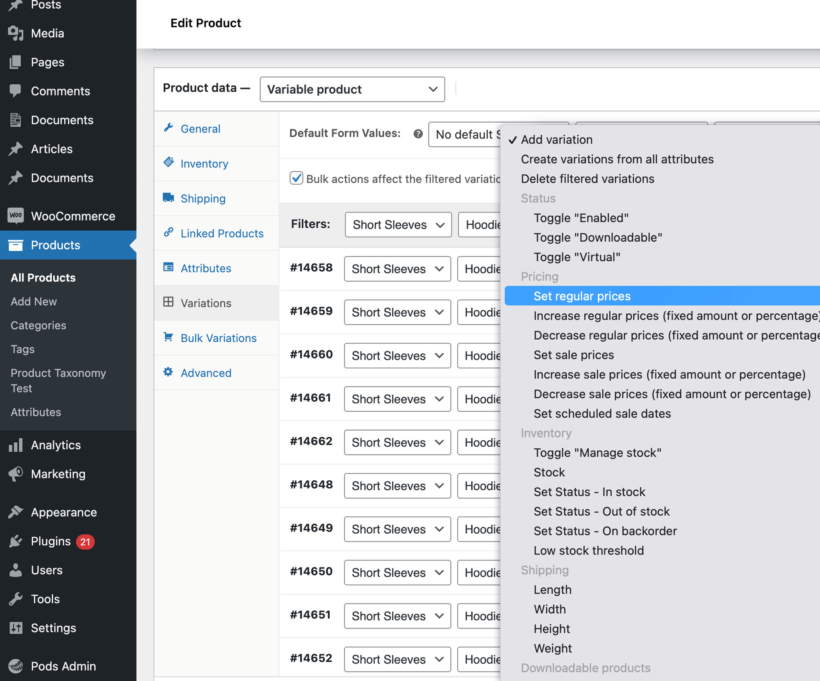
For example, let's say that you sell a custom printed hoodie and have received a delivery of 5 units of all the Small variations. You can select all the variations with the 'Small' attribute and bulk-update the stock to 5.
While you'll still need Setary to manage variations across multiple products, WooCommerce Bulk Variations is a useful time-saver within the product editor.
WooCommerce Bulk Variations tutorial
Once you install the WooCommerce Bulk Variations plugin, the setup wizard will open. This lets you choose the main options for your variation order forms, including whether to display stock information in the variations grid.
You can also set variation grid display options for each product individually. To do this, navigate to the product’s edit page and scroll down to the Bulk Variations tab:

Enable the Product-level control checkbox and the Enable checkbox to display a variations grid for the new product instead of the default WooCommerce dropdowns.

This is how to use the bulk variation stock management features:
- Install the WooCommerce Bulk Variations plugin.
- In the plugin setup wizard, activate your license key and then skip the remaining steps.
- Go to the 'Edit' screen for the variable product that you want to bulk-edit the stock levels for.
- Open the Variations tab in the Product Data section.
- Select the variations that you want to manage stock for. To select variations with specific attributes only, use the filters above the list of variations.
- Use the bulk actions dropdown to change the stock status for all the selected variations.
- Save the variable product.
Show the lead time for each variation
While WooCommerce and the above plugins can display stock information in your store, it doesn't tell customers how long they'll be waiting. You can do this with the WooCommerce Lead Time plugin.
WooCommerce Lead Time does this in two ways:
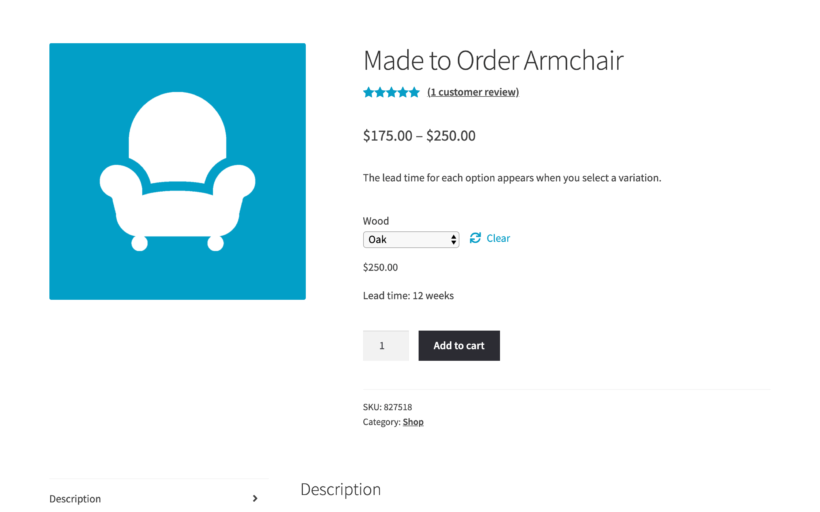
- Displays exact waiting times on product pages, in addition to the usual stock status.
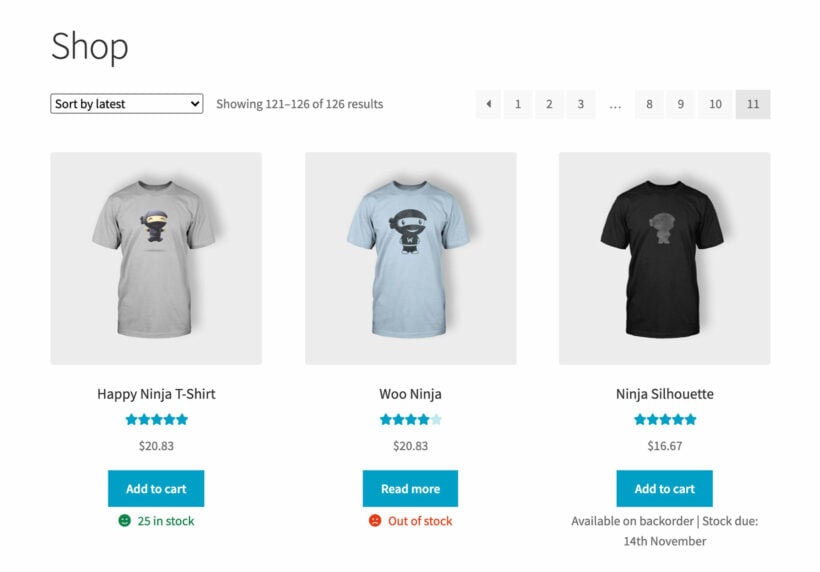
- Optionally displays stock information on the shop and category pages, without changing your store's layout.
It's possible to show different messages for each stock status. For example, if a variation's stock reaches zero and it goes on backorder, then you can display the number of days or weeks until it will be despatched. All you need to do is set a date for when the variation will be back in stock. After that, the plugin will automatically calculate a lead time for you. This allows customers to order backorder products immediately, safe in the knowledge of how long they will be waiting.
Related: Find out how to display WooCommerce backorder products on the front-end.
WooCommerce Lead Time tutorial
Once you get the plugin, the setup wizard will open. Use it to choose how to display lead times in your store.
Here, you can select when to display lead times on your WooCommerce site as well as specify what to display as the lead time message to customers on the front-end. These settings will be applied to all products on your WooCommerce site.
You can choose between static lead times and dynamic lead times:
- Static lead times are used when the information stays the same. For example, you can display a static lead time such as “Handling time: 10 days” for a variation.
- Dynamic lead times specify when out-of-stock products will come back in stock on a particular date. For instance, a dynamic lead time might look something like “Back in stock in 8 days”. You can specify a particular date and WooCommerce Lead Time will calculate the remaining number of days before it comes back in stock.
In addition, you can set lead times for individual products and variations. Simply navigate to the product’s Edit page and click on the Inventory tab under the Product data meta box.

Set the lead time for each product or variation using the Lead time text field and click on the Update button to save changes.

Other variation stock plugins to consider
The plugins and tools mentioned above are my top recommendations for managing WooCommerce stock at variation level. Here are some additional options for you to consider, depending on your store's requirements:
1. FlexStock

FlexStock - WooCommerce Stock Sync with Google Sheets enables you to effectively manage your entire store inventory, bulk edit products, and create new listings directly from a spreadsheet. This extension provides a complete inventory management system that allows you to bypass the WordPress dashboard for every update by syncing SKUs, images, and variable product data to your fingertips via Google Sheets.
The extension comes with a two-directional synchronization engine that ensures your site and your spreadsheet always reflect the same data in real-time. Whether you update the sheet or the site dashboard, the data auto-syncs instantly, allowing you to view a clear picture of stock status, pricing history, and sales counts from a single Google Sheet. This eliminates "dashboard fatigue" and provides a reliable command center for both simple stores and high-volume multi-vendor marketplaces.
Bidirectional Real-Time Sync: Changes reflect instantly both ways, eliminating the need for manual CSV imports or exports.
API Dependency: Real-time updates rely on a stable connection between Google and your server to maintain the bidirectional handshake.
2. Stock Manager for WooCommerce
image_border style="browser" align="center" caption=""] [/image_border]
Stock Manager for WooCommerce is a powerful plugin that allows store owners to easily manage their stocks from the front end. You can manage stock in a pop-up on the shop front end, and set up the product stock, Name, SKU, tax class, and prices, and even hide the product if it's out of stock.
Keeping track of the stock from the shop’s front end is made easy by assigning specific colors - such as red, yellow and green - to the manage stock buttons.
Further reading: How to add visual color pickers with variation swatches for WooCommerce.
Pros & cons:
- Modern, intuitive interface
- Ratings are not clearly displayed on the plugin's sales page
3. Product Stock Manager for WooCommerce

Product Stock Manager is a versatile extension that enables you to manage your product and variation stocks using a simple list view. You can filter the list by products type, category name, price, stock quantity, stock status, and more.
The plugin maintains a log file to view all changes to stock levels and it also comes with a dashboard that displays your current stock quantities and their values.
Pros & cons:
- Stock list view and filters for fast and easy stock management
- Mixed reviews from users
4. Inventory Management for WooCommerce

Shelf Planner’s Inventory Management for WooCommerce aims to solve the costly problem of accurately predicting customers’ daily demand for products.
They offer a plug-and-play forecasting engine that helps you optimize your inventory, improve your margins and reduce waste. The plugin analyses your store’s performance and creates a live order recommendation for every product on a daily basis.
Pros & cons:
- Powerful analytics dashboard
- Can be tricky to set up and learn at first
5. Multi Inventory Management for WooCommerce

WooCommerce Multi Inventory Management extension by Addify enables you to effectively create and manage inventories across different locations, warehouses and stores. You can add multiple stocks for each product based on type, location and suppliers.
The extension comes with a smart stock listing page that allows you to view stock and edit products stock from a single dashboard. From which you can see a clear picture of the current stock status, change history and a list of out-of-stock, low stock and over stock products.
Pros & cons:
- Extremely comprehensive set of features and options
- Most expensive option on this list of plugins
6. ATUM WooCommerce Inventory Management and Stock Tracking

For online store owners in need of powerful stock management, ATUM is a standout solution for WooCommerce. This free inventory management tool offers an intuitive dashboard and "Stock Central" interface that provides complete control over product inventory, suppliers, SKUs, locations, weights, and pricing.
The user-friendly layout seamlessly integrates with the WordPress admin, making it easy to quickly edit all aspects of your WooCommerce stock. ATUM's dashboard displays key business statistics and allows customization of widgets for personalized insights.
Pros & cons:
- Free and highly rated by users
- Does not change the stock display on your site's front end
The better way to manage stock at variation level in WooCommerce
Used as it comes, you can use WooCommerce to manually manage stock at variation level and display information about out-of-stock variations. However, this doesn’t quite cut it. It takes ages to change the stock status and stock level for each variation individually. And even worse, it's very hard for customers to see the stock status of each variation.
Luckily, there are some amazing plugins to fix this for you:
- Setary is the ultimate bulk editor for products and variations.
- The WooCommerce Bulk Variations plugin creates quick variation order forms with stock information.
- WooCommerce Lead Time displays extra information about the waiting time for each variation, based on stock status. It also shows stock information on the shop and category page.
Together, these plugins help you display your online store stock at the variation level.
We hope that this article has provided lots of useful information about the different options for using WooCommerce to manage stock at variation level. Let me know which plugins you chose in the comments!