How to set up conditional logic for WooCommerce product variations

WooCommerce conditional variations keep product pages clean and simple by showing only relevant options to each customer. I'll show you how to set them up effectively.
Offering customizable product options helps online merchants meet unique customer needs and preferences. However, overwhelming customers with excessive choices can hurt conversions. WooCommerce conditional variations solve this challenge.
Adding conditional logic to variations enables store owners to show or hide specific product options based on previous customer selections. This creates a more streamlined and user-friendly shopping experience.
In this article, we'll explore how to set up conditional logic for WooCommerce product variations step by step. We'll discuss benefits for store owners and customers, plus provide complete instructions for implementing conditional variations.
We'll use the WooCommerce Product Options plugin, which adds conditional variations to products.
Let's get started!
What is a conditional variation?
Conditional logic is a feature that shows or hides product options based on customer selections. A conditional variation uses if-then rules to control which product options appear. When customers make a selection, it triggers conditions that determine what options display next.
In WooCommerce, conditional logic controls the visibility of product page elements based on specific conditions. The logic works through triggers, rules, and actions. Customer selections act as triggers. These triggers activate predefined rules. The rules then cause actions like showing or hiding options.
Conditional logic also extends to checkout fields and order emails. Store owners can display different shipping options based on customer location. Payment gateways can appear or hide based on selected products.
Conditional variations specifically control product variation visibility. They present customers with only relevant options. This creates a tailored shopping experience. Choice overload decreases significantly. Decision-making becomes simpler for customers.
Key terminology explained
Understanding these terms helps when implementing conditional variations:
- Variation attributesProduct characteristics that customers can choose from, such as size, color, or material.
- Conditional logicIf-then rules that determine when specific options appear or disappear based on customer actions.
- Product optionsAdditional customization fields beyond standard variations, including text inputs, checkboxes, or file uploads.
- Option groupsCollections of related product options that can be applied to multiple products simultaneously.
- Dynamic pricingPrice adjustments that change based on selected options or combinations of choices.
- Choice dependencyWhen one selection determines which subsequent options become available.
- Variation swatchesVisual representations of options, such as color circles or pattern samples, instead of text dropdowns.
WooCommerce conditional variations in action
Conditional variations can display different product sizes based on selected colors. A gift-wrapping paper option might appear only when a specific ribbon color is chosen:
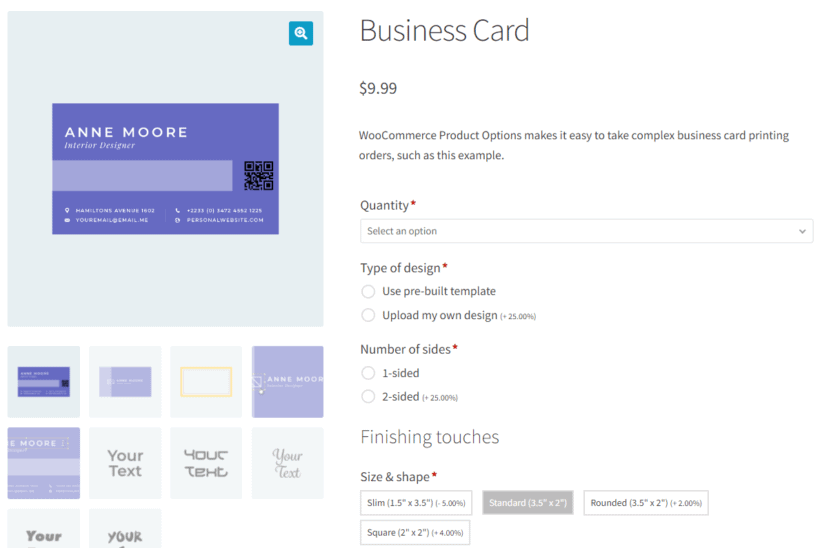
The business card demo for the Product Options plugin demonstrates practical implementation. Visit the page and select options to see dynamic changes. Options adapt conditionally based on your selections:
Selecting Use pre-built template under Type of design reveals specific options:
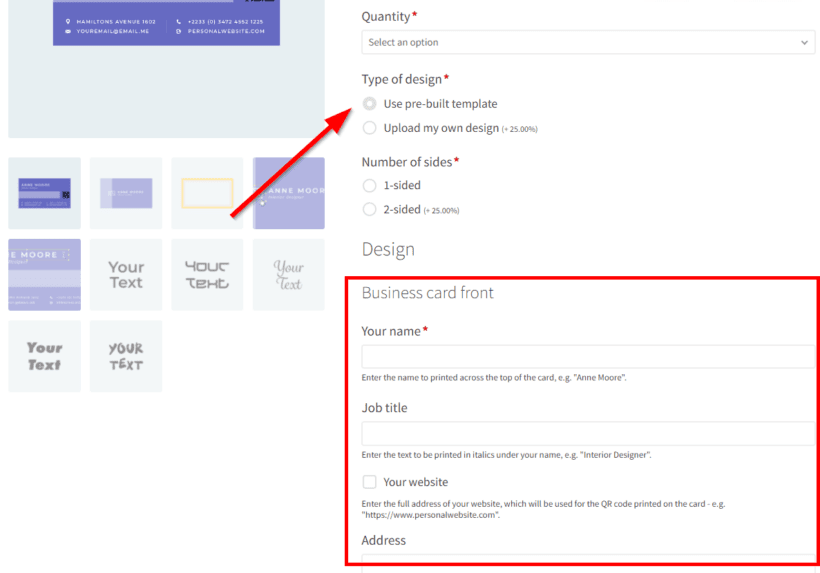
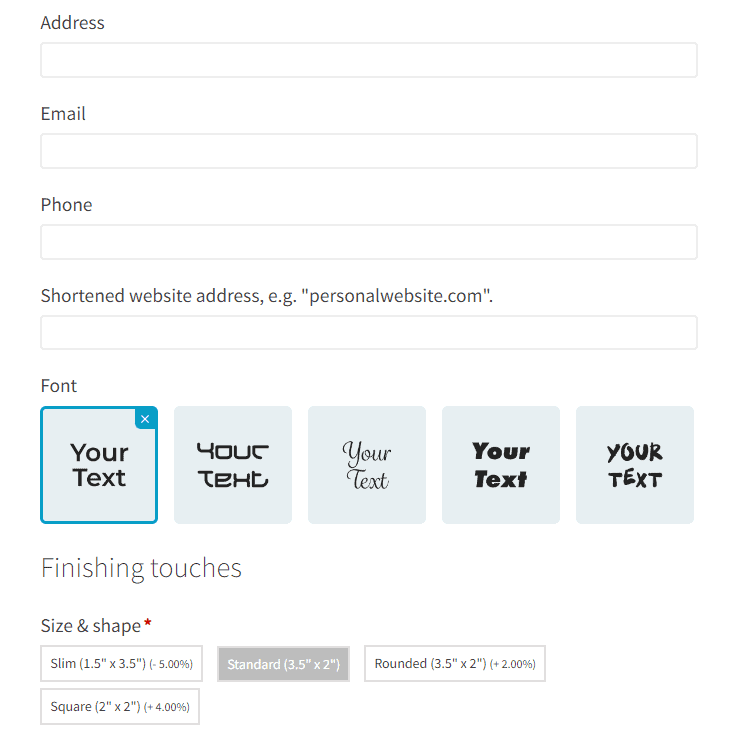
Additional options appear below, including information fields and font selection image swatches:
Selecting Upload my own design displays different options:
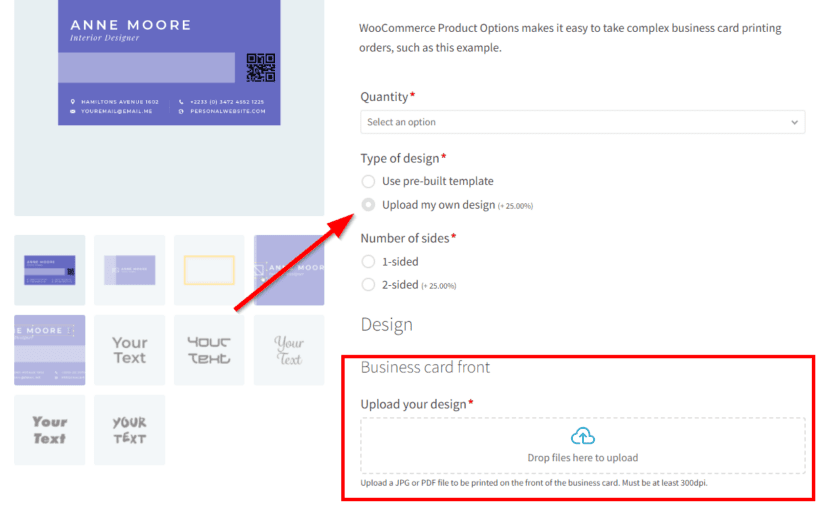
The Upload my own design option shows different variation custom fields based on the number of design sides selected:
What are the benefits of using WooCommerce conditional variations?
WooCommerce conditional variations improve customer satisfaction while boosting sales and revenue. These variations create more efficient product pages and purchasing processes. I find that stores implementing conditional logic often see immediate improvements in conversion rates.
Key benefits of implementing WooCommerce conditional variations include:
- Improved user experienceConditional variations present only relevant options to customers. De-cluttered product pages display options based on customer selections only. This streamlines the shopping experience considerably. Customers find the right product faster with less confusion.
- Increased sales and revenuePresenting appropriate options at the right time encourages purchases. Average order values increase through strategic upselling opportunities. Cross-selling becomes more effective with targeted option presentation. Inventory management improves when variations control product availability.
- Enhanced product flexibilityConditional variations enable more product options without overwhelming customers. Stores can handle wider product ranges effectively. Complex product configurations become manageable. Different customer segments see different options.
- Improved product managementDifferent variations for different conditions improve inventory control. Price management becomes more precise. Product information stays organized across multiple variation sets. Stock tracking becomes more accurate.
- Increased customization opportunitiesConditional variations create tailored experiences for customer segments. Shopping experiences become more personalized. Customer engagement increases through relevant option presentation. Upselling opportunities appear naturally within the purchase flow.
- Reduced cart abandonmentSimplified decision-making reduces customer frustration. Relevant options prevent choice paralysis. Streamlined checkout processes increase completion rates. Clear option presentation reduces confusion during purchase.
These benefits make conditional variations essential for stores selling customizable products. Next, we'll explore the best plugin for implementing this functionality without custom code.
How to create conditional variations with the WooCommerce Product Options plugin
WooCommerce Product Options is a WordPress plugin that adds conditional logic to product pages. The plugin creates custom fields with if-then rule capabilities and it works with both simple and variable products.

WooCommerce Product Options extends your store's capabilities by adding extra product options. Customers can personalize products without requiring PHP or HTML code. Store owners configure options through an intuitive interface.
The plugin works seamlessly with existing products. Its interface enables setting WooCommerce conditional variations for single or multiple products quickly. Advanced features include formula-based pricing and quantity limits.
2 ways to create conditional variations
WooCommerce Product Options provides two methods for creating conditional variations:
- Show and hide normal product variations based on customer selections. For example, you might want to show different color options depending on which size the customer chooses.
- Create extra options directly in the plugin that display conditionally based on selected variations.
The second method offers more flexibility due to WooCommerce's architecture. WooCommerce requires customers to select one option for each variation attribute. If any of the dropdowns are hidden, then this won't work!
It's far better to use product variations for the choices that don't need to be conditional, and to use WooCommerce Product Options to create the options that you want to display for selected variations.
This is the approach we recommend. WooCommerce makes customers pick one option for every variation attribute before they can add a product to the cart, so hiding a variation dropdown breaks the purchase. Building the conditional choices as Product Options fields sidesteps that completely, which is exactly why we added conditional logic to the plugin in the first place.
Conditional logic earns its keep most on configurable products. In our own analysis of 693 stores using Product Options, product configurators made up 30% of all use cases, the kind of multi-step builds where showing only the relevant options keeps the page clean.
Comparison of conditional logic methods
| Feature | Native WooCommerce variations | WooCommerce Product Options plugin |
|---|---|---|
| Setup complexity | Requires custom code or additional plugins | No-code visual interface |
| Conditional logic support | Limited - all variations must be selected | Full conditional display/hide capabilities |
| Field types available | Dropdowns only | Text fields, checkboxes, color swatches, file uploads, date pickers |
| Price adjustments | Fixed prices per variation | Dynamic pricing based on multiple selections |
| Multiple conditions | Not supported | AND/OR logic with multiple conditions |
| Performance impact | Can slow down with many variations | Optimized for complex conditional logic |
| Maintenance required | High - manual updates for each product | Low - bulk editing and global groups |
Step 1: Install and activate the plugin
- To install WooCommerce Product Options, get the plugin here. You'll receive an email containing a downloadable zip file and license key. Access your WordPress admin area. Navigate to Plugins → Add New → Upload Plugin.
- Select the plugin zip file. Click Install Now then Activate Plugin.
The plugin is now active. Let's create WooCommerce conditional variations. This assumes you've already configured products with base variations for conditional logic.
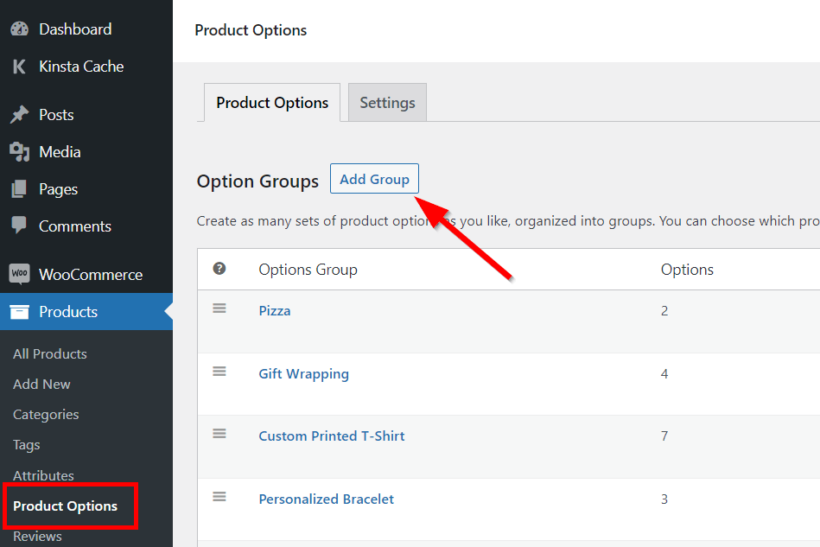
Step 2: Create a new product option group
Navigate to Products in your WordPress dashboard. Click Product Options from the submenu. Select Add Group to create a new option set.
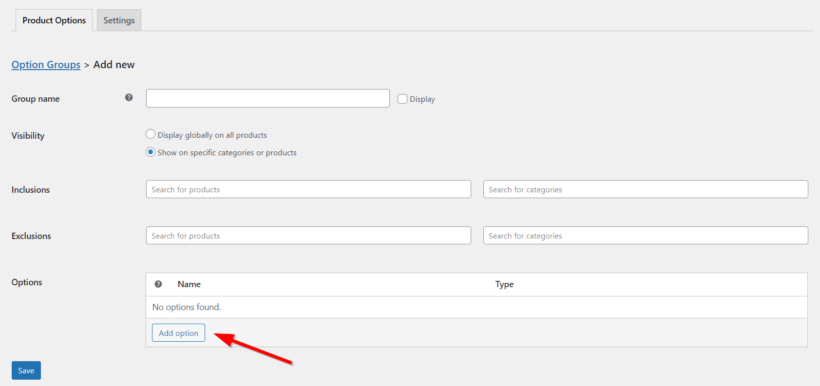
Add the group name on the next page. Select products or product categories for applying conditional variations. The plugin applies options globally by default. Specific targeting improves performance.
Click Add option to continue.
Step 3: Add conditional options
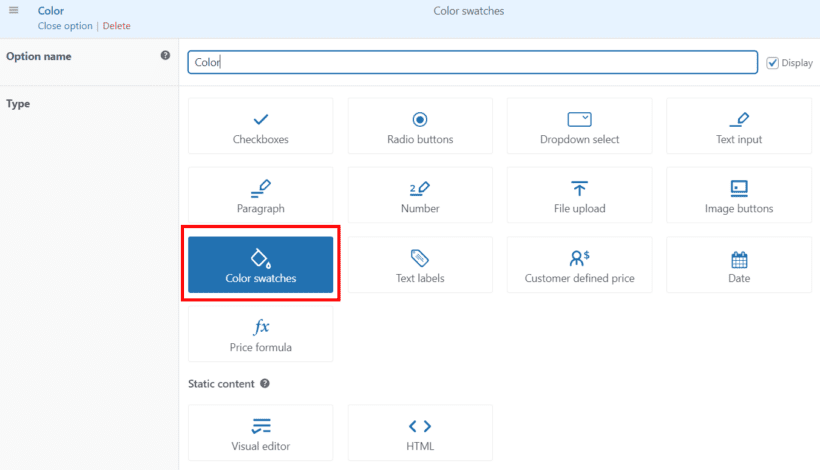
Enter the option name. Select the option type. This example uses 'Color swatches' to display a color selector for certain variations. Alternative options include text fields, text areas, dropdown lists, and other input types.
The 'Choice type' option appears below. Use this to create conditional options directly in WooCommerce Product Options (recommended). Alternatively, display existing variation attributes.

Create customer-selectable choices. Add different colors as options. Include optional prices for specific choices. Each choice can have unique pricing.
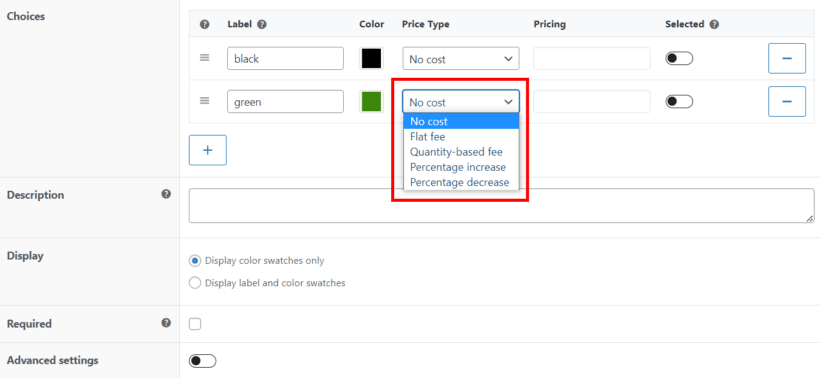
Additional options include adding descriptions. Leave the 'Required' field unchecked for optional variations. Required fields force customer selection before checkout.
Step 4: Enable WooCommerce conditional variation logic
Toggle on Advanced settings to enable conditional logic. The conditional logic section appears. This controls when color options display or hide.
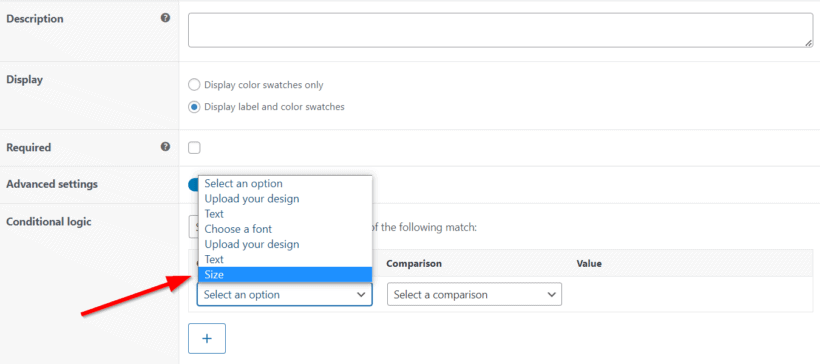
Select the 'Condition' field. Choose which option or product variation controls visibility. Set requirements for conditional logic activation.
For the t-shirt color example, select the 'Size' attribute. Colors appear only for certain sizes. This prevents irrelevant options from displaying.
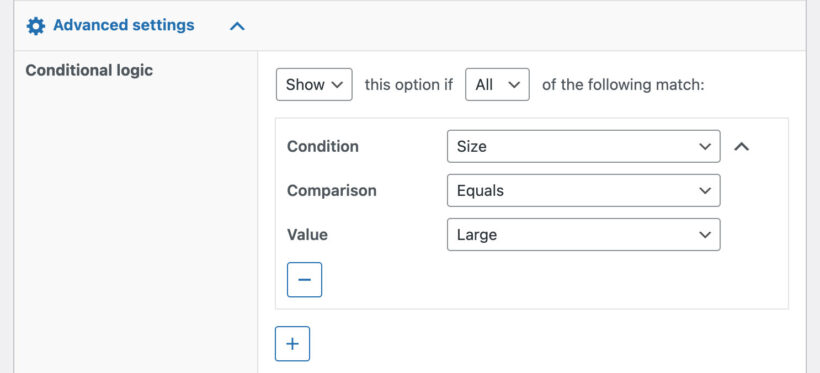
Set the 'Comparison condition' field. Choose 'Equals' for exact matching. Select 'Contains' for partial matching. Other options include 'Not equals' and 'Greater than'.
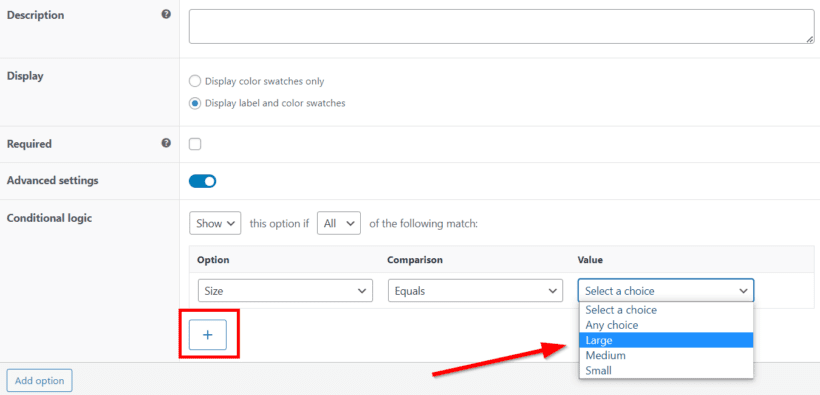
Enter the 'Value' field. Type 'Large' for this example. Color options now display only when Size equals Large. The logic triggers immediately when customers select Large.
Add more conditions using the '+' sign. Multiple conditions create complex logic. Use AND/OR operators between conditions. Build sophisticated product configurations easily.
Step 5: Test the conditional variation on your site's front end
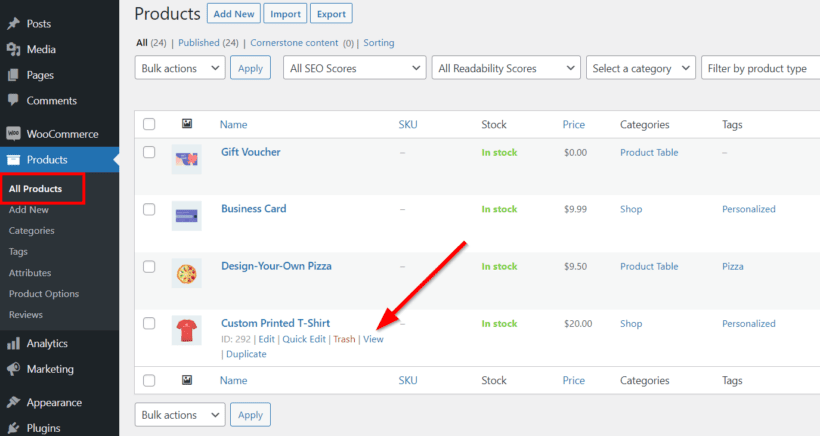
Let's examine the front-end results with these conditions configured. From your WordPress dashboard, go to Products → All Products. Hover over the target product and click View.
The page initially displays standard product variations without the added color option. Selecting the appropriate variation triggers color swatch appearance. Options appear smoothly without page refresh.
Continue adding advanced conditional variations as needed. Create different color swatches for each size variant. Add a 'gift wrap' checkbox controlling gift wrapping options. Build complex product configurators with multiple dependencies. The possibilities are extensive.
Conditional logic transforms static product pages into dynamic experiences. Our customers report conversion increases of up to 30% after implementing conditional variations.
Katie KeithFounder & CEO
Advanced conditional logic techniques
Once you've mastered basic conditional variations, consider these advanced techniques to maximize their effectiveness:
Multi-level dependencies
Create cascading conditions where multiple selections trigger different option sets. For instance, selecting a product type reveals material options. Choosing a material then shows color choices. Each level refines available options further.
I find that multi-level dependencies work particularly well for complex products. Computer configurations benefit from this approach. Selecting a processor type determines compatible motherboards. The motherboard choice then limits RAM options.
Price-based conditions
Use conditional logic to show premium options only after certain price thresholds. Budget-conscious customers see standard options first. Premium selections appear when higher-priced base products are chosen.
This technique increases average order values naturally. Customers self-select into appropriate price ranges. Premium add-ons feel more justified with expensive base products.
Quantity-triggered variations
Display bulk options when customers select larger quantities. Wholesale pricing tiers appear automatically. Custom packaging options show for bulk orders. Shipping methods adjust based on order size.
Quantity triggers streamline B2B purchasing. Corporate customers see relevant bulk options immediately. Retail customers avoid confusion from wholesale-only choices.
Time-sensitive conditions
Schedule conditional variations for specific periods. Holiday gift wrap appears seasonally. Special edition colors launch on predetermined dates. Limited-time options create urgency.
Time-based conditions support marketing campaigns effectively. Product launches become more dynamic. Seasonal offerings integrate seamlessly.
Common implementation mistakes to avoid
After helping numerous stores implement conditional variations, I've identified frequent pitfalls:
Over-complicating logic chains: Keep conditional rules simple and intuitive. Complex nested conditions confuse customers. Test thoroughly from a customer perspective. Simplify wherever possible.
Forgetting mobile optimization: Conditional variations must work smoothly on mobile devices. Touch interactions differ from desktop clicking. Test all conditions on various screen sizes. Ensure smooth transitions between option states.
Neglecting load time impact: Multiple conditional rules can slow page loading. Optimize images for variation swatches. Minimize JavaScript execution time. Consider lazy loading for complex option sets.
Inconsistent pricing strategies: Maintain logical pricing across conditional options. Hidden costs frustrate customers. Display price changes clearly. Update totals in real-time.
Poor visual hierarchy: Conditional options should appear naturally. Use animation to guide attention. Maintain consistent styling throughout. Clear labels prevent confusion.
Measuring success with conditional variations
Track these metrics to evaluate your conditional logic implementation:
- Conversion rate changes on products with conditional variations.
- Average order value increases from upsell options.
- Cart abandonment rates before and after implementation.
- Customer support tickets related to product selection.
- Time spent on product pages with conditional logic.
- Option selection patterns through analytics tracking.
Regular monitoring reveals optimization opportunities. A/B test different conditional logic flows. Refine based on customer behavior data. Continuous improvement drives better results.
Frequently asked questions
What are conditional variations in WooCommerce?
Conditional variations show or hide product options based on a customer's earlier selections. They use if-then rules so each shopper sees only the choices that apply to them, which keeps variable product pages clean and simple.
How do you add conditional logic to WooCommerce product options and add-ons?
Install WooCommerce Product Options, create an option group, add your fields, then open Advanced settings and set a condition that shows or hides each field based on a chosen variation or option. No code is required.
What is the difference between conditional variations and conditional product add-ons?
Conditional variations control which built-in variation choices appear, while conditional product add-ons control extra fields such as text inputs, swatches, or file uploads. WooCommerce Product Options handles both from one interface.
Start using conditional variations for your WooCommerce products
WooCommerce conditional variations enhance customer experience in ecommerce stores through dynamic option presentation. Smart implementation reduces complexity while increasing conversions.
This article explained conditional variation fundamentals and demonstrated practical implementations using the business card demo example. We covered setup steps, advanced techniques, and common mistakes to avoid.
We showed how to configure conditional options using Barn2's WooCommerce Product Options. This plugin simplifies implementation while maintaining clean store appearance. The visual interface eliminates coding requirements completely.
Ready to add WooCommerce conditional variations to your store? Get WooCommerce Product Options today and transform your product pages into dynamic selling machines.
Questions about implementing conditional logic? Share them in the comments section below. I respond to every question personally.