Email lists and contact information have value, which is why you might be looking for how to sell email lists online. You might have a collection of high-value leads/contacts that are useful by themselves or you could just have a large list of segmented subscribers.
Either way, people will be willing to pay for that information, which gives you another way to monetize your website and/or standalone email lists.
You could sell:
Individual contacts for high-value leads.
Collections of leads, like all the therapists in New York City.
Lists of opt-in email subscribers for Internet marketing or digital marketing uses.
In this post, you'll learn how to sell email lists for all those scenarios using WordPress and WooCommerce Product Table. That is, you'll learn how to create your own online store where you can:
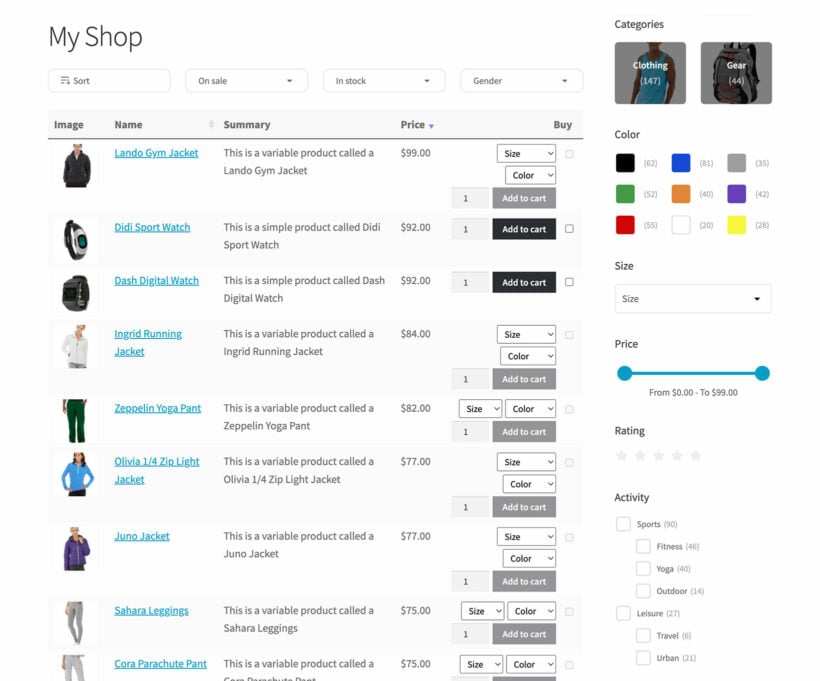
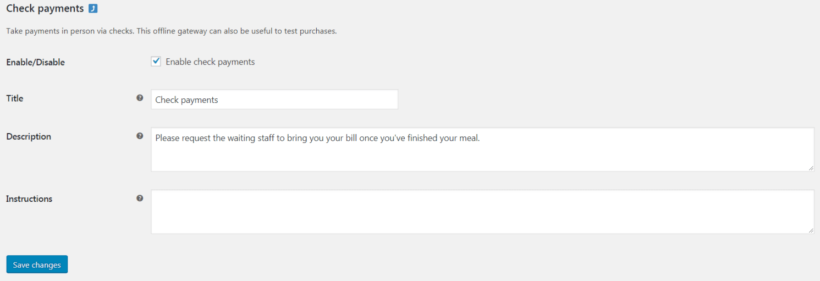
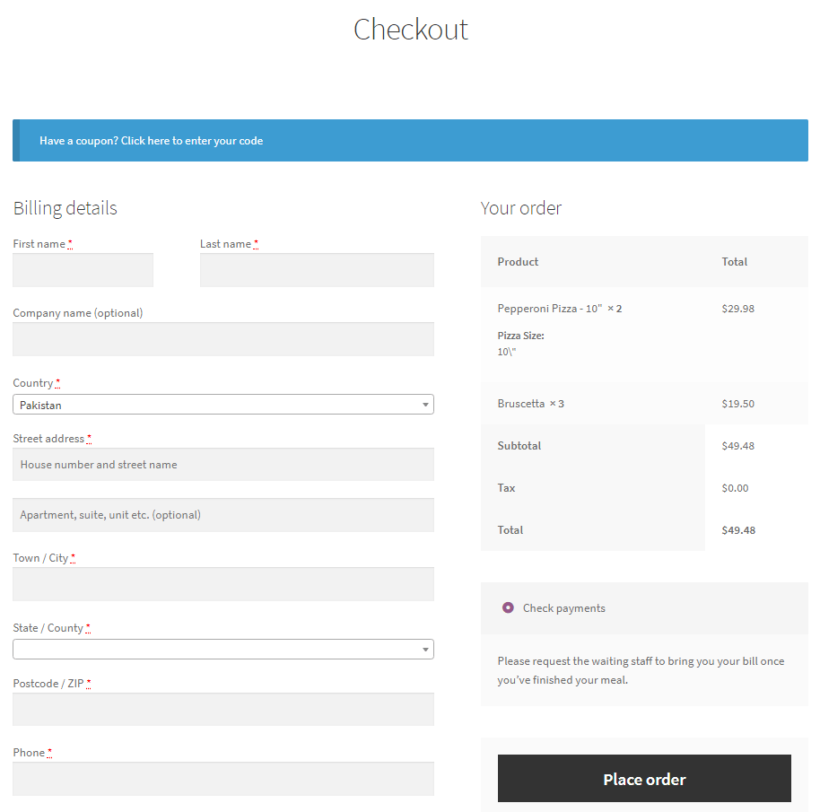
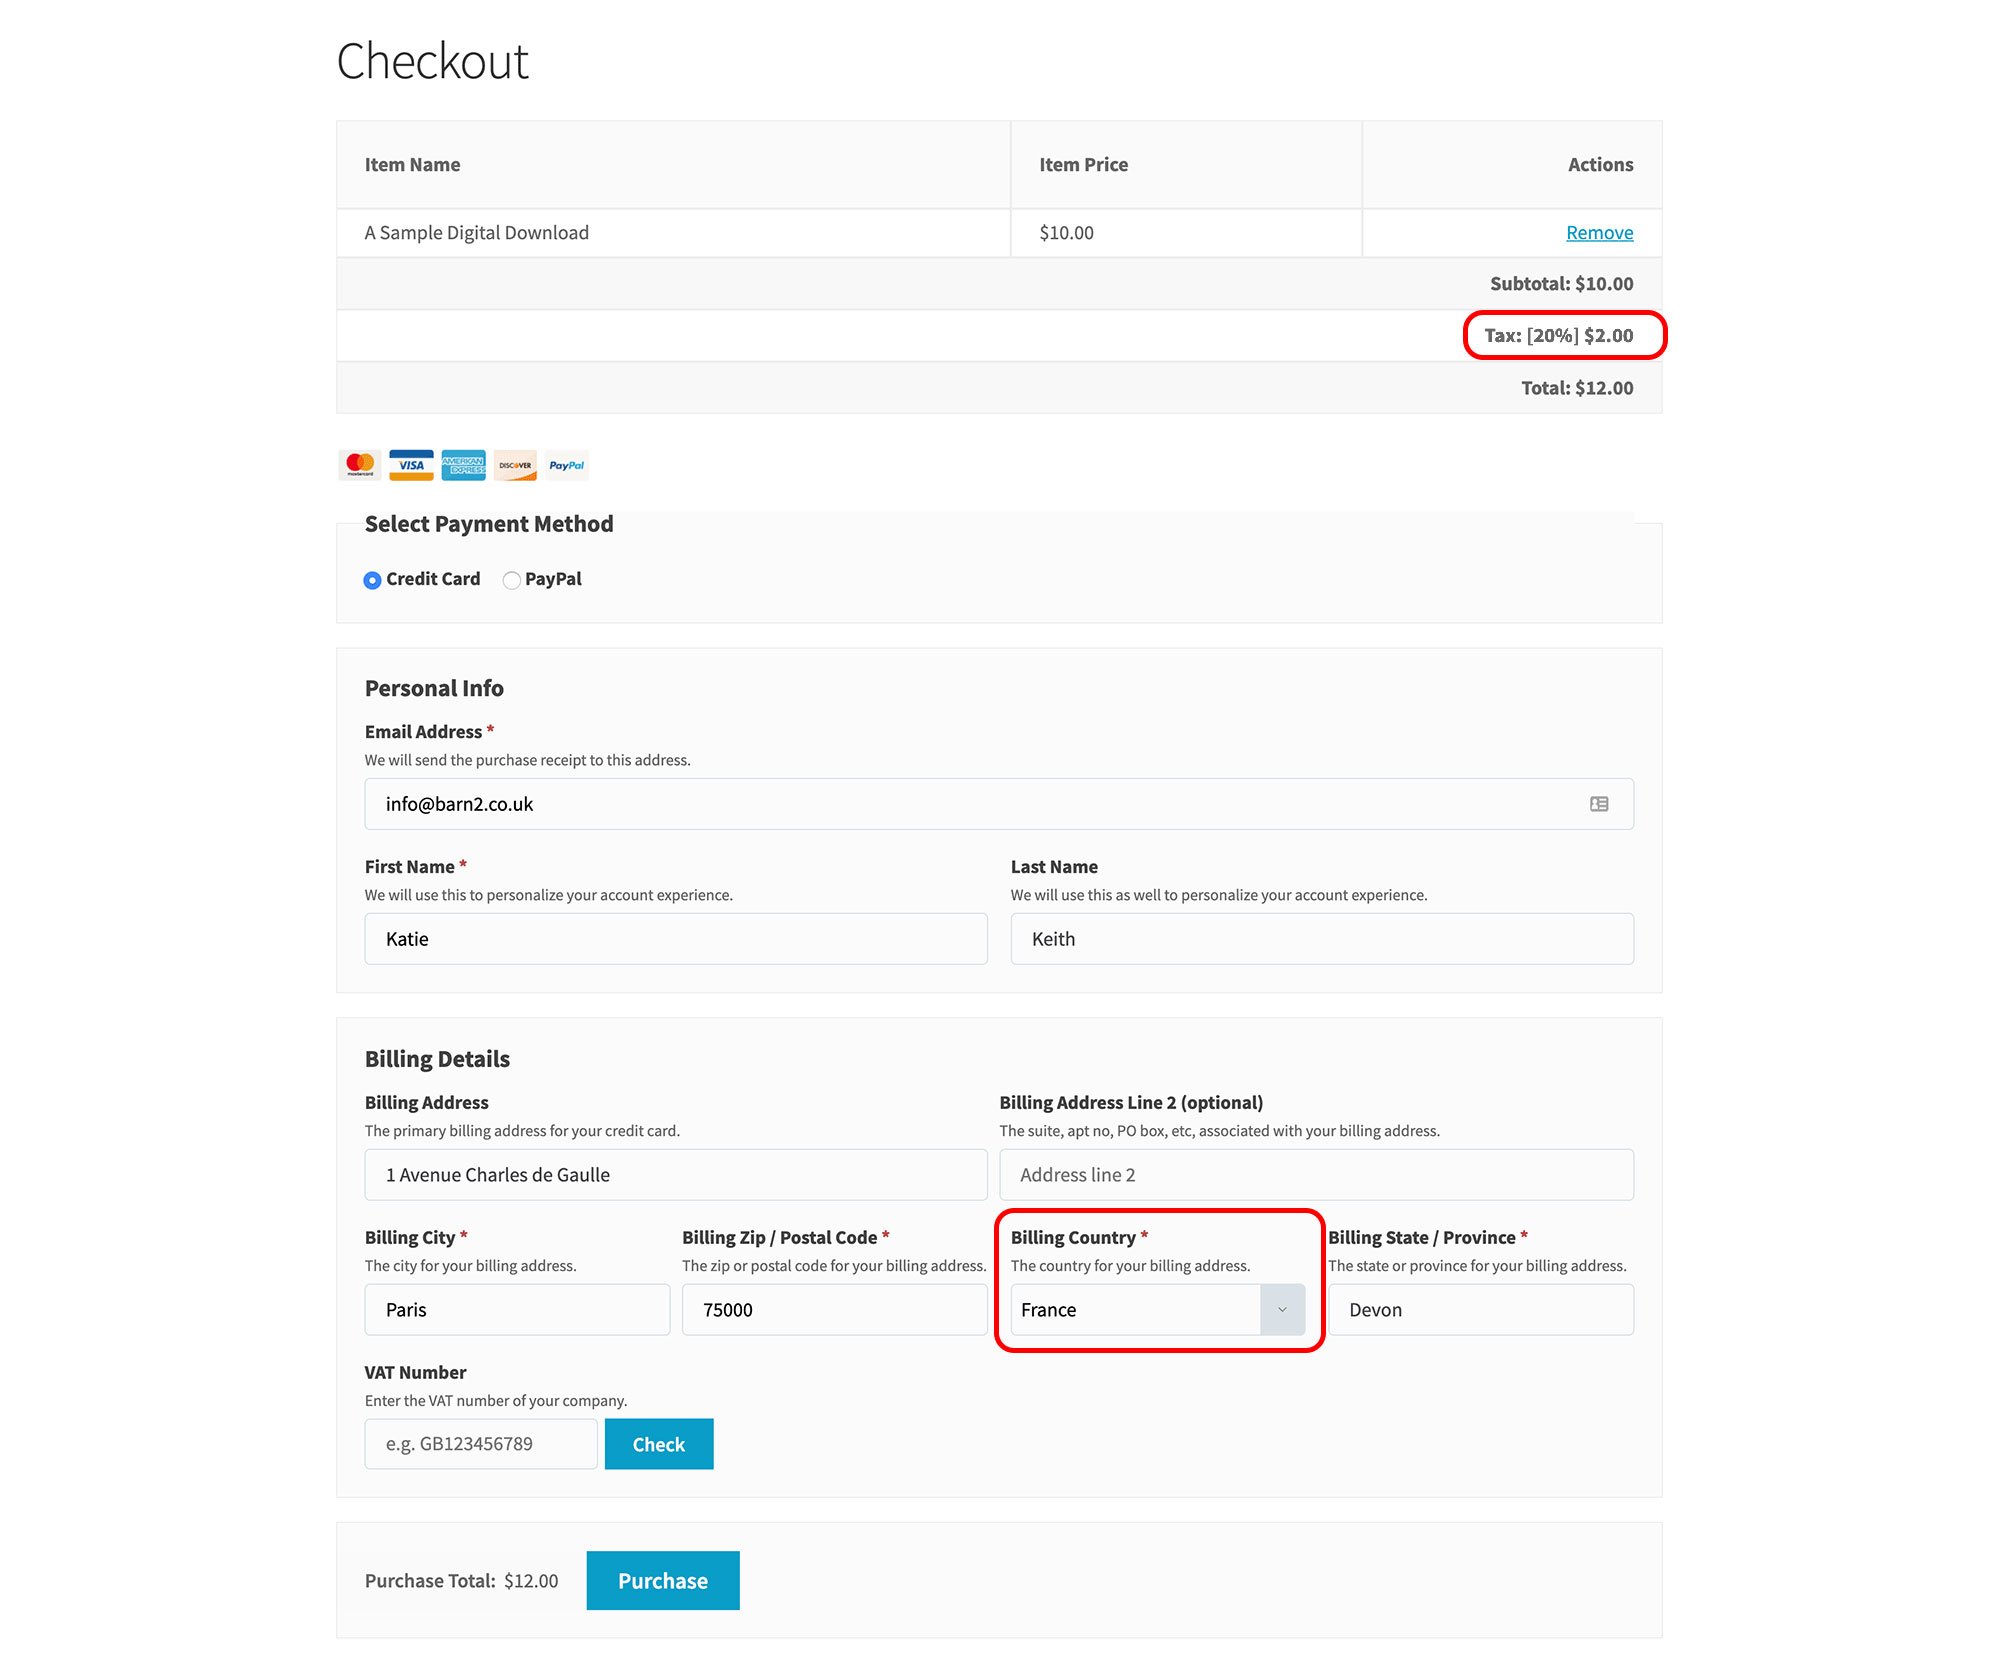
Sell individual contact lists like the example below Visitors can check a box for all the contacts they want to purchase and then check out.
Sell complete email lists For example, one list of "Therapists in New York City" and another of "Therapists in Los Angeles".
Case study: How to sell email lists as individual contacts
To give you an idea of how to sell email lists online, let's look at a real-world example:
TV Production Contacts offers an interactive directory of individual contacts within the TV production industry. Visitors can see important information, like a contact's TV credits, social media information, and company. Then, shoppers can purchase individual contacts that they're interested in.
TV Production Contacts has put in the leg work to create a searchable database of 2,500+ accurate contacts, so visitors are happy to pay a little money to save time and avoid having to dig around themselves.
What you need to sell email lists online with WordPress
Before we get to the tutorial, let's go over what you need to sell emails online:
Your email list
The first thing that you need to sell email lists is...your email list itself!
That's a little obvious, but there are some important things to consider in how you build your email list.
First, if you're creating an individual contact list of potential customers or small business owners like the TV Production Contacts example above, you might need to manually gather these contacts.
If you're going this approach, it's important that you're not selling them to bulk emailers who will send them automatic unsolicited emails, as that would violate the United States CAN-SPAM Act and other anti-spam acts. Here, you're basically putting in the legwork for sales teams or other individuals to manually reach out to each contact.
On the other hand, if you want to sell larger lists, it's important that your lists are opt-in. Again, people do not want to buy lists that are not opt-in because of the danger of being labeled a spammer and/or the fear of sending unsolicited email.
To help you grow your email list and enforce opt-in protocols, you can use an email marketing service like Mailchimp or Aweber. There are also a number of WordPress email opt-in plugins that can help you grow your list from your website or landing page.
WooCommerce and WooCommerce Product Table
To use your WordPress site to sell email lists, you need to add ecommerce support to WordPress, which you can do with the WooCommerce plugin.
However, by itself, WooCommerce is not optimized to sell email lists online. To fix that, you need to add WooCommerce Product Table, which lets you display your WooCommerce products in a table layout, just like the TV Production Contacts case study you saw above.
You can control exactly what information shows up in your table to create a shopping experience that's optimized for the specific email lists/contacts that you're selling.
How to sell email lists online with WordPress: Two scenarios
Below, we'll show you two different scenarios that you can use to sell email lists online:
Sell individual contacts.
Sell separate lists that contain multiple contacts each.
The basic process is the same for each, but there are a few important differences in approach.
To get started, we'll assume that you've already set up a basic WordPress site, installed WooCommerce, and run the WooCommerce setup wizard to set up credit card payment gateways and other basic settings.
To get started, you need to add each email/list as a separate WooCommerce product by going to Products → Add New.
This step is where you make the choice between selling individual contacts and selling separate lists:
If you're selling individual contacts, add each contact as its own product.
If you're selling lists, add each list as its own product.
Here's what a product for an individual contact might look like:
If you want to mimic the approach that you saw with TV Production Contacts, you can use categories, tags, and custom fields to add extra information about each contact, like phone numbers, social media information, industry, etc.
Here's what a product for an entire list might look like:
For a list, you might want to add extra information for details like:
Unsubscribe rates
Open rates
Deliverability
Email campaign conversion rates
Whether it's an opt-in list or not
Current email service provider
Email newsletter frequency
You can either add this information in the product description or use custom fields.
If you want to automatically deliver purchased lists, you can also mark the product as Downloadable. Then, you can upload a CSV file with the list of emails. For individual contacts, you could just include a single record in the CSV:
If you want more control, you can also manually email the contact details after someone makes a purchase.
To finish things out, repeat the process for all of the contacts/lists that you want to sell.
If you have thousands of contacts and don't want to add them manually, you can use Product CSV Import Suite to bulk import contacts from a CSV.
2. Create front-end interface with WooCommerce Product Table
Once you've added all your contacts/lists as WooCommerce products, you're ready to create the front-end shopping experience to sell email lists.
To do that, install and activate the WooCommerce Product Table plugin. This will open a wizard for creating our first table, which you can also access at Products → Product Tables.
Go through the wizard to choose how you want your list of contacts or email addresses for sale to appear. This includes options to:
Choose where to display the list of contactsEither show the contacts on your main shop pages, or create a dedicated page for listing them. If you choose to list them on a page, then you'll then be able to choose which products (i.e. contacts) to include in the table. You can either create a single table listing all your email lists/contacts. Alternatively, you can use modifiers to only include certain emails and create different tables for different categories/tags.
Display your chosen product dataUse the 'Columns' page to control what product data to display about each email address. For example, if you added custom fields for a contact or list, you can include details from those custom fields in your tables.
Customize the 'Buy' columnControl important details about how visitors can purchase email lists. If you're selling individual contacts, you'll want to set the Add to cart button drop-down equal to Button and checkbox so that visitors can select multiple contacts at the same time.
Add filtersFinally, add any filter dropdowns that will help people to find the contacts they're interested in. For example, you could structure the contacts into categories based on details such as country, location or type of contact. You can then display these as filters above the list of contacts for sale.
Add the table to a pageIf you chose to add the list of contacts to a page manually, then copy the shortcode from the 'Ready' page at the end. Alternatively, insert a 'Product Table' block if you're using the WordPress block editor.
3. Add shortcode to display product table
Finally, view the page where you added the email list table.
Here's an example of what it might look like to sell individual contacts:
Start selling contacts and emails
With WordPress and WooCommerce Product Table, it's easy to sell emails online.
You can either sell individual contacts or entire lists of contacts. Either way, your shoppers will get an easy-to-browse table layout where they can find what they're looking for.
By making it easy for shoppers to find the right email(s), you can boost your chances of a sale.
LearnDash is the world's leading WordPress LMS (Learning Management System) plugin. Keep reading to discover the easy way to list your LearnDash LMS courses and lessons in a searchable, filterable table.
LearnDash is a fantastic WordPress LMS. It makes it easy to create online courses with sophisticated features. And with the LearnDash WooCommerce add-on, you can even sell your courses online!
LearnDash comes with some neat layouts and shortcodes that you can use to display your courses and lessons - either in a grid or as a basic list. However, if you have lots of courses then you might find these slightly limiting. That's where the Posts Table Pro plugin comes in.
You can choose what information to display about your courses and lessons, and which courses you want to include. It's even possible to add filter dropdowns to help students to find particular LearnDash content more easily!
Before you start
We'll need the Posts Table Pro WordPress plugin in order to list courses and lessons from the LearnDash CMS in a table.
Download the plugin from the link provided in your order confirmation email. This will save a zip file to your computer.
Go to your WordPress admin panel, then navigate to Plugins → Add New → Upload Plugin.
Click "Choose File" and select the posts-table-pro.zip file you just downloaded.
After uploading, click "Activate"
The Posts Table Pro setup wizard will automatically open. Follow the prompts to create your license key.
If you are not familiar with building courses on LearnDash, you can check out Learndash Dashboard. It comes with an intuitive frontend builder to help you create dashboards for instructors, students, and group leaders to monitor and manage anything related to their LearnDash account.
List LearnDash courses in a table
First, let's learn each stage of the process for creating a table or how to list your LearnDash courses in a table. You can add the table to any page on your site, or even to other locations such as sidebar widgets.
The setup wizard will open automatically when you install the plugin. Alternatively, go to Post Tables → Add New to create new tables.
Give your table a name and select the post type you wish to display. If you don't have a content type yet, you can create one using the Easy Post Types and Fields plugin for free.
Select the posts or pages you want to include in the table. The available options will vary depending on the post type you selected in the previous step. If you chose a post with custom taxonomy, the relevant taxonomies will be listed for you to select.
Customize your table according to your preferences. You can choose which columns to display and in what order. To add a new column, choose the column type from the dropdown menu and click "Add". You can also reorder columns by dragging and dropping the sort icon or column heading. Check out the full list of available columns. You can add lots of additional columns including custom fields, taxonomies, and more!
You can improve user experience by adding filters to your table in the Post Table Pro plugin. Filters appear as dropdowns above the table and can be customized according to your preferences. You can add as many filters as you want, each accepting more than one value at once, and students can bookmark or share a filtered list of courses.
The table loads one page at a time, so it stays fast even with hundreds or thousands of items.
Choose how to sort the table. You can set the default sorting option and the sort direction.
Finally, the wizard will confirm that you have finished creating your table and provide instructions for inserting it onto your site.
Choosing which courses to display
If you don't want to list all the courses from your LearnDash LMS, that's fine too. Use these options to control which courses to list in the table. You can list LearnDash courses by category, ID, date, author, custom field or custom taxonomy values, and more.
Once you've created a table using the Post Table Pro plugin, the next step is to display it on your WordPress site. There are two ways to do this, and both options provide you with flexibility in terms of where the table appears on your site.
There are two ways to display the table created with the Post Table Pro plugin on your WordPress site.
The first method involves using the 'Post Table' block in the Gutenberg editor to insert the table directly from the block settings.
The second method is to copy the shortcode from the table builder of the main Tables page in the Post Tables section of the WordPress admin and paste it anywhere on your site. This method allows you to place the table on any page, regardless of its content, providing you with the flexibility to showcase the table where it's most relevant.
An example list of LearnDash courses
List LearnDash topics in a table
LearnDash has a feature that lets you add topics to your lessons and courses. This is an excellent way to group your course content thematically.
Posts Table Pro is excellent for allowing students to search by topic, as they simply type a topic name into the search box above the table.
If you want to create a table that includes a list of topics, simply specify the 'topic title', 'topic tag', and 'topic category' in their respective columns when using the table builder.
It's not possible to include the lesson name in the table because LearnDash stores the lesson as a separate post type, and not as a field on the topic post. If you want to list the topics for each lesson individually, then it's best to create a separate table for each lesson.
You can easily do this by using topic categories to record which lesson each topic is used on. You can then add the lesson name as a subheading on the page, and add a table listing the topics for that lesson underneath.
Sell LearnDash courses with WooCommerce and WooCommerce Product Table
Lots of LearnDash LMS websites like to take payment for courses. The student pays for a course online and then receives instant access to the course and all its lessons, quizzes, etc.
The LearnDash WooCommerce plugin provides an excellent way to do this. You install WooCommerce to provide the ecommerce and payment features, create a new product, select the 'Course' product type, and choose which course the student will be enrolled in when they buy the product.
The problem with this plugin is that your course products are listed in a standard store layout, which isn't really designed for selling courses! Each course product is displayed with a large image and very little information about the course. It's difficult to compare courses alongside one another, and students have to scroll down a long way to see the different courses. Compare the two screenshots below:
The default grid layout - not ideal!
WooCommerce Product Table - much better!
As you can see, the table layout on the right is a much better way to display courses. If you want to display course images then you can add small thumbnails to the table, but there's no need for such huge images. It's better to show more products within a smaller amount of space, along with extra information about each course. You can also add quick filters and a search box to help people to find courses more easily, for example by category.
You can achieve all this by using the LearnDash WooCommerce LMS plugin with the WooCommerce Product Table plugin. And if you like the quick view buttons in the screenshot above, then you'll need the WooCommerce Quick View Pro plugin too. I'll tell you how to set all this up next.
Listing LearnDash products with WooCommerce Product Table
Set up LearnDash, add some courses, and then use the WooCommerce Integration add-on to create some course products.
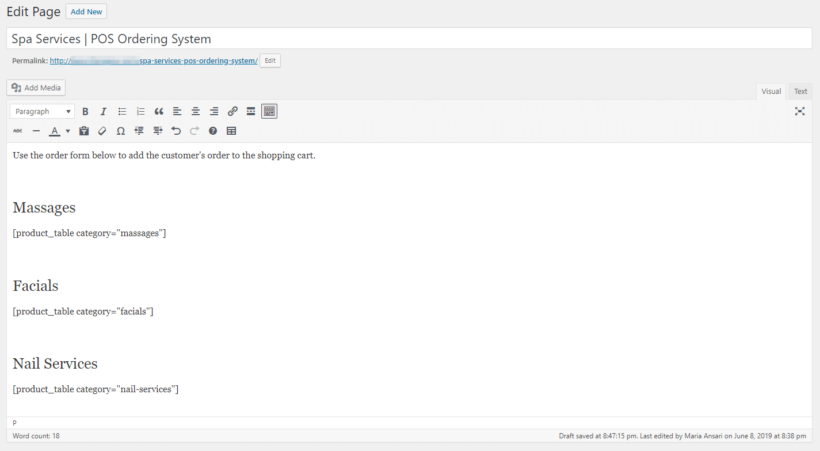
If you'll be using WooCommerce Product Table to sell other types of products as well as courses, create a category for your course products.
Go to WooCommerce → Settings → Products → Product Tables and choose the settings for your tables. In particular, choose which columns you want to include, and add filters to help people to buy specific courses more easily.
Create a new page, which you'll use to list your LearnDash course products.
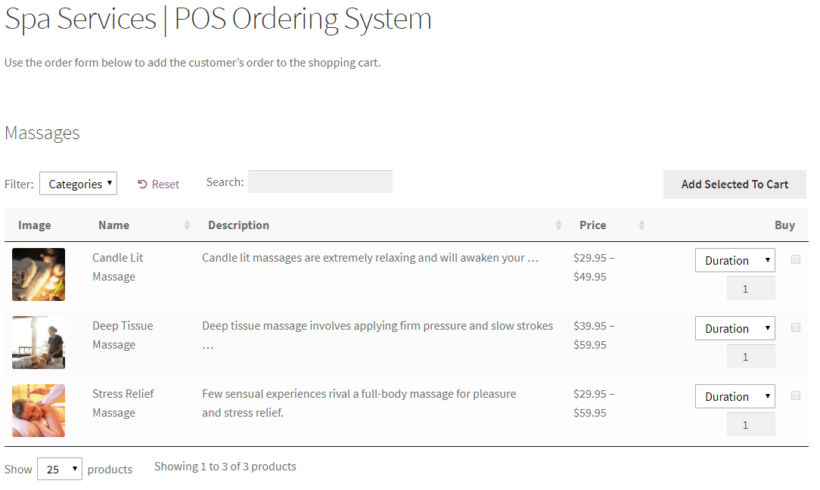
Add the shortcode: [product_table category="courses"]. Replace 'courses' with the slug of the product category you want to display, or if you're not using categories then just use [product_table]).
This will create a searchable table listing the LearnDash courses that you have added as WooCommerce products. It's perfect if you want to create a one-page order form for signing up to your courses. Students can select the courses they want to sign up to (either using the add to cart buttons or quick-select checkboxes) and pay for them all using the WooCommerce checkout.
Add quick view buttons
Normally, students have to click on the product title to learn more about the course and read the full description. You can speed up the process by installing WooCommerce Quick View Pro.
This handy plugin lets you add 'quick view' buttons to the product table. Potential students can use these to learn more about each course from a quick view lightbox popup. That's much faster than having to visit a separate page for each product. It also keeps them on the list of courses, which encourages them to sign up for multiple courses at once.
Once you've installed WooCommerce Quick View Pro, simply add quick_view to your list of columns on the WooCommerce Product Table settings page. For example, your list of columns might now be: image,name,quick_view,buy
If you'd like to list these in a table, instead of using the standard bbPress forum layouts, then check out our other tutorial. This provides full instructions on how to use Posts Table Pro to list your LearnDash forums and discussion topics in a table.
It's also possible to list LearnDash quizzes in a table. To do this, install LearnDash and Posts Table Pro (as described above) and either use the Gutenberg editor to insert your list of quizzes block or copy the shortcode from the final page of the WordPress table builder. You can then paste it anywhere on your site.
Use the include option to choose which quizzes to show. For example, if you wanted to list quizzes for a specific course only (e.g. on the course homepage), then you would select all the quizzes for that course.
Displaying other LearnDash data in a table
So far, we've looked at how to display LearnDash courses, lessons, forums, quizzes, and WooCommerce course products in a searchable table view. LearnDash also comes with other post types such as groups (groups) and assignments (sfwd-assignment) which you can list in a table.
To list other LearnDash post types, just select the post type on the first page of the Posts Table Pro table builder.
Adding a searchable directory of course materials to your LearnDash courses
Finally, there's one more way that you can improve your LearnDash courses. As well as listing the courses and course information in a searchable format, it's important to consider how to present your course materials.
Most LMS courses need to provide extra resources to their students. For example, this might include course handbooks, lesson notes, worksheets, links to useful websites, and so on. The best way to do this is with Posts Table Pro's sister plugin - Document Library Pro.
Document Library Pro makes it easy to:
Add any type of resource, link or download to LearnDash.
Display them in any location within your courses and lesson pages.
Add easy search boxes and filter dropdowns so that students can find the resources they need.
As you can see, Posts Table Pro offers the perfect way to list LearnDash courses, lessons, forums and quizzes in a more searchable, interactive format. It's an excellent way to engage potential students and encourage them to take more courses.
Together, these plugins provide the perfect solution to listing any type of LearnDash data in a table. Get them today, and start listing your LearnDash content in new and better ways!
If you want to share your book reviews with the world, you can use a WordPress book review plugin to collect all your reviews in one spot and make it easy for your visitors to find reviews for certain books. You can list all your reviews in one convenient table and let visitors search by title, filter by author or genre, and more.[/lead_paragraph]
With the right WordPress book review plugin, you can set up a flexible system that meets your needs without any complications. You won't need to write any code or have any special technical knowledge, but you can still create a review site that's customized for you and avoid the "one size fits all" approach of some WordPress review plugins.
Below, you'll learn step-by-step how to start using Posts Table Pro as a WordPress book review plugin to create a review site that looks something like this:
You'll also be able to control exactly what information displays in your book review list. So if you want to add a review summary, list the book's ISBN, or anything else, you'll be able to easily set that up.
Why Posts Table Pro is the best WordPress book review plugin
Posts Table Pro is an easy-to-use WordPress plugin that lets you take any content on your site and display it in a customizable table.
For this implementation, that "content" is your book reviews. You can publish your reviews using the normal WordPress editor. Then, you can collect all of your reviews in one spot and add helpful filters and search options.
The benefits of using Posts Table Pro as a WordPress book review plugin are:
Control You can choose exactly what to include in your book review list. Want to list a star rating? Does Amazon buy link? Thumbs up/down rating system? Publishing date? ISBN? You can add anything you want.
Ease of useYour visitors can easily find the reviews they're interested in with filters and search boxes.
Flexibility You can create different lists for different books. For example, you could have one collection of science fiction reviews and another collection of fantasy reviews.
You can also use Posts Table Pro with all WordPress themes, which lets you keep using your favorite review website theme. And because you can control exactly what information to include, you can also write other reviews, like video games or product reviews.
Below, we'll show you a real example of Posts Table Pro in action and then we'll take you through how to set it up as a WordPress book review plugin.
Case study: Science Fiction Book Reviews
Science Fiction Book Reviews is a real-life book review website that's published over 500 book reviews for books from over 140 different science fiction authors.
That's a lot of books -- so Science Fiction Book Reviews needs a user-friendly way to help visitors find reviews of books they're interested in.
To create an easy-to-browse archive of all those reviews, Jim, the man behind the website, uses Posts Table Pro to create an easy-to-browse list of all his book reviews:
If users want to filter out reviews for books from a specific author, they can use the drop-down to select that author. They can also pick several authors or genres at once, and each option shows how many reviews sit behind it. And the great thing is that visitors can filter by author without reloading the page, which creates a really convenient experience for them:
If users want to see the full review, they can click through to the review's page. This also improves SEO and gives each review a chance to rank in Google.
Want to set up your own WordPress book review plugin like Science Fiction Book Reviews? Here's how to do it...
How to use Posts Table Pro as a WordPress book review plugin
Below, you'll learn how to set up Posts Table Pro as a WordPress book review plugin to duplicate the setup that you saw in the Science Fiction Book Reviews case study above.
1. Create a book review custom post type
To house your book reviews, you have two options:
You can write them as regular blog posts.
You can create a custom post type.
While the first method works, it's not great if you still want to post non-review blog posts because everything is mixed together.
With a custom post type, you can create a separate type of post for just your book reviews.
You can create a new blog post when you want to blog, and a new book review post when you want to write a book review. You'll also be able to add extra information fields to your book reviews to collect important details, like your star rating for a book and the Amazon purchase link.
Go to Post Type → Manage in your WordPress dashboard.
Click Add New.
Enter the singular and plural post type names. E.g. "Book Review" and "Book Reviews" and click Next.
Select the type of information you wish to display and click Create.
And that's it! You just created a book review post type. You should see it as a new option in your WordPress dashboard sidebar.
2. Add custom fields and taxonomies
Custom taxonomies and custom fields let you store extra information about a review:
Custom Taxonomies These are like blog categories or tags, but tailored to your reviews. For example, "Book Author" or "Genre".
Custom Fields These let you store extra information about a review. For example, the star rating you give it, a book's ISBN, or the Amazon purchase link.
To add custom fields, go to Post Type → Manage in your WordPress dashboard. For the post type you want to add the custom field to, click on the Custom Fields button.
Click on Add New to add a new custom field to that post type and enter the Name, Slug and select the field type (text or visual editor).
Make sure to click Add custom field button when you're finished.
To create custom taxonomies, go to Post Type → Manage. Click on the taxonomies button for the respective post type you wish to customize. Click on the Add New button.
Enter the singular and plural names and the slug for your new taxonomy. For example, here's a custom taxonomy for the book's author:
If you want, you can create additional taxonomies, like for a book's genre.
3. Write some reviews
Now, you can visit Book Reviews → Add New to write your first book review:
Add the book/review title at the top.
Write your review in the main text editor.
Select the Book Author and Genre on the side.
Add the book cover image as the Featured Image.
Enter your star rating in the Star Rating box. You can use the ⭐ emoji.
Add the Amazon PurchaseLink as a link in the text editor.
Fill out any other fields (like the ISBN)
To add additional book reviews, you just need to repeat the process as needed.
If you enabled comments in the first step, visitors will be able to leave a comment on your full review. Some other ways to enhance your individual review page are:
Pro tip: To add reviews in bulk, use Posts Table Pro with the Setary bulk editing spreadsheet. This lets you add reviews from a single interface instead of clicking through multiple pages.
4. Display your reviews with Posts Table Pro
Once you've added a few book reviews, you're ready to set up the Posts Table Pro WordPress book review plugin to list your book reviews for visitors.
Upon installing the Post Table Pro plugin, a setup wizard will automatically guide you through the process of creating your first table. Additionally, you can create new tables at any time by navigating to the "Post Tables" section of your WordPress admin and selecting "Add New." Here are the steps to create a table using this plugin:
To create a table using the Post Table Pro plugin, start by giving your table a name and selecting the post type you wish to display. If you do not yet have a content type, you can create one using the free Easy Post Types and Fields plugin.
Next, select the books or pages you would like to include in the table. The available options will vary based on the post type you selected in the previous step. For instance, if you chose a post with custom taxonomy, the relevant taxonomies will be listed for you to select.
Customize your table to suit your preferences. You can determine which columns to display and in what order. For example, to add the cover image, book title, author, genre, purchase link and rating, simply choose the column type from the dropdown menu and click "Add". You can then reorder them by dragging and dropping the sort icon or column heading.
Add filters to your table to help users narrow down their selections. The filters appear as dropdowns above the table, and you can add as many as you like for example, book author and genre. It is important to note that available filter options will vary depending on the post type selected on the first page.
The table loads page by page automatically, so it stays fast even with hundreds or thousands of reviews.
Choose how to sort the table. You can set the default sorting option and the sort direction.
Finally, the wizard will confirm that you have finished creating your table and provide instructions for inserting it onto your site. To display the table on your WordPress site, you can either use the 'Post Table' block in the Gutenberg editor or copy the shortcode from the table builder and paste it anywhere on your site. This gives you the flexibility to place the table on any page regardless of its content.
And once you publish your page, you should see your full book review list:
Visitors can browse and filter the list. Then, they can click through to the book review to read your thoughts.
Congrats! You just set up your own WordPress book review plugin.
Create your own WordPress book review plugin today
With Posts Table Pro, you can create your own WordPress book review plugin that lets you create a unique book review experience.
You can choose exactly what information to include in your book review list, and your visitors will be able to easily browse your entire catalog of reviews.
Best of all, you can achieve this level of customization with easy-to-use plugins -- no technical knowledge required. So even if you're just a casual book review blogger, you can set this up!
To set up your own WordPress book review website, purchase Posts Table Pro and get started today:
And if you want to sell books on your own ecommerce WordPress website, you can use WooCommerce and WooCommerce Product Table to list books for sale and create your own book store, as well.
This guide explains how to create a searchable document library in WordPress. We'll cover how documents are organized, displayed, and accessed.
A WordPress document library plugin displays documents and other files in a structured, searchable layout on the front end of your site. Common use cases include internal document libraries, resource hubs, knowledge bases, and public document collections such as reports or publications.
While WordPress includes a built-in media library, it is designed for managing files in the admin area rather than presenting them to site visitors. Many plugins focus on file storage or back-end management, but fewer provide a searchable, filterable document library that works well on the front end.
The Document Library Pro WordPress plugin was designed specifically for creating front-end document libraries. The steps shown in this tutorial apply whether you are building a public document library, a private internal library, or a restricted collection for specific users.
The guide walks through the full setup process, from creating documents and categories to displaying them in a searchable library. No custom code is required.
What is a WordPress document library?
A WordPress document library is a structured, searchable collection of files displayed on the front end of a WordPress site. It lets visitors browse, search, filter, and download documents such as PDFs, spreadsheets, and presentations from one organized page.
Site owners use it for resource hubs, policy and report collections, knowledge bases, and member portals. WordPress has no built-in front-end library, so this is usually added with a plugin such as Document Library Pro, which organizes documents into categories and displays them in a searchable table or grid.
What you'll need to create your WordPress document library
You need 3 things to build a document library in WordPress:
The files that you want to list in the document library. You can host these in the WordPress Media Library, or literally anywhere else on the web (Google Drive, YouTube, SoundCloud, Dropbox, etc.).
This tutorial covers the WordPress plugin. If your site runs on a different platform, or you would rather not manage a plugin at all, the same searchable library is available as a cloud version that works on any website. You build it once and embed it anywhere, from Squarespace to a company intranet.
The complete document library solution
Document Library Pro is a comprehensive solution with everything you need to add and display documents:
Quickly add documents to WordPress - Either manually, using drag and drop, as a bulk CSV upload, or via a front end upload form for your users.
Store extra data about each document - Make the WordPress document library more accessible by adding extra information such as a title, excerpt and description. Other data is calculated automatically, such as file size, file type, date, and last modified date.
Instantly list documents in a searchable, sortable table with filters - or alternatively in a tiled grid layout.
Supports any file type - The WordPress document library plugin supports literally any file type that can be stored in the Media Library. If the documents are hosted externally then you can link them to any third-party website like Dropbox, Office 365, or YouTube.
Embed documents, audio, and video - Instead of (or as well as) download links, you can display documents directly on your website. You can even add embedded music and video players which people can play on the main document library page.
Flexible download links - Choose whether to show download buttons, text links, or file type icons on your main document library page. Also, choose whether to provide instant downloads or a separate page for each document.
How it works
To use the WordPress document library plugin, you simply add your documents to the WP admin. The plugin takes care of the rest and automatically displays them in a searchable document library in the front end. You can choose which columns of information to include. You can decide whether to structure the documents into folders based on their category. There are many more customization options available.
People can easily find the documents they're looking for. They can either read them online or download a file.
What sort of documents can I display?
The document library plugin can list any type of document on a WordPress website. This includes:
WordPress audio or video galleryYou can display photos, music, and videos in a WordPress audio library or video gallery, creating any type of resource or document gallery!
Step-by-step guide to building a WordPress document library
Next, I'll show you how to create a WordPress document library for your documents, publications, or any other type of resource.
We built Document Library Pro after years of watching people use our Posts Table Pro plugin to list documents, then ask for download buttons, previews and file uploads it was never designed for. So it's built around one thing: displaying your files on the front end of your site, public or private. If you just need to tidy up files in the WordPress admin, it's overkill, because the whole point is what your visitors see.
I'll also share bonus tips on how to add even more features to your WordPress document libraries. This includes how to make parts or all of the document library private, document management advice, and embedding multimedia content such as flip books, audio, and video.
First, watch Sam explain how to create a document library with WordPress and build your own along with him. Alternatively, keep reading for full written instructions:
1. Install Document Library Pro
Installing the WordPress document library plugin only takes a minute:
Get Document Library Pro and download the plugin files from the order confirmation page or email.
In the WordPress admin, go to Plugins → Add New and upload the plugin zip file that you just downloaded. Click 'Install' and then 'Activate'.
Activate your license key in the plugin setup wizard.
2. Set up your document library
The Document Library Pro setup wizard will guide you through the main settings. You can then access more advanced settings at Documents → Settings.
First, use these options to set up your document libraries globally. Later, you can override these options for each individual list of documents as needed.
Recommended settings
Layout - Choose between a table or grid view. I recommend the table view if you have lots of documents, as it displays more per page. In our analysis of 500 sites using the plugin, the table layout was the most popular choice, and PDFs were by far the most common file type. Use the grid view for smaller document libraries where you want to make each document more prominent.
Folders - Tick this to automatically structure the document library into folders, instead of as a single list. There will be one folder for each document library category.
Content - Choose what data to display in your document library. There's a huge range of possible columns to choose from, including the document name, description, file size, file type, published date, modified date, and download link. You can rename the columns as needed.
Link style - Decide whether the document link field will display a download button, text link, or file type icon.
Link text - Change the word 'Download' to anything you like, such as 'View' or 'Read Online'.
Clickable columns - These link to an individual page for each document. If you don't want a page for each document, then set this option to 'none'.
Search filters - If you will have lots of documents in each table, then add filter dropdowns to help people find them more easily. You can have filters for your document categories, tags, or any custom taxonomy (see bonus tips).
There are also lots of other settings to choose from. For example, you can optionally customize the document library's design:
[/image_border]
3. Structure the document library
Before you start adding documents, it's important to plan the structure of the document library. This is an important part of organizing your document library.
The WordPress document library plugin provides 2 ways to organize documents:
Document categories - Create hierarchical categories and sub-categories, structured into unlimited levels.
Document tags - Add tags or labels to each document. For example, you could use tags for the document year, publisher, topic, or type. (If you want multiple types of labels, then you can do this by creating custom taxonomies to use as well as tags.)
Your document library can display each file's category and tag. It can also include category and tag filters to help people to find documents more easily. You can even create multiple document libraries, each containing files with a specific category or tag.
4. Add documents to the library
Now it's time to start adding documents!
The Document Library Pro plugin is flexible and supports any type of 'document'. A document could be:
A downloadable file that is stored in the WordPress Media Library - e.g. a PDF, image, or PowerPoint presentation.
A resource that is available for people to read directly on your website, without having to download anything.
Any resource that you embed directly into your website - e.g. a page-turning flip book or an embedded Google Drive document.
A link to a web page, either on your own website or on a different website.
Whatever type of document or resource you want to display, you can do it with Document Library Pro. Simply add or upload the document along with any extra data that you want to display about it. It will then be stored in a dedicated 'Documents' section of the WordPress admin.
This keeps your documents separate from other website content and Media Library files.
5 quick ways to add documents
Now we know what the WordPress document library plugin can display, you can choose the best way to add your documents:
Bulk import documents from CSV - To import large numbers of documents to the library, add all the data to a CSV file, and upload it to WordPress.
Front-end document submission - Allow users or team members to add documents without having to log into the WordPress admin.
All these methods let you choose what information to display in the document library (summaries, file type, file size, category, etc.), and add links to access or download the document. They all support every file type, including uploaded PDFs, JPG, DOCx, etc.
How to add documents manually
You can add documents one by one, in exactly the same way as you add pages and posts in WordPress:
Go to Documents → Add New.
Add all the information that you want to display about the document, such as the name and description. Ignore the file size option if it's a downloadable document because this will be calculated automatically.
For the main content, either add a description, leave this blank, or add the full document. This might be the full text of the document (you can add thumbnail images etc. as required), an audio or video player, a Google Drive document embedded onto the page, or even a flip book plugin.
Choose an option in the 'Document Link' section:
File Upload - Upload any file type which users can download.
Custom URL - Add the URL of where the document is located, e.g. a Dropbox or Office 365 link, or a third-party website.
None - Choose this if you are embedding the document into the main content instead of as a clickable link.
Click 'Publish' to instantly add the document to the library. You can optionally set a date when the document will expire and be removed from the library.
How to add Media Library files to the document library
Lots of people install Document Library Pro after using a different plugin. If your document library files are already in the WordPress Media Library then you can easily convert them into documents:
Go to the 'Media' section in the WP admin.
Make sure you're on list view rather than grid view (click the icons in the top left to switch).
Tick the files that you're adding to the document library plugin.
Use the bulk actions dropdown to select 'Add to document library'.
Click the link that appears to view your documents. You might want to tweak some details like the name or add extra information about each document.
How to add documents using drag and drop
If you want to add lots of downloadable files to the document library, then the drag and drop uploader provides a useful shortcut:
Go to Documents → Import.
Drag and drop the files onto the page.
Go to the 'Documents' section of the WordPress admin to view them and make any changes.
How to import documents from CSV
The WordPress document library plugin provides a fully automated way of importing documents in bulk:
Use any spreadsheet program (e.g. Excel) to add all the information about your documents to a CSV file, including the URL of where it is currently located. For a useful starting point, download the sample CSV file from the document library plugin knowledge base.
Go to Documents → Import.
Follow the on-screen instructions to upload your CSV file. This includes a page where you choose which column from the CSV to map to each field in the document library.
Set up front-end document submission
A lot of websites list documents that users have submitted themselves. For example, you might allow people to submit resources which are then shared with the entire community. Or perhaps you want an easier way for employees to add documents to the library without accessing the WordPress admin.
The WordPress document library plugin comes with a front end document upload form. To use this, simply add [dlp_submission_form] anywhere on your site.
You can put the document upload form on a public or private page on your website. When new documents are submitted, you can either publish them immediately or hold them for moderation first.
5. Creating custom download buttons/links
Document Library Pro lets you choose between 6 styles of button to link to your documents:
Button
Button with text + icon
Button with icon
Icon
File type icon
Text link
Think carefully about which button style will work best for your document library. For example:
If you're listing different file types in the same library, then the file type icon makes it clear which is which.
Where it's obvious what the button will do, a simple download icon is enough.
If the action isn't clear, then add button text to clarify what the button does. For example, if you're creating a WordPress audio library with files hosted on SoundCloud then you could change the button text to "Listen Now".
As well as (or instead of) the download buttons, Document Library Pro also provides preview buttons. These come with a similar choice of styles.
You can control all the button styles on the settings page at Documents → Settings.
6. View the document library
When you installed the Document Library Pro plugin, it created a main document library page for you. This page lists all your documents in a beautiful document directory on the front end of your website. You can find this in the main list of 'Pages' in the WordPress admin.
Depending on your settings, the document library page may look something like this:
So far, you've learned how to display all your documents on the main document library page. If you prefer, then you can use a shortcode to add multiple document libraries.
Use the shortcode options to list different documents on different parts of your WordPress site. You can also change other details such as the table columns and whether to display download buttons or file type icons. This is a great way to make your document library more varied, tailoring each table to the type of documents you're listing.
Restricting access to the document library
You can control who can see your documents at three levels: the entire document library, specific categories, or individual documents. The WordPress document library plugin supports two access methods:
Password protection, no user login required. This option works well for intranets, client portals, or shared resources where managing individual user accounts would be unnecessary overhead.
Restricting access to specific WordPress users or user roles. Use this method if you need maximum control, want different users to see different documents, or require a fully authenticated setup.
Individual documents: Documents, then edit the document.
Find the Visibility settings and choose how access should be restricted:
Select Protected to add one or more passwords, or;
Select User roles or Users to restrict access to logged-in users.
Tips
For more granular control, create multiple user roles and show different documents to different users. Your main document library page will automatically show the correct documents for each logged in user.
Are you showing different documents to different people? If so, DO NOT tick the 'Caching' option on the document library plugin settings page. This will ensure that each user sees the correct documents rather than a cached version of the library. You should also ensure the content of these pages isn't being cached by your host or another plugin.
Enhancing your WordPress document library
Next, I will share some tips on how to add even more features to your document libraries.
Add extra fields to the library
The document library plugin for WordPress comes with all the standard fields you're likely to need. Built-in columns include file size, file type, published date, modified date, author, and download count - all generated automatically, with no custom fields or extra plugins required.
If you want to display additional metadata, Document Library Pro supports extra columns such as version numbers, reference codes, or publication dates using custom field columns. You can store all this extra information in custom fields and taxonomies.
First, decide whether to store the extra data as a custom field or taxonomy:
Custom fieldsUse these to store unique data about each item in your WordPress document library. For example, if you're using your document library to store internal publications, each one might have a unique document number. You would store the document numbers as a custom field.
Custom taxonomiesTaxonomies are an opportunity to sort and organize data. Use these to store information that will apply to multiple documents in your library. For example, you might want people to be able to filter the document library to view documents from a particular year. To do this, you would create a taxonomy called 'Year' and assign each document to the appropriate year.
Our free Easy Post Types and Fields plugins let you add custom fields and taxonomies to the 'Documents' post type. These will appear on the 'Add/Edit Document' screen in WordPress, where you can add all the extra data for each document.
Display your extra document fields
A document library with custom taxonomies for Media Categories and Document Years
Once you've added your custom fields and taxonomies, you can start displaying them in your document library:
Go to the WordPress document library plugin settings page (Documents → Settings).
Add the relevant columns to your columns list using the appropriate syntax:
Built-in column - Use the column name directly, e.g. file_size or file_type.
Custom field column - Add cf: followed by the field name, e.g. cf:version.
Custom taxonomy column - Add tax: followed by the taxonomy slug, e.g. tax:document_year.
For example, your list of columns might be: title,file_size,cf:version,tax:document_year
This will create a WordPress document library like the screenshot above.
How to sell documents
So far, I've assumed that you want to provide free access to your WordPress document library. But what if you want to sell printed or digital documents online? Fortunately, you can do that too.
The easiest way to create an ecommerce document library is to use our other plugin WooCommerce Product Table, instead of Document Library Pro. The instructions for selling documents in this way are similar to the document library tutorial in the previous sections. The main differences are:
Add each document as a WooCommerce product. This is instead of having a 'Documents' post type for storing documents or displaying files from the media library. In WooCommerce, choose the 'Downloadable' product type and upload the file that people will receive after purchasing the document. You can also add other information such as the price.
WooCommerce Product Table has a different shortcode for listing your document products. You can read about all the options in this article.
Your WordPress document library will look similar to the other screenshots in this article. The difference is that they will actually be e-commerce products available for sale, with add-to-cart instead of download buttons.
Tips for managing your WordPress document library
After your document library goes live, you can sit back and relax knowing that people can easily access your documents. However, at some point, you'll need to add more documents or edit existing ones. Luckily, the Document Library Pro plugin makes ongoing document management easy for you.
You can easily view all documents in the 'Documents' section of the WordPress admin. Use this to find and filter documents before making changes.
You can also view the files which are attached to your documents. Just go to the 'Media' section of the WP admin and select 'Documents' from the 'All types' dropdown list.
Updating document files
Many document files need to be updated at some point. For example, you may need to replace a link to an old PDF with an updated one. There are several ways to do this:
Simply replace the file - You can delete an existing file and upload a new one on the 'Edit' screen for each document. To avoid duplication, install the free Enable Media Replace WordPress plugin. You can then overwrite old versions when you upload a new file, without changing the URL.
Enable version control - There's an option to enable version control on the Document Library Pro settings page. This lets you choose what happens to the old file when you upload a new one.
Making documents editable from the front-end
If you want colleagues to be able to edit documents from the front end, then we recommend a choice of 2 excellent plugins for this.
WP Sheet Editor adds 'Edit' buttons above or below your document library, which only appear for certain user roles. Users can click these to open an editable spreadsheet-style table with all the document data. We have a separate tutorial on how to set this up.
Alternatively, WPSyncSheets has an add-on for Document Library Pro which lets you edit documents via a Google Sheet:
How to track document downloads
The Document Library Pro plugin has a Download Count column which you can include in the document library. This displays the number of times the document has been downloaded. You can either view the count in the WordPress admin, or display it on the front end like this:
For more advanced tracking, the Document Library Pro knowledge base provides a range of methods for you to choose from. As well as information about tracking downloads as events in Google Analytics, it recommends complementary plugins such as Download Monitor. This tracks and reports on the number of people who download your documents, plus exactly which users downloaded which document:
Frequently asked questions
What is the difference between Document Library Lite and Pro?
Document Library Lite is the free version and creates a basic searchable document library in a table layout. Document Library Pro is the paid version and adds grid layouts, document categories and filters, file previews, front-end uploads, CSV import, and access control by password or user role. Most organizations that need filtering, private libraries, or member access choose Pro.
How do I create a document library in WordPress?
WordPress has no front-end document library built in, so you add one with a plugin. Install a document library plugin such as Document Library Pro, add your files as documents either manually, by bulk CSV import, or by drag and drop, sort them into categories, then display them with the plugin’s searchable table or grid layout. No custom code is required.
Can a WordPress document library display PDFs and other file types?
Yes. A document library supports any file type that WordPress can store, including PDF, DOC, XLS, PPT, EPUB, and audio or video. Files can be hosted in the WordPress Media Library or linked from a service such as Google Drive, Dropbox, or SharePoint. Visitors can download each file or, where enabled, preview it without leaving the page.
How do I make a WordPress document library private?
You can restrict a document library at three levels: the whole library, a category, or an individual document. There are two methods: password protection with no login, which suits client portals and shared resources, or restricting access to specific WordPress users or user roles for a fully authenticated setup. Both are set in the plugin’s visibility settings.
Get started: Build a WordPress document library in minutes
Now you know how to create a fully functional document library for your WordPress site.
Document Library Pro is the ultimate solution for adding a searchable library of any type of file or resource to WordPress. It comes with everything to streamline your document-handling process:
100% flexible.
Quick 5-minute setup.
Create unlimited document libraries.
Ideal for non-technical website owners and developers.
30-day money-back guarantee - try it risk-free!
I hope you enjoy creating your document directory with the best WordPress document library plugin! Let me know how you get on in the comments below.
A simple WordPress membership plugin lets you publish exclusive content, sell membership subscriptions, and accept payments from members. While you can certainly use a full-blown membership plugin to set up your membership site, it might be overkill for your needs.
In this article, we’ll walk you through a step-by-step tutorial explaining how you can add simple WordPress membership to your site and hide your WordPress members area and content from regular visitors. We'll explain how you can do this using the Password Protected Categories plugin.
Let’s put everything into context before we begin.
What is a membership plugin and what is it used for?
There are many reasons why you might consider creating a membership website. You might want to offer a training program, provide access to a premium forum, or share exclusive content with members.
Creating a private WordPress members area on your site used to be a daunting task. Typically, it involved creating and maintaining separate user accounts for each member. As you can probably imagine, managing this sort of setup can be difficult considering you also have to accept registrations, enforce membership levels, and regularly publish fresh content.
A membership plugin lets you restrict access to your site’s content and make it accessible only to paying members, hiding it from public view. By restricting access to exclusive membership content, you can charge members a recurring (or one-time) membership fee.
This is how a WordPress membership plugin is typically used:
Restricting access to content. Membership plugins give you control over which parts of your site are visible to the public and which parts only members have access to, i.e. the WordPress members area. You’re able to restrict access to posts and pages, categories, or your entire WordPress site.
Creating membership levels. A membership plugin allows you to offer a free membership package along with paid plans. These are called membership levels.
Facilitating registrations. Membership plugins let you monetize your membership site by accepting recurring (or one-time) fees from your site’s members. Most popular WordPress membership plugins let you accept member registrations and support PayPal, PayPal Payments Pro, and Stripe payment gateways.
The good news is that simple WordPress membership plugins exist that can help you do all of these things easily.
Why you might want a membership plugin for your website
There are many scenarios where you might be better off with a simple WordPress membership plugin rather than a full-blown solution that offers features you don’t intend on using. Most membership plugins offer features that you probably don't need, like:
Creating assignments or quizzes.
Drip feeding content to students and members.
Social media and CRM integration.
Certificates and badges.
These features can make the back-end unnecessarily complicated to use – especially for users who aren't particularly tech savvy. If you're looking for a simple WordPress membership site, it's probably better to go with a lightweight plugin.
The first step, of course, is to take a step back and evaluate your needs. Let’s take a look at some use case scenarios:
Scenario #1: You publish blog posts and articles on your website that you’d like to make available to subscribers only
With a simple WordPress membership plugin, you can simply create blog posts as you would on a regular website and add them to your members area. This makes it easy and intuitive to share content with members.
This also makes it easy for members to access the content. Instead of navigating a complex dashboard, they can simply login to your members area using a password and gain access to the content. The best simple membership plugin even lets you create user specific content!
To make things even simpler, you could use the Posts Table Pro plugin to list content in a neat table layout:
A private blog listed in a table using the Posts Table Pro plugin
Scenario #2: You’ve built a community around a specific topic and would like to charge for access to discussion forums
Some membership site owners charge for access to an exclusive community that’s interested in similar topics. If your main membership offering is exclusive access to, say, a discussion forum, then you probably don’t need most of the features that traditional WordPress membership plugins offer such as assignments and quizzes or membership tiers.
By using a simple WordPress membership plugin along with a forum plugin for WordPress, you can set up a members area on your site. You can also pair this up with a registration form plugin that lets you accept membership fees.
Scenario #3: You’re a consultant or online course instructor and need an easy way to sell services or products
If you’re an online course instructor or consultant, you might need to offer different sorts of membership products. For example, you might need to make course content or training programs available to paying members in exchange for a recurring monthly fee.
A lightweight membership plugin makes it easy to set everything up and gives you the option to integrate with any e-commerce plugin. For example, if you sell digital products, you might consider using Easy Digital Downloads. But if you’re looking to sell physical goods through your membership site (like a planner), you might use WooCommerce or a WooCommerce add-on instead to simplify checkout.
If you’re looking for any of these implementations or something similar, you might be better off using a simple WordPress membership plugin (like Password Protected Categories) to restrict user access to content. Let's quickly take a look at the key features on offer with the simple membership plugin before we jump into the step-by-step tutorial.
Simple password protection - Assign a password (or passwords) to categories on your WordPress site. This is the easiest way to set up a private WordPress members area. You can use this sort of implementation to restrict access to content and keep entire categories hidden from your public website.
User and role protection - If your members have accounts on your WordPress site, then you can create members-only pages that only they can access. This is super-flexible and you can create a hidden area that is visible to all your members, or show different content to different members.
There are a number of benefits of using Password Protected Categories as a simple WordPress membership plugin. For starters, it’s easier to set up than most traditional membership plugin. All you have to do is install the plugin – no configuration necessary!
Password protected categories don't require individual user accounts since it uses password protection instead. This sort of simple implementation requires a lot less management overhead and makes it easy to accept new members. Plus, you won’t have to worry about your site slowing down.
On the other hand, if your members have accounts then it's easier to enable the user or role protection. That way, they just need to log into their account and will immediately see the hidden members-only content.
The plugin lets you put all of your membership content behind a single category or multiple categories depending on how you’d like to set things up. This is the simplest way to create a membership site as it is easy to set up, maintain, and scale.
Now that we have a better idea of what Password Protected Categories brings to the table, let’s take a look at how you can use it to add simple membership to your site.
How to set up Password Protected Categories as a simple WordPress membership plugin
Password Protected Categories lets you create a secure, private WordPress members area. Here’s what you need to do to create a simple WordPress membership site using Password Protected Categories.
Step 1: Install Password Protected Categories on your WordPress website
Get the Password Protected Categories plugin and install it to your WordPress website. You’ll find the license key in the email you receive along with the plugin’s zipped file. After the plugin is installed, click the Activate button.
Next, you’ll need to activate the plugin’s license key. To do this, navigate to Settings → Protected Categories from the admin panel and enter your license key.
Click the Save Changes button at the bottom of the page to proceed.
You can also configure the plugin’s settings from this page. It lets you change the title, password label, form message, button, and placeholder text for your front-end membership login form – more on this later.
Check out the plugin’s documentation for more information about the available options.
Step 2: Create the protected category (or categories)
There are two different ways you can create protected categories in WordPress:
Method 1: By following this method, you can include one protected category which contains the content you’d like to keep private for all members. The protected category can have as many sub-categories as you’d like. Members can navigate through the sub-categories without having to re-enter the password.
Method 2: The other way to go about it is to create separate categories and assign each one a unique password, or make it available to different users. This is an ideal solution if you’re looking to offer multiple membership tiers. As we mentioned before, this is much simpler than using a traditional WordPress membership plugin because each tier is separate. In other words, you don’t have to worry about dealing with membership hierarchies.
Create protected categories
Next, we’ll explain how you can create categories and sub-categories for your site’s members. You can follow the steps outlined below to either implement a Method 1 style membership site or go with a Method 2 style membership site instead.
From the WordPress admin panel, navigate to Posts → Categories to create a parent category. It’s worth mentioning that Password Protected Categories works with custom post types, as well. If you’re using a custom post type, head over to the relevant Categories screen for the custom post type you’d like to include in your WordPress members area.
Once you’ve reached the Categories screen, enter a category name and slug.
For example, if you’re creating a private area for your site’s members and would also like to have a public-facing site, you can call your category Members Area.
Once you’ve done that, scroll down to the Visibility section and click on the protected option. Choose the type of protection you require and click the Add New Category button to proceed.
Tip: If you're creating a password protected members area then you can assign multiple passwords to a single category. This lets you give out different passwords to different members for accessing the same members area, without needing an individual account for each person. The benefit of this is that your WordPress members area will become more secure than having shared passwords Additionally, you can revoke a specific member’s access without affecting other members.
Create protected sub-categories
After you’ve created the main category (also called the parent category), you can choose to create as many sub-categories as you need to organize the content you want to share with your site’s members. The process is exactly the same except that you will need to set the Parent Category to Members Area.
For example, if you’re looking to share content about cooking, you might have sub-categories on freezer meal planning, meals for kids, meals for vegetarians, and pro cooking skills.
You don’t have to change the visibility settings for sub-categories as they’ll already be protected. In other words, they’ll only be visible to members who have access to the parent category.
Step 3: Create a member login page
Your site’s members will need a way to login and gain access to the member’s area. The easy way to do this is by creating a centralized login page. The method for this is different depending on whether you've password protected your simple membership area or restricted it based on logged in users or roles.
Password protection member login
If you're using password protected categories then here’s what you need to do to create a member login page:
First, navigate to Settings → Protected Categories and check to make sure that the box next to the Show Categories option is unchecked.
Next, head over to Pages → Add New to create a new login page. You can call it something like Member Login. Enter the shortcode [category_login].
Hit the Publish button to proceed.
Preview this page on the website’s front-end to make sure you can see the centralized login page. It should look something like this depending on the WordPress theme you're using:
When a member enters the password you’ve provided them, they’ll only see the content that is included in the membership plan they’ve registered for.
User and role protected members area
Alternatively, if you've set up your member-only categories to unlock for logged in users or roles, then they need to log into their user account on your WordPress site. This means that you can use any type of WordPress login form, such as:
Send logged out members to the default WordPress login page at /wp-login.php. I don't recommend this because it's not professional for members to see any page that is styled like the WordPress admin.
If your WordPress theme comes with a front end login form then you can use that as the member login page.
For the most professional result, use the Profile Builder plugin to create a front end login form, plus registration form if required.
If you'd prefer a free login plugin, then I recommend Theme My Login.
Either way, create a login page and link to it from somewhere prominent such as the navigation menu or header. Label the link something like "Member Login".
Step 4: Add content to your members area
Now that you’ve added simple WordPress membership to your site, all that’s left to do is create content. The key benefit of using Password Protected Categories is that it makes it easy to manage content in the back-end. It’s as simple as assigning the correct category to each new piece of content you create.
Following our example, let’s say you publish content for members who’ve signed up for advanced cooking skills content. All you’d have to do is assign the correct sub-category to the blog post once you’ve created it. Once you publish the article, members who’ve signed up for the advanced cooking skills plan will have access to it.
Similarly, if you have a custom post type for your meals for vegetarians category to share recipes, all you have to do is make sure each vegetarian recipe is assigned the correct category.
Pro tip: You can create members-only pages with the Password Protected Categories plugin, as well as posts and custom post types. Check out the knowledge base for detailed instructions on how to set this up!
Bonus: Create a member registration form
Password Protected Categories is a lightweight plugin that works seamlessly with other WordPress plugins. You can easily bolt on a member registration form so that people can sign up. As with the login form, the exact method depends on what type of protection you've added to the simple WordPress membership area.
Registering for a password protected membership area
You can use any WordPress contact form plugin to create a simple WordPress membership registration form to your site. If you want to charge for memberships, you can even link it with payment gateways like Stripe, PayPal, or PayPal Payments Pro.
To automate things further, you can use the form’s ‘success’ message or an email auto responder (with Mailchimp) to share the members area password and URL with new members. This way, members can log in straight away without having to manually request login details.
You might also want to moderate new members first or check to make sure they’ve paid for their membership. To do this, you can manually send them the password after receiving their filled out registration forms and payment.
Registering for a user or role protected membership area
Alternatively, if you're unlocking the simple members area for logged in users with an account, then you can use any WordPress registration plugin - or even the basic one that comes with WordPress itself.
You can create registration forms with plugins like Profile Builder or Theme My Login - so use whichever one you're using to create the login page.
Bonus: Offer trial memberships
With password protected categories, you can also set a password expiration date. This is useful if you want to offer trial memberships. For example, you could give a prospective member access to your members area for a period of 14 days.
To do this, navigate to Settings → Protected Categories and set the Password Expiration field to 14 days.
If you've set up user or role protection instead of password protected categories, then the free Expire Users plugin offers an easy way to revoke access after a certain period.
Set up your WordPress membership site today
Password Protected Categories is a simple yet powerful WordPress membership plugin that lets you put any category on your site behind a password. By following the step-by-step guide given in this article, you’ll be well on your way to adding simple WordPress membership to your site and making your members area and content hidden from non-members.
The best part is that your membership site will be incredibly easy to maintain. You can add new content to it whenever you’d like and drip feed it to members. In addition to this, you can take things to the next level by using Password Protected Categories with additional WordPress plugins (for example, for accepting member registrations or membership fees).
What are some of the features you look for in a simple membership site plugin? Let us know by commenting below.
Sometimes, customers want a way to view the products they already ordered. A 'WooCommerce display all products purchased by user' plugin does exactly this. Keep reading to learn which plugin to use, and how to set it up to display the current user's previously ordered products.
There are lots of reasons to list products that the user has already bought:
Display purchased products on the My Account pageYou may wish to use a WooCommerce display all products purchased by user plugin to display their previous products in one place.
Quick re-order tableList the user's previous products in a quick one-page order form, so they can quickly find and select items to re-order.
List favorite productsMost customers who make repeat purchases have favorite items that they buy multiple times. Make it easier for loyal customers to find and re-purchase their regular and related products in your ecommerce store.
A WooCommerce Account page listing all products purchased by the current user
Displaying purchased items in this way offers benefits such as customer loyalty, enhanced satisfaction, and targeted product recommendations. This personalized shopping experience fosters loyalty, saves time, and allows for effective cross-selling, encouraging repeat sales and customer satisfaction. Keep reading to learn how to use WooCommerce to display purchased items only.
The easy way to display products previously ordered by user
WooCommerce Product Table is a flexible plugin which lists products in a convenient one-page order form. It has a little-known feature which allows you to display all products purchased by the current user. As a result, you can use it to enhance the overall customer experience for each user by showcasing their past purchases - either on the Account page or an another page of your website.
An order form to display all products purchased by user
When you activate this feature, the WooCommerce recently purchased products plugin works like this:
Depending on how you set it up, customers can either log in to their WooCommerce account or view a dynamic 'My Previous Products' page which shows different products depending on the user. The shop page would include a WooCommerce Product Table listing all products previously ordered by that user.
If the user has never ordered any products from your WooCommerce store, then they will see a customizable message saying that there are no products in the table.
Why this is different from listing previous orders
The WooCommerce Account page already lists previous WooCommerce orders like this:
As you can see, the default list of orders doesn't make it easy for customers to repeat an order or re-order products. You can click on an order to view more information in your online store. From there, you can click through to the single product page to re-order each product. That's a lot of clicks if you want to re-order products you have previously purchased!
Without using a WooCommerce get products from order plugin like WooCommerce Product Table, it's difficult to identify the specific order that includes the product you wish to reorder.
WooCommerce Product Table automatically displays a comprehensive list of products that the currently logged-in user has previously purchased. Its 'display all products purchased by user' feature lists all products ever purchased by the customer. Each product is listed only once, regardless of the number of times the user has made the purchase.
As a result, shoppers can easily browse through a list of previously ordered products. The table contains search, sorting, and filtering options to quickly locate items they wish to reorder. By selecting their desired products and adding them to the cart, they can smoothly proceed to the WooCommerce cart before completing the checkout process as usual.
Next, I'll tell you how to set it up on your own WordPress website which can display all products purchased by user. The order history is generated automatically, making it surprisingly easy to set up!
Why it's different from a WooCommerce Repeat Orders plugin
You might have read about WooCommerce reorder plugins. These simply add an 'Order Again' button to the list of orders in the WooCommerce Account. They're different from the method described in this tutorial because instead of duplicating a previous order, WooCommerce Product Table displays products previously purchased by the user who is currently logged in.
The customer doesn't have to remember which order their previous products related to. They just need to use the search, sort, and filter functions to quickly find their favorite products. Then, they simply add them to the checkout page and create a brand-new order.
Now you understand the importance of allowing existing customers to reorder their previous products using the WooCommerce get products from order feature. Next, we'll get into the most important part of this tutorial - how to set it up.
How to display products previously ordered by current logged in user
First, I'm going to tell you how to show products previously ordered by the current user on any page. Afterward, we'll look at specific places on your site where you might want to display this list. For example, you can add a 'My Products' section to the WooCommerce Account page, or create a hidden page that only logged in users can see.
The product table builder will open automatically.
2. Create a product table
Use the table builder to choose how you want your product tables to work.
To optimize the display of previously purchased products in WooCommerce, consider implementing the following recommended settings for the WooCommerce display all products purchased by user feature:
Add the table manually - The first page lets you choose whether to add the table to a page manually or to enable it on your shop page templates. Since we're listing products ordered by the current user, you need to add it to a page manually. You don't want it to take over your main shop pages (although you can do that too if you like)!
Choose your columns - To list a customer's order history, I recommend keeping your columns simple. Just display factual customer data about each product, such as a thumbnail image, name, and price. Everything is optional, e.g. if you can list products without images if you prefer. Don't include more general information such as the description, as the user is already familiar with the product. You should almost certainly include a Buy column because this allows users to re-order the product directly from the list.
Quantity inputs - You should generally tick this box because it allows users to select a quantity before adding it to the cart.
Add to cart button - If you're creating a quick re-order form then I generally recommend selecting the 'Checkbox' option. This adds multi-select tick boxes instead of standalone add-to-cart buttons for each product.
Product variations - It's normally best to select the 'Dropdown' option so that users can choose variations from the list of previously ordered products. Alternatively, choose 'Separate' to list each variation on its own row.
Keep going...
Search filters - If some customers have previously ordered a large number of products, then add filter dropdowns to make the products easier to find. You can even help customers to find specific products more easily by adding a search box and filters. This is essential for users with a large order WooCommerce customer history. (Tip: The WooCommerce recently purchased products plugin also comes with filter widgets.)
Lazy load - Since you don't know how many products each user has WooCommerce customers order history, there's a chance that some of them might list large numbers of products. Enable the lazy load option to avoid any performance problems for larger tables.
3. Use a shortcode to display previous products
Now, we get to the fun bit! It's time to list products ordered by the current logged in user. We'll do this by adding a simple WooCommerce shortcode to any page on your WordPress website.
The final page of the table builder gives you a shortcode similar to this: [product_table id="1"]
To display the user's previously ordered products, you need to add user_products="true" to the shortcode like this:
[product_table id="1" user_products="true"]
Add the shortcode wherever you want to display the previously ordered products.
View the page. As a logged in user with a WooCommerce customer history of previous orders, you will find all your purchased products elegantly listed in a user-friendly table layout with the WooCommerce display all products purchased by user:
Remember that when you test the page, you'll be seeing the previous products for your own admin-level user account. If you haven't placed any previous test orders then nothing will be listed here! Each user will see the products that they personally have ordered in the past, based on their own order history.
4. Decide where to put the list of previous products
Having effectively retrieved a list of products previously ordered by the current user using the WooCommerce get products from order functionality, it is now essential to determine how this seamlessly integrates within the overall structure of your ecommerce website. How will logged in users find their products?
Option 1: List previously ordered products on the Account page
The WooCommerce account page is the most obvious place to list the user's previously ordered products. For example, you can add a 'My Products' tab to the Account area.
Go to WooCommerce → My Account and add a new endpoint or tab named 'My Products'.
Paste the product table shortcode from earlier into the tab content area.
Save the tab.
This adds a new link to the WooCommerce My Account page. The tab will be called 'My Products'. When users log in and click the tab, they will see the list of products they previously purchased:
Add a 'My Products' tab to the Account page
The product table listing previous products appears there
Option 2: List previously ordered products on a hidden page
Alternatively, you might want to structure the list of previously ordered products outside of the Account area. To do this, you need another method for restricting the page so that only logged in users can see it.
Keeping the page away from the Account area gives you slightly more flexibility. For example, it makes it easier to choose a different page layout and add filter widgets to the sidebar, as you're not restricted by the layout of the account page.
Click '+ New Condition Group' and select 'Pages'. Click in the 'All Pages' box that appears below.
Select the page where you've added the shortcode to list the current user's previous products.
Now go to the 'Members' tab and select the 'Logged-in' role. (Or, if you prefer, select the 'Customer' role so that only logged in customers can see the page.)
Use the 'Options' tab to choose what happens if a guest or logged out user tries to access that page for any reason - for example, because they have bookmarked it.
Click the blue 'Create' button.
Now, only logged in users with the role you selected will be able to access the page where you've added the product table shortcode. Each logged in user will only see the products that they have previously purchased.
Add the hidden page to the menu
Of course, your users need an easy way to find the list of products they have previously purchased. You can do this by adding a menu link that only logged in users can see:
Go to Appearance → Menus.
Select the page from the list of Pages on the left, and click 'Add to Menu'.
Click on the little arrow in the menu on the right. This will open up extra options for that menu item.
Use the 'Access Levels' option to select which user role(s) can see the menu link.
Option 3: List previous products on a public page
Alternatively, you might want to list previously ordered products for logged in users, and all products for logged out users. For example, this is an excellent option if you want to display each user's favorite products on the homepage - but don't want new customers to see a blank table.
To do this, you need to combine WooCommerce Product Table with another plugin - Advanced Access Manager (AAM). AAM comes with some handy shortcodes that let you display different product tables to guests and logged in users.
To use the two WooCommerce plugins together, simply install them and then paste the following shortcodes onto a page:
This conditional statement will list all products for guests, logged out users, and non-customer user roles (e.g. people who have subscribed to your blog but not bought a product). Logged in users will see a table listing the products they have previously ordered.
Can I display order information in the table?
WooCommerce Product Table is all about listing products so that the customer can re-order them. You can display any type of information about the products, such as the image, name, short or long description, price, categories, tags, attributes, and much more. However, it's not possible to display order information alongside each product, such as the date the product was last ordered.
This is because orders are stored as a separate post type in WooCommerce. Even though you're listing products previously ordered by the current user, the order information is not stored against these products in the WordPress database.
To access their WooCommerce customers order history, they can conveniently navigate to the WooCommerce Account page, where they can explore their complete WooCommerce customer history with ease. This works nicely alongside the list of previously purchased products.
Can I show previously ordered variations?
When you use WooCommerce Product Table to display products that the user has previously purchased, this includes variable products. If the user previously ordered a product variation, then this product - along with its variations - will appear in the table.
For example, the following screenshot shows what it might look like if the current user had previously ordered 3 variable products. As you can see, all variations for each product (not just the ones that you have previously purchased) are listed as dropdowns next to the add to cart button. The user can select whichever variations they want to buy, and add them to the cart.
In this example, the first and third products have no default variations, so the variation dropdowns are not pre-selected. The second product has a default variation of Black Small, which is selected by default. You can set default variations on the 'Edit Product' screen.
Bonus tips
Choose which types of product to include
So far, we've assumed that you want to list ALL products that the current user has ever ordered. If you prefer, you can have more control over which products to include.
WooCommerce Product Table comes with lots of options for displaying specific products only. In addition to setting it to only show products ordered by the current user, you can choose to list products from a specific category, tag, search keywords, and much more.
For example, you might like to create multiple tables listing items that the user has ordered from a specific category. If you sell clothing and jewelry, then the 'My Products' page might include one product table listing purchased products from the clothing category; and another product table from the jewelry category. If you stock a wide range of items, then this can be more intuitive for your customers.
Customize the message for users with no previous orders
If a user with no previous orders sees the product table, then they will see message notifications. By default, it looks like this:
I recommend customizing this message to make it more relevant to previous products. For example, you could change it to: "You haven't ordered any products yet! Place your first order, and then your products will appear here."
You can do this on the plugin settings page at Products → Product Tables → Settings.
Use quick view to speed up re-ordering
You have full control over which columns of product data to include in the table. Customers can choose quantities and variations from the add to cart column of the table, achieving true one-page ordering in your ecommerce platform.
However, there are situations where you might want to show more information, or if you have too many variations to fit into the product table. If that applies to you, then quick view is the solution.
The WooCommerce Product Table plugin is designed to work alongside its sister plugin, WooCommerce Quick View Pro. Use them together to add quick view buttons to the table. To do this, select 'Quick view' from the list of product table columns. (This only appears when both plugins are active.)
Shoppers click on the quick view buttons to view more product information in a popup lightbox. Depending on which settings you choose, this might include the full product image gallery, short description, and add to cart options with variation dropdowns.
Review: How Pete Griffith lists his customer's favorite products
Before we close, let's look at a real user of WooCommerce Product Table. Pete Griffith uses the WooCommerce recently purchased products plugin to allow repeat customers to order their favorite products more easily each week:
This plugin was almost exactly what my customers were asking me to do to make ordering products on a weekly basis much more convenient. Instead of having to wade through our entire catalog of products, they can have a customized order form of only the products they order on a regular basis. They can still access the other products, if their needs change, of course, but this is much more user friendly for them (and me) than the default shopping method on WooCommerce.
I had a question for the developer when setting it up, and was amazed at the speed of their response, the depth of understanding of my issue and the amount of time they must have spent in researching the answer. This is the second plugin we've purchased from them and it is because of Katie's blog articles that we knew about it and how we could use it to solve our problem. Her articles are written from the user's point-of-view and give working solutions to some real-world problems that WooCommerce users face.
My wish list for future improvement: Add the ability to limit the variable products to selected varieties. I have one popular product with 50+ flavors, but most of my regular customers only order a few of the flavors on a weekly basis. Having all 50+ flavors is not ideal, and while I've devised a sort of workaround for some clients, it would be best if the plugin could handle this itself (each variety has its own product id, so implementing the shortcode would be simple for me or any other WC user if they do add this feature down the road).
Highly recommend this plugin and this developer's other products.
Where to get the WooCommerce re-order plugin
WooCommerce Product Table is an ideal solution to display all products purchased by the current user. This powerful tool enables the display of specific products based on the past orders of the logged-in user.
This can significantly enhance the login experience for existing customers by providing swift access to a comprehensive list of previously ordered products. Customers can effortlessly select the desired items for reordering, swiftly adding their favorite products to the cart with just a few clicks.
And the result for you as the store owner? Improved customer loyalty and retention, leading to more repeat sales for you 😀
If you’re looking for a simple solution for taking customer orders at the counter or table using a tablet or iPad, this article is just the thing you need.
Here, we’ll show you how you can create a WooCommerce POS ordering system for your business. Whether you run an online store, physical store, retail store, restaurant, spa, local coffee shop, or hotel – a WooCommerce POS plugin (or "WooCommerce point of sale plugin") can help you streamline business operations.
Having software that enables you to take customer orders is incredibly important – regardless of what sort of business you’re running. It enables your staff to quickly enter customers’ orders into a single ordering system – not multiple versions for in-store and online, or worse, something on paper. It’s more accurate and more efficient, especially for cashiers.
A WooCommerce POS system will simplify the order-taking process and make it easier for your waiting staff or behind-the-counter staff (cashiers) to add and remove items from the order list, select variations, place orders for customers, and instantly send it through for processing.
By the end of this post, you'll know how to set this all up.
You can also watch a video version of this post below.
What we'll cover
I’ll show you step-by-step how you can use WooCommerce with the WooCommerce Product Table plugin to create a one-page ordering system that enables your staff to take customer orders. They’ll be able to use this system on different types of devices including mobile devices like iPads or Android tablets/phones.
I’ll start by showing you how to install and set up the WooCommerce Product Table plugin on your existing WordPress website.
Then, you’ll learn how to use the plugin to create an easy-to-use, one-page POS ordering form. This form will enable your waiting staff to easily view, select, and customize the customer’s orders.
And, lastly, we’ll go over some tips about how you can optimize your order taking process using advanced features like routing orders to the right department.
Let’s get started.
Why you need a WooCommerce POS tool to take orders
Most stores take customer orders using a static computer screen. All of the items in the customer’s order are recorded and forwarded to the relevant departments. Unfortunately, there are a number of problems associated with this approach to taking orders:
The software used by these stores is outdated and difficult to use. You need something that’s up-to-date and easy-to-use, like WooCommerce and WordPress.
As there is a limited number of counters, either customers or the waiting staff have to stand in queues to pay for their items. This can be a real pain for anyone that has to wait for a long time in order to make a purchase.
Desktop computers occupy valuable space at the counter and on desks.
If you sell online as well, you'll need to maintain two order systems!
Setting up multiple POS systems means you need to maintain inventory and stock data across both systems. This can lead to inaccuracies.
The solution is to set up a WooCommerce point-of-sale system to quickly input the customer’s order, calculate the total amount owed, and collect payment information using an iPad or Android tablet.
Using WooCommerce for your point of sale system gives you a web-based, state-of-the-art solution. It's inexpensive, and it's easy to set up. If you're already using WooCommerce for selling online, then even better – integrating WooCommerce POS with your existing store will offer a huge saving of time, simplicity, and money for store owners.
How your business can benefit from an automated WooCommerce POS ordering system
So, what are the benefits of WooCommerce POS?
If you run a business that requires waiting staff to take customer orders or requires customers to place their own orders at the counter, you’ll be able to speed up the order placing process using a WooCommerce POS integration on your WordPress website. It’s easy to set up and uses the popular WooCommerce plugin with some minor modifications and additional plugins.
The best part is that a POS WooCommerce system is highly customizable. You get the freedom and flexibility to set up POS products the way you want. This way, you can create an intuitive interface that's easy for staff to use.
In addition to this, you can store all sales and inventory data for POS products in your custom WooCommerce point of sale system. This enables you to make informed business decisions in a timely manner such as preventing out-of-stock situations.
Related: Check out our complete guide on how to build a WooCommerce B2B wholesale store!
Which point of sale integrates with WooCommerce?
There are plenty of POS products that integrate with WooCommerce. Some examples include Square Point of Sale and wePOS. Although these are viable options, we recommend building your own WooCommerce POS system.
The main benefit of custom POS products for WooCommerce is that you have full control over its functionality and ease of use. You get to choose which features to include and which ones to leave out. This will depend on the types of products you sell and the technical expertise of your sales staff.
We're going to show you step-by-step how to create an easy-to-use, one-page POS system. This form will enable your waiting staff to easily view, select, and customize the customer’s orders in a way that aligns with your business requirements.
What you’ll need to get started
WooCommerce is the most popular e-commerce platform that you can use to sell just about anything. Whether you’re organizing your online store’s items, creating an online shopping cart, placing orders, or checkout pages, it’s got you covered. It’s a free plugin that can be installed to any WordPress site.
Along with a WordPress website and WooCommerce plugin, you’ll also need the WooCommerce Product Table plugin to turn your normal WooCommerce store into a WooCommerce point of sale product that's highly customizable and functional.
Introducing the WooCommerce Product Table plugin
You need the WooCommerce Product Table plugin to be able to display products in a user-friendly, one-page table layout that’ll also serve as an order form. Your front-of-house staff will be able to use this on any device to take orders.
Your front-of-house staff, waiting staff, or even customers themselves will be able to run a product search, sort, and filter the products they’d like to purchase and place orders. Any point of sale system needs to be fast, and using WooCommerce Product Table ensures there's no waiting around. Your uses will be able to:
View and choose product variations or add-on options directly from the order form.
Use the quantity selector to purchase more of the same items in one go.
Add extra notes about the order. For example, custom monograms or what color crinkle cut paper to include in the gift hamper.
Make a note of the customer’s order number which will be directed to the back-end for processing.
How it works
Confirmed orders are automatically sent to your back-end staff via email and are displayed on a computer screen. Additionally, you can pair your WooCommerce POS system with a WooCommerce order printing plugin (we'll recommend one later) that enables you to print out this information as a receipt.
When a customer places an order, they’ll be directed to the purchase page where they can choose the payment method of their choice, including PayPal and credit cards.
Advantages of using WooCommerce Product Table
Using a WooCommerce Product Table plugin enables you to handle variable products. You can quickly find and select the variants that your customers want to purchase using the product table’s search, sort, and filter tools.
And the best part is that all of this works in real time and is responsive across different devices.
How to create a WooCommerce POS point of sale system using WooCommerce Product Table
Once you’ve set up your WordPress site and installed a WooCommerce-ready theme, you can get started creating your own point of sale ordering system. This ordering system will enable your customers to easily add items to their shopping cart, and pay for the cart items using the payment method of their choice at the counter or at the table using an iPad/tablet.
Here, you’ll learn how to create a WooCommerce POS system that consumer-facing stores can use for taking orders. You can follow the steps outlined below from start to finish or jump straight to a specific step:
If you don't already use WooCommerce, you'll need to start by adding your products.
WooCommerce offers built-in tools to help you handle product inventory and store management. Once you’ve installed the WooCommerce plugin, add your store’s items as WooCommerce products. Here’s what you need to do to add new products (including variable products) to your WooCommerce store:
Go to Products → Add New from the WordPress dashboard and enter the following product details:
Name Here you’ll enter the item name that’ll appear in your WooCommerce POS ordering system.
Product description Fill in the detailed description of the item in the main text editor.
Product data This is where you’ll enter the price, type, attributes, SKU, and variants of the product.
Short description Enter a short description of the item if you want.
Categories This helps organize your items into categories and keeps all the products nicely arranged in a systematic way. For example, if you were selling clothes, you could create categories like T-shirts, Hoodies, and Accessories.
Tags Similar to categories, tags enable your staff to further organize your items, and enables them to locate particular items. For instance, you can create tags like, For Men, For Women, and Baby items.
Product image Here you’ll provide your product’s image to display in your order form.
If any of your products don’t have options or choices, simply select the ‘Simple Product type’ in the ‘Product Data’ section. Use ‘Variable Products’ for adding choices. For example, if you’re selling t-shirts, you could add variations for the different available colors (blue, green, gray) or sizes (small, medium, large).
Click on the Publish button. Repeat the same process until you’ve added all of your products to WooCommerce.
Use Product Add-Ons for accepting customer requests
You can also add text boxes and other fields to your order forms using the Product Options plugin. This is a great addition to robust POS products that aim to deliver a personalized user experience. They enable you to collect additional information from your customers like special requests or preferences. This information will be automatically directed to your back-end staff along with the order.
An extra product options plugin gives you more flexibility compared to the product variations. That's because it lets you add checkboxes and various other options.
Step 2: Install and activate the WooCommerce Product Table plugin
Now you’re ready to display your products in one-page WooCommerce POS order form:
Go to Plugins → Add New from the WordPress dashboard and upload the plugin’s zipped file to your site. Click the Activate button.
Navigate to Products → Product Table and click 'Add New'.
Step 3: Create a WooCommerce POS order form
Use the product table border to create a WooCommerce POS order form to meet your requirements.
3a. Select your products
The first page lets you choose which method you'll use to create the table product. We want our WooCommerce POS system to be separate from the public-facing website, so leave this set to "Add to a page using a block or shortcode".
On the next page, you can choose for the WooCommerce POS order form to include all your products or specific items only.
3b. Decide which columns you want to include in the POS order form
As you’re creating an order form to be used by your staff, choose columns that’ll make it easier for them to find exactly what they’re looking for. For starters, display columns for the product’s name, price, and add to cart button. You can also add an image of the product to make it easier for users to identify the product they’re looking for in the order form.
Similarly, you can add other columns like product’s SKU in your POS order form. This helps staff members easily reference exact items and help your back-end staff find the correct item. Additionally, you can create a stock column to keep your customers updated about product availability. This will also help you monitor stock levels and restock them before they run out (this alone is a huge benefit for your inventory management, and a great reason to use this system).
Here's a complete list of available columns that you can choose to display in your WooCommerce POS order form.
3c. Enable add to cart checkboxes
There are several options that can be configured from the WooCommerce Product Table’s settings page. Our main goal is to make it easier for users to find products and add them to the shopping cart. For this reason, I’d recommend using the Add to Cart page to enable the quantity field, variation dropdowns, and multi add to cart checkboxes.
Make it easy to quickly find products
Employees using a WooCommerce POS system need to find products very quickly. By default, the POS order form will include a search box at the top. This lets customer’s easily search for an item quickly using the product name or SKU.
You can make products even more findable by enabling filter dropdowns too:
Set the Search box option as Above table.
You can also add relevant filters for information you’ve already added about your products, like categories or tags. This will allow users to quickly find specific types of items. You can do this by setting the Product filters option to Custom and adding categories, tags in the Custom filters option.
Use WooCommerce Product Table with the Product Filter plugin for even faster product searching
Step #4: Create a one-page WooCommerce POS order form
By now you’ve set up the WooCommerce Product Table plugin on your WooCommerce website and configured its settings. Next, we’ll create a simple, one-page order form for your users to take orders at the counter or table using a tablet/iPad. To do this, we’ll add the WooCommerce Product Table plugin’s shortcode to the ordering system page:
Head over to Pages → Add New from the WordPress dashboard to create a new page for your WooCommerce order form. Your customers and/or waiting staff will use this one-page order form to select items, add them to the shopping cart, and place the order:
Give the new page a title. For example, Spa Services | POS Ordering System.
You can also add an introductory description in the text box.
Create relevant sub-headings (Massages, Facials, or Nail Services) for each section of your order menu.
Add the shortcode [product_table category="category-slug"] under each sub-heading. This will display all your products from the relevant category. And if you want to display products categorized under Massages, add the shortcode [product_table category="massages"].
Publish the page and hit Preview to see how it looks on the front-end.
Step #5: Simplify the checkout process
WooCommerce requires your waiting staff to complete the necessary checkout fields, and click the Place Order button to place a customer's order. This is because WooCommerce is designed to take online customer’s orders, which wouldn’t work for other businesses such as spas and restaurants. We need to make sure there’s an option for waiting staff to take orders on behalf of the customer.
We’ll configure the checkout page to accept payments after placing the order. This will allow your waiting staff to place an order without making the payment. Here’s a quick tutorial explaining how it’s done:
Navigate to WooCommerce → Settings → Payments from the WordPress admin panel.
Pick an offline method Check payments or Cash on delivery. This allows your waiting staff to place the order without actually collecting payment from the customer.
You can rename the payment method or add a relevant description by clicking the Manage button. For example, if you’ve selected ‘Check payments’, then you can rename this to something like ‘Payment required at the end of services’.
Click the Save changes button.
Here’s what your checkout page should look like:
WooCommerce has the default option set to ask your waiting staff for the Billing details. You can remove the Billing details fields by using the YITH WooCommerce Checkout Manager plugin. This will also make your checkout process faster for your staff. Another way is to create a shared user account for staff members to use and enter the default billing details for your business. This will auto-populate information for each order, so your staff can ignore this page, and just click the ‘Place order’ button to complete the order.
Bonus tips
By now, you've learned how to create a one-page point of sale system in WooCommerce. Keep reading for a selection of bonus tips on how to fine-tune the POS order process to suit your organization.
Collect extra information from the customer
You can make it easier for your waiting staff to take POS orders at the table or the counter using an iPad/tablet by adding extra fields to your order form. To do this, you’ll have to add an extra field or two, to help them take note of any additional information. These could include:
Customer’s name (great for ensure you retain new customers; you could send this to a CRM or similar)
Token or voucher number
Customer’s table/room/station/parking spot number
The YITH Checkout Manager plugin lets you add, edit, and remove the fields shown on the WooCommerce checkout page. This makes it the ideal tool for adding an extra field to the checkout form.
Accept payment by credit card
You can let your customers make a credit card payment directly into the WooCommerce POS system by adding an online payment gateway such as Stripe. This allows your customers to add their credit card information directly into the checkout page. I
f you want to be able to scan their card, you’ll need to use a separate card reader and process payment outside of the WooCommerce POS order system. Similarly, you can also leverage barcode scanning options with a barcode scanner (use a plugin such as this to generate barcodes).
Protect your WooCommerce POS system and hide it from public view
You may want to add your WooCommerce POS order system to an existing WooCommerce site. This is an extremely efficient setup, as you'll have all your orders and inventory management in one place. But – you don't want the public being able to use your custom system.
In this case, you’ll have to hide your POS ordering system from public view. It should only be accessible to staff members who take customer orders at the table or from behind the counter.
You can do this by password protecting your page containing the POS ordering system. As a result, only staff members with the correct password will have access to it.
However, your products will still appear on the rest of your website, for instance, in the search results. You can use the WooCommerce Private Store plugin to add extra security which will hide everything related to your WooCommerce order system from public view.
Go to the WooCommerce Private Store plugin settings, and choose the same password you used to protect the ordering system. This enables all your staff members to unlock the ordering page and all other parts of WooCommerce using a single password.
Managing orders
Once you've set up the WooCommerce telephone ordering system, you need to plan how to manage the orders. Next, I'll share some tips on how to adapt the WooCommerce order process to make it easier for staff.
Automatically mark orders as complete
Out of the box, WooCommerce requires users to select payment options and enter payment information before they mark orders as complete. However, this might not suit your specific buying process (for example because you’ll be handling your payments outside of the website - e.g. at the end of the massage services).
The YITH Order Status Control plugin offers functionality that will let you automatically mark all your orders as complete. This way customer orders will be sent straight to the back-end staff without any further manual steps.
Forward orders to the right department and print receipt
You can now automatically send new orders to staff involved in the order process.
There are two default ways for back-end staff to view new orders:
WooCommerce will automatically send new orders to the email address given in the settings.
If they’ve access to WordPress admin, they can keep the WooCommerce orders page open and refresh it regularly to view new orders.
Alternatively, there are two easy plugins that improve the order notifications:
Automatically print new orders
Print out new orders automatically by pairing the WooCommerce-based ordering system with a GPRS printer. This will ensure that all customer orders are instantly printed for your back-end staff as soon as they’re placed.
Depending on the store setup, you can either print the receipt to give to the customer, or print the receipt for immediate processing by another team. You do this with the Bizprint plugin.
Send new orders to different email addresses
Use the WooCommerce Multiple Email Recipients plugin to send order notifications to different email addresses, depending on which product or category has been ordered. This is a huge time-saver if different departments are responsible for processing different types of product.
Set up your own WooCommerce POS ordering system
Setting up an efficient (and accurate) POS ordering system for customers and staff is simple and easy.
The WooCommerce and WooCommerce Product Table plugins together enable you to create a searchable, sortable, and customizable point of sale order form for your business. A point of sale for WooCommerce system makes it easy for your staff members to take orders at the counter or table using different devices (including mobile devices) like iPads or Android tablets/phones.
You can upgrade your existing ordering system by pairing it with some of the useful WordPress plugins we mentioned in this post.
What are some of the features you look for in a WooCommerce POS ordering system to make it easier for customers and staff members to place orders using an iPad/tablet? Let us know by commenting below!
Did you know that if you use Easy Digital Downloads to sell to EU customers, then you must meet EU VAT rules - even if you're not based in the EU. And you can't comply with EU law using the tax settings that come with EDD - you need a separate plugin for that.
In this complete guide to EU VAT for EDD stores, I'll explain the legislation and the easy way for you to comply. I'll provide full step-by-step instructions on how any Easy Digital Downloads store can meet EU VAT law. And the good news is, it's surprisingly easy!
What is the EU VAT law and how does it affect my Easy Digital Downloads store?
(EU-based businesses only) Is your combined annual revenue from all EU countries more than €10,000?
If you've answered 'Yes' to all these questions, keep reading because you're legally required to meet EU VAT law in your Easy Digital Downloads store.
What is EU VAT and who has to collect it?
European Union value added tax (more commonly known as EU VAT, or IVA in certain countries) is a tax that is added onto goods and services that are sold within the EU. It is paid by the customer when they make the purchase. The seller is responsible for collecting the tax and paying it to the correct authorities.
The law changed on 1st January 2015, forcing companies worldwide - including those outside of the EU - to handle EU VAT:
Before 1st January 2015 - If a company sells digital products to a consumer in an EU country, then the "place of supply" was the country where the seller is based - not the consumer.
After 1st January 2015 - If a company sells digital products to a consumer in an EU country, then the "place of supply" was the country where the consumer is based - not the seller.
As a result, the new law forces all sellers of digital products to collect and handle VAT at the consumers' local rate. So if you're outside Germany and sell a computer game to a consumer in Germany, then you need to charge German VAT to that consumer and pay it to the German tax authorities.
I know it sounds crazy that a company in - for example - America has to collect German VAT. However, that's the law.
You only need to charge EU VAT when selling to consumers in EU countries. It's not required for business-to-business (B2B) transactions.
When an EU business with a valid VAT number buys from you, the VAT can be zero-rated - i.e. you don't have to charge them VAT.
However, you can't just take their word for it that they're a business. You actually need to validate their VAT number to confirm that they're a VAT-registered company, and store this information so that you can prove it later. Or if they're a small business without a VAT number, then you need to request and store some other sort of proof (e.g. a link to the customer’s business website or other commercial documents).
Even if you see yourself a a B2B supplier, in practice you probably sell to some EU customers who don't have a VAT number. As a result, your Easy Digital Downloads store must be able to handle EU VAT. Keep reading to learn how.
What about UK VAT?
The UK has now left the EU, but they have adopted the same legislation into UK law. This means that if you sell digital products to consumers in the UK then you must charge them UK VAT, wherever your company is based.
The Easy Digital Downloads EU VAT plugin fully supports UK VAT, which makes things easy for you. You can learn more about UK VAT here.
What are my legal obligations?
Here's a summary of your legal obligations - whether or not your company is based in the UK:
Register for EU VAT You must register for a EU VAT number so that you can submit the quarterly tax returns and make payments.
Collect EU VAT Your Easy Digital Downloads store must check whether each EU sale is B2B or B2C, and charge the customer's local rate of EU VAT for B2C sales; and zero rate the VAT for B2B sales.
Provide valid VAT receipts Provide your customers with VAT invoices containing:
Your business’ name and address.
Your business’ VAT number.
Invoice date.
Invoice number.
Buyer’s name and address.
Buyer’s VAT number.
Rate of VAT applied. For tax exempt reverse charged B2B sales, you should include the text "EU VAT reverse charged".
Amount of VAT charged.
Total price including VAT.
Store the invoices for 5 years.
Store evidence about your customers' location
You must store 2 pieces of evidence (or 1 piece of third party evidence for EU companies with under €100,000/year in cross-border sales of digital goods to the EU) to confirm the customer's location. While EU legislation lists various acceptable forms of evidence, the most realistic for an Easy Digital Downloads store are the customer's billing address and IP address.
Store this location evidence for 10 years.
Submit quarterly tax returns Every 3 months, you must submit a tax return showing the EU VAT you collected in the previous quarter, and pay the correct amount of tax.
This all sounds like a nightmare!
Of course, all of this sounds like a huge burden for any small business! Fortunately, there are two steps that you can take to make EU VAT less burdensome for your company:
Use the best Easy Digital Downloads EU VAT plugin to handle the collection of VAT for your online sales automatically. We built this plugin to make it as easy as possible for any EDD store to meet European VAT law.
Register for a service that lets you file a single quarterly tax return for all your EU sales, and make a single payment for all the EU VAT you have collected. This is much easier than having to register for VAT with each individual EU country.
Together, these two steps combine to make your Easy Digital Downloads store compliant with EU VAT legislation. It won't take up much of your time, freeing you up to focus on the most important task of growing your EDD store's sales. Keep reading to learn how.
A lot of e-commerce companies - particularly those outside of the EU - choose to stick their heads in the stand and pretend the EU VAT law doesn't apply to them. These are the most common excuses, and why they don't work!
Excuse #1 - My company is based outside of the EU
Unfortunately this isn't relevant. If your Easy Digital Downloads store sells to consumers in the EU, then you MUST charge them EU VAT/IVA. Don't be confused by the €10,000 annual sales threshold that applies to EU businesses. Businesses outside the EU must collect EU VAT for ALL their sales to European consumers, with no minimum threshold.
Excuse #2 - I only make B2B sales to the EU
While it's correct that you only have to charge EU VAT on B2C sales, you can't argue that your Easy Digital Downloads store is exempt because all your products are aimed at businesses. That's because both registered companies AND self-employed individuals make business-related purposes - and self-employed individuals in the EU have to pay EU VAT.
You can only get out of charging VAT to EU customers if you have collected evidence that they are a registered business. This means that your Easy Digital Downloads checkout needs a way to check whether each customer is a business, and decide whether to charge VAT accordingly.
The easiest way to do this is to add a VAT field to the EDD checkout, integrated with an official database of VAT numbers. The new Easy Digital Downloads EU VAT plugin (coming soon!) will do this automatically, so there's no excuse not to comply!
Excuse #3 - I'm in the UK and.... well... Brexit
The UK has now left the EU. UK companies selling digital products still have to meet EU VAT law. This is because the legislation applies to all companies who sell to EU countries - it doesn't matter whether your company is based in the EU. As a result, Brexit won't change the obligations for Easy Digital Downloads stores in the UK.
You can read the latest advice about Brexit in our blog post.
Excuse #4 - Nothing will happen if I ignore EU VAT
Regardless of which country you're in, there are potential penalties if you fail to meet your EU VAT obligations. This can include:
Financial penalties and fines
Years of backdated payments to cover the VAT you should have paid
Your seller account being shut down on marketplaces
Investigation by tax authorities
These consequences can be crippling for any e-commerce business. As a result, it's best to take simple steps to comply with EU VAT law, and collect the VAT from your customers whenever you sell to the EU - instead of having to cover the cost yourself in fines later on.
Why has it always been so difficult for EDD stores to comply with EU VAT?
We've been running Easy Digital Downloads on the Barn2 site ever since we started selling WordPress plugins. As a result, we've been on the journey to seeing the introduction of the new EU VAT law in 2015, right through trying different ways to implement it.
Until now, there were no good options for collecting EU VAT in Easy Digital Downloads. Straight out of the box, the built-in EDD tax settings don't have the required features to meet EU law. There is no official EDD extension for EU VAT. The only options were:
A free WordPress EU VAT plugin that is no longer supported and had poor ratings.
A premium plugin that hasn't been updated since 2015.
A premium plugin that isn't presented very professionally and when we sent an enquiry to the developer, their response was extremely rude and offensive! (As the owner of a WordPress plugin company, I feel particularly strongly about this because we work so hard to provide positive, helpful support to our own customers.)
A SAAS solution that integrates with Easy Digital Downloads, but costs $49-149 per month and has fewer than 20 EDD users. It also has more features than we need. (For example, it comes with complete reporting on EU VAT sales, which most people don't need because you can easily get the same information by exporting from EDD and/or an accounting system such as Xero.) You're tied in long-term because your tax evidence is stored on their servers and legally must be stored for 10 years. The total cost works out at $5,880-$17,880 per decade!
As a WordPress plugin company, we were perfectly placed to develop a better - and cheaper - solution. We got to work, and built our Easy Digital Downloads EU VAT plugin. As well as using it on our own Easy Digital Downloads store, we're releasing it to the public to help other EDD users to meet their EU VAT requirements.
The solution: The ultimate Easy Digital Downloads EU VAT plugin
We've built the Easy Digital Downloads EU VAT plugin as the solution for all EDD stores who need to comply with European VAT law. This easy-to-use plugin will work straight out of the box, and comes with everything you need.
How it works
The Easy Digital Downloads EU VAT plugin is designed for any WordPress site that uses Easy Digital Downloads. It works like this:
Charges the correct VAT to EU customers When the customer selects their country on the EDD checkout, the correct VAT is charged. If you have set the tax rate for each EU country in the Easy Digital Downloads settings then this is used; otherwise it will use the EU tax rates built into the plugin. This ensures that the customer is always charged the correct rate, regardless of their location.
Removes the VAT for registered EU businesses The plugin adds a VAT number field to the Easy Digital Downloads checkout, which only appears for customers in EU countries. VAT-registered EU companies can enter their VAT number. The number is checked against the official VIES VAT register, and if it is valid then no VAT is charged on the sale.
Collates customer location evidence It also adds a 'VAT Details' section to the payment screen in Easy Digital Downloads, so that the store owner can quickly check the evidence that was used for the VAT calculations. You can also export this evidence if you are ever audited.
Provides legally valid tax receipts Converts the EDD purchase details screen into a full tax receipt with all the required information, and adds merge tags so that you can use the 'Purchase Receipt' email as a tax receipt too. If you're using the PDF Invoices extension then it adds extra information to this too.
Easy VAT reporting Adds an EU VAT report to the Exports page in Easy Digital Downloads. You can use this to export all the data you need for your quarterly MOSS VAT returns.
Collect VAT numbers and charge the correct tax to each customer
Purchase confirmation page - VAT reverse charged
Convert purchase receipt emails into a full tax invoice
Online receipt linked to from purchase receipt email
Show VAT on PDF Invoices (requires Invoices extension)
View the evidence used for VAT calculations
Easily download all the data for your EU MOSS tax return
Example of the data in the EU VAT plugin report
The plugin builds on the features that are already built into Easy Digital Downloads to create complete solution to European VAT. Its in-depth documentation covers everything you need to manage EU VAT in Easy Digital Downloads, including:
How to provide legally valid VAT invoices to customers.
How you can export the EU VAT collected for your accounting software and quarterly tax returns.
Where to find the legally required pieces of evidence about each customers' location.
Further advice on how to make sure your company complies with EU VAT legislation.
Step-by-step - How to make your EDD store compliant with EU VAT
It's surprisingly easy to make your Easy Digital Downloads store meet EU VAT law. To comply, simply follow this two-step process:
Since you'll be collecting EU VAT from consumers in EU states who buy your products, you need to be registered with a tax authority in the EU. You can either register for VAT in each EU country where you make sales, or register for Mini-One-Stop-Shop (MOSS).
MOSS is a centralized VAT scheme that enables you to submit a quarterly single tax return and make a single payment to cover the entire EU. Your online tax return will declare all the EU VAT you have collected, and you will then make a single payment which the MOSS service will then distribute to the relevant EU member states on your behalf.
Needless to say, nearly all companies running Easy Digital Downloads are better off registering for MOSS! It's free, and will save you a ton of time and paperwork.
How to register for MOSS
Union Scheme If your company is based in the EU, or has any establishments (e.g. an office) in an EU country, then you should register for MOSS with your local tax authority (for example, UK companies apply to MOSS via HMRC, which handles UK tax).
Non-Union Scheme Non-EU companies can choose to register for VAT with the tax authority for any EU member state. For English speaking companies, the Republic of Ireland is usually a good option because there's no language barrier and they have a good online system.
In addition to MOSS, you will need to register for UK VAT. This is because the UK has now left the EU, and is no longer part of the MOSS scheme - but non-UK companies must still charge UK tax to customers in the UK.
2. Set up the EDD EU VAT plugin (in 2 minutes!)
Now you're registered to start collecting EU VAT, it's time to add the necessary features to your Easy Digital Downloads store:
Each EU country is free to choose its own rate of VAT. As a result, your EU VAT-compliant Easy Digital Downloads store must charge the correct tax rate to consumers in each EU country.
Fortunately, the Easy Digital Download EU VAT plugin makes this easy. It comes complete with the correct standard VAT rate for each EU country, and we'll regularly release updates whenever any of the rates change.
When you install the plugin, the current standard VAT rate will be charged to customers in each EU member state. You can override these rates in the general Easy Digital Downloads settings under Downloads → Settings → Taxes. For example, you might want to do this if you're selling products that allow you to charge a reduced rate, or if you have any other reason for not charging the standard VAT rate. This gives you complete flexibility over the tax rates.
Easy Digital Download EU VAT integrates seamlessly with the payment receipt that comes with Easy Digital Downloads, EDD email, and the PDF invoice plugin. This gives you several options for providing EU customers with VAT receipts that they can use for accounting and tax purposes:
Order confirmation and customer account page
Logged in customers can access the Easy Digital Downloads Account page and view tax information for their orders. This is available by clicking the 'View Details and Downloads' link alongside any order. They all see this information on the confirmation page which loads as soon as they complete their order in Easy Digital Downloads.
The Easy Digital Download EU VAT plugin extends the EDD order confirmation and payment details pages to include all the information that is required by EU VAT law. This means that if you don't use any invoice plugins on your Easy Digital Downloads store, your customers can use this as their tax invoice.
Showing EU VAT in the EDD payment receipt email
Easy Digital Downloads sends a payment receipt to each customer after purchase. You can manage this via Downloads → Settings → Emails → Purchase Receipts.
The Easy Digital Downloads EU VAT plugin comes with merge tags that you can use to add the required tax information to this email.
Alternatively, if you're using the Per Product Emails EDD extension to send a different email for each product (as we do for sending personalised setup information for our WordPress plugins), then you can add these merge tags and manage the emails under Downloads → Per Product Emails.
Either way, you can add payment and tax information to the EDD payment receipt email using the built-in email merge tags. Mix and match them to create the perfect email receipt.
Attach a PDF Invoice to the EDD order confirmation email
Example of a PDF Invoice with EU VAT informationEasy Digital Downloads' PDF Invoices plugin is the most sophisticated way to provide your customers with VAT invoices. We have integrated the Easy Digital Downloads EU VAT plugin with PDF invoices to add the legally required information to the invoice.
As well as allowing customers to generate PDF invoices from the Account page, it comes with a merge tag that you can use to add a 'Download Invoice' link to your customer emails.
We use this plugin on the Barn2 site, and find that it's the easiest way to provide tax information. Customers can download their EU VAT invoice directly from the order email receipt. This is more convenient than having to log into their account and download it from there. It also saves them having to contact us to request a tax invoice.
Store your invoices for 5 years
EU law states that you must store your VAT invoices for a minimum of 5 years. Since you use Easy Digital Downloads, this is taken care of automatically. The invoices will remain available for you to download for as long as you continue using EDD.
Storing evidence of your customers' location
As we saw earlier, you're required to collect 2 pieces of evidence to confirm which country each of your customers are in. You have to store this for 10 years.
Again, the good news is that this is all handled for you! The Easy Digital Downloads EU VAT plugin collates all the customer location evidence and stores it in a single location, making it easy for you to find. When you install the plugin, you'll see a 'VAT Details' section on the screen for each payment in your store:
This displays:
Evidence 1 - Customer billing address Easy Digital Downloads stores the customer's billing address, which is entered on the checkout page.
Evidence 2 - Customer IP address Easy Digital Downloads collects the customer's IP address and stores it in the WordPress database. You can click on this in the 'VAT Details' section to see which country the IP address relates to.
Additional evidence
Most Easy Digital Downloads sites store additional evidence of the customer's location too. For example, your payment processor (e.g. Stripe or PayPal) might collect their own information, such as IP address, country code, and bank location. Each of these can count as additional pieces of evidence.
As an EDD store owner, you should look at all the evidence that is collected. Make sure that you have the correct amount of non-contradictory evidence to confirm your customers' locations. Remember - the more evidence, the better!
So long as you keep your Easy Digital Downloads store online, this evidence will always be available for you to access and report on.
How to report on customer location data
Easy Digital Downloads comes pre-built with an export facility, which you can use to download reports continuing your customer location evidence. For example, you might need to do this if you are ever audited by the tax authorities:
In the WordPress admin, go to Downloads > Reports > Export.
Use the 'Export Payment History' tool to download all the payment records for the period you wish to report on.
This will download a CSV file to your computer.
Use any spreadsheet software such as Excel, Numbers or Google Sheets to edit the CSV file:
Simplify the spreadsheet by deleting any columns you don't need.
Find the Tax and Country columns and sort by them as required.
EU law states that the location data for each customer must be "non-contradictory". This means that both records of the customer's country should match. Normally, the records will match but there are occasions where this may not happen. For example, if the customer buys while they're abroad on holiday, then their IP address won't match their billing address country.
I recommend that you create a process to check the reports periodically. If you ever discover records that don't match, then you should contact the customer. Ask them to resolve the discrepancy between the two pieces of information. (More advice on this here.)
How to send quarterly EU VAT returns
Once your EDD store is up and running with the Easy Digital Downloads EU VAT plugin, you can sit back and relax until it's time to file your first EU VAT return.
Tax return deadlines
You must submit a EU VAT tax return and make a payment by:
Q1 - 20 April - covers the first quarter ending 31 March
Q2 - 20 July - covers the second quarter ending 30 June
Q3 - 20 October - covers the third quarter ending 30 September
Q4 - 20 January - covers the fourth quarter ending 31 December
Most EU tax authorities will email you shortly before the deadline, but I also recommend setting a reminder to make sure you don't forget!
Where to get the information
There are several ways to get the information for your quarterly MOSS return. The simplest is to use the EU tax report that comes with the Easy Digital Downloads EU VAT plugin. This lets you export details of all the EU tax collected during a specific period, divided by country.
The report exactly matches the data you need to provide for your MOSS tax return, making it as easy as possible for you.
Alternatively, if you use an online accounting system such as Xero, QuickBooks or Sage, then the accounting system can generate and submit your MOSS returns at the click of a button. First, you need to get the data into your accounting system. You can either export your sales from Easy Digital Downloads and then import them to your accounting system, or you can integrate your accounting system with EDD to import the data automatically.
Submitting the tax return
Log into the online system for whichever tax authority you registered for VAT with. For example, if you registered for MOSS in the Republic of Ireland then you should log into their online system.
The exact process depends on the country. Find the link to submit a MOSS VAT return, and follow the online instructions.
Making a payment
After submitting the MOSS return, you'll see the total amount of tax owed on the final page. You'll probably receive an email too. There will be instructions on how to make the payment, so use these to send the money.
At Barn2, we pay our EU VAT by making a bank transfer to the MOSS bank account. MOSS then distributes this to all the EU countries that we collected tax for. This is normally over 20 different countries, so the single payment saves us a lot of time!
What if I don't collect any EU VAT one quarter?
You must submit a tax return even if you didn't collect any EU VAT that quarter. When you create a MOSS return in the online reporting system, you'll see a tick box. Use this to confirm whether or not you made any taxable sales to EU countries in the previous quarter. If you didn't collect any VAT during that period, simply declare this and submit the return.
Where to get the plugin
The Easy Digital Downloads EU VAT plugin is available on our website. Get it today and start meeting European tax rules - the easy way!
Since building WooCommerce Lead Time - the first ever WordPress plugin to show product dispatch times on the product page - we've been researching how different ecommerce stores display this information. We're sharing this with you so that you can show product dispatch times on your own WooCommerce site.
Keep reading for a sneak peek at how some high profile sites are displaying dispatch times. This can be a fantastic way to get inspiration for your own site!
1. Etsy handmade and personalised products
Etsy brings together independent sellers and craftspeople from all over the world. The items are typically handmade or made to order, so Etsy displays a dispatch time on the product page. This provides clear information on how long the customer can expect to wait for their order.
Etsy show the estimated dispatch time alongside the other product information, close to the add to basket button. They use the wording 'Ready for dispatch in...', which is generic enough to work for the wide range of products on Etsy.
If you sell a wide range of e-commerce products on your WordPress site, then this wording could work for you too.
2. Made.com non-stock furniture
Furniture store Made.com sells furniture with varying lead times. They display the dispatch time immediately above the add to basket button on the product page. This makes it clear how long the customer should expect to wait, so they can make an informed decision on whether to place an order.
3. Personalized products on Amazon
Amazon sells just about everything under the sun, including personalized products with longer lead times. Marketplace sellers can choose to display lead times on their products.
The extra information appears with the stock status, making it clear that there is a processing time on top of the delivery time. Wording such as "Usually takes between 1 and 2 days to create" reassures the customer that the product is genuinely personalized to order, while letting them know the expected dispatch time.
Add dispatch times to your own WooCommerce products!
I hope these examples provide some new ideas on displaying WooCommerce dispatch times for your own products! To add the same information to your own site, get the WooCommerce Lead Time plugin today.
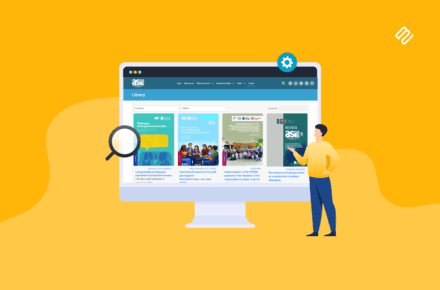

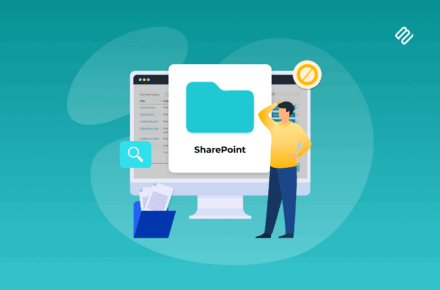
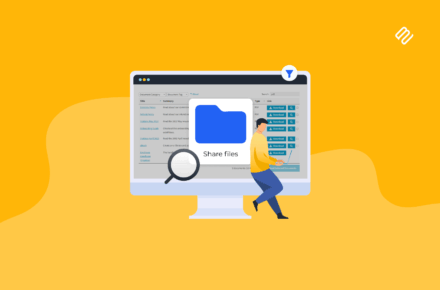
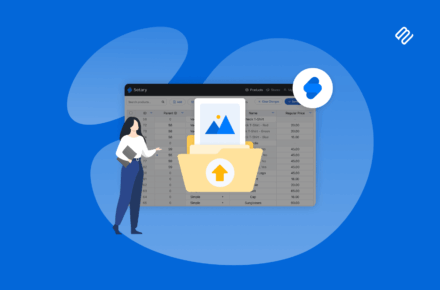
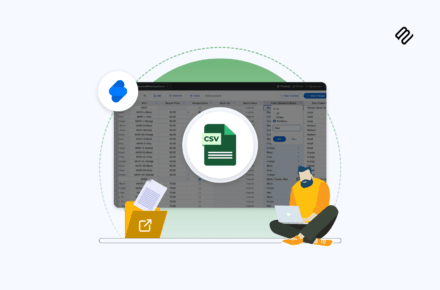
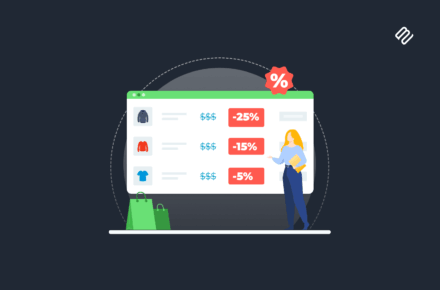
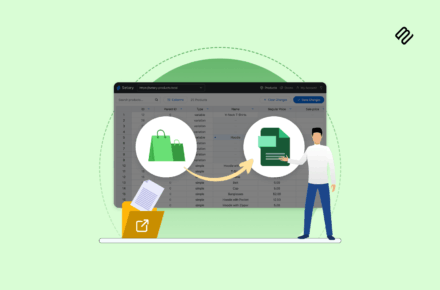
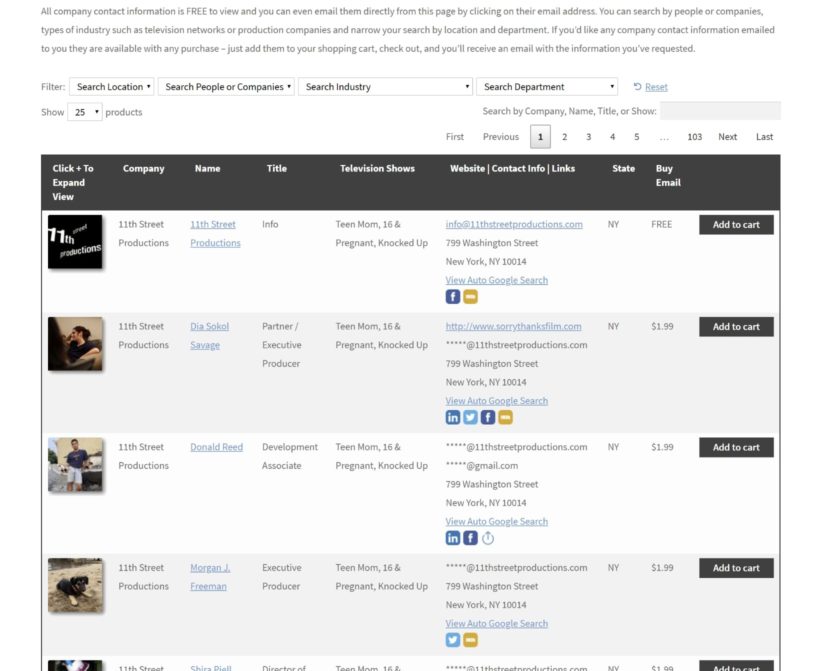
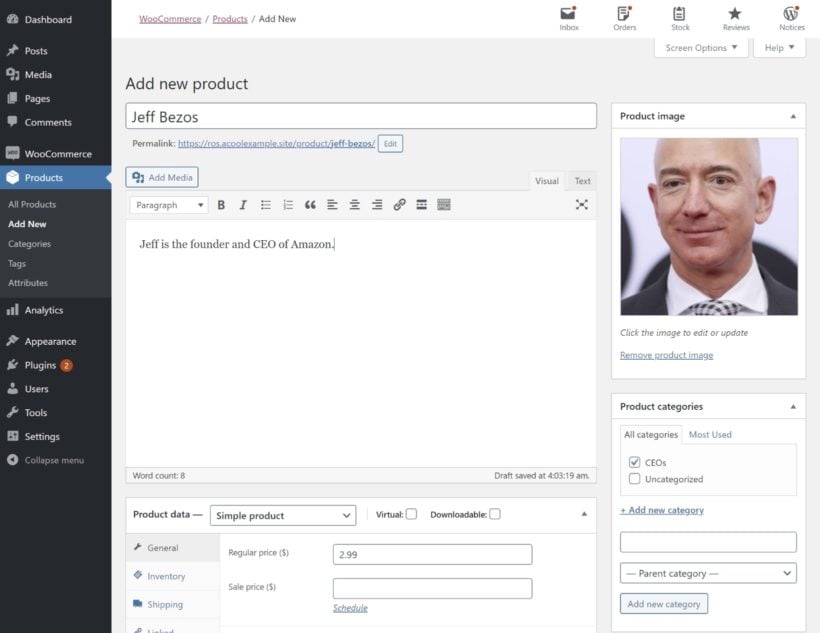
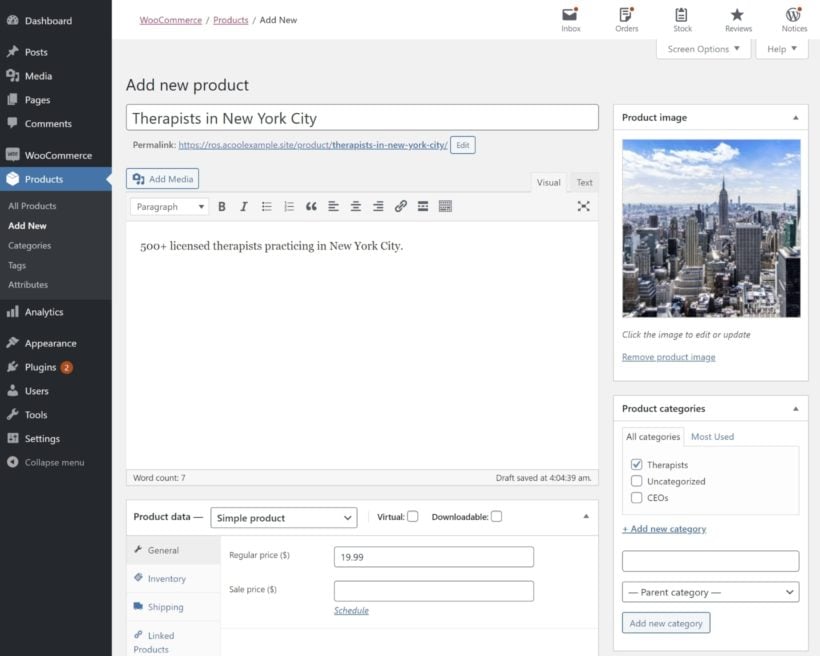
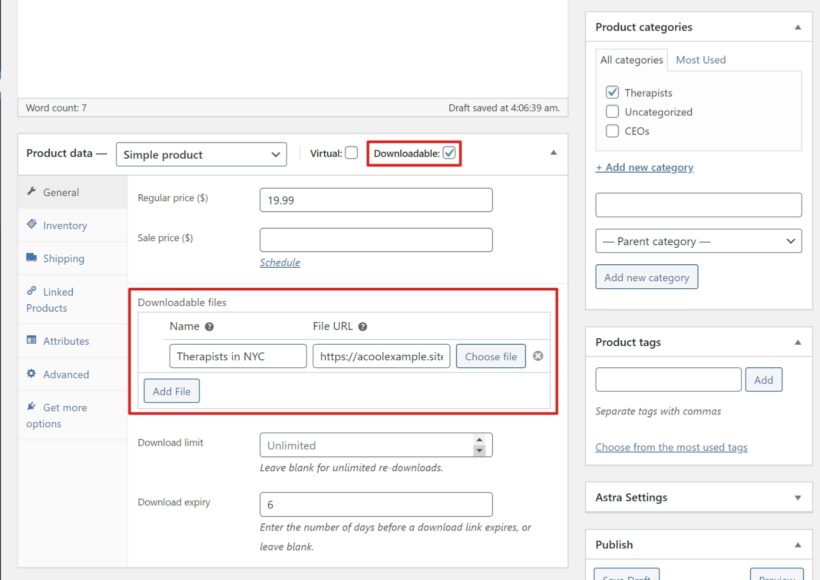


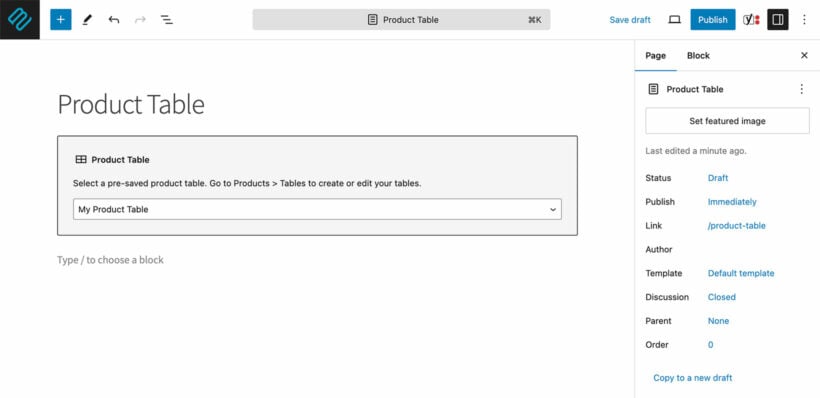
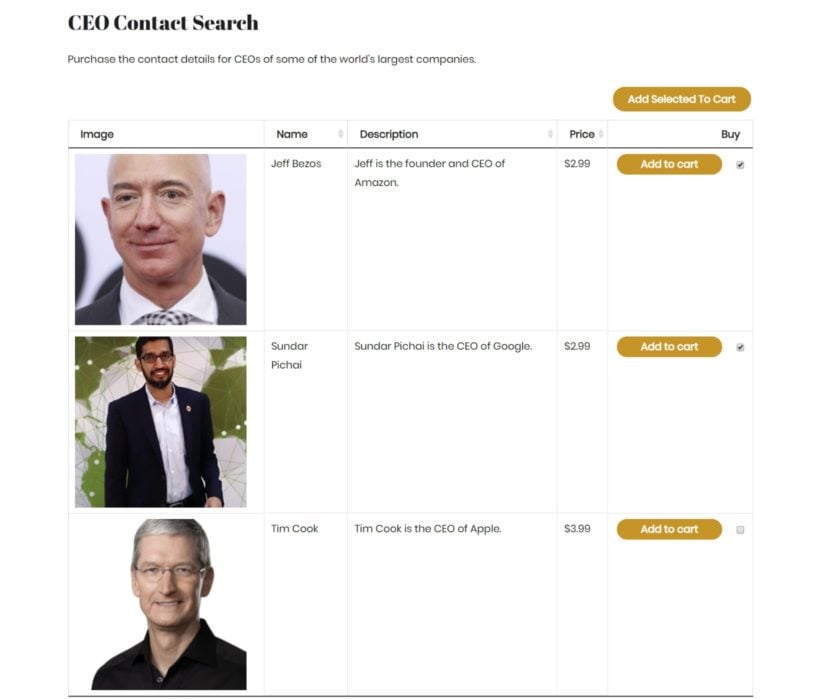

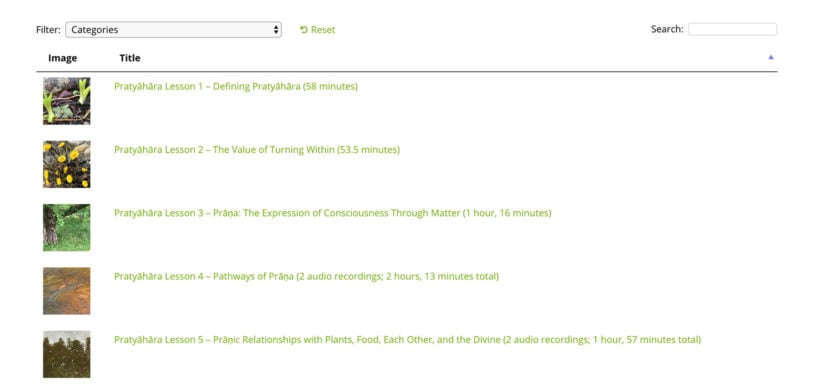
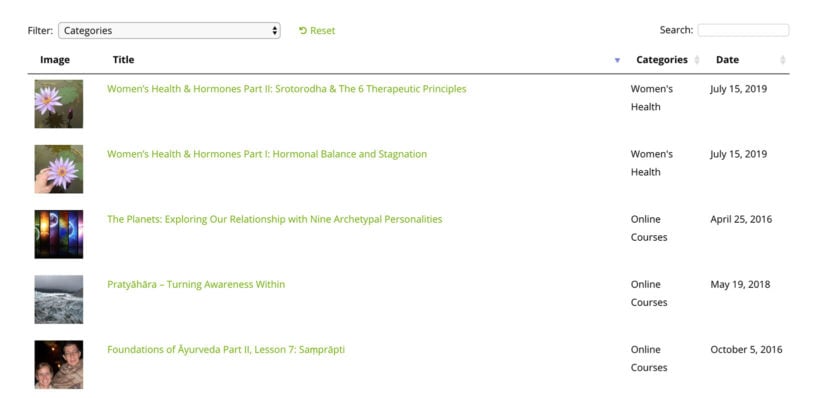
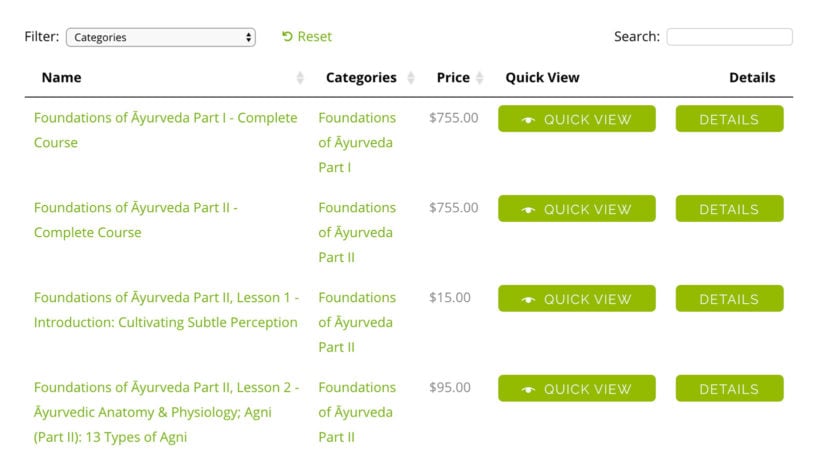
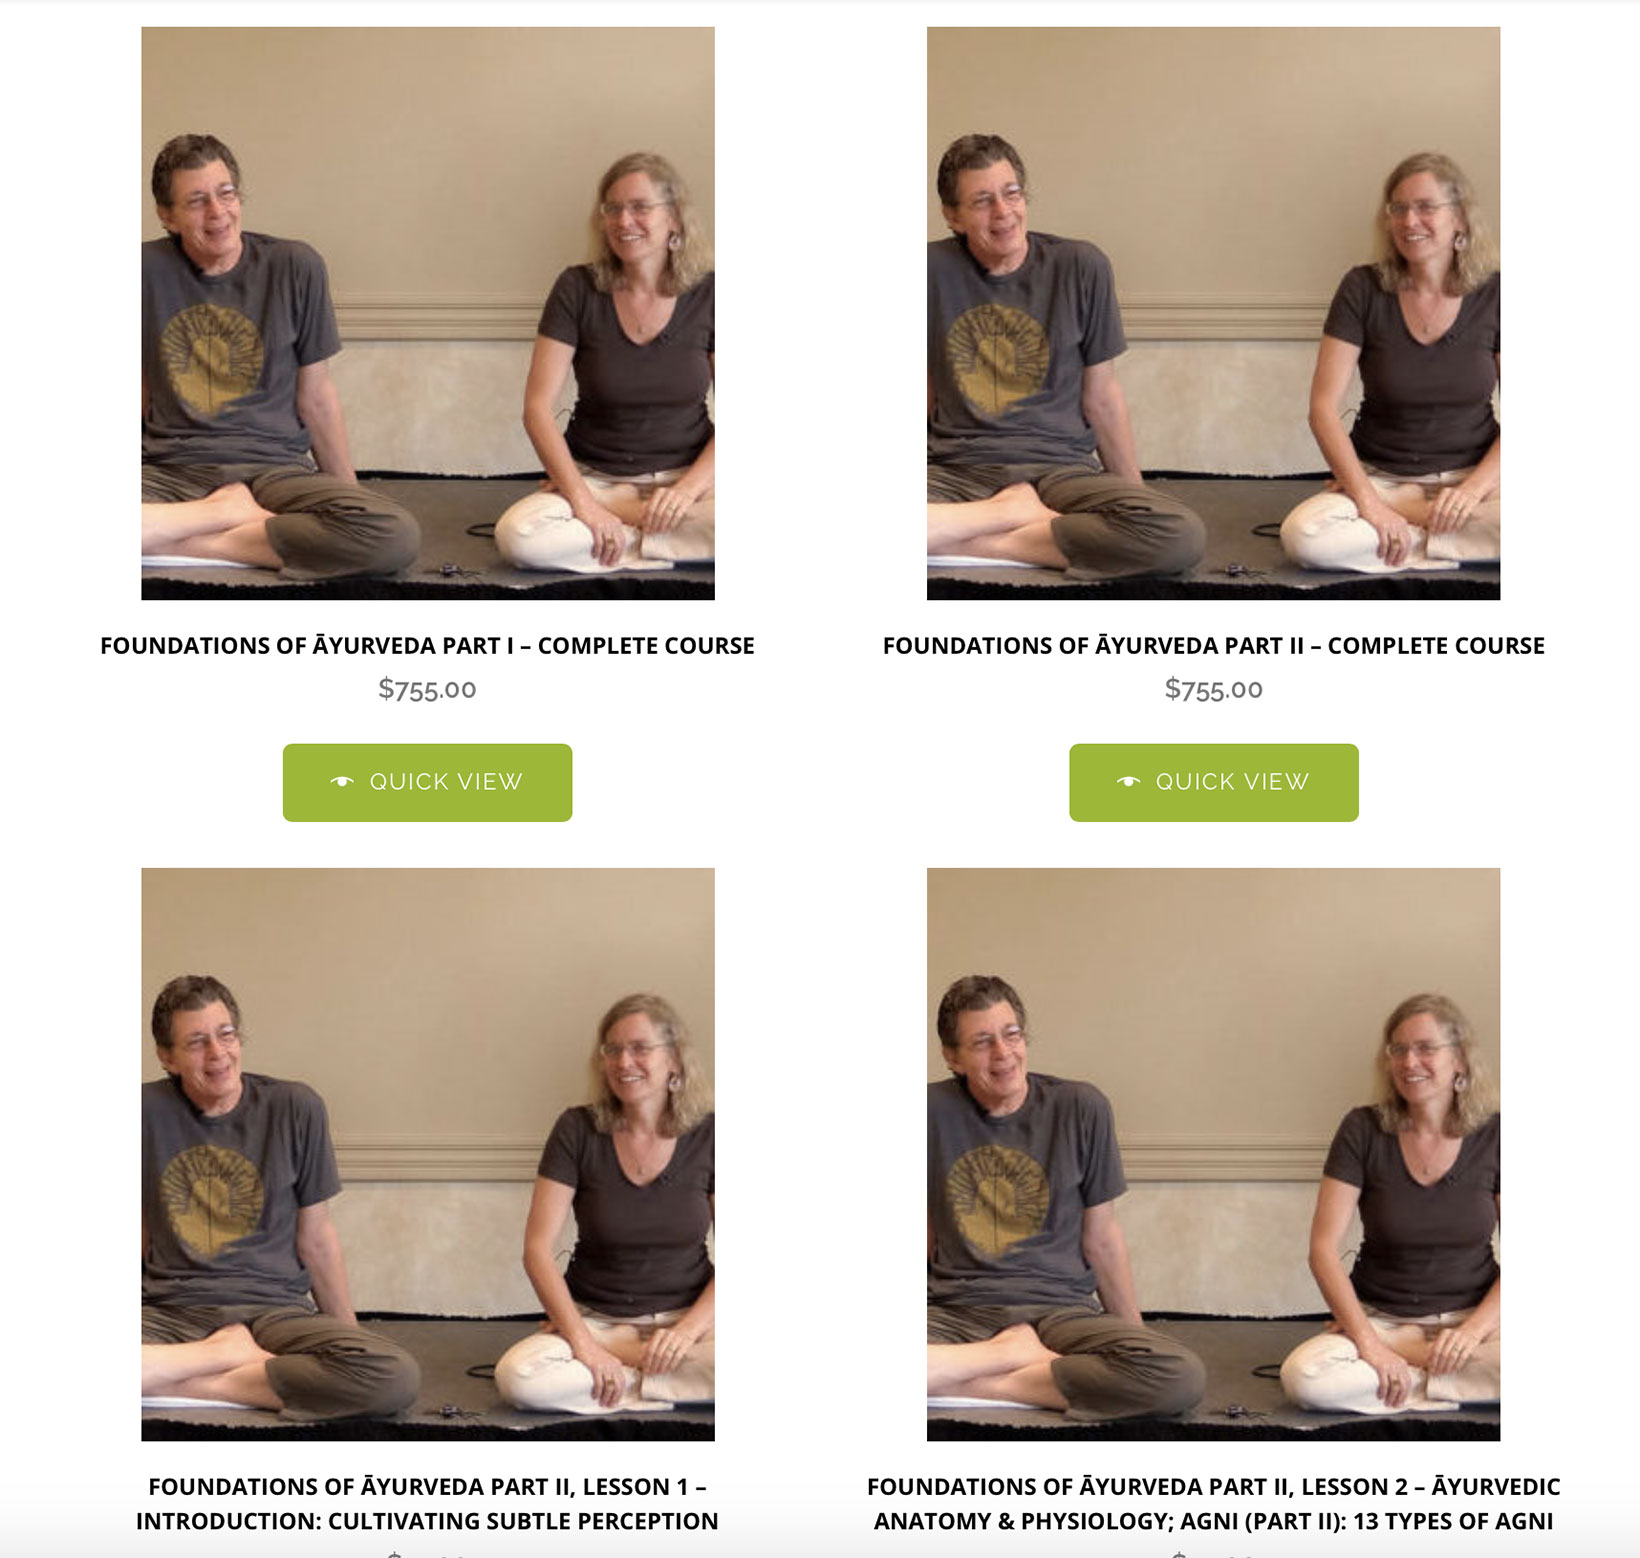
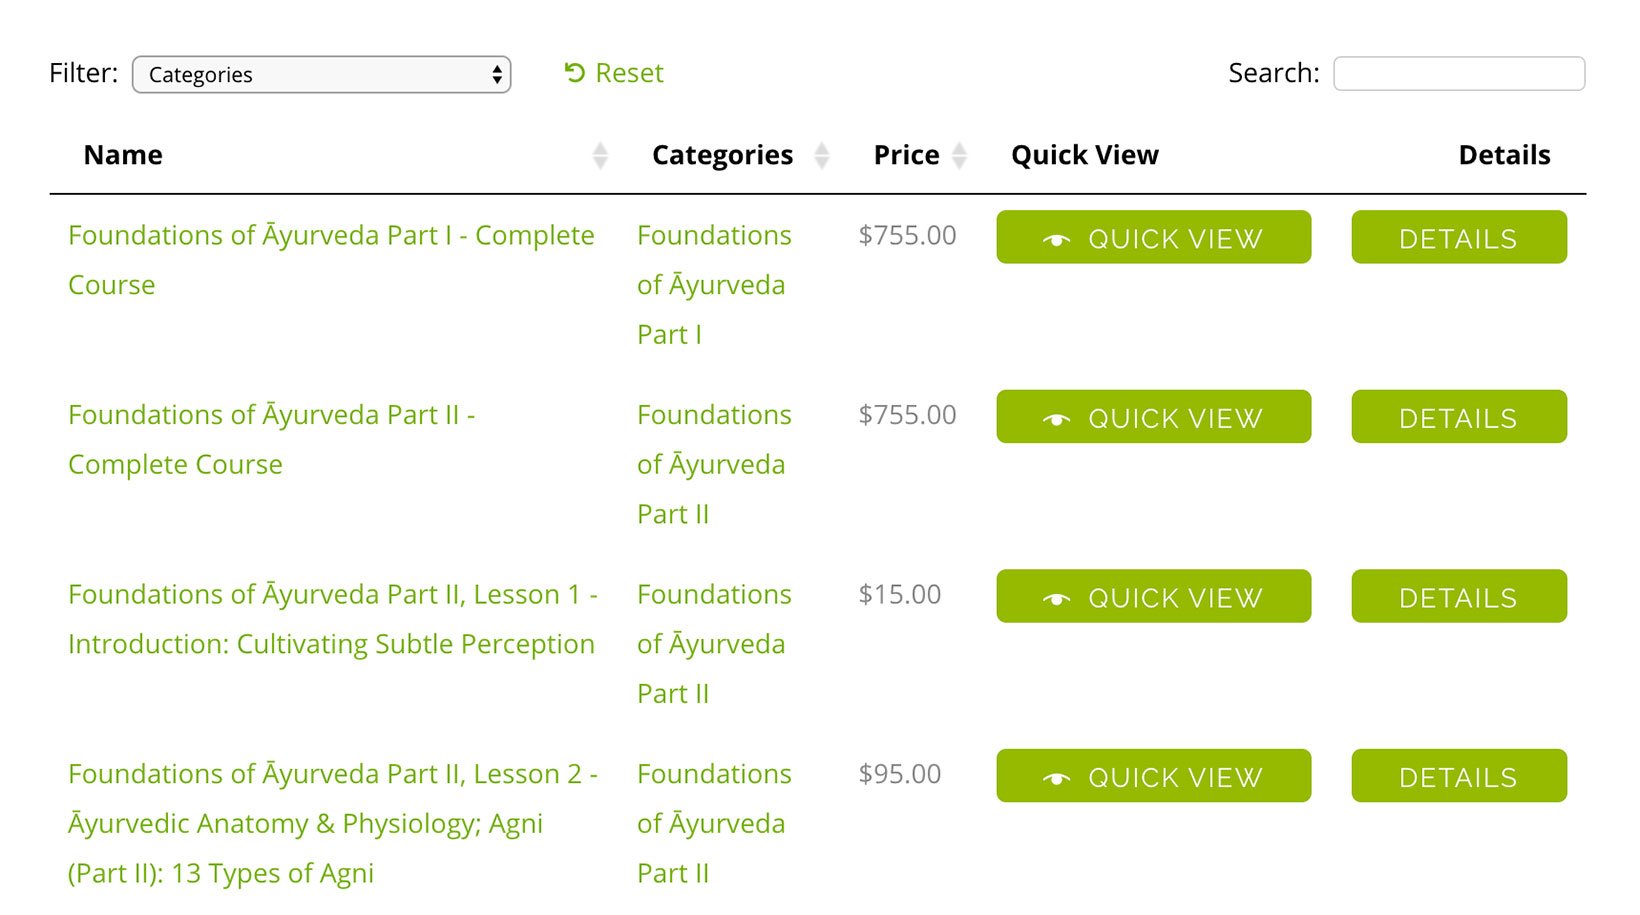
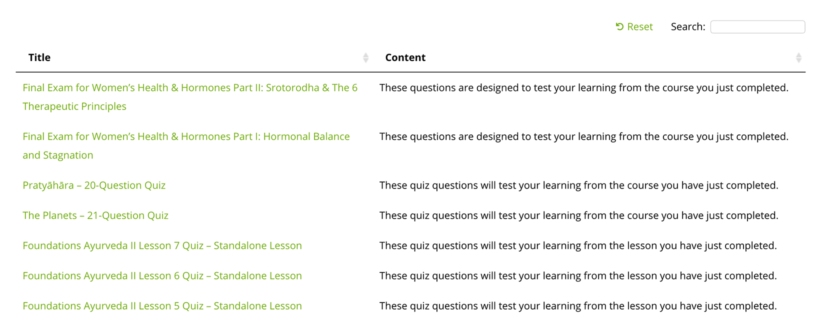
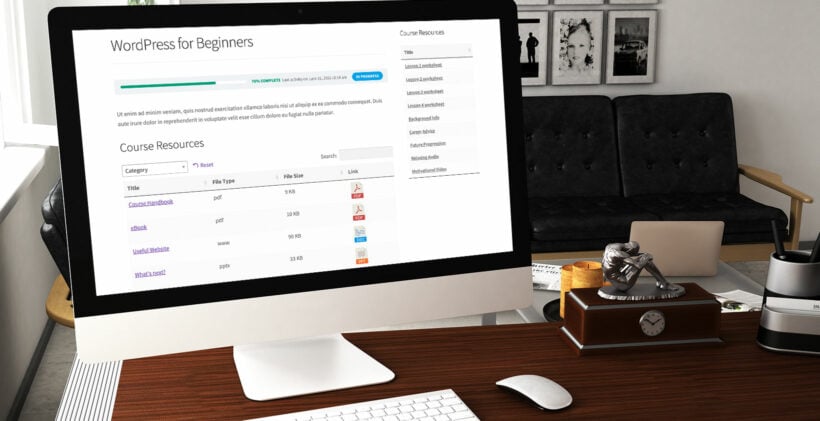

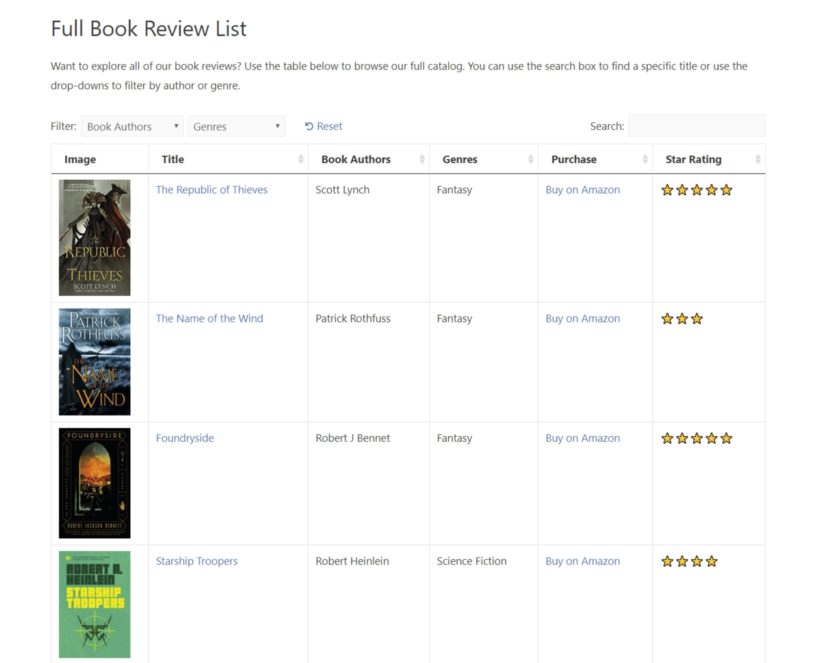
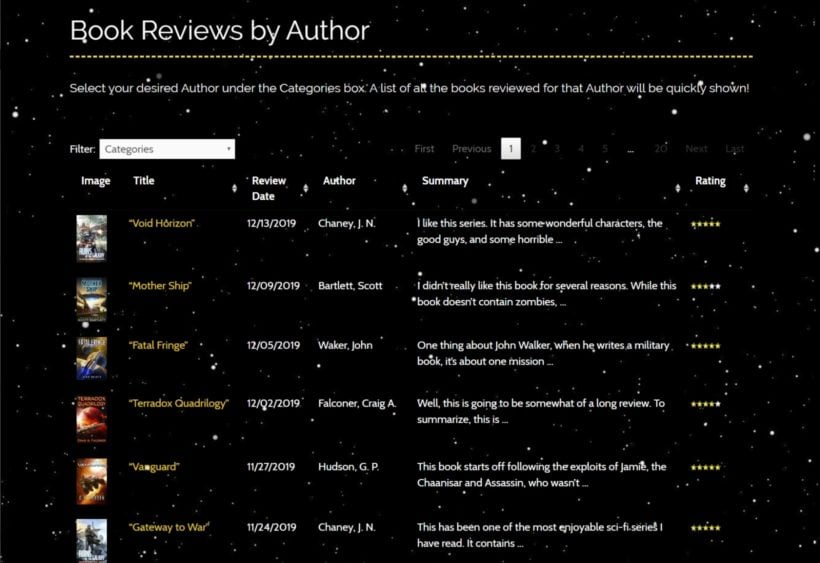
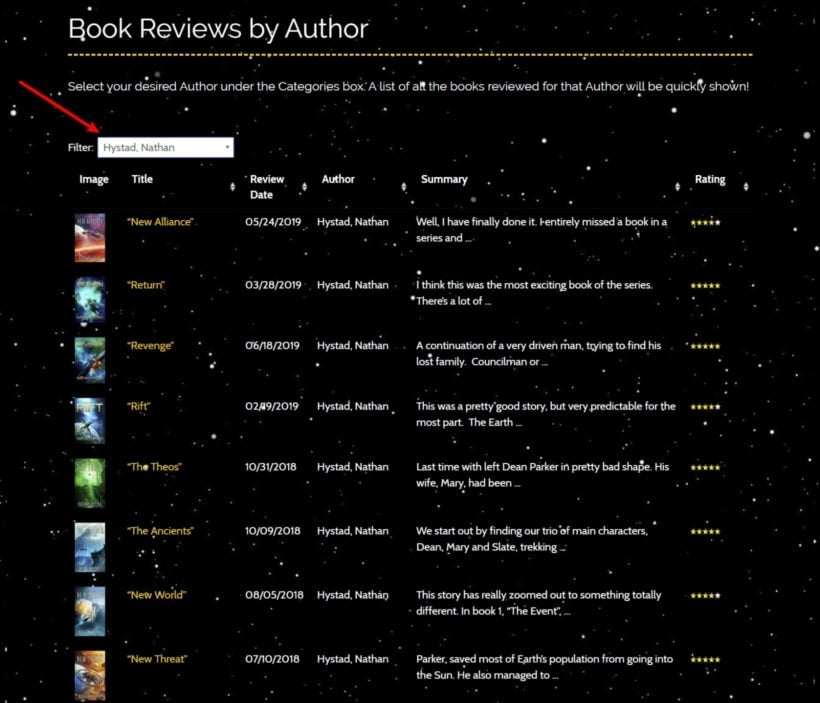
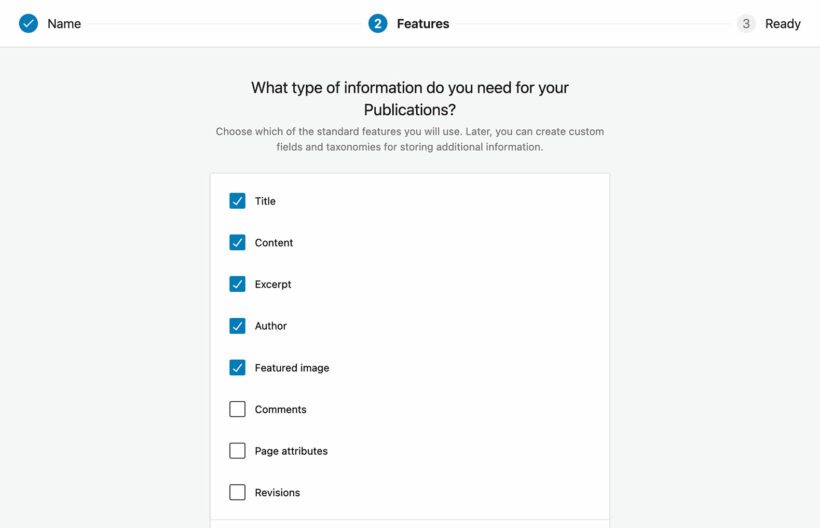
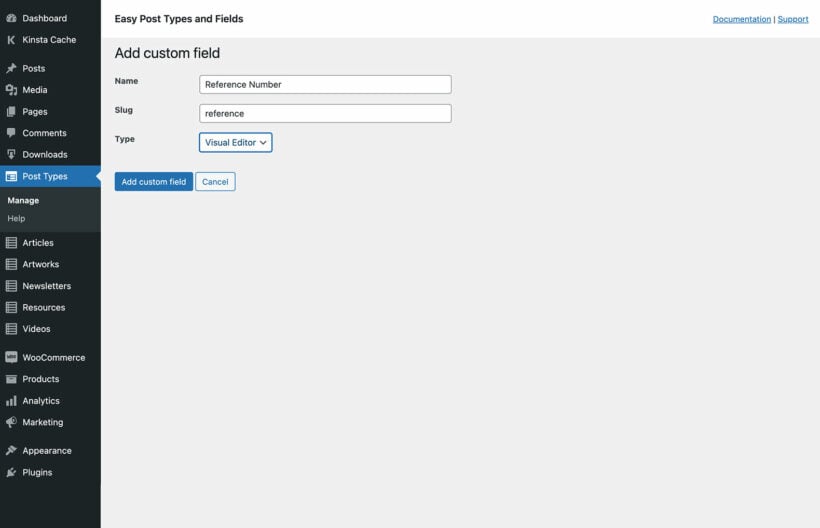
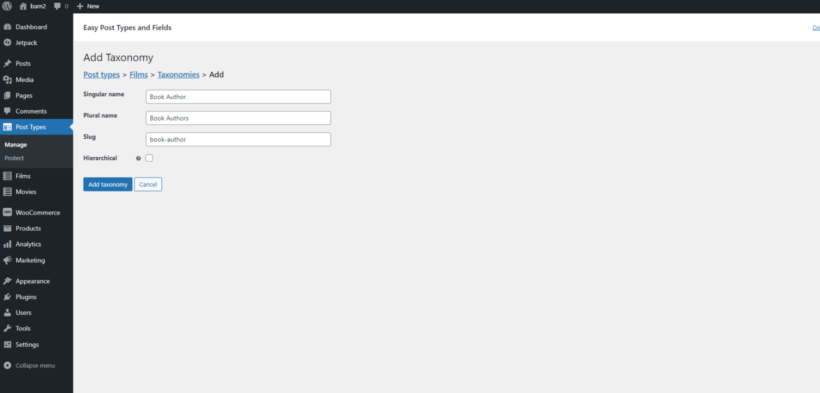
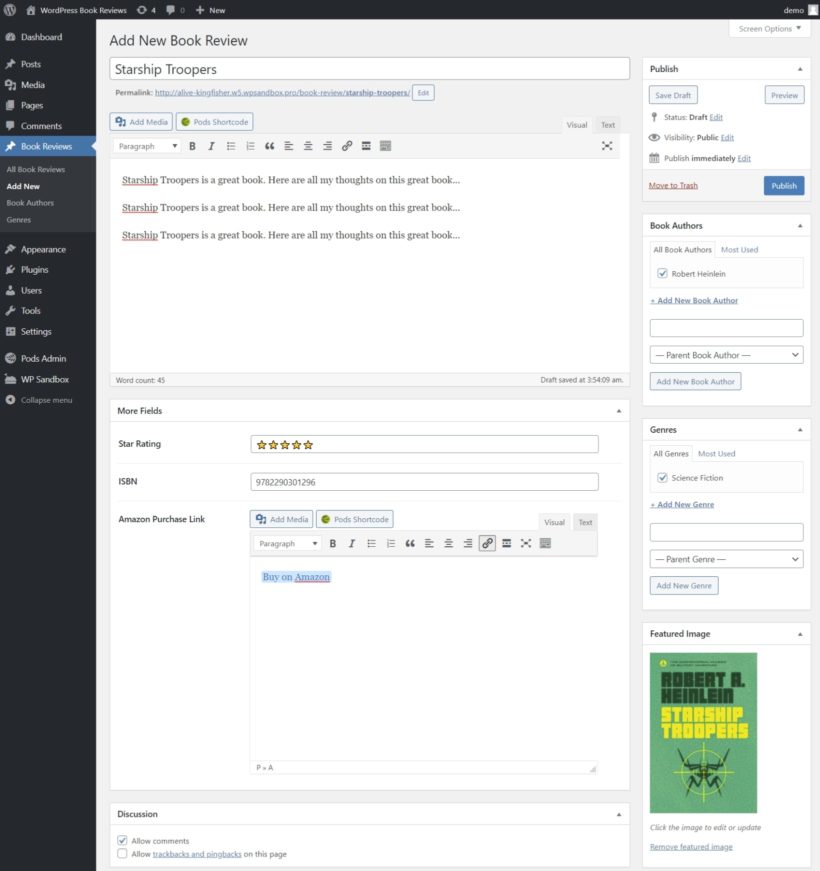

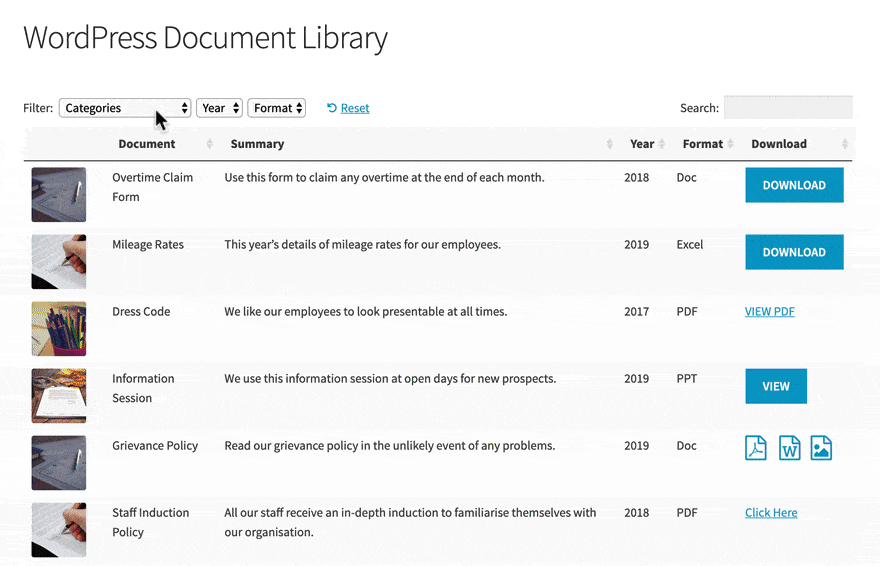
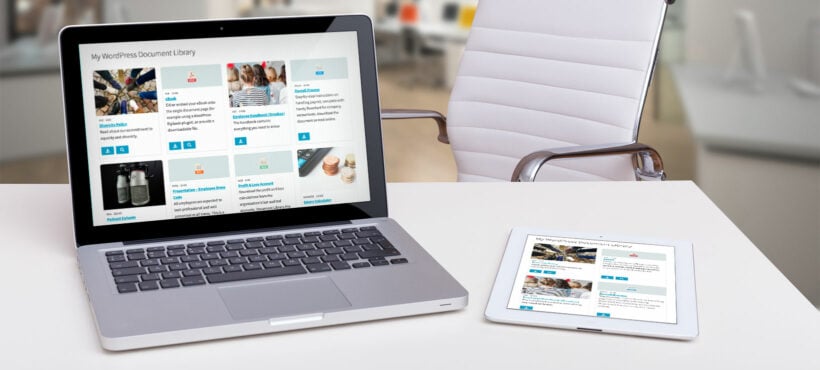
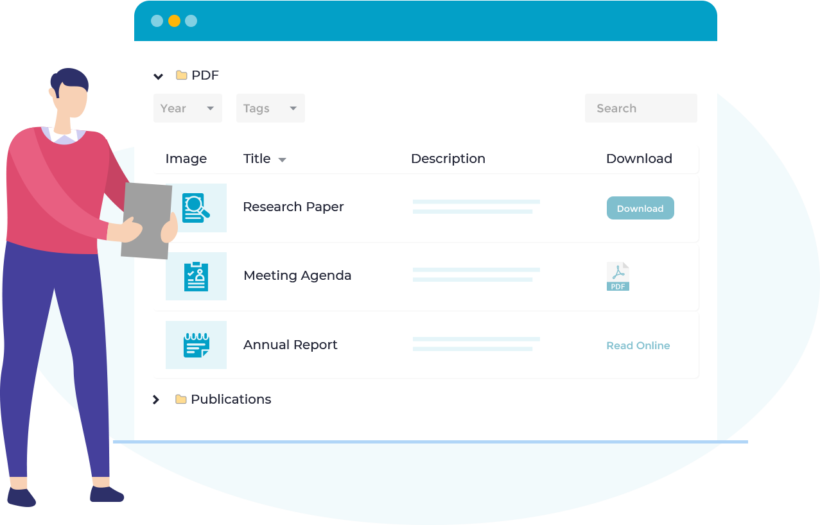

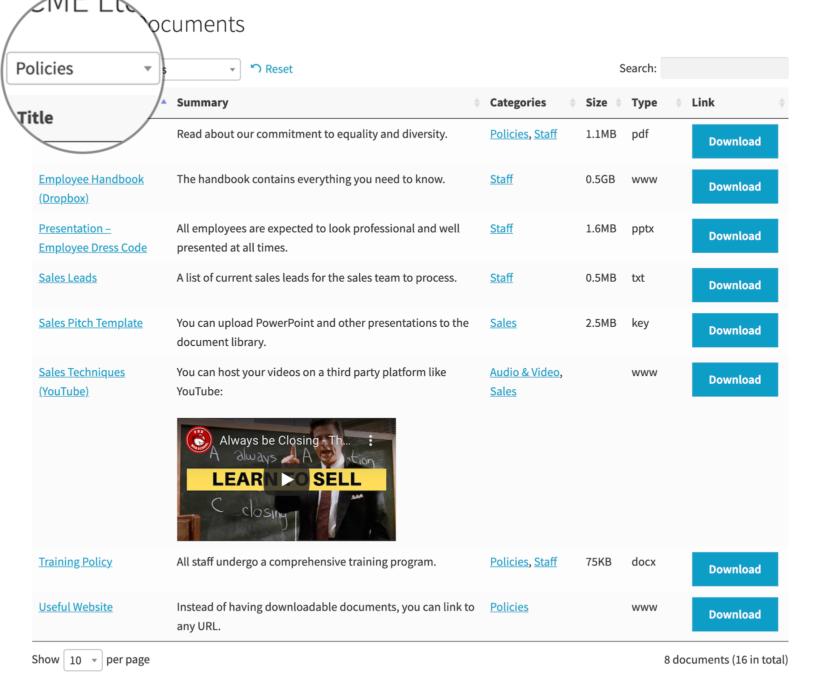
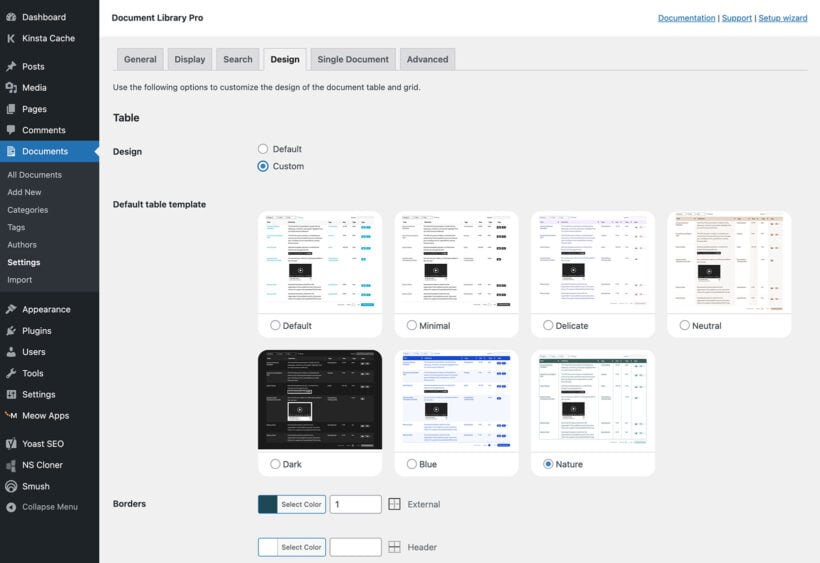

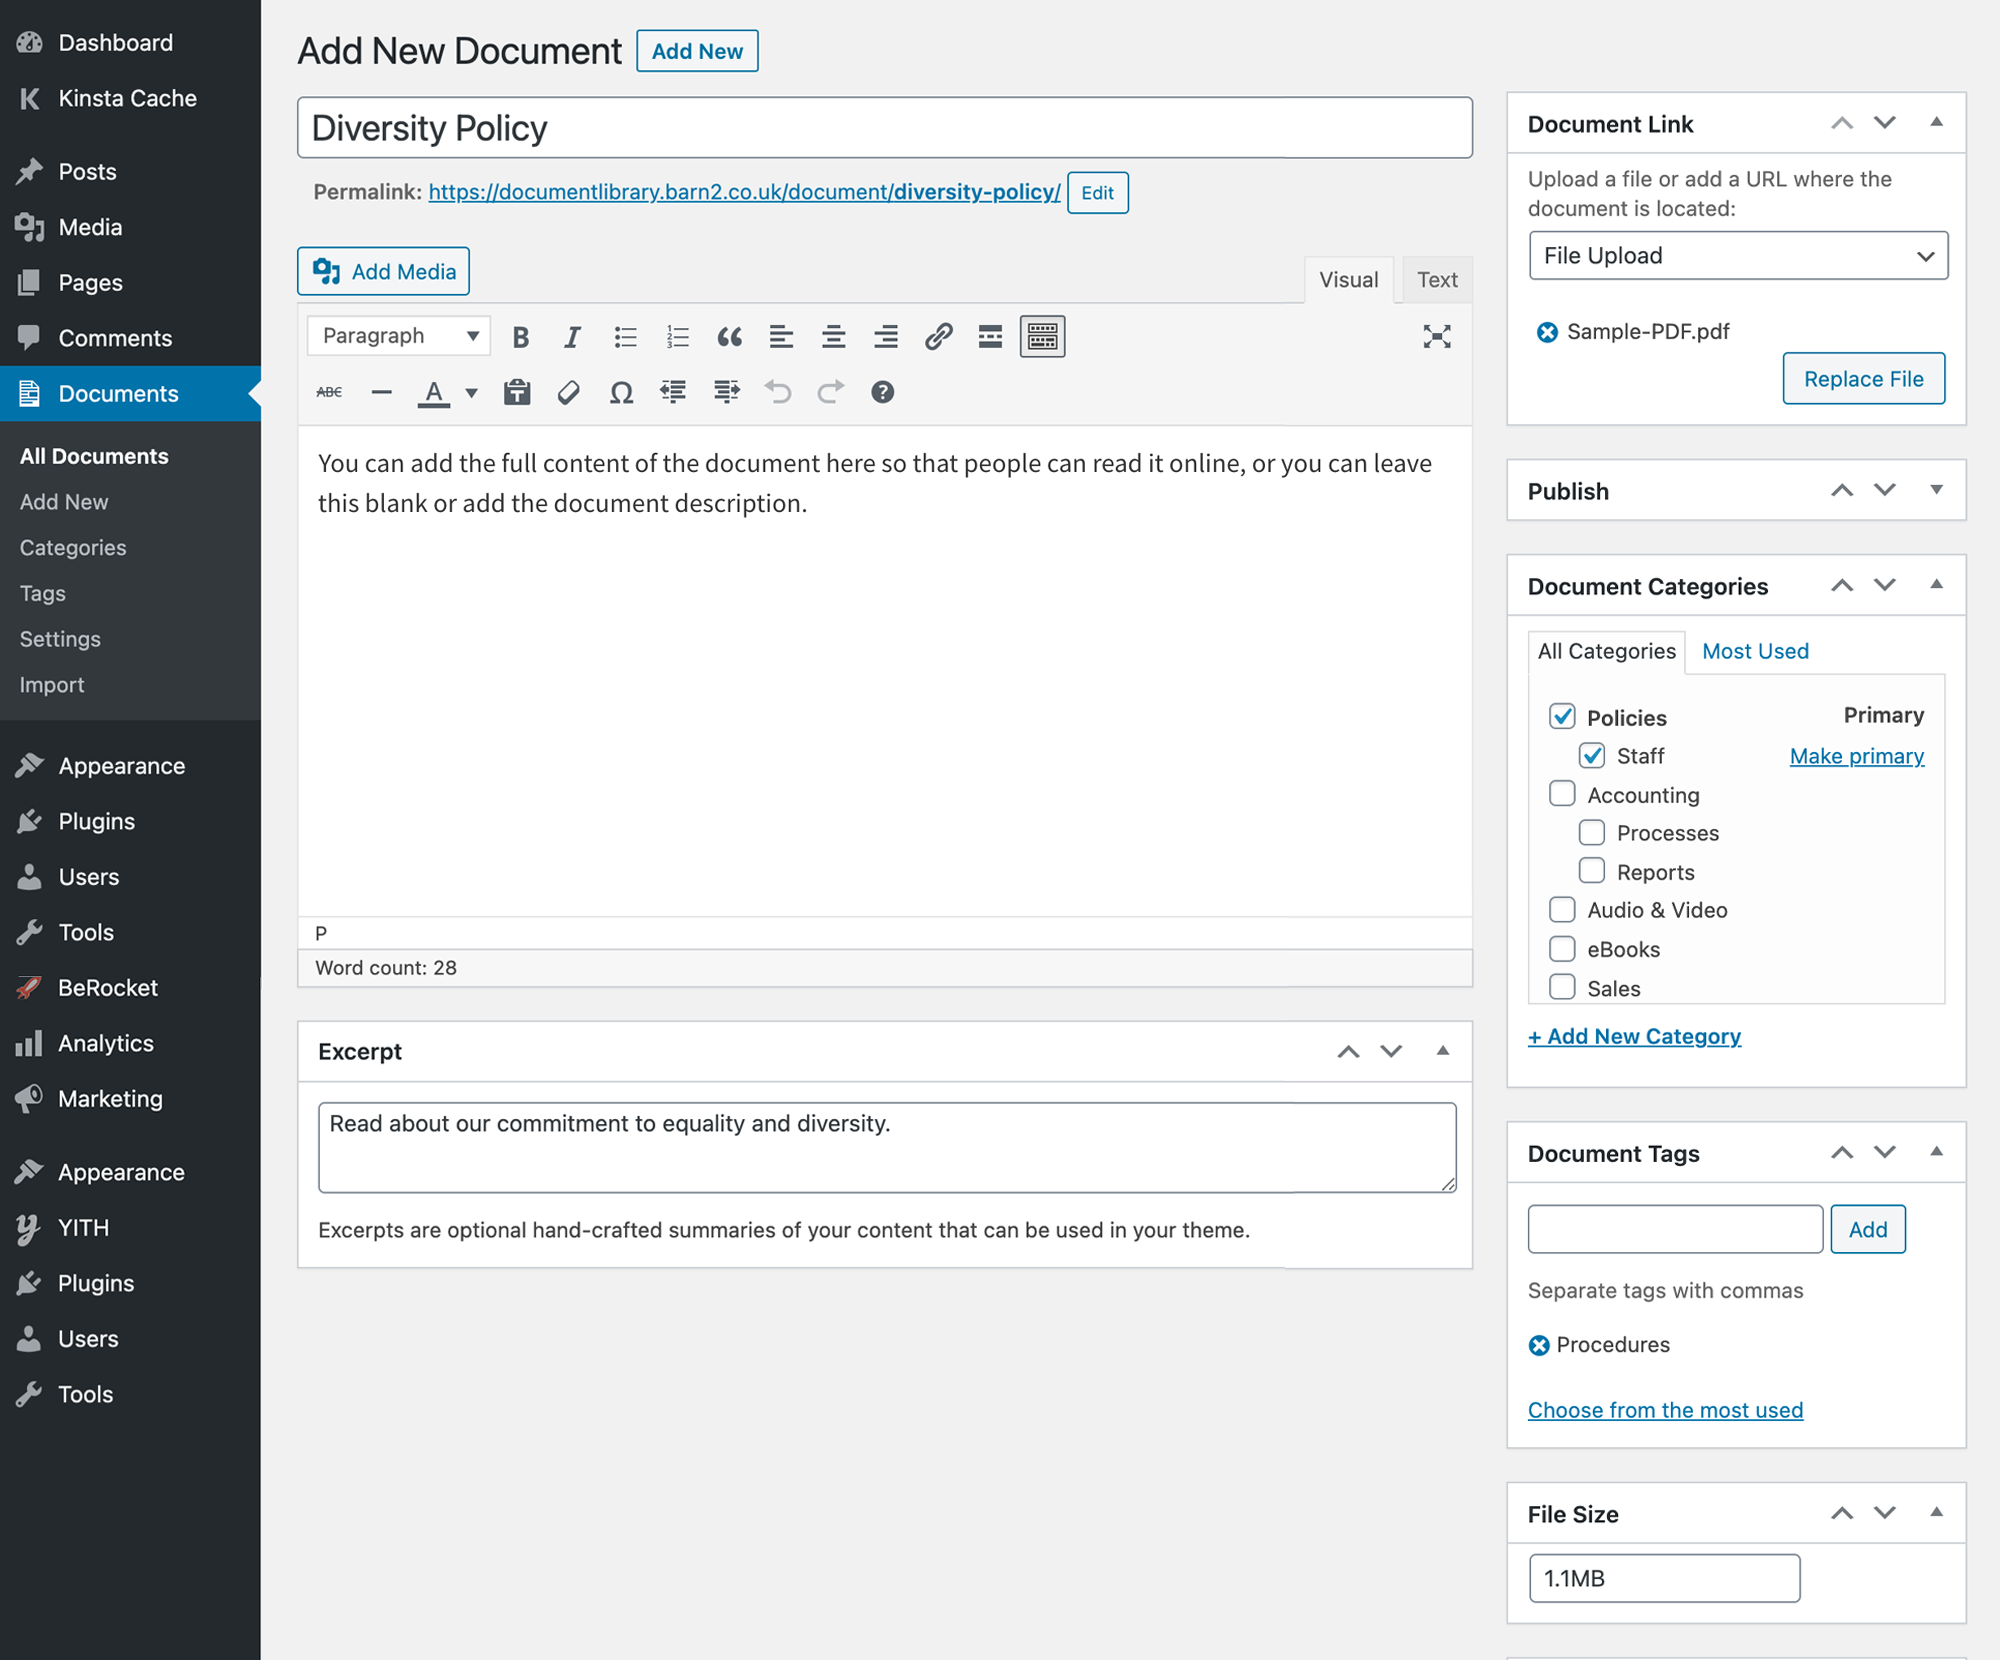
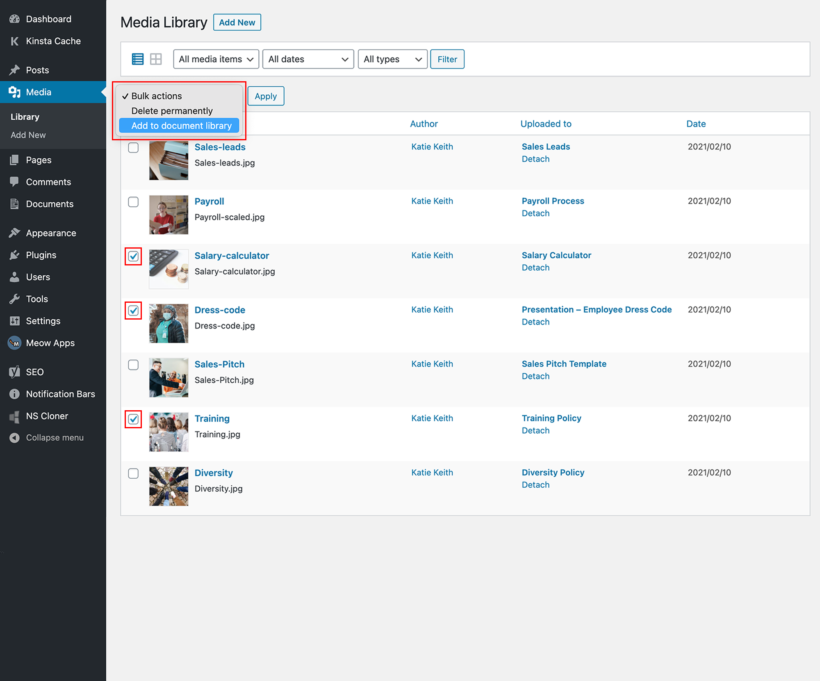

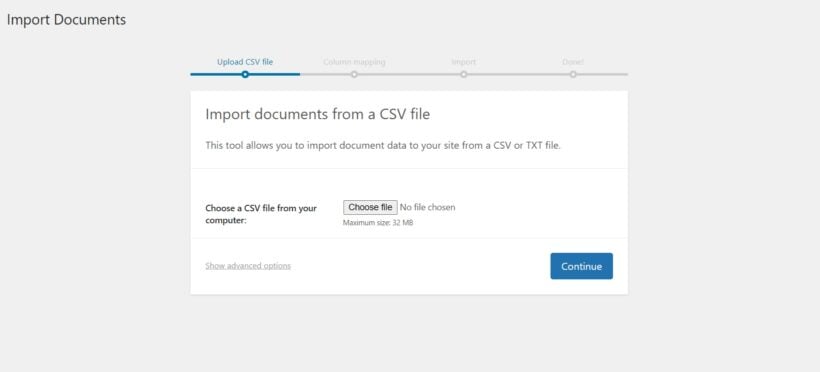
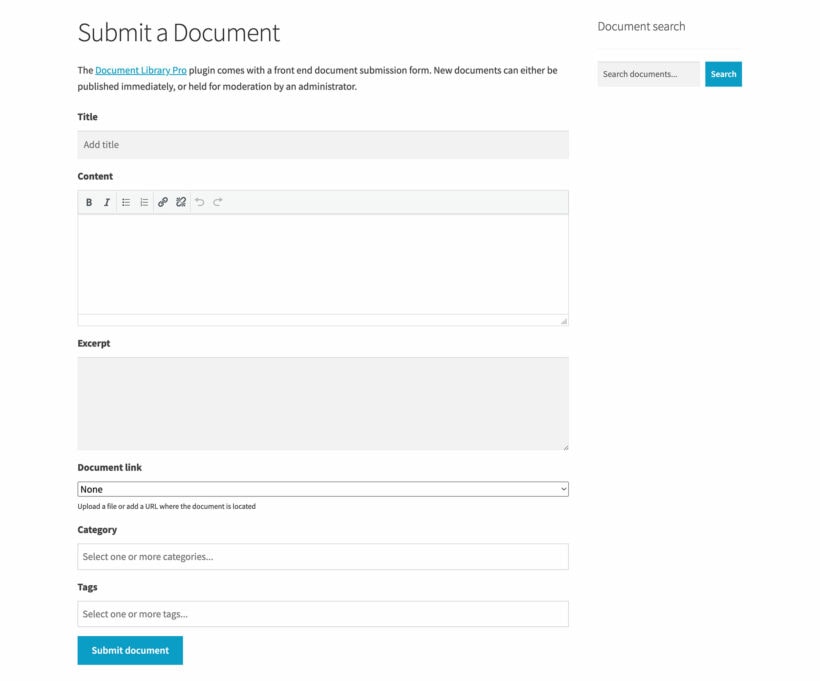


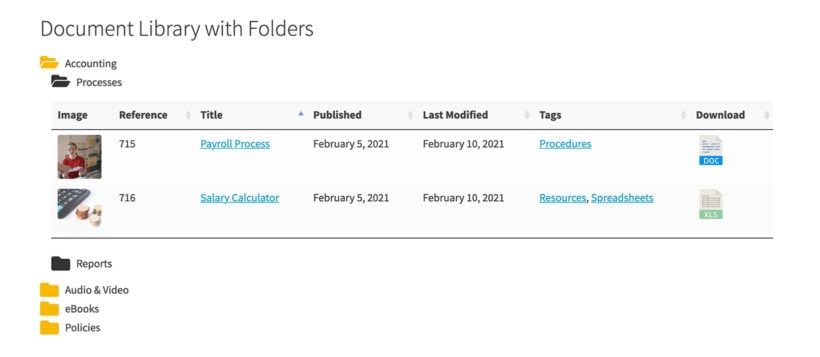

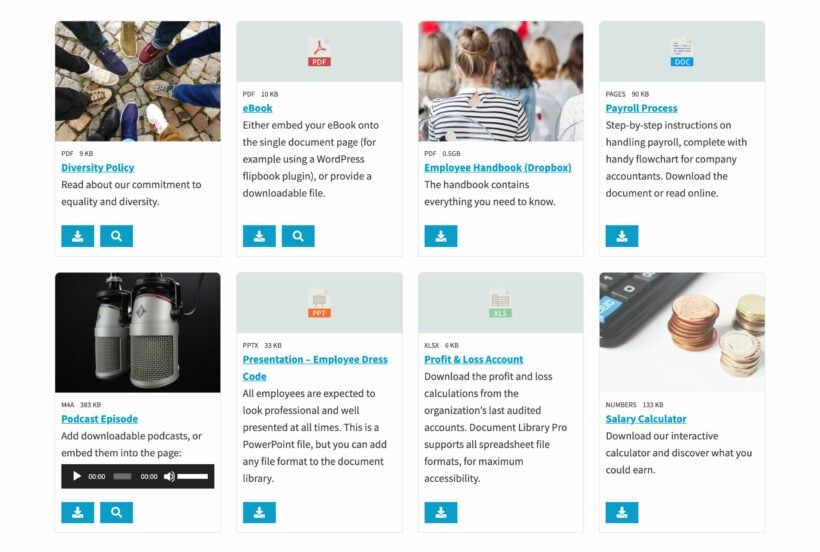
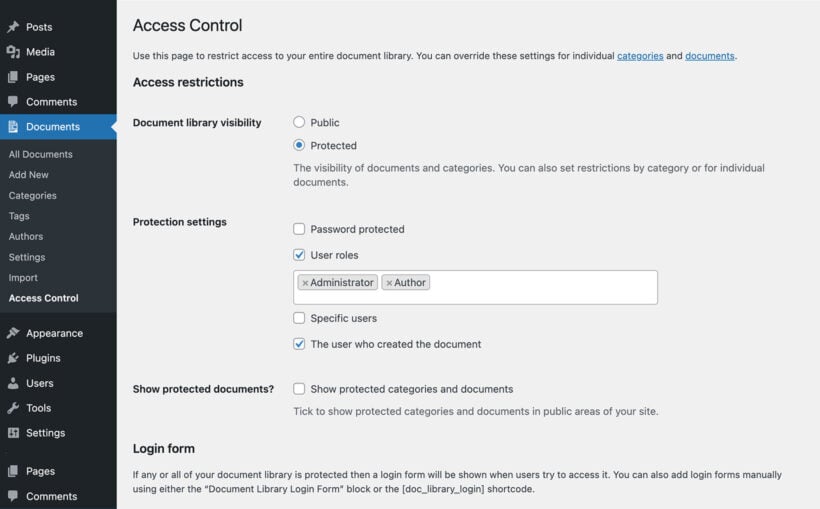
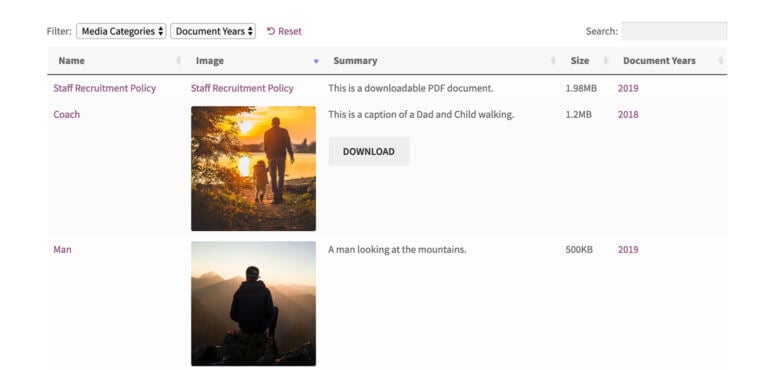
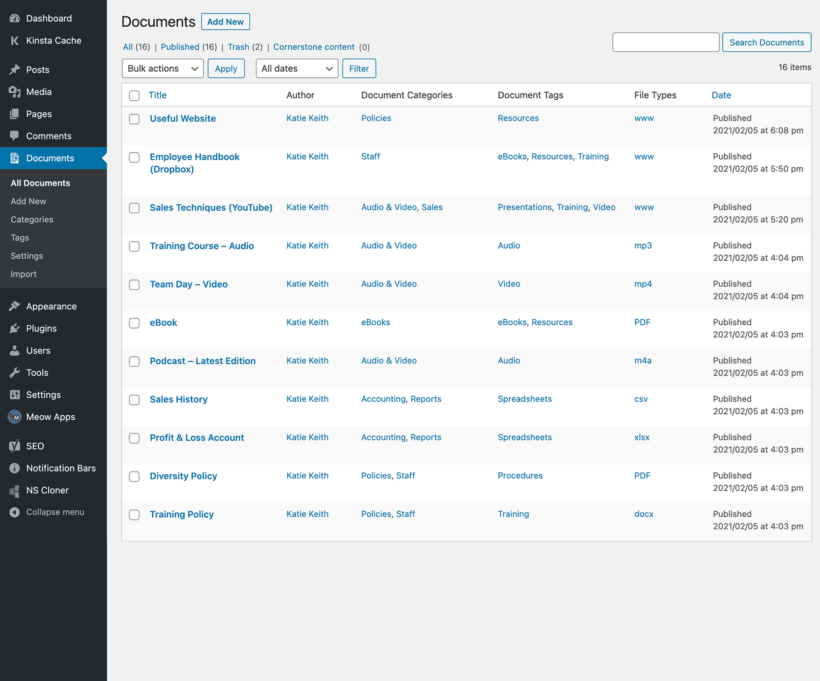
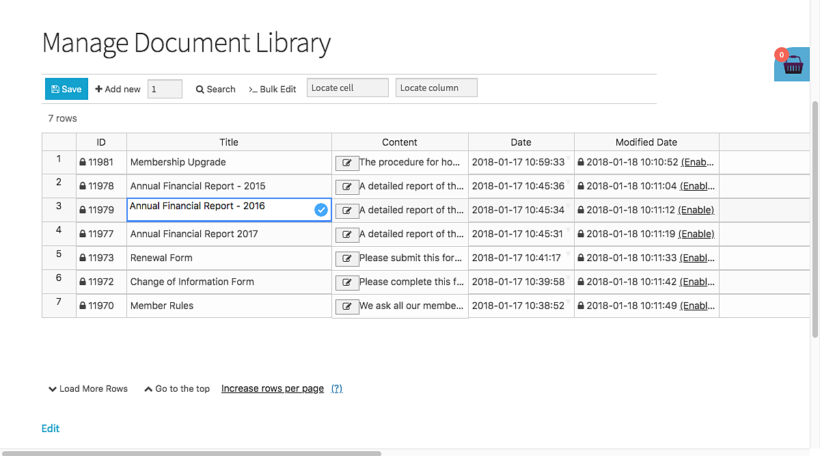
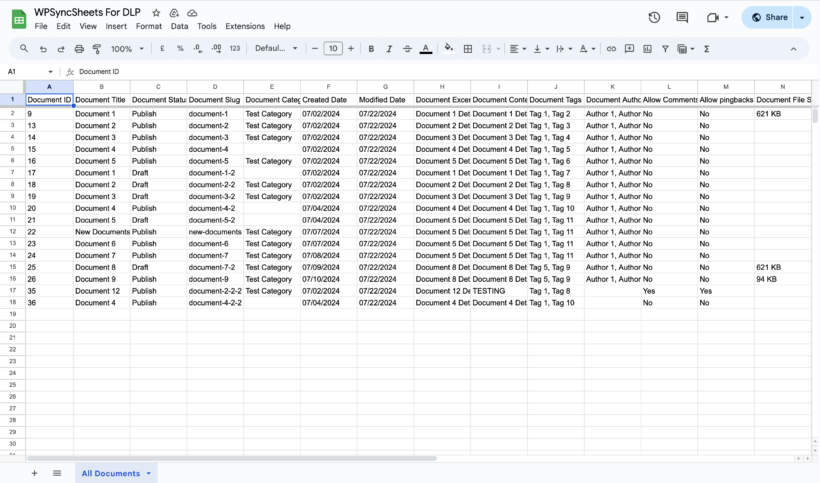
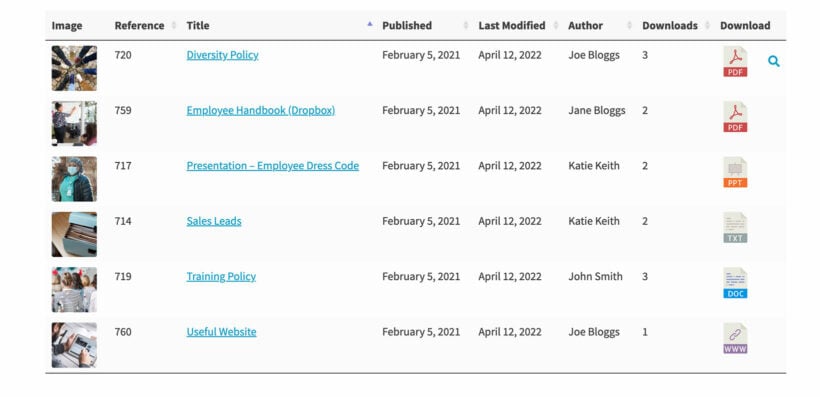
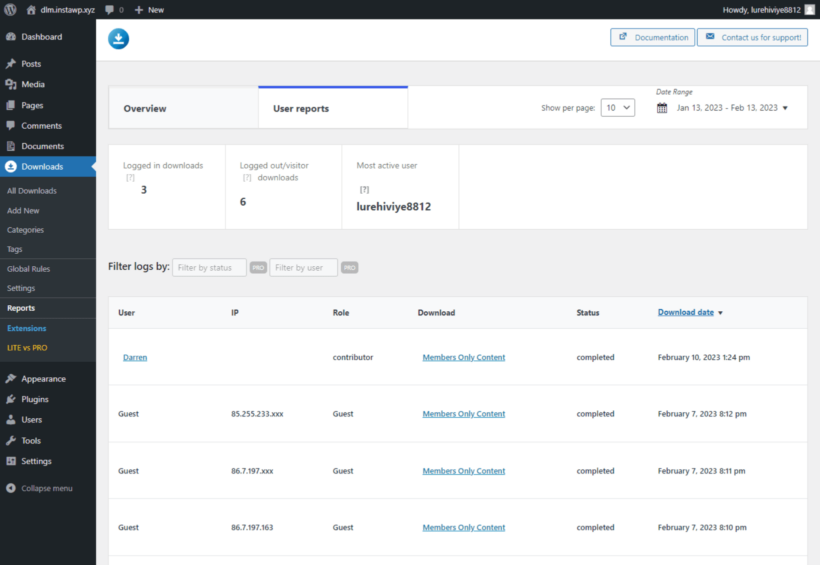

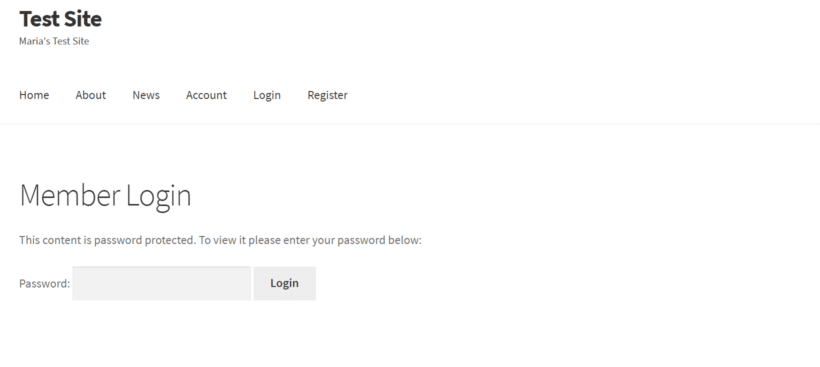

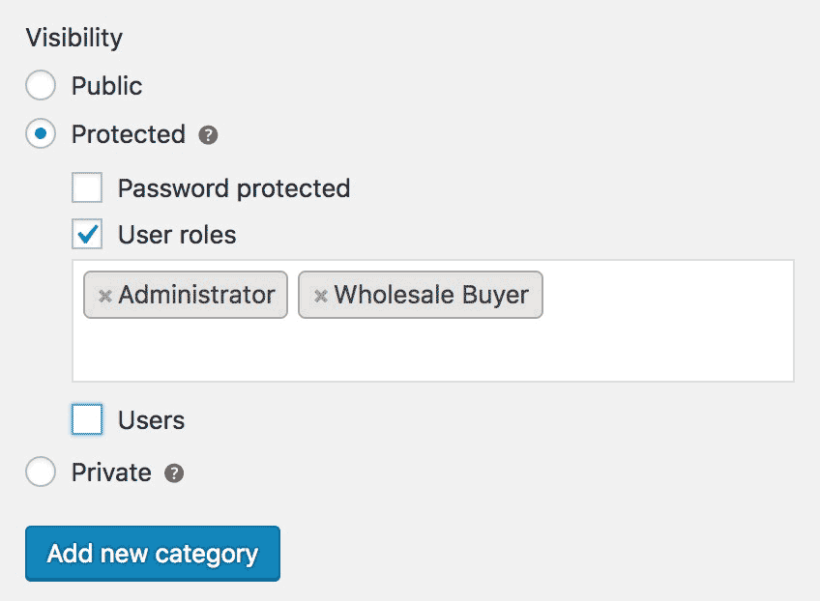


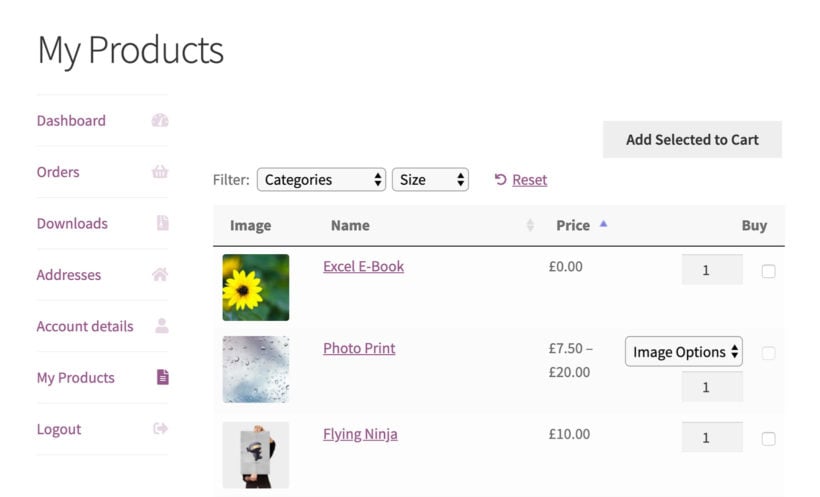


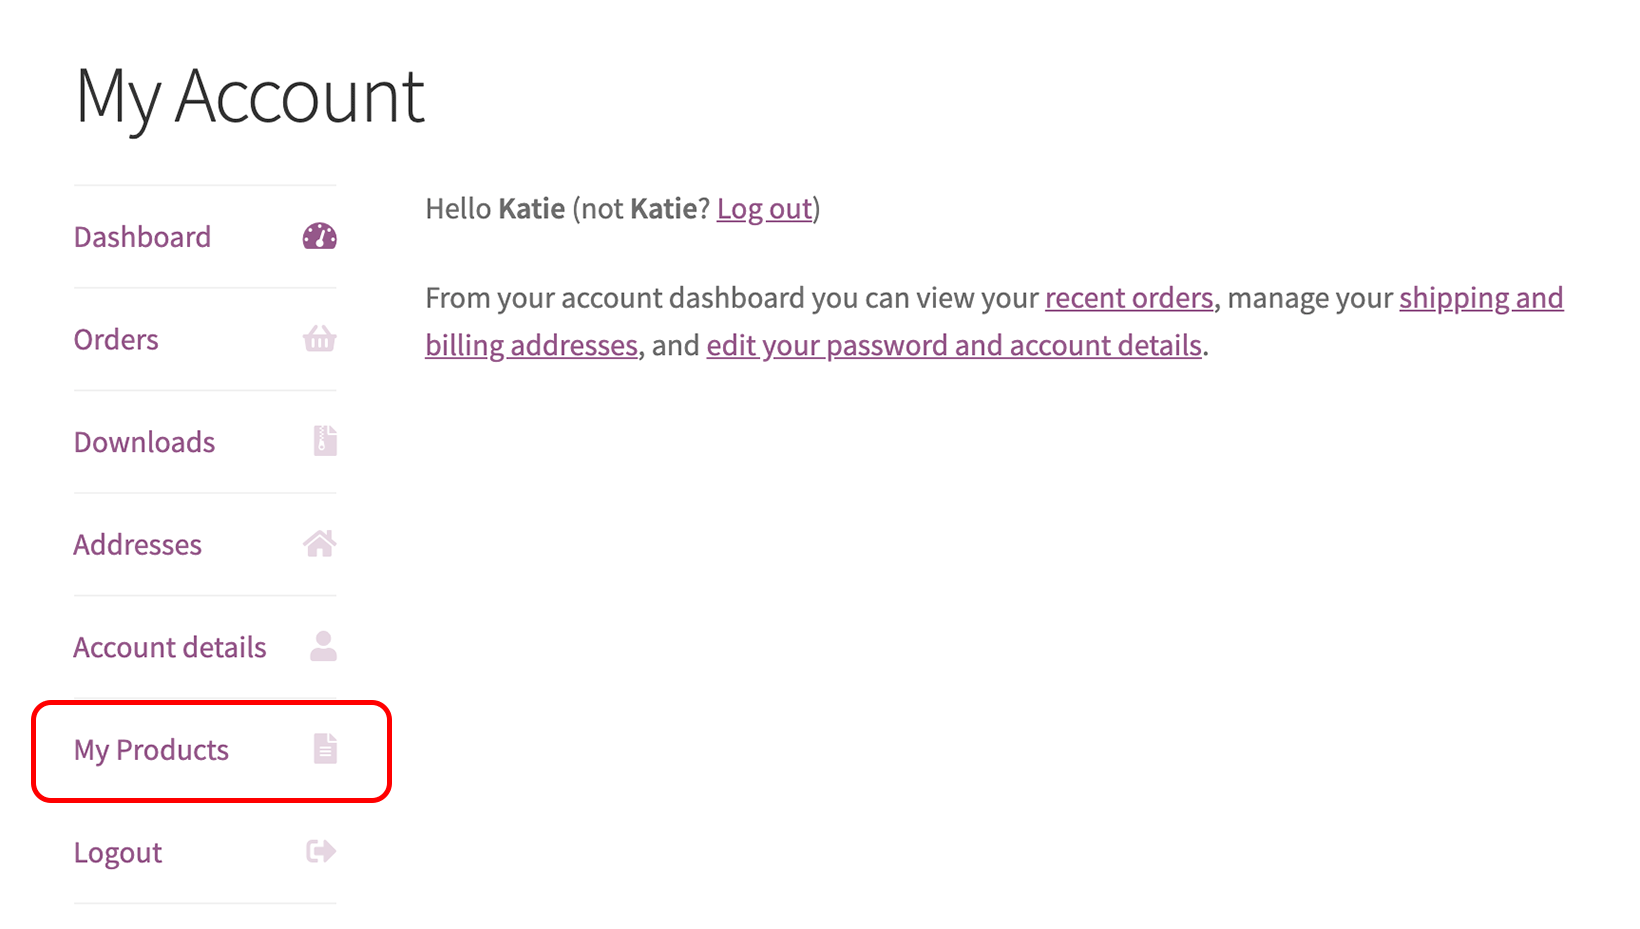


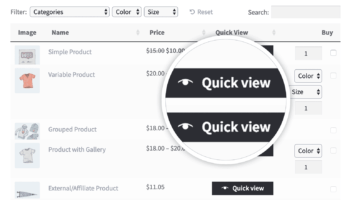
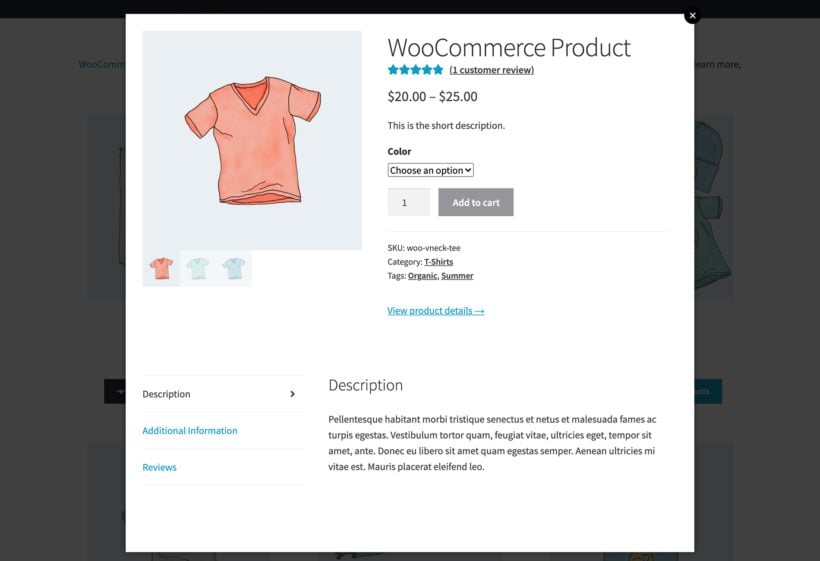

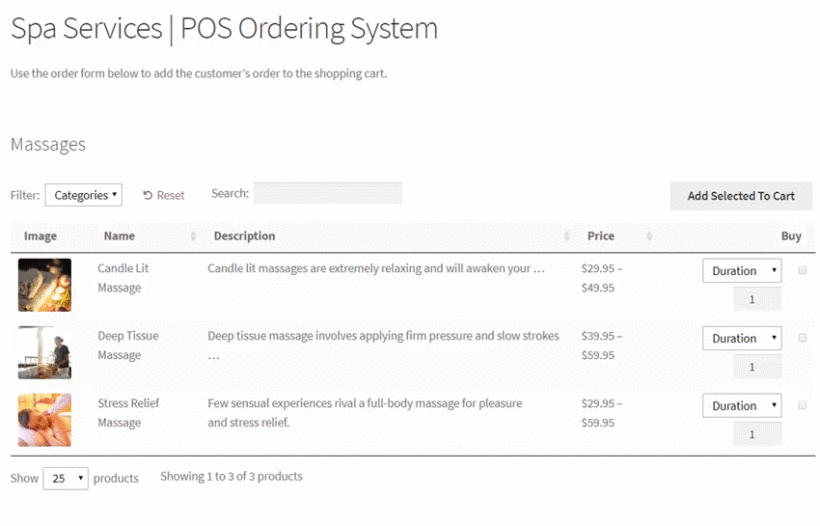

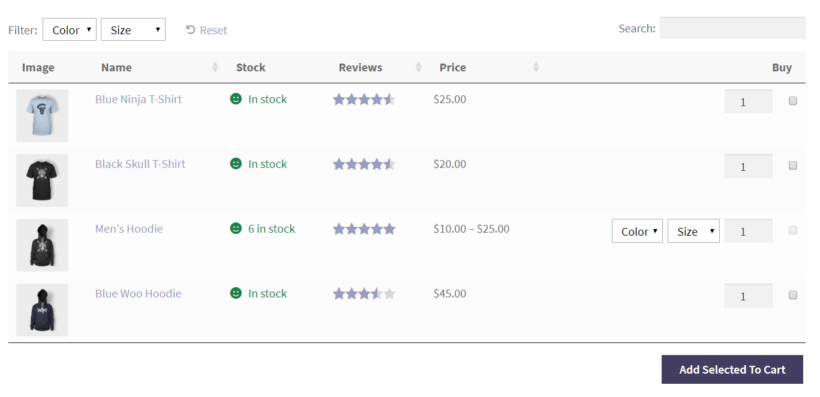
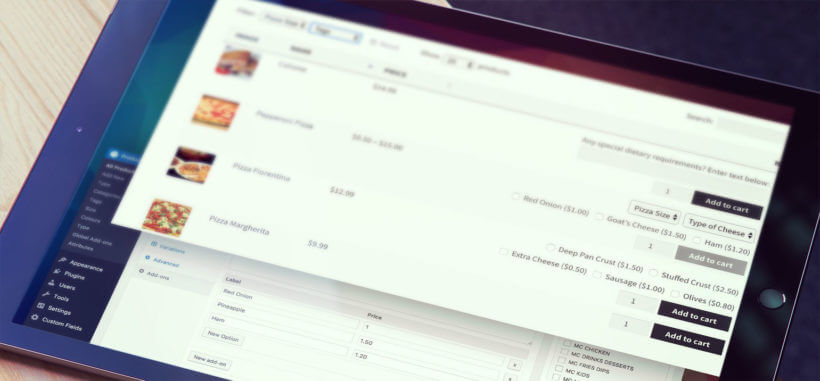 You can also add text boxes and other fields to your order forms using the