Keeping content fresh: Mastering automatic post expiration in WordPress

Looking for a way to automatically hide temporary or time-sensitive content on your site? In this tutorial, I'll share the 3 best WordPress post expiration plugins. I'll also show you how to use Document Library Pro to auto-expire files and other resources on your WordPress site.
If you've been running a WordPress site for some time, it's easy for content to accumulate. However, that doesn't mean all posts need to remain visible forever.
For example,
- Promotional offers end.
- Job vacancies get filled up.
- Workshops and events are hosted... and so on.
When a piece of content is past its shelf life, it's best to remove it from public view. Especially considering that 81% of people think less of brands whose websites include outdated content. (Source: PR Underground)
That's where WordPress post expiration plugins come in.
WordPress expiry plugins allow you to set a date and time for a piece of content to expire in advance. Once the content expires, the plugin will automatically remove it from your site's front end.
Of course, you can manually hide a post by changing its status to draft when they expire. However, depending on how large your WordPress site is, this can take up a lot of time. Post expiration plugins handle this for you automatically so you can free up your bandwidth.
In this in-depth guide, I'll:
- Introduce you to three top-tier WordPress content expiration plugins. These will let you auto-expire actual WordPress pages and posts, custom post types, and downloadable resources.
- Demonstrate step-by-step how to use Document Library Pro to auto-expire files and other resources in WordPress.
- Answer common questions about WordPress post expiration.
- Share tips to help streamline your site's content management process.
Ready? Let's kick off with a quick overview of the best WordPress plugins to set up automatic content expiration.
The best WordPress post expiration plugins
These are 3 best post expiration WordPress plugins:
- Auto Post Expiration - Add expiry dates to WordPress posts, pages, and custom post types.
- Document Library Pro - Instead of pages or posts, this plugin lets you set an expiry date for downloadable files or other resources which are provided via your WordPress site.
- PublishPress Future - Just like Auto Post Expiration, this plugin lets you expire WordPress posts, pages, and custom post types.
Let's explore each in more detail.
Auto Post Expiration
Auto Post Expiration plugin by Viitorcloud is a simple, no-frills freemium WordPress post expiration plugin. It lets you define expiration dates on posts, pages, and custom post types so you can manage time-sensitive content on your WordPress site.
Auto Post Expiration's key features
- Automatic expiration setting: You can configure content to expire at a specific date and time. Once a piece of content expires, it is automatically reverted to draft status.
- Support for custom post types: It works for standard posts, pages, and custom post types. This makes it handy for various use cases, such as regular blog posts, product announcements, etc.
- Admin email notifications: You can alert admin users when posts reach their expiration date. Admins will receive an email notifying them about the post’s status change to draft. Note that this feature is only available in the paid version of this plugin.
Here's a user review about the Auto Post Expiration plugin:

Document Library Pro
Document Library Pro is a robust document and resource expiration plugin. It lets you add, organize, and display a searchable document library in WordPress, complete with an expiry date for each one.
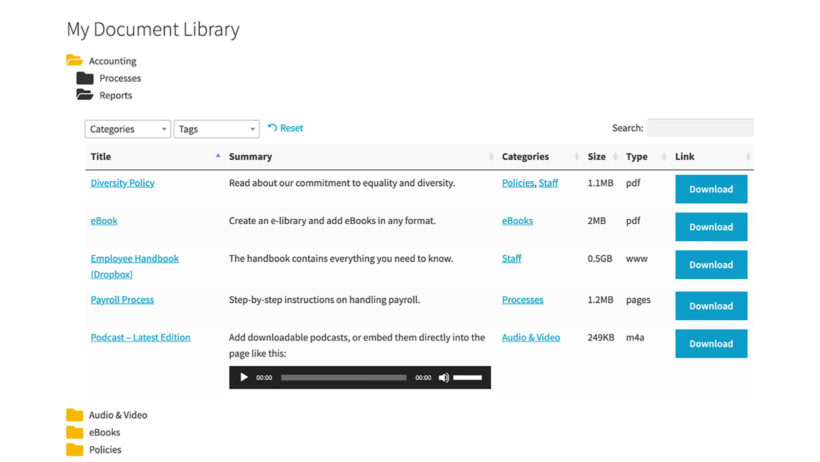
Plus, if you opt for its two-plugin bundle that includes Password Protected Categories, it includes options for controlling who can see each document or resource.
Document Library Pro's key features
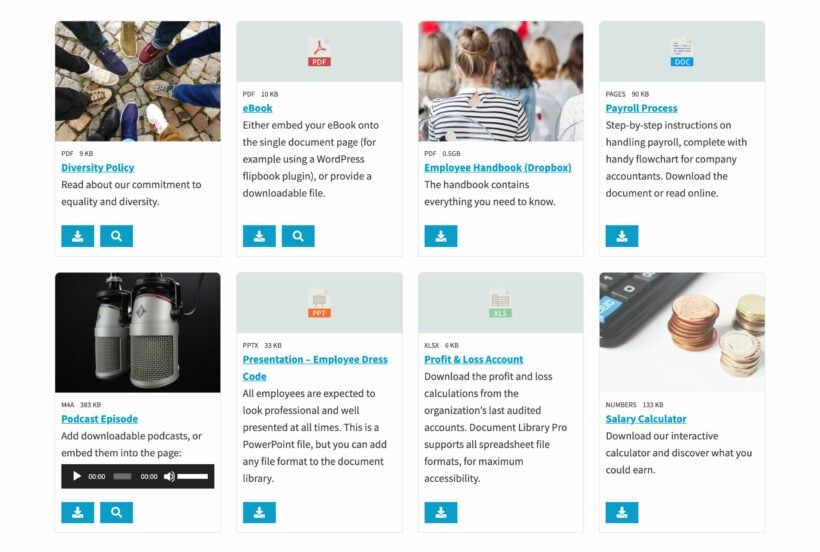
Here’s what makes Document Library Pro such a powerful file management and resource expiration tool:
- Support for a wide array of content types: Document Library Pro supports a range of file types from popular formats like PDFs, Word docs, Excel spreadsheets, images, etc. to niche ones like epubs, XPS, OGG, and more.
- Document expiration settings: You can set expiration dates and times for files, regardless of the file type. Once the file expires, Document Library Pro will automatically revert the content status to draft mode.
- Support for self-hosted and externally-hosted files: Admin users can upload documents and resources directly through the WordPress dashboard. It also lets you embed files hosted on external platforms like Dropbox, Google Drive, YouTube, etc. In addition, non-admins can upload resources via your site's front end.
- Customizable resource display options: You can choose to showcase documents and resources in beautiful grid or table layouts. Plus, it lets you add and showcase useful metadata like titles, descriptions, categories, tags, etc.
- Advanced search and filter options: Site visitors can search by keyword or use filters like file type, category, or tag to quickly find relevant documents and resources.
- Restricted user access permissions: The document management features let you limit access based on WordPress user roles. That way, you can make sure only authorized users are allowed to view sensitive files before they expire.
Here's a user review about the Document Library Pro plugin:
PublishPress Future
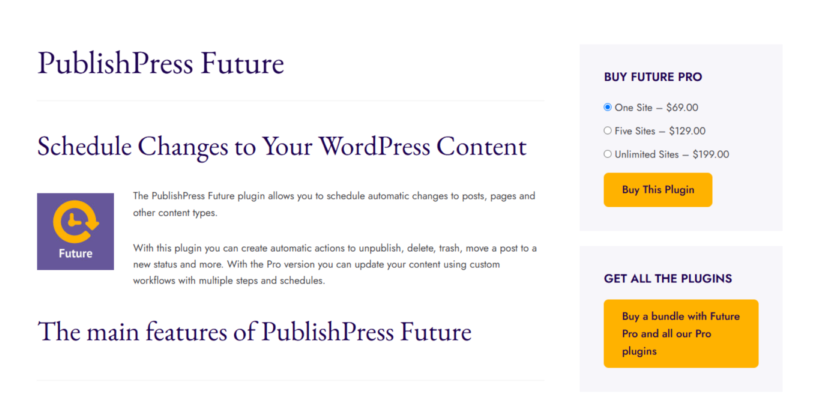
If you're looking for a more advanced WordPress post expiration plugin, you may want to check out PublishPress Future.
Formerly called Post Expirator, PublishPress Future is a popular plugin used to schedule automatic content expiration in WordPress. It lets you set expiration dates for standard WordPress posts and pages, as well as custom post types.
PublishPress Future's key features
- Schedule content expiration dates: You can set future dates and times for your content to expire and automate the process of keeping your site's content fresh and relevant.
- Display post expiration dates for site visitors: It lets you showcase expiration dates on the front-facing section of your website. If you opt for this, your site's visitors will be able to see the exact post expiration date. This is useful for situations where you are publishing content with a limited shelf life and want to compel your target audience to respond quickly. Think: Holiday sale promotions, job ads, special announcements, etc.
- Automate the content management process: It lets you set up advanced workflow automations for other aspects of your content management process. You can choose what happens when a post expires: unpublish it, move it to drafts, delete it, or even change its category. For example, you can add an automation that moves content to the “Archive” category once it has expired. This helps reduce the manual effort required to organize and manage your content.
- Speed up content management: It includes quick edit and bulk edit modes which make adding and managing expiration dates for multiple posts easier and saves you a ton of time. For instance, you can use the bulk edit mode to quickly assign expiration dates to multiple posts at once without having to open each one individually.
- Activity log tracker: It has a built-in activity log to monitor all changes made to post-expiration settings. The log keeps track of who made changes and when they happened. This is especially helpful for larger-sized teams that have multiple people who manage content.
Here's a user review about the PublishPress Future plugin:

How to expire documents and resources in WordPress
The process of auto-expiring content in WordPress is actually pretty straightforward, and only takes a few minutes to set up. Follow these steps to add expiration dates and times to resources and documents in WordPress:
Step 1: Setup this WordPress post expiration plugin's default settings
- Get Document Library Pro and add it to your website.
- In your WordPress admin, go to Documents → Settings → General and start the setup wizard. Enter your license key, click Check to activate the plugin, and proceed to the next page.
- Select either Table or Grid as your default layout for the file library. The table layout is better if you plan to showcase a large number of files along with a lot of metadata. If you plan to showcase heavily visual content, then go with the grid. (Don't worry about picking the perfect layout. Whichever you select, you can easily change it later if needed).

- If you plan to display supported file formats hosted locally on your site, then check the Document Preview option.
- If using the Table layout:
- Refer to the documentation for a full list of available fields. Then enter the columns you want displayed in your library, separated by commas without spaces. For instance,
add title,content,doc_categories,linkto show file title, description, categories, and link.

- In the Accessing Documents dropdown menu, choose Link to document.
- Enable Lazy Loading if you’ll be displaying a large number of files. This helps speed up loading times.
- If you want to add filters for easier navigation, select "Show based on columns in table" or "Custom". Otherwise, choose "Disabled".
- Refer to the documentation for a full list of available fields. Then enter the columns you want displayed in your library, separated by commas without spaces. For instance,
- If using the Grid layout, select the details to display in your file repository.

- Hit the "Finish setup" button.
Step 2: Add documents with auto-expiry dates
- Head to the newly added "Documents" section in your site's admin and press "Add New".
- In the top-right section of the page, locate the "File" modal. Select "File upload" to add a file that will be hosted on your WordPress site. Otherwise choose "File URL" to link files hosted on external platforms like YouTube, Google Drive, Dropbox, etc.
- Add a name for the file in the "Title" field at the top of the page. Then add the relevant details to the remaining fields, including file description, featured image, excerpt, document author, slug, and others.
- If applicable, assign categories and tags to organize your document.
- Select an expiration date and time in the "Publish" modal. This will ensure that the document is automatically reverted to draft status as soon as it is expired.
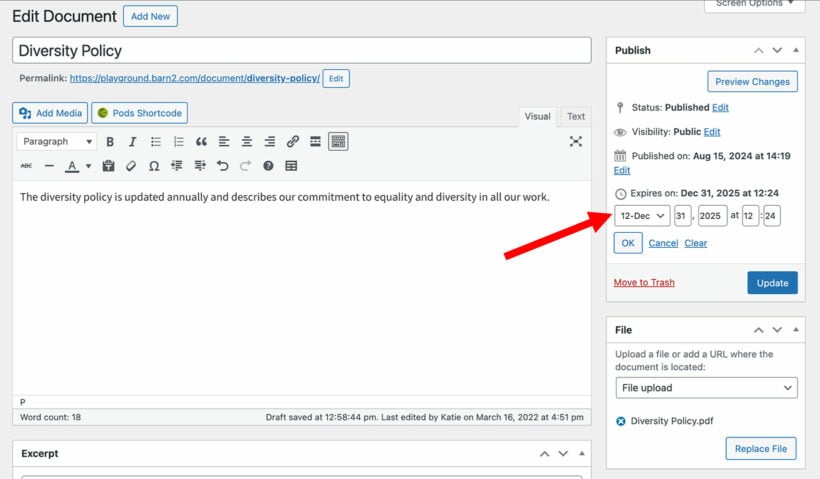
- Finally, once all the options have been selected, press "Publish".
Step 3: Publish documents to WordPress
When you install Document Library Pro, it will automatically create a new page on your site where you can display files. The page is aptly named Document Library but you can rename it if you like. Here's how:
- Head to Pages → All Pages → Document Library in your WordPress admin.
- Update the page title to something fitting, such as “Resources,” “Client Documents,” or whatever best describes your resource collection.

- Press “Update“ to save and publish your changes.
And that's it. If you'd like to try out this feature, set up document expiry for a few minutes. Then head to the front end and test it out.
Should you use version control instead of WordPress post expiration?
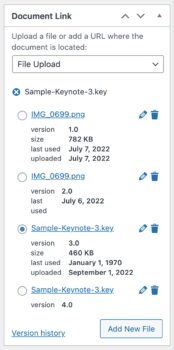
Like automatic post expiration, version control is another popular content management approach.
Version control is a feature that tracks changes to your WordPress content (posts, pages, documents, etc.), and enables you to see, manage, and revert to their previous versions.
Essentially, each time you update a piece of content, a new version is created. And you can compare edits and restore earlier versions if needed.
Version control vs. document expiry
Here are 3 key differences between version control and post-expiration.
- Maintaining content history: Version control allows you to keep a record of every change made to a post. For example, if you’re updating a policy document over time, you can track what’s been altered in each version and easily revert to past versions if needed. Whereas post expiration removes content from non-admin users' views as soon as it’s no longer relevant. You'd have to manually republish content with or without a future expiration date to restore past versions.
- Enabling collaborative editing: With version control, different users can contribute to the same document or resource without overwriting each other’s work. If, for example, two team members update a post at the same time, version control logs each update so they can review all changes and choose which version to keep. In contrast, post-expiration automatically removes outdated content altogether. It's not designed for managing ongoing collaboration or content updates.
- Content workflow and accuracy: Version control works well for content that’s regularly revised and must stay accurate. It allows each revision to be saved and documented without the need to delete outdated content. Post expiration, on the other hand, is more effective for content with a definite end date, like temporary promotions or time-sensitive announcements, where the main priority is keeping content current without clutter.
Overall, version control is ideal for content that needs to be updated frequently and is meant to be permanently available to viewers. Think: policy documents, working templates, etc. While post expiration is great for managing time-sensitive content. Think: promotions, workshop announcements, job postings, etc.
Why WordPress post expiration is crucial for your site
Automatic post expiration is an important step in keeping your site's content relevant and easy to manage.
"
While it's a good idea to continuously update content to keep it relevant, there are certain pieces of content that should be taken down after a period of time. For example, if you run a flash sale, you don't want to risk new customers finding the page and being disappointed that they missed a deal. Having your posts automatically expire eliminates the risk of unwanted content staying live on your website."
 Laura ElizabethFounder of Client Portal
Let's look at its benefits:
It streamlines content management
Keeping content up-to-date is an important aspect of content management. Of course, you’re dealing with hundreds of pieces of content, it can be overwhelming to manage.
If you don't have a proper system for keeping your content fresh, over time, it's easy for outdated information to accumulate and clutter your site. For example, if you run an online job board, you can make sure expired listings are automatically unpublished after a defined period. This way, your site visitors only see current job posts.
It reduces manual work and saves time
Manually updating and removing posts can quickly consume a huge amount of your bandwidth, especially on sites with a lot of content. With a post expiration plugin, you can set the date once and forget about it — no need to manually go back to remove outdated content once it expires.
It can help boost search rankings
Your site's content can decay, meaning that it gradually declines in performance and relevance over time. This is crucial because it is well known that search engines like Google favor sites with current, up-to-date content.
Consistently removing outdated or time-sensitive content helps search engines understand that your content is regularly updated and relevant.
It helps maintain compliance and accuracy
For sites that publish content in regulated industries — think: finance, healthcare, or legal — content accuracy is non-negotiable. Automating expiration dates helps make sure that outdated information isn’t left visible.
For example, if you run a site that shares legal guidelines, you can set expiration dates for documents that are regularly updated due to regulatory changes. When the post expires, it automatically reverts to draft status which keeps your site compliant with minimal effort.
It helps maintain users' trust
Outdated or inaccurate content can quickly erode users' trust in your business. Whether it’s limited-time offers, event announcements, or product releases, many types of content are only relevant for a specific period. Automatically removing those posts when they’re no longer up-to-date keeps your site’s integrity intact and builds trust with your audience.
What sort of WordPress posts need expiry dates?
Automatic post expiration enables you to keep your site's content current and relevant. Here’s how post expiration can work for different types of content:
Downloadable resources
If your site offers downloadable resources — like e-books, templates, or guides — setting expiration dates ensures users only access up-to-date materials. This helps keep your downloads section organized and ensures your site's visitors always find the latest version.
Events
Once an event has ended, it’s best to set it to expire to avoid confusing people. For example, if you offer a series of workshops every month, it's best to remove past workshop announcements and only show upcoming ones.
Promotions
Discounts and promotions are usually only available for a limited timeframe, and the last thing you want is for a sale announcement to remain visible after it’s ended. It's better to remove them automatically to prevent your website from becoming cluttered.
Seasonal content
Seasonal content, by definition, is only relevant for a short period each year. For example, if you post winter holiday gift guides every year, it's a good idea to set them to expire when the season ends.
Educational resources
Tutorials, training videos, and other kinds of educational resources can also benefit from auto-expiration dates. For example, if you’re offering a series of training modules for a new software product, you can set them to expire when new versions are released.
Job ads
Unless there's always demand for a certain role, most job ads should have clear expiration dates. Once the interview process is underway or the position has been filled, it isn't ideal to make the ad still visible. Setting it to auto-expire avoids confusing applicants and keeps your site's content current.
FAQs about WordPress post expiration
How do I choose the right expiration date for my content?
Think about how your site visitors use your content. If they rely on your website for up-to-date information, avoid keeping outdated posts live too long. Ideally, you should set the expiration one or two days after it's no longer valuable to them.
If you plan to repurpose the content, consider leaving a buffer period before expiration. For example, if you plan to offer a digital course that will be updated and relaunched in six months, you can set its expiration date and time to coincide with your content review schedule.
If you're still unsure about choosing an expiration date for my content, use tools like Google Analytics to understand how long your audience engages with specific types of content. If you notice that a specific type of post sees a significant drop in traffic after a week, that may be the right expiration window.
How do I choose the right post status after expiration?
The post status you choose determines what happens to the expired content. Choosing the right status depends on whether you want the content fully removed, hidden for potential updates, or just temporarily taken offline. Here’s how to decide:
- Draft: If you might reuse or update the content in the future, set the post to “Draft” after expiration. This is useful for recurring events, seasonal guides, or repeat job listings. Drafts stay in your admin dashboard but aren’t visible to your site visitors.
- Private: This option keeps the content hidden from the public but accessible to logged-in admin users. It’s handy for internal references, like old training materials, that you want off your public site but don’t want to delete entirely.
- Trash: Use this for content you don’t need to keep, like old promotions or expired sales. “Trash” removes the post from both the front end and admin view but keeps it recoverable for 30 days, just in case.
A quick note: To keep things simple, Document Library Pro always saves expired documents as drafts. However, some WordPress post expiration plugins let you set expired content as private or move them to the trash.
How do I handle 404 errors?
If you are using a WordPress post plugin, it would usually offer options for what happens to the content after it expires. This includes changing the contents' status to draft, private, or trash.
However, if you manually set a post to expire by changing its status or expiring it without setting up a redirect, there’s a chance visitors may still try to access its old URL, which can lead to 404 errors.
Here are some tips to manage expired content and make sure they don't damage your site's user experience (UX):
- Redirect expired content: You can use a redirection plugin to automatically send users to relevant pages instead of showing a 404. This way, users still find valuable content instead of an error.
- Create 301 redirects: You can set up a 301 redirect (i.e. a permanent redirect) and include links to popular pages or a search bar so users can easily find what they’re looking for. So if they do encounter a 404 error, it can help guide them to other sections of your site.
- Monitor 404s regularly: Use tools like Google Search Console or the Redirection plugin to track 404 errors. If expired content is causing frequent 404s, you can then adjust your redirects to guide your site visitors more effectively.
Can I still access my content after it expires?
Depending on your WordPress post expiration plugin's settings, you may still be able to access your expired content — post expiration wouldn't usually delete it permanently.
The post status you set controls what happens to it:
- If set to Draft: The expired post moves to “Draft” status. This keeps it in your WordPress dashboard but hidden from the front end. You can edit, update, and republish it at any time.
- If sent to the Trash: Expired posts that go to “Trash” are usually still available in the Trash folder for 30 days. This gives you time to recover them if needed, or permanently delete them if they’re no longer relevant.
- If made Private: When set to “Private,” the expired post stays accessible to site admins and editors but is hidden from public view. This option is ideal for internal content or posts you might need to reference or repurpose later.
Automate WordPress post expiration dates and streamline your content management
Without an automated system to manage temporary posts, your site can quickly become cluttered with outdated content. This can damage visitors' trust in your brand and lead to poor user experience (UX). Not to mention, manually removing expired content can take up a huge chunk of your bandwidth.
WordPress post expiration plugins help automate content management and keep your content relevant and evergreen.
To recap,
- Standard post expiry plugins like Auto Post Expiration and PublishPress Future enable you to auto-expire normal WordPress pages, posts or custom post types.
- Document Library Pro enables you to create a searchable file library, with links to resources that expire on the date you select.
Get these plugins and automate your site's content expiration in minutes!