How to add a download button in WordPress (3 methods)

Want to add a WordPress download button to your site? In this comprehensive tutorial, I'll show you three quick and easy ways to enable file downloads on your WordPress website.
Adding a download button makes it easy for people to save files for easy access later.
In this article, I'll show you three easy methods to add download buttons and links to your WordPress website:
-
- Method 1: With the 'File' block in the WordPress block editor.
- Method 2: By using the Document Library Pro WordPress plugin to list multiple downloads in a searchable, filterable library.
- Method 3: With a dedicated WordPress download plugin for features like download tracking, access control, and file management.
The best part? All three methods are beginner-friendly. There's no need to edit your theme's php files and you can follow along even if you have zero HTML or CSS knowledge.
But first, let's address what download buttons/links are and why you might want to add them to your site.
A WordPress download button is a clickable element that lets website visitors save a file - such as a PDF, image, or document - directly to their device. WordPress supports download buttons natively via the File block, or through plugins like Document Library Pro.
What is a WordPress download button?
A WordPress download button is a clickable element that lets website visitors save a file - such as a PDF, image, or document - directly to their device. WordPress supports download buttons natively via the File block, or through plugins like Document Library Pro.
Adding a download button to WordPress allows users to save and access specific files as needed - promoting a more user-friendly experience.
Popular use cases for WordPress download buttons
There are many reasons to add downloadable PDF files to WordPress, including:
- Access to resources: People may need to download files to access valuable resources like downloadable PDF files, guides, or tutorials. For instance, a school or college’s website can offer educational content in the form of downloadable PDFs of lecture notes or study guides. Another (somewhat meta) example, is the download button available on individual plugin pages on the WordPress.org directory.
- Document sharing and collaboration: Businesses and professionals may need to share documents for collaborative work. By allowing users to download files like Word documents or spreadsheets, teams can work on projects collaboratively, even when offline. This is particularly beneficial for organizations with remote or distributed teams.
- Media consumption: It’s very common for people to download audio and video files to enjoy offline. Podcasts, music tracks, or video tutorials can be downloaded for listening or viewing. This is perfect for those on the go or without a constant internet connection.
- E-commerce transactions: Customers who buy virtual products like e-books, digital art, WordPress and WooCommerce plugins, music tracks, or software licenses from WooCommerce sites will need to download them. Digital products are delivered virtually, and customers usually need to download them for instant access.
Benefits of adding download buttons to WordPress
While it's important to add as much information as possible to your actual web pages, there are lots of times when people need to download a file. The best WordPress download button plugins make it easy to upload files and display them in an engaging format in the front end.
Katie KeithCEO, Barn2 Plugins
Uploading and sharing downloadable files in WordPress can bring many benefits, including:
- Improved site engagement: Download options keep visitors on your site longer. People are more likely to return when they can save resources for later, such as e-books, guides, or media files.
- Better user experience (UX): Download buttons give visitors a simple way to access specific content. For example, you can upload and share downloadable files in WordPress, such as product manuals, guides, or PDFs. That way, people can use them online or offline.
- Higher conversion rates: Clear download buttons tell visitors exactly what to do next. You can customize the text with clear calls to action (CTAs), which can help increase conversions.
How to add download buttons to WordPress
As I mentioned earlier, there are three main methods to add download buttons and links to your WordPress website:
- Using the 'File' block within the Gutenberg editor.
- Using a file download manager plugin like Document Library Pro to create a searchable library with robust search, sort, and filter options, and download buttons.
- Using a dedicated WordPress download plugin for extra features like download tracking, restrictions, or digital product delivery.
Let's look at each method in detail.
Method 1: How to add a WordPress download button with the built-in File block
The 'File' block is part of the Gutenberg block editor which comes with WordPress itself. It makes embedding and managing downloadable files on your pages or posts easy.
It lets you upload a file (such as a PDF, document, or image) by uploading the file directly onto the WordPress post or page and creating a link to offer digital downloads. When visitors click the link, the file is downloaded directly or opened in a new tab, depending on the user's browser settings.
Note: This method embeds the file directly to the page or post with the download button underneath it. Here's a screenshot showing how it w'll look on the front end of your WordPress site:

While the built-in WordPress File button block is a handy tool for adding download buttons to your website, it has certain limitations.
Limitations of using the 'File' block to add a WordPress download button
- Limited customization options: The customization options are pretty basic. For instance, you can update the link text and decide whether the link should open in a new tab. However, if you need more advanced styling or want to match the download button closely with your site's design, these built-in options may be somewhat restrictive.
- Single file per block: Each 'File' block can only handle one file at a time. If you want to offer multiple files for download, showcasing them this way may not be user-friendly. In this case, it may be better to present and organize the downloadable content in a table format.
- Basic link behavior: When users click on the download button created by the 'File' block, it generates a simple download link. How the link behaves ultimately depends on the user's browser settings. Some browsers may open the file in a new tab rather than initiating an automatic download, even if you didn't choose this setting. This can be confusing for people expecting the file to be downloaded immediately.
- No advanced features: Each download button is completely standalone. You can't add a search box or allow users to filter downloads by topic or tag. The only option is to download each file to their computer and there's no handy "Preview" option either.
- Only works if you're using Gutenberg: Since this is a Gutenberg block, you can only use it if you're actually using the block editor. It's not available when you use other page builders such as Elementor, Divi or Classic Editor.
However, if you're not bothered about these limitations then I'll tell you how to use this method next. Alternatively, skip to method 2 for a more fully-featured way of creating a searchable library of download buttons.
Step-by-step instructions for the File block
1. Edit your page or post
Log into your WordPress admin dashboard. Navigate to the page or post where you wish to add the download button and click 'Edit'.

2. Add a new block
Click on the '+' button to add a new block. In the block search bar, type 'File' to locate and select the 'File' block.

3. Upload your file
Click on the block to see options to upload or select a file. Click 'Upload' to choose the file from your computer or 'Media Library' to add a file previously added to your site.
Once added to the post/page, the block will display the file name and an icon.
4. Configure block settings
On the right-hand side, the menu includes the core block settings. Here, you can choose the background and link colors, file dimensions, whether or not the file opens in a new tab and more.
Note: The exact settings depend on the type of file you upload.

5. Publish your file for download
Click 'Preview' to see how the download button will appear on your page. If you're satisfied, click 'Publish' to make your changes live. Your WordPress page or post will now feature a download button.

Adding the download button to your site with the 'File' block works well if you want to showcase a few files for download. However, if you have more than a couple of files, then you're better off organizing and presenting them in a searchable library with download buttons. I'll tell you how to do that next.
How to create a download button in HTML (without a plugin)
If you don’t want to use a plugin, you can create a simple download button using basic HTML. This method works well when you already have a direct file URL and want full control over the output.
The simplest option is to use the <a> tag with the download attribute. For example:
<a href="file.pdf" download>Download PDF</a>In this example, href points to the file you want people to download, and the download attribute tells the browser to download the file instead of simply opening it.
You can also style the link like a button with CSS:
<a href="file.pdf" download class="download-button">Download PDF</a>

<style>
.download-button {
  display: inline-block;
  padding: 10px 20px;
  background: #0073aa;
  color: #fff;
  text-decoration: none;
  border-radius: 4px;
}
</style>
This approach is best for simple, static files that do not change often. It can be useful if you only need to add one or two download links and do not need extra features.
However, the HTML method is not ideal if you need download tracking, file permissions, previews, bulk downloads, or an easy way to manage lots of files. In those cases, the WordPress File block or a dedicated plugin is usually a better option.
Method 2: How to create a searchable library with WordPress download buttons

Document Library Pro lets you list any type of file - PDF, PowerPoint, Word, Excel, digital assets, audio, images, video, etc - with download buttons on your website in an accessible, user-friendly manner.
We built it because the most common thing people did with our Posts Table Pro plugin was list documents, and they kept asking for download-specific features. So it's designed for sharing files on the front end of your site, not just managing them in the back end.
Plus, it has many extra features to help you efficiently organize and manage your files.
Key features
Multiple styling options for the download button
There are tons of options to choose from for the download button, including download buttons/icons/text links and multi-select checkboxes. Feel free to customize the download button as desired. For example,
- Button + Text
- Button + Icon + Text
- Button + Icon
- Icon only
- File type icon
- Text link
Also, you can add custom text displayed in the link field when the download button or link is selected.
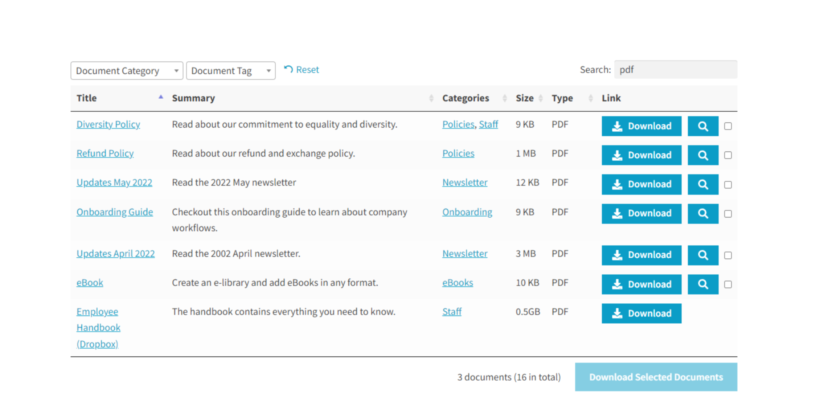
Multi-select checkboxes and bulk download
The multi-select checkbox option - only available on the table layout - adds checkboxes next to download buttons/links. (See the checkboxes next to the search icon on the far right of the table).
People can select multiple checkboxes followed by the 'Download Selected Documents' button from the top or bottom of the table, saving all the selected files to their computer as a zip file. This provides a much better user experience for people who want to download multiple files at once.
Add preview options next to the download buttons
You can add an option next to the download button/link to enable users to preview files before downloading. When people select the preview option, the file will open in a popup lightbox.
Note: This setting is optional.

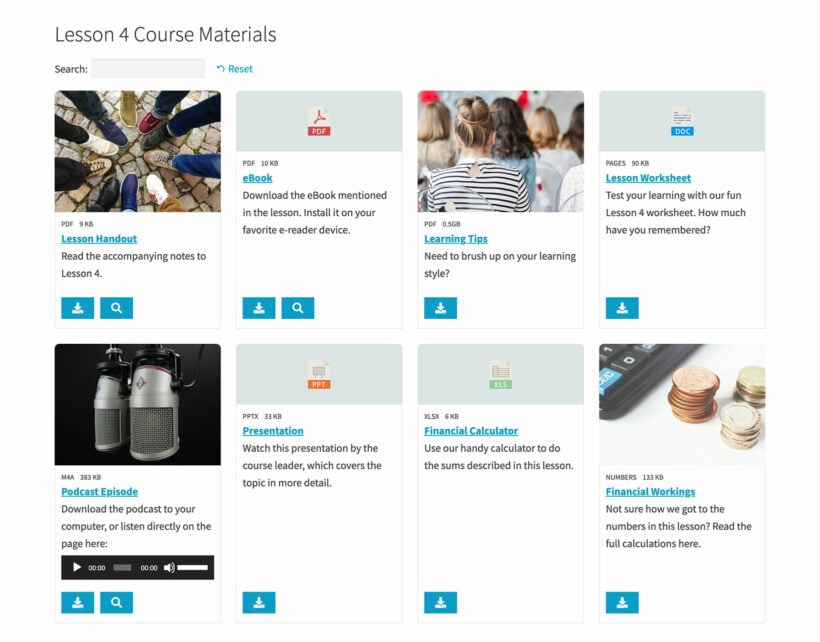
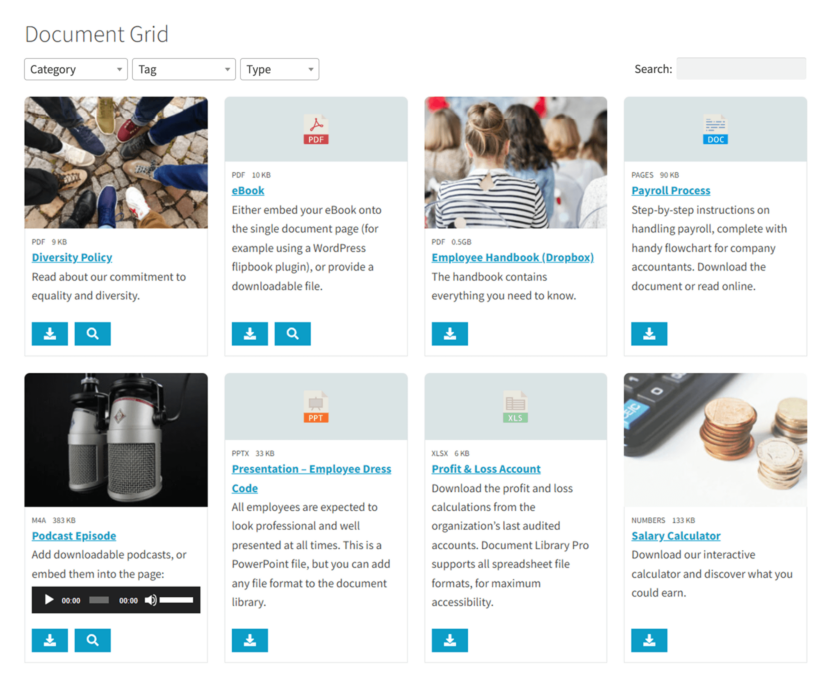
Download library with robust search, sort, and filter options
If you want to present many files for download, adding them on a single page isn't the best user experience. People may struggle to find the ones they want. Document Library Pro lets you present files in a table or grid form with built-in powerful search, sort, and filters to help people locate and download files within seconds.
List unlimited files with WordPress download buttons
There's no limit to the number of files you can present for download. If you have hundreds or thousands of documents, you can enable the lazy load setting to show files one at a time - this doesn't slow down your site and gives users the optimal experience.
Showcase file downloads anywhere on your site
When you install Document Library Pro, it automatically creates a separate page to showcase files for download. Also, you can present files anywhere else on your site using a simple shortcode.
The Document Library Pro plugin is highly responsive and pairs well with all themes - meaning it'll look great on any website.
Not using WordPress? The same download library comes as a cloud version for any website, so you can add file downloads to Squarespace, Wix, or an intranet.
Steps to create a searchable library with WordPress download buttons
1. Install Document Library Pro on your website
Step 1 is to add the plugin to your WordPress site. It's a straightforward process:
- Purchase the Document Library Pro plugin and download it.
- Log into your WordPress admin area and go to Plugins → Add New → Upload Plugin within your dashboard.
- Upload the Document Library Pro plugin .zip file.
- Select Install → Activate.
- Type the license key into the setup wizard or on the dedicated page at Documents → Settings to activate it.
2. Configure the key settings
Here are the main settings to configure:
For the download form
- Layout: There are two layout options to choose from: Table and Grid. While both look equally great on the front end, I recommend the Table layout if you plan to present many files for download.
- Folders: Folders let you structure files hierarchically (think: main folders with nested sub-folders). They make it easier for people to navigate and locate files on your site.
- Columns: This option is where you select the columns to be displayed on the front end. You can choose from the plugin's default options or add custom ones.
For the download button/link
Navigate to Documents → Settings, locate the 'Document links' section, and update the following options:
- Link to document: Tick this checkbox to add the download link for each file.
- Link style: The 'Link style' option controls how the download buttons are displayed on the front end. You can display download buttons as 'text link,' 'button with text,' 'button with icon and text,' 'icon only,' 'button with icon,' and 'File type icon.' Select the preferred setting from the dropdown list.
- Link text: Here, you can enter the text to be shown on the download button/link. Note: This is case-sensitive. So, it will be displayed in upper or lowercase, as entered.
- Link destination: This controls what happens when a site visitor clicks on the download link/button. You can choose whether the plugin allows them to download the file immediately or take them to separate pages for each file. The separate pages will include all the details about each file together with a download link. Choose the appropriate setting from the options on the dropdown list.
- Link target: Enable this to open the file link in a new tab.
How to enable file previews before download
Note: This is optional.
File previews are turned off by default and are only possible for the following types:
- PDFs
- Audio (mp3, mp4, aac, aacp, flac, mpeg, ogg)
- Images (jpeg, png, gif, svg, webp)
- Videos (mp4, ogg)
To add the preview option next to the download button/link
- Tick the 'Document preview' option to allow people to preview files in a lightbox.
- Select the appropriate styling option for the preview button from the 'Preview style' dropdown. The options are: button with text, button with icon, button with icon and text, text link, and icon only.
- Enter the text to be displayed on the preview button/link.
How to enable multi-downloads
If you expect people to download multiple files at a time, you can enable the multi-download option, which adds checkboxes beside each downloadable file.
Users can select multiple checkboxes and then download them at once as a .zip file.
Note: The multi-download option is only available on the table layout, not the grid layout. Also, the multi-select checkboxes will only appear next to downloadable files. People can't download files linked to URLs or web pages. Therefore, those files won't have the multi-select checkbox.
To add multi-select checkboxes next to the download button
Navigate to Documents → Settings → Document Tables and locate the 'Document links' section.
- The 'Accessing documents' option controls whether users can access files from the table as a link, checkbox, or both.
- Next, select whether you want to position the multi-download button at the top or bottom of the file library or in both places.
- You can change the text shown on the multi-download button in the 'Multi-download button text' field.
- Save your settings at the end of the page.
3. Upload files to your website
There are several different ways to add files to your website:
- Upload individual files.
- Drag-and-drop files.
- Add files from your WordPress Media Library.
- Upload a CSV file.
Let's explore each method.
1. Upload individual files
This method works best if you want to add a single file to your site at a time:
- Go to Documents → Add New in your WordPress admin area.
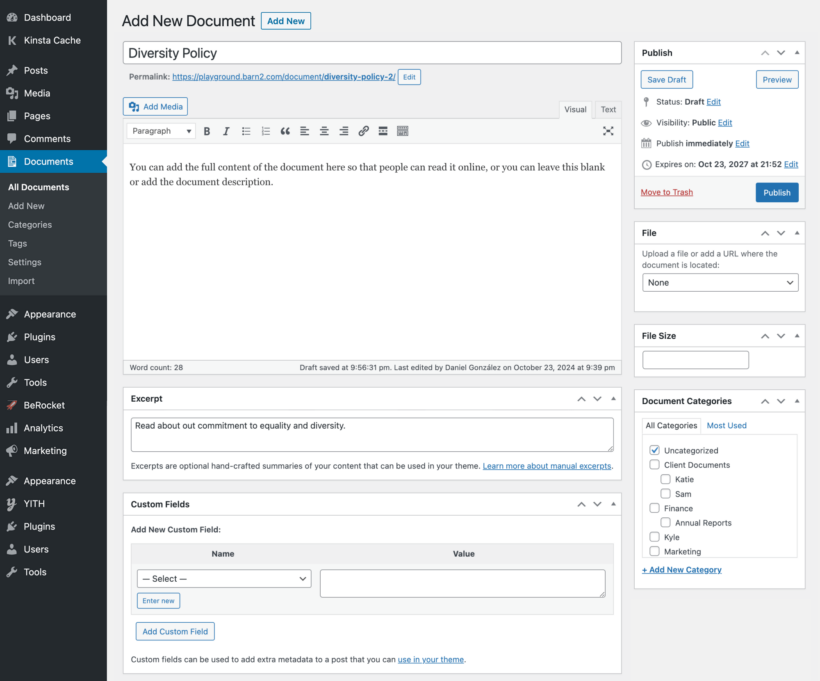
- Update the file name, description, featured image, slug, categories, tags, and the remaining details.
- Click File Upload → Add File → Upload Files → Select Files.
- Select the file you want to upload to your site and click on 'Add File'.
2. Drag-and-drop files
The drag-and-drop method works great if you want to upload multiple files at once:
- Go to Documents → Import within your WordPress admin area.
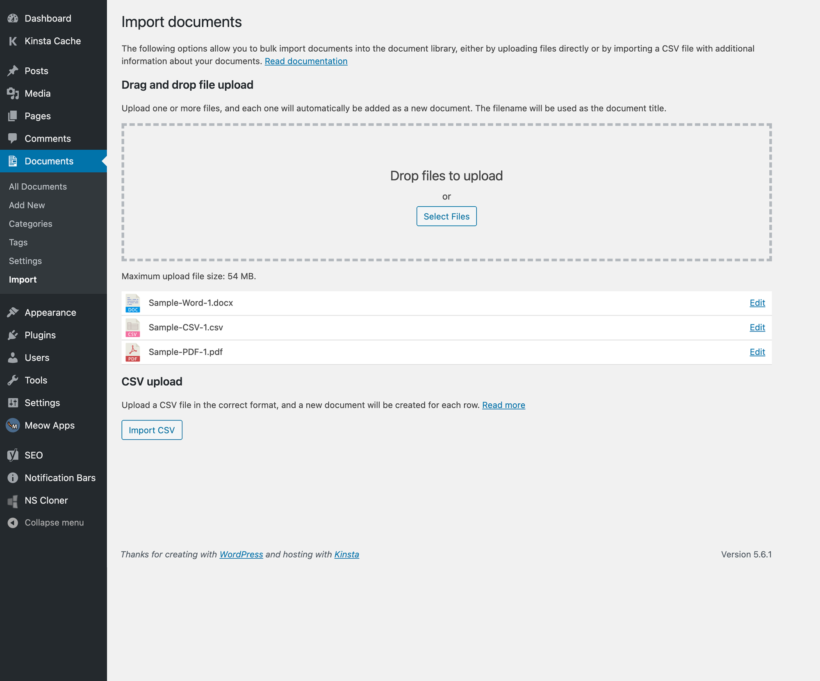
- Select the files you wish to add from your computer.
- Drag and drop the files in the Import page → Drop files to upload section.
- Finally, go to the 'All Documents' section to update the file details (categories, tags, slug, etc.).
3. Add files from your site's Media Library
This method works well to showcase files previously uploaded to your site's Media Library:
- Navigate to the Media Library within your WordPress admin.
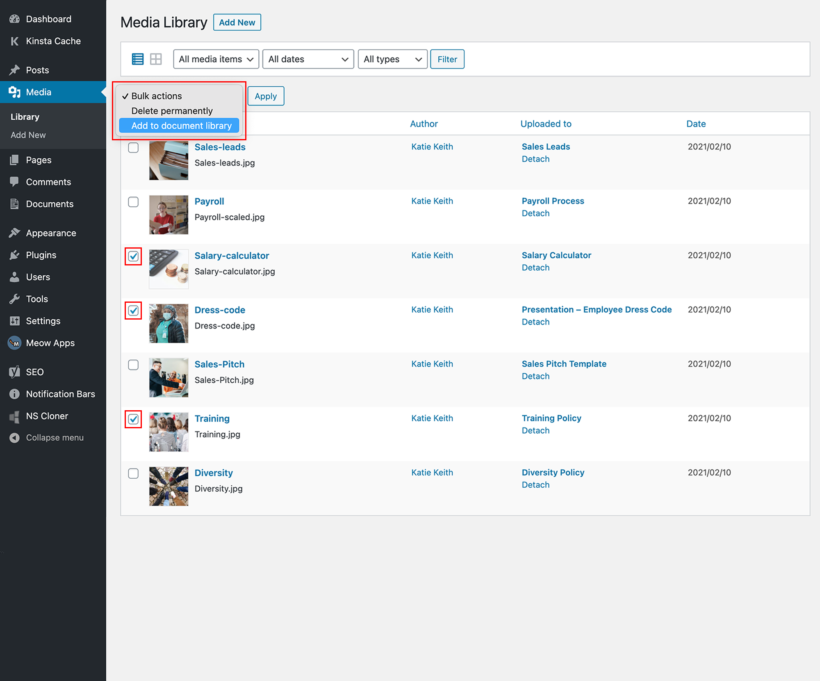
- Click 'List view' and select the files you want to make available for download.
- Click the 'Add to document library' option from the Bulk Actions menu, followed by 'Apply'.
- Finally, select the link at the top of the page to update the document name, description, slug, and other relevant file details.
4. Upload a CSV file
This method works great for uploading multiple files at once:
- Add file details (file URL, categories, tags, custom taxonomies, etc) to a new CSV file.
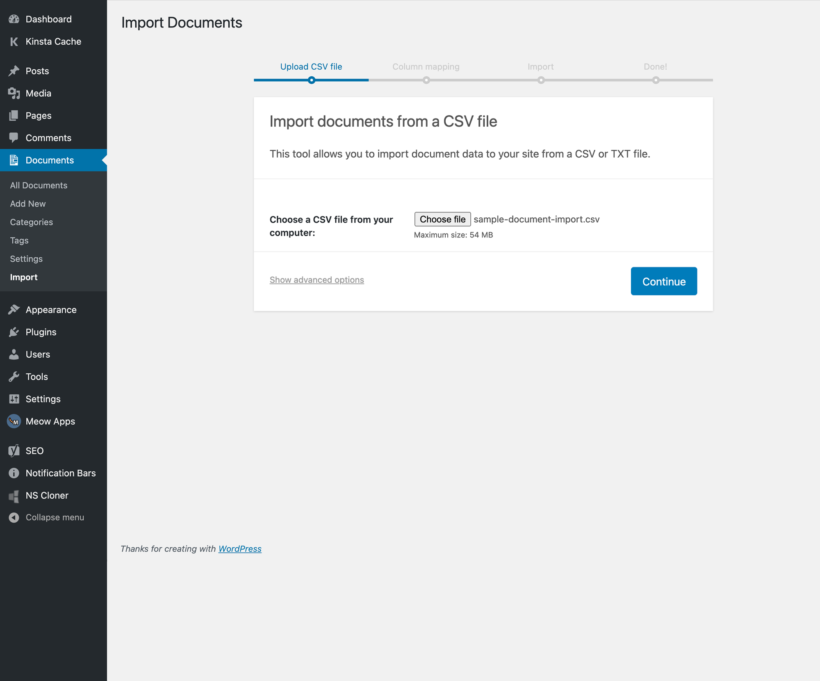
- Go to Document Library → Import within your WordPress admin.
- Select 'Import CSV' from the 'CSV upload' section.
- Click on 'Choose File,' then select the CSV file you created and click on 'Continue.'
- Select 'Run the importer'. Once the files are uploaded, you'll see a 'Success' message with a link to edit them.
4. How to add the downloadable form to the front end
Once installed, Document Library Pro automatically adds a new page to your site's main menu. This presents the files in a searchable, sortable, and filterable form on the front end.
You can navigate to Pages → All Pages → Document Library page → View within your WordPress admin to edit this page.
Alternatively, you can use shortcodes to add the download form elsewhere on your website.
Method 3: How to add a WordPress download button with advanced analytics
If you need more control over your download analytics, then a dedicated WordPress download plugin can be a good option. This is useful when you want features such as download tracking, access restrictions, gated downloads, or digital file delivery.
For example:
- Download Monitor lets you manage downloads and track file activity.
- The Quick Download Button plugin is a simpler option for adding basic download buttons.
- Easy Digital Downloads is another popular choice if you want to sell digital files instead of simply offering free downloads.

You can also explore more WordPress download manager plugins to compare different tools.
| Plugin | Best for | Free/Paid | Key features |
|---|---|---|---|
| Document Library Pro | Creating a searchable front end downloads library | Free + paid | Download libraries, search and filter, bulk upload |
| Download Monitor | Tracking and managing file downloads | Free + paid extensions | Download tracking, file management, access controls |
| Quick Download Button | Simple download buttons | Free | Basic button creation and styling |
| Easy Digital Downloads | Selling digital products | Free + paid extensions | Digital product checkout, payments, customer records |
| WP File Download | Advanced file organization | Paid | File manager, categories, search, and previews |
Dedicated download plugins are helpful if your main goal is to manage downloads as standalone items. However, if you want to display many documents in a searchable front-end library with preview buttons, download buttons, folders, filters, and bulk download options, then Document Library Pro is usually the better fit.
Which method should you choose?
| Method | Best for | Free/Paid | Difficulty |
|---|---|---|---|
| File block | Single files on pages or posts | Free | Beginner |
| HTML download link | Simple custom links without plugins | Free | Beginner-Intermediate |
| Document Library Pro | Multiple files in a searchable library | Paid | Beginner |
| Dedicated download plugin | Tracked downloads, gated content, or digital products | Free/Paid | Beginner-Intermediate |
Frequently asked questions
How do I create a download button?
You can create a download button in WordPress using the built-in File block, a basic HTML download link, or a plugin. The best method depends on whether you need a single file download, a custom link, or a searchable library of downloadable files.
How do I enable the download button in WordPress?
To enable the download button in WordPress, add the File block to a page or post and upload your file. WordPress will display the file and its download button. You can then adjust the block settings, including whether the file opens in a new tab.
How do I add a download button in WordPress without a plugin?
You can add a download button without a plugin by using an HTML link with the download attribute. For example, Download PDF. This works best for simple files that do not need tracking or restrictions.
Can I add a download button to any WordPress page?
Yes. You can add a download button to any WordPress page or post using the File block, custom HTML, or a plugin. If you use Document Library Pro, you can also add a searchable download library anywhere on your site using a shortcode.
That's how to add a WordPress download button to your site!
In this article, we've looked at three quick and easy ways to add download buttons to your WordPress website:
- With the 'File' block in the Gutenberg editor. This method works well if you want to make a handful of files available for download.
- With the best file management plugin, Document Library Pro. This method is perfect if you want to offer a lot of files for download and/or want additional customization with a better user experience (UX) for your site visitors.
- With a dedicated WordPress download plugin. This works well if you need tracking, restrictions, or digital download features.
With Document Library Pro, you can:
- Customize the download buttons however you like by using download buttons/icons/text links and multi-select checkboxes.
- Add preview buttons next to download buttons/links so users can preview files before saving them.
- Use separate download buttons and multi-select checkboxes to enhance the download experience.
- Create a download library in a table or grid layout with advanced search, sort, and filter options.
- Present files for download on a single page or anywhere on your site using shortcodes.
Download Document Library Pro and add download buttons to your site today!