Creating a WooCommerce audio store doesn't have to be complicated. With the right plugins, you can have a music store up and running in under an hour - without hiring a programmer to help you out.
So if you're looking to sell audiobooks, samples of music, audio language learning materials, or even karaoke music, you're in the right place.
In this post, I will guide beginners through the step-by-step process of creating their own WooCommerce audio library. By following the instructions provided, you can easily build a user-friendly audio library for your online store, without the need for advanced technical skills.
In this post, I take you step-by-step through the process of building your very own WooCommerce audio library. The end result will be a fully operational WooCommerce audio store.
Here's the kind of final effect that we're going for:
What you need to get started building your WooCommerce audio store
Before we start, I'm going to assume that you already have the following:
Any WordPress theme (with or without a page builder such as Elementor)
There's also the third element - our WooCommerce Product Table plugin. Let me show you how to get your hands on it, install it, and use it to build your WooCommerce audio store.
But before that...
Okay, I should probably address one small thing before I discuss how to use the plugin.
That thing is, "Why do you even need a WooCommerce music store?"
The short answer is that it's going to make selling audio files more effective for you, and more convenient for user experience. We've previously published a tutorial about how to create a WordPress audio library with embedded audio players. That focuses on how to display audio and music for everyone to view in the front end, but it doesn't let you sell them. That's what I'm going to tell you about today.
A WooCommerce audio store is powered by an e-commerce plugin. As well as embedded WooCommerce audio previews, it has purchasable download files.
What will my WooCommerce music store look like?
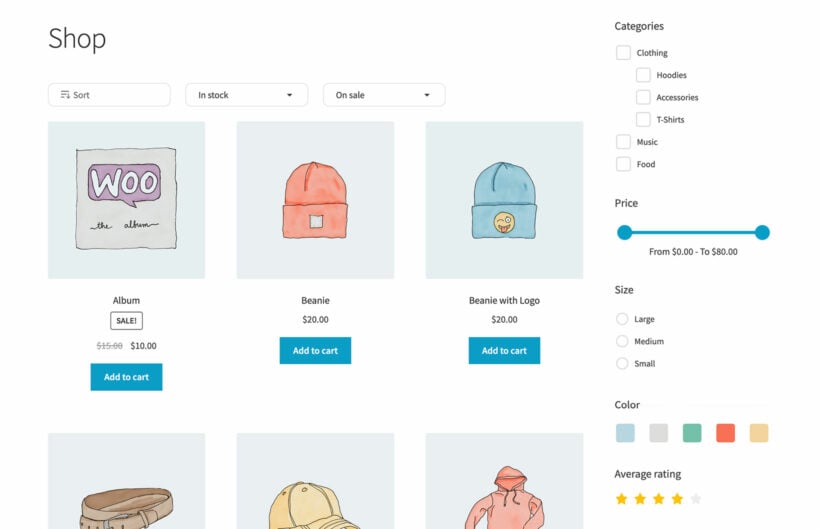
You can use WooCommerce on its own to sell audio files. However, it displays them in a really unhelpful way. You can sell audio files online more effectively by showcasing your catalog of audio tracks in a list or table. That's why you need the WooCommerce Product Table audio plugin store too.
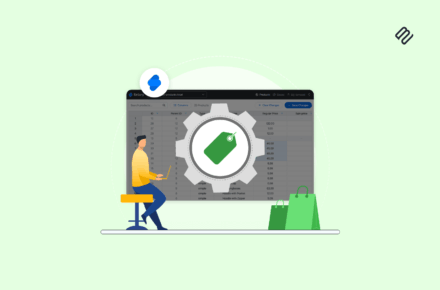
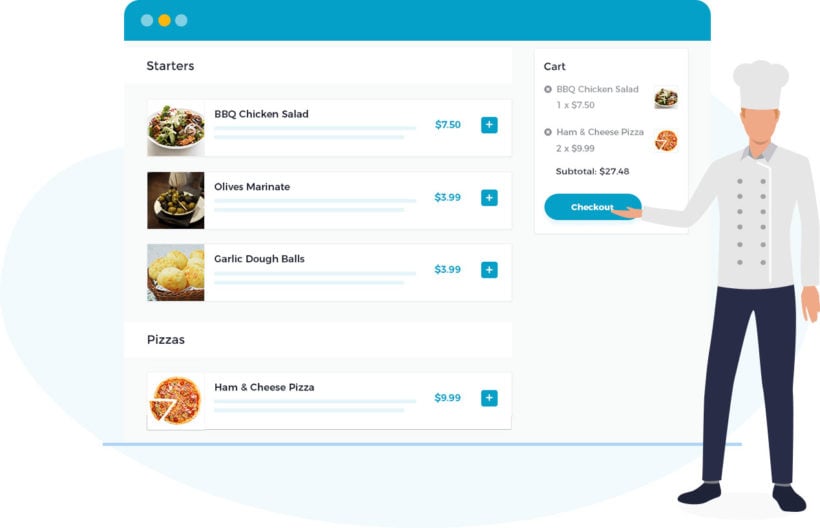
Your finished WooCommerce music store might look something like this:
With this type of WooCommerce music store, the reader/buyer can listen to a number of audio files one after the other without having to navigate to separate product pages - each for one audio file. This might be the full audio file so that people can listen without being able to download it (as they have to buy the product to actually download it!). Or it might be a short sample or snippet to convince them to buy the full version.
The buyer can click the "add to cart" buttons directly next to the tracks that they like. This lets them purchase and download items from the music store WordPress. Again, no need to navigate anywhere else.
Keep reading to see examples of WooCommerce music stores in action, and then learn how to set it up on your own site!
Examples of music you can sell online with WooCommerce
WooCommerce Product Table lets you create a WooCommerce music store selling literally any type of music online. Here are some examples:
Any audio file format MP3, WAV, and much more. Choose the most appropriate format for your music products, and sell them online with WooCommerce.
Any audio or music genre You can sell original audio (audiobooks, foreign language lessons, singles, albums, podcasts, recorded lectures) or stock footage (corporate or relaxing background music, karaoke backing tracks, royalty-free music, samples, sound effects).
Before I show you how to set up your WooCommerce audio store, let's look at some case studies. You can also see our demo of an audio store in action.
Case study #1 - A WooCommerce audio store for Nico Backing Tracks
Nico composes and sells background music tracks through his Woo audio store – Nico Backing Tracks. Nico's customers need to be able to listen to snippets of tracks before purchasing so he needed audio players embedded into the product list.
That's why Nico lists his backing tracks in a WooCommerce music store powered by our WooCommerce Product Table plugin.
Customers can sort the audio store by price, reviews, or track name. There's no clicking from one page to another to listen to tracks and add them to the cart. Everything's on one page. Once the customer knows what they want, they just have to add the track to their shopping cart before clicking view cart to choose the payment gateway.
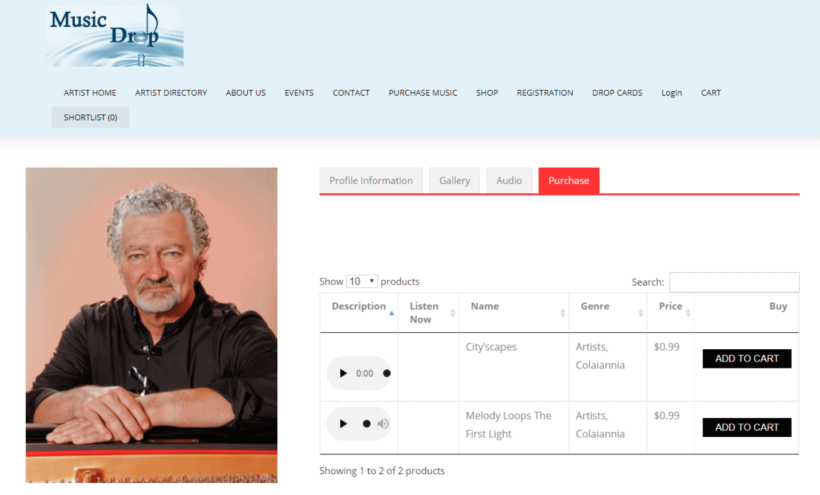
Case study #2 - Music Drop's WooCommerce audio store
Music Drop is a music platform with a WooCommerce audio store. Set up by Louis Colaiannia, the site's mission is to be a platform where artists can sell their music to music lovers across the world.
Each artist has their own profile with tabs for information, an image gallery, and audio. The purchase tab features a product table listing all the audio tracks by that artist. Customers can sort the WooCommerce music store by price, track name, and genre. Plus, the embedded audio players mean users can listen to the tracks before they add any item to the shopping cart.
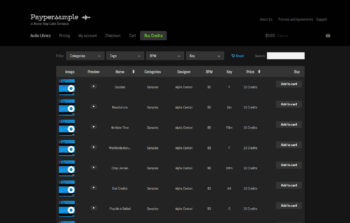
Case study #3 - Boom Bap Labs' audio sounds shop
Boom Bap Labs sell individual sounds with WooCommerce audio previews through their sister site called Paypersample.
The audio store is powered by WooCommerce Product Table, making the tracks quick and easy to find.
Each track has a sample track embedded into the table so customers can listen before they buy. To do this they installed the WordPress HTML5 Audio Player.
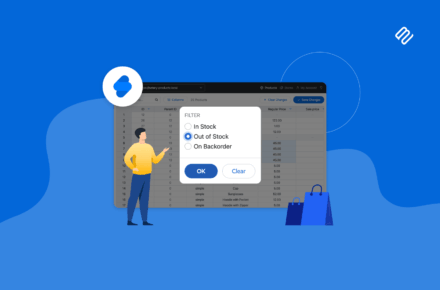
There are hundreds of tracks to look through, that's why customers benefit from the filter dropdowns and sort options. In a couple of seconds, the customer can filter the table by category, tag, beats per minute, and key.
Read on to find out how to create your own WooCommerce audio store.
How to create a WooCommerce audio store: step-by-step
The great thing about WooCommerce Product Table is that it can be used for all sorts of different types of WooCommerce products, not only audio files. Whether you want to sell physical CDs or digital products, this audio plugin store can do it.
To learn how to set up a WooCommerce music store, either watch the video or read the step-by-step instructions below.
1. Get the WooCommerce audio plugin and install it on your WordPress site
The interactive table builder will open, or you can access it later from Products → Product Tables.
Follow the step-by-step process to set up your WooCommerce audio store.
2. Configure your audio store
Pay particular attention to the following options:
Music store columns
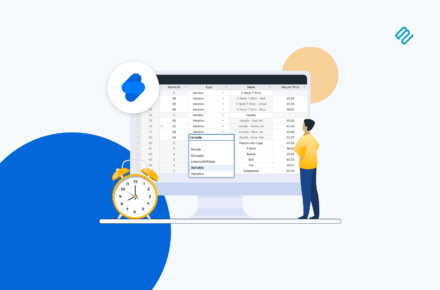
WooCommerce Product Table comes with a long list of columns that you can add to the table. You can add and rename columns in the table builder. I recommend these columns for selling audio and music:
Description - We're using the main description field of the product to display a live audio embed. This allows the buyer to listen to the track before buying it. Click on the pencil icon for the Description column and rename it to "Listen Now" or similar.
Name - The name of the audio track.
Categories - It's a good idea to categorize your audio products based on the genre. Use the product category for that, and change the column name to "Genre".
Price - The price of each audio product.
Buy - The "Add to Cart" button.
Of course, the above settings are just a suggestion. You are free to experiment and pick other columns when building your WooCommerce audio library.
Disable links to the product page
By default, columns like the product name will link to the individual page for each product. I like to disable these for a WooCommerce audio store because customers already have all the information they need to buy. Keeping them on the main audio store page helps to prevent distractions.
You can do this in the advanced settings for each column when you edit an existing table at Products → Product Tables:
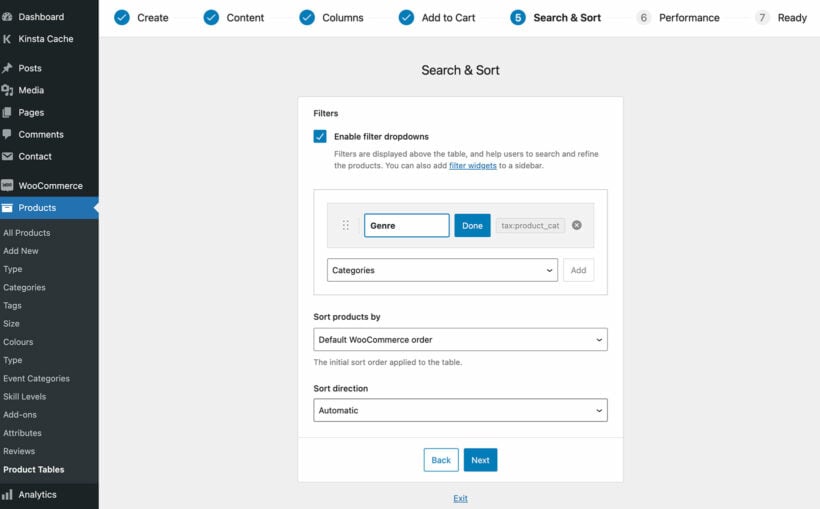
Product filters
The table builder also lets you add filter dropdowns above the audio store. WooCommerce music store, it makes sense to enable filtering based on genre.
Add a category filter and click the pencil icon to change the name to 'Genre':
Plugin settings
To create the ultimate WooCommerce audio store, you also need to go to Products → Product Tables → Settings and enable the 'Shortcodes' option. This ensures that the embedded audio players in the table will work.
Add filter sidebar widgets to the music store
Some WooCommerce audio stores like to allow their users to filter by multiple tags, for example, to find all songs that are 'romantic' and 'classical'. The filter dropdowns above the table only let you select one option at a time (although you can have as many different dropdown lists as you like, for example, so that users can choose a genre, a composer, and so on).
If you'd like people to be able to select multiple items from the same category (e.g. multiple composers) then you can do this using filter widgets. These appear in the page sidebar. Add the options as product attributes, and users can tick as many as they like.
Add advanced filters
For even more advanced filters, you can also use WooCommerce Product Table with the WooCommerce Product Filters plugin. This has a huge range of filter options that you can tailor to your music store's exact needs.
You can add these advanced filters to your default store layout, your WooCommerce Product Table-powered audio store pages, or anywhere else where you sell products.
3. Add products to your WooCommerce audio store
WordPress and WooCommerce make this part very simple. Here's what you do:
Start by going to your Products panel normally, from the WordPress dashboard.
Click on Add New.
Give your audio product a representative name. Keep it brief, though.
Assign the product to a category. As I mentioned earlier, it's a good idea to use categories for genres.
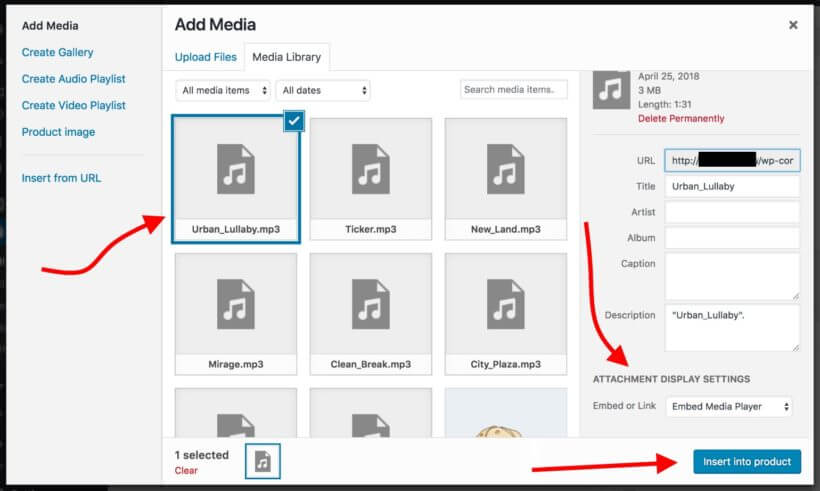
Decide where you want to add the embedded audio player. Most people add it to the main product description or short description. Alternatively, you can add it to a WYSIWYG custom field. Either way, click the Add Media button above the toolbar (or insert a Gutenberg block) and upload or select an audio file from the media library. (Alternatively, insert the file from an external URL if you're web hosting your audio elsewhere.) Where it says, Embed or Link, pick Embed Media Player. Like so:
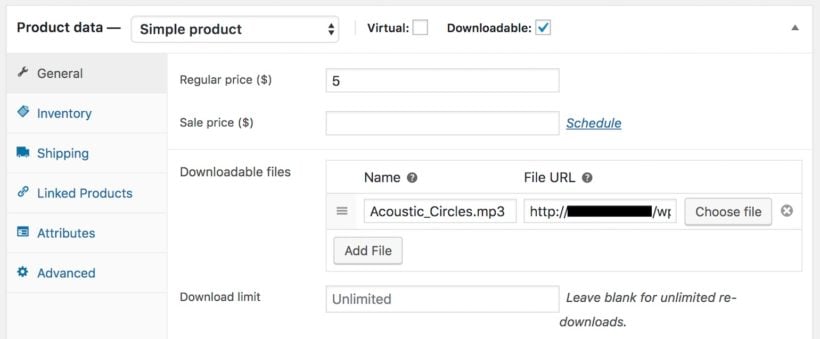
Mark the product as Downloadable, enter its price, and pick the file that the buyer will get access to after completing their purchase. (This will most likely be the exact same audio file you've embedded above.)
Repeat this step for each of your WooCommerce audio store's products.
Tip: If you don't like how the default WordPress audio player shortcode looks, don't worry. Keep reading to learn about other audio player plugins you can use in your WooCommerce audio library.
4. Add your WooCommerce audio store library to any page or post
So far you've configured the WooCommerce plugin and added audio tracks to the product catalog. Next, you just need to show this WooCommerce audio store module to your buyers.
This is very simple to do. Just edit any page or post, and use one of these methods to insert the audio store:
Insert the 'Product Table' Gutenberg block and select your table.
Add the table's shortcode. You can find this at Products → Product Tables.
When you publish the page or post, this shortcode will be converted into a live WooCommerce audio store table containing all your products with embedded audio tracks.
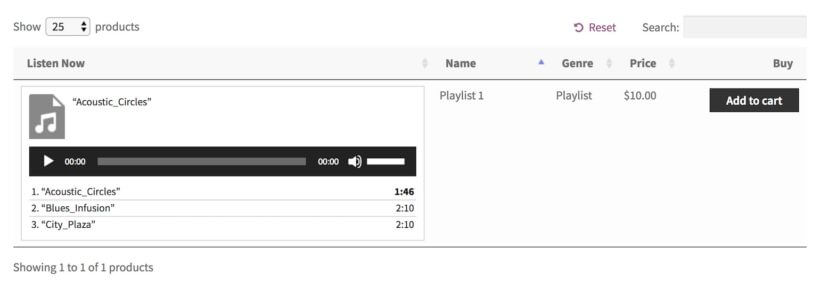
Depending on the options you chose on the audio table plugin settings page, your buyers can navigate the table easily, listen to any of the tracks or sort it by any column. They can also add audio tracks to the cart, and filter the entire table to only display tracks of a given genre.
The WooCommerce music store plugin in action
Bonus tip #1 - Show audio previews in a quick view lightbox
So far, you've learned how to list your WooCommerce audio store products in a table layout with a column containing embedded WooCommerce music players. If you prefer, you can provide the audio samples in a quick view lightbox instead of directly in the product list.
You can achieve this by installing the WooCommerce Quick View Pro plugin. This adds 'Quick View' links or buttons to your product tables, or to the default store layout if you prefer. Customers can open the quick view for a product and listen to the WooCommerce music player from a lightbox popup.
To set it up, simply install the plugin and add the embedded audio players or playlists to the product's short description. This will appear as a music player for WooCommerce in the quick view popup.
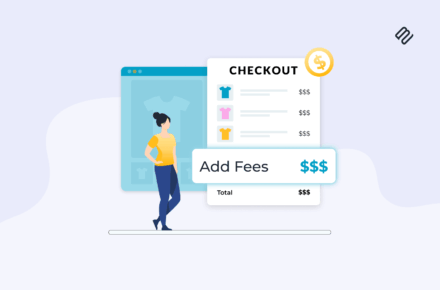
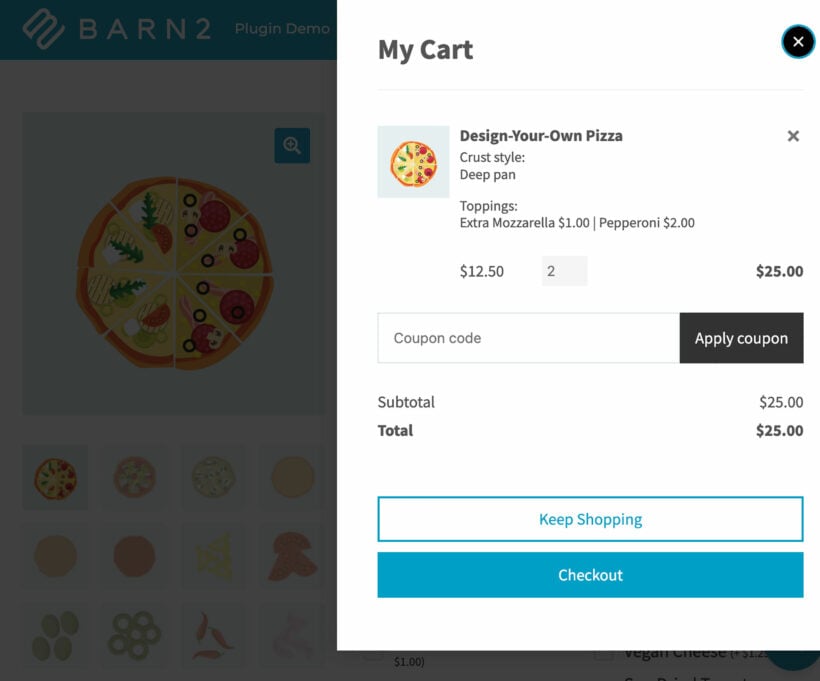
Bonus tip #2 - Boost conversions with faster checkout mechanism
For any ecommerce store, cart abandonment is a big issue. One of the primary reasons for cart abandonment is the long and complex checkout process. For this, having a simplified and quick checkout set up on your store can greatly increase conversions and bring down the cart abandonment rate.
The WooCommerce Fast Cart plugin is specifically designed for this purpose. The plugin features an intuitive one-page checkout mechanism that lets customers complete the checkout process without leaving the page at all. They can review their orders, add their mailing details, and complete the payment on the same page.
To set it up, simply install and activate the WooCommerce Fast Cart plugin on your WordPress website. Configure plugin settings for your store, and that's it. The plugin will begin working independently and help customers easily place orders on your WooCommerce store.
Enhance your WooCommerce audio library with other audio plugins
In the instructions above, I explained how to add music players for WooCommerce audio store using the basic audio shortcode that comes with WordPress. If you don't like how this looks, then you can embed your audio files using third-party audio plugins instead.
There are lots of audio plugins available. We particularly love:
The free or premium version of Presto Player, which adds easy-to-use yet attractive video players that look fantastic in WooCommerce Product Table:
The free
Compact WP Audio Player plugin because it's so incredibly simple. It lets you add a circular play icon that customers can click on to listen to tracks directly in the WooCommerce audio library. This takes up less space than the default WordPress audio player and looks really neat.
The plugin author has packed a lot into this small audio plugin, as it has the main controls you need. While you're playing an embedded audio track, the icon turns to a pause button so that you can stop and resume as needed.
To add a compact WooCommerce music player to any of the fields in your WooCommerce audio store, simply install the plugin. The only other step is to add the shortcode [sc_embed_player fileurl="URL OF THE MP3 FILE"] to the field where you want to display the customizable audio player for each product. This will display correctly in WooCommerce Product Table.
Create a WooCommerce audio store with free downloads
So far, we've talked about how to create an audio library with add-to-cart buttons. This is ideal if you want to sell your audio products. But what if that's not what you want?
Fortunately, you can also use this WooCommerce audio plugin to provide free downloads. There are several ways to do this:
Option 1 - Create free audio products
Create a download product and set the price to 0. Users can add the free download to the cart in the usual way, and complete the WooCommerce checkout without having to pay. WooCommerce will then send them a secure link to the free download via email.
Option 2 - Add direct download links to the audio library
Alternatively, you can add a direct link to the download to the short description, long description, or a custom field. You can style this as a button if you like, or leave it as plain link text. Call it something like 'DOWNLOAD NOW'.
People can click to download the file to their computer immediately, bypassing the cart and checkout. For instructions on how to add a link or button to the audio library table, please see the knowledge base.
Can I create a WooCommerce audio store without free audio snippets?
Absolutely. You don't have to include audio players with the full track or a short sample snippet.
Instead, you can just list the other columns without an embedded audio player. Or alternatively, add an image (watermarked if required) as the main product image and add an 'image' column to your product table. This will show the image instead of an audio player. The customer will receive an email with the actual audio file after purchasing.
Can I sell non-downloadable audio tracks?
So far, I've assumed that you want people to receive a link to download the full audio file after purchasing. If you don't want people to be able to download the audio - for example for copyright reasons - then that's fine too.
Here's a nice simple way for you to sell audio products, without making them available for download. Customers can only listen to them on a hidden page on your online store.
This is how to set it up:
Create a new page and use the 'Add Media' button to upload the audio file. WordPress will automatically convert this into an embedded audio player that you can listen to on the page, but which can't be downloaded.
Use WooCommerce Password Protect to restrict the page where you've added the audio player. This is easy to do - just click 'Edit' next to the 'Visibility' option in the 'Public' section of the Add/Edit Page screen.
Add the audio track as a 'Virtual' WooCommerce product.
Now, install Woo's official Follow Ups plugin. Use it to create an email that will be sent to customers after they purchase this specific product. The email should contain a link to the password-protected page where you have embedded the non-downloadable audio track. It should also contain the password so that they can unlock the hidden page.
Repeat this process for each audio product.
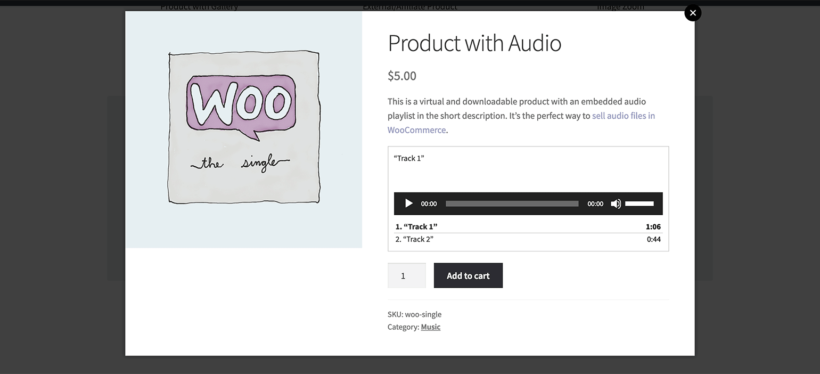
Go the extra mile and sell entire audio playlists
With the following setup, you can not only sell individual audio tracks but also entire playlists.
To do that, you first need to create some new products. The process starts normally by going to Products → Add New and naming your new audio playlist product accordingly.
Next, click on the Add Media button, but this time instead of adding an individual audio file, click on Create Audio Playlist and pick the tracks that should go into the playlist. When you're done, click on Insert audio playlist.
Lastly, mark the product as Downloadable, and assign all the files that the buyer should be able to download once they complete the purchase.
This is what the playlist looks like for the buyer:
Your turn!
Now you know how to create a fully functional WooCommerce audio store with the WooCommerce Product Table plugin! The best thing is that the whole process can be carried out in less than an hour (reading this tutorial included). If you have lots of products then you might need longer to add them all, but an hour should be realistic to set up the basic WooCommerce audio store.
Get this WooCommerce audio plugin today and begin your adventure with it:
A lot goes into building and running a successful online store. Although hosted e-commerce platforms like BigCommerce take care of much of the heavy-lifting, they don’t always offer the best shopping experience to customers.
The good news is that you can use a BigCommerce product table to make your online store more effective and user-friendly. Essentially, you’d be listing BigCommerce products on a WordPress site in a searchable, sortable table layout with filters. This way, customers will be able to browse your store and make purchases directly from one convenient location.
With this in mind, in this article, we’ll explain what a BigCommerce product table is and how it can benefit your online store. We’ll also show you how to create a product table in WordPress using BigCommerce and Posts Table Pro.
What is a BigCommerce product table and who needs one?
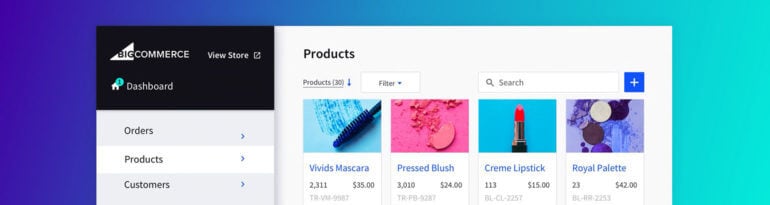
BigCommerce is a hosted e-commerce platform. Out of the box, BigCommerce lets users display products in a standard format. Typically, products are displayed in a grid where each product takes up a considerable amount of screen real estate - like this:
While this certainly adds to your store’s visual appeal, this simply isn’t the best solution for every online store. More specifically, online stores that sell more than a few products or products that aren’t image-centric need a more user-friendly way to showcase their offering.
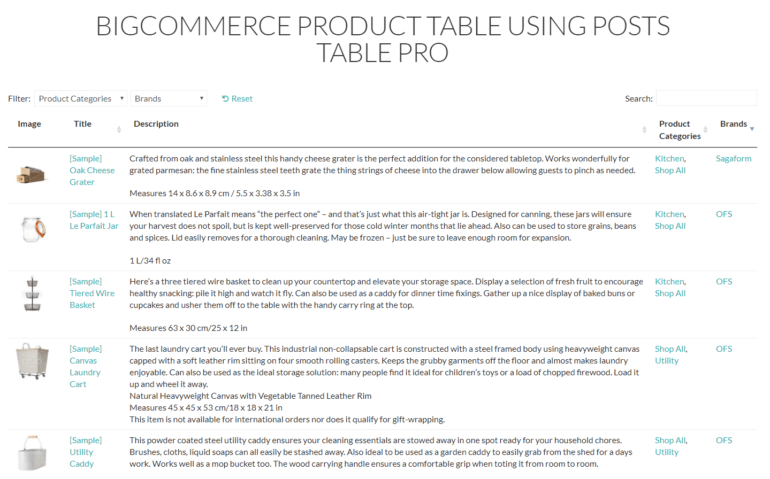
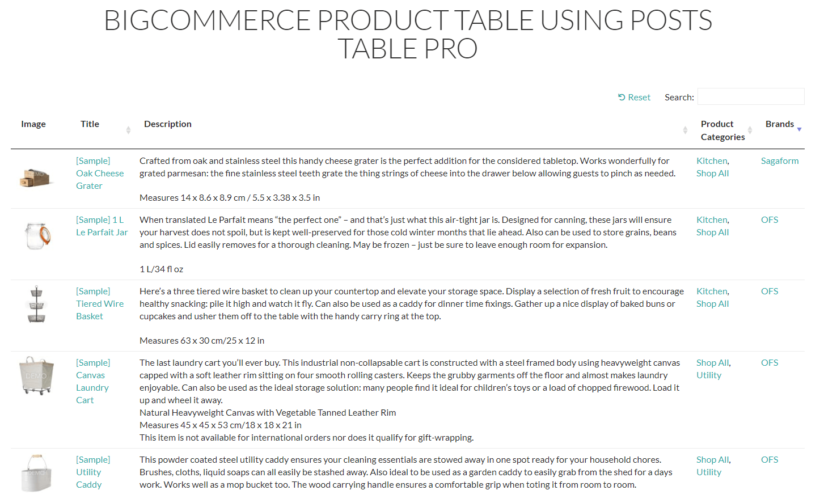
Grid layouts make it difficult for customers to browse through products, find exactly what they’re looking for, and compare product details. In contrast, displaying your inventory in a product table allows you to showcase more products per page while making it easy for customers to search, sort, and filter through them:
Who needs a BigCommerce product table?
The short answer is that anyone who’s looking for an intuitive and user-friendly way to showcase lots of products in their online store can benefit from a BigCommerce product table. It allows you to display products in a neat table layout with important product details. This makes it easy for customers to be able to view more products (with product details) per page.
For example:
BigCommerce restaurant ordering system
With a BigCommerce product table plugin, you can create restaurant ordering systems that allow customers to place orders online (or at the table). It essentially doubles as a BigCommerce order form.
This resembles a real-world menu in that you simply list out the dishes you offer along with additional details such as ingredients and price. In addition to this, you can also display quantity selectors and add-to-cart buttons directly in the product table layout.
With a BigCommerce order form, you can also allow customers to customize their orders. For example, if you serve pizza at your restaurant, customers would be able to select their crust, sauce, and toppings directly from the product table.
BigCommerce wholesale stores
Generally speaking, people who shop at wholesale stores have a good idea about what they’d like to buy. For this reason, a BigCommerce product table is an ideal implementation for wholesale stores. Here’s why:
Customers are able to find exactly what they’re looking for by using the search, sort, and filter options.
A BigCommerce product list makes it easy for customers to make bulk purchases.
Since wholesale stores sell lots of products, store owners are able to display more products per page then they would be able to with BigCommerce’s default shop layout.
BigCommerce stores selling products that don’t require large images
BigCommerce store owners that sell products that don’t require big images can also benefit from a product table layout. Since the standard format for displaying products in BigCommerce is image-centric, it doesn’t suit products that don’t require big images. Stores like these would benefit more from a BigCommerce product list instead.
These include digital goods such as audio lectures, music sheets, and software. It can also include hardware products like bolts, screws, washers, and fasteners where it’s more important to display product information than it is to display a product image.
How a product table can benefit your BigCommerce-based online store
With BigCommerce, the standard way to display products in your online store is by showcasing them in a grid on your shop page while also giving each product its own individual page.
The problem with this implementation is that it makes it difficult for customers to browse products, compare them, or purchase a lot of different items at once. While this may not be an issue for large products (like furniture) or expensive products (like jewelry), this approach doesn’t offer the best shopping experience for many other types of products.
So, if you’re looking for a way to showcase products in an intuitive, user-friendly way then consider creating a product table. With a BigCommerce product table, you can display more products in an organized way in a neat table layout along with all important product details.
BigCommerce product tables are incredibly beneficial to e-commerce stores, because:
Customers are able to see everything your store offers at a glance.
They allow store owners to curate a selection of products to display on their site (e.g. all organic products).
They make it easy for customers to be able to compare products quickly and make a buying decision.
Product tables take up less screen real estate as compared to other methods of organizing products.
They simplify the purchasing process since customers are able to add multiple products to their cart from a single screen. In other words, they don’t have to visit individual product pages to view product details and add products to their cart.
Introducing Posts Table Pro: The e-commerce product table plugin for BigCommerce stores
Posts Table Pro is a BigCommerce product table plugin that lets you display items in a dynamic table layout with built-in options for searching, sorting, and filtering products.
As a WordPress plugin, Posts Table Pro lets you list BigCommerce products on any WordPress website. The products are still added and maintained via BigCommerce - and orders are still managed via BigCommerce. However, it's a fantastic opportunity to list your products in WordPress - ideal if your main company website uses WordPress, or you want to list products outside of BigCommerce instead.
With Posts Table Pro create customizable product tables easily that improve the customer’s shopping experience and simplify the purchasing process. Specifically, you can tweak:
How each table will appear on the front end.
What information (product details) will be presented and in what order?
Whether you want to display product variations, quantity selectors, and add to cart buttons.
How customers can filter through products e.g. by product category.
Using Posts Table Pro, you can improve the user experience your BigCommerce-based store delivers and potentially improve conversions and increase sales.
How to create a BigCommerce product table in WordPress
If you’ve connected your BigCommerce store to your WP website, you’ll need a way to display BigCommerce products in an intuitive and user-friendly way. With the Posts Table Pro plugin, you can easily list products in a neat table layout.
Assuming you have a BigCommerce store set up with some products and the BigCommerce for WordPress plugin installed on your WordPress website, here’s what you need to do to create a product table:
Step #1: Install and activate Posts Table Pro
To get started, purchase the Posts Table Pro plugin and install it on your WordPress website.
You will receive a zip folder containing all the necessary files upon purchase. Navigate to the WordPress dashboard, select Plugins → Add New, and click on the Upload Plugin button to proceed with the installation.
Go to the Plugins section in your WordPress dashboard and click on "Add New." Then, click on "Upload Plugin" and select the zip folder containing the plugin's contents. Click on "Install Now" to start the installation process, and once it's complete, activate the plugin. Upon activation, the setup wizard for Posts Table Pro will launch and guide you through entering your license key.
Step #2: Customize your table
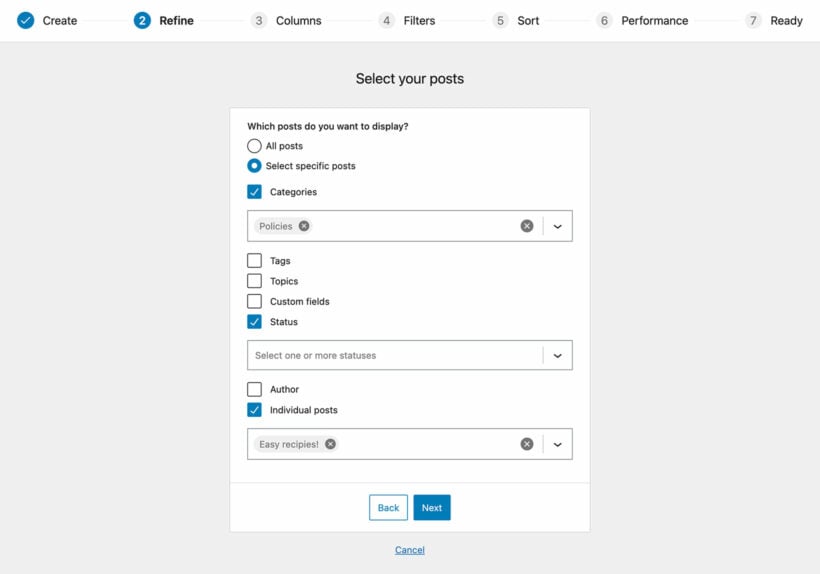
Start by giving your table a name and select the post type BigCommerce has created for you. And then follow the steps below:
Select the posts or pages you would like to include in the table. The available options will vary based on the post type you selected in the previous step. For instance, if you chose a post with custom taxonomy, the relevant taxonomies will be listed for you to select.
Customize your table to suit your preferences. You can determine which columns to display and in what order. To add a new column, choose the column type from the dropdown menu and click "Add". You can also reorder columns by dragging and dropping the sort icon or column heading.
Filters appear as dropdowns above the table, and you can add as many as you like. Each filter accepts more than one value at once and shows a count of matching products, and visitors can bookmark or share a filtered view of the table. It is important to note that available filter options will vary depending on the post type selected on the first page.
The table loads one page at a time, so it stays fast even with hundreds or thousands of items.
Choose how to sort the table. You can set the default sorting option and the sort direction.
Finally, the wizard will confirm that you have finished creating your table and provide instructions for inserting it onto your site.
Step #3: Add the product table to your website
Once you've finished creating your table using the Post Table Pro plugin, the setup wizard will confirm that you're done and give you instructions for displaying the table on your WordPress site.
You have two options for displaying the table:
Use the 'Post Table' block found in the Gutenberg editor.
Copy the shortcode from the table builder and paste it anywhere on your site. This gives you the freedom to place the table on any page, no matter its content.
When you view it, it should look something like this on your site’s front end:
Conclusion
You can use a BigCommerce product table plugin to list products in a neat table layout that’s searchable, sortable, and filterable.
This makes it easy for customers to browse products and see everything your store offers at a glance thereby improving their user experience. As a result, you’ll be able to increase product visibility and, ultimately, boost sales.
We showed you how to create a BigCommerce product table in WordPress using Posts Table Pro. Hopefully, you’re in a good position now to take the next steps.
What are some of the ways you improve your customers’ shopping experience on your BigCommerce website? Let us know in the comments section below.
If you’re running an online business selling courses or information products, you’ll want to build some private areas where only your customers or subscribers can access premium content and digital product files. Password and membership protection prove useful in these cases.
However, there is a serious loophole in these protection methods that often result in your digital product files being leaked out.
In this article, we’re going to show you two easy ways to protect both your WordPress content and digital products without any technical knowledge.
Why you should protect WordPress media files
Did you know that even though your website content is protected with a password or membership plugin, the media attachments embedded in those pages are still accessible to anyone who has direct links to those files?
That's because password and membership plugins don’t protect your file uploads - they're designed to protect content instead, such as pages, posts or products. As a consequence, if someone shares these file URLs on other forums and social platforms, others will be able to access them without having to purchase membership or log into your website.
Even worse, Google and other search engines could potentially index these private documents, videos, and images. So people can just find and access them directly through some simple search with the right keywords.
If you're selling courses or digital products then this puts you at risk of losing all your efforts, digital product files, and a lot of money...
2 ways to protect WordPress media attachments
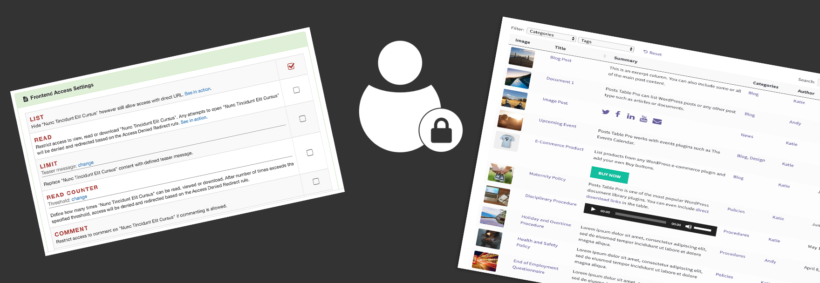
We've discovered two plugins that make it easy to protect your WordPress media files. You can use either of them with plugins such as Password Protected Categories and WooCommerce Protected Categories which let you restrict access to your WordPress pages, posts and custom post types to specific users or roles. They add an extra layer of security by restricting access to the media files which are linked to from your protected pages/posts/products/etc.
The two plugins are:
Download Monitor (DLM) - This plugin adds an additional layer of protection for your digital files. Either upload new files to WordPress and protect them one-by-one, or choose which existing files to protect.
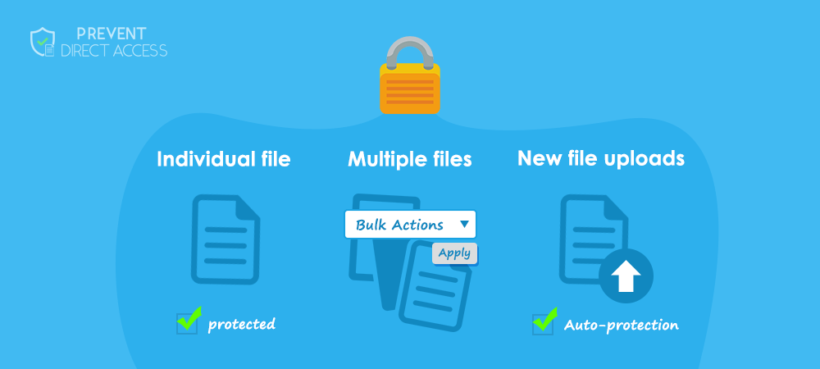
Prevent Direct Access (PDA) Gold - Similarly, this plugin provides many different ways to protect your WordPress media files. You can protect new file uploads automatically or on the fly under the WordPress media library. Alternatively, you can protect some specific files when editing a page or post. Instead of protecting each file individually, you can select and protect multiple files simultaneously using WordPress bulk actions under Media list view.
Plugin 1: Download Monitor
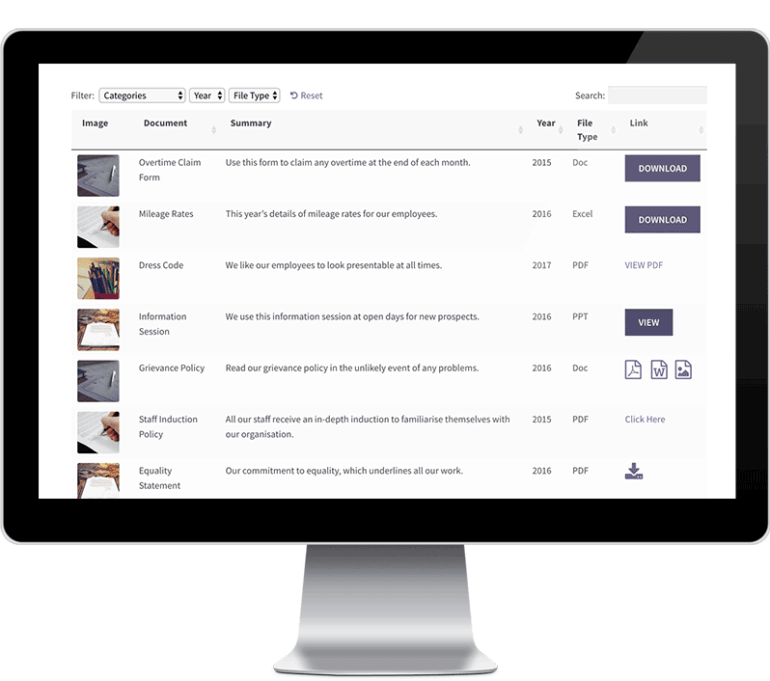
Download Monitor (DLM) makes it easy to protect your WordPress media library files. To illustrate how it works, let's imagine that you've used the following plugins to create a private WordPress document library:
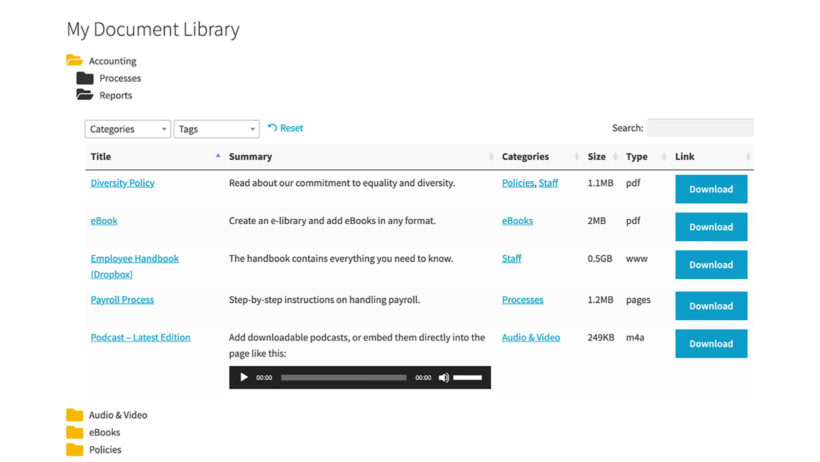
Document Library Pro for adding documents and displaying them in a searchable document library.
A searchable directory of downloadable files using the Document Library Pro plugin
That's a great solution, but doesn't actually protect the underlying WordPress media files - i.e. the documents that are linked to from the library. It's unlikely that unauthorised people will find them because they're only linked to from the private document library pages. However, if one user publicly shares the link to a document then they could potentially share it more widely.
If you're concerned about this then the solution is to add the Download Monitor plugin to the mix.
Securing digital files
With Download Monitor installed, let's look at how to secure our digital files. While we're using Document Library Pro and Password Protected Categories as an example, you can also use it alongside other membership plugins which restrict access to WordPress content.
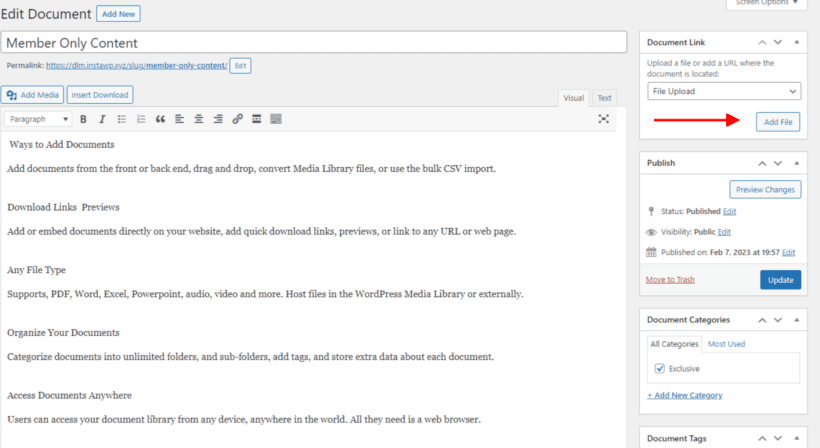
For example, we've added a document using Document Manager Pro. From the 'Edit Document' screen in the WordPress admin, we've chosen to add a file upload as below:
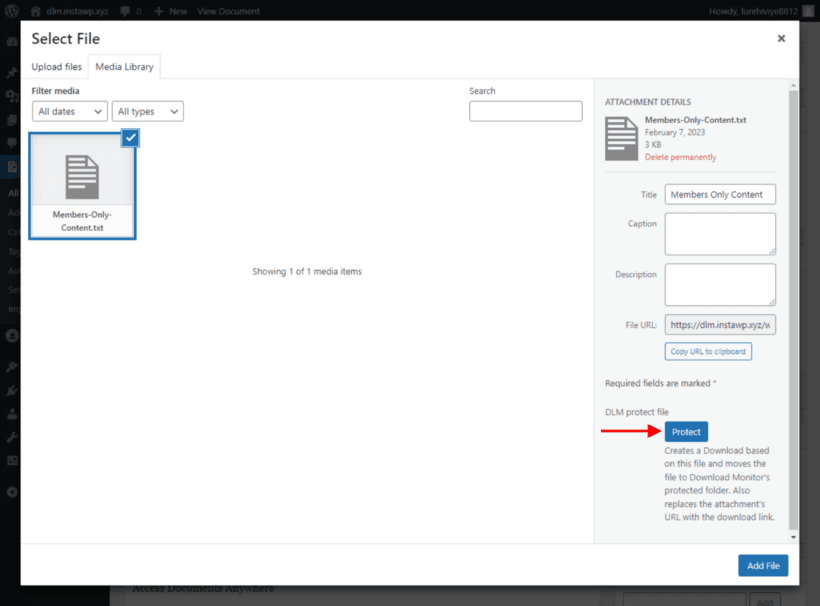
Adding a file for download, and you'll see the media library modal with a new addition:
Clicking on the Protect button protects the file. Then we can publish our new document. Our digital file is now protected, thanks to DLM.
More features of DLM
Download Monitor (DLM) also offers hotlink protection. For example, if you have a member who wants to make a name for themselves by sharing a link to your digital files, then hotlink protection will check the referrer. The plugin will redirect the user to your homepage unless the download request has come from your site.
Hotlink protection is available in the free version of Download Monitor and is an invaluable deterrent for those looking to benefit by stealing and sharing your work.
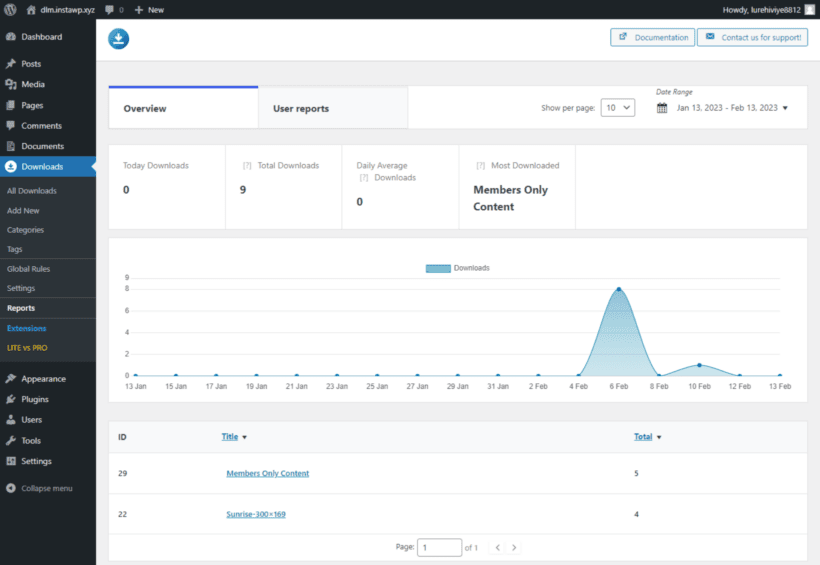
An additional bonus of DLM is the reporting feature. You can enable/disable reports in the back end of your website; see below for an example report:
The reporting feature gives you an overview of downloads, filterable by date. Another helpful feature is user reporting:
DLM offers an extension that gives even more insight into reports called Enhanced Metrics. This extension provides even more information, such as failed/completed downloads, active users and downloads, and more.
As you can see, it builds on plugins like Document Library Pro and Password Protected Categories to give you extra protection. As an added bonus, you get built-in reporting on who is accessing your downloadable files.
Plugin 2: Prevent Direct Access
Prevent Direct Access (PDA) Gold is an alternative plugin for restricting access to your WordPress Media Library files. Like Download Monitor, it works with WordPress protection plugins like Password Protected Categories and WooCommerce Protected Categories. Simply use it to restrict access to your media files using the same type of protection that you're using for your pages, posts, and other content.
File Access Permission
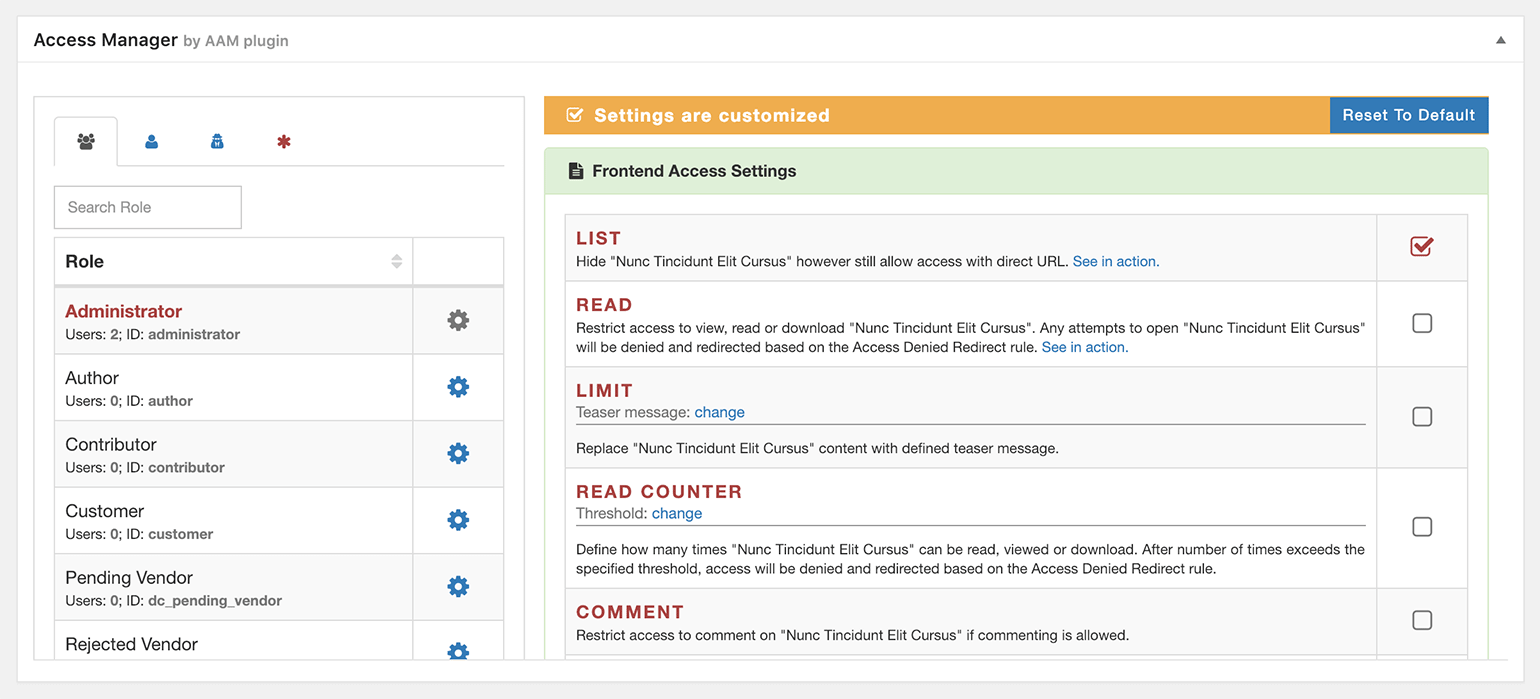
File Access Permission (FAP) allows you to select certain user roles who can access your private protected files directly. There is global FAP which applies the permissions to all files by default. What’s more, you can set individual FAP with their Access Restriction extension. In other words, you can make different files accessible to different user roles.
While most of the options are self-explanatory, you may wonder when to use the "Anyone" and "No one" options:
Anyone option allows everyone to access your private files while stopping Google or other search engines from indexing them. This comes in useful when you want those files to be directly accessed through your website links and not through search results.
No one option literally stops everyone from accessing your protected files directly through their file URLs. In return, PDA Gold plugin gives you the power to create as many private download links as needed. This helps you share your protected files with some specific groups of users. And at the same time, you can track and restrict its usage by time or click.
How to protect both WordPress content and file attachments
The most bulletproof way to secure your WordPress content is to protect both your content and media attachments altogether.
Password Protected Categories - and it's e-commerce version WooCommerce Protected Categories - is one of the best WordPress password protection plugins. Both plugins allow you to protect an entire category including its sub-categories and all posts/products under that category, with a single password. You can also restrict entire categories so that only specific logged-in users or roles can access them.
Now, let’s learn how to integrate Prevent Direct Access Gold with Password Protected Categories and WooCommerce Protected Categories. It's the perfect combination to protect both WordPress categories and media file attachments on these posts/products.
Using Prevent Direct Access with Protected Categories
Follow these simple steps to protect any type of WordPress category. This could be a post category, page category, WooCommerce product category, or a category/custom taxonomy for any other custom post type.
You can protect as many categories as you’d like to while leaving the rest accessible to the public:
Go to the 'Add/Edit Category' page.
Add a new category or edit an existing one.
Under the ‘Visibility’ section above the ‘Add New Category’ button, select ‘Protected’.
Set a password and/or select user roles or specific users who can access the post/product.
In the WordPress Media Library List view, protect your attachment file and then click on ‘Configure File Protection’.
Select the ‘File Access Permission’ tab and choose the same user roles as per step 4.
Now, you can not only protect your private attachment files against Google and unwanted users. Simply by logging into their user account, your visitors can unlock both your attachments and protected media library files, as well as content.
Do you have any questions on how to password protect your website content and attachment files in WordPress? Please let us know in the comments section below.
If you want to create a restaurant website with online ordering for home delivery, there are plenty of services built to help you do that...for a hefty commission! A WordPress restaurant plugin lets you skip the commission and keep your margins for yourself.
People want to be able to get food delivered over the Internet. Online food ordering more than doubled between 2010 and 2015, and those trends are continuing - especially due to the COVID-19 pandemic. Customers prefer ordering online rather than over the phone, and the right WordPress restaurant plugin will satisfy that demand without needing to pay a 15% commission rate.And this won't just be a desktop affair - like all the best WordPress plugins, this one works seamlessly on mobile devices as well.
In this post, you'll learn how you can use the best WordPress restaurant plugins to create your own online restaurant ordering system like the example above, complete with:
Menus
Delivery options and time slots
Pickup options
Notifications (so that you know when a new food order comes in)
You'll be able to customize it to your needs, and you won't need to be a tech savant just to get it working!
The two big benefits of using a WordPress restaurant plugin over the alternatives
There are two huge benefits to using a WordPress restaurant menu plugin as an Uber Eats alternative over services like GrubHub, JustEat and Uber Eats.
1. You'll save money
First, the big one - saving money!
Just for getting listed at GrubHub, you're giving up a whopping 15% commission rate. And if you want a sponsored listing, you'll give up 20% or more. That's crazy!
The typical margins for food just high enough to justify these commissions. Giving up 15% commission makes a huge difference to your bottom line.
With a WP restaurant plugin, there are no ongoing commissions. Instead, you'll pay a one-time or annual fee for the plugins that you need. After that, everything is profit.
So how much will it cost for a good restaurant plugin for WordPress? The two core tools you'll need - WooCommerce and WooCommerce Restaurant Ordering - will cost you under $150/year.
After that, you might want to further enhance your system with some extra plugins for delivery options or menu customization. However, even with these, you'll probably only spend $200-300 to get the whole system up and running. And again, there are no ongoing commissions after that.
2. You can offer a better user experience
Sites like GrubHub or Deliveroo are, for the most part, one size fits all. That is, your menu and listing pages look exactly like other restaurants.
However, what if your restaurant is unique? What if you make these awesome customizable burgers and you want to create a custom way for people to choose their ingredients and toppings?
With the other tools, you're out of luck. But with a WordPress restaurant plugin, you can tweak things to make them perfect, which helps you create a better ordering experience.
The best WordPress restaurant plugin system
To create your WordPress website's online restaurant ordering system, you'll need two key tools:
An ecommerce plugin This is the backend system that will help you manage food items, accept orders and payments through Stripe, Paypal, etc.
A food order form plugin This is the frontend system that will create a user-friendly restaurant menu for your hungry visitors to browse. It lists your foods in a one-page table layout. You can divide your menu up into different categories, offer customization options, etc.
For the ecommerce part of the equation, the most popular option is WooCommerce. This open-source, free plugin comes from Automattic (the billion dollar company behind WordPress.com) and is the most popular way to build an ecommerce store.
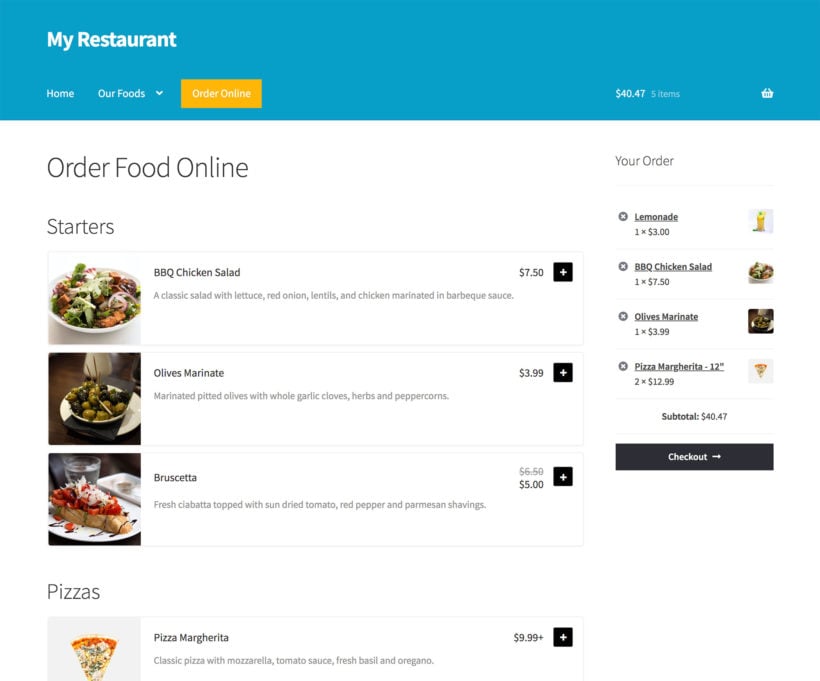
For the food order form, you'll use WooCommerce Restaurant Ordering. It makes it easy to create a customizable frontend food menu that you can adapt to your restaurant's unique needs:
In today’s environment of having to act nimbly for clients, the WooCommerce Restaurant Ordering plugin is the perfect solution for getting a website running quickly. We were able to launch on day one with the help of this plugin. It took all the heavy lifting out of the equation and let us focus on design. If you are debating whether or not this is the solution for getting a restaurant going — look no further, this is the plugin you want. The support is also top-notch!
Use your ecommerce plugin to manage food items and orders
To get started, you'll need to install and configure your chosen ecommerce plugin. For example, WooCommerce.
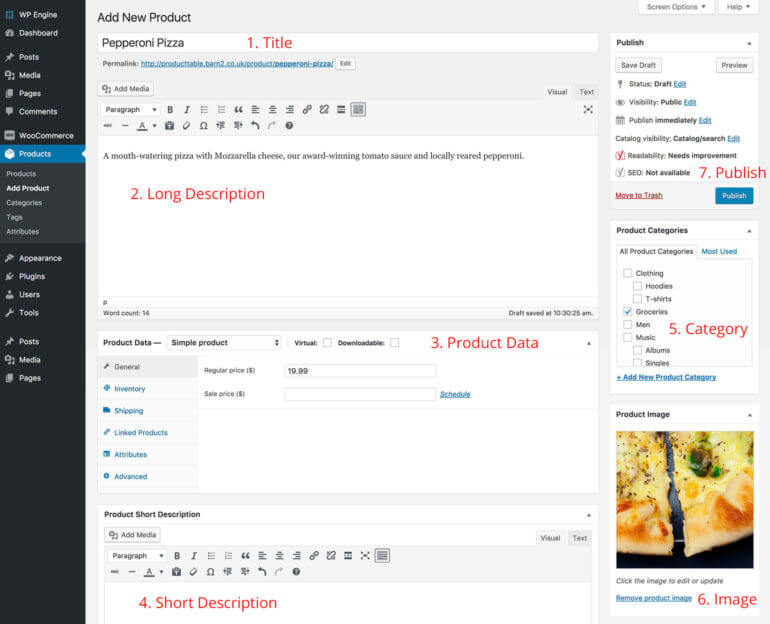
From there, you can add all of your menu items as "products". For example, if you sell a pepperoni pizza, you'd add that pizza as a product:
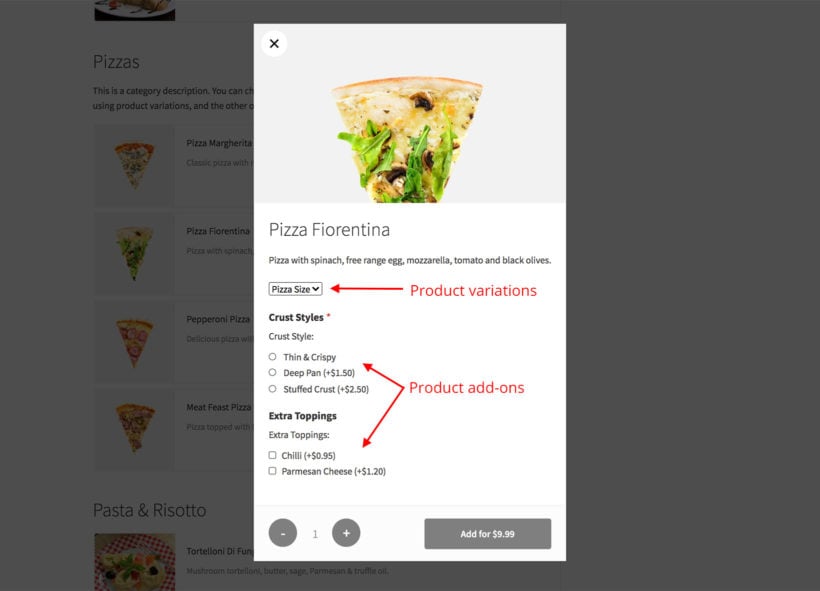
If your menu item is customizable, you can use either product variations or product add-ons to give visitors the option to customize their orders:
VariationsVariations are good if people will select a single option from a list. For example, the size of a pizza.
Add-ons Add-ons are good if people can select multiple items. For example, selecting one or more options from a list of toppings. If you want to use product add-ons, you'll need the Barn2 WooCommerce Product Options plugin.
Use the WordPress restaurant plugin to create your front-end menus
Once you've added all of your food items as WooCommerce products, you're ready for the next step. It's time to create your online menu using the WooCommerce Restaurant Ordering plugin.
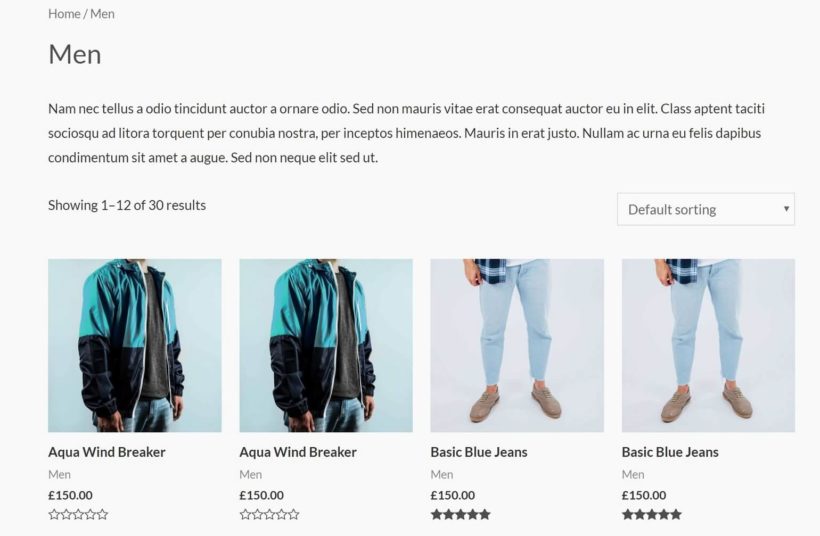
See, by default, WooCommerce displays your "products" in a traditional ecommerce layout. For example, something like this:
Now, that's fine for an ecommerce store, but it's not a good option for a restaurant menu!
That's where the WooCommerce Restaurant Ordering plugin comes in.
This WordPress restaurant plugin lets you take all your items and display them in a user-friendly food and drink menu layout like this:
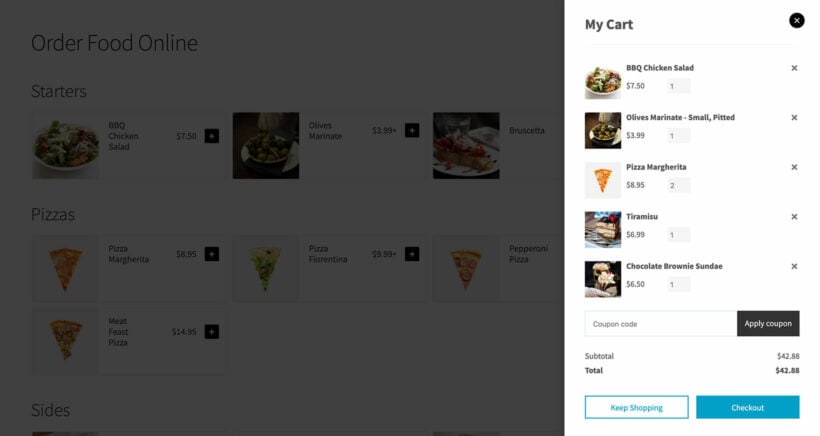
Shoppers can add simple food products straight to the cart, or open a lightbox to select variations and add-on options.
As you can see from the above screenshot, the plugin also works perfectly with the WooCommerce 'Cart" widget in the right sidebar, provided your WordPress theme supports templates that allow this functionality. You could also include a widget with a note about your site's delivery area, or even a custom Google Map that shows the area you serve.
The great thing about WooCommerce Restaurant Ordering is that you have 100% control over the information that displays.
Want to add a description column that marks vegan or gluten-free options, or the calorie count? You can do it! 🥗
Want to show, hide or reposition the image of each food? Yup, you can do that, too! 💯
What's more, WooCommerce Restaurant Ordering comes with a shortcode that allows you to incorporate your food ordering system anywhere on your site.
You can even add opening times and prevent people from ordering while you're closed.
The end result is that you can create a restaurant ordering system that's totally unique to your restaurant's needs and offerings.
Enhance your WordPress restaurant plugin system with other plugins
Get more sales by using WooCommerce Restaurant Ordering with other plugins like Fast Cart
At this point, you'll have a working WordPress restaurant plugin system. However, you still might want to adjust things to tweak how your ordering system works.
WooCommerce Restaurant Ordering is designed to work with many different plugins - not just WooCommerce - and any WordPress theme. That means it integrates as well with your page builder, SEO or multilingual plugins (WPML, WeGlot, etc.), as it does with more obvious pairings - restaurant reservation plugins, food delivery plugins, and so on.
Here are some good options for third-party plugins to enhance your system:
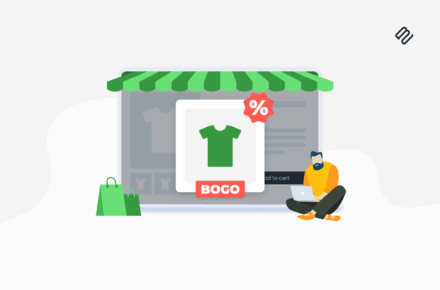
Dynamic Pricing Lets you create special deals, like buy one get one free.
Twilio SMS Notifications Lets you receive SMS notifications for new orders (by default, WooCommerce only sends email notifications).
WooCommerce BookingsLets you set up a table reservation system alongside your menu to allow your customers to fill out an online reservation form and pre-order their food at the same time.
To make the most of your restaurant’s online ordering setup, MH Themes offers SEO-friendly WordPress themes that are both clean and responsive. Designed to deliver a great user experience, they pair seamlessly with WooCommerce-based food ordering plugins, helping your site look polished while working smoothly in the background.
Build your own WordPress restaurant ordering system today!
Stop giving up your hard-earned margins to middlemen!
With your own WordPress restaurant ordering system, you'll be able to offer the convenience of Internet ordering to your customers, without paying a 15% commission.
As an online store owner, the easier you make it for customers to find what they’re looking for, the greater the chance of landing a sale. One way to achieve this is by making the process of buying from you as easy and efficient as possible, for example, by creating a WooCommerce product gallery lightbox.
Practically speaking, if visitors are interested in looking at product images, you might consider implementing quick view functionality into your e-commerce store that allows them to view product images and galleries without having to navigate to the single product page.
In this article, we’ll show you how to display your WooCommerce products in a lightbox along with the:
Product image (with or without extra product information),
Image zoom functionality, and
Full product image gallery (with a choice of 2 gallery styles).
We’ll also step through some advanced display options to help you fine-tune your WooCommerce product gallery lightbox.
What is WooCommerce Quick View Pro?
WooCommerce Quick View Pro is a WordPress plugin that allows users to display product information and product images in a lightbox view. This makes it easy for customers to browse products and make purchases – without having to navigate to the single product page. Essentially, it works like a WooCommerce product image lightbox plugin.
The plugin adds a quick view option directly to your WooCommerce store’s main shop page and category pages. You also have the option to launch a gallery lightbox whenever a customer clicks on the product image or product name. This automatically disables links to the single product page i.e. the links are replaced with the quick view links.
With WooCommerce Quick View Pro, you’re able to choose exactly which information from the product’s single product page (for example, product variations and attributes) you’d like to include in the quick view lightbox.
As a result, you’re able to display the information a prospective customer would need to make a buying decision without any distractions or additional steps while delivering an outstanding user experience.
How to create a lightbox containing product images, image zoom, and the full product image gallery
Assuming you have a WordPress-powered website with ...
WooCommerce installed, activated, and set up.
Some products added to your online store.
… follow the step by step instructions outlined below to create a lightbox containing product images, image zoom functionality, and the full product image gallery.
Step #1: Install and activate the WooCommerce Quick View Pro plugin
If you haven’t done so already, get the WooCommerce Quick View Pro plugin and install and activate it on your WP website. I'll tell you how to set it up as a WooCommerce product gallery lightbox plugin.
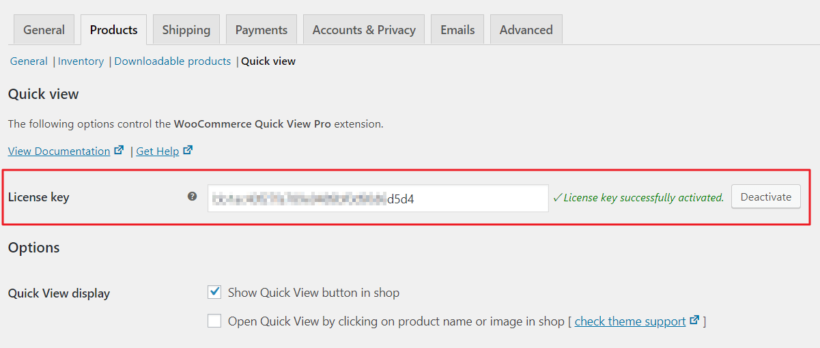
Next, head over to WooCommerce -> Settings -> Products -> Quick view from the admin panel to activate the plugin license.
Click the Save changes button to proceed.
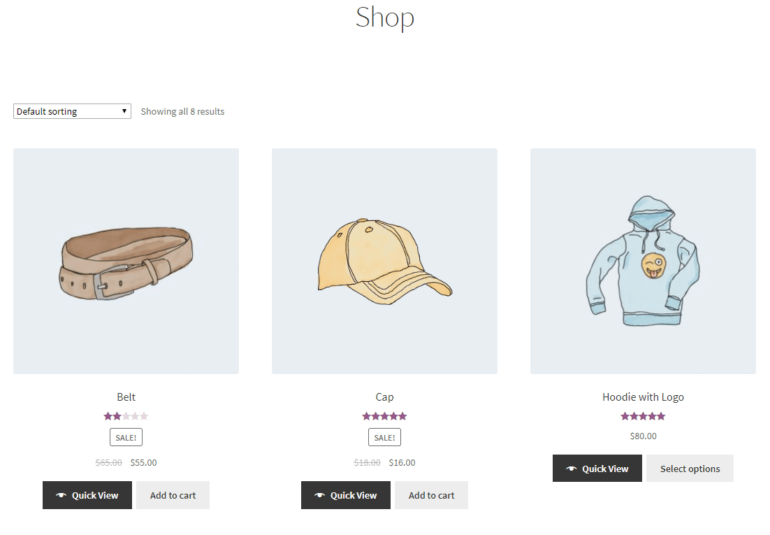
You’ll notice that the Woo Quick View plugin automatically displays products in a quick view layout as soon as you activate it. Your main shop page (and category archives) should have Quick View buttons under each product.
It should look something like this:
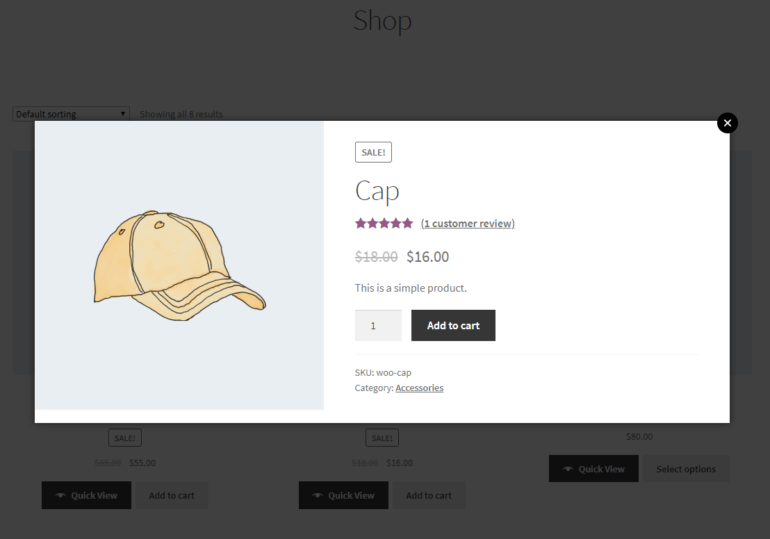
When customers click the Quick View button, the quick view lightbox opens and displays the following information:
Product name
Product image
Reviews
Price
Quantity selector
Add to cart button
Product information (SKU, category)
Step #2: Choose what information to display in the product quick view lightbox
Out of the box, the plugin displays the above-mentioned information in the lightbox view.
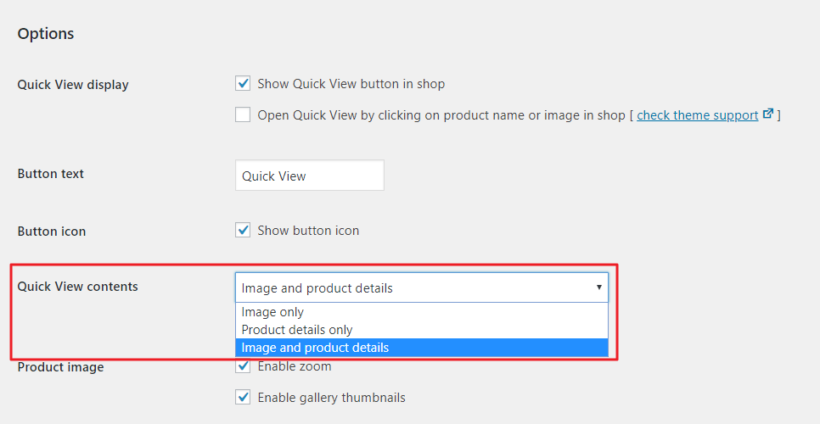
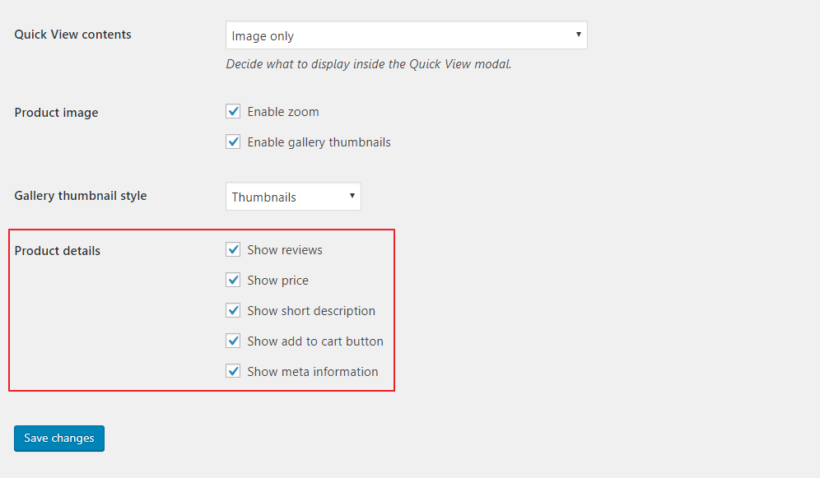
However, you can choose exactly what you’d like to display from the plugin’s settings page. Specifically, you’re able to display images with (and without) the product image and product details. Product details include product name, variations, attributes, SKUs, and categories. Here’s how:
From the WooCommerce Quick View Pro plugin’s settings screen (WooCommerce -> Settings -> Products -> Quick view), scroll down till you reach the Quick View contents option. Use the dropdown menu next to it to decide what to display inside the quick view lightbox:
Image only
Product details only
Image and product details (default setting)
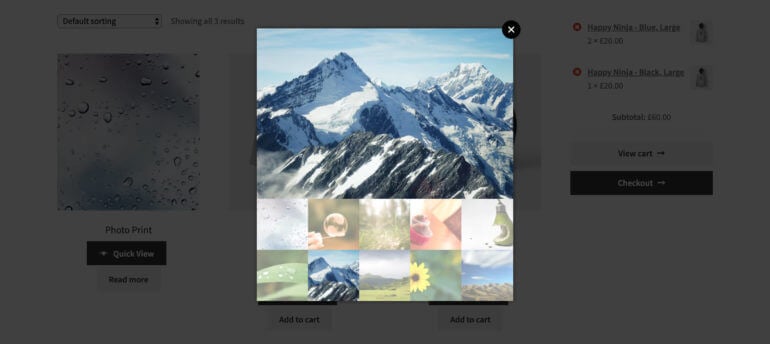
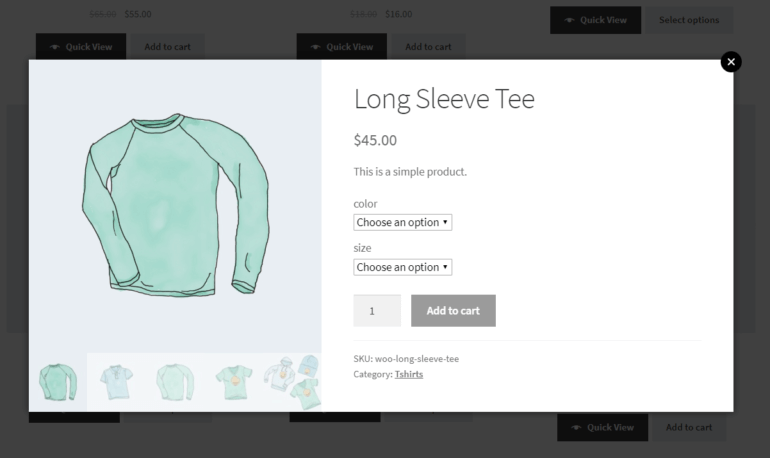
For example, if you set the Quick View contents to Image only, the lightbox will only display the product gallery. It will look something like this:
However, if you decide to go with the Image and product details setting, you can choose which product details to include in the quick view lightbox. The available options include:
Reviews
Price
Short description
Add to cart button
Meta information
Simply tick the checkboxes next to the product details you’d like to display in the quick view lightbox.
Step #3: Select a gallery thumbnail style
With WooCommerce Quick View Pro, you can choose how to display product gallery images in the quick view lightbox. You can decide between Thumbnails and Bullets.
From the same screen (WooCommerce → Settings →Products → Quick view), scroll down till you reach the Gallery thumbnail style option. Use the dropdown menu next to it to decide between displaying product gallery images as thumbnails or bullet navigation in the quick view lightbox.
If you decide to go with Thumbnails, the quick view lightbox will look something like this:
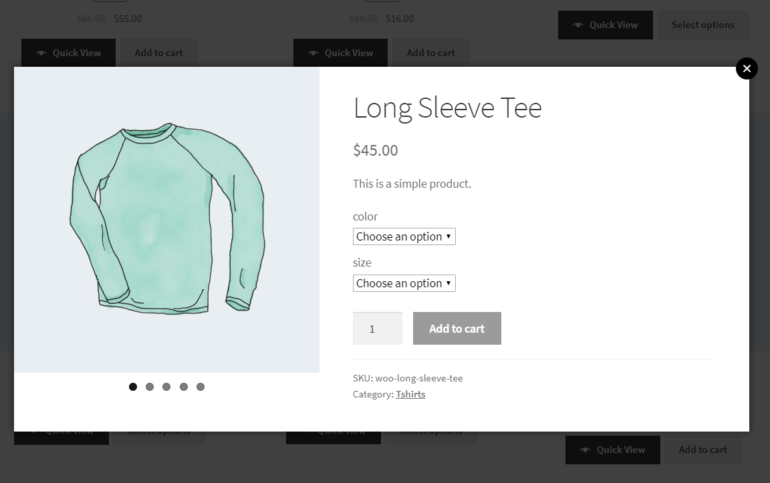
And if you decide to go with Bullets, the quick view lightbox will look like this:
With the bullet navigation option, customers can click through the bullets to browse the product gallery.
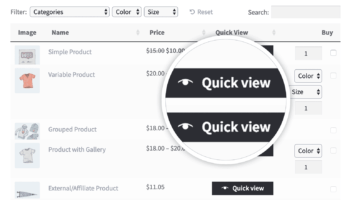
WooCommerce Quick View Pro integrates seamlessly with the WooCommerce Product Table plugin. Use them together to list products in an interactive table or order form layout, complete with add quick view buttons or links.
As a result, customers will be able to open up the full product image gallery in a WooCommerce product image lightbox directly from the table.
Add quick view buttons or links to the wholesale order form.
You can choose to add a Quick View button to the table. Or you can choose to have it launch whenever a customer clicks on the product name (or image) in the table.
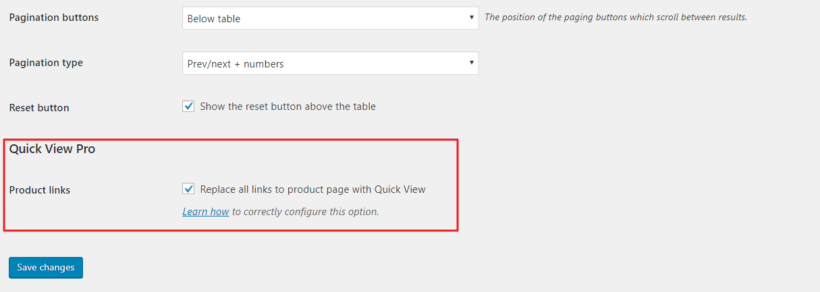
When both the WooCommerce Quick View Pro plugin and the WC Product Table plugin are installed and activated to your website, you’ll see a new Quick View Pro option the the WooCommerce Product Table plugin’s settings screen (i.e. WooCommerce -> Settings -> Products -> Product tables).
Ticking the checkbox next to the Product links option makes it so the product page links in your table layout open the quick view box instead of linking to the single product page. This is the perfect option for users who want to completely disable the individual product page.
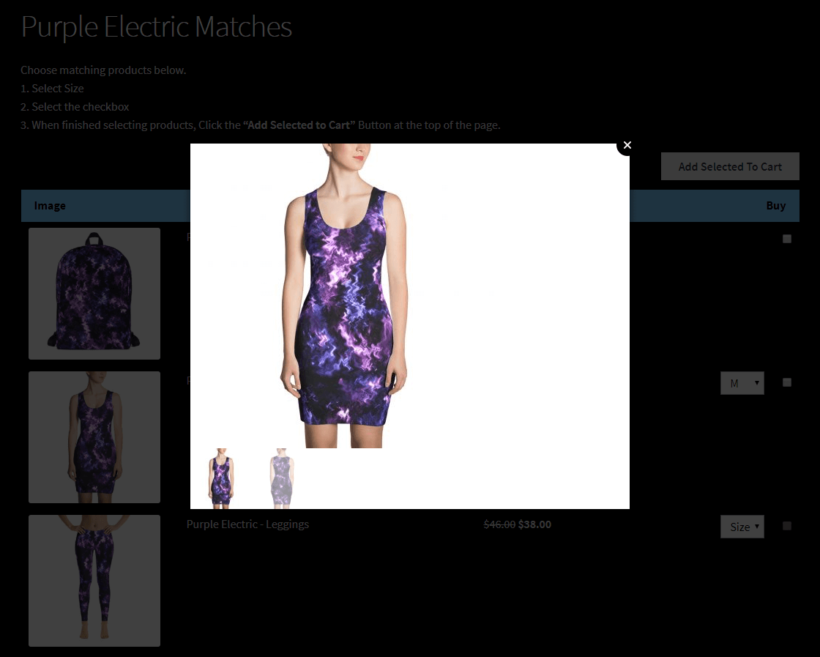
Case study: Ink This and That’s product table with quick view functionality
Ink This and That sells different sorts of matching products including backpacks, dresses, t-shirts, swimsuits, and leggings. They use WooCommerce Quick View Pro along with WooCommerce Product Table to showcase their product galleries in a lightbox view.
Whenever a customer clicks on the product image in the table layout, the product gallery opens up in a lightbox view. Customers can then zoom into the image and browse other images in the gallery. The e-commerce store chose to go with the Thumbnails gallery style for their WooCommerce gallery lightbox.
Integrating quick view into your main shop page and category archive pages makes it easy for customers to view product images and product galleries without having to click through to the single product page. It effectively optimizes the purchase process and helps you deliver a professional and enhanced user experience to your customers.
Do you have any questions about how to use a WooCommerce gallery lightbox plugin in your own online store? Let us know in the comments below!
As the WordPress content management system has grown and evolved over time, more and more websites are using their own custom post types (CPT). You can use them for any type of website content, from documents to events, and from products to portfolios. However, visitors may find it difficult to search for and navigate to your custom posts via WordPress' typical blog-style layout and default WordPress search feature.
Displaying your WordPress content in a CPT table can help address that problem. Creating a dynamic, searchable list for your custom posts ensures that users can quickly find what they're looking for. Plus, an easy-to-navigate list of custom post types makes for easy browsing, which encourages users to spend more time on your site.
In this article, we'll discuss custom post types and explain why listing them in a WordPress CPT table is a smart move. Then, we'll provide steps on how to easily create a searchable list or search form of any WordPress custom post type. Alternatively, watch us creating and listing WordPress custom post types in this video:
An introduction to custom post types
Custom post types are used for content that's similar to a standard WordPress post but has different organization and/or information. For example:
Many e-commerce plugins include a 'products' custom post type. This is built on top of the familiar WordPress editor, supplemented with additional fields for displaying pricing data, shipping methods, and so on. For example, WooCommerce has a 'products' custom post type, and Easy Digital Downloads has a 'downloads' custom post type.
WordPress events plugins create an 'events' new post type. This makes it easy to add upcoming courses and events to your website.
Most WordPress themes come with one or more custom post types. This can include new default post types for portfolios, testimonials, real estate listings, etc.
You can also create your own new custom post types to store any other type of content. For example, if you want to create your own document library then you'll want to create a 'documents' post type. We recommend using a plugin to do this rather than messing around with register_post_type code snippets.
With custom post types, you can improve your site's organization and navigation. For instance, if your e-commerce site had a blog with regular posts in addition to products, then it would be a nightmare if both were stored as 'posts'. Your single posts and products would be mixed together in one archive, which would be difficult for you to manage, and unintuitive for your users.
The same is true for any kind of new content, whether that's recipes, encyclopedia-style articles, or something completely unique. Custom post types also change your permalinks. For example, if you create a recipes CPT, the permalink of your egg salad recipe might be www.example.com/recipes/egg-salad.
By creating different types of content and listing each one separately on your website, you can help your site's visitors find information for more easily. Using WordPress custom post types also opens the door to listing each post type in a suitable layout, instead of using the same blogging layout for everything. You'll learn how to create WordPress CTP tables in this article.
The benefits of listing custom post types on your WordPress site
The possibilities for custom post types are nearly endless. Listing them in a CPT table makes it easier for users to navigate and browse your site. By quickly searching and filtering your custom posts, visitors can quickly find what they're looking for.
You can list custom post types with our WordPress CPT plugin, Posts Table Pro:
We've received a lot of feedback about how Posts Table Pro has helped people to list CPT more effectively:
This plugin is well worth the price. We use it to display and sort medical documentation, embedded in Custom Post Types. The display is clean, mobile responsiveness is not an issue, the filtering is nearly instant.
Another thing that to me made all the difference: the support is fast and capable.
Highly recommended
Case study: How Nova Group list custom post types with Posts Table Pro
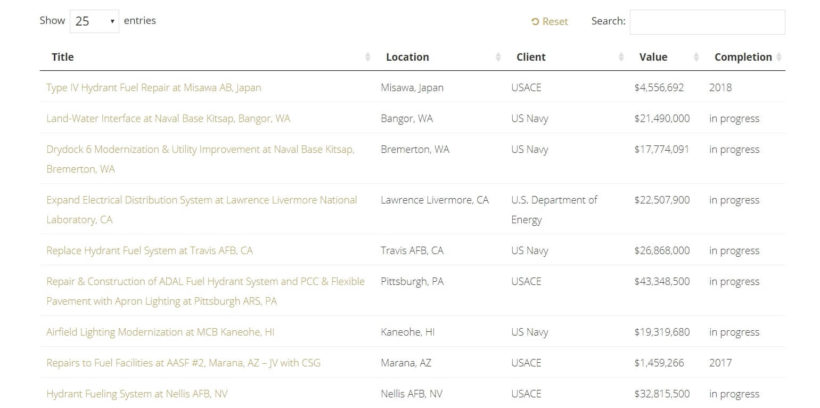
Nova Group used Posts Table Pro to make their portfolio project listings accessible and navigable for potential clients. The WordPress plugin saves them time by automatically listing the 'Projects' custom post type in a readable, searchable format:
This site uses a WP custom post type to display the company's case studies and organize those studies into a searchable table or search form. That helps site visitors find the projects that are most relevant to them.
Keep reading to learn how to list custom content types on your own WordPress website in a CPT table. (Hint: It's really easy!)
How to easily list WordPress custom post types in a searchable table (in 3 steps)
The easiest way to list WordPress search custom post types is by using a plugin. This way, you don't have to mess around with code snippets like register_post_type, pre_get_posts, add_filter, add_action, or wp_query in your functions.php file or template files or hire a WordPress developer.
Another of our customers said it best in their review:
I chose the plugin because I couldn't find any other plugins on the market that would display a custom post in a table.
Once you have the zip folder, go to your WordPress dashboard, navigate to the Plugins section, and click on "Add New." From there, click on "Upload Plugin" and select the zip folder containing the plugin's contents.
Then, click on "Install Now" to start the installation process, and once it's complete, activate the plugin. When you activate the plugin, the setup wizard for Posts Table Pro will launch and guide you through the process of entering your license key.
Step 2: Configure Post Table Pro's settings
Upon installation of the plugin, an automatic setup wizard will be launched to assist you in creating your first table. However, if you are already familiar with the plugin or would like to get started immediately, you can create new tables at any time by navigating to Post Tables → Add New.
Follow the steps below to finish creating your first table:
Start by giving your table a name and selecting the post type you wish to display. If you do not yet have a content type, you can create one using the free Easy Post Types and Fields plugin.
On the page for adding posts or pages to your table, you can select from posts, pages, and Custom post types. The available options will depend on the post type you selected in the previous step. If your post type has custom taxonomies, they will also be listed here for you to select.
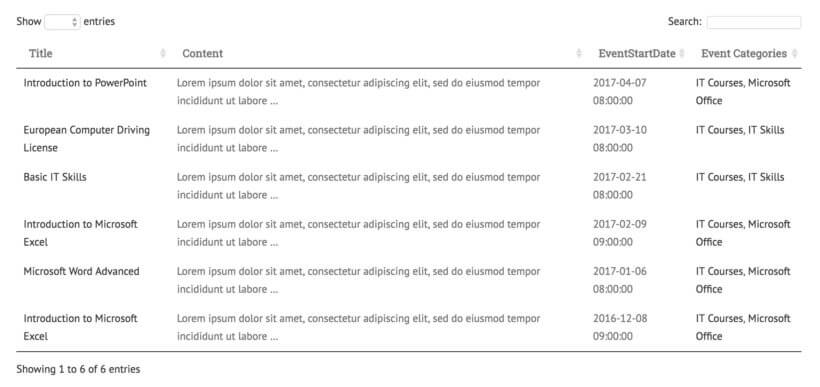
You can determine which columns to display and in what order. To add a new column, choose the column type from the dropdown menu and click "Add". For example, title, content, event start date, and event categories. You can also reorder columns by dragging and dropping the sort icon or column heading.
Filters appear as dropdowns above the table, and you can add as many as you like. Each filter accepts more than one value at once, and shows a count of matching items beside each option. For example, you can add categories and locations as filters. It is important to note that available filter options will vary depending on the post type selected on the first page.
The table loads one page at a time, so it stays fast even with hundreds or thousands of items.
Choose how to sort the table. You can set the default sorting option and the sort direction.
Step 3: Add the posts table to your site
To display your table created with the Post Table Pro plugin on your WordPress site, follow the instructions given by the setup wizard once you've completed creating the table. You can choose from two options for displaying the table:
Using the 'Post Table' block available in the Gutenberg editor, or
Copying the shortcode from the table builder and pasting it anywhere on your site. This allows you to place the table on any page regardless of its content.
And your list of custom post types will look something like this:
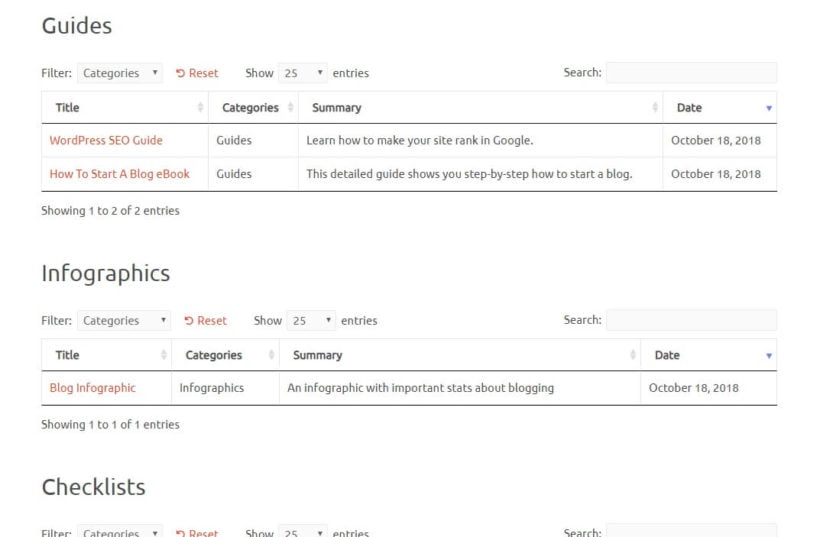
Or maybe your WordPress CPT table will look more like this on the front end:
Of course, you may want to use Posts Table Pro to display multiple tables on your site. For example, you might have more than one custom post type and want to create a separate list for each of them.
There are also lots of options to list specific post types, custom posts, or specific custom post types in the table, instead of all of them. For example, you can list custom posts by category, tag, and more. Users will still be able to search it using the text input type.
Then, your list of custom post types will look more like this:
The sky's the limit when it comes to the different ways you can list your content types!
The easy way to list custom post types in WordPress
Custom post types help you display your site's CPT content in a way that makes sense to your users. With Posts Table Pro, you can list your custom content in a way that's logically organized and clearly navigable. In addition, you can enable custom search for it.
In this article, we showed you how to easily list WordPress custom post types in a searchable CPT table or search form:
Install and activate Posts Table Pro.
Create and customize your table,
Add your table to your site wherever you want to list custom posts.
Do you have questions about how to list WordPress custom post types on your site? Leave them in the comments section below!
As an online store owner, you might want to create a WordPress product catalog to showcase your products. The only problem is that most e-commerce plugins don't provide much flexibility in terms of how to display products.
One way to create a visually appealing, user-friendly product catalog in WordPress is by using a product table layout, with a simple WordPress plugin - WooCommerce Product Table. It makes it easy for customers to browse a product list view, view details, and act on your conversion goal, whether it’s to make a purchase or get in touch for a quote.
In this article, we’ll start off by explaining in more detail what a WP product catalog table is. We’ll also walk you through a step by step tutorial on how you can create a WordPress product catalog, with or without a shopping cart.
What is a WordPress product catalog and who needs one?
A WordPress product catalog is a structured display of your products that customers can browse, search, and filter. Out of the box, most e-commerce plugins only display products in a standard grid. Each product takes up a large amount of screen space. The layout looks attractive, but it is not user-friendly for stores that sell more than a few products.
A grid also makes it difficult for customers to browse quickly or compare product details.
A product table plugin solves this. It creates a WordPress product catalog with or without a shopping cart. You can display more products per page. Customers can search, sort, and filter to find exactly what they need.
Who needs a WordPress product catalog?
Anyone who wants a user-friendly way to showcase many products can benefit from a WordPress catalog plugin. Products appear in a neat table or grid layout with the details that matter. There is no need for fiddly custom CSS or complicated HTML. Customers see more products per page.
E-commerce stores that sell products
Online stores that sell directly from their website benefit from a product table layout. It displays more products on a single page, with key product information and Add to Cart buttons.
The table layout also makes bulk buying easy. Stores that sell several products per order, such as wholesale suppliers or stationery shops, gain the most. From our own analysis of stores using Product Table, the biggest users are industrial and technical shops with spec-heavy catalogs of parts and components, where buyers compare data rather than browse big images.
Product tables also include search, sort, and filter options based on parameters such as price.
Businesses wanting to showcase products without e-commerce
Some businesses want to showcase products without selling them on the website. Customers browse the online catalog and make a selection.
These businesses usually take orders by phone or through quote requests. A full shopping cart is not practical for them.
However, a WordPress product catalog displays the range without showing prices or cart functionality.
The WooCommerce Product Table plugin lets you create a product catalog in WordPress to display products in a searchable, sortable, and filterable table layout.
We built WooCommerce Product Table for stores where the data about each product matters more to the buying decision than a big image. It's a great fit for technical or spec-heavy catalogs, and less suited to traditional clothing stores where shoppers want big photos and the full gallery.
This product catalog plugin is hugely beneficial to both businesses and e-commerce stores because:
Works with WooCommerce, the world's leading WordPress e-commerce platform.
Lets customers browse your entire product listing, or a curated selection of products, at a glance.
Makes it easy for customers to view important product information and compare products quickly.
Takes up less room on your website as compared to the standard format offered by most WordPress e-commerce plugins.
Simplifies the purchasing process by allowing customers to buy multiple products from a single page. In other words, they don’t have to visit individual product pages to add products to their shopping cart.
You can improve the buying process even further by using Product Table with its sister plugin, WooCommerce Quick View Pro.
I've tried so many product table and list view plugins over the past year. None of them were supported well and often simply were non-functional. I recently discovered BARN2 and WooCommerce Product Table; it does everything I need for my store that I had been searching for. My large and growing product catalogue was becoming irritating to customers and having data readily in view helps tremendously. The plugin worked perfectly for my site, the documentation is thorough and helpful, its simple to setup, and I highly recommend it.
In addition, the WooCommerce Product Table plugin lets you decide which columns you’d like to display in your WordPress product catalog (and in what order). You also have the option to decide how customers can filter through products e.g. by product category.
How to list products in a catalog for e-commerce
If you’d like to give customers the option to buy products directly from your online store then you’d want to display Add to Cart buttons in your WordPress product catalog.
Below, we’ll show you how you can do this regardless of which WP e-commerce plugin you’re using.
For WooCommerce
To get started, you’ll need a WordPress website with the WooCommerce plugin installed and some products added. You’ll also need to purchase the WooCommerce Product Table plugin and install and activate it on your website.
Step 1: Create a table-based WordPress catalog
Go to Products → Product Tables → Add New to launch the table builder. We'll use this to create a WordPress product catalog which lists your inventory in a table view.
The first page prompts you to decide how you'll add the catalog to your site. You have 2 choices here:
Add to a page using a blog or shortcode - Use this option if you want to add a WordPress product catalog to a separate page, without affecting your main ecommerce store pages.
Display on a shop page - Alternatively, use this option to use the catalog layout on all your store pages, without having to add it to any pages manually.
There are lots of useful options in the table builder, but we'll focus most on choosing your columns. These affect what product data appears in the WordPress catalog view.
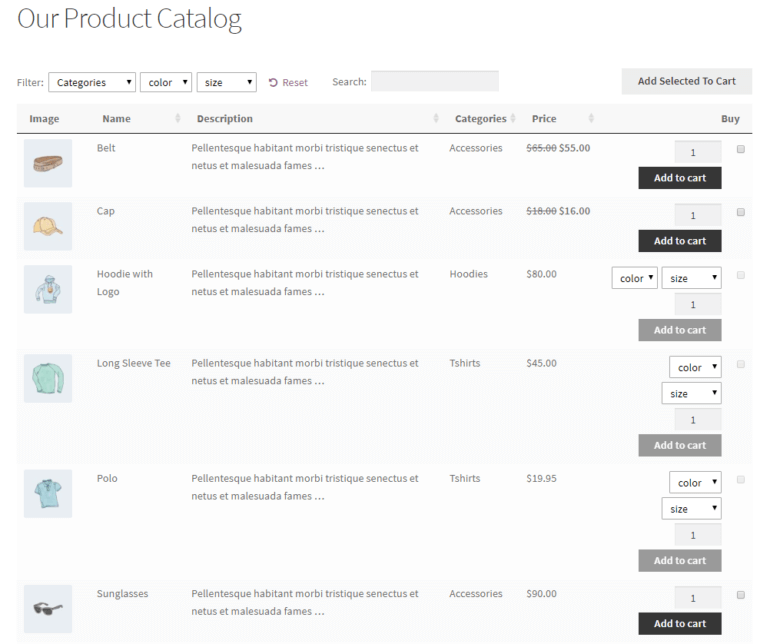
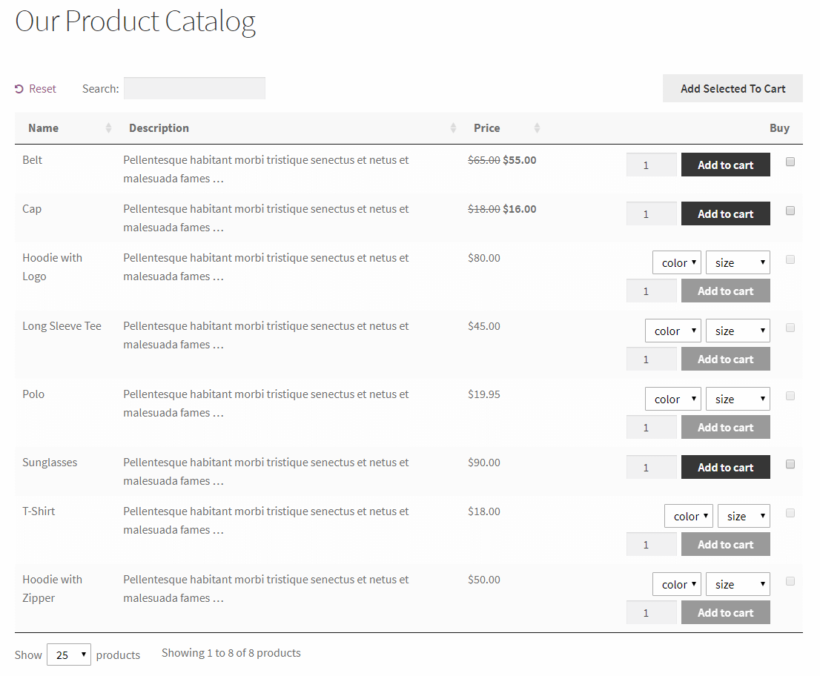
Set the columns you’d like to have displayed in the front-end WordPress product catalog. For example, you might consider displaying the product’s image, name, a short description, price, and add to cart buttons:
A WordPress product catalog with these columns will look something like this:
You only need this step if you chose to insert the WordPress product catalog manually, above.
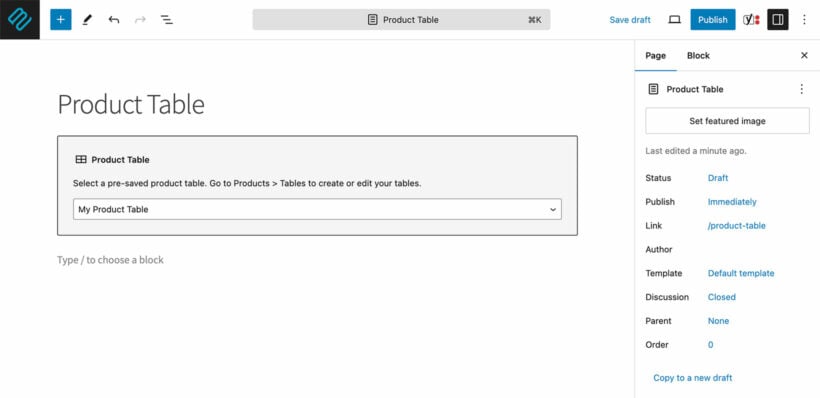
Log in to your WordPress admin panel and head over to Pages →Add New to create a new page for the WordPress product catalog. Give your new page a name. For example, you might call it Our Product Catalog.
Add the catalog to a page by selecting the 'Product Table' block and choosing your table. Or if you don't use the WordPress block editor then copy the product table from the end of the table builder and add that.
Once you’re done, click the Publish… button and preview the page. The WordPress product catalog should look something like this:
You’ll see a dynamic product catalog in a table layout. At this time, the table layout displays the default columns.
Step 3: Add product quick view to your tables
Used alone, WooCommerce Product Table comes with an add to cart column where customers can choose variations, pick a quantity, and add to the cart.
Some stores find that they want to show extra information, without taking customers to a separate page for each product. They might want to show multiple product images. Or they might have too many variations to fit neatly in the product table.
Add quick view buttons or links to the product catalog.
If any of this applies to you, then you can enhance your product tables by adding WooCommerce Quick View Pro. This plugin works alongside the table-based product catalog. It adds quick view links or buttons to the catalog pages.
Customers use the lightbox to view the full image gallery, read more information, choose variations and add to the cart.
Quick view is a great alternative to having a separate page for each product. Add it to your WooCommerce product catalog as follows:
Go to WooCommerce → Settings → Products → Quick view. Enter your license key and choose what you'd like to appear in the quick view lightbox.
Edit the product table you created above (Products → ProductTables) and edit it. Add Quick View to the list of columns. If you want to disable the links to the single product page, scroll down to the Quick View settings on the same page, and enable this option.
For WP ecommerce, Easy Digital Downloads, or any other e-commerce plugin
If you’re using any other e-commerce plugin, such as WP ecommerce or Easy Digital Downloads, to power your online store, you can use the Posts Table Pro plugin to create a dynamic, functional WordPress product catalog.
The only condition is that the e-commerce plugin must create its own custom post type in WordPress for storing products. That's fine, as nearly all WordPress e-commerce plugins do this.
With the Posts Table Pro plugin installed and activated, simply select the products post type from your e-commerce plugin on the Posts Table Pro settings page. Then, enter the [posts_table] shortcode wherever you’d like to display the WordPress product catalog.
How to create a WordPress product catalog without a shopping cart
In some cases, you might want to create a WordPress product catalog without a shopping cart. In other words, you want to showcase your products in a product table layout with e-commerce functionality disabled.
Below, we’ve outlined the steps you need to follow to combine product tables with catalog mode while disabling the e-commerce functionality.
Strangely, I'm going to talk about WooCommerce again. Yes, I know it's an e-commerce plugin - but you can equally use it without offering an online ordering facility. I'll show you how this works, and I'll also tell you how to create a WordPress product catalog without installing any e-commerce plugin at all.
Create a WooCommerce product catalog without online ordering
Start off by following Steps 1 and 2 outlined in the previous section. The only differences are:
Do not include a buy column when you choose your product table columns.
When you add your products in WooCommerce, do NOT add prices. This is important because you're not selling them online. If you don't add prices then no add to cart buttons will appear. Or if you really want to show prices, then use the Catalog Visibility Options extension to hide product prices and add to cart buttons throughout your online store.
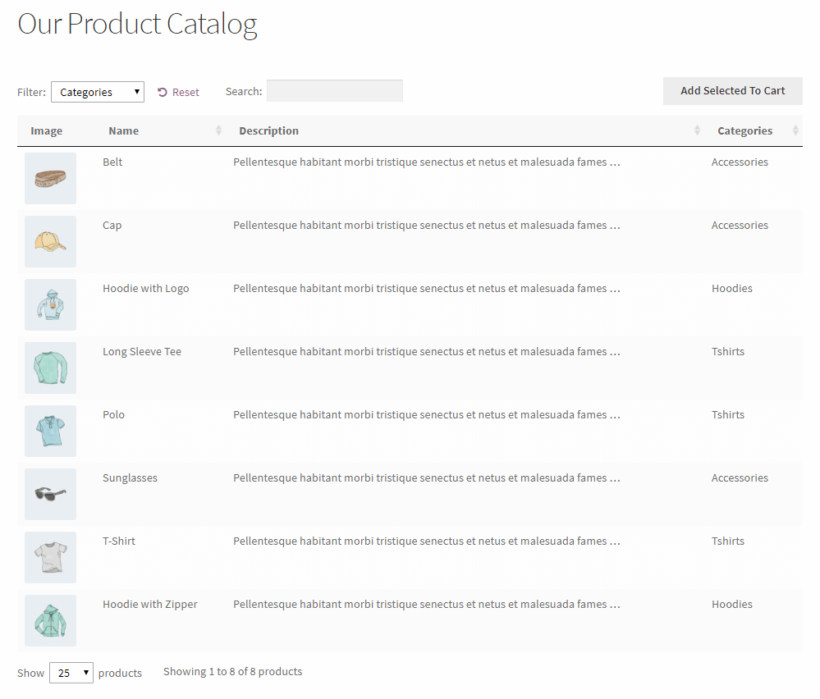
Your non-ecommerce WordPress product catalog will look something like this:
Perfect!
Create a product catalog without an e-commerce plugin
Finally, I'll reveal how to create a WordPress product catalog without needing an e-commerce plugin at all! E-commerce plugins such as WooCommerce are fantastic, free of charge, and won't weigh down your site too much.
But if you really don't want one, then you can create your own custom post type and use this to store your products instead. This will add a 'Products' section (or whatever you want to call it) to the left of the WordPress admin.
Once you've added the products, use the Posts Table Pro plugin to them in a table-style WordPress product catalog on the front-end of your website.
Install a catalog plugin, add your products, and choose a catalog layout. With WooCommerce Product Table, go to Products, then Product Tables, then Add New, pick your columns, and add the table to any page with a block or shortcode.
Can you create a WordPress product catalog without WooCommerce?
Yes. Store products in a custom post type and display them with Posts Table Pro. This works with Easy Digital Downloads and any e-commerce plugin that registers its own post type. It also works with no e-commerce plugin at all.
How do you display products without a shopping cart?
Leave out the buy column and do not add prices to your products. WooCommerce then shows no add to cart buttons, so visitors browse the catalog and contact you to order. The Catalog Visibility Options extension can also hide prices and add to cart buttons storewide.
The perfect WordPress product catalog plugins
The WooCommerce Product Table and Posts Table Pro plugins give you a functional, dynamic WordPress product catalog. You can showcase products only, or let customers buy directly from your store.
Either way, you control how your product listing appears on the front end. Choose the columns that fit your products. Offer search, sort, and filter options. Let customers buy from a single page bulk order form.
Do you agree that a table-based product catalog improves the customer experience? Share your thoughts in the comments below!
Today I'm going to tell you about a free plugin which adds Favorite buttons to your lists of WordPress posts, documents or custom post types. When used with our Posts Table or Document Library plugin, you can list WordPress content in a searchable table - complete with 'Add to Favorite' buttons.
Whatever your reason for needing favourite buttons on your website, you can use these instructions to add them to any list of WordPress posts, documents, or any custom post type.
You can use one of our table plugins to list your WordPress content in a table. Then, you can use the Favorite plugin to add Favorite buttons. Your visitors can select their favorite posts or documents and create a handy shortlist.
When a visitor comes back to your website, they will still be able to see their selections. If they're not logged in then their favorites are stored via browser session or a cookie. If they have an account on your website, then their favorites will appear even if they re-visit from a different browser or device.
How to add Favorite buttons to WordPress
First, use Posts Table Pro or Document Library Pro to list your WordPress posts, documents or any custom post type in a table view. Set up the plugin using the instructions in the knowledge base, with these settings:
Columns - include the 'content' column. The favorite button will appear here automatically.
Tick the 'Shortcodes' option. This makes sure the button appears in the table correctly.
Now go to Plugins→ Add New in the WP Dashboard.
Search for 'Favorites' and install the plugin by Kyle Phillips.
Now check the page where you've added the table. There will be a 'Favorite' button in the content column for each post or document in the table.
You can also add favorite buttons to other locations
The instructions above tell you how to add favorite buttons to the content/description columns the table. If you'd like to add them elsewhere - for example because you don't want this column in your table - then that's fine. Simply remove the content/description column and add the following shortcode to one of the other fields that you're displaying in the table (e.g. the excerpt or a text or Visual Editor custom field).
This article explains how to use our table plugins with the Advanced Access Manager plugin. It's perfect for creating tables that show different content to each user - also known as WordPress user specific content.
At Barn2, we create plugins that list content from your WordPress website in a searchable, sortable table. This might be blog posts, pages, documents, or any other post type. Our table plugins are:
Posts Table Pro - Lists WordPress pages, posts, and any custom post type such as members or events.
Document Library Pro - Creates a searchable document library of resources, publications, audio or video.
But what if you want each user to see different items in the table? Well, that's when you need to use our plugins with Advanced Access Manager.
Keep reading to learn how to create an interactive table with user specific content. I'll also reveal how to hide your entire table so that only certain people can see it.
Why would I want to list WordPress user specific content?
There are lots of reasons why you'd want to create a WordPress table with user-specific content. For example:
Your index of blog posts might include some hidden posts that only logged in users with a specific role can see.
You might have an e-commerce site that sells user-specific products (e.g. branded logo wear to sports teams).
You can do all this and more by combining our table plugins with Advanced Access Manager.
Creating user specific content with Advanced Access Manager
Advanced Access Manager has a surprising number of features for a free WordPress plugin. It comes with several ways to control access to WordPress content:
Create role-specific content that only specific logged in user roles can see.
Protect user-specific content that only named logged in user accounts can access.
Choose whether or not visits (i.e. guest users) can see the content.
For each option, you can choose what appears for people without the correct privileges. You can hide the information completely, restrict it so that only people with the direct URL can see it, or display a custom message. You can restrict the ability to add comments, redirect people to another page, or password protect the content. It's even possible to add an expiration date so that the user's access automatically expires at a future date.
How to control access to pages, posts & custom post types
When you add or edit a page, post or custom post type, you'll find a new 'Access Manager' section.
On the left, there are tabs for the different protection options. These let you create user role specific content, user specific content, as well as choosing what happens for guests.
On the right, choose one or more access restriction settings. (More on this in the next section.)
How does it work with Barn2's table plugins?
So far, I've told you how to create WordPress user specific content with Advanced Access Manager. Next, I'll reveal how each restriction option works when you list your WP content in a table with our table plugins:
List - Hides user specific content from public areas, while remaining available to anyone with the direct URL. Restricted items are hidden from your tables for unauthorized users. Users with the correct role or login can see them in the table.
Read - Lists protected content as usual, but unauthorized users will see an 'Access denied' message when they try to access the page. Content is listed for all users in the table but unauthorized users cannot access the single post page.
Limit - Not recommended, as the teaser message will not appear in the table.
Read Counter - Restricts how many people can access the restricted content. The restriction only applies when people click on a link in the table to access the single post page. The post/document/product still appears in the table after the limit has been reached.
Comment - Restricts who can comment on the single post page.
Redirect - Redirects unauthorized users to your chosen URL if they try to access the single page/post/document/product.
Password Protected - Password protects the page/post so that only people with the password can access it. It is still listed in the table as usual. Most of the columns in the table will appear for everyone, but information in the content column is hidden. A password login form appears in the content column so that users can enter the password directly into the table and reveal the hidden content.
Access Expiration - Choose a date when the content will expire and people can no longer access the single post page.
Combining the access restrictions
You can combine the above options to create more complex rules for your WordPress user specific content.
For example, you can combine the 'List' and 'Password Protected' options to hide information from the table and require a password when someone tries to access the direct URL to the protected content.
Can I show different information in the table columns to different users?
Yes, you can do this with the Advanced Access Manager shortcodes. Create a column in the table as usual (e.g. a custom field column), and add Advanced Access Manager shortcodes to this field. You'll need to add a separate shortcode for each group of users who needs to see different content.
For example, you might be listing ebooks in a table and want to add a 'Register' button for visitors and a 'Download' button for logged in users. You can do this by adding both buttons to a field in your table. Wrap one in a shortcode that is only visible to visitors; and wrap the other in a shortcode that is only visible to logged in users.
If you use this option, make sure you disable the caching option and enable the 'Shortcodes' option on the table plugin settings page.
Please note that AAM has a 'Message' option in its shortcodes which lets you specify a message that appears to users without access to the content of the shortcode. This does not work with our table plugins - the column will simply appear blank to unauthorized users, with no message. Instead, you need to add multiple shortcodes - one for each user group.
I want to restrict entire categories, not individual posts
The free version of Advanced Access Manager forces you to create user specific content on a per-post basis. There are a few choices for restricting access to entire categories:
Advanced Access Manager Pro has a category-wide option.
By now, you've learned how to list posts, pages or custom post types in a table with user specific access restrictions. Each user sees different information in the table - or can access different links from the table - depending on the restrictions.
If you prefer, you can hide the page containing your table instead. Simply use the 'Access Manager' controls at the bottom of the page where you're using our table plugin. This will hide the entire page - including the table - from non-authorized users.
Can I sell access to members-only content?
Yes, the Pro version of WP Advanced Access Manager has this feature. It lets you sell access to exclusive content. You can then restrict certain pages/posts/custom posts so that only people who have purchased access can view it in the table.
Does it work with other WordPress membership plugins?
There are dozens of WordPress membership plugins available, and we can't realistically test with all of them. The other one that we have tested with is Groups, which also works nicely with our table plugins.
With Groups, you have to create a 'group' (hence the name!) and add users to one or more groups. You can then restrict your content so that only logged in users in the correct group can see it. If you're listing content using our table plugins, then users will only see information that their group has access to.
We love Groups, but Advanced Access Manager is a simpler option for many people. This is because it lets you lock down content to specific user roles, so you don't have to bother creating groups and adding users to the correct group.
Do you use Barn2's table plugins with access restrictions?
If you want to add tables to your WordPress site which show different items to different users, then choose one of Barn2's table plugins and use it alongside Advanced Access Manager:
Posts Table Pro - Lists WordPress pages, posts, and any custom post type such as members or events.
Document Library Pro - Creates a searchable document library of resources, publications, audio or video.