If you run a WooCommerce store where you deliver different items or quantities depending on the day of the week, you might want to create a WooCommerce daily order form. I'm going to show you how to set one up.

Customers can select multiple quantity inputs per product for each day of the week. This makes it easy to create their entire weekly order on either a one-off or recurring basis.

This approach is something you'll commonly see with delivery food services. For example:

  • Bakeries Customers might want to set up a recurring order for a certain baked food, with different values each day.
  • Coffee deliveryIf you deliver coffee to businesses, you might need a system where businesses can choose how many containers they want to be delivered each day.
  • Meal delivery services Whether you sell to individuals, schools or offices, you might want to let customers order a certain quantity for each day in advance or on a subscription basis. This works for normal restaurants, as well.

In this article, you're going to learn how you can use a WooCommerce daily order form using a choice of two plugins – WooCommerce Product Table and WooCommerce Bulk Variations.

The daily order forms will have multiple quantity inputs per product to let your customers choose how many items they want to order for each day of the week. You'll also be able to make these either one-off orders or ongoing subscriptions, depending on your needs.

But first, I'll explain how your customers will use your days-of-the-week order form to place a one-off or regular order for each day.

2 plugins for creating a daily order form

There are two easy ways to create a WooCommerce daily order form for your e-commerce store.

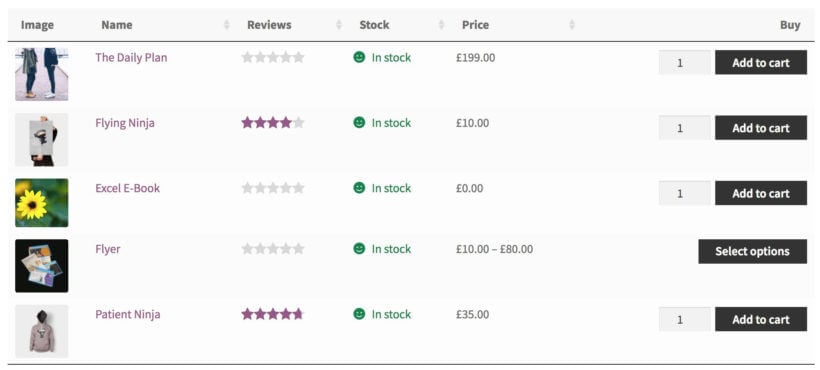
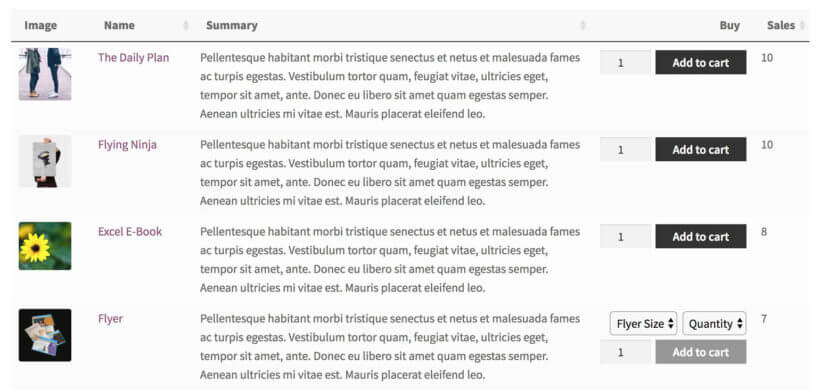
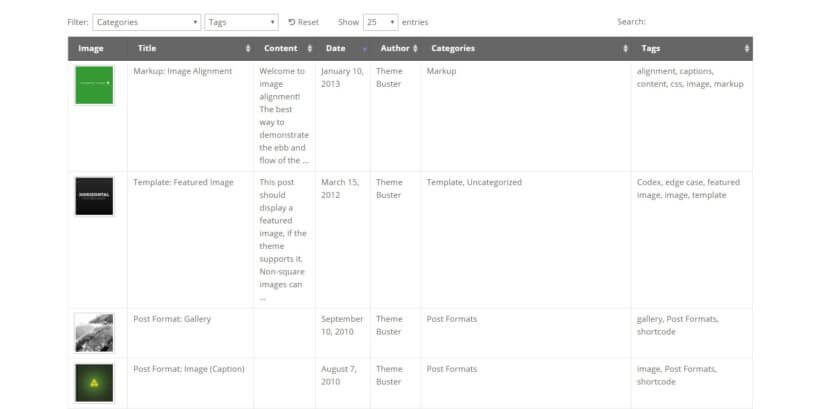
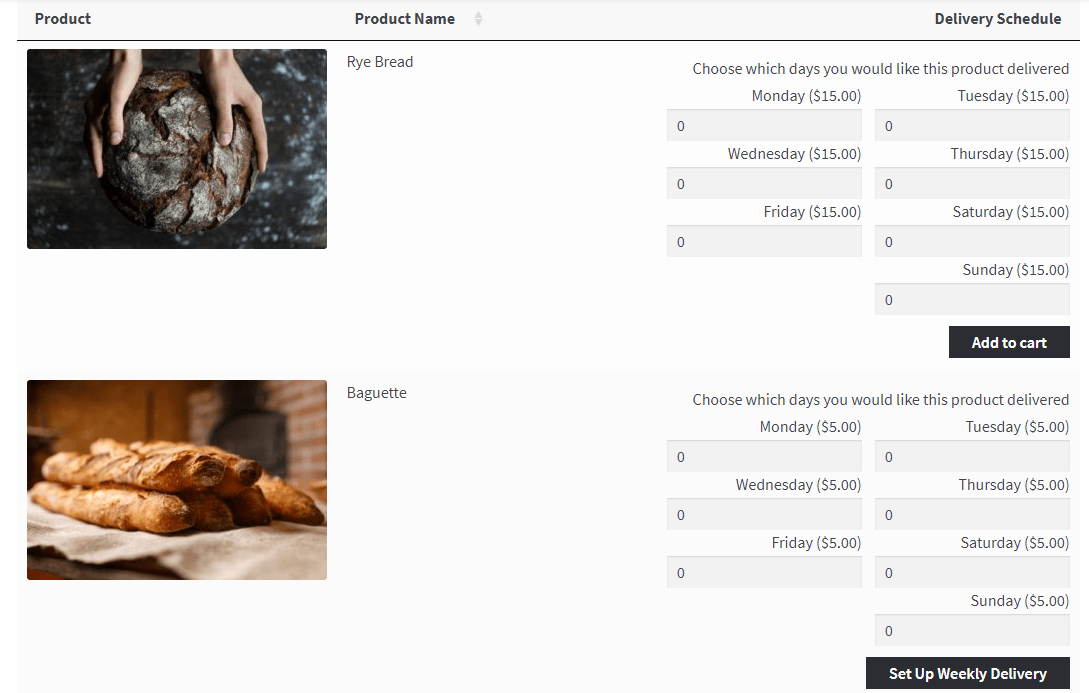
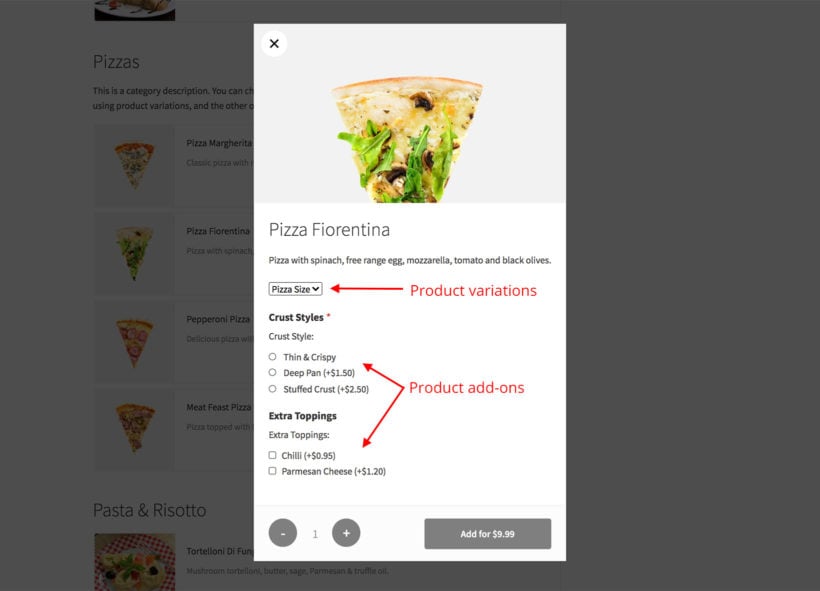
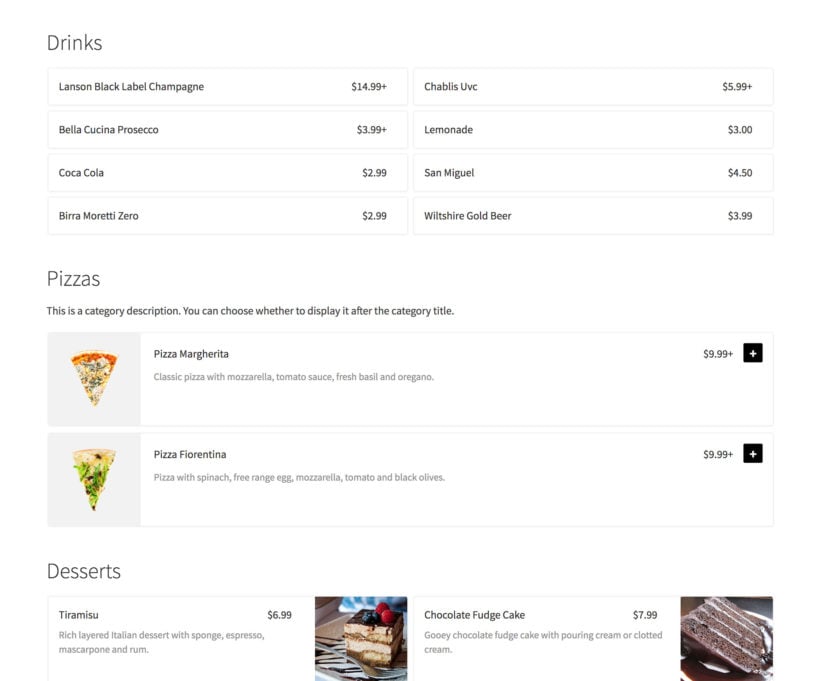
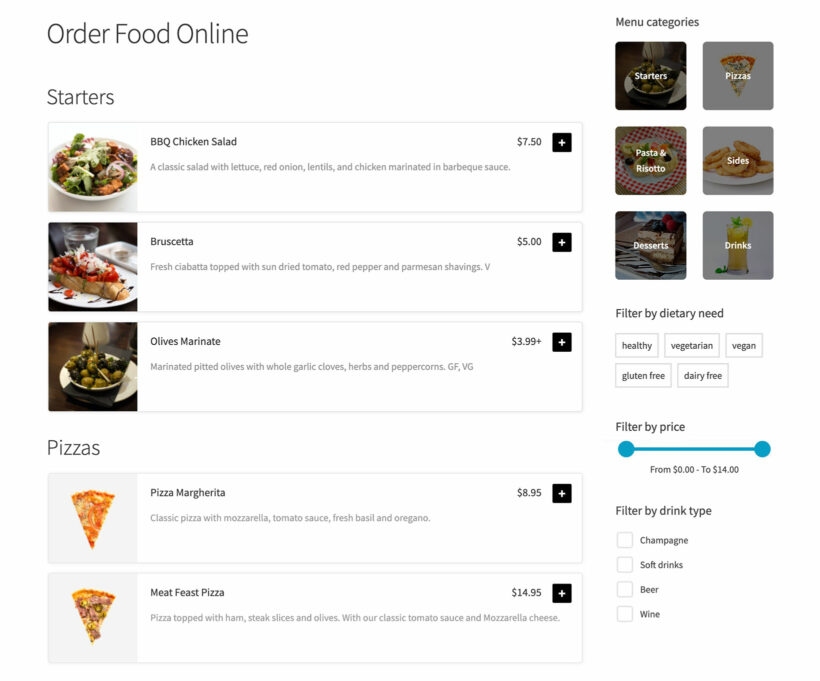
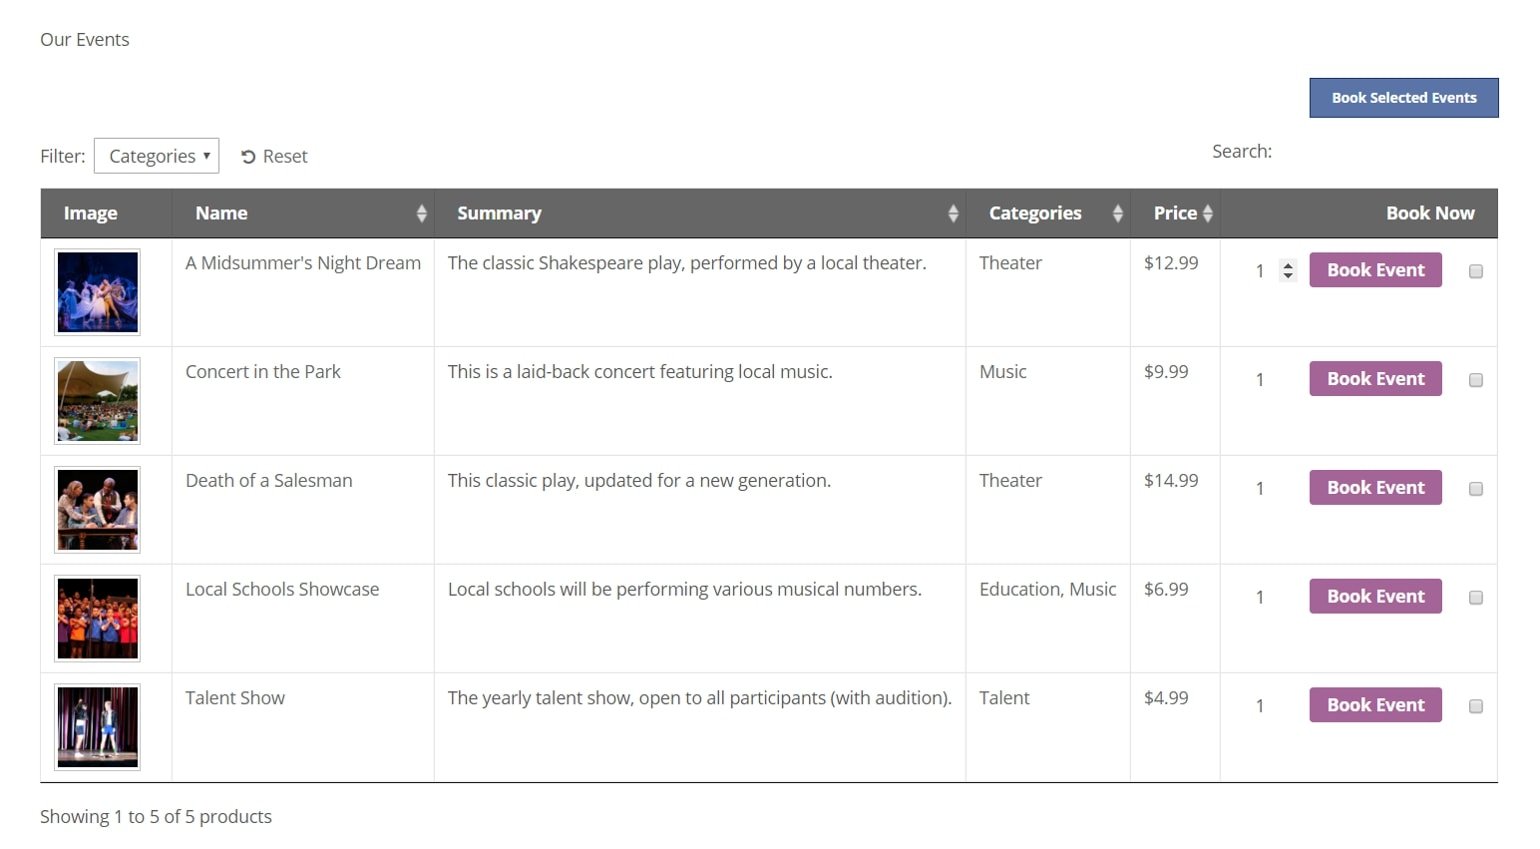
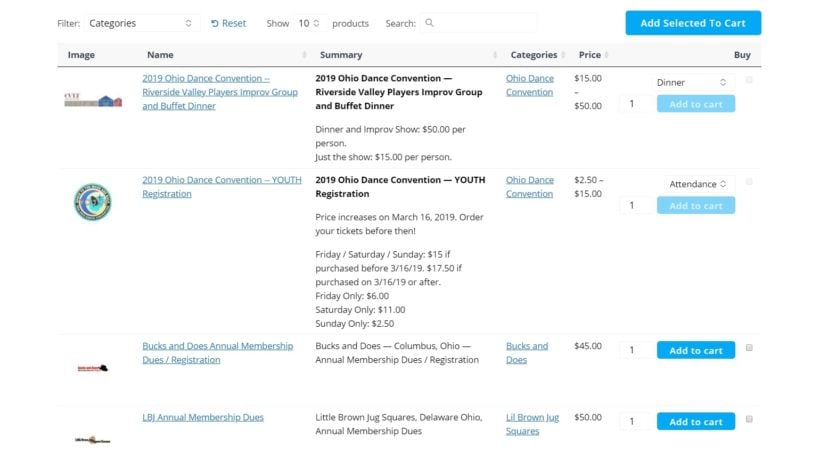
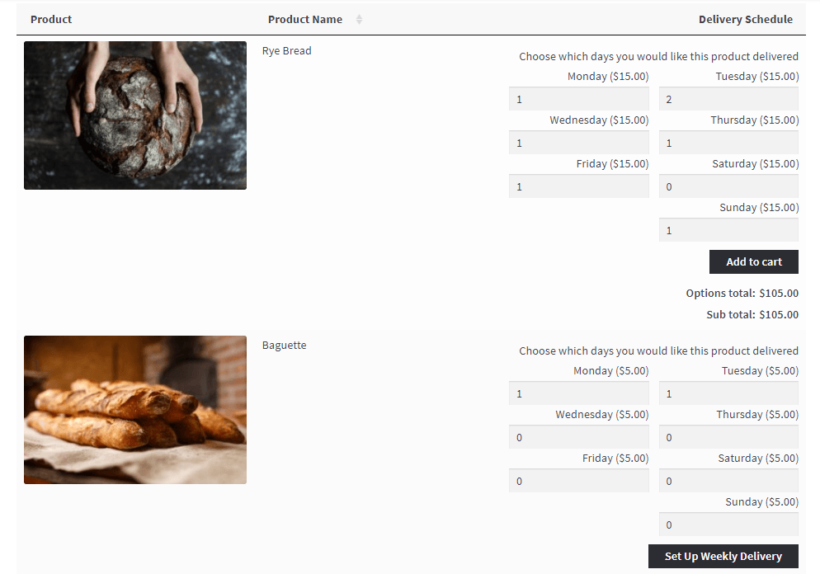
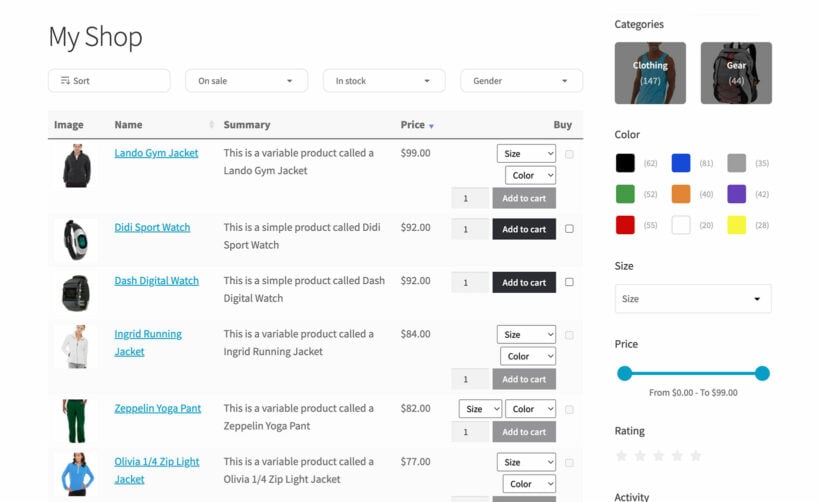
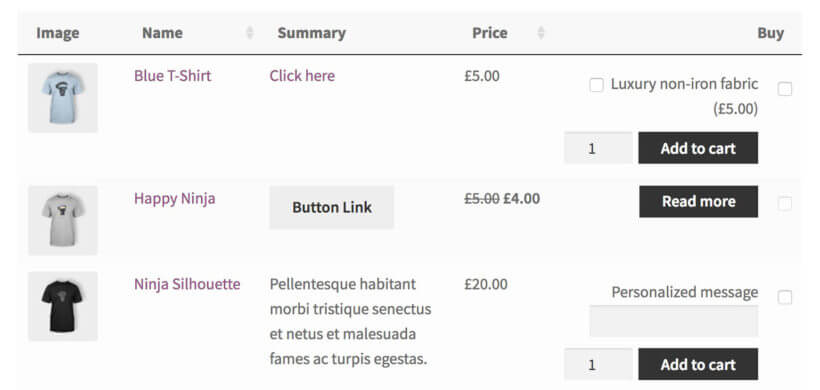
  1. The WooCommerce Product Table plugin works with the Product Add-Ons plugin to list multiple products in a table with a quantity box for each day of the week. This method works for one-off purchases and on-going subscriptions. It's ideal if you want to list multiple products in the same order form. For example, in the 'Method 1' screenshot above, we can see two separate products - each with a quantity box for each weekday.
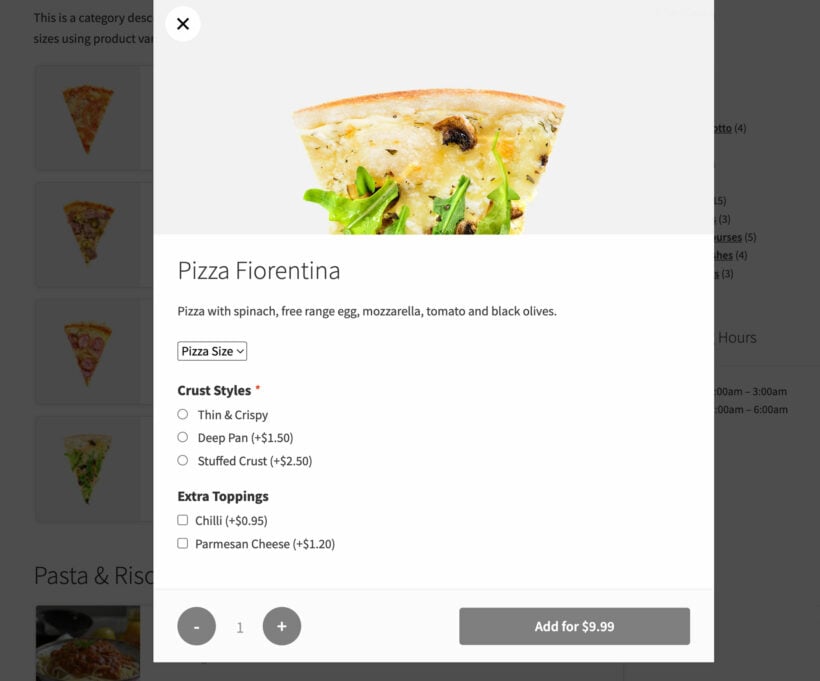
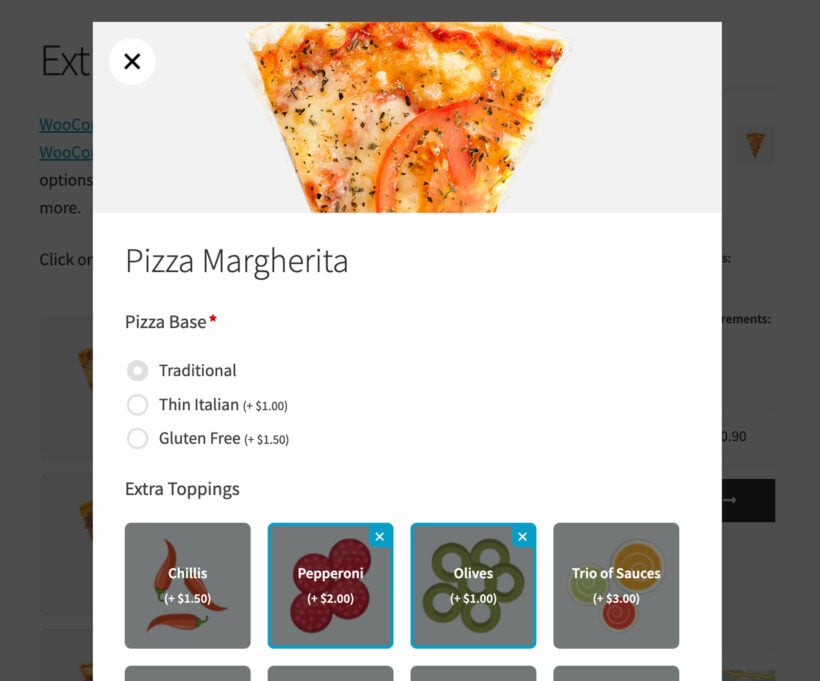
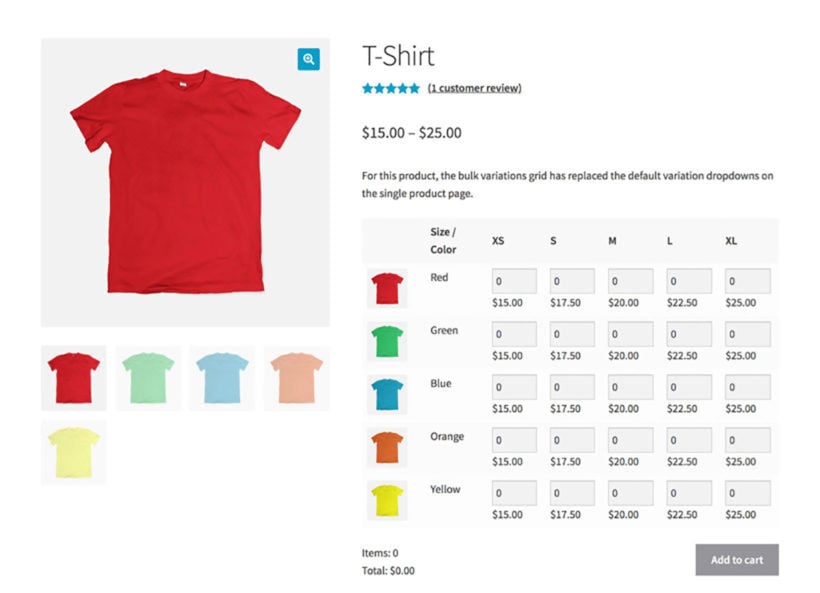
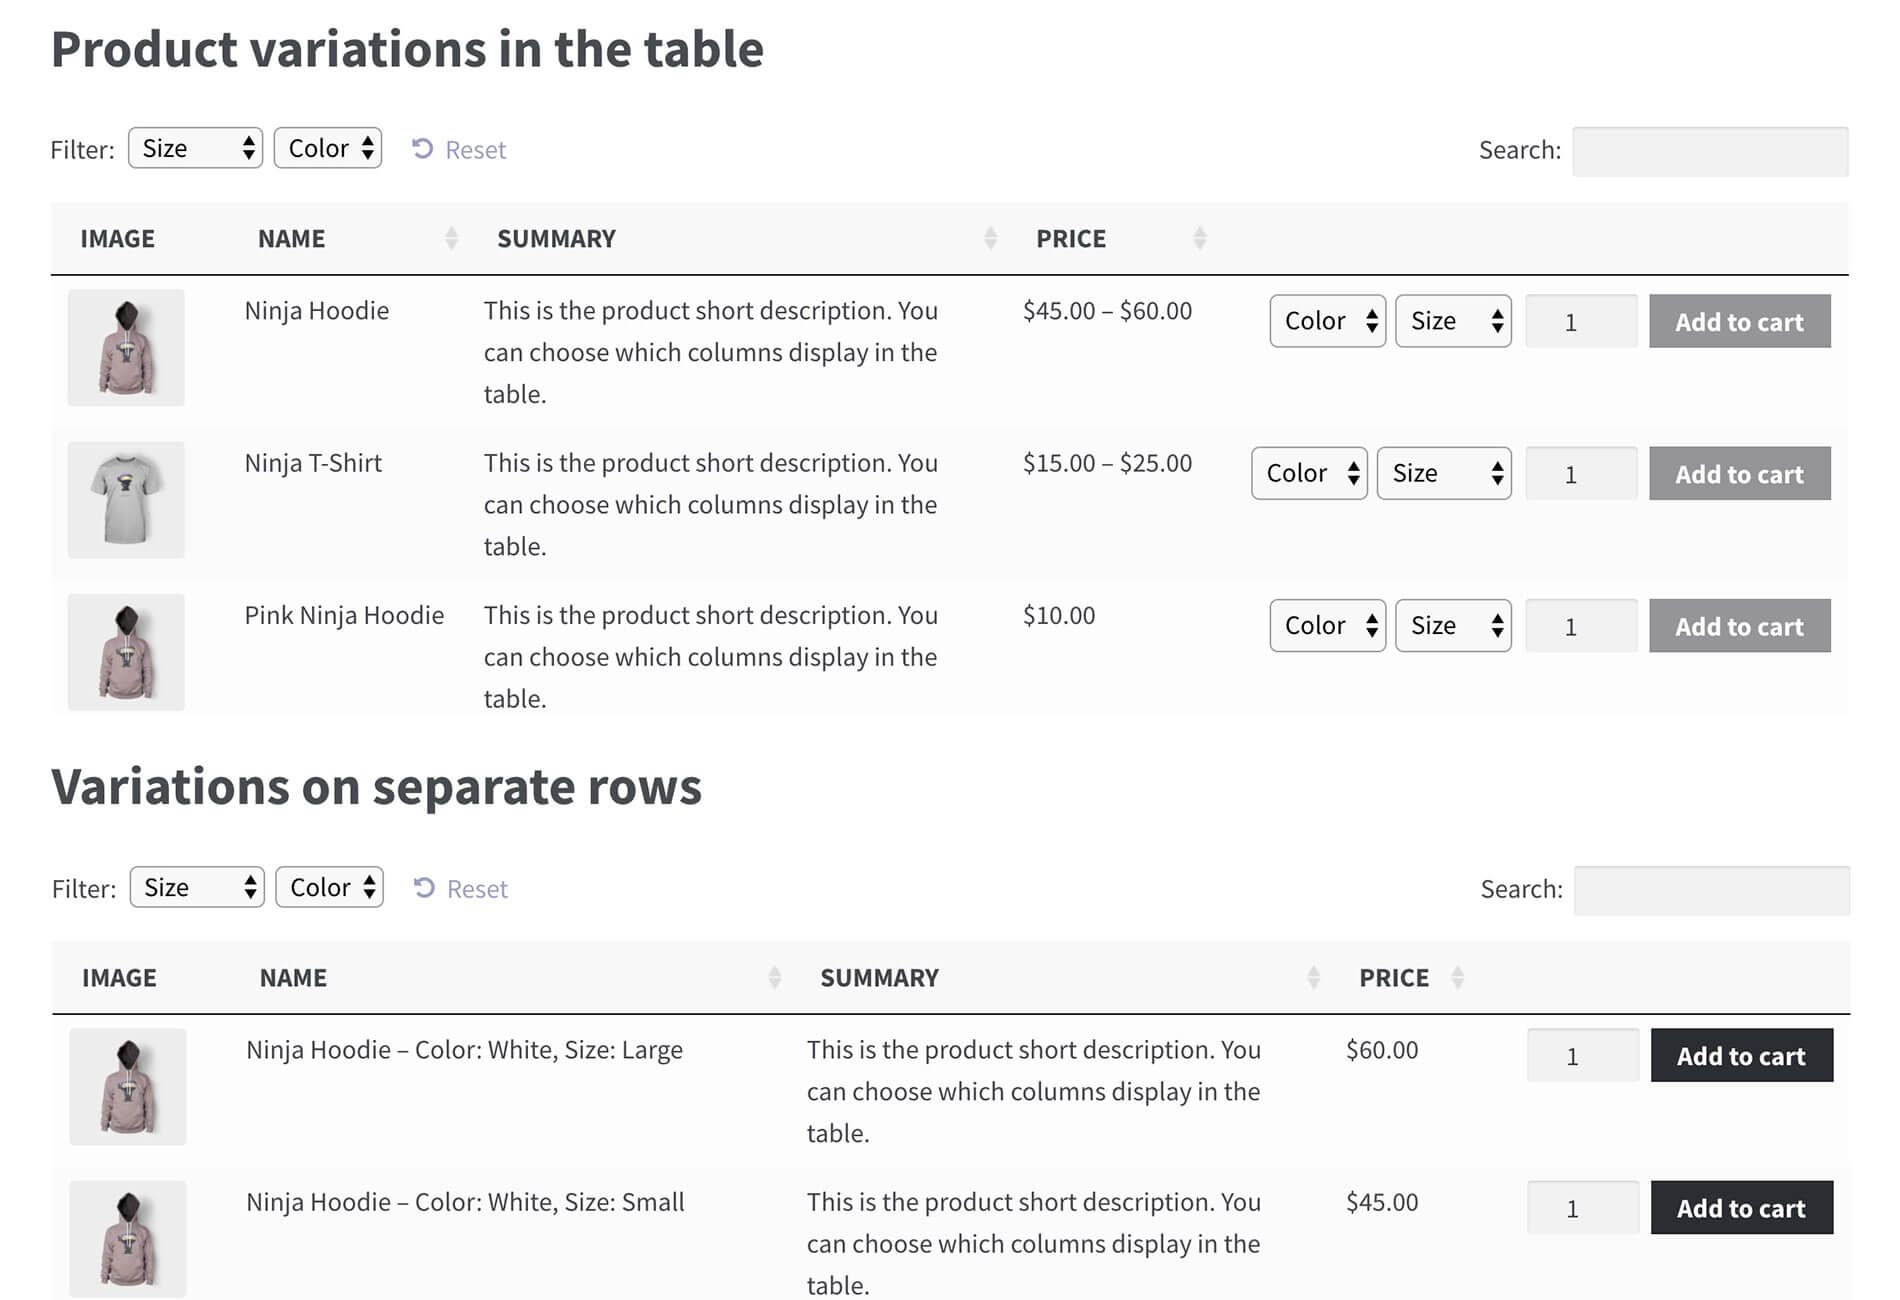
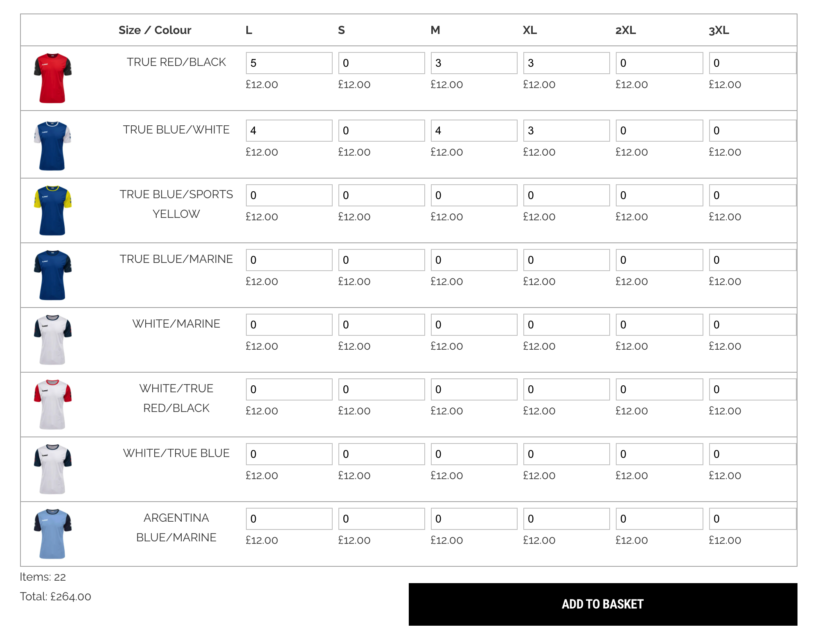
  2. The WooCommerce Bulk Variations plugin, on the other hand, creates a grid showing the variations for a single product. This method works for one-off purchases. It's ideal if you want to set up all the options in the daily order form as variations of a single product. For example, in the 'Method 2' screenshot above, we can see one product with two attributes which are used for variations: one for 'Day of the week', and one for the different food items.

With both approaches, you create the daily order form by adding each food item as a different product or option, and then list them on the front-end each with their own quantity selectors. Customers can enter the quantity they’d like to purchase for each day of the week and place their orders.


Method 1: WooCommerce Product Table

Here, we'll explain how you can create daily order forms using the WooCommerce Product Table plugin. This is perfect for anyone looking to accept one-off orders or offer ongoing subscriptions.

How your WooCommerce daily order form will work

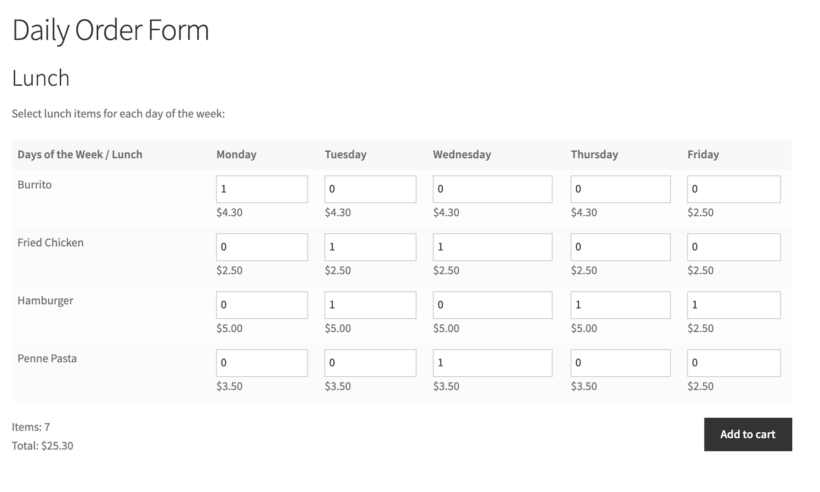
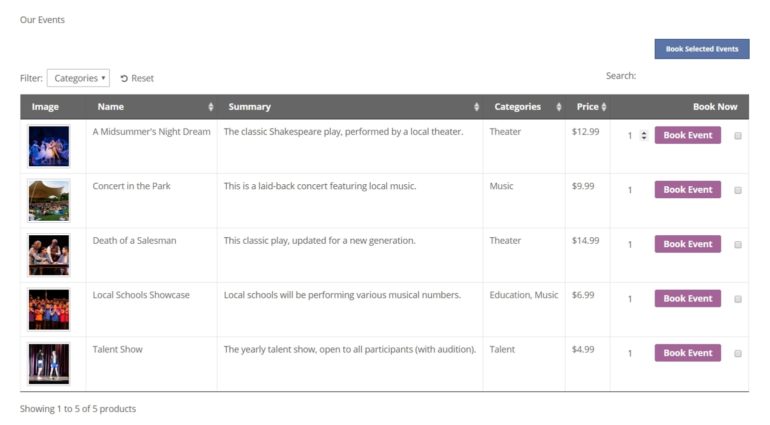
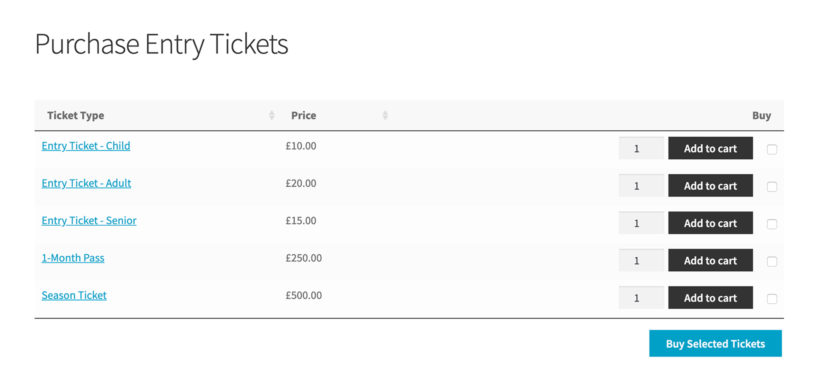
Your order form will feature a separate quantity field for each product for each day of the week. Here's how your customers will use it...

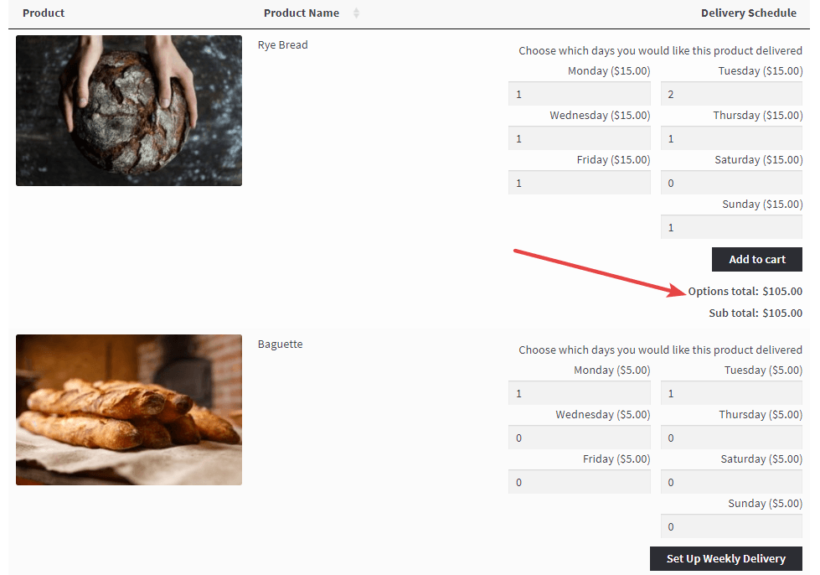
First, they'll use the form to enter the quantity they want for each day. As they add a quantity to each day, the order form will automatically add up the total for their order:

Daily order form totalling up quantities of bread for each day

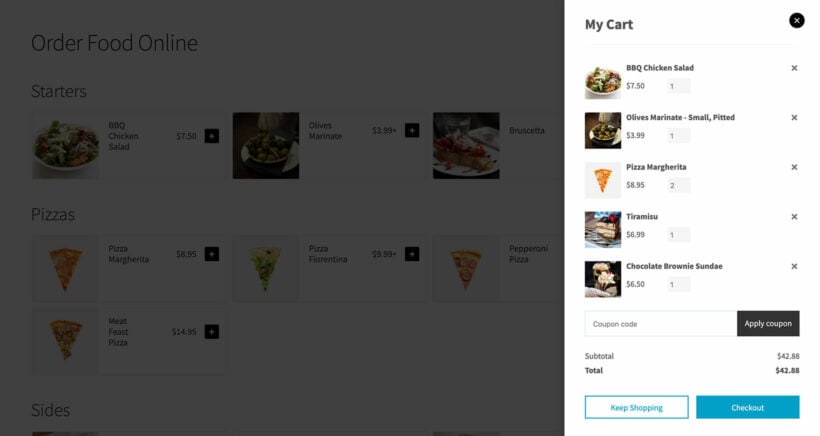
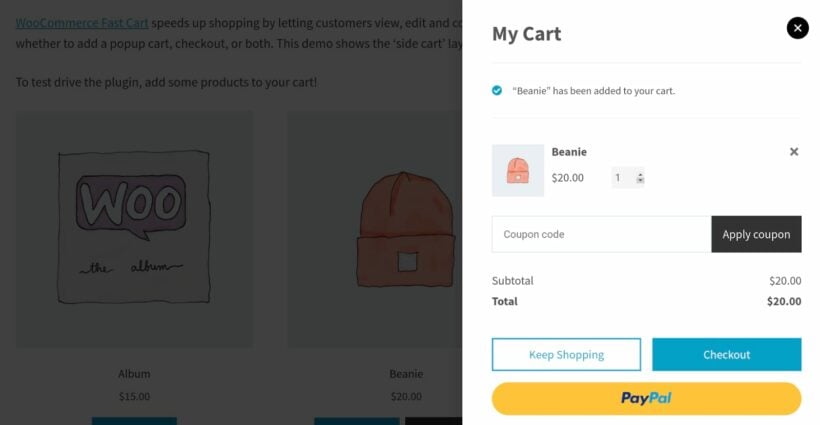
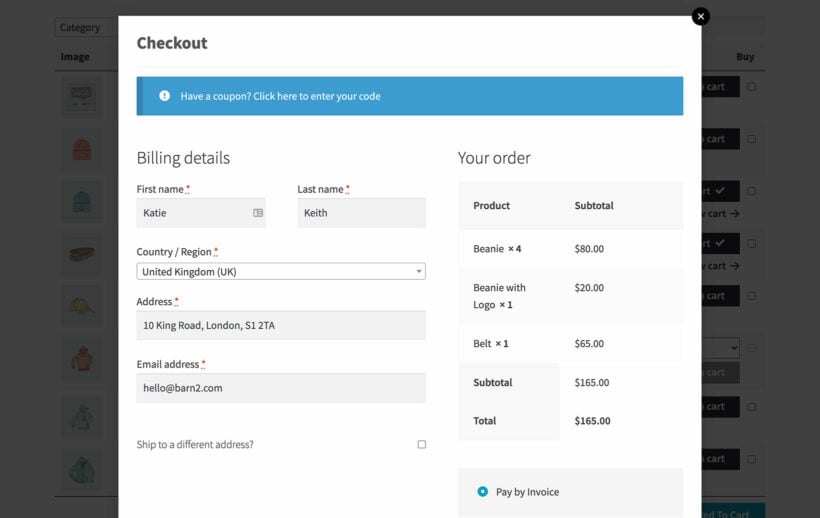
Once they click Add to Cart, or Set Up Weekly Delivery, they'll be able to view their cart. In their cart, they'll see a summary of their order (note the difference between one-off orders and subscriptions):

Cart summary showing the daily order form items and weekly subscription

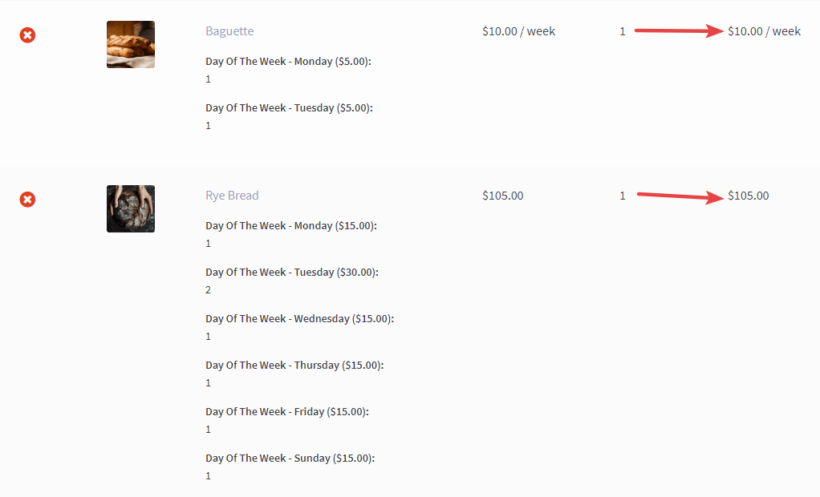
And then they can complete the checkout process as normal.

Next, I'll explain exactly how you can create a weekly order form to take daily orders from your own WooCommerce store. I'll reveal which plugins you need, with full step-by-step instructions on how to set it up.

Let's get started!

How to create a WooCommerce daily order form with multiple quantity inputs

Since this article is about WooCommerce, we'll assume that you already have WordPress and WooCommerce installed on your site.

Beyond those bare minimums, here's what you'll need to create a WooCommerce daily order form:

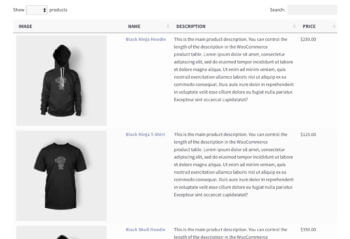
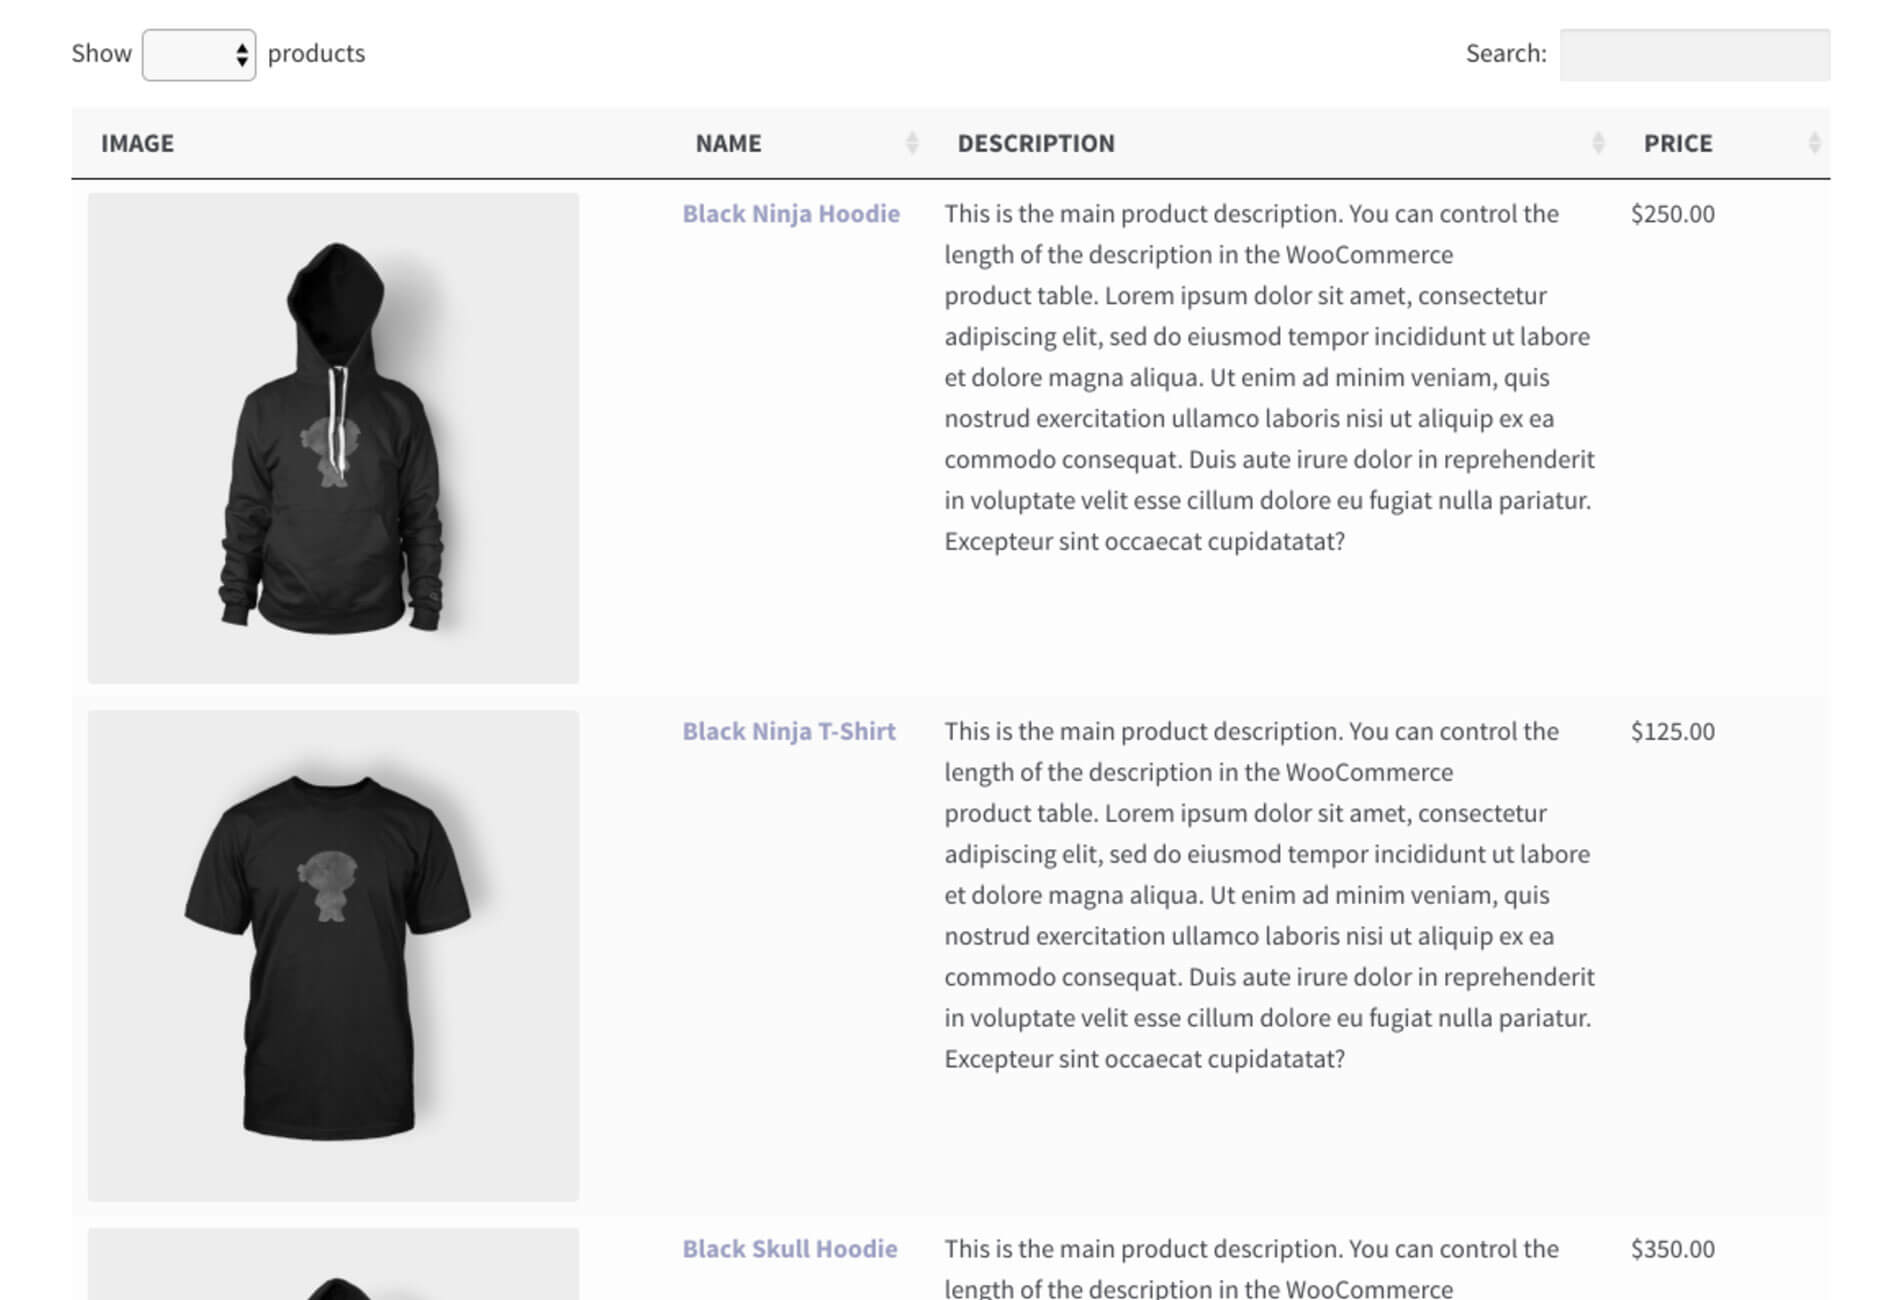
  • WooCommerce Product Table - required This plugin lets you create a flexible table that includes any of your WooCommerce products. It's what you'll use to create the actual order form so that shoppers can see multiple products on one page.
  • WooCommerce Product Add-ons - required You'll use this plugin to create a separate text entry field for each day of the week so that customers can choose a daily quantity for each product.
  • WooCommerce Subscriptions - optional If you want to let customers set up automatic recurring orders, you'll need WooCommerce Subscriptions. But if you're ok with having your customers manually place their order each week, you don't need it.

Now, I'll show you step-by-step how to create the order form the example above. The only thing I will assume is that you already have WooCommerce installed and configured, as well as the required plugins from the list above.

Step 1: Add products and configure them the right way

Ok, the first step is to add your offerings as Woo products and get them properly configured.

To begin, go to Products → Add New as normal. Fill in the core details just like you would any other product. That is, enter the product:

  • Title
  • Image
  • Description
  • Etc.

Once you've filled out all the basic information, it's time to configure the Product data box. This is where you'll need to do things a little differently to make things work.

Configuring the product data box

For this first example, I'm going to show you how to configure things for a one-off order. In the next section, I'll share how to adapt it to subscription orders.

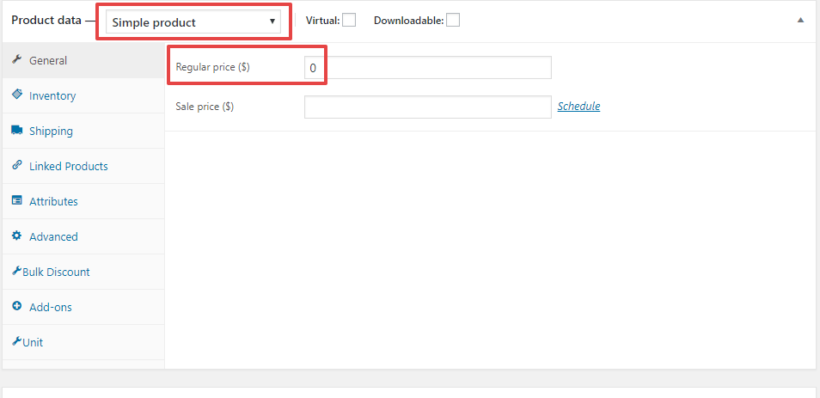
First, choose Simple product from the dropdown. Then, set the Regular price equal to 0. Yes - zero. Don't worry - you'll hide the price column on your order form so that shoppers never see this information:

Setting a simple product's regular price to zero in WooCommerce

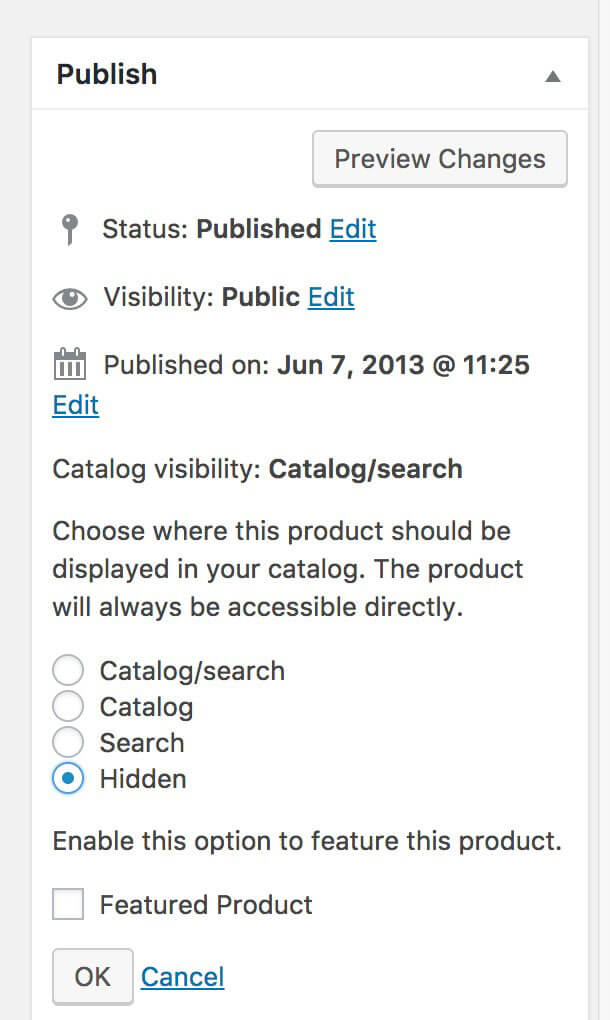
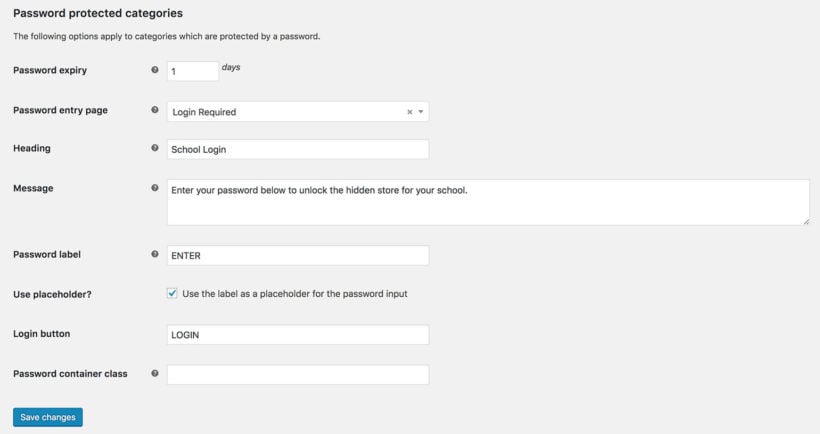
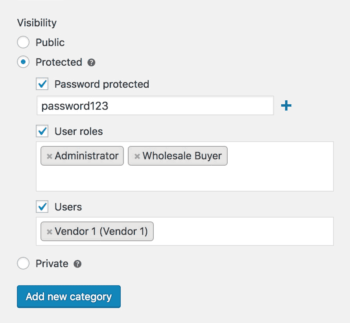
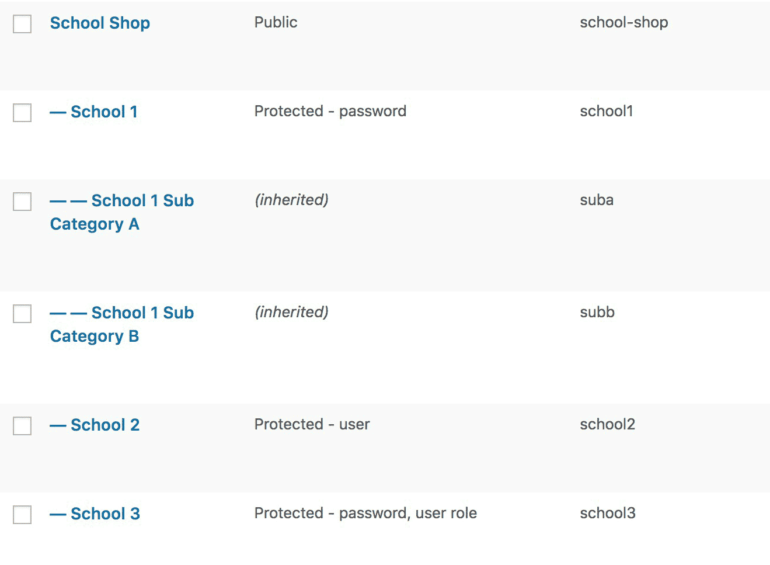
Because you're making the product's price 0, it's important that you don't display the normal WooCommerce catalog so shoppers can't access the 0 price item. Or, if you do still need to use the regular catalog, you can hide these products from the public parts of your store. For example, schools might need to create a private area for taking orders for school dinners. 

Next, go to the Inventory tab and check the box for Sold individually. This will remove the quantity field for the Woo product itself so that your shoppers only see the add-on quantity fields for each day of the week:

Enabling the Sold individually option on a WooCommerce product

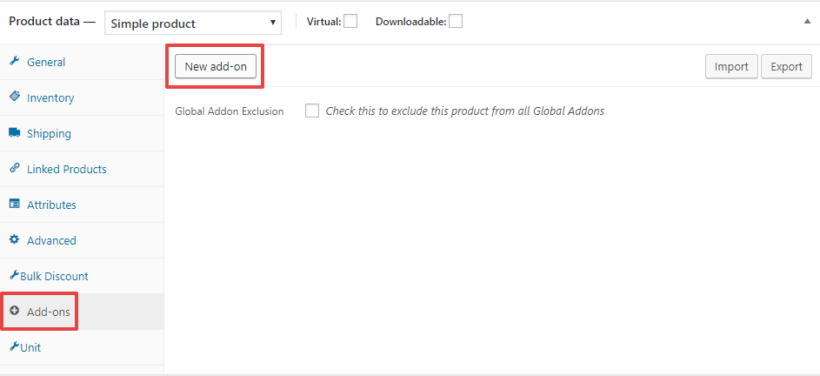
Then, go to the Add-ons tab in the Product data box and click New add-on (you'll only see this tab if you've activated the WooCommerce Product Add-ons plugin):

Adding a new add-on under the WooCommerce product Add-ons tab

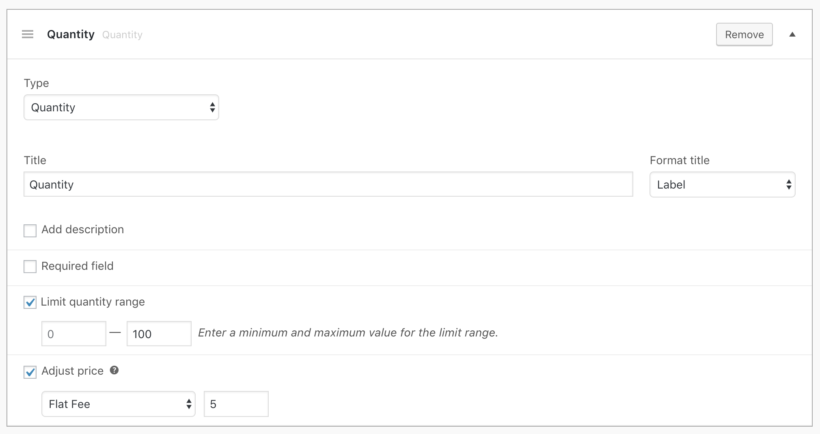
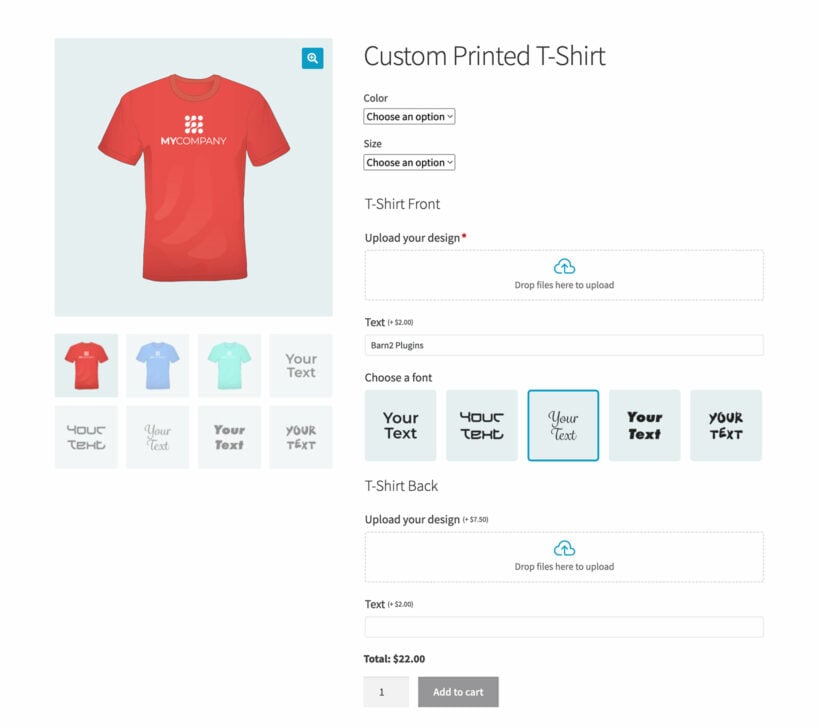
Then, select Quantity from the dropdown and add the price for each item. This will multiple up depending on the quantity selected. So, if the item price is '$5' and the customer selects 2, then the price will be multiplied up to '$10':

Quantity field settings with price multiplied per unit in Product Options

Once you've done that:

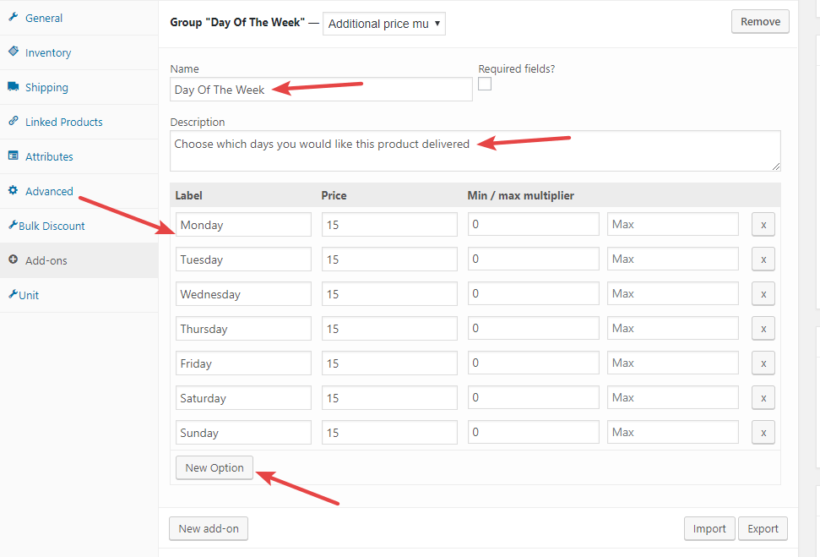
  • Enter something like "Day Of The Week" for the Name (this will display on the checkout page, but not on the weekly order form).
  • Do not check the Required Fields option (unless you want to force customers to purchase this product each day).
  • Enter something like "Choose which days you would like this product delivered" in the Description field. (This message will display on your order form.)
  • Use the New Option button to create an option for each day of the week.
  • Enter the unit price of your item in the Price column for each day of the week.
  • Enter 0 in the Min column for each day of the week.

It should look something like this:

Day of the week add-on options with a price for each weekday

And that's it! Make sure to publish your product. Then, repeat the process for all the items you want to include in your WooCommerce weekly order form.

What if you want people to order on a recurring basis?

If you want to have people sign up for a recurring subscription instead of a one-time purchase for each week, the process is almost identical. You just need to change one thing.

Remember - you will need the WooCommerce Subscriptions plugin to do this.

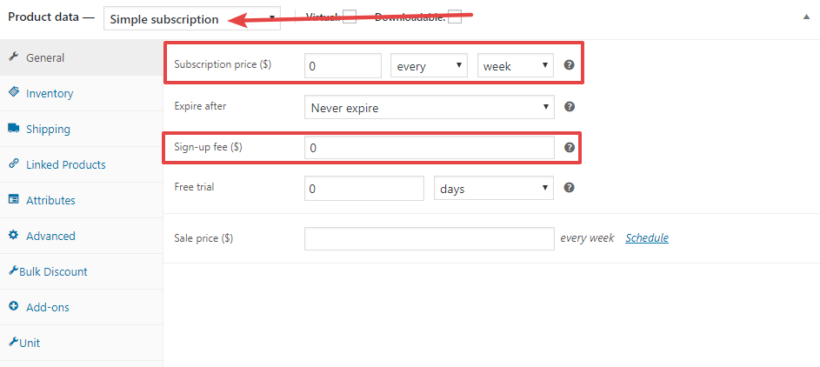
Once you have that installed, all you need to do is change the Product type to Simple Subscription. Then:

  • Enter 0 for the Subscription price (when users choose the day of the week, it will add that price to the subscription charge).
  • Use the dropdowns to choose the duration of the subscription.
  • Enter 0 for the Sign-up fee.

It should look something like this:

Setting a weekly subscription price and zero sign-up fee in WooCommerce

Then, perform the other steps shown in the section above.

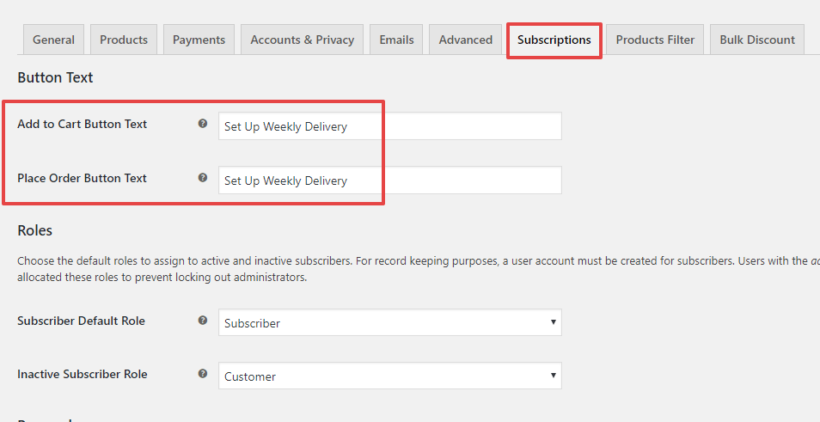
I would also recommend that you go into the WooCommerce Subscriptions text and change the Add to Cart Button Text to something like "Set Up Weekly Delivery", as it will be more user-friendly for your shoppers:

Renaming the subscription button text to Set Up Weekly Delivery

Step 2: Create a daily order form with WooCommerce Product Table

At this point, you've already done the heavy lifting! To finish things out, you just need to create the actual WooCommerce daily order form using WooCommerce Product Table.

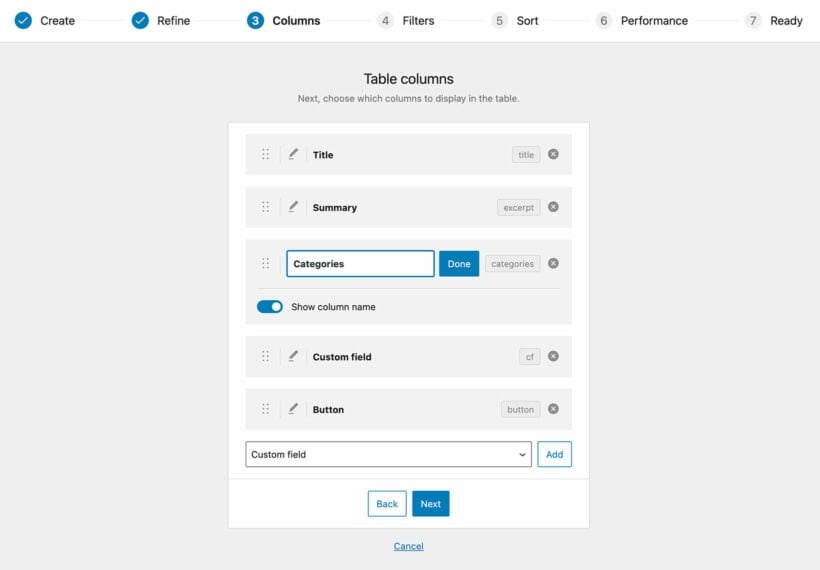
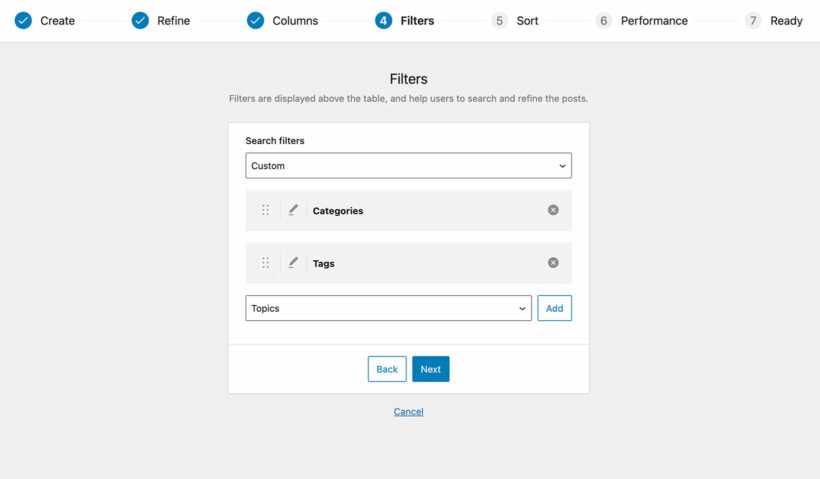
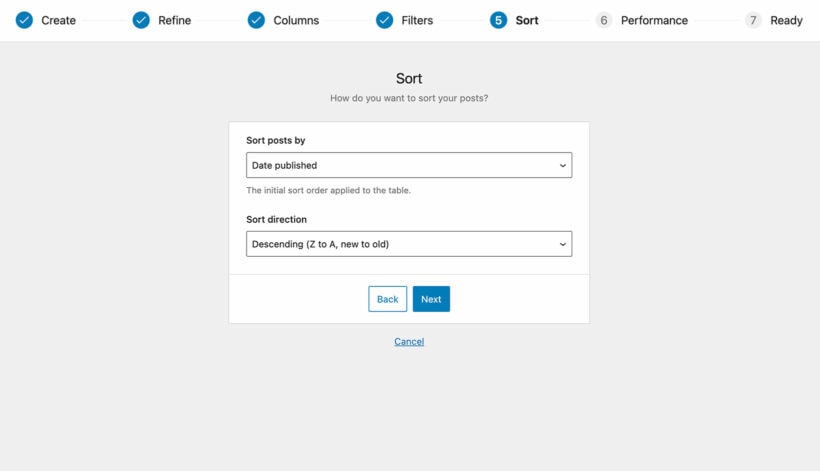
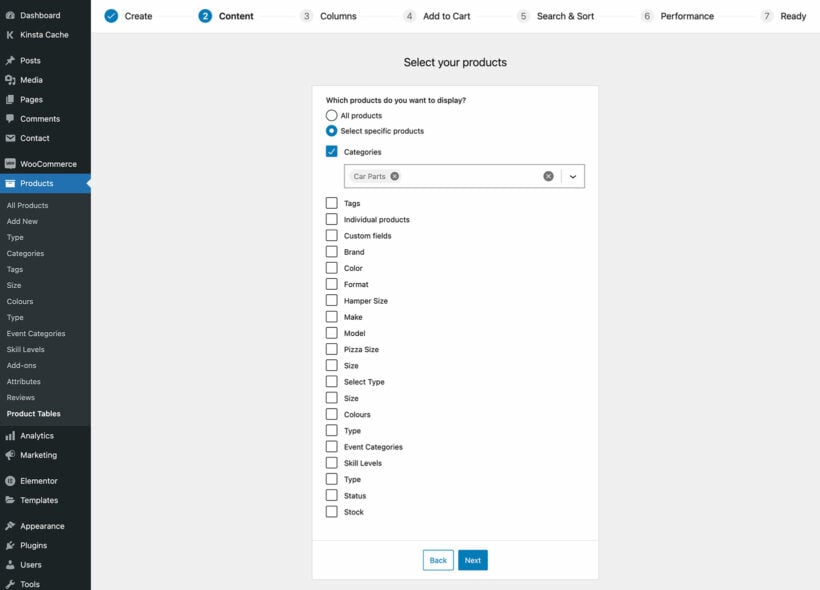
To do that, all you need is create a table and add it to the page. Launch the easy table builder at Products → Product Tables → Add New. Use it to set up your weekday order forms

If you want to divide your order form into different sections, you need to create a separate table for each category. You can then list each one separately on the daily order form page. This is easy to do - just duplicate an existing table and change which products are included.

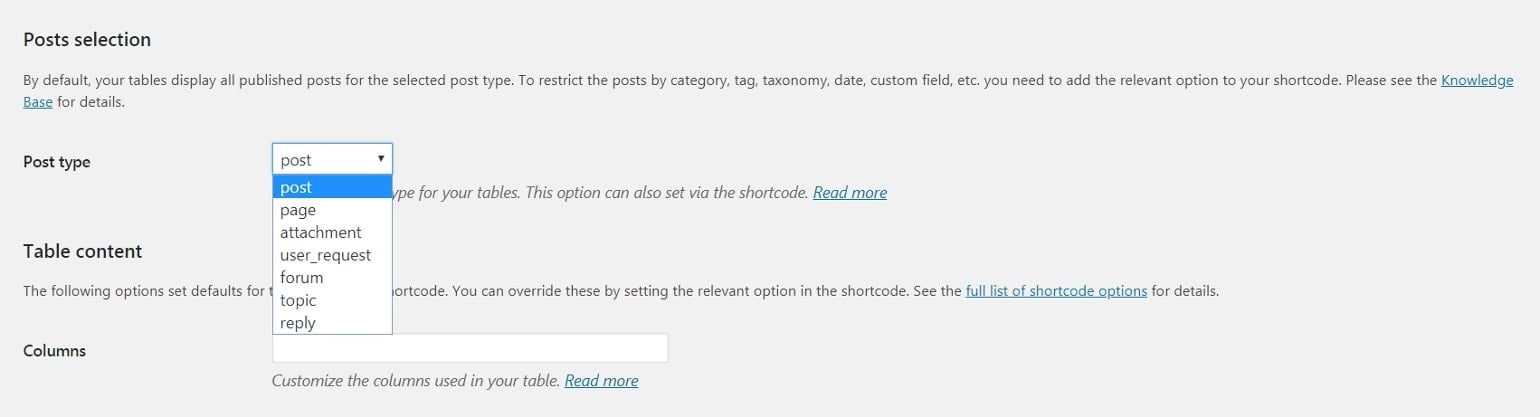
Finally, go to edit the order form page and insert a 'Product Table' block (actually, insert one for each table). If your site doesn't use the WordPress block editor then you can get a shortcode for adding each table instead. Find the shortcode at Products → Product Tables.


Method 2: WooCommerce Bulk Variations

Here, we’ll show you how to create a daily order form using the WooCommerce Bulk Variations plugin. This is perfect if you’re looking to create an order form for one-off purchases.

How your WooCommerce daily order form will function

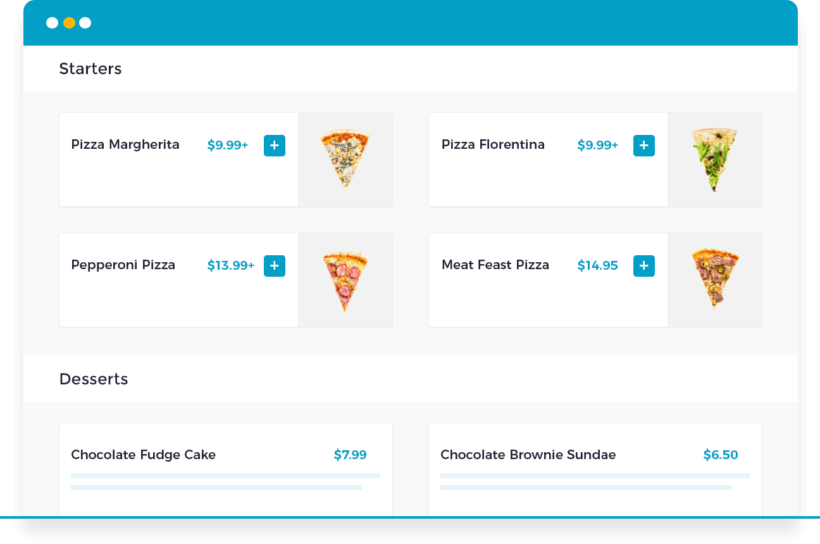
Customers can use the quantity selectors to enter the quantity they require of each attribute or variation. Once that’s done, they click the Add to Cart button to add the selected product variations in the correct quantities to their shopping cart and place their order.

Daily order form grid showing lunch items for each day of the week

Displaying product variations in a grid layout simplifies the user flow allowing users to quickly place their orders.

How to create a WooCommerce daily order form for one-off purchases

For this tutorial, we’ll assume you already have the WooCommerce plugin installed on your website. Aside from that, you’ll need to get the WooCommerce Bulk Variations plugin and install it on your website. This plugin lets you display product variations in a user-friendly grid layout. It also makes it easier to manage and edit variations in the WordPress admin.

Step #1: Create product attributes

The first thing you need to do is create attributes. Head over to ProductsAttributes from the WordPress admin panel to get started. Since we want to create a daily order form, we’ll create two attributes – Lunch and Days of the Week. If you offer breakfast and dessert options then you can create an attribute for that, as well.

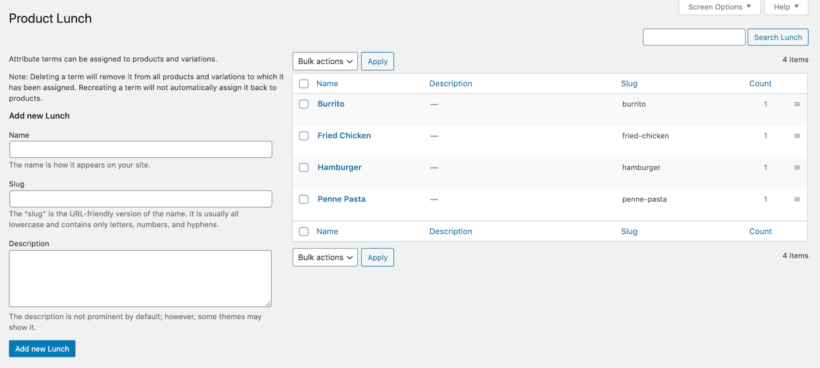
Once that’s done, configure the terms for both attributes. For Lunch, you’ll need to add the food items you want to offer as lunch meals as individual terms. It will look something like this:

Lunch meal options added as attribute terms in WooCommerce

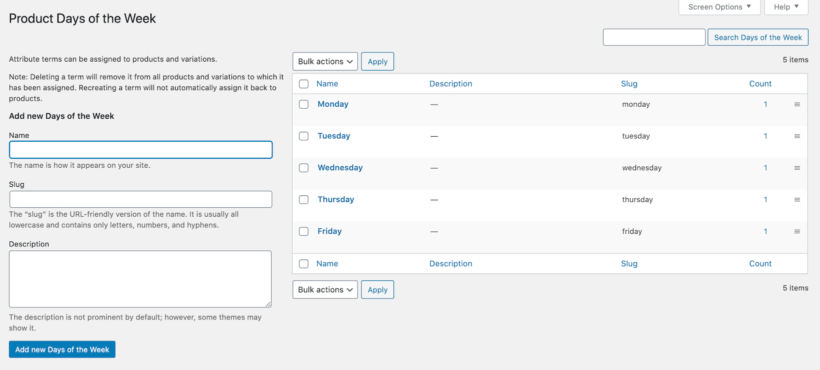
Similarly, configure the terms for the Days of the Week attribute. Add the days of the week you will deliver food on.

Days of the week added as attribute terms in WooCommerce

Step #2: Add a new WooCommerce product

Create a new WooCommerce product for presenting the different meal options for lunch. You might call it something like Lunch Menu. Scroll down to the Product data section and select the Variable product option using the dropdown.

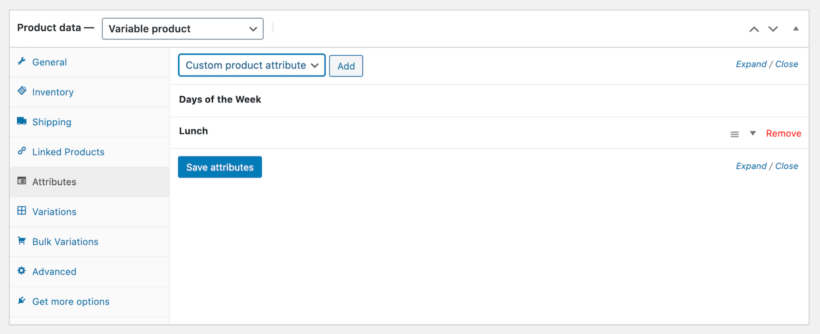
Click on the Attributes tab and add both the Lunch attribute and the Days of the Week attribute. Click the Save attributes button to proceed.

Lunch and Days of the Week attributes added in the product data tab

Next, go to the Variations tab and use the dropdown to select the Create variations from all attributes option. Click the Go button.

You’ll notice that all of the product variations will be added automatically. You can expand each variation and enter a price for each food item. You can also offer special pricing on certain days of the week. For example, you can offer all meals for a special price on Fridays only. This is a great way to boost orders.

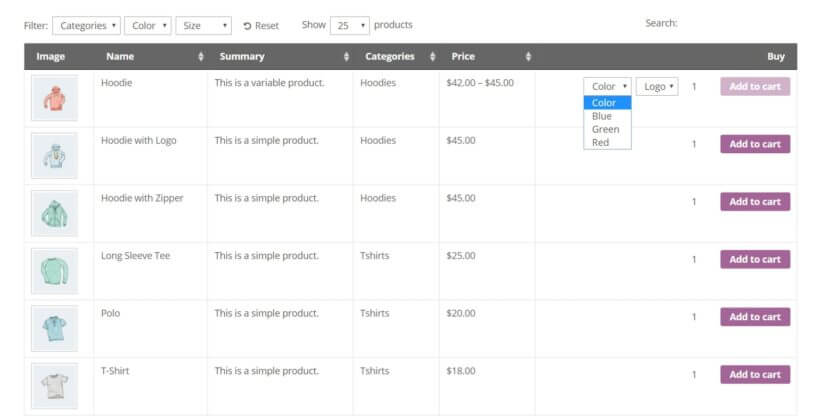
To apply the same pricing and other data to multiple variations at once, you can use the bulk management features in WooCommerce Bulk Variations:

  1. Use the 'Filters' bar to select the variations you want to edit together. For example, select the 'Friday' attribute if you want to add the same price for all meals on a Friday.
  2. Next, use the 'Add variations' dropdown above the filters bar to apply the bulk actions.

Step #3: Configure bulk variations settings

Click on the Bulk Variations tab to configure the WooCommerce Bulk Variation plugin's settings for the product.

Bulk Variations settings with days of the week and lunch axes

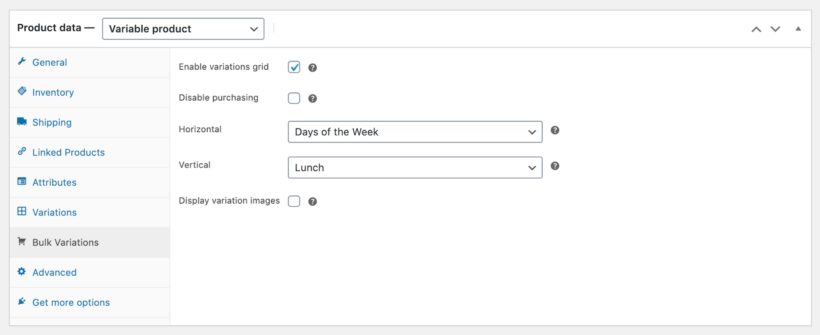
Tick the checkbox next to the Enable variations grid option. Set the Horizontal option to Days of the Week using the dropdown and Vertical to Lunch.

Step #4: Display the WooCommerce daily order form on the front-end
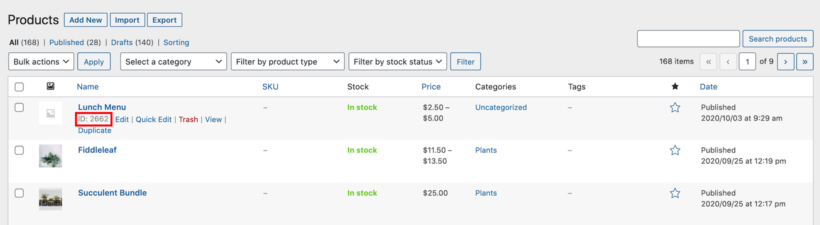
Head over to PagesAdd New from the WordPress dashboard to create a new page and give your page a title. Next, use the shortcode [bulk_variations include="2662"] to add the WooCommerce product you created in Step #2 to your order form. Simply replace 2662 with the product ID of the WooCommerce product you created.

Finding the product ID for the lunch menu in the WooCommerce products list

This will generate a grid showing the variations for the lunch product on the front-end.

Front end grid showing lunch variations for each weekday

If you want to let customers place orders for breakfast items or desserts, then you can add shortcodes for their corresponding WooCommerce products in the same way.

Bonus - Set min & max quantities

Sometimes, you need to control how many items your customers can select from the daily order form. For example, if you're using it to take orders for staff lunches, then there may be a limit to what's included.

You can easily do this by installing the WooCommerce Quantity Manager plugin. Use it to add minimum and/or maximum quantities to the products in the daily order form.

Create your WooCommerce daily order form today!

By using multiple quantity fields for each day of the week, you can make it easy for customers to order different quantities depending on the day of the week.

For one-off weekly orders or on-going subscriptions, all you absolutely need is WooCommerce Product Table and WooCommerce Product Add-ons - plus WooCommerce Quick View Pro, if required. And if you want to enable recurring orders, then you can add WooCommerce Subscriptions.

Alternatively, you can use the WooCommerce Bulk Variations plugin to create a grid showing the variations for a single product.

Have any other questions about implementing a WooCommerce daily order form like this? Let us know in the comments!

Phone showing a restaurant takeaway menu built in WooCommerce

If you run a pizza delivery, Chinese, Indian, or other types of fast food restaurant, you know how important a quality takeaway ordering system is. A huge variety of paid services exist to help you accept takeaway orders. But if you're looking to cut costs, consider using a WooCommerce takeaway plugin for your WordPress site. This plugin allows you to handle everything in-house and avoid paying commissions to third-party platforms.

If you've peeked at a third-party takeaway service like Uber Eats or Grub Hub, then you've probably seen that using one of those tools will cost you at least ~$100 per month, plus a hefty setup fee. For example, ChowNow costs $149 per month plus a $399 setup fee for every single location. Yikes - hopefully you're selling a lot of takeaway food!

If you run a restaurant with a takeout business - e.g. pizza shops, sandwich shops, etc. - you need a better option. It must be convenient for your customers, and profitable for your takeaway restaurant.

To make that happen, we're going to show you how to use the WooCommerce Restaurant Ordering plugin to create your own WooCommerce takeaway plugin setup with no monthly fees or commission to pay. You'll have full control to customize it, and it costs a fraction of what you'd pay for ChowNow's setup fee alone. In the end, it will look something like this:

WooCommerce takeaway ordering system demo with a menu grouped by category and a live checkout sidebar

Example of a WooCommerce online takeaway ordering system

Importance of having a restaurant takeaway ordering system

Having a restaurant take away system is crucial for any restaurant that wants to offer takeout or delivery options services. It allows customers to browse the food menu, place their order, and pay online, all from the comfort of their homes or office. Here are some reasons why having a restaurant take away ordering system is important:

  1. Convenience: Customers can place their order whenever they want, without having to wait on hold or in a long line. They can also choose to pick up their order at the restaurant or have it delivered to their door.
  2. Increased Sales: A take away system can help increase sales for restaurants by making it easier for customers to order food. Customers are more likely to order online than over the phone, which can lead to more orders and higher revenue.
  3. Order Accuracy: With a take away system, there is less room for error when taking orders. Customers can select their items and customize them as they like, which reduces the chance of miscommunication or mistakes.
  4. Customer Loyalty: Offering a convenient and efficient ordering experience can help build customer loyalty. When customers have a positive experience, they are more likely to return to the restaurant and recommend it to others.
  5. Data Collection: A take away system can also provide valuable data to the restaurant, such as popular menu items, peak ordering times, and customer feedback. This information can be used to improve the restaurant's menu, marketing, and overall operations.

Using WooCommerce to create a restaurant takeaway ordering system

By using WooCommerce takeaway plugin, You can take advantage of its robust features, customization options, and flexibility to build an online food ordering system tailored to their specific needs.

It offers a wide range of features that make it easy to manage orders, track inventory, accept different payment gateways, and even set up shipping options. This means that restaurant owners can have all the tools you need to manage you online ordering system in one place.

Restaurant owners can also easily customize your online ordering system to match your brand and the specific needs of your business. You can choose from a wide range of templates and themes to create a unique look and feel for your online ordering system. You can also add custom fields to your order forms to collect specific information from customers, such as dietary restrictions or special requests.

All you'll need is a WordPress website and the WooCommerce takeaway plugin. And the best news is that it only takes a few minutes to set up your WordPress takeaway order system!

What you need for a WooCommerce takeaway system, plus how much it will cost

WooCommerce takeaway ordering page in a two-column grid layout showing pizza and dessert items with add buttons

To create a successful WordPress takeaway order system, there are a few tools you'll absolutely need. There are others that are optional and can help you refine how the WordPress takeaway plugin functions.

On the must-have front, you'll need:

  • WooCommerce - free WooCommerce will handle organizing your different menu items. It can also let you accept online payments if desired. But, most people will probably pay for take away orders in person anyway, so you can skip the payment functionality if you want to accept payments in person.
  • WooCommerce Restaurant Ordering - premium By default, the way WooCommerce displays items isn't good for a takeaway menu. The WooCommerce Restaurant Ordering plugin fixes that by listing your entire takeaway menu on one organized page, divided by food category. It also has other essential features such as setting delivery times and preventing customers from ordering while you're closed.

Those two WordPress restaurant plugins comprise the core of your WordPress takeaway plugin stack. Later in this article, I'll tell you about some extra plugins you might like for adding extra features such as opening hours, delivery slots, and automatic order printing.

Here's how to put it all together…

How to create a WooCommerce takeaway order system

Below, you'll find a full written tutorial about how to take fast food orders online with WordPress takeaway plugin or WooCommerce takeaway plugin. Alternatively, watch this video and watch me set it up in 10 minutes, or sign up for my free online course for restaurants.


You can divide the process into three rough steps:

  1. Adding your menu items to WooCommerce
  2. Creating your takeout order menu with WooCommerce Restaurant Ordering
  3. Extending your WooCommerce takeaway system with other plugins (optional)

Step 1: Add your menu items as WooCommerce products

To get started, make sure you've installed and activated the free WooCommerce takeaway plugin, as well as configured basic information using the plugin's setup wizard. During the setup wizard, either follow the onscreen instructions to set up PayPal or Stripe (credit/debit card) payments, or just choose 'Local Pickup' and have customers pay when they pick up their order at the restaurant or curbside.

Once you have WooCommerce running, you'll need to add each item on your menu as a WooCommerce product.

To do that, go to Products → Add New in your WP dashboard. Because WooCommerce is a general ecommerce plugin, not all of the settings here will apply to your takeaway order system.

Essential product data
  • Title - the name of the food item as it appears on your menu.
  • Long description (optional) - the full description of that menu item if you want to display extra text in a lightbox popup for each product.
  • Product data - this is where you'll add the price and, if needed, let people customize the dish with their own toppings, substitutes, etc. (more on this in the next section).
  • Short description (optional) - if you want, you can create a separate shorter description that will appear on the fast food ordering system page.
  • Category - this helps you divide your menu into different categories. For example, you could have one category for "Pizza", another for "Subs", etc.
  • Image (optional) - the image for your menu item. Make it as mouth-watering as possible!
  • Publish - once you finish configuring everything, you click this button to save your menu item and make it live.

Once you're done, you'll need to repeat the process for all of your takeaway food items. And you can also give your customers options, which we'll talk about next...

Use product variations or add-ons to let shoppers customize their food choices

You'll probably have some menu items where your customers get to pick different toppings or sizes as part of their takeaway orders. Or, you might even have items where a customer needs to pick both.

For example, if you're setting up a WooCommerce pizza ordering online, then customers will want to:

  1. Choose what size pizza they want
  2. Add their own toppings (for an extra cost)

To give customers the power to customize their own orders, you can use two more options called variations or add-ons:

  • Variations - variations are good for core options - like a food item's size. Variable product are built into the free WooCommerce plugin.
  • Add-ons - product add-ons are better for upgrades - like toppings to add on to a pizza. You'll need the official Product Options plugin to add these extra options to your takeaway meals.

You can see the difference between variations and add-ons in the screenshot below:

Takeaway pizza order showing the difference between variations and add-ons

Step 2: Create your WooCommerce takeaway order form with the Restaurant Ordering plugin

Once you've added all of your takeaway food items as WooCommerce products, you need a user-friendly way to display them. This makes it easy for your shoppers to browse your entire takeout menu and build their order without needing to click around to different pages.

That's where WooCommerce Restaurant Ordering comes in. It will let you:

  • Display all of your menu items in one list, divided by category (just like your printed takeaway menu!).
  • Control exactly what information displays, like product images, descriptions, and so on.
  • Prevent customers from ordering outside of your opening hours.

And your customers will be able to:

  • Customize menu items
  • Add all the food they want to their cart without leaving the page

To get started, make sure you've purchased and installed the WooCommerce Restaurant Ordering plugin:

Configure the takeaway order form

When you install WooCommerce Restaurant Ordering, it instantly creates a food ordering page listing all your products. The page is structured by category.

You can customize this page on the plugin settings page. For example, you can choose which information to display about each food item, and change the order form layout to 1, 2, or 3 columns.

WooCommerce takeaway ordering page with different food categories using a table, list and two-column grid layout
WooCommerce Restaurant Ordering provides flexible layouts for your takeaway order forms

For even greater flexibility, the takeaway plugin comes with a shortcode that you can use to add different food order forms anywhere on your restaurant online store. This is handy if you want each category to be displayed differently, or on different pages.

Customers can click on each food item to add it instantly to the cart, or if you prefer then they can open up a lightbox to view more information, select options and add to the cart from there.

Takeaway order lightbox showing pizza size and crust options with extra toppings checkboxes and an add-to-order button
Customers can learn more and choose options from a product lightbox

Add a cart to the takeaway ordering page

Most online takeaway order forms show the contents of your cart on the page.

While you could add a sidebar to the page and add the standard 'Cart' widget, this wastes valuable real estate. Most takeaway food order forms look best if they take up the full width of the page. Installing WooCommerce Fast Cart is a better solution.

A fast cart pops up on the page - either automatically, or when the customer clicks on the floating cart icon. Either way, hungry shoppers can quickly review their selections, pay and order takeout food without leaving the page.

WooCommerce restaurant floating cart
Use WooCommerce Fast Cart to add a popup cart to the takeaway ordering page

Add any type of extra options using WooCommerce Product Options + filter plugin

You can create a seamless restaurant takeaway ordering system with the help of two WooCommerce plugins. The WooCommerce Product Options plugin is the perfect choice for adding extra options to restaurant menu items, with the ability to create and manage customizable product options in various formats, including checkboxes, radio buttons, clickable images, and text boxes. It works by adding groups of options globally to selected products or categories, streamlining the process of creating combinations of options, and eliminating the limitations of creating variations.

WooCommerce takeaway plugin quick view with pizza base and topping image button options

In addition, the WooCommerce Product Filters plugin can enhance the browsing experience for customers by allowing you to create filters for menu items based on categories like appetizers, entrees, desserts, or dietary restrictions like gluten-free or vegetarian. The plugin offers the flexibility to create multiple filter layouts, including display filters above the list of products or as sidebar widgets, with filter visibility options and mobile-friendly slide-out panels.

WooCommerce restaurant plugin with filters
Add filters with WooCommerce Product Filters

With the ability to customize the filter styles and layouts, you can create a seamless ordering experience that matches your restaurant's branding and WordPress site design. Together, these two plugins can help you create a streamlined and efficient restaurant takeaway system like a WooCommerce pizza ordering system.

Step 3: Extend your Woo ordering system (delivery slots, order notifications to the kitchen, etc.)

At this point, you have a working WooCommerce takeaway ordering system. But there are still a few potential problems:

  • People will always receive their takeout order as soon as it's ready - they can't schedule an order in advance.
  • You have to pay attention to your email or refresh the website to see when a new takeaway order comes in.

To refine your WooCommerce takeaway system's functionality and fix some of these issues, you can optionally use some of the plugins we discussed earlier to change how things work.

Again, consider:

  • Twilio SMS Notifications to receive SMS notifications whenever a customer places a new takeaway order. Or, optionally, to send automatic SMS notifications to customers when their order is ready to be picked up.
  • WooCommerce Automatic Order Printing prints takeaway orders direct to the kitchen.
  • If you have a smartphone or tablet, you can also install the free WooCommerce iOS mobile app. This app allows you or your staff to mark orders as fulfilled when the customer picks the order up without needing to hop on your computer.

Bonus: Increase your average order value by taking tips on your WooCommerce takeaway website!

When you accept takeaway orders online via WooCommerce, it's easy to miss out on tips. This is because ordering and paying in person is personal and people are in the habit of adding a tip to their order. To increase the average order value from your takeaway restaurant customers, you need to replicate this on your website.

Fortunately, you can do this using the WooCommerce Donation Or Tip On Cart And Checkout plugin. It adds a 'Tip' field, pre-filled with a suggested tip amount, to the checkout page. This is a great way to increase your revenue and accept tips from your online takeaway orders.

Save money with this WordPress takeaway plugin stack today

By creating a WooCommerce takeaway system, you both gain the flexibility to create a truly custom takeaway order system and bypass huge setup fees and monthly fees for other restaurant ordering systems.

That means happier customers and a better bottom line for your restaurant! Whether you need a WooCommerce pizza ordering and food delivery system or automated ordering for Chinese fast food, it's the perfect solution.

Get started today with WooCommerce and WooCommerce Restaurant Ordering.

If you want a more in-depth look at any of the topics we touched on in this post, be sure to read our complete guide to creating a restaurant ordering system with WordPress takeaway plugin.

If you use WordPress.org to build your website, one of the things you’ll benefit from is its inherent flexibility. In other words, you can use WordPress to do a lot of things that aren’t apparent at first glance. This includes the ability to create a forum for your website or online community.

WordPress is a powerful platform, but creating a forum in WordPress requires extra tools. The platform doesn't come with built-in forum functionality. However, with the right tools, you can create a functional and attractive forum on your WordPress site. One of the easiest methods for how to create a forum page in WordPress is to use the Posts Table Pro plugin. This WordPress forum plugin allows you to organize your forum threads, topics, and replies in a table layout, making it especially easy for your users to navigate.

Different ways to create a forum with WordPress

There are two main methods you can use when you want to know how to create a forum page in WordPress. The first method involves using basic WordPress features such as custom post types, custom taxonomies, and custom fields to create the necessary components for your forum. The second method involves using a dedicated WordPress forum plugin such as the BuddyPress or bbPress plugin. Both methods have their pros and cons, but the Posts Table Pro plugin is a versatile solution that improves the presentation of your forum with either method.

A cooking forum thread list displayed in a sortable table

How to add a forum to WordPress

In this tutorial, we will show you two ways to create a search engine-optimized (SEO-friendly) forum using Posts Table Pro. But first, let's explore the reasons why you might want to create a forum in the first place.

Online forums are a great way to create a community around your website or business. They allow you to engage with your audience, provide them with a platform to share ideas and feedback and offer them valuable resources. Moreover, forums can help drive traffic to your site, increase engagement, and boost your SEO efforts by providing fresh and relevant content. Add a forum to WordPress with Posts Table Pro, and you can organize and display all your forum threads, topics, or replies in an easy-to-use table format.

Advantages of a WordPress forum

Online forums such as StackOverflow and Quora have been an integral part of the internet for quite some time now. Despite newer social networks and social media tools taking over the internet, forums are still very much relevant today. They also offer a unique platform for users to interact, ask questions, share knowledge, and build a sense of community around a particular topic or niche.

With forums, users can easily search for and find answers to specific questions or topics and especially engage in discussions with other like-minded individuals. They also provide a space for users to express their opinions, share their experiences, and learn from others.

The Photoshop Gurus community forum homepage

What are the benefits of adding a forum to my WordPress site?

While social media platforms have replaced forums in some areas, they remain useful in a variety of website types. Below are some reasons why you may want to consider creating a forum for your WordPress website:

  • Forums enable you to communicate directly with your site’s users through a message board (also called a discussion forum). You can answer their questions, provide advice, solicit opinions, and even just chat.
  • In addition, forums let your community members interact with each other. They can form connections, help one another out, and build a sense of community.
  • If you provide products or services, you can even create a support forum so customers can get help quickly.

When it comes to learning how to create a forum website with WordPress, the platform itself is a great option to consider. Not only is it beginner-friendly, but it's also a powerful platform that can handle a wide range of needs. Moreover, if you want to add features that aren't built into WordPress, you can use plugins to get the job done.

Can I create a forum in WordPress without a plugin?

Creating a forum in WordPress without a plugin is possible, but it requires some technical knowledge and coding skills. It involves creating a custom post type, custom taxonomies, and custom templates to display the forum threads and replies. This method is more time-consuming and may not be the best forum plugin for WordPress, especially for those who are new or don't have experience with coding.

Alternatively, you can use a plugin like Posts Table Pro to add a forum to WordPress quickly and easily. This plugin allows you to display posts, pages, or custom post types in a table format, making it ideal for displaying forum threads. Additionally, you can customize the table to include specific columns, search and filter options, and more. With Posts Table Pro, you can have a fully functional forum up and running in no time.

How to create a forum in WordPress using Posts Table Pro (2 methods)

While there are several dedicated plugins that can help you create a forum on the WordPress site, many of them offer only limited customization options. If you want more control over how your forum looks and functions, you may want to consider using the Posts Table Pro plugin.

Posts Table Pro allows you to create custom tables to display your forum topics and replies in a way that's easy to navigate and visually appealing. With this plugin, you can customize the layout, columns, and filters to create a forum on WordPress that meets your exact needs. Whether you're creating a forum for your online community or for customer support, Posts Table Pro can help you create a more user-friendly and engaging experience for your visitors.

How Posts Table Pro can help you create an easy-to-navigate forum in WordPress

Posts Table Pro is a flexible and powerful tool that allows you to create customizable tables and embed them anywhere on your WordPress site. With this plugin, you can display information in a table format that is easy to read and navigate, and you have complete control over how it appears and functions.

One of the key features of Posts Table Pro is the ability to enable forum users to search, sort, and filter the table to quickly find the information they need. This can be particularly helpful when managing a forum with a large number of threads, topics, or replies.

If you want to get a better idea of what Posts Table Pro can do, we recommend checking out the demo site dedicated to this plugin. There, you can see how the tables can be customized to fit your needs and how they can especially be used to display various types of content.

Visit the Posts Table Pro demo!

Right now, we’re going to focus on how it can be used to create an SEO-friendly forum in WordPress. First, we’ll explore how to turn your entire site into a forum using the platform's built-in features. Moreover, we’ll walk through how to use Posts Table Pro in combination with the best forum plugin for WordPress.

Method 1: Turn your WordPress site into a forum

Let's start with the simplest way to create a forum on WordPress (or WordPress multisite), by using regular pages and/or posts as forum topics. You can do this using only Posts Table Pro and WordPress’ built-in functionality. You don't even need a complicated WordPress forum plugin. This method works well if you want to turn your entire WordPress site into a forum or add a forum to WordPress.

How it works

  1. You'll add each forum 'topic' or 'thread' as a separate page, post, or custom post in WordPress.
  2. Users will interact with the forum by adding comments at the bottom of each topic/thread. This uses the comments system that comes with WordPress itself. You get all the benefits of WordPress comments, such as nested comments, Gravatar images, and more. (Or if you prefer, then you can replace this with a dedicated comments system such as Disqus (free version).)
  3. Your forum will be displayed in a table layout, with each topic or thread listed on its own row in the table. You can choose what other information to display on the forum page, such as the date you created the thread, categories, tags, etc. This way, people will be able to find the topics you cover through search engines like Google.

It's straightforward to set up, and simple to use.

Setup instructions

To begin, you’ll want to purchase the Posts Table Pro plugin. Then you can install and activate it on your WordPress site, following this setup guide. Don’t forget to activate your license key as well.

Get Posts Table Pro!

After the plugin is installed, you will be guided through an automatic setup wizard to help you create your initial table. Nonetheless, if you are already acquainted with the plugin or would like to start right away, you can generate new tables anytime by going to Post Tables → Add New.

To create a forum using the plugin, follow the instructions below:

  1. To begin, provide a name for your table and choose the post type you want to showcase.
  2. Next, pick the posts or pages you want to include in the forum. You have the option to select from posts, pages, and custom post types. Posts are usually the better option, given their inherent flexibility and the fact that they have comments turned on by default. However, either content type will work. Or if you're already using posts and pages for something else, follow this guide to create a dedicated custom post type for your WordPress forum. To add a new column, select the column type from the dropdown menu and click "Add."
    Choose which posts to include in the table screenshot
  3. Here, you can choose exactly what information about each forum topic will appear in the table. Personalize the table according to your preferences. For example, you can have a column for thread, topic, last post, posters, categories, and tags. You can also choose which columns to show and in what order.
  4. Next, customize the sorting options for your table by selecting the default sorting option and the sorting direction. This gives you control over how the table is presented to your audience.
  5. The table loads one page at a time, so it stays fast even when it contains hundreds or thousands of items.
  6. Then, select how you want to sort your database. You can set the default sorting option and the sorting direction.
  7. Now you're ready to display your forum on your website.

Now list your forum content in a table

Then, create a new page and give it a title. This will be the ‘home’ for your new forum table.

After you have finished creating your table with the Post Table Pro plugin, the setup wizard will verify that you have completed the process and offer instructions for displaying the table on your WordPress site. There are two methods for displaying the table:

  • Using the "Post Table" block in the Gutenberg editor
  • Copy the shortcode from the table builder and paste it wherever you desire on your site. This enables you to place the table on any page, regardless of its content, providing you with greater flexibility.

How to create starter topics

After configuring all the settings for your new forum, both methods require you to place a shortcode on the page to generate a table. Once done, you now know how to make a forum page on your website. From here, you can either save the page as a draft or publish it to make your forum live and start engaging with your audience.

However, you need to create a few starter topics to get your forum going as the table won't show any content until you add topics to it. You can do this easily by creating a few posts or pages, which will automatically appear in your table. Once you have added the necessary content, your forum will start to take shape. On the front end, it will look something like this:

An example of a cooking forum posts table.

You can control the topics that are allowed, or let logged-in WordPress users create their own by integrating with a WordPress plugin such as Gravity Forms with the Gravity Forms with user-submitted content extension (see our tutorial on how to set this up). Either way, forum members can simply click on each topic in the table to visit its actual page. Then, they can use WordPress’ built-in comments system to interact with each other and you.

The individual forum topic pages will look something like this, depending on your WordPress theme:

A cookery forum topic page with a recipe shared in the comments

Method 2: Combine Posts Table Pro with a WordPress forum plugin

The technique described above has simplicity on its side. It is a bit limiting, however, since WordPress doesn’t have a built-in way for people to view comments, respond to one another within forum threads (outside of the comments feature at the bottom of the page for each topic), or set up user profiles or user roles (like moderators).

Therefore, you may want to consider getting your hands on a dedicated WordPress forum plugin or add-on as well. There are a lot of options, such as free plugins like BuddyPressbbPress, and Discussion Board Pro. These plugins particularly add basic (and sometimes more advanced) forum features to your WordPress site. For e.g. the individual topic and thread pages are more interactive. Additionally, a WordPress forum plugin comes with built-in custom post types which you can display using Posts Table Pro, so you don't need to create your own.

What is the advantage of using Posts Table Pro with a forum plugin?

As you might be able to create a forum using one of the top WordPress forum plugins, you may be curious about why you should still consider using Posts Table Pro. The main advantage is that you will have a more streamlined and structured approach to presenting threads compared to what most WordPress forum plugins provide by default. For instance:

  • Users can perform a keyword search, sort by any column, or filter by category, filter, or any custom taxonomy. This makes it much easier for people to find new topics they're interested in.
  • Plus, you can fully customize what information appears on your forum page, which isn't an option with most forum plugins.
  • A Posts Table Pro forum layout will also look more modern and interactive than most forum plugins, straight out of the box.

Setup instructions

To get started, you’ll need to set up your free WordPress forum plugin first. We’ll use bbPress as our example, so first install and activate it. Then, purchase and install Posts Table Pro as well. Again, make sure to activate your license key.

After that, go to Post Tables → Settings. As in the previous section, you’ll want to check out the Post type option. However, this time you'll have a few more choices:

Posts Table Pro post type dropdown including forum and reply options

Configuring the post type and settings for displaying forum threads with Posts Table Pro

To showcase forum threads with Posts Table Pro, you can generate a table for each forum. To create a new table, navigate to Post Tables → Add New and follow the step-by-step process, ensuring you select the correct post type. In this case, you'll want to select the "reply" post type.

You can customize the rest of the settings to your liking. For specific recommendations on which options to check out, refer to the previous method. The important settings will be the same.

To add the completed table to your website, there are two simple methods available:

  1. Use the Gutenberg editor to insert a 'Post Table' block.
  2. Copy the shortcode from the last page of the WordPress table builder and paste it anywhere on your website.

Users will then be able to select individual threads in order to see their contents and post responses:

A forum thread in bbPress.

How to add a bbPress forum topic filter

If you have a forum with a large number of topics, adding a 'Topics' filter dropdown above the table of bbPress forum topics is an excellent option. You can do this by adding tax:topic-tag to the 'Filters' option on the Posts Table Pro plugin settings page.

Normally, it's not possible to filter by topic in bbPress straight out of the box, but with this feature, users can quickly and easily find the topics that interest them. It's equally a useful addition that makes it much easier to navigate large forums, and it can enhance the user experience by allowing them to find the content they want without needing to spend too much time searching.

bbPress forum topics listed in a filterable table

How to list bbPress replies

In the previous section, we discussed how to list bbPress topics in a table format. However, there's another approach that you can consider. I instead of displaying topics, you can display the actual replies in a table layout. This can be useful if you want to show all the replies in a specific forum or thread in one place, without requiring users to click through to each individual topic.

To set this up, you'll still need to use Posts Table Pro and configure the appropriate settings. Make sure to select the "Reply" post type instead of "Topic". Once you've done this, the table will display all the replies in your selected forum or thread, along with their corresponding details.

This approach can be especially useful if you have a very active forum with a lot of replies. Here's an example of what the table might look like:

bbPress forum replies shown in a searchable table

With that, you’ve successfully learned how to create and how to add forum in WordPress!

Conclusion

Forums are a handy feature on just about any small business or community-focused website. Additionally, their simplicity makes them a versatile tool – you can use your forum for support, and feedback, or also simply help your audience connect with one another and new members.

While WordPress doesn't include the functionality you’ll need out of the box, you can create your own forum easily using Posts Table Pro. You can use it in one of two ways:

  1. Turn your WordPress site into a forum, using posts and pages as topics.
  2. Combine Posts Table Pro with a dedicated WordPress forum plugin such as bbPress.

If you are still unsure about how to use Posts Table Pro to create and how to add forum in WordPress, don't hesitate to ask for help. Moreover, we understand that creating a forum can be a daunting task, especially if you are new to WordPress. Our team is here to help you every step of the way.

Feel free to leave a comment in the section below if you have any questions on how to add a forum to WordPress. We are especially committed to providing you with the support and guidance you need.

Image credit: Neal Stimler.

Illustration of planning a WooCommerce events page on a laptop calendar

If you use your WordPress website to sell upcoming events, you'll need an effective way to display them. While you can use a dedicated WooCommerce events plugin, these can be complex and weigh down your site – which is the last thing you want. Keep reading to learn the pros and cons of both options, and how to set them up.

Are you looking to create an events page for your WooCommerce store but not sure where to start? Look no further! In this comprehensive guide, I'll walk you through the process of creating a dynamic and engaging events page, with or without using an events plugin.

What are WooCommerce events?

WooCommerce events are products which are configured to represent bookable occasions with specific dates and times. These products function as tickets or registrations for live performances, conferences, courses, or online webinars.

There are two main approaches to add events to WooCommerce. You can either:

Each method has distinct advantages. The date picker approach offers simplicity and lightweight implementation. A dedicated events plugin provides advanced features like attendee management and recurring events.

After setting up your events, you can list them in a searchable table. Install the WooCommerce Product Table plugin to create an organized display. This format helps customers find and book events more efficiently.

In this post, I'm going to tell you all about both ways to create a WooCommerce events page. I'll also show you how to list your events in a table so that more people will find and book your events.

Let's get started!

Comparison: 2 ways to add events to WooCommerce

Feature Method 1: Date picker field Method 2: Events plugin
Setup complexity Simple - install one plugin, add date field Complex - multiple plugins and configuration
Setup time 15-30 minutes 1-2 hours
Cost $69 (Product Options plugin) $99+ (Events Calendar Pro + Tickets)
Site performance impact Minimal - lightweight solution Moderate - additional database queries
Date and time selection Yes - calendar picker Yes - advanced scheduling
Recurring events No Yes - weekly, monthly, custom
Capacity limits No - uses stock management Yes - per event and ticket type
Multiple ticket types Limited - through product variations Yes - unlimited ticket tiers
Attendee management Basic - through WooCommerce orders Advanced - dedicated attendee lists
Waitlist functionality No Yes
Calendar view display No Yes - month, week, day views
Google Maps integration Manual Automatic
Event import/export No Yes - CSV, iCal formats
Email notifications Standard WooCommerce emails Custom event-specific emails
Best for Simple bookings, classes, appointments Complex events, conferences, festivals

Which method should you choose?

Answer these questions to find your best WooCommerce events solution:

1. How many events do you run monthly?

  • Less than 10 → Use date picker method
  • More than 10 → Consider events plugin

2. Do you need recurring events?

  • No → Date picker method works fine
  • Yes → You need the events plugin

3. Do you sell multiple ticket types per event?

  • No, just one type → Date picker method
  • Yes, various tiers → Events plugin recommended

4. What's your technical skill level?

  • Beginner → Start with date picker method
  • Intermediate/Advanced → Either method works

5. What's your budget?

  • Under $70 → Date picker method
  • Over $100 → Events plugin viable

6. Do you need attendee capacity limits?

  • No → Date picker sufficient
  • Yes → Events plugin required

Overall recommendation: If you answered mostly with the first option, choose the date picker method (Method 1). If you answered mostly with the second option, invest in a dedicated events plugin (Method 2).

Method 1: Add an event date field to your WooCommerce products

A date field conversion is the simplest method to transform WooCommerce products into bookable events. The WooCommerce Product Options plugin enables this transformation through customizable field additions.

The plugin adds a calendar-based date field to product pages. Customers select their preferred date and time directly from this calendar. You can include additional fields to collect attendee information or sell event extras.

WooCommerce product date picker field
A WooCommerce product with a date picker field added by the Product Options plugin

This method provides essential event management features without plugin complexity. You control available dates and booking windows. You set time slot restrictions and advance booking limits. The system handles event scheduling through standard WooCommerce orders.

The date picker lacks some specialized features. It doesn't include attendee capacity limits or waitlist management. However, it delivers a streamlined solution for basic event sales.

How to add a date field to a product

WooCommerce product date picker field
The event date field comes with lots of options for controlling your events
  1. First, create the products that you will be adding the event date field to (Products → Add New).
  2. Next, install the WooCommerce Product Options plugin.
  3. Go to Products → Product Options in the WordPress Dashboard.
  4. Create a new options group and give it a name that you will remember. Select the product(s) that you want the date field to appear on, or leave this field blank to add it to all products.
  5. Next, click 'Add Option'. Choose the 'Date' option type.
  6. Fill in all the options for your event date field.
  7. Finally, visit the product page. You will see the event date field above the add to cart button.

Now go back and add any other fields that you need for your event pages. This is an excellent way to collect information about the people who will be attending your events. You can also sell extras, such as training handbooks or lunch.

Method 2: Use a WooCommerce events plugin

A dedicated WooCommerce events plugin is software that adds comprehensive event management capabilities to your store. These plugins provide features like capacity management, ticket tiers, and attendee tracking.

The Events Calendar stands as the leading event management solution for WooCommerce. It integrates seamlessly with WooCommerce through the Event Tickets add-on. The combination enables full-featured event creation and ticket sales.

The plugin offers both simplicity and advanced functionality. Beginners find the interface intuitive. Advanced users access powerful customization options. The system handles everything from basic event listings to complex ticketing scenarios.

Features

The Events Calendar includes these core capabilities:

Easy event creation: The interface streamlines event setup. Add event name, date, time, location, description, and organizer information through simple forms.

Calendar view and list view: Display options include visual calendar layouts and straightforward list formats. These work well for small event collections. For larger catalogs, combine Events Calendar with WooCommerce Product Table for enhanced searchability.

Responsive design: The plugin adapts to all screen sizes. Events display correctly on desktop, tablet, and mobile devices.

Customizable templates: Pre-built templates control event page appearance. Custom CSS enables unique designs.

Integration with Google Maps: Location data automatically generates map displays. Attendees receive visual navigation assistance.

Recurring events: Schedule repeating events once. The system automatically creates weekly or monthly occurrences.

Import and export functionality: Transfer events between platforms. Import existing event data or export for backup.

Event Tickets add-on: Sell multiple ticket types per event. Manage attendees and track sales. Offer general admission, VIP, and custom ticket categories.

Using Events Calendar to create WooCommerce events

  1. Install and activate The Events Calendar plugin: Navigate to the 'Plugins' section in your WordPress dashboard. Click 'Add New', search for 'The Events Calendar', and then install and activate the plugin.
  2. Install and activate the Event Tickets add-on: Similarly, search for 'Event Tickets' in the 'Add New' plugin section, then install and activate the plugin.
  3. Now you need to purchase and install the premium version of Event Tickets. This is what adds the WooCommerce integration for selling access to your events.
  4. Configure plugin settings: Go to Events → Settings in your WordPress dashboard to configure the plugin settings, such as your preferred calendar view, timezone, currency, and more.
  5. Create an event: Click on Events → Add New to start creating your first event. Fill in the required event details, such as title, date, time, location, and description.
  6. Add tickets to your event: With the Event Tickets add-on installed, you can add tickets to your events by scrolling down to the 'Tickets' section on the event editing page. Set ticket prices, quantity, and any other relevant details. This creates a WooCommerce product, which is your 'ticket'.

As you can see, Events Calendar is harder to set up than the Product Options method. However, it's worth it if you need the extra WooCommerce events management features.

Why you need a better way to display WooCommerce events on your website

With both of the methods described above, each event has its own unique product page. Visitors must click through numerous pages to compare events or book multiple tickets.

The solution is to list all your events in a single, searchable interface. You can do this with the WooCommerce Product Table plugin, which presents all events in a structured table view.

WooCommerce events presented in a structured table with photos

Why list events in a WooCommerce table?

A WooCommerce event table is a structured display format which shows multiple events in rows and columns. This layout provides immediate access to event details and booking options. Customers can compare events and access essential information without leaving the main events page. It's an excellent way to peak your visitors' interest and encourage them to sign up for more events.

  • You can include the essential information about each event, providing visitors with what they need to make a decision without overwhelming them with details.
  • Customers can quickly search and filter the list of events to find what they're looking for.
  • Plus, they'll be able to make comparisons easily, choose the number of places they want to book, and even purchase tickets to several events at once.

How to create a WooCommerce events page

Creating a WooCommerce events table requires initial event setup and plugin installation. Both event creation methods described earlier work with this display system.

Follow the simple steps below to display your WooCommerce events effectively.

Step 1: Install the WooCommerce Product Table plugin

  1. Download the plugin zip file after purchase.
  2. Install the plugin through WordPress admin via Plugins → Add New.
  3. Upload and activate the downloaded file.
  4. Navigate to Products → Product Tables → Add New to access the table builder.

Step 2: Create your WooCommerce events table

  1. First, select the option to add the table to a page using a block or shortcode.
    First step of the WooCommerce Product Table builder choosing how to add the table
  2. Next, choose which products to include in the table. For example, if you use WooCommerce to sell products that aren't events then you should just select the event categories here. The rest of your store will be unaffected.
    Choosing which products to include in the WooCommerce Product Table
  3. Choose which columns of information about your WooCommerce events to include in the table. Try to strike a balance between providing all the necessary information, and not overwhelming your visitors. For an events table, we’d recommend the following columns at a minimum: image, name, summary, categories, price, and buy.
    Choosing which columns to show in the WooCommerce Product Table
  4. You may want to rename some of the labels in your events table. For instance, instead of using Buy above the final column, you could use something more events-specific, such as Book Now. To do that, click on the pencil icon for each column and rename it as needed.
  5. On the 'Add to cart' page, you’ll definitely want to check the Quantity selectors box. That way, if people want to bring along friends or family to the event, they can reserve multiple places at once.
    Add to Cart settings in the WooCommerce Product Table builder
  6. If you choose Button and checkbox for the 'Add to cart method', then customers will be able to purchase tickets for more than one event at a time, and add everything to their cart with a single click. This is a smart way to streamline their experience.
  7. After that, take a look at the Filter dropdowns field. You may want to add filters for data such as product categories, tags or attributes. This will place one or more dropdown menus above your WooCommerce events table. If you offer more than a few events, this makes the events list much more user-friendly.
    Adding filter dropdowns in the product table Search and Sort step

Step 3: Change the add to cart button text

The default "Add to cart" text doesn't suit event bookings.

Go to Products → Product Tables → Settings to modify button text. Change the label to "Book Now" or similar event-appropriate wording.

This small change clarifies the action for event purchasers, giving them the confidence to add the event to their cart.

Step 4: Create your WooCommerce events page

Now, it’s time to create the page where your WooCommerce events will be displayed. To do that, just navigate to Pages → Add New.

If you're using the WordPress block editor then insert a 'Product Table' block and select your table. Otherwise, get the shortcode from Products → Product Tables and add the table that way.

After that, view the page to see the WooCommerce events plugin in action:

Customized WooCommerce events page with images and book now buttons

Or if you decided to keep things simple then it might look more like this:

Basic WooCommerce events listed in a product table with add to cart

Step 5 (optional): Add quick view to the list of events

Examples of WooCommerce quick view popups for different product types

Quick view is a lightbox popup which displays detailed event information without needing to load a separate page. You can use the WooCommerce Quick View Pro plugin to add this feature to your WooCommerce event lists.

The plugin keeps the customer's focus on the main events page. They can view extra details in overlays rather than separate pages. This reduces friction in the booking process, keeping customers where you want them.

By using quick view, you can take advantage of advanced display options. For example, you can show image galleries from previous events in the popup. You can also display ticket variations and pricing tiers, along with extended descriptions and additional event details. All of this works together to increase booking confidence and conversion rates.

What types of event can I sell in WooCommerce?

WooCommerce events can accommodate any bookable occasion or time-based product. The flexible system adapts to diverse event types and industries. For example:

  • Live in-person eventsAdmissions tickets, live music or comedy events, charity events, concerts, conferences, dating events, festivals, meet-ups, performances
  • Online eventsLivestreams, live coaching, online conferences, webinars.
  • CoursesBootcamps, classes, crash courses, test preparation or interview training, training courses, webinars.

Each event type benefits from being listed in a table layout. For example, it's ideal for showing multiple sessions at conferences. Course providers can display semester offerings in a table. It's also an excellent way of listing seasonable performances at entertainment venues.

Now let's see what a lightweight list of WooCommerce events looks like in action.

Case study: Using WooCommerce to sell event tickets

To get a taste for what you can accomplish using the WooCommerce Product Table plugin, check out Weave The Ring:

Weave the Ring website listing events for booking in a table

Weave The Ring is the perfect example of listing WooCommerce events in a table. Each row contains complete event information. The layout includes descriptions, categories, prices, and featured images. As a result, there's no need for customers to visit multiple pages to learn about each event.

The smart navigation features enhance user experience even further. Customers can use the category filters and search box to view events by type.

Case study - Selling WooCommerce events imported from Moodle

Weave the Ring events imported from Moodle shown in a bookable table

Tallahassee Christian College and Training Center integrates WooCommerce with their learning management system. The Edwiser Bridge plugin connects WooCommerce to Moodle. Courses automatically import into WordPress as WooCommerce products.

Once imported, WooCommerce Product Table displays the imported events in an organized format. Students can filter by category or tag to find relevant programs. They can also visit the sngle product pages to view detailed course information and registration forms.

Bonus: How to sell entry tickets in WooCommerce

Entry tickets sold in a WooCommerce product table with add to cart

You can use the techniques discussed in this tutorial to sell entry tickets to a range of locations including museums, art galleries, tourist attractions, or events.

Enable the add to cart checkboxes in WooCommerce Product Table for family purchases. Parents can select multiple ticket types before adding to the cart. The system calculates totals automatically and processes all the entry tickets together.

Bonus: Set the default ticket quantity to zero

WooCommerce Default Quantity plugin showing a product with a default quantity of zero in the quick-view

In WooCommerce, the default quantity for buying products is always 1. This applies to any type of products, including events and entrance tickets. However, a default quantity of 0 is actually more appropriate when selling tickets, seats for theatre shows, or places on courses or events.

You can easily change the default quantity to zero by installing the WooCommerce Quantity Manager plugin. That way, shoppers can change the required quantity for each ticket to any number they choose before adding them to the cart.

Where to get the plugins

In conclusion, creating a dynamic and engaging events page for your WooCommerce store doesn't have to be a daunting task. This guide has outlined two primary methods to achieve this goal:

To further enhance your events page, you can use the WooCommerce Product Table plugin for a searchable and user-friendly event listing experience.

By carefully considering the pros and cons of each option and assessing your specific needs, you can make an informed decision that best suits your website. Whichever method you choose, remember that the ultimate goal is to create an events page that is both visually appealing and functional. It must make it easy for your customers to discover and book your events. With the right tools and strategies, your WooCommerce events page can become a valuable asset for promoting your upcoming events and driving sales.

Do you have any questions about how to set up the perfect WooCommerce events page? Ask away in the comments section below!

Child writing with a coloured pencil at a desk

Schools are one of the biggest users of the WooCommerce Protected Categories plugin. Distributors and edtech companies use this amazing tool to sell uniforms, stationery, and other branded outreach products to parents and schools. Other startups sell booklists, webinars, and professional development courses to schools they supply. Only authorized people can access the hidden store for each school, and it's completely hidden from public view.

And the schools?

School boards, colleges and universities can create hidden and safe areas themselves to sell products for pupils, parents, and alumni.

What is WooCommerce Protected Categories?

WooCommerce private school shop

WooCommerce Protected Categories is basically a tool to sell anything to anyone in a secure and private way. You can use this WordPress plugin to make your whole online store private, with a separate private area for each stakeholder or user group. Or alternatively, you can use it alongside a public shop, selling a mix of public and school-only products.

With so many educators - from individual K-12 schools and higher education colleges to entire school districts -  using the plugin, you can rest assured that it's fully optimized for your use case.

Whether you wish to sell branded products or books to schools, the plugin allows you to create private categories for each school. You can hide each category behind a simple password and give the password to parents, teachers and other customers. Or for added security, you can restrict the category to specific users on your WordPress website, or even entire user roles.

Educators and their suppliers use the WooCommerce Hide Categories plugin to keep information safe and make sure their products are facing the right audience to fit in with their overall marketing strategy. Its central login page gives each school access to their own hidden category. There is no longer a need to create a separate shop and sales process for different clients or schools.

This plugin is easily the most versatile WooCommerce protection suite on the market.

Benefits of the plugin

Five-star customer review of WooCommerce Protected Categories from a school supplier
Here is what one highly satisfied school supplier has to say about WooCommerce Protected Categories

Undoubtedly, one of the main benefits of the WooCommerce Protected Categories plugin is the opportunity to create one or more hidden areas to sell to each school.

You aren’t just limited to a single product category for each school. That would be confusing and might limit you in terms of setting pricing. You can create multiple categories with different passwords. This allows you to manage and oversee products for different customers (school leaders and decision-makers, parents, alumni, or students).

How to create hidden WooCommerce categories for schools

Setting up your own store for selling to schools - or setting up a store if you are a school - takes less time than you think. Let's take a look at how to do it in a few simple steps:

Step 1: Get the WooCommerce Protected Categories Plugin

Download the plugin to start creating the hidden stores for schools or school suppliers.

Step 2: Install the Plugin

Once you have downloaded the plugin, install it and enter the license key you received in the confirmation email.

Step 3: Fill in the plugin settings page

When you open the plugin settings page, stay away from the boxes that show the products and protected categories in the public parts of your WooCommerce store. This keeps the shop for each school secure and hidden from everyone else.

Change any other settings to configure the plugin in the way that best suits your sector of the education industry, be it high school, college, or universities who use WordPress. For example, if you're using it to create WooCommerce password protected categories then you can change the wording on the password login form. If you're restricting each school's category to specific WordPress user roles or users, then you can choose what happens when they're not logged in.

Password protected categories settings with heading and message for a school login page

Step 4: Visit WordPress Admin > Products > Categories

Open the Categories page and create a new category for each school or group you want to sell to. You can make structures based on category and sub-category levels. There is literally no limitation as to how you can organize these - by school age, at the district level, or by some other metric; it's up to you

Step 5: Select ‘Protected’ and choose a protection option

Category visibility set to Protected with password, user role and user options for a school shop

Select 'Protected' to hide the main category for each school or group. You can find this in the Visibility section of the page where you add or edit the category.

For each protected school category, choose whether you want to password protect it, or automatically unlock it for individual logged in users or specific user roles. You can also mix and match these options as needed.

Note: When you add sub-categories, make sure to leave these child categories set to ‘Public’. The main password you set for the ‘Parent’ category will apply to the sub-categories, too.

Category structure with separate password and user protected shops for three schools
Example WooCommerce category structure with hidden shops for 3 schools

Step 6: Add the Products

Next, add the products to the category for each school. Keep the default visibility settings of the individual product, as the WooCommerce Protected Categories plugin will protect them automatically under the parent category. The product will be secure and hidden even if an unauthorized user tries to access it directly.

Step 7: Add the Shortcode

School login page asking for a password to unlock the hidden store

If you're using the options to unlock the school shops for logged in users or roles, then add each school's category to the navigation menu (Appearance > Menus). Logged out users won't be able to see this menu link. When a school or parent logs into their account, the link will appear so they can access their hidden shop.

Finally, if you're using password protected WooCommerce categories for schools, then you need to create a central school login page. Add the following shortcode wherever you want schools to login:

[category_login]

When a school, organization or parent enters a correct password, the plugin will automatically direct them to the category that matches their password.

That’s all! These really simple steps will give you access to everything you needed to sell securely to schools and parents with WordPress and WooCommerce.

How to create a WooCommerce private store for a single school

So far, we've talked about the WooCommerce Protected Categories plugin because it's the only way to create multiple hidden shops - one for each school. If you need a single hidden school shop that is completely hidden to the outside but open to everyone inside, you need the WooCommerce Private Store plugin instead.

WooCommerce Private Store is even easier to use. It will let you use passwords and user logins to hide the school's shop from your website. Your remaining pages will be public, such as the school homepage and other public information.

For example, if you're an individual school then you might want to add a hidden WooCommerce store to your school website. You want to protect all your products so that only authorized parents and teachers can see and buy them. If you want all authorized users to see all your school's products, then WooCommerce Private Store is a quick and simple solution.

Get WooCommerce Private Store

Related tutorial: How to Create a WooCommerce Pay Later System for Schools & Other Repeat Customers

How to take orders for school dinners online

While we're talking about using WooCommerce to sell to schools, you might like our other tutorial about how to take school dinner orders online. Parents can select the quantity of each food that is required on each day of the week, and pay online using WooCommerce. It works beautifully with Password Protected Categories, providing an easy way to securely receive orders for school dinners.

WooCommerce daily order form

Where to get the plugin

The WooCommerce Protected Categories plugin is hugely popular among companies and organizations that sell to schools, as well as schools themselves. Don't miss out - get the plugin today!

Ecommerce is big business. It's also incredibly competitive, which means you need to take advantage of proven techniques to give yourself the best chance for success and make money by selling online. Rarely is this more true than when you’re trying to sell clothes online, given the saturation of the online fashion market.

To encourage customers to choose you over the competition, you’ll want to make buying clothes on your website a convenient and streamlined experience. This means finding a way to display your clothing products and options effectively, such as by using a customized product table.

Clothing products listed in a filterable WooCommerce table to sell online

Or perhaps you need a quick and easy way for customers to choose clothes sizes, colors and other options?

WooCommerce Bulk Variations single product page

Best plugins for selling clothes online

In this guide, we’ll introduce you to the best plugins for selling clothes online with WooCommerce. This includes:

  • WooCommerce Product Table - List clothing products in a quick order form layout which is perfect for one-page shopping. (Learn more.)
  • WooCommerce Product Filters - Add advanced filters so that customers can quickly find closed based on size, color, price, and more. (Learn more.)
  • Bulk Variations - Display all of the options for an item of clothing in a quick buying grid, so that customers can purchase multiple sizes and colors with ease. (Learn more.)
  • Quick View Pro - Let customers preview products and add to the cart without leaving the shop page. (Learn more.)
  • WooCommerce Fast Cart - And finally, provide the fastest possible way for customers to review and complete their order. (Learn more.)
  • Product Options - Add extra options in order to sell customizable products. For example, add file upload fields for a logo, or text message fields for a custom message. (Learn more.)

All of these amazing plugins make it easier for customers to browse and buy clothing such as custom screen print shirts, shoes or accessories. They are all either developed by the same company or guaranteed to be compatible. As a result, you can mix and match them to create a robust clothing store that meets your exact business needs. You can either buy them individually or save money with an All Access Pass.

Let’s get started!

Plugin 1: Why your clothing store can benefit from a customized product table

WooCommerce Product Table showing apparel items with image, name, description and price columns for a clothing store

Some online consignment shops (like Etsy, thredUP or Poshmark) sell products that require a lot of detailed information. For instance, an online electronics shop will usually merit dedicated pages to explain the ins and outs of each item.

However, a clothing store is a little different as is the case with thredUP, Tradesy, and Poshmark. If you're running this kind of ecommerce site, chances are your products are pretty simple to grasp. Most customers won’t need a lot of information in order to know whether they want to buy a particular shirt, for example. They’ll just want to know what it looks like, and see the options when it comes to colors and sizes.

Therefore, making visitors navigate to a bunch of individual product pages – as in a traditional ecommerce store layout – can be counterproductive when you’re trying to sell clothes online. Some customers might like this extra information, but most want a quick buying process. Instead, you can show off everything you have to offer in a concise product table.

Keep in mind that you don't need to compete with high-end brands that sell luxury items like Louis Vuitton, Chanel, Gucci, or Prada right off the bat.

This lets customers view all the clothing options in one place. They can compare products easily, and add everything they want to their carts from a single page. Once they're done, they can proceed to checkout and make the payment through the payment options you offer (such as PayPal). It's just like buying in a physical clothing store! What’s more, it's simple to set up if you have the right plugin.

Introducing WooCommerce Product Table

While WordPress and WooCommerce are the perfect foundation to sell clothing online, they're missing some essential features. For example, they don't provide a way to show off all your items on a single organized page, similar to eBay. Luckily, you can easily listing clothing products with the WooCommerce Product Table plugin:

This plugin helps you create a customized product table to display any or all of your clothing products. Among its many features, this plugin:

  • Lets you organize all your clothing, accessories, and more into one table similar to eBay.
  • Makes it easy for customers to compare items.
  • Customers can click on a clothing image to view a zoomed in version in a lightbox.
  • Includes sorting and filtering capabilities, making your product table dynamic.
  • Enables you to display product variations (such as colors and sizes) alongside each item.

Best of all, WooCommerce Product Table is simple to use and only takes a few minutes to set up.

Try out the WooCommerce Product Table clothing store demo for yourself!

How to sell clothes online with WooCommerce Product Table

In the following tutorial, we’re going to assume that you already have a WooCommerce store set up to sell clothes online. If you’re creating a brand-new ecommerce site, therefore, you'll want to do three things before proceeding:

  1. Set up a basic WordPress website.
  2. Install WooCommerce, and go through its setup wizard to configure your store.
  3. Add all your clothing and other items as individual WooCommerce products.

Once those tasks are out of the way, you’re ready to get started.

Install and activate WooCommerce Product Table

First up, you’ll want to get the WooCommerce Product Table plugin running on your clothing website. To do that, you’ll need to purchase the plugin.

After the plugin is installed, activate it. Next, the table wizard will open. It also walks you through the main settings for creating your table listing some or all of clothes products. This will get WooCommerce Product Table fully up and running, ready to start selling clothes online.

Popular settings for selling clothes online

Here are some tips on which settings to choose in the setup wizard:

Display - Where to display product tables
First step of the WooCommerce Product Table builder choosing how to add the table

Enable the table on your shop page templates if you want your whole clothing store to use the table layout. Alternatively, you can add the table listing clothes products to specific pages only. If you do this, then you can then choose exactly which products/categories/etc. to display.

Table content
Choosing which columns to show in the WooCommerce Product Table

Next, use the Columns page of the table builder to specify what information will appear in the product tables.

You’ll probably want to include images, as well as a few details about each item such as its category, description, and sale price. And don't forget to include the product name and a 'Buy' column!

Adding to the cart
Add to Cart settings in the WooCommerce Product Table builder

The add to cart method controls what appears in the 'Buy' column of the table. If your customers are likely to choose one clothing item at a time then use the 'Button' method. Alternatively, select 'Checkbox' (or 'Both') to allow customers to use multi-select to add multiple clothing products at once.

Right below that, you probably want to check the 'Quantities' box. This will enable customers to purchase more than one of each item directly from the product table page. That's a useful feature for a clothing store to have, as it's quicker than visiting a separate page for each product.

Most importantly, you’ll want to choose how to display product variations. This setting displays your items’ variations right within the table. In other words, customers will be able to see and select all clothing options, such as colors and sizes. You can either display these variations as dropdown menus, or on their own rows.

Product filters
Adding filter dropdowns in the product table Search and Sort step

Nearly all stores that use WooCommerce to sell clothes online need some sort of filtering. This allows customers to select details about what they're looking for (e.g. their size or preferred colors) and quickly narrow down their selections.

WooCommerce Product Table comes with some basic filter dropdowns which you can enable above the table. You can enable them on the next page of the setup wizard. Alternatively, leave this option empty if you want to add more advanced features. We'll look at how to do that a bit later.

Preview your WooCommerce clothing store

If you enabled the product table on your shop templates, then you can view these straight away. Alternatively, add a 'Product Table' block to another page, or copy the shortcode from the final page of the table builder and add it that way.

Now, the basics are in place to sell clothes online in WooCommerce. You can see what it looks like so far by viewing the front end. Depending on your settings, it might look something like this: 

Customized product table selling clothing with add to cart buttons

You can continue to make changes – anything you alter in the settings will be instantly applied to your product tables. When you’re happy with the way your table looks and functions, you're done!

Your ecommerce store is now ready to publish. However, you might want to add some extra features to truly supercharge your WooCommerce clothes website. We'll look at these next.

Plugin 2: Use advanced product filters to help customers find specific clothes more easily

Online clothing store using a product table with sidebar filters for category, color, and size

In step 1, we learned how to use the basic filter dropdowns that come with WooCommerce Product Table. For more advanced filtering, you can use the WooCommerce Product Filters plugin instead.

As you can see in the screenshot above, this is perfect for helping customers to find exactly what clothes they like. They can filter by category, color, size, price, rating, and any other data you have added for your clothing products. They look great and you can choose from various filter styles, such as images, color swatches, checkboxes, sliders, and more.

If you have a lot of clothing products then advanced WooCommerce filtering is a must for selling clothes online.

How to add filters to your WooCommerce clothes store

  1. Install the WooCommerce Product Filters plugin.
  2. Activate your license key in the setup wizard, and choose how you want your filters to behave. One of the options in the wizard allows you to display the default filter group at the top of all your shop pages. Select this if you want to show filters above the list of clothes in your store. Or if you want the filters to appear in the sidebar on the left or right of the list of clothes, then ignore this.
  3. Next, go to Products → Filters and add all the ways that you want your customers to be able to filter products.
  4. If you selected to display the default filter group at the top of your clothes shop in Step 2, then ignore this step. Alternatively, go to Appearance → Widgets and use the Product Filters widget to display the filters in your store sidebar.

Plugin 3: Create a grid of color and size options

WooCommerce product page showing a grid of colour and size options for ordering clothes in bulk online


Have you used product variations to sell different size and color options of the clothes in your store (or any other type of option)? If so, then WooCommerce will normally display each option as a dropdown for customers to choose from. Once they select a size and color (for example), the price appears and they can add it to the cart. They then repeat the process for each combination of options they want to order.

That's not ideal for selling clothes in WooCommerce because customers tend to order multiple sizes and colors to try. It's much better if customers can see all the options and prices at once.

You can do this by installing the WooCommerce Bulk Variations plugin. To help you decide if you need it, then see whether you answer 'Yes' to any of these questions:

  • Would you like a faster way to add and edit variations in bulk. For example, do you want to be able to instantly add an image of a blue t-shirt to all the blue variations on your t-shirt product? Or do you want to be able to quickly set the price of all the 'Large' size t-shirts at once?
  • Do you want people to be able to select clothing sizes and other options in bulk on the single product page?

Instead of having to select their clothes size from a dropdown, WooCommerce Bulk Variations displays all the options in an eye-catching grid or matrix.

A WooCommerce bulk variations form is ideal for selling clothes in larger quantities. For example, you'll need this if you're selling clothes for parties or corporate events, branded workwear, or wholesale.

The variations are displayed in two dimensions within the matrix-style order form. The customer can enter the quantity that they require for each option, and quickly add them all to the cart.

Case study: Elite Teamsport

Elite Teamsport uses WooCommerce Bulk Variations to sell teamwear kits and training wear on their online store.

Online store selling teamwear kits in a bulk variations grid

From the single product page, customers can choose to either buy one variation at a time or select multiple options and add them all to their cart at once. The WooCommerce Bulk Variations plugin displays all of the available variations in a grid layout with size and color attributes. This makes it easy to buy multiple variations of a product and reduces friction in the buying process.

Customers can use the quantity selectors to specify how many units of each product. They can then click the Add to Basket button to add them to their shopping cart in one go.

How to set up WooCommerce Bulk Variations

  1. Install WooCommerce Bulk Variations on your site.
  2. The setup wizard will open. Use this to set up the plugin, including enabling it on your variable products.
  3. To edit variations in bulk, go to the 'Variations' tab on the 'Edit Product' screen. Use the 'Filters' bar to select which variations you want to edit. Next, use the bulk actions dropdown above to apply changes in bulk.

Tip - WooCommerce Bulk Variations lets you edit and display variations. If you want one of these features but not both, that's fine - just activate the ones you need. 

Plugin 4: Add quick view to your clothes store

WooCommerce Quick View Pro demo showing Quick view and Add to cart buttons on a clothing store product grid

You can take your store to the next level by combining the table layout with product quick view.

Think about when you've bought high-quality clothing or handbags online from leading fashion websites like Etsy, thredUP, Tradesy, and Poshmark. You've probably noticed that nearly all of them offer some sort of quick view function. This is where you can see extra pictures and buy without having to visit a separate page for each garment. There's a reason for this - it's because quick view is a much more user-friendly way to sell clothes online.

That's why you need the WooCommerce Quick View Plugin. This handy tool adds - you guessed it - quick view links or buttons to your WooCommerce clothing store. Customers can use these to view more photos of each clothing item, zoom in on images, view the selling price, and buy directly from a quick view popup. You can also show the short description in the quick view, which is a useful place to add size charts, washing instructions and other useful information.

If you're selling customized clothing, then quick view is ideal for this too. Use it with the Product Options plugin to add text input boxes. This is where customers can upload a logo or enter a personalised message to be added to their custom clothing product.

You can use quick view with product tables. Alternatively, it also works as a standalone product that adds quick view buttons to the default WooCommerce store layouts.

If you're using the WooCommerce Bulk Variations plugin, then the variations matrix can appear in the quick view lightbox. That way, people can select variations and buy in bulk without having to access a separate page for each garment.

How to add quick view to your WooCommerce clothes store

As we saw earlier, the WooCommerce Quick View Pro plugin is a must if you're selling clothes with WooCommerce and WordPress. This how to set it up:

  1. Install and activate WooCommerce Quick View Pro.
  2. Go to the plugin settings page at WooCommerce → Settings  → Products → Quick view.
  3. Enter your license key and choose what you want to appear in the quick view lightbox. For selling clothes, you'll probably want the full product image gallery, image zoom, and possibly the short description and add to cart options.
  4. If you're using WooCommerce quick view with product tables, then you should also go back to WooCommerce → Settings  → Products → Product tables. Add quick_view to the list of product table columns, or tick the option further down the page to replace links to the single product page with quick view.

Plugin 5: Speed up ordering with an on-page cart and checkout

WooCommerce side cart for faster on-page ordering

Plugins like Product Table, Product Filters and Quick View Pro make it quicker and easier for customers to find and add products. In contrast, the WooCommerce Fast Cart plugin speeds up the final stages of the ordering process.

Normally, WooCommerce makes customers visit separate cart and checkout pages to complete their order. That's quite time-consuming, and your WooCommerce clothes store will convert better if they can complete their order on the same page.

WooCommerce Fast Cart adds a popup cart and/or checkout to your store. As soon as customers add clothes to their cart, the popup cart either launches automatically or a floating cart icon appears. They can use this to review their selections, make changes, add related products, and even pay and check out - without ever leaving the page.

Popup cart and checkout where shoppers can pay without leaving the page

Plugin 6: Sell customizable clothes with product add-on options

Clothing store product table with t-shirts offering custom message and add-on fields
Customizable T-Shirts website created with WooCommerce Product Table and Product Options

The above three steps are sufficient for creating a fully-featured and compelling product table. However, there’s one more tool you may want to consider adding to your site: Product Options.

This add-on lets customers further personalize their purchases. You can enable them to add on items to their orders, via input boxes, drop-down menus, and checkboxes. If you offer personalized clothing and accessories, this extension will also make it easy for customers to request custom messaging.

For example, if you want to sell personalized custom t-shirts online then Product Add-Ons is a must. You can use it to add check boxes for optional extras, and a text entry box to add a personalized message. It's even possible to include a File Upload field (e.g. to upload a custom logo or design), although customers will need to click through to the single product page to use this.

Selling a customizable t-shirt online with design upload and text options
Selling a customizable t-shirt with the WooCommerce Product Options plugin

As you can see, Product Add-Ons is a valuable addition that helps you sell clothes online more effectively. The extra product options appear on the single product page and also in the 'Buy' column of the product table.

Where to get the plugins

If you’re looking to sell clothes online, you’ll need to use the most effective strategies in order to stand out. This includes finding a way to show customers everything you have to offer – and all the relevant variations – in one convenient place.

Fortunately, this is a simple matter with the plugins featured in this article:

  • Product Table - perfect for listing clothes in a flexible order form layout.
  • Product Filters - ideal for helping customers to find products more quickly.
  • Bulk Variations - perfect for letting customers choose sizes and other options in bulk on the product page, and for bulk editing variations.
  • Quick View Pro - perfect for speeding up shopping.
  • Fast Cart - ideal for speeding up the final stages of the customer journey.
  • Product Options - essential for selling customizable clothing products.

Use the plugins alone or together to create a professional clothing store that will be a pleasure to use. You can save money with an All Access Pass. They all come with full support, documentation and a full 30-day money back guarantee.

Do you have any questions about how to sell clothes online with WooCommerce? Let us know in the comments section below!

Illustration of a WooCommerce hidden store with a shopper hiding products from the shop page

Lots of people ask us how to create a WooCommerce hidden store. This tutorial covers 2 methods to build a private store using 2 plugins: WooCommerce Private Store and WooCommerce Protected Categories. It will also help you choose which WooCommerce hidden store plugin is best for your website.

Hidden WooCommerce shop with a password entry screen shown on a phone
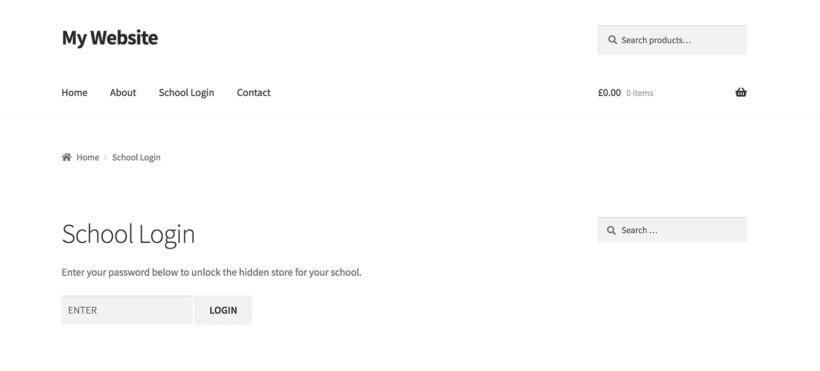
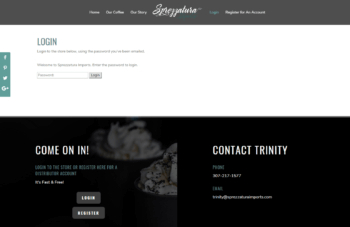
You might want a public-facing website that anyone can access, with a hidden e-commerce area that only people with the right credentials can see. Or you might want to hide your entire WooCommerce store.

At the end of this tutorial, you'll know how to create a WooCommerce hidden store or temporarily hide a store.

Your categories, products and other WooCommerce content will not appear anywhere on your public website. They won't appear in the navigation menu, sidebar widgets or on your homepage. Read on to learn how, or watch the video:

1. Before you start

To build a WooCommerce hidden store, you need a WordPress website with the WooCommerce plugin installed. You also need a WooCommerce-compatible theme - I used Storefront on my test site.

Once you have done this, you should add your WooCommerce products to their respective product pages in the usual way. You can also create the public pages of your website (if you're having one) such as Home, About and Contact.

Once you've done that, you're ready to hide products and transform your website into a hidden WooCommerce store.

2. Decide which WooCommerce hidden store plugin to use

First, you need to decide which of the plugins described in this tutorial to use for your WooCommerce hidden store. Read the 2 lists below and then skip to the method that best applies to you. Or to make it easier, take our quick quiz!

Do you:

  • Want to hide your whole WooCommerce store?
  • Need your WooCommerce shop page and ALL your products, categories and tags to be completely hidden from search engines, sitemaps etc?
  • Want all customers to have access to all the products within your WooCommerce hidden store?

If so, you need WooCommerce Private Store. Create your hidden WooCommerce products using Method 1 of this tutorial.

Do you:

  • Want to hide some of your WooCommerce products, while also having a public online shop?
  • Need to give different customers access to different products within your hidden store?

If you've answered Yes to either of these questions then you need WooCommerce Protected Categories. Build your WooCommerce hidden store using Method 2 of this tutorial.


Method 1 - Hide Products with the WooCommerce Private Store plugin

The WooCommerce Private Store plugin is the easiest way to make WooCommerce private. It creates a 100% WooCommerce hidden store, locking down your entire shop behind a single password. Alternatively, you can automatically unlock your private store for logged in users or specific roles. No one will know your hidden store exists unless you want them to! So if you need to disable a store temporarily, this is a great option.

This video tutorial will tell you how to set up your WooCommerce hidden store. I've also provided written instructions below.

Still not sure if our WooCommerce Private Store plugin is for you? Have a look at this customer review or check out the Montana Medicinals case study below.

If you want a Private Store, Look no further!!
This plugin has been a GODSEND for us. Perfect for Wholesale usage. Hide your store with one or two checkboxes within the plugin settings and BOOM! We now have a private store. Only unlockable with a username and password. Thank you, guys :)

Case study #1 - Sprezzatura Imports

Sprezzatura Imports login page
Sprezzatura Imports distribute the Italian coffee brand, ICAF, across the US. As wholesalers, they need to keep their WooCommerce wholesale store hidden from the public. That's why they've password protected it with the WooCommerce Private Store plugin.

After registering, distributors can purchase products and gain access to the price list by logging in to the password protected area. Then, to make it even easier for distributors to login, the login page was added to the menu. As a result, the hidden WooCommerce store is just a matter of clicks away from the homepage.

Case study #2 - Montana Medicinals
Montana Medicinals homepage after unlocking the hidden store

Montana Medicinals needed to password protect their shop to comply with laws in the state of Montana. That's because Montana Medicinals operate a medical marijuana dispensary and only pre-authorized customers are allowed to access the shop. That's why they used our WooCommerce Private Store plugin.

To limit access to those over 18, they also used a sitewide WordPress age verification plugin.

Within a matter of minutes of installing the WooCommerce Private Store plugin, the developers had created a password protected private store. Customers registered with Montana Medicinals are given a password to access the store.  Once a user has confirmed they're over 18, they can access the site. Anyone can read general information about getting prescriptions, but to view products and start shopping you need a password. Clicking on Shop or Products prompts the customer to enter their password. And without a password you can't access the private store.

Read on to find out how to hide WooCommerce stores or even temporarily disable online shops.

1. Install WooCommerce Private Store

WooCommerce Private Store Plugin Settings
  1. First, buy WooCommerce Private Store.
  2. Download the plugin files and copy your license key from the confirmation page or order confirmation email.
  3. In the WordPress admin, go to Plugins → Add New and upload the plugin files.
  4. Activate the plugin.
  5. Next go to WooCommerce → Settings → Private Store and paste your license key. Change the other settings as required.
  6. Create a store login page by adding the shortcode [store_login] anywhere on your site.

And that's it! That's all you need to do to hide products in WooCommerce and make your store private.

The next few steps will let you further configure your hidden WooCommerce store. However you've already done the most important bits and your store is secure and hidden.

2. Customise the WooCommerce login page (optional)

If you like, you can customise the text that appears above the password entry form for your WooCommerce hidden store. You can also change the text on the 'Submit' button. You can do all this on WooCommerce → Settings → Private Store.

Make any changes and then check the WooCommerce login page that you selected in step 1.6 (above) to ensure it looks ok.

You can also add text and other content above and below the password entry form, directly onto the WooCommerce login page.

Login form that hides the entire WooCommerce store behind a password

All WooCommerce hidden stores are different. You might want to include a link to your store login page on your public site. For example if you're creating a WooCommerce wholesale shop then you might want to add a 'Wholesale Login' page to the menu or header. Or you might want to keep your WooCommerce store hidden so that only people with the link can ever find it.

You can link to the store login page in the usual way for adding a link in WordPress.

4. Add additional store login forms (optional)

You can also add login forms anywhere else on your public site - for example on another page or sidebar widget. In this screenshot, I've added a login form to a text widget in the right hand column.

WooCommerce store page with a sidebar login form for hidden products

To do this, add the shortcode [store_login] to any page, post or text widget. (Or if you're a developer, you can add it elsewhere such as in the header or a popup login form.) This will insert a login form and the text that you added to the settings page in step 2.

Customers can use this to access your WooCommerce hidden store while everyone else remains locked out.

5. Add WooCommerce content to the menu

If you haven't already done this, you can edit your navigation menu to include links to the main WooCommerce store page or to specific products, categories or tags.

Go to Appearance > Menus and select the relevant page/products/categories/tags. Add them by ticking the correct box and clicking 'Add to Menu'. (If you add them as Custom Links then the WooCommerce hidden store plugin won't hide them.)

If you use this method then the shop page/products/categories/tags in your menu will be invisible until you enter the password to unlock the hidden store.

You can see this in action on the password protect WooCommerce plugin demo. When you first view the site there's no menu dropdown under the 'Hidden Shop' link. Once you enter the password, hover over 'Hidden Shop' and you'll see that links to various WooCommerce content have magically appeared!

6. Check your WooCommerce store is hidden

Now comes the fun part. Visit your public website and try to find your WooCommerce hidden store:

  • Try accessing any of your WooCommerce pages - e.g. your main Shop page, a product or specific category. You'll be taken to the store login page.
  • Do a Google search for one of your hidden WooCommerce products.
  • If you have a search box on your site, see if your hidden WooCommerce content appears in the results.
  • Check your XML sitemap.
  • Test the navigation menu.
  • Check that no WooCommerce widgets (e.g. Products, Product Categories or Product Filters) are showing.

We've developed the WooCommerce hidden store plugin to be completely private and hidden. If you find any loopholes (e.g. you might be using a WordPress SEO plugin that we haven't tested), let us know.

Once you're happy that your WC store is 100% hidden, go to your login form and enter the password. Now you can test what customers will see after they unlock the private store.

7. Give the password to your customers

When you're completely happy with your WooCommerce hidden store, you can start using it. Give the password to your customers. And if you haven't added a 'Store Login' link to your public site, give them the URL too.

Or if you've ticked the 'Logged In Users' box in the settings, they just need to log into their account and the store will automatically unlock. There's also an option to choose which logged in users roles can access the store.


Method 2 - Hide Products with WooCommerce Password Protected Categories

WooCommerce Protected Categories is most commonly used to hide one or more product categories within a public online shop. However the plugin can equally be used to create a WooCommerce hidden store. This video and the written instructions below will show you how to create a private shop and hide WooCommerce products.

1. Create a main protected category to hide products

The first step is to create a main product category for your WooCommerce hidden store and protect it, either with a password or user login. By having one protected category, you can then structure your entire store within this category:

  1. Marking a category as Protected to build a hidden WooCommerce store
    In the WordPress admin for your website, go to Products → Categories. This is the standard WooCommerce category page, except that you will see a 'Visibility' section at the bottom left when you create or edit a category. This has been added by the WooCommerce Protected Categories plugin.
  2. Add a new category and call it anything you like. This will be the name of your WooCommerce hidden store.
  3. Click 'Protected' and either enter one or more passwords, or choose which users or roles will have access.
  4. Your new hidden category will appear in the list of product categories on the right. You can see that it's protected in the 'Visibility' column.
Category list showing a hidden store marked protected in the visibility column

Password protected categories is a good option for most WooCommerce hidden stores because you don't have to manage individual logins for each user. Everyone shares the password to your hidden shop, or you can give a different password to each person. Alternatively, choose the user or role protection options if you want each customer to have their own user account.

2. Add sub-categories to your WooCommerce hidden store

You can divide your WooCommerce hidden store into multiple categories if you like. (If not, skip ahead to step 3.)

Everything in your private WooCommerce store must be in a protected category or one of its sub-categories.

  1. Create each of your sub-categories using the 'Add new category' option on the left of Products → Categories.
  2. Select your main protected category as the 'Parent'.
  3. Leave the visibility as 'Public'. This is because the sub-category (and its products) will automatically be hidden using the same type of protection.

Once a customer enters the correct password or logs into their user account, it will unlock the entire WooCommerce store and all the hidden products. This saves them having to re-enter a password for each product as they navigate around the shop.

Note: If you want to create separate protected categories that are unrelated to each other, that's fine. You might want to do this if you want to create different private areas of your shop for different customers. For example, a photographer might create a separate hidden category to sell the photos for each client. You can then have a central login form which will direct each customer to their hidden category. 

3. Hide products by adding them to a protected category

Next, it's time to put your products within the protected categories you just created:

  1. Go to the Products section of the WP admin.
  2. Hover the name of each product and click the 'Quick Edit' link that appears.
  3. Select one or more categories and click 'Save'.
  4. Repeat for all your other products.

When you add new hidden products to WooCommerce in future, you will also need to assign them to your store's hidden categories.

Quick edit assigning a WooCommerce product to a hidden category

Even if you are hiding your Woo shop, you might still want to link to it. For example, you might want to add a link called 'Client login' or 'Trade area' to your homepage, header or footer. You might want to link to it from the navigation menu and either make it publicly visible so that anyone can access the login page, or set it to only appear after customers have entered the password.

Of course if you want to hide the fact that your website even has an e-commerce store, you don't have to link to it at all. Instead, you can give your customers the link directly (e.g. via email).

There are 2 ways to let people find your hidden WooCommerce store. You can either link to a central WooCommerce customer login page, or link to each hidden product category.

Add a central WooCommerce customer login page

If you're using password protected categories, then the shortcode [category_login] will add a WooCommerce customer login form. When customers visit this page, they can enter the password for any hidden WooCommerce product category. If the password is correct then they'll be redirected to the correct category page in your hidden WooCommerce store.

This option works well whether you have one or several protected categories in your WooCommerce hidden store. It's more flexible than linking directly to a protected category because you can add the WooCommerce login form to any page or widget. However I'll tell you how to do that next, just in case.

If you're using role or user protected categories, then you just need to link to a user login page instead. Use the free Peter's Login Redirect plugin to automatically redirect users to the correct hidden category after they log in. You can choose a different category for each user or role to be forwarded to - it's surprisingly flexible for a free plugin.

  1. Go back to Products → Categories. Hover over the name of your main hidden category. Right-click the 'View' link and copy the link. That will put the URL/address for your hidden category to your clipboard.
  2. Now go to wherever you want to add the link - e.g. your homepage, header or footer. Create a hyperlink in the usual way (either using HTML or the 'Insert/Edit Link' WordPress toolbar icon).

How to link to hidden product categories from the menu

  1. Go to Appearance > Menus.
  2. On the left, open up the 'Product Categories' section.
  3. Tick whichever protected categories you want to add to the menu OR the page where you have added the WooCommerce login form.
  4. Click 'Add to Menu'.
  5. The product categories will be added to the end of your menu on the right. Drag them to the correct position and click 'Save Menu'.

Now go back to your website and click 'Refresh'. If your private categories don't appear in the menu, that's because the plugin is set to only show them in the menu after you have unlocked the category. If you go to the main category for your WooCommerce hidden store and enter the password, the links will then appear in the menu.

To make the menu links visible to everyone, you can change this setting at WooCommerce → Settings → Products → Protected Categories.

5. Choose how your hidden WooCommerce product categories behave

The WooCommerce Protected Categories plugin lets you choose how the hidden part of your store appears publicly. You can change the plugin settings as follows:

  1.  Go to WooCommerce → Settings → Products and click the 'Protected Categories' link at the top.
  2. Tick and untick the boxes to choose whether to hide your WooCommerce hidden products and categories from menus etc.
  3. This page also lets you change the text that appears above the 'Enter password' box and the wording of the button. For example you might add instructions on what to do if a customer loses the password.

Depending on your WordPress theme, there might be publicly visible links to the cart which aren't hidden. If you want to hide a WooCommerce store, you probably don't want this to appear on your public website.

If you use a fully featured theme from ThemeForest or similar then the theme options might let you hide the cart icon. If your theme doesn't have this option then you can hide it using CSS. (We offer a customization service for small coding tasks like this). You can code the cart link to only appear when there are products in the cart. This will automatically hide it from your public-facing store because customers can only add products to the cart after unlocking the category!

7. Add the WooCommerce cart widget

If you've hidden the main links to your cart, you can use the WooCommerce cart widget to display the cart in the sidebar. This might be the right or left hand column on your WP site.

  1. Go to Appearance → Widgets.
  2. Find the sidebar area where you want the cart to display.
  3. Drag the 'WooCommerce Cart' widget from the left hand side to the correct sidebar area.
  4. Tick the 'Hide if cart is empty' box in the widget settings and click 'Save'.

By ticking 'Hide if cart is empty', the cart widget will only display when customers have products in their cart. Since your Woo store is hidden and people can only add products after they unlock the category, this stops it from appearing on your public website. Even if you have the same sidebar on the public and private areas of your website, the cart will only appear when there are products in the cart.

This means that it doesn't matter if you have hidden the shopping cart from the header, as it appears in the sidebar instead.

Adding a Cart legacy widget to the sidebar in the WordPress widget editor

8. SEO - Block your WooCommerce hidden store from search engines

Finally, a note about SEO.

I won't cover this in-depth as it depends on your WordPress SEO plugin. As a general principle, you will want to mark all of the following as noindex:

  • All the default Woo pages (Cart, Checkout, My Account and Shop).
  • The Products custom post type.
  • Product category pages.
  • Product tag pages.

If you have an XML sitemap then you need to tweak the settings to exclude.

Use the documentation for your WordPress SEO plugin to find out exactly how to do this.

This will hide the hidden areas of your WooCommerce store from search engines while allowing search engines to index your public pages.

If you're worried about this, you may be better off using Method 1 and WooCommerce Private Store which handles this automatically.

By default, the products in your hidden product categories will appear in the website search but if you click them then you will be prompted for the password. This also applies to other WooCommerce content such as your main shop page, categories and tags.

You can stop your hidden WooCommerce products from appearing in the WordPress search results at all. To do this, you need to set the "Catalog Visibility" option for each product to "Hidden". You can find this option in the 'Publish' section on the right hand side of the Edit Product screen:

WooCommerce Publish box with catalog visibility set to Hidden

This advice applies to the default search feature that is built into WordPress. If you're using a different search plugin, it's worth testing this to make sure it works for your plugin.

If you're worried about hidden WooCommerce products appearing in the search, you may be better off with Method 1 and our WooCommerce Private Store plugin. That plugin hides products from the search results automatically.

Further reading: How to Build a Private WooCommerce Members Only Shop

Wrapping up

In this tutorial, we have used 2 different plugins to create a WooCommerce hidden store. We've added links to it - either to the menu or to anywhere else on your website. We've dynamically added links and widgets so they only appear once people have unlocked a category.

Both plugins let you hide products and protect a WooCommerce store within your WordPress website. WooCommerce may be most popular for public online shops, but it's just as good for hidden WooCommerce shops. Whether you want to hide WooCommerce wholesale areas, customer-specific products, temporarily hide stores, or create a WooCommerce age restricted area, you can do it with these plugins.

I hope the tutorial has been useful for you. Use the plugin documentation for WooCommerce Protected Categories or WooCommerce Private Shop to learn even more about your chosen hidden store plugin. Or if you like the plugin, become a Barn2 affiliate and earn 30% commission for recommending our plugins!

Are you using one of these methods to hide products in WooCommerce? I'd love to hear how it's working for you - please add a comment below.

Sidebar widget listing popular products with image and name columns
List popular products on pages, widgets - anywhere you like!

I love discovering new ways to use our bestselling WooCommerce Product Table plugin. Today I'm going to share a new method for how to list bestselling or popular products anywhere on your website.

There are lots of reasons why you might want to list bestselling products in order of popularity. Maybe you want to list the most popular products on your website homepage. This is a neat way to draw attention to your main products, and give the most valuable estate to bestselling products making the most sales.

There are many benefits to using this method to list popular products:

  1. List bestselling products anywhere on your site. This could be the homepage, sidebar text widget, within a blog post - absolutely anywhere!
  2. Choose how many products to include in the list.
  3. Add extra columns of data, such as the product image, description, and stock status.
  4. Include an add to cart column so that people can buy popular products directly from the list!
  5. Choose whether or not to show actual sales figures for each product.
  6. The dynamic list of bestselling products automatically updates in real-time based on actual sales figures. No need to manually update it - ever.

Keep reading to learn how to set it up.

How to list bestselling products in a WooCommerce table

The WooCommerce Product Table plugin provides 100's of different ways to list products. This is how to set it up to list bestselling or popular products in a table anywhere on your site.

First, set up the list popular products plugin

  1. Get WooCommerce Product Table and install it on your site.
  2. The product table builder will open automatically, or you can access it later at Products → Product Tables.
  3. Look through the settings and choose how you want your product tables to behave. On the search and sort page, sort by popularity in descending order.
  4. Now go to Products → Product Tables and edit the table you just created. The 'Edit' screen contains some more advanced options. Use these to set the product limit to however many popular products you want to list in the table.
  5. Next, go to the plugin settings page at Products → Product Tables → Settings. Hide any unnecessary elements such as the search box and total number of products. It's best to keep a list of WooCommerce most popular products clean and simple because you will probably only have a few products in the table.
  6. Next, edit the page where you want to list bestselling products. Either insert the shortcode from the final page of the table builder (you can also find this at Products → Product Tables) or add a 'Product Table' Gutenberg block and select the table you just created. This will all your products.

Your popular products WooCommerce list should look something like this:

Bestselling products listed in a table sorted by number of sales

Can I list the number of sales for each product?

Yes. To display the number of sales of each WooCommerce product:

  1. Create a product table as described above.
  2. In your list of table columns, add a custom field column called total_sales.

It will look something like this:

Product table with a Sales column showing the number of times each product has sold

By now, you know how to list WooCommerce bestsellers on any page, based on the number of sales. You can also add the product table shortcode anywhere else on your site.

For example, there's no WooCommerce popular products widget built into the WooCommerce core. It's easy to create your own bestselling products widget by adding a WooCommerce Product Table shortcode directly to a text widget. This is a nice way to draw attention to popular products by listing them throughout your store.

If you're listing popular products in the sidebar then I recommend keeping table columns to a minimum. For example, you might just include columns for the product image and name. The name column will then link through to the individual product page.

You can find a shortcode for each of your product tables at Products → Product Tables. Copy this and paste it into a text widget.

About page with a popular products list added to the sidebar widget area
List of popular products added to a text widget, with columns for image and product name

Where can I get the plugin?

As you can see, WooCommerce Product Table provides lots of fabulous opportunities for listing bestselling products based on popularity. Think about how it can increase sales in your own store.

WordPress posts listed in a searchable table with thumbnails and summaries

'If you run a successful WordPress blog – or are planning on building one – chances are you post a lot of content. While dedicated readers may check out every new article as soon as it's live, you’ll want a way to draw everyone's attention to the posts you want them to see.

A WordPress post table is the perfect way to do just that. It enables you to list some or all of your blog posts in an attractive, organized tabular grid format.

You can provide key information about each article to encourage clicks. You can make it easy for readers to search and filter the table for specific content.

In this guide, we’ll explain exactly what a WordPress posts table is and what you can do with it. Then we’ll show you how to set one up easily, using the Posts Table Pro plugin. Let’s get right to it!

What a WordPress post table is (and why it’s so useful)

Most blogs rely on search fields and sidebar menus to help readers find the posts they’re looking for. These features are a good start, of course. However, they often require visitors to sort through pages of search results or complex archives. This isn't a good way for readers to find information about a particular topic.

A WordPress dynamic table plugin provides a better way to organize and display your blog posts:

WordPress post table listing blog posts with content, categories and tag filters

As you can see, this is an organized list of blog posts presented in a table format. A post table provides a lot of key benefits. For instance, you can:

  • Display all your posts, one or more specific categories, or a carefully curated collection.
  • Choose exactly what information will appear in the table, so you can peak visitors’ interest effectively.
  • Enable readers to search through, sort and filter the table at will, in order to find what they want quickly.

What’s more, a WordPress post table plugin offers an attractive way to show off your content. It doesn't even need to take the place of any other part your blog, since you can add it to any page. Instead, you can use it as an additional way to navigate your blog, like a WordPress post index.

Let’s look at how to create a table of blog posts for your own WordPress site.

Case study - WordPress post table for Journey with Omraam blog

Journey with Omraam blog posts listed in a searchable table

The inspiration for our Posts Table Pro plugin originally came from one of our web design clients, Journey with Omraam. They wanted a WordPress post table to use as an index for their growing blog.

The solution was a table layout allowing users to search and sort all their blog posts. The post table includes various information to encourage users to click through to read each post. There are columns for post title, content, publish date, author and a filterable list of categories. The search box above the table lets users search for blog posts with any keyword.

See the Journey with Omraam post index in action.

As you can see, adding a post table made Journey with Omraam's blog much more user-friendly. Next, I'll share how you can make your own blog easier to navigate too.

How to create a compelling WordPress posts table for your blog (in 3 steps)

WordPress is a powerful platform, which enables even complete beginners do many things easily. Unfortunately, creating a fully-featured table of any sort is not one of them. While you could put together a table by hand using code or a manual entry table plugin, the result is likely to be underwhelming. It would also take you a lot of time, as you'd have to add each blog post to the table by hand.

Instead, let me introduce you to the Posts Table Pro plugin:

This dynamic table plugin helps you build an attractive and feature-rich WordPress post table in minutes. Your blog posts are automatically displayed in a searchable table layout with filters - no manual data entry. Plus, you can customize your posts table to look and work just the way you want.

In the following walkthrough, I'll show you how to use this WordPress plugin, and offer some tips for creating the perfect posts table.

Check out the Posts Table Pro demo!

Step 1: Install and activate Posts Table Pro

The very first thing you’ll need to do (if you haven’t already) is purchase the Posts Table Pro plugin.

When you do this, you’ll be provided with a few things. The most important will be a zipped folder containing the plugin itself, and a license key for activating it. Make sure you save both somewhere safe.

Upload the plugin to your WordPress admin by going to Plugins → Add New → Upload Plugin, selecting the zip file, and activating it. The setup wizard will then guide you in a step-by-step process to create your first table.

Posts Table Pro installed successfully with an Activate Plugin button

Step 2: Configure your WordPress post table settings

Technically, you could skip this step and jump straight to adding a WordPress posts table to your site. This would generate a table using the plugin’s default settings. However, you’ll probably want to customize your post table at least a little, to better match your vision.

Upon the plugin's initial installation, an automatic setup wizard will launch, providing a step-by-step guide to creating your first table. After creating the table, you can customize its appearance. Additionally, you have the option to generate new tables anytime by going to Post Tables → Add New.

Select an exclusive name for the table that will only be used internally and appear on the list of tables in the WordPress admin. Afterward, select the post type you wish to showcase. If you haven't created a content type yet, you can quickly generate one using the free Easy Post Types and Fields plugin.

Choose what type of content to display

Customize columns in WordPress table plugin

This is a vital setting since it’s what lets you customize which information appears in your post table. You can add a column by choosing the type of column from the dropdown menu and clicking 'Add'. The added columns appear in the list of columns above, and you can reorder them by dragging and dropping the sort icon on the left or the column title.

You’ll find a list of all the column options in the Posts Table Pro documentation. At the least, we’d suggest displaying each post’s title, category, date, and featured image. You may also want to include the name of the author, as well as either the content or excerpt column (although using both might be confusing to readers).

Customize search and filter settings

Setting up search and filter options for a WordPress post table

You can incorporate filters into your table to assist users in refining their selections. Keep your target audience in mind while considering which filters would be most beneficial. Filters appear as dropdown menus above the table, and you can add as many as you require.

The filter options available are determined by the post type selected on the first page. For example, typical blog posts can be filtered by categories, in addition to tags or any custom taxonomies added.

Choose how to sort the table

Wizard step choosing how to sort a WordPress post table by date published

You have the ability to personalize the sorting options for your table by selecting the default sorting option and sort direction. This gives you control over the sequence in which the table is presented to your users.

Step 3: Add your WordPress post table to a page

It’s finally time to add a WordPress post table to your website. Technically, you can place it on any page, post, or custom post type. However, we recommend using a brand new page, so your table will be front and center. Alternatively, you may want to embed it on your home page.

Upon completing the creation of your table with the Post Table Pro plugin, the setup wizard will verify that you have finished and furnish you with directions for presenting the table on your WordPress site. You have two options for showcasing the table:

  • Using the 'Post Table' block in the Gutenberg editor or
  • Copying the shortcode from the table builder and pasting it anywhere on your site. This gives you the flexibility to position the table on any page, regardless of its content.

Here's an example of what your table layout might look like:

WordPress post table with image, title, date, author, categories and tag columns

You’ll see your WordPress posts table, configured using all the settings you chose in the previous step. If there’s anything you want to modify, you can go back to the settings page and do so. Any changes you save will automatically be applied to your table via the shortcode, so you won’t have to recreate it.

That’s it! Your WordPress post table is fully functional and ready to go. Now, all you have to do is make sure it’s prominently placed and/or linked to your blog, so readers can start benefiting from it right away.

Where to get the plugin

Once you have a lot of content on your blog, you’ll probably start wondering if there are better ways to organize and display it. A WordPress post table is one of the best ways to make a blog easier to navigate. It’s simple to set up, yet robust when it comes to functionality.

As we’ve shown, the Posts Table Pro plugin makes showing off your content this way easy. All you have to do is:

  1. Install and activate Posts Table Pro.
  2. Configure your WordPress post table settings.
  3. Add your WordPress posts table to a page.

Do you have any questions about how to configure your WordPress post table? Ask us anything in the comments section below!

Image credit: pxhere.