Creating a WooCommerce audio store doesn't have to be complicated. With the right plugins, you can have a music store up and running in under an hour - without hiring a programmer to help you out.
So if you're looking to sell audiobooks, samples of music, audio language learning materials, or even karaoke music, you're in the right place.
In this post, I will guide beginners through the step-by-step process of creating their own WooCommerce audio library. By following the instructions provided, you can easily build a user-friendly audio library for your online store, without the need for advanced technical skills.
In this post, I take you step-by-step through the process of building your very own WooCommerce audio library. The end result will be a fully operational WooCommerce audio store.
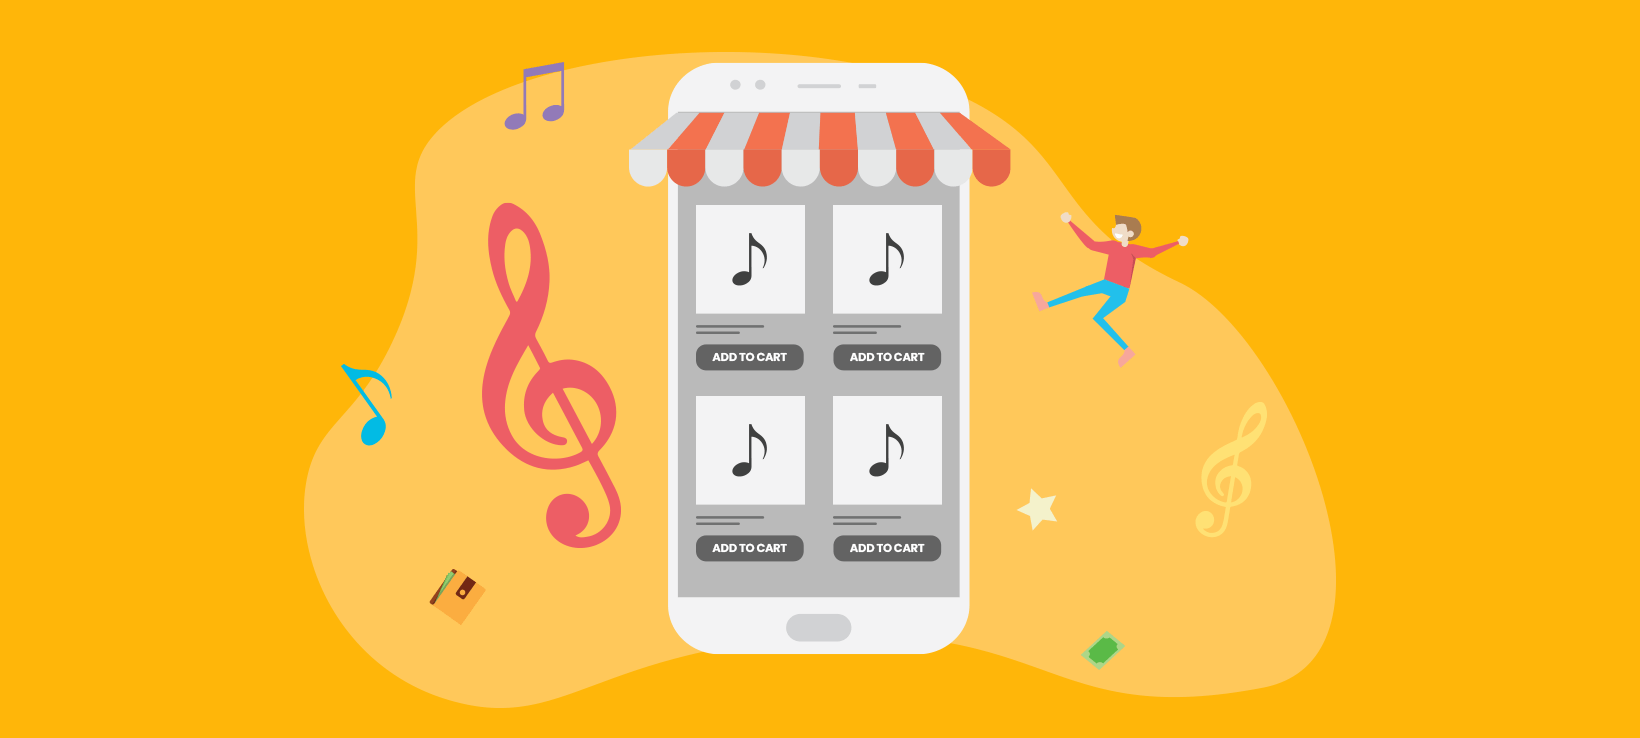
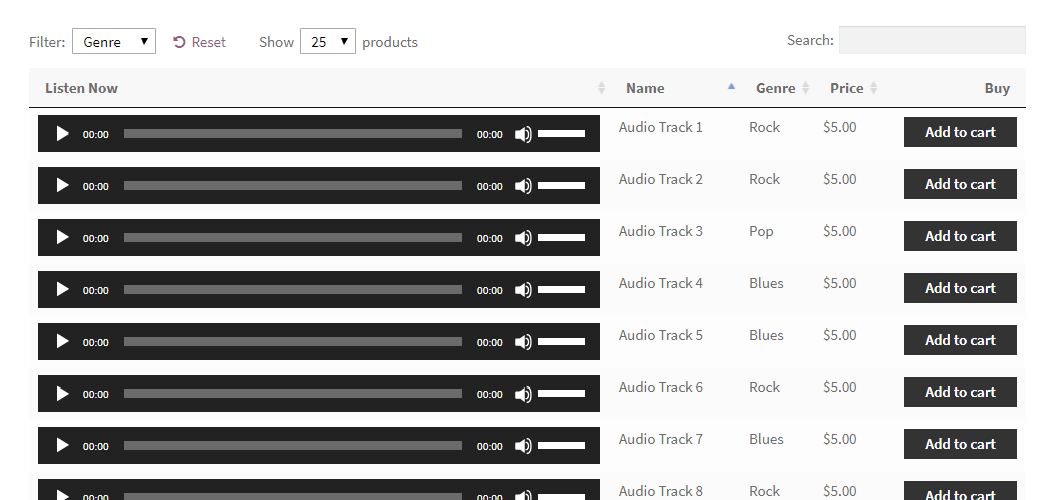
Here's the kind of final effect that we're going for:
What you need to get started building your WooCommerce audio store
Before we start, I'm going to assume that you already have the following:
Any WordPress theme (with or without a page builder such as Elementor)
There's also the third element - our WooCommerce Product Table plugin. Let me show you how to get your hands on it, install it, and use it to build your WooCommerce audio store.
But before that...
Okay, I should probably address one small thing before I discuss how to use the plugin.
That thing is, "Why do you even need a WooCommerce music store?"
The short answer is that it's going to make selling audio files more effective for you, and more convenient for user experience. We've previously published a tutorial about how to create a WordPress audio library with embedded audio players. That focuses on how to display audio and music for everyone to view in the front end, but it doesn't let you sell them. That's what I'm going to tell you about today.
A WooCommerce audio store is powered by an e-commerce plugin. As well as embedded WooCommerce audio previews, it has purchasable download files.
What will my WooCommerce music store look like?
You can use WooCommerce on its own to sell audio files. However, it displays them in a really unhelpful way. You can sell audio files online more effectively by showcasing your catalog of audio tracks in a list or table. That's why you need the WooCommerce Product Table audio plugin store too.
Your finished WooCommerce music store might look something like this:
With this type of WooCommerce music store, the reader/buyer can listen to a number of audio files one after the other without having to navigate to separate product pages - each for one audio file. This might be the full audio file so that people can listen without being able to download it (as they have to buy the product to actually download it!). Or it might be a short sample or snippet to convince them to buy the full version.
The buyer can click the "add to cart" buttons directly next to the tracks that they like. This lets them purchase and download items from the music store WordPress. Again, no need to navigate anywhere else.
Keep reading to see examples of WooCommerce music stores in action, and then learn how to set it up on your own site!
Examples of music you can sell online with WooCommerce
WooCommerce Product Table lets you create a WooCommerce music store selling literally any type of music online. Here are some examples:
Any audio file format MP3, WAV, and much more. Choose the most appropriate format for your music products, and sell them online with WooCommerce.
Any audio or music genre You can sell original audio (audiobooks, foreign language lessons, singles, albums, podcasts, recorded lectures) or stock footage (corporate or relaxing background music, karaoke backing tracks, royalty-free music, samples, sound effects).
Before I show you how to set up your WooCommerce audio store, let's look at some case studies. You can also see our demo of an audio store in action.
Case study #1 - A WooCommerce audio store for Nico Backing Tracks
Nico composes and sells background music tracks through his Woo audio store – Nico Backing Tracks. Nico's customers need to be able to listen to snippets of tracks before purchasing so he needed audio players embedded into the product list.
That's why Nico lists his backing tracks in a WooCommerce music store powered by our WooCommerce Product Table plugin.
Customers can sort the audio store by price, reviews, or track name. There's no clicking from one page to another to listen to tracks and add them to the cart. Everything's on one page. Once the customer knows what they want, they just have to add the track to their shopping cart before clicking view cart to choose the payment gateway.
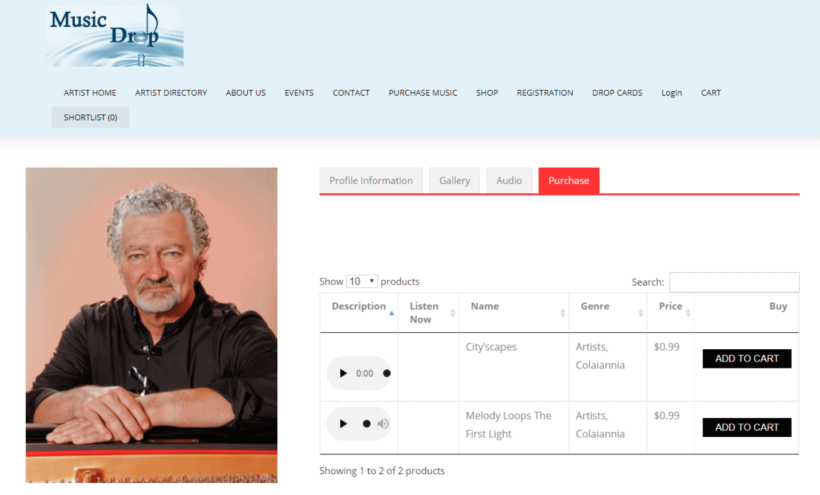
Case study #2 - Music Drop's WooCommerce audio store
Music Drop is a music platform with a WooCommerce audio store. Set up by Louis Colaiannia, the site's mission is to be a platform where artists can sell their music to music lovers across the world.
Each artist has their own profile with tabs for information, an image gallery, and audio. The purchase tab features a product table listing all the audio tracks by that artist. Customers can sort the WooCommerce music store by price, track name, and genre. Plus, the embedded audio players mean users can listen to the tracks before they add any item to the shopping cart.
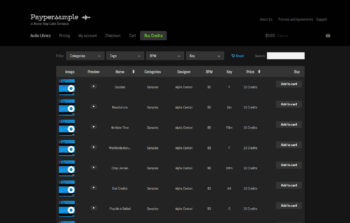
Case study #3 - Boom Bap Labs' audio sounds shop
Boom Bap Labs sell individual sounds with WooCommerce audio previews through their sister site called Paypersample.
The audio store is powered by WooCommerce Product Table, making the tracks quick and easy to find.
Each track has a sample track embedded into the table so customers can listen before they buy. To do this they installed the WordPress HTML5 Audio Player.
There are hundreds of tracks to look through, that's why customers benefit from the filter dropdowns and sort options. In a couple of seconds, the customer can filter the table by category, tag, beats per minute, and key.
Read on to find out how to create your own WooCommerce audio store.
How to create a WooCommerce audio store: step-by-step
The great thing about WooCommerce Product Table is that it can be used for all sorts of different types of WooCommerce products, not only audio files. Whether you want to sell physical CDs or digital products, this audio plugin store can do it.
To learn how to set up a WooCommerce music store, either watch the video or read the step-by-step instructions below.
1. Get the WooCommerce audio plugin and install it on your WordPress site
The interactive table builder will open, or you can access it later from Products → Product Tables.
Follow the step-by-step process to set up your WooCommerce audio store.
2. Configure your audio store
Pay particular attention to the following options:
Music store columns
WooCommerce Product Table comes with a long list of columns that you can add to the table. You can add and rename columns in the table builder. I recommend these columns for selling audio and music:
Description - We're using the main description field of the product to display a live audio embed. This allows the buyer to listen to the track before buying it. Click on the pencil icon for the Description column and rename it to "Listen Now" or similar.
Name - The name of the audio track.
Categories - It's a good idea to categorize your audio products based on the genre. Use the product category for that, and change the column name to "Genre".
Price - The price of each audio product.
Buy - The "Add to Cart" button.
Of course, the above settings are just a suggestion. You are free to experiment and pick other columns when building your WooCommerce audio library.
Disable links to the product page
By default, columns like the product name will link to the individual page for each product. I like to disable these for a WooCommerce audio store because customers already have all the information they need to buy. Keeping them on the main audio store page helps to prevent distractions.
You can do this in the advanced settings for each column when you edit an existing table at Products → Product Tables:
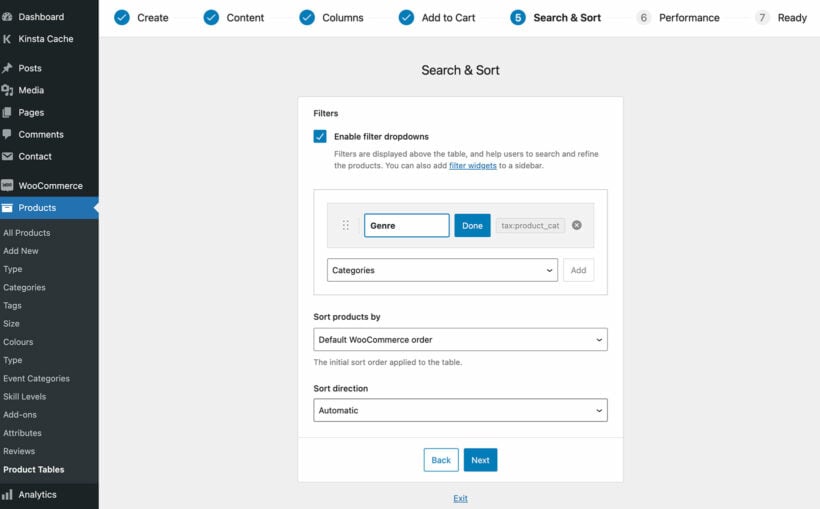
Product filters
The table builder also lets you add filter dropdowns above the audio store. WooCommerce music store, it makes sense to enable filtering based on genre.
Add a category filter and click the pencil icon to change the name to 'Genre':
Plugin settings
To create the ultimate WooCommerce audio store, you also need to go to Products → Product Tables → Settings and enable the 'Shortcodes' option. This ensures that the embedded audio players in the table will work.
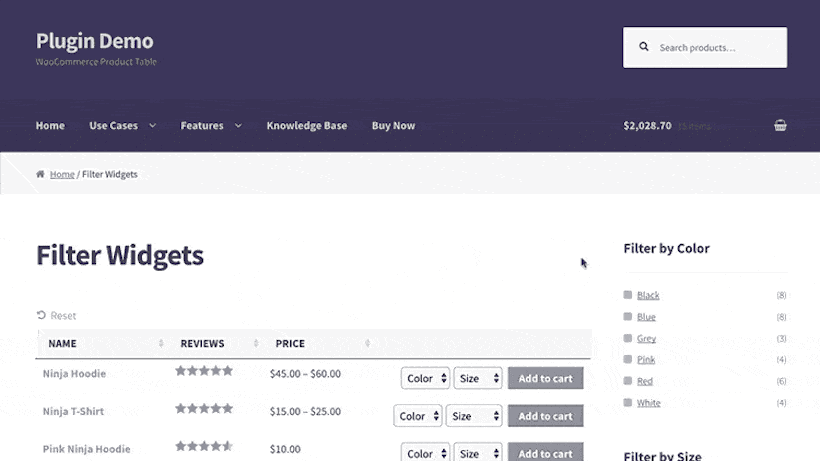
Add filter sidebar widgets to the music store
Some WooCommerce audio stores like to allow their users to filter by multiple tags, for example, to find all songs that are 'romantic' and 'classical'. The filter dropdowns above the table only let you select one option at a time (although you can have as many different dropdown lists as you like, for example, so that users can choose a genre, a composer, and so on).
If you'd like people to be able to select multiple items from the same category (e.g. multiple composers) then you can do this using filter widgets. These appear in the page sidebar. Add the options as product attributes, and users can tick as many as they like.
Add advanced filters
For even more advanced filters, you can also use WooCommerce Product Table with the WooCommerce Product Filters plugin. This has a huge range of filter options that you can tailor to your music store's exact needs.
You can add these advanced filters to your default store layout, your WooCommerce Product Table-powered audio store pages, or anywhere else where you sell products.
3. Add products to your WooCommerce audio store
WordPress and WooCommerce make this part very simple. Here's what you do:
Start by going to your Products panel normally, from the WordPress dashboard.
Click on Add New.
Give your audio product a representative name. Keep it brief, though.
Assign the product to a category. As I mentioned earlier, it's a good idea to use categories for genres.
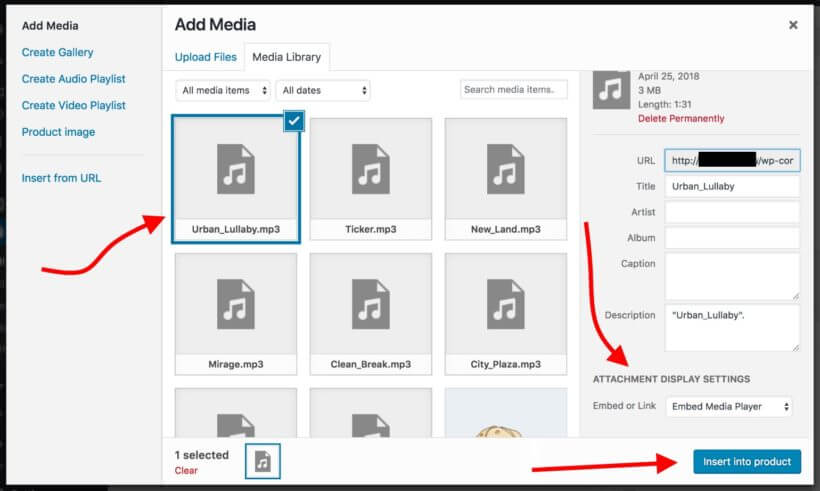
Decide where you want to add the embedded audio player. Most people add it to the main product description or short description. Alternatively, you can add it to a WYSIWYG custom field. Either way, click the Add Media button above the toolbar (or insert a Gutenberg block) and upload or select an audio file from the media library. (Alternatively, insert the file from an external URL if you're web hosting your audio elsewhere.) Where it says, Embed or Link, pick Embed Media Player. Like so:
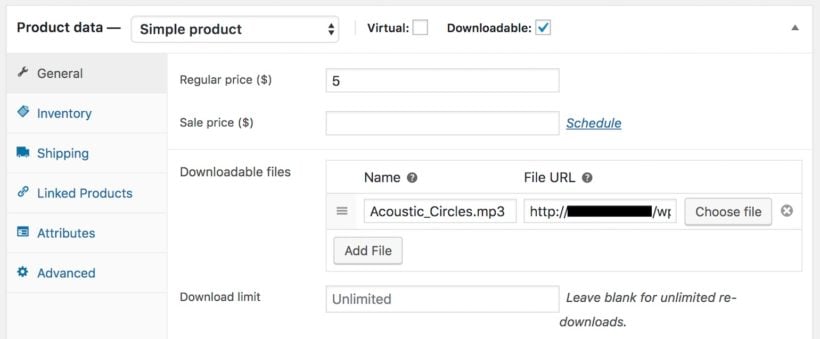
Mark the product as Downloadable, enter its price, and pick the file that the buyer will get access to after completing their purchase. (This will most likely be the exact same audio file you've embedded above.)
Repeat this step for each of your WooCommerce audio store's products.
Tip: If you don't like how the default WordPress audio player shortcode looks, don't worry. Keep reading to learn about other audio player plugins you can use in your WooCommerce audio library.
4. Add your WooCommerce audio store library to any page or post
So far you've configured the WooCommerce plugin and added audio tracks to the product catalog. Next, you just need to show this WooCommerce audio store module to your buyers.
This is very simple to do. Just edit any page or post, and use one of these methods to insert the audio store:
Insert the 'Product Table' Gutenberg block and select your table.
Add the table's shortcode. You can find this at Products → Product Tables.
When you publish the page or post, this shortcode will be converted into a live WooCommerce audio store table containing all your products with embedded audio tracks.
Depending on the options you chose on the audio table plugin settings page, your buyers can navigate the table easily, listen to any of the tracks or sort it by any column. They can also add audio tracks to the cart, and filter the entire table to only display tracks of a given genre.
The WooCommerce music store plugin in action
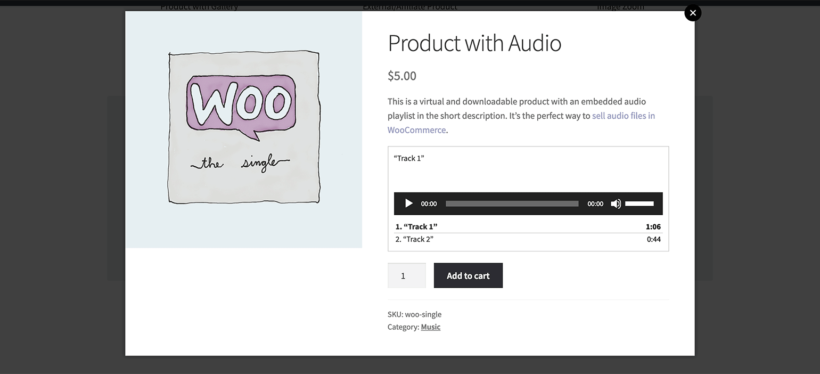
Bonus tip #1 - Show audio previews in a quick view lightbox
So far, you've learned how to list your WooCommerce audio store products in a table layout with a column containing embedded WooCommerce music players. If you prefer, you can provide the audio samples in a quick view lightbox instead of directly in the product list.
You can achieve this by installing the WooCommerce Quick View Pro plugin. This adds 'Quick View' links or buttons to your product tables, or to the default store layout if you prefer. Customers can open the quick view for a product and listen to the WooCommerce music player from a lightbox popup.
To set it up, simply install the plugin and add the embedded audio players or playlists to the product's short description. This will appear as a music player for WooCommerce in the quick view popup.
Bonus tip #2 - Boost conversions with faster checkout mechanism
For any ecommerce store, cart abandonment is a big issue. One of the primary reasons for cart abandonment is the long and complex checkout process. For this, having a simplified and quick checkout set up on your store can greatly increase conversions and bring down the cart abandonment rate.
The WooCommerce Fast Cart plugin is specifically designed for this purpose. The plugin features an intuitive one-page checkout mechanism that lets customers complete the checkout process without leaving the page at all. They can review their orders, add their mailing details, and complete the payment on the same page.
To set it up, simply install and activate the WooCommerce Fast Cart plugin on your WordPress website. Configure plugin settings for your store, and that's it. The plugin will begin working independently and help customers easily place orders on your WooCommerce store.
Enhance your WooCommerce audio library with other audio plugins
In the instructions above, I explained how to add music players for WooCommerce audio store using the basic audio shortcode that comes with WordPress. If you don't like how this looks, then you can embed your audio files using third-party audio plugins instead.
There are lots of audio plugins available. We particularly love:
The free or premium version of Presto Player, which adds easy-to-use yet attractive video players that look fantastic in WooCommerce Product Table:
The free
Compact WP Audio Player plugin because it's so incredibly simple. It lets you add a circular play icon that customers can click on to listen to tracks directly in the WooCommerce audio library. This takes up less space than the default WordPress audio player and looks really neat.
The plugin author has packed a lot into this small audio plugin, as it has the main controls you need. While you're playing an embedded audio track, the icon turns to a pause button so that you can stop and resume as needed.
To add a compact WooCommerce music player to any of the fields in your WooCommerce audio store, simply install the plugin. The only other step is to add the shortcode [sc_embed_player fileurl="URL OF THE MP3 FILE"] to the field where you want to display the customizable audio player for each product. This will display correctly in WooCommerce Product Table.
Create a WooCommerce audio store with free downloads
So far, we've talked about how to create an audio library with add-to-cart buttons. This is ideal if you want to sell your audio products. But what if that's not what you want?
Fortunately, you can also use this WooCommerce audio plugin to provide free downloads. There are several ways to do this:
Option 1 - Create free audio products
Create a download product and set the price to 0. Users can add the free download to the cart in the usual way, and complete the WooCommerce checkout without having to pay. WooCommerce will then send them a secure link to the free download via email.
Option 2 - Add direct download links to the audio library
Alternatively, you can add a direct link to the download to the short description, long description, or a custom field. You can style this as a button if you like, or leave it as plain link text. Call it something like 'DOWNLOAD NOW'.
People can click to download the file to their computer immediately, bypassing the cart and checkout. For instructions on how to add a link or button to the audio library table, please see the knowledge base.
Can I create a WooCommerce audio store without free audio snippets?
Absolutely. You don't have to include audio players with the full track or a short sample snippet.
Instead, you can just list the other columns without an embedded audio player. Or alternatively, add an image (watermarked if required) as the main product image and add an 'image' column to your product table. This will show the image instead of an audio player. The customer will receive an email with the actual audio file after purchasing.
Can I sell non-downloadable audio tracks?
So far, I've assumed that you want people to receive a link to download the full audio file after purchasing. If you don't want people to be able to download the audio - for example for copyright reasons - then that's fine too.
Here's a nice simple way for you to sell audio products, without making them available for download. Customers can only listen to them on a hidden page on your online store.
This is how to set it up:
Create a new page and use the 'Add Media' button to upload the audio file. WordPress will automatically convert this into an embedded audio player that you can listen to on the page, but which can't be downloaded.
Use WooCommerce Password Protect to restrict the page where you've added the audio player. This is easy to do - just click 'Edit' next to the 'Visibility' option in the 'Public' section of the Add/Edit Page screen.
Add the audio track as a 'Virtual' WooCommerce product.
Now, install Woo's official Follow Ups plugin. Use it to create an email that will be sent to customers after they purchase this specific product. The email should contain a link to the password-protected page where you have embedded the non-downloadable audio track. It should also contain the password so that they can unlock the hidden page.
Repeat this process for each audio product.
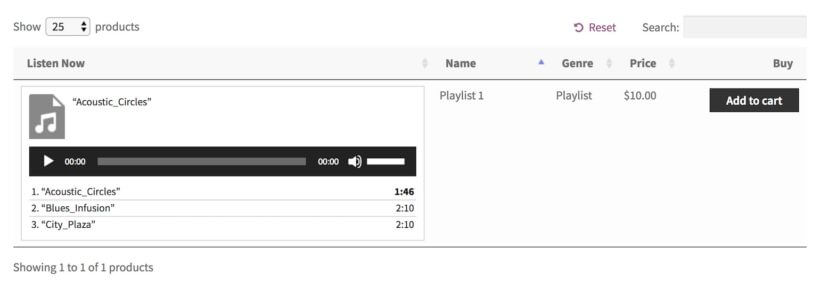
Go the extra mile and sell entire audio playlists
With the following setup, you can not only sell individual audio tracks but also entire playlists.
To do that, you first need to create some new products. The process starts normally by going to Products → Add New and naming your new audio playlist product accordingly.
Next, click on the Add Media button, but this time instead of adding an individual audio file, click on Create Audio Playlist and pick the tracks that should go into the playlist. When you're done, click on Insert audio playlist.
Lastly, mark the product as Downloadable, and assign all the files that the buyer should be able to download once they complete the purchase.
This is what the playlist looks like for the buyer:
Your turn!
Now you know how to create a fully functional WooCommerce audio store with the WooCommerce Product Table plugin! The best thing is that the whole process can be carried out in less than an hour (reading this tutorial included). If you have lots of products then you might need longer to add them all, but an hour should be realistic to set up the basic WooCommerce audio store.
Get this WooCommerce audio plugin today and begin your adventure with it:
Hi, Alex. Thanks for using WooCommerce Product Table. You're right, the featured video tutorial was created 3 years ago, and so the interface looks different on the current versions of our plugin, WordPress, and WooCommerce, albeit the basic functionality remains the same. My apologies for the inconvenience. You can find up-to-date documentation in our Knowledge Base articles for WooCommerce Product Table. I see that you also submitted a request via our Support Center over the weekend, which I responded to a few minutes ago.
I know another DONG! ""Every noise at once"" is a website where music genres are ordered according to how accustic or electronic they are... how dark or light... you can listen to demo tracks and even see what bands are in witch genre and and how good they fit within the genre itself.
Hi, Paul. Thanks for your comment. I reviewed the website you mentioned. It has an interesting way of automatically categorizing each music genre, and quite a unique visual display of the same. I can see how this way can be quicker at finding a particular type of audio track. Right now, the artist/band subcategory/taxonomy links lead to their page on Spotify, but I suppose it can be customized to instead link to WooCommerce product pages for each track or album playlist.
If I sell an audiobook direct to consumer via WooCommerce, how does the end user listen to it?
With apps like Audible, it’s seamless, right? But what does the end user need to do if they buy direct? Is there an import to listen app type process? Or will most mobile devices just know what to do?
Hi, thank you for the comment. You can use WooCommerce's default way of distributing files after purchasing. It is discussed above (3. Add products to your WooCommerce audio store). You can find a video of how it's done here. If you want to sell non-downloadable audio tracks, there is a section on how to do it here.
I hope this helps. If you have further questions, you can reach us through our Support Center. Cheers
Hi, i saw your page about audiobooks store. I need an audiobook store, where the client can buy the audio and then can listen only on the website (no download).
Could you help me?
Thank you
Hi Alex! Yes, you can do this. Please see the 'Can I sell non-downloadable audio tracks?' section in the tutorial! Hope this helps. Please let me know if you have any more questions. You can also enquire in more detail via our dedicated Support Center. Thanks!


61 Comments
Hello.
Is there an up to date guide for this? The current pro version of the plugin looks completely different to this tutorial.
Thank you!
Hi, Alex. Thanks for using WooCommerce Product Table. You're right, the featured video tutorial was created 3 years ago, and so the interface looks different on the current versions of our plugin, WordPress, and WooCommerce, albeit the basic functionality remains the same. My apologies for the inconvenience. You can find up-to-date documentation in our Knowledge Base articles for WooCommerce Product Table. I see that you also submitted a request via our Support Center over the weekend, which I responded to a few minutes ago.
I know another DONG! ""Every noise at once"" is a website where music genres are ordered according to how accustic or electronic they are... how dark or light... you can listen to demo tracks and even see what bands are in witch genre and and how good they fit within the genre itself.
Hi, Paul. Thanks for your comment. I reviewed the website you mentioned. It has an interesting way of automatically categorizing each music genre, and quite a unique visual display of the same. I can see how this way can be quicker at finding a particular type of audio track. Right now, the artist/band subcategory/taxonomy links lead to their page on Spotify, but I suppose it can be customized to instead link to WooCommerce product pages for each track or album playlist.
If I sell an audiobook direct to consumer via WooCommerce, how does the end user listen to it?
With apps like Audible, it’s seamless, right? But what does the end user need to do if they buy direct? Is there an import to listen app type process? Or will most mobile devices just know what to do?
Hi, thank you for the comment. You can use WooCommerce's default way of distributing files after purchasing. It is discussed above (3. Add products to your WooCommerce audio store). You can find a video of how it's done here. If you want to sell non-downloadable audio tracks, there is a section on how to do it here.
I hope this helps. If you have further questions, you can reach us through our Support Center. Cheers
Hi, i saw your page about audiobooks store. I need an audiobook store, where the client can buy the audio and then can listen only on the website (no download).
Could you help me?
Thank you
Hi Alex! Yes, you can do this. Please see the 'Can I sell non-downloadable audio tracks?' section in the tutorial! Hope this helps. Please let me know if you have any more questions. You can also enquire in more detail via our dedicated Support Center. Thanks!