WooCommerce frontend product submission plugin

Want to add WooCommerce frontend product submission to your store? This allows other people to add products from the frontend of your website. They never need to visit your WordPress admin dashboard.

Frontend product creation is great for any type of multi-vendor store. That's because most people will find it more convenient to work from the frontend. It can also come in handy for many other types of WooCommerce store.

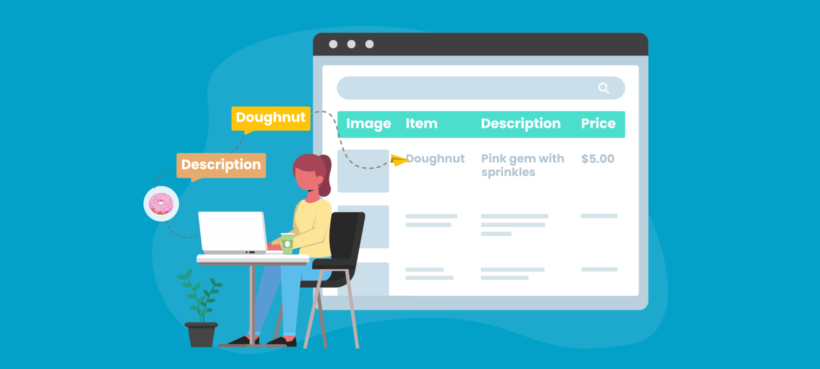
In this post, you'll learn how to allow WooCommerce frontend product submission using Gravity Forms and then display those products using WooCommerce Product Table.

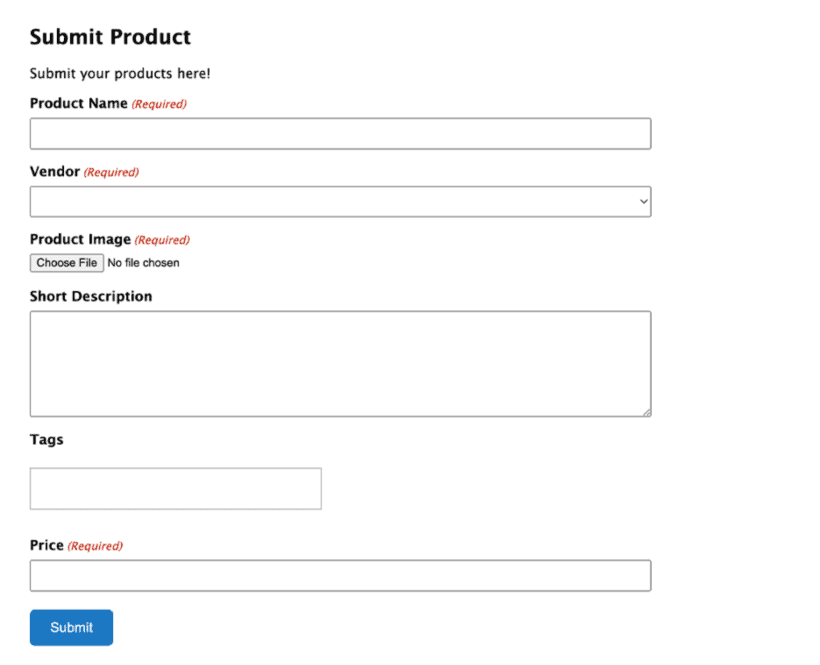
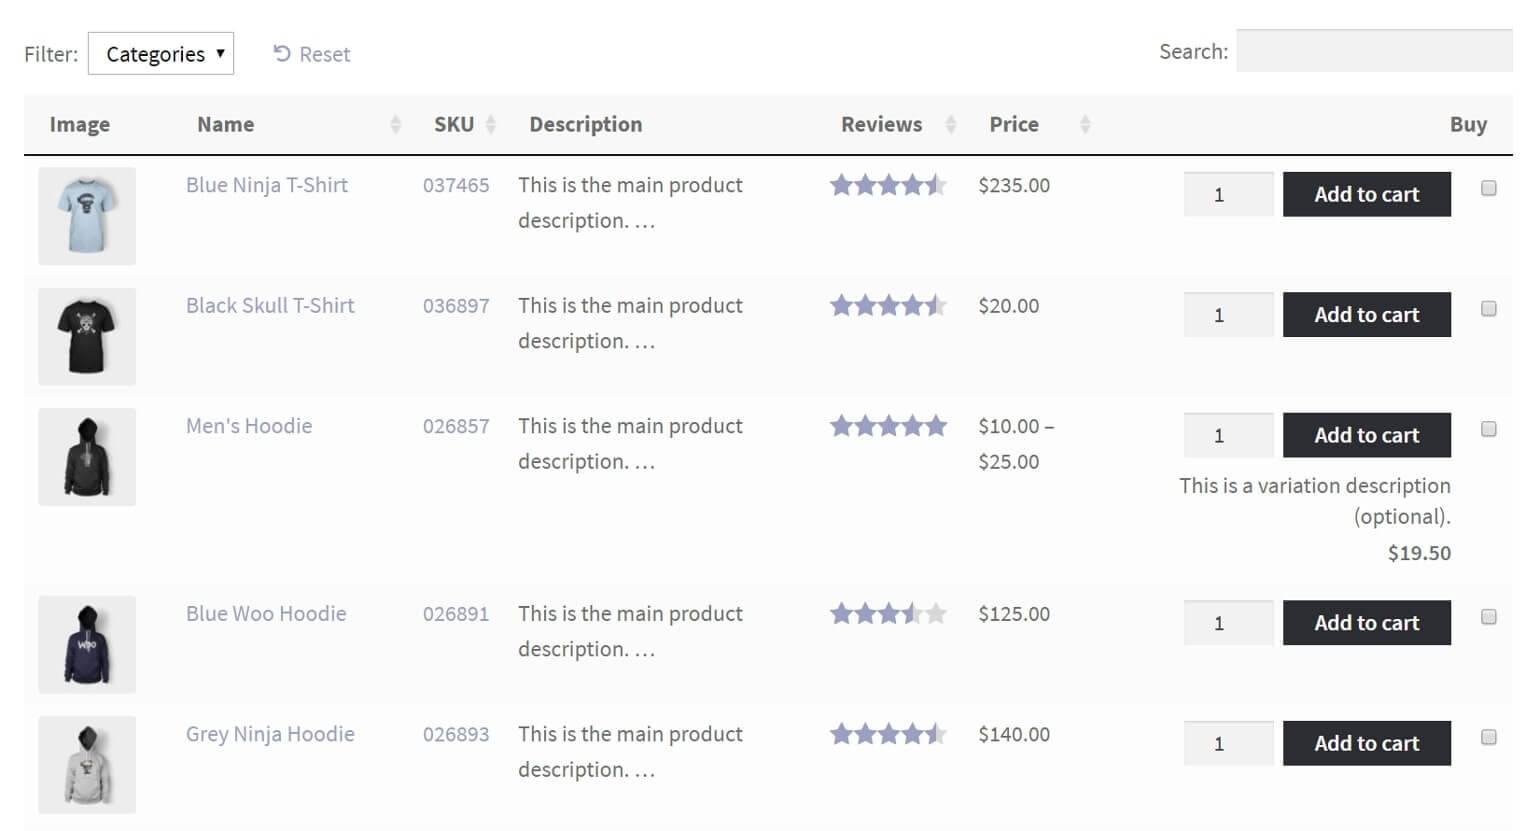
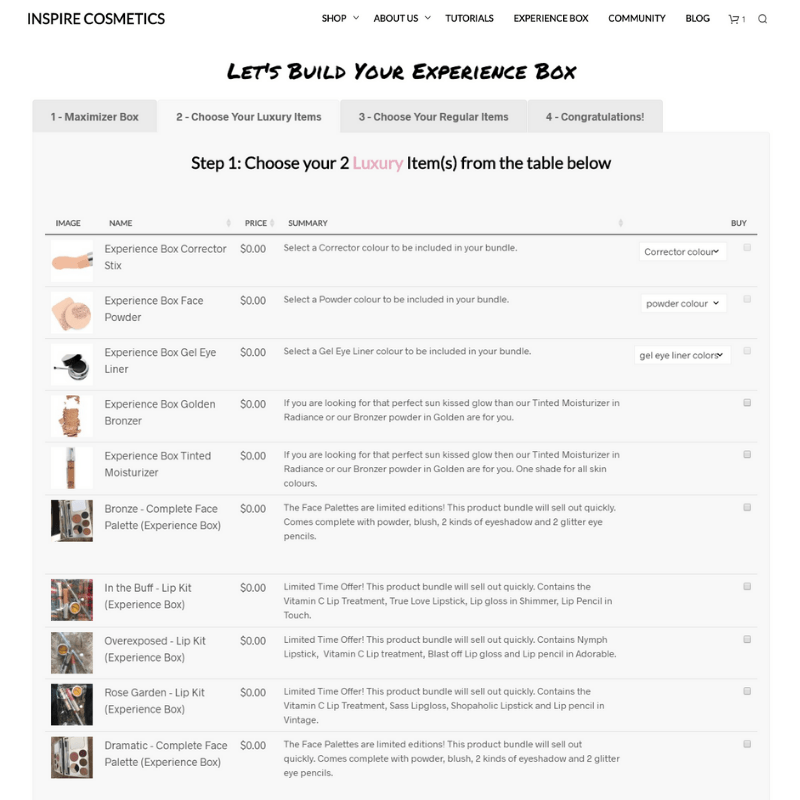
Thanks to Gravity Forms' flexibility, you'll have a ton of control over how your frontend add product forms look and where they appear. Here's an example of what you can build:

WooCommerce frontend product submission form with name, vendor, image, description, tags and price fields

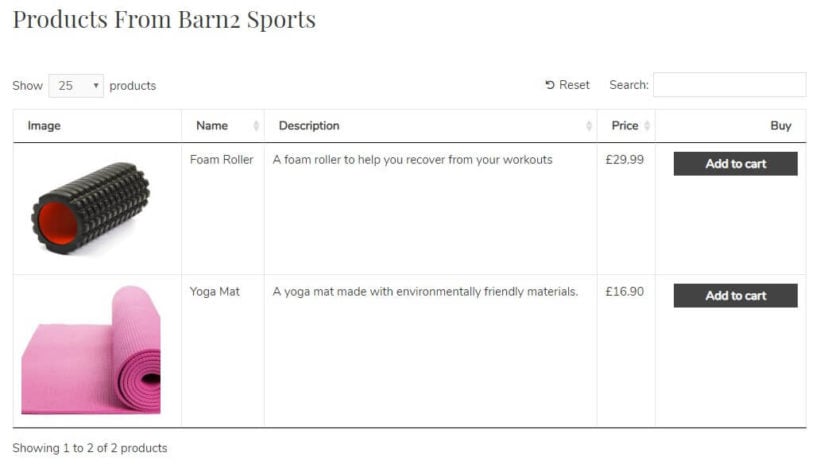
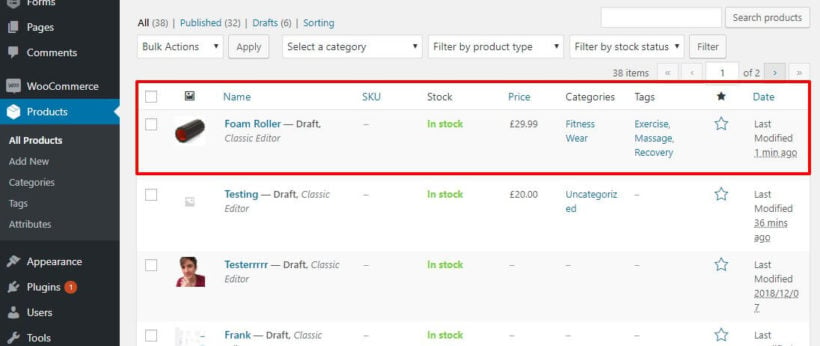
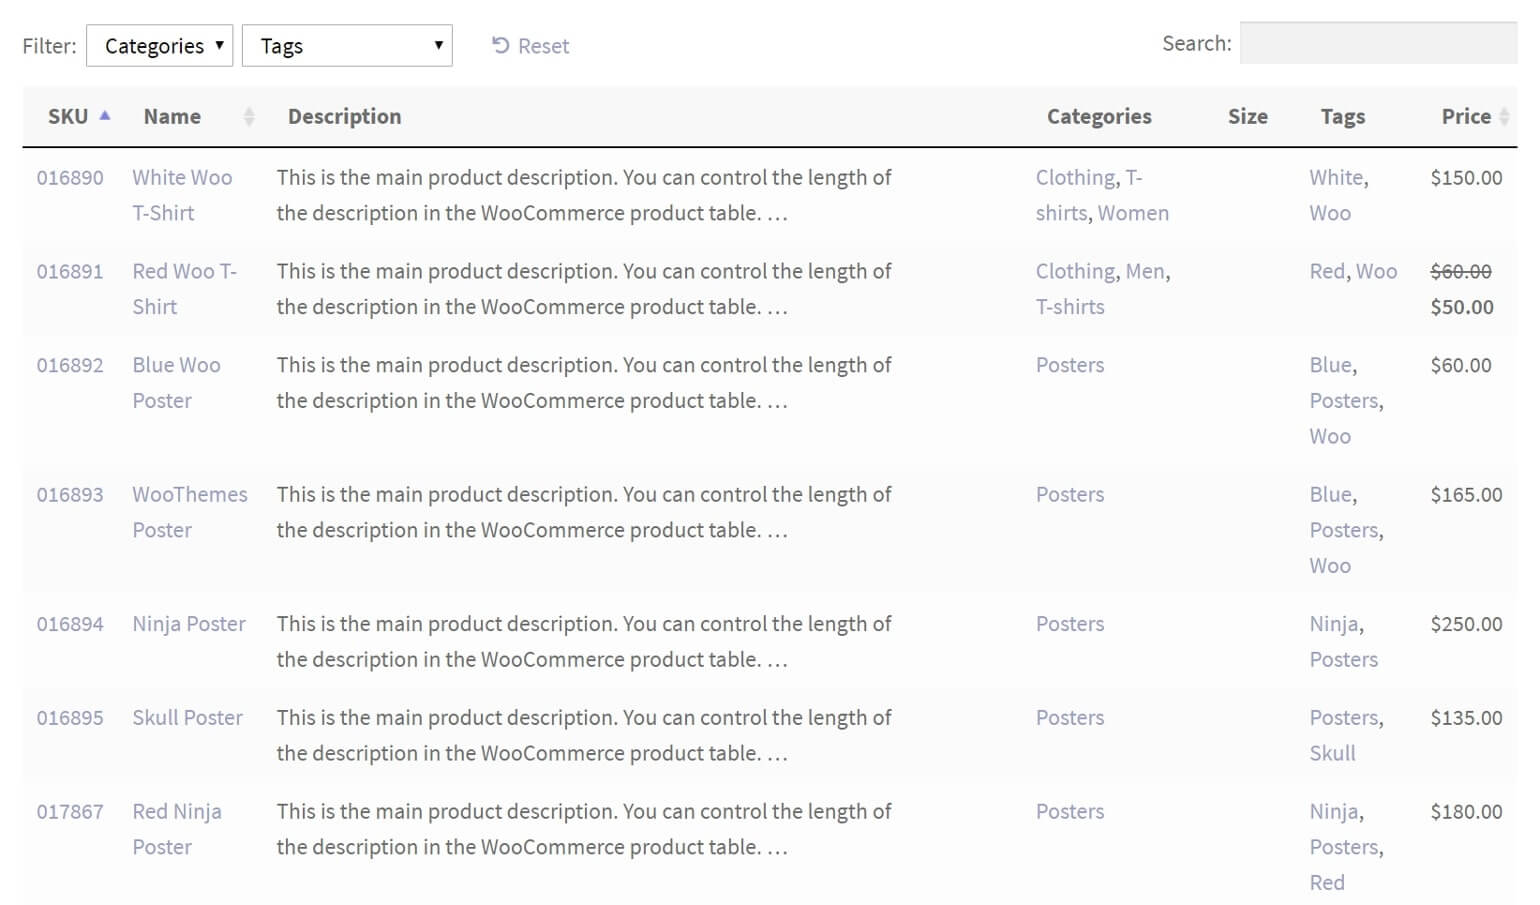
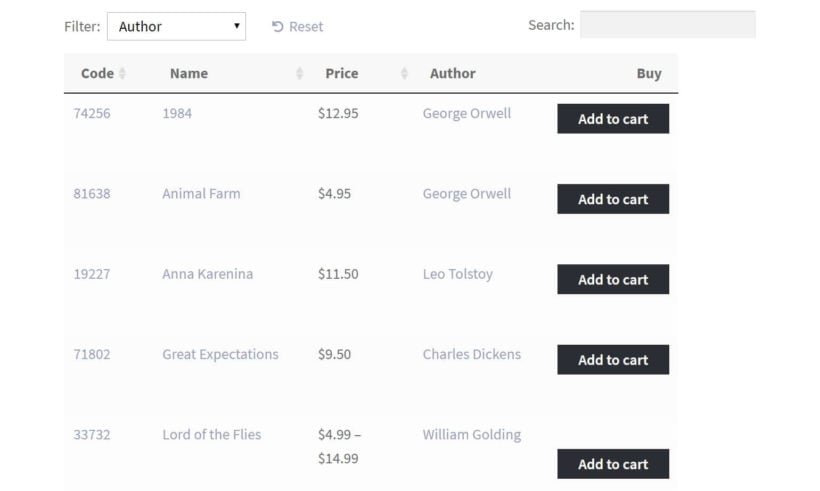
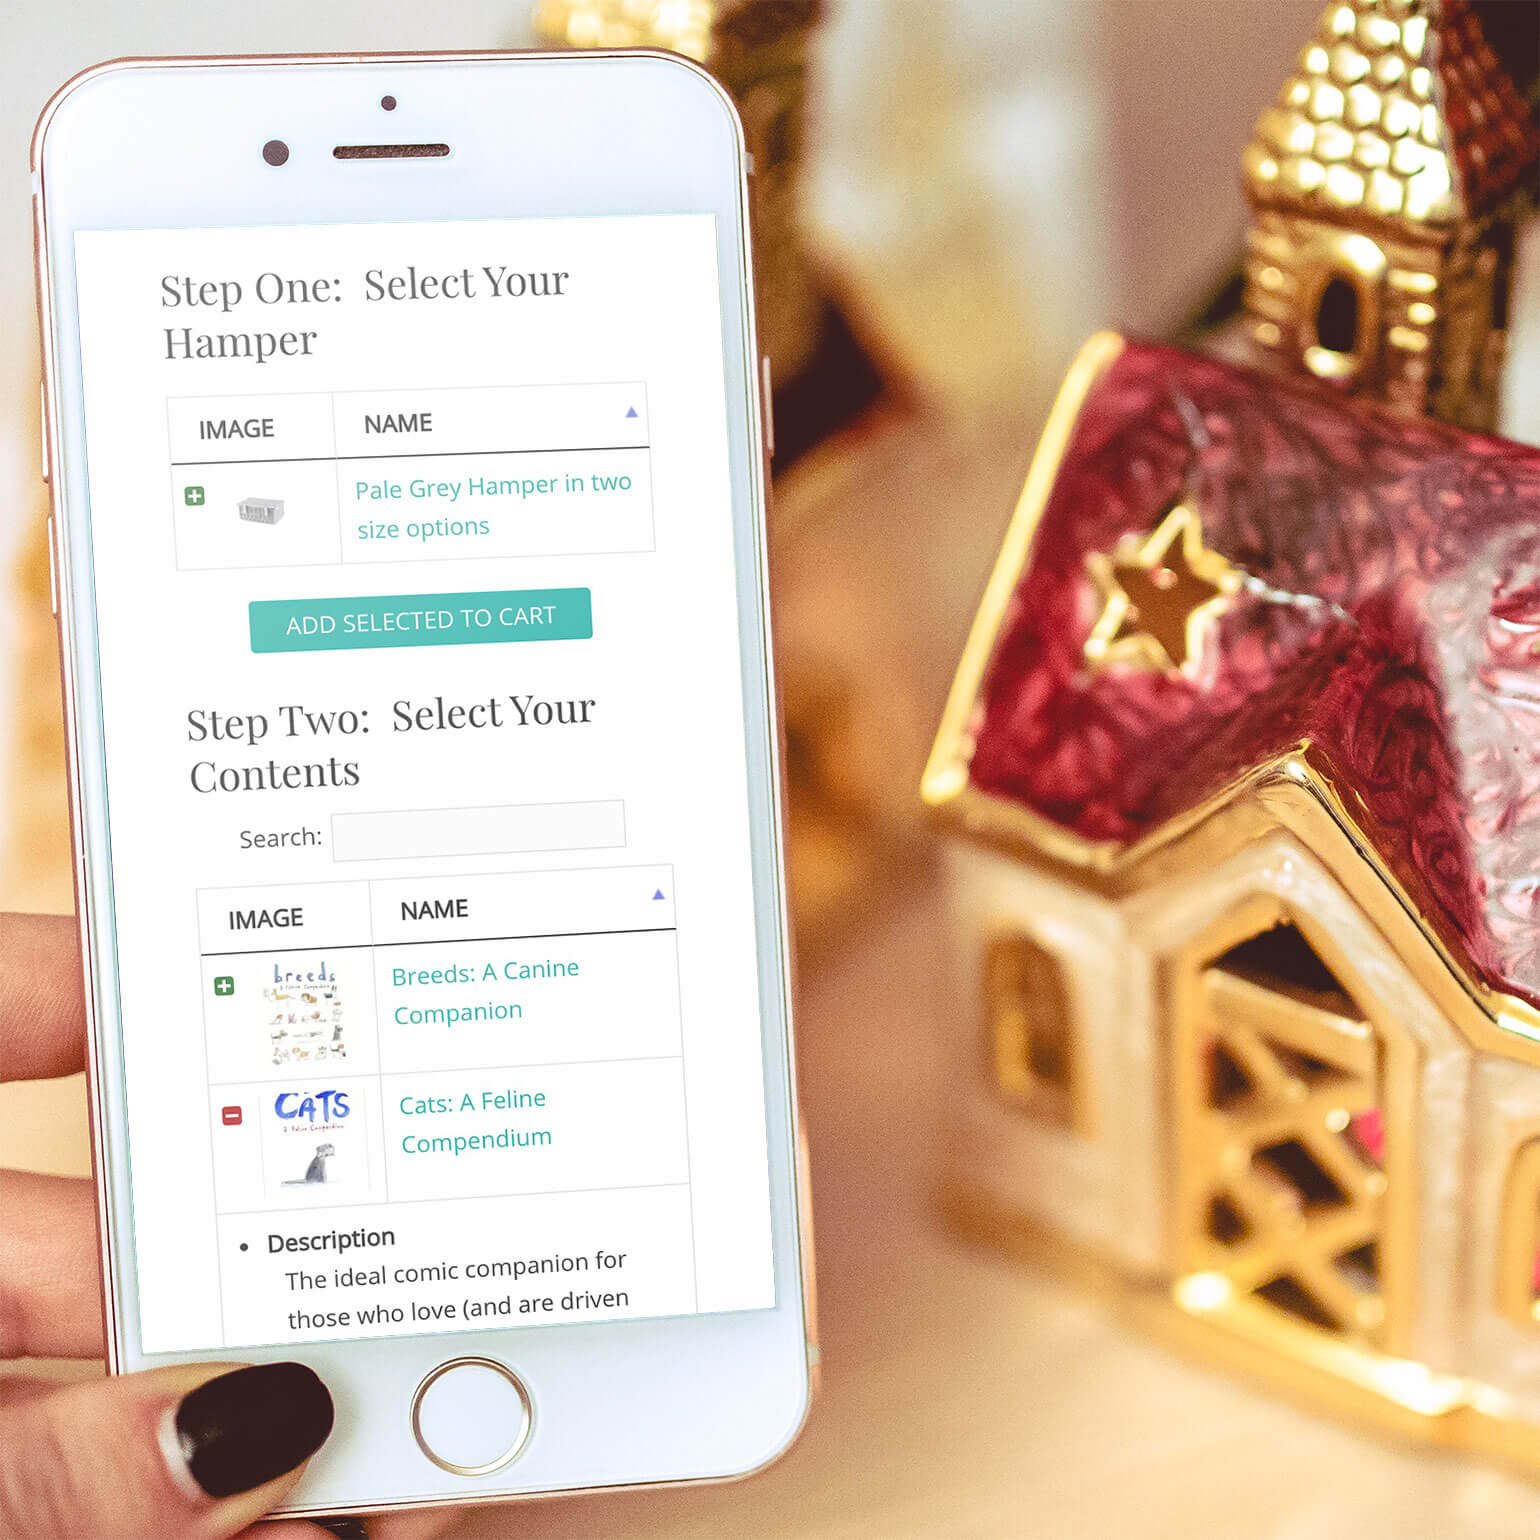
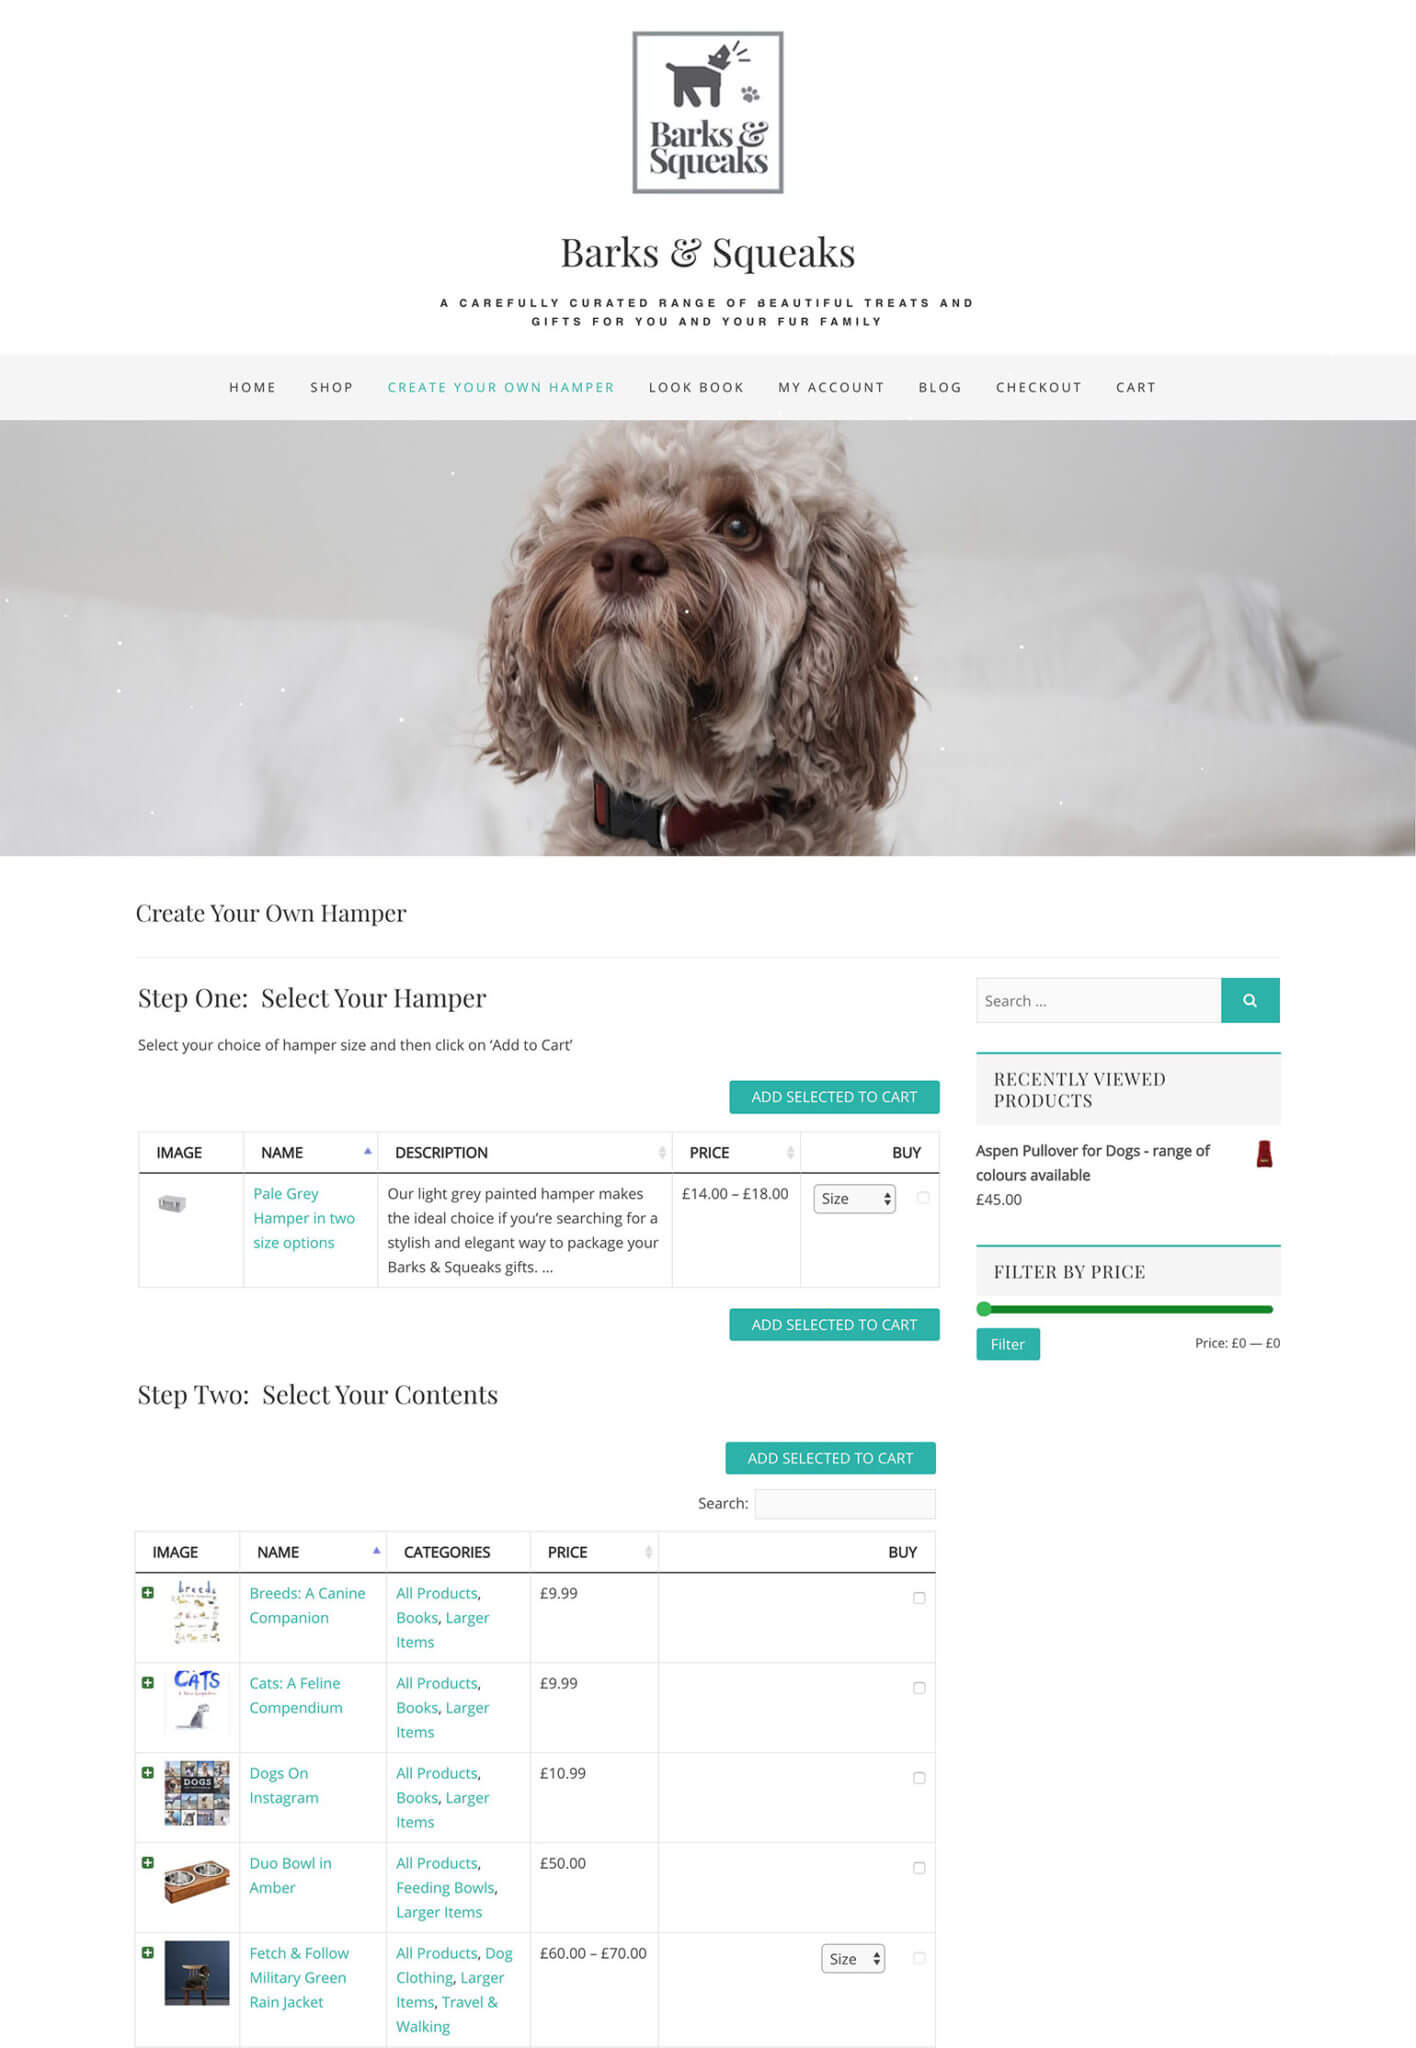
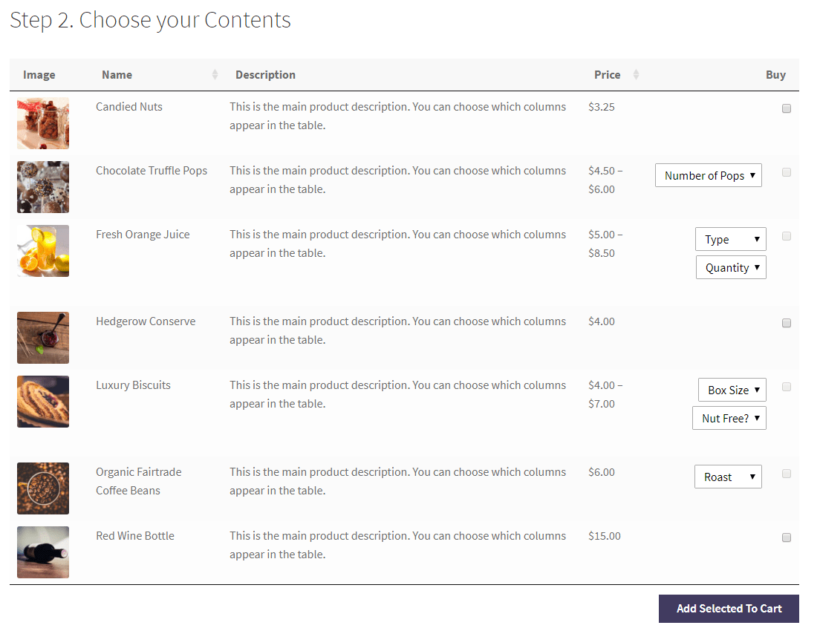
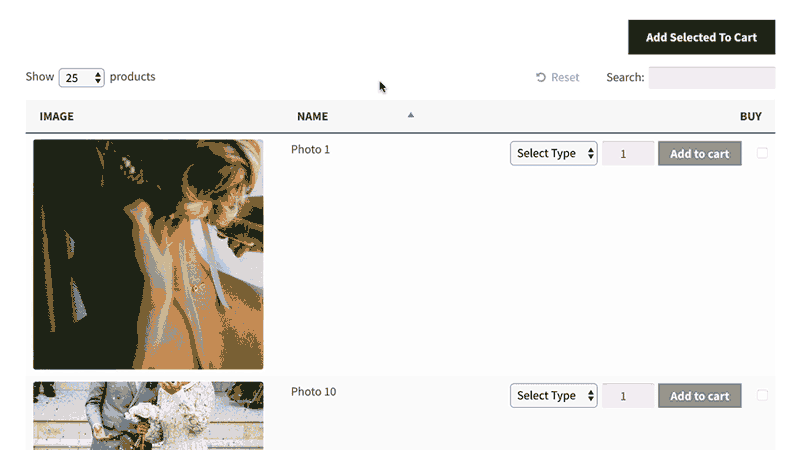
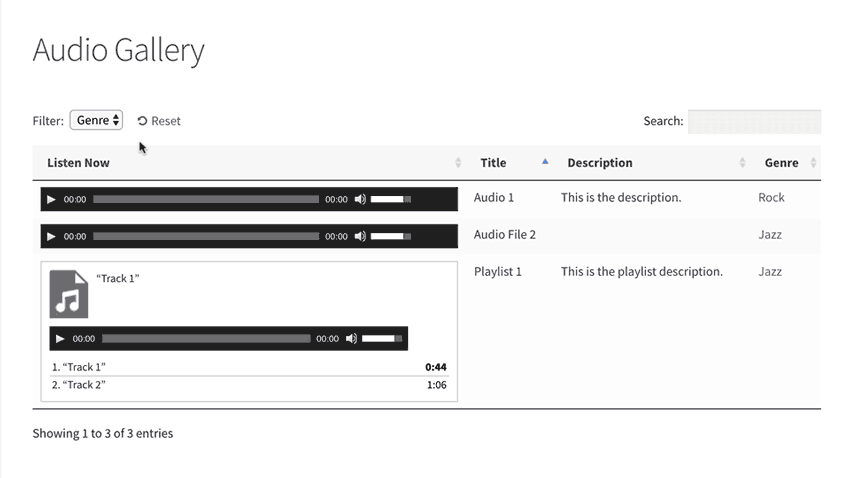
You can then display the user-submitted products in a table layout, like this:

User-submitted vendor products shown in a sortable WooCommerce product table

Beyond that, we'll also share tons of tips for working more effectively with your frontend forms. This includes restricting access to the forms, assigning custom taxonomies for vendors, and displaying user-submitted products in a shopper-friendly manner.

Either read the article below, or watch this video:

What sorts of website need WooCommerce frontend product submission?

The biggest use case for frontend product submission is any type of WooCommerce multi-vendor store. That is, a situation where third-party users can add products from the frontend and sell them through your Woo store.

While there are quality full-service multi-vendor plugins, sometimes you don't need all that extra functionality for commissions, vendor reports, etc. This method is a much more lightweight approach.

For example, maybe you're creating a website for a food festival and you want to let each restaurant owner add their menu items as WooCommerce products. This method would make that easy, without bogging you down with a bunch of functionality that you don't need.

Beyond letting other people add their own WooCommerce products, you might find this method helpful even if you're the only one selling products.

For example, maybe you've hired an assistant to help with uploading new products. Rather than forcing your assistant to learn the WordPress backend, you can just have them work with a WooCommerce frontend add product form instead. Beyond being more user-friendly, this also helps keep things secure as you don't need to worry about which backend capabilities the user has.

What you'll need to follow this tutorial

To create your WooCommerce frontend product submission form, you'll need two plugins:

  • Gravity Forms - this is the core form builder that you'll use to build the structure of your form.
  • Gravity Forms + Custom Post Types - by default, Gravity Forms' form-to-post functionality creates a standard WordPress post. This free plugin lets you change the post type to a WooCommerce product instead.

Then, you'll also learn how to use the WooCommerce Product Table plugin to display the products submitted through your add product form.

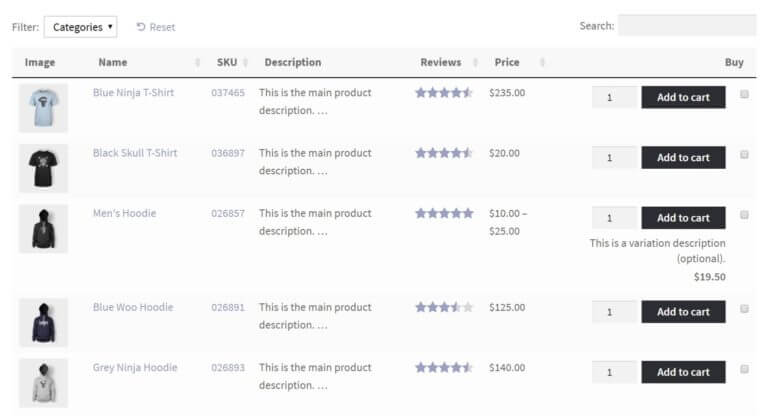
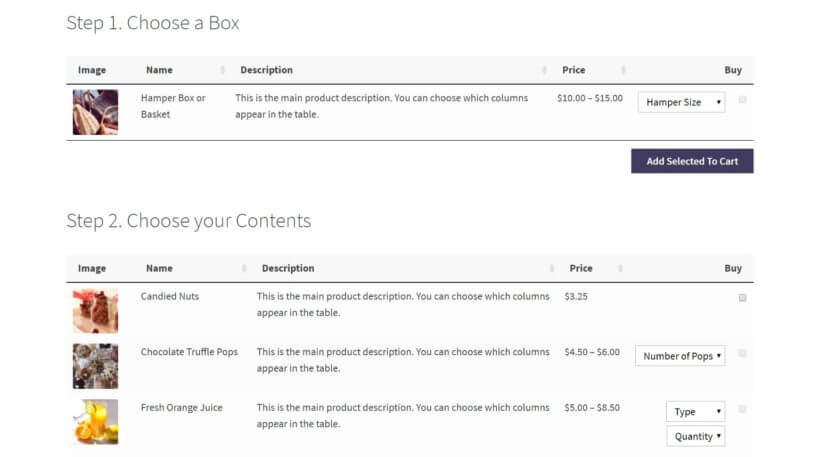
We'll use WooCommerce Product Table to list the uploaded products in different ways. For example, you'll learn how to create a separate page for each vendor's products, or let shoppers filter products by a specific vendor:

Product table with a vendor filter dropdown letting shoppers narrow products by vendor

As such, we'll divide this tutorial into two parts.

First, we'll cover building the form and mapping it to a WC product. Then, we'll cover how to take those product submissions and display them to potential shoppers.

Part 1: Create your frontend product form with Gravity Forms

Ok, so you want to let users add WooCommerce product from the frontend - great plan! To get started, you'll need to create the actual form that people will use to add products on the frontend. To do that, go to Forms → Add New.

Step 1: Map form submissions to WooCommerce product

Unlike most WordPress form plugins, Gravity Forms has a neat feature that lets you automatically create a WP post whenever someone submits a form.

To map form submissions to a post, Gravity Forms includes a special set of Post Fields. By default, these post fields create a standard WordPress post. The Gravity Forms + Custom Post Types add-on plugins let you change that and map fields to a WooCommerce product, instead. That's what transforms Gravity Forms into a WooCommerce frontend product uploader.

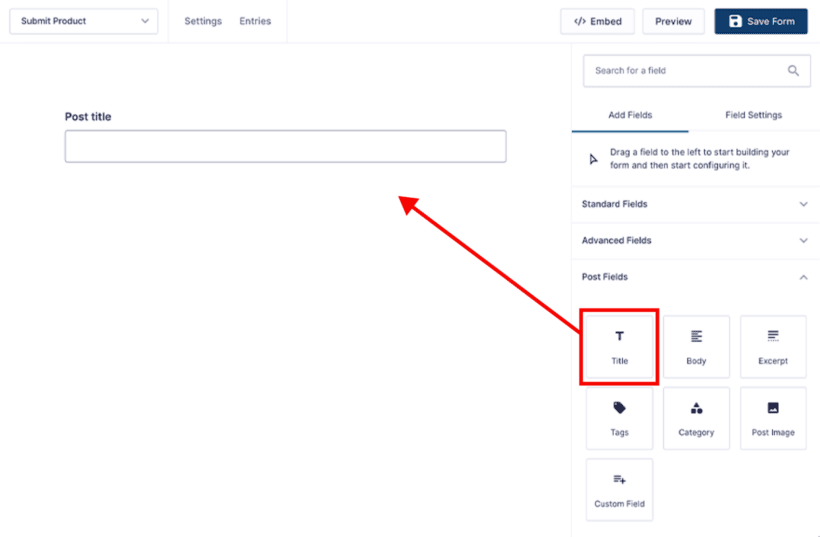
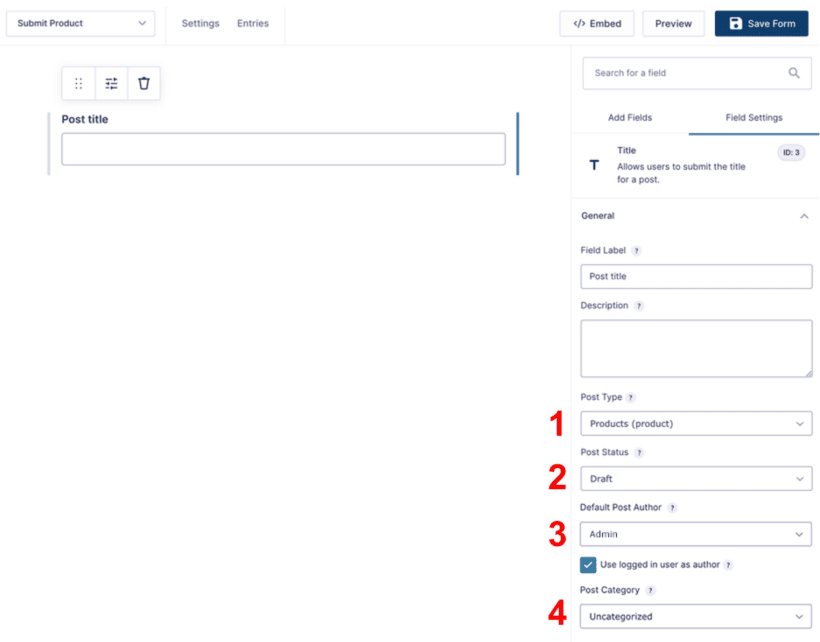
To set up this mapping, add the Post title field from the Post Fields area. Beyond letting users enter the name of the product, this Post title field also includes some important configuration options:

Post title field added to the product submission form with post type, status and author options

Once you've added the field, click on it to edit it. Here's what you'll need to configure:

  1. Post Type - use the dropdown to select Products. If you can't see this, don't forget to install the free Gravity Forms + Custom Post Types plugin.
  2. Post Status - we recommend leaving this as "Draft" or choosing the "Pending Review" option. This ensures that you're able to moderate all the submitted products before they're publicly available at your store. Alternatively, you can also choose "Published" to make products live right away without admin approval.
  3. Default Post Author - WooCommerce products don't support authors by default, so this setting isn't relevant. We'll show you how to use a custom taxonomy to store vendor/author information later on.
  4. Post Category - you can select the default category here. You'll also be able to let submitters choose their own categories and tags, if required.
Title field settings with post type set to Products, status Draft and logged-in user as author

And that's it! You're part way there. Now, a user can submit the form and Gravity Forms will add a new product.

But...you still need to collect some more information, right? What about prices, pictures, categories...you get the idea.

Step 2: Add form fields for WooCommerce product information

Next up, you need to add form fields for all the product information. Exactly how you do this depends on what type of information you're collecting, so bear with us here! There are four different approaches for:

  • Featured image
  • Description
  • Basic product information like price, stock status, etc.
  • Taxonomies (categories, tags, custom taxonomies)

We'll go through each approach in detail.

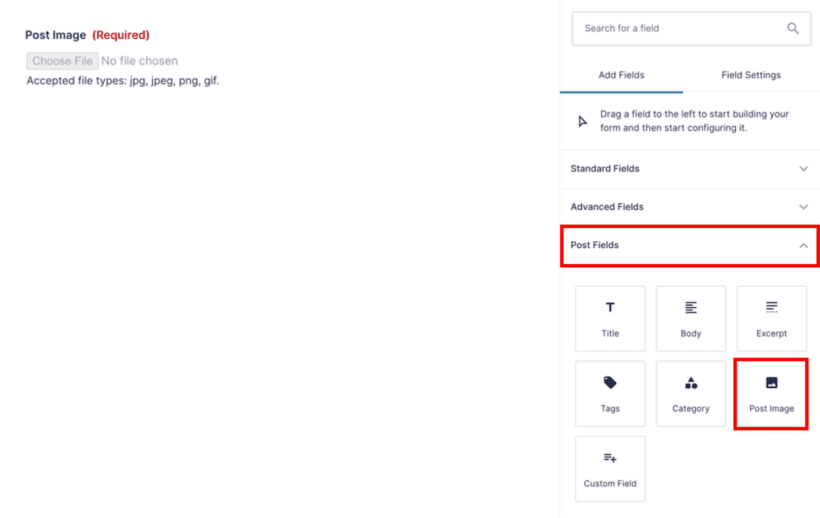
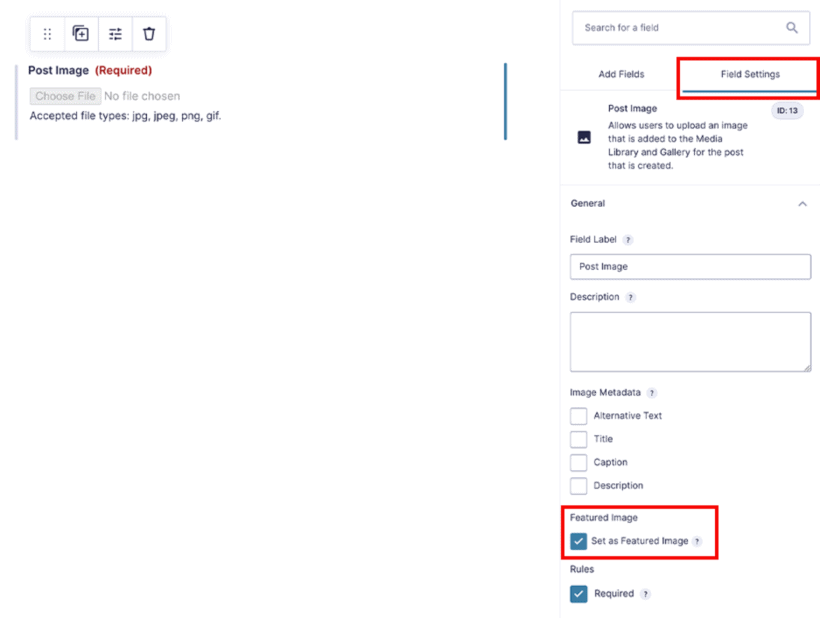
How to add the product image

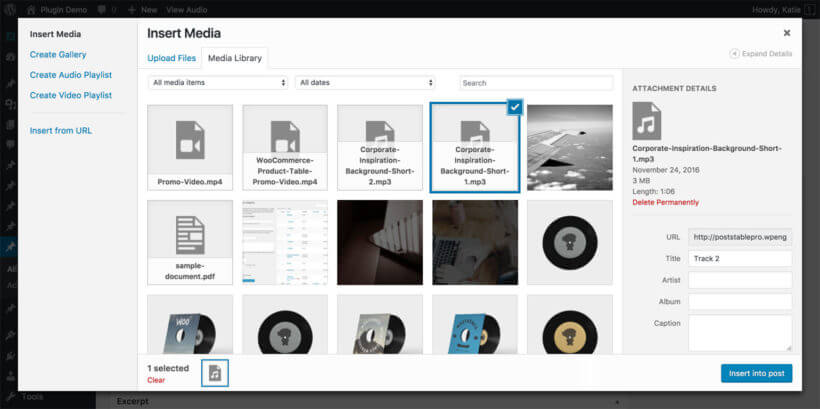
To add the featured product image, drag over the Post Image field. Then, edit the field and check the box for Set as Featured Image. This will let the form submitter upload an image that will be used as the Product featured image:

Post Image field option in the form builder Post Fields panel
Post Image field set to upload the submitted file as the product featured image

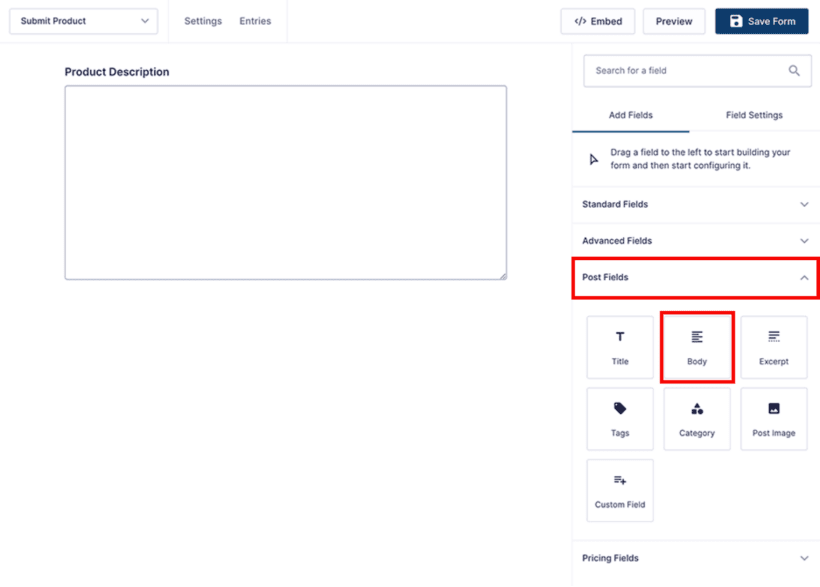
How to add the product description

To add a field for the product long description, use the Body field from the Post Fields area. In the field settings, you'll want to configure the basic information to be the same as the information you added in Step 1:

Body field option in the form builder Post Fields panel for the product description

Body field settings labelled Product Description with draft status and author options

If you want to also add a separate Product short description, you can use the Excerpt field from the Posts fields area.

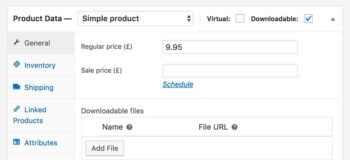
How to add prices, stock status, etc.

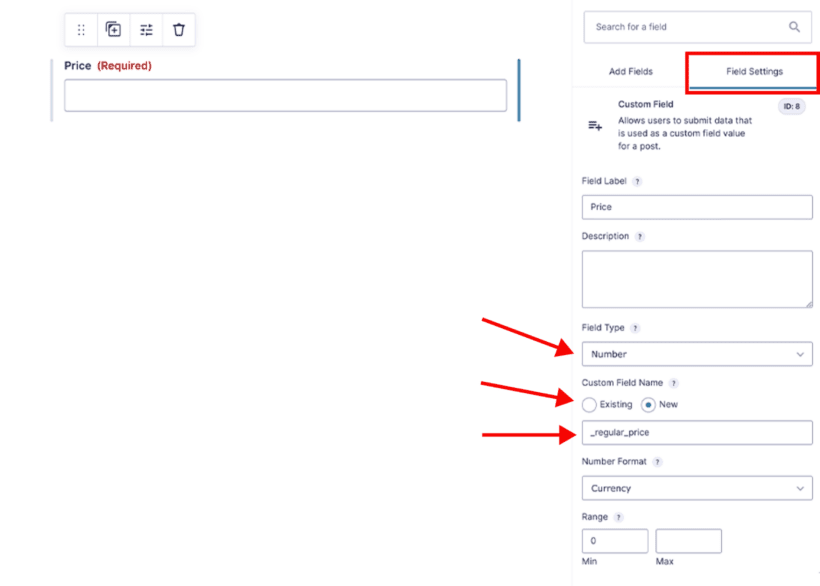
To add basic product information like price and stock status, you'll use Gravity Forms' Custom Field field from the Posts Field area.

This is the trickiest field to add, but we'll try to simplify the process as much as possible.

When you drag over the Custom Field field, the first thing that you'll want to do is choose the Field Type. This type depends on what type of information you're adding with this field, but for most of the fields, you'll use a Number. For example:

  • Price - Number
  • Shipping weight - Number
  • Etc.
Custom Field option in the form builder Post Fields panel for adding a price field
Custom Field settings for the price field with field type set to Number

Then, under the Custom Field Name, choose New (you're not really creating a new field - but Gravity Forms doesn't let you select most WooCommerce fields from the existing drop-down).

In the text box underneath, you need to enter the custom field ID. Here are the field IDs for the most relevant fields:

  • Price - _regular_price
  • Shipping weight - _weight

It should look something like this:

Price custom field mapped to the _regular_price field name with currency number format

You might also want to add some other restrictions, like a minimum and maximum range.

Then, repeat the process for as much information as you want to collect.

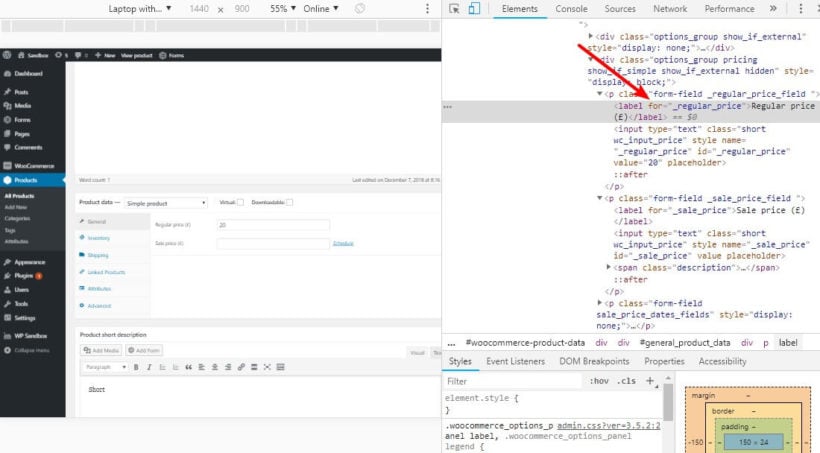
If you need to add other WooCommerce fields beyond price and stock status, a neat trick to find the field name is to use Chrome Developer tools on the edit product page and look at the label for ="FIELD NAME":

Chrome developer tools showing the _regular_price field name on the edit product page

You can also create your own WooCommerce custom fields to display on the product page.

How to let users choose a product category

Finally, let's cover how to work with taxonomies like categories or tags (or your own custom taxonomies - more on this later).

For product categories (or other hierarchical taxonomies), you can let users choose one or more of your existing categories. And for product tags, you can also let users add their own tags.

Let's cover categories first…

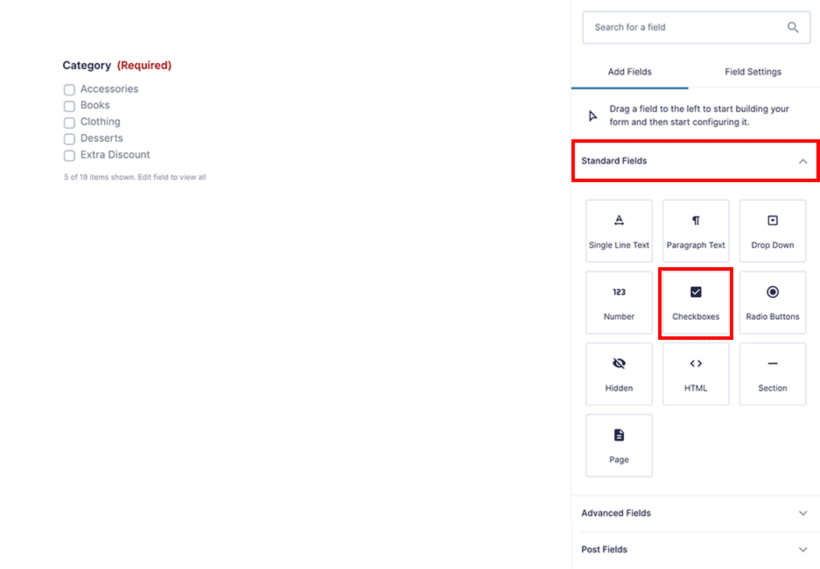
To let users select from your product categories, you can use one of these Standard Fields:

  • Drop-down - users will only be able to select a single category with this method.
  • Multi-select - users can select one or more categories using a multi-select box.
  • Checkboxes - users can select one or more categories using checkboxes.
  • Radio buttons- users will only be able to select a single category with this method.

You can choose whichever method works for you. No matter which one you choose, you'll first need to drag the relevant field over from the Standard Fields area.

Then:

  1. Edit the field
  2. Go to the Advanced tab
  3. Check the box for Populate with a taxonomy
  4. Select Product categories from the drop-down
Checkbox field set to populate with the Product categories taxonomy

Checkboxes field option highlighted in the form builder Standard Fields panel

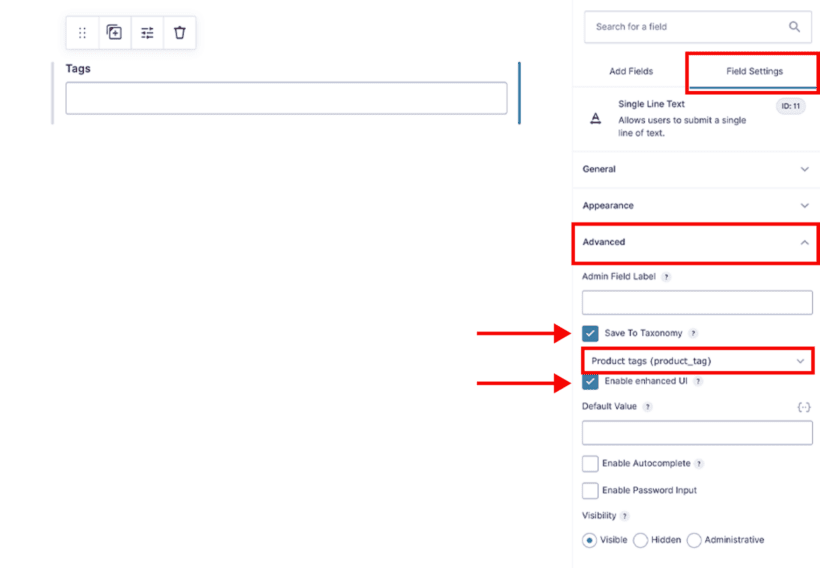
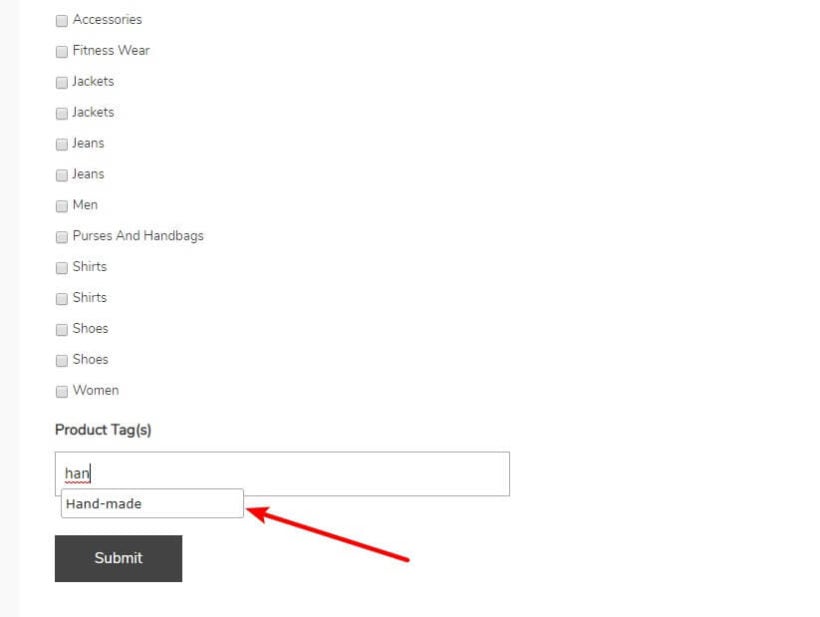
For product tags (or other non-hierarchical taxonomies), you can use all the same field types. However, you also get a new option.

If desired, you can use a Single Line Text field. Then:

  1. Edit the field
  2. Go to the Advanced tab
  3. Check the box for Save To Taxonomy
  4. Select Product tags from the dropdown
  5. Check the box for Enable enhanced UI
Single line text field set to save submissions to the Product tags taxonomy with enhanced UI

Tags field option highlighted in the form builder Post Fields panel

The benefit of using this approach for tags over checkboxes or a multi-select field is that people submitting products will be able to use that same "autosuggest" style box that you get in the back-end. Here's an example of what we mean:

Product tag field on the submission form autosuggesting a Hand-made tag as the user types

Step 3: Configure other basic form settings

Phew - that was a lot! If you made it through, you can be happy to know that pretty much all the hard work is done now.

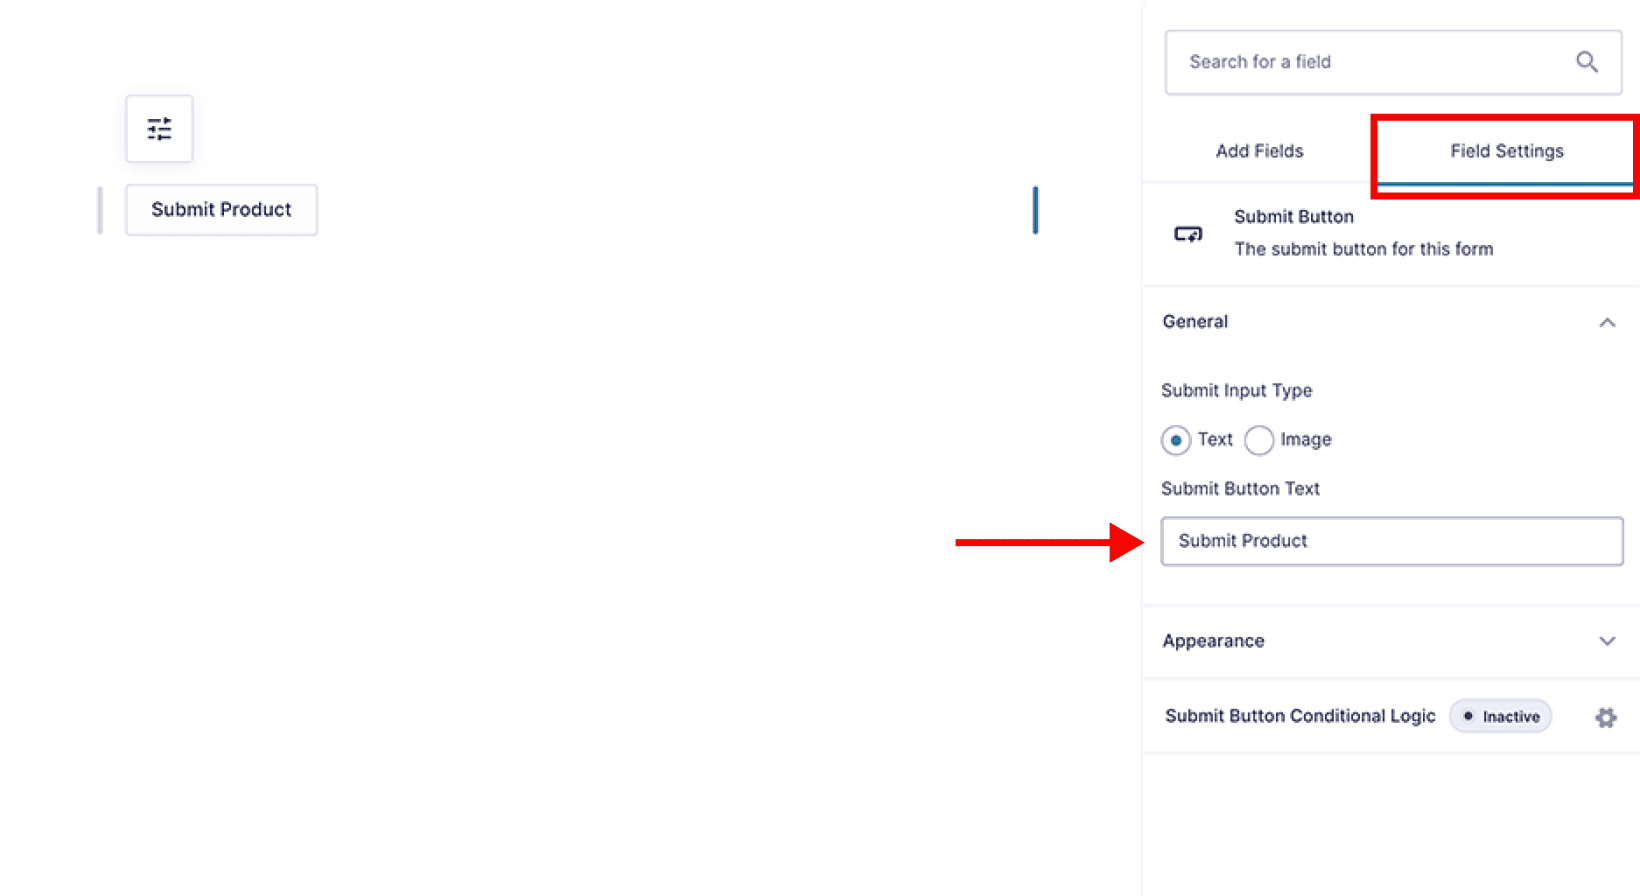
Next, you'll just want to go to the Settings and configure some things there. First, you'll want to consider these options in the Form Settings:

  • Button text - changing this to "Submit Product" or something more descriptive is good for UX.
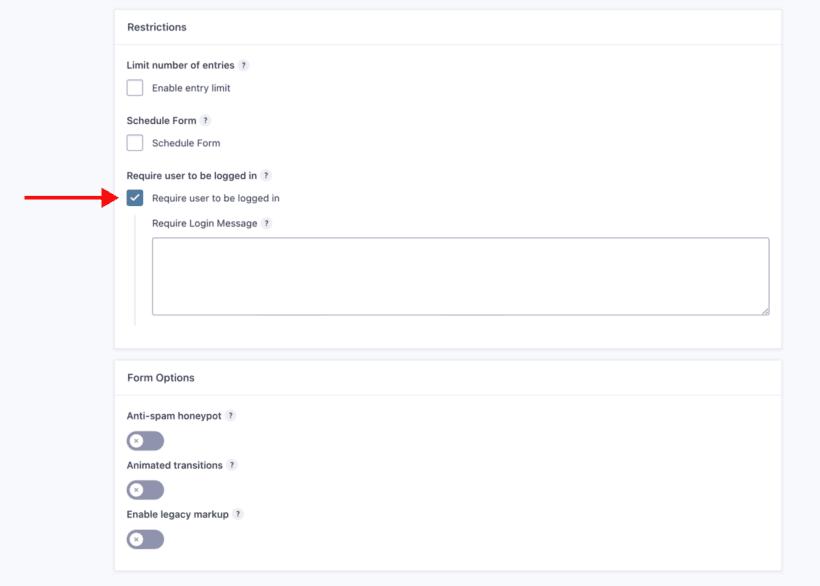
  • Require user to be logged in - you can check this box so that only logged-in users can add new WooCommerce products from the frontend.
Submit button settings with the button text set to Submit Product

Form restriction settings with Require user to be logged in enabled

Beyond that, you also might want to configure the Confirmations and Notifications so that they're more relevant to creating a product. For example, you can receive an email whenever someone adds a product from the frontend in WooCommerce.

Putting it all together

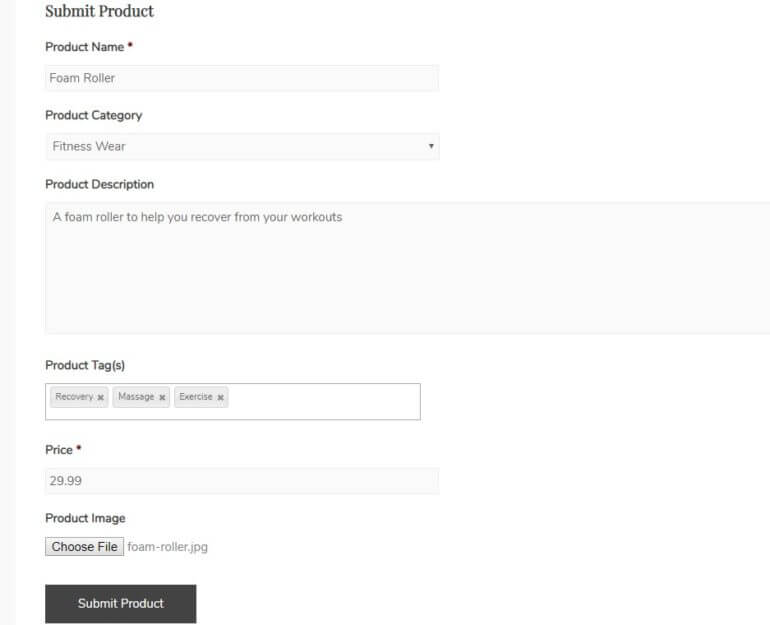
Ok, so here's what the finished form looks like on the frontend of our site. We've filled it out with some basic information:

Completed frontend product submission form for a Foam Roller with category, tags, price and image

Now, when we submit that form, the product shows up as a draft when we go to the Products area in our dashboard:

Submitted Foam Roller product appearing as a draft in the WooCommerce Products list

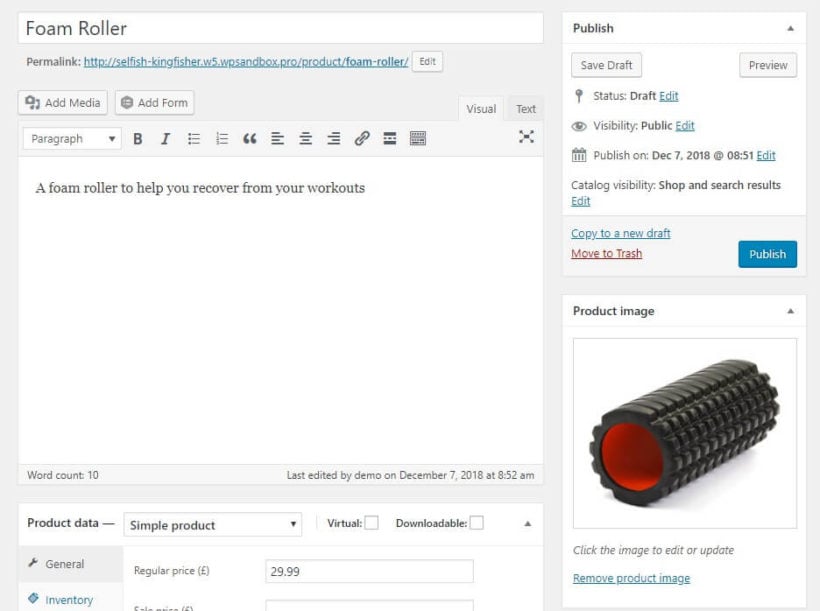
And if we edit that product, you can see that it also includes both the product description and the product image:

Submitted Foam Roller draft in the editor showing its description and uploaded product image

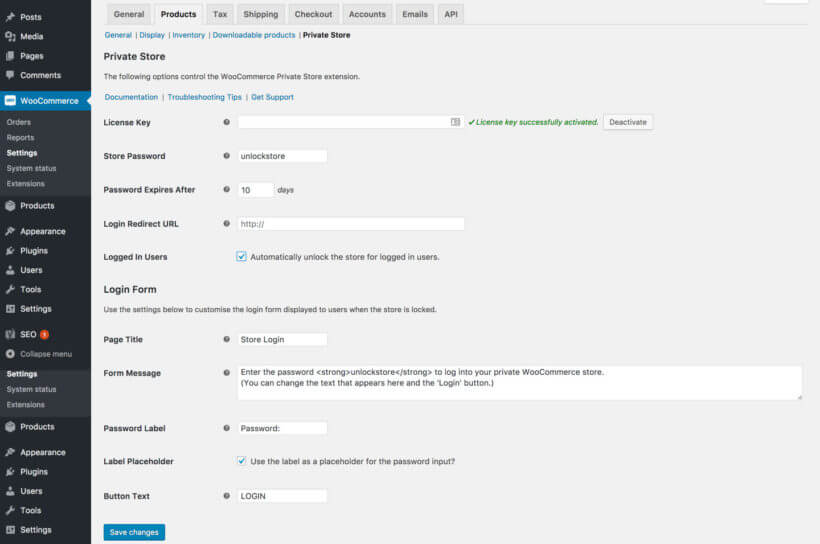
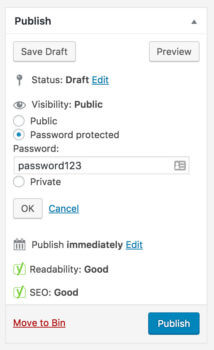
Protect your frontend add product form with a password

One way to restrict access to your form is to use Gravity Forms' feature that requires users to be logged in.

However, maybe you don't want to create user accounts for each person. Maybe you don't want all registered users to be able to add WooCommerce products from the frontend. If so, then you can easily password protect the form.

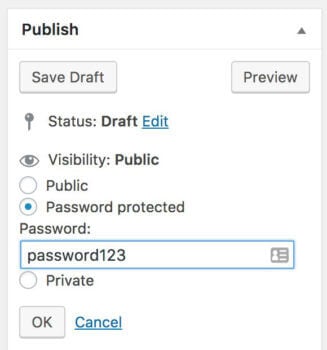
To do that, you can use WordPress' built-in password protection:

Setting the product submission page to password protected in the WordPress visibility options

People will need to enter the password before they can access the form.

Create a custom taxonomy for vendors to help organize products

If you want to:

  • Create a separate display area for each vendor
  • Let shoppers filter by each vendor

Then you'll need to create a custom taxonomy to associate a product with a vendor.

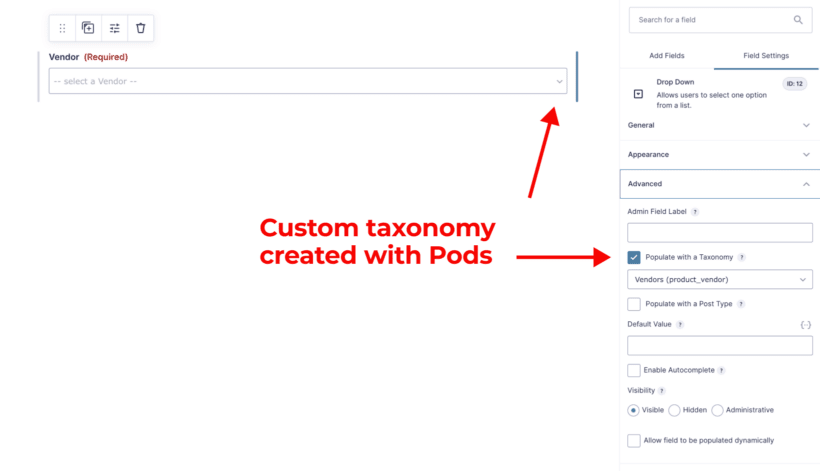
To do that, you can use the free Pods plugin to create a new custom taxonomy and associate it with your WooCommerce products - you can follow our Pods tutorial here to do that.

Then, you can add a field to your Gravity Forms form and populate it with information from your Vendors custom taxonomy, just like you did for your regular product categories. Here's what it should look like:

Form dropdown field set to populate with the Vendors custom taxonomy created in Pods

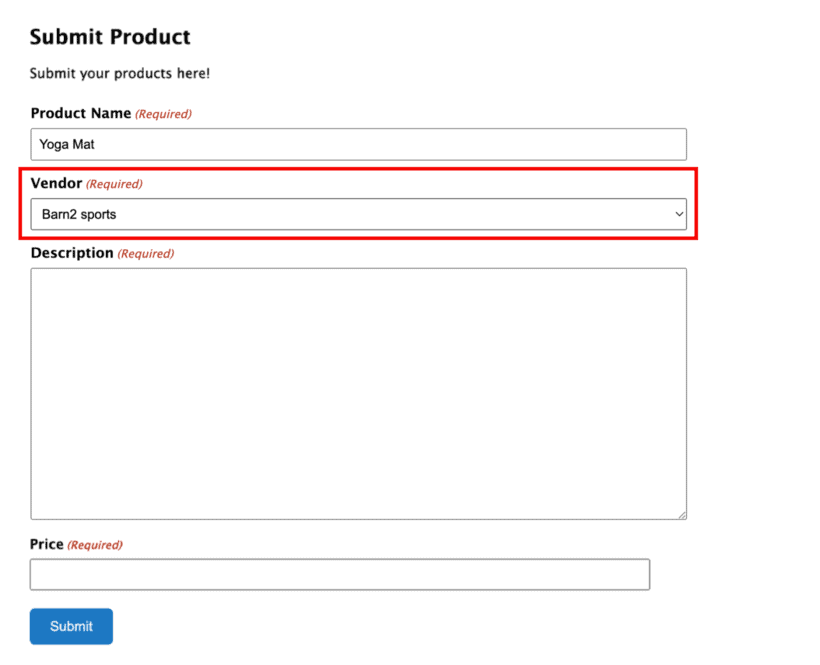
Then, form submitters can choose the vendor when they add a new product:

Frontend product submission form with a Vendor dropdown set to Barn2 sports

Part 2: Display WooCommerce frontend product submissions to shoppers

In Part 1, you learned how to create a WooCommerce frontend add product form. Now, let's cover how to take those frontend product submissions and display them in a shopper-friendly way at your store.

To do that, you'll use the WooCommerce Product Table plugin. WooCommerce Product Table takes all or some of your products and displays them in a searchable, sortable, and filterable table anywhere on your site.

Step 1: Configure basic settings

Once you've installed and activated the plugin, you can create your first table by going to Products → Product Tables.

1a: Choose where to display the tables

First, you'll want to decide exactly how and where you want to display the tables. There are two options for this:

  • Enable the table layout on your main shop and category page templates.
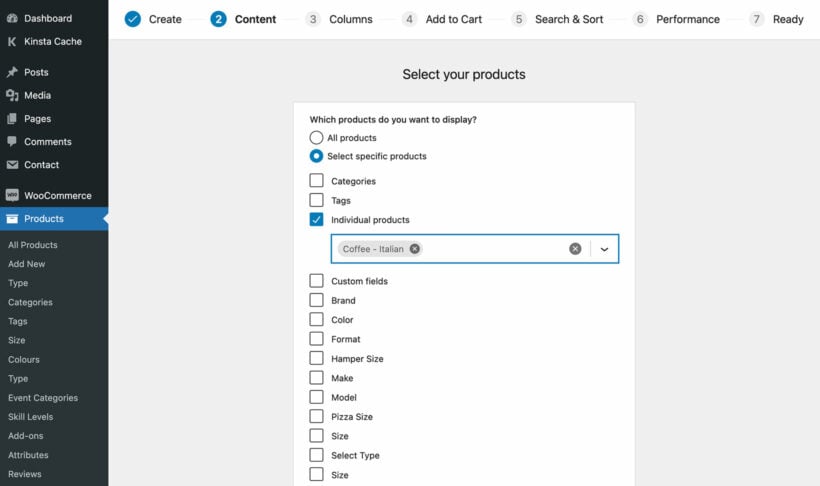
  • Manually add tables to pages using a Gutenberg block or shortcode. These tables can list all products, or specific products/categories/tags/etc.

So where can you add tables? Well, you have a few different options here. You can:

  • Create a single page and display all your products in one table
  • Create a single page and use multiple shortcodes with different include rules to create different sections on the page.
  • User separate pages and use the include rules to display different products on each page.

1b: Configure the product table

Also use the table builder to configure the settings according to your preferences. Pay special attention to these settings:

  • Columns - This lets you control what information displays in your columns. For example, you could include the product short description, a column for price, etc. Learn more about columns options.
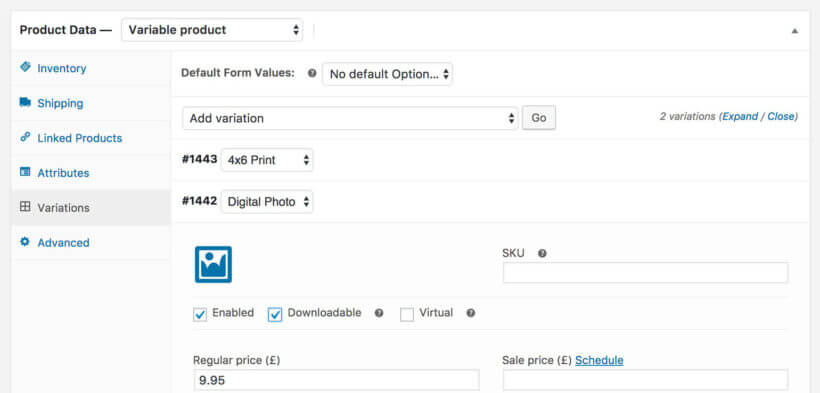
  • Add to cart - This lets you control how the add to cart functionality works, including how product variations are displayed. Learn more about add to cart.
  • Table controls - These let you control filters, search boxes, etc. Depending on your implementation, you might want to use filters to let shoppers filter out products from specific vendors. Learn more about filters.

1c: View your finished table

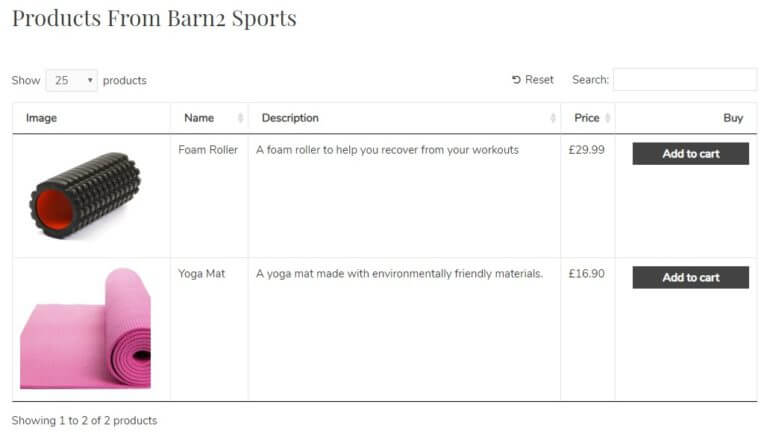
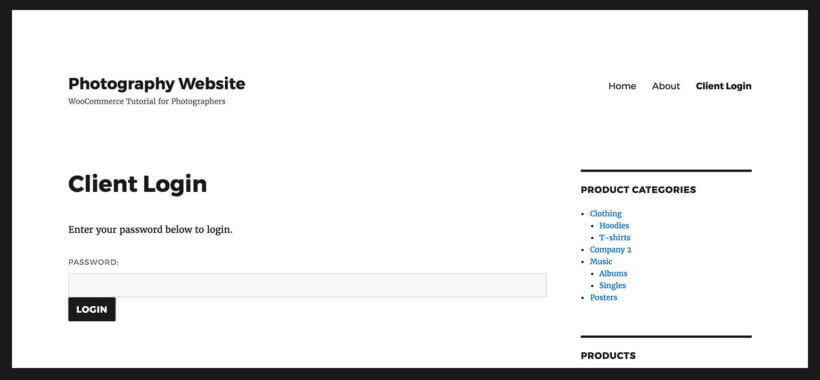
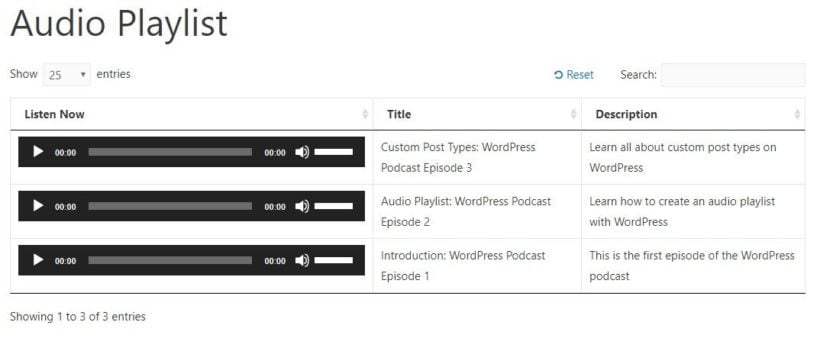
For example, here's what it looks like to create a separate page and populate it with only products that are tagged with a "Barn2 Sports" vendor custom taxonomy:

Products from a Barn2 Sports vendor displayed in a WooCommerce product table

Alternatively, you could also use one table for all vendors and use WooCommerce Product Table's filter options to let shoppers filter by the Vendor custom taxonomy like this:

WooCommerce product table filtered by a Barn2 Sports vendor dropdown

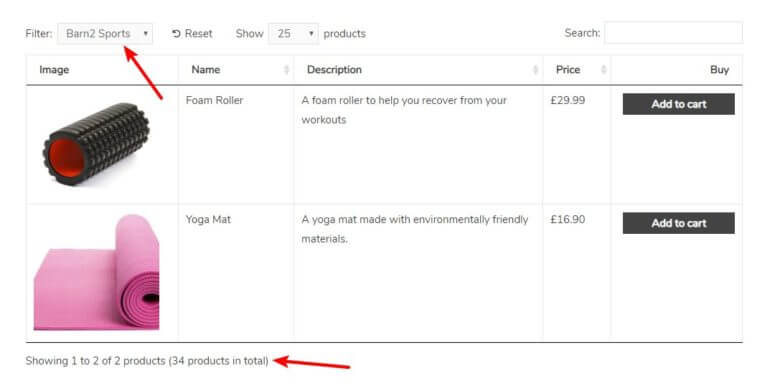
If desired, you could also display the vendor information as a column in your table.

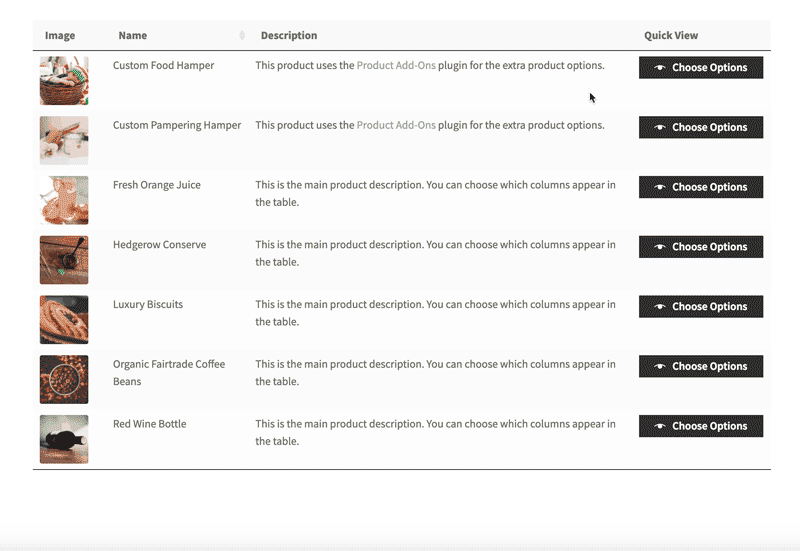
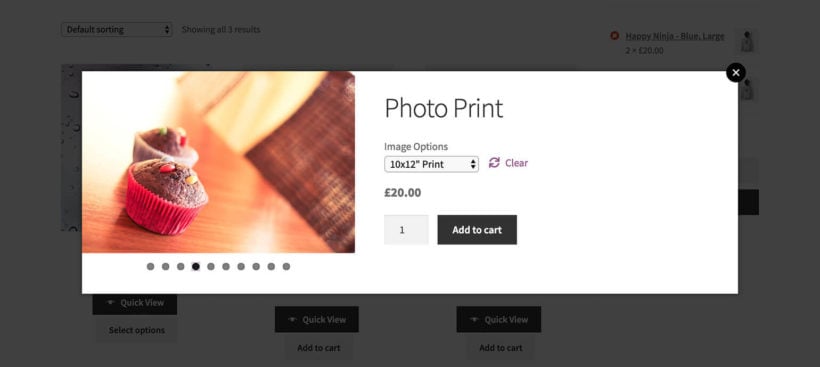
Bonus tip: Show extra information in a quick view lightbox

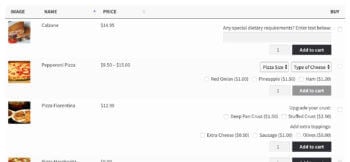
When you list products in a table layout, you can show information submitted by the user in the various columns.

Quick view buttons added to a WooCommerce product table
If you'd like to show more information than will neatly fit into the table, then you can add the WooCommerce Quick View Pro plugin. This handy plugin adds quick view buttons or links to the product table. Or if you're not listing your user-submitted products in a table, then you can also use quick view with the default WooCommerce shop and category pages.

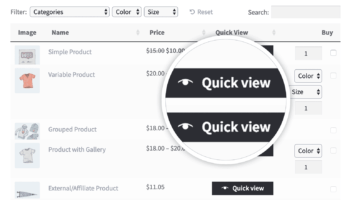
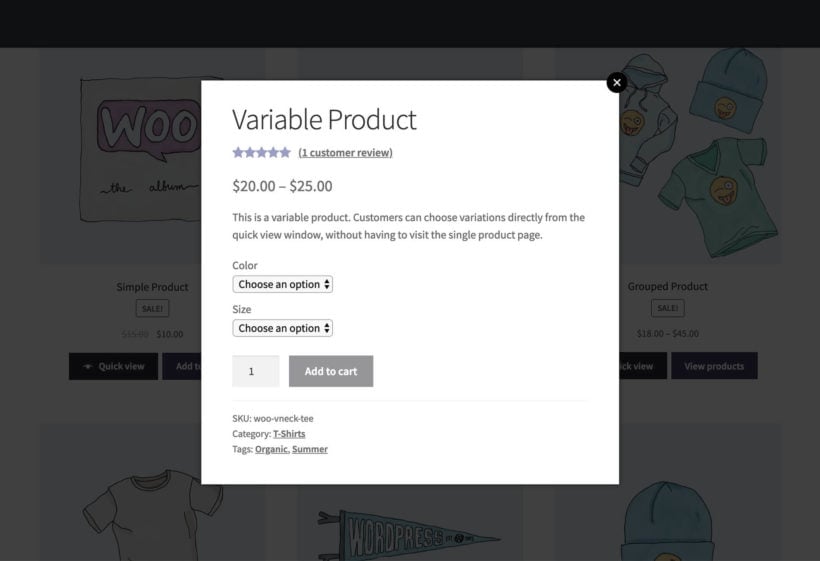
Either way, customers can click on the quick view links to view extra product information in a lightbox. This can include the product image, short description, price, and add to cart column. The customer can view this information and add the product to the cart without having to visit a separate page for each product.

It's an excellent option if you want to keep your product tables clean and simple, while still providing extra information about each product.

Can users add products in the frontend and then them?

Devices showing WooCommerce products submitted and edited on the front end

You might want users to be able to edit the products in the table after they go live in your store. There are 2 ways to do this:

  1. You can use WooCommerce Product Table with a frontend editor plugin and add an 'Edit' button above or below the table. Logged in users with the correct role can use this to access an editable spreadsheet, from which they can edit products without having to access the WordPress admin. If you just want users to edit their own products, then you can use the free User Role Editor plugin to edit the appropriate user role, adding the capability "edit products" and removing the capability "edit others products". (Read tutorial.)
  2. You can allow them to edit information about your products using a WordPress frontend editor plugin such as Editus. Logged in users with the correct privileges would click through to the single product page to make changes. This is because Editus makes the single product page editable, but not the product table.

Create your own WooCommerce frontend product submission form today!

By combining Gravity Forms, the Gravity Forms + Custom Post Types add-on, and WooCommerce Product Table, you can create your own WooCommerce frontend add product system that's perfectly suited to your needs.

Click below to get started with WooCommerce Product Table, and leave a comment if you have any further questions.

WooCommerce URL Based Login Plugin

It can be a nightmare to expect your WooCommerce store's customers to remember their username and password. The 'Lost Password' feature in WordPress is all well and good. However, emails can be spammed and it's plagued with caching problems.

That's when you need a WooCommerce URL-based login plugin. This type of plugin lets you generate a secret link that users can click on to log into their WordPress or WooCommerce account on your website. They'll never have to remember a username or password again!

In this article, I'm going to recommend the best automatic login plugin for WordPress and WooCommerce, and tell you how to set it up. I'll also tell you how to use it with other plugins to allow customers to click on a URL to instantly log into a hidden area of your website that no one else can see. This is perfect for creating a private WooCommerce store, wholesale login area, or hidden product categories that only specific users (or user roles) can see. It's also ideal for creating customer-specific products that are exclusive to each user.

Which is the best WooCommerce URL-based login plugin?

There used to be a free WordPress plugin called - you guessed it - URL-Based Login. This worked on any WordPress site, including WooCommerce online stores. Unfortunately the developer no longer supports this plugin, so you need to find a more modern alternative.

Instead, I recommend the Login Me Now plugin. This is another free WordPress plugin that lets customers log into their WP or WooCommerce account simply by clicking on a link to a secret login URL. You can also achieve something similar with Magic Login.

How do the automatic WooCommerce login URL's work?

The Login Me Now plugin works by letting administrators of your WordPress website create a hidden login URL for each user. They can easily do this on the 'Edit User' page under the Users section of the WordPress admin.

You can do this for any WordPress website, including WooCommerce stores. That's because Woo uses the standard WordPress login facility for its customer accounts.

  1. First, an administrator logs into the WordPress admin for their WC store, goes to the Users section and clicks on the user who they want to create a URL-based login for.
  2. Scroll down to the Auto-login section of the page and click the 'New' button next to 'Auto-login link':
WordPress user profile with the Auto-login link section and New button for URL-based login
  1. Copy the URL that appears on the page.
  2. Give the WooCommerce login link to the customer. Tell them to use it as the instant login link for their account.
  3. Scroll down to the bottom of the 'Edit User' page and click 'Save'. The URL-based login will only work if you remember to save the page. 
  4. Now send the user a link to their unique login URL for your WooCommerce store (e.g. by email).
  5. Finally, the user clicks on the link (for example in an email). It automatically takes them to your WordPress website or WooCommerce store and logs them in. They don't have to enter a username or password. This is because the plugin automatically passes this to WordPress via the auto-login URL.

For example, this sample WooCommerce URL-based login link will take users to the homepage of my website.com and log them into their account.

https://mywebsite.com/?autologin_code=iaj3F39dfkdfDdDDaASRR12FMmbbT6

Each customer will have a unique URL-based login for their account. The random string in my example URL will therefore be different for each person.

Can I use URL's to log users into a completely hidden WooCommerce store?

Used alone, the Login Me Now plugin lets you provide URL-based login for WooCommerce stores where all the products are public. This means that the products are available for everyone to view, and the user-specific login links simply log customers into their account.

You can extend the Login Me Now plugin to change the actual visibility of products by using it with a WooCommerce protection plugin. Choose one of the following plugins, depending on whether you want to hide some or all of your products.

WooCommerce Private Store

WooCommerce Private Store - as its name suggests - makes your entire WooCommerce store hidden. The rest of your website (e.g. your homepage and blog) remains public, but all the WooCommerce parts (shop page, products, categories, cart, etc.) are hidden from logged out users.

Use WooCommerce Private Store with the Login Me Now plugin to create an auto-login URL that will unlock the hidden store and log them into their account in a single click.

WooCommerce Protected Categories

WooCommerce Protected Categories is similar to WooCommerce Private store, but with more fine-grained control. Instead of making your entire shop private, you can use it to create hidden areas within your store.

For example:

  • You might have a public shop that anyone can access, and a hidden area that only logged in users with a specific role can see.
  • Maybe you need customer-specific products, with a different hidden category for each customer.

Either way, you can use WooCommerce Protected Categories to protect any or all of your categories so that only specific logged in users or user roles can see them. Use it with the Login Me Now plugin to give each customer a unique link, and make their lives easier with WooCommerce URL-based login.

WooCommerce Wholesale Pro

The WooCommerce Wholesale Pro plugin adds a hidden wholesale area to your online store. It comes complete with all the features you need to sell to B2B buyers, including:

  • Wholesale user registration and login
  • An unlimited number of wholesale roles, each of which can have different product pricing and discounts
  • Built-in emails for your wholesale users
  • A wholesale-friendly quick order form

Use the WooCommerce wholesale plugin with Login Me Now to allow wholesale users to login without having to enter their details.

Can I redirect customers to a specific page after they login?

Yes, absolutely. When you create the URL-based login link for each user, simply amend the link to add the URL of the correct page. Just make sure you don't change the autologin code at the end of the URL.

For example, this login URL will take customers directly to the shop page and log them into their user account:

https://mywebsite.com/shop/?autologin_code=iaj3F39dfkdfDdDDaASRR12FMmbbT6

Alternatively, you can use the free Peter's Login Redirect plugin to choose where people are taken to after they login. It even has a feature to choose a different login URL redirect for each role or individual user account.

How secure are auto-login URL's?

Letting your customers login by clicking on a link is - by definition - less secure than requiring a username and password. As a WordPress website manager or WooCommerce store owner, you need to make a balanced decision about usability vs. security.

Allowing users to click a link to automatically login to their account on your WooCommerce website can make your store much more user-friendly. Implement it carefully to maximize security in your store, and relax while your customers log into their accounts with ease.

Can I use URL based login with password protected store and categories?

As well as working with individual user accounts, the WooCommerce Private Store, WooCommerce Wholesale Pro and WooCommerce Protected Categories plugins have password protection options. This means that people can unlock the hidden content by entering a simple password, instead of needing their own unique user account.

Unfortunately this doesn't work with auto-login URL's, which only work with actual user logins. To automatically unlock the hidden content by clicking on a URL, you need to use one of the options in these plugins which work with individual user accounts.

Illustration of a WooCommerce product list with a placeholder image in the first column

Many WooCommerce online stores are highly visual by nature. You may have noticed that your page layouts place a lot of emphasis on WooCommerce product images. However, what if you don’t have access to high-quality photographs for your products? Keep reading to learn how to create a WooCommerce product list without images.

While displaying lots of media can be very valuable for some stores, it’s not always necessary. In some cases, a featured image for your storefront and WordPress theme may be more than enough.

However, there's no need to worry if you have a different vision for your shop, or are constrained as to what type of WooCommerce product images to use. There are alternative ways you can display your products in an attractive and compelling manner, such as in a dynamic table:

In this post, we’re going to talk about the reasons you might want to create a WooCommerce list view with no product images, or with small images. We’ll also show you some examples of this feature in action, and introduce you to a tool you can use on your own site – WooCommerce Product Table.

Let’s jump right in!

The benefits of creating a WooCommerce product list without images

There’s no denying the power of visuals. In many cases, people use images as a key part of their decision-making process when buying items online. That’s why you’ll see so many stores that put a significant focus on what each product looks like:

A regular WooCommerce product page.

However, the benefits of having large images only apply to certain types of product. Sometimes, you might want to avoid placing a lot of focus on product imagery. In fact, you may prefer to have no WooCommerce product images. Or you might want small product thumbnail product images, instead of high pixel imagery that takes over the page.

There are a lot of reasons your store might benefit from small product images, or no images at all:

  • Lack of high-quality WooCommerce product images. Quite rightly, you don’t want to shortchange your products by using photos that don’t represent them at their best. This also applies to developers building sites for clients who’ve provided less-than-stellar product imagery (or nothing at all). Let's face it, we've all been there and received blurry product images from clients 😅.
  • Your products are completely digital – such as ebooks, music albums, computer programs, or PDFs – and so there’s nothing to take images of.
  • While your products are physical, they’re very simple or not interesting to look at. For instance, maybe you’re selling machine parts, or other items where appearance isn’t a key factor. Here, you may only need thumbnail-size catalog images, or none.
  • Removing images places emphasis on your products’ details or specifications, rather than the way they look. It may be more important that your customers are able to compare a large number of items quickly, based on their sizes, materials, capacities, and so on.
  • A WooCommerce product list without images will make your store load faster. High-quality images, are, by nature, large image files. If larger images fill your product gallery, they may slow your website’s loading time and hurt your SEO performance.

To give you some real-life example, here are some quotes from our own customers who wanted to have no product images:

My client HAD to have the table layout. The grid layout just does not work for boring electronic parts.

I’m selling digital goods that require little more than a thumbnail image, excerpt, title, and price. The product details page is largely redundant.

Most of the products we sell do not have pictures, and a list looks cleaner than a blank thumbnail.

Ultimately, not all stores need or can benefit from including a lot of large, dominant WooCommerce images.

Which WooCommerce products sell best with no image?

By now, you have some idea of the reasons a WooCommerce store might not have product images (or only use small, simple photos). However, you may still not be sure whether this applies in your specific situation.

To answer that question, you’ll want to consider the types of non-visual products you’re selling. Of course, we can’t possibly list all the types of items that fall into one of the categories discussed above. However, here are some examples of products that don’t need to rely on images:

  • Lab products, scientific instruments, or medical devices
  • Machine parts, electronic parts, blueprint templates and similar items
  • Ground support equipment for airports
  • Instrument cases (and other types of containers)
  • Gift certificates
  • Any sort of digital products (music, games, files, etc.)
  • Pharmaceuticals
  • Modular furniture (for example, a selection of various cupboard doors)
  • Event tickets and registrations
  • Certain food and beverage items, such as wine or spices
  • Practical household items (such as fans)

Even if you do have access to images for these types of items, it can be a better choice to have no product images, or to keep them small. Customers are more interested in making comparisons and viewing details about your products than what they look like.

To further illustrate the point, let’s take a look at how having small WooCommerce product images might work in action.

Universal Fans: A case study of selling non-visual products in WooCommerce

As it turns out, there are a lot of e-commerce stores that have decided not to emphasize product imagery, and have found ways to do so successfully. For example, Universal Fans is a website selling – you guessed it – fans and similar products:

The Universal Fans website.

This store owner offers everything from ceiling fans to exhaust fans, and lists a wide range of products, parts, and options on its website. For some of those items, WooCommerce images do in fact matter. If you’re looking to buy a ceiling fan, for example, you probably care what it looks like:

A ceiling fan on the Universal Fans website.

Other types of fans are a lot less exciting to look at. For instance, there’s not much reason to include a single product image of an exhaust fan. What customers care about when searching for that type of product is its specifications, not its appearance.

The team at Universal Fans understand that fact, which is why they use product tables to display non-visual items:

A product table on the Universal Fans website.

This listing of exhaust fans does include WooCommerce product images, but they are small, simple, and basic thumbnail pictures. Instead, the focus is on the products’ key details, such as duct size, capacity, and wattage. Customers viewing this page can easily see all the different sizes and options on offer, make comparisons between them, and plan out exactly what they want to buy.

This is made even easier by the table’s dynamic design. Individual columns can be sorted, and there’s a handy search bar. Plus, you can use a dropdown menu at the top to filter the listing, and only include products with a specific duct size:

A WooCommerce product table filter.

You could even create a table like this with no product images at all. As you can see, it wouldn’t make a significant different to the listing’s usefulness.

It’s clear that Universal Fans knows what its customers are interested in, and how they shop. That’s why this business has tailored the design of its e-commerce store to focus on the elements that really matter – which isn’t always WooCommerce product images.

How to create a WooCommerce product list without images

By this point, you probably have a good idea of whether or not listing WooCommerce products with no images (or with small, simple photos) would benefit your store.

If you’re using Woo to run your store, this can be a little tricky. After all, WooCommerce is designed with product images in mind. Its layouts assume that everyone will want to display large, high-quality images on individual product pages. But as we’ve seen, this isn’t always the best approach.

That doesn't mean you can’t use WooCommerce, however. After all, it’s an easy and flexible way to set up an e-commerce shop. Instead, the solution is to pick up an additional tool as well – the WooCommerce Product Table plugin.

This WP plugin is designed to work right alongside WooCommerce. More specifically, it enables you to create a dynamic product listing with no product images or with small thumbnails:

WooCommerce product list without images showing a book table with code, name, price and author columns

While this plugin has many applications, it’s especially useful if you want to create a WooCommerce product list without images, or keep the photos understated. Let’s talk about why.

How WooCommerce Product Table can display your inventory more effectively

At first, WooCommerce Product Table may seem like a simple tool. Its goal is straightforward – helping you design a better product listing for your WooCommerce store.

Check out the Woo Product Table demo!

However, there are a lot more benefits to using this plugin than you might at first expect. Some of its key features include:

  • Enabling you to fully customize the information that appears in your product table.
  • Letting customers search, sort, and filter the table to find what they need quickly.
  • Keeping all your products and their key information organized.
  • Saving space by displaying everything on a single page.
  • Making it possible to list your store’s entire inventory in a single shop page, or to pick and choose. which items you want to include.

As one customer put it:

We sell relatively technical products, so it is really helpful for customers to be able to see products in certain categories and view them in a list format, which can be sorted by custom attributes.

What’s more, there are a variety of ways you can use WooCommerce Product Table to display products with no images, or to draw visitors’ focus to other key elements. Here are just a few of the ways you can customize your product table:

  • You can remove WooCommerce product images entirely, by simply not including them in your table.
  • Alternately, you can include a product image column, but keep the photos small.
  • You’re also able to customize the image dimensions in your table, so you have complete control over how prominent they are.

Instead of putting all the focus on images, the product image settings in WooCommerce Product Table help you display what is important about the items you’re selling. That helps to sell your products more effectively, leading to increased conversions.

How to get started with WooCommerce Product Table

At this point, all that’s left is to start using WooCommerce Product Table for yourself. Watch this video or follow the written instructions below:

  1. Get WooCommerce Product Table and install it on your WordPress site.
  2. Activate your license key in the setup wizard which opens automatically. You'll find the license key in your order confirmation email.
  3. Now follow the onscreen steps to create a product list without images. Choose the following options:
    • Shop page display - If you want to use the table layout on all your shop pages, select this option on the first page of the table builder. Alternatively, you can add the table manually by adding a block or shortcode anywhere on your site.
      First step of the WooCommerce Product Table builder choosing how to add the table
    • Columns - Choose which columns to include in the table. Remove the default 'Image' column if you want to hide images from the shop pages.
      Choosing which columns to show in the WooCommerce Product Table
    • WooCommerce product image size - If you're keeping the image column but want small single product images, then enter the desired size in pixels. Do this by clicking the pencil icon on the image column and enabling the 'Advanced' toggle to find the image size option.

Now view the page where you added the product table. This might be the shop page or wherever you added the shortcode. It should look something like this, if you opted to have small product images:

A WooCommerce product table with images.

Or maybe there's no product image column at all.

How do images in the table work?

By default, customers can click on the WooCommerce product images to open them in a lightbox. If you're working with poor-quality or blurry images, small resolution or image sizes, there's an option on the plugin settings page to disable the lightbox. That way, customers will only see the small version of each product image.

You can also disable the links from the product table to the single product page. This keeps the customer on the product table, where they can use it as a one-page order form. There's no need for them to access the product detail page, which will display a much bigger version of each WooCommerce product image.

For more information, you can take a look at the complete list of options in WooCommerce Product Table. With a little time and tweaking, you’ll find it easy to list WooCommerce products with no images.

Bonus tip - Add WooCommerce quick view without images

WooCommerce variable product opened in a quick view popup with variation dropdowns

As you can see, it's easy to list products in a table layout without images. You can build on this by providing extra product information and purchase options within quick view lightboxes - also with no product images!

To do this, you need to use WooCommerce Product Table with our other plugin - Quick View Pro. This adds a 'quick view' column to the product table, which customers can click to open extra information in a lightbox. You can choose what information to include in the quick view, including:

  • Whether to show product information with or without an image gallery. (If you're reading this tutorial, then you probably want the lightbox option without no product images!)
  • Product data such as the price, categories, tags and reviews.
  • Add to cart information including the quantity picker, variation dropdowns and add to cart button.

WooCommerce quick view is an excellent way of providing extra information about non-visual products. Use it to encourage customers to buy more and immediately return to the product list, without being taken to a separate page for each product.

Bonus tip #2 - How to change the default product image in WooCommerce

Changing the default placeholder image in WooCommerce is a simple process that helps your store look polished, especially if you have products without assigned images. Follow these steps to update it:

  1. Prepare your new placeholder image. Create or choose an image you want to use as the default. Ensure it’s the right dimensions and file size for your store to avoid layout issues or slow loading.
  2. Upload the new image to your media library. Go to your WordPress Dashboard, navigate to Media → Add New, and upload your new placeholder image. Take note of the image ID after uploading.
  3. Replace the default placeholder image.
    1. Once you have the image ID, you will then need to go to WooCommerce → Settings → Products → Placeholder Image.
    2. Update the image ID in the appropriate field.
  4. Save and check your changes. Click Publish or Save Changes, and preview your store to ensure the new image displays properly for products without individual images.
WooCommerce product settings with the placeholder image field highlighted for products without images

Go Image-Free with a List View

If you prefer a streamlined, no-image look, you can use the WooCommerce Product Table plugin to display your products in a list view. This layout is perfect for stores where images aren’t essential, like for digital products or simple inventories.

To set this up:

  • Install and activate the WooCommerce Product Table plugin.
  • Configure the settings to display your products in a table format.
  • Remove the image column in the table settings to hide images entirely.

Disable Links to Product Pages

For a more direct shopping experience, consider disabling links to individual product pages. Instead, allow customers to add items to their cart directly from the list view. This minimizes distractions and makes browsing more efficient.

By customizing your WooCommerce store with these changes, you can improve the user experience and tailor your store’s design to better suit your products and branding.

Create a non-visual WooCommerce checkout

The next or the final step in an ideal buyer’s journey is the cart and checkout pages. The default WooCommerce cart page is designed to show the product images alongside the product list and there’s no option in the settings to disable the images. But, if you want to create a true non-visual shopping experience, this can be achieved by our WooCommerce Fast Cart plugin.

WooCommerce Fast Cart plugin is designed to increase conversions by providing a more seamless checkout experience by trimming down the long and tedious traditional WooCommerce checkout process.

The WooCommerce Fast Cart plugin features a custom popup cart and checkout window that comes with loads of customization options and one of those options is to remove product images from the cart page.

Product list without images feeding a side cart that also hides product thumbnails

You can use this plugin in combination with the WooCommerce Product Table plugin to give your store visitors a complete non-visual shopping experience.

After installing and activating the WooCommerce Fast Cart plugin, go to WooCommerce → Settings → Fast Cart, and in the cart contents section, deselect the product image item and the product images will not be displayed on the cart page. Simple as that!

Fast Cart settings with Show product images unchecked to hide thumbnails in the cart

WooCommerce Fast Cart is perfect for giving your shoppers a more streamlined and swift checkout experience. Using it can reduce the cart abandonment rate by shortening the checkout process.

Product images matter - but not for every store!

WooCommerce is an excellent way to design and run an online store. At the same time, it isn’t perfect. It makes certain assumptions about the kind of shop you want to create. For instance, it provides few options for helping you build an e-commerce store that doesn’t rely on large, high-quality WooCommerce images.

If you don’t have product images or can only access low-quality photos, you’re in luck. The WooCommerce Product Table plugin makes it simple to design a WooCommerce product list with no images, or to display small images instead.

Do you have any questions about how to use WooCommerce Product Table on your own site? Let us know in the comments section below!

WooCommerce is an incredibly powerful and flexible e-commerce platform. You can use it to create just about any type of online store and offer all kinds of online shopping experiences. You can even use it to create a WooCommerce mix and match products website.

WooCommerce mix and match products

Whether you’d like to start selling custom gift hampers, assorted donuts, and pastries, or bespoke food boxes, WooCommerce makes it incredibly easy to get started.

Paired with the right plugins, WooCommerce is the perfect solution for selling bespoke mix and match products and taking customized orders. After ensuring compatibility and setting everything up, your customers will have the ability to place personalized orders on your online store. They can view items in a user-friendly, catalog-like list, choose options and tick the items they’d like to add to their order and place their customized order. All from a one-page WooCommerce order form.

In this article, we’ll cover everything you need to know about WooCommerce mix and match products. You'll learn how to add products in WooCommerce, as well as how enabling customers to personalize their orders can benefit your online shop and how people are utilizing this feature. We’ll also step through a quick tutorial to help you create your own WooCommerce mix and match online store using the WooCommerce Product Table plugin.

Let’s get started!

Some examples of WooCommerce mix and match products

Mix and match products work by allowing customers to select individual products they’d like to purchase and add them to a gift hamper, product box, or bundle items. Let’s take a look at some of the most popular types of WooCommerce mix and match products that you can sell with WooCommerce.

Crate with various food jars.

Example #1: Pizza, sandwich, and salads

Customizable food items such as pizzas, sandwiches, and salads are often sold using a mix and match system. For instance, a WooCommerce-based restaurant that allows customers to place orders online usually allows customers to choose toppings and filings to put together their own meals. This is just one of many mix and match products examples, where WooCommerce can be utilized to offer personalized and customizable options to customers, such as selecting ingredients for their pizza, sandwich, or salad.

Your WooCommerce mix and match products offering may vary slightly depending on what you're selling. However, the core concept remains the same. Essentially, you allow your customers to build their own meals. For instance, if you were selling pizzas then you’d let customers choose their base, sauce, toppings, and dips. They mix and match the pizza options to create their own customized pizza - all using WordPress and WooCommerce.

Example #2: Gift hampers

Buying a hamper as a gift is always more special when you can select the individual items you’d like to add to it. Whether you’re selling face and body products, wines and candles, decadent chocolate, corporate gifts, or gourmet products, you can create a personal gift experience by letting customers mix and match their own selection of items.

Learning how to add products in WooCommerce opens up several avenues for offering WooCommerce mix and match products on your online store. Some companies, for instance, sell custom meat or vegetable deliveries to customers on a subscription basis. With WooCommerce, you can easily offer this option on your online store, in addition to selling custom meat or vegetable packages on a subscription basis and other mix and match products examples. Keep reading to learn how to do this and more.

How do customers mix and match products in WooCommerce?

Create WooCommerce mix and match products order forms to let customers build their own customized products or create-your-own combo offers. It will look something like this:

Mix and match product table letting customers build their own combo

This is how the WooCommerce mix and match products system works:

  1. You have a page on your online store where you list all of the products (and variations or other options) that customers can choose from Generally, the products are divided into several categories, each listed separately on the mix and match page. The categories should be based on how the customer would actually put together their mix and match product order.
  2. The customer chooses items to create their own unique mix and match products Standalone items appear on individual rows of a table, whereas mutually exclusive items appear as dropdown lists within a single row of the table. The customer simply ticks a checkbox next to each item they’d like to add to their mix and match product.
  3. Once they’ve picked out all of the items they’d like to purchase, they click the Add Selected to Cart button This adds all the selected items to the WooCommerce shopping cart.
  4. The customer views their cart and can make changes to it, if necessary Once they’re happy with the order, they can proceed to the Woo checkout page and make a payment.
  5. As the store owner, you’ll receive an email with the order details You can then build the customer's mix and match product, add the products they selected to it, and ship it to them.

Which WordPress plugins will I need?

Under the hood, the mix and match products system uses WordPress to power your overall ecommerce website. It requires a free WooCommerce plugin to create products and manage the checkout process. You'll also need the WooCommerce Product Table plugin to list your inventory in a table layout on the mix and match product order form.

Next, I'll tell you how to set up your WooCommerce mix and match plugin. But first, let's look at a real-life case study of a website with this exact setup.

Case studies - How other WooCommerce websites sell mix and match products

Inspire Cosmetics - selling mix and match cosmetics

Inspire Cosmetics has created a multi-step process for ordering mix and match make-up and cosmetics.

They used the Beaver Builder WordPress page builder plugin to create a series of four connected pages in tabbed layout options. Each tab contains a separate list of WooCommerce mix and match products, created using the WooCommerce Product Table plugin.

This makes it quick and easy for customers to choose a container, select the contents and place their order in WooCommerce.

Barks & Squeaks - selling mix and match pet hampers

Barks and Squeaks pet hamper site letting shoppers build a mix and match hamper

Barks & Squeaks use WooCommerce and WooCommerce Product Table to sell mix and match gift hampers for pets.

They list the items from each category on a single page. The customer chooses their container options first, then scrolls down to mix and match the contents.

Now you've learned all about how a WooCommerce mix and match plugin works. Next, I'll tell you how to set it up on your own WordPress website! Keep reading and we'll get started straight away.

How to create a WooCommerce mix and match products website

Letting customers put together their own product bundles using a product configurator can help you increase sales and make the customer feel special.

This tutorial assumes you already have WooCommerce installed on your WP website. If not, check out the fantastic guide on how to create a WooCommerce online store. When you're ready, continue this tutorial to transform it into a WooCommerce mix and match product configurator.

Here's a video on how to set it all up. You can also read our detailed written instructions below.

Step 1: Create the mix and match product categories

First, figure out how you’d like to design the mix and match products' user flow. Decide which categories you’d like to divide the WooCommerce mix and match ordering system into.

For example, if you wanted to let customers build their own gift hampers, you might consider creating a category for the container, the contents, and wrapping and filling:

WooCommerce mix and match products categories

It’s a good idea to create a logical category structure that takes the customer on a journey and helps them put together their WooCommerce mix and match product in an intuitive and user-friendly way. In the above example, customers would order using a three-step process:

  1. Select a container.
  2. Choose the items they’d like to add to the container.
  3. Configure padding and wrapping options.

This way, your customers can mix and match their own bespoke gift hampers.

Once you’ve settled on which categories you’d like to create, head over to ProductsCategories and create as many as you need.

Step 2: Plan out products and add them to your online store

Next, we’ll add the individual items we want to sell to our WC online store. The items that customers can mix and match to build their product should be added as WooCommerce products.

Following our example, here are some of the WooCommerce products you might add under each mix and match category:

Container/Hamper

  • Hamper
  • Box

Contents

  • Candied Nuts
  • Luxury Biscuits
  • Decadent Chocolates
  • Red Wine Bottle
  • White Wine Bottle

Packaging

  • Gift Wrap
  • Ribbon
  • Straw Filling
Items added as products in WooCommerce.

First, jot down all of the products you’d like to sell. Categorize them under one of the categories you created in the previous step. Once that’s done, you need to decide whether you’d like to create each item on your list as an individual product or group it into variations.

To decide whether a particular product needs to have variations, consider whether the customer would have to make an either/or choice. In the example outlined above, the customer would have to pick either the hamper or the container. Whereas in the second stage, they’d simply be asked to select all of the items they’d like to mix and match.

Add products and/or variations based on these principles:

  • For 'or' choices where the customer can only choose one option, create a WooCommerce variable product. Add each option as a variation.
  • For 'and' choices where the customer can choose multiple options, create a standalone WooCommerce product for each item.

Tip: If you want to add multi-select options to individual products, keep reading to learn how.

Step 3: Add products to WooCommerce

Once you’ve planned out your products, add them to your WooCommerce store by following these steps:

  1. Navigate to Products → Add New from the admin panel.
  2. Enter the WooCommerce mix and match the product’s details such as product title, description, and featured images.
  3. Assign categories and tags.
  4. From the Product Data section, choose a product type based on the format you’ve decided:
    1. Simple Product. For standalone products that customers can add to their mix and match product bundles without variations, select the Simple Product.
    2. Variable Product. Select Variable Product for all mutually exclusive items that customers can personalize before adding to their shopping carts. Follow these instructions to add variable products.
  5. Click the Publish button.

Follow these steps to add all of your products to your online store.

Step 4: Create a mix and match products page

Now we're getting to the fun part! This is where your WooCommerce mix and match products configurator comes to life.

By now we’ve added all of the products to our WooCommerce store and categorized them. Next, we'll list everything in a mix and match products order form. By doing so, customers will be able to mix and match products and build custom gift packages.

4a. First, create your mix and match product tables

  1. Purchase the WooCommerce Product Table plugin and install it on your WordPress website.
  2. Head over to Products → Product Tables → Add New.
  3. Use the table builder to create your first table of WooCommerce mix and match products as follows:
    1. On page 1 of the table builder, choose the option to
      First step of the WooCommerce Product Table builder choosing how to add the table
    2. Use the next page to choose which products to display in the order form. When creating a WooCommerce mix and match site, you'd normally create multiple tables, each listing specific products or items from a different category. That way, you can structure the order form into multiple sections.
      Selecting individual products for a mix and match order form
    3. Add all the columns of product data that you want to include in the mix and match order form.
      Choosing which columns to show in the WooCommerce Product Table
  4. Change the 'Add to cart method' to 'Checkbox' and change the variations option to 'Dropdown'.
    Add to Cart settings in the WooCommerce Product Table builder

Repeat the above steps to create a separate table for each group of mix and match products that you want to list separately. To save time, duplicate an existing table at Products → Tables and edit which products are included.

4b. Create the mix and match products page

  1. Next, go to Pages → Add New to create a new page where we’ll list the WooCommerce mix and match products. Add any text that will appear above the order form, such as instructions or information about the ordering process.
  2. Divide the page into sub-headings. Each sub-heading will be based on the categories you created in Step 1. Following our example, the sub-headings might be Step 1 - Choose a Container, Step 2 - Choose your Contents, and Step 3 - Choose the Finishing Touches.
  3. Finally, insert a 'Product Table' block under each heading and select the relevant product table which you created earlier. If you don't use the WordPress block editor then instead, you can get a shortcode for each table from Products → Product Tables.

That’s it! Now hit the Publish button and preview your page on the storefront. It should look something like this:

Mix and match products order form on the front-end

Bonus tip #1 - Add extra mix and match product options

Pizza product table with variation dropdowns and add-on options for mix and match orders
Product add-ons appear in the add to cart column of the mix and match product configurator.
So far, you've learned how to use variations to add a choice of options for each mix and match products. This is fine for most WooCommerce mix and match configurators. However, variations aren't suitable if customers need to be able to select more than one option at a time.

Fortunately, you can easily do this with the WooCommerce Product Options plugin. This fantastic WooCommerce extension makes it easy to add extra options to your mix and match products. For example, you can add multi-select checkboxes to each product. You can even add text fields where the customer can enter a personalized message.

Bonus tip #2 - Too many options? Add quick view lightboxes

WooCommerce customizable product quick view

Some WooCommerce mix and match products websites end up with a large number of variations or options for each product. For example, look at the Pizza Fiorentina product in the screenshot above. This product has 2 rows of product add-ons, which isn't a huge number of options - and it's already taking up a fair amount of vertical space. As a result, you can easily imagine what would happen if you tried to list several dozen options per product!

Quick view buttons added to a WooCommerce product table
The solution is to remove the add to cart column from your mix and match products table, and replace it with quick view buttons. You can do this by adding the WooCommerce Quick View Pro WordPress plugin.

Customers click on the quick view buttons to view more product information and purchase options in a lightbox window.

There are lots of benefits from using quick view to sell WooCommerce mix and match products:

  • You can choose what information to include in the lightbox. For example, you may wish to show the full gallery of product images. Or you may wish to hide the images and just show extra product data or add to cart options. Alternatively, you can have both! Either way, there's no limit to the number of variations and options that you can offer in the lightbox.
  • Customers remain on the product table at all times and don't have to visit a separate page to purchase each better. That's why quick view is better than using the single product page to sell mix and match products.
  • WooCommerce Quick View Pro also supports other methods of selling mix and match products such as grouped products, Composite products, and Product Bundles. List the products in a table, and customers can create custom product marketing bundles from within the quick view lightbox.

Bonus tip #3 - Sell mix and match product subscriptions

Most mix and match WooCommerce products configurators sell products on a one-off basis, with a single payment.

If you prefer, you can create mix and match product subscriptions. The instructions are the same as above, but you need to add the YITH WooCommerce Subscriptions plugin to take repeat payments.

WooCommerce Subscriptions make it easy to accept free trials and regular payments for each product. You can choose whether to offer a free trial and whether customers will be billed weekly, monthly, or whatever frequency you like.

Bonus tip #4 - Restrict how many mix and match items the customer will order

So far, you've learned how to sell mix and match products by setting a fixed regular price for each product or variation. The total order cost is the sum of all the products that the customer selects and adds to their cart.

Some WooCommerce mix and match websites prefer to set a fixed cost for the entire product box. If you do this, then you'll need to add a product price for the container itself and set the price of the contents products as $0.00. (You can easily hide the item pricing column of the tables listing the mixed and matched contents.)

If you do this, then you'll want to restrict the number of products that the customer can order. You can easily do this with the WooCommerce Quantity Manager plugin. Its plugin lets you create a minimum and maximum quantity rules. The rules prevent customers from ordering the wrong amount - essential for selling fixed price mix and match products in WooCommerce.

For example,  you might set a minimum and maximum quantity of 1 for the container itself. You would then add a maximum quantity or value for the 'contents' category. This controls how many items can be added to the container.

Bonus tip #5 - Sell mix and match packages with quantity-based discounts

Perhaps you want to sell WooCommerce mix and match products with a choice of packages, with discounts based on the number of products ordered. This is a good way to give discounts based on the number of photos purchased, without having to restrict the number of products that each person can buy.

To do this, use the WooCommerce Discount Manager plugin to dynamically change the price based on the number of products in the cart.

Next, you need to display the information in the frontend in a format that will encourage people to buy more:

  1. At the top of the page, add information about the different packages and prices.
  2. Underneath, use WooCommerce Product Table to list your mix and match products.

Customers can choose as many photos as they like and they will automatically be charged the correct price for their package.

Where to get the plugins

Letting customers mix and match products to create personalized orders and gift hampers is a great way to deliver an exceptional customer experience. And the best part is that it’s incredibly easy to do with the WooCommerceWooCommerce Product Table, and Quick View WordPress plugins.

Now you know how to create your own WooCommerce mix and match product order form. Hopefully, you’re in a good position to take things further.

Also, be sure to check out our step by step tutorial on how to use WooCommerce to sell ‘build your own’ products for inspiration and detailed instructions!

How do you use mix and match products in your WooCommerce store? We’d love to hear from you so let us know by commenting below!

WordPress member directory shown as a searchable table on a laptop

A WordPress member directory plugin lets you create a list of your organisation's members. The member list will appear on a public or private page on your website.

Creating a member directory in WordPress can help you showcase your community and provide valuable resources for your users. In this tutorial, we'll walk you through how to set up a searchable table with user profile fields using the Posts Table Pro plugin. In addition, we'll cover how to allow members to sign up from the front end and sell access to the user directory using Gravity Forms payment extensions.

Members will be listed in a table with options to sort, search, or filter to find a particular member. When a user finds the member they're searching for in the members' directory, they can just click through to read their full profile. With the added ability to sign up for membership and pay for a directory listing, your member directory will become a valuable resource for your users and a source of revenue for your business.

WordPress member directory listing members with photo, name, country and skill level

A new type of WordPress member directory plugin


A WordPress member directory plugin is a tool that creates searchable, sortable lists of members. Unlike membership plugins that restrict access to content, member directories display information about your members in an organized format.

This is completely different from a WordPress membership plugin. While a membership plugin lets you create a private members-only area for your members to log into, this member directory plugin creates a directory of people or members that's sortable and filterable by the user.

It's also different from most WordPress user list plugins. These typically create a fairly basic directory listing all the users from your WordPress website (i.e. everyone from the Users section of the WordPress admin). While this might be fine for some membership site directories, what happens if your members are not WordPress admin users? Your directory of members might contain different people from your list of WordPress users.

This makes it tricky to find the best WordPress member directory plugin. If you search for a WordPress user list plugin, you'll find membership plugins designed to create a protected members-only area of your website, or member directories listing all your WordPress users. However, don't give up!

This tutorial will show you how to build a different sort of WordPress member directory. We'll use the Posts Table Pro plugin, alongside other free WordPress plugins for creating member profiles. The members in your directory don't need to have logins for your website - your users are kept completely separate.

You may also like: How to Use Posts Table Pro to Create a WordPress Staff Directory

How others use the WordPress members directory

Check out these examples of WordPress websites with a searchable member directory with the profile. See what's possible and find inspiration to start building your own directory of members today.

Case study 1 - CEPPs members directory

CEPPs is a charity that supports mothers and early childhood. They use the Posts Table Pro plugin to create a WordPress member directory with profiles.

A WordPress member directory of organisations with search and filters

The CEPPS directory of members lists their supporters in a mobile-friendly, fully responsive WordPress table. Each supporter is listed within a custom post type in WordPress. Information about each member is stored as custom fields, categories, and taxonomies. Each piece of data is stored as a separate column in the table.

Visitors can sort the table by clicking on any column header. They can search for any keyword by typing it into the search box. They can also filter the WordPress member directory by clicking on country, city, type or tag. This makes the member directory really flexible and quick to use.

You can click on a logo, name, or 'Visit' link to view the individual member profile page. This contains further information about each member.

Case study 2 - SuperConnection consultants directory

SuperConnection has a WordPress member directory, listing their expert consultants. Each consultant has attended their training and is available for consultation.

Consultants are listed in alphabetical order with their names and location. You can sort by either column or perform an instant search using the search box. This makes it easy to find a consultant in your area.

You can click from the directory to the individual member profile pages. These include various custom fields about each member including contact details, location map, and classes completed.

Consultants directory table:

Live WordPress member directory of health consultants with name and location columns

Member profile page:

Individual member profile page showing photo, bio and contact details

Case study 3 - Private members-only database of authors

Private members-only database of authors built as a searchable directory table
Five-star customer review praising the member directory plugin

Christopher Graham uses our Posts Table Pro WordPress table plugin for his private members directory of thriller, mystery and crime fiction authors.

He was looking for an easily searchable members database that would allow the authors to search for other members with skills or knowledge in a particular area.

When one member finds another with the skills they are interested in, they can contact them, ask questions, or chat.

What are your requirements for a WordPress membership directory with profiles?

First, it's important to think about your requirements. What do you want to achieve from your WordPress member directory plugin? This will help you decide if the type of member directory covered in this tutorial is right for you.

Planning your member directory

  • Will your WordPress member directory be publicly available or hidden from public view? I'll show you how to create a public member directory and how to password protect it. If you want to add further security - for example, by making it available to specific groups via a WordPress membership plugin - then we won't be covering this. However, techniques covered in this tutorial can be used anywhere on a WordPress site. This means that you can put it on a page that is restricted using another membership plugin, if you like.
  • Can members create and manage their own profiles? This tutorial is about how to create a WordPress member directory with profiles that you will maintain as the website administrator. If you want members to be able to create their own profiles then you'll need to do some extra work outside of this tutorial. (Bonus tip: You could use Gravity Forms with the Gravity Forms + Custom Post Types plugin to let members submit their own profiles to the directory. You could even take payment via PayPal if required. New members would complete an online form with their profile information which would then be saved in the 'Members' custom post type to be displayed in the directory. Please see our tutorial on how to set this up.)
  • Do your members have to be WordPress users? Unlike other membership directory WordPress plugins, you'll be adding the members as a custom post type in WordPress. The Posts Table Pro plugin we'll be using as our member directory plugin displays custom post types but NOT WordPress users or user roles. If your members are also WordPress users (i.e. they're listed in the Users section of the WordPress admin) then you can't list them in the directory. To do this, you'd need to add each member to the 'Members' custom post type we'll be creating in this tutorial.

What information will the WordPress member directory plugin contain?

You should also consider:

  • What information do you want to display about each member? Write a list of the data you want to display using Posts Table Pro, the best WordPress member directory plugin. This can include various text fields (name, description, experience, etc.), one or more images, icons (e.g. linking to their social media profiles), etc. Basically, anything you like. You'll use this later in the tutorial when you create the custom fields for your WordPress directory of members with member profiles.
  • How will you structure your WordPress directory of members? As well as the unique data about each member such as their name and email, you'll probably want to categorize your directory of members. Write a list of the different ways you want users to be able to sort and filter the member directory.

Armed with this information, you're ready to start building your WordPress member directory.

How to create a members directory in WordPress

1. Create a 'Members' custom post type

Part 1 covers the initial setup of creating a WordPress member directory. You can also read the full instructions below.


A custom post type is a way to store different types of content in WordPress. We'll create a 'Members' post type to store all your member profiles separately from your regular posts and pages.

Each WordPress member in your directory will be stored with their profile data in a WordPress custom post type called 'Members'. (Don't worry, you can call it something else if you prefer.) This will create a 'Members' section on the left of the WordPress admin. Each member will be added as a separate 'post' within this section.

If you're a developer, you can create a 'Members' custom post type the way you would usually. If not, you can do it using our free Easy Post Types and Fields WordPress plugin.

  1. Go to Plugins → Add New and search for 'Easy Post Types & Fields'.
  2. Install and activate the plugin.
  3. In the setup wizard, complete the following fields to create a new "Members" post type:
    • Singular name - Add a singular label, e.g. 'Member'. This will appear when you add a new post in your Members post type, e.g. 'Add New Member'.
    • Plural name - Add a plural label for your Members post type, e.g. 'Members'. This will appear in the left of the WordPress admin.
      Naming a Members custom post type in the setup wizard
  4. At the end of the setup wizard, you'll see a new 'Members' link on the left of the WordPress admin. Use this to add your members to the directory.

2. Structure the member directory into categories, tags & custom taxonomies


Categories, tags, custom fields and custom taxonomies are ways to organize your members. They let people filter the directory to find specific types of members quickly.

Categories, tags, custom fields and custom taxonomies let you store information that will apply to multiple members in your directory. People viewing your members directory can filter the table to find all the members with a specific category/tag/taxonomy.

For example, you might want to categorize your WordPress member directory by local area. You could create a category, tag, or taxonomy for each geographical area. An 'Area' filter could appear above the member directory so that users can filter the table for members in a specific area.

These 3 ways of organizing content in WordPress are quite similar. To be honest, it's not that important which you use, but here are some tips to help you decide between them:

  • Categories - Use WordPress categories as the primary way of organizing your member directory. All members should come under one or more categories.
  • Tags - Tags are labels that provide extra information about your members. They're optional and members can have no tags or several.
  • Custom Taxonomies - Use these for additional categorization that you want to use in the WordPress member directory. For example, if you're using your main categories for the geographical area then you might want custom taxonomies for any other ways you want to categorize your members.

Some examples

For example, you might use categories to record the geographical area of each member, e.g. 'England'. Each member might have some tags relating to their specific skills such as 'French speaking' or '5+ years experience'. You might have custom taxonomies for 'Level' (e.g. Junior, Intermediate, or Senior Consultant).

You can create tags when you add the members later, but you need to add the categories and custom taxonomies now.

2a. Create your categories

  1. Go to Members → Categories in the WordPress admin.
  2. On the left-hand side, add the name and slug (the end bit of the URL) for each category you want to create.
  3. Click 'Add New Category'.
  4. Repeat the process for all the categories you want to create.

Tip: You can create sub-categories by selecting another category as the 'parent'. However, your member directory will list all the categories and sub-categories on the same level, for example in the 'Categories' filter dropdown. If you want to list them separately then you should create a custom taxonomy instead. For example, you might be using your top-level categories to record each member's country. Instead of adding the regions within each country as sub-categories, you can create a custom taxonomy for 'Region'. This will let you list the regions as a separate dropdown filter above the members table, instead of combining the countries and regions in a single list of categories.

2b. Create custom taxonomies

Create custom taxonomies using the Easy Post Types & Fields plugin you used to create the 'Members' post type:

  1. Go to Easy Post Types → Post Types and click the 'Custom Taxonomies' button next to the Members post type.
  2. Enter the name for the taxonomy and click Save.
  3. This will then appear on the Add/Edit Member page.

2c. Create custom fields


Custom fields are extra pieces of information about each member that aren't covered by WordPress's standard fields. Examples include phone numbers, email addresses, or dates of birth.

Look at the list you wrote earlier about the data you need in the WordPress member directory. This probably includes things like member name, phone number, etc. Mark which items in the list correspond to the following WordPress fields:

  • ID - This is the unique ID for the member which is stored in the WordPress database and will be created automatically when you add each member. The IDs will be non-sequential as they are used for other types of content in WordPress too. You may want to use this to store member ids. Or if you want to choose the ID, you should use a custom field instead.
  • Title - Use this for the member's name.
  • Content - Use this for the main description on the member profile.
  • Excerpt - Use this if you want to display a brief introduction to the member on the main directory page. (If you prefer, you can leave this blank and just display the first few words of the main description instead.)
  • Image - Use this for the member's photo or logo.
  • Date - This is the date when the member was added to the website. You can change the date if needed.

Any fields that don't come under the above list and aren't suitable for categories, tags, or custom taxonomies (i.e. they're not unique to each member) should be added as custom fields. Examples of the sort of member data you'll need custom fields for include email address, phone number, and date of birth.

To create WordPress custom fields for your members:

  1. Go to Easy Post Types → Post Types and click the 'Custom Fields' button next to the Members post type.
  2. Enter the name for the custom field and click Save.
  3. This will then appear on the Add/Edit Member page.

3. Add members to the directory

Now you've finished creating the infrastructure for storing your member profiles in the directory. It's time to add all your members:

  1. Go to Members → Add New in the WordPress admin.
  2. Add the member profile using the standard WordPress fields, categories, tags, taxonomies, and custom fields you created earlier.
  3. Click the blue 'Publish' button.
  4. Repeat the process for all your other member profiles.
Editing a member profile with phone email and photo for a directory

4. Create your searchable member directory table

The next step is to add a members directory table to a page on your website. This will list all your members, with optional click-throughs to the individual member profile pages.

Here's Part 2 of my video tutorial on how to create a WordPress members directory with profiles. Or you can read the written instructions below.

  1. Buy the Posts Table Pro plugin, download the plugin files from the order confirmation page and copy your license key.
  2. Go to Posts → Add New in the WordPress admin.
  3. Click 'Upload' and upload the Posts Table Pro files.
  4. Activate the plugin.
  5. Activate your license key in the setup wizard, and follow the instructions to create your main member directory listing. This will take you through decisions such as which columns of member data to include.
  6. The final page of the wizard will give you a shortcode to insert the member directory onto your site. Use this to add it anywhere you like.

You will see all your members listed in a searchable directory:

Searchable WordPress member directory on a laptop with photos and filters

5. Customize your WordPress member directory

The Posts Table Pro setup wizard will walk you through the main options. Here are some that are particularly useful for a WordPress member directory.

Add filter dropdowns

By default, the WordPress member directory includes a search box above the table. You can also add filter dropdowns to let users filter by category, tax, or custom taxonomy. Visitors can select several values at once, and each filtered view of the directory has its own URL they can bookmark or share.

Choose filters in the setup wizard or by editing your member directory in the Post Tables section of the WordPress admin.

Change the order of your members' list

Remember to change the sort order of your member directory to one that is most useful to your visitors. The default member directory lists members on the date they were added, with the most recent first. You can change it to sort by any column in the table or other options such as setting a custom order.

Most WordPress member directory plugins sort the list alphabetically.

Disable individual member profiles

In the default members table, you can click on a member's title or image to view their profile page. You can disable this by clicking the pencil icon next to each table column. All your members will still be listed in the directory table - but users won't be able to view separate profile pages for each member.

Create a directory listing specific members only

By default, the directory will list all members. If you prefer, you can create multiple tables - each listing different types of members. For example:

  • You may want to list members with different skill levels on different pages of your website.
  • Alternatively, you might want to divide your member directory page into multiple sections. You might have a 'Europe' subheading followed by a table of members in the Europe category. Then you could have an 'Asia' subheading and a table of members in the 'Asia' category. And so on.

You can add tables containing members with a specific category, tag, taxonomy, or custom field. (It's also possible to create tables with members who were added on a specific day, month or year but you're less likely to need this.) Simply choose which members you want to display in the wizard or by editing the table.

Create a 'Search members' page


A standalone search page lets users search for members without displaying the full directory. It's perfect for homepages or sidebars where you want a clean search interface.

The instructions above showed you how to create a WordPress member directory with an AJAX-powered search box above the list of members. You can also create a standalone page allowing people to search the member directory.

A member directory search box for finding members by name, city or specialism

There are two ways to add a search box anywhere on your member directory website:

  • Add the 'Posts Table Pro: Search Box' widget to any widgetized area. Change the widget name to something like "Find a Member".
  • Insert the [ptp_search placeholder="Find a Member"] shortcode into any page. If you're using a page builder such as Gutenberg, Divi or Elementor then insert this into a 'Shortcode' block.

The member directory search looks across every column in the table. For example, if you included a "City" column in the table then this will be searchable.

For an even more powerful member directory search, you can use Posts Table Pro alongside the SearchWP plugin. This supercharges the search by letting you control the logic of the search, view analytics on how people are using the search, and more.

How to password protect your WordPress member directory

WordPress publish box set to password protected for a member profile

If you want your WordPress member directory and profiles to be publicly available then you've finished - well done! To create a private members directory, the easiest option is to password protect the relevant page in WordPress.

  1. Go to 'Pages' in the admin and click on the page used for your WordPress member directory table.
  2. Click the 'Edit' link next to 'Visibility' in the 'Publish' panel at the top right of the screen.
  3. Choose 'Password protected' and enter a password for the page.
  4. Click the blue Publish or Update button.

You can then give the password to everyone who needs access to the member directory.

For a more advanced solution, you can use a WordPress membership plugin to protect the page or to create a wider members area. The Groups WordPress plugin offers a simple, user-friendly way to create a protected members area.

Create a members sidebar widget

If your WordPress member directory website has a page sidebar, then it can be a good idea to list members in a widget. The best way to do this is to show the full member directory on the main page, and a simpler version in a sidebar widget.

This is how to add a simplified member directory to your website's sidebar:

  1. Go to Tables → Add New.
  2. Create a table listing the 'Members' post type you created earlier in this tutorial.
  3. On the 'Columns' page, just choose two or three columns. I would recommend something like "image, title, button". This will create a 3-column WordPress member directory containing the name of each member, plus their image and a button linking to their full member profile.
  4. If your page sidebar is created using the Gutenberg block editor, then use the 'Posts Table' widget to insert the new table. Alternatively, copy the shortcode from the last page of the table builder and paste it into a text widget.

How to allow members to sign up from the front end and sell access to the member directory


Front-end registration lets members sign up directly on your website. You can even charge for directory listings using payment gateways like PayPal or Stripe.

One of the best ways to make your member directory more valuable is to allow users to sign up for membership directly from the front end of your website. This can be done easily using Gravity Forms, a popular form builder plugin for WordPress.

The way it works is that you'll use Gravity Forms to create a membership signup form. You'll set this up so that when a new member registers, it will save their information to the 'Members' post type you created earlier in this tutorial. When you approve the new registration, the member will automatically appear in the member directory which you created using Posts Table Pro.

This is the fastest way to create an automated WordPress member directory. I recommend holding new member registrations for moderation, but you can automate it 100% by auto-publishing the new member posts instead of saving them as drafts and publishing them manually.

Step 1: Create a member's custom post type with Gravity Forms

Make sure you have followed the instructions above to create a members custom post type in WordPress. Once this is set up, you can use Gravity Forms to create a form that allows users to sign up for membership. To do this, you'll need to install the Gravity Forms add-on, which allows you to save the information submitted by the user to the member's custom post type.

To create a form, simply navigate to Forms → New Form in your WordPress dashboard and add the necessary fields. You can include fields for user information, such as name, email address, and a brief description, as well as any other relevant details you want to collect. Make you have created a field for each of the pieces of data that you added to your members custom post type.

Next, you need to use the Gravity Forms + Custom Post Types plugin to map the form fields to your members custom post type. This means that when a new member registers, their data will automatically be saved to the correct fields in your member directory. Gravity Wiz have a tutorial about how to save Gravity Forms submissions as custom posts. Do this, then come back finish the process of setting up the WordPress members directory plugin.

Once you've created your form, you can add it to a page on your website using the Gravity Forms shortcode. Name the page something like 'Member Registration' or 'Become a Member'.

Step 2: Use Gravity Forms payment extensions to sell access

To sell access to your member directory, you can use Gravity Forms payment extensions to create a payment gateway for users who want to be included in the directory. There are several payment gateway options available, including PayPal, Stripe, and Authorize.net, so you can choose the one that works best for your business.

To set up a payment gateway, you'll need to install and activate the appropriate Gravity Forms payment extension. Once this is done, you can create a new form and add the payment fields to it. This will allow users to pay for their membership directly from your website.

Create your own WordPress member directory with member profiles

Now it's your turn! I've given you all the information to create a fully functional member directory for your WordPress site. You know how to create a 'Members' custom post type with various fields of data about your members. I've told you how to use Posts Table Pro to create a searchable members directory. You know how to customize the members' table and where to get the resources to edit your member profile template. I've even shown you how to hide the member directory from public view.

Once you've finished your member directory, you can also use Posts Table Pro to present other types of content. For example, you can use it as a WordPress document library plugin or create a publications library. You can even use it as a WordPress audio library, video gallery, or events list.

Allowing users to sign up for membership directly from the front end of your website and selling access to your member directory can also greatly increase the value of your directory while generating revenue for your business. By following the steps outlined above, you can easily set up these features using Gravity Forms and WordPress. Don't forget to enable moderation to ensure your directory stays up-to-date and relevant.

I'd love to see a link to your own WordPress member directory after you've created it. How did you get on? Is there anything I can do to improve this WordPress tutorial? Please leave your comments below.

Camera and notebook beside a laptop on a photographer's desk

This is the ultimate guide to WooCommerce for photographers. WooCommerce offers some fantastic opportunities to sell photos online, whether this is to the general public or specific clients. I'll walk you through the best WooCommerce photography plugins and WooCommerce gallery plugins , as well as provide tips on how to sell more photos on your WordPress website.

Not all photographers want to sell their images to the general public. If you provide bespoke photography services, you'll want to sell photos in secure areas of your website that only certain clients can access. Fortunately, WooCommerce for photographers is straightforward. And if you're not a photographer, don't worry! These solutions are suitable for anyone wanting to create client-specific products or categories in WooCommerce.

By the end of this article, you'll know how to choose the best WooCommerce for photographers plugins and set them up:

  1. Why should a photographer use WordPress & WooCommerce?
  2. Why sell client-specific products in WooCommerce?
  3. Create a password protected category for each client
  4. Sell physical photo prints, downloadable digital photos & other types of product
  5. Use product variations to provide multiple options
  6. Use WooCommerce Product Table to list more photos per page
  7. What if my client has already paid for their photos?
  8. Show extra photos and image zoom in a quick view lightbox
  9. Sell personalised photo frames or engravings with Product Add-Ons
  10. Add a watermark to protect your images
  11. Bulk import photo products to WooCommerce

Skip straight to the section you're interested in for detailed written instructions. To bring it all together, we've also created this video tutorial on how to create a complete WooCommerce photography website. It covers all the features you need, including quick bulk upload, photo order form pages with variations, plus a password protected category for each client:

WooCommerce & WordPress for Photographers: how useful is it?

Just what I needed
Does just what I needed. I list the set of photos based on each client. Good adjustment and easy to use.

There a huge number of WooCommerce gallery plugins, WooCommerce gallery plugins and other miscellaneous plugins for photographers. A huge number already have WordPress websites. It's hardly surprising given that WordPress powers over 1/4 of all websites. A huge number of WordPress photography themes and plugins are available. This makes WP for photographers easy: you can create professional websites using flexible, off-the-shelf solutions.

WooCommerce is the world's biggest e-commerce platform. As well as powering a huge 94.3% of all WordPress e-commerce websites, it's used by over 41% of all e-commerce sites worldwide. Wow.

While popularity isn't everything, WooCommerce is obviously here to stay. It's well supported with a huge ecosystem of Woo experts behind it. With so many plugins and add-ons available, there are plenty of options for selling client-specific products in WooCommerce. Not to mention all the other great plugins and features for displaying photos in WooCommerce.

Types of photography you can sell with WooCommerce

You can use WooCommerce to sell absolutely any tip of photography product - digital or printed. For example:

  • Any photo file format JPG, PNG, GIF, and any other type of image file.
  • Type of photography Artistic photography, aerial or drone images, client photography (e.g. family, couple or wedding photos), editorial images, event photos, portraits, stock photos.
  • Image genres Animals, architecture, beaches, holidays and travel, business, celebrities, cities, fashion, food and cookery, home and lifestyle, natural photography, panoramas, seasonal photography, sports and fitness, technology.
  • Delivery mechanism Digital photos, printed photos, or images printed onto other media such as stationery and promotional materials.

Whatever type of photos you need to sell, you can do it with WooCommerce. Keep reading to find out how.

WooCommerce for Photographers case study – Photo Studio TNK WooCommerce photography website

Photography website with client login displayed on laptop, tablet and phone

Photo Studio TNK is a WooCommerce for photographers website run by Thierry in Paris, France. His clients book him for photoshoots, he then sells the prints to them on his WooCommerce website. Selling prints is a big part of his business, so Thierry's clients each need access to a private space where they can view and purchase their photos. That’s why Thierry’s WooCommerce website is powered by our WooCommerce Protected Categories and WooCommerce Product Table plugins.

Photo Studio TNK wedding photography homepage
This is how it works. After a photoshoot, Thierry uploads the images into the client’s hidden WC category. The client is sent a password. They log on to their hidden area to view the images. Each image is displayed in one table than can be filtered. Clients can view images, select variations and add multiple photos to the cart, all from this one table.

It works well for customers as they can view the images on their mobile or laptop and they don't need to leave the page to purchase their chosen images.

You can read more about Thierry’s WooCommerce photography website here. Or read on to find out more about how to make WooCommerce gallery plugins work for your photography business.

Why sell client-specific products in WooCommerce?

There are lots of reasons why a photographer might want a WooCommerce photography plugin to sell client-specific products. Woo for photographers is highly flexible. Let's take a look:

Event or wedding photography

Wedding photographer in a suit holding a DSLR camera

Wedding photographers take photos of a specific event such as a wedding. Afterwards, they need to upload the photos of the event for the couple to view.

A wedding photographer will typically charge a fixed fee for the event itself, with perhaps a photo album included in the price. They may earn extra revenue from the wedding by selling extra options to the couple and their guests. For example, the photos can be bought individually (either as photo prints with different framing options, or as digital prints for download) via the photographer's website. The photographer might also sell packages via their website, such as additional albums or photo montages.

The images must be uploaded to a secure area of the WooCommerce photography website that only the couple - and possibly their guests - can access. People with access to the photos should be able to buy them online.

Family photographer

Family portrait of the kind a photographer might sell online

A family photographer is similar to a wedding or event photographer in that they're commissioned to do a photoshoot of a specific family. They might do the photoshoot for free, with the family just paying for the photos they actually want.

After the photoshoot, the photos need uploading to a private area on their website. The family can login, choose their photos and buy online.

School photography

School photographers take individual and class photos of school children. After visiting the school (which they typically won't charge for), they earn money by selling the photos to parents. The same often happens in nurseries, pre-schools and kindergardens.

Traditionally, school photographers would print a preview of each photo which the school would distribute to parents. This still happens, but parents are typically directed to the school photographer's website where they can view all the images of the class and buy online. The website often sells many options such as different packs and framing choices, and even other objects printed with the photo (e.g. mugs or mouse mats).

Given the confidentiality around photos of children, it's important that school photography is uploaded to a secure area. Only the individual parents - or perhaps the parents for the whole class - can access the photos.


How photographers can sell client-specific products in WooCommerce

There's an excellent plugin to sell client-specific products to photography clients. It involves creating hidden areas of your WordPress WooCommerce website that only the appropriate client can access. It does this by password protecting a category so that only people with the correct password can view and buy the hidden photos.

Password protected categories are better than creating a separate login for each user and giving them access to specific photos in WC. This is because:

  • You don't have to spend time creating a separate user login for each client.
  • You can easily give multiple clients access to a hidden category of photos. For example, wedding photographers can give a shared password to the bride and groom, and all their wedding guests. Everyone can access the protected category and buy the photos, resulting in more sales for you! (Tip: You can create multiple passwords for each customer, if you want to. This is still easier to manage than creating a full WordPress user login for each person who accesses your protected photos.)

Create a password protected category for each client

WooCommerce Password Protected Categories is the easiest plugin to sell client-specific products on a WooCommerce photography website.

To use the plugin, photographers can create a separate product category for each client in WooCommerce. You can then upload all the photos for that client to the relevant category. For regular clients, you can create sub-categories - one for each event or photoshoot.

How to create client-specific WooCommerce password protected categories

  1. Create a WordPress website with WooCommerce and WooCommerce Password Protected Categories installed.
  2. In Pages > Add New, create a page called 'Client Login' (or similar). Leave this blank and Publish the page.
  3. Go to WooCommerce > Settings > Products > Password Protected Categories. De-select the options to show protected categories and products in the public areas of the site. This will hide your client-specific products so no one else will know they exist. Change any other settings as needed, for example to customise the text on the WooCommerce category login form.
  4. Go to Products > Categories and create a category (plus any sub-categories) for each photography client. In the 'Visibility' section, choose 'Password protected' and enter 1 or more passwords. (Tip: Don't password protect any sub-categories - they will automatically inherit the same password as the parent category.)
  5. Upload the photos that you want to sell to each client by creating products in WooCommerce and assigning them to the correct category. (If you've already added your photos products for the client, go to the main Products list in WP. Use Quick Edit to categorise them quickly.)
  6. Finally, go to Appearance Menus and add your Client Login page to the menu. Or if you prefer, link to this page from the header, footer or anywhere else on your site. (Or just keep it hidden from your public website and send the link to your clients.) You can also add a login form to a text widget using the shortcode: [category_login].

And that's it!

That's all you need to do to sell client-specific products and categories for a WooCommerce photography website. When a client visits your website, they can click on the 'Client login' link to view the login page. On entering the correct password, they will be automatically directed to their own category. They won't be able to see your other clients' categories - just their own.

The plugin is simple but secure. Visitors will be prompted for a password whether they try to access the login page, the category page, a sub-category or a specific product page. Once they've unlocked their client-specific category, they can navigate anywhere within that category without having to re-enter the password.

Photographer client login page where customers enter a password to view their photos

It's the perfect way for any photographer to securely sell customer-specific products in WooCommerce.


Bonus! Tips on using WooCommerce for a photography website

So far, you've discovered an easy way for photographers to use WooCommerce to sell photos to specific clients. Then some tips on how photographers can use WooCommerce more effectively.

Sell physical photo prints, downloadable digital photos & other types of product

Photography store shown selling prints and digital downloads across devices
One of the best things about WooCommerce for photographers is that you can sell multiple product types. The ones most suited to a WooCommerce photography website are:

  • Standard products This is a traditional 'physical' product which you will ship to the customer. With this product type, you can add postage costs.
  • Downloadable products You can also use WooCommerce to sell downloadable products. These don't have a shipping cost. When you create a downloadable product, you can upload the digital image file of the photo. Once a client has purchased the digital version of a photo, they will be given access to a secure link where they can download it.

By combining simple and downloadable products, you can design a WooCommerce photography website where you can sell photo prints and digital versions. If you only want to sell one of these product types (e.g. some photographers refuse to sell digital versions of their photos), that's fine too!

Use WooCommerce Product Table to list more photos per page

Wedding photos listed in a WooCommerce product table with add to cart buttons

Most themes have a fairly typical WooCommerce category layout, which may or may not be suitable for selling client-specific photography products. This tends to have big images with the product name, price and add to cart button.

The usual layout is pretty good on most WooCommerce for photographers websites due to the big images. However, it's less appropriate for selling photography products that aren't so visual. For example, a product category for framing options and photo bundles may not need big images. Instead, you might prefer to list as many products per possible, with extra information to make it easy to compare products such as size and colour.

If that applies to any of your products then WooCommerce Product Table offers a better photo gallery layout. It lists products in a searchable, sortable table or grid with filters.

You can make the product images as big or as small as you like (or hide them completely). This is better for less visual products such as frames or bundles, where you just want to list the options on a single page.

You can even use it as a one-page order form, where customers can select variations, quantities and add to cart directly from the product table. There are lots of ways to use product tables to increase your conversion rates and get more sales.

How to use WooCommerce Product Table to sell photos with password protected categories for each client

WooCommerce Product Table is fully compatible with the Password Protected Categories plugin that I told you about earlier. To use the two plugins together, you just need to follow these instructions to automatically add the product table layout to your category archive template file.

When your photography clients log into their hidden password protected category, they will see their photos presented in a product table layout.

Photography product table shown on a tablet and phone

WooCommerce gallery plugin: Check out our separate tutorial on selling more photos with a WooCommerce gallery layout.

What if my client has already paid for their photos?

Some photographers upload photos so that clients can buy them individually, whereas others take payment as a package beforehand. You can let clients order photos without having to pay for each one. The exact method depends on whether you're selling physical or digital downloadable photos.

Photo prints and physical products

Add your photos as WooCommerce products using the method that I described above. Instead of requiring payment online, choose an offline payment gateway such as 'Invoice'. You can rename this to anything you like, so the word 'invoice' won't appear anywhere.

When the customer adds photos to the cart and the checkout, they can use this pseudo payment method to complete their order without having to pay.

If you still want to take payment for other types of product, then that's fine too. Simply use the Conditional Shipping and Payments plugin to show the pseudo payment method for specific categories only.

Downloadable digital photos

Your customers can also download their pre-paid photos from their private portal, without having to pay online. To do this, I recommend using the following plugins alongside WooCommerce Protected Categories and WooCommerce Product Table:

  • Free Downloads WooCommerce - Add each photo as a downloadable WooCommerce product, and use this free plugin to allow customers to download them without having to check out or pay online.
  • WooCommerce Quantity Manager - If a client has pre-paid to download a specific number of photos, then use this plugin to restrict the number of products they can download. For example, if they have purchased a package of 20 photos then you should set a maximum quantity of 20. You can set limits on the client's whole category, or individual products/photos.

Use quickview to show multiple photos and image zoom

Photography product gallery shown in a lightbox for a WooCommerce store

WooCommerce Product Table is ideal for listing photography products. However, the size constraints of the image column mean that it can only show one static image of each product.

Photography product opened in a quick view gallery lightbox

You can show extra images by adding the WooCommerce Quick View Pro plugin. This handy plugin displays the full image gallery for each product, and customers can scroll between images by clicking on the thumbnails or using navigation bullets.

You can hover over an image to zoom in on it, showcasing your photos in full high definition that will inspire people to buy them.

The quick view plugin is very flexible and you can choose which style of photo gallery to show, and whether to include images only or whether to add extra product data and purchase options. It's the perfect way to provide further information and show off your photography more effectively without taking people to a separate page for each product.

Use product variations or add-ons to provide multiple options

WooCommerce photography websites often need to sell products with several options. For example, you might sell a photo print in multiple sizes. You might offer a choice of framing options. You could offer different file formats for your photos.

Give customers a choice with product variations

Use variable products in WooCommerce to add extra options. Customers can select the combination of variations they need and see the updated price before adding photos to the cart.

WooCommerce variable product set up with print and digital photo variations

Sell optional extras and customizations with Product Add-Ons

If you need extra flexibility (e.g. multi-select checkboxes or space for the customer to add a personal message), then you can use the WooCommerce Product Options plugin.

This WooCommerce extension adds extra add-on fields to the product page where clients can add text, upload a file, or choose additional options.

The add-on options will appear in the add to cart column of your product table. Customers can select them before adding to the cart.

Add a watermark to protect your images

Many photographers who sell photos in WooCommerce wish to protect their images and prevent people from downloading them without making a purchase. After all, the product featured image is available for people to see before they buy. Anyone with basic computer knowledge knows how to right click on a photo to download it, or how to take a screenshot of it.

There are several easy ways to protect your photos:

  1. When you add the product featured image, make sure it's low resolution. That way, if anyone downloads it then it won't be print quality. They must pay for the high resolution downloadable product in order to get the full quality version. (Of course, they can still share the low res photo on social media, so you may want more protection.)
  2. You can also use the YITH WooCommerce Watermark plugin to automatically add a watermark to your featured images. This is a neat compromise because while it doesn't prevent people from downloading the image, the watermark will prevent them from using it. They must buy the photo in order to receive the un-watermarked version.

Bulk import photo products: WooCommerce import and WooCommerce Gallery plugins

Since publishing this tutorial, lots of you have asked how to bulk import photos to sell in WooCommerce for photographers. For example, a photographer might want to upload an entire photoshoot to their website and sell each image as a separate product. It would take too long to do this manually, so you need a WooCommerce gallery import plugin that can import simple, variable and downloadable products.

You can do this using the official Product CSV Import Suite plugin. I'll tell you how to import your photos using this plugin now:

Instructions - Product CSV Import Suite

  1. Get the plugin and install it on your WooCommerce site.
  2. Use FTP to upload all the photos to the /wp-content/uploads/ folder on your website. To keep your photos organized, add them under the current month. This is easy, as the uploads folder is already structured by month. (If you haven't used FTP before, learn how here.)
  3. If you want to create a lower resolution version of each photo to use as the main product image, upload these too.
  4. Next, prepare a CSV file containing the product data that you wish to import. The easiest way to create a CSV file is to use spreadsheet software such as Microsoft Excel or Numbers. When you've finished, use the Save As or Export option to save the file as CSV.
  5. Add all the product data using the column headers in the import plugin documentation. If you want each product or variation to have the same data (e.g. price) then you can copy and paste rows of the spreadsheet to quickly add them - just make sure each row has a unique URL for the actual image.
  6. If you're selling photos as downloadable products, use this section of the documentation to add the downloadable product data to the CSV file. This includes downloadable file URL (this will be the URL of the photo that you uploaded via FTP), download limit and expiry.
  7. When the CSV file is complete, upload it using the Product CSV Import Suite plugin. This will automatically import your photos as WooCommerce products, so you can start selling them.

Preparing your CSV file sounds a bit daunting. Stick with it, as the documentation is excellent and covers everything you need to know. WooCommerce.com also provide excellent live chat support to help with any problems. Once you've created your first CSV file, it will be much easier next time.

WooCommerce for photographers – time to create your website!

I hope this guide has helped you to choose the best WooCommerce photography plugins or WooCommerce gallery plugin for your WordPress website. I'd love to hear how you get on.

You've learned:

Which are the best plugins on WordPress and WooCommerce for photographers in your opinion – are there any I've missed? Please add your comments below.

WordPress password protected portfolio

Are you a graphic designer, web designer, architect, interior designer, electrician, builder or from another profession? Either way, you can use your previous projects to attract new clients. A password protected portfolio lets you publish examples of your work on a WordPress website, while hiding parts or all of it from public view.

You can give potential clients the password to your portfolio, while maintaining the confidentiality of your projects and previous work.

Lots of people have a public WordPress website and use a third party portfolio provider to securely share examples of their work online. Hosted third party portfolios are expensive. They're also less professional because they don't match your website. You can save money and get a better result by creating a password protected portfolio in WordPress. Your main website content and your portfolio will be managed via the same WordPress admin area. It's simple, efficient and works a treat!

The ultimate guide to WordPress password protected portfoliosWordPress password protected portfolio

This is the complete guide to creating a WordPress password protected portfolio. I'll talk you through 3 easy ways to protect your whole portfolio or just parts of it. The rest of your website will remain available for anyone to view, but your portfolio projects will be hidden and password protected.

Use these links to jump to the 3 types of password protected portfolio:

  1. Password protect individual portfolio posts
  2. Password protect your entire WordPress portfolio
  3. Create a public portfolio in WordPress with a password protected category

And here's a fun quiz to help you decide which method is best for you.

Should I password protect my portfolio?

Let's start with the question of whether password protected portfolios are actually a good idea. There are plenty of people in both camps. Some want to keep parts or all of their portfolio private, protected from public view. Others prefer a public portfolio that anyone can see. Here are the main reasons for and against - read these and decide whether or not to password protect your portfolio.

Reasons to have a private or password protected portfolio

  • You might have confidential, white label or proprietary projects under an NDA. Or maybe you have clients who aren't happy for the world to know that they use your services. Either way, a password protected portfolio lets you showcase your work to potential clients without compromising your existing clients' confidentiality.
  • If you're concerned about copyright issues or people stealing your work, a password protected portfolio keeps your content safe.
  • Password protecting your portfolio hides your work from competitors. They can't see your methods or try to compete by copying your style.

Tip: A password protected portfolio isn't a guaranteed way to protect your clients' confidentiality. You should still get their agreement to be included in your private portfolio, even only people with the password can see it.

Reasons to have a public portfolio

  • Your portfolio is a way to showcase your work to the world. This adds credibility to what you do, reassuring people about your skills and ability. This makes them more likely to use your services. Password protecting a portfolio hinders this, as new visitors to your WordPress website can't see your work.

The best of both worlds

The decision on whether to create a password protected portfolio depends on the nature of your work and your clients. If your work isn't commercially sensitive then you should ask certain clients if they're happy to be included in your public portfolio. If this isn't appropriate, create a WordPress password protected portfolio instead.

The ideal compromise is to have a public portfolio to showcase your non-sensitive projects or case studies, with a password protected section for work you can't share publicly. That way, new visitors can see your fantastic work. After they make an enquiry and progress further towards becoming a client, you can share the password protected portfolio projects with them too.

#1 - Password protect individual portfolio posts

WordPress Publish box setting a portfolio post to password protected
All WordPress websites include a feature to password protect individual pages or posts. This includes 'Portfolio' posts, if you have them.

  1. Go to the 'Edit' screen for the portfolio item you wish to password protect.
  2. Find the 'Publish' box in the top right corner.
  3. Click the 'Edit' link next to 'Visibility'.
  4. Choose 'Password protected', add a password and click 'Ok'.
  5. Click Update/Publish to save the portfolio post.

When anyone tries to view the password protected project in your portfolio, they will be prompted for the password.

The downside

This is a simple method for password protecting parts of a WordPress portfolio without any extra plugin. However, there are downsides:

  • While you can password protect as many portfolio posts as you like, they all work independently. This means that even if you choose the same password for each one, your clients will have to enter a password EVERY time they want to view a protected portfolio project. If they're viewing multiple projects then this creates a bad user experience.
  • Password protecting a portfolio post in WordPress doesn't affect its visibility on your public website. Anyone can see it (including the title, which may include your clients' name) but they have to enter the password to view the content within. Your password protected portfolios will appear in search results, the built-in WordPress search, and on your main portfolio page if you have one. The whole reason for password protecting parts of your portfolio is to protect client confidentiality, so this is counter-productive.
  • Mixing up public and password protected portfolio projects also creates bad user experience for your public visitors. Imagine if you were a normal visitor to your website looking for examples of your work. Sometimes, you would click on a portfolio item and be able to see it. Other times, you would be asked for a password. You would have know way of knowing what to expect. This would be quite off-putting and would deter potential new clients.

So, this is a simple way to create a password protected portfolio. However, the results aren't ideal for any of your visitors. It's worth spending a few extra minutes implementing methods 2 or 3. We'll look at these next.

#2 - Password protect your entire WordPress portfolio

Password protected portfolio category login shown on phone and tablet
Methods 2 and 3 both use the same plugin. They're just set up in different ways depending on whether you want to hide some or all of your portfolio.

The plugin to use is WordPress Password Protected Categories. This simple but effective plugin lets you password protect any category of WordPress content, including portfolio categories.

Password protecting a portfolio category is better than protecting individual posts (see method 1) because entering a single password will unlock all projects within a category. The plugin lets you hide your protected portfolio projects and categories from other parts of your site, so public visitors won't accidentally end up on the password entry page. By using Password Protected Categories, you won't fall foul of any of the downsides of method 1.

How to create a private WordPress portfolio

  1. Get Password Protected Categories, download the files and copy your license key.
  2. In the WordPress admin, go to Plugins → Add New.
  3. Upload the files and activate the plugin.
  4. Go to Settings → Password Protected Categories, enter your license key and change any settings. For example, you can customise the wording on the password entry page. You can show or hide your protected content in public areas of your site. I recommend hiding it for a WordPress password protected portfolio.
  5. Go to Portfolio → Categories (or wherever you edit your WordPress portfolio categories).
  6. Next, go to add or edit your main portfolio category. Your entire portfolio - including any sub-categories - will sit under this password protected category. You'll see a new 'Visibility' section added by the Password Protected Categories plugin. Click 'Password Protected' and choose a password. Add 1 password if you want everyone to share a password. Add multiple passwords if you want each visitor to have a unique password which you can then revoke after a limited period to remove their access to your protected portfolio.
  7. (Optional) If you need to divide your portfolio into sub-categories, create them now. Leave the Visibility set to 'Public' and set your password protected category as the 'Parent'. The plugin will automatically protect your portfolio sub-categories and their posts with the same password.
  8. Finally, go to the 'Portfolio' section in WordPress (or wherever you edit portfolio posts). Use 'Quick Edit' to add each post to your password protected category or one of its sub-categories.
  9. (Optional) Add links to your password protected portfolio category.
Password protected portfolio categories WordPress

How the private portfolio works

Anyone who visits your website can see your normal pages. If they click a link to your password protected portfolio category - or of its posts or sub-categories - they will be prompted for the password. After entering the password, they can navigate to other portfolio pages without having to re-enter the password.

The Password Protected Categories knowledge base contains more information about the options for your password protected portfolio. For example, if the people accessing your portfolio already have user accounts on your WordPress site, then you can bypass the password protection and restrict the category to specific users or roles instead.

#3 - Create a public portfolio in WordPress with password protected categories

Method 3 also uses the Password Protected Categories WordPress plugin and has the same benefits. The difference is that I'll show you how to set it up in a way that hides specific areas within your portfolio, while leaving others public. This is a good option if most of your portfolio can be public, but you want to add a few projects that need to remain private.

I'll show you how to set it up so that you can have public and private areas within your portfolio, without compromising on user experience.

How to create a public and private WordPress portfolio

  1. Buy Password Protected Categories, download the plugin files and copy the license key.
  2. Go to Plugins > Add New in the WordPress admin.
  3. Upload the plugin files, install and activate it.
  4. Navigate to Settings > Password Protected Categories. Enter your license key and change any settings, such as customising the password entry page. Choose the setting to hide your protected portfolio content in the public areas.
  5. Next, go to Portfolio > Categories (or whichever section you edit your portfolio categories in WordPress).
  6. Create 1 or more categories for your public portfolio. Leave the 'Visibility' option set to 'Public'.
  7. Now create 1 or more categories for your private portfolio. Set the 'Visibility' to 'Password protected' and choose 1 or more passwords.
  8. Go to the 'Portfolio' section in WordPress (or wherever you edit portfolio posts). Use the 'Quick Edit' option to categorise your projects.
  9. Finally, go to Appearance > Menus and add links to your portfolio categories as required. You'll definitely want to link to the public portfolio, and may or may not link to the private area. See the below tips on linking to your private portfolio.

Tips on structuring your public/private WordPress portfolio

These tips will help you to use the Password Protected Categories plugin to its full potential:

  • To protect multiple portfolio categories within a single password, create a password protected 'Parent' category. Add as many sub-categories as you like. Leave the Visibility of the sub-categories as 'Private' as they will automatically be protected using the same password as a the parent. That way, visitors can navigate between multiple categories without having to re-enter any passwords.
  • Alternatively, you might want to create separate password protected portfolio categories which different people can access. For example, you might create a password protected portfolio for each industry that you cover, and give potential clients access to the portfolio for their specific industry. To do this, create several standalone categories and password them all individually.
  • If you accidentally add a project to a public and a private category, it will be password protected. It's best to avoid doing this - keep your public and private case studies separate.

Bonus content - how to create a WordPress portfolio

So far, I've shared 3 ways ways to password protect a portfolio in WordPress. That may be all you need, in which case you can stop reading now. Or if you need extra tips on how to create a WordPress portfolio, keep reading.

How to create portfolio posts in WordPress

There are 4 main ways to create a portfolio for your WordPress website:

  1. WordPress admin list of portfolio posts
    Use normal WordPress posts If you're not using the 'Posts' section of your WordPress website for anything else (e.g. Blog or News) then you can use it for your portfolio. Add each project as a separate post. You can then use the blog layouts available in your theme to present your portfolio in eye-catching ways. You can also divide the portfolio into categories etc.
  2. Use your theme's 'Portfolio' post type Most WordPress themes come with a 'Portfolio' post type, which you can find by looking for the 'Portfolio' link in the left of the WordPress admin. This will be designed to specifically to work as a portfolio, with one or more layouts for showing off your work.
  3. Use a portfolio plugin If your theme doesn't come with a portfolio layout then you can add this using a plugin. Elegant themes have written an excellent article on the best WordPress portfolio plugins. The disadvantage is that the portfolio layouts may not match your theme, so a bit of custom styling may be needed.
  4. Create a 'Portfolio' custom post type You can also create a 'Portfolio' post type yourself using a plugin such as Easy Post Types & Fields (or programmatically if you're a WordPress developer). This is a nice lightweight option as you'll only end up with the features you actually need. You can then use the Posts Table Pro plugin to display the portfolio posts on your website.

Whichever of these methods you choose, you can use them all with any of the password protection options mentioned in this article.

If you're password protecting individual portfolio posts then this doesn't apply. If you're protecting parts or all of your portfolio then you need to decide how to include it in your website navigation structure.

You want to achieve the right balance between making it easy for people to login, and good user experience for public visitors. Normal visitors without the password will find it off-putting to click on a link and be asked for a password. The usual options are:

  • Link to your private portfolio from the menu. If you've unticked the box to show your protected portfolio content in the public areas of your site, you need to do this by adding a custom link. Don't select the category from the list in Appearance > Menus as the plugin will hide it until someone enters the password! A custom link will appear to public users so get the link for your protected portfolio category and add it in this way instead.
  • Add a login form somewhere on your public site, for example the sidebar. If you're using the Password Protected Categories plugin then you can do this by adding [category_login] to any text area on your website.
  • Add a subtle text-based link to your password protected portfolio category or private portfolio page anywhere on your website. For example, you might add it to the header or footer.
  • Keep your private portfolio hidden from public view. When you want to give someone access, email them a direct link to your password protected category along with the password. They can view your hidden portfolio without anyone else knowing it exists.

Finally, it's worth noting that since you create the passwords on the Portfolio Categories page, the usual tricks to recover a lost password in WordPress don't apply. This is because the portfolio passwords are linked to the category, not individual WordPress user accounts. If you feel you need a lost password link, add this to the password entry page so that people can contact you to request a password.

Displaying your portfolio posts

Once you've finished password protecting your 'Portfolio' custom post type, you need to display it on your website. That way, people who have logged in or entered the password can see the portfolio posts.

The best way to do this is using the Posts Table Pro plugin. This is especially useful if you have a lot of portfolio posts because the built-in search box and filter dropdowns make it easy for people to find what they're looking for.

Posts Table Pro displays your private portfolio posts in a structured table view, complete with an image column plus whatever information you want to display about each item:

Audio and video library displayed in a table with image and play columns

It's time to create your WordPress password protected portfolio

I hope this article has helped you to decide the best way to create a password protected portfolio in WordPress. We've covered easy ways to make your whole online portfolio private or just parts of it.

You're not limited to using Password Protected Categories plugin for a private portfolio. You can protect any type of WordPress content that uses categories. Experiment with creating a password protected blog, protect e-commerce products using plugins such as Easy Digital Downloads, and more.

Do you have hidden portfolio projects on your WordPress website? Which method do you use? Do you think that private portfolios give customers a good or a bad impression? Leave your comments below.

WordPress audio library being searched and sorted by genre

This tutorial will show you how to create a WordPress audio library or MP3 player using the Document Library Pro plugin. Your visitors will be able to find and play audio tracks directly in a searchable and sortable table. They can play individual audio tracks or even complete audio playlists.

Audio galleries are a popular feature of many websites. There are lots of reasons for wanting to know how to create a filterable music library or audio track directory. You may be a band, artist, composer or musician and want to display your music or sound effects on a single directory page with embedded audio. Maybe you're a CD and want to include a track listing with samples.

You might need to provide samples as part of an audio or music catalogue or directory. Perhaps you're a voiceover artist and want to create an audio track library with examples of your work. Alternatively, your site might feature audio learning materials such as recorded tutorials or lectures, foreign language classes, or podcasts.

Whatever your reason for creating a WordPress audio library, this tutorial will show you how to do it using the Document Library Pro plugin.

The perfect WordPress audio library plugin

The Document Library Pro plugin has everything you need to create a WordPress audio library. While it has 'Document' in the name, it's perfect for listing any type of resource - including audio.

You add your audio files to the WordPress media library (or host it elsewhere, e.g. on Spotify), and the plugin displays them in a searchable table or grid. It contains embedded music tracks or MP3 players which you can listen to directly from the audio library page:

WordPress audio library grid layout
An audio library with a grid layout and embedded media players

It's a really neat way of displaying audio tracks. People can listen to them, play, pause and fast forward directly within the table.

Document Library Pro also works as a WordPress audio playlist plugin. It creates a container for playlists by listing them in a table-like directory structure. You can listen to playlists and navigate between the tracks from the table. People don't have to click through to a separate page to listen to them - it's all on one page.

You can use Document Library Pro to display audio players and playlists created using the audio shortcodes that come with WordPress itself. I'll also share some third party WordPress audio plugins that can be used to display more fancy audio players.

Read on to learn how to create a searchable, filterable WordPress audio library.

It works!
Beautiful product! I did a nice filtering and dynamic search for my music library without any strong skills in web development.

What type of audio can you include in a WordPress audio library?

WordPress audio library table with a playlist and individual players
A WordPress audio library with a playlist and 2 individual music players

These days, people use audio files for a huge variety of purposes. The good news is that you can publish any of these in a WP audio library. This includes:

  • Multiple audio file formatsMP3, WAV, MPEG and more.
  • Types of audio recordingAudiobooks, bands, choir music, foreign language lessons, karaoke backing tracks, orchestra music, relaxing background music, samples, singles and albums, podcasts, stock music (e.g. corporate background music, royalty free music, sound effects, etc.).
  • Audio from third party websitesIf you host your audio files externally, that's fine. The WordPress audio library also supports embeds from other platforms such as Mixcloud, ReverbNation, SoundCloud and Spotify.

Whether your site features audio learning materials such as recorded tutorials or lectures, foreign language classes, or podcasts, you can also integrate text to speech technology to offer additional accessibility features. This allows users to listen to written content in audio format, thereby catering to diverse learning preferences and enhancing the overall user experience.

How to set up your digital WordPress audio library

Now, we get to the tutorial part of this article. Keep reading to learn how to set up a WordPress audio library.

1. Add the audio files to WordPress

To get started, you need a WordPress website with the Document Library Pro plugin installed.

First, you need to add each audio item to WordPress as a 'Document' post. Each 'Document' will appear individually in your front end audio library. You need to do this even if your actual audio files are hosted outside of WordPress.

There are several ways to do this:

  • Option 1: Add document manuallyGo to Documents → Add New in the WordPress admin and add all the information you want to display about each document. Don't worry about uploading the actual audio file yet - we'll do this in Step 2.
  • Option 2: Use drag and drop file uploadGo to Documents → Import and drag and drop the audio files into WordPress. Then, go to Documents and manually edit each one as needed. For example, the name will be the same as the filename, and you can change this to make it more user-friendly.
  • Option 3: Upload from CSVYou can also go to Documents → Import and upload a CSV file. This should contain all the information that you want to display for each audio track, as well as the URL where the audio file is hosted (e.g. in the WordPress Media Library or on another website).

2. Add embedded audio players

The next step is to add an embedded audio player to each of the audio items (i.e. 'Documents') that you added in Step 1. For each one, you can add either a standalone audio track or a full audio playlist.

Initially, we'll use the native WordPress audio and playlist shortcodes. Later, I'll show you how to create even more impressive-looking audio embeds using other plugins which work with the WordPress audio library.

  1. Go to the Documents section of the WordPress admin and click on one of the documents.
  2. Add an audio player to the main content area using one of these methods:
    • If you plan to store the audio files in the WordPress Media Library, then you should click the 'Add Media' button and upload the file. When you insert it into the document content, WordPress will automatically convert it into a full functional audio player. It must be a valid audio file type such as MP3, AAC, WAV or FLAC.
    • To embed audio files hosted on Mixcloud, ReverbNation, SoundCloud or Spotify, simply paste the URL into the content area. Again, WordPress will display this as an embedded audio player.
    • If your audio files are hosted on another third party platform then you need to get an embed code. To add it, go to the 'Text' tab and paste the embed code there.
  3. Click 'Update' to save the document post.
WordPress Insert Media dialog with an MP3 file selected from the media library
Adding audio to the WordPress Media Library

Adding audio playlists

You can also add complete playlists to the WordPress audio library. If you're planning to treat the entire table as a playlist then you should add each embedded audio track as a separate 'Document' as described above. This would look like this:

wordpress audio playlist plugin example
An audio playlist with 1 track per row

Alternatively, it's also possible to add actual playlists which appear in a single row of the table like this:

playlist of playlists example
An audio library with an entire playlist in the first row of the table

To add a playlist to one of your 'Documents' - like in the second screenshot above:

  1. Edit the document.
  2. Click 'Add Media'. Instead of adding an individual MP3 file or similar, click 'Create Audio Playlist'. If you can't see this link, it's because you haven't uploaded any audio tracks to your WordPress media library yet. Once you have uploaded some audio tracks, this link will appear.
  3. Select all the audio or music tracks that you want to include in the playlist and click 'Create a New Playlist'.
  4. On the next page, you can add the track name underneath. This will appear on your playlist so make it as descriptive as possible - e.g. the song name. There are also some settings on the right, for example whether to display the artist name.
  5. Finally, click 'Insert Audio Playlist'. WordPress will automatically create and embed your playlist.
  6. Click 'Update'.
WordPress Create Audio Playlist dialog with two MP3 tracks selected
Adding an audio playlist using the Classic WordPress editor

3. Create a front end WordPress audio library

Now it's time to list the audio files on the front end of your website so that everyone can see (and hear!) them.

Document Library Pro has already created a main audio library page for you. To find it, go to the Pages section in the WordPress admin and find the page called 'Document Library'. Rename this to something more relevant such as 'Audio Library' (remember to change the permalink too).

View the page and you'll see your audio files listed in a table or grid view with one on each row. However, it may not have the information that you want to display yet.

To customize it to your requirements, go to Documents → Settings. Read through the page and change the settings as needed.

Recommended settings for an audio library

Document Library Pro has over 50 options and you can set it up however you like. In particular, I recommend that you use the following options:

  1. Layout - Choose between a table layout with 1 audio track per row; or a grid layout with a tile for each document (like Netflix).
  2. Content - There are lots of available content types to choose from. For a WordPress audio library, add something like: title, content, excerpt. This will display the title, the content field (which contains your embedded audio player or playlist), and an excerpt (which is useful for showing a brief overview of the audio file). You can rename the columns by adding a colon after each one like this: title: Song, content:Listen Now, excerpt:Description.
  3. Shortcodes - Enable this option. This tells Document Library Pro to display the embedded music players in the main audio library, instead of the unrendered shortcode which WordPress has created behind the scenes.
  4. Links - By default, people can click on the title column to access a separate page for each audio item. The separate page will have the name at the top with the embedded audio player underneath, and any other data you've entered on the right (e.g. the file size). If you don't need these pages then add none to the Links option.
  5. Filters - If you have added categories or tags to your audio items, then add some filter dropdowns so that people can find then more easily.
  6. Lazy load - Enable this if you will be listing lots of audio files. This tells the plugin to load one page of the audio library at a time, speeding up the load times.

4. View the audio library

Your finished audio directory will look something like this:

WordPress audio library with a searchable playlist and music players

This has created a professional-looking WordPress audio library listing all your music tracks. You can add as many as you like.

If you have lots or music tracks or audio playlists then the plugin will add pagination buttons at the bottom.

So far, I've shown you how to display the built-in audio and playlist shortcodes in a searchable WordPress audio library.

Audio library row showing an image, title and play button
If you don't like how the basic players look or function, then you can enhance them by adding the free Compact WP Audio Player plugin. This works nicely with Document Library Pro.

Use it to create a very simple audio player, which appears as a small play button in a circle. When you click on the circle, the audio track plays and a pause icon appears within the button instead. If space is at a premium in your WordPress audio library, then this is an ideal plugin to add small audio players.

To display a compact audio player in the audio library, just install the plugin. Next, add the shortcode [sc_embed_player fileurl="URL OF THE MP3 FILE"] to the content field for each document.

Some WordPress audio libraries simply embed the audio files on the page, like the examples above. This is very secure because visitors can listen online but can't download the files.

If you want people to be able to download the audio files, then that's fine too. You can add download links, buttons or file type icons. Visitors click on these to download the audio file to their computer.

  1. Go to Documents and click to edit a document.
  2. Find the 'Document Link' option in the top right hand corner. Use it to either select the audio file from the WordPress Media Library, or add the URL where it is hosted on another website.
  3. Go to Documents → Settings and add a 'link' column to your list of columns.
  4. Use the other link-related settings on the page to choose a style for the download links.

This will add a download column to the WordPress audio library.

Need to sell audio online?

If you want to sell audio files in your WordPress audio library then you need an e-commerce plugin. You can sell audio files using either WooCommerce or Easy Digital Downloads.

Either way, you can use our other plugins to list the audio products in a searchable table. Your audio store will look like the other screenshots in this article, but will also have 'Buy' buttons so that people can make purchases.

Selling audio with WooCommerce

Audio store shown on a monitor with players and buy buttonsThe free WooCommerce plugin lets you sell absolutely anything online. Use it with our other plugin, WooCommerce Product Table, to create a searchable audio library.

For example, Dosado used WooCommerce Product Table to sell audio files with embedded music players in the table.

Selling audio with Easy Digital Downloads

Person browsing an Easy Digital Downloads audio library on a laptop

An Easy Digital Downloads audio library table shown on a laptop

If you only sell digital audio files then you can also sell them using the Easy Digital Downloads (EDD) plugin.

EDD is a bit simpler than WooCommerce because it doesn't have any options you don't need, such as Shipping.

For example, Fascinated Sound use EDD with our Posts Table Pro plugin to sell royalty-free sound effects and music tracks. They list over 600 downloadable audio products in their WordPress audio library.

Each audio download is listed in a table with columns for audio player, title, description, category and add to cart button. You can click on a category in the table to filter by that category. There's also a category filter dropdown above the WordPress audio library.

Customers can listen to each track by clicking on the embedded play buttons. The play buttons were created using the free Compact WP Audio Player plugin, which works perfectly in the audio library.

We love Fascinated Sound's WordPress audio library because it's such a user-friendly way to list and sell music and other audio products.

It's time to create a WordPress audio library!

So now you know how to create an audio library in WordPress. Now it's your turn. Follow the steps in this tutorial to create your own WordPress audio library or music directory. To get started, download Document Library Pro today - it's one of the best WordPress audio plugins around.

  • Supports all types of audio file.
  • Aimed at beginners or developers.
  • Full support and documentation.
  • Money back guarantee.

Are you thinking about creating a WooCommerce shop only for registered users? Looking for a way to limit access to your online store so that only logged in users or those with a password can browse and make purchases? You've come to the right place!

Hidden WooCommerce shop on tablet and phone restricted to logged in usersIn this article, we'll guide you through the process of hiding your WooCommerce shop from guests with the easy-to-use WooCommerce Private Store plugin.

This powerful yet simple plugin enables you create a secret WooCommerce shop only for registered users. It keeps your store exclusive by hiding its pages from the public eye. This ensures that only logged-in users or those with the correct password can access and order your products. It maintains the privacy and exclusivity of your store - an ideal solution for businesses that cater to a specific clientele or want to offer special deals for registered customers.

We'll start by introducing you to the WooCommerce Private Store plugin, its features, and its benefits. Next, we'll take you step by step through the catalog visibility process, ensuring that you're able to set up your private store with ease. We'll also provide tips and best practices for managing your private store and creating a seamless experience for your registered customers.

By the end of this article, you'll have all the information you need to build a WooCommerce shop only for registered users. So, buckle up and get ready to start a journey to learn how to set up and manage your very own private ecommerce store.

How does it work?

When you install the Private Store plugin, you instantly have a WooCommerce wholesale store that is only available to logged in users. Simply choose how your customers will unlock the hidden store, and you're done!

Maybe you're setting up a WooCommerce shop only for registered users and want to hide it from non-members. Maybe you're building a B2B wholesale store. Whatever your reason, you can easily hide WooCommerce from non-registered users and guests.

3 steps to access your hidden store

It works like this to make sure your WooCommerce products are only for registered users:

  1. A guest user visits your website They can see all your main pages but none of the WooCommerce content. If you have links to the Woo shop page, category pages, product pages, etc. in the menu then these will be hidden from public view. Any WooCommerce sidebar widgets are hidden too. The same applies to other WooCommerce elements such as the cart. The guest user has no idea that your WooCommerce shop exists. Even if they try to access a WooCommerce page directly (e.g. if they know the URL of a product), they will be asked to enter a password.
  2. The user either enters a password or logs into their account Some visitors to your membership site will have an account, which they can log into. They can log in using the usual WordPress/WooCommerce login page. (This might be /wp-login, the WooCommerce 'Account' page, or a front-end login such as Theme My Login. Or if you want people to log in with their Facebook, Twitter, or Google+ account, use the WordPress Social Login plugin.) If you like, then you can also let non-registered users enter a password to unlock the store.
  3. The hidden WooCommerce shop is unlocked After logging in, all the WooCommerce content becomes visible to the specific user. This might include links to the main shop page in the menu, WooCommerce widgets, and all the individual pages within WooCommerce. The logged in user can browse your ecommerce store and buy products with no restrictions.

How to make your WooCommerce shop only for registered users

If you like what I've described above, the good news is that it's really easy to set up. Here's how to set up product visibility for your whole store. I have assumed that you already have a WP website with WooCommerce set up, and you're ready to hide your WooCommerce for logged-in users and visitors only.

  1. Buy WooCommerce Private Store. Download the plugin files and license key from the order confirmation page or the email receipt.
  2. Log in to the WordPress admin and go to Plugins → Add New.
  3. Click 'Upload' and then 'Browse' and upload the plugin files you downloaded in Step 1.
  4. Install and activate WooCommerce Private Store.
  5. Go to WooCommerce → Settings → Private Store. Enter your license key and configure the other plugin settings. Make sure you tick the 'Logged In Users' box. (You can ignore the 'Login Form' settings as you won't be using password protection for your store. Instead, you will use the WordPress user login.) If you like, then you can also choose which user roles will have access.
  6. Click 'Save'.
WooCommerce Private Store settings restricting the shop to logged-in users

And that's it! Your WooCommerce shop is now completely hidden from public view. Guests can see your normal web pages but none of the WooCommerce content. Once they log in to their account, the whole of WooCommerce is instantly unlocked for them. Simple!

By enabling log in to see prices and add to cart in WooCommerce, you can restrict access to your WooCommerce shop only for registered users and visitors. This means that all links to your main Shop page, product categories, individual products, and even the WooCommerce widgets that showcase your products, categories, and other relevant information will be hidden.

Furthermore, elements such as the shopping cart icon and other call-to-action buttons will also be concealed. In essence, any content related to your WooCommerce store, including the links to access it, will be inaccessible to guest users.

This feature provides an additional layer of security and privacy to your online store, as it ensures that WooCommerce products only for registered users with valid login credentials can view and purchase your hidden products. It also helps prevent unauthorized access to your store's pricing and other confidential information, which can protect your business from potential threats.

Can I force users to register before they can access my WooCommerce store?

Yes, you can use the WooCommerce Private Store plugin to hide your online store and restrict access to WooCommerce products only for registered users. To do this, you can use the built-in 'Account' page of the plugin or a front-end registration plugin like Theme My Login.

Theme My Login offers various options to moderate new registrations, including the ability to require administrator approval for new accounts. Alternatively, you can use a free plugin like New User Approve to approve new user accounts before they can access your private store. This ensures that only authorized users have access to your store.

When using a registration plugin, customers will need to create an account and have it approved before they can log in and access your hidden store. Once approved, they can log in and browse your products, add items to their cart, and check out just like a regular online store.

What if I don't want my customers to have individual user accounts?

If you want to keep your WooCommerce store private and only accessible to a select few, you may consider using a plugin that allows you to hide your store behind a password. This is a great option for businesses that want to keep their products and pricing information secure and confidential.

The plugin makes it easy to set up a private store login page where your customers can enter a password to access your store. Unlike requiring customers to log in to their accounts, the password option offers a simpler and more straightforward process. Customers enter the password on the login page. If it's correct, they are granted access to the hidden WooCommerce shop.

Once customers have entered the correct password and unlocked the private store, they will have full access to all the main WooCommerce Shop pages, including your products, categories, and product tags. Customers can search for a single product, add them to their cart, and proceed to the checkout page in the usual way.

Here's a review from a customer using WooCommerce Private Store to create team and school stores behind a common password:

A Must for my Business
This is the most convenient and easy to use plugin for creating team or school stores. My customers love that they have their own custom page to sell on without having to make their own site. Barn2 customer service is very quick efficient. The team really takes care of their customers and products!

Buy Plugin

How can I hide the login page after people login?

If you use the built-in WooCommerce Account page as your register/login page, then you don't need to worry about this. That's because the same page will show a registration and/or login form to guests, and the 'My Account' area for logged in users. This makes it relevant to all types of users like subscribers, whether or not they're logged in.

If you use WooCommerce Private Store with a login plugin such as Theme My Login, then you need to structure your store in an intuitive way. Think about each step of the user journey. For example, you want to add a prominent login link for logged out users. But once people are logged in, then the login page is no longer important to them.

You can add a link to the user login page anywhere you like. For example, you can add it to the menu or header (depending on your theme). This link will be subtle, so it won't bother logged in users. You could also ask your developer to dynamically change it to a logout link for logged in users.

Setting the login page as the homepage might seem like a logical step. However, this can be confusing for users, as even when they're logged in, they'll see the login page with a message indicating they're already logged in. Instead, set another page such as the main 'Shop' page as the homepage. When guest users visit the homepage, they will see a user login form. But when WordPress only for logged in users visit, they will see the shop page. This is a more user-friendly way to set it up.

I just want to hide parts of WooCommerce

If you want to hide parts of WooCommerce membership but not your whole shop then I'd recommend our other plugin, WooCommerce Password Protected Categories.

This lets you lock down specific categories within a Woo store, and hide products within them. Your other categories and main Shop page remain public. This means that you can have public and hidden areas within a single WooCommerce shop.

See also: How to Build a Private WooCommerce Members Only Shop

Do you have a hidden WooCommerce shop?

If you have a WooCommerce store that you want to keep private and accessible to WooCommerce products only for registered users, then using a WooCommerce Private Store or a similar solution can be a great option for you. By hiding your WooCommerce shop only for registered users, you can ensure that your specific products and pricing information are secure and protected.

Deciding between password-protecting or hiding your WooCommerce store until users log in depends on your specific needs and security requirements. If you have a small number of users who require access, password protection may be the better choice. For larger user bases, hiding WordPress only for logged in users may be more efficient.

Some other features that you might expect from a private WooCommerce plugin could include the ability to customize the login page and set up user roles and permissions. As well as track user activity within your store. These features can help you manage your WordPress only for logged in users more efficiently. As well as ensure that your products and pricing information are only accessible to the intended audience.

Please leave your comments below.