WordPress password protection: 5 ways to lock your site
Learn how to make your WordPress site private using five proven methods, from protecting individual pages to locking down entire websites.
WordPress makes creating and managing websites easy. But what if you want to restrict access to your content? Whether you're building an invite-only community, running a private blog, or protecting client materials, WordPress password protection setup is simpler than you might think.
You might need a private WordPress site to:
- Maintain private journals.
- Run school departments.
- Sell exclusive products.
- Organize invite-only events.
- Manage membership sites.
This guide covers five ways to make your WordPress site private. I'll show you how to protect specific pages, lock down categories, or hide your entire website. You'll learn both built-in WordPress methods and powerful plugin solutions for WordPress password protection setup.
Who needs a private WordPress site?
A private WordPress site is a website that restricts access based on passwords, user accounts, or membership status. By controlling who views your content, you protect sensitive information while delivering personalized experiences to authorized users.
Different situations require different levels of protection. Some people need to hide entire websites during development, while others want specific sections private within an otherwise public site. Use this decision framework to identify which WordPress password protection setup matches your needs:
| Your Use Case | Recommended Method |
|---|---|
| Membership or affiliate site | Category protection (Method 2) |
| Invite-only events | Category protection (Method 2) |
| Private journals/diaries | Full site protection (Methods 3-5) |
| School departments | Category protection (Method 2) |
| Private blog/paid content | Category protection (Method 2) |
| Ecommerce private areas | WooCommerce-specific plugins |
To run a membership or affiliate marketing website
Members-only areas provide exclusive access to premium content. When running an affiliate site, you'd restrict the area so only affiliates can access tracking dashboards and resources. Category-based protection delivers this without requiring complex membership systems.
To organize invite-only events
Invite-only events help you reach the right audience and predict attendance accurately. Password-protecting event categories ensures only invited participants can register or view event details.
To maintain private journals or diaries
Personal journals require complete privacy. Full site protection keeps your writing entirely private, preventing any unauthorized access to your personal thoughts and records.
To maintain departmental data
Schools and organizations use WordPress to manage departmental content. Harvard and similar institutions run exclusive blogs where only department members can access materials, discussions, and resources.
To run a WordPress private blog
You can make a WordPress blog private when offering paid content or exclusive tutorials. Subscribers pay for access to protected categories containing premium posts. Free posts remain public to attract new subscribers.
To create private areas of an ecommerce shop
WordPress ecommerce stores often need private sections for wholesale areas or members-only shops. These situations typically require protecting just the shop portions of your site, not the entire WordPress installation. Read our guide to making WooCommerce private for ecommerce-specific solutions.
What are the benefits of restricting access and making your WordPress website private?
Restricting access to your WordPress website delivers measurable benefits:
- Improved security. Limiting access reduces unauthorized access attempts, hacking risks, and spam. This matters most for ecommerce stores or sites collecting sensitive visitor information.
- Increased exclusivity. Private sites create perceived value by restricting access. This attracts specific audiences and builds engaged communities around your content.
- Better control over content. Protecting premium articles, courses, or videos lets you safeguard intellectual property and monetize content effectively.
- Improved user experience. Private forums or membership areas deliver personalized, relevant experiences where users interact and share information freely.
- Compliance with regulations. Some industries require restricted access to meet privacy regulations or data protection requirements.
2 ways to make part of a WordPress site private
This section covers how to make specific parts of a WordPress site private. I'll show you step-by-step instructions for two approaches: using WordPress built-in features and using a specialized plugin.
1. How to restrict access to a specific page or individual post in WordPress
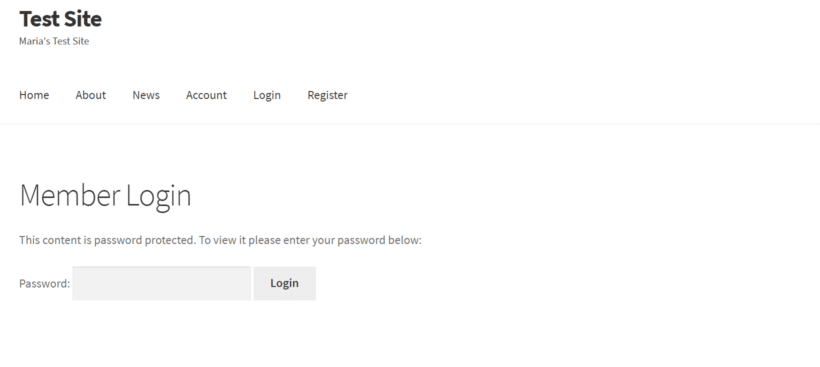
WordPress includes basic password protection for individual pages and posts. You can password-protect content or restrict it to administrators and editors only.
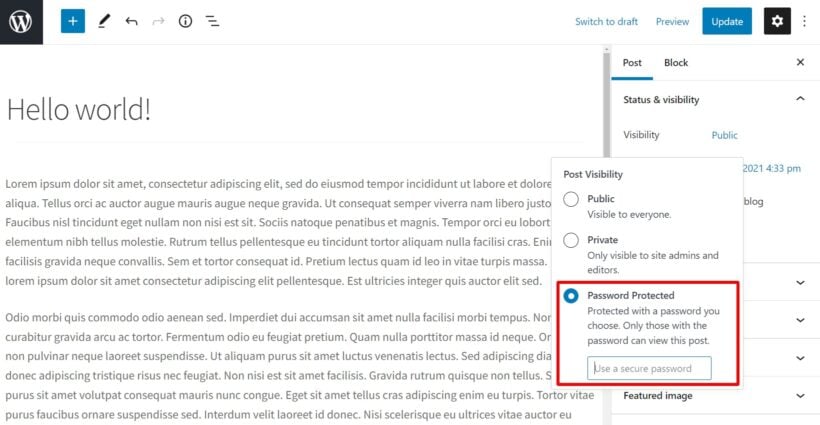
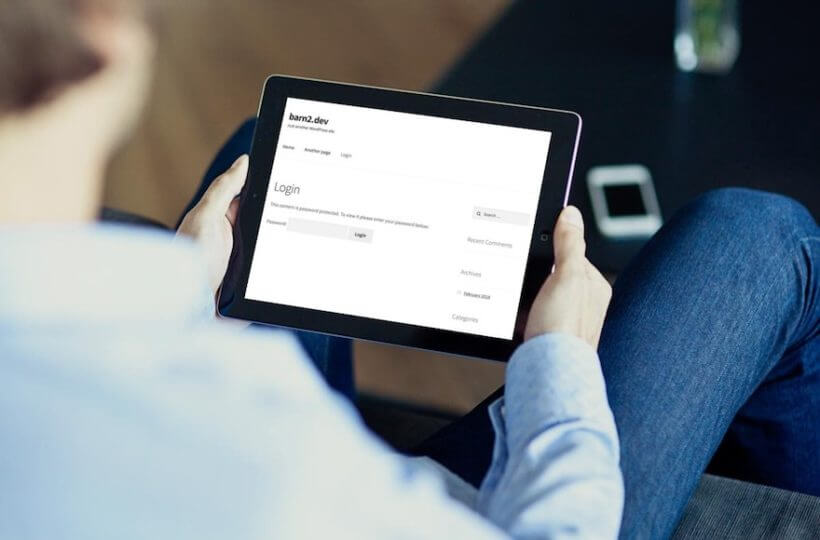
Important distinction: WordPress offers two visibility options that work differently. "Password Protected" keeps pages visible but requires a password to view them. "Private" hides pages completely from everyone except administrators and editors. Neither option is truly private in the way most users need.
Step 1: Access the page editor
Go to the pages or posts page on your WordPress admin dashboard. Hover on the specific page or post you intend to restrict. Click on Edit below the WordPress page title.
Step 2: Open visibility settings
Once the Block Editor opens, go to the sidebar on the right. Click on the Status and Visibility menu to open it, then click on the Visibility settings.
Step 3: Choose protection method
Click on the word Public. From the window that opens, you can select the Private option to limit access to site Administrators and Editors.

Step 4: Set password (optional)
If you'd prefer password protection, click on Password-Protected. Set a password for that post and click on Update (or Publish for new pages). You can then share the password with whoever needs access.
Quick Edit method for faster protection
WordPress offers a faster way to protect multiple pages without opening each one individually:
Step 1: Go to Pages → All Pages (or Posts → All Posts).
Step 2: Hover over any page and click Quick Edit.
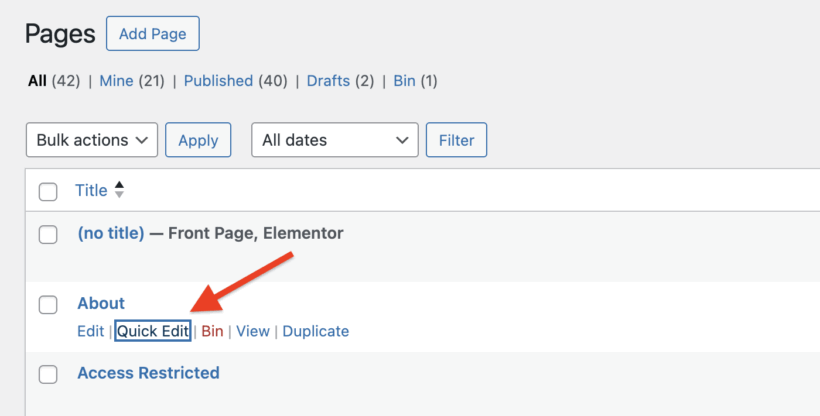
Step 3: Find the password box where you can either add a password or check the box to make it "Private".
Step 4: Enter a password if using password protection.
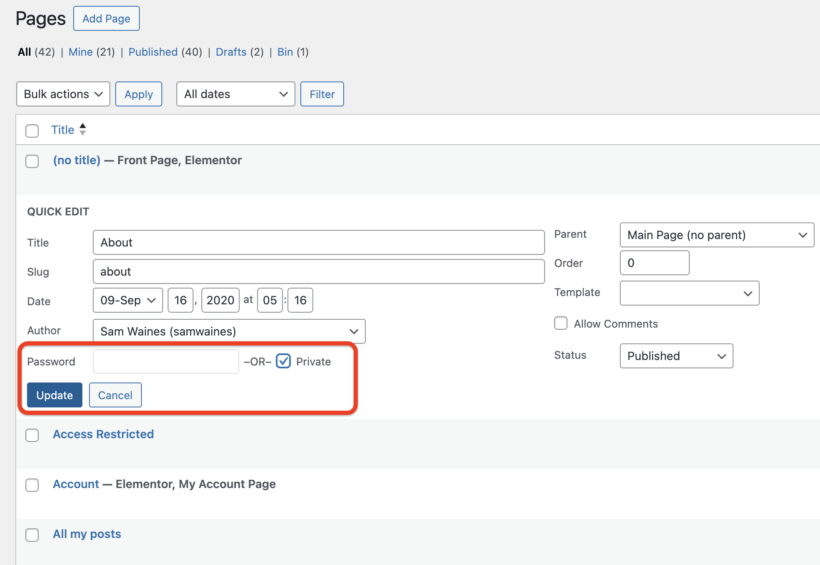
Step 5: Click Update to save changes.
This method works well when protecting several pages with the same password. However, it still requires editing each page individually.
How to remove password protection
When you no longer need protection on a page:
Step 1: Go to the page editor or use Quick Edit.
Step 2: Change Visibility back to "Public".
Step 3: Remove any passwords you set.
Step 4: Click Update to publish changes.
Step 5: Clear your browser cache to see updated pages immediately.
Step 6: Verify the page displays correctly without requiring a password.
File protection with embedded PDFs
WordPress password protection doesn't secure uploaded files like PDFs. Anyone with a direct link can access protected files even without the page password. To protect PDF files:
Create a password-protected page. Embed the PDF using WordPress's built-in embed block. The PDF remains inaccessible without unlocking the page first. However, this method has limitations since determined users can still find direct file URLs.
Disadvantages of using standard WordPress features to protect individual pages and posts
This method has significant drawbacks:
- Tedious process. You must protect each page or post individually. Sites with many private pages require substantial time investment.
- Limited visibility control. Private pages restrict access to admins and editors only. Subscribers and other registered users can't access content.
- Poor user experience. Password-protected pages remain visible in listings and search results. Users must enter passwords repeatedly for each page, even when using identical passwords across multiple pages.
- Higher error risk. Manual protection of numerous pages increases the likelihood of mistakes. Users need WordPress backend expertise to troubleshoot issues.
The Password Protected Categories plugin solves these problems with category-based protection that's more efficient and user-friendly.
2. How to restrict access to content in WordPress using a plugin
Password Protected Categories is a plugin that protects entire categories of content with a single password or user restriction. Category-based protection means one setup protects all posts, pages, products, or events within that category and its subcategories.
The plugin works with any content type using categories or taxonomies. This includes private blog posts, products, password protected events, portfolios, documents, and custom post types. You can hide any type of category, controlling access through passwords, user roles, or individual user accounts.
What makes this plugin the best?
Password Protected Categories is a category-based protection plugin that restricts access to entire content groups using passwords, user roles, or individual user accounts. Unlike Password Protected WordPress Plugin (PPWP) which requires protecting each page individually, this plugin protects hundreds of posts by securing their parent category.
- Protect custom post types. Enable password protection on reviews, portfolios, or any custom content. Restrict areas to specific registered users or roles. Control how long each IP address can access private content before re-entering passwords.
- Complete content hiding. Actually hide private content from the front end with noindex and nofollow meta tags preventing search engine discovery. Protected content disappears from listings, search results, and navigation. Only the main website remains public.
- Create members-only websites without code. Use any user registration plugin alongside WordPress's built-in user system. Password Protected Categories handles all content restrictions and permissions automatically once users join.
- Hide navigation and widget links. The plugin removes menu links and widget references to hidden content, maintaining a clean public interface.
- Works with all WordPress themes. Login pages automatically match your theme and site design for seamless integration.
- Highly rated customer support. Customer care staff provide step-by-step installation and configuration assistance regularly.
Security warning: AI threats and server-side protection
Password protection can be bypassed by AI tools that scrape website content. These tools read password-protected pages by accessing your site's HTML before the password screen loads. For truly sensitive content, implement server-side protection through your hosting provider's security settings. This prevents AI crawlers from accessing protected content at the server level.
Three protection methods overview
Password Protected Categories offers three ways to restrict access:
Password protection: Anyone with the correct password can access content. Best for sharing with groups without requiring user accounts.
User role protection: Automatically grants access to logged-in users with specific WordPress roles. Ideal for membership sites with defined user tiers.
Individual user protection: Restricts content to specific named users. Perfect for client-specific materials or personalized content delivery.
Prerequisites: Setting up WordPress users
Before using role-based or user-based protection, you need WordPress user accounts. To create a new user:
Go to Users → Add New in your WordPress dashboard. Enter the username, email, and password. Select the appropriate user role (Subscriber, Contributor, Author, Editor, or Administrator). Click Add New User to create the account.
For more advanced user management, consider the User Role Editor plugin for controlling frontend content access.
How to use this plugin to restrict access to your website
Step 1: Install the plugin
Purchase Password Protected Categories from the Barn2 site. Download the files and copy your license key. On your WordPress dashboard, go to Plugins → Add New. Select the upload option, upload the plugin, and activate it.
Step 2: Activate your license
Go to Settings → Protected Categories and paste your license key. Click on Save Changes. You should see "License key successfully activated" below the license key field.
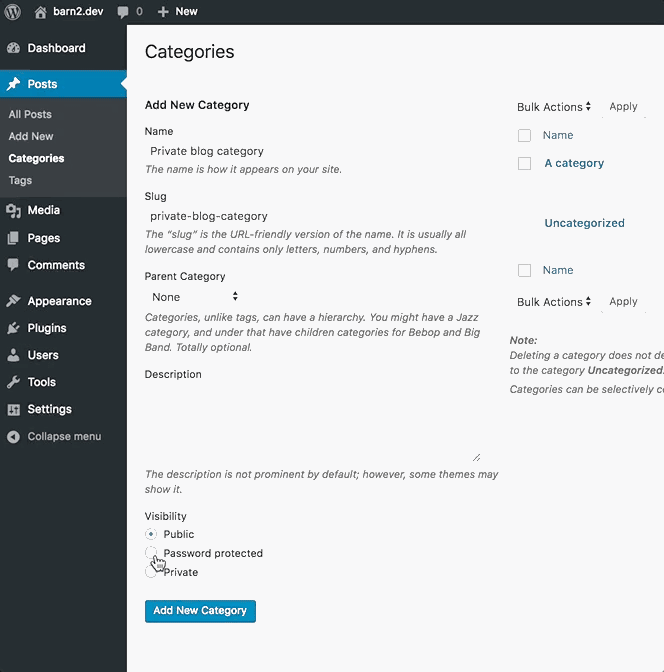
Step 3: Create or edit a category
You can protect any type of site content using categories or custom taxonomies. In this example, we'll create an invite-only event category. The process works identically for posts, products, portfolios, or any other categorized content.
Create a new category or edit an existing one. Name it 'invite-only event'. You'll notice a new Visibility option added by the plugin.
Step 4: Choose your protection method
In the Visibility settings, select the Protected option.

For password protection: Select the Password-protected checkbox and add a password. Anyone with the password can attend, regardless of whether they have user accounts.

For user role protection: Select the user role checkbox and define which roles can access the category in the roles dropdown.

For individual user protection: Select the Users option and specify which users can access the content.

Step 5: Save and assign content
Click on Add New Category to finish. Create the invite-only event or edit an existing one and assign this category to it.
Step 6: Understand cascading security
Cascading security means sub-categories automatically inherit password protection from parent categories. When you protect a parent category, all child categories gain the same protection without additional configuration. This inheritance feature maintains consistent security across your entire category hierarchy.
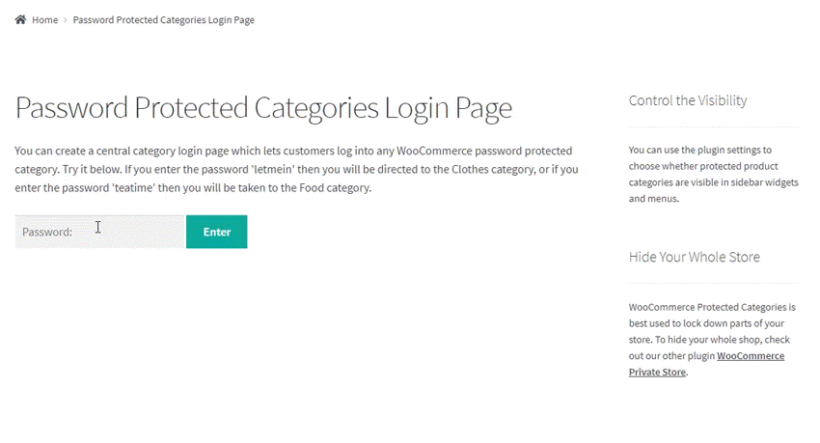
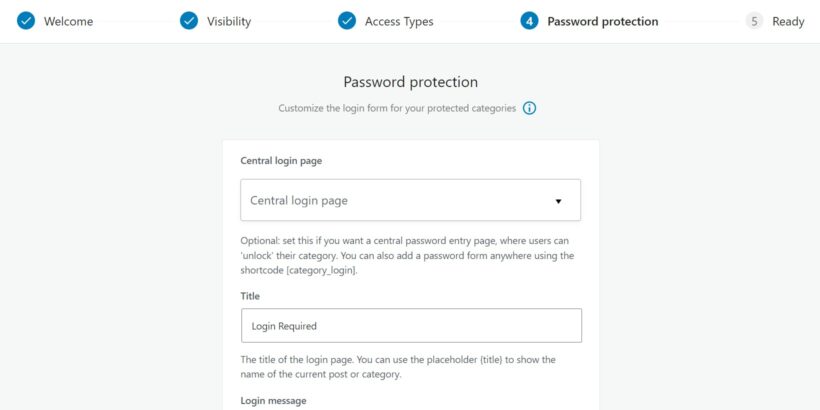
Central login page
Password Protected Categories creates a unified login experience where users enter credentials once to access all protected content. To set up a central login page:
Create a new page called "Member Login" or similar. Add the shortcode [category_login] to the page. Go to Settings → Protected Categories and select this page as your "Category Login Page". Add a link to this page in your navigation menu.
Users can now bookmark this single login page rather than encountering separate password prompts for each protected category.
How to remove category protection
When you no longer need protection on a category:
Step 1: Go to the category editor (e.g., Posts → Categories).
Step 2: Find the protected category and click Edit.
Step 3: In the Visibility section, change from "Protected" to "Public".
Step 4: Clear any passwords, user roles, or user restrictions.
Step 5: Click Update Category to save changes.
Step 6: Verify that content in the category now appears publicly without requiring authentication.
How can you restrict access to your blog?
Password Protected Categories excels at creating private or partly private blogs. Create password-protected categories and assign posts to them to restrict access to specific blog sections.
For example, create a private category for personal posts shared only with close friends and family. Alternatively, create a private category for premium content accessible only to paying members.
If you're running a business blog, you might want public content to attract visitors while reserving other content for a private audience. This could include premium articles, research reports, or case studies accessible only to paying customers. Create a private category and use Password Protected Categories to ensure only authorized users view private posts.
Whether you need a completely private blog or a partly private one, Password Protected Categories helps by restricting access to specific categories and posts. This creates a more exclusive and personalized experience for your visitors.
3 ways to create a 100% private WordPress site
This section shows you how to make an entire WordPress site private. When your whole site contains highly sensitive information like personal journals, complete privacy is essential. With these methods, there is zero public access to your site content and you specifically choose who can access it.
WordPress private site plugins offer all-or-nothing control. Your site's entire front end is either disabled or available for everyone to view. If you need fine-grained control over which parts of your site remain public, use Password Protected Categories instead.
1. Built-in WordPress.com privacy setting
WordPress.com offers a native privacy setting unavailable on self-hosted WordPress.org sites. This setting makes your entire site private to everyone except users you invite.
Free WordPress.com sites: Limited to three invited users. Suitable for small private projects or personal sites.
Paid WordPress.com sites: Unlimited invited users. Better for teams, organizations, or larger private communities.
To enable this setting on WordPress.com, go to your site's dashboard, navigate to Settings, and select the "Private" option under "Privacy". Add user email addresses to grant access.
Note: This method only works on WordPress.com hosted sites, not self-hosted WordPress.org installations.
2. Password Protected plugin

Password Protected is a free plugin providing simple protection for your entire WordPress website with a single password. The plugin offers options to allow feed access and let admins and logged-in users bypass the password.
Install and activate the plugin like any other WordPress plugin. Enable it on the settings page, enter your password, and define which user roles can bypass the password. This is the simplest way to make your website 100% private.
3. .htaccess protection
The .htaccess file secures all files on your website at the server level. This method depends on your hosting service provider and requires knowledge of Apache commands and PHP code. This powerful protection tool is the least user-friendly option.
If you're not tech-savvy, I don't recommend this method for creating a private WordPress site. To learn more, search for current .htaccess protection tutorials specific to your hosting provider, as methods vary by server configuration. Here's a guide from our favorite hosting provider, Kinsta.
4. Maintenance mode plugin (Coming soon plugin)
This plugin creates Coming Soon pages, Maintenance mode pages, landing pages, and Custom 404 pages. Coming soon or maintenance mode pages let you continue building your website privately while visitors see a temporary message.
You can display information about your services to users while keeping the full site hidden. The maintenance mode page keeps your audience informed that your services will return shortly. This helps build anticipation for when the website becomes publicly available.
Next steps after setup
Once you've implemented WordPress password protection setup, take these additional security steps:
Enable two-factor authentication for all administrator accounts to prevent unauthorized access even if passwords are compromised.
Regular security audits help you identify and fix vulnerabilities. Check which users have access to protected content and remove accounts no longer needed.
Update all plugins and themes regularly since outdated software creates security vulnerabilities that could expose your protected content.
Monitor failed login attempts using security plugins to detect potential breaching attempts on your private areas.
Implement SSL certificates to encrypt data transmitted between users and your server, protecting passwords and sensitive information.
Frequently Asked Questions
Can you password protect a free WordPress site?
Yes, you can password protect a free WordPress.com site using its built-in privacy settings. However, free plans limit you to three invited users. Self-hosted WordPress.org sites (including free self-hosted installations) require plugins like Password Protected Categories for password protection. The free Password Protected plugin works for entire sites, while Password Protected Categories offers more flexible protection options.
How do I customize the password login form design?
Password Protected Categories automatically styles login forms to match your WordPress theme. For custom styling, navigate to Settings → Protected Categories where you can modify form text, labels, and messages. Advanced users can add custom CSS through Appearance → Customize → Additional CSS to change colors, fonts, and layout. The plugin maintains your customizations across updates.
Create a WordPress private site today
You've discovered five methods for WordPress password protection setup. When you want to make parts of your website private while keeping the rest public in the front end, you can use:
- Standard WordPress features to change visibility settings of individual posts or pages. (Not recommended.)
- The Password Protected Categories plugin to protect categories and taxonomies, then assign posts, events, pages, and other content to these protected categories.
When you want to create a 100% private WordPress site, you can use:
- WordPress.com's built-in privacy setting (for WordPress.com hosted sites only).
- Password Protected plugin - a free plugin that quickly protects your WordPress website with a single password.
- .htaccess protection - a very secure server-level method. Not user-friendly since it requires coding knowledge.
- Maintenance mode/coming soon plugin - allows you to work on your website privately while visitors see a 'Coming Soon' or 'Maintenance Mode' page.
Password Protected Categories allows you to easily protect any category or taxonomy, hiding private content from public view. It saves time and effort while making it easy to customize access to parts of your website.
Click here to get started with Password Protected Categories and ensure that your website's private content remains private.