Looking for the best way to build a WordPress members area on your website? Look no further. In this article, I'll reveal the best membership plugins. I'll also provide a step-by-step tutorial on how to create a simple but effective members area.
Membership WordPress areas are used by millions of businesses like e-commerce sites, news sites, gallery sites, restaurants, agencies, affiliate marketers, etc. They're a perfect way to build private communities and generate recurring income.
Building a WordPress membership website may look like a daunting task but trust us, it isn’t. All you need to do is choose the best members area plugin, install it, and set up your private membership area!
There are lots of WordPress membership plugins out there. In this article, I'll show you how to set one up using the Password Protected Categories plugin.
Let’s get started.
What exactly are members-only areas?
Before we begin, let’s quickly talk about what we mean by membership sites and their many benefits.
There are several features that you might expect to find on a WordPress members area.
Exclusive content
A members-only area is a private section within a website, accessible by authorized users. For instance, MasterClass is a popular membership site where students pay a membership fee to access pre-recorded lectures by experts in various fields:
A popular membership site
Membership areas are commonly found on websites selling digital downloads or physical products. They enable sellers to restrict all or some of the site’s content, services, or products.
Member registration
Many sites with a WordPress members area allow members to register online. This typically involves filling in a membership application form, often with online payment by credit card or PayPal. New members might be given access automatically, or their registration might be held for moderation and manual approval.
A member registration page isn't essential and some sites prefer to add members manually via the WordPress admin.
Payment plans and methods
Some WordPress sites provide a free members area, and others charge for it. While the easiest option is to take a one-off payment during the registration process, this isn't the most lucrative option for site owners.
A well-run WordPress members area is an excellent opportunity to earn ongoing revenue from repeated member subscription payments. For example, members might be required to pay monthly or annually for continued access to the members area.
Whatever you need a WordPress membership area for, it's the perfect way to create a hidden area within your website.
The best WordPress membership plugin
To create a WordPress members area, you need a membership plugin. That's because WordPress itself lets you password protect pages individually, but it doesn't let you create an entire members area.
Most membership plugins are quite feature-heavy and take a long time to set up. If you're looking for simple way of adding a members area, then go for the Password Protected Categories plugin. This lets you create a simple membership area to any WordPress site.
I was searching for a simple way to secure members' only content in our church's website without creating a full-fledged membership site as some people get confused with creating an account and having to log in, etc. Password Protected Categories enabled me to do exactly what I needed.
The plugin is super easy to use on the backend, and it's easy for users to access the secured area. I'm very pleased with the results.
How it works
As the name suggests, the plugin helps you hide WordPress categories and other taxonomies. You can use it to restrict access to private portfolios, customer portals, invite-only events, exclusive products, among other things.
Unlike all other WordPress members area plugins, you can choose how people will access the hidden content. You can either create a user account for each member so that they log in to unlock the members area, or you can use password protection. This means that if you don't want to create an account for each member then you can just give them the password - simple!
Next, let's look at how to set up the plugin. You can either watch the video, or follow the written instructions below:
How to create a WordPress members area
There are 5 steps for how to create a membership site with WordPress:
Install the Password Protected Categories plugin
Create the members-only area
Add members-only content
Create a member registration form (with or without payments)
Create a member login page
I'll provide full step-by-step instructions in the tutorial below.
Step 1: Install the Password Protected Categories plugin
Install and activate Password Protected Categories on your WordPress website. Next, enter your license key in the plugin setup wizard.
The setup wizard will also walk you through the main settings for your WordPress members area. Go through each one and choose how you'd like it to work. For example, you should enable the setting to completely hide the protected content from non-members.
Step 2: Create the members-only area
The next step is to start adding content to the members area. The Password Protected Categories plugin lets you restrict access to literally any type of content which is stored on your WordPress site. This might be:
Posts from the 'Posts' section of the WordPress admin.
Any custom post type that you have added to your site. For example, you might install a document library plugin which creates a post type which you can use to add members-only resources. Alternatively, you might create you own post type called 'Members Area' which will add a 'Members Area' section to the left of the WordPress admin.
Any combination of the above.
For this tutorial, I'll show you how to create your own 'Members Area' post type and add the hidden content to it. Skip the next step if your website already contains the content that you'll be adding to the members area.
Use the setup wizard to create a post type called 'Members Area' (or whatever you want to call it).
Create one or more categories (also known as taxonomies) for the post type, and tick the 'Hierarchical' box.
Save the post type.
3b. Create a 'Members' user role (optional)
If you will be creating an account for each member, then you might want to create a custom user role for members. I recommend creating a custom user role if either of the following applies to you - skip to step 3c if not:
You want each member to have their own unique user account on your website. (If you're creating a simple members area with shared passwords then you don't need unique user accounts.)
You're already using the default 'Subscriber' user role for something else, and don't want all your subscribers to have access to the members area.
You can easily create a new user role by installing the free User Role Editor plugin, going to Users → User Role Editor, and cloning the 'Subscriber' role to create a new 'Members' role:
3c. Make the members-only content private
Before we start adding content to the members-only area, let's make it private:
Go to the area where you manage the categories/taxonomies for your post type. This might be Posts → Categories, Members Area → Categories, or you may have called your taxonomy something else when you created it in step 3a.
Add as many categories as you plan to include in the members area. To do this, add one top level category and as many sub-categories (and sub-sub-categories, etc.) as you need.
Now edit your top level category, find the 'Visibility' section, and select 'Protected'. Choose a type of protection for the WordPress members area as follows:
Members area for logged in users/rolesSelect 'Roles' or 'Users' and choose which user roles and/or individual users can access the members area. This could be the 'Members' role you created in step 3b.
Enable User Roles and specific User access to the WordPress members area
Password protected members area (no user accounts required)Select 'Password protected' and enter one or more passwords which people can use to access the members area.
Multiple password options
Some tips
There's no need to protect sub-categories of your main top level category. That's because Password Protected Categories will protect them automatically using the same settings as the top level category.
If you want to create multiple membership levels, or give different members access to different content, then you need to structure things slightly differently. To do this, simply create a different top level category for each membership level or group. You can then select different protection options for each set of categories.
Step 3: Add members-only content
By now, you've created the overall structure of your WordPress members area and made it private. Now it's time to start adding content to it:
Go to the section of the WordPress admin where you'll be adding the members only content. For example, if you created a 'Members Area' post type in section 3a then you will now be able to see a 'Members Area' section on the left of the WordPress Dashboard. Alternatively, if you're planning to use regular posts or any other post type, then go to this section instead.
Click the 'Add New' button and start adding information which will appear in the members area. For each one, make sure you select a category/taxonomy on the right hand side of the 'Add New' screen.
Repeat the process to add multiple items to the members area. When members login, they will see them listed with the most recent first.
Step 4: Create a members registration form (with or without payments)
Now you've set up the members only area, you need a way for people to register. Skip this step if you plan to add members manually via the WordPress admin.
I recommend using Password Protected Categories with the Gravity Forms plugin to allow people to register for members area access. You'll need their 'Elite' license in order to take payment and automatically create user accounts for new members.
Install the Gravity Forms User Registration add-on if you want to create a user account for each member when they register.
Also install the PayPal Checkout add-on if you want to charge for access to the WordPress members area.
Now go to the Forms → Add New and create a member registration form with whichever fields you need. (This might be name, email, and so on.) To save time, select their pre-built User Registration Template.
In the form, go to Settings → User Registration and set it up so that people will be added to the role you created in step 4.4 when they submit the form. (More details here.)
Finally, you can optionally use one of these methods to take payment whenever a member registers:
Regular subscription payments for access to the members area - As above, plus follow these instructions to configure PayPal Subscriptions.
Step 5: Create a member login page
Finally, we need a way for people to log into the WordPress members area! There are two ways to do this, depending on the type of protection you used for the members area:
Members area for logged in users/rolesThis type of members area works with the default WordPress user login system. This means that you can use any WordPress login plugin. We recommend using either Profile Builder or Theme My Login for this. They both let you create professional-looking user login forms, and redirect people to the members area after logging in.
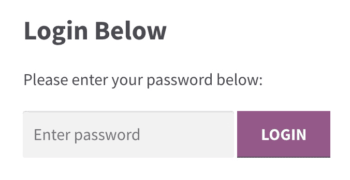
Password protected members area (no user accounts required)People access this type of members area simply by entering a password. The Password Protected Categories plugin comes with its own password entry form which people can use to access the members area. Simply add the shortcode [category_login] to any page. Go to Settings → Protected Categories to customize the login form wording.
FAQ
Before we finish, I'll answer some frequently asked questions about creating a WordPress members area.
What are the benefits of providing a members area?
Membership sites are becoming increasingly popular because of the many benefits they offer. Businesses build membership areas to achieve the following benefits:
Grow traffic and revenue
Foster community
Build a list of leads
Let’s take a closer look at each of these benefits.
Monetary benefits
One of the most consistently profitable ways to secure income comes in the form of a membership area. Membership areas are used to sell just about anything like - tutorials, e-books, articles, cloud-based services, and even special discount codes.
Products, content, or services can be sold for one-time payments or recurring payments. Take for instance Zen Business, an entrepreneurship training platform that offers annual and monthly recurring membership for aspirants to choose from.
Recurring payments are great for businesses. Unlike other marketing strategies (like email marketing, social media marketing) where you have to actively try and convince customers to buy again, recurring payments don’t require any active marketing campaigns. Businesses can solely focus on keeping the customers happy.
Community building
Communities can be used to keep customers engaged and interested in your brand. Facebook groups, Slack groups, and forums are often used to build a community.
Example of a business-building Facebook community
Membership sites can also create a forum with plugins like bbPress. They can find ways to keep users engaged and with time, a passionate fan base is likely to emerge. This fanbase will help you improve your products and even help your business grow by spreading the word.
Collecting leads
Users signing up on your membership area are not just paying you, they are also sharing valuable information like name and email addresses. You can use this information for sales campaigns like Black Friday sales, new product launches, brand awareness drive, etc.
It’s worth noting that you don’t have to offer a paid membership service to collect leads. Plenty of businesses restrict parts of their website to drive visitors to sign up if they want to access hidden content.
Example: Going™ offers free membership to visitors who want to be alerted about international flight deals in exchange for a name and email address.
Scott's Cheap Flights membership registration form
What types of members-only content can I provide?
Before we finish, let's talk about different types of content that you can add to a WordPress members-only area. Read through the ideas for inspiration on extra resources you can provide. This is a great way to add extra value to your members, making them more likely to sign up and remain members for a long period.
Types of members-only content
Articles - A WordPress members area can be as simple as a private blog.
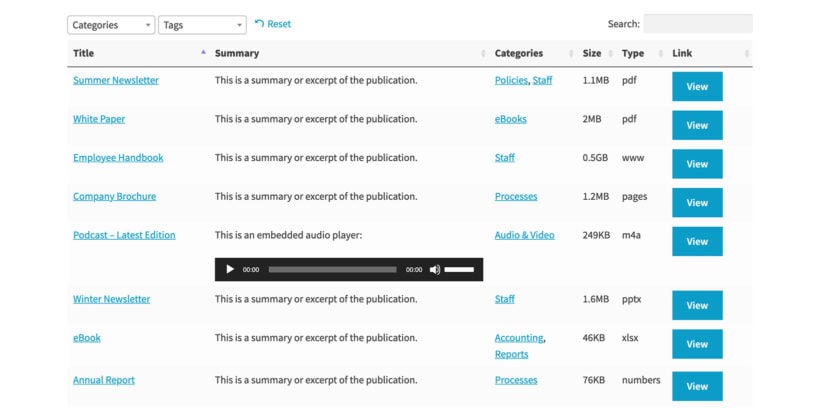
Documents and resources - Most members areas will benefit from a section to provide exclusive resources for members. These might be downloadable documents, a library of audio or video content, or links to third party websites. Either way, you can use the Document Library Pro plugin to easily create a searchable resource library.
News - Members are interested in your organisation, and will like to see you adding internal news to keep them up to date.
Webinars - If you organize regular webinars then make these available in your members area.
Courses - Lots of WordPress members areas provide online courses and eLearning opportunities to members. You can do this using a WordPress LMS plugin and inserting the courses into the membership area.
Special offers/discounts - It's often a good idea to offer exclusive offers and discounts to members. This might be in your own online store (e.g. using a WooCommerce discount plugin to provide a discount for all users with the 'Members' role). Alternatively, you might negotiate discounts with a range of partner companies and add a 'Member discounts' page containing coupon codes to the members area.
Early access - If you're planning to launch new products or services, then consider providing early access via the members area. This boosts loyalty by making members feel special. It's also a good opportunity to receive early feedback before the wider launch.
Whatever type of content you add to the members area, it's important to keep adding to it regularly. This is especially important if you require members to continue paying for ongoing access. When they see you adding more and more content, they'll be much more likely to remain members for many years.
What other plugins can I use to create a members only area?
I've recommended Password Protected Categories because it makes it so simple to add a members area to WordPress. However, it may not be the best solution if you have more complex requirements.
For a more advanced WordPress members area, I recommend considering one of these plugins.
Paid Member Subscriptions
Paid Member Subscriptions by Cozmoslabs is a full-blown WordPress membership plugin. It offers numerous features like restricting access to specific content, lifetime memberships, membership levels, and payment gateways like PayPal and Stripe. The plugin also helps run promos like trial periods, coupon codes, discount codes, etc.
With this plugin, you can set up membership levels, members-only reward systems, free trials, invite-only members area, and lots more. The key point about this members area plugin is that it works alongside the free WooCommerce plugin to power the payment gateways, taxes, products, and so on.
It lets you create and manage multiple membership levels with various access rights. You can restrict access to specific pages, posts, or sections and set up members-only stores where only logged-in users can shop. It supports content dripping, so you can release content gradually, which is great for online courses or subscription libraries. The plugin works well with WooCommerce, so you can offer members-only discounts and manage payments. It supports over 30 payment gateways like Stripe and PayPal. The dashboard is user-friendly for managing members, tracking subscriptions, and customizing notifications. It is ideal for scaling your membership site with WooCommerce integration and a customizable experience.
Final thoughts on creating a WordPress members area
Creating a WordPress membership area has never been easier. Simply use the Password Protected Categories plugin to create a members area. It comes with a full 30-day month back guarantee so you can set up a membership area risk-free 🚀
We'd love to know how you get on with building your very own WordPress membership area. Please leave a comment below.