How to create a private section of your WordPress website for specific users: Complete Guide

By default, when you create a WordPress website, it’s available to everyone. In other words, anyone who wants to access the website can access the URL and view it. But it doesn’t have to be that way. You can make WordPress private.
In this complete guide to making WordPress private, you’ll learn how to:
- Create private pages and posts, make custom post types private, and save time by hiding entire categories.
- Make a whole WordPress site or blog private access only, with or without a plugin.
- Make parts of WordPress private for specific use cases, such as creating a private wholesale online store.
What are the different ways to make WordPress private?
There are several different ways to make WordPress private. Below, we’ve explained the different options and you can use whichever method suits your needs best.
- Make pages or posts private. Mark selected pages or posts private in WordPress or password-protect them to prevent unauthorized user access.
- Create a private area in WordPress. Restrict access to entire WordPress categories by password, user account, and user role or make them private.
- Make your WordPress site or blog completely private. Perfect for anyone looking to make a WordPress site private access only.
- Make WordPress private for specific use cases. Different ways to make WordPress and WooCommerce private depending on your specific use case.
You can jump straight to the method you’d like to follow or read through the different options for more detail and instructions on how to set it up.
How to make pages or posts private in WordPress
Many site owners need a way to make pages or posts private in WordPress. This means that there are selected pages or posts that they’d like to hide from all visitors on their website. This involves marking the page or post private from the back-end.
WordPress itself has a basic option for making pages or posts private. It's not the most user-friendly way to do it, as we'll see in a minute. However, I will show you how to set it up before moving on to more sophisticated options.
If you’re wondering how to set up private pages and posts in WordPress, follow these steps:
Open up the page or post you want to make private in the Edit Page (or Edit Post) screen. Find the Publish metabox on the right-hand side of the screen. Click the Edit link next to the Visibility option. If you’re using the Gutenberg editor, click the Public link next to the Visibility option to change the page or post’s visibility.
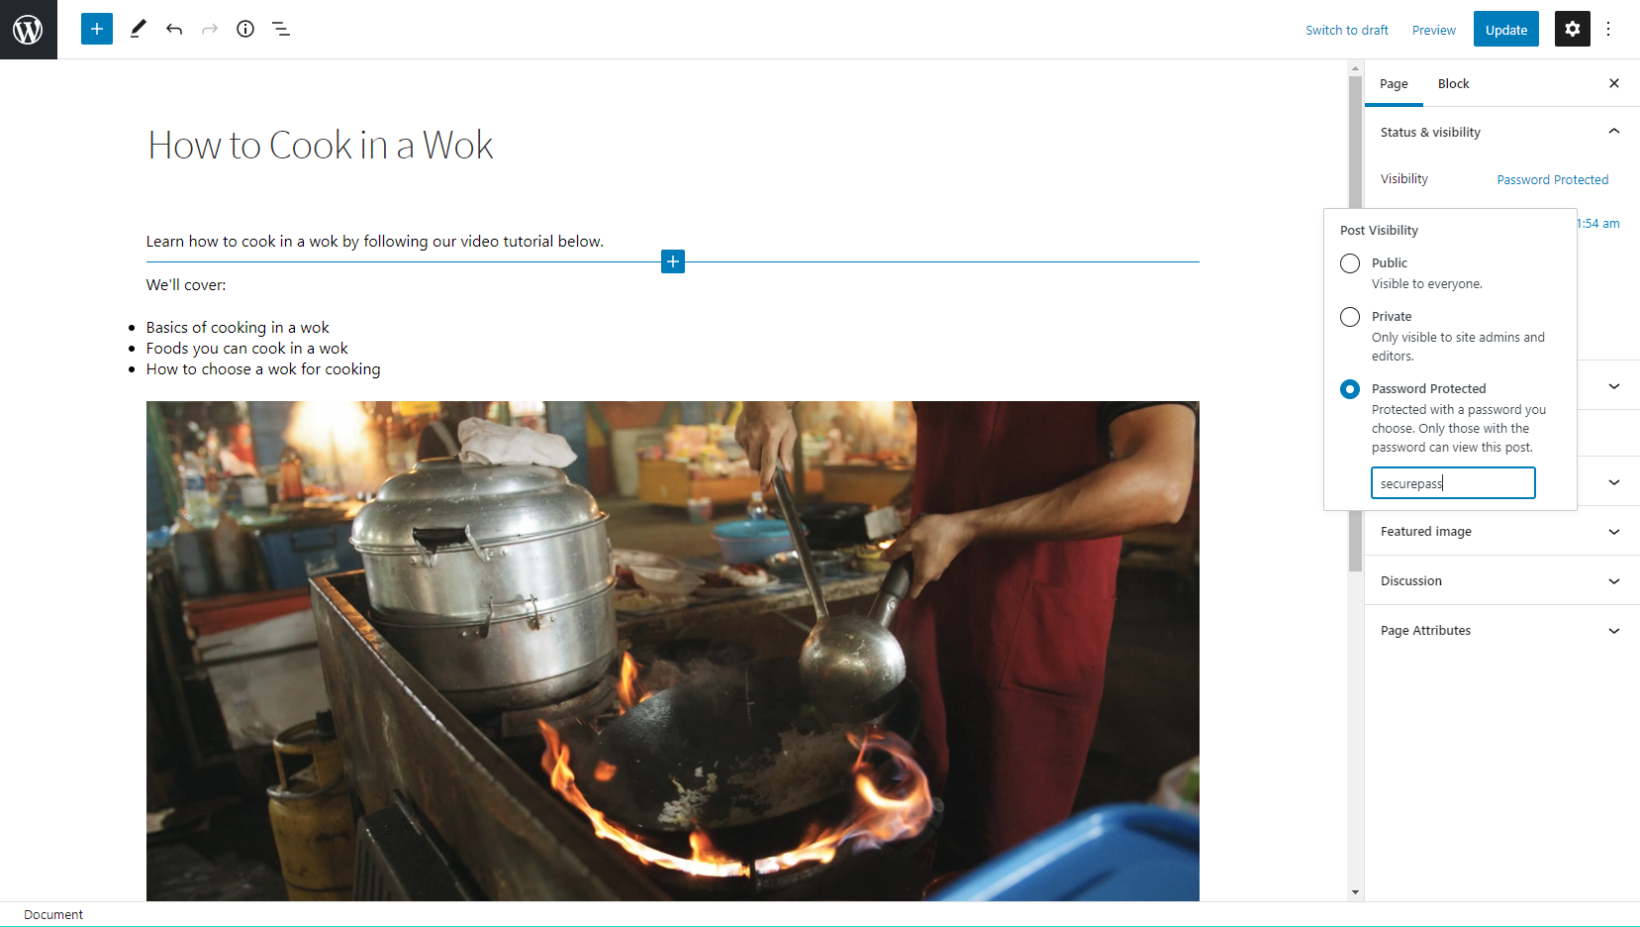
By default, the page or post will be set to Public. From here, you can select either the Password protected option or the Private option to hide it from visitors.
- Password protected. Use this option when you want to password-protect the page or post. Visitors will need to enter the correct password to view the page or post. Keep in mind that password-protected pages are still visible but only people with the password can access the single post page.
- Private. Pages and posts marked private are hidden from everyone apart from logged-in Admins and Editors.
The problem with WordPress password protected and private pages
While it’s great that this is part of WordPress out of the box, it’s not at all user-friendly. Here’s why:
While password-protected pages are accessible to everyone with the password, they're not actually hidden from the people who visit your website. The password-protected pages and posts will still appear on your WordPress site as normal. However, only people with the password can access the single post page. Other content – such as the excerpt and title – will still be visible to everyone.
From a user experience standpoint, it's frustrating for public visitors to click on a post and then find out that it is password protected.
Password-protected pages are also a pain because people will have to enter a password every time they want to access a private page, which is really frustrating.
Private pages are slightly better because once someone logs in, they can immediately see all the private pages and posts without having to log in over and over again. However, only Admins and Editors can see private WordPress content. If you want to allow other user roles (e.g. Subscribers or Members) to see the private pages and posts, you have to install a plugin to change the user permissions. That can be fiddly.
The solution is to use the Password Protected Categories plugin and create private categories with more flexible visibility options. Keep reading to learn how.
How to create a private section of your WordPress site
The WordPress Password Protected Categories plugin lets you hide any type of category or taxonomy from public visitors. You can set it up so only specific users, user roles, or people with the correct password can access the private area.
Password Protected Categories is the perfect option for anyone looking to create a private area on their WordPress website. It also makes it easy to build a private blog or make your portfolio, gallery, or events private.
Why use Password Protected Categories to create a private section?
By using the Password Protected Categories plugin to create a private section of your WordPress site, you can password-protect entire areas in a user-friendly way. This is better than using WordPress to make individual pages private because:
- Saves time. You don't need to waste time password-protecting each page or post individually. Set up password protection for the category and the Password Protected Categories plugin makes the category page and all its contents private.
- Make sure pages don’t appear on the front-end. You can choose to actually hide the password-protected posts and pages from public view. This way, they’ll only be visible to people who have entered the correct password.
- Multiple password protection. You can add multiple passwords for each category. This way, you can hand out different passwords to different users (or user groups) and revoke access whenever you’d like.
- Protect multiple pages with a single password. The Password Protected Categories plugin's advanced logic lets you protect multiple posts, pages, or categories with a single password. This means that people only have to enter the password once to access a large amount of content instead of entering a different password for each piece of content.
- Set different passwords for different categories. You can also use the Password Protected Categories plugin to set different passwords for different categories. Different people can access different private areas in WordPress. This is perfect for websites that cater to different types of users e.g. users of different age groups or different types of customers and clients.
- Mix and match the protection options. You can even mix and match the protection options. For example, you can set it up so that Admins can access the private category while people without an account must enter a password to view content.
Choice of 4 privacy options
As mentioned earlier, the Password Protected Categories plugin offers four different protection options. You can mix and match these to create a private section of your WordPress site:

- Password protection. You can add one or more passwords to a category to protect the entire category including all sub-categories and their posts.
- User protection. Protect WordPress categories by user account. This option lets you select specific users to hide the category from. This is perfect for websites that want to restrict a handful of people from viewing content.
- Role protection. Enter user roles you want to hide the WordPress category, its sub-categories, and posts from. For example, you can use this to hide members-only content from Subscribers.
- Private. Set up private WordPress categories to hide content from public visitors. Keep in mind that categories marked private will only be accessible to Admins and Editors. In most cases, it’s easier to use the Role protection option instead.
How to make your WordPress site or blog completely private
Here, we’ll show you how to make your WordPress site or blog completely private – with or without a plugin.
Making your entire site or blog private is useful for anyone who wants to set up a private website that only their team or staff has access to. It’s also useful for when you’re building your website or when your site is undergoing maintenance.
One way to make your WordPress site or blog completely private is by using the free Password Protected plugin. However, if you’d prefer to not use a plugin, you can ask your hosting provider to enable password protection on the whole website. Both options are perfect for anyone that wants to make a WordPress site private access only.
You can also use the free Coming Soon Page, Maintenance Mode & Landing Pages by SeedProd plugin to make your WordPress site private temporarily while it’s in development or you’re performing maintenance.
Other ways to make WordPress private
So far, we’ve covered some ways to create a private section of your WordPress website. But this is only the beginning. There are plenty of other options depending on your exact use case. Let’s look at some examples:
Private document library
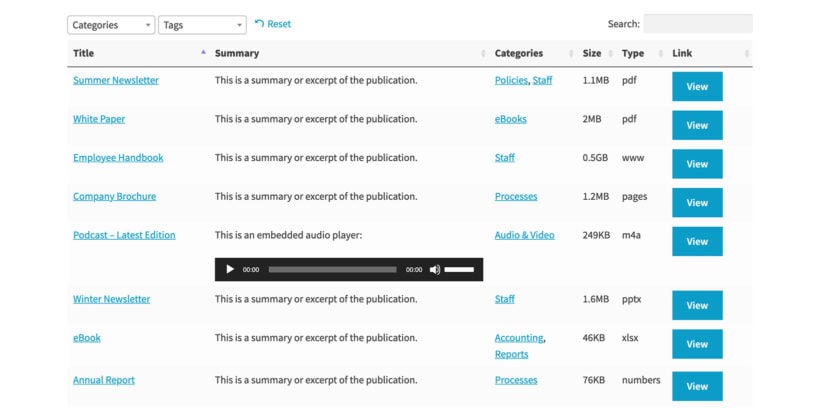
If you’re using the Document Library Pro plugin to list documents and other resources online, you can use it with Password Protected Categories to make it private. This is perfect for businesses and institutions that want to create a private document library for their team or organization.
How to make WooCommerce private
If you run an online store powered by WooCommerce, you might want to create a private store. For example, you might want to have some products that only members can buy. By making WooCommerce private, you can have a members-only area in WooCommerce.
More specifically, you can:
- Password-protect entire WooCommerce categories.
- Create protected categories that only specific users or user roles can access.
- Make your whole WooCommerce store private.
Check out these 3 easy ways to create WooCommerce private content for more information.
Create a WooCommerce wholesale store
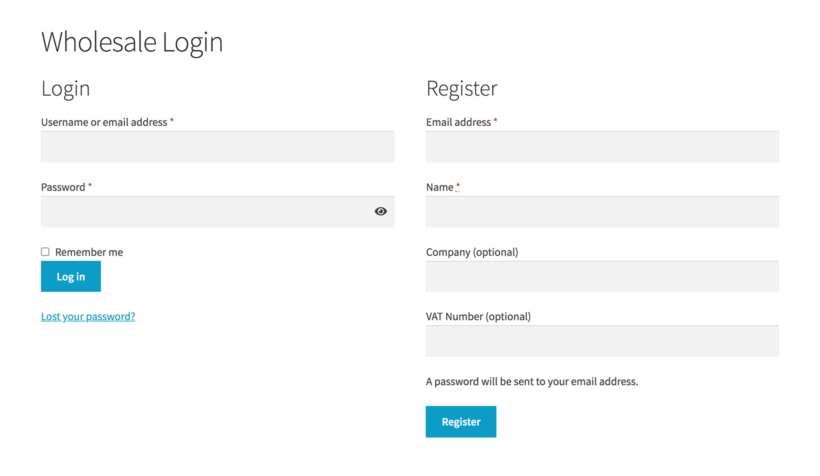
Use the WooCommerce Wholesale Pro plugin to create a private wholesale area in WooCommerce. You can set it up so wholesale buyers are charged different prices from your public customers. This is a simple way to sell to different types of customers (e.g. regular customers and wholesale buyers) on the same site.
Create a private area in WordPress for event bookings or training materials
You can also use the Password Protected Categories plugin to protect event booking areas on your WordPress website based on their category. The plugin works seamlessly with any WordPress events plugin including Events Calendar Pro, Event Espresso, and WP Events Manager.
Check out our tutorial on how to Create password protected events in WordPress for step-by-step instructions.
The easy way to make WordPress private
There are lots of ways to make different parts of WordPress private. You can mark your posts and pages private or make your entire website private.
However, if you just want to make parts of WordPress private then the best option is to use the Password Protected Categories plugin. It’s an easy-to-use plugin that offers four different ways to protect content on your website. You can restrict access to categories by user accounts, user roles, and passwords, and by marking them private.
Get Password Protected Categories today!
2 Comments
Good article.
Is there a means to password protect individual pages for individual users?
I need to leave progress notes for individual users and don't want other users to see them.
Hi, Andy. Thanks for your feedback. Individual pages don't have an option to be categorized by default, albeit you can add/use either custom coding or a plugin to do so. For details, please see: How can I categorize my WordPress pages? I hope this helps. Please let me know if you have any more questions. You can also get in touch via our dedicated Support Center. Best regards.