


Let me guess: You've been searching for a WordPress A-Z plugin but none of them do exactly what you want them to do. Now, you need to create an alphabetical listing of your WordPress content but maybe you're not sure how to get started.
Don't worry - we've got you covered.
In this post, I'll show you how to use the Posts Table Pro plugin to create a WordPress alphabetical index from any type of content on your site - posts, pages, custom post types... you name it! You can use this to create A-Z listings, with posts listed by letter. Or maybe a WordPress glossary, where people can click on the A-Z letters or numbers to view the listings under each one.
Let's get started so you can have a working solution to your problem as soon as possible!
How to create a WordPress alphabetical index or list
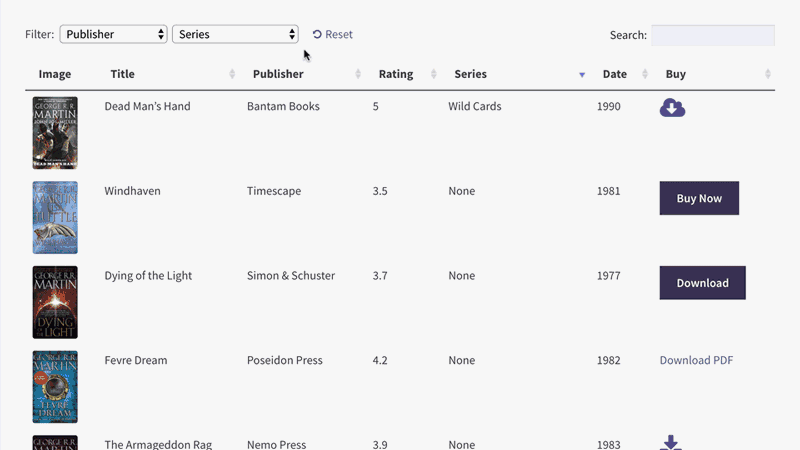
To demonstrate how to create a WordPress alphabetical index, I’m going to use a real-life example of creating an A-Z movie index where visitors can click on any letter to jump straight to movies with names that start with that letter.
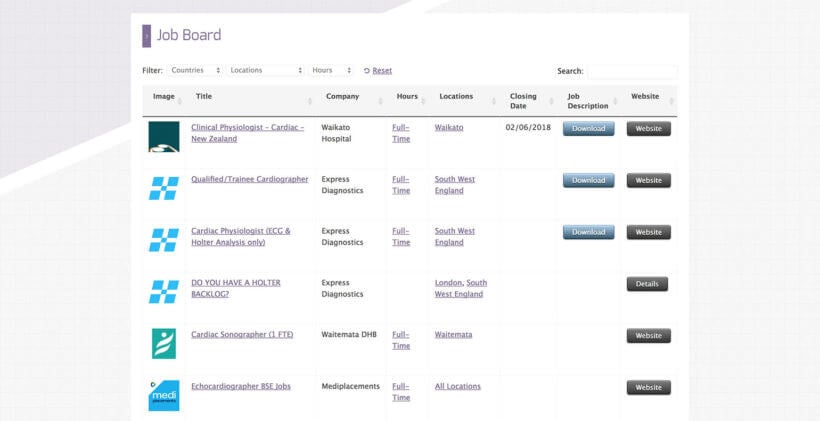
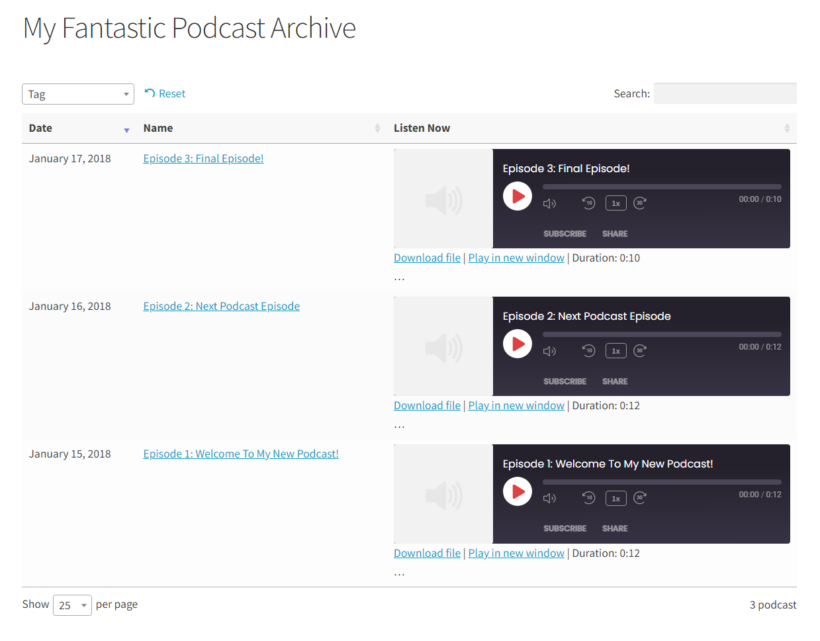
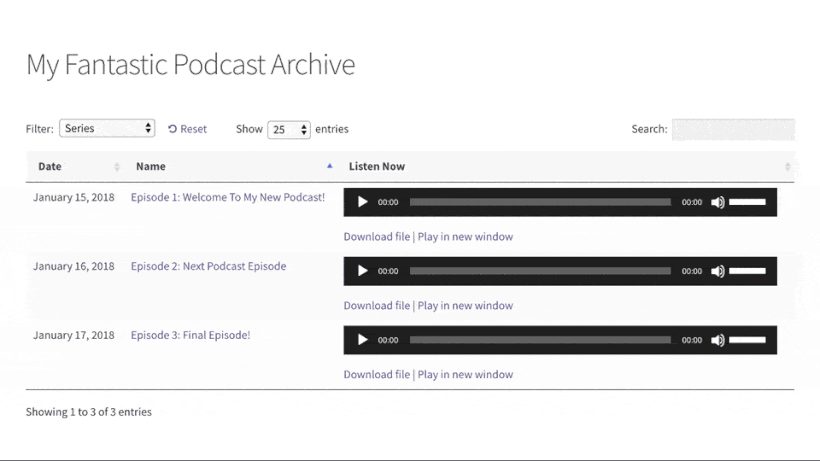
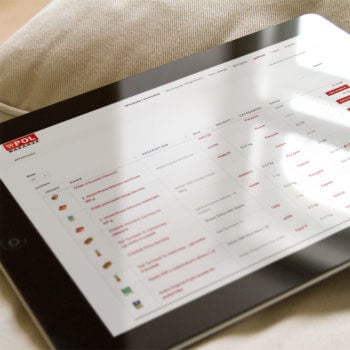
You can see an example of the end result below:
The process that I show you can work for anything, though. This means you'll be able to adapt this same basic approach to anything from regular WordPress posts to custom post types to numerical indexes and even WooCommerce products.
Posts Table Pro - the perfect WordPress A-Z plugin
While there are some simple WordPress A-Z plugins, most of them force you into using a single preset layout and only apply to regular WordPress posts.
On the other hand, by using Posts Table Pro, you’ll be able to:
- Create an A-Z index for regular posts, pages, or custom post types
- Manipulate your WordPress alphabetical index to show only the exact information that you want
- Include data from custom fields in your index
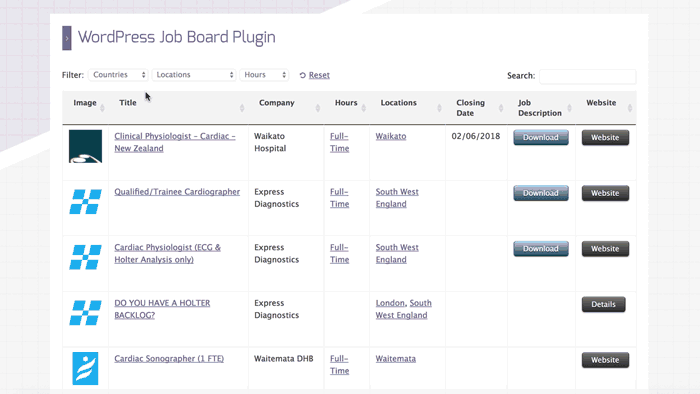
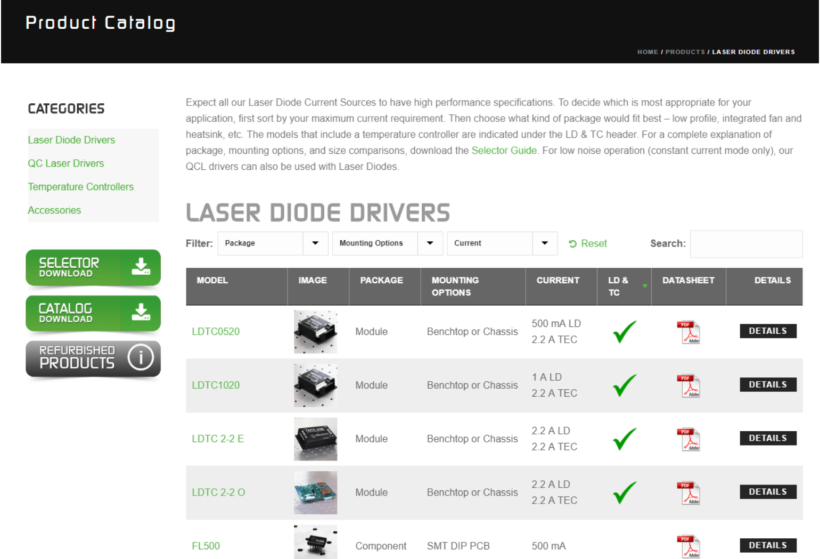
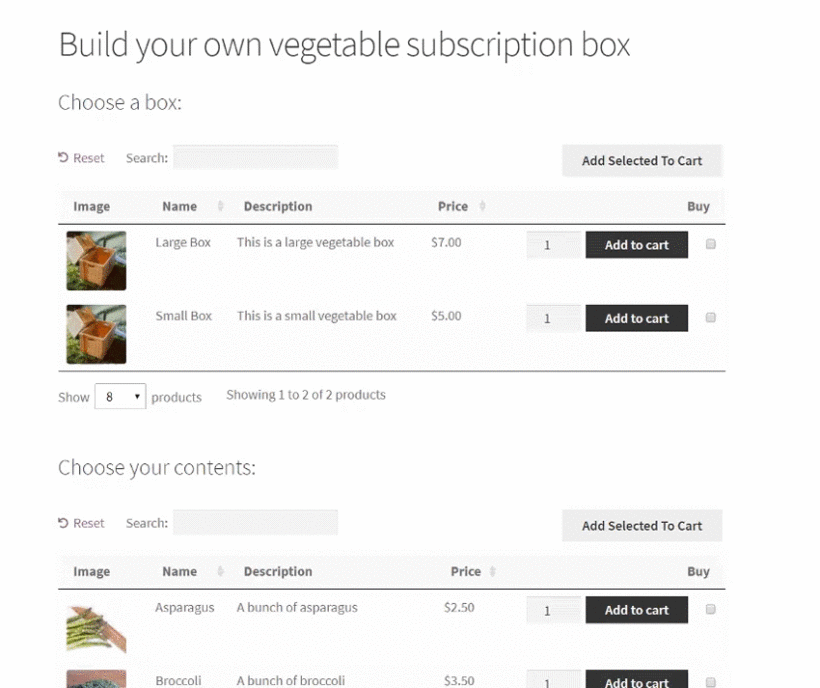
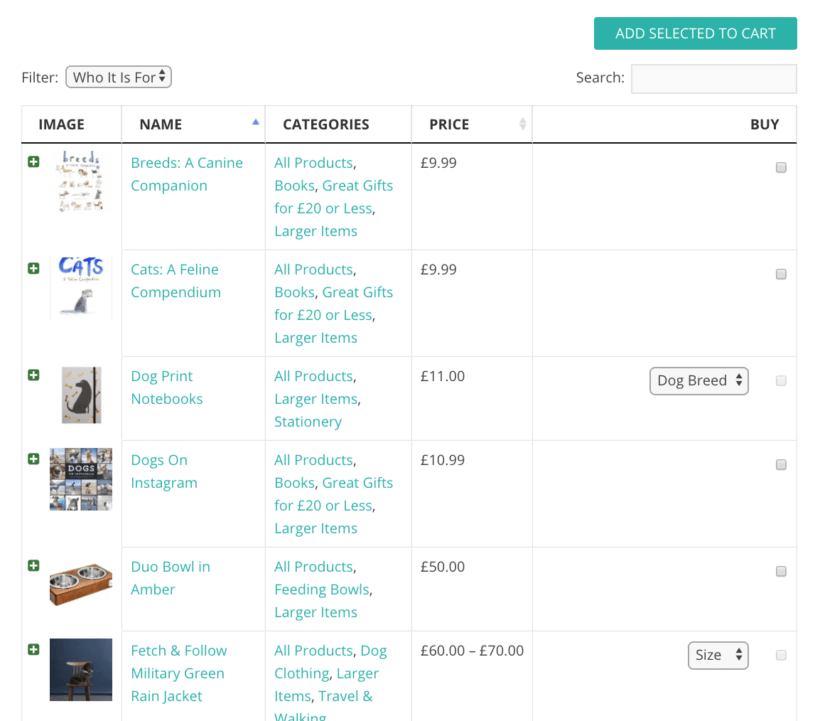
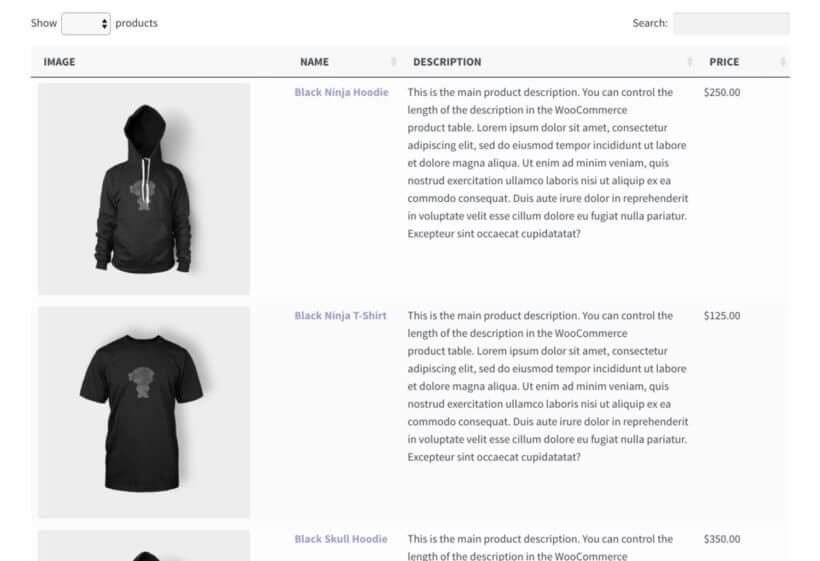
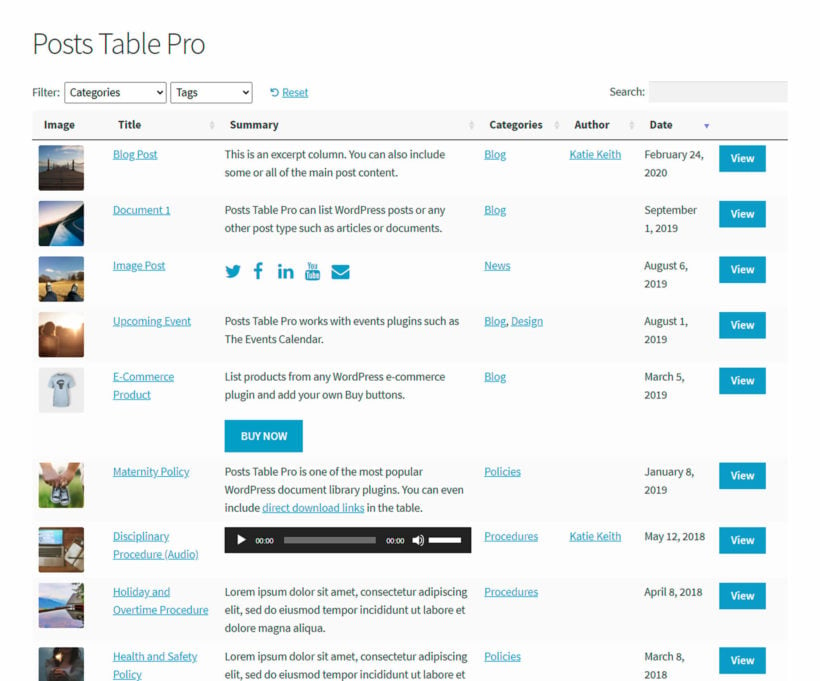
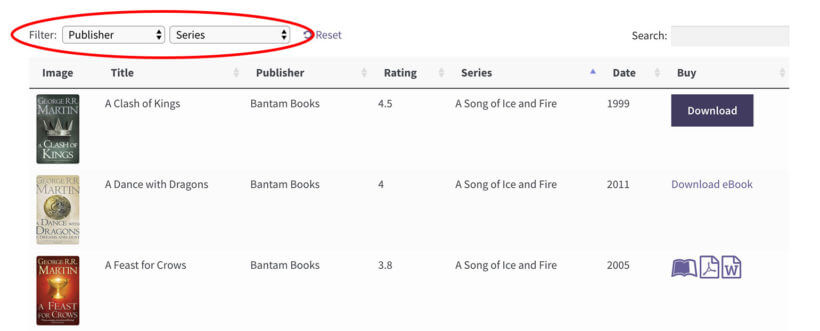
You can see a live example of the types of indexes that Posts Table Pro can help you create on this demo page.
Here’s everything you need to create your WordPress alphabetical index
- Posts Table Pro plugin (paid)
- Easy Post Types and Fields (free), to create custom taxonomy (for alphabetization) and/or custom post type
And if your theme doesn't already have functionality for tabs or toggles, you'll also need:
- Shortcodes Ultimate plugin (free), optional, but makes it easy to create clickable tabs to divide your index by the letters in the alphabet.
The entire process in a nutshell
I’m going to break down every single step in more detail. But before I do that, I want to give you a high-level look at the process so that you have an idea of where this article is going.
To create a WordPress alphabetical list you’ll:
- Decide between listing regular posts, and pages, or using a custom post type
- Create a custom taxonomy that you’ll automatically add the first letter of the post using a code snippet (for easy alphabetization) - or you can set the letters manually if you don't want to edit any code
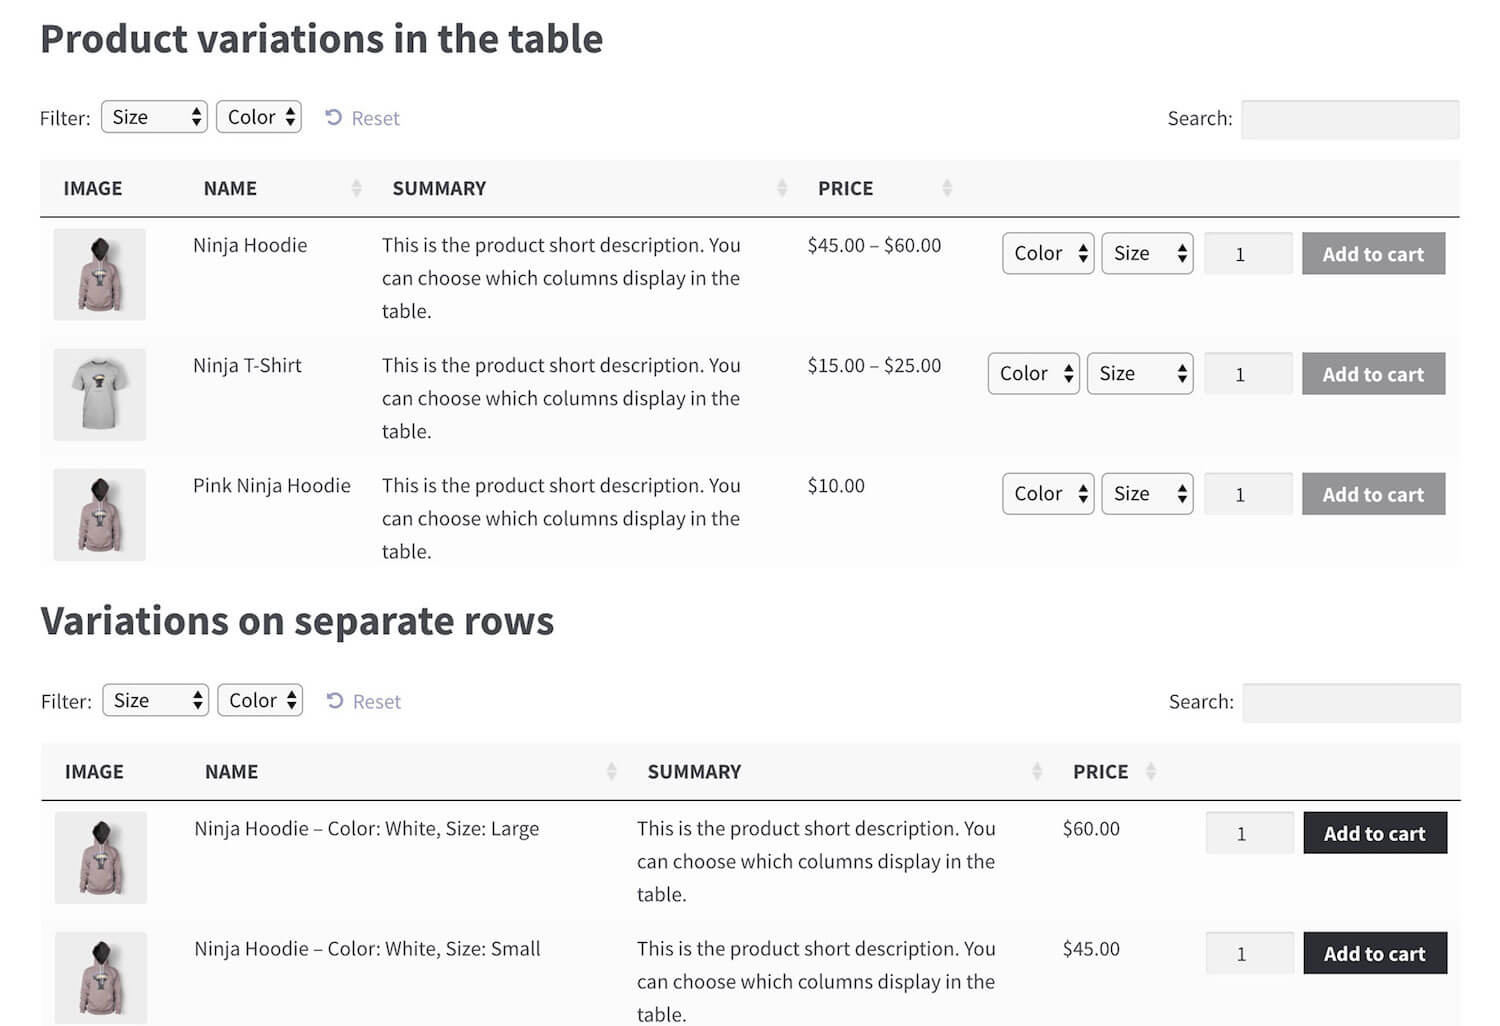
- Create a list of content for each letter using the Posts Table Pro shortcode
- Display those lists in a tabbed interface using Shortcodes Ultimate (or something similar)
Let’s get started!
Step 1: Decide what content you want to index
Posts Table Pro lets you index and alphabetize content from:
- Posts
- Pages
- Custom post types
So if you haven’t already, it helps to think of the best way to store the content that you want to index.
- Posts - typically, people use the default posts to store blog posts. So if you want to create an alphabetical index to list WordPress blog posts, this is what you want.
- Pages - pages are generally more for static content. You can create an index of your pages, but for more specialized content, you'll probably want a custom post type instead.
- Custom Post Type - custom post types are flexible and good for storing non-standard content, like a movie entry, staff member, and more.
For this demo, I’m going to use a custom post type to store the movie entries. But if you want to use regular posts, instead, it’s as simple as removing one tiny little phrase later on in the article (I’ll explain this when we get there!).
Step 2: Create a custom post type using Easy Post Types and Fields
If you’re going to use regular WordPress posts instead of a custom post type, you can click here to skip straight to the next step.
To create your custom post type, install and activate the free Easy Post Types and Fields plugin. Then:
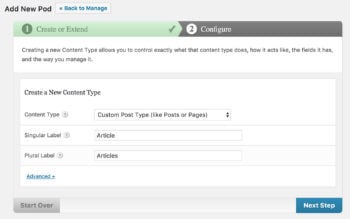
Go to Post Type → Manage in your WordPress dashboard. Click Add New to launch the wizard.
First, enter the Singular and plural names for your post type. For this example, “Movie Review” and “Movie Reviews”. But again, you can adapt this to anything - “Staff Member”, “Artist”, or “Document”.
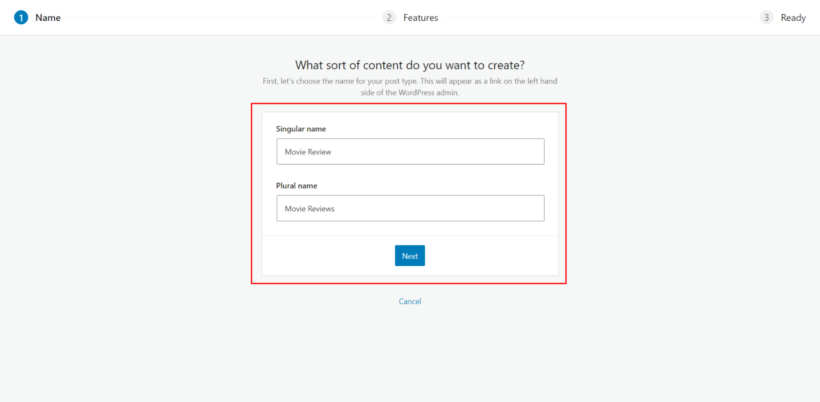
Select the type of information you wish to display and click Create.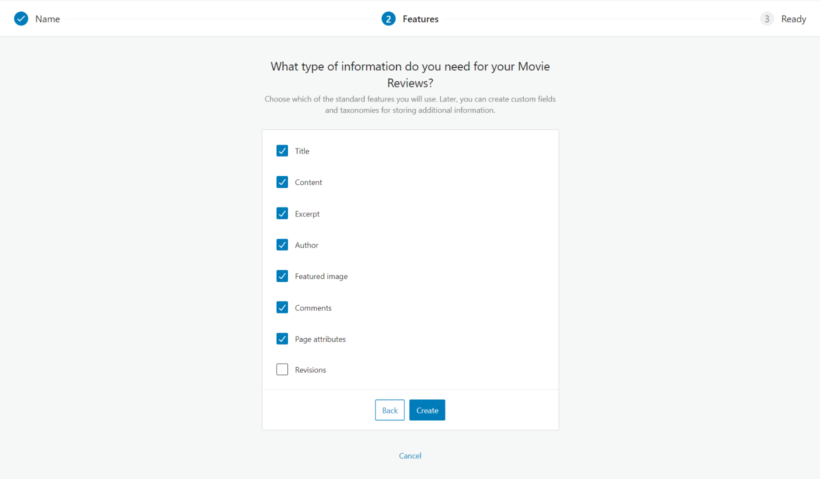
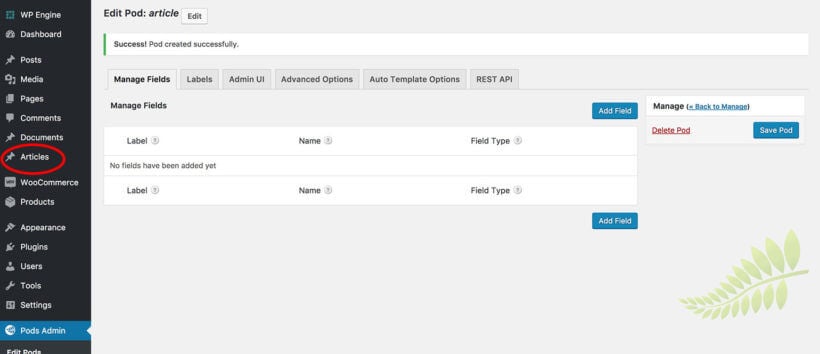
And you are done! You should see your new custom post type show up in the WordPress sidebar.
I’ll cover some neat enhancements - like adding custom fields - later on. But for now, you’re ready to move on to the next step.
Further reading: How to create custom post types in WordPress (step-by-step)
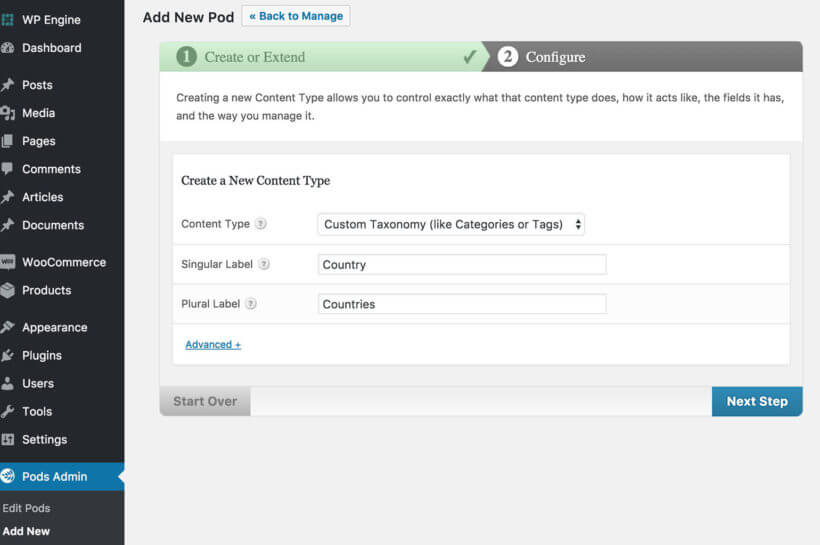
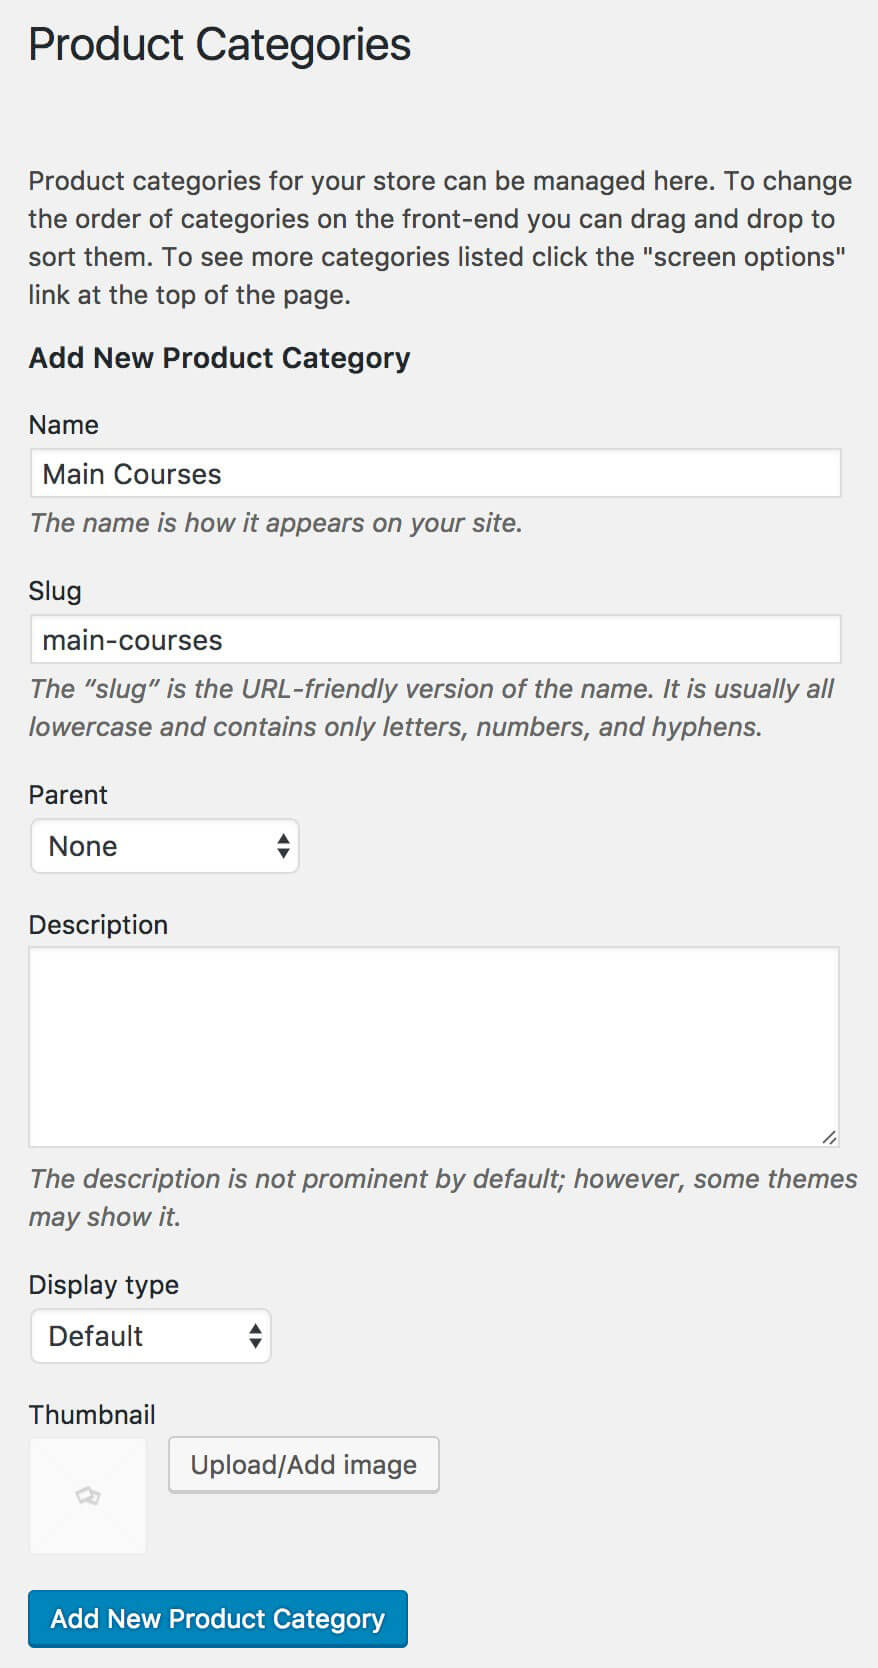
Step 3: Create a custom taxonomy
In order to index content alphabetically, you need to create a taxonomy for Posts Table Pro to filter content based on.
Essentially, you create the Alphabetical Letter taxonomy and assign each post a taxonomy for the first letter in the post's title (don’t worry - I’ll show you a way to do this programmatically so that you don’t need to manually set the taxonomy for every content item).
For my movie example:
- “Eat Pray Love” would get “E”
- “Conspiracy Theory” would get “C”
- And so on...
Here’s how to create the necessary taxonomy:
If you skipped here from Step 1, you’ll need to install and activate Easy Post Types and Fields plugin before you continue.
- Go to Post Type → Manage.
- Click on the taxonomies button for the post type you wish to customize (in our example, it would be Movie Reviews).
- On the Manage Taxonomies page, click on the Add New button.
- Enter the singular and plural names for your new taxonomy. For our purpose, it would be Alphabetical Letters. The actual name can be anything but make sure the slug is easy to remember.
- Make sure the Hierarchical checkbox is unchecked as there will only be 26 letters of the alphabet and no need to create sub-taxonomies.

After making those changes, make sure to click Add taxonomy button.
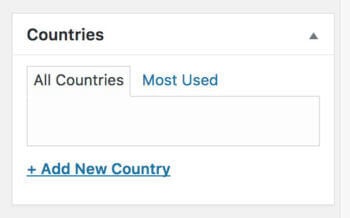
Step 4: Add content using the custom taxonomy
Now, if you go to add new content using regular posts or your chosen custom post type, you should see the new Alphabetical Letters taxonomy.
Add your content, making sure to add the appropriate letter to the Alphabetical Letters taxonomy for each piece of content.
How to add the taxonomy programmatically
For small amounts of content, it’s fine to add the taxonomy manually. But if you’re dealing with large amounts of content, you might prefer a method that doesn’t require you to manually input the taxonomy every single time.
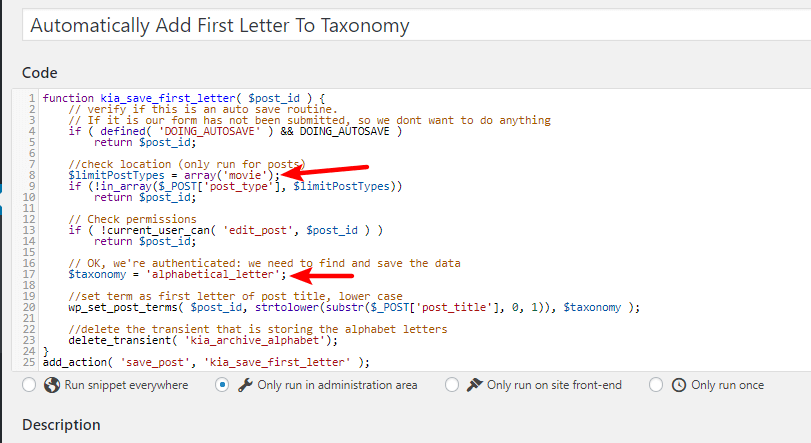
Thankfully, you can do that using some basic code. Essentially, this code snippet will automatically chop off the first letter of any piece of content and add it as a taxonomy - no manual input required!
While you’ll need a tiny bit of PHP knowledge to get this done, it’s nothing too complex. Here’s the code I used for my example (credit to Kathy Is Awesome for this snippet):
Note - assisting with code snippets is outside of our plugin support. If you're not comfortable editing code yourself, we recommend using our plugin customization service.
/* When the post is saved, saves our custom data */
function kia_save_first_letter( $post_id ) {
 // verify if this is an auto save routine.
 // If it is our form has not been submitted, so we don't want to do anything
 if ( defined( 'DOING_AUTOSAVE' ) && DOING_AUTOSAVE )
 return $post_id;

//check location (only run for posts)
 $limitPostTypes = array('post');
 if (!in_array($_POST['post_type'], $limitPostTypes))
 return $post_id;

// Check permissions
 if ( !current_user_can( 'edit_post', $post_id ) )
 return $post_id;

// OK, we're authenticated: we need to find and save the data
 $taxonomy = 'glossary';

//set term as first letter of post title, lower case
 wp_set_post_terms( $post_id, strtolower(substr($_POST['post_title'], 0, 1)), $taxonomy );

//delete the transient that is storing the alphabet letters
 delete_transient( 'kia_archive_alphabet');
}
add_action( 'save_post', 'kia_save_first_letter' );
To make this code your own, you need to:
- Replace
postinarray('post');with the name of your custom post type (only if you’re using a custom post type). - Replace
glossaryin$taxonomy = 'glossary';with the name of your actual taxonomy
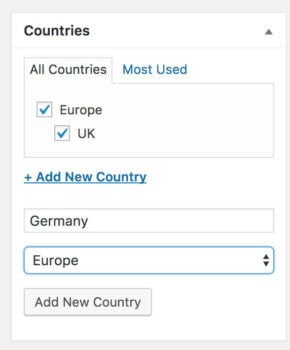
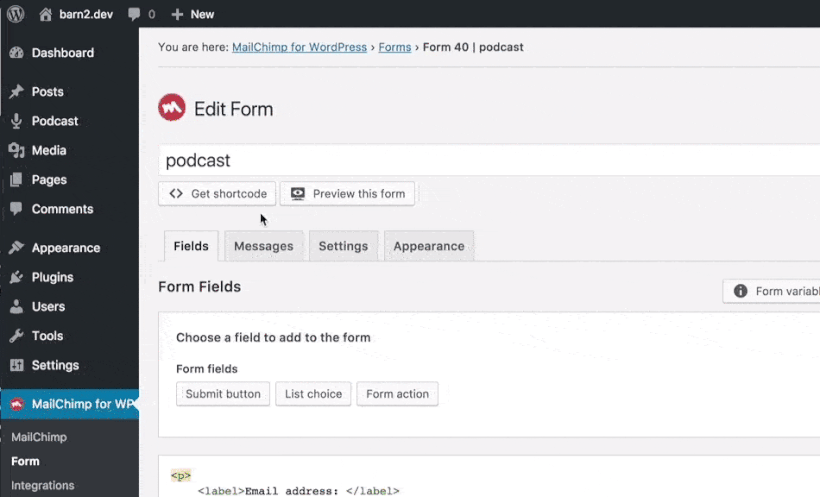
To find the name of your custom post type, click on Post Types → Manage and check the Name/Slug column. To check the name of Taxonomies, click on Taxonomies button and check the Name/Slug column: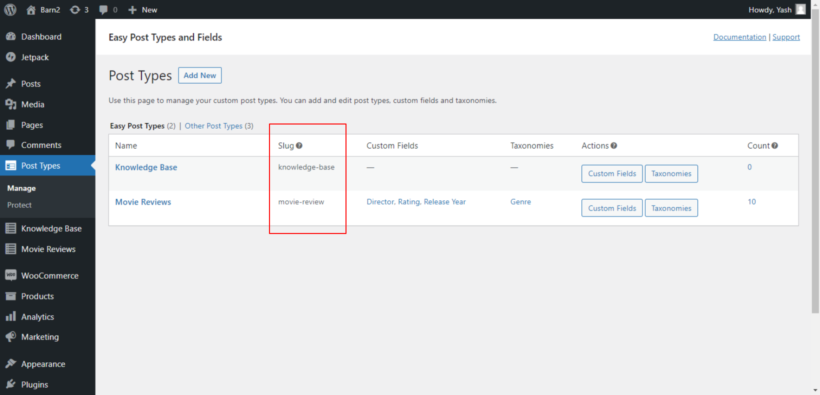
You can then add this code to your site using a plugin like Code Snippets (I marked the two areas that you need to modify with arrows to make things clear):
Once you add the code, you’ll no longer need to manually edit the taxonomy for each piece of content. Instead, WordPress will automatically take the first letter of the post and add it to the taxonomy whenever you publish or update the piece of content.
You can see this in action below: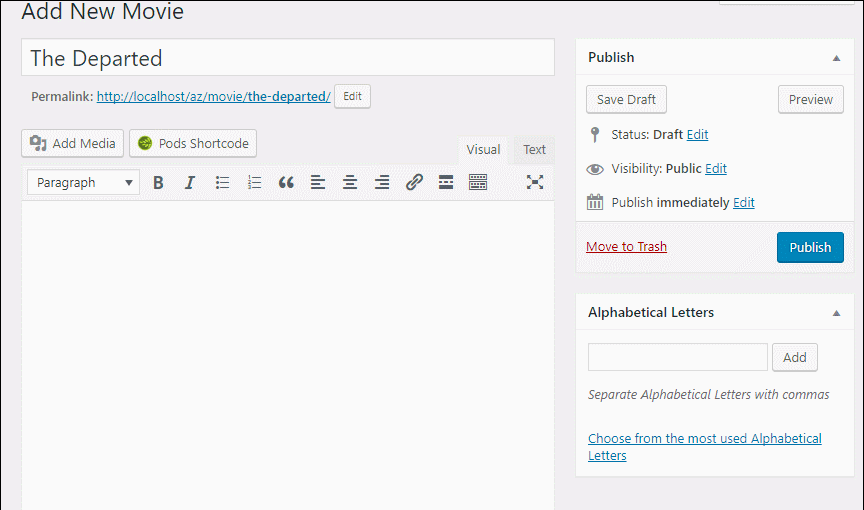
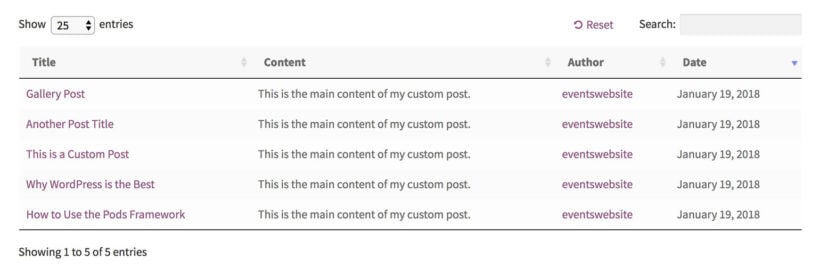
Step 5: Add content to the alphabetical list
Now, you’re ready to create the various alphabetical lists of your content.
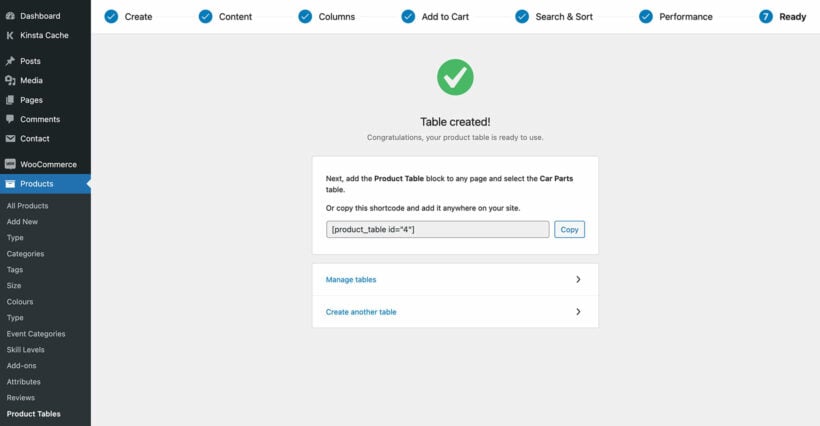
After buying Posts Table Pro, you will get a confirmation email that includes a download link and a license key. Once you get the email, download the plugin from the link provided and save the zip file to your computer.
Next, upload the plugin to your WordPress admin by going to Plugins → Add New → Upload Plugin, selecting the zip file, and then activating it. Once activated, the setup wizard will take you through a step-by-step process to create your first table. The wizard will guide you through the process of selecting columns, adding filters, and customizing the display of your table. With these easy-to-follow steps, you can quickly set up your Posts Table Pro plugin and start creating tables to display your content in an organized and efficient manner.
Here are some tips on which specific settings to choose in the table creator:
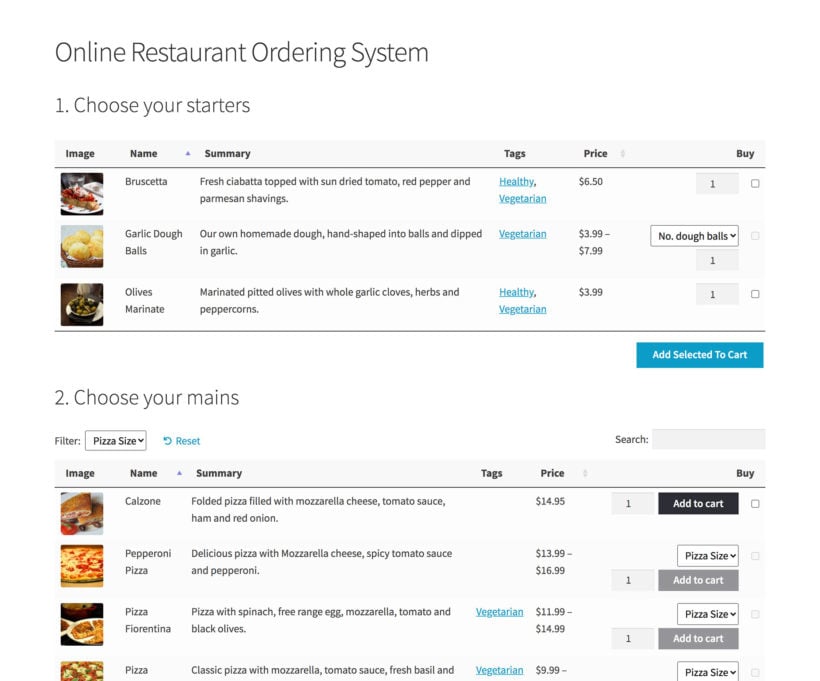
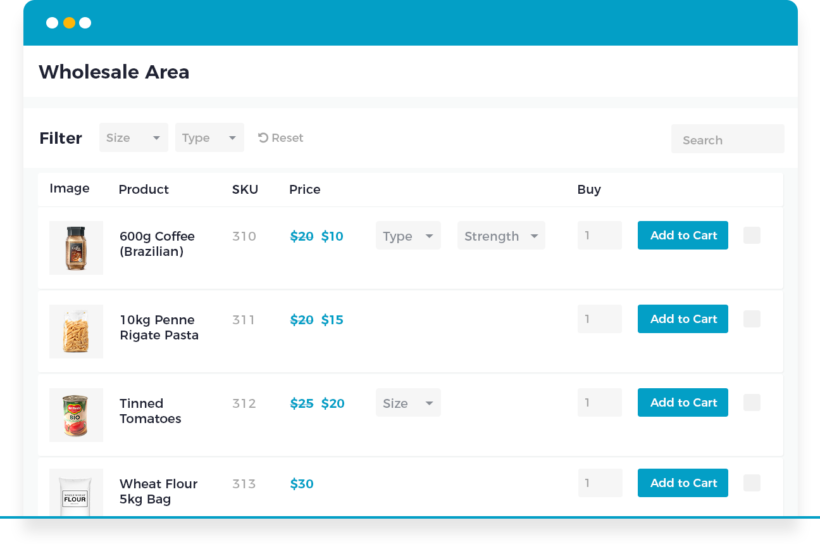
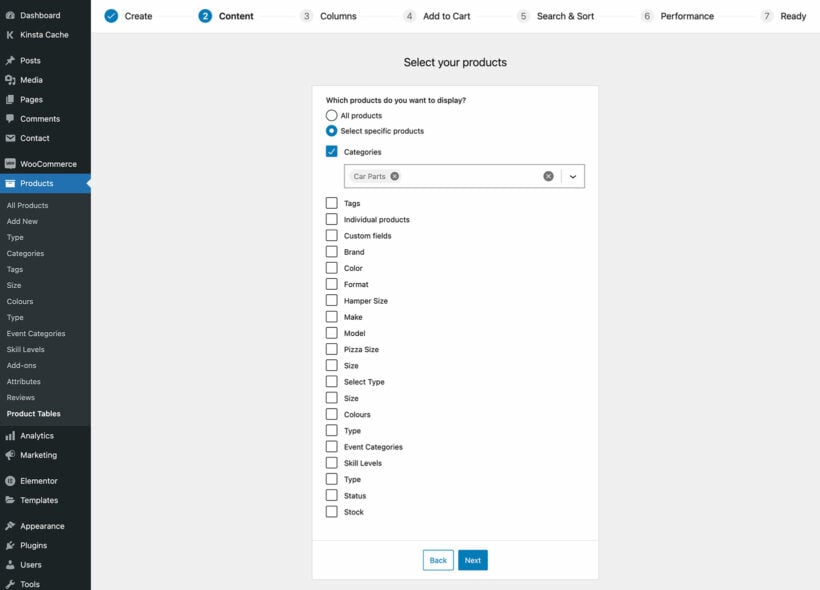
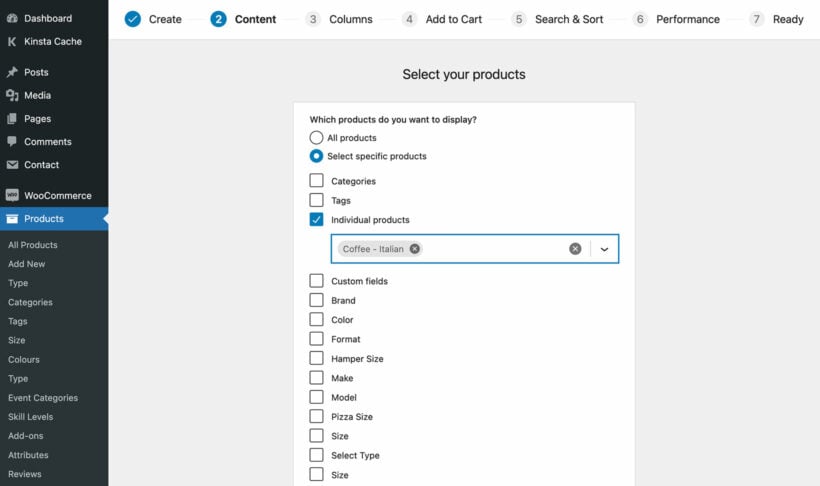
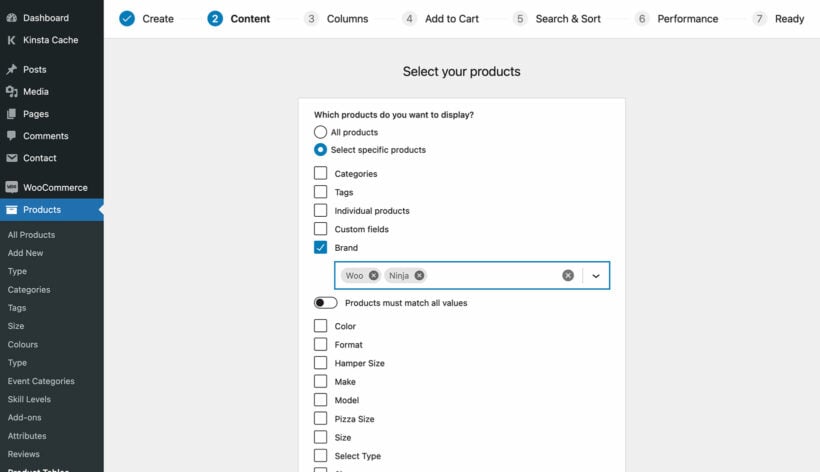
Choose which type of content to display
To create a table listing the pages or posts for a specific letter of the alphabet, the first step is to provide a name for your table and select the post type you want to display.
After giving your table a name and selecting the post type, the next step is to choose which posts or pages to include in your table. The available options will differ based on the post type you selected in the previous step. For example, if you chose a post with custom taxonomy, you will be presented with the relevant taxonomies to select from.
For example, to display content from the Movies post type, just choose 'Movies' from the dropdown menu in the 'Create' tab.
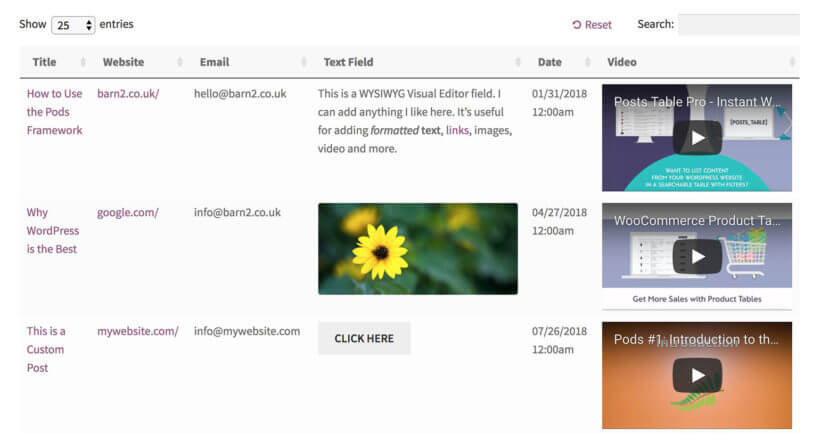
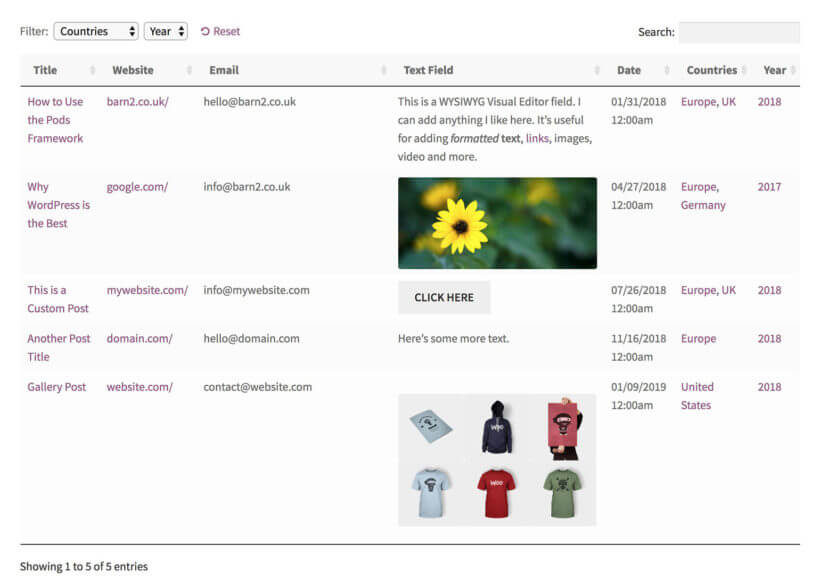
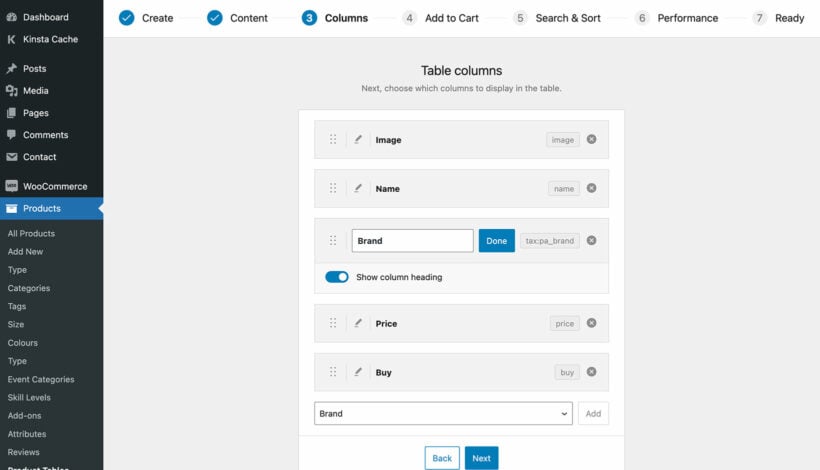
Choose which columns to display in your table
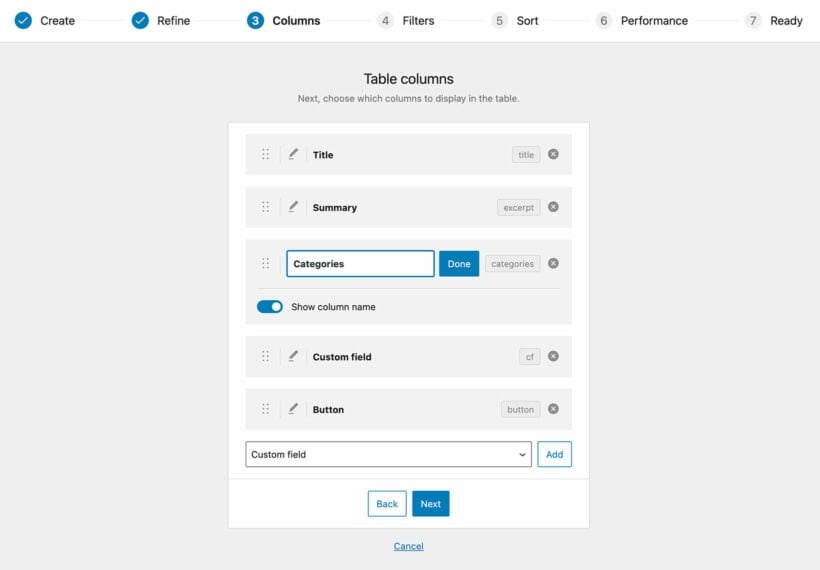
Now that you’ve selected what type of content to display, you need to choose the specific information that you want to display as columns in your table. For example, depending on what you’re displaying, you might want to show:
- Post title
- Custom fields
- A link or buy button
- Etc.
To do that, choose the column type from the dropdown menu and click "Add". You can also reorder columns by dragging and dropping the sort icon or column heading.
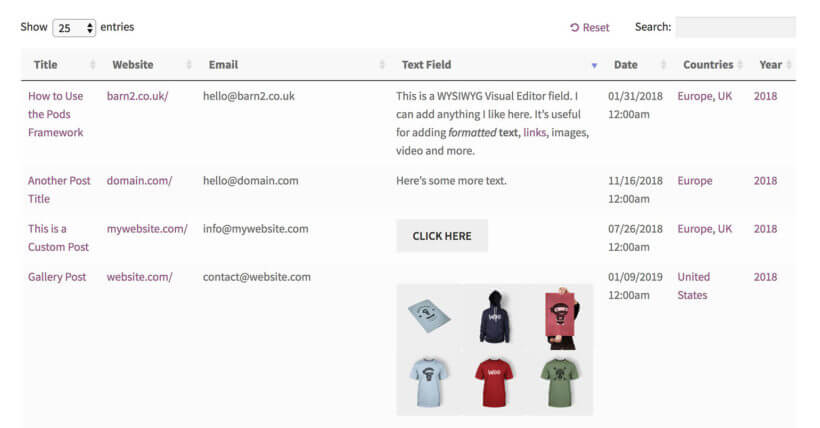
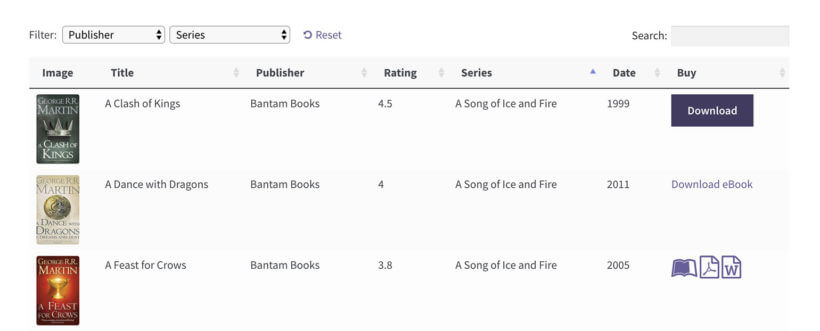
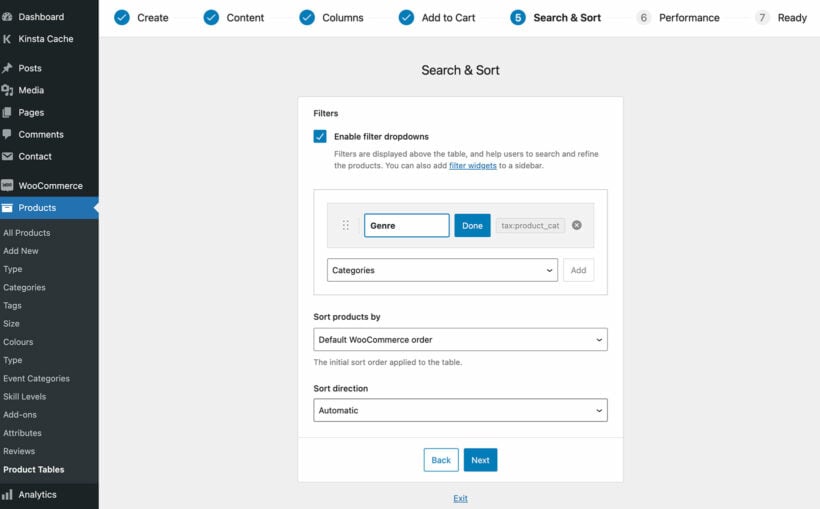
Filter posts to display them alphabetically and set the sort order
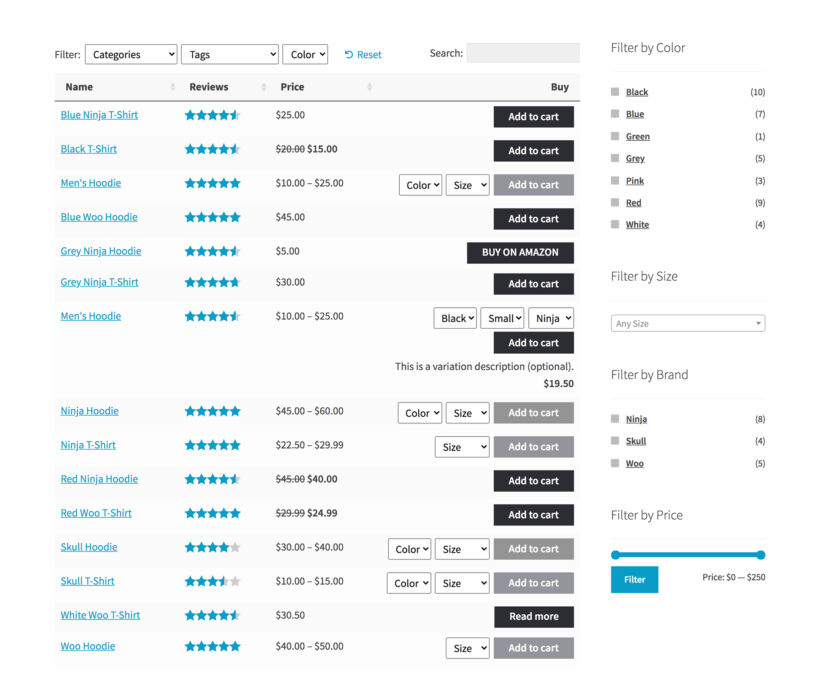
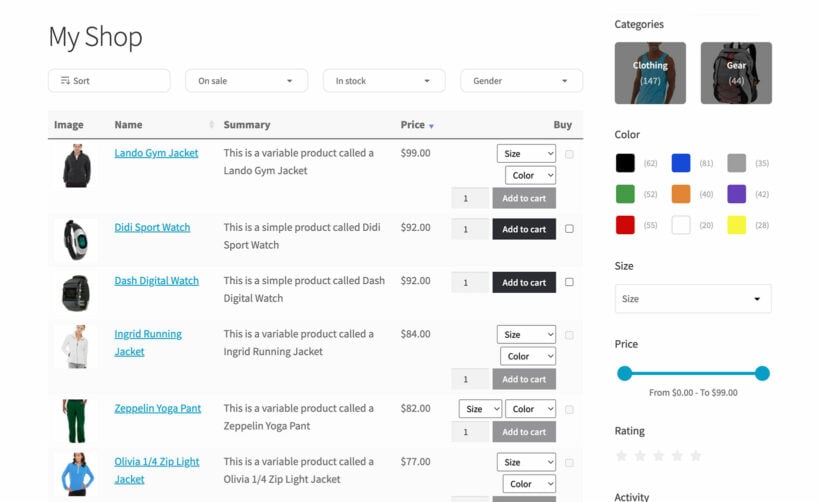
Add filters to your table that enable users to refine their selections. Filters appear as dropdowns above the table, allowing users to quickly sort and find the information they need. You can add as many filters as you like, depending on the content of your table and what your target audience would find most helpful. For example, you can add a filter for titles or categories.
In addition to filters, you can also choose how to sort the table. You can set the default sorting option and the sort direction. Sorting allows you to arrange your table's contents in ascending or descending order based on a particular column, making it easier for users to find what they are looking for. For example, if you have a table of books, you could sort them by name, allowing users to quickly find their books in alphabetical order.
Display your table
Once you have completed creating your table using the Post Table Pro plugin, there are two ways to add it to your website:
- Using the Gutenberg editor: In the Gutenberg editor, you can insert a 'Post Table' block by clicking on the plus (+) sign and searching for 'Post Table'. Once you select the 'Post Table' block, it will be added to your page. You can then customize it further by choosing which table to display and other settings.
- Using shortcode: If you're not using the block editor or prefer to use shortcode, you can copy the shortcode from the final page of the WordPress table builder. You can then paste the shortcode anywhere on your site, such as a page, post, or widget. The shortcode for each table also appears on the main list of tables in Post Tables → Tables, so you can easily access it at any time and add it to your site. By using shortcodes, you have the flexibility to place the table on any page, regardless of its content.
Step 6: Create tabs using Shortcodes Ultimate plugin and insert shortcode
If you want to create a set of clickable tabs like the example above, Shortcodes Ultimate provides an easy, theme-agnostic solution. With that being said, if your theme does include already functionality for tabs/toggles, we recommend using that first. If not, go for Shortcodes Ultimate!
To get started:
- Install and activate the free Shortcodes Ultimate plugin
- Go to the WordPress editor for the page you want to add your WordPress alphabetical index to
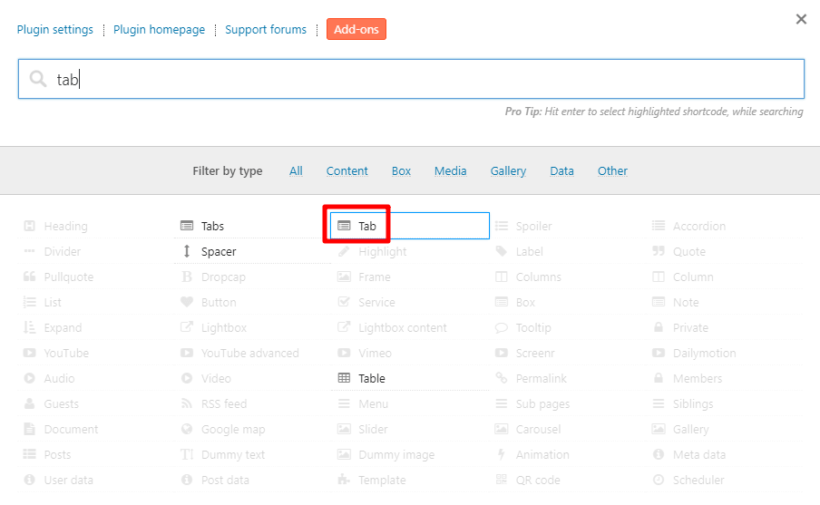
- Click on the new Insert shortcode button above the editor toolbar (or use a block if you're using the Gutenberg editor)
- Select the Tab option
- Enter “A” in the Title and Anchor
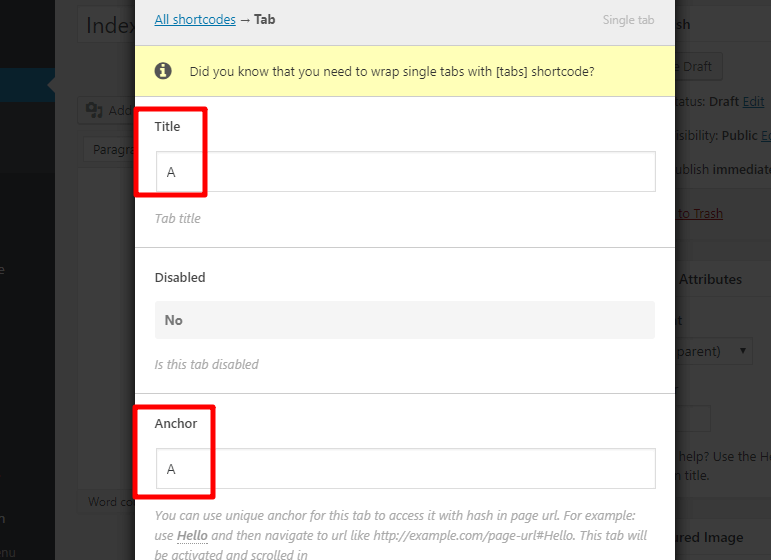
- Enter the Posts Table Pro shortcode in the Content box
- Click Insert Shortcode
- Repeat the process for each letter in the alphabet, making sure to change the letter in the Posts Table Pro shortcode each time to display the correct taxonomy term
Once you’ve added 26 shortcodes for all the letters in the alphabet (27 if you want to collectively include numbers 0-9 as a separate option), wrap the entire set of shortcodes in the [su_tabs] shortcode. You should have a separate [su_tab] shortcode for each letter of the alphabet, each containing a Posts Table Pro table.
If you get stuck, skip ahead. I've provided some sample shortcodes that you can copy and paste straight into your page.
Sample A-Z shortcode for you to copy
If the above seems a bit tricky, don't worry. Here's a set of sample shortcodes that you can use to get started. Just paste the entire group into your page, then replace 'alphabetical_letter' with the actual name of the taxonomy you're using to tag your posts with the correct letter":
[su_tabs]
[su_tab title="A"] [posts_table term="alphabetical_letter:a"] [/su_tab]
[su_tab title="B"] [posts_table term="alphabetical_letter:b"] [/su_tab]
[su_tab title="C"] [posts_table term="alphabetical_letter:c"] [/su_tab]
[su_tab title="D"] [posts_table term="alphabetical_letter:d"] [/su_tab]
[su_tab title="E"] [posts_table term="alphabetical_letter:e"] [/su_tab]
[su_tab title="F"] [posts_table term="alphabetical_letter:f"] [/su_tab]
[su_tab title="G"] [posts_table term="alphabetical_letter:g"] [/su_tab]
[su_tab title="H"] [posts_table term="alphabetical_letter:h"] [/su_tab]
[su_tab title="I"] [posts_table term="alphabetical_letter:i"] [/su_tab]
[su_tab title="J"] [posts_table term="alphabetical_letter:j"] [/su_tab]
[su_tab title="K"] [posts_table term="alphabetical_letter:k"] [/su_tab]
[su_tab title="L"] [posts_table term="alphabetical_letter:l"] [/su_tab]
[su_tab title="M"] [posts_table term="alphabetical_letter:m"] [/su_tab]
[su_tab title="N"] [posts_table term="alphabetical_letter:n"] [/su_tab]
[su_tab title="O"] [posts_table term="alphabetical_letter:o"] [/su_tab]
[su_tab title="P"] [posts_table term="alphabetical_letter:p"] [/su_tab]
[su_tab title="Q"] [posts_table term="alphabetical_letter:q"] [/su_tab]
[su_tab title="R"] [posts_table term="alphabetical_letter:r"] [/su_tab]
[su_tab title="S"] [posts_table term="alphabetical_letter:s"] [/su_tab]
[su_tab title="T"] [posts_table term="alphabetical_letter:t"] [/su_tab]
[su_tab title="U"] [posts_table term="alphabetical_letter:u"] [/su_tab]
[su_tab title="V"] [posts_table term="alphabetical_letter:v"] [/su_tab]
[su_tab title="W"] [posts_table term="alphabetical_letter:w"] [/su_tab]
[su_tab title="X"] [posts_table term="alphabetical_letter:x"] [/su_tab]
[su_tab title="Y"] [posts_table term="alphabetical_letter:y"] [/su_tab]
[su_tab title="Z"] [posts_table term="alphabetical_letter:z"] [/su_tab]
[/su_tabs]
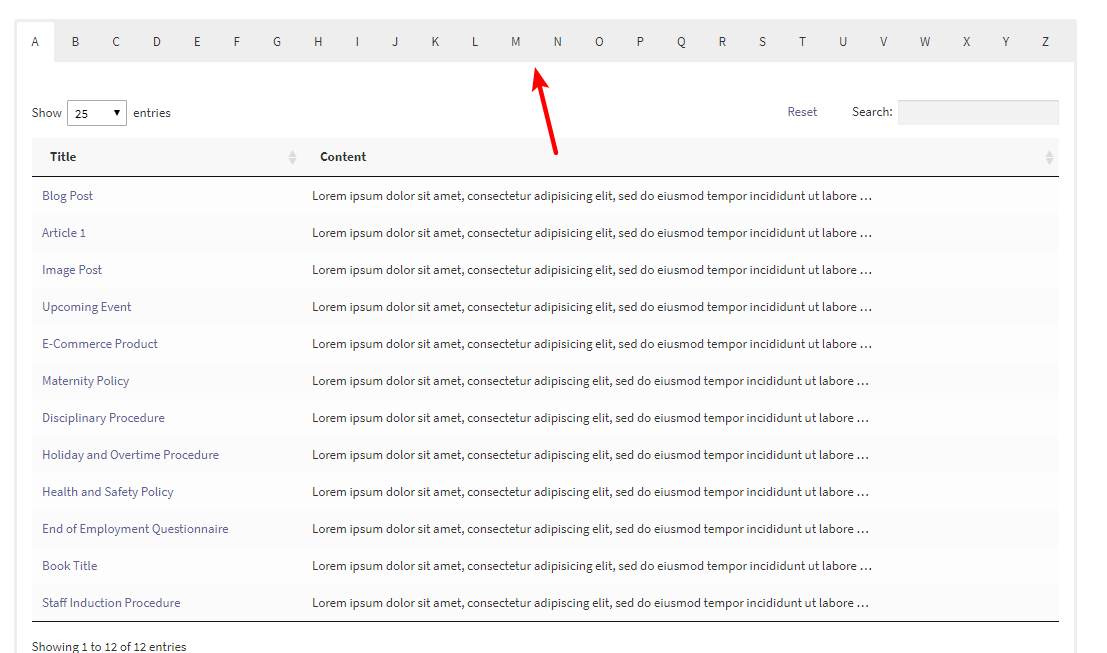
Enjoy your new WordPress alphabetical index
Now, if you Publish your page, you should be able to see your WordPress alphabetical index.
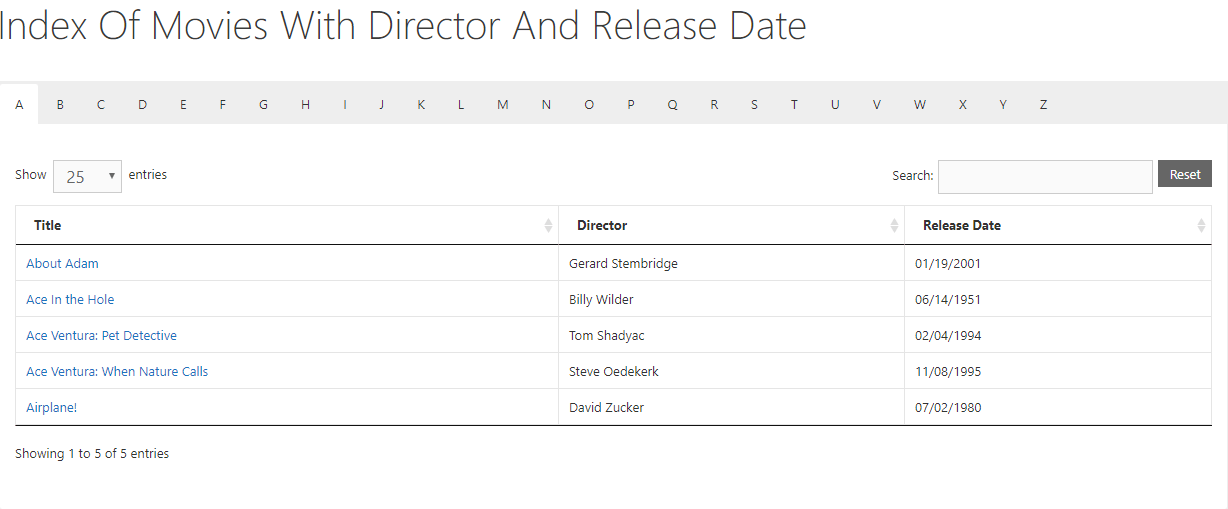
Here’s what my example looks like after adding a few more movies. I’ll use a GIF so that you can see how the alphabetization works:

If you want to remove the search, filter, and/or pagination options, you can add additional shortcode parameters to further customize how things look and function.
And if you want to enhance your index with more information, here’s a neat way to display extra information using custom fields...
Enhancing your WordPress alphabetical index with custom fields
Because Posts Table Pro can display custom fields, you can use custom fields to display additional information as a separate column in your index.
For example, in my alphabetical movie list, it might be helpful to include extra information for things like:
- Release Date
- Director
- Etc.
Here’s how to do it:
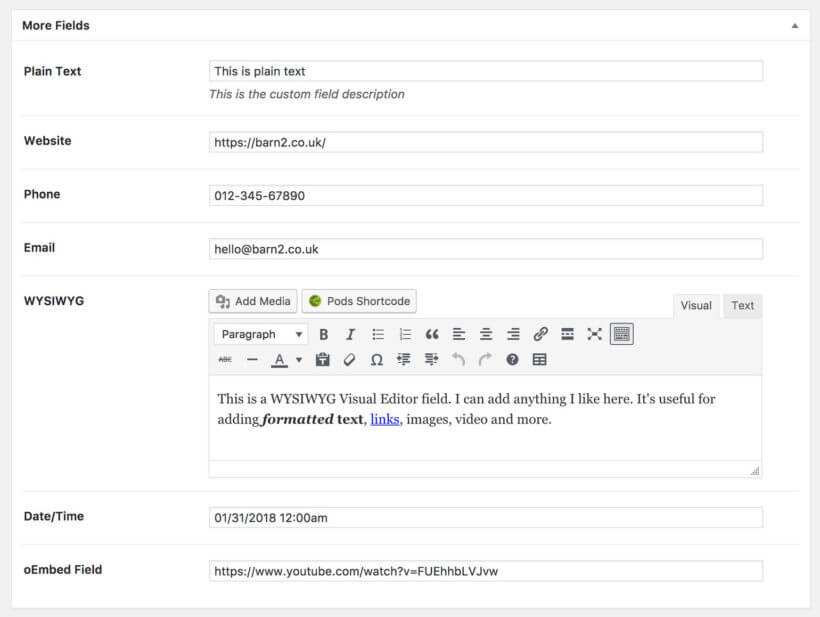
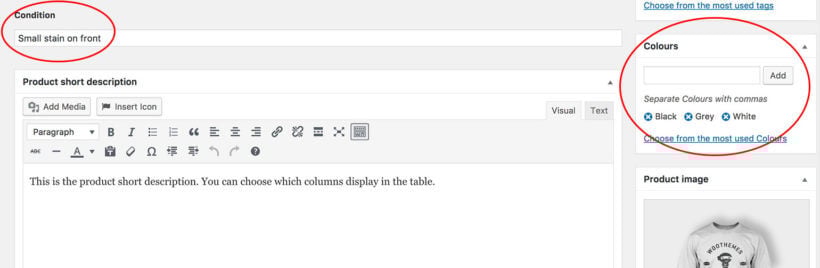
Step 1: Add custom fields using Easy Post Types and Fields plugin
To add custom fields to a custom post type, just edit that custom post type from the Post Types → Manage interface.
On the other hand, if you want to add custom fields to your regular WordPress posts, you’ll need to:
- Go to the Post Types page and click on the Custom Fields button for the respective ost type.
- Click on the Add New button on the Manage Custom Fields page.
- Give your custom field a name, slug, and type. The type can be a simple text or a visual editor.
- Click on the Add custom field button.

For example, here’s what it looks like after I’ve added a few custom fields: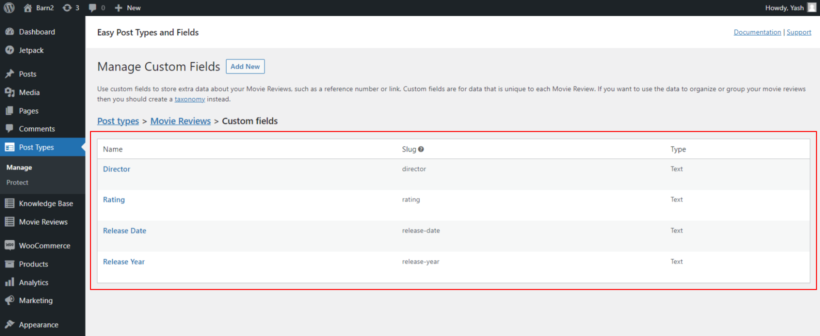
Once you save your changes, you’ll be able to add information directly to those fields if you go to the relevant post type: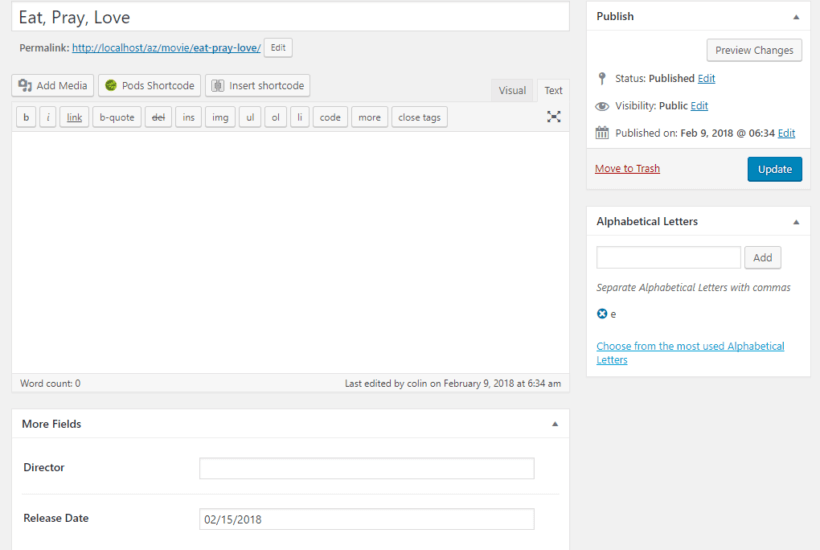
Step 2: Include custom fields as columns in Posts Table Pro
Now that you have your custom fields, all that’s left to do is include them as columns in your table. To do that, add a comma between each column you want to display.
You need to know the custom field name for this. You can find the field name in the Post Types → Manage interface:
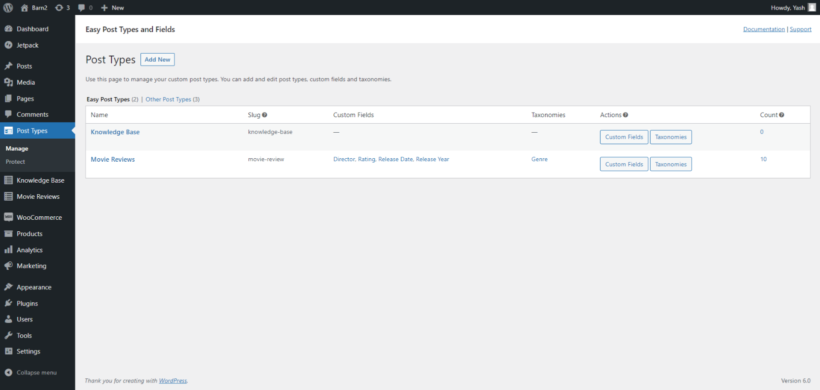
So to add columns for Director and Release Date to my example from before, I would go to Post Types → Tables and click to edit my table. On the columns page, I would click to add a custom field column and add the custom field name.
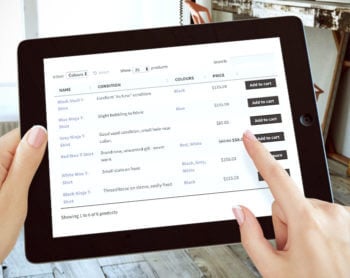
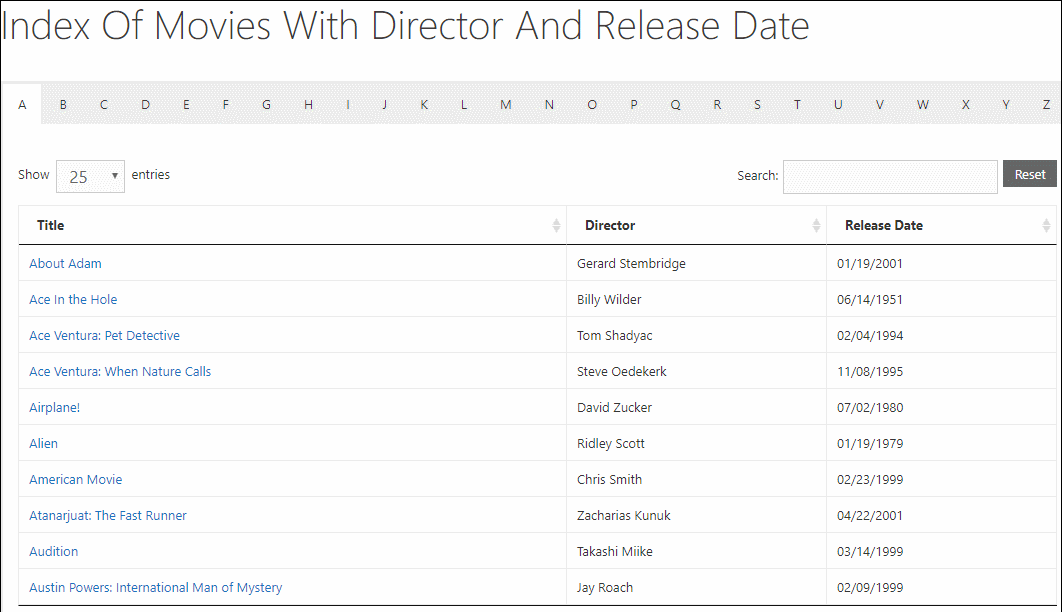
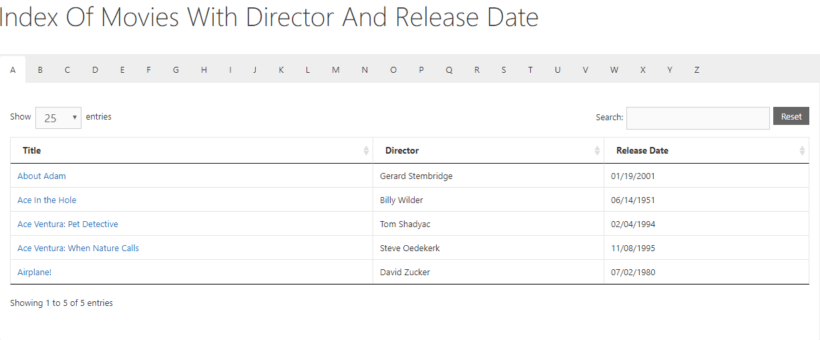
Put it all together, and my example alphabetical movie index looks like this:
You may also like: How to use a WordPress index plugin to list pages, posts or any custom post type.
Create a WordPress numerical index with tabs for numbers 0-9
So far, you've learned how to create an A-Z alphabetical index in WordPress. If you'd like to create a numerical index - for example with tabs for numbers 0-9 - then the instructions will work for that too.
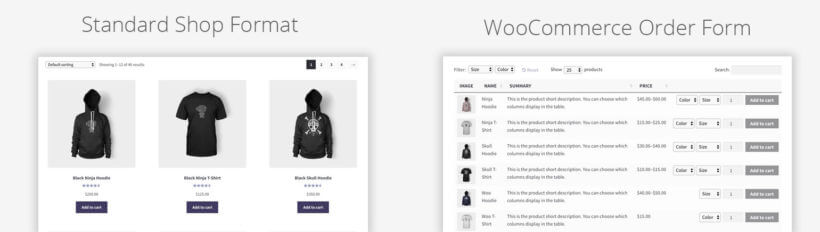
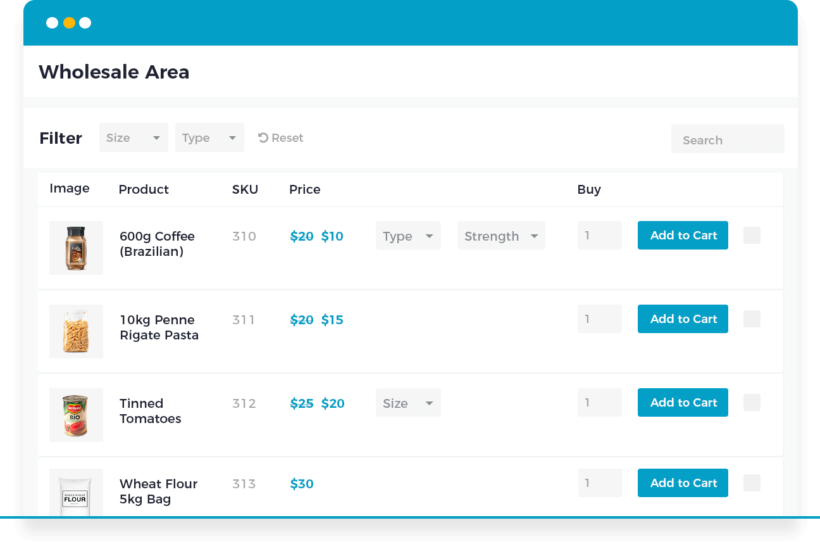
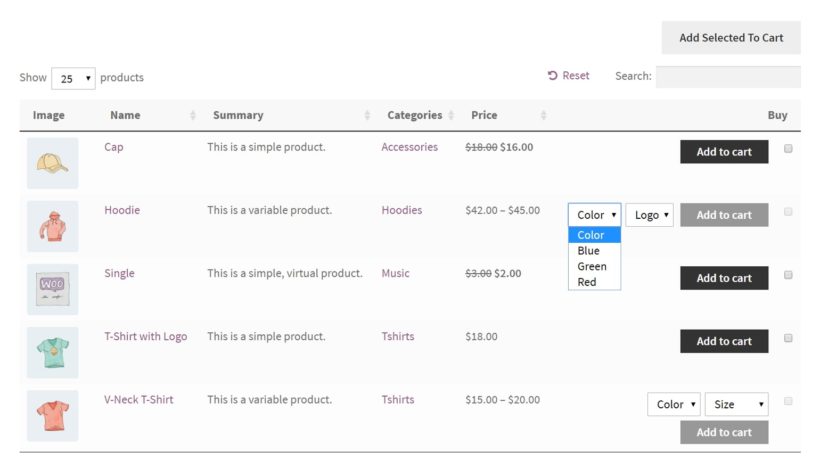
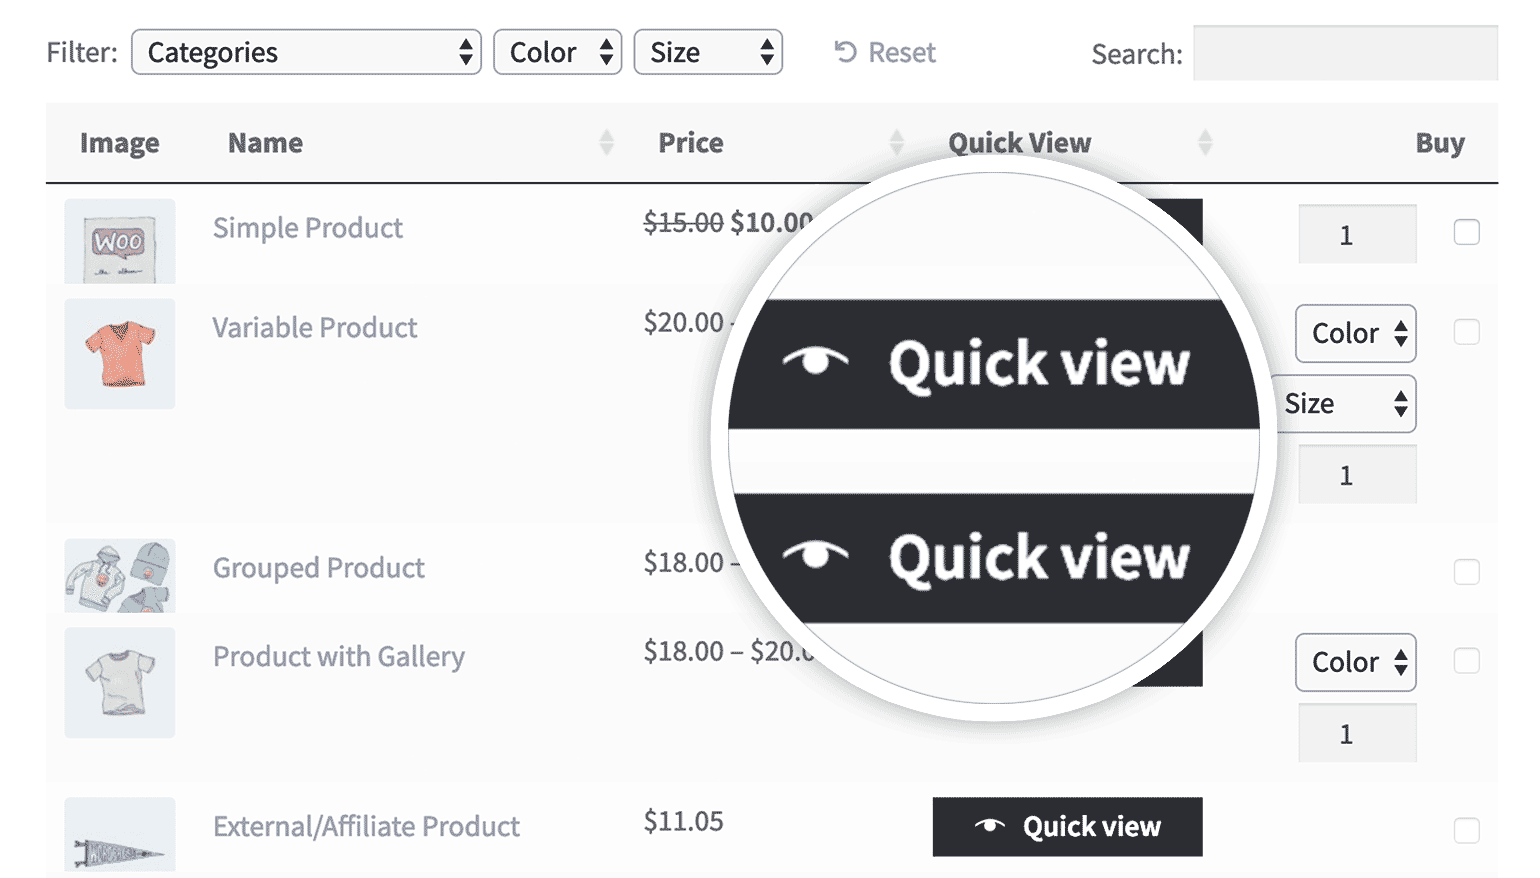
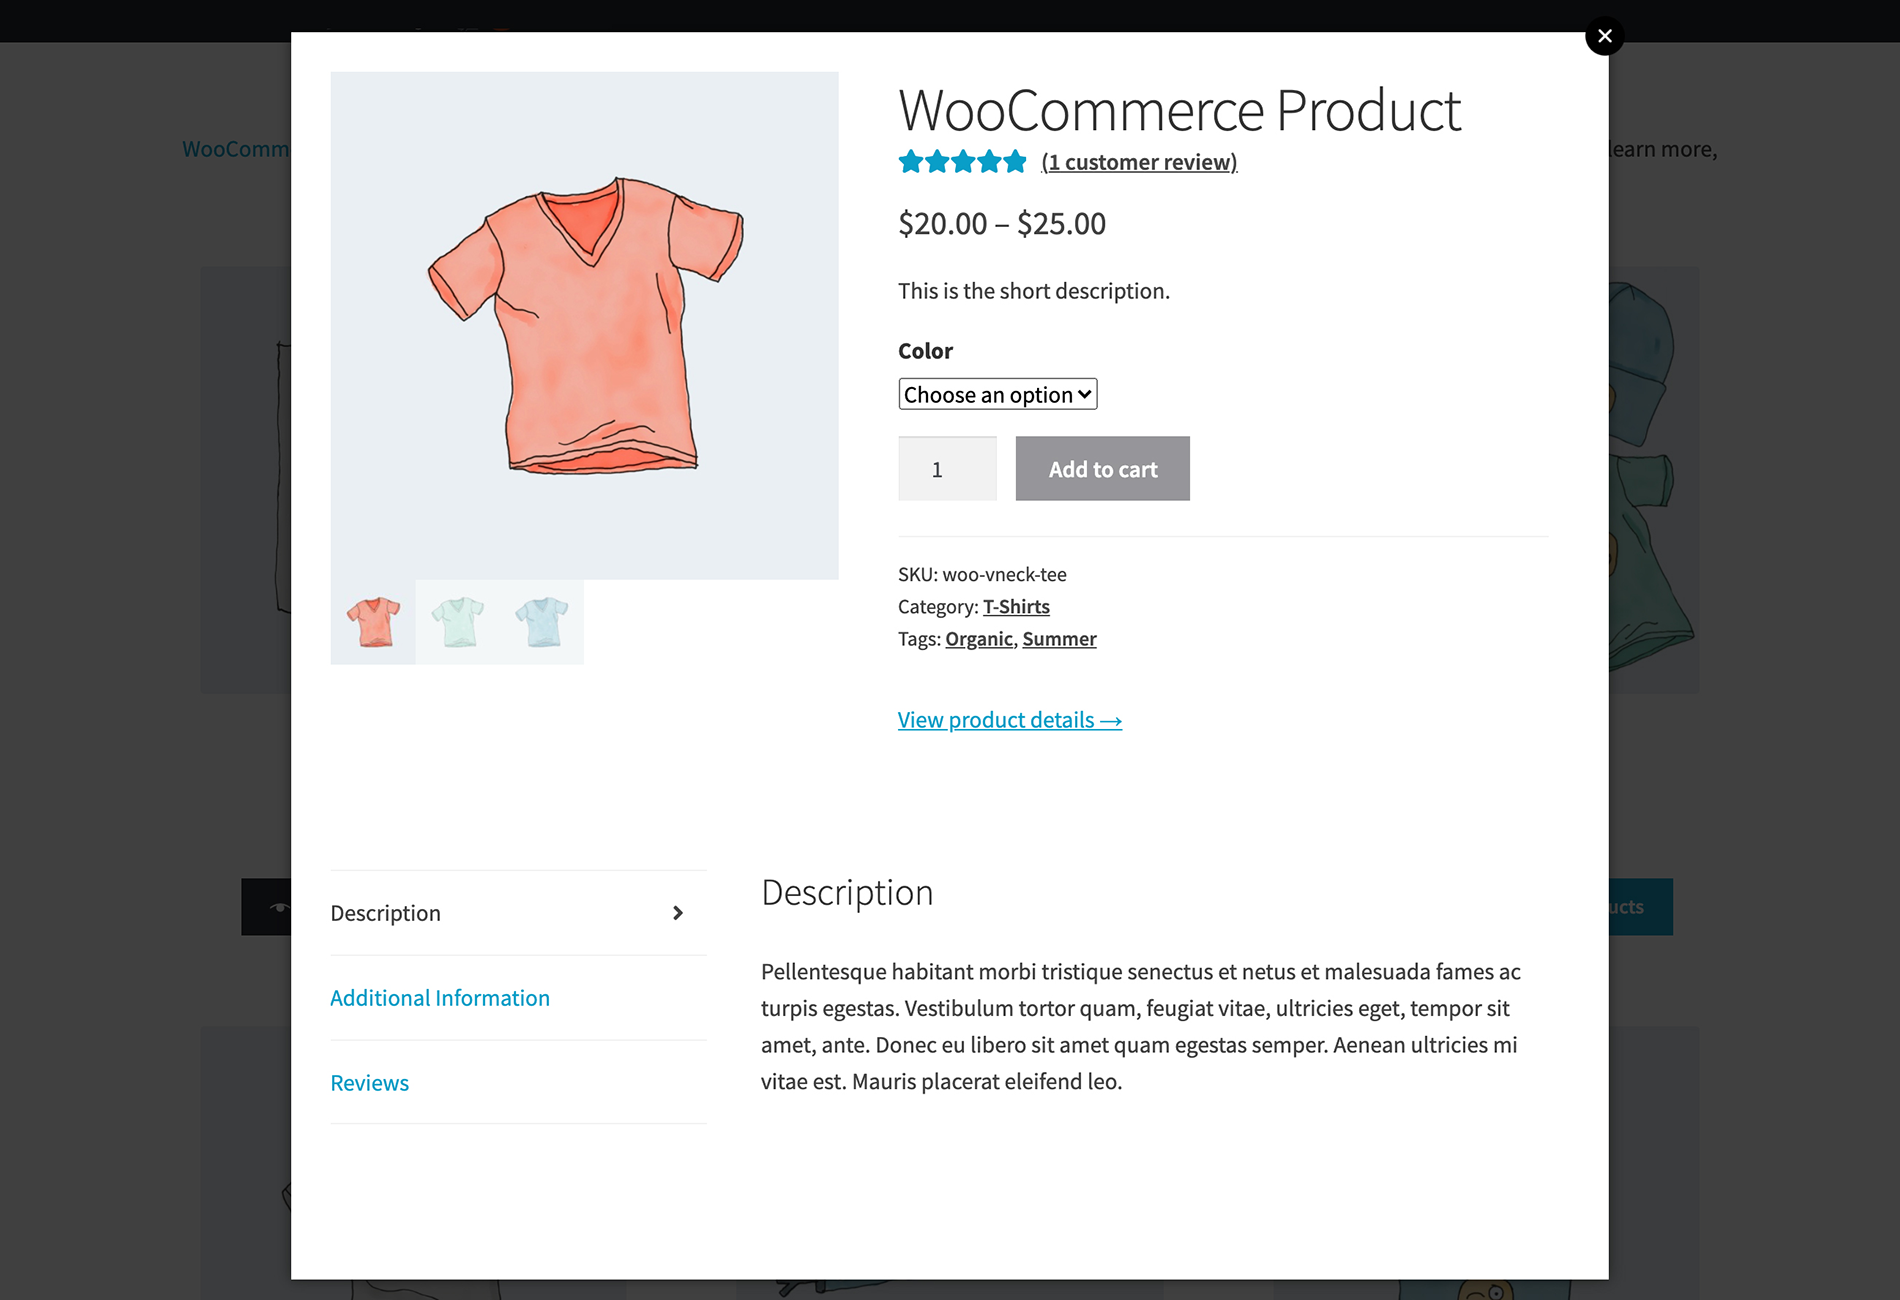
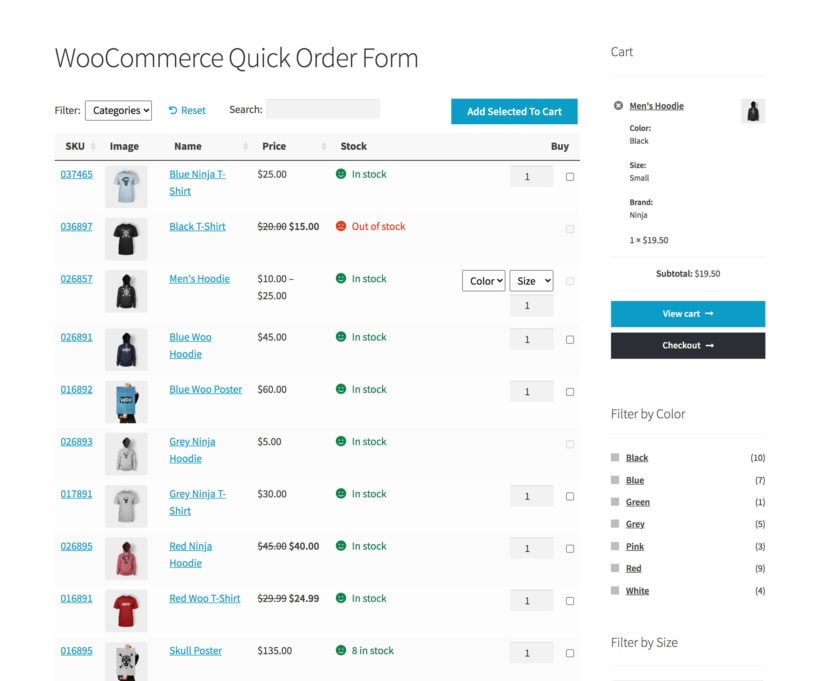
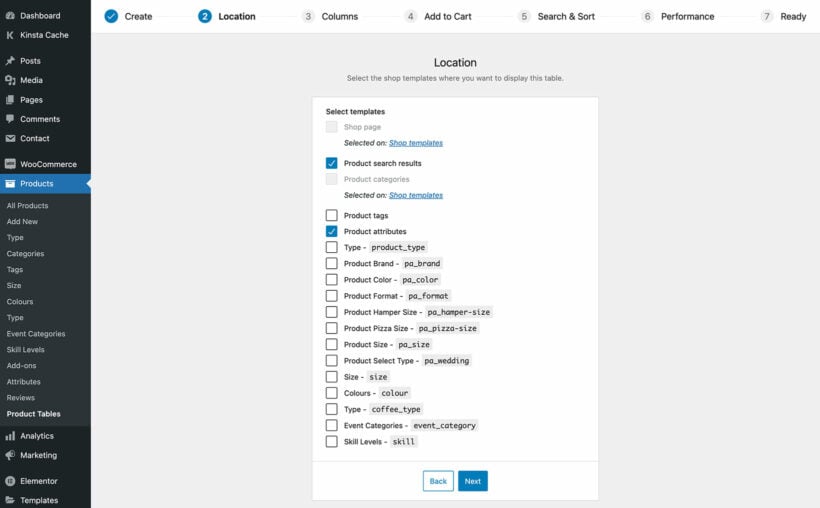
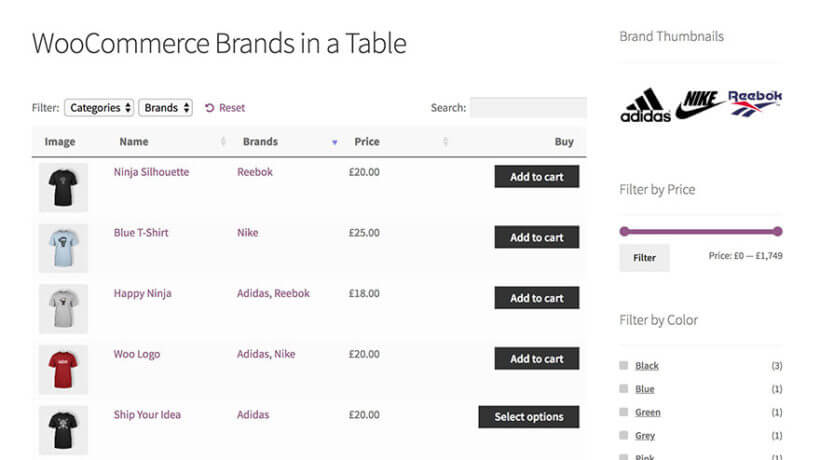
Creating An Alphabetical Index Of WooCommerce Products
All the steps that I’ve shown you in this article can be easily adapted to create a WordPress alphabetical index of WooCommerce products using our WooCommerce Product Table plugin.
Essentially, you’ll perform identical steps to everything I’ve discussed above but focus on the product post type that WooCommerce creates.
Here’s a quick summary of the steps that you’ll want to take:
- Use Easy Post Types and Fields to create a new Alphabetical Letter custom taxonomy that is associated with the Products post type
- Take the same code snippet from Step 4 and apply it to the product post type to programmatically add the product’s first letter to the Alphabetical Letter taxonomy that you created
- Use the WooCommerce Product Table shortcode to filter products by taxonomy and control what information is displayed
- Add the WooCommerce Product Table shortcode to tabs that you create with Shortcodes Ultimate
The advantage of using WooCommerce Product Table is that you'll be able to easily include product images, Buy buttons, and other ecommerce-focused information in your alphabetical product table.
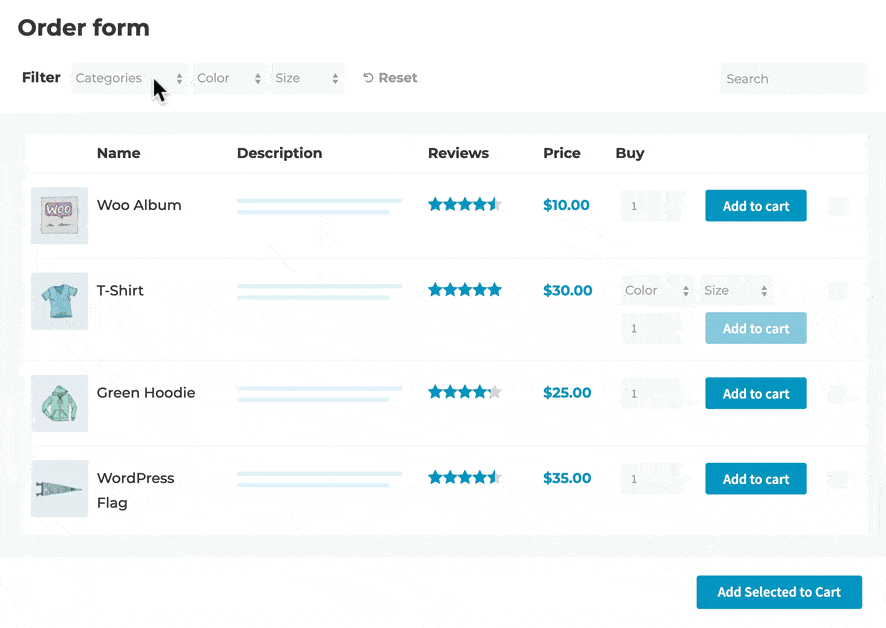
Posts Table Pro is your flexible WordPress A-Z plugin
If you want to create a flexible WordPress alphabetical index, Posts Table Pro gives you all the functionality that you need.
You'll be able to organize any type of content, including custom post types. And you'll also be able to manipulate your content's front-end display by choosing exactly what shows up in the index, including custom fields.
Remember - to create the alphabetical list like the example above, all you need is:
- Posts Table Pro (or WooCommerce Product Table if you want to create an alphabetical list of WooCommerce products)
- Easy Post Types and Fields to create the custom taxonomy and/or custom post type
- Shortcodes Ultimate to display everything in a tabbed A-Z list (or your theme's built-in options)
Have any further questions about how to create a WordPress alphabetical index? Leave us a comment and we'll try to help out!