How to enhance your WooCommerce products with ACF fields

In this detailed tutorial, I'll show you a quick and easy way to combine ACF and WooCommerce to add and display custom fields with extra data on your product and shop pages. The best part? You can have it all set up in less than 15 minutes.
I've seen a couple of variations of this question from Woo store owners:
- How can I add ACF custom fields to WooCommerce products?
- How to integrate Advanced Custom Fields with WooCommerce product pages?
- How can I use Advanced Custom Fields with WooCommerce for product personalization?
I get it! Sometimes, the standard WooCommerce fields aren't enough to add and display product data the way you want.
In this detailed tutorial, I'll show you how to add custom fields to WooCommerce pages. Don't worry - this is pretty beginner-friendly, so you won't need to add custom code snippets or mess with your site's CSS, HTML and functions.php files. Here's what we'll need:
- Advanced Custom Fields (ACF): A plugin that creates custom fields in your ecommerce site's backend.
- WooCommerce Product Table: A plugin that displays custom product fields on your site's front end.
But first, let's begin with a quick refresher on custom fields and their benefits.
What are custom fields in WooCommerce?
Custom fields in WooCommerce are additional data fields that extend beyond the default product information. These fields allow store owners to add extra product details to products, orders, checkout pages, or other store elements.
Custom fields enable you to provide specific product information that standard WooCommerce options cannot accommodate. They appear alongside standard product data like price and description.
Common uses for WooCommerce custom fields include:
- Adding extra product specifications and details.
- Creating updateable marketing notifications.
- Displaying dates for countdowns, launches, or auctions.
- Providing product usage instructions.
- Embedding additional videos or media.
A quick note: People sometimes refer to custom fields as fields which customers fill in. That's not what this post is about. Here, we'll look at how to add static text fields to the product detail and shop pages in WooCommerce. If you want to add fields customers can fill, then check out WooCommerce Product Options instead.
What is the value of custom fields for your WooCommerce store?
Studies by Salsify (2024) reveal that 87% of shoppers rate product content as extremely important when making purchase decisions. Additionally, 50% of consumers have returned items bought online due to inaccurate product descriptions.
Stores that implement custom fields typically experience measurable improvements in several key areas:
- Enhanced product information: Custom fields provide additional product specifications beyond standard details. You can include fields for size, color, material, or other relevant attributes.
- Tailored product pages: Different products require different information sets. Custom fields enable personalization of product detail pages. Clothing stores add size options and fabric composition fields. Electronics retailers include technical specifications like processor speed or screen resolution.
- Better user experience (UX): Custom fields create a more user-friendly shopping experience. Buyers find information like product dimensions or variations without searching through lengthy descriptions.
- Improved SEO rankings: Custom fields help optimize product pages for search engines. Organic skincare stores include keywords like "natural", "organic", and "cruelty-free" in product descriptions using custom fields. Adding detailed specifications and custom attributes also gives search engines more structured product data to work with. Google's product structured data guidelines show how rich, well-organized product details can earn enhanced search listings with prices, availability, and review ratings, helping your pages stand out and attract more clicks.
- Better product management: Custom fields provide flexibility in managing product catalogs. They enable quick addition, editing, or removal of product data for large inventories.
Custom fields vs. custom taxonomies
Custom fields and taxonomies serve different organizational purposes in WooCommerce. Understanding their distinction helps optimize your product structure.
Custom fields are additional data fields attached to individual products. They provide specific details, attributes, or extra product information. Custom fields for clothing products include:
- Sizes: Small, medium, large, extra large.
- Color options: Red, blue, green, purple.
- Materials: Cotton, leather, rayon.
Custom taxonomies are classification systems that group products based on specific criteria. They enable customers to browse products through predefined categories. Custom taxonomies for bookstores include:
- Genres: Fiction, non-fiction, science fiction, mystery
- Author name: Mark Manson, Jonas Jonasson, Sophie Kinsella
- Publish year: 2022, 2023, 2024
How can I add ACF custom fields to WooCommerce products?
Advanced Custom Fields (ACF) is a WordPress plugin with over 2 million active installations. ACF provides a user-friendly interface for creating custom fields on WooCommerce product pages.
The plugin offers multiple field types including text, select, checkbox, and image fields. These field types capture and display various information kinds.
ACF includes features like repeater fields for adding sub-fields. Field groups organize custom fields and assign them to specific post types.
How to create custom product fields in WooCommerce using ACF
Creating custom fields in WooCommerce using ACF follows a straightforward process. Here's the complete method:
1: Install and activate the Advanced Custom Fields (ACF) plugin
ACF offers two versions: free ACF and ACF Pro with additional features:
ACF Free vs ACF Pro Comparison
| Feature | ACF Free | ACF Pro |
|---|---|---|
| Basic field types | ✅ Text, Textarea, Number, Email, URL | ✅ All free fields included |
| Advanced field types | ❌ Not available | ✅ Repeater, Flexible Content, Gallery, Clone |
| Options pages | ❌ Not available | ✅ Create custom options pages |
| Blocks for Gutenberg | ❌ Not available | ✅ Create custom blocks |
| Support | Community forums only | Priority email support |
| Price | Free | $49/year (personal license) |
This tutorial uses the free version.
2: Create a new field group
- Download the free plugin from the ACF website.
- Access your WordPress dashboard and navigate to Plugins → Add New Plugin.
- Upload the plugin zip file and click Activate.
- In your WordPress admin dashboard, go to ACF → Field Groups.

- Click "Add New" from the top of the page to create a field group.
- Give your field group a name, for example, "Product Details."
3: Add a custom field
- In the new field group, click on the Add Field button.
- Choose the field type based on the information you want to collect (e.g., "text area" for text input).

- Enter a field label, which is the name of your new custom field shown on the "Edit" page, e.g., "Strength" or "Region".
- The plugin generates the field name based on your entered field label. You can edit it or use it as is.
- Configure additional settings (like default value, layout, etc.) as needed.
- Repeat this process to add more field groups.
4: Assign the field group to products
- Scroll down to the "Location rules" section to specify where the custom field should appear.
- Choose the following options from the dropdown menus: "Post Type," "Is equal to," and "And product."
- Scroll back up and click the "Save changes" button to save your field group.
5: Assign the custom field group to specific products
- Go to Products → All Products within your WordPress admin and open the edit screen for each product.

- Open the "Edit product" page for the product to which you wish to add custom fields.
- The custom field you added using ACF appears in the product data section.
- Enter values into the custom fields, then save the product.
Following these steps successfully adds custom fields to WooCommerce product pages using the Advanced Custom Fields plugin.
Displaying ACF custom fields with WooCommerce Product Table
ACF creates custom fields on the backend. The custom field data requires additional configuration to become visible to customers on the front end.
WooCommerce Product Table is a lightweight plugin that displays products with custom fields in user-friendly tables. The plugin showcases ACF fields in two front-end locations:
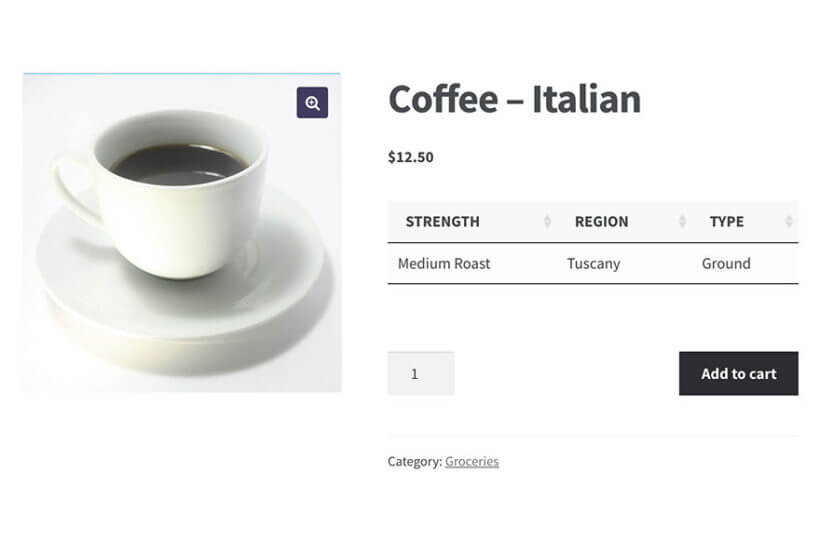
- As a table on individual product pages (see image).
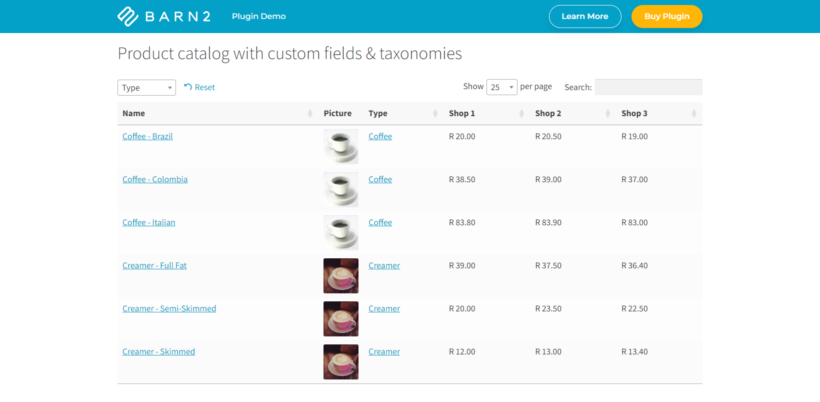
- As columns in product tables on shop, category, and listing pages (see image).
- As filtered tables showing products with specific custom field values. For example, tables displaying only products with 'January' in a 'Month' ACF field.
Keep reading to learn how to implement all three display methods.
How to display ACF custom fields on the product page
Step 1: Add WooCommerce Product Table to your site
- Get the WooCommerce Product Table plugin and download its files to your computer.
- Go into your WordPress admin area and navigate to Plugins → Add New → Upload Plugin.
- Upload the plugin's zip file from your computer.
- Select Install Now → Activate.
Step 2: Create your first product table
- The table builder launches upon plugin activation. Re-launch it later via Products → Product Tables → Add New.
- Configure the table for displaying on product pages. Pay attention to these settings:
- Select products - Choose 'Individual products' and select the product displaying ACF custom fields.
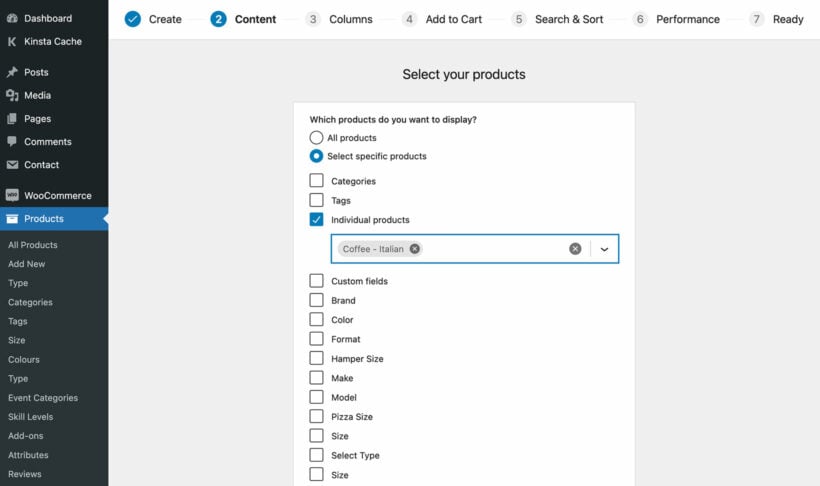
- Columns - Add desired columns to the table. For custom field tables, select only the custom fields. All ACF custom fields appear in the column list. Select each one and rename columns using the pencil icon. This example shows an ACF 'Reference' custom field column:

- Select products - Choose 'Individual products' and select the product displaying ACF custom fields.
- The final page provides a shortcode for inserting the table. Copy this shortcode.
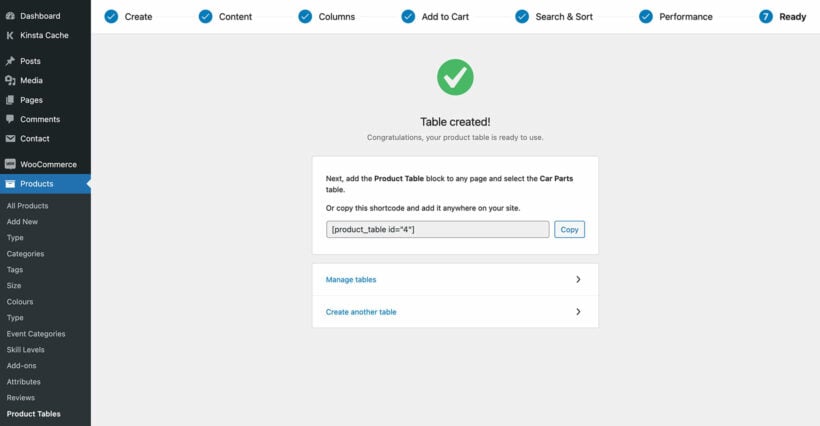
- Navigate to Products → Product Tables → Settings and hide unnecessary elements like search boxes and pagination. These default elements aren't relevant for displaying custom fields on product pages.
Step 3: Add the table to the single product page
- Go to the 'Products' section in the WordPress admin and click 'Edit' for the selected product.
- Paste the shortcode into the short description field.
Here's how ACF custom fields appear on WooCommerce product pages. This table displays 3 custom fields for the coffee product in separate columns:
Step 4: Add the table to more products
The process above adds ACF fields to one product page. Two methods exist for adding tables to multiple products:
- Method 1 - Duplicate the table:
- Go to Products → Product Tables.
- Hover over the existing table.
- Click 'Duplicate'.
- Edit the cloned table and change the target product.
- Paste the new table's shortcode (from Products → Product Tables) into the relevant product's short description.
- Method 2 - Add the table programmatically: This method automatically inserts the product table shortcode into the single product page template. This developer-level task uses a code snippet that dynamically adds the current product's ID.
Display ACF custom fields on the shop, category, and other WooCommerce template pages
WooCommerce Product Table displays custom fields on main shop pages. The product table lists multiple products with custom field columns. This shop page example includes custom fields for Shop 1, Shop 2, and Shop 3:
Setup instructions:
- Create a product table at Products → Product Tables → Add New.
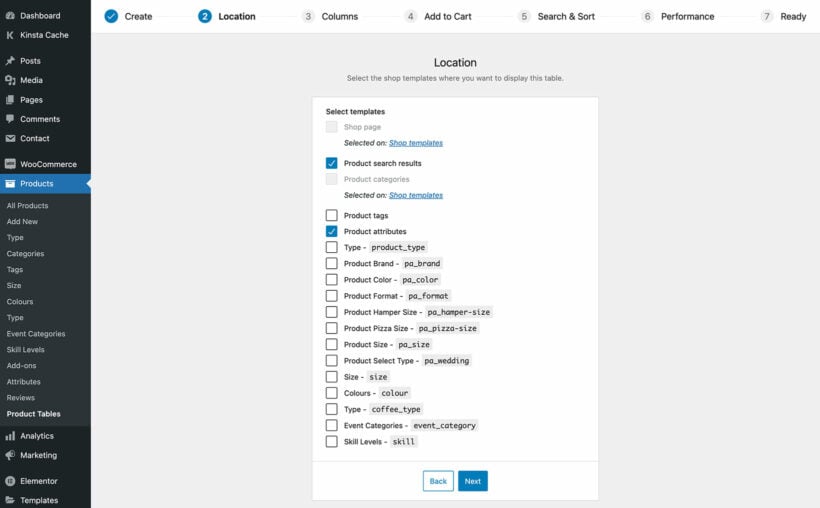
- Choose "Display on a shop page" on the first page.

- Select shop page templates for displaying the ACF custom field table:
- Use the 'Columns' page to add all desired columns, including custom field columns:
- Configure remaining product page settings as needed.
Preview the product table with custom fields on your shop and category pages.
Custom field display methods comparison
| Display method | Best for | Setup complexity | Performance impact |
|---|---|---|---|
| Individual product page | Detailed product specifications | Simple (5 minutes) | Minimal |
| Shop/category pages | Product comparison and browsing | Simple (5 minutes) | Low to moderate |
| Filtered tables | Seasonal products, special collections | Moderate (10 minutes) | Low |
| Programmatic display | Large catalogs, automated updates | Advanced (requires developer) | Minimal |
List products with a specific ACF custom field value
Create tables listing only products with specific ACF field values. For example, display products with 'January' saved in the 'Month' ACF custom field:
- Create a product table via Products → Product Tables → Add New.
- Choose the option to add the table manually.
- On the 'Select products' page, select the custom field from the list or choose 'Custom fields' and enter the field name plus the exact value. Find these in Advanced Custom Field settings at ACF → Field Groups:

- Select columns and configure additional options.
- Paste the shortcode from the final page onto your desired display page.
Show ACF fields on your WooCommerce product and shop pages today!
The simplest method to implement custom fields uses two plugins:
- Advanced Custom Fields (ACF): Creates custom fields in your site's backend.
- WooCommerce Product Table: Displays custom product fields on product pages and shop/category pages.
Set them up today, and start displaying better product data to your customers.