magnifying glass on a tutorial page

Discover everything you need to know about WooCommerce product variations. Learn how to set them up, manage them more easily, and maximize your sales of variable products.

WooCommerce product variations let online store owners sell items with multiple choices for the customer to select from. For example, you can use variations to sell t-shirts in different colors, pizza in different sizes, or subscription boxes with different capacities. This way, customers can choose whichever version or variation of the product they want.

In this ultimate guide to creating and using WooCommerce variations, we’ll explain what product variations are and how to use the product variations that come with WooCommerce. We’ll also share some fantastic plugins you can use to display your WooCommerce product variations in more effective ways, manage them easily, and ultimately sell more of each variation:

  1. WooCommerce Bulk Variations - Bulk edit variations on the Edit Product screen; and display them in a quick order form on your product pages.
  2. Setary - Add and edit variations across your entire store from a single bulk editing spreadsheet.
  3. WooCommerce Product Options - Display variations in more interesting ways, for example as checkboxes, radio buttons and clickable images.
  4. WooCommerce Product Filters - Let customers find products by filtering for their chosen variation attributes.
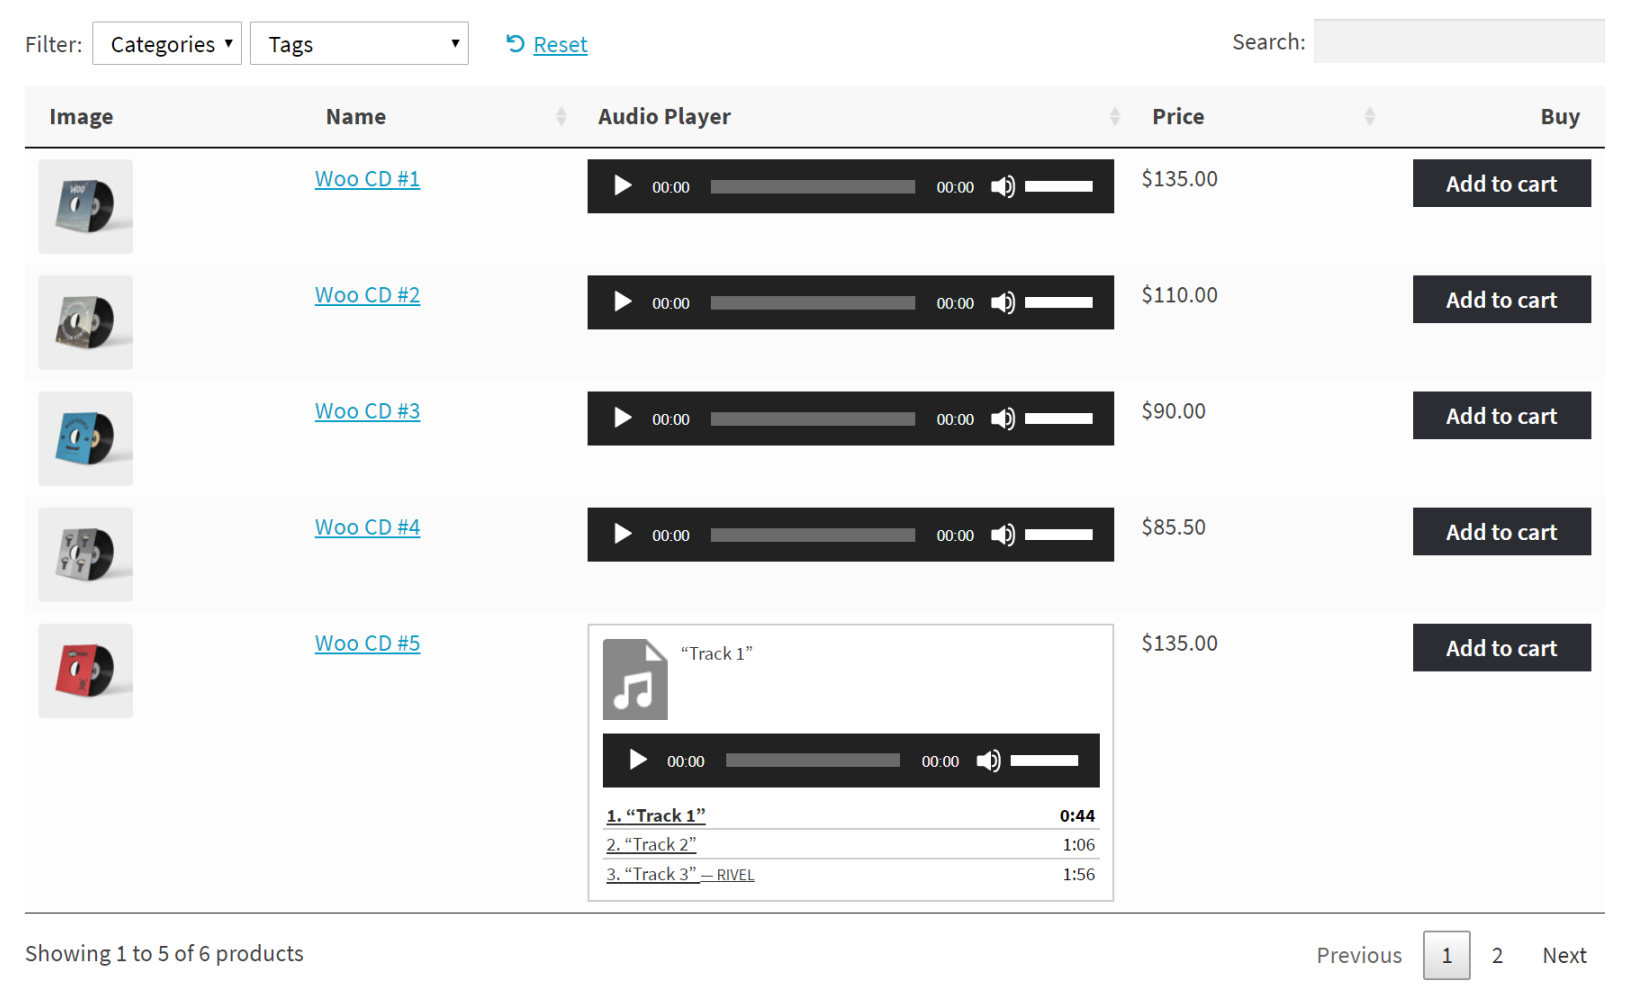
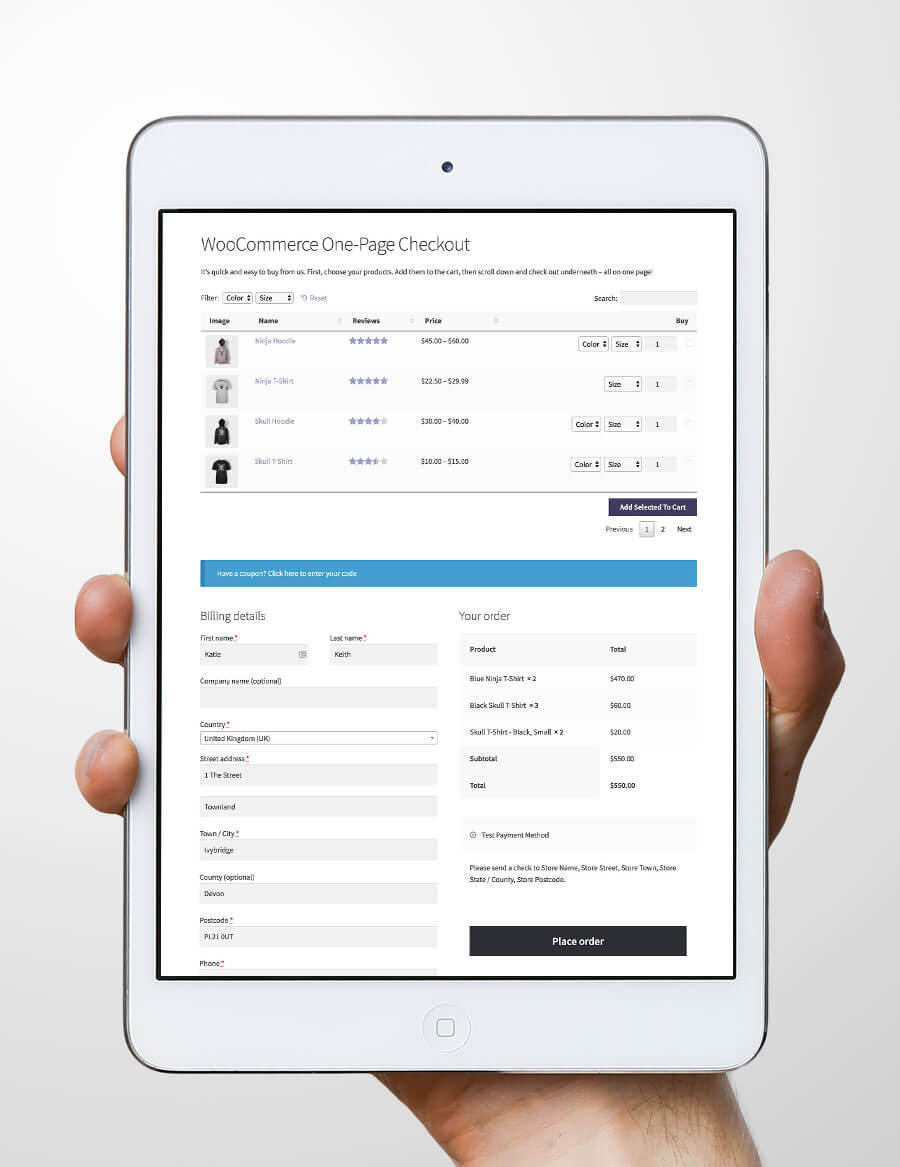
  5. Product Table - List products in a one-page order form, so that customers can quickly select variations and add to the cart.
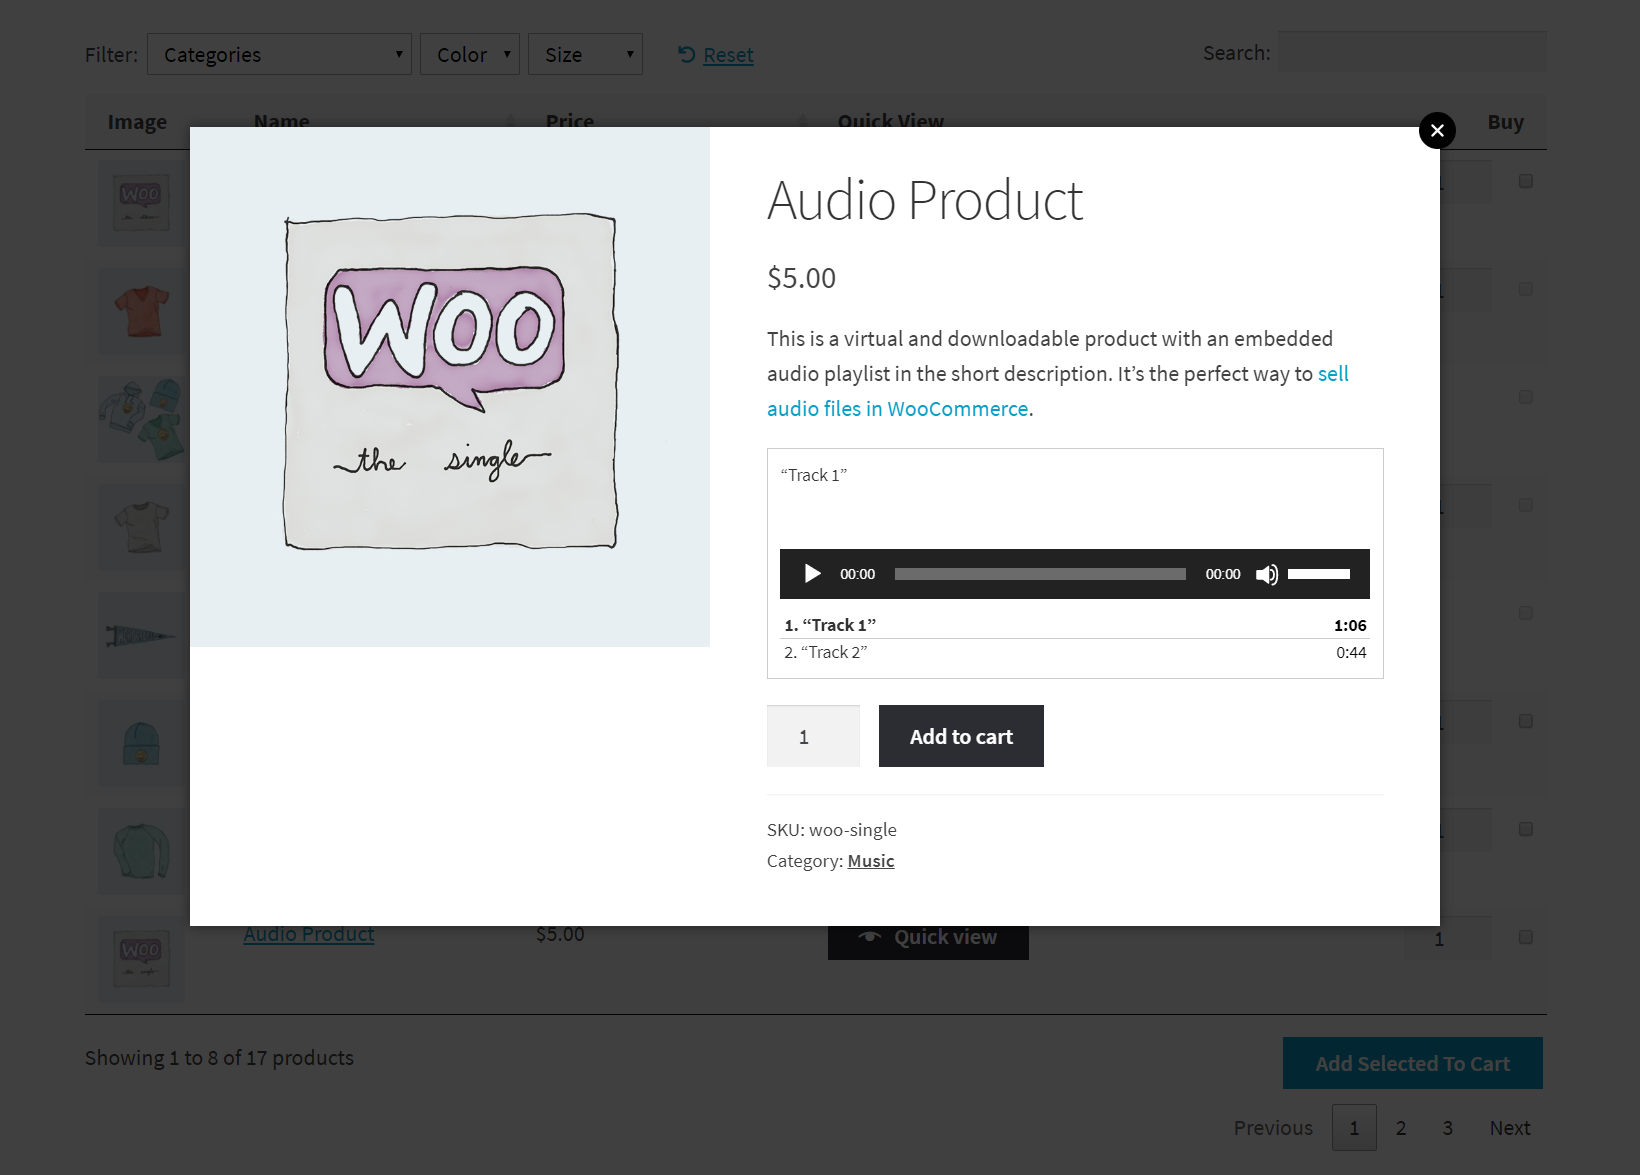
  6. WooCommerce Quick View - Sell variations from a quick view lightbox.
  7. WooCommerce Variation Prices - Take control over how variation prices are displayed.

What are WooCommerce product variations?

Most online stores sell at least a few products that are available in different variations. For example:

Product with variations
  • Apparel that comes in different colors or sizes (like t-shirts, trousers, or shoes).
  • Food items that have different sizes (for example coffee cup sizes or pizza base diameters).
  • Subscription boxes or build-your-own products that are available in different sizes (for example small, medium, and large).

As an online store owner, you should use WooCommerce product variations when selling products that have different choices you want to let customers select from. For example, if you were Starbucks, you would offer coffee cup sizes (Short, Tall, Grande, Venti Hot, Venti Cold, and Trenta) as variations.

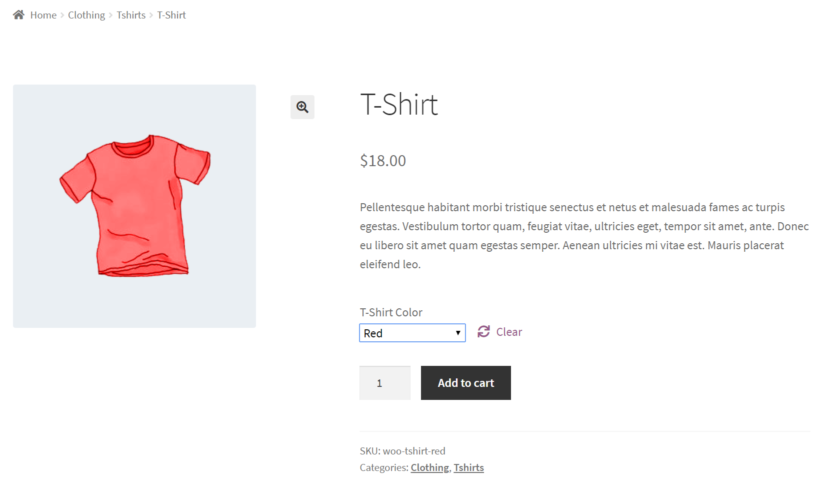
Out of the box, the free WooCommerce plugin lets you add as many “options” (i.e. variations) as you’d like to each WooCommerce product. Customers can select the variation they’d like to purchase from the single product page and add it to their cart.

Further reading: How To Bulk Edit Prices of Variable Products

How to create and manage variations using WooCommerce

In WooCommerce, the product variations feature comprises of two aspects – attributes and variations.

  • Attributes. These are product descriptors like color, size, material, and capacity.
  • Variations. These are the variants available for each attribute. For example, the color attribute might have Red, Blue, and Gray variations or the size attribute might have Small, Medium, and Large variations for customers to choose from.

Here, we’ll show you how to create and manage variations using WooCommerce.

Step 1: Create attributes

To create WooCommerce product variations, you need to first create attributes and then create variations for each attribute.

Attributes in WooCommerce

Here’s how:

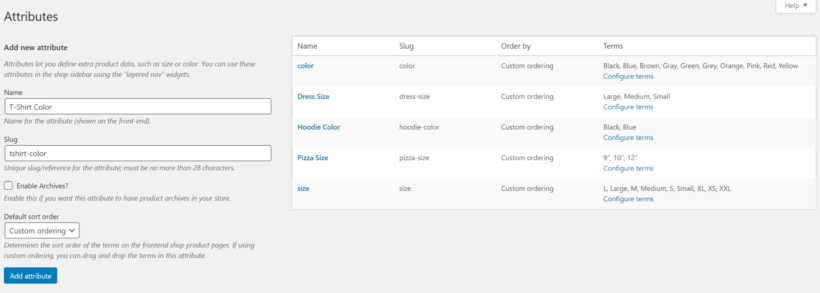
  1. Navigate to Products → Attributes from the WordPress admin panel.
  2. Enter a name and slug for the attribute and click the Add attribute button.
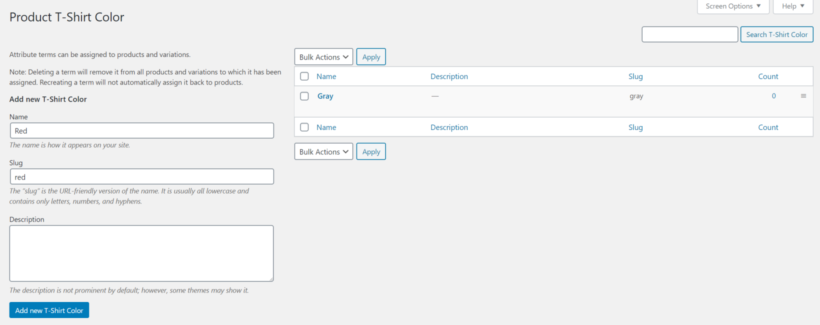
  3. Click the Configure terms link from the list of attributes on the right.
  4. Add as many values as you’d like for the attribute.
Configure terms

Step 2: Assign attributes to WooCommerce products

By now, we’ve created attributes for the product variations we want to offer through the online store. Next, we’ll set products up as variable products (i.e. products that have variations) and assign attributes to them.

WooCommerce product data section
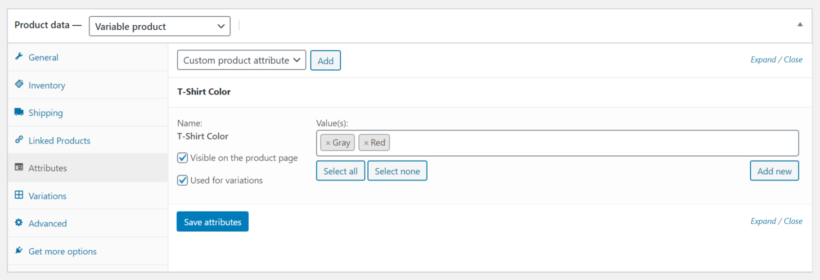
  1. Open up a WooCommerce product that you’d like to add variations to and scroll down to the Product data section.
  2. Select the Variable product option using the dropdown.
  3. Click on the Attributes tab and use the dropdown to select the attribute you’d like to assign to this product. Click Add.
  4. Choose all the values that apply to the product.
  5. Tick the checkboxes next to the Visible on the product page and Used for variations settings.
  6. Click the Save attributes button to proceed.

Step 3: Add WooCommerce variations to products

The final step is to add WooCommerce variations to the product. These will be the product variations that appear on your site’s front-end.

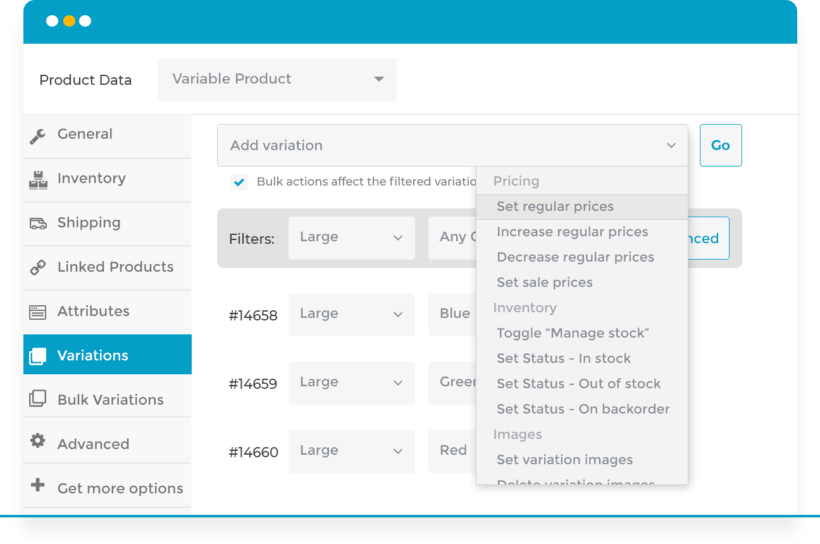
  1. Go to the Variations tab, use the dropdown to select the Add variation option, and click on the Go button.
  2. Select whichever attribute values apply to the product.
  3. Customize the settings for each variation you created. You can:
    1. Upload a separate image for each variation.
    2. Set the product SKU, regular price, sale price, and stock status.
    3. Set the weight and dimensions of the product.
  4. Click the Save changes button.

Repeat these steps to add as many WooCommerce product variations as you’d like.

How to add variations in bulk

The above steps let you add each variation individually. But what if you want to add lots of variations at once? It would take forever to do it individually for each one.

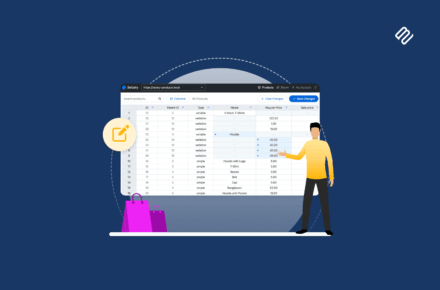
To save time, you can install the WooCommerce Bulk Variations plugin. This adds the following features to let you add and edit variations more easily:

  • A set of filters which you can use to narrow down the list of variations. You can then use the bulk actions dropdown (which appears above the filters bar) to apply the same changes to all the filtered variations. For example, you could filter for all the variations with a 'Large' attribute and set the price of them all together.
  • An extra option letting you set variation images in bulk. For example, if all your variations with a particular color attribute need the same image, then you can set the images together. This is much faster than setting images for each variation individually.

WooCommerce Bulk variations manager plugin

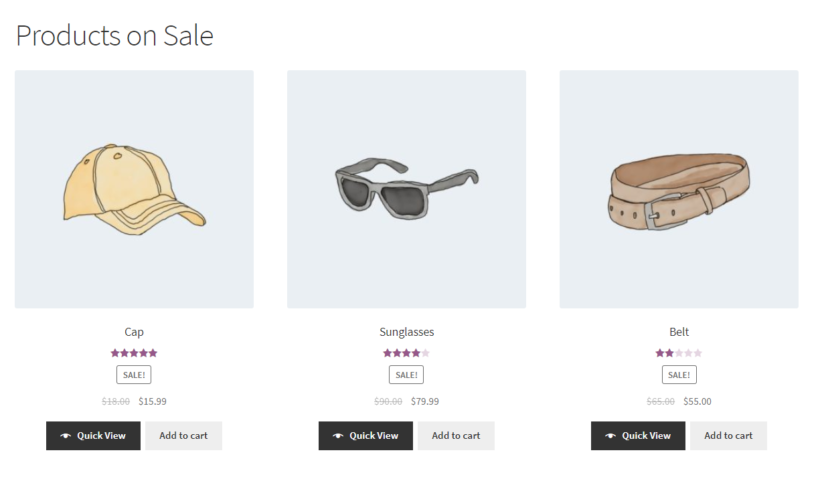
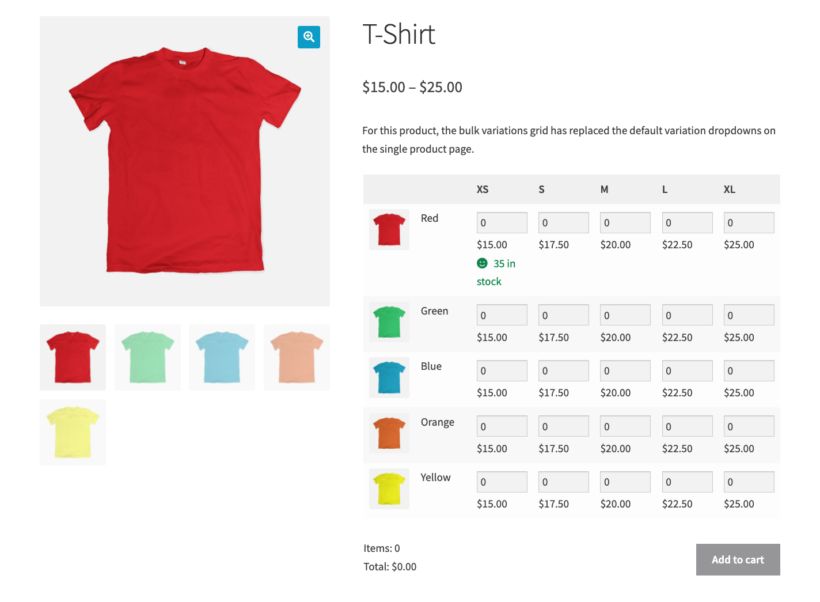
Once you've finished setting up the product variations, click the Save changes button. It will look something like this on your site’s front-end:

Front-end preview of WooCommerce product variation

Create quick variation order forms

We've already seen how to use the WooCommerce Bulk Variations plugin to add and edit variations in bulk. But that's not its main feature!

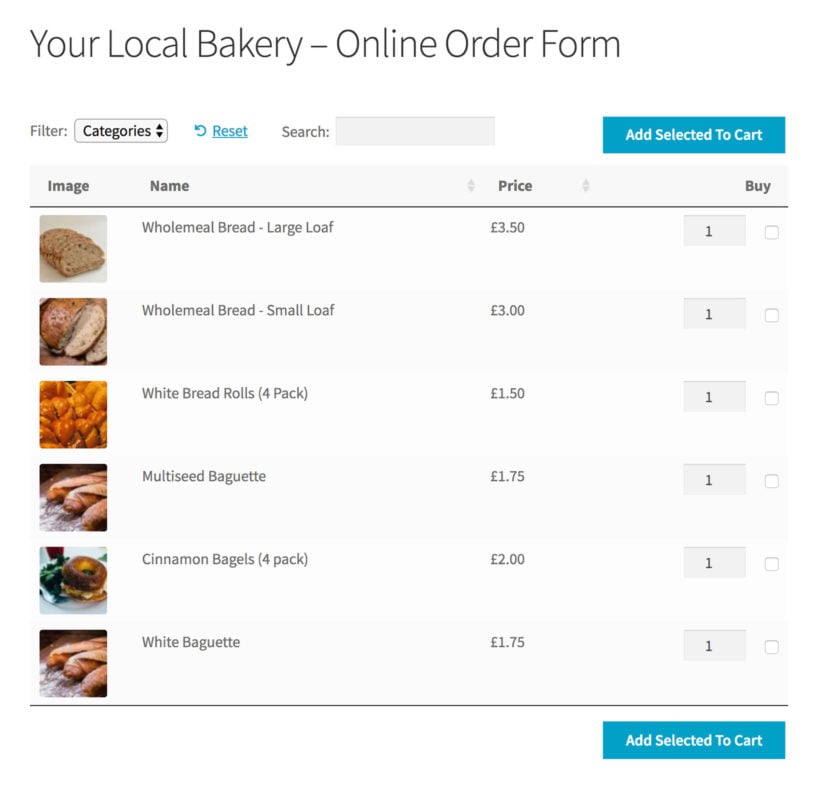
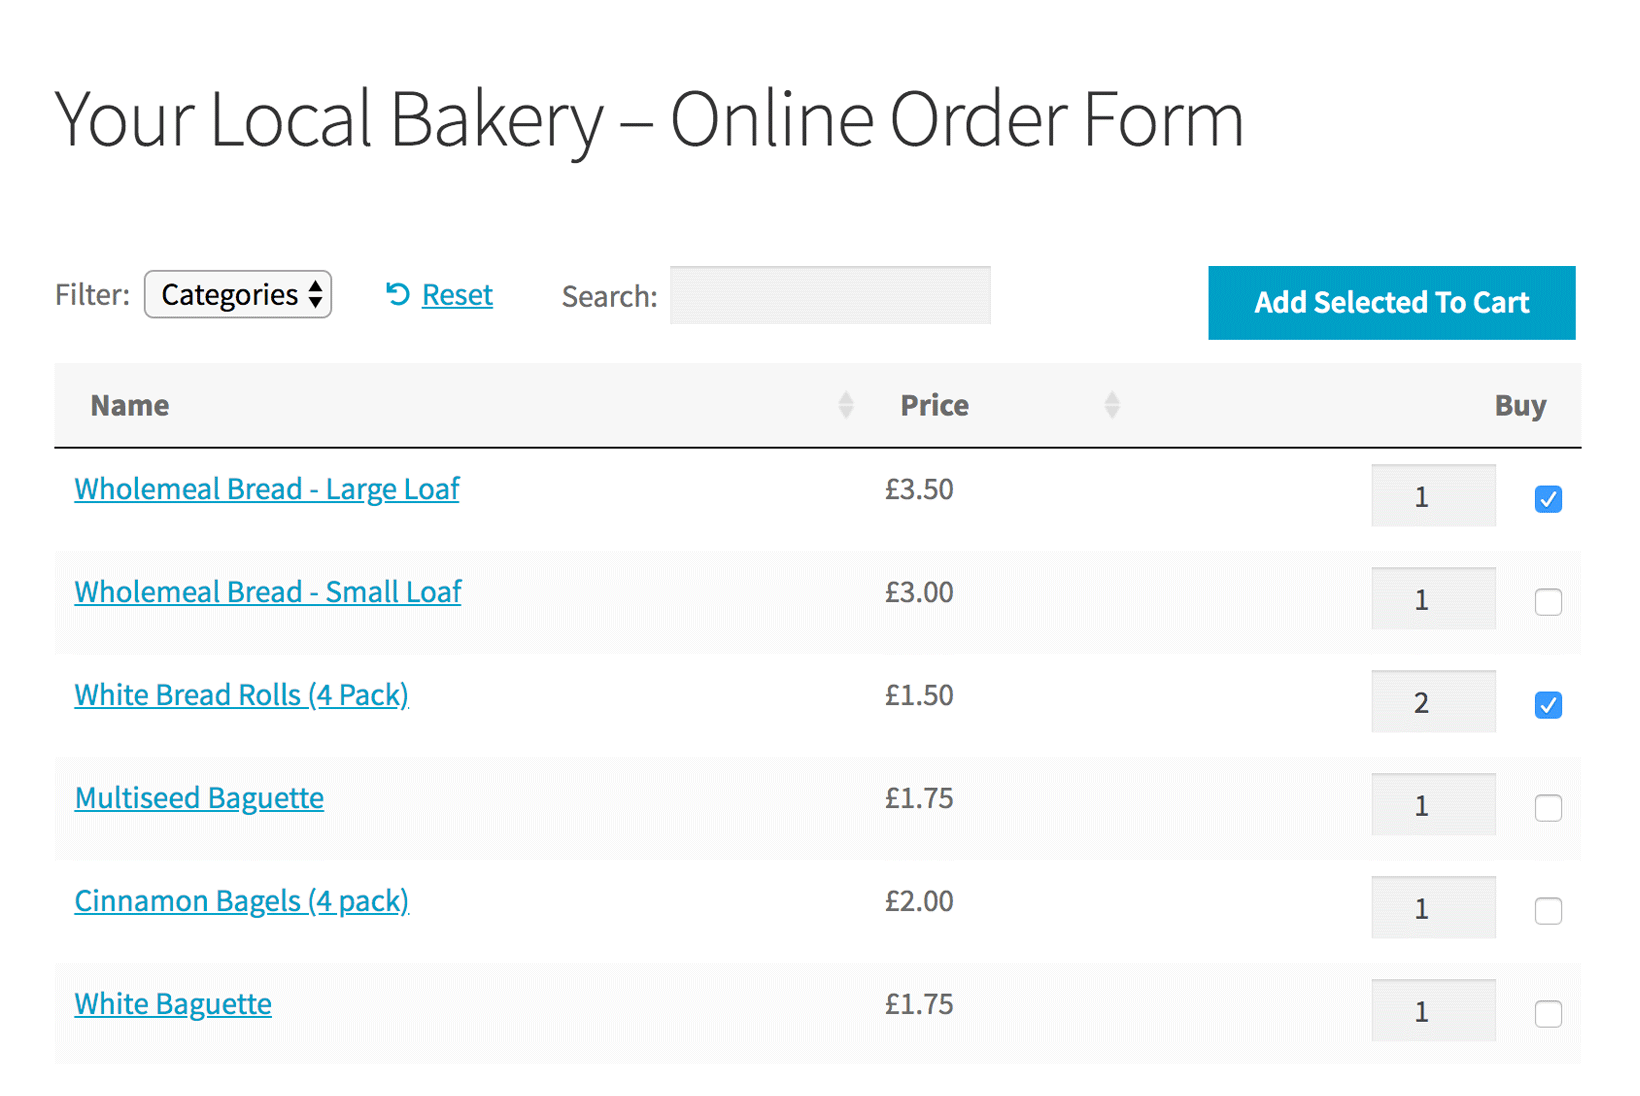
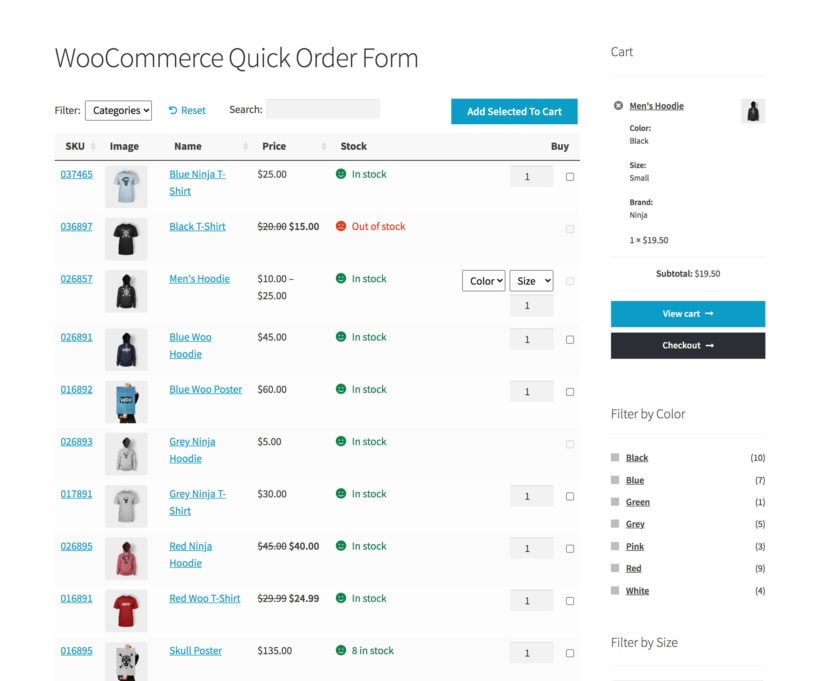
The most important part of the plugin is the way it displays WooCommerce product variations on the front end of your website. Yep - it also provides a quick way for customers to buy product variations in bulk.

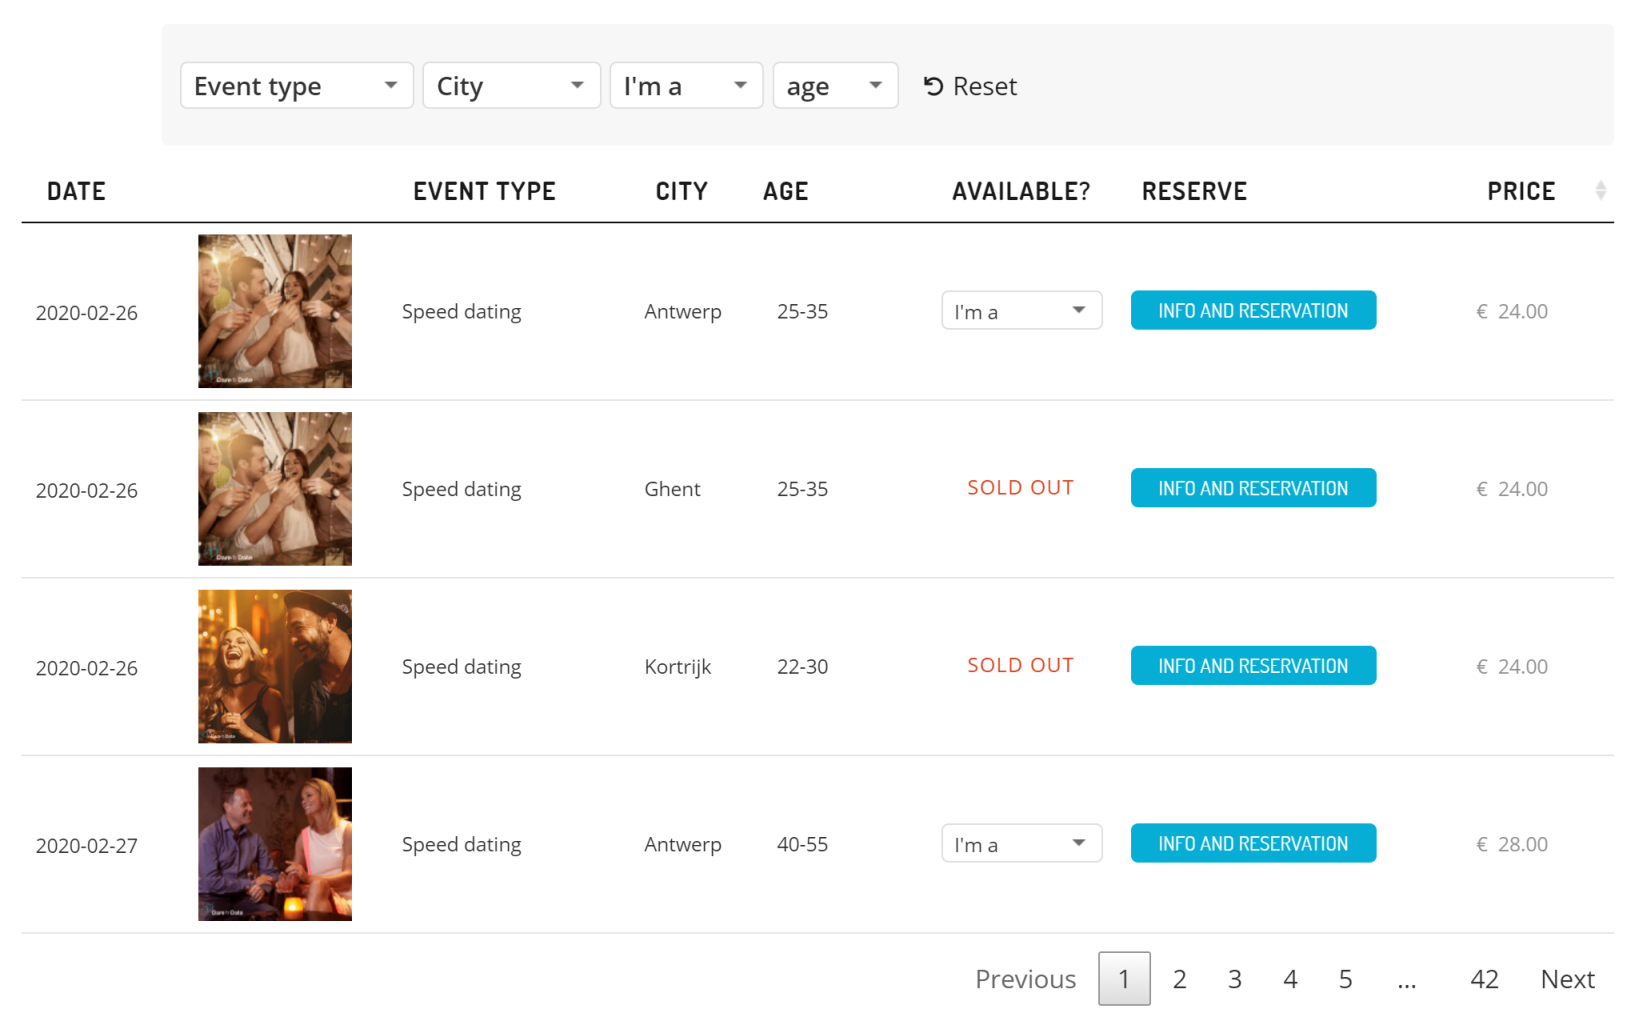
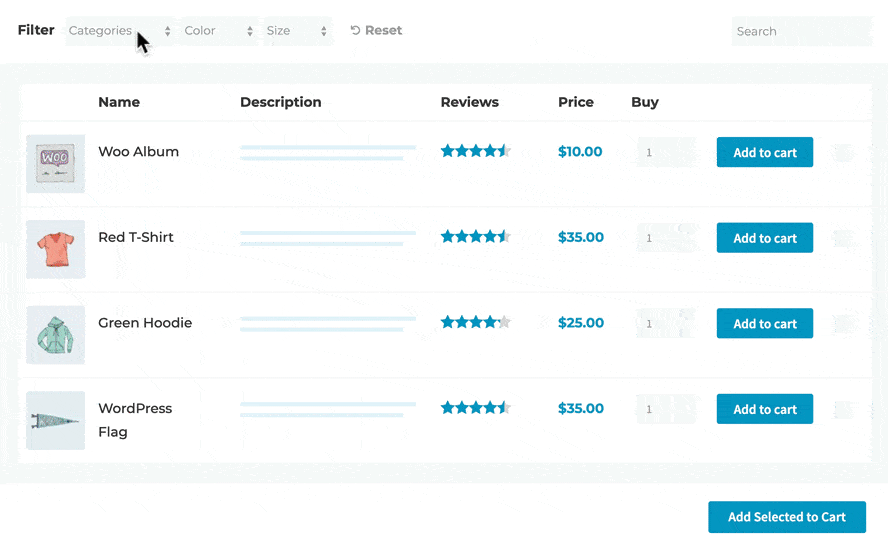
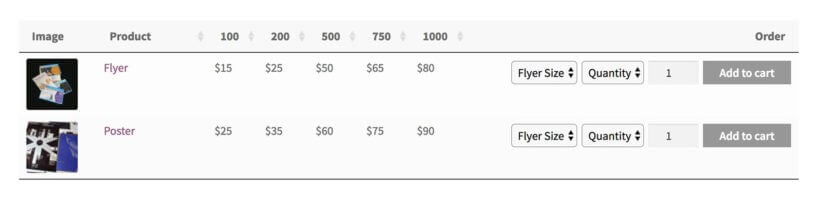
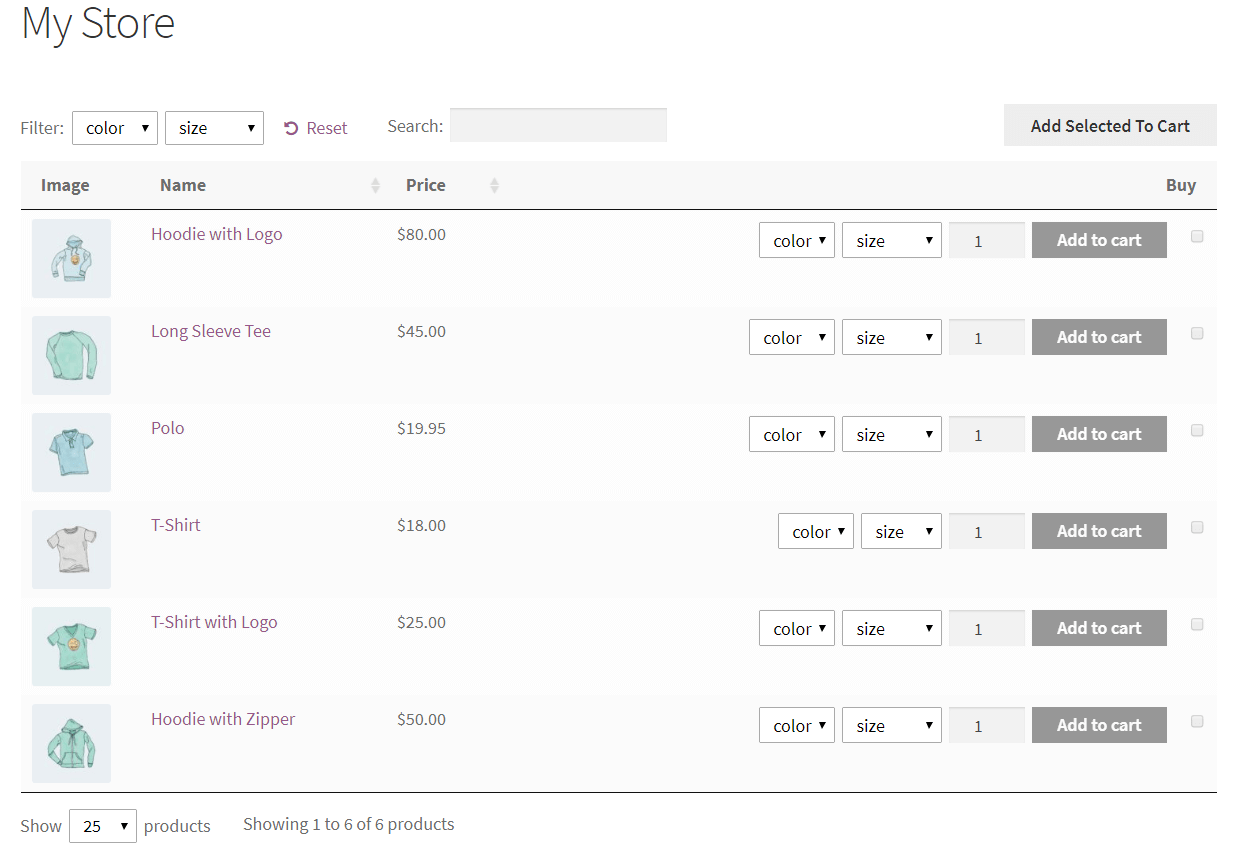
WooCommerce Bulk Variations does this by letting store owners list products in a WooCommerce variations grid layout. It also adds a quantity picker for each variation and a bulk add to cart button, like this:

WooCommerce Bulk Variations grid

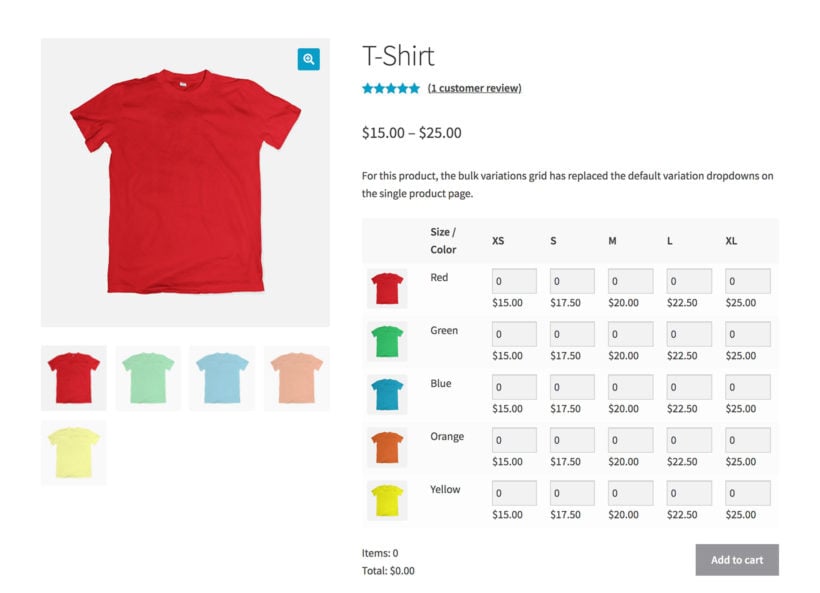
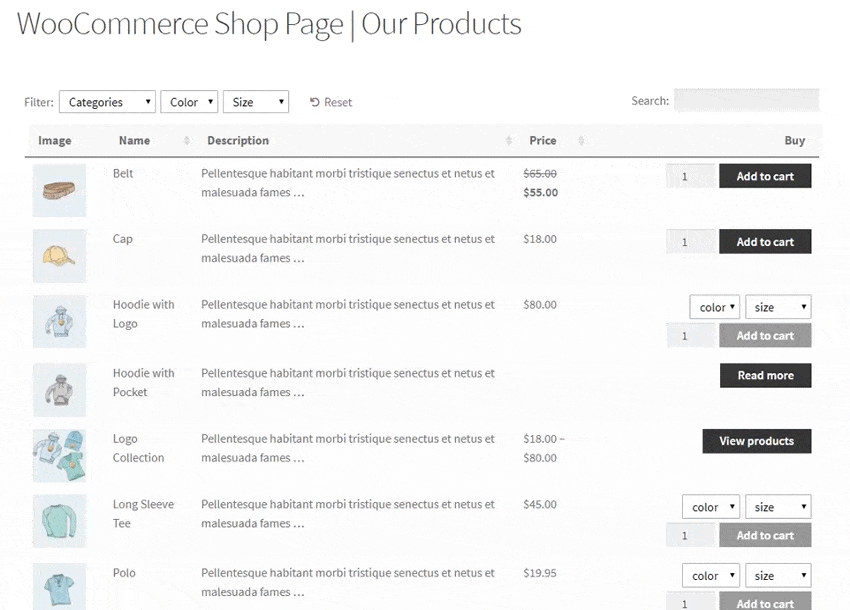
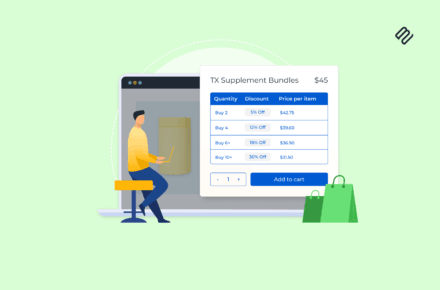
Allowing bulk variation purchases is particularly useful for e-commerce stores that sell to wholesale buyers. Customers can simply use the WooCommerce variations grid layout to enter how many units of each variation they’d like to purchase and click the Add to Cart button to add all selected variations (in the correct quantities) to their shopping cart at once. This is also the easiest way to showcase variable products with two attributes.

Add and manage product variations from a time-saving bulk edit spreadsheet

Setary bulk edit

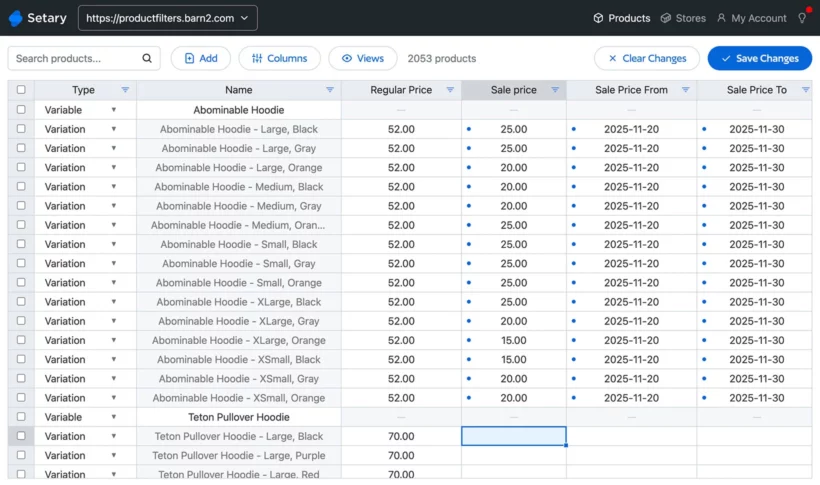
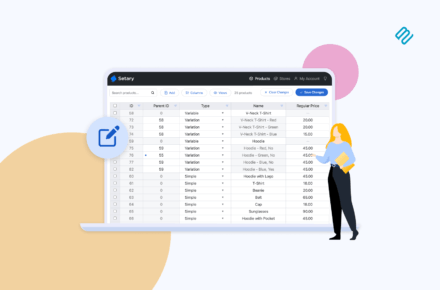
The Setary app will save you a huge amount of time in adding and managing variations. Above, we looked at how to use WooCommerce Bulk Variations to add bulk editing features to the Add/Edit product screen. That's useful, but it still only lets you edit the variations for one product at a time.

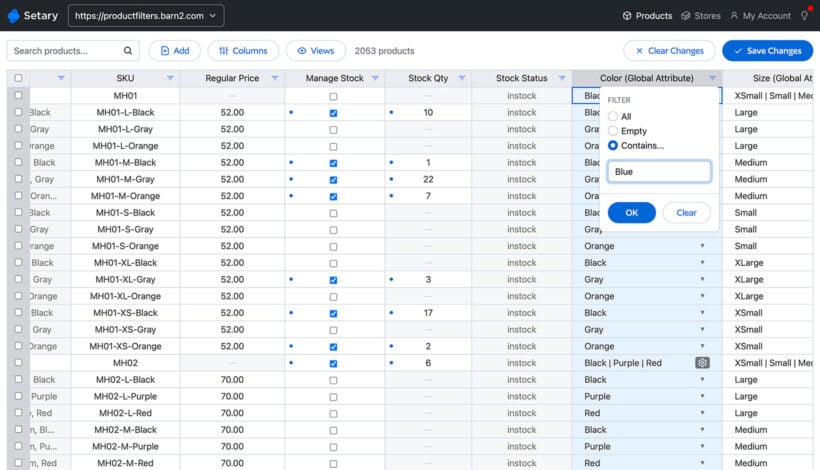
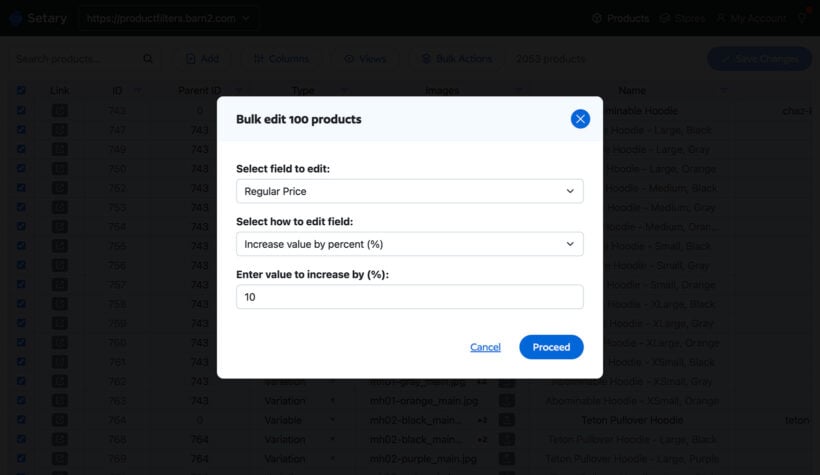
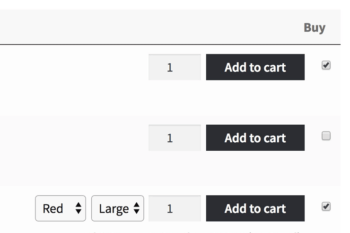
Setary is different because it displays all your products and variations in a time-saving bulk editing spreadsheet. Each variation is listed on its own row of the spreadsheet, with separate columns for the different types of variation data.

You can create new product variations simply by adding a row to the spreadsheet and entering all the data. Alternatively, you can duplicate or clone an existing variation.

For the bulk editing, you can use the search box and advanced filters to narrow down the list to the exact variations you want to edit. After that, you can either:

  • Click any cell of the spreadsheet to make inline changes to variations.
  • Select multiple variations and use the Bulk Actions button to make a wide range of advanced edits. For example, you can make various changes to the variation prices, update the variation names, set variation images, and more.

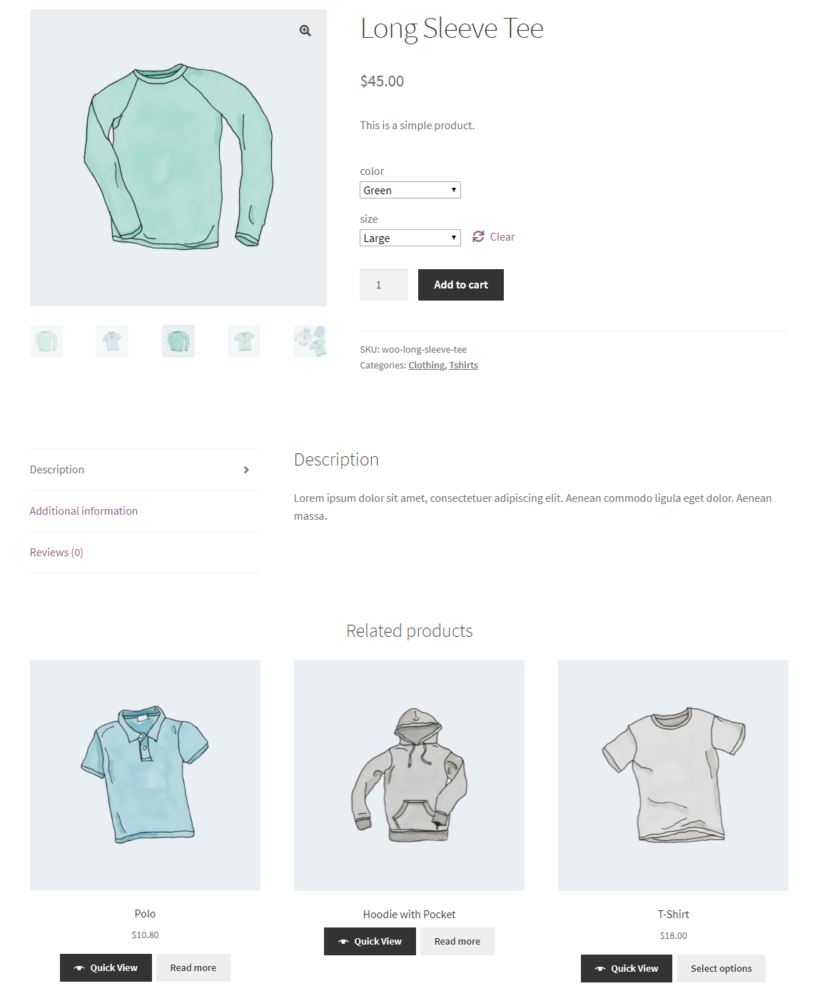
Replace variation dropdowns with checkboxes, image buttons, and more

WooCommerce can only display product variations as a dropdown list. For example, you might have a dropdown for the size attribute and another dropdown for color. That's pretty limited 🥱

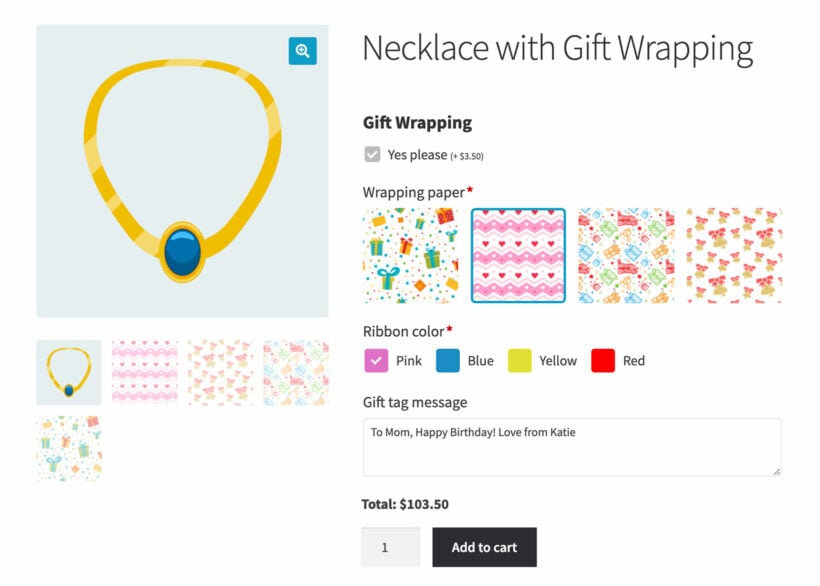
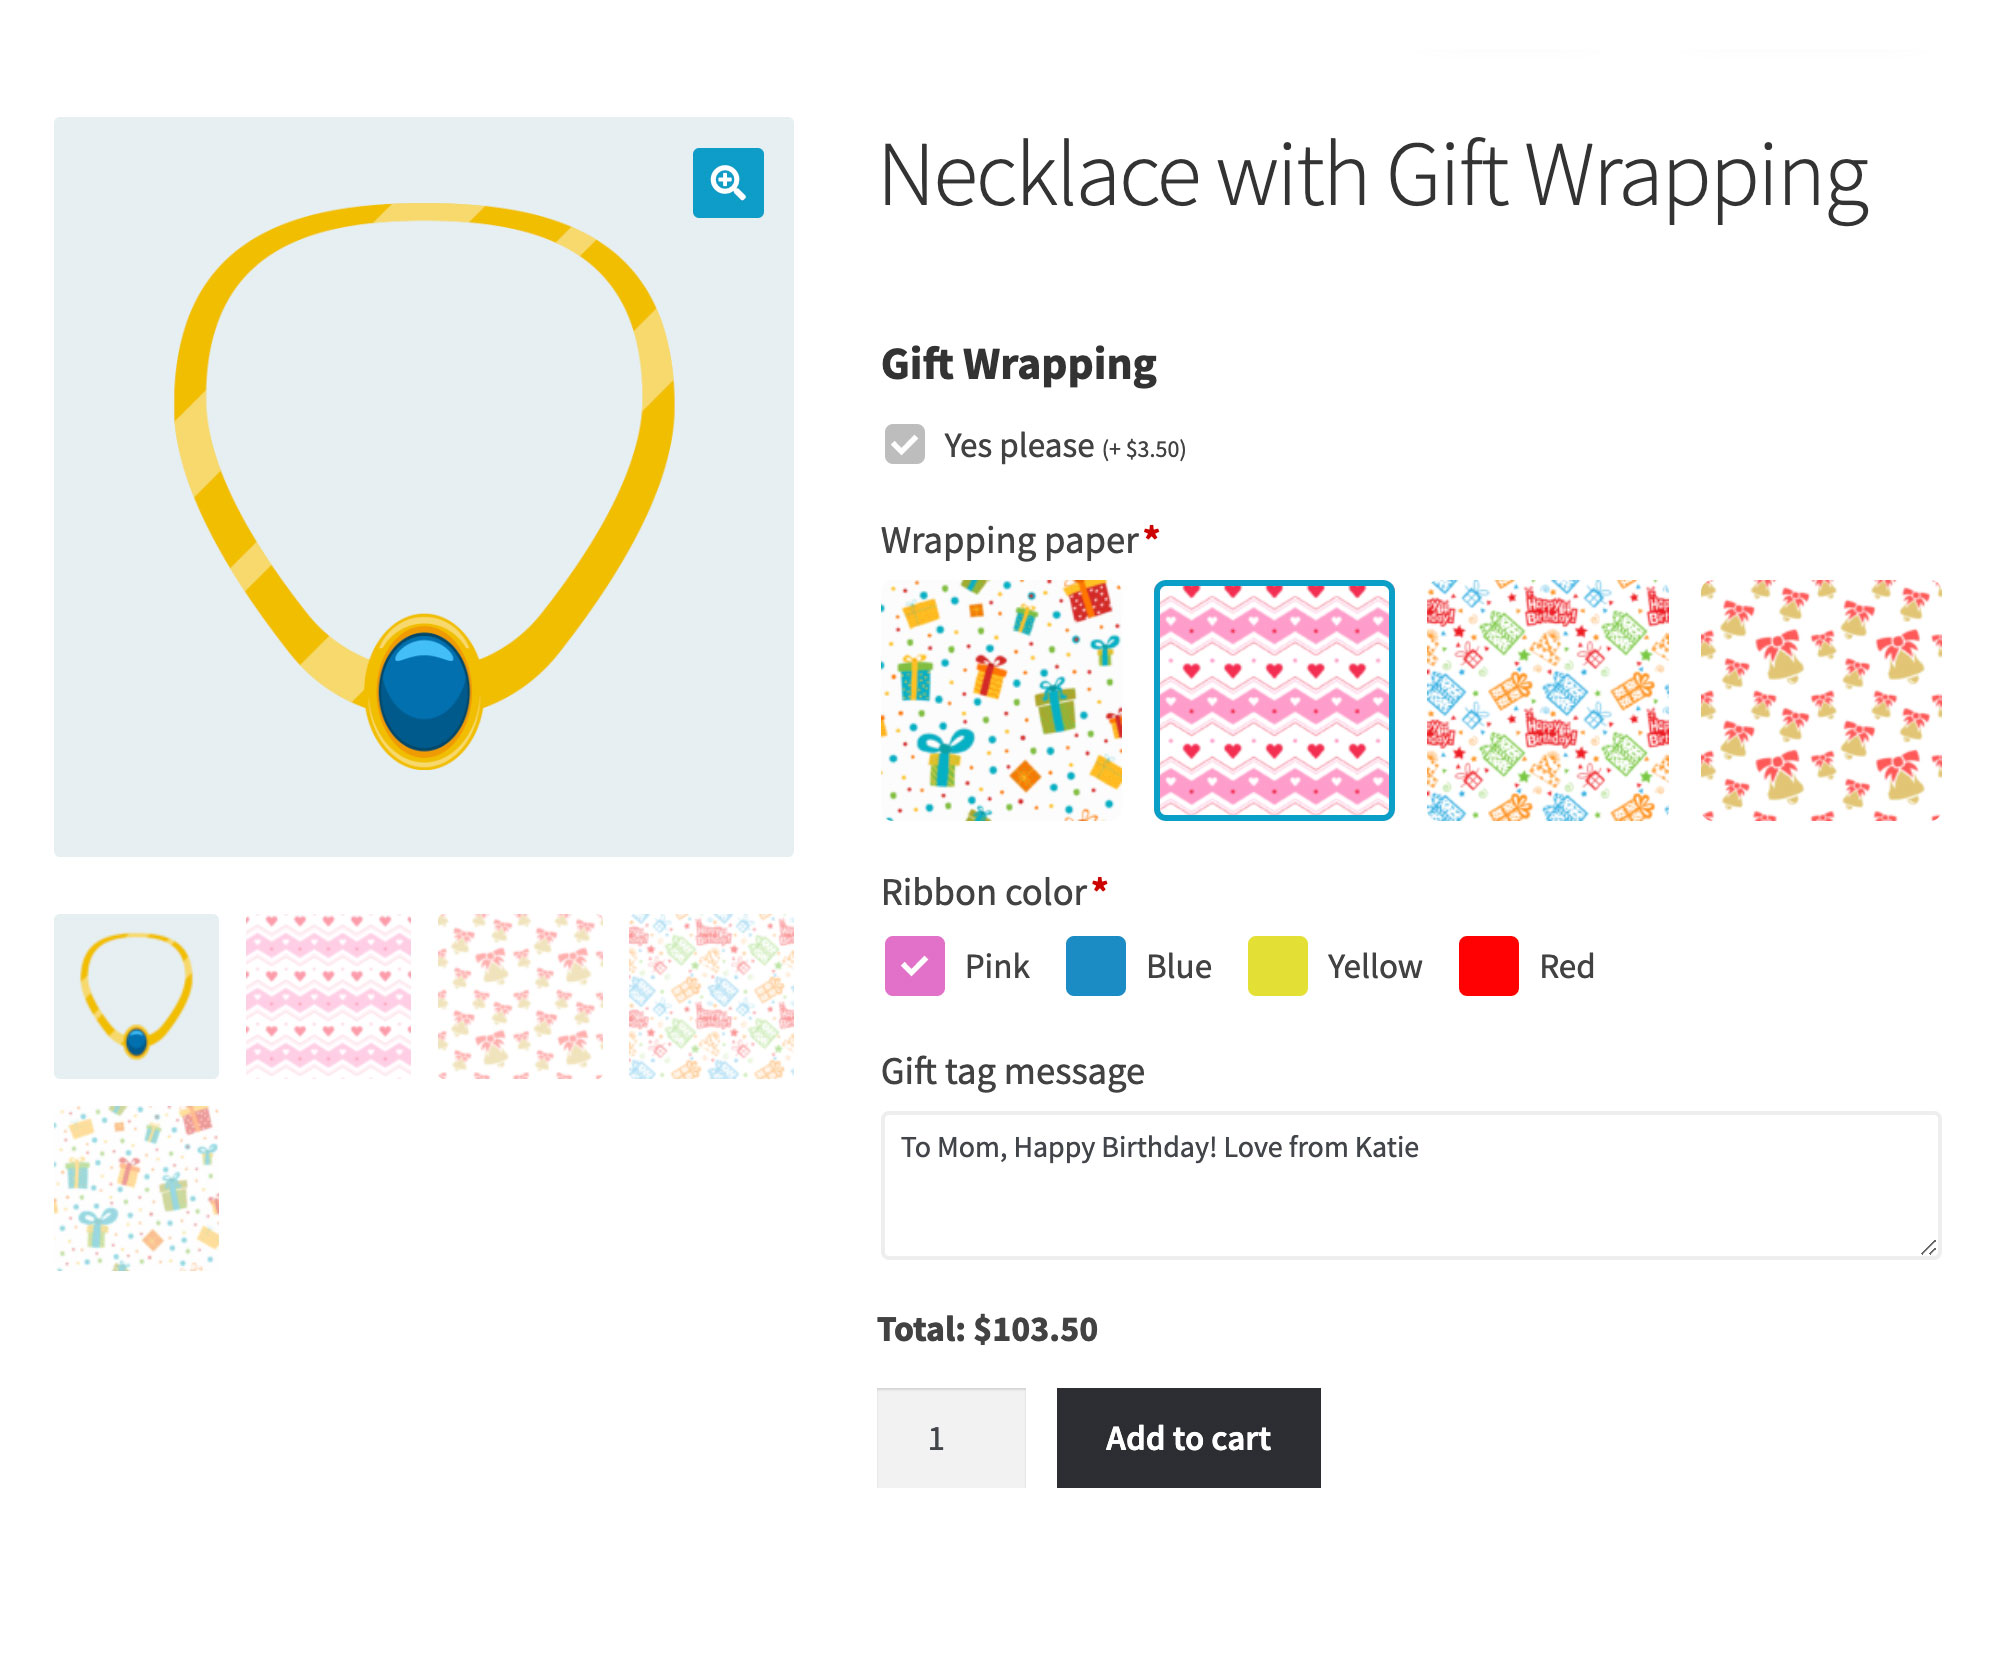
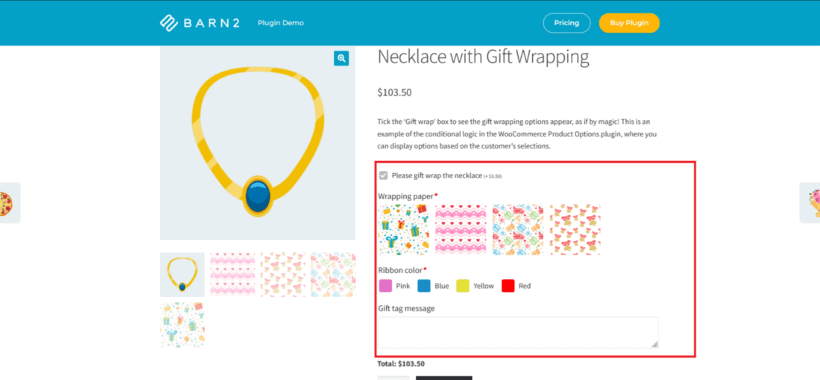
The WooCommerce Product Options plugin can make your variations stand out by replacing the dropdowns with a wide range of other styles:

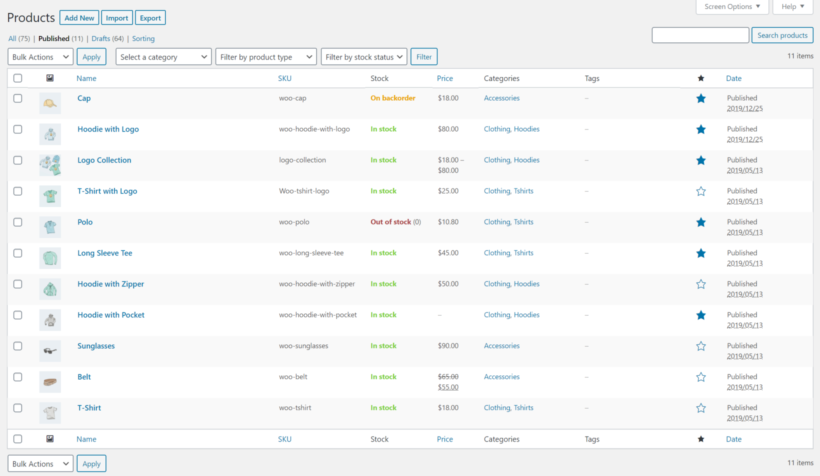
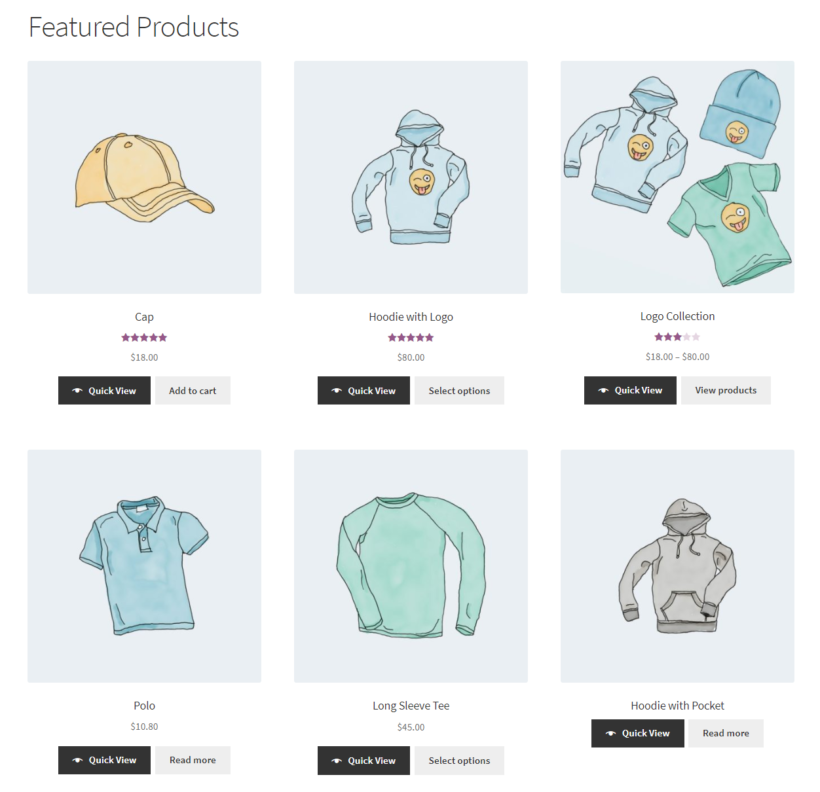
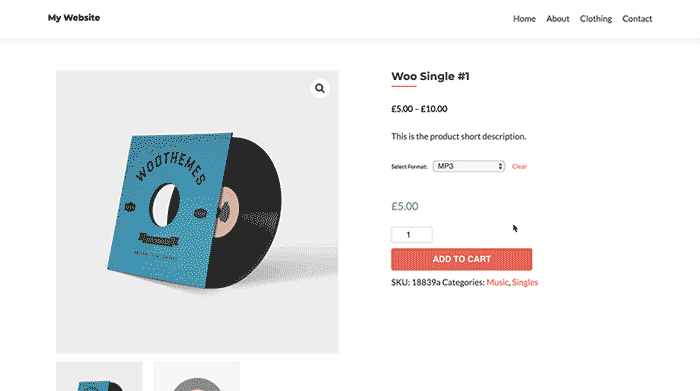
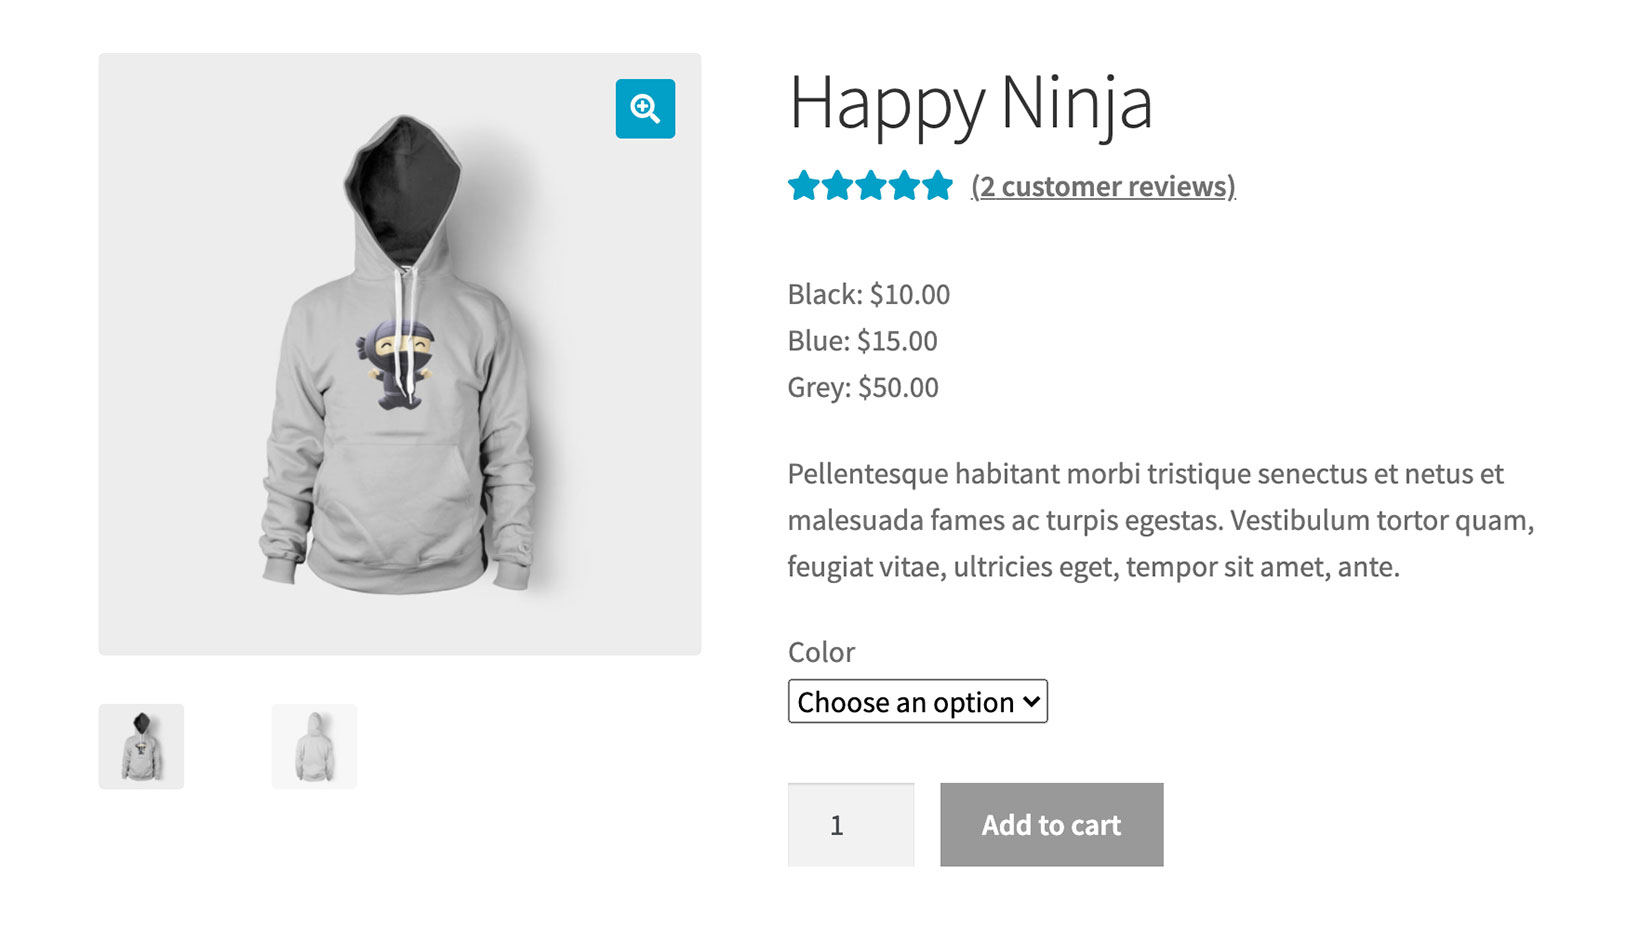
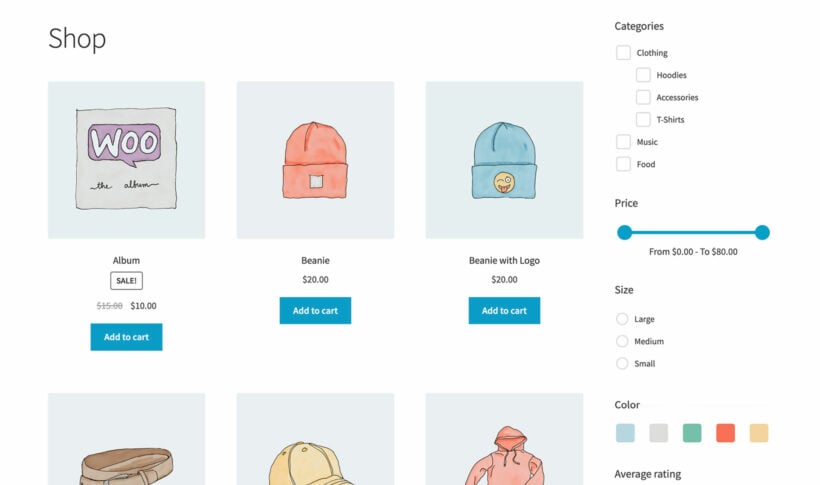
With this plugin, you add your product variations as usual. You then go to Products → Product Options and create product options by selecting the variations you already created. Select an alternative style for them, such as checkboxes, radio buttons, clickable images, text labels, and so on.

Another benefit of this plugin is that you can use conditional logic to show/hide variations depending on the customer's other selections. For example, if you want to add gift wrap options to a product then you could add a "This is a gift" checkbox which customers can click to reveal the hidden gift wrapping options. The customer can then choose a wrapping paper variation by clicking on a picture of their preferred design.

WooCommerce gift wrap

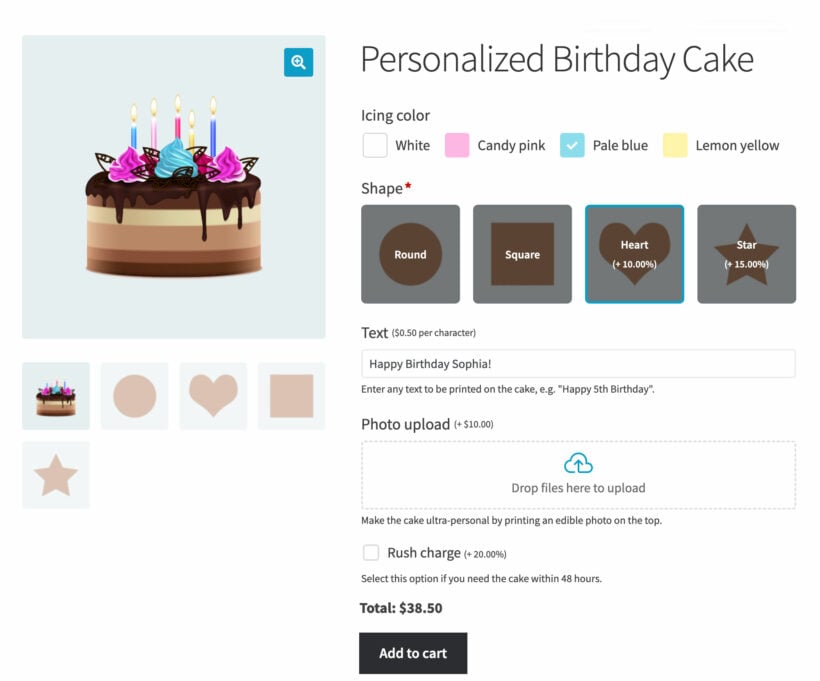
Product variations vs. add-ons

While the WooCommerce Product Options plugin can display product variations in more interesting ways, that's not all it can do. This product add-ons plugin provides a way of creating product options without using variations at all.

When you create options using this method, instead of using variations, you create the options directly in the plugin. This can be more flexible and easier to use than the interface for creating variations. It also gives you, a wider range of display styles, such as text fields, date fields and file upload fields, which aren't possible with actual variations.

This opens the door to selling types of variant which simply aren't possible using WooCommerce product variations. Let's go back to our gift wrap example - you could add a text field allowing customers to type a message to be printed on the gift label.

Product options activated on demo store product

Product add-ons also bring lots of other types of flexibility that you don't get with WooCommerce variations:

How to filter by product variation

When it comes to WooCommerce product variations, filtering by specific attributes can greatly enhance the shopping experience for your customers. By using the WooCommerce Product Filters plugin, you can easily add attribute filters to your store, allowing customers to quickly find products that match their preferences.

The WooCommerce Product Filters plugin offers a wide range of product filters, including categories, attributes, color, tags, custom taxonomy, price, ratings, and stock status. With the ability to display filters such as dropdown lists, checkboxes, radio buttons, labels/tag clouds, images, or color swatches, you can create a user-friendly shopping experience that increases the time customers spend in your store. Ultimately, this leads to increased conversion rates and customer loyalty.

Add user-friendly filters for attributes like size and color

Here's how you can filter by product variation using the WooCommerce Product Filters plugin:

  1. Purchase and install the WooCommerce Product Filters plugin: First, buy the plugin and install it on WordPress.
  2. Create attribute filters: After installing the plugin, navigate to Products → Filters and click on the default filter group or create a new one. Use the "Add new filter" form to enter your filter's information, and repeat as many times as needed. You can choose the filter type, such as dropdown lists, checkboxes, or color swatches, to create a user-friendly shopping experience.
  3. Select the product variation attribute: In the filter settings, choose the attribute you want to filter by, such as color or size. This will allow customers to filter products based on their specific preferences.
  4. Place the product filters on your site: Finally, place your product filters anywhere on your site using the automatic display option, sidebar widget, or shortcode placement. This will allow customers to quickly find products that match their preferences and increase conversion rates.

Looking to learn more about how the WooCommerce Product Filters plugin can help you filter by product variation? Check out this helpful article on How to filter by variation using different methods. Here, you'll find detailed instructions on how to use the plugin to filter by variation, along with other useful information on this powerful tool.

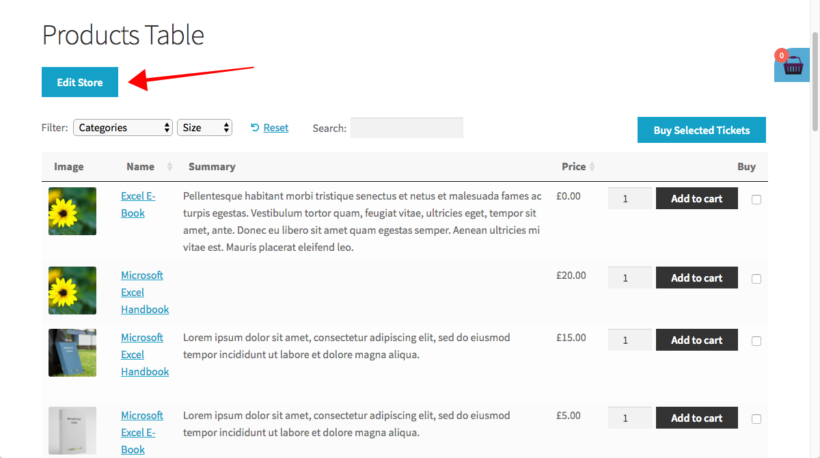
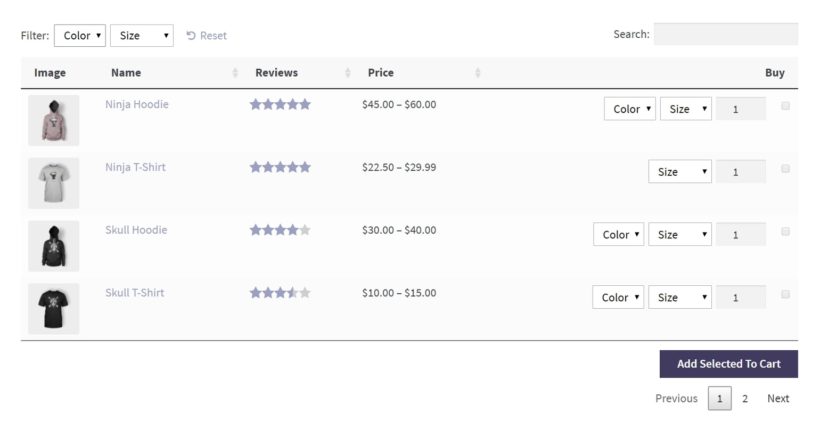
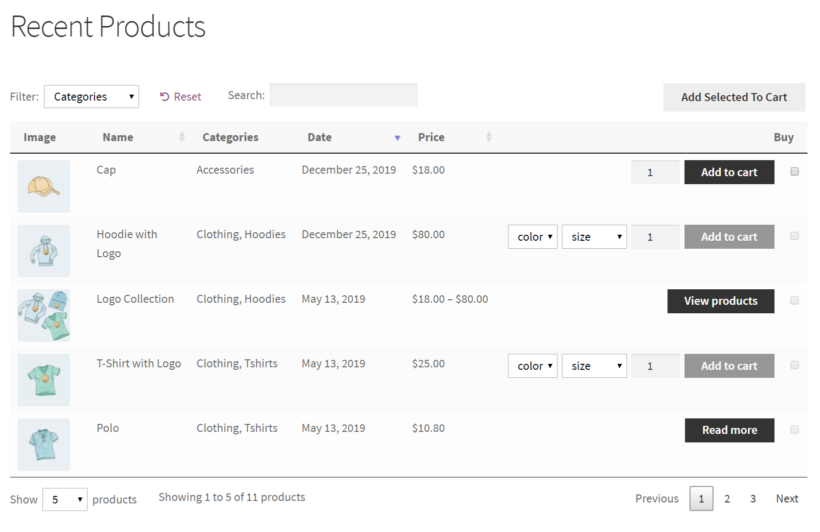
Display WooCommerce product variations in a table

By default, WooCommerce product variations only appear on the single product page. What this means is that customers have to click through to the single product page from the main shop page to view and select variations. This makes the main purchasing user flow unnecessarily long.

The good news is that the WooCommerce Product Table plugin provides superior ways to display product variations on the front-end. This way, you can allow customers to select and add variations to their shopping carts from just about anywhere in your store, not just on the single product page.

More specifically, you can choose to list variations in two different ways:

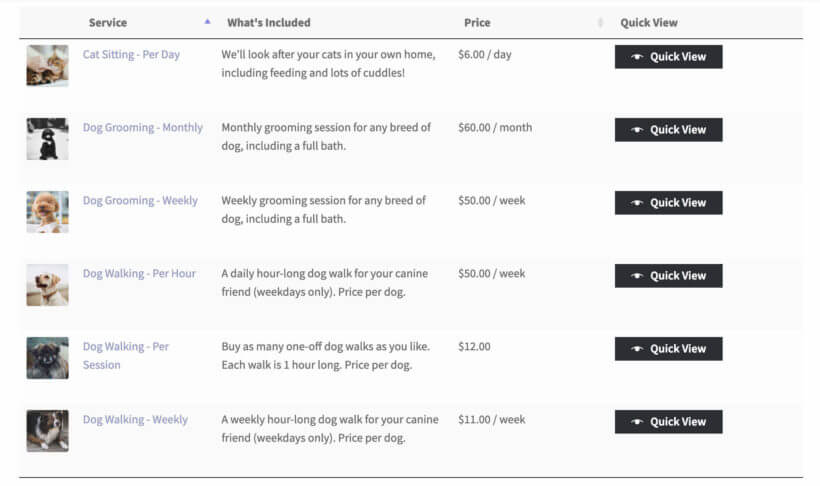
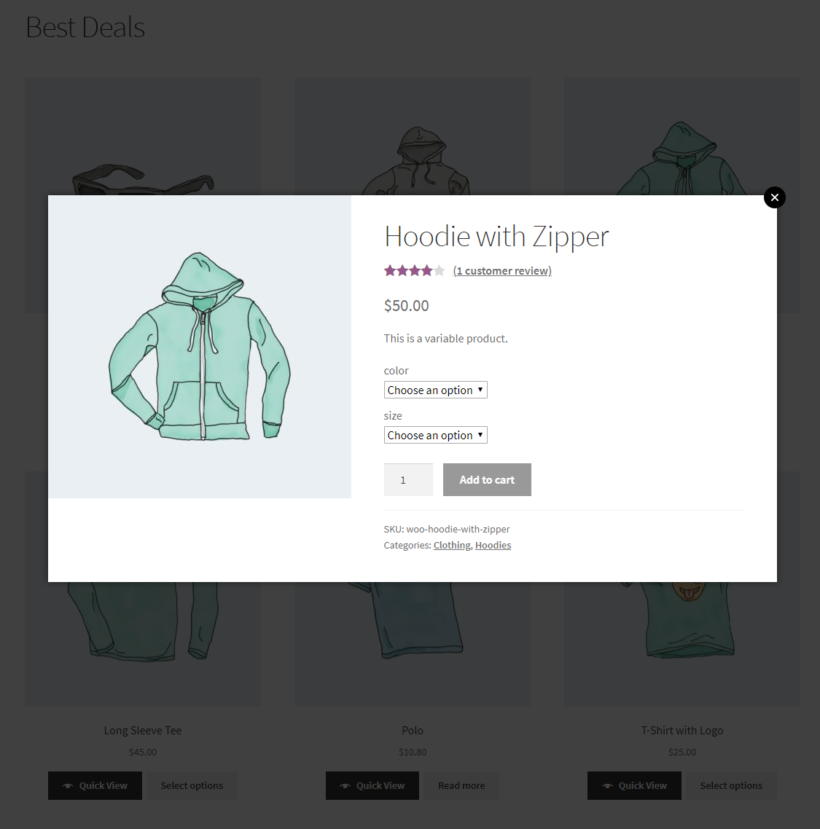
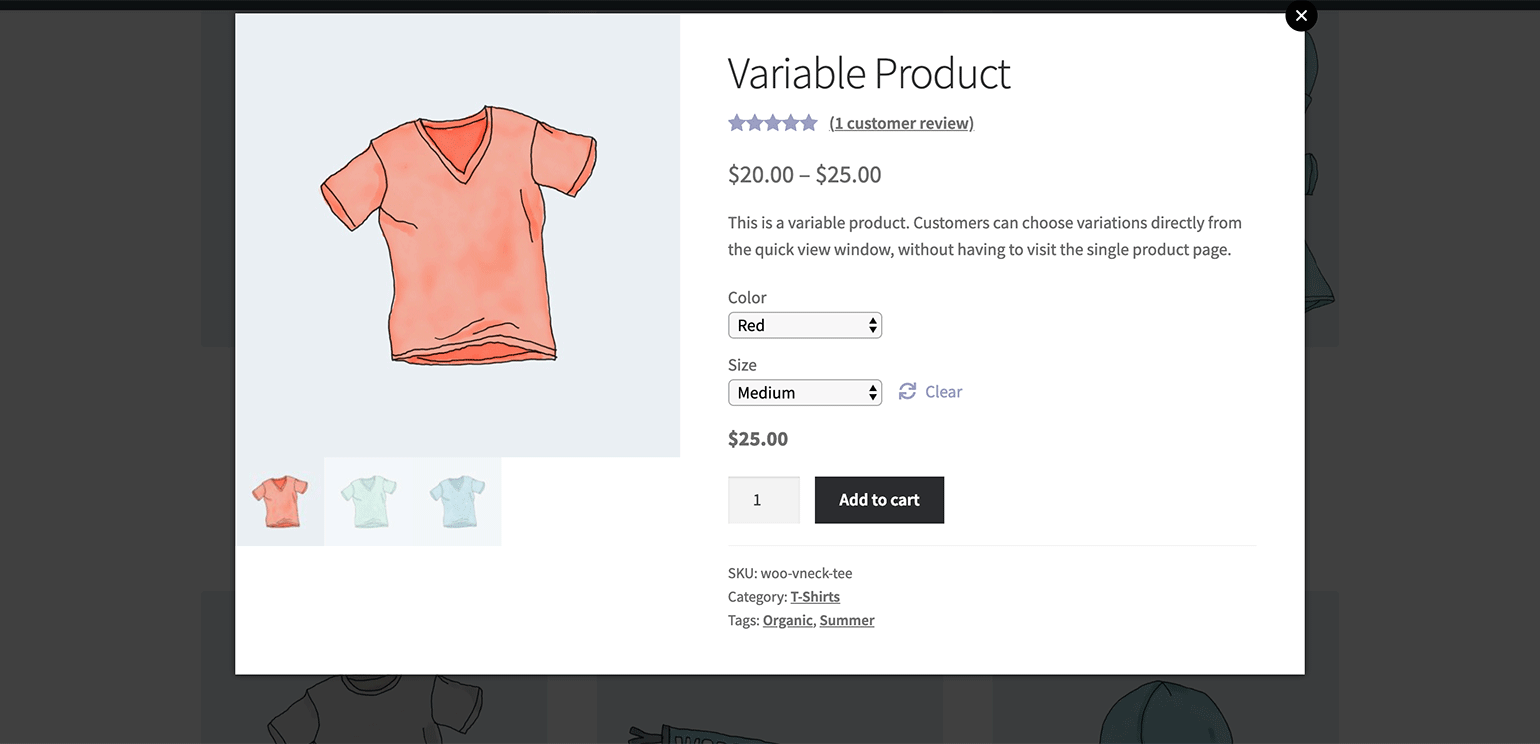
Let customers select variations from a quick view lightbox

Another way to let customers select product variations away from the single product page is by displaying them as dropdowns in a quick view lightbox. This is possible with the WooCommerce Quick View Pro plugin.

You can use the WooCommerce Quick View Pro plugin together with the WooCommerce Product Table plugin to add quick view buttons directly to the table layout. The key benefit of this is that you can display additional product details in the table layout while giving customers the option to use the quick view lightbox to select variations.

In addition, you can use the WooCommerce Quick View Pro plugin to add quick view buttons directly to your main shop page. This way, instead of navigating to the single product page to select and add variations to the cart, customers can simply use the quick view lightbox. The key benefit of this approach is that they can continue where they left off once they’ve added a variation to their shopping cart.

Change the variation price format

WooCommerce Variation Prices cropped

Have you noticed that if a product's variations are different prices, then WooCommerce displays them as a range? (E.g. $50 - $100.) This is ok for some products, but can lose you sales by putting customers off. For example, showing the top and bottom price makes it difficult for customers to predict what they will pay, and can make the product look more expensive.

The solution is to install the WooCommerce Variation Prices plugin. This easy-to-use plugin lets you change the variation price format to anything you like. This might be "From $50", "Up to $100", or replacing the dash between the low-high price with another word or symbol. You can list the price of each variation individually. Maybe you need to create a completely bespoke variation price format with your own format, such as "$10 per kg".

As well as replacing the variation price range, there are further settings for changing how prices are displayed:

  • Hide the main price for the variable product until the customer selects an option.
  • Update the main price on the WooCommerce product page when a variation is selected.

Variation Prices is a very simple plugin, but it adds a very important feature to your WooCommerce product variations. The ability to control how variable product prices are displayed can make a big difference to your sales. After all, customers are more likely to buy products when the prices are displayed in a way that emphasizes what good value they are.

Set up WooCommerce product variations and start selling!

WooCommerce product variations make it easier for online store owners to sell different versions of the same product without having to add it as a separate product. It also makes it easier for customers to make purchases.

To take things to the next level, you can use different WooCommerce plugins to make your WooCommerce product variations sell better:

Ready to maximize WooCommerce product variation sales on your e-commerce store? Choose your plugins and get started today!

If your business or organisation needs help selling online during the COVID-19 crisis, or you're actively helping with the pandemic - e.g. distributing food or medical supplies - then we're offering a free plugin or extended licenses to help you setup as fast as possible.

As millions of people worldwide isolate themselves to restrict the spread of COVID-19, going to the shops is no longer a safe option. Instead, they're forced to buy essential supplies online and have them delivered to their homes.

Many businesses still rely on face-to-face contact. From corner shops, bakeries and local delis, to take away and fast food outlets, many are now feeling a steep drop-off in customer demand. In addition, there may be many outlets such as local pharmacies, chemists, and suppliers of medical items that don't currently operate online but could do so.

To continue trading - and ensure that their customers can receive essential food and medical supplies - many businesses need a fast and simple way to sell online.

WooCommerce bakery order form plugin

Apply for a free plugin

If your business needs to get online quickly in order to provide essential items or services to help with Coronavirus, please get in touch below letting us know what you need. Examples of what we can provide:

  • A free copy of one of our plugins, including WooCommerce Product Table.
  • Extended license options to cover multiple sites under a single license key.

Free/extended licenses will be valid for 4 months until 31st July 2020. If the coronavirus crisis is still ongoing at that point, please get in touch again and we will extend your license.

The free plugin offer has now closed.

Online selling tutorial

The following guidance is aimed at businesses that need to start selling online; and for agencies that are helping businesses to do this. It will tell you:

  1. How to sell your products or services online - don't worry, you don't need any technical expertise. You'll learn how to create a website taking online payments, and have products delivered locally, or by using other delivery services.
  2. How to list your products in a quick one-page order form, making it really easy for customers to select products and order online.

What you need

To start selling online for the first time you'll need:

  • WordPress - this is a content management system which powers your site and makes it easy to create pages, add images, etc. WordPress is free, but you'll need to pay for a domain name (website address) and web hosting. If you need web hosting, we recommend Kinsta who provide fully-managed WordPress hosting (they host this site). Their Starter plan starts at $30/month and WordPress comes pre-installed so you don't need to do this yourself.
  • WooCommerce - this is a free plugin that turns your website into a fully featured e-commerce store. It lets you add products, set up payment gateways, add shipping options, etc.
  • WordPress theme - this provides the design of your site (i.e. how it looks). I strongly recommend the Storefront theme because it's free, easy to use, and built by the same people as WooCommerce itself. It's clean and simple so ideal for any business wanting selling online.
  • WooCommerce Product Table - this lists your products in a quick one-page order form. Your customers can easily view all your products, select the ones they want, and add them to the cart in one click. It's the perfect way to present products that you have previously sold face-to-face. WooCommerce Product Table is a premium plugin, and we're offering free copies to those helping with the Coronavirus pandemic.

Create your online store

1. Install WordPress and WooCommerce

The first step is to get your overall website set up. Rather than reinventing the wheel, I recommend that you follow WPBeginner's excellent tutorial: WooCommerce Made Simple: A Step-by-Step Tutorial. This covers the overall setup of your store, including payment and delivery options.

When you run the WooCommerce setup wizard as part of this tutorial, you'll have to make some decisions about how you want your online store to work. If you're setting up a quick online store during the coronavirus outbreak, then I recommend the following: 

  • Online payment optionsChoose payment options that will be easy for your customers, such as PayPal - that is the quickest and easiest to set up, both for you and your customers. You can add more than one payment option, so you might also want to enable the 'Cash on delivery' payment gateway when you run the WooCommerce setup wizard. However, consider how you will get cash from your customers while still respecting their need for social isolation and minimal contact.
  • Shipping options WooCommerce lets you add one or more delivery options for your customers to choose from. You can also create shipping zones to restrict the area that you will deliver to - for example, if you're a local business (e.g. a convenience store, grocer or butcher) and will only deliver to certain zip/post code areas. The shipping options are:
    • Flat rate - this is the most common shipping method, and lets you charge a flat amount for each purchase.
    • Free shipping - choose this if you don't plan to charge for shipping. To help your customers and keep your business going during the coronavirus crisis, consider offering free shipping in your local area, and charging for deliveries further afield.
    • Local pickup - you may want to activate this in future, but it's probably not relevant during the coronavirus lock-down.

Once you've finished installing WooCommerce, close WPBeginner's tutorial and return here for step 2.

2. Add your store's inventory

Next, you need to add your inventory as WooCommerce products. This may take a while if you have lots of products (e.g. a convenience store or medical supplies company). However, you'll speed up after the first few.

Tip: WooCommerce also has an import tool, so you could use this if you have too many products to add manually.

  1. Log into the WordPress admin and click Products → Add New.
  2. Add the product title at the top of the page.
  3. Add a product category on the right hand side of the page.
  4. Scroll down to the Product Data section and add a price.
  5. If you sell different versions of the same product (e.g. a Large and Small loaf of bread), then it's easiest to add each option as a separate product. WooCommerce also comes with variable products and you can use these for the product options if you prefer.
Create Online Bakery

You can add plenty more information about your products, such as description (useful for listing ingredients, allergens etc.), image, etc. However, if you need to quickly start selling online during the coronavirus pandemic, then I suggest keeping it simple. Just add the essential information about each product, and you can always add more later.

 3. Create a quick order form

If you just follow steps 1 and 2 (above), then your products will be listed in a grid layout. This layout is mostly designed for selling products with big images, where customers will spend their time browsing - for example, online clothes stores. If you're setting up a quick online store during the coronavirus crisis, that's not what you want.

Instead, you need to list products in a quick one-page order form. Customers can instantly view all your products, tick the ones they require, and add them all to the cart. You can do this by installing the WooCommerce Product Table plugin.

If you like, you can add extra columns of information and images to the product table. However, if you need to start selling online quickly, then I suggest keeping it to a minimum.

If your business is selling products or service that are actively helping people to cope with the coronavirus outbreak, please contact us below for a free copy.

How to set up WooCommerce Product Table

  • Install the plugin and activate it using the license key from your Getting Started email. You can do this on WooCommerce → Settings → Products → Product tables.
  • Go through the settings and choose how you want your order form to operate. I recommend the following:
    • Table display - tick box of these boxes to enable the product table layout throughout your online store.
    • Columns - paste the following into this box: name,price,add-to-cart
    • Product links - type none here. This keeps your store simple, as you don't need to worry about having a separate page for each product.
    • Add to cart button - select either 'Checkbox' or 'Button and checkbox'. The checkboxes are important to allow your customers to tick multiple products at once, and quickly add them all to the cart.
    • Product filters - type categories into this box. This will add a filter dropdown of your product categories, so that customers can quickly view products from a specific category only (e.g. bread).

Of course, WooCommerce Product Table has many more options than this - but our aim today is to help you start selling quickly and easily. If you want to make your store more sophisticated, feel free to browse the full list of 50+ options.

Finally, it's time to publish your website and direct people to your shop page!

  1. Go to the list of 'Pages' section of the WordPress admin and find the page with 'Shop' after its name. This is your main shop page - remember this for the next step!
  2. Now go to Appearance → Menus. Find the shop page in the list of pages on the left, click on it and click 'Add to menu'. This will add it to the menu on the right, so save the menu.

Now, the main menu on your site will include a link to the shop page which lists all your products.

If you like, then you can create more complex navigation structure by adding links to your category pages etc. But to get your business online as quickly as possible, the only essential page is the shop page.

Customers can visit this page, filter by category, select the products they want to buy, add them to the cart and complete their purchase using the WooCommerce checkout. You will receive an email notifying you of their order, so that you can take care of delivery.

Next steps

We understand the problems that the Coronavirus crisis has caused for businesses all over the world. Hopefully this article will help in some small way and keep the wheels turning. If you're helping with the coronavirus effort, please get in touch if you need any further advice or help with anything in this article or to request a free copy of one of our plugins.

Version 2.5.2 of WooCommerce Product Table is now available. As well as compatibility with version 4.0 of WooCommerce, it contains an exciting new feature - an easy way to automatically use the product table layout on your shop and category pages! 

Until now, most people used a shortcode to add tables to any normal page on their WordPress site. The shortcode is great (with over 50 options!) and will continue to be available. However, there was no easy way to automatically replace the default layouts on your WooCommerce shop and category pages with product tables. To do that, you had to download a PHP file from the plugin knowledge base and upload this to your child theme.

In the new version of WooCommerce Product Table, you can do this in seconds - there's no need to modify template files!

Custom WooCommerce shop page
Since publishing this article. we've added a table builder to WooCommerce Product Table. This makes it even easier to show product tables on your shop, category and other shop pages than the old method described in this article!

How to use the new feature

You'll find two new options on the WooCommerce Product Table plugin settings page:

WooCommerce add product table to shop and category pages

The first option adds the product table layout to the main shop page in WooCommerce. The second option adds product tables to all your category pages. You can use them alone or together - for example, if you want to use the default layout on your storefront and product tables on the category pages.

If your shop and category pages normally have a left or right sidebar, then the sidebar will still appear when you switch to the product table layout. Similarly, if the shop is normally full-width then it will remain full-width when you activate the product table layout. You can change this using the options in your theme.

Note: Since this article was written, we have significantly improved this feature. You can now select exactly which templates to display WooCommerce product tables on in the WooCommerce product table builder. Here's a video on how to set it up:

Where to get the plugin

If you're already using WooCommerce Product Table, you can update to version 2.5.2 from the WordPress Dashboard. Otherwise, get the plugin today and transform your shop and category pages - the easy way!

Companies that sell subscription boxes ship products to their customers at regular intervals for a recurring fee. In other words, customers sign up for a subscription to receive a package of goods, say, once a month. As an online business owner, you can create and sell a WooCommerce subscription box through your WordPress website.

WooCommerce subscription boxes are a great way to build a stable business because they allow sellers to generate predictable recurring revenue. Once you set a price for your subscription box, you’ll know exactly how much you’ll earn based on the number of subscribers you have.

Build Your Own Product Website WooCommerce

In this article, we’ll show you how to create a subscription box website on WooCommerce in two different ways - both using the WooCommerce Product Table plugin. You can choose to sell WooCommerce subscription boxes with pre-defined content or set up a build-your-box type of subscription box.

But before we begin, let’s take a look at some examples of subscription boxes and how to get started planning your WooCommerce subscription box business.

Examples of WooCommerce subscription boxes

When it comes to selling WooCommerce subscription boxes, there are a few different things you need to consider. First, you have to decide what sort of subscription boxes you’ll be selling.

Here are some popular examples:

  • Vegetable boxes. These can be curated or create-your-own style subscription boxes that contain farm-fresh vegetables. Curated boxes typically contain a selection of seasonal vegetables whereas custom subscription boxes give customers the option to choose which vegetables they’d like to add.
  • Cosmetics boxes. These are typically personalized subscription boxes that include a variety of cosmetics products such as foundation, lipstick, eyeliner, and mascara. Since cosmetics are long-lasting products, you can sell them at three-month (quarterly) intervals.
  • Snack packs. Snack packs are incredibly popular with customers. You can sell all sorts of snacks – fitness snacks, healthy snacks, oriental snacks, candy packs, organic snacks, or gluten-free snacks.
  • Coffee deliveries. Coffee subscription boxes are typically personalized subscription boxes that let customers choose their preferred coffee brand, bag size, creamer, and filter options.
  • Shaving supplies. These typically include razors, wipes, shaving creams, and other toiletries that are replenished on a monthly basis. Dollar Shave Club is a great example of a subscription box service.
  • Hand-curated wines and beers. Customers can subscribe to a hand-curated wine or beer crate that contains an assortment of bottles.

Monthly subscription boxes are pretty common though the interval depends entirely on the type of products you’re selling. For example, if you sell vegetable boxes or fitness bars, you might consider offering one-week and two-week replenishment options. And if you’re selling beauty products (like razors or toiletries), you might offer a bi-monthly or monthly replenishment option.

Planning your WooCommerce subscription box business

Before you begin designing your WooCommerce subscription box store, it’s important to take a step back and plan out the subscription model.

If you’re just starting out, the most profitable (and efficient) way to sell subscription boxes is to offer one or more options with predefined contents. The reason is that it saves you time on packing. Put simply, your subscription box becomes a product rather than a service.

However, when your subscription box business starts to take off, you can also consider offering build-a-box style subscriptions. This allows customers to select the products they’d like to add to their subscription box from a list of available items. Then, the custom subscription box company fills each pack individually and ships it to the customer.

As we mentioned above, in this tutorial, we’ll show you how you can create both types of subscription boxes:

  • Predefined subscription boxes where you ship the same box to all of your customers
  • Mix and match subscription boxes where customers select the contents of their weekly (or monthly) box

In both cases, customers will receive their selected subscription boxes on a regular basis.

With the right plugins, WooCommerce is the perfect e-commerce platform for selling subscription boxes through your WordPress site. The main idea behind both approaches is the same. You want to create a custom subscription box order form that presents available options to customers and lets them choose their subscription box. We’ll show you how you can create an order form using the WooCommerce Product Table plugin.

Method #1: How to sell WooCommerce subscription boxes with predefined contents

If you’re just starting out, you might want to sell WooCommerce subscription boxes with predefined contents. For this, you’ll need a way to set up an order form in WooCommerce and accept recurring payments from customers (i.e. subscribers).

Selling WooCommerce subscription boxes with pre-defined contents

We recommend using the official WooCommerce Subscriptions plugin along with the WooCommerce Product Table plugin.

WooCommerce Subscriptions allows you to sell products on a daily, weekly, monthly, or annual basis. This way, customers will be billed automatically at their chosen intervals using the selected payment gateway (such as PayPal or Stripe). In addition to this, it offers advanced features like free-trials and one-time sign-up fees.

WooCommerce-product table quick view services with subscriptions plugin

The WooCommerce Product Table plugin lets you create a searchable, sortable order form with filter options. This makes it easy for customers to see important subscription box details at a glance and make their selection. You can use it to:

  • Show extra data about each subscription box in a column directly in the order form. This way, customers don’t have to click through to the single product page to learn more about each subscription box.
  • Display add to cart buttons in the product table so customers can set the quantity, add the subscription box to their cart, and proceed to checkout.
  • Add filter options directly above the AJAX-based table so customers can quickly find the subscription products they’re looking for.

To take things further, you can integrate WooCommerce Product Table with WooCommerce Quick View Pro which allows you to showcase your subscription box (and its contents) in quick view lightboxes. This allows you to deliver a better shopping experience and make it easier for prospective subscribers to make a buying decision faster.

Handling variable subscriptions

WooCommerce Quick View Pro is also great for online store owners that need to sell variable subscription products. Instead of adding an add to cart column to your product table, you can add quick view buttons. Customers can then click on the button to select variations and purchase variable subscriptions.

Alternatively, you can use the All Products for WooCommerce Subscriptions plugin to sell variations directly in the add to cart column of the product table. This way, you can add subscription options to WooCommerce variable products.

Method #2: How to sell build-a-box WooCommerce subscription boxes

Selling mix and match WooCommerce subscription boxes gives customers the option to choose their own products. You can implement this in 2 different ways, depending on whether you want customers to choose the same products to receive each time; or whether you want them to be able to change their order each week.

Let customers choose their regular products

First, we'll look at an easy way to let customers choose which products to include in their regular subscription. They choose their products as part of setting up the subscription, and then receive the same products each time.

Typically, the process goes something like this:

Build your own vegetable subscription box

  1. Customers start by choosing a box size. For example, if you’re selling a vegetable subscription box you can have two sizes – Small and Large. This lets you set a base price for your subscription box.
  2. Next, customers can choose their subscription box contents using an order form. They can select as many products as they’d like, choose variations, and set quantities. Once that’s done, they can add all products in one go.
  3. Optionally, customers can choose any finishing touches such as decorative filling. For example, if you sell snack subscription boxes, you can let customers choose between shredded crinkle paper filling or packing peanuts.
  4. Finally, the proceed to checkout and select a payment method such as PayPal, Stripe, or credit card.
Excellent plugin
I am not a developer and have built my own site and wanted to offer a 'build your own hamper' service. This plug in works brilliantly and I had it up and running really quickly. It is particularly helpful that it works with variable products. And I love the demo video - very very helpful. There is tons of easy to search documentation that helped me with pretty much all the questions I have. I highly recommend this plug-in, especially if you are a website-building novice!

Allow subscribers to change their order each week/month

What if you want customers to be able to change which products are included in their regular subscription; or to choose which products to receive each time? For example, if you're selling a recipe box subscriptions (like Hello Fresh, Blue Apron, etc.), then subscribers need to be able to choose their recipes each week.

This is a more complex requirement, but you can achieve it by combining several plugins. They are all plugins from reputable companies which work well together:

  1. Use the WooCommerce Subscriptions plugin to sell your subscriptions. For example, you might have a product called ‘Weekly Recipe Box – 3 Recipes’ (with variations to choose the number of people per recipe). This would set up recurring billing for a fixed payment amount every week.
  2. In a private area on your WordPress website (which you can create with our WooCommerce Protected Categories plugin), you should add the products for the customer to choose from. These might always be the same products, or they might change each week. You can then use WooCommerce Quantity Manager to restrict how many products your subscribers can order from that category. If you set the price for each product to 0.00, then they can order their products each time without paying any extra. Alternatively, you can charge surcharges for higher value products by adding this as the product price. The subscriber will be charged this when they complete the WooCommerce checkout to confirm their products for that week.
  3. Finally, you can use the Follow Ups plugin to automatically send a weekly email reminder. Include information about how to access the hidden category containing the available products,  and the deadline for confirming their products.

Each week, the customer will log into their account, view the hidden category, select them from the product table, and check out to confirm their selection. Unless they have ordered surcharge products, they won't be charged for this because the payment comes from their weekly subscription instead.

As with all subscription boxes, if the customer forgets to confirm their products for the week, then you will select the box contents for them based on their preferences.

Advanced features

When selling subscription boxes, there are various advanced features you can add to your e-commerce store. This can help you deliver a better shopping experience to customers.

How to allow customers to choose the shipping frequency

One of the most important aspects of selling WooCommerce subscription boxes is letting customers choose the shipping frequency. This means how often they want to receive it.

As we mentioned above, most subscription boxes are sold on a monthly basis. However, some sservices let customers set their own shipping frequency. For example, if you sell vegetable boxes or snacks, you might want to give customers the option to receive a new one every week or every two weeks.

The easiest way to let customers choose the shipping frequency is by creating a variable subscription with the different options available as variations. For example, your variations might be a weekly variation, a bi-monthly variation, and a monthly variation.

How to allow customers to choose their billing frequency

Depending on the sorts of subscription boxes you sell, you might want to let customers choose their billing frequency. For this, you will need to set up a billing schedule.

This is great for when you want to give customers more payment options. You can also leverage this to offer special discounts to customers who pay for their subscription boxes months in advance.

You can set this up in WooCommerce by offering different billing frequencies as subscription box variations. For example, your variations might be weekly, monthly, or six months at a time. To incentivize customers to pay for six months at a time, you could offer that variation at a 10% discount. Then, customers can choose to pay using the preferred payment gateway.

How to choose which day of the week to receive your order

If you sell vegetable subscription boxes or recipe boxes, you might want to let customers choose which day(s) of the week to receive their order. For example, customers subscribed to your vegetable box might want to receive a new delivery every Wednesday.

You can use the Checkout Field Editor plugin to collect this information from customers on the checkout page.

How to add a delivery note

Many times, customers want to leave some sort of delivery note for the delivery driver. This allows them to make special requests or provide delivery instructions. The easiest way to let customers leave a delivery note with their subscription box order is by using the Checkout Field Editor plugin. This way, you can collect this information from customers on the checkout page.

How to set up gift subscriptions

If you want to be able to let customers send subscription boxes as gifts to their friends and family, you might consider setting up gift subscriptions. For this, you would need to create special gift subscription boxes with limited-time subscription periods.

You can do this by using the WooCommerce Subscriptions plugin with some additional features:

  • Use the Product Options plugin to add a gift message field to the product.
    WooCommerce extra add-on fields with images, swatches and text field
    A product with gift wrapping options added using the WooCommerce Product Options add-on
  • Use the standard WooCommerce checkout form to collect a different billing and shipping address. The customer would enter the recipient’s address into the shipping address fields. This way, the subscription box will be delivered to the gift receiver.

Bonus: reducing customer churn rates and boosting retention

Although subscription boxes can have predictable recurring revenue streams, they can also have high customer churn. In fact, more than a third of customers cancel their subscriptions in less than three months and more than half cancel within six months.

As a savvy business owner, you can cut down on customer churn by offering discounts to customers who sign up for a longer-term subscription. For example, you could offer a 10% discount to subscribers who opt for the yearly subscription instead of the monthly subscription. You can use the WooCommerce Subscriptions plugin to offer a variety of subscription options. This can help you reduce customer churn rates and boost retention.

Where to get the plugins

If you’re looking to launch a successful e-commerce business, a subscription box service business model that generates recurring revenue is the way to go. It’s more profitable and efficient than selling one-off products through your WooCommerce store. Done right, selling subscription boxes can help you increase your average order value and boost sales.

Using the WooCommerce Product Table plugin for WordPress, you can sell WooCommerce subscription boxes with predefined content or with flexible mix and match options. And to take things to the next level, you can use a variety of other WooCommerce plugins to integrate advanced options.

Ready to start generating recurring revenue selling WooCommerce subscription boxes? Get the WooCommerce Product Table subscription plugin today!

'WooCommerce downloads have opened up a whole new world for online stores, enabling them to sell not only physical products but also digital products like music, images, e-books, and software.

Ecommerce stores allow you to reach out and deliver products to customers the instant they make payment, whereas selling physical products often means losing a significant share of your sales – paying shipping, manufacturing, and distribution costs. This is where selling virtual products using WooCommerce is significantly more profitable for merchants.

Since WooCommerce provides shipping options, many people assume that WooCommerce is only for selling physical products.

So, can WooCommerce do digital downloads? Yes, it can - with a few tweaks, WooCommerce is just as good for selling virtual (or digital) products as it is for physical products.

In this tutorial, we'll cover everything you need to know about virtual products in WooCommerce. We'll also explain how you can start selling them through your online site as a store owner using WooCommerce Product Table. It will look something like this:

Importance of digital downloads in ecommerce

Digital downloads have become increasingly popular in ecommerce platforms, and WooCommerce downloads offer many advantages for online businesses. Here are some of the key reasons why digital downloads are important in ecommerce:

    • Increased accessibility: Digital downloads allow customers to access products instantly, without waiting for shipping or delivery. This convenience can improve customer satisfaction and boost sales.
    • Lower costs: Unlike physical products, digital products don't require inventory management or shipping, which can significantly reduce costs for online businesses. This can also lead to higher profit margins.
    • Greater scalability: With digital products, there are no limits on the number of products that can be sold, as there are no physical constraints like storage space or shipping logistics.
    • Global reach: WooCommerce downloads enable businesses to reach a wider audience, as digital products can be sold to customers anywhere in the world, without the need for international shipping.
    • Enhanced customer experience: Digital downloads offer a seamless and efficient purchasing experience for customers, allowing them to quickly and easily access their products.

WooCommerce is a highly versatile platform for selling digital products, and its true power comes from third-party plugins. With the right extensions, store owners can add licensing, subscriptions, memberships, and more to create a fully customized digital sales experience.

Katie KeithFounder & CEO

Read on or watch our video tutorial to get started with selling digital download products on WooCommerce.

What are WooCommerce virtual products?

With WooCommerce virtual products, you don't have to worry about maintaining your inventory or running out of stock with digital products, as they mainly comprise files stored on your web server. This means you're selling the same files time and again.

Moreover, virtual products in WooCommerce don't require customization of any kind. In contrast, physical products often require you to change their color, size, or any other attribute.

Types of virtual products

If you're new to the virtual product space, you might be wondering what sort of virtual products you can sell using WooCommerce. Here's a quick list of some of the most common types of virtual products online stores sell:

  • E-books (guides, how-to's, and recipes)
  • Video (such as online courses or training programs)
  • Software (such as web apps, game mods, plugins, presets, and tools)
  • Music and audio files (such as songs, sound clips, podcasts, and audiobooks)
  • Graphics (such as icon packs, font packs, PSDs, and themes and templates)
  • Photography
  • Documents (such as printables, guides, reports, white papers, templates, and checklists)
  • Memberships (if you have a membership WordPress site, you can sell memberships)

The great thing about WooCommerce downloadable products is that they are sustainable and can easily be replicated.

How to create digital and virtual products

Before you begin creating the product, it's a good idea to take a step back and gauge product demand. This way, you'll know if there's a market for the digital or virtual product you're looking to create.

You can do this by searching for the product keyword and related search queries in Google Trends.

Google Trends result

If you have multiple ideas for virtual products, you can compare them to see which one has a higher demand.

Once you've decided on a virtual product to sell, the next step is to see what's already out there. In other words, you want to check the market saturation to get an idea of the competition. Run a few Google searches to see who else is selling similar virtual products. This will help you get a better idea of the sort of quality people expect and the keywords they're using to search for these products.

Finally, you can begin creating your virtual downloadable product. For this, you will need to make sure you're using the right tool. This depends on the product you're looking to create. For example, if you wanted to create printables, you could use a free tool like Canva. And if you wanted to create sound clips, you might consider using Audacity.

Step-by-step guide on setting up WooCommerce pages to sell digital products

Here's what you need to do to start selling virtual products using WooCommerce.

Step 1: WooCommerce plugin installation and settings configuration

In order to sell virtual products via WooCommerce, you'll first have to install and activate the WooCommerce plugin.

Once the plugin has been activated, create the WooCommerce pages. Next, configure the plugin settings for digital products that you want to sell from your WordPress website. To do this, log into your WordPress admin panel and navigate to WooCommerce → Settings. From there, you'll be able to see an option Configure WooCommerce Settings for Digital Products - click on it and update the following settings:

  •  General settings tab – Limit the downloadable items purchase quantity to 1
  •  Inventory settings tab – Disable stock management
  •  Shipping settings tab – Disable shipping
  • Payment Gateways settings tab – Disable the payment options: Direct Bank Transfer and Cheque Payment. Enable the PayPal payment option and enter your PayPal email address
  • Emails settings tab – Configure your order notification settings and customize your chosen WooCommerce email templates

Step 2: Product categories creation

When setting up your online store with WooCommerce, it's important to have a clear and organized structure in place for your products. One way to achieve this is by setting up product categories before adding products. By creating categories, you can group related products together, making it easier for customers to navigate and find what they're looking for.

To set up product categories in WooCommerce, go to Products → Categories in the WordPress admin. From there, you can add new categories, edit existing ones, and assign products to specific categories.

When creating categories, it's important to keep your target audience in mind and think about how they would search for and navigate your products. You may want to consider creating broad categories that encompass a range of products, as well as more specific subcategories for niche or specialized products.

In addition to improving the user experience for your customers, setting up product categories can also make it easier to manage your inventory and track sales data. With a clear and organized structure in place, you can more effectively analyze which categories and products are performing well and adjust your marketing and sales strategies accordingly. So before adding products to your WooCommerce store, take the time to set up product categories and create a strong foundation for your online store.

Step 3: Addition of virtual products in WooCommerce

In the third step, you will need to add your digital products (that you need to make available for download). To do this, go to ProductsAdd Product (as shown in the screenshot below).

Clicking on the Add Product option will redirect you to the product creation form. Fill in the below fields:

  • Title
  • Long product description
  • Short description
  • Select the product category
  • Set a featured image
  • Insert additional thumbnail images (if necessary)
  • Price

In order to make your digital products downloadable, scroll down to the Product data section and do the following:

From the Product data metabox, choose the Simple Product option from the drop-down. Check both the Virtual and Downloadable check-boxes, as shown in the below screenshot:

Virtual Downloadable WooCommerce ProductsNext, assign a value to the Regular Price field. From the Downloadable Files path, click on the Upload a File option and copy the Link URL. Click on the Save Changes button, then paste the URL of the digital product you've just uploaded into the File Path field.

If required, you can choose to set a download expiry date for the product download link. This will stop the products from getting downloaded after the link expires.

Understanding the order process

So, now that you have carried out the most crucial steps of setting up your WooCommerce pages selling your digital products, you might be interested to know how a digital product order is processed. Let's take a look at the order process:

When a customer makes a payment via PayPal, any one of the following things can happen:

  • If all the items (or products) in the order are downloadable and virtual, then the order will complete
  • Or else, the order will continue processing till the time you change it

After completion of the order, or when the Grant access to downloadable products after the payment option is enabled, the user who has purchased the products will:

  • Be given permission to download the purchased products
  • Receive the download links for the purchased products on the order received page
  • Receive email notification that contains the download links
  • Be able to see the download links, once they are logged into their My Account page.

Get more sales with WooCommerce Product Tables

Your store can be reasonably successful if you set it up with the built-in layouts that come with WooCommerce and your theme. For greater success, it's worth doing some work to optimize your WooCommerce conversion rate.

Buy Plugin

The WooCommerce Product Table plugin gives you lots of flexibility about how to display your products. It lists products in a table and you can choose from dozens of options about how to present the table and what data to include. This can help to increase your sales and make your store more successful.

Case study: digital event tickets

Dare to Date product table

Dare to Date uses WooCommerce Product Table to list upcoming events in a neat and organized front-end table layout. Event-goers can search for events based on the type of event, location, gender, and age.

How to list virtual products using WooCommerce Product Table

The key benefit of listing virtual products using WooCommerce Product Table is that it makes it easier for customers to find what they're looking for.

Generally speaking, virtual products aren't image-centric. What this means is that they don't require the large images that physical products do. For this reason, the default WooCommerce store layout isn't ideal for selling WooCommerce downloadable products.

If you're selling lots of virtual products, showcasing them in a product table layout is the best option. Using the WooCommerce Product Table plugin, you can choose which columns to show in the front-end table layout.

WooCommerce Product Table with embedded audio

For example, if you sell audio tracks, you might include columns for product image, SKU, product name, sale price, download limit, and add to cart button (or checkbox). To boost sales, you could even include an embedded audio player column which gives customers a quick preview of the audio track.

WooCommerce Product Table lets you embed video and audio content directly in the table layout. You can also choose to add a search bar and filter options to make it easier for customers to find what they're looking for.

Use WooCommerce Quick View Pro to provide additional product details

You can use WooCommerce Product Table with the WooCommerce Quick View Pro plugin to provide even more information about each virtual product. This is especially useful if you're selling WooCommerce downloadable variable products with variations.

Quick view lightbox with virtual product

Customers can simply click the quick view button in the product table to view additional product details in a lightbox. They can also set purchase options and add the types of products to the cart directly from the quick-view lightbox. The key benefit of using WooCommerce Quick View Pro is that customers don't have to navigate to a single product page.

You can use WooCommerce Product Table with the WooCommerce Quick View Pro plugin to provide even more information about each virtual product. Additionally, if you're looking to add or allow customers to attach PDFs to your WooCommerce products, we have a comprehensive guide that will take you through the process step-by-step. This is especially useful if you're selling WooCommerce downloadable variable products with variations.

How to make digital products private with WooCommerce Protected Categories

Depending on the types of virtual products you're selling, you might need a way to make them private.

For example, you might need to sell private WooCommerce downloadable products that are unique to individual customers or clients. This could be an album from a photoshoot you did for a client's birthday party or wedding.

Or you might want to make certain virtual products in WooCommerce only available to registered members. For instance, you might want to sell guides, reports, or printables to members only through your membership site's merch store.

The easiest way to make digital products private is by using the WooCommerce Protected Categories plugin.

In addition to setting up your store to sell digital products, if you're looking to enhance your product pages by adding downloadable PDFs or allowing customers to upload their own PDFs during the purchase process, check out our guide on how to attach PDF files to your WooCommerce products.

How to send digital or virtual products to the client

One of the most important aspects of selling virtual products in WooCommerce is getting downloadable goods over to the customer. Of course, customers can always download them directly from your site after checkout page. However, if you need a way to send virtual products to your clients you can:

  • Use the downloadable product type to automatically send a file or file url to the customer's email after they complete their purchase. This way, they can download the files directly from their inbox.
  • Alternatively, you can use the Follow-Ups plugin to send an email containing information that explains the next steps. For example, this might contain event tickets, image file downloads, or details of how to access to WooCommerce downloadable products.

Customizing the digital download experience for customers

Offering paid or free digital downloads can be a great way to attract new customers and build brand awareness. However, to truly stand out and provide a great user experience, it's important to customize the digital download experience for your customers. Here are some tips on how to do this:

  1. Personalize the download page: Instead of a generic download page, create a customized shop page for your customers that features your branding and provides additional information about your products and services. This can help build trust with your customers and encourage them to explore your website further.
  2. Add social sharing buttons: Encourage customers to share your paid or free digital downloads with their friends and followers by adding social sharing buttons to the download page. This can help increase your reach and attract new customers to your website.
  3. Collect customer data: While offering free digital downloads can be a great way to attract new customers, it's also important to collect data from those who download your products. This can include their name, email address, and other relevant information that can help you personalize your marketing efforts and improve the customer experience.
  4. Follow up with customers: After a customer downloads a paid or free product from your website, consider following up with them to thank them for their interest and provide additional information about your products and services. This can help build a relationship with your customers and encourage them to make a purchase in the future.
  5. Offer additional free resources: To further engage your customers and provide value, consider offering additional free resources such as e-books, tutorials, or templates. This can help position your brand as an authority in your industry and attract more customers to your website.

Promoting digital downloads on your WooCommerce store

To maximize the impact of your pair or free downloads, it's important to promote them effectively. Here are some tips for promoting digital downloads on your WooCommerce store:

  1. Highlight your downloads on your homepage: Make sure your downloads are prominently displayed on your homepage so that visitors can easily find them. You can use eye-catching graphics and headlines to draw attention to your downloads and encourage visitors to explore your website further.
  2. Use targeted email marketing: If you have a mailing list of subscribers, consider sending out a targeted email promoting your paid and free downloads. You can also segment your list based on interests or previous purchases to ensure that your message is relevant to each recipient.
  3. Leverage social media: Social media can be a powerful tool for promoting your downloads. Consider creating eye-catching graphics or videos that showcase your paid and free downloads and share them on your social media channels. You can also use hashtags and targeted ads to reach new audiences.
  4. Collaborate with influencers: Partnering with influencers in your industry can be a great way to reach new audiences and promote your downloads. Consider reaching out to influencers who have a following that aligns with your target audience and offering them a free download in exchange for promotion.
  5. Offer exclusive free downloads: To incentivize customers to sign up for your mailing list or follow you on social media, consider offering exclusive free downloads that are only available to subscribers or followers.

Standalone plugins to enable digital downloads on your WooCommerce store

There are number of useful digital download plugins available for WooCommerce. Consider adding one from the list below to speed things up for you and your customers.

1. Ultimate Downloadable Products for WooCommerce

Plugin listing for Ultimate Downloadable Products for WooCommerce

Ultimate Downloadable Products for WooCommerce makes it easy to showcase downloadable files directly on product pages. Perfect for selling digital products, this plugin helps you provide a clear preview of what customers will receive after purchase, improving transparency and boosting sales.

Pros & cons:

  • Comprehensive free version available with optional pro features
  • 5 star rating from users (at the time of writing)
  • Very limited user base

2. Digital Goods for WooCommerce Checkout

Plugin listing for Digital Goods for WooCommerce Checkout

The Digital Download Goods Checkout plugin helps to remove unnecessary fields from the checkout page and make the process smooth and easy for customers. For example, if you are selling digital products then you might not need customer’s billing and shipping address.

Pros & cons:

  • You can sell various types of downloads. For example pdf, ebook, photo, music, video, audio, mp3, etc
  • Includes a "quick checkout" button
  • Limited features in the lite version

3. WooCommerce Subscription Downloads

Plugin listing for WooCommerce Subscription Downloads

WooCommerce Subscription Downloads enables you to offer downloadable products to your subscribers, while maintaining individual listings for each of your downloadable products, having them sold individually via your store, as well as via the subscription.

Pros & cons:

  • Quick and easy configuration
  • Adds a 'Subscriptions' field to the product data meta box
  • No free version available
  • No reviews from users are displayed (at the time of writing)

Bonus: selling digital subscription products with WooCommerce Subscriptions

One of the most popular types of virtual products is memberships and subscriptions. Selling subscription products is a great way to generate recurring revenue.

You can use WooCommerce with the official YITH WooCommerce Subscriptions add-on to sell digital subscription products through your online store. This helps you set up an ongoing payment plan for your products or services.

Start selling virtual products using WooCommerce

Apart from setting up any standard website or blog, there are so many things that you can do with WordPress.

In this post, we have discussed how you can easily sell digital products through your WordPress e-commerce website, thanks to the WooCommerce plugin and WooCommerce Product Table. Hopefully reading this will help you learn about the basics of how you can sell digital products by setting up WooCommerce pages.

WooCommerce Private Store unlock user role

How to use the new feature

  1. Update to version 1.6 of WooCommerce Private Store.
  2. Go to the plugin settings page at WooCommerce > Settings > Private Store.
  3. Enable the 'Logged In Users' option and select one or more rows in the new option that appears underneath.

We recommend doing this if your WordPress site allows user registration for purposes other than the private store. For example, if people can create a 'Subscriber' account in order to comment on your blog, then you can exclude Subscribers from the private store and just make it available to Customers. If you have custom user roles such as 'Wholesale' then you can also select these.

Whichever roles you select, we also recommend selecting 'Administrator' and 'Store Manager' so that you can easily access the store while you're working on it.

Where to get the plugin

If you're already using WooCommerce Private Store, then you can update to version 1.6 from the WordPress Dashboard.

If you don't already have it, get WooCommerce Private Store today. You can download the latest version of the plugin from the order confirmation page, and you'll also receive it by email. That way, you can get it set up straight away.

WooCommerce frontend editor plugin

WooCommerce Product Table is perfect for creating a simple product list or quick order form. Keep reading to discover 2 easy ways to allow your users to edit the products in the table directly from the front end of your website, or from a user-friendly spreadsheet view. At the end, you'll know how to create the ultimate WooCommerce product front end editor.

Used alone, WooCommerce Product Table is a great way to list products. However, the table is for displaying public information which isn't editable from the front end.

We've previously told you how your users can submit products to your WooCommerce store and display them in a product table. Since then, lots of you have requested a way to allow your staff or customers to edit the products in the table from the front end, without having to access the WordPress admin. If you want to allow users to edit products from the table, then you need to follow this tutorial. We will show you how to create an editable frontend table for your WooCommerce store using either of these tools:

  1. Setary is a user-friendly spreadsheet app for WooCommerce. It makes it easy for customers to update products and variations, either directly in the spreadsheet or by using bulk edit forms.
  2. WP Sheet Editor is a WordPress plugin which allows WordPress users to edit the products in the table directly from the front end of your website.
WooCommerce front end product editor plugin

Why do I need a WooCommerce front end editor?

Normally, you can only edit WooCommerce products via the WordPress back end. This involves visiting multiple product pages and can be time-consuming if you have lots of changes to make. A front end spreadsheet-style editor significantly speeds up your product and inventory management.

A WooCommerce product front end editor can help with many different scenarios. For example:

  • Your employees might need to edit products, but you don't want to let them loose in the WordPress back end. Instead, keep it simple by providing a front end product editor that only a specific user role can access.
  • If you're creating a WooCommerce multi-vendor marketplace then you can list each vendor's products in a different table or order form. You can then add a front end editor to allow your vendors to edit their own products without having to use the WordPress admin.
  • Perhaps you allow users to upload their own products to your store. Add a WooCommerce front end editor so that each user can edit their own products, but not anyone else's.

Keep reading to learn how to use WooCommerce Product Table to create non-editable order forms so that customers can buy products more quickly. After that, I'll show you how to integrate a front end or spreadsheet-style editor to your store so that relevant people can edit products outside of the WordPress admin.

1. Create the product table

WooCommerce order form plugin

The first step is to list some or all of your products in a product table view. This is the view that your customers will see when they visit your store. Later, you'll learn how to add an 'Edit' button which will take logged in users to the WooCommerce product front end editor (depending on their role).

To set it up, get WooCommerce Product Table and follow the instructions in the 'Getting started' email.

The plugin knowledge base is hugely comprehensive. It includes instructions on everything you need, including which columns to include in the table, how to add filters to help people to find products more easily, how to display product variations, and more.

You can either create a table containing all your products, or you can create tables listing specific products (e.g. products from a specific brand or vendor only).

2. Install a front editor or spreadsheet plugin

For this section, you have a choice of 2 plugins to choose from:

  1. Setary - the user-friendly spreadsheet app for WooCommerce. No WordPress logins required.
  2. WP Sheet Editor - the WordPress plugin which adds a front end spreadsheet editor to your site, which is only accessible to certain user roles.

2a. The Setary bulk editing spreadsheet app

I love Setary because it's just so easy to set up. As you can see by how short the following instructions are, it's far easier to configure than WP Sheet Editor!

  1. Choose a Setary plan and start your 7-day free trial.
  2. Follow the onscreen prompts to install the Setary helper plugin on your WordPress site.
  3. Next, the Setary app will open with all your products and variations listed in the spreadsheet.
  4. Use the 'Columns' option to choose which columns to include.
    Setary WooCommerce spreadsheet bulk editor columns
  5. Use the advanced filters and search box to select specific products to edit.
    Setary filter by attribute and change stock in bulk edit spreadsheet
  6. Select multiple products and use the 'Bulk Actions' button to apply quick bulk actions via a form.
    Setary bulk price update
  7. You can also use the 'Views' option to save time by saving your favorite filter combinations for future access.

2b. WP Sheet Editor's frontend editor plugin

WP Sheet Editor is a collection of plugins that provide an easy-to-use front end table editor for any information that is stored in the WordPress database - including WooCommerce products. Their Universal Frontend Editor plugin creates a spreadsheet-style WooCommerce front end editor for the products in your table.

  1. First, buy and install the plugin on your WordPress site.
  2. In the WordPress admin, go to Frontend Sheet → All Spreadsheets:
    WordPress table front end editor create spreadsheet
  3. Once there, click on Add New to create a new table editor for your WooCommerce products:
    WordPress spreadsheet editor add new
  4. Now you need to enter the editor title. This title is private and is only used for identifying the editors in the backend. You may call it something like Manage Products.
    WooCommerce product front end editor add
  5. Then, select the post type you want to edit with it. In this case, you need to select Products. Next, click Save changes:
    WooCommerce front end editor products post type
  6. After that, you'll see that the plugin will generate a shortcode - copy this for later.
  7. Next, you need to decide which tools to include in the WooCommerce frontend editor. Think about what you want people to be able to edit from the front end, and only include tools they actually need. In the settings for your spreadsheet, select which tools to show on the Primary toolbar and the Secondary toolbar of the editor:
    WooCommerce select front end editable columns
  8. After selecting the tools that will appear on the toolbar, you need to select the columns you'll display on the spreadsheet-style inline product editor. The list of columns automatically detects all the fields that are available for your products. This includes fields added by other plugins, such as YITH WooCommerce subscriptions, Advanced Custom Fields, all the WooCommerce extensions, etc. So you can easily enable, disable, sort, or rename any field.
  9. You can create multiple editors for different users based on their needs. For example, you might add one editor with full columns for shop managers, and a simple editor with fewer columns for employees. I generally recommend having the same columns in your public-facing product table and the front end editor. That way, users will see the information in the same format as they switch between the main product table and the spreadsheet editor views.
    WooCommerce product front end editor columns
  10. Once you're done configuring the frontend editor, click on Publish to finish.
  11. Finally, we need to create a page and add the WooCommerce product front end editor to it. To do this, copy the shortcode from step 6, above. Now go to Pages → Add New to create a new page for the frontend editor:
    Create page for WooCommerce product frontend editor
  12. Once here, just enter the page title (we'll call it Edit Products), paste the shortcode in the page content, and select a Full width page template (if your theme has one). Finally, click on Publish.

Note. If you have a marketplace with multiple vendors, the frontend editor integrates with Dokan, WooCommerce Frontend Manager, and WooCommerce Marketplace. The integration works like this:

  • Vendors will view and edit products created by them only.
  • The editor settings have the option to display a button inside the marketplace dashboard. This allows vendors to launch the inline spreadsheet editor from their own dashboards, as well as by using the other methods discussed in this tutorial.

Now, it's time to integrate the new frontend editor with the public-facing product table that you created in Step 1.

3. Add an 'Edit' link to the product table

In Step 1, we used WooCommerce Product Table to list products in a public-facing table view. In step 2, we set up either the Setary or WP Sheet Editor spreadsheet-style editors.

Now, we need to add an 'Edit' link so that people can get from the table view to the front end product editor.

To do this, we'll add a button titled Edit store above the product table so that users can log in to start editing products right there.

  1. Go to the page where you used WooCommerce Product Table to add a product table, and add a new link or button. This should either link to the Setary app, or the page where you added the WP Sheet Editor shortcode.
    Add edit link to WooCommerce Product Table
  2. Finally, Update the page to add the button to it.

Optional - Hide the 'Edit' link from normal customers

You might want everyone to be able to see the 'Edit' link, as it provides a simple way for guests to log into their account before editing the products in the table. Alternatively, you can hide it from public view so that only certain logged in users see it.

There are a few options for hiding the edit link:

  • Instead of adding an 'Edit' link to the same page as your product table, you can give certain users a direct link to the page containing the frontend product editor.
  • You can add the edit link to a more subtle location such as the footer.
  • Or if you prefer, you can install the Advanced Access Manager plugin. This plugin comes with shortcodes which you can use to make the button visible to users with a specific role, and hidden from everyone else. This is a neat compromise because you can still add the Edit link above your product table, but only the appropriate people can see it.

4. Test out the WooCommerce product front end editor

After these steps, users will be able to see the Edit Store button above the product table.

WooCommerce Product Table edit button

And when they hit that button, they will be asked to log in to start editing the products. For Setary, they will have to log into the Setary app. For WP Front End editor, it will be your WordPress login page:

Login to edit WooCommerce products

After they log in, users will be able to use the frontend editor:

WooCommerce front end product editor plugin

5. Who can use the WooCommerce frontend editor?

Only logged in users with the correct permissions can see the WooCommerce frontend editor, so you don't need to worry about customers accidentally accessing it.

For Setary, you must be logged into the Setary app. You can give access to whichever of your colleagues and/or clients need to edit products. It doesn't matter whether or not they have WordPress admin logins.

For WP Sheet Editor, the WooCommerce products frontend editor is available only for logged-in users. Logged out users or guests will see a login form when they click the 'Edit' button. It uses the default permissions from WordPress, so the products can be edited by these roles:

  • editor
  • administrator
  • shop manager
  • any user role that has the "edit_products" capability

You can create new user roles with the free user role editor plugin and assign it with the "product" capabilities. This is helpful if you want to allow users to edit products without having permission for anything else.

Just want users to edit their own products?

If you've set up your site to allow users to upload their own products, then you might want them to be able to edit these products but not anyone else's. This isn't possible with Setary, so if you need this then you should use a different tool instead. Here are some options:

  • WP Sheet Editor has an option to allow users to add new products to the table, as well as existing existing ones. If you use this to accept front end product submissions, then each user will automatically only be able to edit their own products in future.
  • If you're using Dokan, WooCommerce Frontend Manager or WooCommerce Marketplace, then logged in product vendors can only view and edit their own products.
  • If you're using Gravity Forms to allow front end product submissions, then you can use the free User Role Editor plugin to edit the appropriate user role, adding the capability "edit products" and removing the capability "edit others products".

Where to get the plugins

You'll need 2 plugins to list information in an interactive table with frontend editing capabilities:

  1. WooCommerce Product Table - creates the product table that your public visitors will see.
  2. Setary - add and edit products via a spreadsheet editor with bulk edit forms so that users with Setary access can edit the products in the table.
  3. Universal Frontend Editor - creates a spreadsheet editor so that logged in users with the correct role can edit the products in the table.

Get the plugins today, and then follow this tutorial to set it all up!

Example of WooCommerce reorder plugin

If you want to turn one-time customers into repeat customers, a WooCommerce reorder plugin might be just what you need. It makes it easy for your customers to reorder products they've already purchased, which increases the chances of them making another purchase from your store.

This is essential because the chances of a customer returning to your ecommerce store become higher as customers make more purchases. The likelihood of a shopper making another purchase is only 27% after their first purchase, but if you can get them to check out again and make a second purchase, it jumps to 45% that they'll make a third purchase.

Additionally, on average, 41% of a store's revenue comes from just 8% of its customers, so these repeat customers are incredibly valuable.

In this post, you'll learn how to use a WooCommerce reorder plugin to encourage shoppers to order again by simplifying the process for them.

Note - we recognize that "reorder" can mean two different things. If you're looking for a post on how to rearrange WooCommerce products, we also briefly cover that (though it's not our main focus) - you can click here to skip to that section.

The best WooCommerce reorder plugin

A good WooCommerce reorder plugin benefits your store in a few different ways:

  • It makes it easier for customers to find products they've already purchased when they come back to your store. This creates a better user experience.
  • It offers a subtle reminder for customers to repurchase, which can lead to more sales. It's a bit like upselling, but for products that shoppers have already ordered.
  • You can showcase price differences, like making sure they see a sale on a product they've already purchased.

To achieve these benefits, you can use the WooCommerce Product Table plugin.

This WooCommerce re-order plugin lets you display your WooCommerce products in a flexible table layout. You can control exactly what information displays in the table and how it's ordered.

While WooCommerce Product Table lets you display any of your WooCommerce products, one of its filter options lets you display only products that the current user has purchased.

This is what lets you use it as a WooCommerce re-order plugin.

You can then display these products anywhere on your site. You could:

  • Add a "My Products" section to the existing WooCommerce Account page. This is the same page that lists WooCommerce orders.
  • Create a dedicated "Reorder Products" page for logged-in users if you want to really promote repeat orders.
  • Create a public page that displays all your products to anonymous shoppers and a user's products to logged-in users. You can rank this in Google, which is a nice benefit.

How to set up the WooCommerce reorder plugin

There are two steps to setting up the WooCommerce reorder plugin:

  1. Configure your table layout on the backend and generate shortcode This is the same for all scenarios.
  2. Add your table layout to the front-end of your site This depends on where you want to display your reorder products table.

1. Configure your table layout and generate shortcode

To get started, install and activate the WooCommerce Product Table plugin. Activating it will launch the table builder. Use it to create your first table of products to reorder.

You should go through all of the settings, but the most important options to consider are:

  • Columns - controls the information that appears for each product.
    WPT table builder columns
  • Add to cart column - controls the reorder button and how the add to cart process functions. For example, you can set up one-click add to cart or use checkboxes.
    Add to cart page of WooCommerce product table builder
  • Sort and filter - these let you add filters and search boxes.
    WooCommerce Product Table builder filter dropdowns
  • Copy the shortcode from the final page of the table builder:

Ready - Final screen of table builder

2. Add table to front-end of store

Now, you need to add the shortcode to the front-end of your store where you want it to display. There are a few different places that you can add it, depending on who you want to see the product table. Whichever of the locations discussed below you decide to use, add the table to the page using the shortcode you copied a minute ago.

The original shortcode will look something like [product_table id="1"]

Edit it to tell it to only list products that the current user has previously ordered:

[product_table id="1" user_products="true"]

The user_products parameter tells the plugin to only display products that a user has previously purchased.

My Account page

WooCommerce reorder plugin on my account page

To add the WooCommerce reorder plugin to the existing my account page, you can use the WooCommerce Account Pages plugin from IconicWP.

For full instructions on how to set this up, check out this post.

Private dedicated page

Example of WooCommerce reorder plugin

Another option is to create a dedicated private page that only logged-in customers can see. This can help you better promote product reordering.

To make sure that only logged-in users can see the page, you can use the free Restrict User Access plugin.

For full instructions on how to set this up, check out this post.

Public page

Finally, you can create a public page that shows different products to different users:

  • Existing customers will see a list of their previously purchased products.
  • Anonymous shoppers will see a list of all your products.

To set this up, you can use the Advanced Access Manager WordPress plugin.

For full instructions, check out this post.

Bonus: Add product quick view

If you want to show more detail about each product, like its add-ons or a lengthier description, you can use the WooCommerce Quick View Pro plugin to add product quick view to your WooCommerce reorder plugin. When you use both plugins together, a 'Quick View' column appears in the list of WooCommerce Product Table columns when you create the table.

Get started with a WooCommerce reorder plugin today

Repeat customers are the lifeblood of your ecommerce store, so you want to make it as easy as possible for customers to reorder the products that you already know they love.

To accomplish this, you need a WooCommerce reorder plugin like WooCommerce Product Table.

WooCommerce Product Table lets you list a shopper's previously ordered products in a flexible table layout. You can then display these products anywhere on your site to promote repeat orders.

Bonus: How to rearrange products with WooCommerce Product Table

While we've focused on helping shoppers reorder products, it can also be useful to change the order of products which, as we mentioned before, is another interpretation of a WooCommerce re-order plugin.

Thankfully, you can also accomplish this with the same WooCommerce Product Table plugin that we featured above!

First off, you can control the default sorting for your products, which lets you rearrange your products by any criteria and choose the sort order/default product sorting:

Rearrange WooCommerce products

You can also split up your products into different tables using include/exclude rules.

For example, if you wanted to feature a specific set of products at the top, you could assign a "Featured" tag to those products and then create a table specifically dedicated to just the featured products using the following shortcode:

[product_table tag="featured"]

You can also create any other arrangement that works for your store.

WooCommerce shortcodes

WooCommerce shortcodes display information from your shop in new and exciting ways. The core WooCommerce plugin comes pre-built with shortcodes, and you can install plugins to add more. Whether you want to list products in a table, display the cart anywhere on your site, or something else - you've come to the right place!

You've probably come across shortcodes before, whether you’re new to WordPress or have been using it for some time. Shortcodes are, as the name suggests, short pieces of code that perform some sort of function. WooCommerce shortcodes, for example, let you add neat WooCommerce-related functions to WordPress pages, posts, sidebars, and widgetized areas on your website.

For example, you can use WooCommerce shortcodes to:

  • Display a list of top rated products on your homepage.
  • Showcase related products whenever a customer expresses an interest in a product.
  • Highlight featured products in Gutenberg blocks, sidebars, other widgetized areas.
  • Create quick one-page order forms.
An example of a WooCommerce Product Table with variations.
This store uses the WooCommerce Product Table shortcode to create a quick one-page order form

In this complete guide, we’ll explain how you can use WooCommerce shortcodes to deliver better user experiences and grow your bottom line. We'll look at the shortcodes that come with WooCommerce itself, and shortcodes that you can add with other plugins.

What are WooCommerce shortcodes?

A shortcode is a specially formatted text tag that opens and closes with square brackets. You can insert shortcodes into WordPress posts and pages as well as other areas (such as the sidebar) that support shortcodes.

WordPress itself comes with many shortcodes, such as the gallery shortcode. In the context of WooCommerce, the WooCommerce shop page shortcodes let you display products and other elements of your shop.

How to use WooCommerce shortcodes

If you're wondering "How to use shortcode in WooCommerce?" then it's not as hard as you might think. Shortcodes look and sound technical, but they're actually designed for anyone to use. You don't need any coding skills.

  1. Go to the page, post or widget where you want to add the shortcode.
  2. Simply insert the shortcode into any text editor within WordPress, or to a 'Shortcode' block if you're using Gutenberg or a page builder such as Elementor or Divi Builder:
    WooCommerce Product Table Gutenberg Block
    This website has added the WooCommerce Product Table shortcode to a Shortcode Gutenberg block.

You can combine shortcodes and display multiple shortcodes on a single page. For example, you might combine a product table shortcode with a WooCommerce checkout shortcode. All you have to do is insert both shortcodes on the same page. It would look something like this:

WooCommerce One Page Checkout Plugin
This website uses the WooCommerce checkout shortcode and WooCommerce Product Table shortcodes to create a one-page shopping experience.

Complete list of WooCommerce shortcodes

Here’s a quick breakdown of the most useful WooCommerce shortcodes. Some of these use WooCommerce on its own, and others require a plugin. I'll tell you about each shortcode and its options in detail underneath.

Plugin Required Shortcode Name Basic Shortcode Description
Product list shortcodes
None Products [products] Lists products in a grid layout
WooCommerce Product Table Product table [product_table] Lists products in a table layout
None or WooCommerce Product Table Product category [product_category category="clothing"] Lists products from a specific category
None Product categories [product_categories] Lists the categories from your store
None or WooCommerce Product Table Recent products [recent_products] Lists recently added products
None or WooCommerce Product Table Featured products [featured_products] Lists featured products
None or WooCommerce Product Table Bestselling products [best_selling_products] Lists most popular products
None Sale products [sale_products] Lists on-sale products
None Top rated products [top_rated_products] Lists top rated products
None or WooCommerce Product Table Related products [related_products] Lists related products
None or WooCommerce Product Table Product attribute [product_attribute attribute="color" terms="red"] List products with a certain attribute
None or WooCommerce Product Table Product tags [product_tags] List product tags (or products by tag)
WooCommerce Bulk Variations Bulk variations [bulk_variations id="123"] Displays an order form of variations for a specific product
WooCommerce Product Filters Product filters [product_filters id="1"] Displays a group of filters on a product listing page
Displaying information about products
WooCommerce Quick View Pro Quick view [quick_view id="123"] Displays quick view buttons for a product
None Product page shortcode [product_page id="123"] Inserts the content from a product page
None or WooCommerce Product Table Add to cart [add_to_cart id="123"] Displays the add to cart button for a specific product
None Product reviews [product_reviews id="123"] Displays the reviews for a specific product
WooCommerce page shortcodes
None WooCommerce cart [woocommerce_cart] Displays the content of the cart page
None WooCommerce checkout [woocommerce_checkout] Displays the content of the checkout page
None WooCommerce order tracking [woocommerce_order_tracking] Displays the content of the cart page
None WooCommerce my account [woocommerce_my_account] Displays the content of the cart page

How to use product list, table and grid shortcodes (complete list)

There are many shortcodes for listing products in different ways. These add extra flexibility, so you're not stuck with the restricted views that you get on the shop and category pages. Instead, you can use WooCommerce shop page shortcodes to list products literally anywhere on your WordPress site - either in a grid or table layout.

1. How to list specific products in a grid layout

WooCommerce has a shortcode that lets you list specific products in a grid layout: [products ids="83,68,70,66,64,62"]

Displaying multiple WooCommerce products

You can also add other parameters to it, such as choosing the number of products per row, the sort order, and more.

I also like using this WooCommerce shortcode to list individual products with an add to cart button. For example, this is a good way to get more conversions for products you're discussing in blog posts:

Add to cart button in a blog post
Example of the add to cart button shortcode within a blog post

2. How to list specific products in a table layout

WooCommerce Product Table screenshot

While the built-in WooCommerce products shortcode is pretty flexible, it only lets you display them in a grid layout. That's not ideal for stores wanting to show more products per page, for example if you're creating a quick one-page order form or wholesale store. In that case, you might be better off with a product table shortcode.

You can easily add this with the WooCommerce Product Table plugin. The basic shortcode is [product_table] and you can configure this using over 50 shortcode options. You can display absolutely any type of product data, including all the built-in product data and custom fields. There are lots of options for choosing which products to include, such as products by category, tag, date, and more.

3. How to list products from specific categories in a grid

The Product category shortcode lists products from a specific category in a standard grid layout, for example:

[product_category category="clothing" per_page="12" columns="4" orderby="default" order="asc" operator="in"]

Display products from a specific category with quick view buttons

If you don't like the grid layout, or if you want more control over what information to display about each product, then you can use the WooCommerce Product Table shortcode instead. The WooCommerce Product Table plugin comes with a category shortcode option, which you can use to list products from specific categories only:

[product_table category="clothing"]

Unlike the built-in [product_category] shortcode, you can choose which columns of information to display about each product, and allow customers to select variations and choose quantities directly from the product table. This makes shopping much faster and boosts your conversion rate.

4. How to show your product categories in a list

The Product categories shortcodes lists your product categories, instead of the products within them. For example, [product_categories orderby="name" order="asc"] will list your WooCommerce categories, ordered by name.

Showcasing WooCommerce product categories using a shortcode

Shortcode options:

  • limit controls the number of categories that are displayed.
  • orderby controls the sort order; "name" and "date" are valid options.
  • order represents the order of product categories, i.e. "ASC" or "DESC".
  • columns show the number of columns the categories are arranged into.
  • hide_empty is used for hiding product categories with no products.
  • parent lets you only showcase top-level product categories.
  • ids represent that category IDs can be set according to only output specified results.

5. How to show a grid of products by SKU

The WooCommerce Products by SKU shortcode creates a grid of products with specific SKU's. For example:

[products_by_sku skus="123,234,345" limit="10"]

6. How to display products recently added to the store

The WooCommerce Recent products shortcode displays the products you've recently added to your ecommerce store, for example:

[recent_products per_page="8" columns="4" orderby="date" order="asc"]

Most recent products on the front-end

However, if you want to display the actual date the product was added to your online store, or if you want more control, then you can use the WooCommerce Product Table plugin instead. Simply order the product table by date in descending order, and use the product limit number to control how many products to include:

[product_table sort_by="date" sort_order="desc" product_limit="5"]
Display WooCommerce recent products by date

If you include a date column in the table, then customers can easily see which products were recently added to the store.

The Featured products WooCommerce shortcode lists featured products separately from the rest of your store:

[featured_products per_page="6" columns="3" orderby="date" order="desc"]

Use it to list featured products anywhere you like, for example in blog posts or other pages. For example, you might want to feature specific t-shirts or caps.

Featured products are WooCommerce products that have a blue star icon next to them on the All Products page:

Featured WooCommerce products back-end

The output should look something like this:

Listing featured products front-end using WooCommerce shortcodes

Again, if you don't like the image grid then you can list featured products using the WooCommerce Product Table plugin shortcode instead:

[product_table term="product_visibility:featured"]

This lists featured products in a table layout, with whichever columns of information you like.

8. How to display best-selling products in a grid

Use this WooCommerce shortcode to display your all-time best selling products in a grid:
[best_selling_products per_page="6" columns="3" orderby="date" order="asc"]

List all best-selling products using WooCommerce shortcodes

The quick view buttons appear on the front-end if you have the WooCommerce Quick View Pro plugin installed, otherwise you just get add to cart buttons.

If you'd prefer a table layout then you can also list bestselling or popular products with the WooCommerce Product Table shortcode like this:
[product_table sort_by="popularity" sort_order="desc" product_limit=5]

9. How to show products that are on sale

The Sale products shortcode showcases products currently on sale, for example:

[sale_products per_page="6" columns="3" orderby="date" order="desc"]

List all WooCommerce products on sale

10. How to showcase top-rated products

You can use the Top Rated Products shortcode along with WooCommerce’s built-in reviews and ratings feature to showcase your top rated products:
[top_rated_products per_page="6" columns="3" orderby="date" order="asc"]

WooCommerce shortcode for top rated products

You can also list top rated products in a table view using the WooCommerce Product Table shortcode:

[product_table sort_by="reviews" sort_order="desc" product_limit="5"]

Related products are a list of products that are similar to the product that the customer is browsing. These normally appear under the main product on the single product page. There are two ways to use a WooCommerce related products shortcode to list upsells and/or cross-sells elsewhere in your store:

How to list products related to the product the customer is browsing [default method]

The WooCommerce related products shortcode lists related products anywhere on your WordPress site. To use it, add the shortcode [related_products per_page="3"].

This related products shortcode uses the same layout as the single product page:

Related products on single product page
A single product page with related products listed at the bottom

As you can see, this layout takes up a lot of space per product. Customers have to click through to each product page to choose quantities and add the related products to the cart, which is bad user experience. If you're concerned about this, then consider using the related products table shortcode instead. I'll tell you about that next.

How to list products related to the product the customer is browsing [user-friendly method]

The WooCommerce Product Table plugin offers a more user-friendly way to list related products. You can use a shortcode to display related products anywhere on your site. They are listed in an order form layout, complete with quantity pickers, variation dropdowns and add to cart buttons. As a result, customers can choose options and add related products to the cart without leaving the current page.

WooCommerce related products table plugin
A product page with a related products table shortcode in the main description

For full instructions, read our tutorial How to add a WooCommerce related products table to your site (in 3 steps).

12. How to use product attribute shortcodes

You can also use a WooCommerce shortcode to create a grid of products with one or more specific attributes. For example, use this shortcode to list red or blue items:

[product_attribute attribute="color" terms="red,blue" operator="OR" limit="10" columns="3"]

Or to list products by attribute in a table layout, use the WooCommerce Product Table shortcode like this:

[product_table term="pa_color:black"]

13. How to display your store’s product with shortcodes

The tags shortcode lists the tags in your store, each one linking to the relevant tag archive.

[product_tags exclude="10,11" orderby="count" order="desc"]

This lists tags, rather than listing products with a certain tag. To do that, then you can use the WooCommerce Product Table shortcode to list products by tag in a table layout:

[product_table tag="samsung"]

14. How to use shortcodes to display a grid of variation products

The [bulk_variations id="123"] shortcode is added by the WooCommerce Bulk Variations plugin. It displays a quick-buying grid of all the variations for the selected product. You can either include quantity pickers and add to cart buttons so that customers can buy the variations; or use the shortcode to create a variation price matrix.

bulk order variations

15. How to insert product filters with shortcodes

The WooCommerce Product Filters plugin comes with a [product_filters id="123"] shortcode which you can use to insert filters on any page that you're using to list products. The ID refers to the filter group which you create using the plugin.

WooCommerce product filter AJAX plugin

16. How to add a live product search bar with shortcodes

A fast, intuitive product search is essential for improving the customer experience and increasing conversions in your WooCommerce store. If customers can't quickly find what they're looking for, they’re more likely to leave without making a purchase.

WooCommerce includes a built-in shortcode that lets you add a product search bar to any page, post, or widget area:

[woocommerce_product_search]

This shortcode outputs a live search bar that customers can use to instantly find products as they type.

You can place it on your homepage, shop sidebar, or landing pages to help customers quickly locate specific items. It’s especially useful on large stores with dozens or hundreds of products.

💡 Tip: For more advanced search with filters and AJAX results, consider using the WooCommerce Product Filters plugin alongside the search bar.

How to use individual product shortcodes

You can also use WooCommerce shortcodes to embed individual products, or information about them.

1. How to create a quick product view using shortcodes

A WooCommerce quick view shortcode provides an excellent way to learn more about products, choose options and add them to the cart without leaving the current page.

Install the WooCommerce Quick View Pro plugin and choose between two ways to add quick view buttons via a shortcode:

Using the the [products] shortcode for quick view

As we saw above, you can list one or more products using the WooCommerce [products] shortcode. This shortcode works seamlessly with WooCommerce Quick View Pro, which adds quick view buttons to the list of products like this:

Displaying multiple WooCommerce products with quick view buttons

Customers can open the lightbox to see/choose attributes and variations. They can then add to cart without having to visit the single product page.

Quick view lightbox
A quick view lightbox, accessed via a shortcode

Using the WooCommerce Quick View plugin shortcode

The Quick View Pro plugin also comes with its own WooCommerce quick view shortcode. This displays quick view buttons individually, so that you can easily insert them into other content on your site:

A blog post with quick view buttons added manually using a shortcode
  1. Simply add the shortcode [quick_view id="123"] shortcode, replacing "123" with the product ID.
  2. The button text is controlled from the WooCommerce Quick View plugin settings page. You can change it in the quick view shortcode like this: [quick_view id="123" text="Buy Hoodie"]

2. How to display contents of a product page with shortcodes

The product page shortcode displays the contents from the product page of a specific product, for example:

[product_page id="987"]

Simply enter the ID of the product that you wish to display.

WooCommerce Discount Manager product page content display

3. How to create an add to cart button with shortcodes

The WooCommerce plugin comes with a built-in [add_to_cart] shortcode which lets you insert an add to cart button for a specific product anywhere you like. Simply add the ID and/or SKU of the product you want to display the add to cart button for: [add_to_cart="68"]

If you want to include the product price, then use: [add_to_cart id="68" show_price="true"]

For simple products, this will display an add to cart button. For variable products, it will show a 'Select options' button like this:

Preview of Price/Cart button on the front-end

Personally, I don't like using this shortcode for variable products because customers have to visit the single product page to choose their variations. It's better to use WooCommerce Product Table to list one or more variable products in a table, complete with variation dropdowns:

WooCommerce pricing table plugin with variation dropdowns

That way, customers can select options and add to the cart from the page they're currently on.

If you'd rather display add to cart buttons for multiple products, or if you don't like the default format with the large image, then you can use WooCommerce Product Table instead. This works with WooCommerce Quick View Pro so that when you use both plugins together, quick view buttons appear alongside the add to cart buttons.

Choose which columns you wish to include in the product table (make sure you include the add-to-cart column!) and use the [product_table] shortcode to insert it anywhere you like. Use the include option to choose which products to include, for example: [product_table include="123,456"]

How to display product reviews with shortcodes

This shortcode displays the reviews for the product with the ID that you specify in the shortcode. For example:

[product_reviews id="123" limit="5"]

How to use WooCommerce shop page shortcodes

Now let's take a look at some of the most common WooCommerce shop page shortcodes. When you first install WooCommerce, it automatically creates most of these pages and adds the appropriate shortcode. You can also use the shortcodes to insert the content of these pages elsewhere on your site - for example, by using the WooCommerce checkout shortcode to display a one-page checkout form underneath a product table.

1. How to display the customer cart anywhere with shortcodes

The WooCommerce shopping cart shortcode - [woocommerce_cart] - displays the customer’s shopping cart on your WordPress website’s front-end. You can add it to WordPress pages or posts or display it in widgetized areas (such as the sidebar).

It will look something like this on the front-end:

Front-end preview of the WooCommerce shopping cart

Other cart shortcodes

In addition, WooCommerce provides some further shortcodes to display specific parts of the cart:

  • [woocommerce_cart_contents] - Use this shortcode to list the contents of the user's cart in a table.
  • [woocommerce_cart_total before="Total: "] - This shortcode will display the total price of all the items in the cart. The "before" parameter lets you choose what text appears before the total price.
  • [woocommerce_cart_coupon placeholder="Enter coupon code"] - Use this shortcode to insert the coupon code field which is normally found on the WooCommerce cart and checkout page. The "placeholder" parameter lets you change the text which appears in the coupon code field. You can get more shortcodes like this by installing the free Coupon Code Shortcodes plugin.
  • [woocommerce_cart_shipping before="Shipping: "] - This shortcode displays your store's shipping options, with an option to customize the text that appears before it.

2. How to display the checkout page anywhere with shortcodes

You can use the WooCommerce checkout shortcode - [woocommerce_checkout] - to add the contents of the checkout page anywhere on your ecommerce website. For example:

[woocommerce_checkout order_review="false" terms="false" privacy_policy="true" login_form="false"]

Preview of the WooCommerce checkout page

The WooCommerce checkout shortcode optionally includes billing details, order details, and the option to ship to a different address.

Other WooCommerce checkout shortcodes

In addition, WooCommerce provides some further shortcodes to display specific parts of the checkout:

  • [woocommerce_checkout_fields order="billing,shipping" fields="first_name,last_name,phone,email" required="first_name,email"] - Use this shortcode to display specific fields from the WooCommerce checkout and choose which ones are required.
  • [woocommerce_checkout_cart show_shipping="false" show_coupon="true" show_cart="false"]- Displays the cart contents on the checkout page, with customizable content.
  • [woocommerce_checkout_order_review show_shipping="true" show_coupon="false" show_cart="true"] - This WooCommerce checkout shortcode inserts the order review section from the checkout page, with customizable content.

3. How to show order tracking with shortcodes

WooCommerce lets store owners create an order tracking page using the [woocommerce_order_tracking] shortcode. Although this page doesn’t come with WooCommerce out of the box, you can simply create a new page and insert the shortcode in the text editor to create your own. It should look something like this on the front-end:

Order tracking page in WooCommerce

4. How to show account information with shortcodes

You can use the WooCommerce account shortcode - [woocommerce_my_account] - to insert the account area in additional locations throughout your site. This doubles as a login and registration form for logged out users. As a result, you can also use this as a WooCommerce login shortcode.

My Account page in WooCommerce

Take action: Implement these WooCommerce shortcodes today 🚀

In this article, we have listed all the default WooCommerce shortcodes as well as some provided by extra plugins. These include:

  • WooCommerce Product Table - Lists products in a quick one-page order form, with over 50 flexible shortcode options.
  • WooCommerce Quick View Pro - Displays quick view buttons which customers can use to open user-friendly product lightboxes instead of having to visit individual product pages.

FAQ

What's the benefit of using shortcodes in WooCommerce?

Different WooCommerce stores follow different business models, have different sets of requirements, and operate in different niches. WooCommerce shortcodes make it easy for store owners to customize the look and feel of their online store. Using shortcodes, store owners can experiment with their online store’s design, functionality, and user flows to enhance the user experience.

This is where WooCommerce shortcodes come in.

What are the common use cases for WooCommerce shortcodes?

Here are some example use cases where shortcodes can be helpful:

  • You might want to display your WooCommerce products differently than how the default WooCommerce plugin does it.
  • WooCommerce shortcodes let you select exactly which types of products (or which specific products) to show in certain areas. This is a particularly neat use case for anyone that wants to create a Bestsellers page or a New Arrivals page.
  • Shortcodes are also useful for displaying a single product in a page or post. For example, if you want to write a review of a particular product on your blog, you might want to include the product (with purchase options) directly in the blog post.
  • Another important use case for WooCommerce shortcodes is displaying products by their attributes. For example, you might want to list all dresses that are the color red or pink for Valentine’s Day. You can do this using a WooCommerce product shortcode and specifying products with the color attribute red or pink.

How to troubleshoot WooCommerce shortcodes

This is what to do if a shortcode isn't working:

  • Have I made a syntax error?The most common cause for shortcode problems in WooCommerce is that you have made an error. With shortcodes, accuracy is essential. For example, imagine that you're using the shortcode [add_to_cart="68" show_price="true"]. If you've got the wrong product ID, used add-to-cart instead of add_to_cart or accidentally deleted a space between some of the shortcode parameters or an equals sign then it won't work. Check your shortcode carefully against the documentation.
  • Am I using straight or curly quotation marks?When you copy a shortcode from one website to another, the type of quotation marks often changes and breaks the shortcode. Make sure you're using straight quotation marks like " and not the curly type.
  • Is the shortcode available on my site?Some of the shortcodes listed in this article require a plugin. For example, if you've copied the [product_table] shortcode into your site then you must install the WooCommerce Product Table plugin in order to use it.

What should I do if I can't find a shortcode for my needs?

If you can't find the shortcode you're looking for then you have a few options:

  • Go online and research a plugin which will provide the extra functionality.
  • Hire a developer to build the shortcode for you as a custom plugin. If you don't have a developer already then you can use our customization service.

How to style shortcodes with CSS (advanced shortcode technique)

Since WordPress and WooCommerce are open source, the shortcodes that they provide are infinitely customizable. This means that you use custom CSS to restyle the shortcode output, improve their responsive design, and add more dynamic content. For example, you could use advance shortcode techniques and custom code to dynamically input the product ID instead of having to add it manually.

Every WooCommerce shortcode outputs HTML that includes specific CSS classes. You can use these classes to customize the appearance of shortcode content with your own styles.

To do this, simply add custom CSS rules to your theme’s style.css file or by going to Appearance → Customize → Additional CSS in your WordPress dashboard.

For example, here’s how you might style the [products] shortcode to adjust the product grid layout and add a hover effect:

css
/* Adjust product grid layout */
.woocommerce ul.products {
margin: 0 -15px;
}
.woocommerce ul.products li.product {
padding: 15px;
transition: transform 0.3s ease;
}
.woocommerce ul.products li.product:hover {
transform: translateY(-5px);
}

This simple snippet gives each product a bit of breathing room and adds a subtle animation when users hover over a product, making your layout look more polished and interactive.

Again, this is a developer-level task and if you need help customizing WooCommerce shortcodes then our customization service will be happy to help.