WooCommerce discontinued product status plugin

WooCommerce, out of the box, doesn’t provide a way of marking products as discontinued while keeping them visible in the store. The easiest way to do this is by using a WooCommerce product discontinued status plugin.

Discontinued products are completely different from out-of-stock products. While WooCommerce lets you mark products as out-of-stock, there’s no built-in option to mark products as discontinued.

The only option is to manually add a notice to the product short description saying that the product has been discontinued. Aside from this, you can either delete the price of the discontinued product or mark the product as out-of-stock.

The WooCommerce Discontinued Products plugin provides an easy way for store owners to mark products as discontinued. In this article, we’ll explain why you might want to do this and how you can get started with the discontinued products plugin.

Why might you discontinue products in your store?

Companies discontinue products for many different reasons.

  • Profitability. One of the most common reasons why store owners discontinue products (or product variations) is that they simply aren’t profitable anymore. This could be due to a drop in product demand or a loss in market share.
  • Availability. Products that are no longer available from the supplier are usually discontinued.
  • Time-limited products. Products that are time-limited are often discontinued when they’re no longer relevant. Examples of time-limited products include seasonal goods and holiday gifts such as New Year’s party glasses from 2010!
  • Obsolete. Products that have been replaced by other products are also discontinued. Tech products are usually discontinued when an upgraded version is launched. Apple, for example, has discontinued the iPhone X.
  • Manufacturing. Products that are no longer manufactured are discontinued. This can also happen due to a shortage of raw materials.

Let’s take a look at some examples of products that are discontinued:

  • T-shirts.
  • Wines from previous years that have sold out.
  • Tickets for past events.
  • Seasonal products e.g. Christmas ornaments with the year printed on them.
  • Limited edition products such as Nike shoes.
  • Tech products such as older iPhone models and accessories. Similarly, DVDs were replaced by Blu-Rays.
  • Makeup products are often reformulated and the older versions are discontinued.

It’s also worth noting that companies bring back previously discontinued products all the time. For this reason, as a store owner, you need a way to mark discontinued products in WooCommerce rather than taking them down.

Why mark products as “discontinued”?

The typical product life cycle goes something like this:

  1. In stock - products are active and in stock, available for purchase.
  2. Out of stock - products are active but currently out of stock, awaiting restock.
  3. Discontinued - inactive, end of life products that are no longer being sold with no plans to restock.

For WooCommerce store owners, the problem is that WooCommerce plugin combines stages 2 & 3 and doesn’t provide a separate option or stock status for discontinued products. In other words, there’s no option available to mark discontinued products.

Until now, there were two main options available to store owners:

  • Mark discontinued products as out of stock. This isn’t a suitable option because it clutters up your store catalog in the front-end (and in the back-end if you hide out of stock products) with unnecessary discontinued products. This leads to a bad user experience since there’s no way to distinguish between out of stock and discontinued products. The out of stock status is normally used for products that are temporarily out of stock. It implies that the product will become available again if you wait. But, if you mark both out of stock and discontinued products as “out of stock”, customers won’t know whether or not to wait for new stock to arrive.
  • Delete discontinued products or change them to private (or draft) status. This is bad for WooCommerce SEO. You lose all the link juice and rankings for your discontinued product pages if you change the page’s status to private or draft.

The solution: the WooCommerce Discontinued Products plugin

Whether you’re dealing with products that are discontinued temporarily or permanently, it’s essential to distinguish out of stock products from discontinued products.

The WooCommerce Discontinued Products plugin was built for exactly this purpose.

WooCommerce discontinued product with alternative suggestions
An example of a discontinued WooCommerce product.

It’s designed to keep your search engine rankings intact for your discontinued product pages while also keeping customers happy and avoiding disappointment. It allows store owners to keep the product while marking it permanently as out of stock i.e. discontinued.

Benefits of marking discontinued products

Let’s step through the main benefits of marking WooCommerce products discontinued:

SEO

Using a WooCommerce discontinued products plugin, you can handle discontinued products on your online store without damaging your SEO.

You might want to disable purchases for discontinued products while keeping them visible on your store’s front-end for SEO reasons. After all, you don’t want to lose your rankings for that product!

Using a WooCommerce discontinued products plugin, you can keep the product page alive without confusing shoppers.

It’s important to keep in mind that, even if an item is discontinued, you can still get a lot of traffic to these pages. Done right, you can use this as an opportunity to encourage customers to purchase other, similar items.

Put simply, the product pages for discontinued products have significant SEO value. There may be backlinks pointing to them and customers still search for them. Deleting them can lead to lost sales of your other products and potentially stop people from finding your store in the first place.

Handled correctly, you can keep discontinued product pages alive to boost your SEO rankings in the long term. It’s an easy way to preserve your product page’s SEO value.

Customer expectations

From a user experience standpoint, customers need to know that a discontinued product will never be available for purchase again. This way, they won’t keep checking back in hopes of placing an order.

You need control over what text to display on the discontinued product page to make things clear to the customer. This way, you can effectively manage customer expectations and prevent disappointment. In addition to this, it also helps you eliminate broken links to your online store.

Even though customers can no longer buy the product, being able to access the discontinued product page has important informational purposes. For example, the product page might contain documentation of downloadable user guides, specification information, and usage tips that might be useful to anyone that purchased the product before it was discontinued.

Existing customers who bought the product before it was discontinued will find links to the product page in places such as their Account area and saved bookmarks. So, they will still need to be able to access the product page. The product page isn’t just for potential new customers but also for existing customers.

Sell alternative products

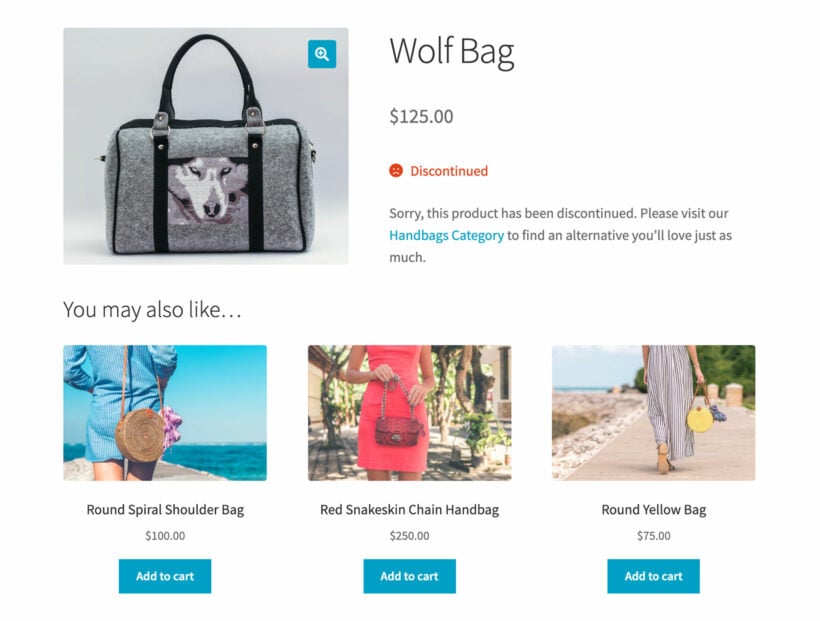
You can use the Discontinued text field to advise customers to check out related products. For example, you could display a message saying "We're sorry, this product has been discontinued. Please visit our store for similar products."

The cross-sells feature in WooCommerce lets you suggest alternatives. Customers will only pay close attention to these if they know the product they’re looking at is permanently discontinued.

Upsells cross-sells

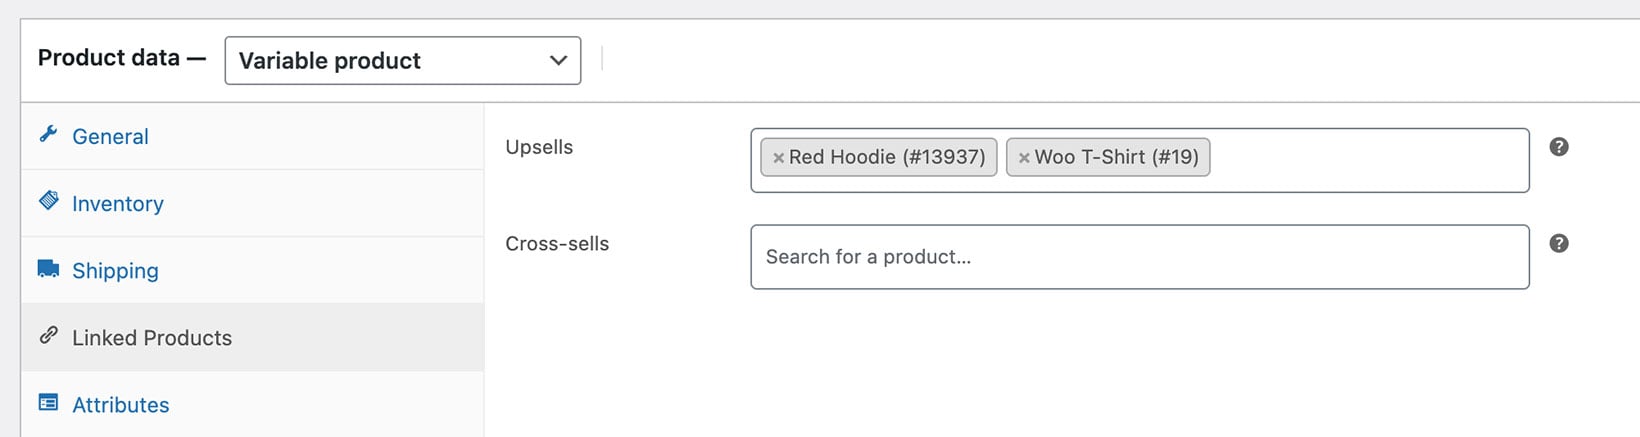
You can manually select suitable related products for each discontinued product. This way, you can point customers to products they can place orders for.

To counter any disappointment, add a coupon code to the short description to encourage customers to continue browsing your store. In addition to this, you can also add an email capture form promising to notify them of similar products.

You can also add a Visit Shop button or link to the short description to direct people to available products they can place orders for.

This way, you can make a sale even if the exact product the customer was searching for is discontinued.

Accurate stock reporting

Store owners need to be able to filter and view discontinued products separately from other statuses (such as in stock products and out of stock products) in the admin area. This allows them to accurately report on discontinued products separately from out of stock products.

This way, the view at WooCommerceReportsStockOut of stock doesn’t clutter up the stock report or stock checks.

Ideally, you don’t want to delete discontinued products from your online store as this could mess up historical sales data and stop customers from viewing the product when they view their past orders in the Account area.

Reliable, quality solution

Using a WooCommerce discontinued products plugin means that you can avoid hacky and error-prone workarounds. It’s the easiest way to mark your products as discontinued while keeping things simple for the store manager.

How the discontinued products plugin works

The WooCommerce Discontinued Products plugin lets you add a ‘discontinued’ stock status to your products. It lets you easily mark products as discontinued, either individually or in bulk.

Keep reading for step-by-step written instructions, or watch this video on how to add a WooCommerce discontinued product status to your store:

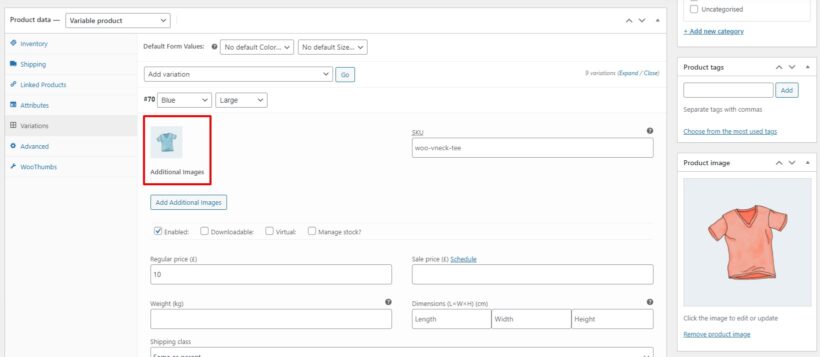
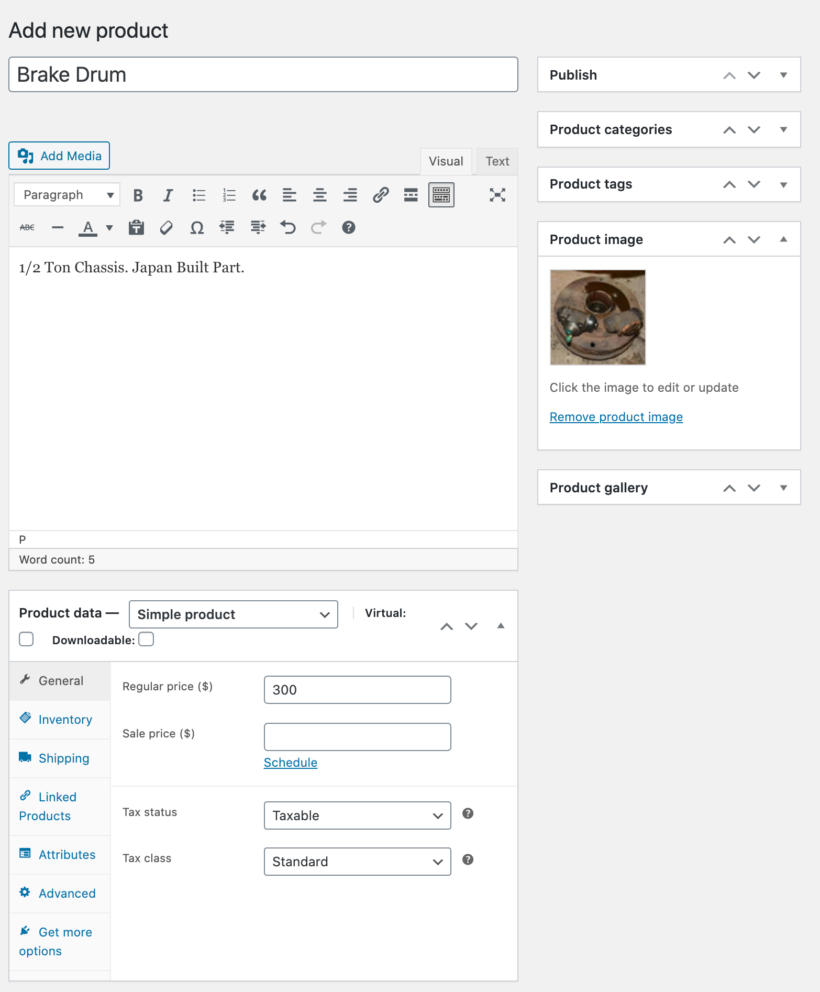
Easily select the discontinued stock status for products or variations

Mark discounted products

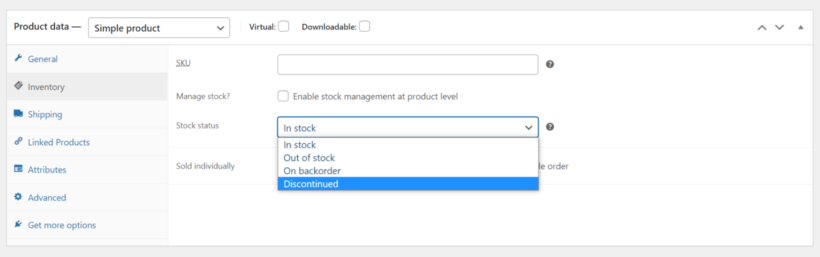
After installing the plugin, simply select the discontinued stock status for all the products and variations that you wish to discontinue. You can do it individually, in bulk for all variations of a particular product, and in bulk for multiple products at once.

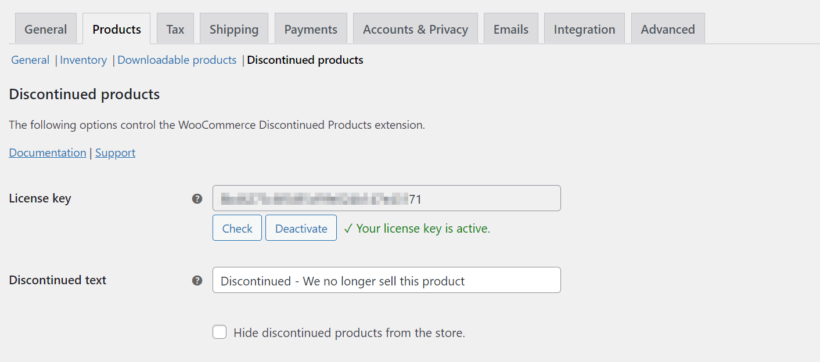
Add a discontinued product message

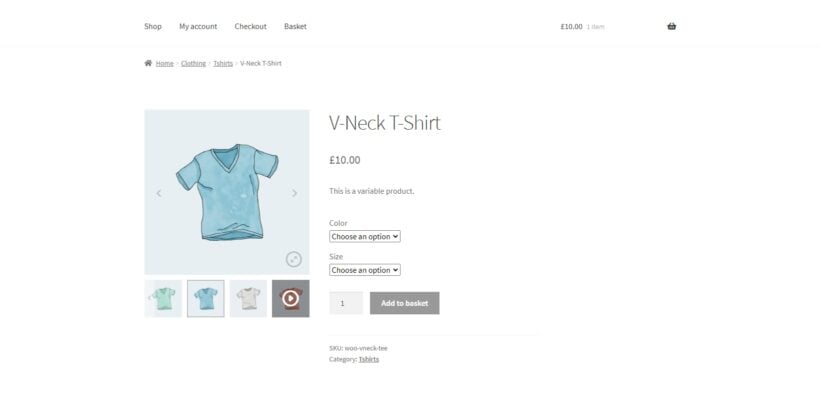
Customers visiting discontinued product pages need to know that the product won't come back in stock. You can easily do this by customizing the 'Discontinued' text that appears on discontinued status products. For example, you can write something like “Discontinued product” or “We no longer sell this product”.

Discounted products settings

In addition, we recommend using features such as cross-sells and related products to display other products that the customer may like. This helps you to recover a sale that would otherwise be lost.

WooCommerce discontinued product with alternative suggestions
Recommend alternative products and avoid losing the customer!

Show or hide products with a discontinued status

The WooCommerce Discontinued Products plugin lets you choose whether to show or hide discontinued products from your shop and category pages and on-site search. Either way, the page remains visible in the background to search engines. This means that you can keep the page alive without damaging its SEO value.

WooCommerce discontinued products plugin preview

Bonus: list discontinued products on a separate page

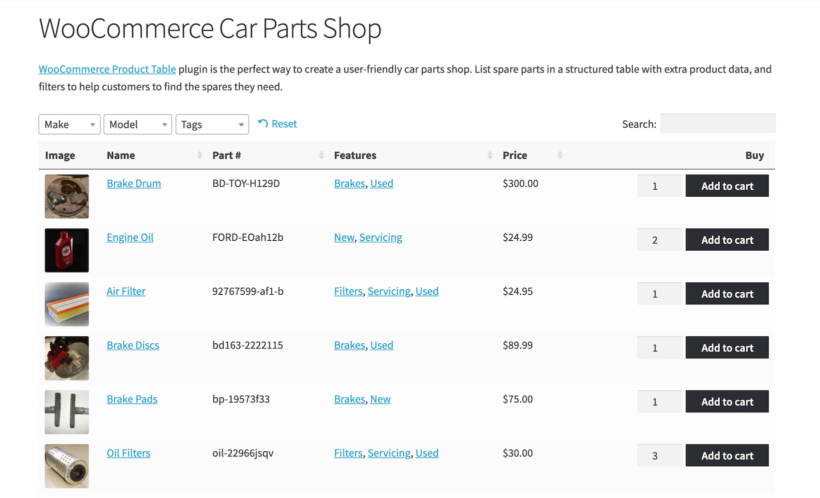
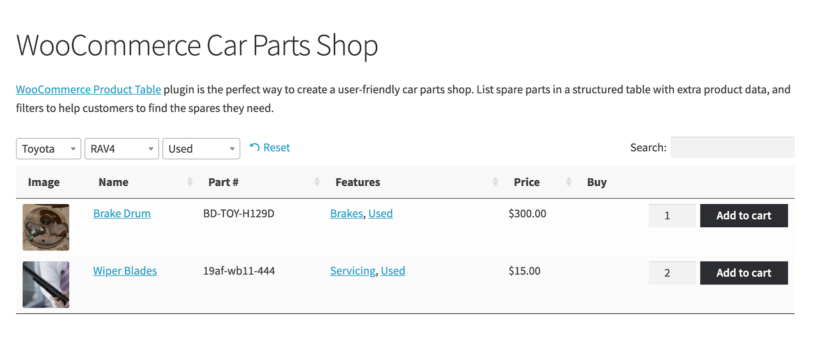
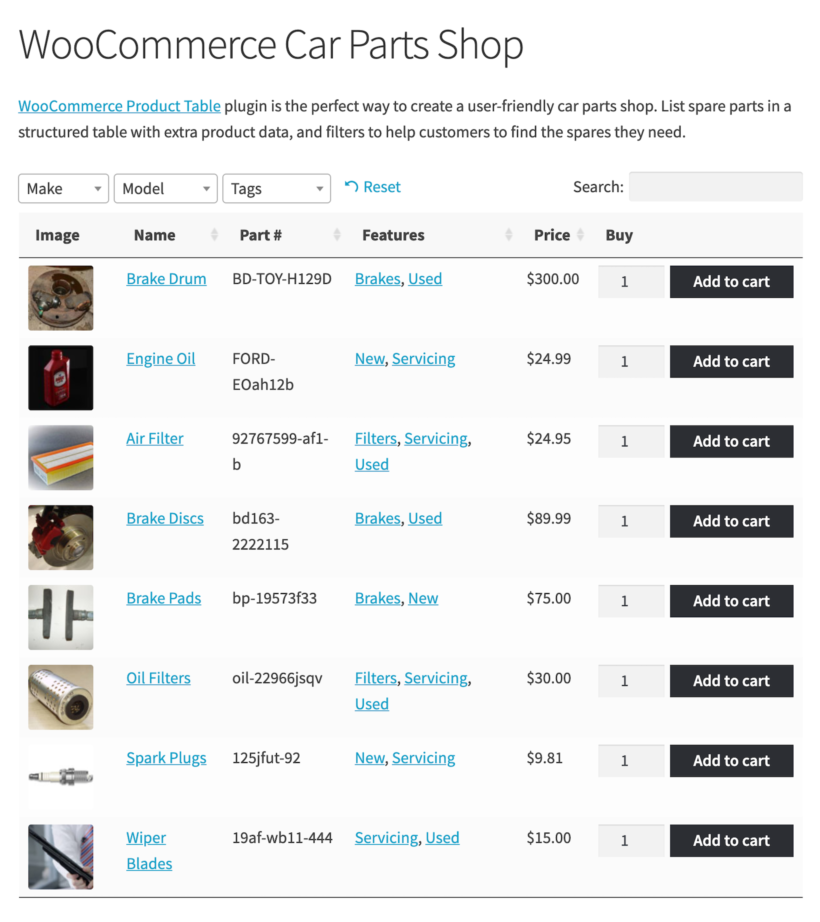
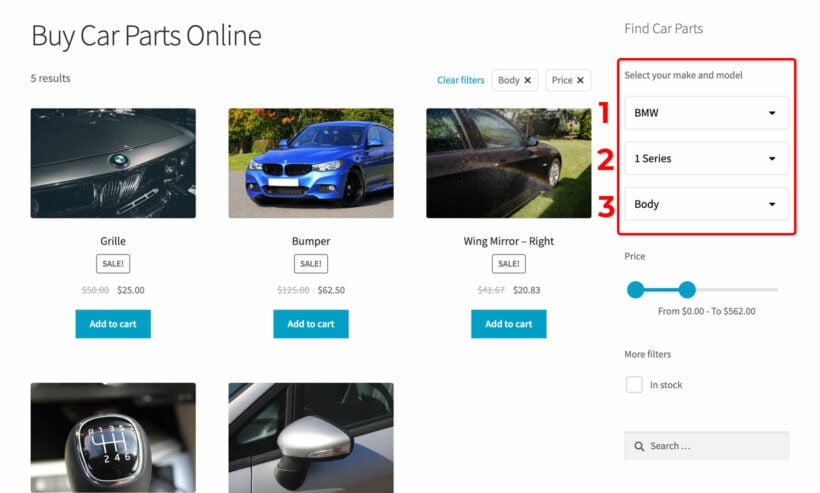
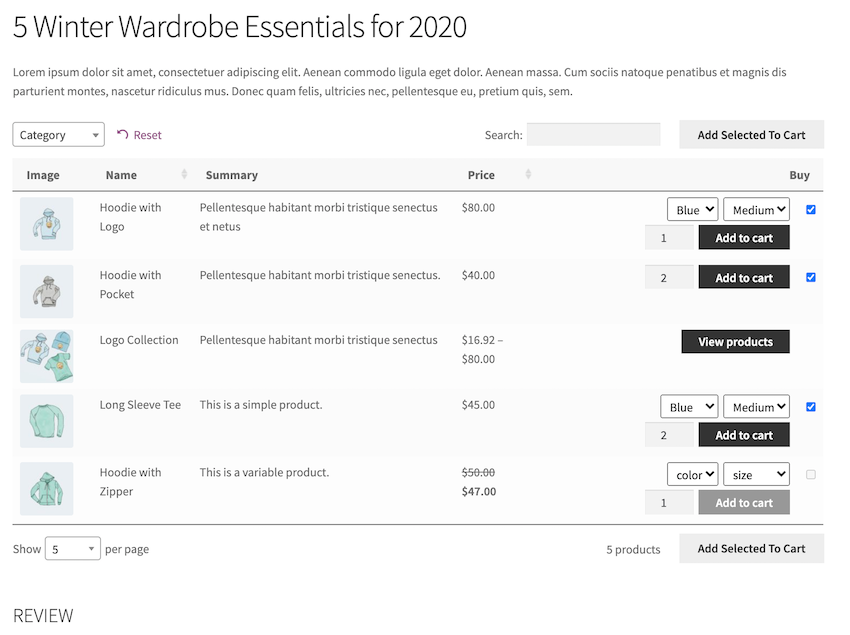
You can use the WooCommerce Discontinued Products plugin with our WooCommerce Product Table plugin to list discontinued products on a separate page. This way, customers can quickly see all of the products that you’re no longer selling on a separate page.

  1. First, make sure you have both the WooCommerce Discontinued Products plugin and the WooCommerce Product Table plugin installed and activated on your online store.
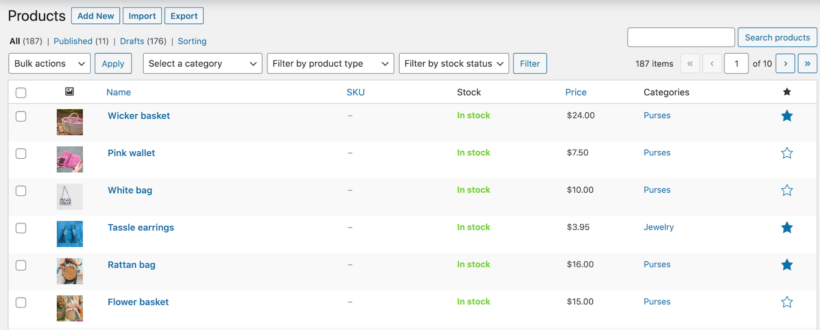
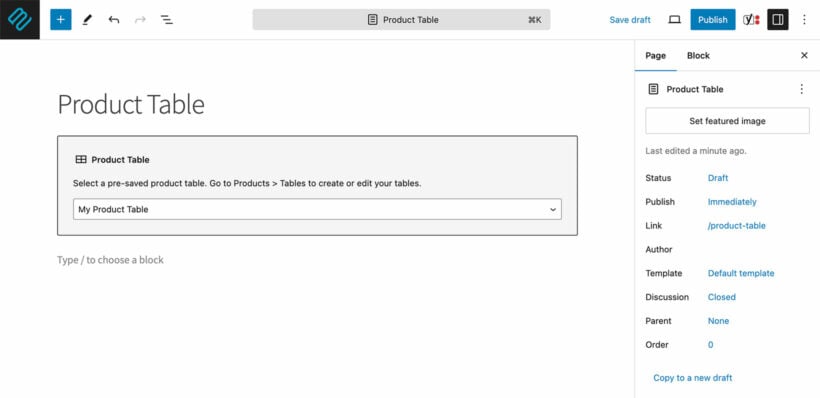
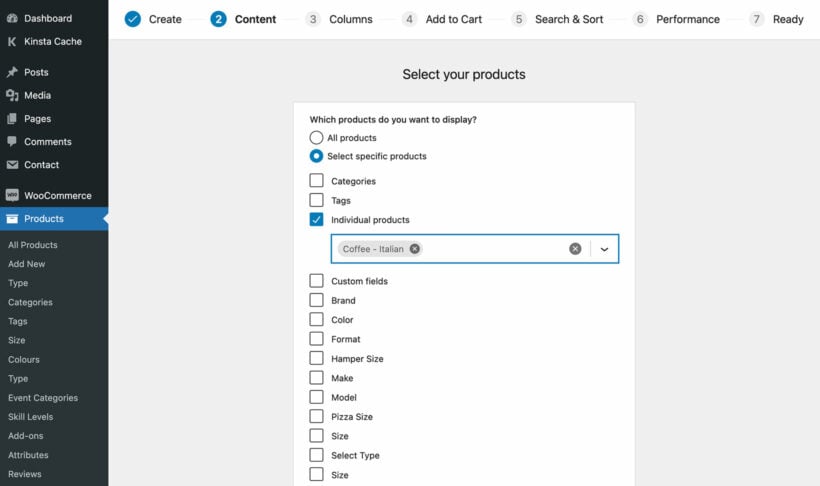
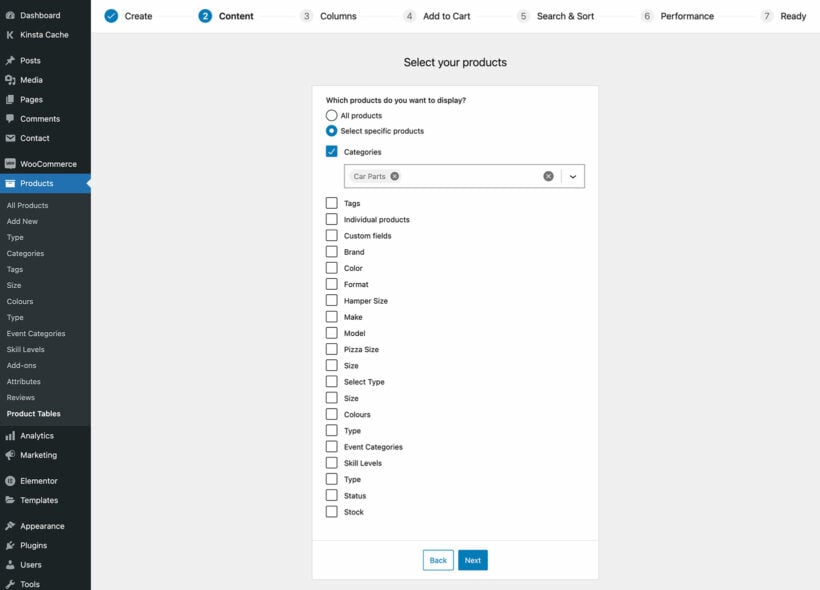
  2. Next, go to Products → Product Tables → Add New and create a table which will list your discontinued products.
  3. On the 'Select your products' screen, select the 'Stock' option at the bottom of the list and then 'Discontinued'.
Select products page of table builder

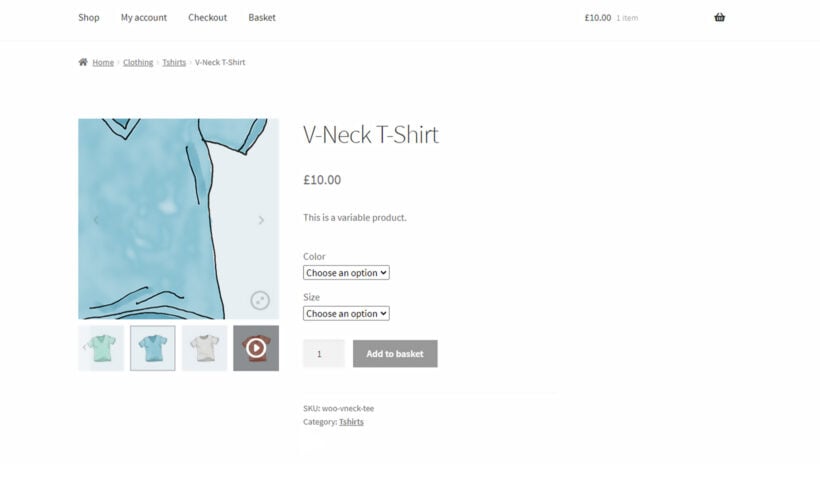
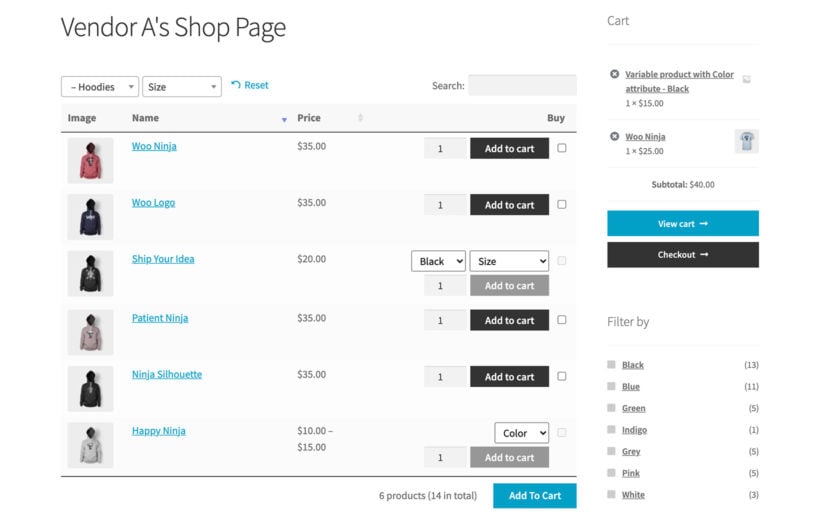
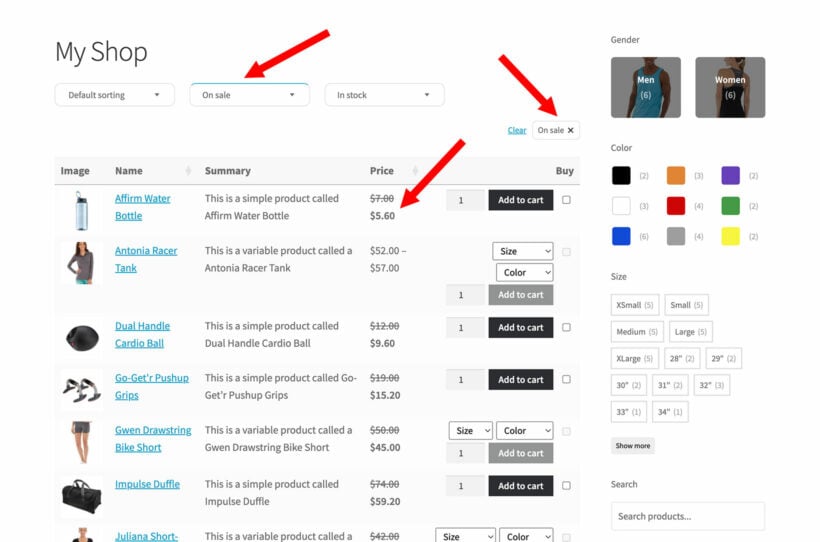
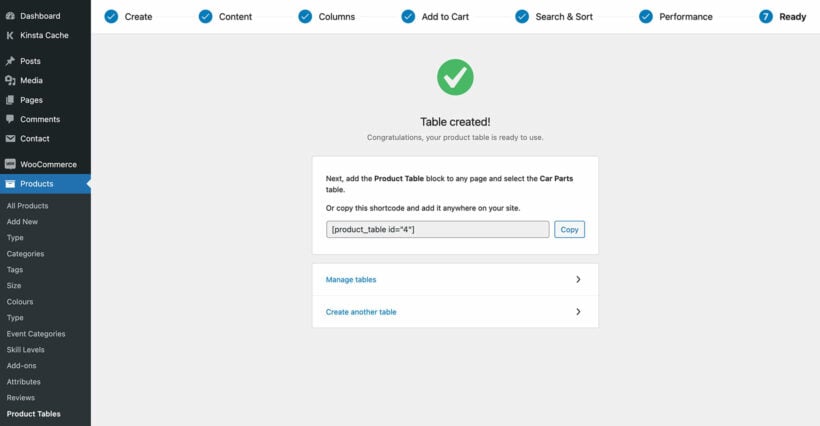
The discontinued products page will look something like this on the front-end:

List discontinued products

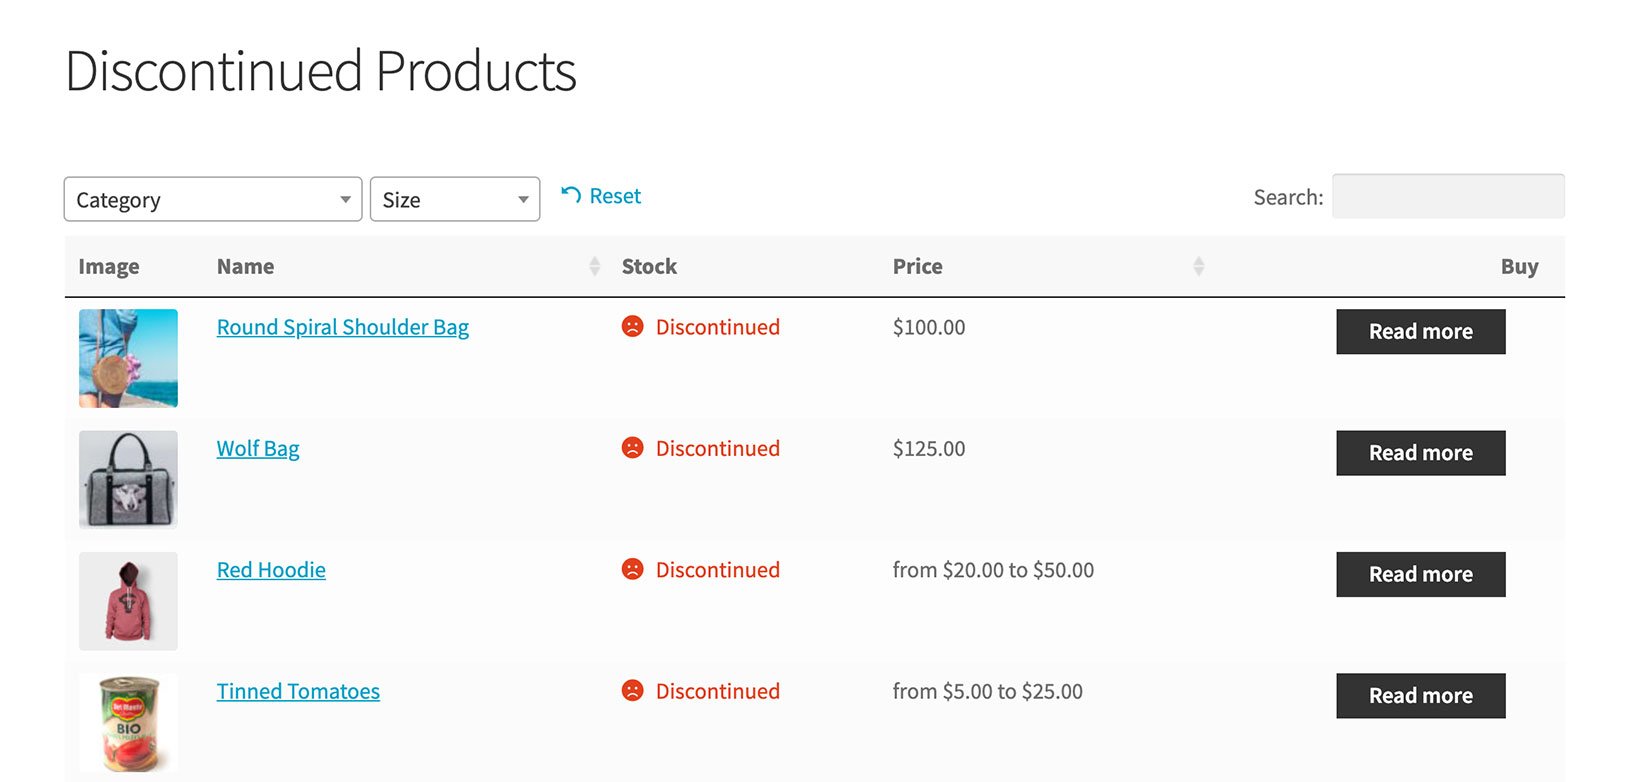
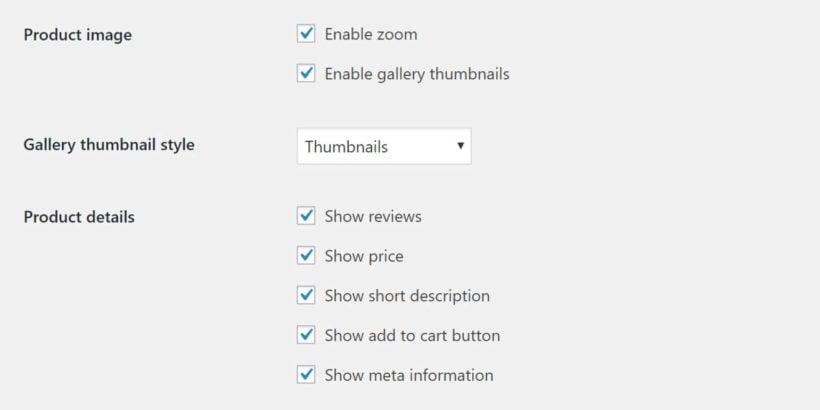
The WooCommerce Product Table plugin lets you choose which columns to include in the list.

Where to get the plugin

With a WooCommerce discontinued products plugin, you can easily mark discontinued products while retaining the product page’s SEO value. It also makes it easy for shop managers to accurately report on stock.

Get the WooCommerce Discontinued Products plugin today!

woocommerce product images

The product images in your WooCommerce store have a major role to play in increasing sales, conversions, and clicks. So when we know how effective they can be on their own, how do we maximize their potential?

While a standard WooCommerce install will help you set up the basics of your store (with a simple product gallery and image settings), you’ll need little help if you’re looking to give your product images a boost.

So in this article, we’ll be discussing the benefits of improving your WooCommerce product images. Then we’ll give you 3 ways you can boost them with the help of some easy-to-use plugins.

These plugins allow you to take control of how your product images are displayed. With an upgraded product gallery, click-saving product lightbox, and image hover effects, you’ll improve customer experience and boost sales at the same time.

The benefits of improving your WooCommerce product images

Improving the product images in your WooCommerce store will have massive benefits for your sales and conversions. Here’s why:

1. It entices your customers to buy your products

It goes without saying that high-quality product images are key when it comes to convincing customers to buy from your store.

While customers browse, it’s often only your product images that will give them the best indication if your product is right for them or not.

In fact, a study from the online marketplace Etsy found product image quality was a decisive factor among 90% of the users when it came to buying.

But what does ‘quality’ mean?

According to Etsy, quality is a combination of the following:

  • An image that’s clear, in focus, and sharp.
  • An image that’s well-lit.
  • A photo that contains enough ‘information’ about the product. In other words, you can see the details, you can see the whole product and the product is the main focus of the image.
  • An image that represents the product well - for example, the colors in the photo shouldn’t be different from the actual product.
woocommerce product images
An example of excellent product photography from Etsy/BON LUX

Of course, these are just the basics. Great product images can be so much more than this.

They can show customers what the product will look like in their hands with lifestyle shots. They can show customers how a product can be used with instructional photos. They can also show different angles, closeups, and more to showcase the product to its full potential.

2. It gives your store a competitive edge

The product images you use play a huge role in making you stand out from other stores. When you go beyond a standard product image on a white background, you’ll be providing your customer with way more visual information.

So by improving your product images, you’ll not only catch the eye of potential customers, but you’ll show them you value your products too. The simple act of improving your product images will immediately show customers you can be trusted and valued as a brand.

Plus, you can give your competitive edge a massive boost by using the techniques we’ll list in the next section.

3. It narrates a story about your brand

It’s said an image can speak a thousand words and this absolutely applies to product images too.

Carefully selected product images for your WooCommerce store tell a story. They inform customers, in a simple image, what the product and your brand are all about. In fact, according to data from BigCommerce, 78% of online shoppers want product images that bring products to life.

By getting creative with your photography, you’ll be able to show customers how your product, fits into their life. In particular, lifestyle photography transforms a product that a customer cannot touch, into one they can see slotting into their life with ease.

So, now we know the benefits of improving the actual product images you use in your WooCommerce store, so let’s give them a major boost with some easy-to-use plugins.

You’ve improved your product images, they’re clear, professional, eye-catching, and very clickable, but what now?

Once you’ve uploaded your product images to your WooCommerce store, they’ll be showcased in the standard WooCommerce product gallery. This is fine if you’re looking to keep things basic, but we’re here to give your product images a boost.

That’s where WooThumbs for WooCommerce comes in.

woothumbs for woocommerce

WooThumbs for WooCommerce allows you to take complete control over the layout and design of your product gallery. It dramatically improves the look and feel of your gallery, as well as improving the customer experience.

As well as customizing the layout of your WooCommerce product gallery, WooThumbs helps you customize your product gallery in two other major ways. We’ll talk about both of these below.

1. It allows you to include additional variation images

In a standard WooCommerce store, you can’t add additional variation images to your products. This can be a problem if you want to, for example, show the different angles, details, or lifestyle shots of your product variations.

This is where WooThumbs comes in. It allows you to import additional variation images for your product image. Giving you more freedom to show your products from different perspectives.

additional variation images

A major benefit of having more variation images is customer satisfaction. Sometimes, to judge the quality of a product, customers want to see the product from different angles. With WooThumbs, customers can see as many variation images as they like. Helping them make a decision.

2. It improves image zoom

Visual cues are a very important factor in generating sales and improving customer experience. Making your WooCommerce product images interactive will help your customers to get a better view of your products.

While a standard WooCommerce store does have image zoom on your product images, it’s hard to customize and could be improved.

woocommerce image zoom

With WooThumbs for WooCommerce, you’re able to specify which type of zoom you’d like to use, including:

  • Inner Zoom - This uses the current image bounds as a frame for the zoomed image. When you hover, the zoomed image will be displayed smoothly on the screen.
  • Outer Zoom - This displays the zoomed image beside the main image, on whichever side you choose in the settings.
  • Follow Zoom - This is a ‘magnifying glass’ style of zoom and will display the zoomed image in a circle or square at the mouse position.

Once selected, you can then customize each of these to suit your specific preferences.

Showcase product images in a lightbox

Now we’ve improved your product image gallery, it’s time to show off your improved product images on the shop and category pages.

When browsing your store, customers will likely click through to many different product pages to find the products they’re looking for. All these clicks can end up tiring the customer out, causing them to leave your store - especially if they’ve not found the item they’re looking for.

Let’s fix this by giving customers the option to quickly view product information right from the shop and category pages. This can be done with WooCommerce Quick View Pro.

3_WooCommerce_Quick_View_Pro_Lightbox

Quick View Pro allows customers to see product images, information, options and more, in a popup lightbox, all without leaving the shop page.

Plus, you’ll be able to completely customize what the customer sees within the lightbox for full control. You’ll be able to:

  • Keep things simple by showing just the product images, description, and buy button.
  • Or give customers a full preview by showing all of this and attributes, meta information, reviews, and more.
Quick view information

With the help of this plugin, your customers can quickly preview items in the product lightbox and add them to the cart. Customers can then quickly return to the product page and continue shopping.

Not only will this save customers clicks, but it will speed up the buying process too. Resulting in more sales and much happier customers.

Change product images on hover

We all know the benefits of an improved product gallery, but what if we could bring those benefits to the shop and category pages of your WooCommerce store?

With Image Swap for WooCommerce in place, you’ll be able to add hover and click image effects to your product images.

image swap for woocommerce

These effects will replicate the benefits of a product gallery but will apply to the images on your shop and category pages. So when customers browse your products, they’ll be able to do any of the following (depending on which you pick):

  • Fade - When a customer hovers or clicks, the next product image will fade in.
  • Slide - Your customers will be able to use arrows on a slider to flick through your product images.
  • Bullets - Similar to above but instead of arrows, they’ll be able to use bullets or dots.
  • Thumbnails - Customers will see smaller thumbnails of your product images below the main image, much like a product gallery.
  • Zoom - Customers will be able to hover over your product images and see a zoomed-in version.
  • Picture-in-Picture - This will show a small version of the next image in the corner of the first image. Once clicked, it will switch the images around.
  • Modal Gallery - This will allow customers to click the product image and see an enlarged version in a modal popup.
  • Enlarge - When hovered over, this image will increase in size, right on the shop/category page.
  • Flip - Once clicked or hovered over, the first product image will flip over to reveal the next.

By using effects like these, you’ll again reduce clicks by showing customers much more visual information and speed up the buying process at the same time.

Upgrade your WooCommerce product images today

With these three plugins in place, you’ll be able to dramatically improve the sales in your store by using the most up-to-date sales-boosting techniques.

Plus, having improved the quality of your product images, you’ll be able to draw even more attention to them by showcasing them to their fullest.

You can try each of these plugins risk-free by clicking the links below:

Product table WooCommerce archive page template

Version 2.8.3 of our WooCommerce Product Table plugin is now available. You can now enable the order form layout on any type of WooCommerce archive page in your online store. As well as shop and category pages, this includes product tags, attributes and custom taxonomies. This helps you to use it with other plugins.

It has been possible to display product tables on the main shop page, category archives and product search results for a while now. Since we added those features, customers have asked to use product tables on other types of WooCommerce product archive too.

In the new version of the plugin, you can choose whether to automatically enable the product table layout on any page that uses the archive-product.php template in your theme. These are:

  • The main Shop page
  • Product search results (note: this is different from your sitewide search results, which come from WordPress itself. To display those as a table, you need our Posts Table Pro plugin instead.)
  • Product category archive pages
  • Tag archive pages for your products
  • Product attribute archive pages
  • Archive pages for any WooCommerce custom taxonomy, including those created by other plugins such as multi-vendor plugins. (More on this below)

How to show product tables on any type of WooCommerce archive page

It's really easy to enable the product table layout on the various archive pages in your store. Just tick a box for each one!

  1. Install WooCommerce Product Table if you haven't already done so.
  2. The table builder will open when you first activate the plugin.
  3. In the 'Shop templates' section, tick all the boxes where you want to use the product table layout:

Using product tables on archive pages created by other plugins

The best thing about the new features is that they let you use WooCommerce Product Table with other plugins in ways that weren't possible before.

Essentially, if you're using another plugin that lists products on any type of archive template, then you can now use the product table layout.

For example, lots of people have asked us how to use WooCommerce Product Table in a multi-vendor marketplace. (We even have a tutorial about this use case.) Some multi-vendor plugins - including YITH and Product Vendors - create a taxonomy for each vendor, and use this to generate the 'Shop' page for each vendor.

Normally, the vendor's products are listed in a standard grid layout, which is the default for all WooCommerce archive pages. You can make the vendor store pages more user-friendly by using WooCommerce Product Table to list products in a one-page order form layout. This will help to grow their conversions. Simply go to the Product Table settings page and tick the box to enable it for the 'Vendor' taxonomy.

Multi vendor shop page with product table
A vendor shop page with the product table layout

Where to get the new features

Existing WooCommerce Product Table users can update from the WordPress Dashboard. If you're not already using the plugin, get it now and start displaying product tables on all your WooCommerce archive pages.

How many websites use WooCommerce

Here's the latest WooCommerce stats for 2025. Finding accurate data on how many websites use WooCommerce can be challenging, as many statistics are outdated. I've done the research to provide the most up-to-date figures on the number of websites using WooCommerce.

I've also provided stats on the WooCommerce market share compared to other e-commerce platforms and WordPress e-commerce plugins. The results are fascinating!

You're welcome to quote, share, or embed any of the resources from this article. Please add a link crediting this article as the source.

WooCommerce stats infographic


Embed on your website:

How many websites use WooCommerce?

It depends on where you look!

Based on this, we can reliably say that more than 5 million websites worldwide use WooCommerce 🤯

While the number of websites using WooCommerce is interesting, I find it more interesting to look at the % of e-commerce websites that use WooCommerce. The percentage is where WooCommerce really starts to stand out in the stats. We have found this each year since we started publishing this post, including 2017, 2018, 2019, 2021, 2022, 2023, 2024, and now 2025.

What is the market share of WooCommerce?

Now, this is where I got really confused when researching the WooCommerce market share in 2025.

First, let's look at Built With. This suggests that the current 2025 market share for WooCommerce is 13% of the top 1 million sites using e-commerce technologies:

This represents a decrease from its 16% market share in 2024 and also suggests that Shopify take over WooCommerce as the market leader between 2024 and 2025.

On the other hand, data from Store Leads paints a much more positive picture of WooCommerce's market share in 2025:

This suggests that WooCommerce is still the market leader over Shopify by a long way.

The main difference between BuiltWith and Store With seems to be that it tracks 12 million websites, whereas Built With tracks the top 10,000, 100,000, million sites plus the whole internet. Maybe that explains the difference in the market share stats for WooCommerce.

Whether or not WooCommerce is the current market leader, it's clear that Shopify is a strong competitor. The WordPress and WooCommerce communities need to make sure that WooCommerce remains competitive against Shopify in particular.

Where are the other WordPress e-commerce plugins?

You'll notice that no other WordPress plugins appear in the list at all. These are obviously covered by the big 'Other' category, but no other WordPress plugin makes the top 10 e-commerce platforms. It may feel as if plugins such as Easy Digital Downloads are very popular, but they're not even in the top 20.

How many WooCommerce themes are there?

It's impossible to know how many dedicated WordPress themes are available which include support and styling for WooCommerce. This is because many WooCommerce-ready themes are sold on independent websites and smaller marketplaces. Here are some WooCommerce stats for the bigger theme providers, as of January 2025:

This brings us to over 3,702 just from 2 big players. The total number will be much higher when you include other theme marketplaces and independent theme companies. Clearly, there's no shortage of choice in choosing a WooCommerce theme for a website design!

Our friends at ThemeIsle have some good WooCommerce themes if you are looking, or here are some free themes.

And how many WooCommerce plugins are there?

As with themes, it's impossible to provide an exact number of how many WooCommerce plugins there are. Here's what I discovered:

The real total for this stat will be much higher as a huge number of websites sell e-commerce plugins independently or via smaller marketplaces. For example, we sell our own WooCommerce add-ons via our own website, so popular plugins such as WooCommerce Product Table aren't even included in this figure.

How many new websites are installing WooCommerce?

It's easy to get the latest figures on the number of websites that are newly installing WooCommerce if you know where to look. An up-to-date figure for this WooCommerce stat is available at all times on the WooCommerce page in the WordPress plugin directory.

At the time of writing (March 2025), WooCommerce has been downloaded 2,083,489 times in the last week. That's pretty incredible and shows how quickly WooCommerce is growing.

What is the future of WooCommerce

I don't think I'm alone in predicting that WooCommerce will continue gaining market share in the future.

The future of WooCommerce looks promising, with continued growth expected as it remains a popular choice for businesses of all sizes. With such a huge ecosystem of WooCommerce experts, themes, plugins, and hosting to choose from, WooCommerce provides an immediate advantage for any e-commerce website compared to other platforms. WordPress is the world's biggest CMS with a huge 62.7% market share. As the main WordPress e-commerce platform, that's an enormous market.

If you haven't started making money with WooCommerce yet, there are plenty of excellent WooCommerce tutorials on how to get started with WooCommerce in 2025, such as this one from Moosend.

This puts lots of exciting new developments in the pipeline such as the likelihood that WooCommerce will become available on WordPress.com. This will bring it to a whole new market, increasing market share even further in 2025 and beyond.

Overall, WooCommerce's flexibility and constant evolution ensure it will remain a dominant force in the e-commerce world for years to come.

Do you offer discounts in your WooCommerce store, either by running sales or discounting specific products? Discover the easier way to put your products on sale, display 'On Sale' badges, and list sale products in prominent parts of your store 🚀

In WooCommerce, you can add 'On Sale' badges by setting a sale price for individual products or variations. That's pretty time-consuming 🥱. If you want more control over how your badges look, you can also change sale badge styles, text, and positioning. Prominent sale tags are a critical part of your store's success when running a new promotion, so it pays to get it right from the get-go!

Keep reading to discover how to streamline and showcase your WooCommerce on sale products by:

  • Quickly putting products on sale either globally, or in bulk for selected products or categories. We'll do this with the WooCommerce Discount Manager plugin.
  • Supercharging your sales by creating other types of sale price and discount, such as quantity-based incentives and buy-one-get-one-free offers. We'll use WooCommerce Discount Manager for this too.
  • Displaying WooCommerce on sale products in a quick order form in prominent parts of your store, for example on the homepage. We'll use the WooCommerce Product Table plugin for this.
WooCommerce on sale products
List on sale products separately in a Special Offers section.

What's wrong with using the 'Sale price' field in WooCommerce?

As I mentioned above, the default way of adding sale prices in WooCommerce is pretty limited. The problems are:

  • You can only add sale tags to each product or variation individually. That takes a long time and is error-prone if you want to create a store-wide sale or put multiple products or entire categories on sale.
  • The little sale tags are the only clue that the product is on sale. There's no way to display more prominent details of the sale on product pages, such as a big notice saying "50% off everything!"
  • You can only enter an exact sale price for each product. There are no options to create more advanced types of sale, such as percentage discounts, BOGO or quantity-based pricing.
  • The default WooCommerce sale prices apply to everyone. There's no way to choose which users or roles can access the sale prices, such as new or existing customers only.
  • The on sale products are listed in the same places as your non-sale products. Apart from the sale tags, there's no way for customers to quickly view or filter all the products on sale.

The solution is to use the best WooCommerce discount plugin to put products on sale and add sale tags, instead of entering sale prices manually. I'll tell you which plugins you can use to solve each of the above problems.

WooCommerce Discount Manager: The easier way to add discounts and sale tags

WooCommerce storewide sale plugin product page content

Using the WooCommerce Discount Manager plugin to create your sale prices will solve the first four problems that I listed above. You can use it to:

  • Add sale prices to multiple products and categories at once, or your entire store.
  • Display prominent notices about the sale on the product page.
  • Create at least 6 different types of discount and deal, with advanced rules controlling when each type of sale price will be used.
  • Restrict each type of sale price to specific user accounts or user roles - or, alternatively, new customer discounts for guest users only.

Next, I'll tell you how to set it up in a way that achieves all these things 💪

Step-by-step tutorial

  1. Get the plugin and install it in your WordPress Dashboard.
  2. Activate your license key in the plugin setup wizard.
  3. Now go to Marketing → Discounts and click 'Add New'.
  4. Select which type of WooCommerce sale price you wish to create:
    WooCommerce Discount Manager add discount type
  5. Fill in all the options, such as a fixed or percentage amount and the logic that will allow customers to qualify. For example, you can offer sale prices based on amount spent, and much more. Play around to find the most enticing and profitable options for your store.
  6. For simple fixed and percentage discounts, you can tick a box to display the "On sale" badge on qualifying products. (This isn't relevant for more advanced discount types because they're calculated later, on the cart page.)
  7. Use the 'Product Page Content' field to add any information that you want to display to highlight the discount.
    WooCommerce Discount Manager product page content
  8. Finally, test out the WooCommerce sale prices on the front end of your site. Keep tweaking until you're completely happy.

Product Filters and Product Table: The perfect pair for displaying On Sale products

The Discount Manager plugin mentioned above is great for actually adding sale prices in WooCommerce. However, other than displaying sale tags on products with fixed or percentage discounts, it won't help customers to find your on sale products.

In this tutorial, we’ll show you how to list WooCommerce On Sale products more effectively in your store. You'll learn the different ways to put products on sale in WooCommerce, and how to display them prominently in your store.

To draw attention to your on sale products, you can use WooCommerce Discount Manager with either or both of the following plugins:

  • WooCommerce Product Filters for adding an 'On sale' filter to your store. Customer can use this to filter the list of products to view items on sale only.
  • And if you want to display WooCommerce on sale products separately to your main products, then you can do this with the WooCommerce Product Table plugin. This lists any or all of your products in a quick order form. You can use it to:
    • List on sale products, for example on your homepage where customers won't miss them, and/or;
    • Transform the layout of all your shop pages.
WooCommerce Product Filters table on sale
Using the Product Filters and Product Table plugins to display On Sale products more prominently

Add an On Sale filter to your store

The WooCommerce Product Filters plugin lets you add an "On sale" filter above or beside your shop and category pages. That way, customers can easily filter the list to view products at the best prices. This is how to add it to your store:

  1. Purchase and install the plugin.
  2. Use the setup wizard to choose how your want the product filters to work. If you want to display the on sale filter above your main shop pages, then you can do this in the setup wizard too - just select the default filter group for your shop pages.
  3. Now go to Products → Filters and edit the default filter group which has been created for you. Click 'Add filter' and create an 'On sale' filter. Repeat this step to add any other product filters which will help people to find your products, such as a category filter.
    WooCommerce filter by different product data types
  4. If you want the on sale filter to appear at the top of your shop pages, then you've finished! Or to display it in the sidebar, then go to Appearance → Widgets, add a 'Product filters' widget and select your filter group.
add woocommerce product filters to widget

How to list On Sale products separately

The best way to draw attention to your discounted products is by listing them in a dedicated space on your website. There are several places where you can do this:

  • Add a 'Sale' section to the homepageList On Sale products in a prominent spot on the homepage of your WordPress website. This allows them to capture your customers' attention the second they arrive on the site.
  • Create a 'Special offers' pageList the On Sale products on a 'Special Offers' page or a 'Clearance Sale' page. You can then link to this page from your website’s navigation menu to encourage people to check out the WooCommerce On Sale products.

KitchenAid example

KitchenAid links to their Sale page from the main navigation
  • List On Sale products above your other productsYou can list On Sale products in WooCommerce on the main shop page above your other categories and products. This immediately draws the visitor’s attention to the products on sale. And, at the same time, it encourages them to check out the products and make a purchase.
  • Blog about your discounted productsAnother way to draw attention to products is by listing special offers in a blog post. This is particularly useful if you’re reviewing a specific product. Or perhaps you want to write about several different On Sale products and then list all the special deals within the post.

Use these methods to showcase your best deals. In the next section, I'll show you a simple method to list On Sale products in any (or all!) of these locations.

How to list on sale products with WooCommerce Product Table

The WooCommerce Product Table plugin makes it easy to list discounted products anywhere in your store. This includes each of the locations that I recommended in the previous section.

Step 1: Tag your On Sale products

First, you need a way to tag your On Sale products so that you can list them separately from your full price stock.

WooCommerce lets store owners highlight their most important products in the sale by marking them as Featured. Here’s how:

Mark featured products
  1. Go to Products All Products from the WordPress admin panel.
  2. Find the product you want to mark as Featured and click on the star in the far right column.

Pro tip: If you already use featured products for something else in your store, you should create a custom taxonomy called Sale and tag each On Sale product as Yes.

Step 2: Install and configure WooCommerce Product Table

  1. Get the WooCommerce Product Table plugin and install it on your WordPress website.
  2. Once that’s done, the table builder wizard will open. You can also find this at ProductsProduct Tables.
  3. On the first page, select the option to add the table to the page manually. This is important for listing on-sale product in WooCommerce.
    Create page of table builder
  4. Use the 'Select products' page to tell the table to list products which have sale prices. To do this, tick the 'Product visibility' checkbox and then select 'Featured'. Alternatively, if you created a custom taxonomy in step 1 then this taxonomy will appear as a checkbox to tick, and then you can select the 'On sale' term.
    Select products page of table builder
  5. On the 'Columns' page, choose which product data you’d like to display in the table layout. You can do this by setting the Columns option to image,name,summary,price,buy. To show customers what a great deal they're getting, the 'Price' column will display the main price crossed out with the sale price alongside.
    WPT table builder columns
  6. The final page of the table builder provides a shortcode which looks something like [product_table id="1"]. Copy this, unless you're using the WordPress block editor in which case you should insert a 'Product Table' block:
Product Table Gutenberg Block

Step 3: List discounted products

Now it's time to list discounted products on your WordPress site’s front-end with sale tags.

To do this, add a 'Product Table' Gutenberg block to the page where you want to list on-sale products. Alternatively, insert the shortcode you copied a minute ago.

You can display the on sale products wherever you like. For example:

  • Homepage.
  • 'Sale' page.
  • Shop page, above the other products.
  • Blog post.
WooCommerce on sale products

List ‘on sale’ products today

As you can see, there are lots of opportunities to run successful sales in WooCommerce which go beyond what's possible with the default 'Sale price' feature. Here's a recap of them all:

  • Use the WooCommerce Discount Manager plugin to quickly add a wide range of sophisticated sale prices and deals, and display them prominently on product pages.
  • Add On Sale filters to your shop pages with the WooCommerce Product Filters plugin, so that customers can find products on sale more easily.
  • Use WooCommerce Product Table to list WooCommerce On Sale products in a neat table layout - the perfect way to enhance product visibility and make it easier for customers to buy.

Ready to supercharge your sales in WooCommerce? Choose which of the above plugins are right for your store, and install them today 🔥

WooCommerce Previously Sold Products Archive

Some e-commerce websites sell the same products to multiple customers, while others sell one-of-a-kind products that can only be bought by one customer. If you're in the second category, then what happens after a product has been purchased and is no longer available?

There are lots of products that can only be sold once. It could be anything unique, ranging from used products such as cars or designer handbags; to original handmade products such as art or jewellery.

Read this article if you sell one-off products and want to learn how to:

  • Remove each product from sale once it has been bought - this prevents accidents and automates your stock control.
  • Create an archive of sold out products in your WooCommerce store - this can boost your search engine position by adding extra keyword-rich content to your site, as well as your credibility by showing all the amazing products you have sold in the past.

How to prevent products from being purchased more than once

It's surprisingly easy to set up your WooCommerce store so that each product can only be bought once:

  1. WooCommerce settings:
    1. Go to WooCommerce → Settings → Products→ Inventory.
    2. Tick 'Enable Stock Management'.
    3. Disable the low and out of stock notification emails, as if you sell one-time-only products then you don't need to know when something goes out of stock.
    4. Do NOT enable the 'Hide out of stock items from the catalog' option.
    5. Save the page.
  2. Product settings:
    1. Go to the 'Edit Product' screen for each product.
    2. Scroll down to the 'Product Data' section and open the 'Inventory' tab.
    3. Tick 'Manage Stock' and set the stock quantity to 1. Do not allow back orders.
    4. Save the product.

Once you have done this, each product can only be purchased once. The product page will show an 'Add to cart' button with no quantity picker because only one is in stock. After a customer has bought the product, the add to cart button will disappear and no one else will be able to buy it.

How to list previously sold products in WooCommerce

WooCommerce archive sold out products

Most stores selling one-off products want to list the available products in their main shop, and the sold out products on a separate archive page. I'll tell you how to do both of these things next.

You'll need the WooCommerce Product Table plugin for both of these. You can use it to list products in different parts of your store, based on their stock status.

List available products

First, I'll show you how to list 'In stock' WooCommerce products.

Once you've installed WooCommerce Product Table, the table wizard will open. To open it later instead, go to Products → Product Tables → Add New.

The wizard will walk you through the process of listing in stock products:

  1. On the first page, select the option to insert the product table manually to a page.
    Create page of table builder
  2. Use the 'Select products' page to tick the 'Stock status' checkbox and then select 'In stock'. This tells the product table to list product which are in stock and hide other stock statuses.
  3. To add the table to a page, either use the 'Product Table' block or insert the shortcode fro the final page of the table builder. (You'll need to use the shortcode if you're not using the WordPress block editor.)
Product Table Gutenberg Block

Create a sold out products archive in WooCommerce

The process for creating an archive of sold out products is similar to listing in stock products. However, this time we're listing products which you have previously sold but are no longer available.

To do this, simply go to Products → Product Tables → Add New. This time, tick the 'Stock status' box again on the 'Select products' page - but select the 'Out of stock' status.

You can make this as simple or as complex as you wish. For example, you could also use the 'Category' option to list sold out products by category.

Troubleshooting tip: If no products are listed, go to WooCommerce → Settings → Products → Inventory and make sure your store isn't set to hide out of stock products.

Choosing your table columns

The sold out products will be listed with whichever columns you choose on the 'Columns' page of the table builder. By default, this will include an add to cart column, which was perfect when you listed your In Stock products. However, that may not be appropriate now you're listing sold out products. After all, the products are no longer available - so no one can buy them 🙃

At this point, your table won't look broken because WooCommerce Product Table cleverly transforms the 'Add to Cart' button into a 'Read More' button for sold out products. The button links to the single product page, where people can see more images and learn more about the previously sold product.

If you don't want to include a 'Buy' column for your sold out products, then remove it from the list of columns.

Where to get the plugin

As you can see, WooCommerce Product Table makes it super-simple to list your previously available 'sold out' products separately from your main shop. If you sell one-of-a-kind products that are different each time, this is a great way to show customers what to expect from your store, even if they want isn't available right now.

Test the plugin risk-free today - it only takes a few minutes to set up!

WooCommerce restaurant delivery website

The management of restaurants are now being significantly impacted by the world of technological improvements. Given that the majority of people spend a significant portion of their days online, restaurants have enormous market potential. In fact, customers who frequent restaurants are more interested in buying food online. Restaurant managers and owners are constantly looking for ways to make it easier for consumers to order meals online and have it delivered quickly.

Most restaurant owners are setting up a restaurant delivery website to stay in business and give a neck to neck competition to others owners. The good news is that you can create a food delivery website in WordPress in a few simple steps.

One of the key benefits of setting up your own restaurant delivery website is that you don’t have to rely on third-party food delivery service providers and food delivery apps like Grubhub, Uber Eats, Postmates, or Doordash. Instead, you can start taking online orders for your own local restaurant and keep 100% of your profits.

In this tutorial, we’ll explain how you can create a restaurant delivery website using the WooCommerce Restaurant Ordering plugin. You can also watch this video to see how it's done.

How to create a restaurant delivery website in WooCommerce

To create a food delivery website, you’ll need a WordPress website with the WooCommerce plugin installed. You’ll also need the WooCommerce Restaurant Ordering plugin to set up your online menu and take orders online.

If you don’t already have a WordPress website set up, check out our in-depth tutorial on how to create a WooCommerce restaurant online ordering system for step-by-step instructions.

It's much more cost-effective than signing up with a third-party food delivery service provider like Grubhub, Uber Eats, Doordash, or Postmates.

Step #1: Add food items as WooCommerce products

The first thing you need to do is to add menu items to your restaurant delivery website as WooCommerce products.

We recommend organizing food items into different categories the way you would if you were creating a menu for your physical restaurant.

WooCommerce add new product

For example, your categories might be:

  • Starters
  • Main Courses
  • Desserts
  • Drinks

Once you’ve created the categories, simply add each food item as an individual WooCommerce product. Enter its title, description, category, and image, and then fill out the Product data section to set the price and (optionally) variations and other options.

Step #2: Install WooCommerce Restaurant Ordering on your WordPress website

The WooCommerce plugin automatically creates shop pages with its own layout for displaying products or, in this case, food items. However, this isn’t ideal for a restaurant delivery website. Instead, you can use the WooCommerce Restaurant Ordering plugin to list your online menu in a one-page order form.

Get the WooCommerce Restaurant Ordering plugin and install it on your WordPress website. You’ll get the plugin’s files and license key in the confirmation email.

WooCommerce Restaurant Ordering Plugin settings

Head over to WooCommerceSettingsRestaurant from the WordPress admin panel and enter your license key. You can choose the default settings for your restaurant food ordering forms from the same screen. Also add opening dates and times if you want to prevent people from placing orders while you're closed.

Here's how it works:

The WooCommerce Restaurant Ordering plugin automatically creates a food order form for you. If you preview your food delivery website on the front-end, it should look something like this (depending on your settings):

Food order form with sidebar

The food items are listed in a menu-style format with images, descriptions, and pricing information.

Optionally, you can create separate food order forms for different categories instead of listing all of them on one page. You can also create a section for Special Offers.

The easiest way to do this is by adding the [restaurant_ordering] shortcode to a page and using the shortcode options to choose which categories to include on that page.

Customers can simply place their order online and then proceed to the checkout page.

Step #3: Set up delivery and collection

One of the biggest advantages to using WooCommerce to power your restaurant delivery website is that it has options built-in for delivery and collection. To configure these settings, simply head over to the WooCommerceSettingsShipping section of the WordPress admin.

For example, you can create shipping zones for the areas you offer deliveries to. Let’s say you want to offer free shipping to areas close to your restaurant and charge for areas further away. You can set up two shipping zones in WooCommerce. And, if you want to offer collection or takeout option, all you have to do is set up a third shipping zone that gives customers the option to collect their orders from the restaurant.

WooCommerce restaurant delivery options

The WooCommerce plugin also lets you offer delivery options for each shipping zone you create. You can use these options to set up free home deliveries if the order value is above the minimum spend, charge for deliveries on orders less than the minimum spend, and offer local pickup.

If you like, then you can also add a plugin to allow customers to choose an exact delivery or collection time slot.

Step #4: Printing orders in the kitchen

To keep things simple, you can integrate a GPRS printer with your restaurant delivery website to automatically print orders in the kitchen in real-time. For this, we recommend using the WooCommerce Automatic Order Printing plugin. It offers seamless integration with WooCommerce Restaurant Ordering.

Alternatively, you can receive an SMS notification of new orders instead of printing orders to the kitchen. Our best advice is to use the SMS Alert Order Notifications plugin. You can also use the Twilio SMS Notifications plugin to send customers an SMS when their order is ready. This is especially useful if you want to offer local pickup options. Keep in mind that you’ll need to ask for the customer’s phone number at checkout if you want to offer this service.

Step #5: Offer online or offline payments

The WooCommerce plugin lets you set up various payment options. If you’re just getting started and want to offer online payment options, choose PayPal Payments Standard and enter your PayPal email address. In addition to this, you can also accept credit or debit card payments without using PayPal. For this, you would simply select Stripe and follow the setup instructions.

You can also offer offline payments (such as Cash on delivery) which are particularly useful for restaurant delivery websites. This way, your delivery drivers can collect payments from customers. This way, you can rival online food delivery service providers like Grubhub, Uber Eats, Doordash, and Postmates.

Start accepting online orders today

By setting up your own restaurant delivery website in WordPress you can start accepting online orders and keep 100% of the profits. This is much better than going with an online food delivery service provider like Grubhub, Uber Eats, or Postmates. The WooCommerce Restaurant Ordering plugin makes it easy to get started with a step in the right direction.

Once you’ve set up your restaurant delivery website, there are plenty of ways to enhance the customer’s shopping experience, for example, by setting up delivery and collection and offering online payment options in your online ordering system.

Ready to set up your restaurant delivery website and make it easier for customers to order food? Get the WooCommerce Restaurant Ordering plugin today.

If you sell car parts, you might consider setting up an online store to get your products in front of more customers. Selling car parts online also makes it easy for people to buy from you since they can quickly search for what they're looking for.

One of the biggest problems store owners have when selling car parts online is finding a good way to list products in a way that makes it easy for customers to find exactly what they're looking for. One way to do this is by setting up a WooCommerce store and listing automotive or car parts in a product table with purchasing options. As a result, you can increase product visibility and grow your bottom line.

Selling car parts online

With this in mind, in this article, we’ll explain how you can start selling car parts online. Along the way, we’ll also show you how you can optimize your online store’s shopping experience for customers.

The demand for online auto parts

In recent years, the automotive aftermarket industry has witnessed a significant shift towards online channels. This has been driven by several key factors, including:

  • Increasing number of DIY customers
    • As more vehicle owners take matters into their own hands, the demand for auto parts has surged. DIY enthusiasts prefer the convenience of online shopping, where they can easily find the specific components they need for repairs or upgrades.
    • Online platforms provide detailed product information, compatibility guides, and customer reviews, empowering DIYers to make informed decisions.
  • Convenience offered by online shopping channels
    • E-commerce platforms have revolutionized the way consumers shop for auto parts. With just a few clicks, customers can browse catalogs, compare prices, and order parts from the comfort of their homes.
    • The hassle-free experience of doorstep delivery and secure payment options has contributed to the popularity of online channels.
  • Growing market and digitization
    • The e-commerce automotive aftermarket has thrived since the challenges posed by the COVID-19 pandemic. In 2021, the market size reached $78,631.4 million, and it is projected to grow at a CAGR of 10.4% from 2021 to 2031.
    • Vehicle owners turned to online platforms for maintenance services and aftermarket components during lockdowns, driving sales.
  • Increasing average age of vehicles
    • Vehicles worldwide are aging, leading to higher demand for replacement parts. The average age of vehicles in regions like China, the US, and the UK has risen significantly.
    • Car loans with longer repayment periods and improved vehicle quality contribute to this trend. As vehicles last longer, the need for replacement parts grows.
  • B2B dominance in online sales
    • Business-to-business (B2B) sales account for over 73% of revenue in the e-commerce automotive aftermarket. Bulk buyers benefit from easy payment options, discounts, and efficient logistics.
    • Growing economies and disposable incomes drive B2B engagement in online auto component purchases.

For these reasons and more, the demand for online auto parts continues to rise. This creates an opportunity to build an ecommerce store to sell car parts online. Whether you want to target auto professionals or DIYers, it's an interesting niche with plenty of potential.

Identifying popular categories in auto parts market

If you want to sell auto parts online, then it's vital to understand which types are most sought-after. Let’s delve into some of the popular auto parts categories:

  • Engine components - Engine parts are the heart of any vehicle. Categories within this segment include:
    • Spark plugs: Vital for ignition and combustion.
    • Oil filters: Essential for maintaining engine health.Timing Belts and Chains: Ensure precise engine timing.
    • Pistons and rings: Key components for power generation.
  • Braking system parts - Safety is paramount, making braking system components highly sought-after:
    • Brake pads and rotors: Regularly replaced for optimal braking performance.
    • Calipers and brake lines: Crucial for stopping power.
    • Master cylinders: Responsible for hydraulic pressure distribution.
  • Suspension and steering components - These parts impact ride comfort and handling:
    • Shocks and struts: Absorb road shocks.
    • Control arms and bushings: Maintain stability.
    • Tie rod ends and ball joints: Influence steering responsiveness.
  • Electrical and lighting parts - As vehicles become more technologically advanced, electrical components gain prominence:
    • Batteries: Power source for starting and running the vehicle.
    • Alternators and starters: Generate electricity.
    • Headlights and taillights: Essential for visibility and safety.
  • Body and exterior components - Aesthetic and functional parts fall into this car parts category:
    • Bumpers and grilles: Protect the vehicle and enhance appearance.
    • Mirrors and door handles: Vital for safety and convenience.
    • Fenders and hoods: Shield engine components.

You need to decide whether to specialize in a particular area or sell all types of car parts. If you decide to stock a wide range, then it's important to consider the best way to source and stock each item.

Finding reliable suppliers

In the competitive landscape of the auto parts industry, establishing strong relationships with reliable suppliers is essential. There are several ways to source quality car parts:

Traditional suppliers

Traditional suppliers play a crucial role in the automotive parts industry. This includes local distributors and wholesalers. These suppliers operate physical locations and maintain warehouses stocked with a diverse range of auto parts and accessories. By establishing relationships with these local distributors, you gain the advantage of inspecting products firsthand and negotiating favorable terms.

Another category of traditional suppliers is the original equipment manufacturers (OEMs). OEMs specialize in producing parts specifically designed for particular vehicle brands. Collaborating with OEMs ensures access to genuine components. However, it's essential to note that OEMs often impose strict requirements and may have minimum order quantities.

Authorized dealers represent specific brands and provide authentic parts. Partnering with authorized dealers and then selling the car parts online not only ensures the quality of the components, but also enhances your credibility as a seller.

Online marketplaces

In the digital age, online marketplaces have become essential for auto parts businesses. Let's explore some key aspects:

  • Dropshipping - Dropshipping allows you to sell auto parts without the need to hold inventory.
  • Marketplace platforms - Platforms like eBay, Amazon, and Alibaba serve as intermediaries connecting buyers and sellers.
  • Specialized auto parts marketplaces - Dedicated websites such as RockAuto, CarParts.com, and AutoZone cater specifically to auto parts.

Trade shows and industry events

It's definitely worth participating in trade shows, expos, and industry events related to the automotive aftermarket. These events provide valuable networking opportunities. When attending, engage in conversations with suppliers, ask pertinent questions, and gather information. Evaluate factors such as product quality, pricing, and reliability. Meeting suppliers face-to-face allows you to establish stronger connections and make informed decisions.

When evaluating potential auto parts suppliers, consider several critical factors. First, prioritize quality and authenticity - ensure that suppliers offer high-quality, genuine parts to maintain your reputation. Next, compare pricing and margins, taking into account shipping costs, bulk discounts, and payment terms. Evaluate shipping and logistics reliability, as timely delivery is crucial for customer satisfaction. Lastly, choose auto parts suppliers with excellent customer support and a positive track record.

Choosing your platform: ecommerce websites vs. online marketplaces

Now you've learned why it's worth selling car parts online and where to source them from. Next, let's look at different ways to sell auto parts and consider which is best.

1. ecommerce websites: The self-hosted solution

An ecommerce website is a dedicated online store that you build and manage independently. Here’s why it might be the right choice for your online auto parts business:

  1. Brand control and consistency:
    • With your own ecommerce store, you have complete control over the design, functionality, and tone of voice. This consistency reinforces your brand identity and sets you apart from competitors.
    • Unlike marketplaces, where pricing and reviews dominate, your brand experience becomes a powerful differentiator.
  2. Better profit margins:
    • Selling directly through your ecommerce store allows you to retain all profits without sharing them with a third-party platform.
    • Implement strategies like up-selling, cross-selling, personalized recommendations, and dynamic pricing to maximize your margins.
    • In contrast, marketplaces often recommend similar products from competitors, potentially diverting business away from you.
  3. Ownership of customer data:
    • Your ecommerce store grants you access to valuable customer data, which is not possible on marketplaces.
    • Utilize this data for targeted marketing campaigns, personalized experiences, and cost-effective retention strategies.
    • Lower customer acquisition costs (CAC) by leveraging your direct access to customer insights.
  4. Forecasting and proactive measures:
    • With direct data access, you can forecast demand ahead of time and take proactive steps to meet it.
    • Adjust inventory, marketing efforts, and pricing based on real-time insights.

To build your own ecommerce website, you either need to DIY it or hire a developer to do it for you. While some platforms  make it easier for non-technical users to create and manage their stores, some technical knowledge or professional assistance may still be necessary.

You'll need to pay for development, hosting, and ongoing maintenance. However, the long-term benefits often outweigh the upfront costs if you use a platform like WooCommerce.

2. Online marketplaces: The guided bus tour

Online marketplaces act as bustling hubs where buyers and sellers converge. They get you:

  1. Immediate exposure:
    • Marketplaces already have a large customer base actively searching for auto parts.
    • Listing your products on platforms like eBayAmazon, or specialized auto parts marketplaces (e.g., RockAutoCarParts.com) instantly exposes your inventory to potential buyers.
  2. Lower startup costs:
    • Marketplaces handle infrastructure, traffic, and payment processing, reducing your initial investment.
    • Ideal for businesses with limited resources or those testing the waters.
  3. Ease of setup:
    • Listing products on marketplaces is straightforward, especially if you’re already familiar with their interfaces.

If you're wondering "What is the best site to sell car parts on?" then I recommend looking into them all and comparing the size of their audience with their fees and functionality.

Disadvantages of online marketplaces

  1. Profit sharing:
    • Marketplaces charge significant fees for each transaction, impacting your profit margins - especially as your online car parts business grows longer-term.
    • You share profits with the platform.
  2. Limited brand control:
    • Your brand presence is diluted within the marketplace environment.
    • Reviews and pricing become dominant factors, potentially overshadowing your unique value proposition.
  3. Customer data ownership:
    • Marketplaces retain customer data, limiting your ability to run targeted campaigns or personalized experiences.
    • You're dependent on the platform’s policies and algorithms, which can change at any time.

Our recommendation: Sell car parts online with WooCommerce

I believe that WooCommerce is the best way to sell auto parts online. This self-hosted ecommerce solution combines the best of both worlds:

  • You get your own website, which gives you total flexibility and control over your branding, ownership of your customer base, etc.
  • No revenue sharing (except for a small percentage to PayPal or a credit card payment processor if you accept payments online).
  • You can either choose your own hosting with a company like Kinsta, or take the easy route and use the hosted Commerce plan at wordpress.com.
  • Choose from a huge worldwide community of experience WooCommerce developers.
  • Avoid custom development costs by installing off-the-shelf themes and plugins to add extra features to your car parts website. For example, in a minute I'll show you how to use the WooCommerce Product Table plugin to create quick car parts order forms.
  • As well as selling direct on your website, you can integrate your inventory with marketplaces such as eBay, extending your market even further.
  • Integrating with marketplaces (e.g., eBay) allows you to tap into their customer base while maintaining your brand identity.

That's why I think that WooCommerce is the perfect solution for selling car parts online. You get high flexibility, while benefitting from low costs at the same time 🚗💡

How to list a large number of car parts

Selling car parts online means that you have to work with a lot of information. You might have posts for multiple vehicle types with multiple product types for each vehicle type.

Here are some of the key challenges store owners need to think about:

  • You need an easy way for customers to narrow down the list of car parts based on specific criteria such as make, model, and category.
  • Displaying information about each car part is more important than having large images.
  • Ideally, you want to display a large number of car parts on a single page so customers don't have to browse through multiple pages to find what they're looking for.

One way to optimize the customer’s shopping experience is by structuring and displaying product information in a user-friendly way on your store.

For this, you’ll need to make the most of WooCommerce categories, attributes, and custom taxonomies to properly structure data about car manufacturers and models – more on this later.

To make your online car parts store a success, you need to make it as easy as possible for customers to find products, learn more about them, add them to their cart, and proceed to checkout. This is possible with the WooCommerce Product Table plugin.

Search, sort, and filter options will help customers quickly find what they’re looking for. Dynamic filters (i.e. filters that are connected to each other) allow customers to see available products only. In other words, when a customer selects an option in one filter, the options in the next filter are automatically updated.

For your online automotive or car parts store, this means that instead of listing all the available car makes and models in a single dropdown menu, when the user selects Toyota from the Make dropdown, the Model dropdown will update to only include Toyota models only.

Sell car parts online

Dynamic filters are ideal for e-commerce websites that contain lots of information as is allows customers to narrow down their search and quickly find the product they want. Similarly, with a search box customers can search the product name or description to find what they’re looking for.

How to sell car parts online

To sell auto parts online, you’ll need a WordPress site with an e-commerce platform like WooCommerce. After you’ve set up your WordPress site, and installed WooCommerce, add automotive parts or car parts as WooCommerce products. Once that’s done, you can categorize them and list them in a front-end table layout.

Step #1: Add car parts products to WooCommerce

Here’s how you can add car parts to WooCommerce:

Brake drum product
  1. From the WordPress dashboard, navigate to Products → Add New.
  2. Enter the title of the product, description, and product image.
  3. Fill out the Product data section by entering information for each car part like the pricing and stock details.
    1. Simple product refers to products with no variants. So, when adding car parts with only one version, have this option selected.
    2. For car parts with multiple product options (for example color, size, or material), select Variable product. This way, customers will be able to select these attributes before placing their order.
  4. When you’re done, click on the Publish button to add the car part to your store.

Step #2: Categorize the car parts

A typical WooCommerce car parts website contains hundreds or even thousands of products. It’s not easy to find a specific car part on an online store that sells tons of different types of products.

Here are some ways you can structure the car parts products on your website to improve user experience:

  • WooCommerce product categories. Using WooCommerce categories and sub-categories, you can break down your car parts listings. For instance, if you sell car parts for different car manufacturers, you can create a category for each one of them (e.g. Toyota, Honda, and Hyundai). The Toyota category may include subcategories for Aygo, Corolla, RAV4, and Yaris.
  • Tags. Tags let you label products and allow customers to quickly see all products with the same label. Labelling your products with appropriate tags will enable customers to quickly find car parts. For example, you might consider creating tags for battery, bumpers, doors, windows, tail lights, new, and used.
  • Attributes. You can add specific data related to car parts in product attributes. For example, you might create attributes for colors, sizes, and materials. Use attributes when you’re selling auto parts online with variations. For instance, you might create an attribute group Material containing laminated glass and tempered glass for car windows.
  • Custom fields. WooCommerce custom fields enable you to store additional information about the car parts you are selling. Ideally, they should only be used when you want to display information that is unique to a product. For instance, you can create a custom field containing information about the item’s condition if you sell used car parts or fitment details.
  • Taxonomies. As with categories, taxonomies also enable you to organize products into hierarchical groups. However, organizing with taxonomies is a little different than organizing with the standard categories and subcategories. For instance, you might use standard WooCommerce categories for car manufacturers and models and create a custom taxonomy to store hierarchical information about the type of car such as SUVs or Crossovers.

As an example, let’s say you are setting up a WooCommerce car parts website. Here is how your products and categories might look like:

  • WooCommerce Categories – Toyota RAV4.
  • Tags – Windshields, Car Windows.
  • Attributes – Material: Laminated Glass.
  • Custom Fields – Part #194358Z; Condition: used, high-quality.
  • Taxonomies – Car Crossover.

These WooCommerce features enable you to implement a logical product structure for your online car parts store.

Step #3: Create car parts order forms

The default WordPress shop page layout isn’t ideal for selling car parts online. When selling products where the customer’s focus will be on information rather than what the products look like, you need to display them in a structured, grid-style layout.

The first thing you need to do is get the WooCommerce Product Table plugin and install and activate it on your WordPress website. When you do this for the first time, the table builder will open. You can also launch it at Products → Product Tables.

Use the multi-step table builder to set up the car parts order form. Here's a video on how to use it, and there are written instructions below:

3a. Decide where to display the spare parts form

The first page asks you to decide where on your site the WooCommerce car parts order form will appear. There are 2 choices:

  • Add it manually to a normal page on your site.
  • Automatically replace the standard WooCommerce templates with a product table. In other words, you can dynamically add car parts order forms to your main shop page and category pages.
Create page of table builder

3b. Configure the content of the order form

The remaining steps of the order form let you choose what it looks like. For example, you can:

  • Choose which specific products or categories of car parts to display.
  • Configure the columns of product data.
  • Change the initial sort order and add filter dropdowns.

3c. Add the order form to a page

If you enabled the order form on your shop page templates then you don't need to do this. However, if you opted to add it to a page manually then you need to do this now.

If you use the WordPress block editor then add the 'Product Table' block to a page. Otherwise (e.g. if you're using Elementor or Divi to build your pages) then insert a [product_table id="1"] shortcode. Replace the ID with the tables' correct ID, which you can get from the last page of the table builder or Products → Product Tables.

Product Table Gutenberg Block

4. View the car parts order form in WooCommerce

When you preview the page on your store’s front-end, you’ll notice all of the car parts are listed in a table layout.

This way, you can list all car parts in a single WooCommerce table similar to an online order form. An intuitive, single-page layout combined with search and filter options will help customers quickly find the car parts they want. This will also enable customers to view all the products and product information on the same page and place their orders.

Sell car parts on a single page

You can also choose to split a single page into different sections, with each section containing a table listing different car parts.

Bonus! Add advanced car parts filters

So far, we've looked at how to use the filters that are built into the WooCommerce Product Table plugin. They're pretty good for selling car parts, but you can supercharge them even further by installing the WooCommerce Product Filters plugin.

This lets you add a step filter to your car parts store. When the list of car parts first loads, the car manufacturers filter dropdown appears on the page. After the customer selects a manufacturer, a 'Car models' dropdown appears underneath. And so on, for as many levels as you set up when you added your product data:

WooCommerce stepped filter dropdowns

As well as adding step-by-step dropdown filters, you can use WooCommerce Product Filters to add a wide range of other filter styles. For example, it comes with filter checkboxes, radio buttons, clickable images, range sliders, and so on. If you have lots of car parts to sell, then this is a good way to help customers find what they need more easily.

Start selling car parts online

Selling information-dense products like car parts can be difficult if you’re running vanilla WooCommerce. As a car parts retailer, you need a better solution.

The WooCommerce Product Table plugin lets you display products in a neat, front-end table layout complete with a search box and sorting functionality. In addition to this, you can use it to add dynamic filters above your product tables making it easy for customers to quickly find the exact car parts they’re looking for. By doing so, you’ll be able to increase online sales and grow your bottom line.

Ready to optimize the user experience of your online car parts store? Get WooCommerce Product Table today!

WooCommerce single product shortcode

WooCommerce lists products on the shop page and product category pages. However, a standard WooCommerce installation doesn’t make it easy to add one or more products to other WordPress pages on your site. Luckily, you can use a single product shortcode to add a WooCommerce product to a page or post.

In this article, we’ll show you two easy ways to add WooCommerce products to a page or post. The products will look great and people can quickly add them to the cart without leaving the page. You won’t have to worry about styling or messing around with code.

Before we dive into implementation, it’s helpful to understand what WooCommerce shortcodes actually are. Shortcodes are small snippets of code enclosed in square brackets (like [this]) that perform specific tasks. They’re designed to be simple enough for anyone to use, even without coding experience. In WooCommerce, shortcodes let you display products, add buttons, and insert interactive features anywhere on your site. You can read our full guide to WooCommerce shortcodes for more information.

2 ways to add WooCommerce products to a page or post

There are two ways to add WooCommerce products to a page or post on your WordPress website. Skip directly to the instructions for whichever method you’d prefer:

  1. Add one product only
  2. List multiple products

Why add products to normal pages on your WordPress site?

There are several reasons why you might want to add one or more WooCommerce products to a page or post on your website. This is becoming more and more important due to changing trends in e-commerce.

The e-commerce industry is changing and online stores are moving away from the ‘traditional’ navigation structure of focusing heavily on the shop and product category pages.

Instead, products are being shown to sell well when they’re displayed in a more content-centric way. An example of this approach is when specific products are recommended and incorporated into wider content such as a sales page or blog post. The reason why this works so well is that it puts the product into context. The user is therefore more likely to buy it!

Let’s take a look at some examples:

Websites selling only one product

Businesses that only sell one product need to display their offering on sales pages and in blog posts and guides. These sorts of websites still need WooCommerce to power the back-end e-commerce functionality. However, the traditional shop and product category pages don’t make a lot of sense for this use case.

A better way to go about it is to use a page builder (like Gutenberg or a plugin) to create eye-catching content about your product and provide quick and easy ways to add the product to the shopping cart directly from that page. This is also perfect for featuring sale products.

Websites promoting products as part of a wider article or blog post

There are tons of websites that promote products as part of an article or blog post.

Food blog

For example, if you run a food blog, you might have a recipe page that includes a table listing all of the ingredients from the recipe as products. This way, readers can quickly buy them without leaving the page. These might be products that are sold directly on your website or affiliate products where the Buy button links to a third-party website (like Amazon or Tesco).

Fashion blog

If you run a fashion blog, you might publish an article about the latest trends, featured products, or the best selling products. Your article might list examples to illustrate each point along with Buy buttons linking to recommended garments. This also works for a Get the Look type blog post in which you dissect a trending look and list featured products to make it easier for customers to buy.

Tech website

And if you run a tech website, you could include an article reviewing the latest gadgets with Buy buttons for each gadget embedded directly on the page. This is much more user-friendly than having to click through to the shop page or even a separate product page for each item. Customers can simply choose the products they’d like to purchase and add them to their shopping cart in one go and proceed to the checkout page. You can also display recent products and related products.

Method #1: how to add one product to a page

WooCommerce comes with two built-in shortcodes that let you display a single product on any page or post: [product] and [product_page].

  • Use [product id="123"] to show a product with a specific ID. This shortcode displays a compact version of the product, typically including the title, price, and add to cart button.

  • Use [product_page id="123"] to embed the full product page, including the full description, reviews, and tabs.

To find the product ID, go to the Products section in your WordPress dashboard. Hover over a product title and look at the bottom of your screen - the ID will appear in the URL preview as something like post=123.

While these shortcodes are simple and effective, they redirect the customer to the full product page to complete the purchase. For a smoother shopping experience, we recommend adding Quick View buttons to your site with a simple plugin such as Quick View Pro. It works beautifully with WooCommerce shortcodes by letting customers open a product lightbox directly from the page they’re on. That way, they can view more details, select options, and add the product to their cart without any page reloads.

You can use the plugin’s single product shortcode to insert a Quick View button anywhere on your website.

add multiple products on one page or even embed products on a page
Example of a blog post with two product quick view buttons, each added via a shortcode

Instructions

  1. Get the WooCommerce Quick Vew Pro plugin and install it on your WordPress website.
  2. Go to the page or post you want to add the quick view button and insert the [quick_view id="123" text="Buy T-Shirt"] WooCommerce shortcode.
    1. Replace 123 with the ID of the WooCommerce product you want to show.
    2. Replace Buy T-Shirt with a suitable call to action.
  3. Head over to WooCommerceSettingsProductsQuick view and scroll down to the Product details section to select the different product details that will appear in the lightbox:
    1. Reviews
    2. Price
    3. Short description
    4. Add to cart button
    5. Meta information (such as SKUs)
  4. Click the Save changes button to continue.

Whenever a potential customer clicks on the Quick View button, it opens a lightbox containing product information. This way, customers can learn more about the product and add it to their WooCommerce cart without being taken away from the page they’re currently on.

Here are some actionable tips on how to optimize your page for conversions:

  1. Add the quick view button immediately after a large image and overview of the product. This improves the button’s visibility and customers will be more likely to click on it!
  2. Reword the button text to make it relevant to your use case. You can set it to Buy Now if it’s a simple product or Select Options if you’re selling a variable product.

Method #2: how to list or embed multiple products on a page using a single product shortcode

The best way to list multiple WooCommerce products on a page or post is in a product table layout. This makes it easy for visitors to see all of the products at a glance and view product details without having to click through to the single product page. The best part is that they can select options and purchase products directly from the page they’re on.

I recommend using the WooCommerce Product Table plugin to list specific products on your page or post. This versatile plugin lets you specify the products you’d like to list by product category, tag, or product ID.

WooCommerce Product Table preview

You can choose what information to show about the product and include quantity pickers, variation dropdowns, and add to cart buttons (or even multi-select checkboxes) directly in the table. It also lets you display specific types of products such as best-selling products.

In this way, people can quickly find everything they’d like to purchase and add the products to their shopping cart without leaving the current page.

Instructions

  1. Get the WooCommerce Product Table plugin and install it on your WordPress website.
  2. Navigate to ProductsProduct Tables and create your first table:
    1. Select the option to add tables to a page manually.
      Create page of table builder
    2. Choose which products to include in the table. For this use case, you'll generally want to select an individual product which you will be adding the table to. However, if you're planning to display other products on the single product page then you can select them here.
      WooCommerce table builder select individual products
    3. Set the table columns to Image, Name, Description, Price, and Buy. You can also display additional columns like SKU, depending on your needs.
      WPT table builder columns
  3. The final page of the table builder will provide a WooCommerce shortcode to add to the single product page. Copy this to your clipboard.
    Ready - Final screen of table builder
  4. Go to the product page where you want to add the product table to and insert the WooCommerce single product shortcode.

How to embed products with special product shortcodes

Beyond the basic shortcodes for individual products, WooCommerce offers several powerful shortcodes you can use to embed multiple products on a page. These shortcodes are perfect for highlighting specific product collections and work especially well when you're looking to display WooCommerce multiple products on one page—whether it’s a homepage, blog post, or custom landing page.

Here are some of the most useful shortcodes:

  • Best-selling products: Display your top performers with
    [best_selling_products per_page="6" columns="3"]

  • On-sale products: Highlight discounted items with
    [sale_products per_page="6" columns="3"]

  • Featured products: Showcase items you've marked as featured with
    [featured_products per_page="6" columns="3"]

  • Recent products: Display your newest additions with
    [recent_products per_page="8" columns="4"]

  • Top-rated products: Show your highest-rated items with
    [top_rated_products per_page="6" columns="3"]

  • Related products: Display products related to the current one with
    [related_products per_page="4"]

Each of these shortcodes gives you an easy way to embed WooCommerce products on a page, without needing to write any custom code. You can control how many products are shown and how they're arranged using the per_page and columns parameters.

If you want to embed WooCommerce multiple products on one page, these shortcodes provide a flexible and efficient solution. They're especially useful for promoting best sellers, seasonal discounts, or curated product selections — all within the layout of your choice.

Bonus: combining both methods

What if you want to list multiple products on your page or post and want to display them in a lightbox?

Fortunately, the WooCommerce Quick View Pro plugin and WooCommerce Product Table work seamlessly which means you can combine Method #1 and Method #2 to add quick view buttons to your product tables!

WooCommerce Product Table with quick view functionality

Instructions

  1. Get the WooCommerce Quick View Pro plugin and the WooCommerce Product Table plugin and install both on your WordPress website.
  2. Create a table via Products → Product Tables → Add New.
  3. Set up the table as needed. When you add your table columns in the table builder, include a 'Quick view' column.
  4. Go to the page or post you want to add the table to and insert the product table shortcode.

Troubleshooting common shortcode issues

  • Shortcode not displaying properly Ensure you haven't accidentally embedded the shortcode within <pre> tags. Check the HTML editor to remove these tags if present.
  • Shortcode not displaying multiple products If you're using a shortcode like [products] and only one product appears, it's likely due to missing or incorrect parameters. Double-check that you're using attributes such as ids, category, or tag to tell WooCommerce which products to display. For example:
    [products ids="12,34,56"]
    Also make sure the products you're trying to show are published, in stock, and not set to hidden from the catalog.
  • Shortcode not working in specific themes Some themes may have compatibility issues with WooCommerce shortcodes. Try using a basic WordPress theme temporarily to test if this is the issue.
  • Debugging steps If shortcodes still aren't working, try disabling other plugins temporarily to check for conflicts, verify your WooCommerce installation is up to date, and ensure your theme is compatible with your WooCommerce version.

Start using WooCommerce single product shortcode plugins

Instead of struggling with the WooCommerce plugin, you can use WooCommerce Quick View Pro or WooCommerce Product Table to add one or more products to pages and posts on your WordPress website. It’s incredibly easy to set up and you don’t have to worry about messing around with CSS styling.

And the best part is that it helps you deliver a better user experience. Customers can read through your content, make an informed purchasing decision, and buy the product(s) directly from the page they’re on.

Get WooCommerce Quick View Pro if you want to add one product to your page or WooCommerce Product Table to add multiple products to your pages and posts using shortcodes!