How to add a WooCommerce step filter to your store

Discover how to use the best WooCommerce step filter plugin - WooCommerce Product Filters - to add step-by-step filters to your online store. Customers select their requirements one at a time, and instantly see matching products. It's a fantastic way to grow your sales 😀
Navigating online stores smoothly is an essential part of convincing customers to buy your products. Enhancing your online store with a 'WooCommerce step filter' can help customers to find products more swiftly. The faster your customers can find what they're looking for, the more likely they are to make a purchase and come back again.
While WooCommerce itself only provides standalone filters, you can use the WooCommerce Product Filters plugin to add step-by-step filters to your store. As the best filter plugin, it makes it easy to add dependent filter dropdowns with as many steps as you like.
Keep reading to learn how to set up WooCommerce step filters to help customers to find products more easily. I'll provide a complete step-by-step tutorial, plus extra tips on how to use a step filter more effectively.
What is a WooCommerce step filter?
A WooCommerce step filter adds step-by-step filters to an online store. This means that the customer can select their requirements one step at a time until they have drilled down to find the exact products they need. They're also known as "cascading filter dropdowns" or "dependent filters".
How it works
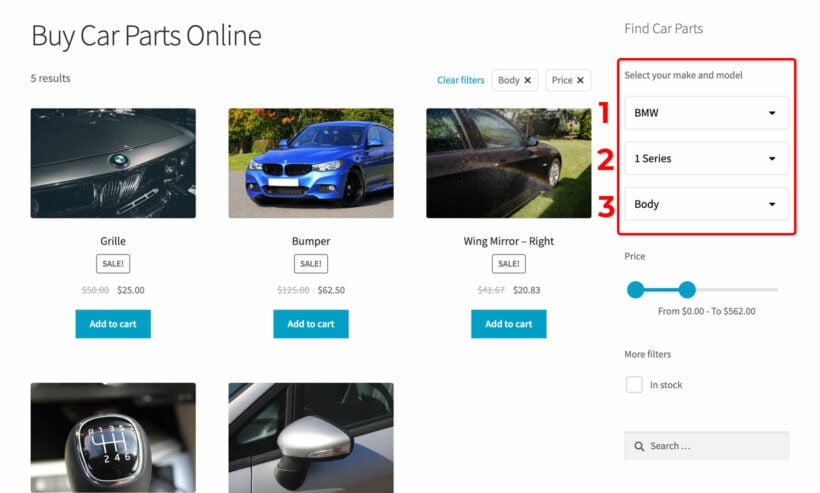
- The customer selects an option from step 1 of the step-by-step filter. For example, if you're selling car parts online then they might select a brand such as "BMW".
- Next, the step 2 filter appears alongside step 1. This might list car models, such as different types of BMW.
- When the customer completes step 2 of the WooCommerce step filter, a step 3 appears too. This will list the variants of the selected BMW model.
- And so on, for as many steps as you need.
While there are several ways to implement step-by-step filtering, it's common to only show step 1 when the page first loads. Step 2 appears dynamically based on the customer's selection in step 1, and subsequent steps appear as they continue through the process.
It's also possible to create WooCommerce step filters that are all visible as soon as your shop page loads, instead of loading the subsequent steps after the customer starts making selections. To do this, you use a dependent filters plugin like WooCommerce Product Filters to add as many filters as you like to the page.
Unlike the basic filters that come with WooCommerce itself, the filters are dependent on each other. This means that when the customer uses one filter, the options in the other filters update to only show matching options. While this isn't a true step-by-step filter, it does have similar benefits.
Does my store need step-by-step filters?
Offering stepped filters simplifies the shopping journey for your customers. They can quickly select their requirements - step-by-step - and instantly see matching products.
A WooCommerce step filter is better than unrelated product filters because they are dependent on each other. The step filters automatically adjust as the customer selects options in each step. Each step only shows options which match the customer's previous selections, so they never see irrelevant options like with some other types of filter. The filters dynamically adjust, removing the need for customers to sift through countless filter options.
In essence, as users engage with these filters, the remaining filters and their options transform in real-time. This is useful when the data about your products is multi-tiered (like car parts), or where you need to create something like a multi-step product recommendation quiz.
Want another example?
Imagine a customer browsing a WooCommerce footwear store. After picking the "Women's" category, the adjacent "Style" filter updates in real-time to showcase women's footwear styles, eliminating non-relevant options like men's loafers. The shopper can then fine-tune their choices by opting for more filters, say to filter by color or designer. Every time, each filter adjusts to display available options for women's shoes in the selected categories.
By eliminating the need to go through redundant filter selections and browse past unrelated products, customers can quickly pinpoint their desired items. For ecommerce stores with many products, this makes a WooCommerce step filter indispensable. It not only improves customer experience but can also hike conversion rates.
From the store managers' perspective, step filters simplify product management. You can organize your products into efficient filter clusters, grouping similar items based on specific criteria. You can do this using various types of WooCommerce product data, such as categories, attributes, or even custom data like taxonomies.
Next, I'll tell you more about WooCommerce Product Filters - the best plugin for creating step filters.
Introducing the best WooCommerce step filter plugin
WooCommerce Product Filters is easily the best plugin for adding flexible step-by-step filters to your store. It lets you create both types of WooCommerce step filter:
- Step-by-step filters where the subsequent steps appear when the customer completes each step.
- Dependent standalone filters which are always visible on the page, but update based on the customer's other selections.
It lets you create filters for absolutely any type of product data - attribute filters, tag filters, category filters, price filters, custom taxonomy filters, and so on. You can choose from a wide range of filter styles, including dropdowns (essential for step-by-step filters), checkboxes, radio buttons, clickable images, word clouds, range sliders, and so on.
2 filter modes
Importantly, you can choose how the filters actually behave. There are two options for this, both of which work well for different types of WooCommerce step filter:
- Show results instantly - With the AJAX filtering option, the list of products updates to indicate matching products as soon as the customer starts making selections. For example, if they select 'BMW' from step 1 of a step-by-step auto parts filter, then the list of products will immediately show all BMW products. When they filter for a particular BMW model in step 2, then the list of products will update to show items for that model. The list keeps updating for every step of the step-by-step filter.
- Show an "Apply Filters" button - If you'd prefer for customers to finish using the step filter before seeing the results, then you can disable AJAX and enable the 'Button click' option instead. This displays an "Apply" button after the WooCommerce step filter so that customers can make all their selections and then view the results. You can rename this button to anything you like, such as "View Results" or "My Recommendations".
And finally, you can display the product count within each filter. This updates dynamically in real-time as the customer makes choices from other filters. That way, customers can make sure they are not narrowing down their choices too much.
As you can see, WooCommerce Product Filters is an incredibly flexible step filter plugin. Next, I'll tell you how to use it to create step-by-step filters.
Tutorial: Setting up step filters in WooCommerce
Ready to add WooCommerce step filters to your store? Here's how to do it:
1. Add your product data
First, you need to add the data product that you will be displaying in the step-by-step filter. There are two main ways to do this:
Categories
If you have already structured the data that you will be filtering by into product categories and sub-categories, then that's great. For example, you might already have created a category structure with car manufacturers as the parent category, car models as child categories under each parent, and types of spare part as grandchild categories underneath. Skip ahead to step 2.
Use a custom taxonomy
If you don't want to use categories for this data, then create a custom taxonomy instead. You can easily do this with the free Easy Post Types and Fields plugin:
-
- Install the plugin and exit the setup wizard.
- In the WordPress Dashboard, go to 'Post Types' and click on the 'Other Post Types' tab.
- Find the 'Products' post type and click the 'Taxonomies' button:

- On the 'Manage Taxonomies' page, click 'Add New'.
- Fill in a singular name and plural name for your taxonomy (e.g. "Car Part" and "Car Parts").
- Tick the 'Hierarchical' box:

- Now go to Products → Car Parts (or whatever you entered for the plural name). Enter all the data to include in the WooCommerce step filter. First, add all the terms that you want to display in step 1 of the filter (i.e. the first filter dropdown). Next, create step 2 by adding terms and selecting a parent from the dropdown on the left. After that, create step 3 by selecting one of the step 2 items as the parent. Keep going to create a nested hierarchical structure like the one shown below:

- Finally, edit each product and find the 'Car Parts' taxonomy (or whatever you called it) on the right of the 'Edit Product' screen. Tick the boxes as needed and save the product.
2. Create a WooCommerce step filter
- Next, get WooCommerce Product Filters and install it on your WordPress website.
- Once activated, the plugin setup wizard opens automatically. Use it to choose the overall behavior for your step filters. For example, you can choose whether to show results instantly using AJAX or wait until the customer clicks a button.
- The final page of the setup wizard will direct you to Products → Filters in the WordPress Dashboard. This is the page where you create the WooCommerce step filters.
- Filters are structured into groups. Either edit the default group which has been created for you, or click 'Add New' to create a new one.
- Now it's time to start creating filters. You can add as many filters as you like. You will see many different types of filter style to choose from - checkboxes, clickable images, radio buttons, etc. However, let's assume that you want to create a WooCommerce step filter where each step appears when the customer selects the previous step. To do that, you must select the 'Dropdown' filter style:
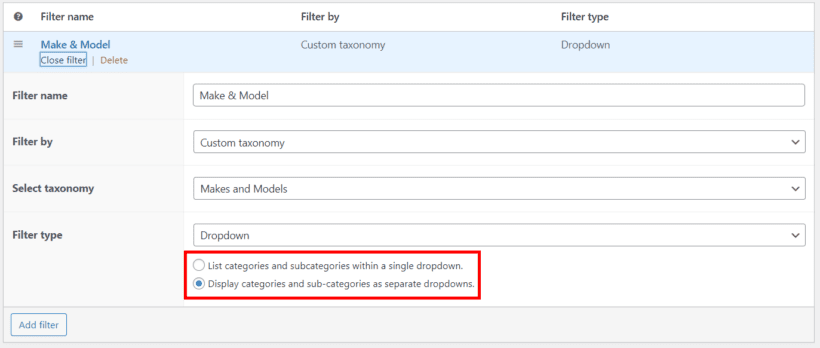
- Enter a name for the filter, select the categories or taxonomy where you added the data in step 1, and choose the 'Dropdown' filter type. Make sure you tick "Display categories and sub-categories as separate dropdowns". This is what turns a standard dropdown filter into a WooCommerce step filter.
- Optionally add any other filters that you'd like to include above or below the step filter. For example, you could add a price filter or "In stock" filter.
Add the filters to the page
Finally, you need to add the filters to the page. To do this, go to Appearance → Widgets and add a 'Product Filters' widget to the sidebar that appears on the shop page. Add a name to appear above the step filter, and select the filter group you just collected.

3. View your WooCommerce step-by-step filter
Next, it's time to see what the step filter looks like on your website.
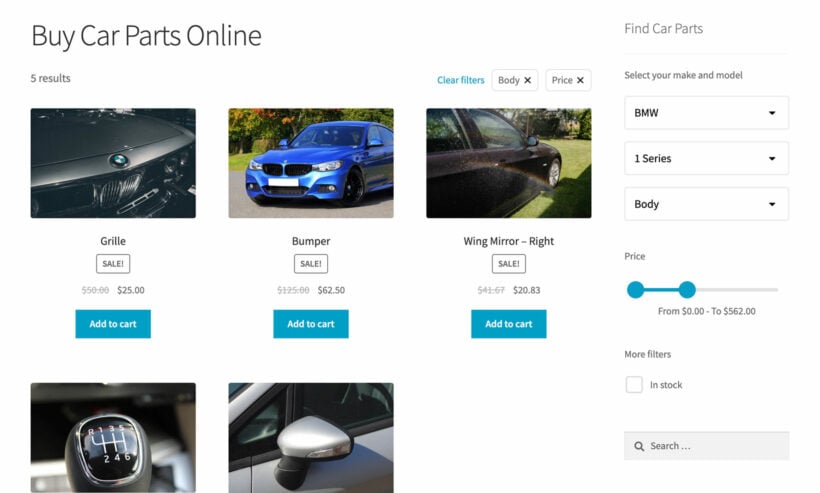
- When the page first loads, you will just see stage 1 of the step-by-step filter. In our example, this is the car manufacturer dropdown.
- After selecting a car manufacturer, a 'Car model' dropdown appears underneath.
- After selecting a car model, a 'Select a car part type' appears underneath.
While you might not be selling car parts, it will work in the same way on your own site. The only difference is the number of levels that you created when adding your hierarchical categories/taxonomies in step 1, above.
It's time to add your own step filter to WooCommerce 🚀
Now you know all about how to add cascading step-by-step filters to your ecommerce store, it's time to put it into action.
As we have seen, the WooCommerce Product Filters plugin provides everything you need to add dependent filter dropdowns to your store.