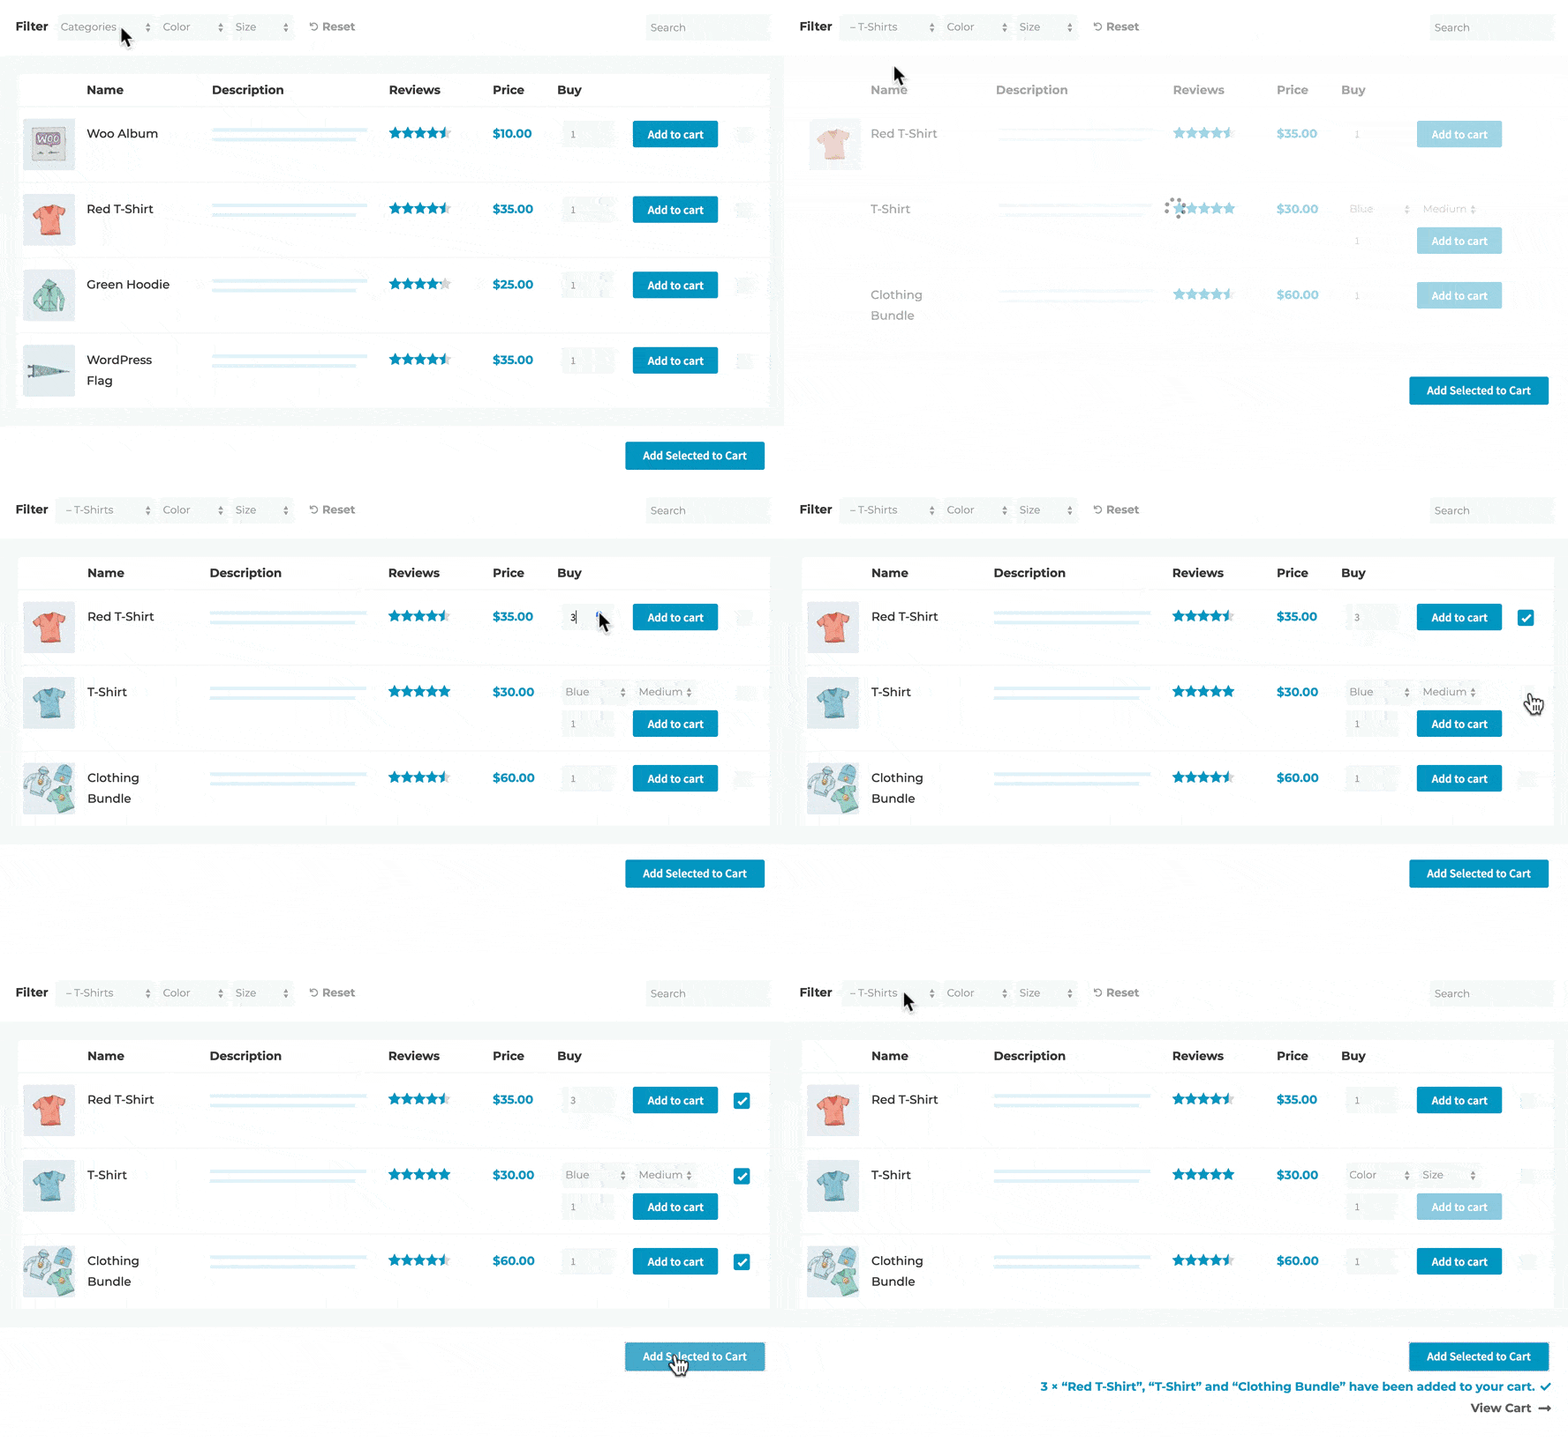
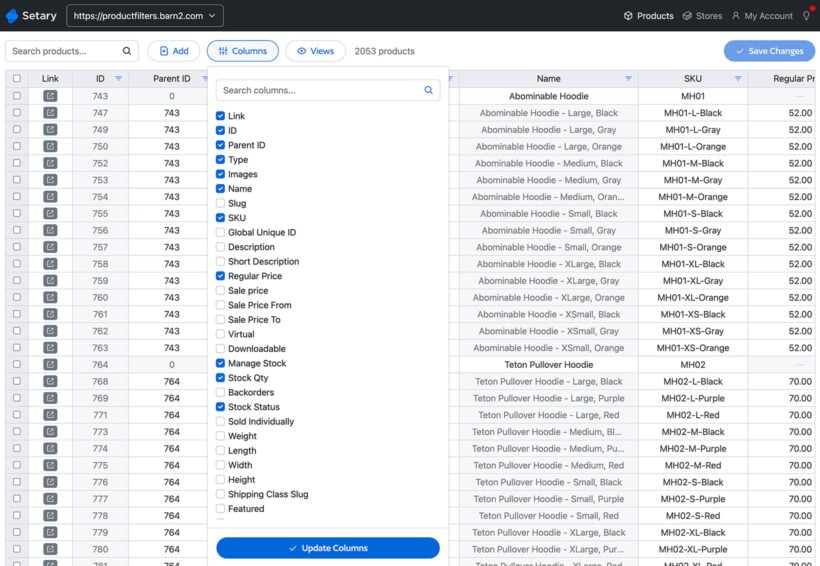
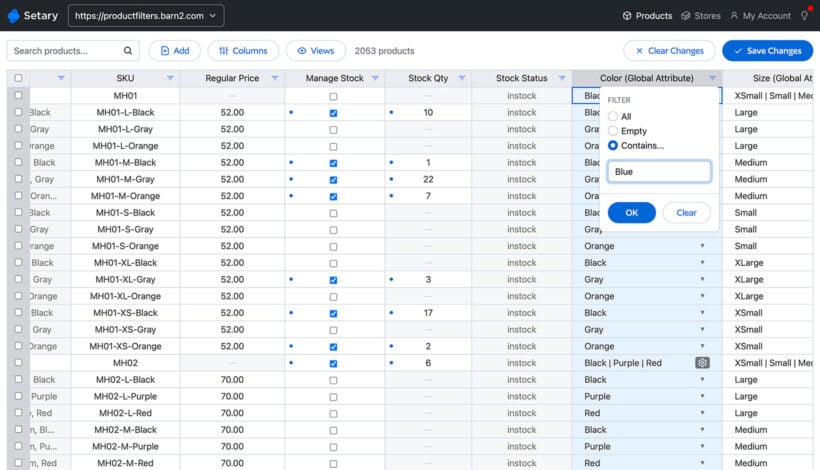
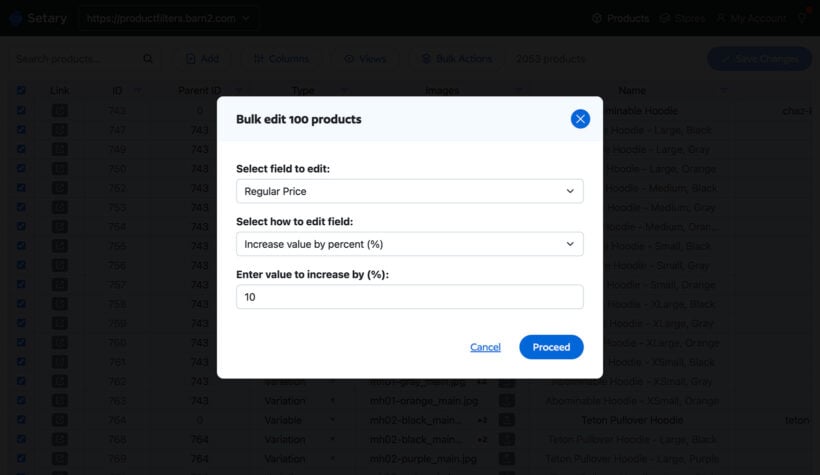
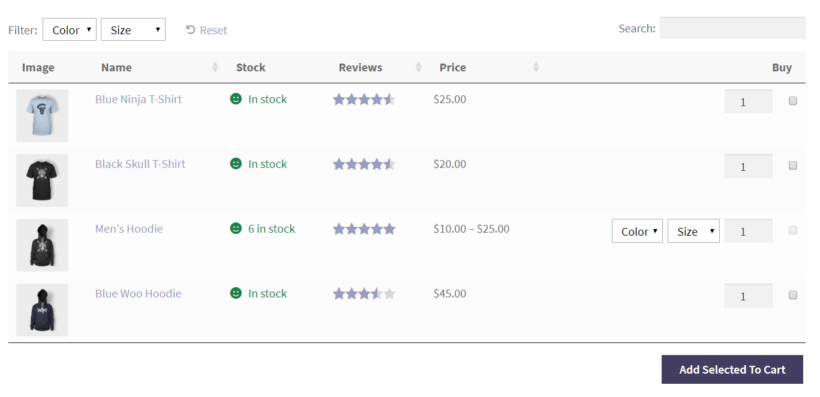
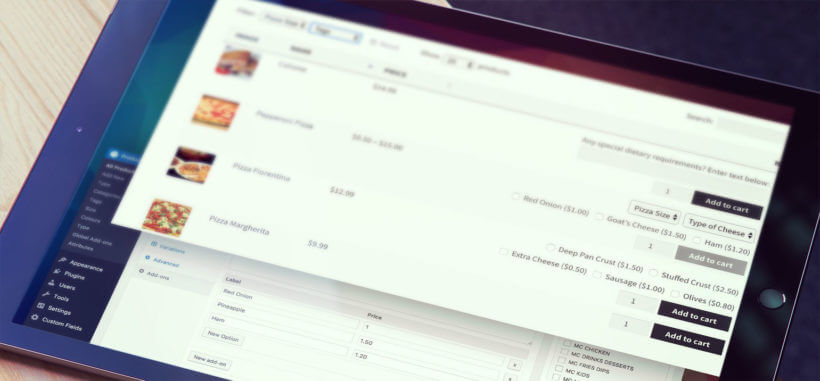
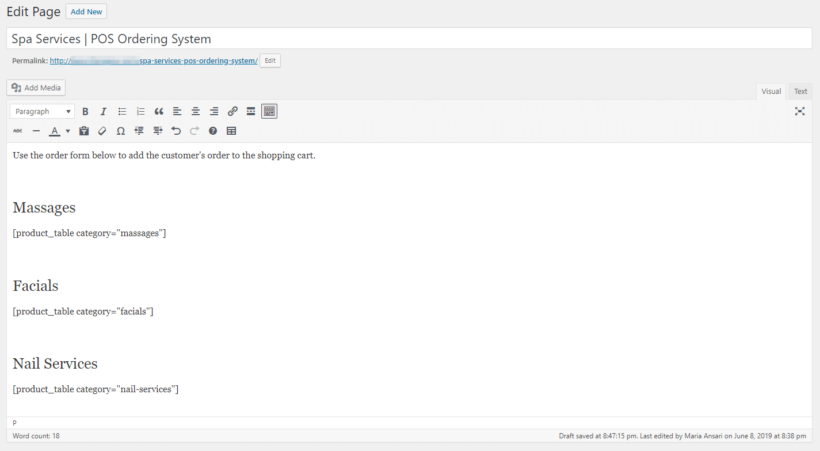
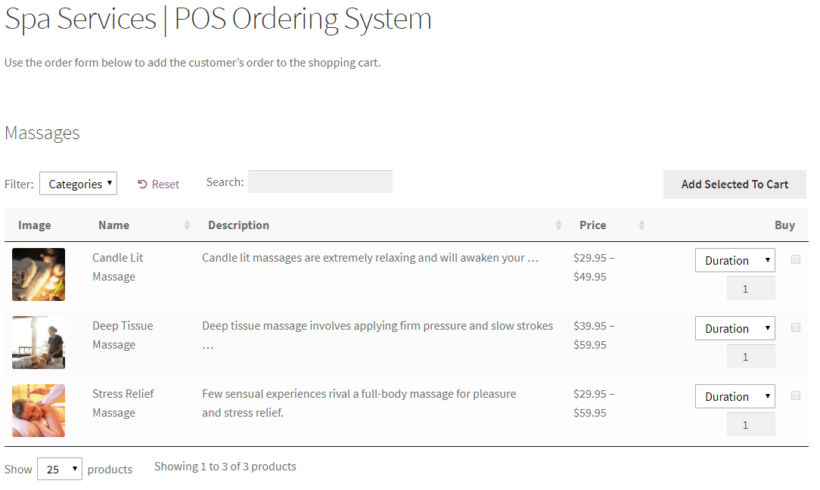
WooCommerce frontend editor plugin

WooCommerce Product Table is perfect for creating a simple product list or quick order form. Our colleagues at WP Sheet Editor have provided an easy way to allow your users to edit the products in the table directly from the front end of your website. Keep reading to learn how to create a WooCommerce product front end editor. 
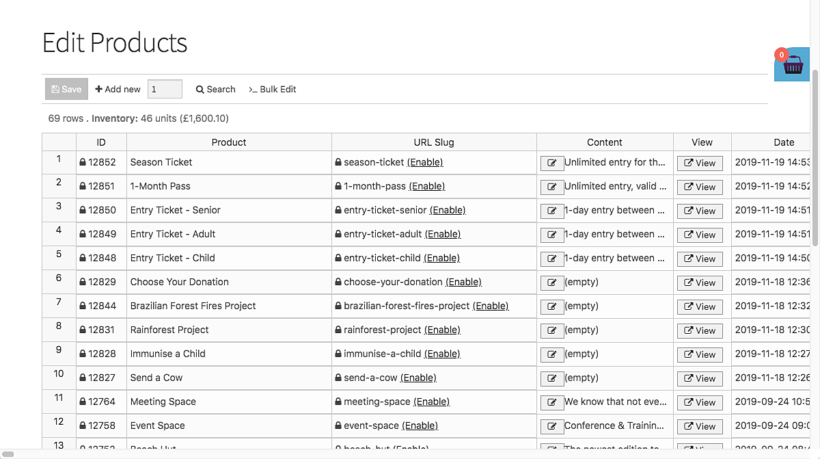
We've previously told you how your users can submit products to your WooCommerce store and display them in a product table. Since then, lots of you have requested a way to allow your staff or customers to edit the products in the table from the front end, without having to access the WordPress admin. Today, we're revealing a new method that will let you do this!

Used alone, WooCommerce Product Table is a great way to list products. However, the table is for displaying public information. If you want to allow users to edit products from the table, then you need to follow this tutorial. We will show you how to create an editable frontend table for your WooCommerce store.

WooCommerce front end product editor plugin

There are lots of reasons why you might need a WooCommerce product front end editor. For example:

  • Your employees might need to edit products, but you don't want to let them loose in the WordPress back end. Instead, keep it simple by providing a front end product editor that only a specific user role can access.
  • If you're creating a WooCommerce multi-vendor marketplace then you can list each vendor's products in a different table or order form. You can then add a front end editor to allow your vendors to edit their own products without having to use the WordPress admin.
  • Perhaps you allow users to upload their own products to your store. Add a WooCommerce front end editor so that each user can edit their own products, but not anyone else's.

1. Create the product table

WooCommerce order form plugin

The first step is to list some or all of your products in a product table view. This is the view that your customers will see when they visit your store. Later, you'll learn how to add an 'Edit' button which will take logged in users to the WooCommerce product front end editor (depending on their role).

To set it up, get WooCommerce Product Table and follow the instructions in the 'Getting started' email.

The plugin knowledge base is hugely comprehensive. It includes instructions on everything you need, including which columns to include in the table, how to add filters to help people to find products more easily, how to display product variations, and more.

You can either create a table containing all your products, or you can create tables listing specific products (e.g. products from a specific brand or vendor only).

2. Install the WP Sheet Editor's frontend editor plugin

WP Sheet Editor is a collection of plugins that provide an easy-to-use front end table editor for any information that is stored in the WordPress database - including WooCommerce products.

In Step 2, we will use the Universal Frontend Editor plugin to create a spreadsheet-style WooCommerce front end editor for the products in your table. So you need to buy and install the plugin on your WordPress site to continue with this tutorial.

Get Universal Frontend Editor

3. Create the frontend editor for WooCommerce

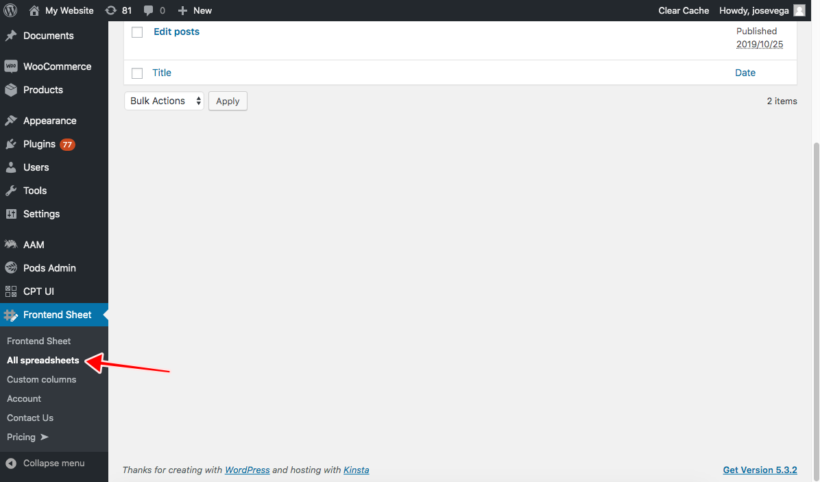
In the WordPress admin, go to Frontend Sheet > All Spreadsheets:

WordPress table front end editor create spreadsheet

Once there, click on Add New to create a new table editor for your WooCommerce products:
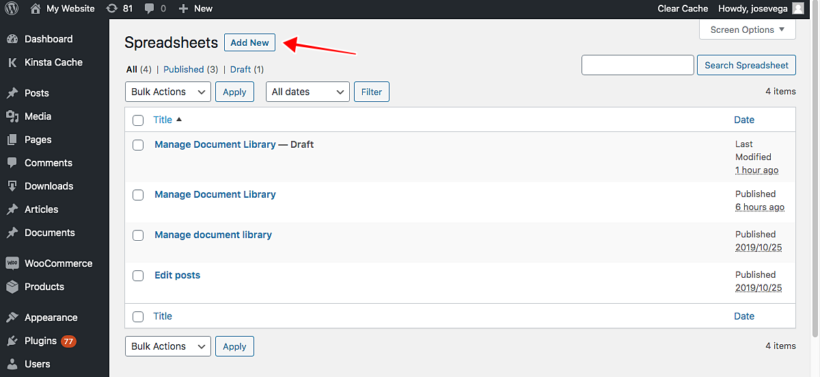
WordPress spreadsheet editor add new

Now you need to enter the editor title. This title is private and is only used for identifying the editors in the backend. You may call it something like Manage Products.

WooCommerce product front end editor add

Then, select the post type you want to edit with it. In this case, you need to select Products. Next, click Save changes:
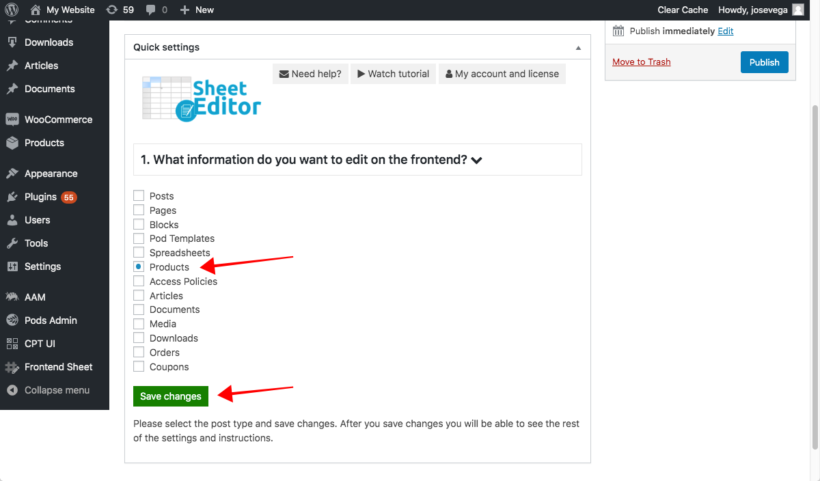
WooCommerce front end editor products post type

After that, you'll see that the plugin will generate a shortcode, which you'll need to add to a full-width page. But we'll do it later. Now we need to configure the frontend editor.

4. Configure the WooCommerce product front end editor

As we learned earlier, the WooCommerce product frontend editor can be used for many purposes:

  • Employees can manage the stock and prices from the frontend. In this case, they only need to edit the product name, SKU, stock status, stock, and price fields.
  • Vendors can upload products to your store directly. In this case, they need to edit all the product fields to upload all the product information.
  • Clients, shop managers, or administrators can manage the full product catalog from the frontend. In this case, they need to edit all the fields.

For this reason, the WooCommerce frontend editor plugin allows you to customize the toolbar options and the columns. You can create a simple editor or an advanced editor based on your needs.

Note. If you have a marketplace with multiple vendors, the frontend editor integrates with Dokan, WooCommerce Frontend Manager, and WooCommerce Marketplace. The integration works like this:

  • Vendors will view and edit products created by them only.
  • The editor settings have the option to display a button inside the marketplace dashboard. This allows vendors to launch the inline spreadsheet editor from their own dashboards, as well as by using the other methods discussed in this tutorial.

a) Select the toolbar tools

Next, you need to decide which tools to include in the WooCommerce frontend editor. Think about what you want people to be able to edit from the front end, and only include tools they actually need. This keeps the product front end editor as simple and user-friendly as possible.

In the settings for your spreadsheet, select which tools to show on the Primary toolbar and the Secondary toolbar of the editor:

WooCommerce select front end editable columns

Secondary toolbar

You can display the Help options, which contains tutorials on how to use the editor.

Primary toolbar

In this toolbar, you can display or hide these options:

  • Add new - Users can add new rows (products) to the store.
  • Search - Users can filter the products by keyword, status, category, attribute, tag, date, price, etc.
  • Bulk Edit - Users can edit thousands of products in seconds using this tool.
  • Create variations - Users can create variations for one or for several products and copy variations from one product to many products to manage the variations quickly
  • Display variations - Users can display variations right below the main products as rows
  • Locate cell - Users can find specific cells by typing the content in them.
  • Locate column - If the editor has many columns, users can find columns by entering a keyword in this field.

If you want to show a simplified editor, you can enable the Add New and Search tools, and deactivate the rest.

Finally, click Save changes.

b) Select the columns to include in the WooCommerce frontend editor

After selecting the tools that will appear on the toolbar, you need to select the columns you'll display on the spreadsheet-style inline product editor.

The list of columns automatically detects all the fields that are available for your products. This includes fields added by other plugins, such as YITH WooCommerce subscriptions, Advanced Custom Fields, all the WooCommerce extensions, etc. So you can easily enable, disable, sort, or rename any field.

You can create multiple editors for different users based on their needs. For example, you might add one editor with full columns for shop managers, and a simple editor with fewer columns for employees.

WooCommerce product front end editor columns

We generally recommend having the same columns in your public-facing product table and the front end editor. That way, users will see the information in the same format as they switch between the main product table and the spreadsheet editor views.
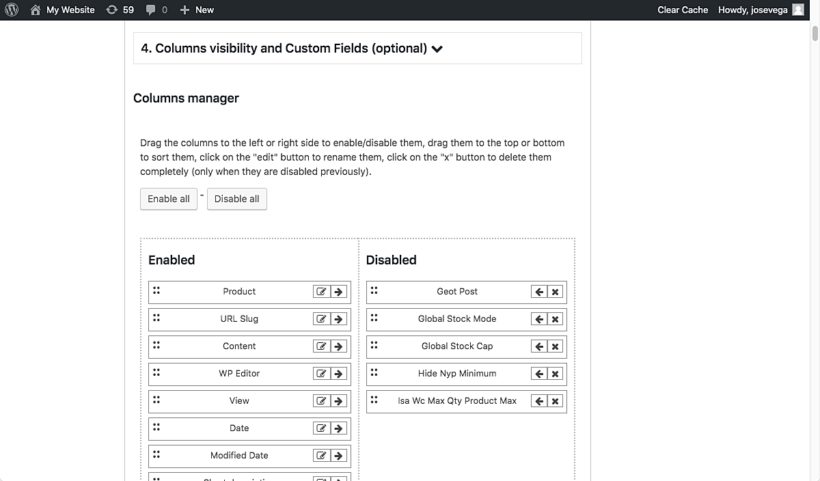
You can rename the columns. For example, you may rename the Title column to Product name. Just click on the Edit button in each column, change the name, and save. Again, try to keep the column names the same as your main product table.

Rename column WooCommerce product editor

Once you're done configuring the frontend editor, click on Publish to finish.

Publish WooCommerce frontend product editor

Now, it's time to integrate the new frontend editor with the public-facing product table that you created in Step 1.

5. Add an 'Edit' link to the product table

In Step 1, we used WooCommerce Product Table to list products in a public-facing table view. Now, we need to add an 'Edit' link so that people can get from the table view to the front end product editor.

To do this, we'll add a button titled Edit store above the product table so that users can log in to start editing products right there.

a) Create the frontend editor's page

First, we need to create a page and add the WooCommerce product front end editor to it. To do this, copy the shortcode from the frontend editor plugin settings (we first saw this in Step 3):

WooCommerce product frontend editor shortcode

Now go to Pages > Add New to create a new page for the frontend editor:
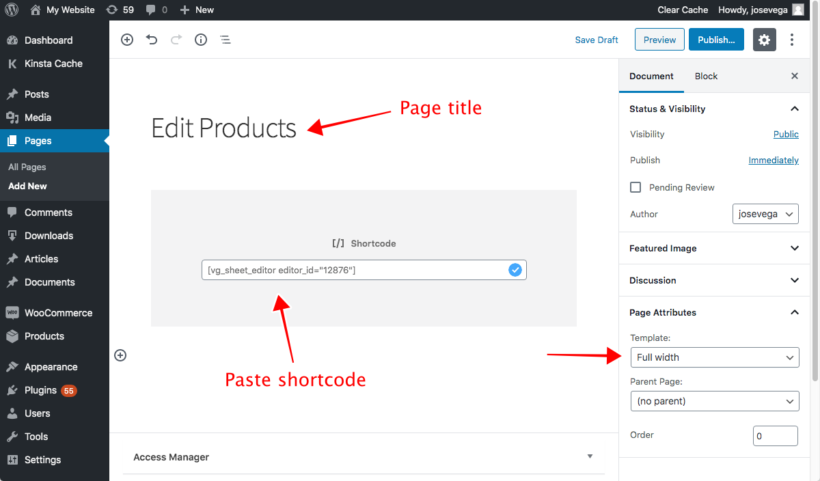
Create page for WooCommerce product frontend editor

Once here, just enter the page title (we'll call it Edit Products), paste the shortcode in the page content, and select a Full width page template (if your theme has one).

Finally, click on Publish. After it's published, copy the page link to paste it on the Product Table page.

WordPress copy page URL

b) Link to the editor page from the product table

Now go to the page where you used WooCommerce Product Table to add a product table, and add a new link or button. This should link to the page that you just created, which contains the frontend product editor:

Add edit link to WooCommerce Product Table

We've created the button with the Gutenberg editor, but you can create it with any page builder or button shortcode.

Finally, Update the page to add the button to it.

c) Optional - Hide the 'Edit' link from normal customers

You might want everyone to be able to see the 'Edit' link, as it provides a simple way for guests to log into their account before editing the products in the table. Alternatively, you can hide it from public view so that only certain logged in users see it.

There are a few options for hiding the edit link:

  • Instead of adding an 'Edit' link to the same page as your product table, you can give certain users a direct link to the page containing the frontend product editor.
  • You can add the edit link to a more subtle location such as the footer.
  • Or if you prefer, you can install the Advanced Access Manager plugin. This plugin comes with shortcodes which you can use to make the button visible to users with a specific role, and hidden from everyone else. This is a neat compromise because you can still add the Edit link above your product table, but only the appropriate people can see it.

6. Test out the WooCommerce product front end editor

After these steps, users will be able to see the Edit Store button above the product table.
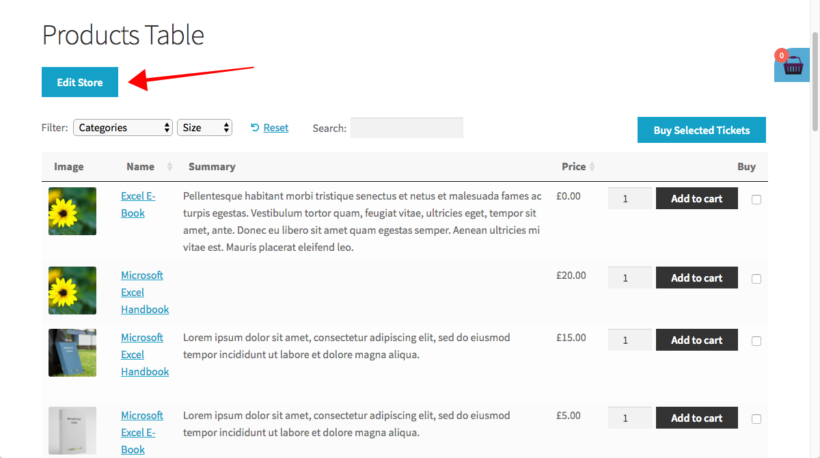
WooCommerce Product Table edit button

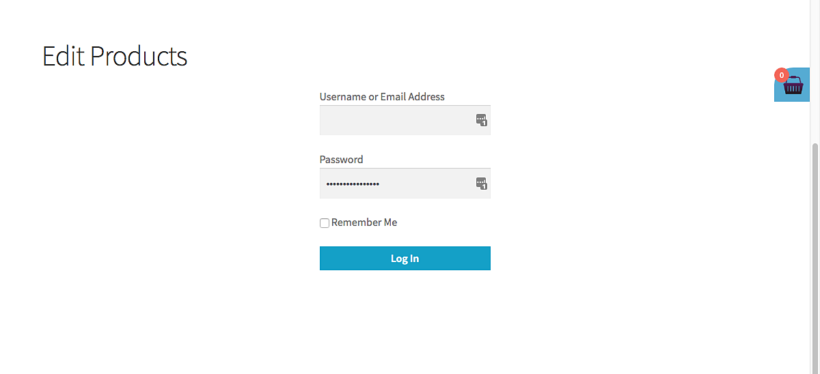
And when they hit that button, they will be asked to log in to start editing the products:

Login to edit WooCommerce products

After they log in, users will be able to use the frontend editor:

WooCommerce front end product editor plugin

It's really simple. You can easily create a frontend editor for WooCommerce and integrate it with the products table you created with the WooCommerce Product Table plugin.

7. Who can use the WooCommerce frontend editor?

The WooCommerce products frontend editor is available only for logged-in users. Logged out users or guests will see a login form when they click the 'Edit' button.

It uses the default permissions from WordPress, so the products can be edited by these roles:

  • editor
  • administrator
  • shop manager
  • any user role that has the "edit_products" capability

You can create new user roles with the free user role editor plugin and assign it with the "product" capabilities. This is helpful if you want to allow users to edit products without having permission for anything else.

Just want users to edit their own products?

If you've set up your site to allow users to upload their own products, then you might want them to be able to edit these products but not anyone else's. There are a few ways to do this:

  • Universal Frontend Editor has an option to allow users to add new products to the table, as well as existing existing ones. If you use this to accept front end product submissions, then each user will automatically only be able to edit their own products in future.
  • If you're using Dokan, WooCommerce Frontend Manager or WooCommerce Marketplace, then logged in product vendors can only view and edit their own products.
  • If you're using Gravity Forms to allow front end product submissions, then you can use the free User Role Editor plugin to edit the appropriate user role, adding the capability "edit products" and removing the capability "edit others products".

Where to get the plugins

You'll need 2 plugins to list information in an interactive table with frontend editing capabilities:

  1. WooCommerce Product Table - creates the product table that your public visitors will see.
  2. Universal Frontend Editor - creates a spreadsheet editor so that logged in users with the correct role can edit the products in the table.

Get the plugins today, and then follow this tutorial to set it all up!

WordPress frontend editor table plugin

Our Posts Table Pro and Document Library Pro plugins display any type of information from a WordPress website in a searchable table. Our colleagues at WP Sheet Editor have integrated with our plugins to provide a user-friendly way to edit the contents of the table from the front end of your website. Keep reading to learn how to add a frontend editor to your tables.

Posts Table Pro is popular for creating a blog post index, member directory, and more. Document Library Pro is popular for listing documents, publications, or other resources such as audio and video. Both plugins work by taking your posts (or any custom post type) and displaying them in an interactive table on the front end of your website. You can either add the content from the WordPress admin, or you can use it with a forms plugin to allow your users to submit information themselves.

However, until now, there was no way for your colleagues or users to edit the contents of the table directly. Thanks to the developer behind the Universal Frontend Editor plugin, this is now possible by adding a user-friendly front-end editor to your tables. 

Whether you're using our table plugins to list posts, pages, products, documents, articles, courses or something else, keep reading to learn how to let your staff or users edit the contents of the table - all without using the WordPress back end.

1. Create a table using Posts Table Pro or Document Library Pro

Before adding the WordPress frontend editor, you must set up Posts Table Pro or Document Library Pro and use it to start listing information. Get whichever plugin best meets your needs and set it up using the instructions in the 'Getting Started' email. Add some posts/documents and list them in a table on your website.

Once you have done this, you need to follow these simple steps to add a front-end editor to the table(s). This means that your colleagues and/or users can edit information from the WP front end, without having to log into the WordPress admin. I'll tell you how to do that next.

2. Install WP Sheet Editor's Frontend Editor plugin

WP Sheet Editor is a collection of plugins that provide an easy-to-use table editor for any type of WordPress information. It comes with more than 11 plugins for editing posts, pages, custom post types, documents, WooCommerce products, WooCommerce coupons, posts, taxonomies, and more.

In this tutorial, we will use one plugin from WP Sheet Editor: The Frontend Editor plugin. Buy and install the plugin on your WordPress site, and then continue with this tutorial:

Get Universal Frontend Editor

3. Create the frontend editor

Next, it's time to create a new frontend editor. Go to Frontend Sheet → All Spreadsheets.

WordPress table front end editor create spreadsheet

After that, click Add new to create a new spreadsheet:

WordPress spreadsheet editor add new

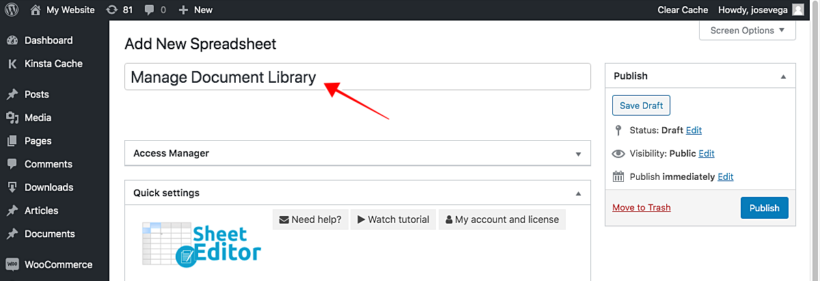
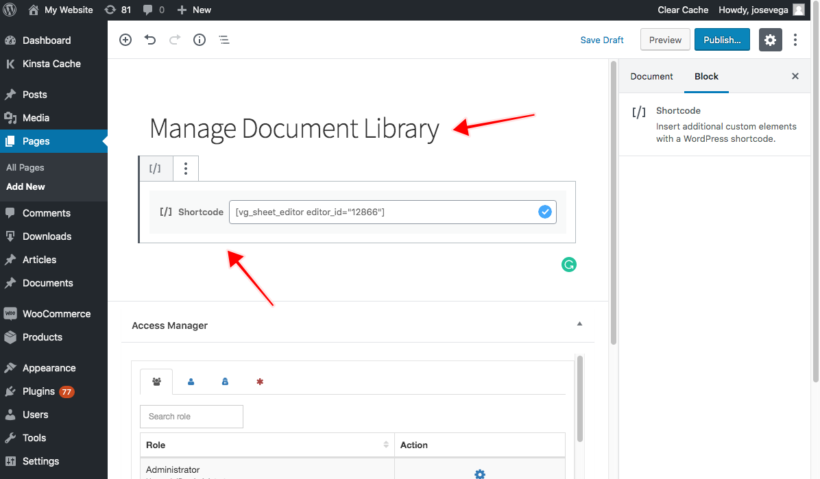
Now you need to add the spreadsheet name. This is private and used for identifying the frontend editors in the WordPress backend. You can use any name. In this example, we'll call it Manage Document Library:

WordPress front end editor table plugin name

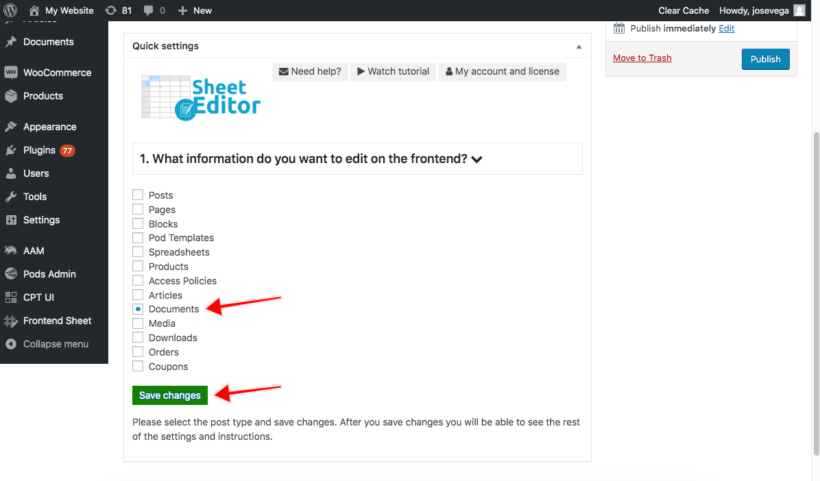
Next, you need to select which post type you'll edit using this new frontend editor. Go to the What information do you want to edit on the frontend? section.

Note: If you haven’t created your custom post type yet, then you can easily do so with the free Easy Post Types and Fields plugin. Check out this step-by-step custom post types tutorial

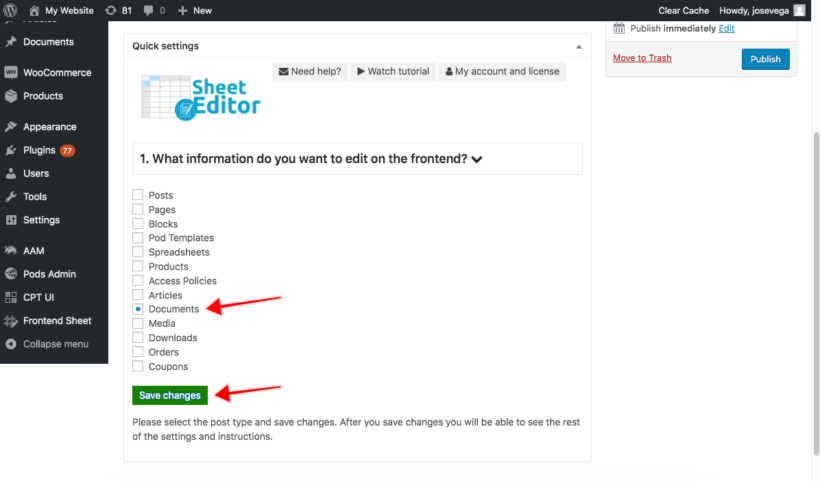
Here you'll see a list of all the post types on your WordPress site. In this case, we need to select Documents and then click on Save changes. You should select whichever post type you're listing in the table. If not, then you can just select posts or pages and use those instead.)

Select WordPress post type for front end editor

After that, a shortcode will appear below. Copy this to your clipboard - you need this for the next step:

WordPress front end editor plugin shortcode

Add the front end editor to a page

Next, you need to create the page where the editor will be displayed. Users will be taken to this page when they click the 'Edit' button above your Posts Table Pro or Document Library Pro table.

Go to Pages → Add New. Once there, add a page title and enter the shortcode in the content. Make sure the page uses a full-width template - this allows plenty of space for the editable table in the frontend.

Create WordPress front end editor page for table editing

Next, finish off this page as follows:

  1. Copy the URL of the page - you'll need to link to it in Step 5, later.
  2. Add a link or button back to the page where you've added the Posts Table Pro or Document Library Pro table. That way, users can easily return to the public-facing version of the table after editing the information within it.
  3. You might also want to mark this page as 'noindex' so that people won't access it directly from search results. You can do this using any WordPress SEO plugin such as Yoast.

4. Configure the frontend editor

Once you've created the page with the frontend editor, you can configure the visibility options. This controls who can access it and edit the contents of the table.

a) Select the toolbar tools

Decide which tools to include in the frontend editor. This will depend on how you plan to use it. For example:

  • You can use it for clients to manage information from the WordPress front end editor. In this scenario, they need advanced options for searching and bulk editing.
  • You can use it for employees or normal users to submit information (e.g. document, events or posts) from the front end. In this case, you need simpler options.

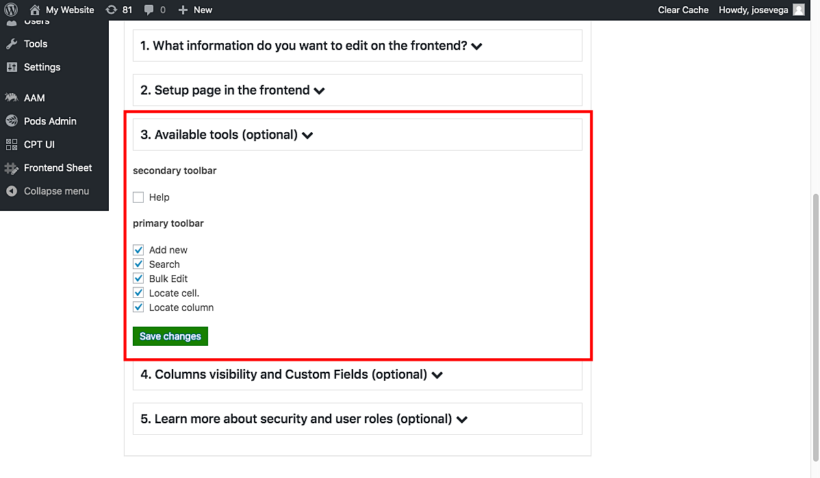
In the settings for your spreadsheet, select which tools to show on the Primary toolbar and the Secondary toolbar of the editor:

WP frontend editor options

For the Secondary toolbar, you can display the Help options with links to tutorials on how to use the editor.

For the Primary toolbar, you'll be able to show or hide these options:

  • Add new - Users can add new items using the spreadsheet.
  • Search - Users can filter the items by keyword, status, category, tag, modified date, comment count, etc.
  • Bulk Edit - Edit thousands of items in seconds. You deactivate it if you want users to edit items using the cells only.
  • Locate cell - Locate the cell containing a value.
  • Locate column - Locate columns quickly. Useful when you have many columns to avoid scrolling too much. Enter a name and the plugin will find the column.

For a simple editing experience, you can activate the "Search" and "Add new" options and deactivate the rest.

b) Select the columns you want to see on the editor

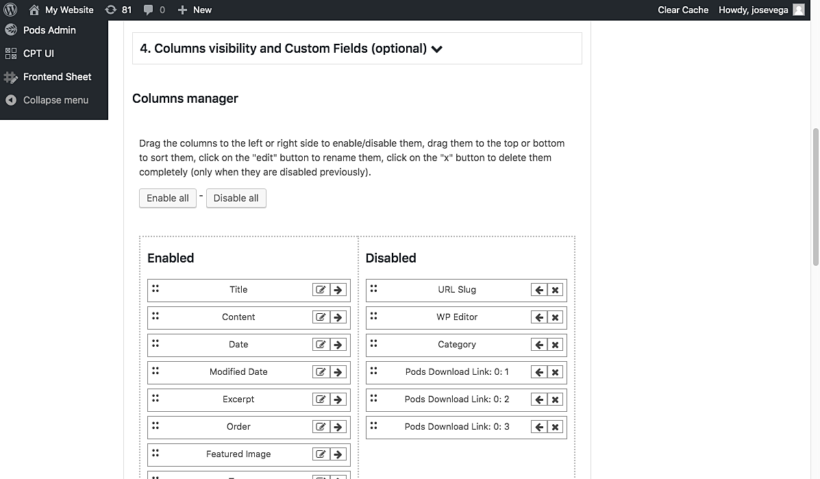
Use the Columns visibility and Custom Fields section to enable or disable the columns and sort them.

If this frontend editor is for high-level users like clients or employees managing full products or documents, you can let them edit all the fields.

If the frontend editor is for normal users or guests then you can limit the columns. You can just show the document name, content, and link columns.

Generally, you'll probably want to show the same columns that you selected when you set up your WordPress table in Posts Table Pro/Document Library Pro. That will be more intuitive for your users because they will view the main table first, and then click to access the inline spreadsheet editing view. They will therefore expect to see the same columns in both views.

The Columns manager will automatically detect all the fields from the post type (e.g. documents) that you're using for the front-end editor. You can view them in the list and enable, disable, sort, and rename them easily:

Select columns for WordPress front end editor table

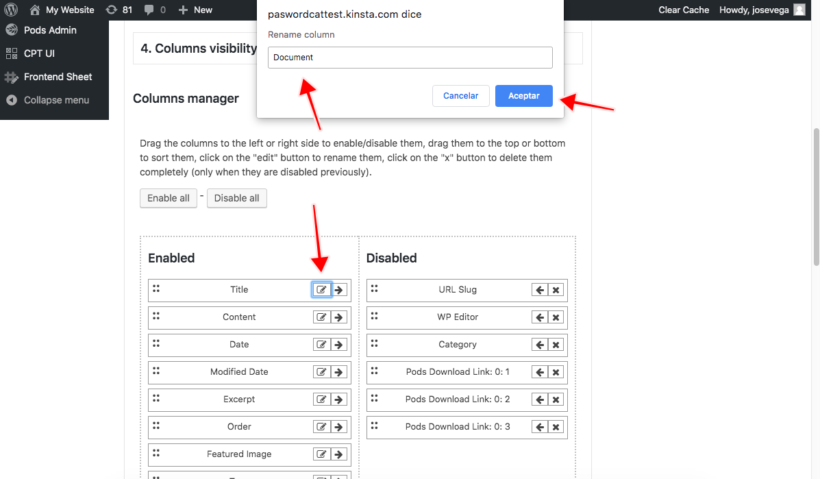
For example, if you're adding front end editing to a WordPress document library, then you might rename the Title column 'Document'. To do this, just click on the Edit button in each column, and you'll see the popup that will allow you to change the column name:

WordPress spreadsheet editor rename columns

If there are any columns that you don't want users to be able to edit, simply don't include these in the frontend editor spreadsheet.

5. Integrate the WordPress frontend editor with the public document library

You can easily integrate the frontend editor with the table that you created using Posts Table Pro or Document Library Pro in Step 1.

Simply add an 'Edit' link above or below the table. This should link to the front end editor page that you created in Step 3.

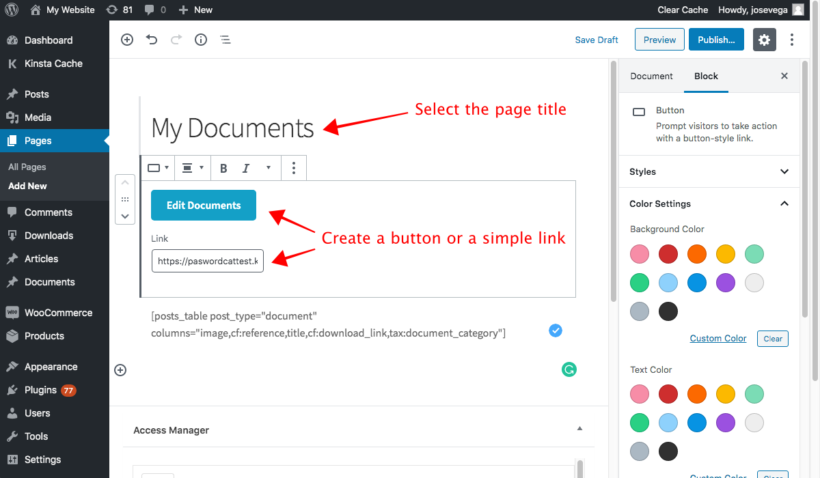
In this case, we've used the Gutenberg editor to create a button linking to the frontend editor page which we created in Step 3:

Add WordPress front end editor to Posts Table Pro

Bonus tip - Hide the 'Edit' link from public users

You might want everyone to be able to see the 'Edit' link, as it provides a handy way for guests to log into their account before editing the contents of the table. However, you might want to hide this so that only certain people see it.

There are several ways to do this:

  • Of course, you don't have to include an 'Edit' link on the same page as your Posts Table Pro table. Instead, you can send your editors a direct link to the page where you added the front end inline spreadsheet editor. Alternatively, you can add the link to a more subtle location such as the footer.
  • You can also install the Advanced Access Manager plugin and use its shortcodes to only show the button to logged in users with a specific role. That way, you can still have an 'Edit' button on the same page as your Posts Table Pro table, but only certain people will see it.

6. Use the frontend editor

When people view the table that you created using Posts Table Pro or Document Library Pro, they will see the button to edit the contents:

Add edit button to WordPress table

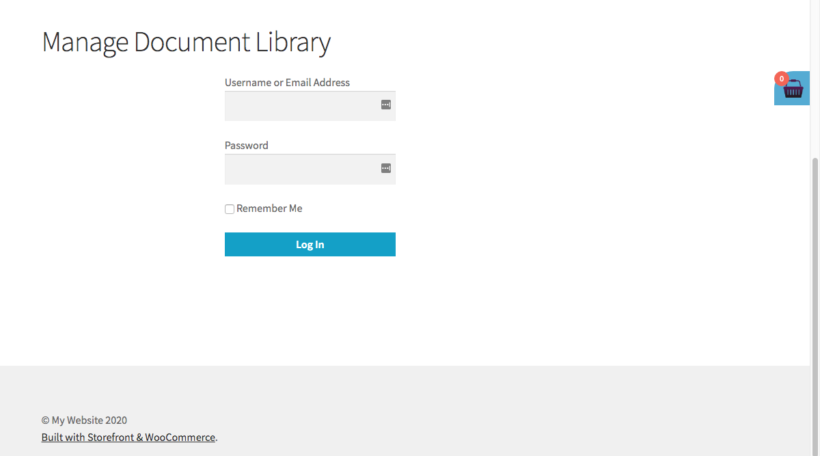
When they click on the Edit Documents button, they will be asked to log in in order to see and use the frontend editor (unless they're already logged into their account):

Login to access WordPress front end editor plugin

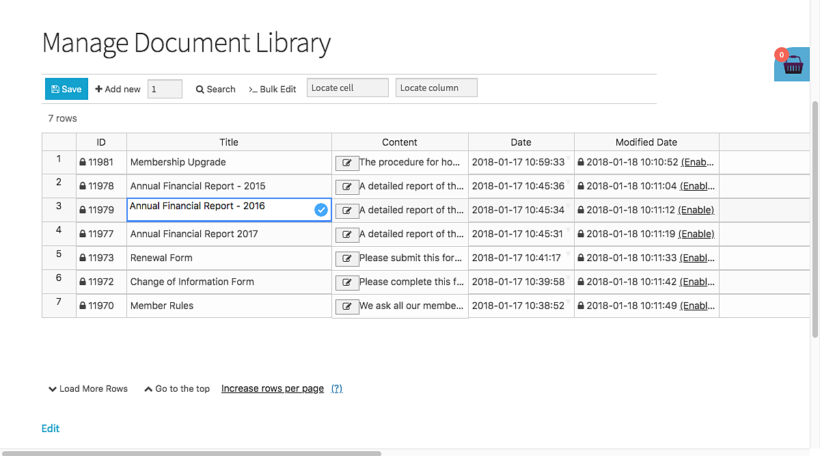
After they log in, they will see the frontend editor with the tools and columns that you selected. They can quickly edit the information using the spreadsheet interface right on the frontend. No need to access the WordPress backend!

Edit spreadsheet with WP frontend editor

7. Who can use the frontend editor?

The WordPress front end editor is available only for logged in users. Guests will see a login form when they click the 'Edit' button.

The Universal Frontend Editor plugin uses the standard user roles that come with WordPress. When you create accounts for your users, you should choose an appropriate role depending on how much you want them to edit:

  • Subscriber and guest - Not allowed to use the editor.
  • Contributor - Can view and edit their own posts only, but they can't upload images.
  • Author - Can view and edit their own posts only, they can upload images.
  • Editor - Can view and edit all posts and pages.
  • Administrator - Can view and edit everything.

For example, a user with an 'Author' role can use the frontend editor and only edit the posts that they created. This is a good way to allow each user to manage their own information.

Where to get the plugins

You'll need 2 plugins to list information in a table with frontend editing capabilities:

  1. Either Posts Table Pro or Document Library Pro - creates the searchable table that your public visitors will see.
  2. Universal Frontend Editor - creates a spreadsheet-style editor so that logged in users with the correct role can edit the contents of the table.

Get the plugins today, and follow the steps in this tutorial to set it all up!

Email lists and contact information have value, which is why you might be looking for how to sell email lists online. You might have a collection of high-value leads/contacts that are useful by themselves or you could just have a large list of segmented subscribers.

Either way, people will be willing to pay for that information, which gives you another way to monetize your website and/or standalone email lists.

You could sell:

  • Individual contacts for high-value leads.
  • Collections of leads, like all the therapists in New York City.
  • Lists of opt-in email subscribers for Internet marketing or digital marketing uses.

In this post, you'll learn how to sell email lists for all those scenarios using WordPress and WooCommerce Product Table. That is, you'll learn how to create your own online store where you can:

  • Sell individual contact lists like the example below Visitors can check a box for all the contacts they want to purchase and then check out.
  • Sell complete email lists For example, one list of "Therapists in New York City" and another of "Therapists in Los Angeles".

Case study: How to sell email lists as individual contacts

Example of how to sell email lists online

To give you an idea of how to sell email lists online, let's look at a real-world example:

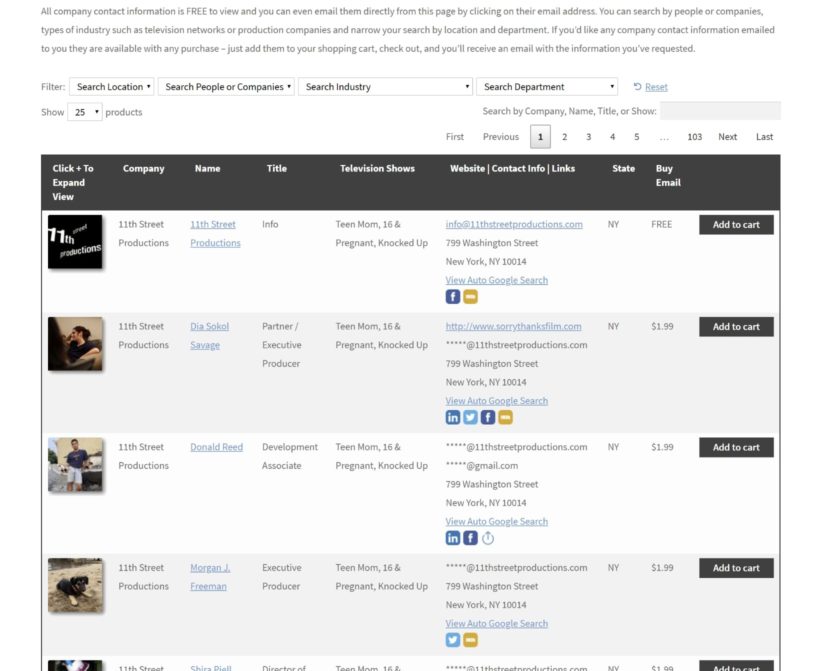
TV Production Contacts offers an interactive directory of individual contacts within the TV production industry. Visitors can see important information, like a contact's TV credits, social media information, and company. Then, shoppers can purchase individual contacts that they're interested in.

To create the shoppable contact list, TV Production Contacts uses WooCommerce Product Table.

TV Production Contacts has put in the leg work to create a searchable database of 2,500+ accurate contacts, so visitors are happy to pay a little money to save time and avoid having to dig around themselves.

What you need to sell email lists online with WordPress

Before we get to the tutorial, let's go over what you need to sell emails online:

Your email list

The first thing that you need to sell email lists is...your email list itself!

That's a little obvious, but there are some important things to consider in how you build your email list.

First, if you're creating an individual contact list of potential customers or small business owners like the TV Production Contacts example above, you might need to manually gather these contacts.

If you're going this approach, it's important that you're not selling them to bulk emailers who will send them automatic unsolicited emails, as that would violate the United States CAN-SPAM Act and other anti-spam acts. Here, you're basically putting in the legwork for sales teams or other individuals to manually reach out to each contact.

On the other hand, if you want to sell larger lists, it's important that your lists are opt-in. Again, people do not want to buy lists that are not opt-in because of the danger of being labeled a spammer and/or the fear of sending unsolicited email.

To help you grow your email list and enforce opt-in protocols, you can use an email marketing service like Mailchimp or Aweber. There are also a number of WordPress email opt-in plugins that can help you grow your list from your website or landing page.

WooCommerce and WooCommerce Product Table

To use your WordPress site to sell email lists, you need to add eCommerce support to WordPress, which you can do with the WooCommerce plugin.

However, by itself, WooCommerce is not optimized to sell email lists online. To fix that, you need to add WooCommerce Product Table, which lets you display your WooCommerce products in a table layout, just like the TV Production Contacts case study you saw above.

You can control exactly what information shows up in your table to create a shopping experience that's optimized for the specific email lists/contacts that you're selling.

How to sell email lists online with WordPress: Two scenarios

Below, we'll show you two different scenarios that you can use to sell email lists online:

  1. Sell individual contacts.
  2. Sell separate lists that contain multiple contacts each.

The basic process is the same for each, but there are a few important differences in approach.

To get started, we'll assume that you've already set up a basic WordPress site, installed WooCommerce, and run the WooCommerce setup wizard to set up credit card payment gateways and other basic settings.

If you haven't yet, we recommend Kinsta for hosting and you can follow this tutorial to configure WooCommerce.

1. Add emails/lists as WooCommerce products

To get started, you need to add each email/list as a separate WooCommerce product by going to Products → Add New.

This step is where you make the choice between selling individual contacts and selling separate lists:

  • If you're selling individual contacts, add each contact as its own product.
  • If you're selling lists, add each list as its own product.

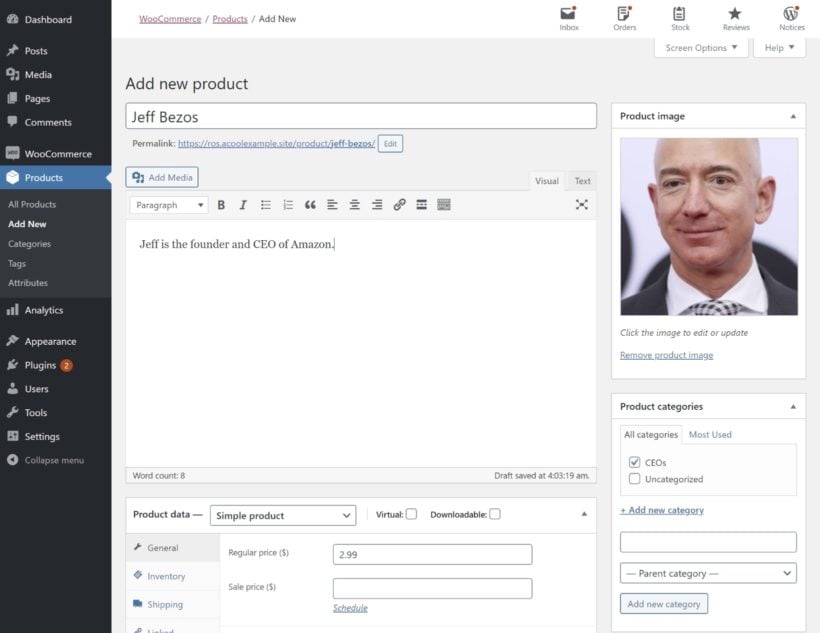
Here's what a product for an individual contact might look like:

Individual products

If you want to mimic the approach that you saw with TV Production Contacts, you can use categories, tags, and custom fields to add extra information about each contact, like phone numbers, social media information, industry, etc.

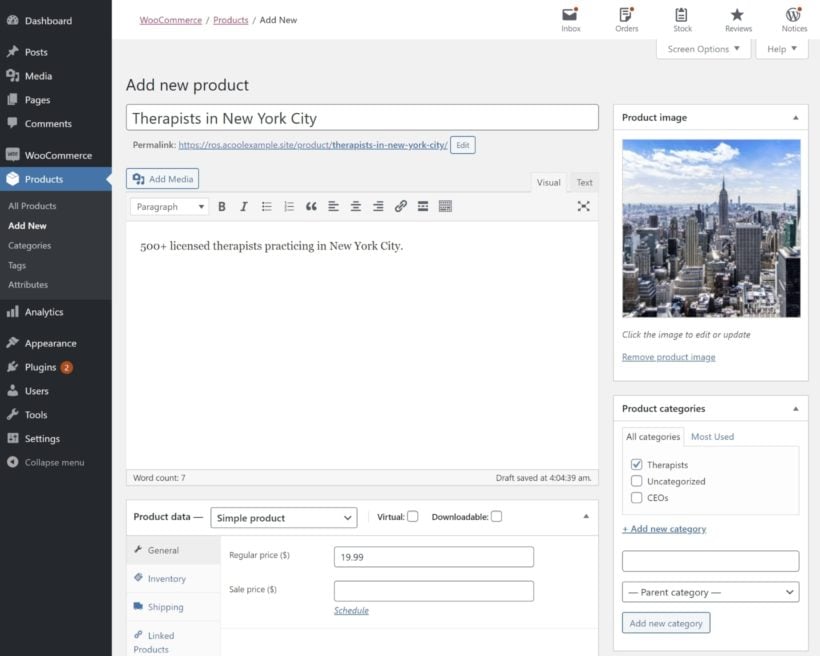
Here's what a product for an entire list might look like:

Sell email list online product

For a list, you might want to add extra information for details like:

  • Unsubscribe rates
  • Open rates
  • Deliverability
  • Email campaign conversion rates
  • Whether it's an opt-in list or not
  • Current email service provider
  • Email newsletter frequency

You can either add this information in the product description or use custom fields.

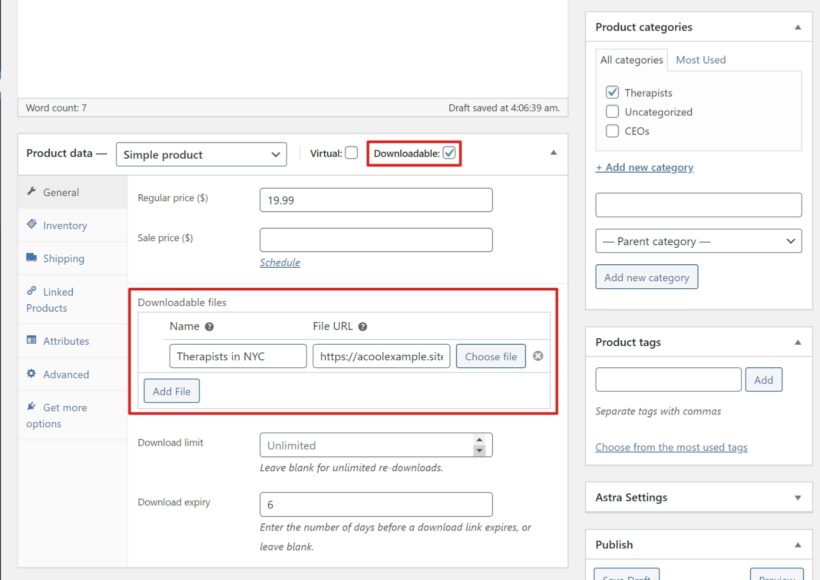
If you want to automatically deliver purchased lists, you can also mark the product as Downloadable. Then, you can upload a CSV file with the list of emails. For individual contacts, you could just include a single record in the CSV:

Add downloadeable emails to sell lists online

If you want more control, you can also manually email the contact details after someone makes a purchase.

To finish things out, repeat the process for all of the contacts/lists that you want to sell.

If you have thousands of contacts and don't want to add them manually, you can use Product CSV Import Suite to bulk import contacts from a CSV.

2. Create front-end interface with WooCommerce Product Table

Once you've added all your contacts/lists as WooCommerce products, you're ready to create the front-end shopping experience to sell email lists.

To do that, install and activate the WooCommerce Product Table plugin.

Then, go to WooCommerce → Settings → Products → Product tables to configure the plugin's settings.

In the Table content settings, you can control what information displays in your table. For example, if you added custom fields for a contact or list, you can include details from those custom fields in your tables:

Configure columns

In the Add to cart column, you can control important details about how visitors can purchase email lists.

If you're selling individual contacts, you'll want to set the Add to cart button drop-down equal to Button and checkbox so that visitors can select multiple contacts at the same time:

Add checkmarks to sell email lists online

Finally, use the Table controls section to add any necessary filters and search boxes. If you have a lot of contacts/lists, you'll want to include filters so that shoppers can find what they're looking for:

Configure filters and search

3. Add shortcode to display product table

Finally, add the [product_table] shortcode wherever you want your email list table to appear.

You can either add a single shortcode for all your email lists/contacts. Or, you can use modifiers to only include certain emails and create different tables for different categories/tags.

Here's an example of what it might look like to sell individual contacts:

Example of selling individual emails online

Start selling contacts and emails

With WordPress and WooCommerce Product Table, it's easy to sell emails online.

You can either sell individual contacts or entire lists of contacts. Either way, your shoppers will get an easy-to-browse table layout where they can find what they're looking for.

By making it easy for shoppers to find the right email(s), you can boost your chances of a sale.

To start selling email lists with WordPress, purchase WooCommerce Product Table today.

List LearnDash courses lessons WordPress plugin

LearnDash is the world's leading WordPress LMS (Learning Management System) plugin. Keep reading to discover the easy way to list your LearnDash LMS courses and lessons in a searchable, filterable table.

LearnDash is a fantastic WordPress LMS. It makes it easy to create online courses with sophisticated features. And with the LearnDash WooCommerce add-on, you can even sell your courses online!

LearnDash comes with some neat layouts and shortcodes that you can use to display your courses and lessons - either in a grid or as a basic list. However, if you have lots of courses then you might find these slightly limiting. That's where the Posts Table Pro plugin comes in.

LearnDash lessons list in a table

Keep reading to learn how to list any type of WordPress content in a table:

You can choose what information to display about your courses and lessons, and which courses you want to include. It's even possible to add filter dropdowns to help students to find particular LearnDash content more easily!

Before you start

We'll need the Posts Table Pro WordPress plugin in order to list courses and lessons from the LearnDash CMS in a table.

  1. Download the plugin from the link provided in your order confirmation email. This will save a zip file to your computer.
  2. Go to your WordPress admin panel, then navigate to Plugins → Add New → Upload Plugin.
  3. Click "Choose File" and select the posts-table-pro.zip file you just downloaded.
  4. After uploading, click "Activate"
  5. The Posts Table Pro setup wizard will automatically open. Follow the prompts to create your license key.

If you are not familiar with building courses on LearnDash, you can check out Learndash Dashboard. It comes with an intuitive frontend builder to help you create dashboards for instructors, students, and group leaders to monitor and manage anything related to their LearnDash account.

List LearnDash courses in a table

First, let's learn each stage of the process for creating a table or how to list your LearnDash courses in a table. You can add the table to any page on your site, or even to other locations such as sidebar widgets.

  1. The setup wizard will open automatically when you install the plugin. Alternatively, go to Post Tables → Add New to create new tables.
  2. Give your table a name and select the post type you wish to display. If you don't have a content type yet, you can create one using the Easy Post Types and Fields plugin for free.
  3. Select the posts or pages you want to include in the table. The available options will vary depending on the post type you selected in the previous step. If you chose a post with custom taxonomy, the relevant taxonomies will be listed for you to select.
  4. Customize your table according to your preferences. You can choose which columns to display and in what order. To add a new column, choose the column type from the dropdown menu and click "Add". You can also reorder columns by dragging and dropping the sort icon or column heading. Check out the full list of available columns. You can add lots of additional columns including custom fields, taxonomies, and more!
  5. You can improve user experience by adding filters to your table in the Post Table Pro plugin. Filters appear as dropdowns above the table and can be customized according to your preferences. You can add as many filters as you want.
  6. Enable lazy loading to improve the table's performance, even when containing hundreds or thousands of items.
  7. Choose how to sort the table. You can set the default sorting option and the sort direction.
  8. Finally, the wizard will confirm that you have finished creating your table and provide instructions for inserting it onto your site.

Choosing which courses to display

If you don't want to list all the courses from your LearnDash LMS, that's fine too. Use these options to control which courses to list in the table. You can list LearnDash courses by category, ID, date, author, custom field or custom taxonomy values, and more.

Once you've created a table using the Post Table Pro plugin, the next step is to display it on your WordPress site. There are two ways to do this, and both options provide you with flexibility in terms of where the table appears on your site.

There are two ways to display the table created with the Post Table Pro plugin on your WordPress site.

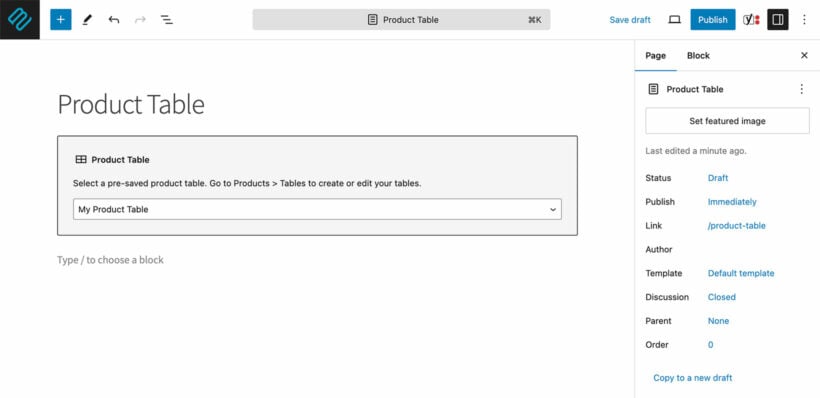
  1. The first method involves using the 'Post Table' block in the Gutenberg editor to insert the table directly from the block settings.
  2. The second method is to copy the shortcode from the table builder of the main Tables page in the Post Tables section of the WordPress admin and paste it anywhere on your site. This method allows you to place the table on any page, regardless of its content, providing you with the flexibility to showcase the table where it's most relevant.

An example list of LearnDash courses

Display LearnDash courses table

List LearnDash topics in a table

LearnDash has a feature that lets you add topics to your lessons and courses. This is an excellent way to group your course content thematically.

Posts Table Pro is excellent for allowing students to search by topic, as they simply type a topic name into the search box above the table.

If you want to create a table that includes a list of topics, simply specify the 'topic title', 'topic tag', and 'topic category' in their respective columns when using the table builder.

It's not possible to include the lesson name in the table because LearnDash stores the lesson as a separate post type, and not as a field on the topic post. If you want to list the topics for each lesson individually, then it's best to create a separate table for each lesson.

You can easily do this by using topic categories to record which lesson each topic is used on. You can then add the lesson name as a subheading on the page, and add a table listing the topics for that lesson underneath.

Sell LearnDash courses with WooCommerce and WooCommerce Product Table

Sell LearnDash courses product table WooCommerce

Lots of LearnDash LMS websites like to take payment for courses. The student pays for a course online and then receives instant access to the course and all its lessons, quizzes, etc.

The LearnDash WooCommerce plugin provides an excellent way to do this. You install WooCommerce to provide the e-commerce and payment features, create a new product, select the 'Course' product type, and choose which course the student will be enrolled in when they buy the product.

The problem with this plugin is that your course products are listed in a standard store layout, which isn't really designed for selling courses! Each course product is displayed with a large image and very little information about the course. It's difficult to compare courses alongside one another, and students have to scroll down a long way to see the different courses. Compare the two screenshots below:

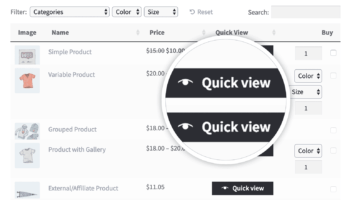
As you can see, the table layout on the right is a much better way to display courses. If you want to display course images then you can add small thumbnails to the table, but there's no need for such huge images. It's better to show more products within a smaller amount of space, along with extra information about each course. You can also add quick filters and a search box to help people to find courses more easily, for example by category.

You can achieve all this by using the LearnDash WooCommerce plugin with the WooCommerce Product Table plugin. And if you like the quick view buttons in the screenshot above, then you'll need the WooCommerce Quick View Pro plugin too. I'll tell you how to set all this up next.

Listing LearnDash products with WooCommerce Product Table

  1. Set up LearnDash, add some courses, and then use the WooCommerce Integration add-on to create some course products.
  2. If you'll be using WooCommerce Product Table to sell other types of products as well as courses, create a category for your course products.
  3. Install WooCommerce Product Table.
  4. Go to WooCommerce → Settings → Products → Product Tables and choose the settings for your tables. In particular, choose which columns you want to include, and add filters to help people to buy specific courses more easily.
  5. Create a new page, which you'll use to list your LearnDash course products.
  6. Add the shortcode: [product_table category="courses"]. Replace 'courses' with the slug of the product category you want to display, or if you're not using categories then just use [product_table]).

This will create a searchable table listing the LearnDash courses that you have added as WooCommerce products. It's perfect if you want to create a one-page order form for signing up to your courses. Students can select the courses they want to sign up to (either using the add to cart buttons or quick-select checkboxes) and pay for them all using the WooCommerce checkout.

Add quick view buttons

Normally, students have to click on the product title to learn more about the course and read the full description. You can speed up the process by installing WooCommerce Quick View Pro.

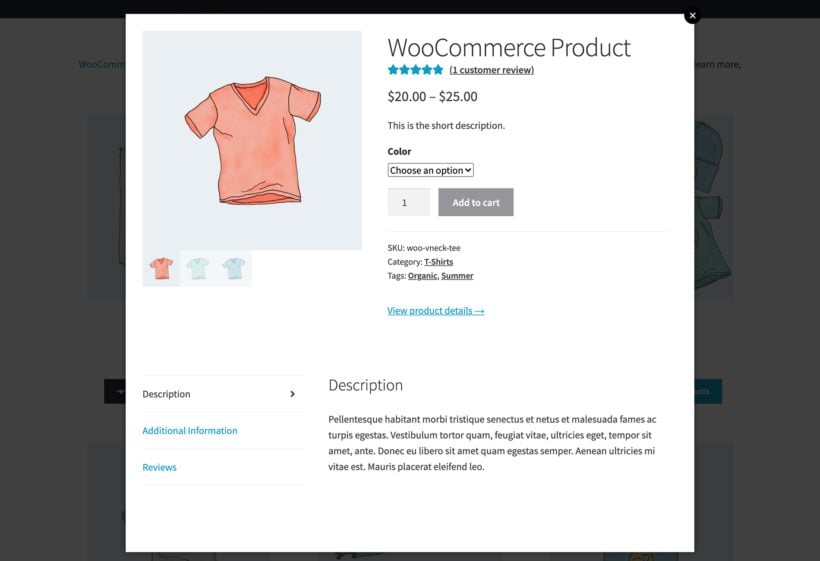
This handy plugin lets you add 'quick view' buttons to the product table. Potential students can use these to learn more about each course from a quick view lightbox popup. That's much faster than having to visit a separate page for each product. It also keeps them on the list of courses, which encourages them to sign up for multiple courses at once.

Once you've installed WooCommerce Quick View Pro, simply add quick_view to your list of columns on the WooCommerce Product Table settings page. For example, your list of columns might now be: image,name,quick_view,buy

List WordPress forums

bbPress forum list replies

LearnDash integrates with the bbPress forum plugin, which is ideal if you want to provide discussion forums for your LMS courses.

If you'd like to list these in a table, instead of using the standard bbPress forum layouts, then check out our other tutorial. This provides full instructions on how to use Posts Table Pro to list your LearnDash forums and discussion topics in a table.

Display LearnDash quizzes in a table

List LearnDash Quizzes WordPress plugin

It's also possible to list LearnDash quizzes in a table. To do this, install LearnDash and Posts Table Pro (as described above) and either use the Gutenberg editor to insert your list of quizzes block or copy the shortcode from the final page of the WordPress table builder. You can then paste it anywhere on your site.

Use the include option to choose which quizzes to show. For example, if you wanted to list quizzes for a specific course only (e.g. on the course homepage), then you would select all the quizzes for that course.

Displaying other LearnDash data in a table

So far, we've looked at how to display LearnDash courses, lessons, forums, quizzes, and WooCommerce course products in a searchable table view. LearnDash also comes with other post types such as groups (groups) and assignments (sfwd-assignment) which you can list in a table.

To list other LearnDash post types, just select the post type on the first page of the Posts Table Pro table builder.

Adding a searchable directory of course materials to your LearnDash courses

Add resources to LearnDash courses

Finally, there's one more way that you can improve your LearnDash courses. As well as listing the courses and course information in a searchable format, it's important to consider how to present your course materials.

Most LMS courses need to provide extra resources to their students. For example, this might include course handbooks, lesson notes, worksheets, links to useful websites, and so on. The best way to do this is with Posts Table Pro's sister plugin - Document Library Pro.

Document Library Pro makes it easy to:

  • Add any type of resource, link or download to LearnDash.
  • Display them in any location within your courses and lesson pages.
  • Add easy search boxes and filter dropdowns so that students can find the resources they need.

For full details, check out our tutorial on how to add searchable course materials to LearnDash.

Where to get the plugins

As you can see, Posts Table Pro offers the perfect way to list LearnDash courses, lessons, forums and quizzes in a more searchable, interactive format. It's an excellent way to engage potential students and encourage them to take more courses.

Or if you want to list WooCommerce course products, then you can do this with WooCommerce Product Table and WooCommerce Quick View Pro.

Together, these plugins provide the perfect solution to listing any type of LearnDash data in a table. Get them today, and start listing your LearnDash content in new and better ways!

WordPress book review plugin

If you want to share your book reviews with the world, you can use a WordPress book review plugin to collect all your reviews in one spot and make it easy for your visitors to find reviews for certain books. You can list all your reviews in one convenient table and let visitors search by title, filter by author or genre, and more.

With the right WordPress book review plugin, you can set up a flexible system that meets your needs without any complications. You won't need to write any code or have any special technical knowledge, but you can still create a review site that's customized for you and avoid the "one size fits all" approach of some WordPress review plugins.

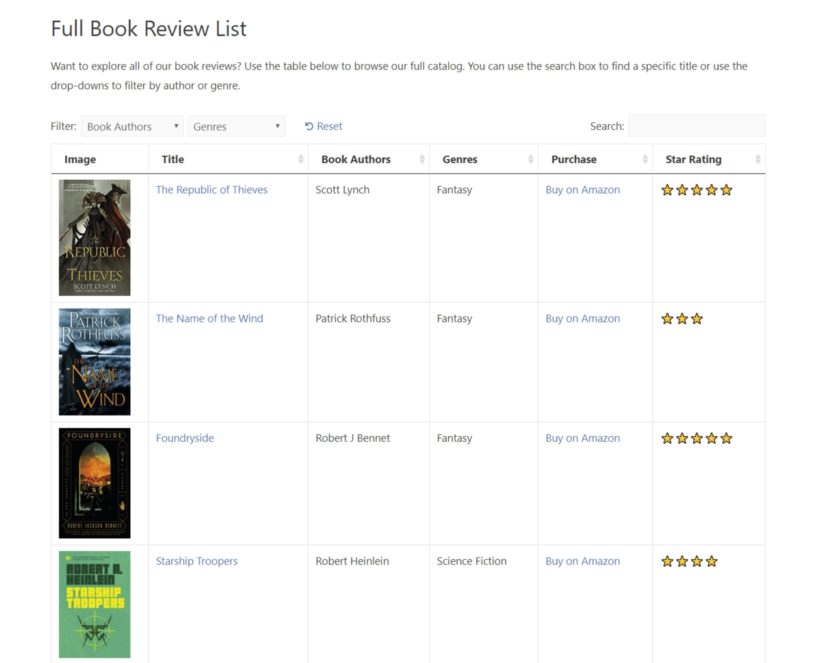
Below, you'll learn step-by-step how to start using Posts Table Pro as a WordPress book review plugin to create a review site that looks something like this:

WordPress book review plugin example

You'll also be able to control exactly what information displays in your book review list. So if you want to add a review summary, list the book's ISBN, or anything else, you'll be able to easily set that up.

Why Posts Table Pro is the best WordPress book review plugin

Posts Table Pro is an easy-to-use WordPress plugin that lets you take any content on your site and display it in a customizable table.

For this implementation, that "content" is your book reviews. You can publish your reviews using the normal WordPress editor. Then, you can collect all of your reviews in one spot and add helpful filters and search options.

The benefits of using Posts Table Pro as a WordPress book review plugin are:

  • Control You can choose exactly what to include in your book review list. Want to list a star rating? Does Amazon buy link? Thumbs up/down rating system? Publishing date? ISBN? You can add anything you want.
  • Ease of useYour visitors can easily find the reviews they're interested in with filters and search boxes.
  • Flexibility You can create different lists for different books. For example, you could have one collection of science fiction reviews and another collection of fantasy reviews.

You can also use Posts Table Pro with all WordPress themes, which lets you keep using your favorite review website theme. And because you can control exactly what information to include, you can also write other reviews, like video games or product reviews.

Below, we'll show you a real example of Posts Table Pro in action and then we'll take you through how to set it up as a WordPress book review plugin.

Case study: Science Fiction Book Reviews

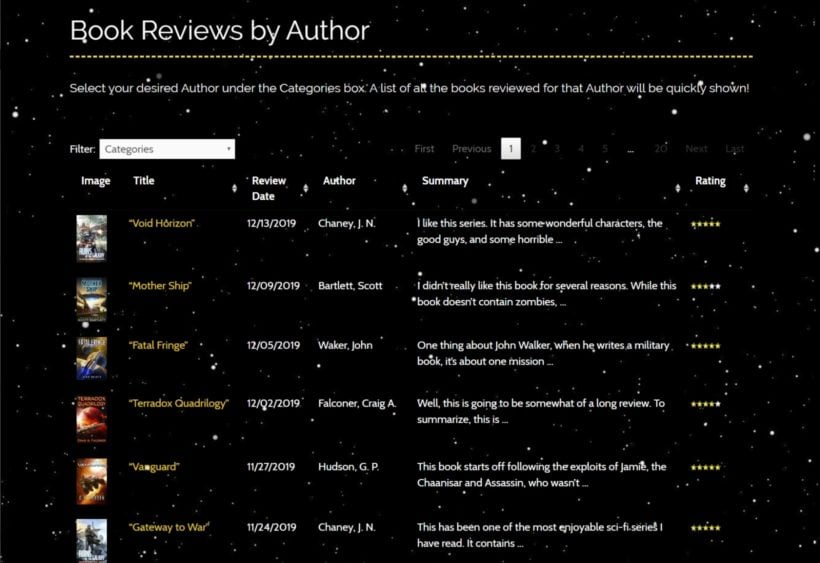
Science Fiction Book Reviews is a real-life book review website that's published over 500 book reviews for books from over 140 different science fiction authors.

That's a lot of books -- so Science Fiction Book Reviews needs a user-friendly way to help visitors find reviews of books they're interested in.

To create an easy-to-browse archive of all those reviews, Jim, the man behind the website, uses Posts Table Pro to create an easy-to-browse list of all his book reviews:

WordPress book review plugin case study

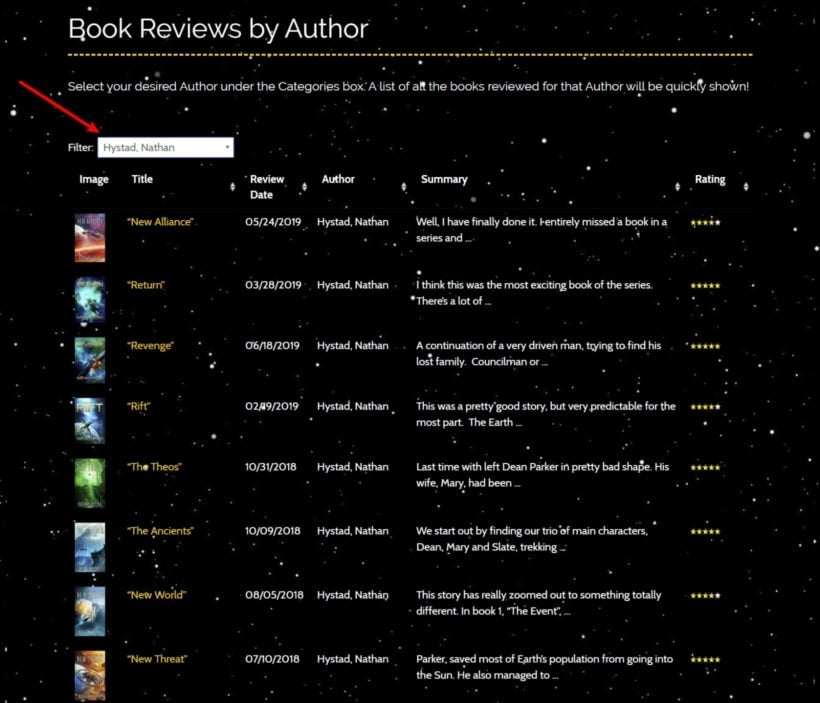
If users want to filter out reviews for books from a specific author, they can use the drop-down to select that author. And the great thing is that visitors can filter by author without reloading the page, which creates a really convenient experience for them:

WordPress book review plugin with filters applied

If users want to see the full review, they can click through to the review's page. This also improves SEO and gives each review a chance to rank in Google.

Want to set up your own WordPress book review plugin like Science Fiction Book Reviews? Here's how to do it...

How to use Posts Table Pro as a WordPress book review plugin

Below, you'll learn how to set up Posts Table Pro as a WordPress book review plugin to duplicate the setup that you saw in the Science Fiction Book Reviews case study above.

1. Create a book review custom post type

To house your book reviews, you have two options:

  1. You can write them as regular blog posts.
  2. You can create a custom post type.

While the first method works, it's not great if you still want to post non-review blog posts because everything is mixed together.

With a custom post type, you can create a separate type of post for just your book reviews.

You can create a new blog post when you want to blog, and a new book review post when you want to write a book review. You'll also be able to add extra information fields to your book reviews to collect important details, like your star rating for a book and the Amazon purchase link.

Don't worry - it's pretty easy to set up using a plugin called Easy Post Types and Fields.

We have a detailed tutorial on how to use Easy Post Types and Fields to create custom post types, so you can check that out if you want more details. But here's the fast version…

  • Install and activate the free Easy Post Types and Fields plugin from WordPress.org.
  • Go to Post Type → Manage in your WordPress dashboard.
  • Click Add New.
  • Enter the singular and plural post type names. E.g. "Book Review" and "Book Reviews" and click Next.
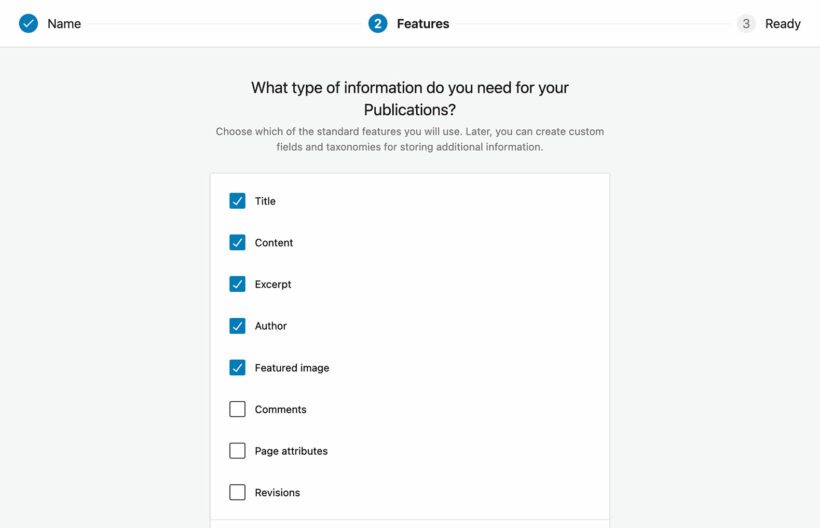
  • Select the type of information you wish to display and click Create.
new custom post type Wizard

And that's it! You just created a book review post type. You should see it as a new option in your WordPress dashboard sidebar.

2. Add custom fields and taxonomies

Custom taxonomies and custom fields let you store extra information about a review:

  • Custom Taxonomies These are like blog categories or tags, but tailored to your reviews. For example, "Book Author" or "Genre".
  • Custom Fields These let you store extra information about a review. For example, the star rating you give it, a book's ISBN, or the Amazon purchase link.

You can add both with Easy Post Types and Fields plugin. Again, you can consult our detailed custom post types tutorial if you want to see the process in more detail.

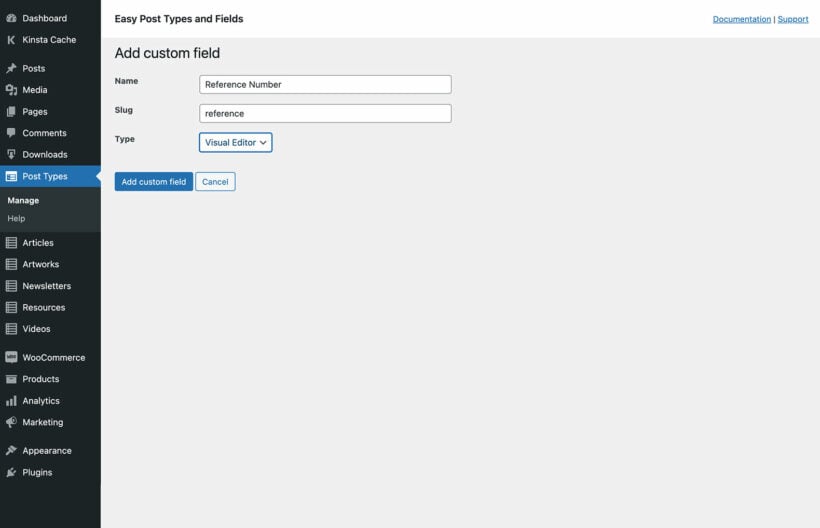
To add custom fields, go to Post Type → Manage in your WordPress dashboard. For the post type you want to add the custom field to, click on the Custom Fields button.

Click on Add New to add a new custom field to that post type and enter the Name, Slug and select the field type (text or visual editor).

custom field WordPress

Make sure to click Add custom field button when you're finished.

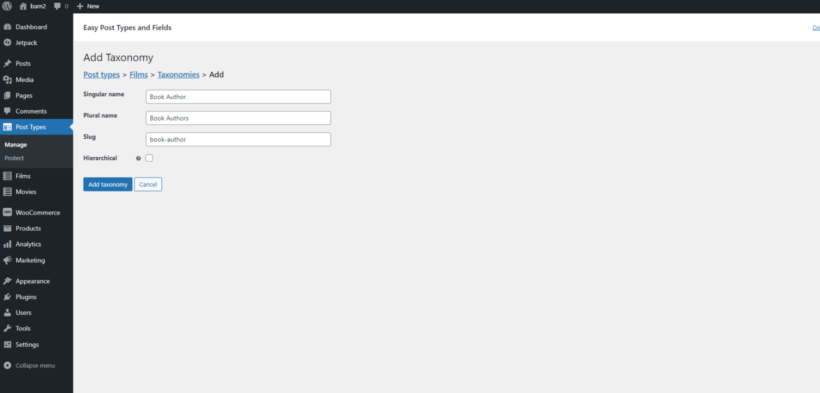
To create custom taxonomies, go to Post Type → Manage. Click on the taxonomies button for the respective post type you wish to customize. Click on the Add New button.

Enter the singular and plural names and the slug for your new taxonomy. For example, here's a custom taxonomy for the book's author:

Book authors custom taxonomy

If you want, you can create additional taxonomies, like for a book's genre.

3. Write some reviews

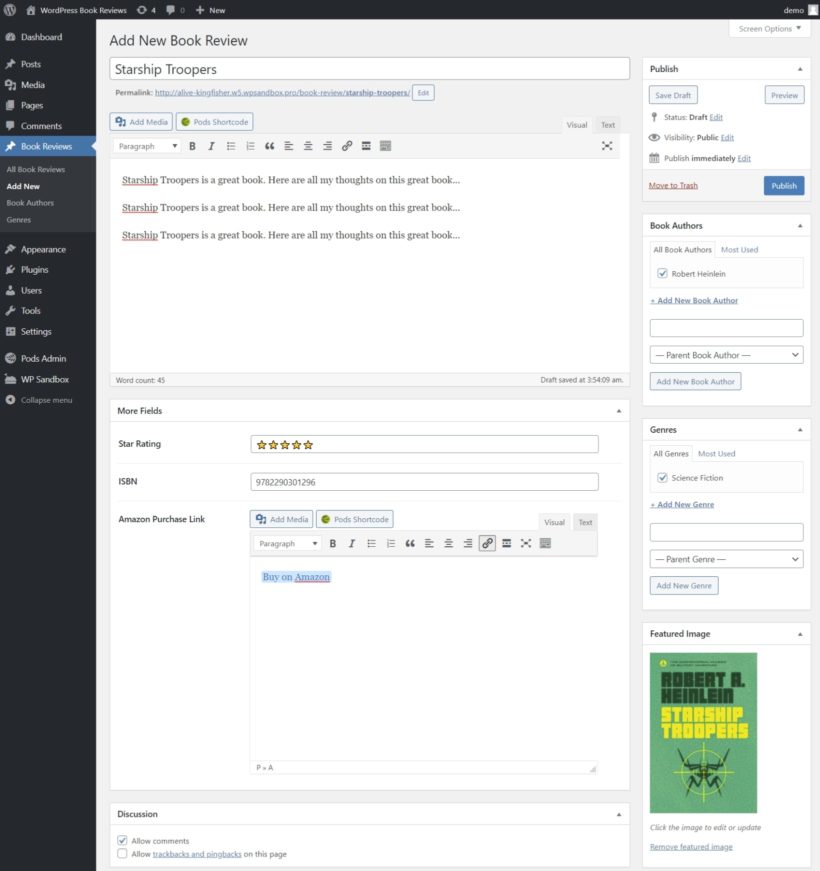
Now, you can visit Book Reviews → Add New to write your first book review:

  • Add the book/review title at the top.
  • Write your review in the main text editor.
  • Select the Book Author and Genre on the side.
  • Add the book cover image as the Featured Image.
  • Enter your star rating in the Star Rating box. You can use the ⭐ emoji.
  • Add the Amazon Purchase Link as a link in the text editor.
  • Fill out any other fields (like the ISBN)
Add WordPress book review

To add additional book reviews, you just need to repeat the process as needed.

If you enabled comments in the first step, visitors will be able to leave a comment on your full review. Some other ways to enhance your individual review page are:

  1. Use a social media plugin to add share buttons.
  2. Install a rich snippets/schema markup plugin to get Google-rich snippets.

4. Display your reviews with Posts Table Pro

Once you've added a few book reviews, you're ready to set up the Posts Table Pro WordPress book review plugin to list your book reviews for visitors.

To get started, install and activate the Posts Table Pro plugin on your WordPress site.

Upon installing the Post Table Pro plugin, a setup wizard will automatically guide you through the process of creating your first table. Additionally, you can create new tables at any time by navigating to the "Post Tables" section of your WordPress admin and selecting "Add New." Here are the steps to create a table using this plugin:

  1. To create a table using the Post Table Pro plugin, start by giving your table a name and selecting the post type you wish to display. If you do not yet have a content type, you can create one using the free Easy Post Types and Fields plugin.
  2. Next, select the books or pages you would like to include in the table. The available options will vary based on the post type you selected in the previous step. For instance, if you chose a post with custom taxonomy, the relevant taxonomies will be listed for you to select.
  3. Customize your table to suit your preferences. You can determine which columns to display and in what order. For example, to add the cover image, book title, author, genre, purchase link and rating, simply choose the column type from the dropdown menu and click "Add". You can then reorder them by dragging and dropping the sort icon or column heading.
  4. Add filters to your table to help users narrow down their selections. The filters appear as dropdowns above the table, and you can add as many as you like for example, book author and genre. It is important to note that available filter options will vary depending on the post type selected on the first page.
  5. Enable lazy loading to improve the table's performance, even when containing hundreds or thousands of items.
  6. Choose how to sort the table. You can set the default sorting option and the sort direction.
  7. Finally, the wizard will confirm that you have finished creating your table and provide instructions for inserting it onto your site. To display the table on your WordPress site, you can either use the 'Post Table' block in the Gutenberg editor or copy the shortcode from the table builder and paste it anywhere on your site. This gives you the flexibility to place the table on any page regardless of its content.

And once you publish your page, you should see your full book review list:

WordPress book review plugin example

Visitors can browse and filter the list. Then, they can click through to the book review to read your thoughts.

Congrats! You just set up your own WordPress book review plugin.

If you wanted to, you can also create another stripped-down table to add as a sidebar widget. Learn more about using shortcode parameters to achieve this.

Create your own WordPress book review plugin today

With Posts Table Pro, you can create your own WordPress book review plugin that lets you create a unique book review experience.

You can choose exactly what information to include in your book review list, and your visitors will be able to easily browse your entire catalog of reviews.

Best of all, you can achieve this level of customization with easy-to-use plugins -- no technical knowledge required. So even if you're just a casual book review blogger, you can set this up!
To set up your own WordPress book review website, purchase Posts Table Pro and get started today:

And if you want to sell books on your own eCommerce WordPress website, you can use WooCommerce and WooCommerce Product Table to list books for sale and create your own book store, as well.

WordPress document library plugin

A WordPress document library plugin presents your documents and other resources in an easy-to-find format. It allows you to keep things organized, share files, and create a resource hub or a publications database.

It's surprisingly hard to find a good WordPress document library plugin. There are lots of file management and media library plugins available, but very few create a searchable front-end WordPress document library. The ones that do exist have poor ratings, missing features, and a lot of negative feedback.

That's why we built Document Library Pro. We consulted thousands of WordPress users to find out exactly what they want. We used the results to design the best WordPress document library plugin on the market.

In this tutorial, I'll explain how to create a document library in WordPress from start to finish. It's really easy and you don't need any technical knowledge.

Later, I'll also share some tips on how to make your document library website (or just parts of it) private and hidden from public view; how to allow your users to submit documents; and more.

WordPress document library: Step-by-step video tutorial

First, watch Sam explain how to create a document library with WordPress and build your own along with him. Alternatively, keep reading for full written instructions:

The best WordPress document library plugin

The Document Library Pro WordPress plugin has everything you need to add and display documents:

  • Quickly add documents to WordPress - Either manually, using drag and drop to add multiple files to the WP Media Library, or as a bulk CSV upload.
  • Store extra data about each document - Make the WordPress document library more accessible by adding extra information such as a title, excerpt, full description, and image. Other data is calculated automatically, such as the file size, file type, date, and last modified date!
  • Instantly list documents in a searchable, sortable table with filters - or alternatively in a tiled grid layout.
  • Supports any file type - The WordPress document library plugin supports literally any file type that can be stored in the WordPress Media Library. If the documents are hosted externally then you can link them to any third-party website like Dropbox, Office 365, or YouTube.
  • Embed documents, audio, and video - Instead of (or as well as) download links, you can display documents directly on your website. You can even add embedded music and video players which people can play on the main WordPress document library page!
  • Flexible download links - Choose whether to show download buttons, text links, or file type icons on your main document library page. Also, choose whether to provide instant downloads or a separate page for each document.
  • Document version control - The built-in document library version control allows you to keep track of past and current versions of each file. You can easily view previous changes, rename versions, and roll back to a previous version. This adds greater accountability to your WordPress document library, helping to prevent mistakes.
WordPress document library plugin

How it works

To use the WordPress document library plugin, you simply add your documents to the WP admin. The plugin takes care of the rest and automatically displays them in a searchable WordPress document library in the front end. You can choose which columns of information to include, whether to structure the documents into folders based on their category and much more.

People can easily find the documents they're looking for and either read them online or download a file.

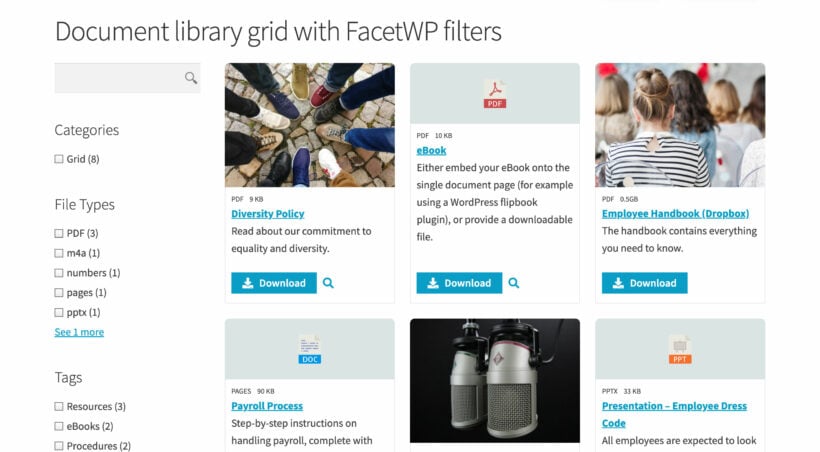
WordPress document library grid

What sort of documents can I display?

The document library plugin can list any type of document on a WordPress website. This includes:

  • Any document file typePDF, DOC, XLS, PPT, EPUB, Google Docs & Sheets, video, etc. This WordPress file manager plugin supports literally any file type.
  • Corporate documentsContact lists, data sets, documentation, financial spreadsheets, forms, how-to guides, handbooks, instructions, legal documents, license agreements, lists, manuals, policies and procedures, reports, stationery, templates, terms and conditions, white papers, worksheets.
  • Promotional documentsCase studies, flyers, leaflets, marketing materials, Keynote or PowerPoint presentations.
  • Industry-specific documentsBlueprints, manuscripts and sheet music, maps, signage.
  • Personal documentsDownloadable kids activities, leisure guides, nutrition guides, recipes, treasure hunts.
  • WordPress audio or video galleryYou can display photos, music, and videos in a WordPress audio library or video gallery, creating any type of resource or document gallery!

Before we start, check out this review from a happy customer. Then we'll go through the steps of setting up the WordPress document library plugin from start to finish.

Really Useful WP Plugin, simple to configure & use
After using SharePoint as a document repository for many years this super little plugin provided all the features we needed for our resource library. Straightforward to configure with well written documentation and help. Looking forward to exploring the more advanced features.

3 easy steps to create a WordPress document library

WordPress Document Library Plugin

Like what you see? Great! Next, I'll show you how to create a WordPress document library for your document, publications, or any other type of resource.

There are 3 simple steps:

  1. Install the document library plugin.
  2. Add documents.
  3. Display documents on your WordPress website.

I'll also share some bonus tips on how to add extra features to your WordPress document library. This includes how to make parts or all of the WordPress document library private, document management advice, and embedding multimedia content such as flip books, audio, and video. You'll be amazed at everything you can do with your document libraries.

Step 1: Install the document library plugin

Installing the WordPress document library plugin only takes a few minutes:

  1. Get Document Library Pro and download the plugin files from the order confirmation page or email. You should also copy your license key.
  2. In the WordPress admin, go to Plugins → Add New and upload the plugin zip file that you just downloaded. Click 'Install' and then 'Activate'.
  3. Now go to Documents → Settings, paste your license key, and click 'Activate'.
  4. On the same page, disable any fields that you don't plan to use in the document library.

Configure your document library settings

Next, go to the 'Document libraries' tab and choose how you want your WordPress document library pages to look and behave. This will depend on your requirements, but I will talk you through the most important options.

You can read about them all in the WordPress document library plugin knowledge base. You can also override these options for each individual list of documents.

Recommended settings

  • Layout - Choose between a table or grid view. I recommend the table view if you have lots of documents and your users will want to be able to filter them as well as search. Use the grid view for smaller document libraries where you want to make each document more prominent.
  • Folders - Tick this to automatically structure the document library into folders, instead of as a single list. There will be one folder for each document library category.
  • Columns - Choose which columns to include in your document library. There's a huge range of possible columns to choose from, including the document name, description, file size, file type, published date, modified date, and download link. You can rename the columns.
  • Link style - Decide whether the 'link' column displays a download button, text link, or file type icon.
  • Link text - Change the word 'Download' to anything you like, such as 'View' or 'Read Online'.
  • Clickable columns - These link to an individual page for each document. If you don't want a page for each document, then set this option to 'none'.
  • Search filters - If you will have lots of documents in each table, then add filter dropdowns to help people find them more easily. You can have filters for your document categories, tags, or any custom taxonomy (see bonus tips).
    Filter document library
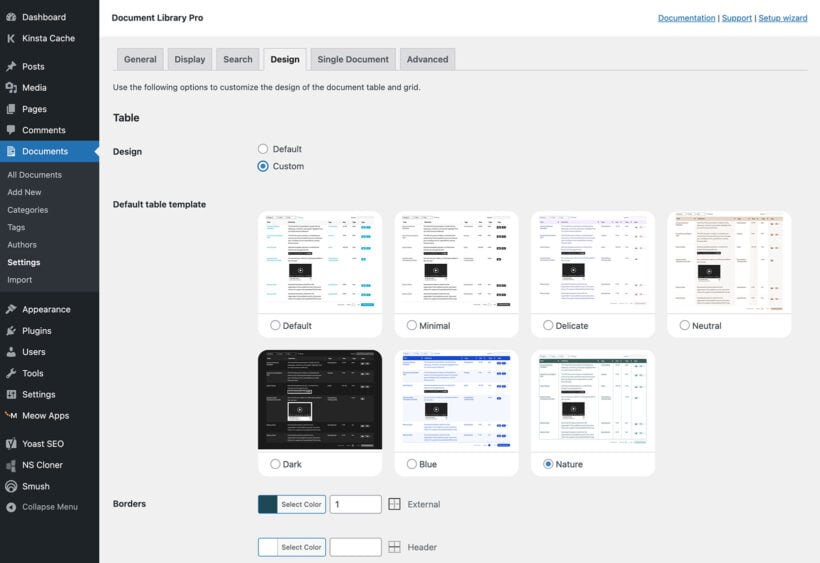
  • Design - Your document library will adapt to suit any WordPress theme theme. This means that it will look good straight out of the box. You can restyle it further using the design settings.

Step 2: Add documents

Once you've installed and configured the WordPress document library plugin, it's time to start adding documents!

What is a 'document'?Document Library Pro circle cropped

The Document Library Pro plugin is ultra-flexible and supports any type of 'document'. A document could be:

  • A downloadable file that is stored in the WordPress Media Library - e.g. a PDF, image, or PowerPoint presentation.
  • Any downloadable file that is stored on a third-party platform like Dropbox, Google Drive, Microsoft SharePoint, or Box.
  • A resource that is available for people to read directly on your website, without having to download anything.
  • Any resource that you embed directly into your website - e.g. a page-turning flip book or an embedded Google Drive document.
  • A link to a web page, either on your own website or on a different website.

As you can see, that's a pretty wide definition of a 'document'! Whatever type of document or resource you want to display, you can do it with Document Library Pro. You simply add or upload the document along with any extra data that you want to display about it, and it is stored in a dedicated 'Documents' section of the WordPress admin.

This makes document organization really straightforward while keeping your documents separate from your other website content and Media Library files.

4 quick ways to add documents

Now we know what the WordPress document library plugin can display, you can choose the best way to add your documents. Each option is really easy and only takes a few minutes:

  1. Add documents manually - it's just like adding a page or post in WordPress!
  2. Select files already in the WP Media Library - are your documents already in WordPress? Add them to Document Library Pro in seconds.
  3. Drag and drop file upload - drag files straight into the document library.
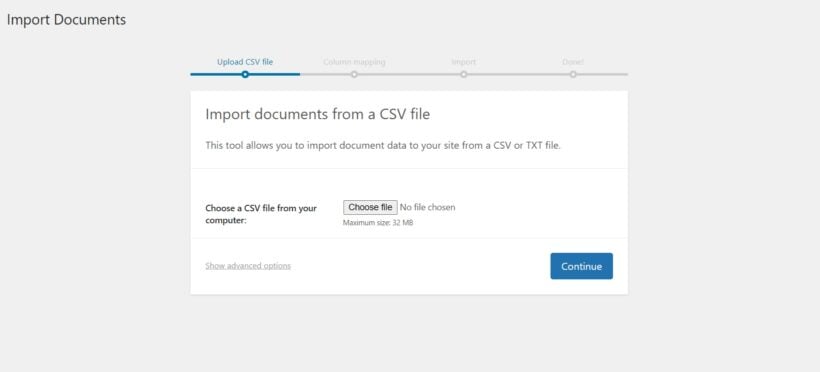
  4. Bulk import documents from CSV - to import large numbers of documents to the library, add all the data to a CSV file, and upload it to WordPress.

With both methods, you can choose what information to display in the WordPress document library (summaries, file type, file size, category, etc.), and you can add links to download the document. Both methods support any file type, including uploaded PDFs, JPG, DOCx, etc.

Categorize your WordPress document library

Document library categories

Before you start adding documents, it's important to plan the structure of the document library. This is an important part of organizing your document library. It's easier to keep documents organized from the outset than the tidy them up later.

The WordPress document library plugin provides 2 ways to organize documents:

  • Document categories - Create hierarchical categories and sub-categories, structured into unlimited levels.
  • Document tags - Add tags or labels to each document. For example, you could use tags for the document year, publisher, topic, type, or something else. (If you want multiple types of labels, then you can do this by creating custom taxonomies to use as well as tags.)

Your document library can include category and tag columns. It can also include category and tag filters to help people to find documents more easily. You can even create multiple document lists, each containing a specific category or tag.

How to add documents manually

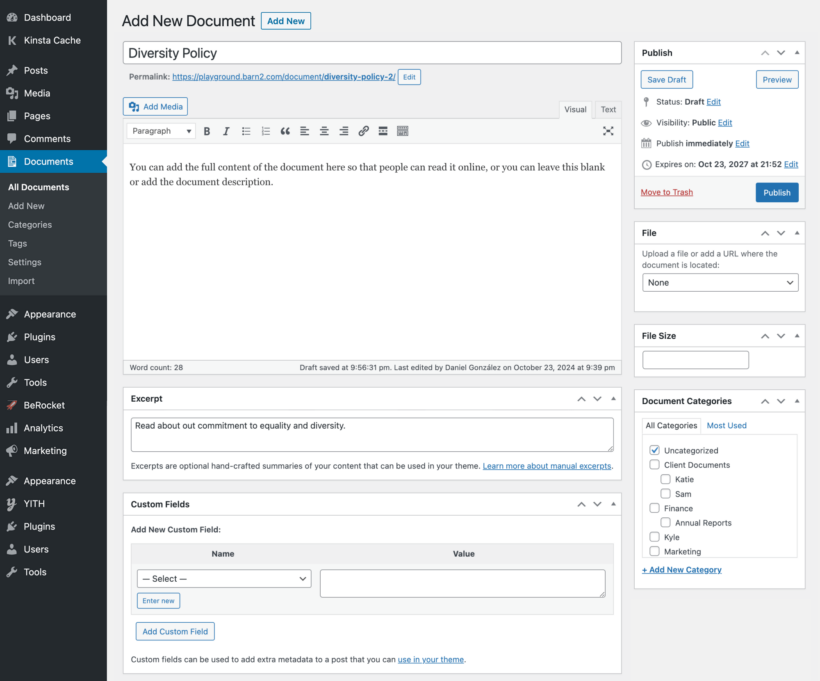
Add document to library

You can add documents one by one, in exactly the same way as you add pages and posts in WordPress:

  1. Go to Documents → Add New.
  2. Add all the information that you want to display about the document, such as the name and description. Ignore the file size option if it's a downloadable document because this will be calculated automatically.
  3. For the main content, either add a description, leave this blank, or add the full document. This might be the full text of the document (you can add thumbnail images etc. as required), an audio or video player, a Google Doc embedded using a plugin such as Google Drive Embedder, or even a flip book plugin.
  4. Choose an option in the 'Document Link' section:
    1. File Upload - Upload any file type which users can download.
    2. Custom URL - Add the URL of where the document is located, e.g. a Dropbox or Office 365 link, or a third-party website.
    3. None - Choose this if you are embedding the document into the main content instead of as a clickable link.
  5. Click 'Publish' to instantly add the document to the library.

How to add Media Library files to the document library

Lots of people install Document Library Pro after using a different plugin. If your document library files are already in the WordPress Media Library then you can easily convert them into documents:

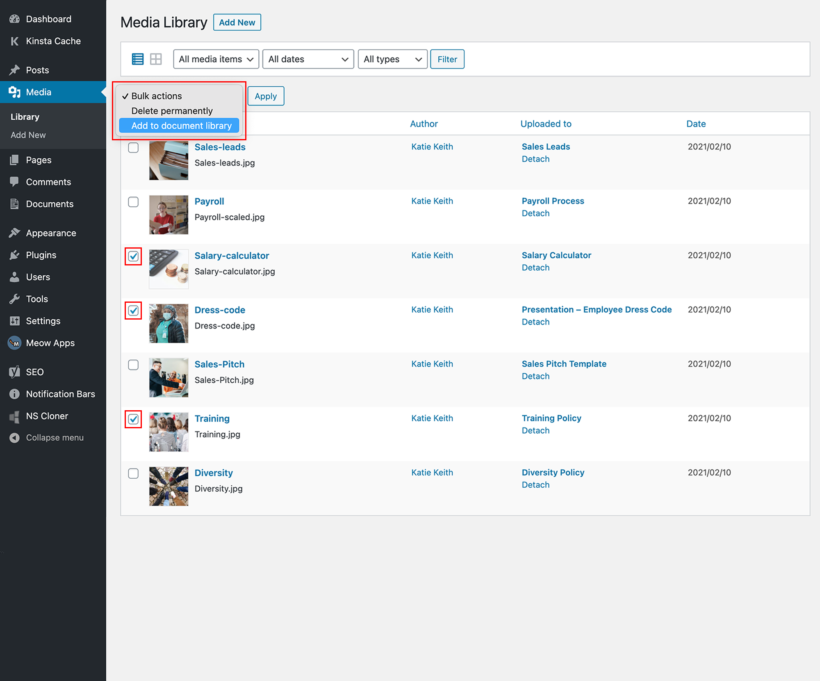
  1. Go to the 'Media' section in the WP admin.
  2. Make sure you're on list view rather than grid view (click the icons in the top left to switch).
  3. Tick the files that you're adding to the document library plugin.
  4. Use the bulk actions dropdown to select 'Add to document library'.
  5. Click the link that appears to view your documents. You might want to tweak some details like the name or add extra information about each document.

How to add documents using drag and drop

If you want to add lots of downloadable files to the document library, then the draft and drop uploader provides a useful shortcut:

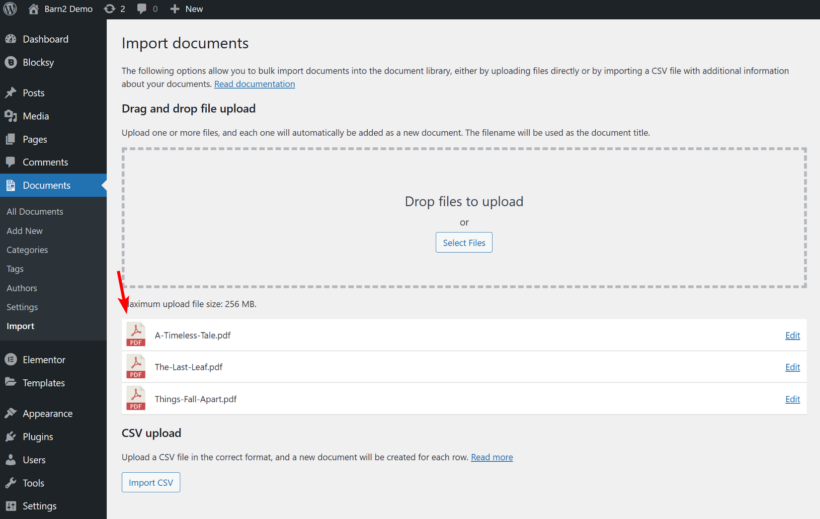
  1. Go to Documents → Import.
  2. Drag and drop the files onto the page.
  3. Go to the 'Documents' section of the WordPress admin to view them and make any changes.

How to import documents from CSV

The WordPress document library plugin provides a fully automated way of importing documents in bulk:

  1. Use any spreadsheet program (e.g. Excel) to add all the information about your documents to a CSV file, including the URL of where it is currently located. For a useful starting point, download the sample CSV file from the document library plugin knowledge base.
  2. Go to Documents → Import.
  3. Follow the on-screen instructions to upload your CSV file. This includes a page where you choose which column from the CSV to map to each field in the document library.

Step 3: View documents on your WordPress website

Now it's time for the fun bit: seeing your WordPress document library for the first time.

When you installed the Document Library Pro plugin, it automatically created a main document library page for you. This page lists all your documents in a beautiful WordPress document directory on the front end of your website.

For step 3, you just need to make sure you're happy with everything and make any tweaks. You can also create more advanced structures and layouts if you want to:

  1. Go to the 'Pages' section of the WordPress admin.
  2. Find and view the page called 'Document Library'. Rename this to anything you like, such as 'Resource Directory'.
  3. You'll see all your documents listed - either as a single table or as a grid. They may be structured into folders. (This depends on whether you enabled the 'Folders' option on the document library plugin settings page.)
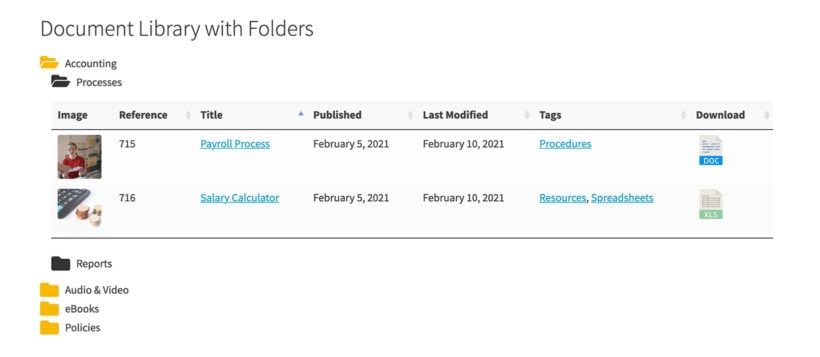
WordPress document library plugin folders
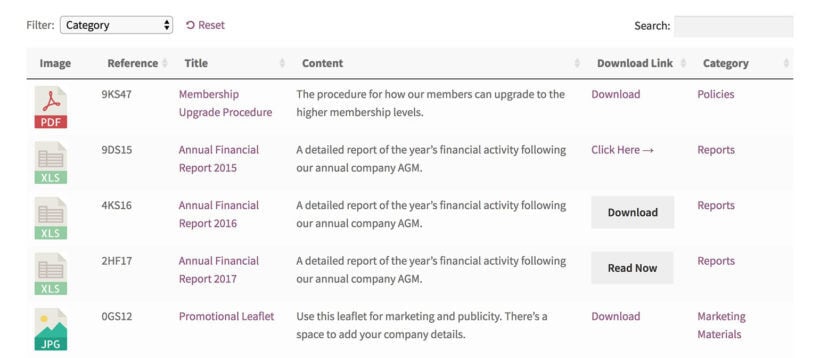
A document library with folders
WordPress document library plugin with links
Document library without folders
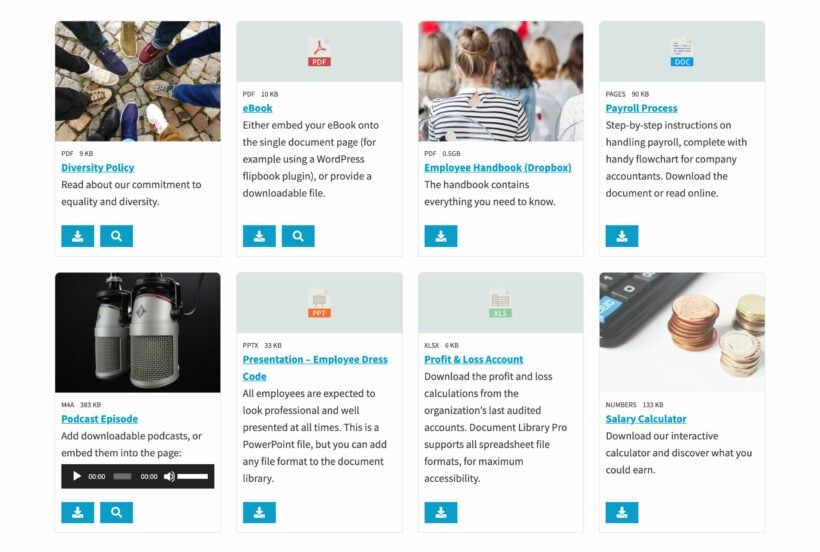
Grid layout document library tiles
A document grid

Keep tweaking until you're happy!

  1. When you've viewed the document library, go back to Settings → Documents in the WordPress admin. Tweak the settings until you're completely happy.
  2. Alternatively, you can create more advanced document libraries by using a shortcode. Use the shortcode options to list different documents on different parts of your WordPress site. You can also change other details such as the table columns and whether to display download buttons or file type icons. This is a great way to make your document library more varied, tailoring each table to the type of documents you're listing.
  3. If your document library contains links to a separate page for each document, then you should also check this and make any changes.
  4. Finally, go to Appearance → Menus and add a 'Document Library' link to your website navigation menu.

Now people can easily find your document library and find the documents they're interested in. Perfect!


Create a private WordPress document library

Now, I'll tell you how to create a private and hidden document library in WordPress. You can password protect your document library. You can also restrict it to specific groups of logged in users.

Option A - Password protected document library

You can hide your entire document library with the Password Protected Categories WordPress plugin. Alternatively, you can make certain documents private while leaving others public.  You can even show different document preview to different people.

It works by password protecting one or more categories within your WordPress document library. Users must enter a correct password to unlock the category and view the private documents. Once they've unlocked a category, they can navigate within it. They won't need to re-enter the password for several days.

The benefit of this method is that you don't have to create a separate user account for everyone who accesses your document library. For example, let's say you're creating a private intranet for employees. There's no need for each person to have their own user account on your WordPress site. Instead, just give them a password. This unlocks the protected library without needing an individual login.

How to password protect the document library

  1. First, create the document library by following the instructions earlier in this tutorial.
  2. Next, get the Password Protected Categories plugin. Install it using the instructions in the Getting Started email.
  3. Go to Documents  Categories.
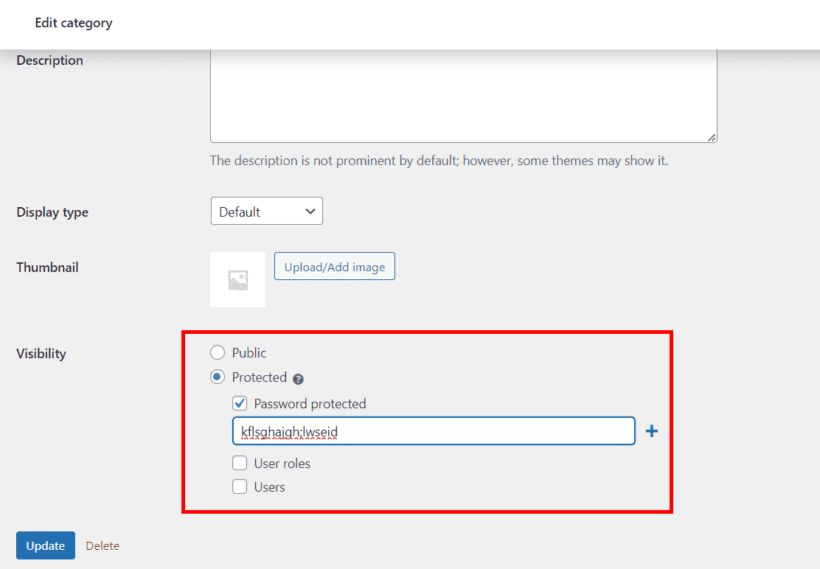
  4. Create 1 or more password protected categories for the WordPress document library. Some tips:
    • If you want to create a completely private document library, create 1 password protected category. Put all your documents within it. If you want to add sub-categories, that's fine. Leave them set to 'Public' - they'll automatically be protected with the same password as the main document library category.
    • If you just want to protect parts of your document library, that's fine too. Structure it into as many categories and sub-categories as you like. Some of these can be set to public and others password protected.
  5. Now go to the main Documents list in the WordPress admin and categorize your documents as needed. Documents in password protected categories will automatically be protected with the same password as the category.
  6. Finally, create a login page for your users by adding the shortcode [category_login] to any page on your site. Or even better, add the shortcode to the top of your document library page. As soon as someone enters a correct password, the hidden documents will appear in the library!

Option B - Restrict your WordPress document library to specific users or roles

If you'd rather create a separate user account for each person who accesses your document library, then that's fine too. The Password Protected Categories plugin also lets you restrict document categories to specific user roles - or even individual logged in users.

Use this method if you:

  • Want the most secure option.
  • Are prepared to create a separate user account for each person who accesses the document library.
  • Want to hide all your documents, just some of them, or show different documents to each user.

First, follow the above instructions to create a WordPress document library with Posts Table Pro. Once you're done, install Password Protected Categories and edit the document categories that you want to restrict. Choose the 'User' or 'Role' visibility options and choose who can see the documents.

Tips

  • For more granular control, create multiple user roles and show different documents to different users. Your main document library page will automatically show the correct documents for each logged in user.
  • If you don't already have a user-friendly login page, use a free front end login plugin such as Theme My Login or Profile Builder.
  • Are you showing different documents to different people? If so, DO NOT tick the 'Caching' option on the document library plugin settings page. This will ensure that each user sees the correct documents rather than a cached version of the library.

Organized document library made easy

After your WordPress document library goes live, you can sit back and relax knowing that people can easily access your documents. However, at some point, you'll need to add more documents or edit existing ones. Luckily, the Document Library Pro plugin makes ongoing document management easy for you.

You can easily view all documents in the 'Documents' section of the WordPress admin. Use this to find and filter documents before making changes.

Top tips on managing your document library

  • See downloadable files in the Media Library - You can also view the files which are attached to your documents. Just go to the 'Media' section of the WP admin and select 'Documents' from the 'All types' dropdown list.
  • Updating documents - When you need to replace a file, you can simply upload documents to a new one directly on the 'Edit Document' page. Or to avoid duplication, install the free Enable Media Replace WordPress plugin. This lets you overwrite old versions when you upload a new one, without changing the URL.
  • Display the version number and modified date - Your users might need to see which version of a document they're downloading. There are a few ways to do this:
    • Add the current version number to the document name, and keep it up to date. This appears in the 'title' column of the WordPress document library.
    • Display a 'date_modified' column in the document library WordPress. This will show the date when you last saved the document on the 'Edit Document' page.
    • You can also add a version number column to the document library WordPress. If there are any standard fields that you're not using (e.g. the excerpt) then you can use this and rename it to 'Version Number'. Alternatively, create a custom field for this purpose and display it in the document library.
  • Update your categories and tags - It's easy for a document library  WordPress to get cluttered over time. Keep it organized by regularly updating the structure so that it reflects your current document database.

Can users edit documents from the front end?

Edit spreadsheet with WP frontend editor

If you want colleagues to be able to edit documents from the front end, then you can use Document Library Pro with the WP Sheet Editor plugin.

The WordPress document library plugin adds 'Edit' buttons above or below your document library, which only appear for certain user roles. Users can click these to open an editable spreadsheet-style table with all the document data.

Read our separate tutorial on how to set this up.


Bonus tips on perfecting your WordPress document library

By now, you've learned how to create a professional document library. You've also learned how to handle keep it organized over time.

Before we finish, I will share some tips on extra functionality for your WordPress document library. You'll learn how to add extra data about your documents, track downloads, and more.

Mix and match these bonus features. They're the perfect way to tailor the document directory to your exact requirements:

Add extra fields to the WordPress document library

The WordPress document library plugin comes with all the standard fields you're likely to need. It even automatically generates extra fields such as the file size and file type.

If you want to display extra information about your documents then you can add extra fields to the document library. For example, you might want to show the publication date or publisher. Maybe you want to display a unique document reference code or version number.

You can store all this extra information in custom fields and taxonomies.

First, decide whether to store the extra data as a custom field or taxonomy:

  • Custom fieldsUse these to store unique data about each item in your WordPress document library. For example, if you're using your document library to store internal publications, each one might have a unique document number. You would store the document numbers as a custom field.
  • Custom taxonomiesTaxonomies are an opportunity to sort and organize data. Use these to store information that will apply to multiple documents in your library. For example, you might want people to be able to filter the document library to view documents from the year 2021. To do this, you would create a taxonomy called 'Year' and assign each document to the appropriate year.

The free Easy Post Types and Fields plugins let you add custom fields and taxonomies to the 'Documents' post type. These will appear on the 'Add/Edit Document' screen in WordPress, where you can add all the extra data for each document.

Display your extra document fields

Front end WordPress media library filters
A document library with custom taxonomies for Media Categories and Document Years

Once you've added your custom fields and taxonomies, you can start displaying them in your document library:

  1. Go to the WordPress document library plugin settings page (Document Library Pro Settings).
  2. Extend the list of columns in the 'Columns' option to include your custom fields and taxonomies:
    • Custom field column - add cf: followed by the custom field name (e.g. cf:size)
    • Custom taxonomy column - add tax: followed by the custom taxonomy slug (e.g. tax:year)

For example, your list of columns might be: title,excerpt,cf:size,tax:document_year

This will create a WP document library like the screenshot above.

Can users submit documents to the document library?

Submit document to library WordPress plugin

A lot of websites list documents that users have submitted themselves. For example, you might allow your users to submit resources which are then shared with the entire community. Or perhaps you want an easier way for employees to add documents to the library without accessing the WordPress admin.

The WordPress document library plugin comes with a front end document upload form. To use this, simply add [dlp_submission_form] anywhere on your site.

You can put the document upload form on a public or private page on your website. When new documents are submitted, you can either publish them immediately or hold them for moderation first.

Here's a video about how to add front end submission to your WordPress document library:

How to track document downloads

Document library author and download count column
Display the document download count in the library

The Document Library Pro plugin has a Download Count column which you can include in the document library. This displays the number of times the document has been downloaded.

For more advanced tracking, you can also use Google Analytics to collect more advanced data about how people are using the WordPress document library. Moz have published an excellent tutorial on How to Track PDF Traffic and Links in Google Analytics. Use this as a starting point to track whichever types of links you're adding to your document library.

How to sell documents

So far, I've assumed that you want to provide free access to your WordPress document library. But what if you want to sell printed or digital documents online? Fortunately, you can do that too.

The easiest way to create an e-commerce document library is to use our other plugin WooCommerce Product Table, instead of Document Library Pro. The instructions for selling documents in this way are similar to the document library tutorial in the previous sections. The main differences are:

  1. Add each document as a WooCommerce product. This is instead of having a 'Documents' post type for storing documents or displaying files from the media library. In WooCommerce, choose the 'Downloadable' product type and upload the file that people will receive after purchasing the document. You can also add other information such as the price.
  2. WooCommerce Product Table has a different shortcode for listing your document products. You can read about all the options in this article.

Your WordPress document library will look similar to the other screenshots in this article. The difference is that they will actually be e-commerce products available for sale, with add-to-cart instead of download buttons.

Alternatively, you can use Posts Table Pro with other WordPress e-commerce plugins such as Easy Digital Downloads. Check out our separate tutorial on how to use Posts Table Pro to list products (including documents) with Easy Digital Downloads.


See a document library in action - RJ Lee Group publications library

WordPress document management

RJ Lee Group is an industrial forensics analytical laboratory and scientific consulting firm. Their staff makes regular presentations and the public in peer-reviewed journals, so they wanted a publications resource library on their website showcasing the firm's work.

With over 300 publications, they needed a user-friendly and easy-to-search library.

They used Document Library Pro to create a publications library listing their articles. The table displays 25 publications per page with pagination allowing users to view older documents. It includes columns for publication title, citation, and date.

You can sort the document library by clicking on any column. The AJAX-powered document search box above the library lets you further navigate the publications in the list.

It's time to set up the WordPress document library plugin

Now you know how to create a fully functional document library for your WordPress site!

Document Library Pro is the ultimate solution for adding a searchable library of any type of file or resource to WordPress. It comes with everything to streamline your document-handling process:

  • 100% flexible.
  • Quick 5-minute setup.
  • Create unlimited document libraries.
  • Ideal for non-technical website owners and developers.
  • 30-day money-back guarantee - try it risk-free!

I hope you enjoy creating your document directory with the best WordPress document library plugin! Let me know how you get on in the comments below.

A simple WordPress membership plugin lets you publish exclusive content, sell membership subscriptions, and accept payments from members. While you can certainly use a full-blown membership plugin to set up your membership site, it might be overkill for your needs.

In this article, we’ll walk you through a step-by-step tutorial explaining how you can add simple WordPress membership to your site and hide your WordPress members area and content from regular visitors. We'll explain how you can do this using the Password Protected Categories plugin.

Centralized members login page

Let’s put everything into context before we begin.

What is a membership plugin and what is it used for?

There are many reasons why you might consider creating a membership website. You might want to offer a training program, provide access to a premium forum, or share exclusive content with members.

Creating a private WordPress members area on your site used to be a daunting task. Typically, it involved creating and maintaining separate user accounts for each member. As you can probably imagine, managing this sort of setup can be difficult considering you also have to accept registrations, enforce membership levels, and regularly publish fresh content.

A membership plugin lets you restrict access to your site’s content and make it accessible only to paying members, hiding it from public view. By restricting access to exclusive membership content, you can charge members a recurring (or one-time) membership fee.

This is how a WordPress membership plugin is typically used:

  • Restricting access to content. Membership plugins give you control over which parts of your site are visible to the public and which parts only members have access to, i.e. the WordPress members area. You’re able to restrict access to posts and pages, categories, or your entire WordPress site.
  • Creating membership levels. A membership plugin allows you to offer a free membership package along with paid plans. These are called membership levels.
  • Facilitating registrations. Membership plugins let you monetize your membership site by accepting recurring (or one-time) fees from your site’s members. Most popular WordPress membership plugins let you accept member registrations and support PayPal, PayPal Payments Pro, and Stripe payment gateways.

The good news is that simple WordPress membership plugins exist that can help you do all of these things easily.

Why you might want a membership plugin for your website

There are many scenarios where you might be better off with a simple WordPress membership plugin rather than a full-blown solution that offers features you don’t intend on using. Most membership plugins offer features that you probably don't need, like:

  • Creating assignments or quizzes.
  • Drip feeding content to students and members.
  • Social media and CRM integration.
  • Certificates and badges.

These features can make the back-end unnecessarily complicated to use – especially for users who aren't particularly tech savvy. If you're looking for a simple WordPress membership site, it's probably better to go with a lightweight plugin.

The first step, of course, is to take a step back and evaluate your needs. Let’s take a look at some use case scenarios:

Scenario #1: You publish blog posts and articles on your website that you’d like to make available to subscribers only

With a simple WordPress membership plugin, you can simply create blog posts as you would on a regular website and add them to your members area. This makes it easy and intuitive to share content with members.

This also makes it easy for members to access the content. Instead of navigating a complex dashboard, they can simply login to your members area using a password and gain access to the content. The best simple membership plugin even lets you create user specific content!

To make things even simpler, you could use the Posts Table Pro plugin to list content in a neat table layout:

WordPress post table blog index
A private blog listed in a table using the Posts Table Pro plugin

Scenario #2: You’ve built a community around a specific topic and would like to charge for access to discussion forums

Some membership site owners charge for access to an exclusive community that’s interested in similar topics. If your main membership offering is exclusive access to, say, a discussion forum, then you probably don’t need most of the features that traditional WordPress membership plugins offer such as assignments and quizzes or membership tiers.

By using a simple WordPress membership plugin along with a forum plugin for WordPress, you can set up a members area on your site. You can also pair this up with a registration form plugin that lets you accept membership fees.

Scenario #3: You’re a consultant or online course instructor and need an easy way to sell services or products

If you’re an online course instructor or consultant, you might need to offer different sorts of membership products. For example, you might need to make course content or training programs available to paying members in exchange for a recurring monthly fee.

A lightweight membership plugin makes it easy to set everything up and gives you the option to integrate with any e-commerce plugin. For example, if you sell digital products, you might consider using Easy Digital Downloads. But if you’re looking to sell physical goods through your membership site (like a planner), you might use WooCommerce or a WooCommerce add-on instead to simplify checkout.

If you’re looking for any of these implementations or something similar, you might be better off using a simple WordPress membership plugin (like Password Protected Categories) to restrict user access to content. Let's quickly take a look at the key features on offer with the simple membership plugin before we jump into the step-by-step tutorial.

Introducing Password Protected Categories

The Password Protected Categories plugin provides two easy ways to add simple membership areas to WordPress:

  • Simple password protection - Assign a password (or passwords) to categories on your WordPress site. This is the easiest way to set up a private WordPress members area. You can use this sort of implementation to restrict access to content and keep entire categories hidden from your public website.
  • User and role protection - If your members have accounts on your WordPress site, then you can create members-only pages that only they can access. This is super-flexible and you can create a hidden area that is visible to all your members, or show different content to different members.

There are a number of benefits of using Password Protected Categories as a simple WordPress membership plugin. For starters, it’s easier to set up than most traditional membership plugin. All you have to do is install the plugin – no configuration necessary!

Password protected categories don't require individual user accounts since it uses password protection instead. This sort of simple implementation requires a lot less management overhead and makes it easy to accept new members. Plus, you won’t have to worry about your site slowing down.

On the other hand, if your members have accounts then it's easier to enable the user or role protection. That way, they just need to log into their account and will immediately see the hidden members-only content.

The plugin lets you put all of your membership content behind a single category or multiple categories depending on how you’d like to set things up. This is the simplest way to create a membership site as it is easy to set up, maintain, and scale.

Now that we have a better idea of what Password Protected Categories brings to the table, let’s take a look at how you can use it to add simple membership to your site.

How to set up Password Protected Categories as a simple WordPress membership plugin

Password Protected Categories lets you create a secure, private WordPress members area. Here’s what you need to do to create a simple WordPress membership site using Password Protected Categories.

Step 1: Install Password Protected Categories on your WordPress website

Get the Password Protected Categories plugin and install it to your WordPress website. You’ll find the license key in the email you receive along with the plugin’s zipped file. After the plugin is installed, click the Activate button.

Next, you’ll need to activate the plugin’s license key. To do this, navigate to Settings → Protected Categories from the admin panel and enter your license key.

Password Protected Categories license key field

Click the Save Changes button at the bottom of the page to proceed.

You can also configure the plugin’s settings from this page. It lets you change the title, password label, form message, button, and placeholder text for your front-end membership login form – more on this later.

Step 2: Create the protected category (or categories)

There are two different ways you can create protected categories in WordPress:

Method 1: By following this method, you can include one protected category which contains the content you’d like to keep private for all members. The protected category can have as many sub-categories as you’d like. Members can navigate through the sub-categories without having to re-enter the password.

Method 2: The other way to go about it is to create separate categories and assign each one a unique password, or make it available to different users. This is an ideal solution if you’re looking to offer multiple membership tiers. As we mentioned before, this is much simpler than using a traditional WordPress membership plugin because each tier is separate. In other words, you don’t have to worry about dealing with membership hierarchies.

Create protected categories

Next, we’ll explain how you can create categories and sub-categories for your site’s members. You can follow the steps outlined below to either implement a Method 1 style membership site or go with a Method 2 style membership site instead.

From the WordPress admin panel, navigate to Posts → Categories to create a parent category. It’s worth mentioning that Password Protected Categories works with custom post types, as well. If you’re using a custom post type, head over to the relevant Categories screen for the custom post type you’d like to include in your WordPress members area.

Once you’ve reached the Categories screen, enter a category name and slug.

WooCommerce Protected Categories User Role Protection

For example, if you’re creating a private area for your site’s members and would also like to have a public-facing site, you can call your category Members Area.

Once you’ve done that, scroll down to the Visibility section and click on the protected option. Choose the type of protection you require and click the Add New Category button to proceed.

Tip: If you're creating a password protected members area then you can assign multiple passwords to a single category. This lets you give out different passwords to different members for accessing the same members area, without needing an individual account for each person. The benefit of this is that your WordPress members area will become more secure than having shared passwords Additionally, you can revoke a specific member’s access without affecting other members.

Set multiple passwords with Password Protected Categories

Create protected sub-categories

After you’ve created the main category (also called the parent category), you can choose to create as many sub-categories as you need to organize the content you want to share with your site’s members. The process is exactly the same except that you will need to set the Parent Category to Members Area.

Create sub-categories using Password Protected Categories

For example, if you’re looking to share content about cooking, you might have sub-categories on freezer meal planning, meals for kids, meals for vegetarians, and pro cooking skills.

You don’t have to change the visibility settings for sub-categories as they’ll already be protected. In other words, they’ll only be visible to members who have access to the parent category.

Step 3: Create a member login page

Your site’s members will need a way to login and gain access to the member’s area. The easy way to do this is by creating a centralized login page. The method for this is different depending on whether you've password protected your simple membership area or restricted it based on logged in users or roles.

Password protection member login

If you're using password protected categories then here’s what you need to do to create a member login page:

First, navigate to Settings → Protected Categories and check to make sure that the box next to the Show Categories option is unchecked.

Show categories option

Next, head over to Pages → Add New to create a new login page. You can call it something like Member Login. Enter the shortcode [

].

Gutenberg text editor with shortcode

Hit the Publish button to proceed.

Preview this page on the website’s front-end to make sure you can see the centralized login page. It should look something like this depending on the WordPress theme you're using:

Centralized members login page

When a member enters the password you’ve provided them, they’ll only see the content that is included in the membership plan they’ve registered for.

User and role protected members area

Alternatively, if you've set up your member-only categories to unlock for logged in users or roles, then they need to log into their user account on your WordPress site. This means that you can use any type of WordPress login form, such as:

  • Send logged out members to the default WordPress login page at /wp-login.php. I don't recommend this because it's not professional for members to see any page that is styled like the WordPress admin.
  • If your WordPress theme comes with a front end login form then you can use that as the member login page.
  • For the most professional result, use the Profile Builder plugin to create a front end login form, plus registration form if required.
  • If you'd prefer a free login plugin, then I recommend Theme My Login.

Either way, create a login page and link to it from somewhere prominent such as the navigation menu or header. Label the link something like "Member Login".

Step 4: Add content to your members area

Now that you’ve added simple WordPress membership to your site, all that’s left to do is create content. The key benefit of using Password Protected Categories is that it makes it easy to manage content in the back-end. It’s as simple as assigning the correct category to each new piece of content you create.

Following our example, let’s say you publish content for members who’ve signed up for advanced cooking skills content. All you’d have to do is assign the correct sub-category to the blog post once you’ve created it. Once you publish the article, members who’ve signed up for the advanced cooking skills plan will have access to it.

Similarly, if you have a custom post type for your meals for vegetarians category to share recipes, all you have to do is make sure each vegetarian recipe is assigned the correct category.

Bonus: Create a member registration form

Password Protected Categories is a lightweight plugin that works seamlessly with other WordPress plugins. You can easily bolt on a member registration form so that people can sign up. As with the login form, the exact method depends on what type of protection you've added to the simple WordPress membership area.

Registering for a password protected membership area

You can use any WordPress contact form plugin to create a simple WordPress membership registration form to your site. If you want to charge for memberships, you can even link it with payment gateways like Stripe, PayPal, or PayPal Payments Pro.

To automate things further, you can use the form’s ‘success’ message or an email auto responder (with Mailchimp) to share the members area password and URL with new members. This way, members can log in straight away without having to manually request login details.

You might also want to moderate new members first or check to make sure they’ve paid for their membership. To do this, you can manually send them the password after receiving their filled out registration forms and payment.

Registering for a user or role protected membership area

Alternatively, if you're unlocking the simple members area for logged in users with an account, then you can use any WordPress registration plugin - or even the basic one that comes with WordPress itself.

You can create registration forms with plugins like Profile Builder or Theme My Login - so use whichever one you're using to create the login page.

Bonus: Offer trial memberships

With password protected categories, you can also set a password expiration date. This is useful if you want to offer trial memberships. For example, you could give a prospective member access to your members area for a period of 14 days.

Set password expiration with Password Protected Categories

To do this, navigate to Settings → Protected Categories and set the Password Expiration field to 14 days.

If you've set up user or role protection instead of password protected categories, then the free Expire Users plugin offers an easy way to revoke access after a certain period.

Set up your WordPress membership site today

Password Protected Categories is a simple yet powerful WordPress membership plugin that lets you put any category on your site behind a password. By following the step-by-step guide given in this article, you’ll be well on your way to adding simple WordPress membership to your site and making your members area and content hidden from non-members.

The best part is that your membership site will be incredibly easy to maintain. You can add new content to it whenever you’d like and drip feed it to members. In addition to this, you can take things to the next level by using Password Protected Categories with additional WordPress plugins (for example, for accepting member registrations or membership fees).

What are some of the features you look for in a simple membership site plugin? Let us know by commenting below.

Sometimes, customers want a way to view the products they already ordered. A 'WooCommerce display all products purchased by user' plugin does exactly this. Keep reading to learn which plugin to use, and how to set it up to display the current user's previously ordered products.

WooCommerce Display Products Previously Ordered by UserThere are lots of reasons to list products that the user has already bought:

  • Display purchased products on the My Account pageYou may wish to use a WooCommerce display all products purchased by user plugin to display their previous products in one place.
  • Quick re-order tableList the user's previous products in a quick one-page order form, so they can quickly find and select items to re-order.
  • List favorite productsMost customers who make repeat purchases have favorite items that they buy multiple times. Make it easier for loyal customers to find and re-purchase their regular and related products in your ecommerce store.
WooCommerce display previous orders by logged in user plugin
A WooCommerce Account page listing all products purchased by the current user

Displaying purchased items in this way offers benefits such as customer loyalty, enhanced satisfaction, and targeted product recommendations. This personalized shopping experience fosters loyalty, saves time, and allows for effective cross-selling, encouraging repeat sales and customer satisfaction. Keep reading to learn how to use WooCommerce to display purchased items only.

The easy way to display products previously ordered by user

WooCommerce Product Table is a flexible plugin which lists products in a convenient one-page order form. It has a little-known feature which allows you to display all products purchased by the current user. As a result, you can use it to enhance the overall customer experience for each user by showcasing their past purchases - either on the Account page or an another page of your website.

Show WooCommerce products previously ordered
An order form to display all products purchased by user

When you activate this feature, the WooCommerce recently purchased products plugin works like this:

  1. Depending on how you set it up, customers can either log in to their WooCommerce account or view a dynamic 'My Previous Products' page which shows different products depending on the user. The shop page would include a WooCommerce Product Table listing all products previously ordered by that user.
  2. If the user has never ordered any products from your WooCommerce store, then they will see a customizable message saying that there are no products in the table.

Why this is different from listing previous orders

The WooCommerce Account page already lists previous WooCommerce orders like this:

WooCommerce Account Page List Orders

As you can see, the default list of orders doesn't make it easy for customers to repeat an order or re-order products. You can click on an order to view more information in your online store. From there, you can click through to the single product page to re-order each product. That's a lot of clicks if you want to re-order products you have previously purchased!

Without using a WooCommerce get products from order plugin like WooCommerce Product Table, it's difficult to identify the specific order that includes the product you wish to reorder.

Why WooCommerce Product Table is different

WooCommerce Product Table automatically displays a comprehensive list of products that the currently logged-in user has previously purchased. Its 'display all products purchased by user' feature lists all products ever purchased by the customer. Each product is listed only once, regardless of the number of times the user has made the purchase.

As a result, shoppers can easily browse through a list of previously ordered products. The table contains search, sorting, and filtering options to quickly locate items they wish to reorder. By selecting their desired products and adding them to the cart, they can smoothly proceed to the WooCommerce cart before completing the checkout process as usual.

Next, I'll tell you how to set it up on your own WordPress website which can display all products purchased by user. The order history is generated automatically, making it surprisingly easy to set up!

Why it's different from a WooCommerce Repeat Orders plugin

You might have read about WooCommerce re-order plugins. These simply add an 'Order Again' button to the list of orders in the WooCommerce Account. They're different from the method described in this tutorial because instead of duplicating a previous order, WooCommerce Product Table displays products previously purchased by the user who is currently logged in. 

The customer doesn't have to remember which order their previous products related to. They just need to use the search, sort, and filter functions to quickly find their favorite products. Then, they simply add them to the checkout page and create a brand-new order.

Now you understand the importance of allowing existing customers to reorder their previous products using the WooCommerce get products from order feature. Next, we'll get into the most important part of this tutorial - how to set it up.

How to display products previously ordered by current logged in user

First, I'm going to tell you how to show products previously ordered by the current user on any page. Afterward, we'll look at specific places on your site where you might want to display this list. For example, you can add a 'My Products' section to the WooCommerce Account page, or create a hidden page that only logged in users can see.

1. Install WooCommerce Product Table

  1. Get WooCommerce Product Table and install it on your WordPress site (Plugins → Add New).
  2. Head to WooCommerce → Settings → Products → Product tables.
  3. Enter and activate your license key.

2. Configure your product table settings

WooCommerce Product Table plugin settings page
Now, the WooCommerce display all products purchased by user plugin setup wizard will open. Use it to choose how you want your product tables to work.

To optimize the display of previously purchased products in WooCommerce, consider implementing the following recommended settings for the WooCommerce display all products purchased by user feature:

  • Choose your columns - To list a customer's order history, I recommend keeping your columns simple. Just display factual customer data about each product, such as a thumbnail image, name, and price. Everything is optional, e.g. if you can list products without images if you prefer. Don't include more general information such as the description, as the user is already familiar with the product. You should almost certainly include a buy column because this allows users to re-order the product directly from the list. (Read full instructions)
  • Quantity inputs - You should generally tick this box because it allows users to select a quantity before adding it to the cart.
  • Add to cart button - If you're creating a quick re-order form then I generally recommend selecting the 'Checkbox' option. This adds multi-select tick boxes instead of standalone add-to-cart buttons for each product.
  • Product variations - It's generally best to select the 'Dropdown' option so that users can choose variations from the list of previously ordered products. Alternatively, choose 'Separate' to list each variation on its own row.

Keep going...

  • Search filters - If some customers have previously ordered a large number of products, then add filter dropdowns to make the products easier to find. You can even help customers to find specific products more easily by adding a search box and filters. This is essential for users with a large order WooCommerce customer history. (Tip: The WooCommerce recently purchased products plugin also comes with filter widgets.) (Read full instructions)
  • Lazy load - Since you don't know how many products each user has WooCommerce customers order history, there's a chance that some of them might list large numbers of products. Enable the lazy load option to avoid any performance problems for larger tables.
  • Caching - Disable this when listing a user's previous products. It's essential to load the list of products separately for each user because a cached version might show other users' products!
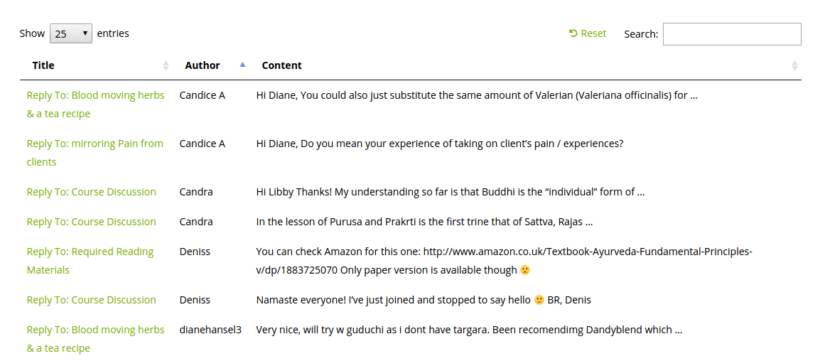
  • Search box - Enable this to add a keyword search above the table, helping users to find their favorite products more easily.
  • Links - Consider whether or not you want people to be able to click from the list of previous products to the single product page. If not, enter false here to disable the links. This keeps the user on the quick re-order form.

3. Use a shortcode to display previous products

Now, we get to the fun bit! It's time to list products ordered by the current logged in user. We'll do this by adding a simple shortcode to any page on your WordPress website:

[product_table user_products="true"]

View the page. As a logged in user with a WooCommerce customer history of previous orders, you will be delighted to find all your purchased products elegantly listed in a user-friendly table layout with the WooCommerce display all products purchased by user.

WooCommerce previously ordered products plugin

4. Decide where to put the list of previous products

Having effectively retrieved a list of products previously ordered by the current user using the WooCommerce get products from order functionality, it is now essential to determine how this seamlessly integrates within the overall structure of your ecommerce website. How will logged in users find their products?

There are three ways to do this:

  1. Add a 'My Products' section to the WooCommerce Account page
  2. Create a hidden page that only logged in users can see
  3. Display the products on a public page of your site

I'll show you how to set up each option.

Option 1: List previously ordered products on the Account page

The WooCommerce account page is the most obvious place to list the user's previously ordered products. For example, you can add a 'My Products' tab to the Account area.

You can easily do this with IconicWP's WooCommerce Account Pages plugin:

  1. Install the plugin.
  2. Go to the list of 'Pages' in the WordPress admin and click 'Quick Edit' on the page where you added the shortcode to show the logged in user's previous products.
    Add extra tab to WooCommerce account page
  3. Select 'My Account' as the parent page and click 'Update'.

This will add a new link to the list of tabs within the WooCommerce My Account page. The tab will have the same name as the page, for example 'My Products'. When users log in and click on the link, they will see the list of products they previously purchased:

Option 2: List previously ordered products on a hidden page

Alternatively, you might want to structure the list of previously ordered products outside of the Account area. To do this, you need another method for restricting the page so that only logged in users can see it.

Keeping the page away from the Account area gives you slightly more flexibility. For example, it makes it easier to choose a different page layout and add filter widgets to the sidebar, as you're not restricted by the layout of the account page.

You can hide the page using the free Restrict User Access plugin:

  1. Install Restrict User Access on your WordPress site.
  2. Go to User Access → Add New.
  3. Click '+ New Condition Group' and select 'Pages'. Click in the 'All Pages' box that appears below.
    Add New Access Level
  4. Select the page where you've added the shortcode to list the current user's previous products.
  5. Now go to the 'Members' tab and select the 'Logged-in' role. (Or, if you prefer, select the 'Customer' role so that only logged in customers can see the page.)
    Restrict WordPress page to logged in users
  6. Use the 'Options' tab to choose what happens if a guest or logged out user tries to access that page for any reason - for example, because they have bookmarked it.
  7. Click the blue 'Create' button.

Now, only logged in users with the role you selected will be able to access the page where you've added the product table shortcode. Each logged in user will only see the products that they have previously purchased.

Add the hidden page to the menu

Of course, your users need an easy way to find the list of products they have previously purchased. You can do this by adding a menu link that only logged in users can see:

  1. WordPress menu link logged in users
    Go to Appearance → Menus.
  2. Select the page from the list of Pages on the left, and click 'Add to Menu'.
  3. Click on the little arrow in the menu on the right. This will open up extra options for that menu item.
  4. Use the 'Access Levels' option to select which user role(s) can see the menu link.

Option 3: List previous products on a public page

Alternatively, you might want to list previously ordered products for logged in users, and all products for logged out users. For example, this is an excellent option if you want to display each user's favorite products on the homepage - but don't want new customers to see a blank table.

To do this, you need to combine WooCommerce Product Table with another plugin - Advanced Access Manager (AAM). AAM comes with some handy shortcodes that let you display different product tables to guests and logged in users.

To use the two WooCommerce plugins together, simply install them and then paste the following shortcodes onto a page:

[aam show="visitor" hide="customer"] [product_table] [/aam]

[aam show="customer" hide="visitor"] [product_table user_products="true"] [/aam]

This conditional statement will list all products for guests, logged out users, and non-customer user roles (e.g. people who have subscribed to your blog but not bought a product). Logged in users will see a table listing the products they have previously ordered.

Can I display order information in the table?

WooCommerce Product Table is all about listing products so that the customer can re-order them. You can display any type of information about the products, such as the image, name, short or long description, price, categories, tags, attributes, and much more. However, it's not possible to display order information alongside each product, such as the date the product was last ordered.

This is because orders are stored as a separate post type in WooCommerce. Even though you're listing products previously ordered by the current user, the order information is not stored against these products in the WordPress database.

To access their WooCommerce customers order history, they can conveniently navigate to the WooCommerce Account page, where they can explore their complete WooCommerce customer history with ease. This works nicely alongside the list of previously purchased products.

Can I show previously ordered variations?

When you use WooCommerce Product Table to display products that the user has previously purchased, this includes variable products. If the user previously ordered a product variation, then this product - along with its variations - will appear in the table.

For example, the following screenshot shows what it might look like if the current user had previously ordered 3 variable products. As you can see, all variations for each product (not just the ones that you have previously purchased) are listed as dropdowns next to the add to cart button. The user can select whichever variations they want to buy, and add them to the cart.

Previously Ordered Variations WooCommerce

In this example, the first and third products have no default variations, so the variation dropdowns are not pre-selected. The second product has a default variation of Black Small, which is selected by default. You can set default variations on the 'Edit Product' screen.

Bonus tips

Choose which types of product to include

So far, we've assumed that you want to list ALL products that the current user has ever ordered. If you prefer, you can have more control over which products to include.

WooCommerce Product Table comes with lots of options for displaying specific products only. In addition to setting it to only show products ordered by the current user, you can choose to list products from a specific category, tag, search keywords, and much more.

For example, you might like to create multiple tables listing items that the user has ordered from a specific category. If you sell clothing and jewelry, then the 'My Products' page might include one product table listing purchased products from the clothing category; and another product table from the jewelry category. If you stock a wide range of items, then this can be more intuitive for your customers.

Customize the message for users with no previous orders

If a user with no previous orders sees the product table, then they will see message notifications. By default, it looks like this:

WooCommerce product table no products message

I recommend customizing this message to make it more relevant to previous products. For example:

[product_table user_products="true" no_products_message="You haven't ordered any products yet! Place your first order, and then your products will appear here."]

User previous orders no products message

Use quick view to speed up re-ordering

WooCommerce Product Table Quick View Magnifying Glass
You have full control over which columns of product data to include in the table. Customers can choose quantities and variations from the add to cart column of the table, achieving true one-page ordering in your ecommerce platform.

However, there are situations where you might want to show more information, or if you have too many variations to fit into the product table. If that applies to you, then quick view is the solution.

The WooCommerce Product Table plugin is designed to work alongside its sister plugin, WooCommerce Quick View Pro. Use them together to add quick view buttons to the table. Shoppers click on these to view more product information in a quick view lightbox. Depending on which settings you choose, this might include the full product image gallery, short description, and add to cart options with variation dropdowns.

WooCommerce Quick View Lightbox with Product Variations

Get Quick View

Review: How Pete Griffith lists his customer's favorite products

Before we close, let's look at a real user of WooCommerce Product Table. Pete Griffith uses the WooCommerce recently purchased products plugin to allow repeat customers to order their favorite products more easily each week:

Great Plugin, Awesome Developer.
This plugin was almost exactly what my customers were asking me to do to make ordering products on a weekly basis much more convenient. Instead of having to wade through our entire catalog of products, they can have a customized order form of only the products they order on a regular basis. They can still access the other products, if their needs change, of course, but this is much more user friendly for them (and me) than the default shopping method on WooCommerce. I had a question for the developer when setting it up, and was amazed at the speed of their response, the depth of understanding of my issue and the amount of time they must have spent in researching the answer. This is the second plugin we've purchased from them and it is because of Katie's blog articles that we knew about it and how we could use it to solve our problem. Her articles are written from the user's point-of-view and give working solutions to some real-world problems that WooCommerce users face. My wish list for future improvement: Add the ability to limit the variable products to selected varieties. I have one popular product with 50+ flavors, but most of my regular customers only order a few of the flavors on a weekly basis. Having all 50+ flavors is not ideal, and while I've devised a sort of workaround for some clients, it would be best if the plugin could handle this itself (each variety has its own product id, so implementing the shortcode would be simple for me or any other WC user if they do add this feature down the road). Highly recommend this plugin and this developer's other products.

Where to get the plugin

WooCommerce Product Table is an ideal solution to display all products purchased by the current user. This powerful tool enables the display of specific products based on the past orders of the logged-in user.

This can significantly enhance the login experience for existing customers by providing swift access to a comprehensive list of previously ordered products. Customers can effortlessly select the desired items for reordering, swiftly adding their favorite products to the cart with just a few clicks.

And the result for you as the store owner? Improved customer loyalty and retention, leading to more repeat sales for you 😀

If you’re looking for a simple solution for taking customer orders at the counter or table using a tablet or iPad, this article is just the thing you need.

Here, we’ll show you how you can create a WooCommerce POS ordering system for your business. Whether you run an online store, physical store, retail store, restaurant, spa, local coffee shop, or hotel – a WooCommerce POS plugin (or "WooCommerce point of sale plugin") can help you streamline business operations.

Having software that enables you to take customer orders is incredibly important – regardless of what sort of business you’re running. It enables your staff to quickly enter customers’ orders into a single ordering system – not multiple versions for in-store and online, or worse, something on paper. It’s more accurate and more efficient, especially for cashiers.

A WooCommerce POS system will simplify the order-taking process and make it easier for your waiting staff or behind-the-counter staff (cashiers) to add and remove items from the order list, select variations, place orders for customers, and instantly send it through for processing.

By the end of this post, you'll know how to set this all up. 

You can also watch a video version of this post below.

What we'll cover

I’ll show you step-by-step how you can use WooCommerce with the WooCommerce Product Table plugin to create a one-page ordering system that enables your staff to take customer orders. They’ll be able to use this system on different types of devices including mobile devices like iPads or Android tablets/phones.

WooCommerce POS front-end table layout ordering system

I’ll start by showing you how to install and set up the WooCommerce Product Table plugin on your existing WordPress website.

Then, you’ll learn how to use the plugin to create an easy-to-use, one-page POS ordering form. This form will enable your waiting staff to easily view, select, and customize the customer’s orders.

And, lastly, we’ll go over some tips about how you can optimize your order taking process using advanced features like routing orders to the right department.

Let’s get started.


Why you need a WooCommerce POS tool to take orders

WooCommerce point of sale ordering system

Most stores take customer orders using a static computer screen. All of the items in the customer’s order are recorded and forwarded to the relevant departments. Unfortunately, there are a number of problems associated with this approach to taking orders:

  • The software used by these stores is outdated and difficult to use. You need something that’s up-to-date and easy-to-use, like WooCommerce and WordPress.
  • As there is a limited number of counters, either customers or the waiting staff have to stand in queues to pay for their items. This can be a real pain for anyone that has to wait for a long time in order to make a purchase.
  • Desktop computers occupy valuable space at the counter and on desks.
  • If you sell online as well, you'll need to maintain two order systems!
  • Setting up multiple POS systems means you need to maintain inventory and stock data across both systems. This can lead to inaccuracies.

The solution is to set up a WooCommerce point-of-sale system to quickly input the customer’s order, calculate the total amount owed, and collect payment information using an iPad or Android tablet.

Using WooCommerce for your point of sale system gives you a web-based, state-of-the-art solution. It's inexpensive, and it's easy to set up. If you're already using WooCommerce for selling online, then even better – integrating WooCommerce POS with your existing store will offer a huge saving of time, simplicity, and money for store owners.

How your business can benefit from an automated WooCommerce POS ordering system

So, what are the benefits of WooCommerce POS?

If you run a business that requires waiting staff to take customer orders or requires customers to place their own orders at the counter, you’ll be able to speed up the order placing process using a WooCommerce POS integration on your WordPress website. It’s easy to set up and uses the popular WooCommerce plugin with some minor modifications and additional plugins.

The best part is that a POS WooCommerce system is highly customizable. You get the freedom and flexibility to set up POS products the way you want. This way, you can create an intuitive interface that's easy for staff to use.

In addition to this, you can store all sales and inventory data for POS products in your custom WooCommerce point of sale system. This enables you to make informed business decisions in a timely manner such as preventing out-of-stock situations.

Related: Check out our complete guide on how to build a WooCommerce B2B wholesale store!

Which point of sale integrates with WooCommerce?

There are plenty of POS products that integrate with WooCommerce. Some examples include Square Point of Sale and wePOS. Although these are viable options, we recommend building your own WooCommerce POS system.

The main benefit of custom POS products for WooCommerce is that you have full control over its functionality and ease of use. You get to choose which features to include and which ones to leave out. This will depend on the types of products you sell and the technical expertise of your sales staff.

We're going to show you step-by-step how to create an easy-to-use, one-page POS system. This form will enable your waiting staff to easily view, select, and customize the customer’s orders in a way that aligns with your business requirements.


What you’ll need to get started

WooCommerce is the most popular e-commerce platform that you can use to sell just about anything. Whether you’re organizing your online store’s items, creating an online shopping cart, placing orders, or checkout pages, it’s got you covered. It’s a free plugin that can be installed to any WordPress site.

Along with a WordPress website and WooCommerce plugin, you’ll also need the WooCommerce Product Table plugin to turn your normal WooCommerce store into a WooCommerce point of sale product that's highly customizable and functional.

Introducing the WooCommerce Product Table plugin

You need the WooCommerce Product Table plugin to be able to display products in a user-friendly, one-page table layout that’ll also serve as an order form. Your front-of-house staff will be able to use this on any device to take orders.

Your front-of-house staff, waiting staff, or even customers themselves will be able to run a product search, sort, and filter the products they’d like to purchase and place orders. Any point of sale system needs to be fast, and using WooCommerce Product Table ensures there's no waiting around. Your uses will be able to:

  • View and choose product variations or add-on options directly from the order form.
  • Use the quantity selector to purchase more of the same items in one go.
  • Add extra notes about the order. For example, custom monograms or what color crinkle cut paper to include in the gift hamper.
  • Make a note of the customer’s order number which will be directed to the back-end for processing.

How it works

Confirmed orders are automatically sent to your back-end staff via email and are displayed on a computer screen. Additionally, you can pair your WooCommerce POS system with a WooCommerce order printing plugin (we'll recommend one later) that enables you to print out this information as a receipt.

When a customer places an order, they’ll be directed to the purchase page where they can choose the payment method of their choice, including PayPal and credit cards.

Advantages of using WooCommerce Product Table

Using a WooCommerce Product Table plugin enables you to handle variable products. You can quickly find and select the variants that your customers want to purchase using the product table’s search, sort, and filter tools.

And the best part is that all of this works in real time and is responsive across different devices.

How to create a WooCommerce POS point of sale system using WooCommerce Product Table

Once you’ve set up your WordPress site and installed a WooCommerce-ready theme, you can get started creating your own point of sale ordering system. This ordering system will enable your customers to easily add items to their shopping cart, and pay for the cart items using the payment method of their choice at the counter or at the table using an iPad/tablet.

Here, you’ll learn how to create a WooCommerce POS system that consumer-facing stores can use for taking orders. You can follow the steps outlined below from start to finish or jump straight to a specific step:

  1. Add items as WooCommerce products
  2. Install and activate the WooCommerce Product Table plugin
  3. Configure the Product Table settings
  4. Create a one-page WooCommerce POS order form for waiting staff
  5. Simplify the checkout process for staff

Step #1: Add items as WooCommerce products

If you don't already use WooCommerce, you'll need to start by adding your products.

WooCommerce offers built-in tools to help you handle product inventory and store management. Once you’ve installed the WooCommerce plugin, add your store’s items as WooCommerce products. Here’s what you need to do to add new products (including variable products) to your WooCommerce store:

WooCommerce add new product

Go to Products → Add New from the WordPress dashboard and enter the following product details:

  • Name Here you’ll enter the item name that’ll appear in your WooCommerce POS ordering system.
  • Product description Fill in the detailed description of the item in the main text editor.
  • Product data This is where you’ll enter the price, type, attributes, SKU, and variants of the product.
  • Short description Enter a short description of the item if you want.
  • Categories This helps organize your items into categories and keeps all the products nicely arranged in a systematic way. For example, if you were selling clothes, you could create categories like T-shirts, Hoodies, and Accessories.
  • Tags Similar to categories, tags enable your staff to further organize your items, and enables them to locate particular items. For instance, you can create tags like, For Men, For Women, and Baby items.
  • Product image Here you’ll provide your product’s image to display in your order form.
Variable products in WooCommerce

If any of your products don’t have options or choices, simply select the ‘Simple Product type’ in the ‘Product Data’ section. Use ‘Variable Products’ for adding choices. For example, if you’re selling t-shirts, you could add variations for the different available colors (blue, green, gray) or sizes (small, medium, large).

Click on the Publish button. Repeat the same process until you’ve added all of your products to WooCommerce.

Use Product Add-Ons for accepting customer requests

WooCommerce Product Add-Ons Product Table PluginYou can also add text boxes and other fields to your order forms using the Product Options plugin. This is a great addition to robust POS products that aim to deliver a personalized user experience. They enable you to collect additional information from your customers like special requests or preferences. This information will be automatically directed to your back-end staff along with the order.
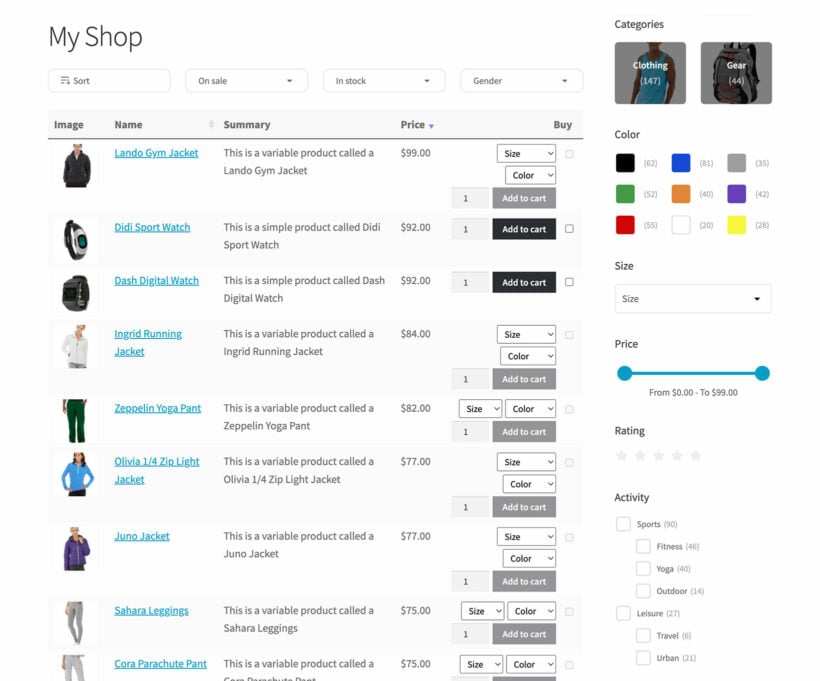
An extra product options plugin gives you more flexibility compared to the product variations. That's because it lets you add checkboxes and various other options.

Step #2: Install and activate the WooCommerce Product Table plugin

Now you’re ready to display your products in one-page WooCommerce POS order form:

  1. Get the WooCommerce Product Table plugin and find your license key from the confirmation email.
  2. Go to Plugins → Add New from the WordPress dashboard and upload the plugin’s zipped file to your site. Click the Activate button.
  3. Navigate to WooCommerce → Settings → Products → Product Table. Copy and paste the license key from the confirmation email into the License Key input field.
Activated license key

Step #3: Configure the Product Table settings

Once you’ve installed and activated the WooCommerce Product Table plugin on your website, head over to its Settings page to configure various options. From here, you can modify the WooCommerce POS order form to make it look the way you want it to appear on the front-end.

3a. Decide which columns you want to display in the product table

As you’re creating an order form to be used by your staff, choose columns that’ll make it easier for them to find exactly what they’re looking for. For starters, display columns for the product’s name, price, and add to cart button. To do this, you can add name, price, buy in the Columns text field.

Product Table columns field

You can also add an image of the product to make it easier for users to identify the product they’re looking for in the order form. This can be done by entering image, name, price, buy in the Columns text box.

Product Table columns field

Similarly, you can add other columns like product’s SKU in your POS order form. This helps staff members easily reference exact items and help your back-end staff find the correct item. Additionally, you can create a stock column to keep your customers updated about product availability. This will also help you monitor stock levels and restock them before they run out (this alone is a huge benefit for your inventory management, and a great reason to use this system). Here’s how it’s done:

Product Table columns field

Here's a complete list of available columns that you can choose to display in your WooCommerce POS order form.

3b. Configure additional settings

There are several options that can be configured from the WooCommerce Product Table’s settings page. Our main goal is to make it easier for users to find products and add them to the shopping cart. For this reason, I’d recommend making the following configurations:

Under the Table content section

Product links option

Enter none in the Product links section. You should do this if your point of sale order system is meant for a business like restaurants or spas, where you don’t need your waiting staff to open up the single product page.

Under the Add to cart column section

WooCommerce Product Table settings

Tick the Quantities checkbox. This enables users to increase the quantity of each product.

If your products have variations, choose Show as dropdown list in the Variations section. This will allow users to view and select different variants of an item.

Under the Table controls section

WooCommerce Product Table settings

Set the Search box option as Above table. This lets customer’s easily search for an item quickly using the product name or SKU.

You can also add relevant filters for information you’ve already added about your products, like categories or tags. This will allow users to quickly find specific types of items. You can do this by setting the Product filters option to Custom and adding categories, tags in the Custom filters option.

Here’s a complete list of filter options you can set for your POS order form. Or even better, you can create even more advanced filtering options by using WooCommerce Product Table alongside the WooCommerce Product Filters plugin.

Step #4: Create a one-page WooCommerce POS order form

By now you’ve set up the WooCommerce Product Table plugin on your WooCommerce website and configured its settings. Next, we’ll create a simple, one-page order form for your users to take orders at the counter or table using a tablet/iPad. To do this, we’ll add the WooCommerce Product Table plugin’s shortcode to the ordering system page:

Head over to Pages → Add New from the WordPress dashboard to create a new page for your WooCommerce order form. Your customers and/or waiting staff will use this one-page order form to select items, add them to the shopping cart, and place the order:

Spa Services POS ordering system in WordPress
  1. Give the new page a title. For example, Spa Services | POS Ordering System.
  2. You can also add an introductory description in the text box.
  3. Create relevant sub-headings (Massages, Facials, or Nail Services) for each section of your order menu.
  4. Add the shortcode [product_table category="category-slug"] under each sub-heading. This will display all your products from the relevant category. And if you want to display products categorized under Massages, add the shortcode [product_table category="massages"].
  5. Publish the page and hit Preview to see how it looks on the front-end.
Preview of front-end POS ordering system in WooCommerce

Step #5: Simplify the checkout process

WooCommerce requires your waiting staff to complete the necessary checkout fields, and click the Place Order button to place a customer's order. This is because WooCommerce is designed to take online customer’s orders, which wouldn’t work for other businesses such as spas and restaurants. We need to make sure there’s an option for waiting staff to take orders on behalf of the customer.

We’ll configure the checkout page to accept payments after placing the order. This will allow your waiting staff to place an order without making the payment. Here’s a quick tutorial explaining how it’s done:

Button for managing payment options
  1. Navigate to WooCommerce → Settings → Payments from the WordPress admin panel.
  2. Pick an offline method Check payments or Cash on delivery. This allows your waiting staff to place the order without actually collecting payment from the customer.
  3. You can rename the payment method or add a relevant description by clicking the Manage button. For example, if you’ve selected ‘Check payments’, then you can rename this to something like ‘Payment required at the end of services’.
  4. Click the Save changes button.
Text fields for display options

Here’s what your checkout page should look like:

WooCommerce default checkout page

WooCommerce has the default option set to ask your waiting staff for the Billing details. You can remove the Billing details fields by using the YITH WooCommerce Checkout Manager plugin. This will also make your checkout process faster for your staff. Another way is to create a shared user account for staff members to use and enter the default billing details for your business. This will auto-populate information for each order, so your staff can ignore this page, and just click the ‘Place order’ button to complete the order.

Bonus tips

By now,  you've learned how to create a one-page point of sale system in WooCommerce. Keep reading for a selection of bonus tips on how to fine-tune the POS order process to suit your organization.

Collect extra information from the customer

You can make it easier for your waiting staff to take POS orders at the table or the counter using an iPad/tablet by adding extra fields to your order form. To do this, you’ll have to add an extra field or two, to help them take note of any additional information. These could include:

  • Customer’s name (great for ensure you retain new customers; you could send this to a CRM or similar)
  • Token or voucher number
  • Customer’s table/room/station/parking spot number

The YITH Checkout Manager plugin lets you add, edit, and remove the fields shown on the WooCommerce checkout page. This makes it the ideal tool for adding an extra field to the checkout form.

Accept payment by credit card

You can let your customers make a credit card payment directly into the WooCommerce POS system by adding an online payment gateway such as Stripe. This allows your customers to add their credit card information directly into the checkout page. I

f you want to be able to scan their card, you’ll need to use a separate card reader and process payment outside of the WooCommerce POS order system. Similarly, you can also leverage barcode scanning options with a barcode scanner (use a plugin such as this to generate barcodes).

Protect your WooCommerce POS system and hide it from public view

You may want to add your WooCommerce POS order system to an existing WooCommerce site. This is an extremely efficient setup, as you'll have all your orders and inventory management in one place. But – you don't want the public being able to use your custom system.

In this case, you’ll have to hide your POS ordering system from public view. It should only be accessible to staff members who take customer orders at the table or from behind the counter.

You can do this by password protecting your page containing the POS ordering system. As a result, only staff members with the correct password will have access to it.

However, your products will still appear on the rest of your website, for instance, in the search results. You can use the WooCommerce Private Store plugin to add extra security which will hide everything related to your WooCommerce order system from public view.

Go to the WooCommerce Private Store plugin settings, and choose the same password you used to protect the ordering system. This enables all your staff members to unlock the ordering page and all other parts of WooCommerce using a single password.

Managing orders

Once you've set up the WooCommerce telephone ordering system, you need to plan how to manage the orders. Next, I'll share some tips on how to adapt the WooCommerce order process to make it easier for staff.

Automatically mark orders as complete

Out of the box, WooCommerce requires users to select payment options and enter payment information before they mark orders as complete. However, this might not suit your specific buying process (for example because you’ll be handling your payments outside of the website - e.g. at the end of the massage services).

The YITH Order Status Control plugin offers functionality that will let you automatically mark all your orders as complete. This way customer orders will be sent straight to the back-end staff without any further manual steps.

Forward orders to the right department and print receipt

You can now automatically send new orders to staff involved in the order process.

There are two default ways for back-end staff to view new orders:

  1. WooCommerce will automatically send new orders to the email address given in the settings.
  2. If they’ve access to WordPress admin, they can keep the WooCommerce orders page open and refresh it regularly to view new orders.

Alternatively, there are two easy plugins that improve the order notifications:

Automatically print new orders

Print out new orders automatically by pairing the WooCommerce-based ordering system with a GPRS printer. This will ensure that all customer orders are instantly printed for your back-end staff as soon as they’re placed.

Depending on the store setup, you can either print the receipt to give to the customer, or print the receipt for immediate processing by another team. You do this with the Bizprint plugin.

Send new orders to different email addresses

Use the WooCommerce Multiple Email Recipients plugin to send order notifications to different email addresses, depending on which product or category has been ordered. This is a huge time-saver if different departments are responsible for processing different types of product.

Set up your own WooCommerce POS ordering system

Setting up an efficient (and accurate) POS ordering system for customers and staff is simple and easy.

The WooCommerce and WooCommerce Product Table plugins together enable you to create a searchable, sortable, and customizable point of sale order form for your business. A point of sale for WooCommerce system makes it easy for your staff members to take orders at the counter or table using different devices (including mobile devices) like iPads or Android tablets/phones.

You can upgrade your existing ordering system by pairing it with some of the useful WordPress plugins we mentioned in this post.

What are some of the features you look for in a WooCommerce POS ordering system to make it easier for customers and staff members to place orders using an iPad/tablet? Let us know by commenting below!