WooCommerce product bundles

By the end of this article, you will have a clear understanding of how to create product bundles for your WooCommerce store, using the Woocommerce product bundles feature.

When using WooCommerce for your online store, you may have noticed that each product is treated individually by default, with no built-in option for customers to purchase multiple products together as a bundle. This can be a major issue if you want to offer product bundles in your store.

However, there is no need to worry! In this comprehensive guide, we'll show you how to create WooCommerce product bundles for your store using three different methods. By the end of this guide, you'll have a good understanding of the various methods available to bundle your products, and you'll be able to choose the one that works best for your store.

Creating WooCommerce product bundles might seem overwhelming, but with our guidance and professional advice, you can create attractive bundles that enhance your customers' shopping experience. Crafting WooCommerce product bundles is a great way that can aid in achieving your business goals.

So, let's dive in and learn how to bundle your WooCommerce products using our tutorial.

How to create product bundles for your WooCommerce store

There are 3 different ways to create WooCommerce product bundles:

  1. WooCommerce Product TableLet customers create their own bundle by listing products individually so that they can mix and match. Perfect for complete flexibility. Setup instructions →
  2. WooCommerce Product BundlesSell fixed regular price product bundles. Perfect for pre-defined bundles. Setup instructions →
  3. WooCommerce Bulk VariationsCreate one product for each bundle you want to upsell and add a range of variations so that customers can choose the items they require. Perfect for converting individual products into a create-your-own bundle. Setup instructions →

And the best part is that we’ll also show you how to set up each method step-by-step. It’s super quick and easy and there’s absolutely no technical knowledge needed to follow this tutorial. You can start selling WooCommerce product bundles today!

What are the benefits of a product bundle in WooCommerce?

WooCommerce product bundles offer several benefits for both online store owners and customers. Here are some of the advantages:

  1. Increased sales: Bundling products together can encourage customers to purchase more items and cross-sells for the store.
  2. Higher average order value: Since bundles typically offer a discount, customers may be more likely to spend more on the bundle than they would on individual items.
  3. Improved customer experience: Bundles can provide a more convenient shopping experience for customers by grouping related products together and subscription products in one place.
  4. Cost-effective marketing: Product bundles can be a cost-effective marketing tool for online stores by promoting products together instead of individually.
  5. Greater flexibility: WooCommerce product bundles offer greater flexibility in terms of the types of products that can be bundled together, and the pricing, coupons, and discount options available.
  6. Easy inventory management: By bundling products together, inventory management can be simplified and streamlined., reducing the likelihood of out-of-stock or overstocking.

What type of products can be bundled together?

The types of products that can be bundled together in WooCommerce are quite diverse and largely depend on the nature of the online store and the products it offers. Here are some examples of product bundles that are commonly used:

  1. Complementary products: Products that are related to or complement each other, such as a coffee machine and a pack of coffee pods.
  2. Accessories and main products: Accessories that are designed to be used with a main product, such as a phone case and a smartphone.
  3. Multiple variations of the same product: Different variations of a product that are bundled together, such as a set of different colored markers.
  4. Seasonal products: Products that are typically used during a specific season or event, such as a bundle of winter clothing or holiday decorations.
  5. Products from the same brand: Products from the same brand can be bundled together to promote brand loyalty or encourage customers to try new products.
  6. Starter kits: A bundle of products that provides customers with everything they need to get started with a particular hobby or activity, such as a yoga starter kit or a cooking bundle.

These are just a few examples of the types of products that can be bundled together in WooCommerce. The possibilities are virtually endless, and WooCommerce product bundles can be tailored to the specific needs and preferences of an online store's customer base.

WooCommerce product bundles use cases

As an online store owner, there are tons of ways you can benefit from creating WooCommerce product bundles plugin for your e-commerce store.

Selling bundled products

Here are some use-case scenarios for which you might consider creating bundles:

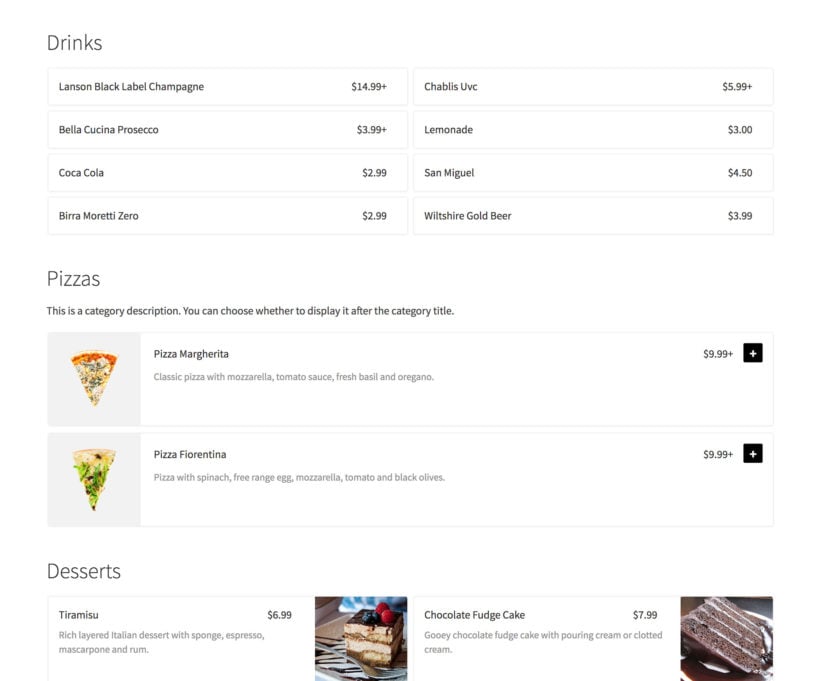
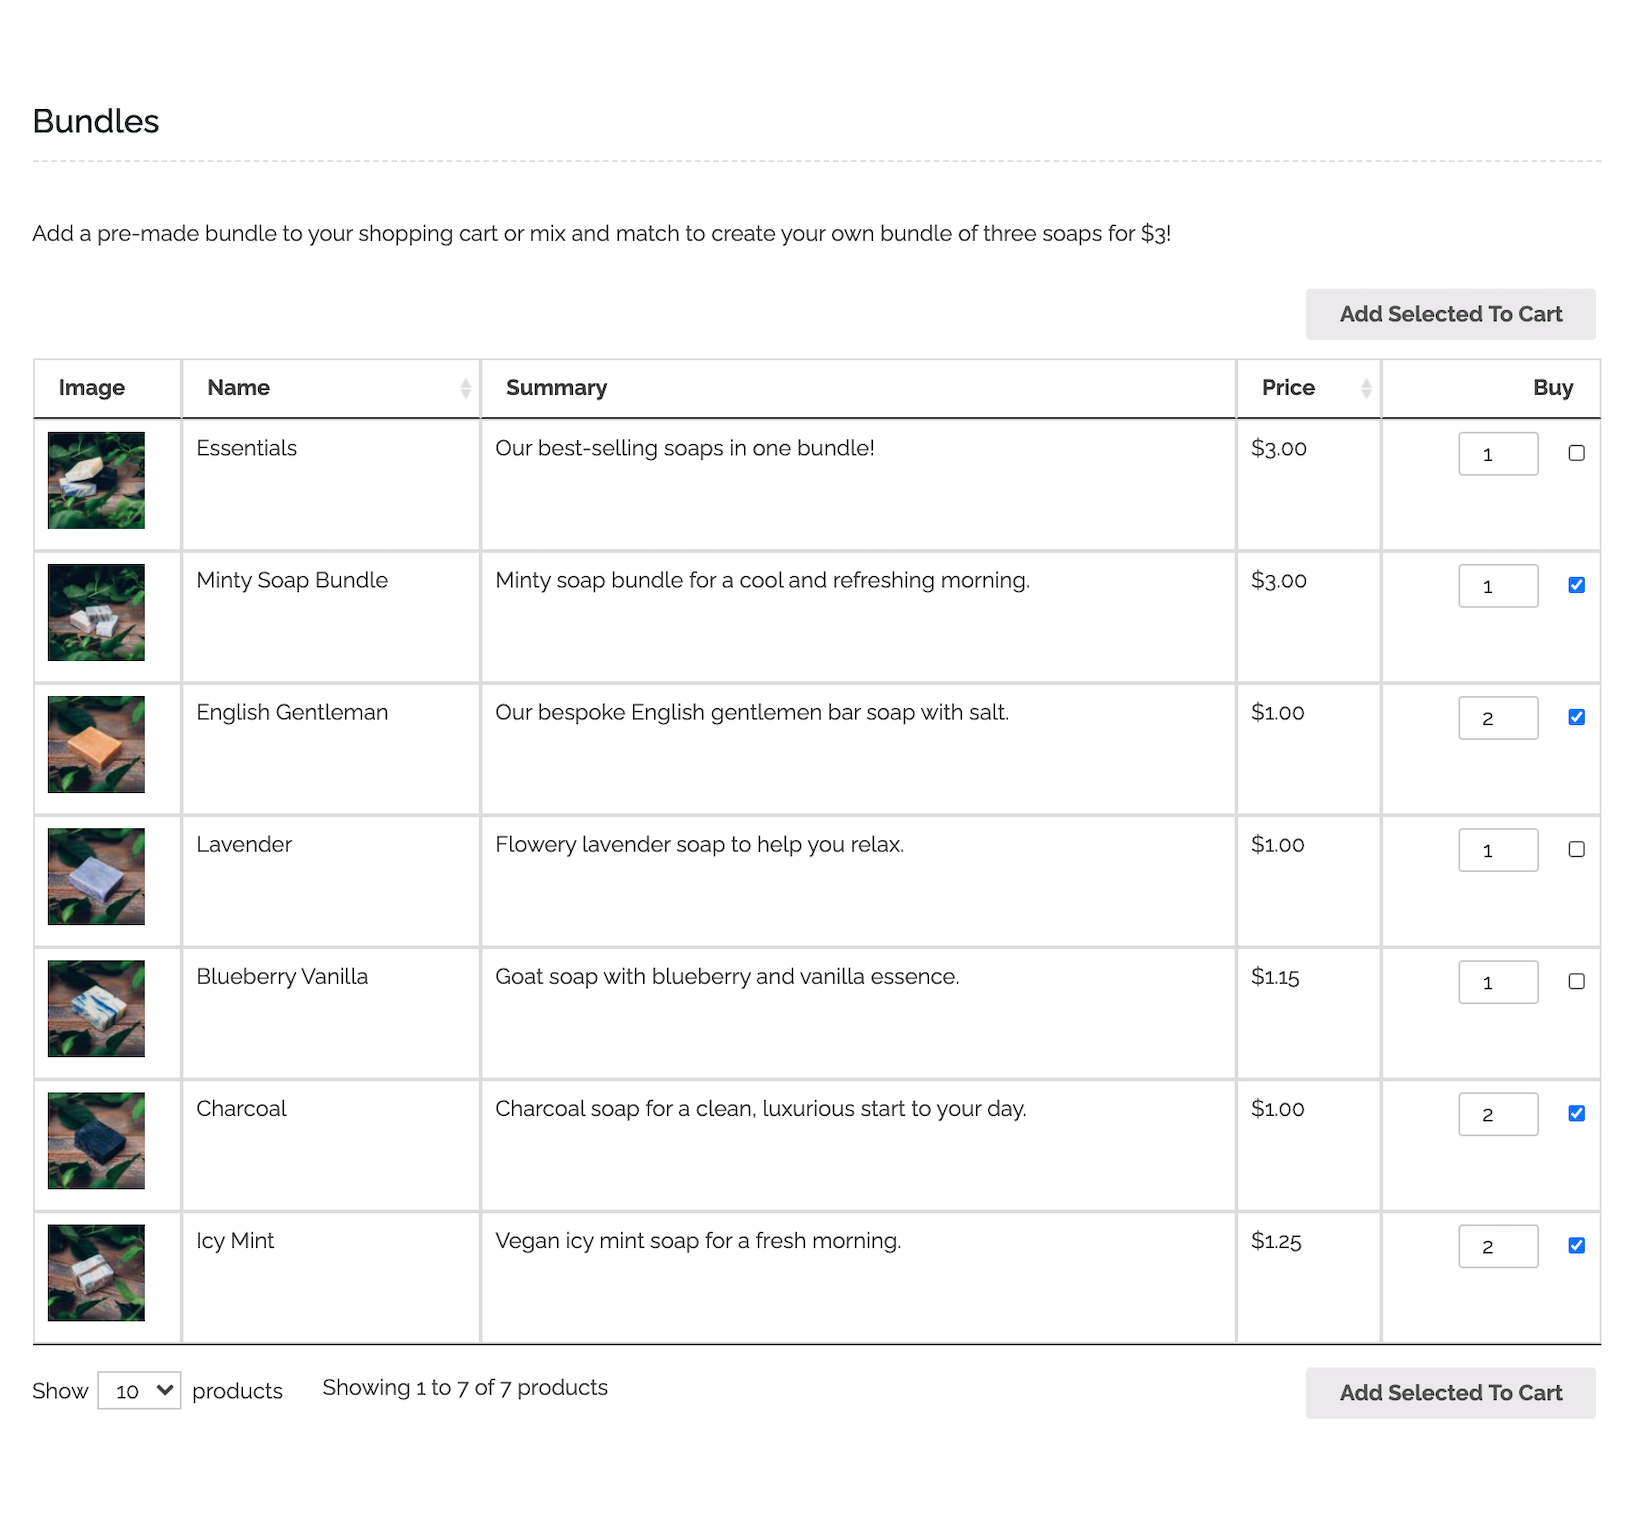
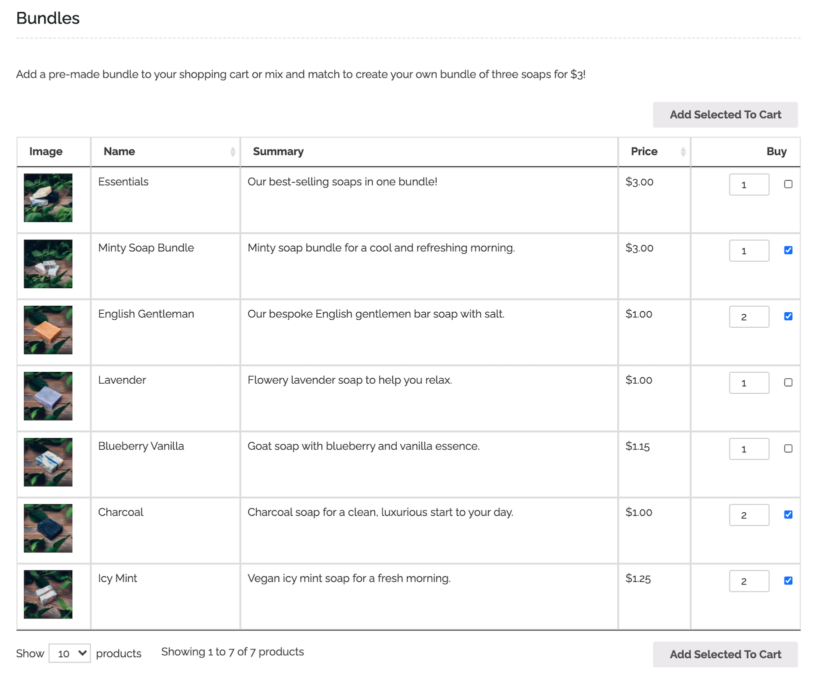
  1. Artisan soaps, lotions, and balms.  With the WooCommerce Product Table plugin, handmade product sellers like those offering soaps, lotions, and balms can create a front-end table layout that lists all their products. For example, you can bundle three soaps and one lotion for $2.50 with a single artisan soap sold for $1, allowing customers to choose which ones to include in their custom product bundle before proceeding to the checkout page.
  2. Sports gear. You can sell related products (like sports gear) in product kits or grouped products using the WooCommerce Product Bundles plugin. For example, you can create a fixed-price product bundle that contains two badminton rackets, two bags, and four nylon shuttlecocks sold at $55.99.
  3. Candies, teas, and coffees. If you want to give customers the option to mix and match their own WooCommerce combo offers, you can use WooCommerce Bulk Variations to create a single product bundle and list the different items as product variations. For example, you can create a Bundle of Candies product and list a variety of candies as variations to let customers pick and choose the ones they want to purchase.

Of course, there are tons of different ways to use the WooCommerce product bundles plugin with variations depending on the product types you sell. For example, the WooCommerce Product Table plugin is perfect for selling downloadable products and composite products, as well.

By now, you know the 3 ways for creating WooCommerce product bundles and should have chosen which method is best for you. Next, here’s how you can set up each bundle type:

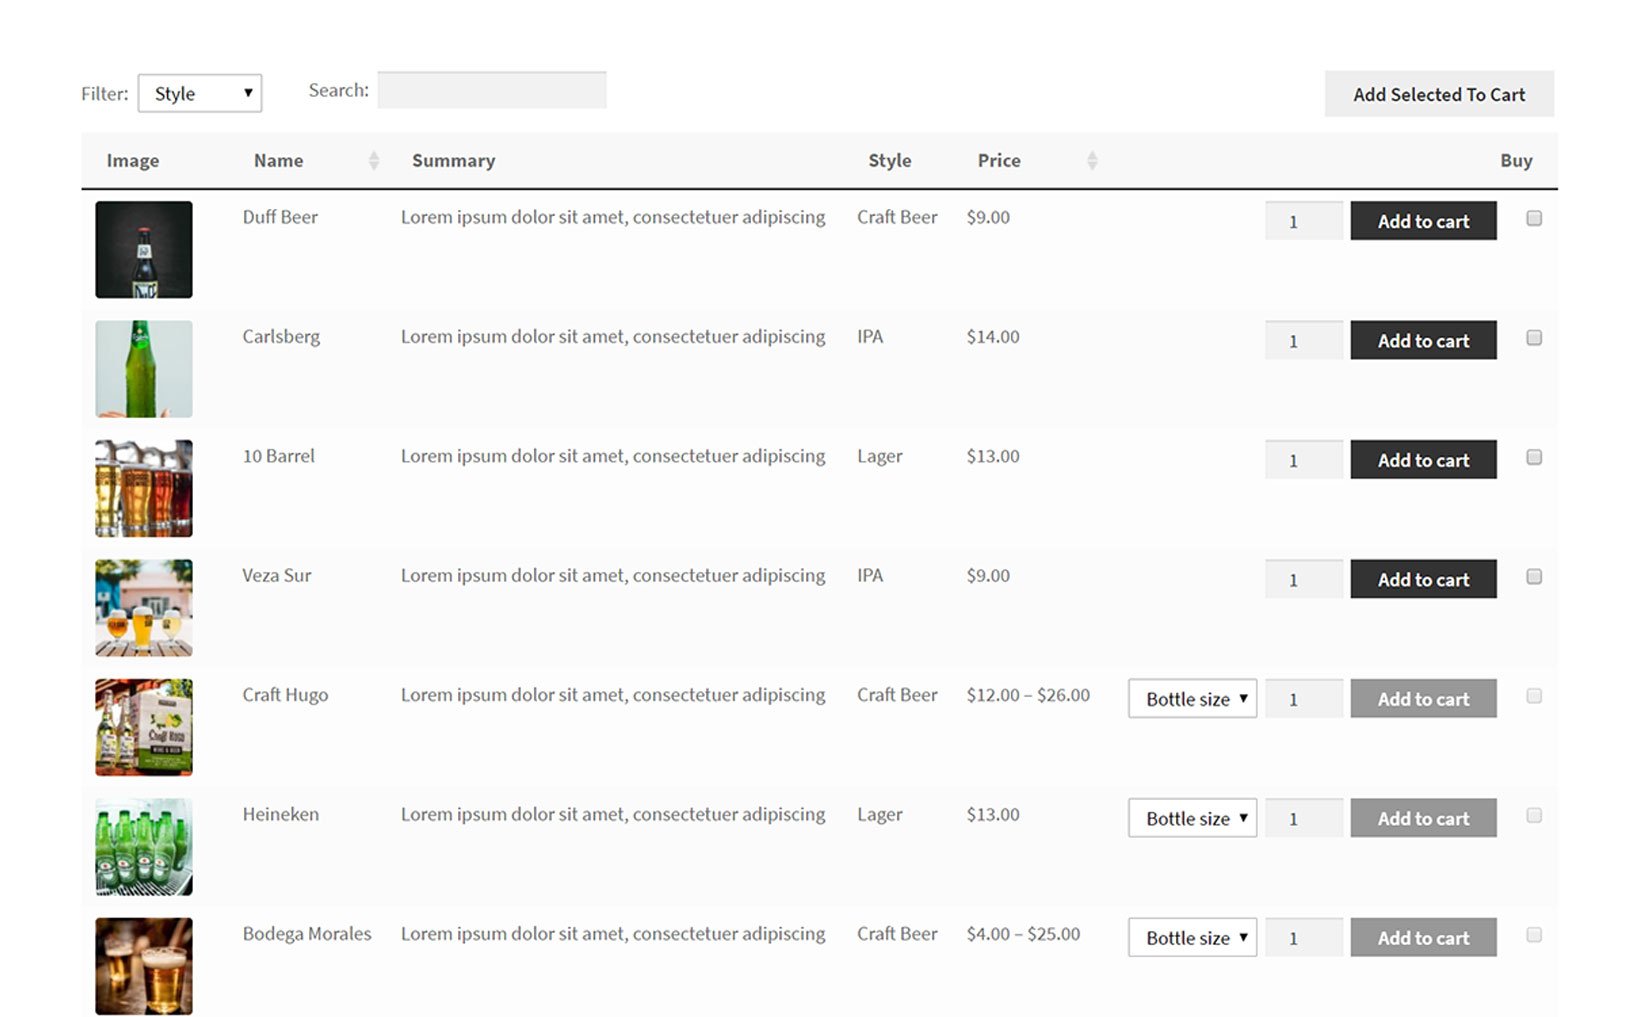
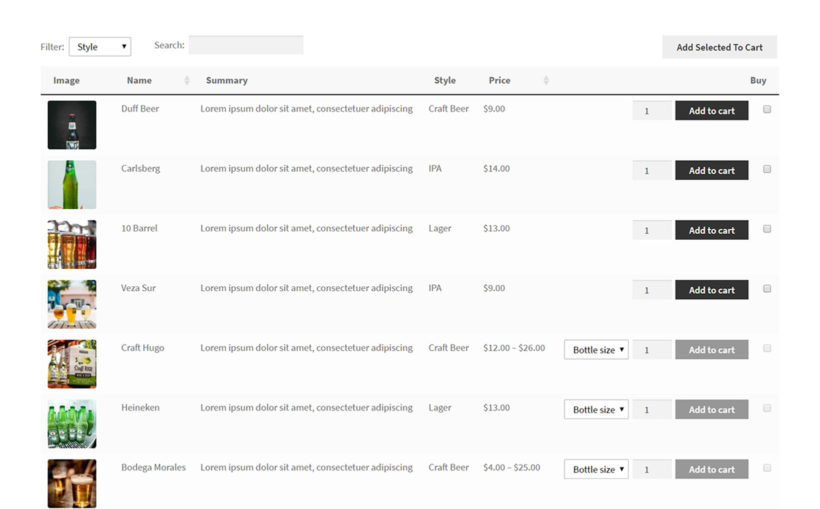
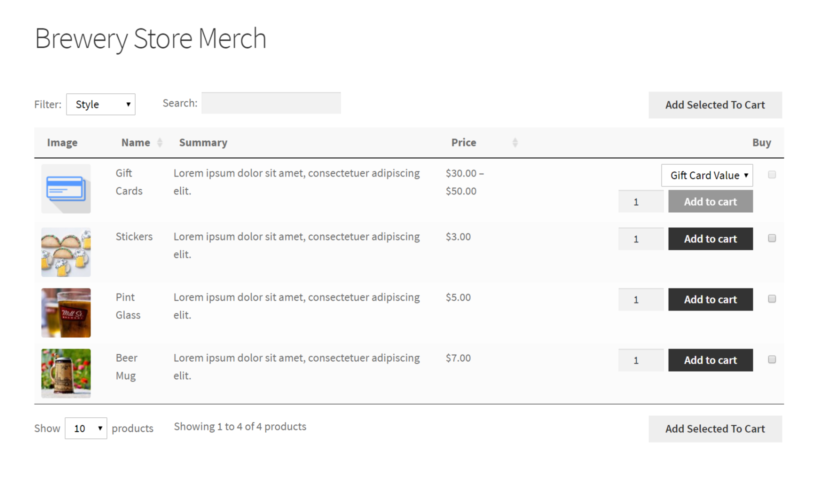
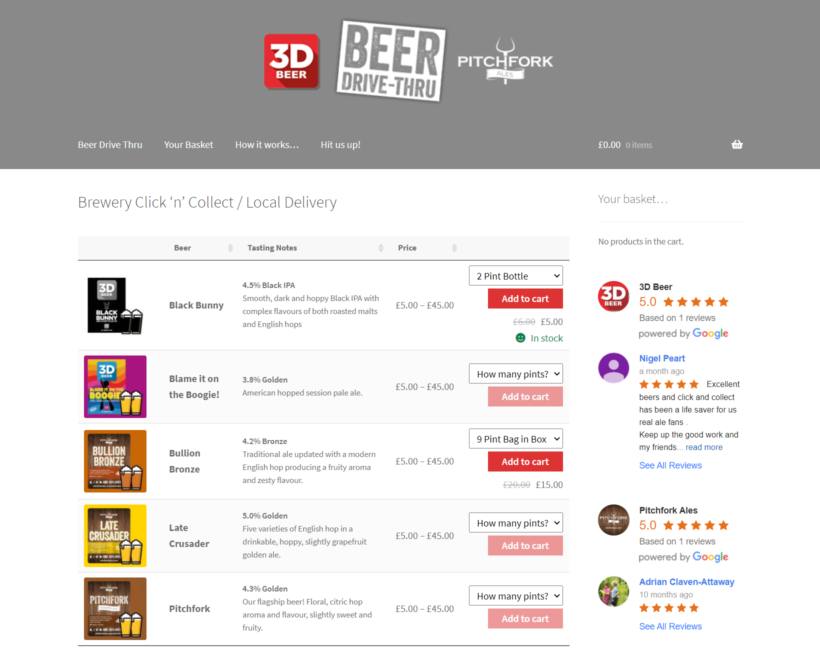
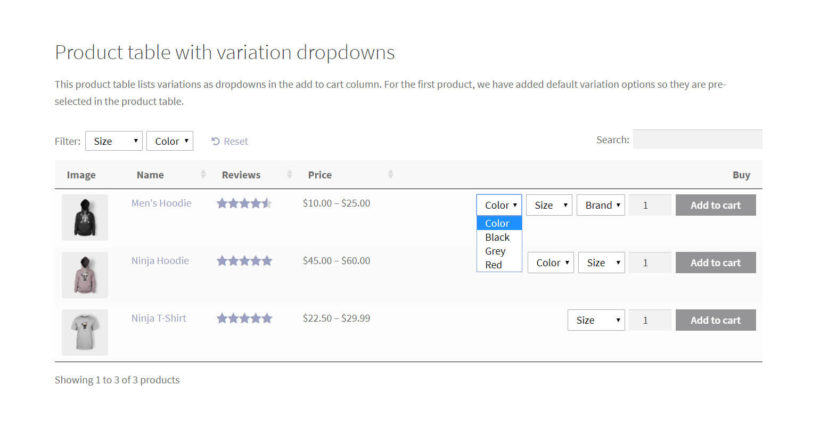
Method 1: Create 'Build Your Own' bundles with WooCommerce Product Table

WooCommerce product bundles in product table

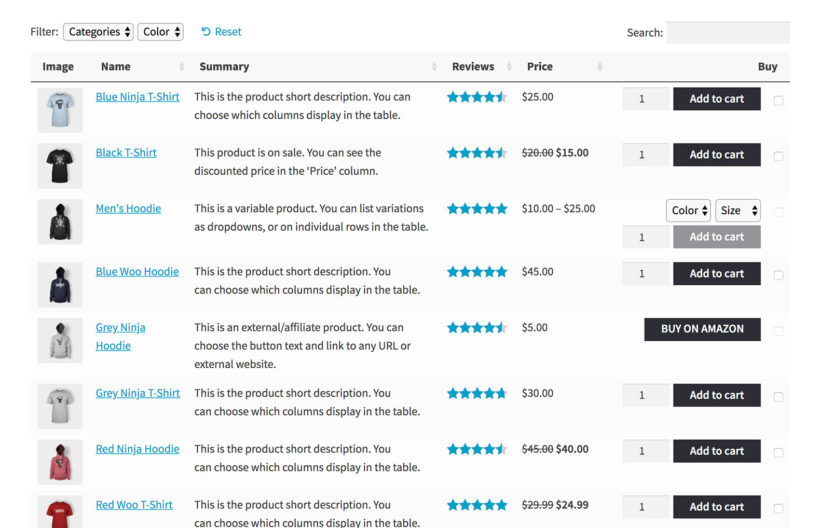
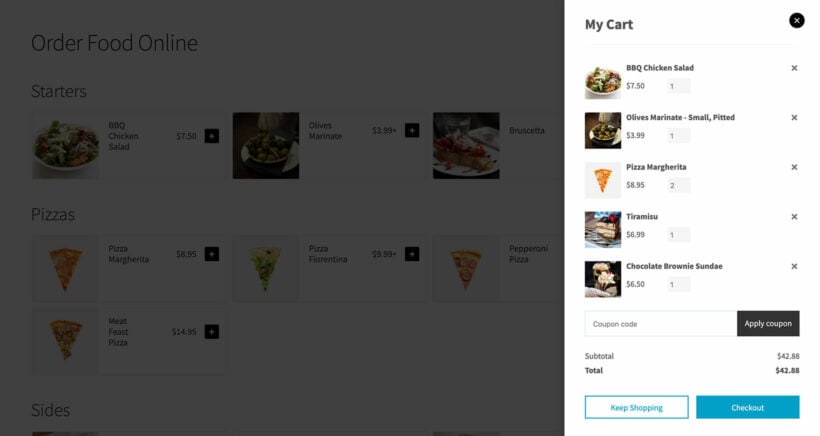
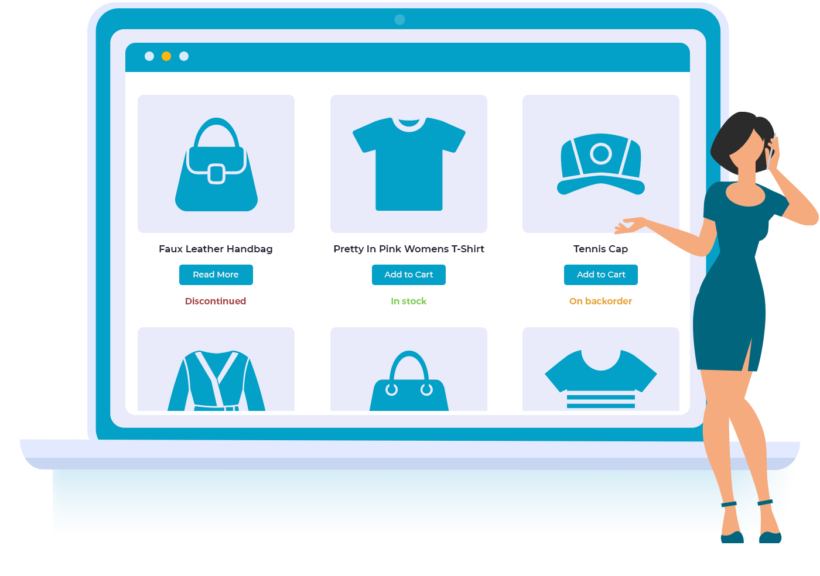
If you sell a variety of products and want to give customers the option to choose which ones they’d like to add to their product bundle, we recommend using the WooCommerce Product Table plugin.

This is the best option if you want a flexible way to suggest product bundlings while allowing customers to choose which products to order and in which quantities.

Setup instructions

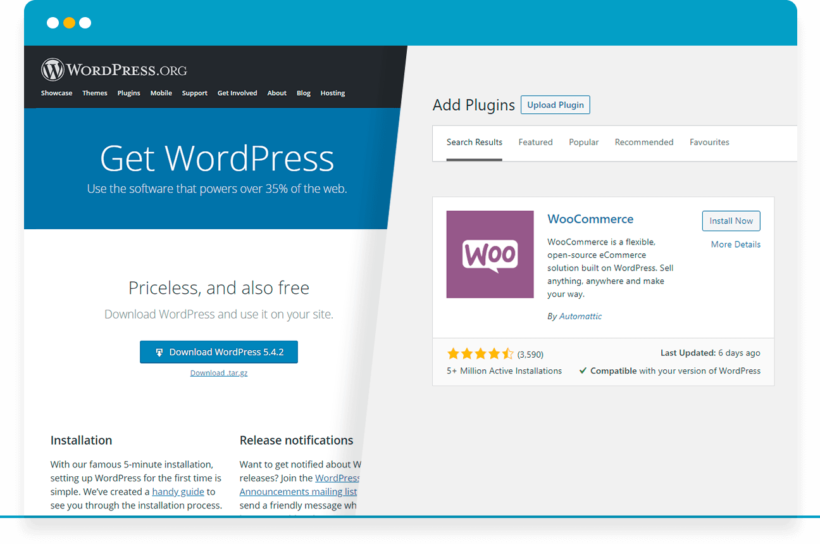
  1. Get the WooCommerce Product Table plugin and install and activate it on your WordPress site.
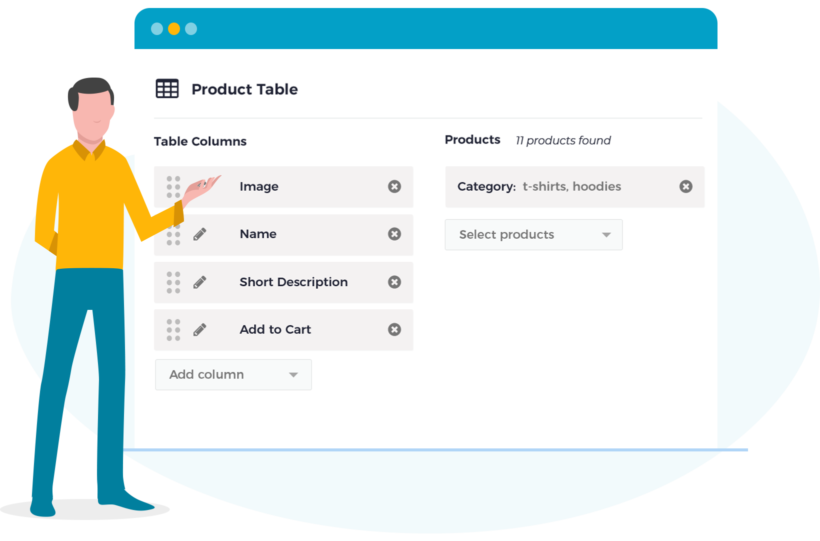
  2. Head over to ProductsProduct Tables → Add New to create your first list of product bundles. I recommend the following configuration:
    • Select the option to "Add to a page using a block or shortcode".
      Create page of table builder
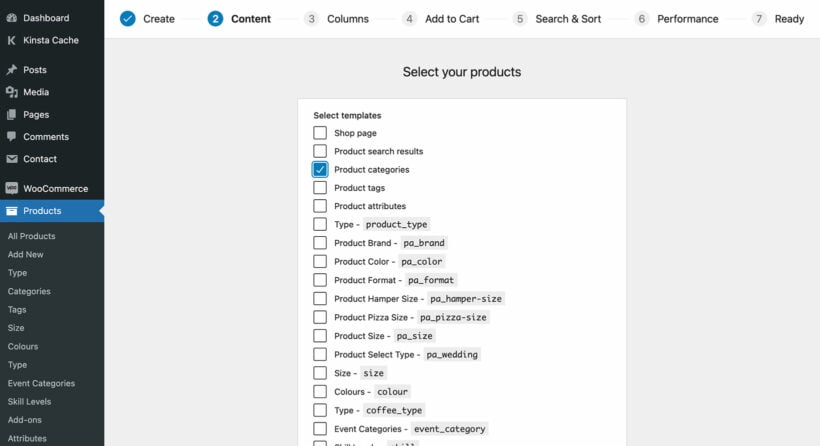
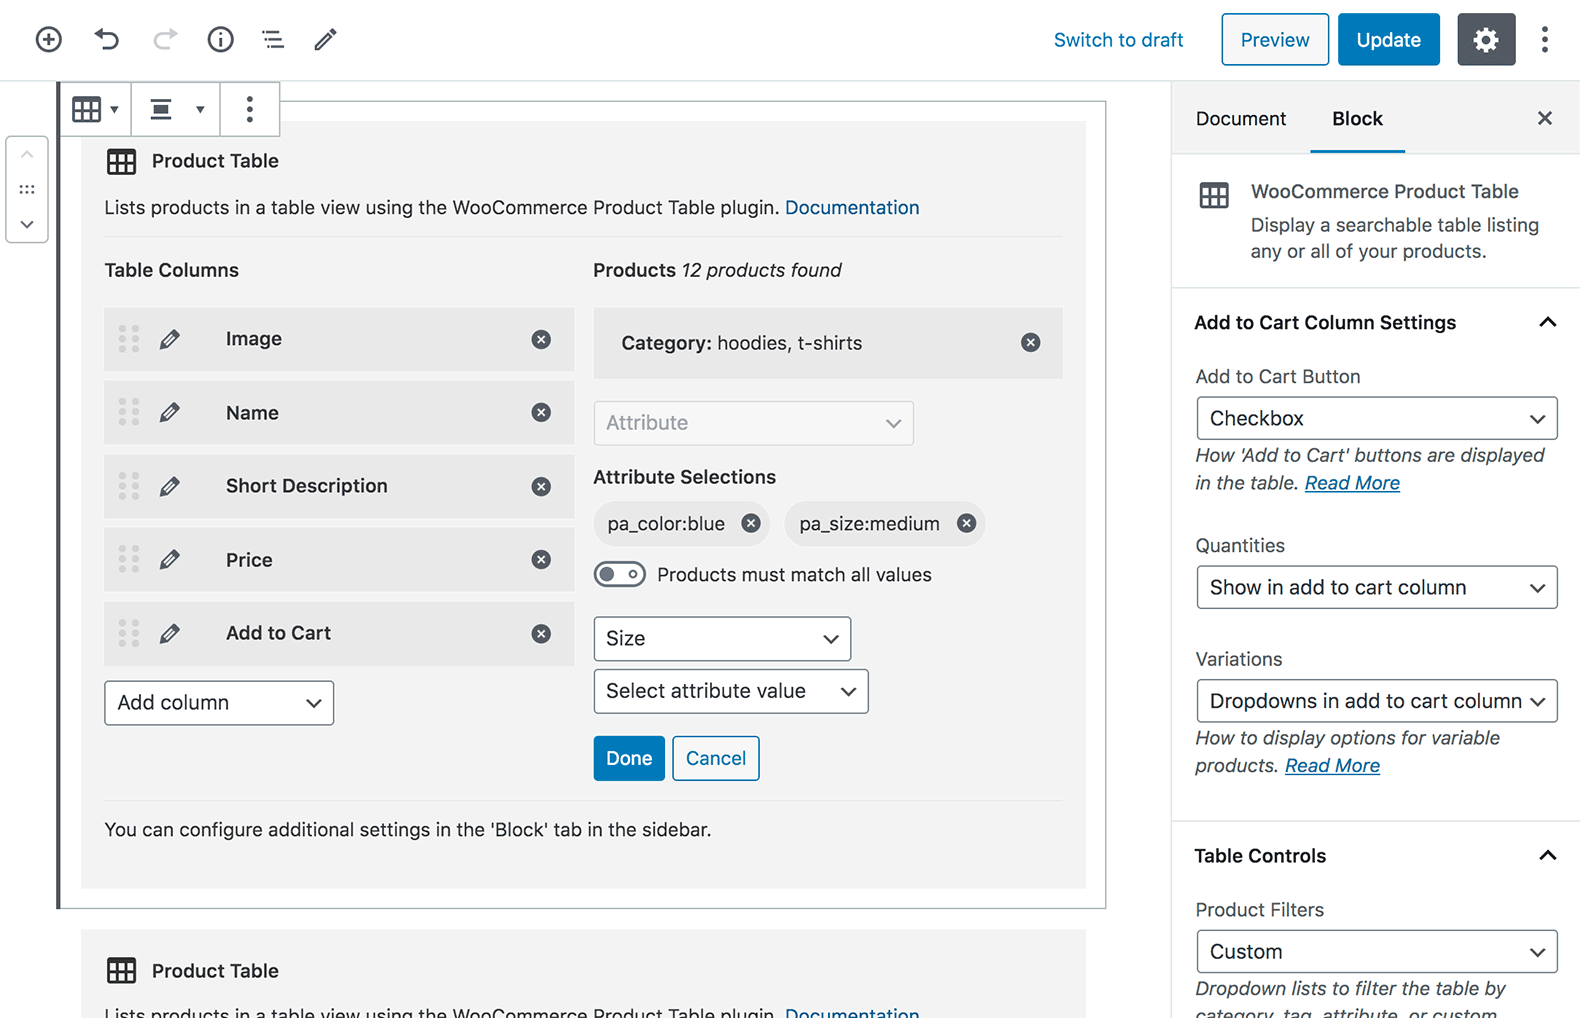
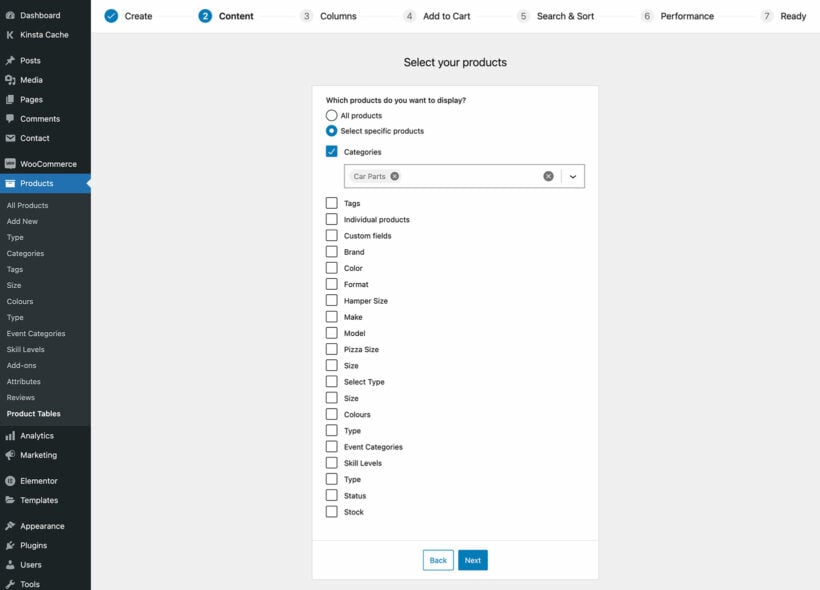
    • Select which products to display in the bundle. For example, you can select individual products, or select them by category or tag. (Tip: If you'll be presenting the bundle options in multiple tables on the same page, then it's probably best to create a separate table listing products from each category. For now, just select the products that will appear in the first section of the bundle.)
      Select products page of table builder
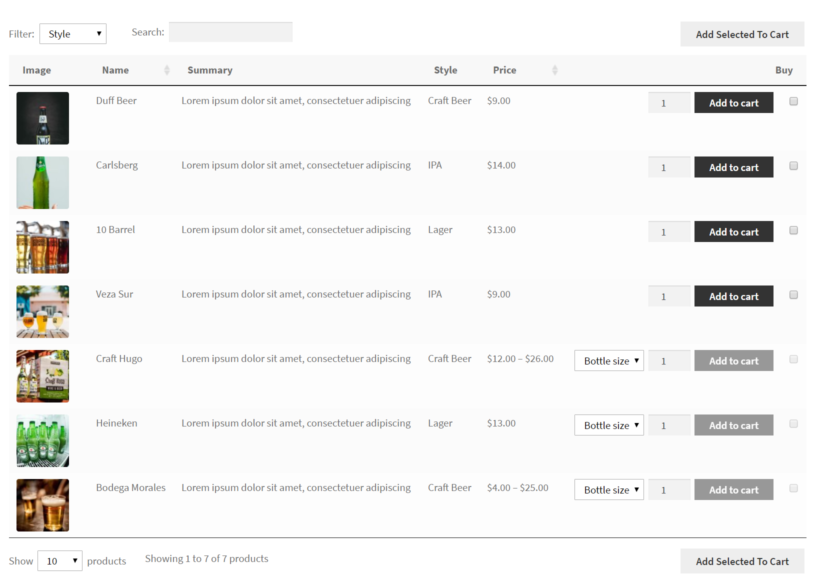
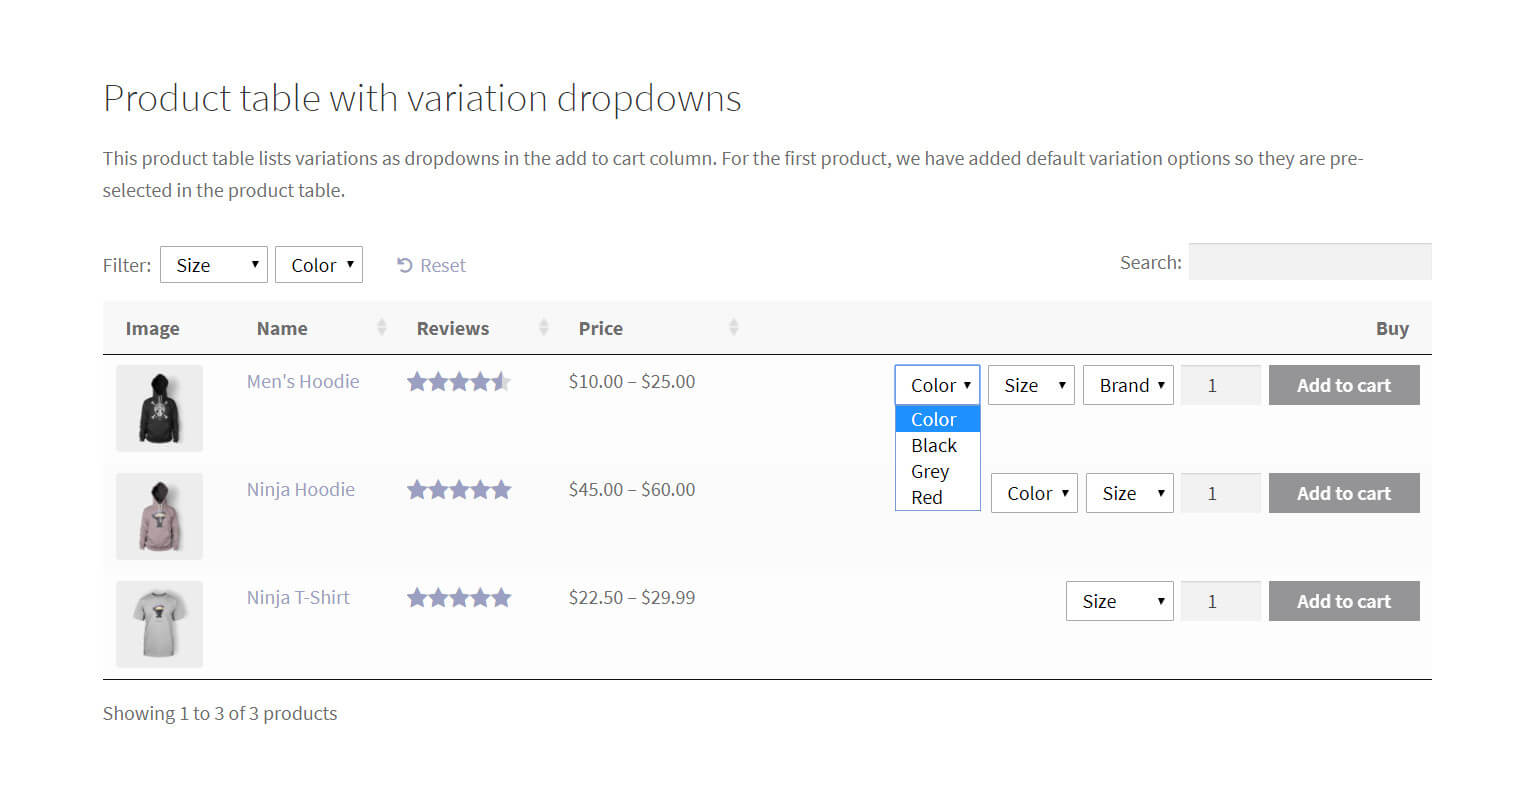
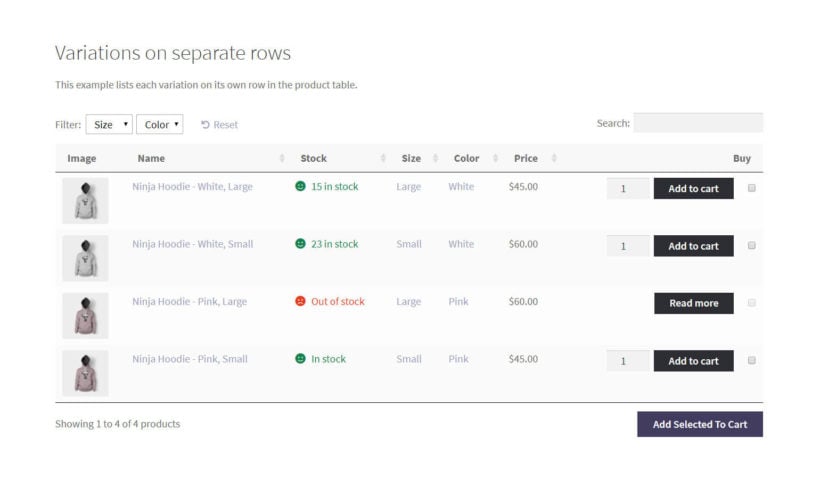
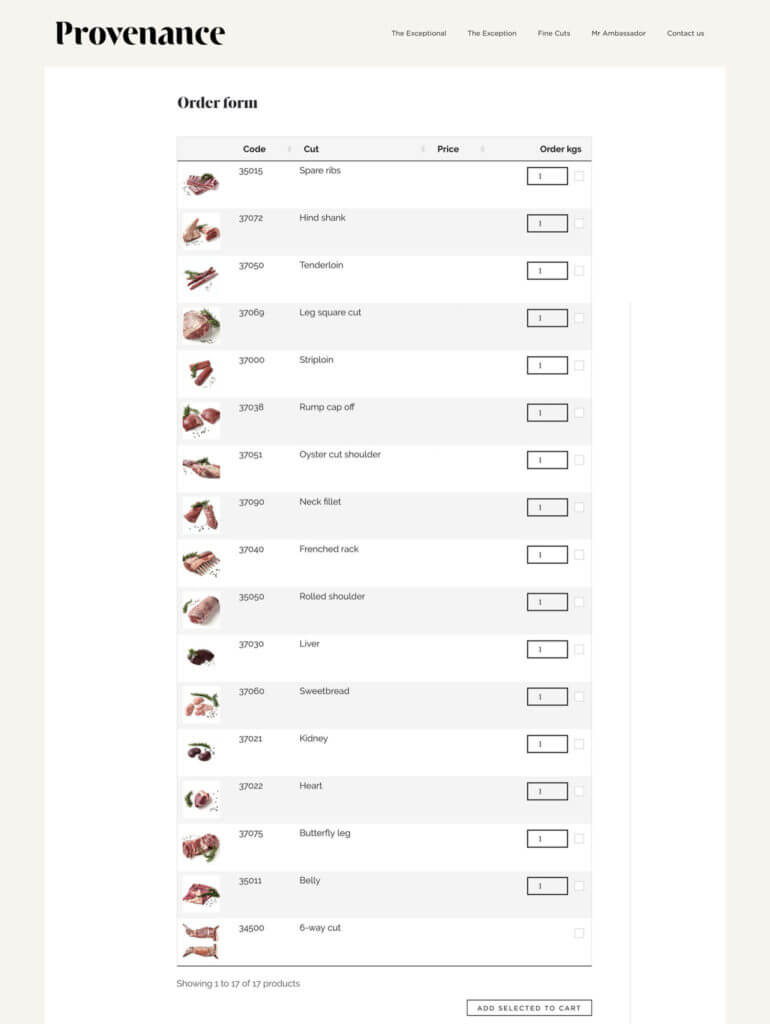
    • On the 'Add to cart' page, I recommend using the checkbox add to cart button style. This lets customers multi-select products to build their bundle. If the bundle includes any variable products then you should either choose the 'Dropdown' style, or 'Show variations on their own row' if you want to list variations separately as if they were individual products.
      Add to cart page of WooCommerce product table builder
    • The last page of the table builder provides a shortcode for inserting the table. Copy this if you're not using the Gutenberg block editor.
    • Repeat the above steps (selecting different products) if you will be listing the product bundle in multiple tables on the same page.
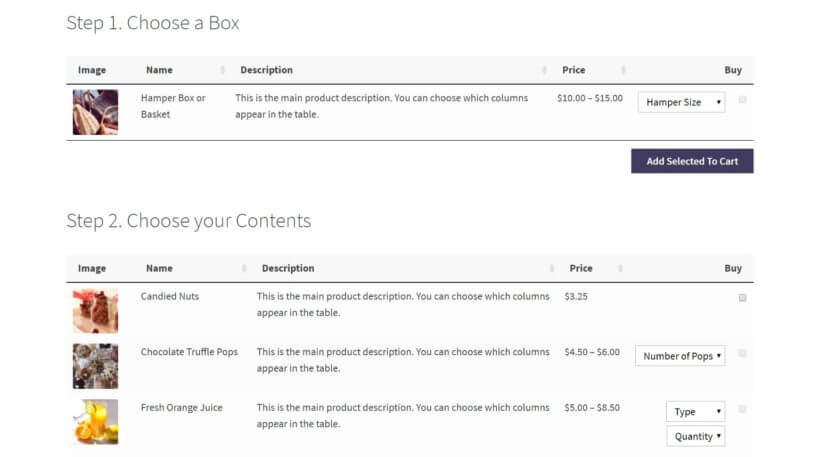
    • Now create a new page and either add all your product table shortcodes to it, or insert each one using a 'Product Table' Gutenberg block. Add a heading between each table as required. This should walk customers through a logical step-by-step process to creating WooCommerce product bundles.
An example of a build-your-own-product page.

Method 2: Sell fixed price bundles with WooCommerce Product Bundles

WooCommerce Product Bundles plugin on the front-end

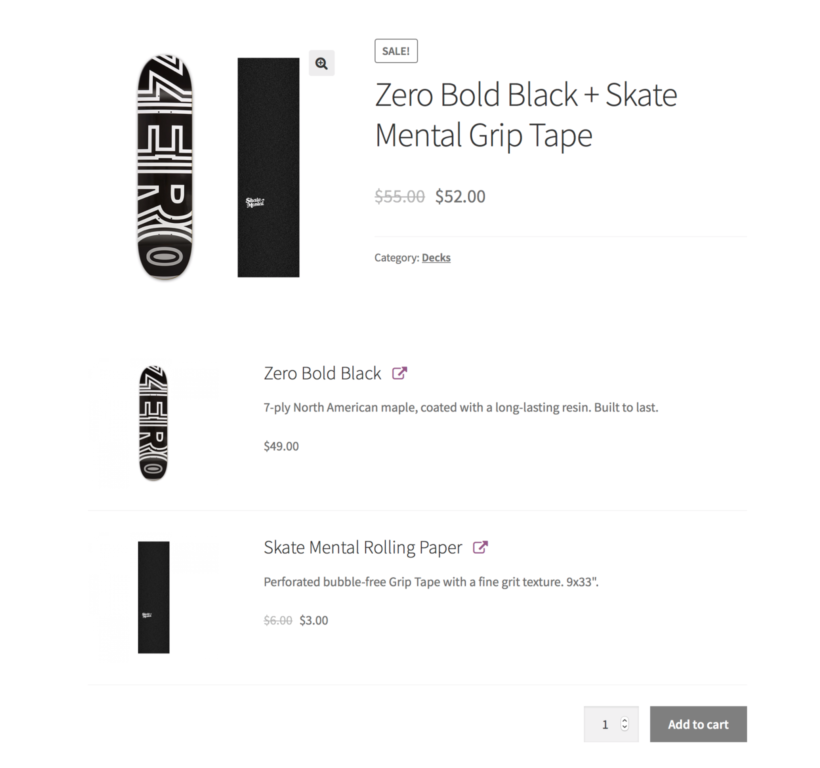
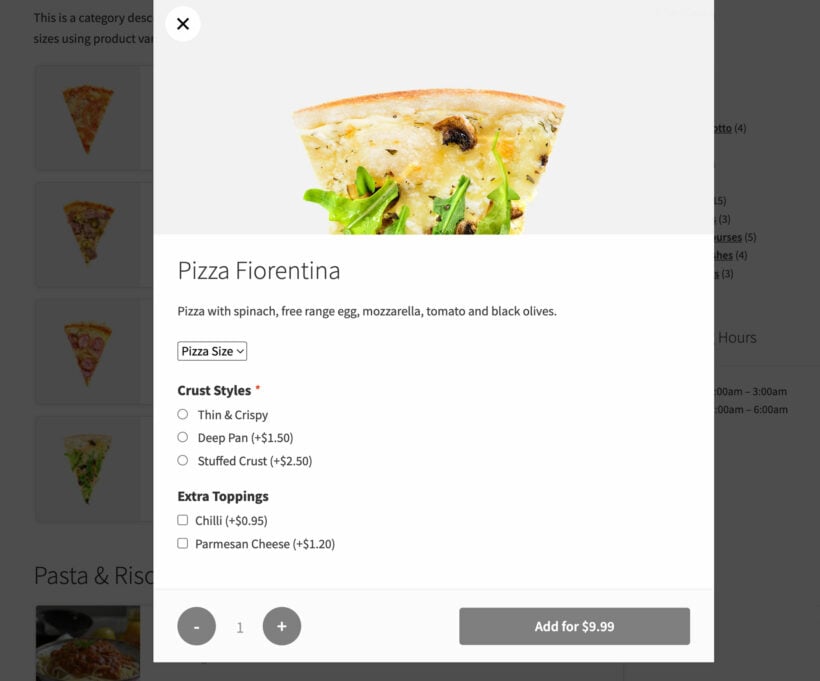
The Product Bundles WooCommerce add-on lets you display bundles of multiple WooCommerce product bundles with variations on a single product page.

There are two ways to sell product bundles: with one add-to-cart button for a fixed price or with separate prices and quantity boxes for each product in the bundle. The first option is recommended if you want to offer a fixed selection of products for a fixed price.

This is particularly useful for more expensive WooCommerce product bundles with variations like tech products (e.g. laptops with accessories), furniture (e.g. mattresses with bed sheets and pillows), or sports gear (e.g. ping pong table, rackets, and ping pong balls).

Setup instructions

  1. Get the WooCommerce Product Bundles plugin and install it on your site.
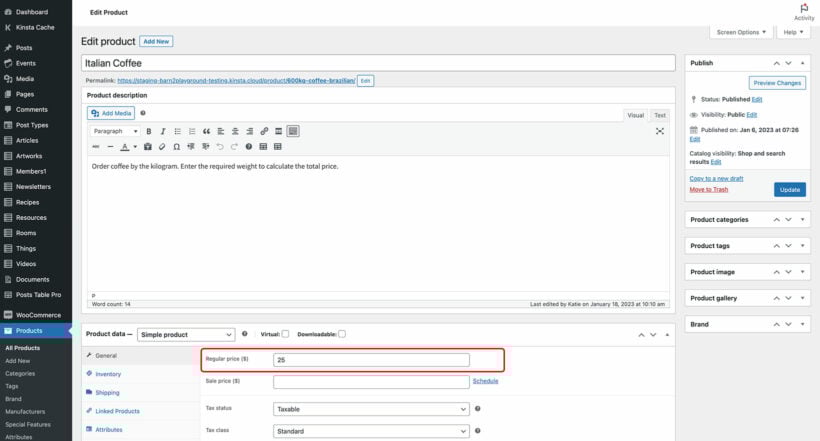
  2. Create a new product. This will be your product bundle.
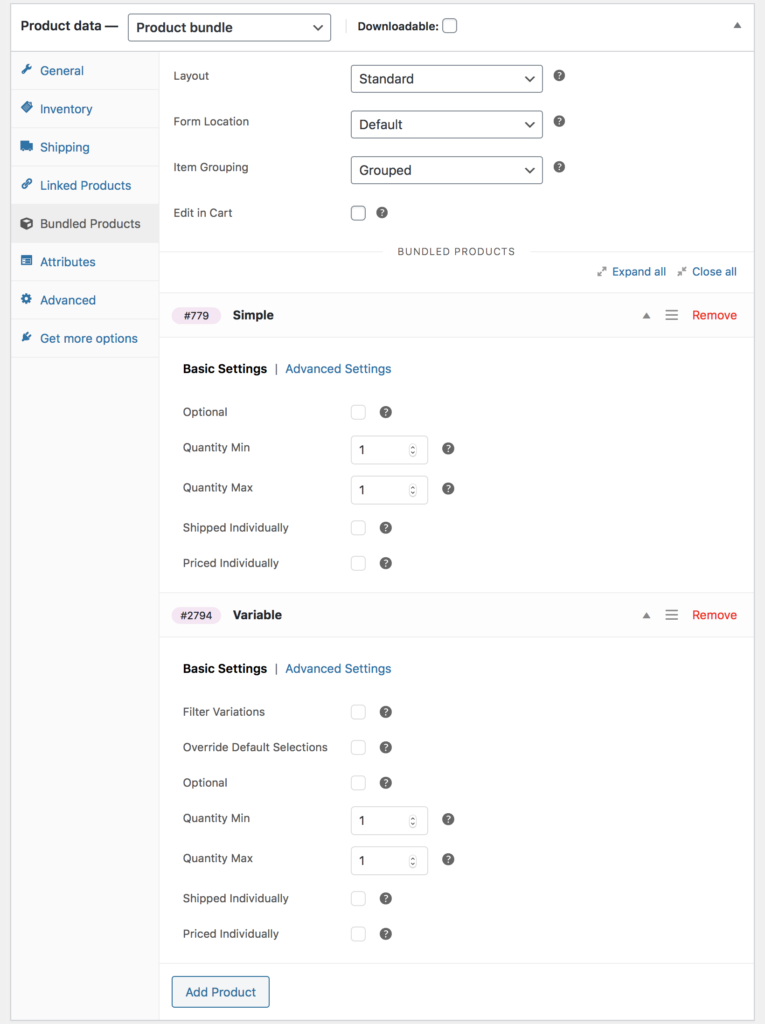
  3. Scroll down to the Product data section and use the dropdown to select the Product bundle option.
  4. Click on the Bundled Products tab to configure the WooCommerce bundled product options.
WooCommerce Product Bundles settings

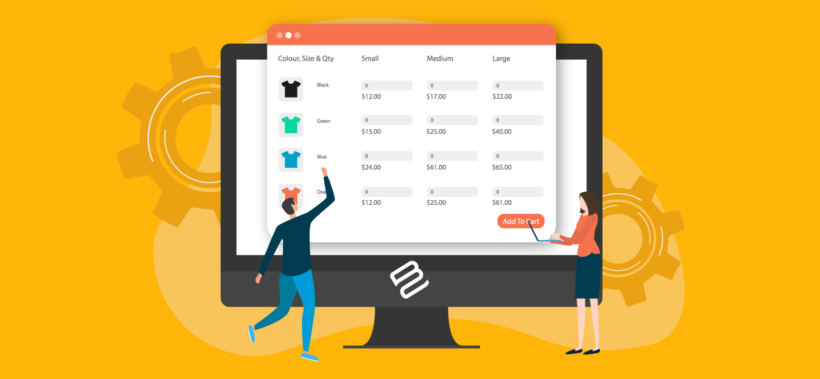
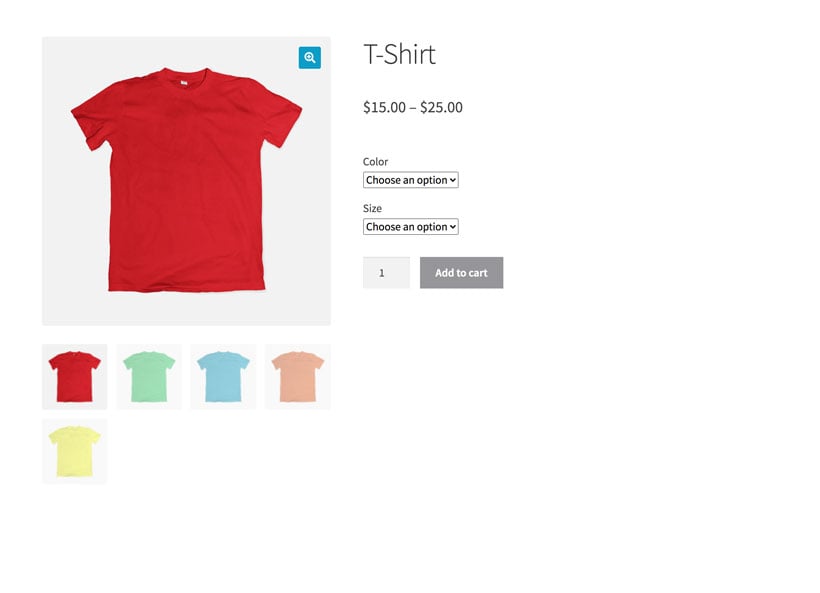
Method 3: Let customers pick and choose product variations to create their own bundle

WooCommerce Bulk Variations matrix preview

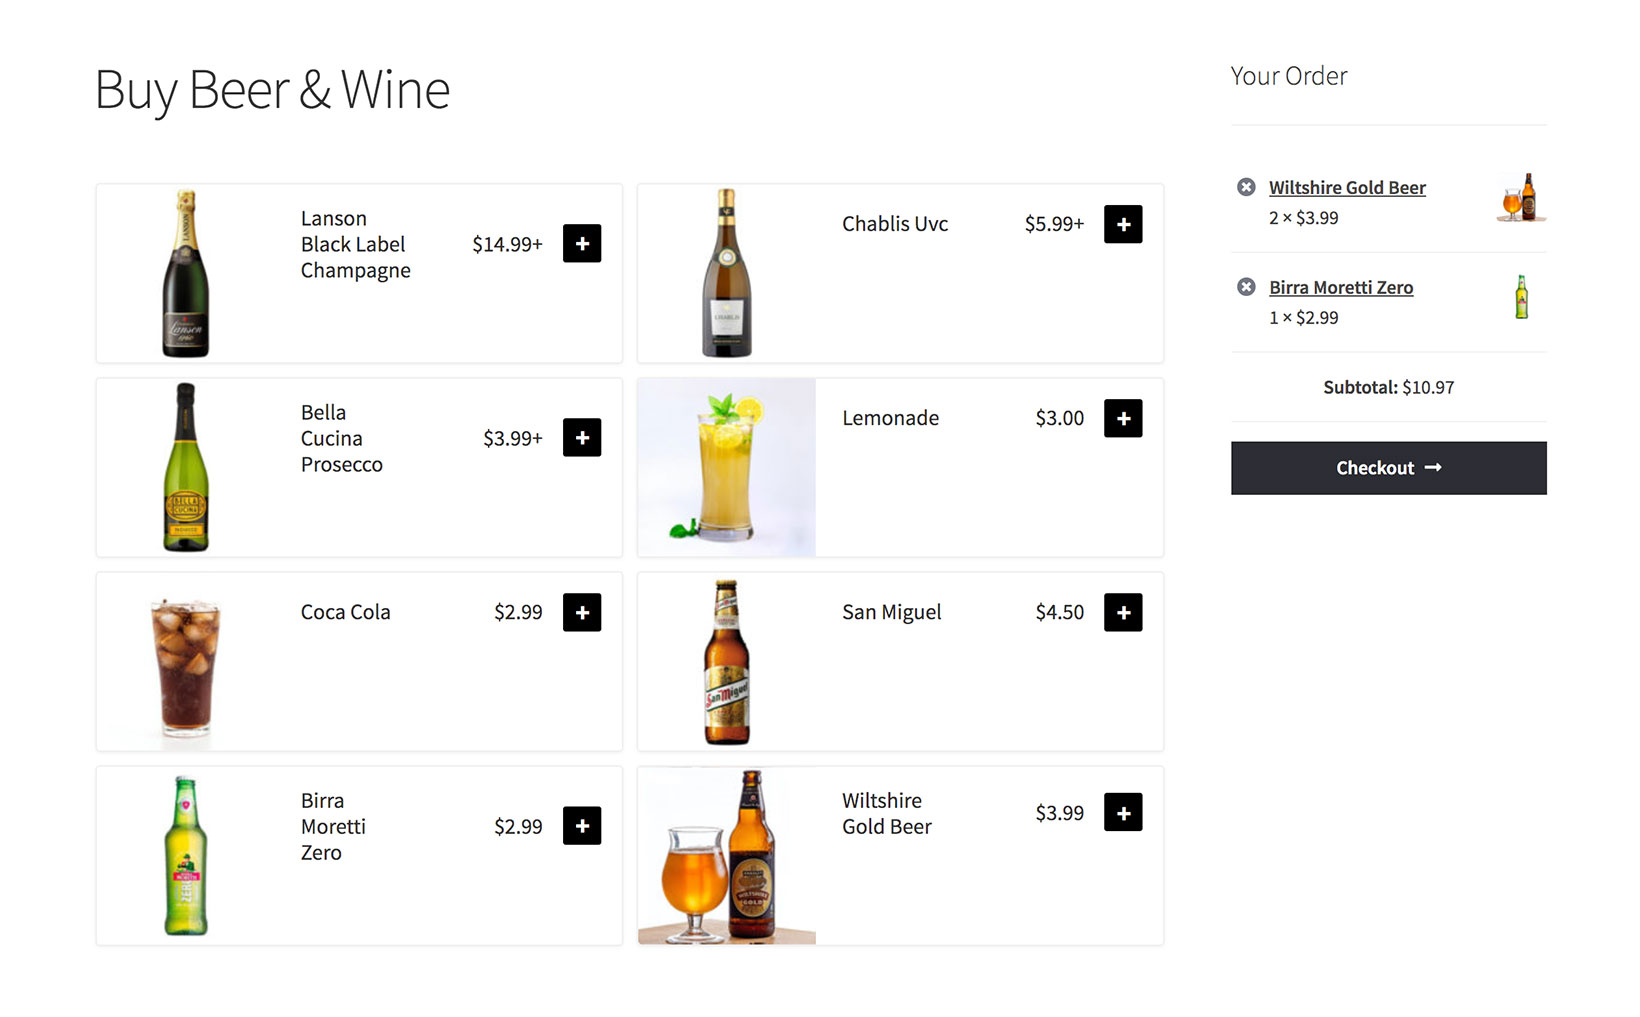
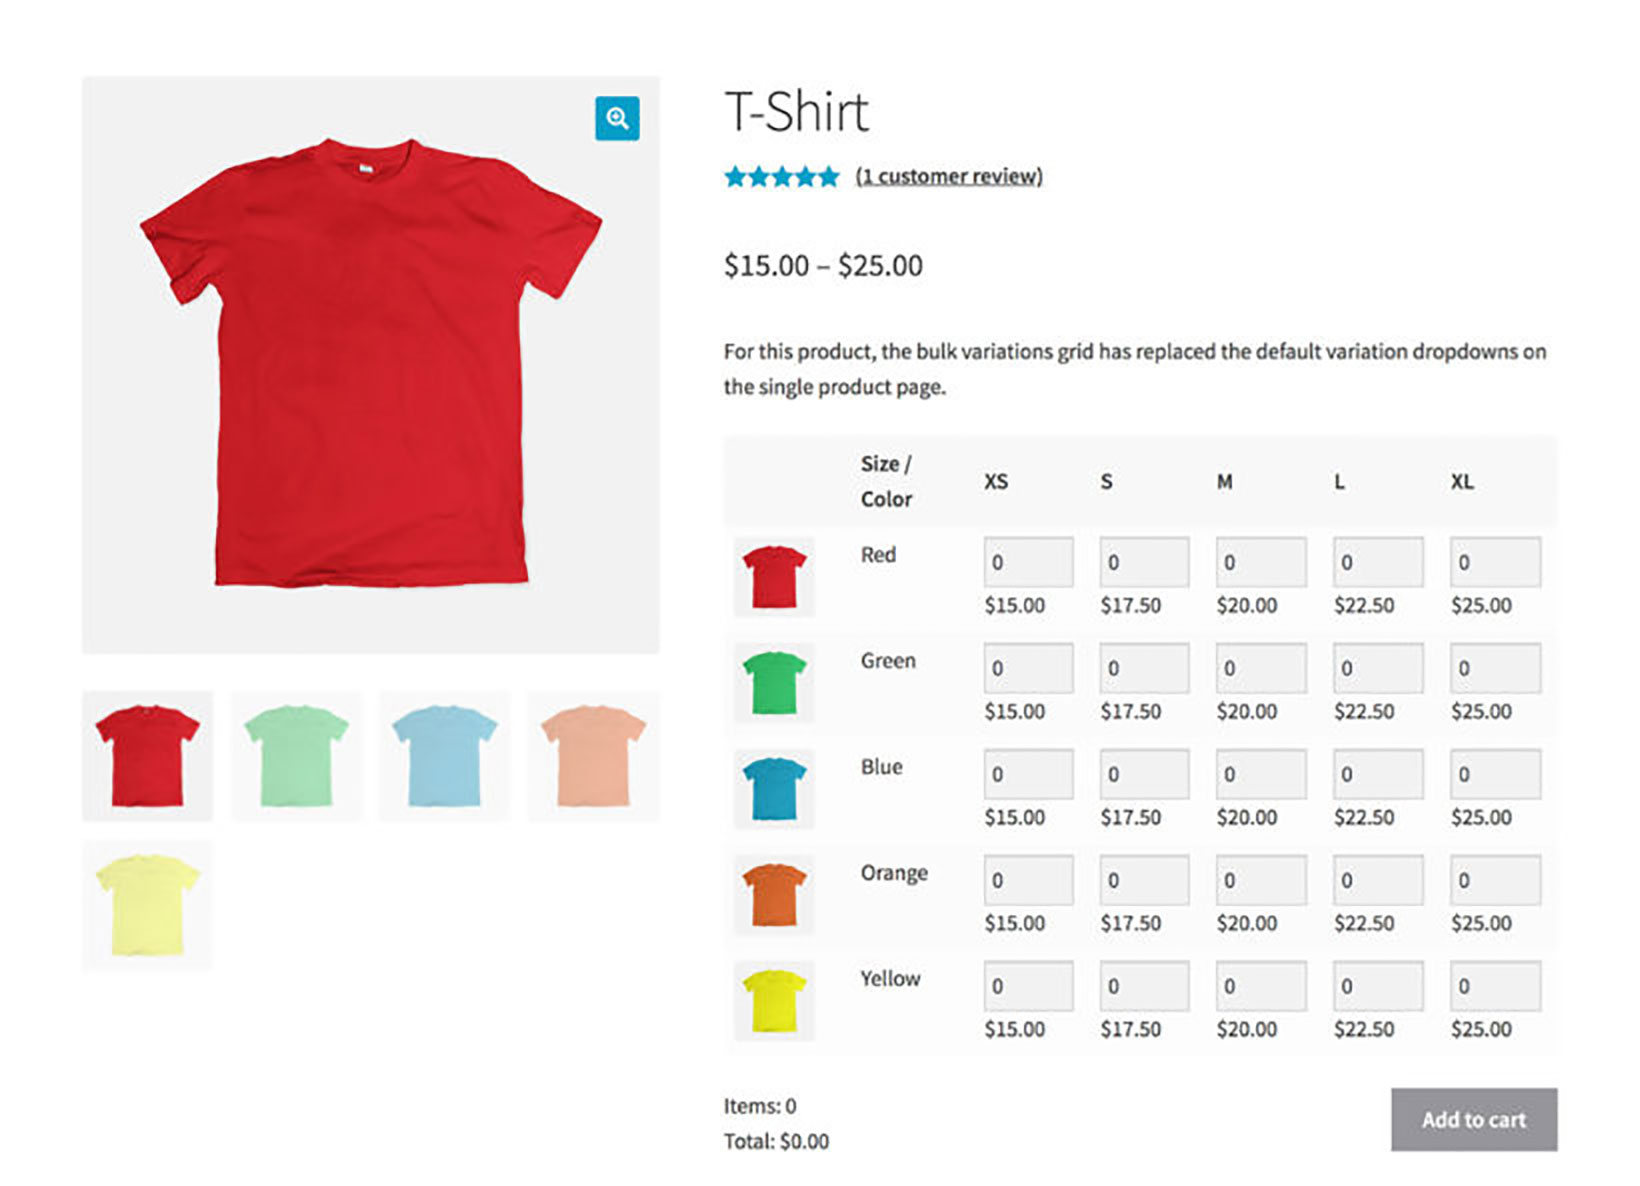
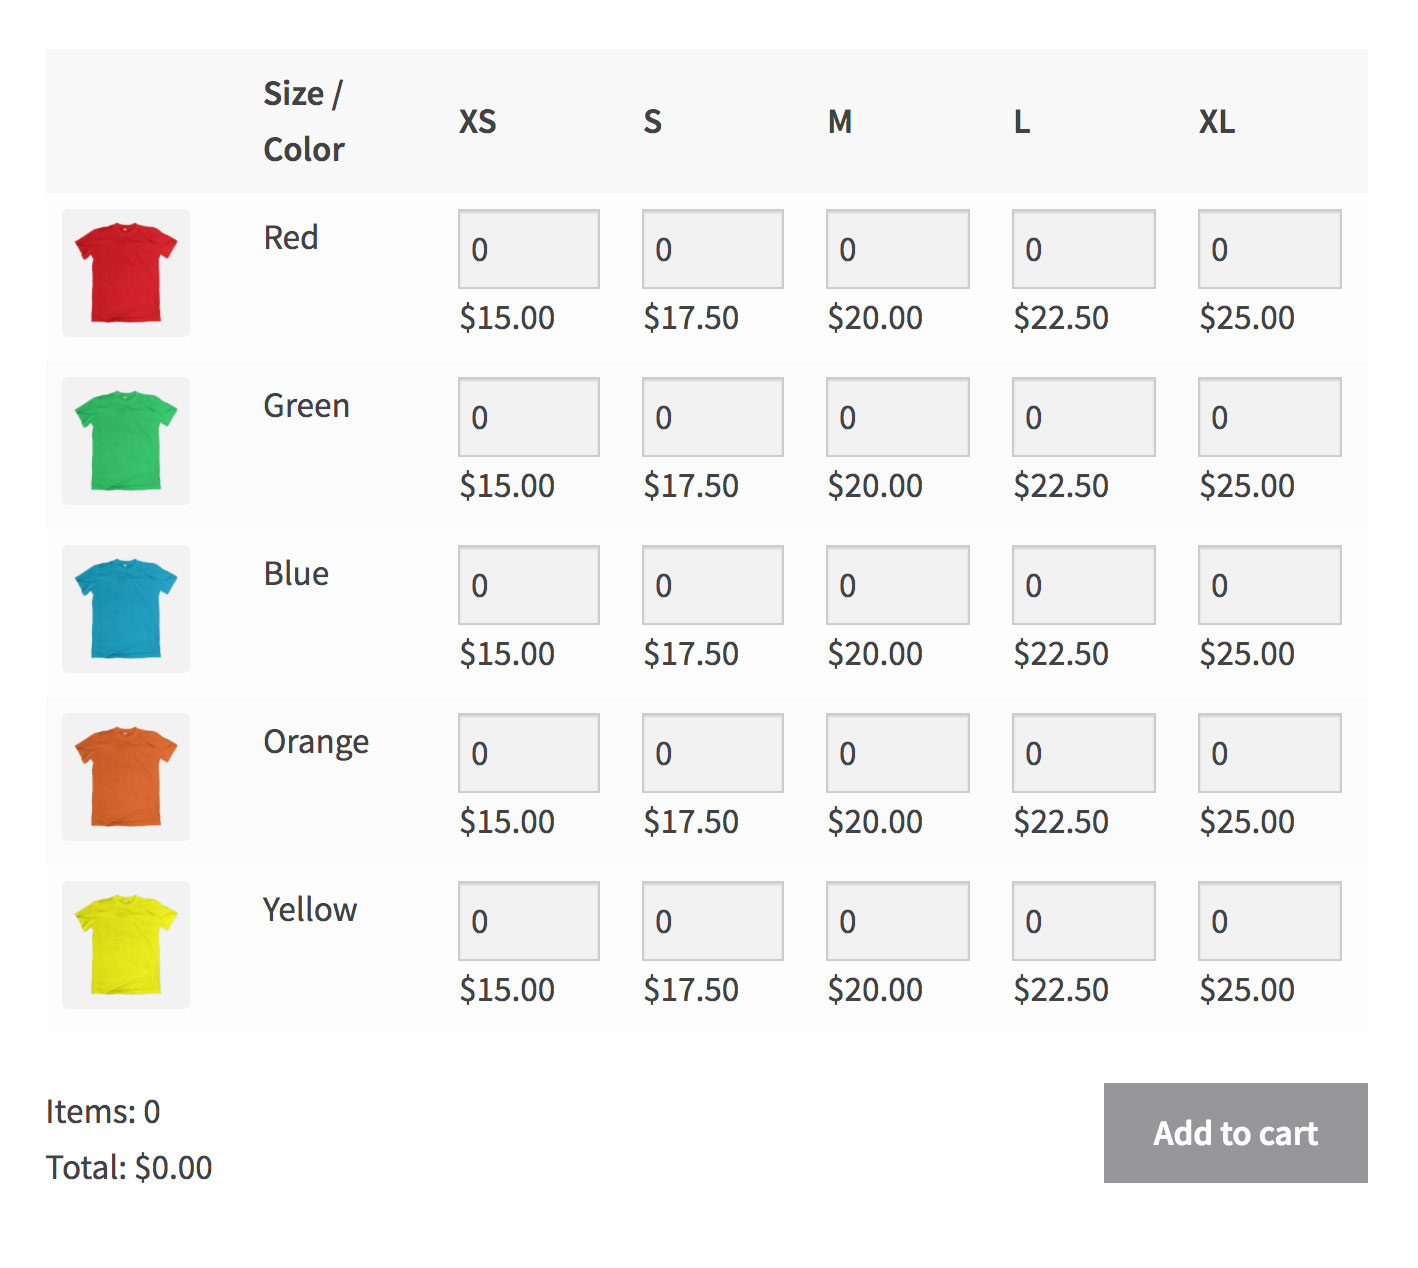
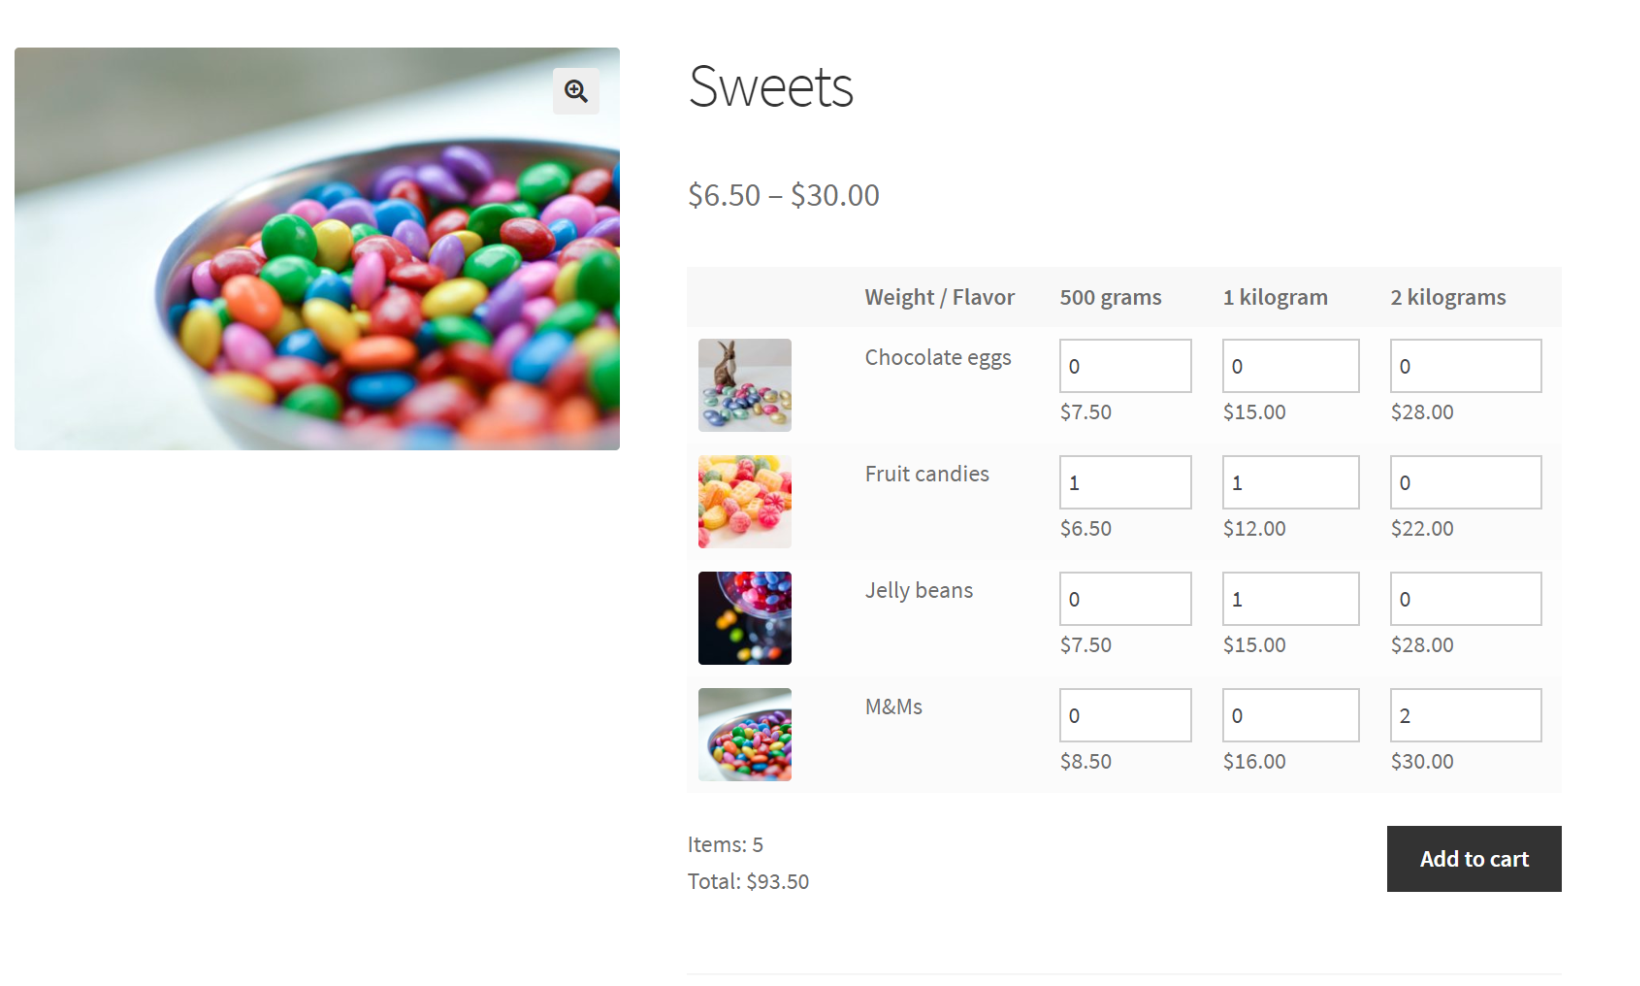
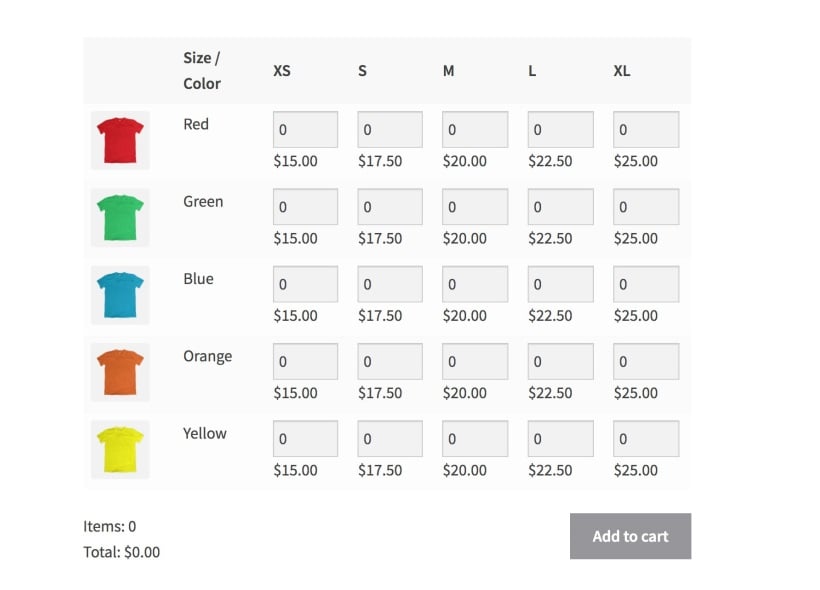
Method 3 uses the WooCommerce Bulk Variations plugin. It lets you create one product for each product bundle you want to sell. You can then add all the individual items that you want to allow users to bundle as variations. This is perfect for online stores that sell low-cost products like candies, sweets, teas, or coffees.

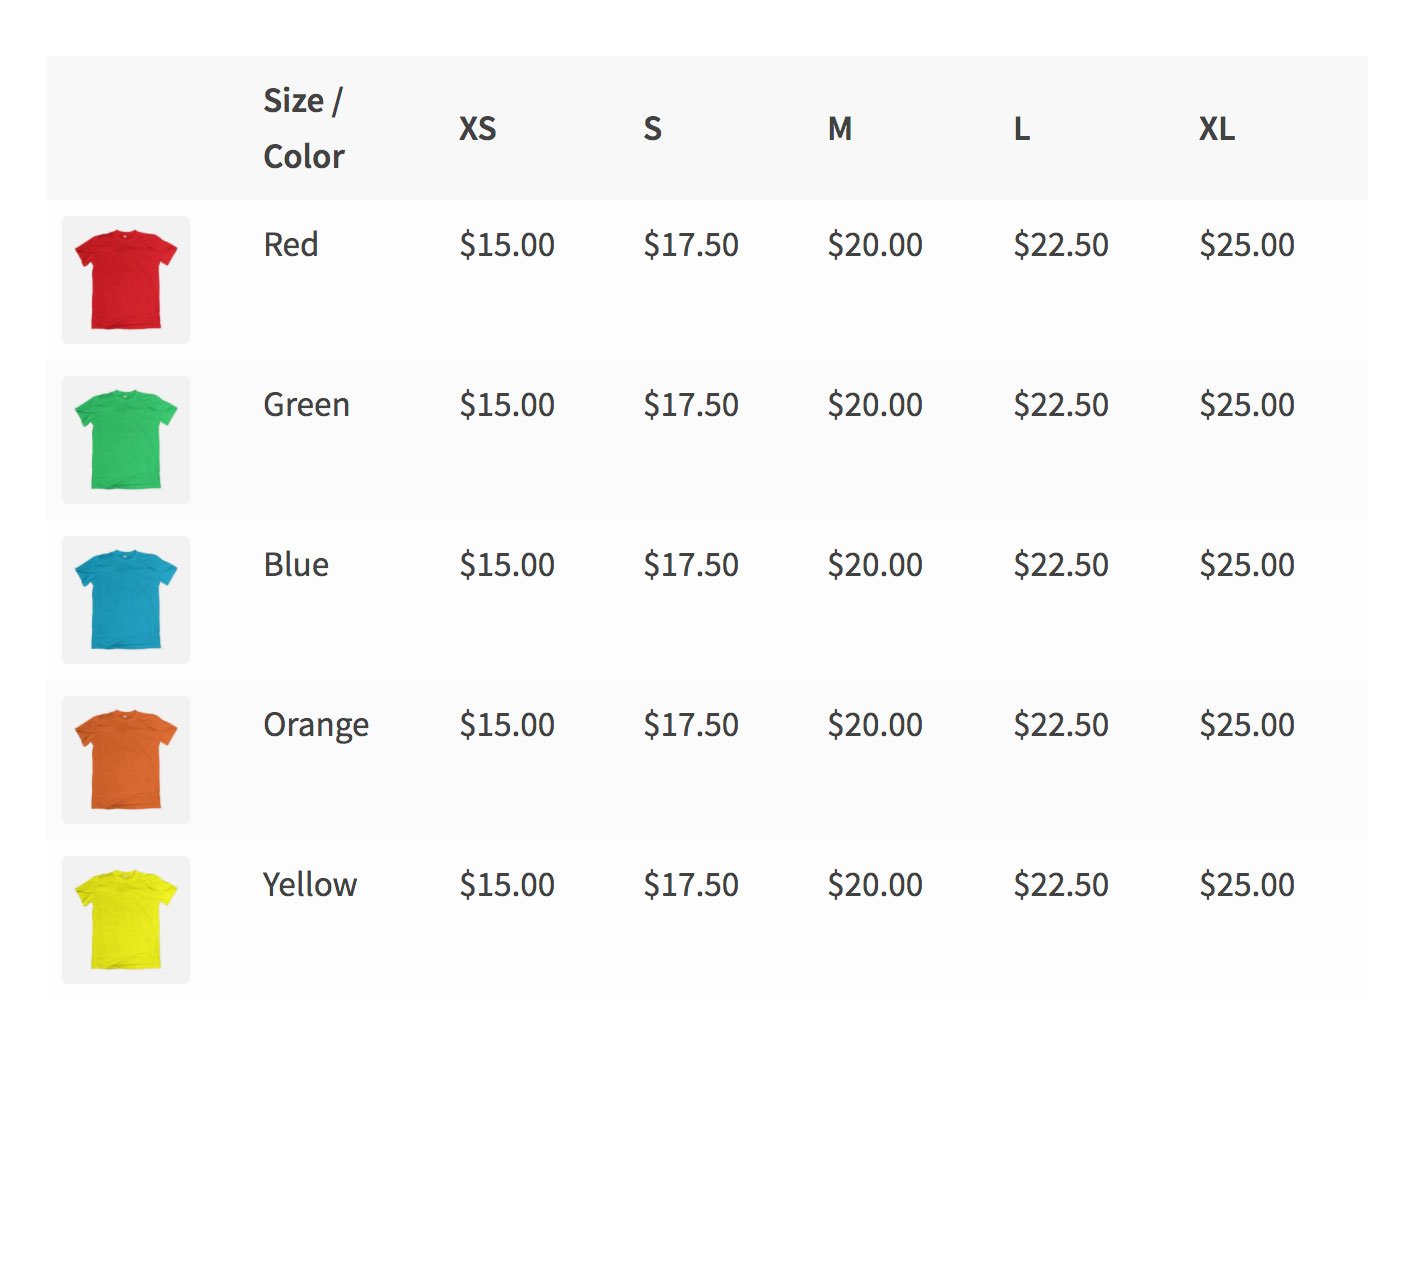
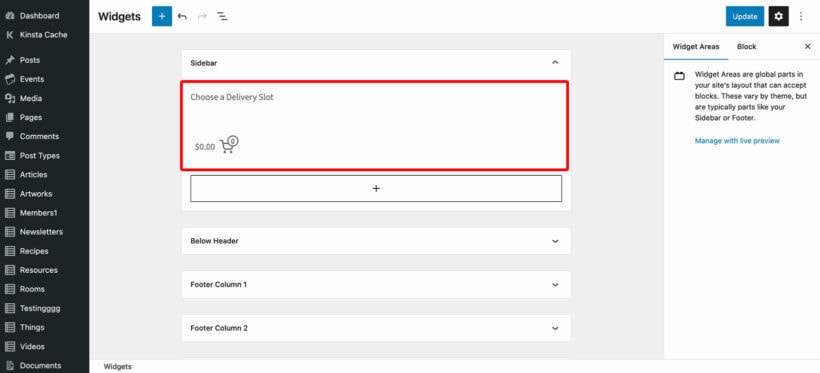
Using this plugin, you can display these variable products in a matrix on the single product page. You can also use the shortcode included in the plugin to show the product matrix on any page, such as a central Bundles page or in a widget. This allows customers to select the number of each variation they want to purchase and create their bundle.

Setup instructions

  1. Get the WooCommerce Bulk Variations plugin and install and activate it on your WordPress site.
  2. Go to Products → Attributes from the WordPress dashboard. Add attributes for the items you’d like to sell as bundle products. For example, if you’re selling candies you could add Flavor and Weight as attributes.
  3. Create a new WooCommerce product. This will be the product bundle.
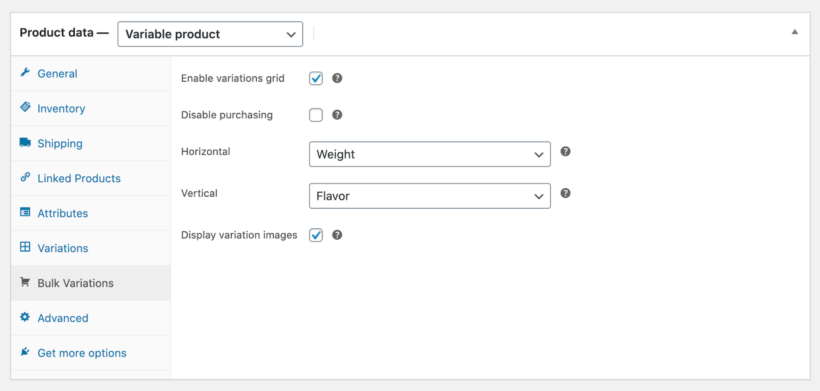
  4. Scroll down to the Product data section and select Variable product using the dropdown.
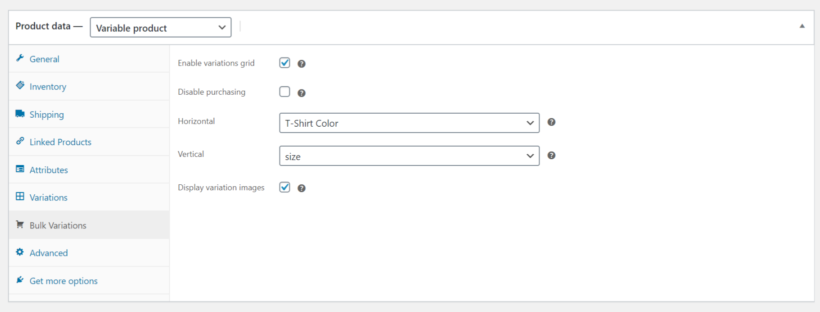
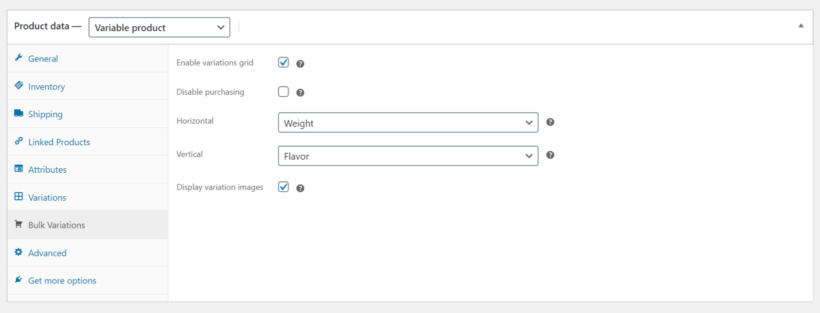
  5. Click on the Bulk Variations tab and configure the following settings:
    1. Tick the checkbox next to the Enable variations grid option.
    2. Set the Horizontal and Vertical attributes.
    3. Tick the checkbox next to the Display variation images option.
      WooCommerce Bulk Variations plugin settings
  6. Click the Publish button.

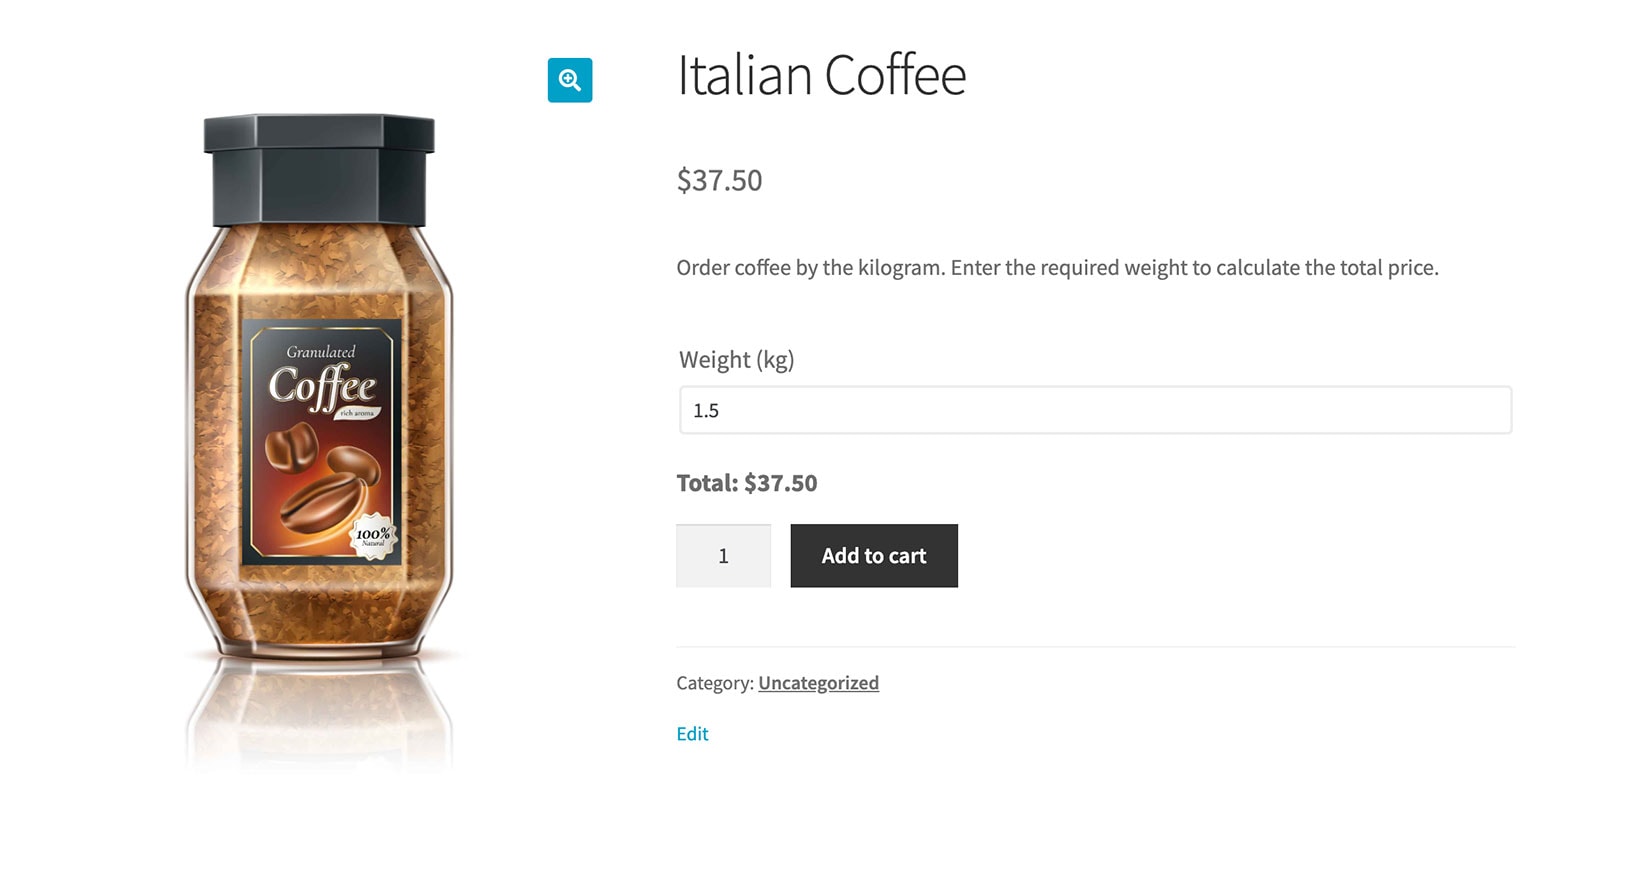
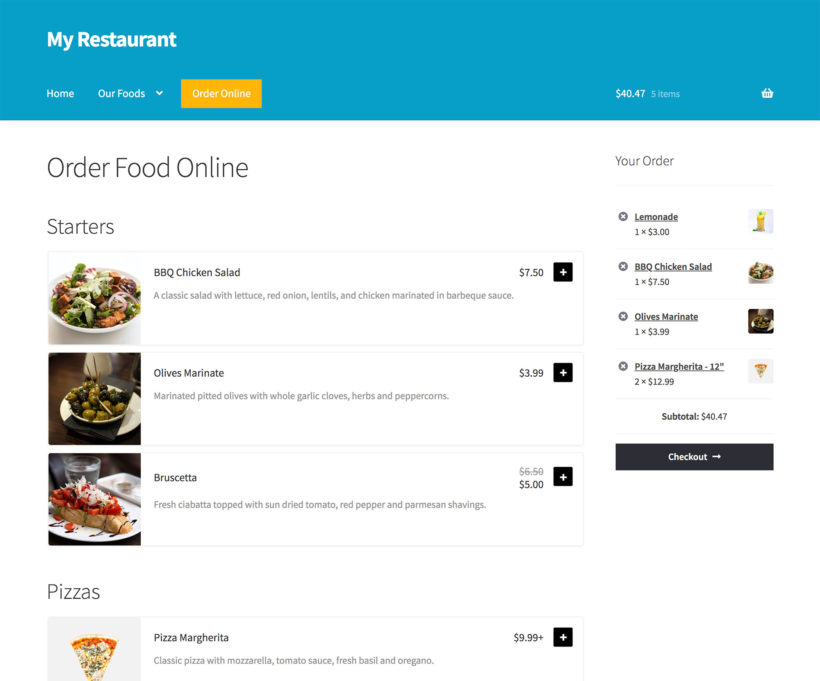
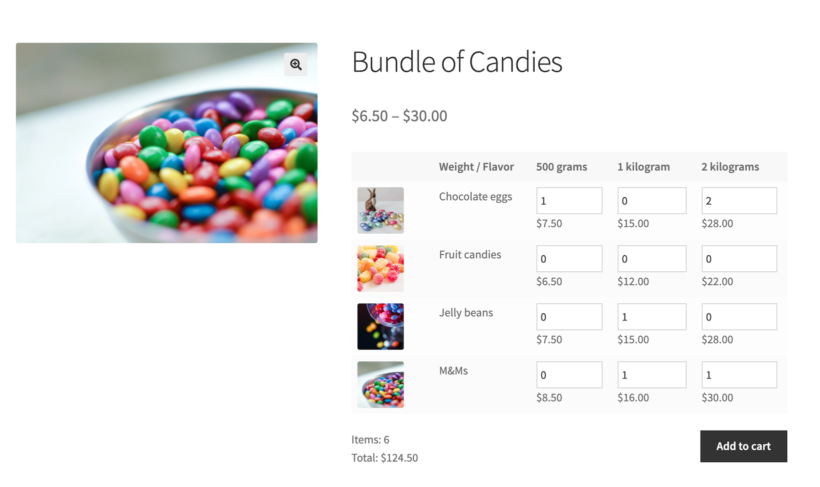
On the product page, customers can choose how much of each variation they’d like to purchase. This lets them complete their WooCommerce product bundles with variations. The total price appears directly under the matrix before they add everything to the cart.

If you don't want to display your bundle on the single product page, then you can insert the variations matrix elsewhere using a shortcode.

Moreover, thanks to its deep integration with WooCommerce Subscriptions and the All Products for WooCommerce Subscriptions add-on, you can also use Product Bundles to offer personalized subscription boxes.

What is the difference between grouped products and bundled products in WooCommerce?

In WooCommerce, a grouped product and a bundle product are two different types of product options that allow you to offer related products to your customer. Here is the main difference between the two:

  1. Grouped product: A grouped product is a collection of individual products that are sold separately, but grouped together on a single page. It allows customers to choose which individual products they want to buy and add them to their cart individually. For example, a camera, lenses, and accessories can be grouped together as a camera kit.
  2. Bundle product: A bundle product is a set of products sold as a single unit. Customers cannot choose which individual products they want to purchase from the bundle but must buy the entire bundle altogether. For example, you can bundle a laptop, mouse, and keyboard together as a single laptop package.

How do I create a grouped product in WooCommerce?

Creating a grouped product in WooCommerce involves a few simple steps. Here's how to do it:

  1. Log in to your WooCommerce account and navigate to the WordPress dashboard.
  2. Click on the "Products" tab and then click "AddNew" to create a new product.
  3. Choose "Grouped product" as the product type from the dropdown menu.
  4. Give your grouped product a name and description, and set the price for the group (if applicable).
  5. Under the "Grouped Products" table, click the "Add Products" button to add the individual products that make up the group.
  6. Search for and select the products you want to include in the group. You can add as many products as you like.
  7. Rearrange the order of the products if needed, using the drag-and-drop functionality.
  8. Save your changes, and you can now publish your grouped product.

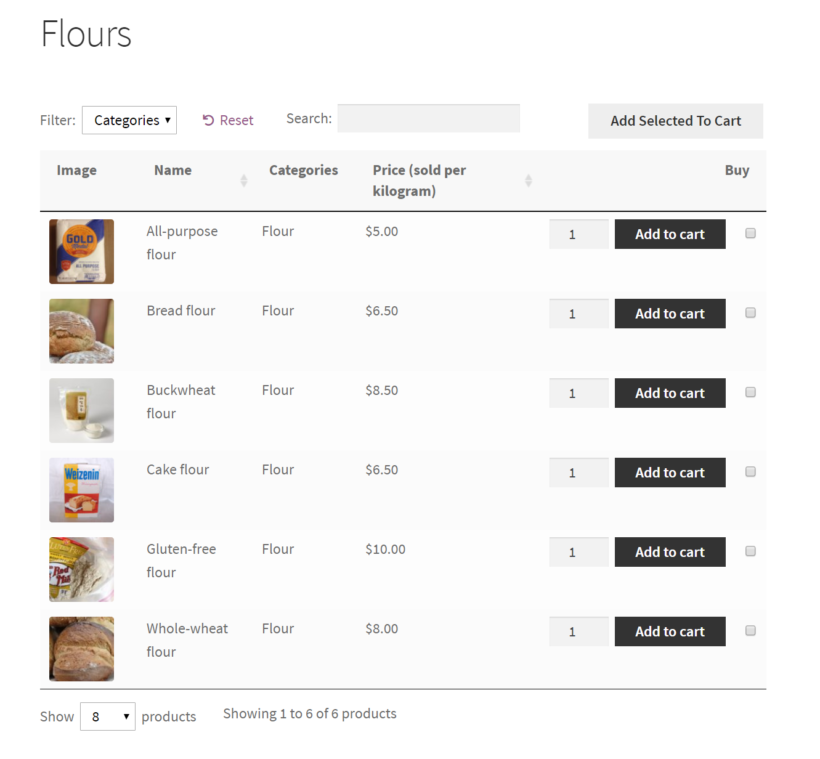
Customers can view a list of individual products included in the group with prices and buy buttons. This provides them with the flexibility to purchase multiple products at once while choosing which products they want to buy.

How do I create a product list in WooCommerce?

Print WooCommerce product list preview

You can create a product list in WooCommerce by using the built-in functionality of the WooCommerce Product Table plugin. Here are the steps to follow:

  1. Log in to your WordPress dashboard.
  2. Navigate to the Products → Product Tables section in the left-hand menu.
  3. Click on the Add New button to create a new product list.
  4. Copy the shortcode from the final page, and paste it into the page where you want to list products. Alternatively, if you're using the Gutenberg editor then you can add the 'Product Table' block and select your product list to insert it.

Quantity rules and discounts

Quantity plugin cart page errors WooCommerce

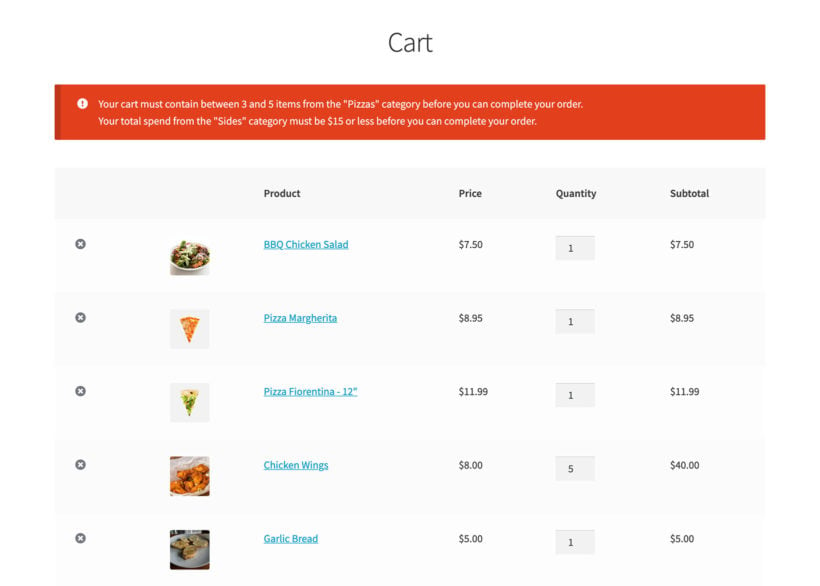
Many WooCommerce websites set rules around their product bundles. For example, you might want to restrict how many items customers can order from a bundle. You might want to automatically apply a bulk bundle discount depending on the number of products or variations ordered.

You can add these features using some excellent WooCommerce plugins, which work with all the methods in this tutorial:

  • WooCommerce Discount Manager - Add quantity-based bulk discounts for specific bundles (e.g. based on category or product).
  • WooCommerce Quantity Manager - Set minimum and maximum quantity rules for your bundles. You can either set these rules globally, per category, per product, or per variation.

Want to create WooCommerce product bundles?

There are a number of user-friendly plugins to create and sell WooCommerce product bundles with variations. We encourage you to check each of them out:

  1. To suggest product bundlings to customers and sell different products, you can use the WooCommerce Product Table plugin.
  2. However, if you want to sell fixed product bundles at a fixed bundle price, check out the WooCommerce Product Bundles plugin.
  3. And the WooCommerce Bulk Variations plugin is perfect for letting customers choose how much of each product to add to their product bundle.

Be sure to make your product bundles relevant and attractive to your target audience. Promote them efficiently across your website and marketing channels. Providing a personalized and convenient shopping experience with product bundles can increase your revenue and profit margins.

Ready to create and sell WooCommerce product bundles with variations? Choose a plugin from the list above, and set it up today! With the right tools and strategies in place, you can take your ecommerce business to the next level 💪

Sell beer online

If you run a craft brewery, it's a great idea to set up a brewery online store. This is a great way to meet customer demands and sell beer online.

For breweries, hard times and emergency situation can hamper and jeopardize the total meet of their sales targets. All of their usual ways of selling were affected by:

  • Supplying craft beers to pubs and restaurants.
  • Face-to-face sales directly from their brewery shop.
  • Stores and shops they supply craft beers to.

For some microbreweries, selling online became the only way to stay in business and maintain their bottom line. Even with the world opening up again, it is now clear that online sales are essential for success.

The good news is that you can set up an e-commerce website to sell beer online. This is also a great way to reduce costs and overheads as you cut out the middleman and sell directly to the public. And the best part is that it's surprisingly easy to set up!

In this article, we’ll show you how to set up a brewery online store using the free WordPress and WooCommerce platforms. You can then choose between two excellent brewery plugins to list your beer in a quick one-page order form: WooCommerce Product Table and WooCommerce Restaurant Ordering.

Setting up WordPress and WooCommerce

We recommend using WordPress and WooCommerce to power your brewery online store. This is because they're easy to set up yourself, and you can sell beer online in a few simple steps. Plus, most of the software you’ll need is open-source and free to use.

WooCommerce Restaurant Ordering plugin setup

This means you won’t have to pay a commission like you would if you were to sell on a hosted e-commerce platform. Finally, selling beer online through your own brewery online store means that you have full control over the look and feel of your store and payouts.

If you don’t already have a WordPress site with WooCommerce installed on it, we recommend checking out these helpful articles:

Once you’ve set up your basic WooCommerce-powered online store, come back here and follow the instructions to sell beer online.

Which is the best brewery plugin for selling beer online?

Once you've installed WordPress and WooCommerce, you need to choose a brewery plugin to list the beers on your public-facing website. Beer sells best in a one-page order form layout, where customers can select the beers they want and quickly add them to their cart.

You can do this by installing either the WooCommerce Product Table or WooCommerce Restaurant Ordering plugins. They both convert the free WooCommerce plugin into a purpose-built food and drink ordering system.

Choose whichever plugin has the appearance and features you need, and then skip ahead to the setup instructions.

WooCommerce Product Table - Best for listing large numbers of beers

WooCommerce beer order form plugin

WooCommerce Product Table makes it quick and easy to find specific fine beers. Customers can use the filter dropdowns, column sorting and keyword search to find exactly what they're looking for. As a result, we recommend this beer ordering plugin if you have a large alcoholic drinks catalog.

Each drink is listed on its own row in a one-page order form (or multiple pages if you want pages for ale, lager, wine, golden apple mead, dark beeretc.). You can choose which columns of information to display. Customers can choose quantities and options, select multiple beers, and quickly add them to the cart.

WooCommerce Product Table is great for selling beer online for several reasons:

  • Structured layout It offers a neat and organized layout for listing various beers.
  • List beers on one page.Unlike the default WooCommerce shop page, you can use WooCommerce Product Table to list all of your beers on one page with small images. This way, each beer won’t take up lots of space like the standard e-commerce layout that’s better suited for selling more visual products (like clothes).
  • Quick order form WooCommerce Product Table gives you a quick order form layout. Think of it this way: customers buying beer online will nearly always want to buy multiple beers at once. So, it’s much better to give them the option to select the required quantity of each type of beer and quickly add them all to their shopping cart. This way, they don’t have to visit a separate page to add each beer to their cart.
  • Customizable The WooCommerce Product Table plugin also gives you the option to choose which information to include in the list of beers. For example, you can choose to display information about the glass bottle size, strength, type of ale, and so on.

Setup instructions →

WooCommerce Restaurant Ordering - Best for a clean, simple layout

WooCommerce sell beer and wine shop

If you have a few dozen beers or less, then you might prefer the clean and minimalist design of the WooCommerce Restaurant Ordering plugin. It creates a simple list of your beers and other drink products. 

There are lots of reasons why WooCommerce Restaurant Ordering is perfect for selling beer online:

  • Quick 5-minute setupWhen you install the plugin, it does everything for you and automatically creates a one-page order form page listing your beers. This is divided into category so that customers can easily find what they need.
  • Flexible optionsYou can choose whether to include information such as the image and product description, and how many columns to list your beers in.
  • Sell variations and quantity optionsYou can add options as variations (e.g. if a particular beer is available individually or as a crate), which the customer can select from a lightbox popup.

Setup instructions →

How to set up a brewery online store using WooCommerce Product Table

By now you should already have a WooCommerce store set up. Here’s what you need to do next to set up a brewery online store:

Step 1: Get the WooCommerce Product Table plugin

Get the WooCommerce Product Table plugin and install it on your WordPress site. You’ll receive the plugin files and license key in an email.

Log in to your WordPress admin panel and head over to ProductsProduct Tables → Add New. This opens the table builder.

Step 2: Create a table listing your brewery products

The next step is to create a quick order form for your brewery online store. Here’s what you need to do:

Table display

Since you’re setting up a brewery online store, I recommend replacing the standard WooCommerce layouts in your theme with the product table. You can do this on the first page of the table builder:

Create page of table builder

After this page, you can choose exactly which shop pages you want to use the table layout on:

Add product table to category page template

Table content

Use the Columns page to select which columns you’d like to show in the front-end table layout. Here’s a complete list of product table columns you can choose from. At the bare minimum, we recommend displaying image, name, short description, price, and buy.

WPT table builder columns

You might have created product attributes when adding craft beers to WooCommerce as products. This is an easy way to store extra information about each beer (such as the strength (i.e. ABV), type (e.g. IPA, double IPA, pale ale, seltzer), bottle size, or additional attributes (like bestsellers or limited edition beers).

WooCommerce Product Table makes it easy to display them as attribute columns in the table. Just select them from the list of columns.

Add to cart buttons

As we mentioned earlier, customers will likely want to purchase multiple beers at once from your brewery online store. I recommend setting the Add to cart button option to either Checkbox only or Button and checkbox using the dropdown menu.

Add to cart page of WooCommerce product table builder

In addition, you’ll want to tick the checkbox next to the Quantities option to show quantity selectors in the add to cart column. This way, customers can add multiple units of a specific beer to their cart at once.

If you sell variable products then you should set the Variations option to Show as dropdown lists. This way, customers can quickly select different options for each craft beer. For example, they can choose to purchase an individual bottle, growler, a 6-pack, box, keg, or crate. Or, you can have different types of barrels such as dark oak barrels or small barrels and big barrels. This is especially useful for brewery online stores that would like to sell to wholesale customers, as well.

Sorting and filtering

WooCommerce Product Table lets you add attribute filters to your front-end table layout. This makes it easy for customers to quickly find the types of beers they’d like to purchase.

For example, you can create attributes for IPA, craft beer, homebrew, lager, pilsner, wheatbeer, and so on and let customers select beers based on alcoholic strength (i.e. alcohol levels or high-proof liquor).

WooCommerce Product Table builder filter dropdowns

Your brewery online store might look something like this:

Brewery online store preview

How to use WooCommerce Restaurant Ordering to sell beer online

If you'd rather list your beers in a clean and simple order form, then WooCommerce Restaurant Ordering is perfect for you.

  1. Get WooCommerce Restaurant Ordering and install it on your WordPress site.
  2. Find the plugin settings page at WooCommerce → Settings → Restaurant.
  3. Choose how you want your brewery order form to work. This includes choosing what information to display and the number of columns.
  4. Go to the Pages section of the WordPress admin, find the new page called 'Restaurant Ordering' and rename it to something more appropriate like 'Order Beer Online'.
  5. Now view the page. You will see your beers and other drinks listed in a professional-looking one-page order form, structured by category:
WooCommerce sell beer and wine shop

Add age verification and shipping options

Since most countries across the world restrict the sale of beer based on age, you’ll want to set up age verification on your brewery online store. Check out our separate tutorial on how to add a WordPress age validation pop-up to your store or prevent under-age people from accessing it.

In addition, you might also want to set up postage costs for cool beer since it’s heavy. You can do this using the flat rate options built into WooCommerce.

WooCommerce flat rate settings

You can also use the Product Shipping plugin if you want to charge different postage based on weight.

WooCommerce local pickup settings

It’s also worth mentioning that WooCommerce offers a local pickup shipping option which is suitable for local brewery online stores that can offer curbside pickup options. This way, customers don’t have to pay postage.

Bonus: Sell merchandise for your brewery

You can also use the WooCommerce Product Table and WooCommerce Restaurant Ordering plugins to sell merchandise for your brewery. This is a great way to establish your brand and supplement your income without doing hard work.

Some popular merch ideas for breweries include branded stickers, gift cards, t-shirts, and hoodies. You can also sell glassware like a branded pint glass or beer mugs.

Brewery merch store preview

You can follow the same techniques to sell merch through your brewery online store. We recommend creating a separate category (with sub-categories, if necessary) for the merch. This way, you can display it on separate pages on your brewery online store.

Add a wholesale area to sell to pubs and restaurants

Many breweries will benefit from a wholesale area that they can use to sell beer kegs, boxes, and crates to pubs, shops, restaurants, and other stores that they supply beer to.

These stores can then place their orders online and be charged the correct wholesale price rather than the regular price. The key benefit of selling beer wholesale online is that it saves a lot of time as compared to taking orders manually over the phone. Check out our tutorial on how to create a WooCommerce wholesale store.

Case study: How Beer Drive Thru uses WooCommerce Product Table to sell beers online

The Beer Drive Thru brewery store needed a way to sell beers to customers in an efficient way. Initially, they were looking for a simple way to set up a single page solution or one-page shop. This would allow Beer Drive Thru customers to choose their beers and place their orders, all from one page.

Beer Drive Thru one-page order form

Using the WooCommerce Product Table plugin, they were able to start selling beers online and keep their business operations running during the Coronavirus lockdown.

Stylish and functional
Very happy with "Product Tables" - it's nicely flexible in terms of both function and style and is a big factor in making the customer experience so much smoother. Excellent support too!

Customers can visit the brewery online store to select the beers they'd like to purchase, set the quantity, and place their order in advance. Then, they can drive into the car park area at the brewery store for contactless pickup (similar to curbside pickup). This is perfect for selling beers during the lockdown.

Beer Drive Thru also offers nationwide delivery options. Using the WooCommerce Product Table plugin, the brewery set up two different order forms with different available options and prices for their beers.

Set up your own brewery online store

A brewery online store is a great way to avoid operational restrictions and reach a wider audience. And the easiest way to sell beer online is by using the WooCommerce Product Table or WooCommerce Restaurant Ordering plugin to showcase the beers you sell and let customers place orders online.

Ready to start selling beer online? Get the plugin today!

Create WooCommerce Bulk Variations Forms

One of the most effective ways to boost sales on your e-commerce store is by making it easy for customers to browse products, select a variation, and add it to the cart. For this, you need a WooCommerce bulk variations form. This acts as a quick order form, allowing people to buy variations more easily.

A WooCommerce bulk variations form can work on either the front or back end of your website:

  • A front end bulk variations form allows customers to choose quantities and add multiple variations to their shopping cart at once. This way, they don't have to spend time adding each WooCommerce variation one at a time or searching for the precise combination they want: every option is easily visible at a glance. For this reason, using a WooCommerce bulk variations plugin is a better way to sell variation products.
  • A back end bulk variations form speeds up store management for the merchant. It does this by listing your products and variations in a bulk editing spreadsheet form. You can either update variations by clicking directly within the spreadsheet editor; or by using a bulk edit form to apply mass updates.
WooCommerce Bulk Variations plugin
An example of a WooCommerce bulk variations form for a single product

In this article, we’ll show you how to create three different types of bulk variations forms for your WooCommerce store without any complicated messing around with PHP code. You'll learn how to list WooCommerce product variations in either a variations grid, table or spreadsheet layout, depending on your requirements.

The benefits of using WooCommerce bulk variations forms

Some online stores sell multiple variations of the same product. For example, clothing stores generally sell items in more than one size. Color and material are two other common variations. You might even consider offering e-books, albums, games, or movies as variations on a generic product.

By default, WooCommerce forces you to select each variation individually. This takes ages for customers wanting to buy variations in bulk!

For example, imagine you wanted to buy lots of different sizes and colors of a t-shirt. Would you rather add each variation individually by using the size and color dropdowns and clicking the 'Add to cart' button lots of times? Or would you rather enter the required quantity for each variation from a bulk variations form and click the 'Add to cart' button once?

As you can see, the default variation dropdowns provided by WooCommerce can make the process long and complicated for customers buying lots of variations.

Displaying product variations in a WooCommerce bulk variations form offers many benefits to both you and your customers. As well as being able to buy variations in bulk more quickly, they can see all the variations at once and bulk edit their orders.

This way, customers can still see all the available variations in the order form and quickly add the ones they want to their cart in bulk from a single page.

And there are benefit for store owners, too!

The above benefits all focus on the customer. If you use the other type of WooCommerce bulk variations form - the spreadsheet editor - then it saves time for store owners instead. It's much faster to edit variations via a single form interface instead of editing each product individually.

To fully combine the benefits for customers and store owners, I recommend using one of each type of bulk variation form.

4 ways to list WooCommerce product variations

Next, I'll introduce you to 4 different ways to list WooCommerce product variations in a user-friendly form:

  1. Variations grid Lets customers quickly select multiple variations of a single product and add them to cart at once. [*For customers*]
  2. List variations in a table List product variations for one or more products on separate rows in an order form layout. This is great for SEO. [*For customers*]
  3. List variable products in a table with dropdowns List product variations in dropdowns in a table layout, with a different product on each row. [*For customers*]
  4. Create variation forms for bulk editing Create a bulk editing spreadsheet with each variation listed on its own row. [*For store owners*]

Jump straight to whichever method you'd like to implement, or keep reading to learn more about each one.

Types of bulk variations forms

Creating a user-friendly WooCommerce bulk variations form allows customers to view and select the product variations they’d like to purchase. Alternatively, it can assist store owners by making it much faster to edit variations in bulk. Both types are essential for online stores that sell variable products.

I'll tell you more about each type next. After that, I'll provide setup instructions for each one.

#1: Variations grid

You need a variations grid if you want to enable customers to quickly enter quantities for multiple variations of a single item and add them to cart all at once. This is a must-have if you sell variable products to wholesale buyers, such as t-shirts. It's also useful if you sell by weight, with each weight option as a variation.

For this, you will need the WooCommerce plugin and the WooCommerce Bulk Variations plugin. It lets you list the variations for a specific product in a matrix-style grid layout. Each variation has a quantity box and price. It works for variable products with either 1 or 2 product attribute terms, which are used for variations.

WooCommerce Bulk Variations plugin

In this way, the WordPress plugin works as a WooCommerce bulk variations manager. Customers can simply:

  1. Enter the quantity they’d like to purchase of each variation.
  2. Click a single Add to Cart button to add the selected WooCommerce product variations (in the correct quantities) to their shopping cart.
  3. Proceed to the checkout page.

A WooCommerce bulk variations form created in a matrix-style layout simplifies the purchasing user flow and can help you boost sales. It also lets you bulk add variations to your WooCommerce store. Setting up WooCommerce bulk variations forms is the easiest way to implement differential pricing.

Here's how you can set up a bulk variations grid in WooCommerce →

#2: List variations in a table

Another way to list WooCommerce product variations on the front-end is by listing them in a table layout with each variation on a separate row. The easiest way to create this sort of layout is by using the WooCommerce Product Table plugin.

Product variations on separate rows.

Whereas the WooCommerce Bulk Variations plugin is designed to list the variations for one product in each order form, this is the best option for you if you’re looking for a way to create an order form containing variations for multiple variable products. Customers can browse through all the product or variation images, filter products according to their needs, and then simply tick the checkbox next to the product variation they’d like to purchase, set the quantity, and add it to their shopping cart.

Another key benefit of using this approach is that it gives you the flexibility to display extra information about each product variation (such as the SKU and variation description). With WooCommerce Product Table, you can choose which columns to include in the table.

Here's how you can list product variations in a table layout →

#3: List variable products in a table with dropdowns

If you sell both variable products and simple products, you might consider listing them in a table layout with dropdowns. This is also ideal if you want the compatibility to sell the variations for multiple products in the same table - this time, each product takes up one row in the table regardless of the number of variations or extra product add-ons.

You can do this using the WooCommerce Product Table plugin. It's an easy way to list more than one variable product in the same order form with a single row per variable product.

Product variations in drop-down menus.

This method also makes it easy for customers to identify variable product types as they’re the only ones with dropdowns next to them. Customers can browse the products, use the dropdown to select the variation they’d like to purchase, set the quantity, and add the variation to their shopping cart. When you add new products to your WooCommerce store, update products, or update prices, they will automatically appear in the product table.

Here's how you can list product variations in a table layout with dropdowns →

#4: List variations in a bulk editing spreadsheet

Setary bulk edit

The first 3 types of bulk variation form make it easier for customers to select variations on the front end. Our 4th option - Setary - is different. Instead of benefitting customers, it saves time for store owners by displaying variations in a quick edit spreadsheet with bulk editing forms.

Setary is great because it makes it significantly faster to add, manage and delete variations in bulk. You can:

  • View each product and variation in your store on a separate row of the spreadsheet.
  • Add a row in order to quickly create a new product or variation.
  • Use the advanced search and filters to select multiple products.
  • Make inline changes directly in the spreadsheet form.
  • Select multiple variations and use the Bulk Actions forms to apply mass changes. There are lots of options here, such as making price increases or decreases, changing variation names, managing stock, setting variation images, and more.

Here's how you can list variations in bulk editing spreadsheet →

Option 1 instructions - How to create a WooCommerce bulk variations grid

Creating a WooCommerce bulk variations grid makes it quick and easy for customers to:

  • See the different variations available for a variable product.
  • View the regular price of the variation.
  • Enter the quantity they’d like to purchase of each variation.
  • Add multiple variations to the cart at once.

To get started, get the WooCommerce Bulk Variations plugin. Once you have it installed and activated on your WordPress website, head over to the variable product you’d like to enable bulk purchasing for. Or, to do it globally for all your variable products, enable it on the plugin settings page.

Scroll down to the Product data section on the Edit Product screen and click on the Bulk Variations tab. Tick the checkbox next to the Enable bulk variations grid option, as shown in the screenshot below.

WooCommerce Bulk Variations settings

Next, select the variation attributes you’d like to display in the Columns and Rows of the price matrix using the dropdowns.

Finally, tick the checkbox next to the Display variation images option if you’d like to have product variation images appear in the matrix layout.

That’s it! When you preview the single product page on the front-end, it should look something like this:

WooCommerce Bulk Variations plugin

Option 2 & 3 instructions - How to list variations in a table layout

Using the WooCommerce Product Table plugin, you can list variable products in two different ways in a front-end table layout with search, sort, and filter options. You can either list each variation on a separate row or list variable products in the table with dropdowns.

The first thing you need to do is install and activate the WooCommerce Product Table plugin to your WordPress website. Once that’s done, ProductsProduct Tables to create a table.

Use the Columns page to select the columns you’d like to include in the table layout.

WPT table builder columns

Scroll down till you reach the Variations option and select the:

  • Separate rows in table (one per variation) option using the dropdown if you want to list each variation on a separate row.
  • Show as dropdown lists using the dropdown to display a dropdown menu for variable products.
Add to cart page of WooCommerce product table builder

Finally, add a 'Product Table' block to a page and select the table you just created. Alternatively, add the shortcode from the final page of the table builder.

For details, be sure to check out this in-depth tutorial on how to create a WooCommerce product variations table using the WooCommerce Product Table plugin.

Option 4 instructions - Create variation forms for bulk editing

Our final WooCommerce bulk variation form is Setary, the bulk spreadsheet editor. This is the fastest and easiest way for store owners to add and manage variations. It only takes a couple of minutes to set up, so you can start saving time straight away:

  1. Start by signing up for a free trial of your chosen Setary plan.
  2. Next, you'll be prompted to install the free Setary helper plugin.
  3. Your store's inventory will appear in the Setary bulk spreadsheet form, with each product and variation listed on its own row.
  4. Click within the form to make quick edits. Alternatively, use the filters to narrow down the list and then select multiple products and use the Bulk Actions form.
  5. Each cell that you've updated will appear with a blue dot alongside. Check you're happy with the changes in the bulk variations form, then click Save. This will instantly apply the changes to your live WooCommerce store.

Create your bulk variations form today

There are two types of WooCommerce bulk variations manager - one to help your customers, and one to help you:

  • The WooCommerce Bulk Variations or WooCommerce Product Table plugins create public-facing bulk variations forms which make it easier for customers to add variations to their cart. [*Recommended for helping customers*]
  • The Setary app provides a spreadsheet editor plus bulk edit forms for variations, making it easy to update your inventory from a single interface.[*Recommended for helping store owners*]

Both types of bulk variation forms can transform the experience for your customers and for you. For maximum results, use one of each type and start seeing the benefits straight away 🚀

WooCommerce Product Table Gutenberg Block Plugin

We have just released a free add-on for our bestselling WooCommerce Product Table plugin. Gutenberg Block for WooCommerce Product Table is a free plugin that provides an easier way to create product tables. Download it from WordPress.org today!

Until now, there were 2 ways to create product tables:

  • Add a shortcode anywhere on your site.
  • Automatically enable the product table layout on shop and category pages.

The new WooCommerce Product Table Gutenberg Block add-on provides a third way: the ability to create a product table using the Gutenberg editor.

Gutenberg Block WooCommerce Product Table Settings

How does the WooCommerce Product Table Gutenberg block work?

When you install the free WooCommerce Product Table Gutenberg block plugin, you'll see a new Gutenberg block called 'WooCommerce Product Table' whenever you add a new block. Use this to add as many product tables as you like, each one different.

Each block will create a beautiful product table, so your customers can select products quickly and easily:

Gutenberg for WooCommerce Product Table block

We've provided full documentation on how to use the product table Gutenberg block.

Why is it a separate add-on?

Even though the Gutenberg editor is now part of WordPress core, a lot of our WooCommerce Product Table customers still build pages using other plugins such as Elementor and Divi Builder.

The WooCommerce Product Table Gutenberg Block add-on is available for everyone who wishes to create product tables with the Gutenberg editor. By providing it as a free add-on, a product table block is now available to our Gutenberg users, while keeping the plugin as lightweight as possible for those of you who aren't using Gutenberg.

How can I create product tables with other page builders?

While the new Gutenberg block only works in Gutenberg, you can continue using WooCommerce Product Table itself with any page builder. Simply insert the WooCommerce Product Table shortcode into a Text or Code block for your chosen page builder.

We'd love to know if you'd like to see a similar add-on for other page builders (e.g. a WooCommerce Product Table Elementor add-on). Please send us a feature request and let us know!

Where can I get the Gutenberg block plugin?

The new WooCommerce Product Table Gutenberg block plugin is available to download free of charge from wordpress.org.

Download Plugin

And if you're not using WooCommerce Product Table yet, get it today and start adding quick order forms to your store!

Our latest WordPress plugin - WooCommerce Bulk Variations - is launched today! It's the easy way to list product variations in an instant matrix layout. Your customers will love ordering multiple variations at once!

Our existing WooCommerce Product Table plugin is popular for listing variations in a table layout - either with variation dropdowns, or with each variation on its own row in the table. Lots of our customers have also asked for a way to display variations in a matrix or grid. We have built WooCommerce Bulk Variations to do exactly that!

What does WooCommerce Bulk Variations do?

WooCommerce Bulk Variations plugin

WooCommerce Bulk Variations provides a new layout option for any variable WooCommerce product.

It takes your variations and lists them in a matrix-style grid format. Each product attribute is listed as one of the axis of the grid. For example, you might list the 'Size' attribute horizontally as columns, and the 'Color' attribute' vertically as rows.

WooCommerce Bulk Variations lets you create 2 types of variations matrix:

  1. Bulk variations order form Add a quantity box for each variation. Customers can enter the quantity of each variation they require, and add everything to the cart at once. This is much faster than the variation dropdowns that come with WooCommerce itself, where you have to select each variation individually.
  2. WooCommerce price grid Disable the quantity boxes and create a read-only variation price grid, displaying the price of each variation without add to cart buttons.

You can enable the variations matrix globally for all eligible products, or you can enable it per-product. The plugin also comes with a shortcode which you can use to insert a variations grid for a specific product anywhere on your site. This is useful if you want to display the grid on a different part of the product page, or on other pages or posts.

The grid is fully customizable. For example, you can choose whether or not to include an image column displaying the variation images.

Who is it for?

WooCommerce Bulk Variations will benefit any online store that needs a quicker way to buy variations. For example:

  • WooCommerce wholesale stores If you sell to the trade and your wholesalers like to buy variations in bulk, then you need a bulk variations form. (Tip: If that's you, then you can use it with our other plugin - WooCommerce Wholesale Pro!)
  • E-commerce clothes shops If you sell clothes online, then customers can bulk order sizes more quickly by choosing the sizes and colors from a variations matrix.
  • Food order forms Some foods, such as pizzas, have lots of options (e.g. size and toppings). A food variations order form lists the options in a clear grid. This makes it easy for customers to select quantities and buy.
  • Products sold by weight If you use variations to sell different weight options of a product, then customers can mix and match from the grid to get the required weight.
  • Products with two dimensions If the price of a product changes depending on the width and length, then you can set up these options as variations and display them in a grid with the width on one axis, and height on the length.
  • Technical products with two types of option A variations grid is perfect for selling technical products that don't require large images. This could be printer ink, spray paint, or electronic gadgets. 

Whatever you're selling, if you need a quick way for customers to order multiple sizes or other options at once without having to list each attribute separately, then WooCommerce Bulk Variations is for you. 

Can I use it with other Barn2 plugins?

We've integrated WooCommerce Bulk Variations with our other plugins wherever possible. For example, you can:

We've also tested it with various third party plugins such as WooCommerce Subscriptions and Minimum/Maximum Quantities. You can read about these on our list of compatible plugins.

Can I list multiple products in the variations grid?

Each variations grid lists the variations for one product. If you want to create an order form containing more than one variable product, then you need WooCommerce Product Table instead, which provides 2 ways to list variations for multiple products.

Where to get the plugin

WooCommerce Bulk Variations is available now. It comes fully backed by our 30-day money back guarantee. Get it today and see how the matrix can transform your own website!

We’ve got your back. Your purchase is covered by our no-risk 30 day money back guarantee. If for any reason you’re not completely happy with the plugin, you’re entitled to a full refund up to 30 days from your original purchase. No questions asked.

As an online business owner, there are many scenarios where you might need to sell by weight in WooCommerce. For example, you might sell fruits and vegetables from your farm, purchase dry fruits and nuts in bulk for resale, or grow various herbs - all of which need WooCommerce weight-based pricing.

Lots of store owners wonder: "How do I sell a product by weight in WooCommerce?" That's because it’s not immediately obvious how to use WooCommerce to sell by weight. The good news is that, with the right WooCommerce plugins, you can easily start selling products by weight.

In this article, we’ll walk you through two different ways to use WooCommerce to list products in a way that allows you to sell by weight. The methods we cover in this tutorial work equally well if you’re selling by other types of measurement such as volume, size, width, length, or dimensions.

Let's get started ⚖️

Why you might need to sell by weight in WooCommerce

There are several different types of products that store owners typically sell by weight. Here are a few examples:

  • Fruits
  • Vegetables
  • Dry fruits
  • Nuts
  • Flour, lentils, and beans
  • Meat

Store owners set the products up in a way that each product has a price per unit weight. For example, this could be in grams, ounces, or pounds. Customers can simply select the number of, say, grams they’d like to purchase of the product and proceed to checkout to place their order.

As an e-commerce store owner, you can sell by weight in WooCommerce with the right combination of plugins.

Two ways to sell by weight in WooCommerce

There are two different ways to sell by weight in WooCommerce:

  1. Allow customers to enter an exact weight to receive an exact weight-based price calculation.
  2. Add pre-set weight options as product variations.

Choose Method 1 if you need WooCommerce weight-based pricing with more flexible options. For example, if you want to sell different types of flour by the kilogram, you could simply add your product prices by weight instead of selling by quantity.

Alternatively, you can go with Method 2 to keep things simple and add each weight option as a separate variation. This is particularly useful for store owners that sell items at different weight quantities. For example, if you have three different weight options – 500 grams, 1 kilogram, and 5 kilograms. You would add products as variable products in WooCommerce.

Keep reading to learn more about each method and how to set it up.

Method 1: Price products by weight

It's surprisingly easy to set up WooCommerce weight-based pricing. It works by replacing the standard quantity field with a weight input field. This lets you sell products by weight instead of quantity, like this:

How to add decimal quantities to WooCommerce products
A product sold by the kilogram

The great thing about this method is that it also supports decimal quantities, and minimum and maximum quantities. For example, you can allow customers to order coffee in any decimal value between 1 and 10kg.

You can do this with the WooCommerce Product Options plugin, which lets you replace the standard quantity field with custom product options. These offer more flexibility, such as the ability to order decimal quantities and display the weight on the product page.

How to add a product weight field to the product page

Step 1: Set up the product

First, you need to disable the quantity field on the main page, and enter the price for one unit of weight:

  1. Go to the 'Products' section of the WordPress admin and open the 'Edit product' page.
  2. Find the 'Product data' section and enter the basic product price. For example, if you are selling by kg then you should enter the cost for 1kg.
WooCommerce decimal quantity value price by kg
  1. Next, go to the 'Inventory' tab and tick the 'Limit purchases to 1 item per order' box. This hides the product quantity field. You need to do this because you'll be selling by weight rather than quantity. (We'll be adding a weight field in the next section.)
WooCommerce hide quantity field and replace with decimal quantity

Step 2: Add a weight field to the product

  1. Get the WooCommerce Product Options plugin and install it on your site.
  2. Go to Products → Options.
  3. Create a Options Group which you'll use to add the weight field, plus any other options you want to add to the product.
  4. Choose which products/categories you want to display the weight field on, or leave it to appear globally on all products.
  5. Click 'Add Option' and select the 'Number' field type.
  6. Enter a name for the weight field (e.g. "Weight") and untick the 'Display' box next to it.
  7. Underneath in the 'Choices' section, enter the label which will appear next to the weight field (e.g "Weight in kilograms"). Leave "No cost" selected for the price because we'll be a proper price formula in a minute, instead of adding a static price here.
  8. Set the field to 'Required' to force customers to enter a weight.
  9. Next, open the 'Advanced settings' to display some additional options:
    • If you want customers to be able to select partial weights (e.g. 1.5kg) then use the 'Decimal' number type to allow this.
    • Set a minimum and maximum weight that customers can enter, if needed.
WooCommerce decimal quantity input field
  1. Save the option group.

Step 3: Add the weight-based pricing to WooCommerce

Now you've added the weight field, you need to create a price formula which will calculate the weight-based pricing:

  1. In the same Option Group that you created in Step 2, click 'Add option' again and select 'Price formula' this time.
  2. Add a name for the option, such as "Weight calculation", and untick the 'Display' box again.
  3. Select the Price Formula option type.
  4. Create a price formula which will calculate the price based on the weight that the customer enters. To do this, click on the name of the number field which appears underneath the 'Formula' field, and also the 'Price' field which will retrieve the price for 1 unit of weight which you entered in Step 1. Enter the multiplication symbol between the two variables so that the formula looks something like: [Weight] * [product_price]. Use mathematical operators, brackets etc. to add extra complexity to the formula as needed.
  5. Use the 'Price display suffix' field to enter some text to indicate that the main price you entered for the product is based on weight. For example, if you entered the price for 1kg on the 'Edit product' screen then you should enter "per kilogram" or "per kg" to make this clear to customers. This will appear after the price for 1kg at the top of the product page.
  6. Finally, visit a product page and test the pricing by weight. Enter a number in the weight field and make sure the correct price is shown below. Keep making changes until you're completely happy.

Method 2: Add weight options as variations

You can use the WooCommerce Bulk Variations plugin to add each weight option as a product variation. This plugin lets you list all the variations in a matrix layout directly on the single product page.

Customers can enter the required quantity of each option and order the exact amount they want. They can mix and match multiple variations to reach the total weight volume they require.

For example, let’s say you’d like to sell sweets online. You might set up the following weight options as variations to sell by weight in WooCommerce:

  • 500 grams
  • 1 kilogram
  • 2 kilograms

So, if a customer would like to purchase 1.5 kilograms of sweets, they could add the 500 grams variation and the 1-kilogram variation to their shopping cart at the same time and proceed to the checkout page. In this way, the plugin supports custom weight measurements. You just need to create a variation for each possible step within the price range.

WooCommerce Bulk Variations price matrix

Setup instructions

  1. Get the WooCommerce Bulk Variations plugin and install it on your WordPress site.
  2. Activate your license key in the plugin setup wizard, which will open automatically.
  3. Next, go to Products → Add New and create a WooCommerce product which you will sell by weight.
  4. Go to Product Data → Attributes and add all the attributes that you would like customers to select from. For example, in the case of sweets, this may be flavor and weight. Enter all the possible options for each attribute, such as all the different weights that you sell in. Tick the 'Use for variations' box for each attribute, then click 'Save attributes'.
    Add weight attribute to WooCommerce product
  5. Open the 'Variations' tab underneath and click 'Generate variations'. This will create a variation for each combination of attributes. Go through each one and enter a price, add an image, and so on. (Tip: Use the filters above the list of variations to quickly select multiple variations and apply the same changes to each one.)
    Sell WooCommerce variations by weight
  6. Now open the 'Bulk Variations' tab and configure the following settings:
    • Make sure the Enable variations grid checkbox is ticked.
    • Set the Horizontal option to the attribute you want to display in columns for the variations grid.
    • Set the Vertical option to the attribute you want to display in rows for the variations grid.
    • Make sure the Display variation images checkbox is ticked.
    WooCommerce Bulk Variations settings
  7. Click the Publish button to add the product to your store.

On the front-end, the WooCommerce Bulk Variations plugin will display the variations along two dimensions in a grid with all the weight options.

Bonus: Selling by weight on the main Shop page

Both methods for selling WooCommerce products by weight focus on what it looks like on the single product page. For even more convenience, you can use WooCommerce Bulk Variations or WooCommerce Product Options with our other plugin, WooCommerce Product Table. This displays products in a much clearer layout on the main Shop page, like this:

WooCommerce Product Table to sell by weight

This makes it very clear to customers that the products are priced by weight. That's because we have renamed the 'Price' column in the table to clearly show that each price is based on weight, rather than by quantity.

Case study: Provenance Meat

Selling by weight is particularly useful if you’re selling meat. It gives customers full flexibility to place orders based on the exact amount they’d like to purchase whether it’s 1.5 kilograms or 1.675 kilograms. Here's an example of how Provenance Meat uses WooCommerce Product Table:

Provenance Meat WooCommerce food order form

Start selling WooCommerce products by weight

In this tutorial, we've looked at several methods for selling by weight in WooCommerce. Read about each one, and choose the combination of plugins that best suits your needs:

  • WooCommerce Product Options - Replace the standard WooCommerce quantity field with a purpose-built weight field. It supports decimal quantities, min/max quantities and more, making it ideal for selling by weight.
  • WooCommerce Bulk Variations - Create a variation for each weight option, and display them in a user-friendly order form on the single product page.

Both plugins come with a full 30-day money back guarantee. Try out your chosen plugin and start selling by weight today!

The possibility for virtual eateries or "ghost kitchens" has dramatically grown as internet usage has increased. Fortunately, you can set up and run a virtual restaurant in WordPress quickly and easily.

In this complete guide, you will learn how to build your own virtual restaurant website, which you will own 100%. This will save you lots of money compared to using a hosted restaurant ordering system such as Uber Eats, Grubhub, or DoorDash.

We’ll show you how to set up a virtual restaurant in WordPress using the WooCommerce Restaurant Ordering plugin. It only takes 10 minutes and by the time you're done, your virtual restaurant site will look something like this:

WooCommerce restaurant plugin

What is a virtual restaurant?

Most people place an emphasis on both quality and convenience. These are services that a virtual restaurant can easily offer if it is set up on the appropriate principles and adheres to the suggested procedures for serving its customers. At times, this has been the only way to keep their business running and continue trading.

A virtual restaurant (also called a ghost kitchen, ghost restaurant, or cloud kitchen) is a restaurant that offers delivery options only. Generally speaking, virtual restaurant services are facilitated through web apps and third-party delivery companies like the Postmates food delivery app. However, you can also create a virtual restaurant website with WordPress and WooCommerce.

This restaurant concept is hugely popular in most large cities like New York, Los Angeles, and Chicago. Kitchen United, for example, is a popular virtual kitchen and restaurant brand.

This foodservice business model allows restaurateurs to cut down on traditional expenses that come with offering a dine-in experience. In fact, adapting the virtual restaurant or ghost kitchen approach helped several restaurant businesses stay operational during the global coronavirus crisis. Now it's here to stay.

How does a virtual restaurant work?

Customers can go to the restaurant’s website to view menus and place their orders online. Once a customer places their order, the virtual restaurant kitchen is immediately notified, and kitchen staff begins preparing the order.

The establishment then delivers the food directly to the customer or uses a third-party food delivery service to deliver the meal to the customer’s location. Some virtual restaurants offer both online payment options and cash on delivery. Once the food is delivered, patrons can enjoy it in their own dining room.

Benefits of online-only restaurants

As compared to the traditional restaurant business model, virtual restaurants have their own set of benefits.

For starters, restaurant owners can mitigate the costs associated with finding an ample restaurant space with room for dining in and instead use that budget to create a kitchen that focuses on improving food preparation processes. Additionally, you can also opt for a shared kitchen setup.

In addition to this, virtual restaurant owners can change their menu items whenever they’d like. This is especially useful if a particular ingredient becomes unavailable or is temporarily inaccessible. This also means that you can experiment with your menu and swap out dishes that aren’t popular with your customer base.

Not to mention, studies indicate that customers favor home-delivery dining options, which makes a strong case for setting up a virtual restaurant.

Types of food that sell best from virtual restaurants

One of the key benefits of running a virtual restaurant is that you can use the wealth of dynamic customer data available to you to your advantage. For example, you might search for the different types of foods and meals that sell best from virtual restaurants and pizzerias in your area on Google.

Best takeout food

Here are some popular examples:

  • Chinese and Japanese food – sushi, noodles, spring rolls
  • Indian food – BBQ, chicken tikka masala, naan
  • Mexican food – tacos, burritos, nachos, taco salad
  • Pizza – make your own pizza with different toppings and crust sizes
  • Mediterranean food – shawarmas and Greek salad
  • Fast-casual food – burgers, sliders, wraps, fried chicken, and fries

How to set up and run a virtual restaurant

The first thing you need to do is set up an attractive, easy-to-use website for your virtual restaurant complete with an order form and delivery slots.

For this, we recommend using WordPress and WooCommerce, so you have full ownership of your virtual restaurant website. This isn’t possible with a hosted solution like Uber Eats, Deliveroo, and Just Eat.

If you don’t already have a WordPress website, you’ll need to choose a hosting company to make your website available to patrons. We recommend going with a reliable web hosting provider like Kinsta.

Once that’s done, we’ll show you how to set up a virtual restaurant using the WooCommerce Restaurant Ordering and WooCommerce Delivery Slots plugins. Together, these fantastic plugins provide everything you need to build a WooCommerce virtual restaurant.

Here’s a complete video tutorial you can follow:

Step #1: Create your virtual restaurant website

If you don’t already have a WordPress website set up, you’ll need to create one on a hosting account. We recommend Kinsta as they’re a managed WordPress host that’s perfect for running a website for your virtual restaurant.

The best part is that you can install WordPress directly from your Kinsta account. Once you’ve entered your domain name, location, and site title, you can configure your login credentials and install WooCommerce to enable e-commerce features.

The WooCommerce Setup Wizard is incredibly intuitive and walks you through the process of setting up e-commerce features for your virtual restaurant website. Since you’ll be offering food delivery options, it’s important to configure your shipping zones and delivery areas carefully.

If you deliver food to a single area and charge the same delivery costs then you only need to create one shipping zone. However, if you’re going to deliver food to multiple areas and charge different costs depending on the area, you’ll need to create multiple shipping zones.

WooCommerce lets you choose from three different delivery options including flat rate, free shipping, and local pickup.

Later, I'll also show you how to add delivery slots and opening hours for your virtual restaurant.

Step #2: Add a food menu

The next step is to add each food item as an individual WooCommerce product. To keep things organized, start by creating different categories for your menu items similar to how you’d do it on a paper menu. For example, your categories might be Starters, Main Courses, and Desserts.

Once that’s done, head over to Products → Add New from the WordPress admin panel to add each food as a product. At the bare minimum, you should enter a title, brief description, image, and price of the food item. Select the appropriate category for the food item. Consider adding nutritional information and allergens to the product description.

If you’re thinking of selling make your own pizzas or need a way to offer a choice of options for a dish, you’ll need to create a variable product or add-on fields. Variations let customers choose from a dropdown, whereas add-ons are great for selling optional extras such as pizza toppings or sandwich fillings.

WooCommerce Restaurant Ordering plugin integration
Customers can choose variations and add-ons from a lightbox

Step #3: Create a food order form using WooCommerce Restaurant Ordering

To let customers place orders, you’ll need to create an order form using the WooCommerce Restaurant Ordering plugin. You’ll receive the plugin files and license key in an email.

  1. Install the plugin to your WordPress website and activate it.
  2. Next, head over to WooCommerce Settings Products Product table from the WordPress dashboard and activate the plugin license.
  3. Now, go through the different settings available with the WooCommerce Restaurant Ordering plugin to configure your food order form. This includes adding opening hours. You can ignore these if your virtual WooCommerce restaurant is open 24/7. But if you only want to accept orders while you're open, then this is a must.
WooCommerce Restaurant Ordering plugin settings
Control your virtual restaurant order system on the plugin settings page

Finally, go to the list of Pages in the WordPress admin and find the page called 'Restaurant Ordering'. Rename this to whatever you like, e.g. 'Order Food Online'. This page lists all the food products that you added in step 2, divided by category:

WooCommerce Restaurant Ordering WordPress plugin

Your main restaurant ordering page is created automatically

If you'd rather list different categories on different pages, then you can do that using the restaurant ordering shortcode.

WooCommerce resturant plugin flexible food order forms
Use the shortcode if you need different settings for each category

Add a cart

Most virtual restaurants display a cart on the food ordering page. This shows the items in your order and makes it easy to click through to the checkout.

The easiest way to do this is to add a sidebar to the restaurant ordering page. Most themes come with page templates that include a sidebar. You can then go to Appearance → Widgets and add the 'Cart' widget to the sidebar.

WooCommerce restaurant widget

If you don't want a sidebar and prefer to keep your page full-width, then you can add a floating popup cart using the WooCommerce Fast Cart plugin.

WooCommerce restaurant floating cart
Add a floating side cart with WooCommerce Fast Cart

Step #4: Set opening hours and delivery times

If you’re offering food delivery options at your virtual restaurant, you’ll need an easy way to manage customer expectations and delivery orders. You can do this with the WooCommerce Delivery Slots plugin.

Once you have the Delivery Slots WordPress restaurant plugin installed and activated on your website, go to WooCommerce → Opening Hours to configure your opening hours, delivery dates and time slots. Here are some of the main features you’ll want to use for your virtual restaurant site:

  • Delivery dates and time slots – You can add delivery slots based on the way you choose to structure food deliveries.
  • Maximum number of deliveries per time slot – This option lets you better manage kitchen capacity by adding a limit to the number of delivery orders per slot.

Set up your virtual restaurant today

If you’re looking for ways to keep your restaurant running with minimal costs, consider setting up a virtual restaurant (or ghost restaurant) that serves solely as a delivery base or offers takeout. You can do this whether you have a physical restaurant or not. Virtual restaurants are hugely popular in the restaurant industry.

Start by installing the WooCommerce plugin on your WordPress website. Next, add food items as individual products in WooCommerce. Finally, use the WooCommerce Restaurant Ordering and WooCommerce Delivery Slots plugins to create a front-end order form with a table of available delivery time slots.

Ready to set up your virtual restaurant and grow your bottom line? Get WooCommerce Restaurant Ordering today!

How to handle WooCommerce stock issues

The coronavirus crisis has had a huge impact on e-commerce stores. WooCommerce store owners have suddenly faced large numbers of out of stock products, and difficulties ordering supplies. However, even though stock problems due to COVID-19 are out of your control, there's still plenty you can do to keep customers happy.

Think about it from the customer's perspective. You've visited an e-commerce website, but the product you need is out of stock. Which of these messages would you prefer to see?

How frustrated would you feel to see an 'Out of stock' message without any further information? The customer wants to know when the product will be back in stock - this helps them to decide whether to shop elsewhere. And if you don't have this information, then they need you to notify them when the product is back in stock.

Fortunately, there are some excellent WooCommerce plugins that can improve the way you handle temporarily out of stock products and variations. You can these as standalone solutions, or you can combine them and use the plugins together.

#1 - Add a notice to temporarily out of stock products

Out of stock product with lead time

The WooCommerce Lead Time plugin lets you add a custom text message which appears next to the stock information on the product page. You can add the same message for all products, or you can add a custom message for each product.

This is how to set it up:

  1. Install WooCommerce Lead Time.
  2. Go to WooCommerce → Settings → Products → Lead time.
  3. Activate your license key (you'll receive this in the order confirmation email) and choose the plugin settings:
    1. Tick the boxes to display the message on backorder and/or out of stock products only.
    2. If you like, enter a prefix to appear before the lead time text for each product (e.g. you might set this as 'Stock expected on:'
    3. If you want to show the same message for all out of stock products, then enter a global lead time.
    4. Save your changes.
WooCommerce global product lead time
Set a global lead time and wording on the settings page

If you've entered a global lead time message, then this will appear for all products with the stock statuses that you selected on the settings page. Alternatively, you can add a different message for each product on the 'Edit Product' screen under Product Data → Inventory.

If you know when the product will be back in stock, choose the 'Dynamic' lead time option. This lets you select the expected availability date from a calendar. The WooCommerce Lead Time plugin will then display a countdown displaying the number of days or weeks until the product will be back in stock.

Alternatively, enter a static lead time with whatever text you want to display on the page.

For more advice, check out the plugin knowledge base.

#2 - Add a WooCommerce email when back in stock plugin

WooCommerce email when back in stock

The YITH WooCommerce Waiting List plugin displays an email field and 'Join waitlist' button for out of stock products. Customers can enter their email address to receive an email when the product is available again.

A 'Notify me back in stock' WordPress plugin an excellent way to avoid losing their business. They're less likely to buy from your competitors because they know they will hear from you when the product is back in stock.

How to set it up:

  • Get the YITH WooCommerce Waiting List plugin and install it on your WordPress site.
  • As soon as you activate the plugin, the 'Email when back in stock' option will appear for all your out of stock products. Simple!

You can also see the plugin documentation for further information.

Get the plugin

Use both plugins together for best results

Of course, you can provide an even better experience for your customers by providing helpful information about when the product is due back in stock, and by allowing them to sign up to be notified.

The two plugins work perfectly together - you can use WooCommerce Lead Time to add the availability notice, and WooCommerce Waitlist for the email signup:

Out of stock message and email when back in stock

Can I just un-publish unavailable products?

No, absolutely not! If your search engine position is important for your store, then you should leave out of stock products online.

Unpublishing them will affect your SEO by temporarily removing them from search results - and it may not be easy to regain your previous ranking for the product. It's better for SEO to keep the products online, while providing clear and helpful information to your customers using the tips in this article.

This will help to retain your search engine position, while minimizing the number of lost sales for you. After all, if customers can see the products and sign up to be notified when they become available, then you may not have lost the sale after all.

Discontinued products

WooCommerce Discontinued Products

Before we finish, it's worth mentioning that there's a difference between products which are temporarily and permanently out of stock. The advice about is about temporarily out of stock products which will become available again soon.

The situation is very different for end-of-life products which will never come back into stock:

  • Customers need to know that the product will never be available again.
  • You don't want to lose the SEO value of your discontinued product pages.
  • Store owners need to view and manage discontinued products separately from out of stock products in the WordPress admin and stock reports.
  • You need to recommend alternative products to avoid losing the sale.

The WooCommerce Discontinued Products plugin is the perfect solution for managing end-of-life products. Use it for permanently out of stock products, while using the advise from earlier in this article for products which will be available again soon.

Where to get the plugins

There's plenty you can do to help your customers when products are unexpectedly and temporarily out of stock. You can:

Improving your out of stock messaging won't change the world, but it's one small step that you can take to help people to get the supplies they need during the coronavirus crisis.

WooCommerce price matrix

If you sell to wholesale buyers or stock variable products, a WooCommerce price matrix can help you list product variations in a grid or matrix layout. This makes it easier for customers to view variations at a glance, see pricing, and quickly add variations to their shopping cart.

In this article, we’ll take a closer look at what a WooCommerce price matrix is and how you can use it to list product variations in a variety of different ways using WooCommerce Bulk Variations. We’ll also share some examples of products you can list in a WooCommerce price matrix.

What is a WooCommerce price matrix?

A WooCommerce price matrix lets you list WooCommerce product variations in a grid or matrix layout instead of a simple price list. There are 3 easy ways to list variations in WooCommerce:

  1. Price matrix - list all the prices for a specific variable product.
  2. Variations order form matrix - list all the variations for a specific product with quantity boxes and add to cart button.
  3. List prices for multiple products in a table - list prices for multiple products in a table layout.

What sort of products should you list in a WooCommerce price matrix?

A WooCommerce price matrix is perfect for listing products that have one or two variation attributes (e.g. 'size' and 'color'). The price matrix makes it easy for customers to see the available variations at a glance and make an informed buying decision. One attribute (e.g. 'size') appears along the horizontal axis of the matrix, and the other attribute (e.g. 'color) appears along the vertical axis, with the variations in the middle.

Here are some examples:

  • Clothes (such as t-shirts) and shoes available in different colors and sizes.
  • Furniture with color and material variation attributes.
  • Tech products (like smartphones) with color and storage variations.
  • Printer inks with compatible printer models and ink color variations.
  • Custom jewelry with metal and stone variations.

Put simply, if you sell products that have one or two variation attributes, listing them in a WooCommerce price matrix is the best way to increase variation visibility and make it easier for customers to quickly purchase variations in bulk.

And the great news is that you can do this in minutes with the WooCommerce Bulk Variations plugin.

If you want to list prices for more than one product in the same matrix, then you'll need the WooCommerce Product Table plugin instead.

Different ways to list variations in WooCommerce

Here, we’ll step through some of the different ways you can list variations on your store using WooCommerce plugins:

#1: Price matrix

A WooCommerce price matrix simply displays the variation’s product price in a grid or matrix layout. This is perfect for creating a price matrix in WooCommerce for displaying product variation information only without giving customers the option to purchase directly from the matrix.

For example, you might want to display a price matrix in the short description on the single product page, with the usual variation dropdowns and add to cart button underneath.

The product variations in a price matrix layout are listed in a grid or matrix with a separate price for each variation, without a quantity box.

Here’s how you can set up a price matrix layout using WooCommerce Bulk Variations:

  1. From the Product data section on the Edit Product screen, navigate to the Bulk Variations tab and tick the checkbox next to the Enable bulk variations grid.
  2. Tick Disable purchasing.
  3. Select the variation attributes to display in the Columns and Rows of the price matrix using dropdowns.

Tip: You can also enable the variations grid for individual products, or use a shortcode to insert it anywhere on your site.

#2: Variations matrix layout

If you sell to wholesale buyers, then you might consider displaying quantity selectors in the matrix along with pricing information. This way, customers can quickly enter the number of each variation they’d like to purchase and add multiple variations to their cart in one go.

With WooCommerce Bulk Variations, the product variations are displayed in a matrix-style grid with a separate quantity box for each one along with pricing information. Customers simply enter the quantity they wish to purchase for each variation and click a single Add to Cart button to add selected variations to the cart at once.

Here’s how you can set up a variations matrix layout using WooCommerce Bulk Variations:

  • From the Product data section on the Edit Product screen, navigate to the Bulk Variations tab and tick the checkbox next to the Enable bulk variations grid
  • Make sure that the Disable purchasing checkbox is unticked.
  • Select the variation attributes to display in the Columns and Rows of the price matrix using dropdowns.

#3: Product table layout

WooCommerce price list plugin

With WooCommerce Bulk Variations, if you want to list the prices for more than one product on the same page, then you can use a shortcode to add as many matrixes as you like. There will be one price matrix for each product.

If you need to list prices for multiple WooCommerce products in the same matrix, then you'll need the WooCommerce Product Table plugin instead. This lists the prices for simple or variable products with one product on each row of the table. For variable products, you can either list each variation on its own row, or you can have one product per row with variation dropdowns.

Bonus tip: Manage variations more easily

I expect you've noticed that it takes forever to edit the prices, images etc. of variations in WooCommerce. For example, let's say that a t-shirt shop has 15 variations in the 'Large' size and wants to change all their prices to $50. To do this, the store owner has to edit each of the 15 variations individually.

You can save lots of time by using the bulk management features that come with the WooCommerce Bulk Variations plugin. These let you select specific variations and apply bulk actions to them together.

If you've followed Method 1 or 2 of this tutorial then you have already installed WooCommerce Bulk Variations. Go right ahead and use its variation management features.

If you're using Method 3 then you can still use WooCommerce Bulk Variations to bulk-edit variations. The only difference is that you will also be using WooCommerce Product Table to display the variations. As a result, you need 2 plugins in total. One for the front end, and one for the back end.

Where to get the WooCommerce price matrix plugin

Listing WooCommerce product variations in a matrix makes it quick and easy to see the price of each variation. Depending on which variable products you’re selling, you might create a:

  • Price matrix for WooCommerce products
  • Variations matrix layout
  • List variations in a pricing table
  • List variable products in a table with dropdowns

Ready to create a price matrix for your WooCommerce products? Install the WooCommerce Bulk Variations plugin today!