Your guide to organizing the WordPress media library

The WordPress Media Library is where all images, videos, and other media files are stored on any WordPress site. With your website’s media assets stored in a library, you need to make sure you keep it organized.

A cluttered and disorganized Media Library can cause problems with site performance, broken links, and the most obvious, difficulty finding the right media file when you need them.

Although performing basic management of your Media Library is straightforward, things can easily get messy over time. In this article, I’ll show you how to improve the organization of your WordPress Media Library and make it easier for you to manage. You'll learn how to organize and display media files to create an organized, optimized Media Library for both you and your users.

We even made a video guide to go along with this article:

Where to find the WordPress Media Library?

The default WordPress Media Library can be easily accessed by navigating to the left sidebar from the WordPress admin dashboard. Simply navigate to Media → Library from the WordPress admin panel to open your website’s Media Library.

WordPress media library

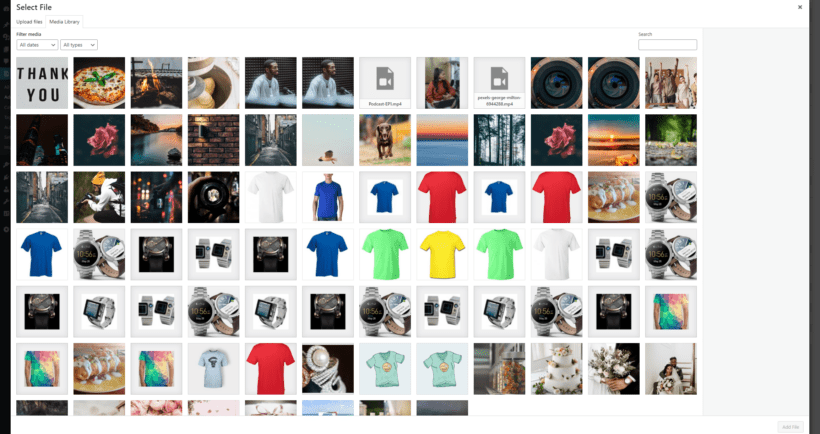
By default, the WordPress Media Library organizes all items in your media library by media type:

Media types in WordPress

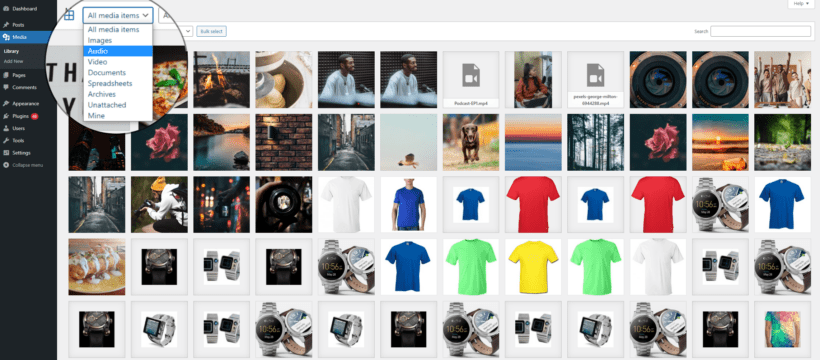
This means you can sort your media library by selecting only images, videos, audio, documents, spreadsheets, unattached, or by your own uploaded files. By using the All dates dropdown menu you can filter out specific media files by their upload date. You can also search for specific files using the search bar on the right side.

The limited sort and filter options make it difficult to find multiple media files at once. For example, if you need to find video and audio files for your podcast then it can be a headache to filter both media types using the default WordPress sorting and filtering options.

On top of this, the default layout of the WordPress Media Library is not very user-friendly. It essentially clutters all of your media files into a library that’s difficult to navigate. There's no built-in functionality to organize or categorize media files.

Method 1: How to organize the Media Library through FTP

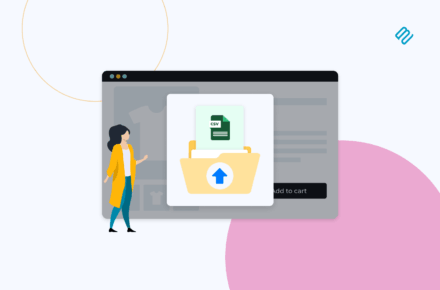
All the files in the WordPress Media Library are ultimately stored in the website's file system. You can use any FTP (File Transfer Protocol) tool to organize these files more efficiently.

FTP gives you direct file system access so that you can create custom folder structures, rename files, and perform bulk edits that aren't possible through the WordPress admin. This can be especially useful for sites with large Media Libraries, where the default monthly/yearly structure becomes unwieldy. FTP also provides a way to backup and restore your full media collection independently of the WordPress database.

However, directly modifying WordPress media via FTP does have some disadvantages. The WordPress Media Library consists of both the file system and MySQL database working together. This means that if you simply moved or reorganized media files via FTP without updating the database, then this is likely to cause problems. That's because it would break any existing references to the old file paths within your WordPress content, custom fields, or other integrations. Images will not display correctly in the front end, and you may see 404 errors when trying to access the media.

If you're unsure of how to do this safely, then I recommend using Method 2 (below) instead.

Organizing WordPress Media with FTP

  1. Access your WordPress file system via FTP. You can use a desktop FTP client like FileZilla or access the files directly through your web host's control panel.
  2. Navigate to the /wp-content/uploads/ directory. This is the default location where all media files uploaded through WordPress are stored.
  3. Examine the existing folder structure. By default, WordPress automatically creates subdirectories based on the year and month the media was uploaded. For example, you may see folders like /2024/11/ for content added in November 2024.
  4. Before making any changes, back up your entire /wp-content/uploads/ directory before. This will ensure you can easily restore your media library if needed.
  5. To further organize your media, you can create additional subdirectories within the yearly/monthly folders. For instance, you could have /2024/11/blog-posts/, /2024/11/social-media/, and /2024/11/product-images/ to categorize files by their intended use.
  6. When uploading new media via FTP, be sure to place the files in the appropriate subdirectory. This will maintain the organizational structure and prevent your media library from becoming cluttered.
  7. In addition to creating new folders, you can use FTP to rename, move, or delete existing media files as needed. However, be careful when making such changes because they could potentially break links or functionality on your WordPress site.
  8. If you make structural changes to your media structure, you should update any references to the old file paths within your WordPress content. You can use a free plugin like Update URLs to automate this.

By using FTP to organize your WordPress media, you can maintain a well-structured, efficient, and easy-to-manage file system. This will organize the files behind the scenes, but things won't look any different in the WordPress admin. For that, I recommend keeping things organized using the Document Library Pro plugin instead. We'll talk about this next.

Method 2: Organizing the Media Library with Document Library Pro

Media Library folder layout

One of the most effective ways to organize the WordPress Media Library is by creating a front-end media library. As the name implies, it’s a media library that can be accessed directly from the front-end of your WordPress site. This means, instead of using the admin panel to access the WordPress Media Library, you and your site visitors can access it on your site’s main pages.

This method doesn't change how your media is structured behind the scenes. Instead, it keeps everything organized and categorized in a front end format that everyone can see.

Introducing Document Library Pro

The Document Library Pro plugin makes it easy to manage media files on your WordPress site and organize them into multiple front-end media libraries. You can upload multiple media files to a single library and display them anywhere on your WordPress site.
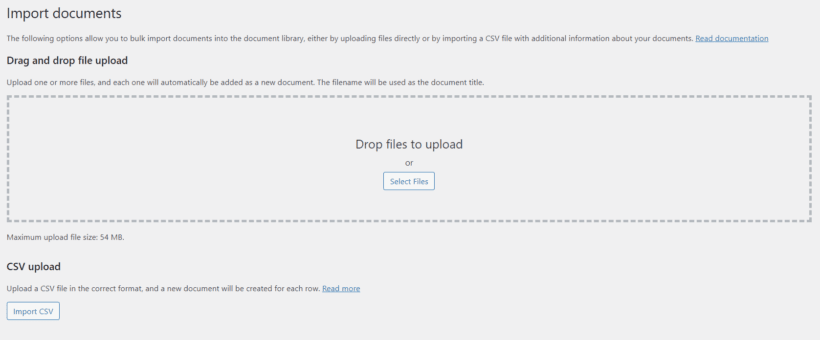
Key features

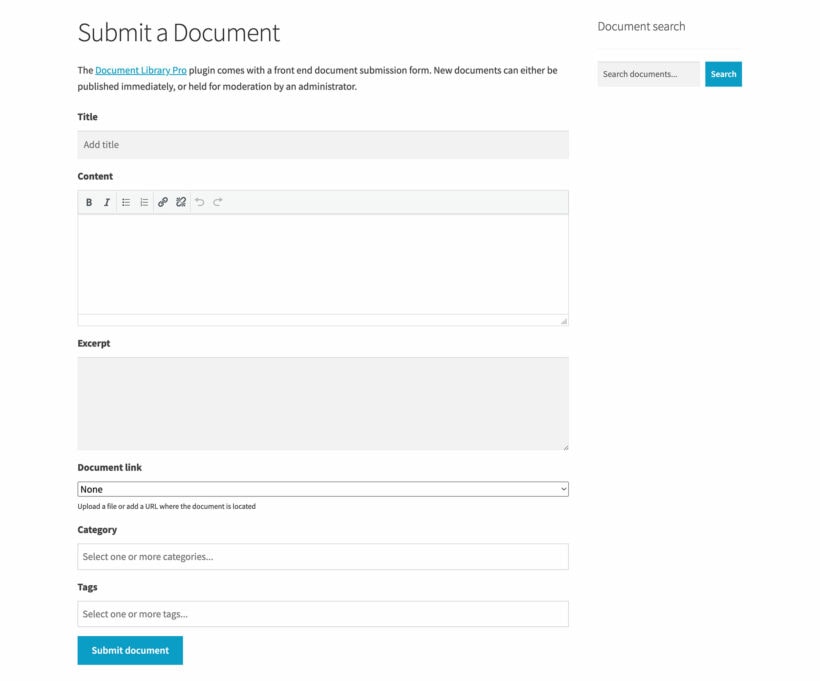
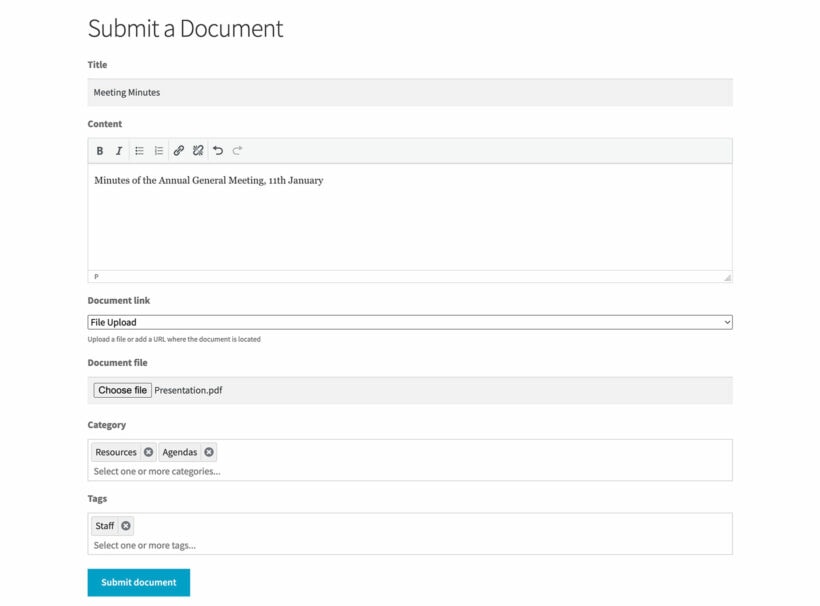
Full control over document uploading

Using the plugin, you have full control over how media files/documents are uploaded to your WordPress site. It lets you properly categorize your media files by adding categories, tags, and other important document data.

Document Library Pro also supports uploads for most types of media types as well as third-party URLs such as embedded audio and video players.
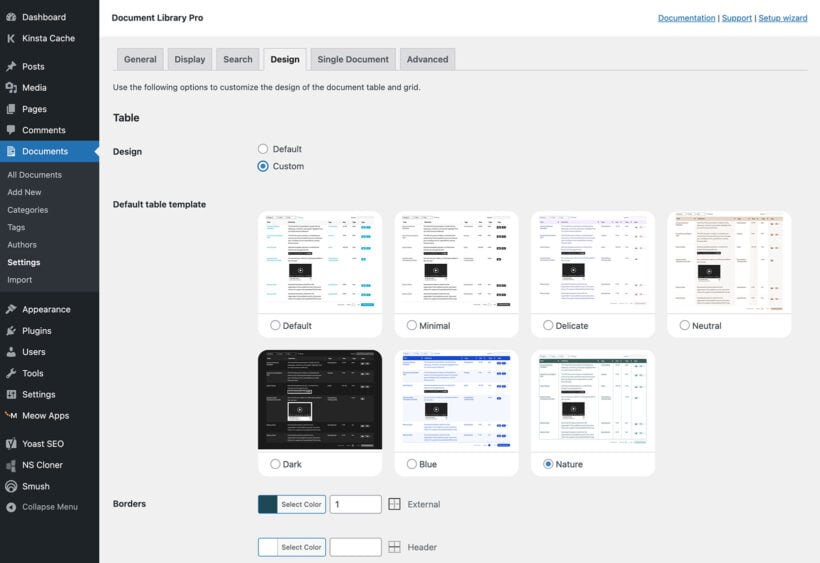
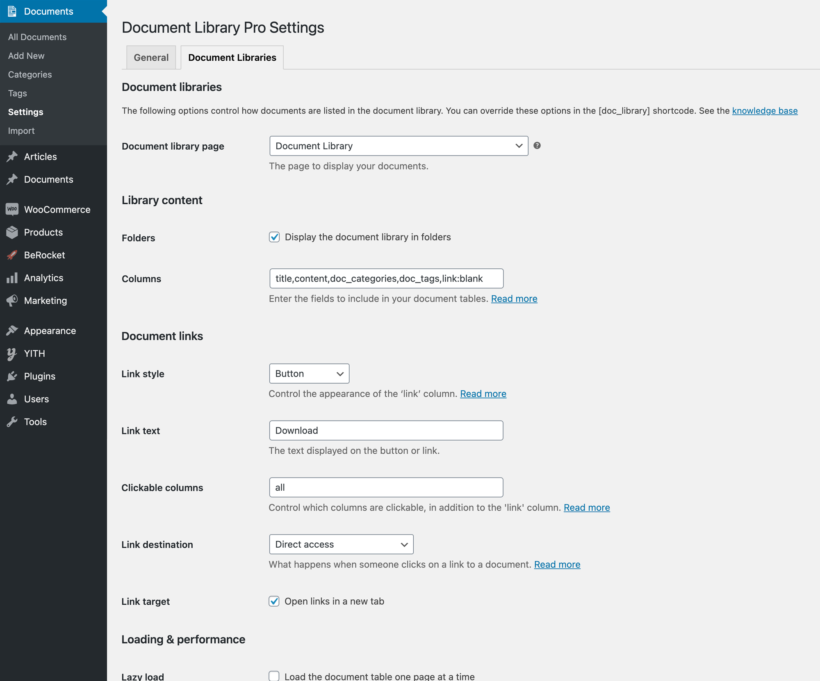
Customizable

The best part about the plugin is that it’s flexible and lets WordPress site owners completely change the look and feel of their front-end media libraries. You can showcase download buttons, links, and icons on your WordPress Media Library, change how the library looks using over 50 different customization options, and even create private document libraries by using it with the Password Protected Categories plugin.

Front-end media library plugin

While it’s called a document library plugin, you can think of it as a front-end media library or resource library add-on. A front-end media library is essentially a place where each document is a different media file and has complete optional information such as an image, excerpt, description, tags, and categories. For more information, check out our guide on how to create a front-end media library in WordPress.

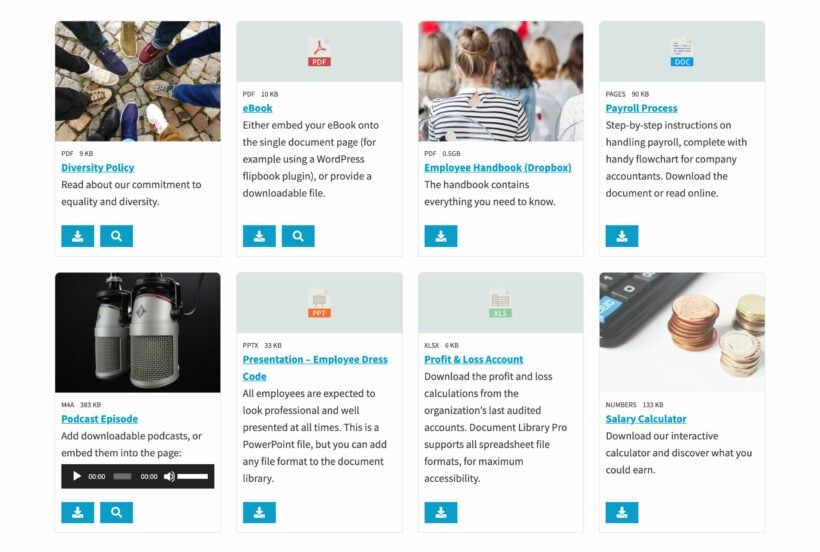
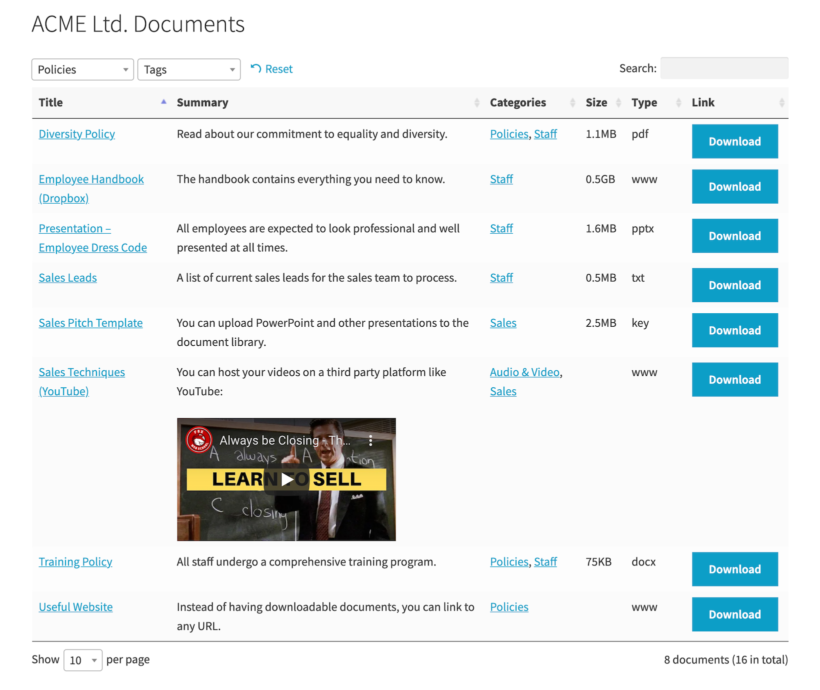
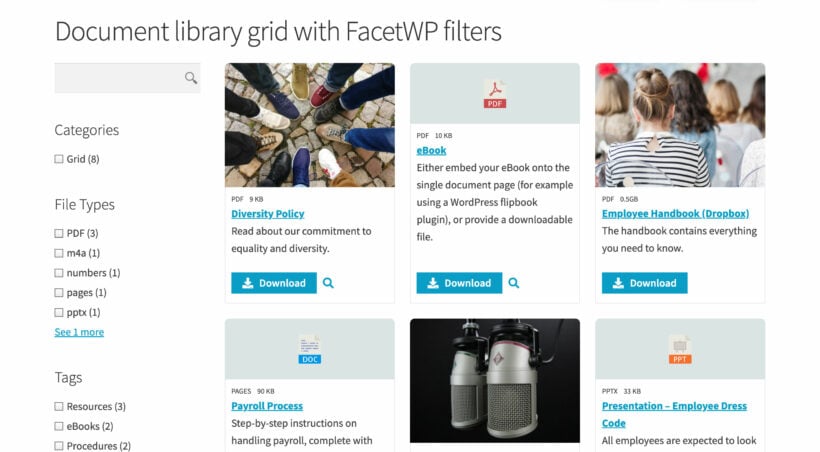
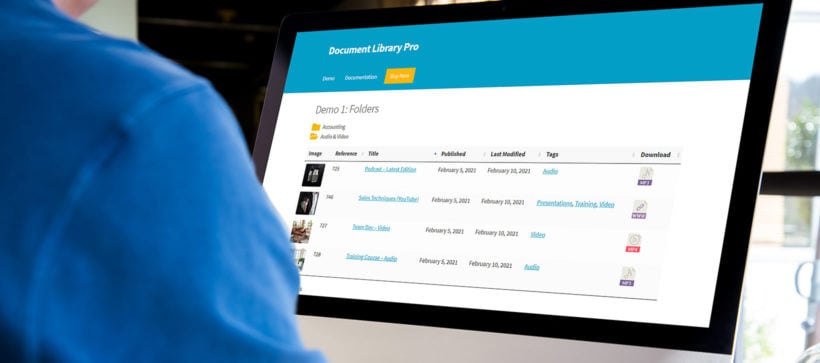
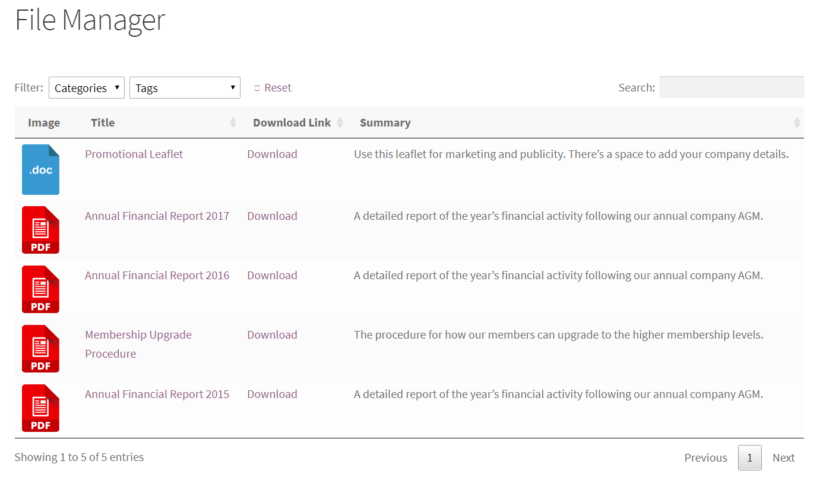
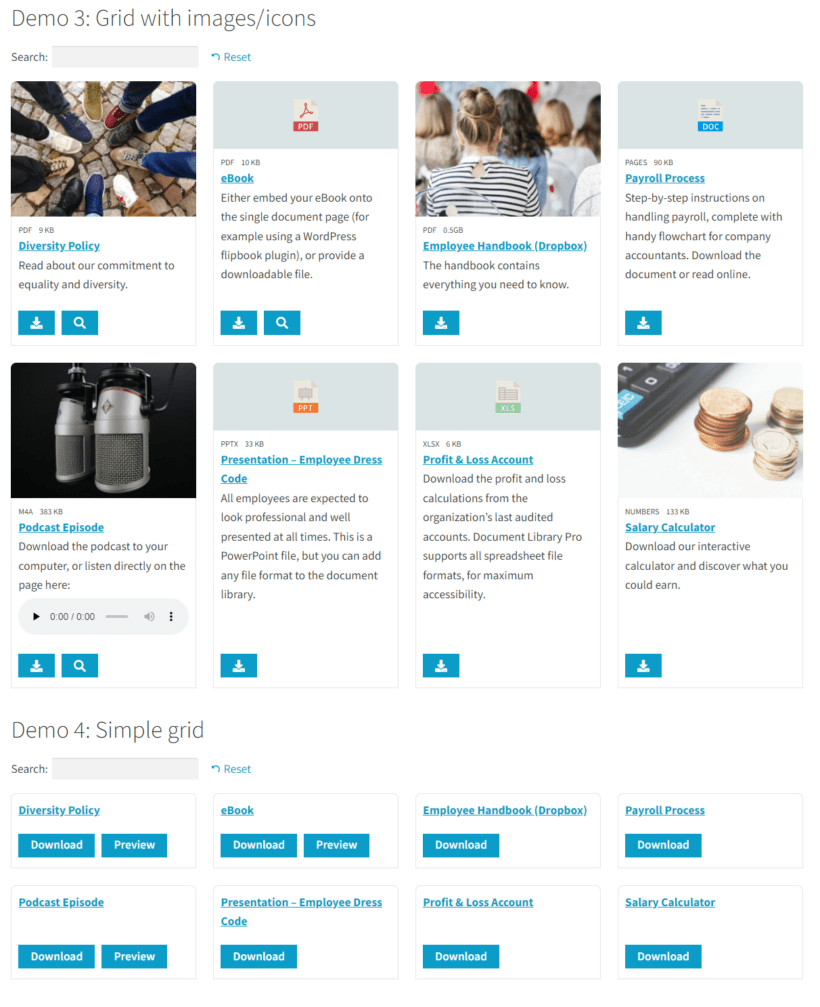
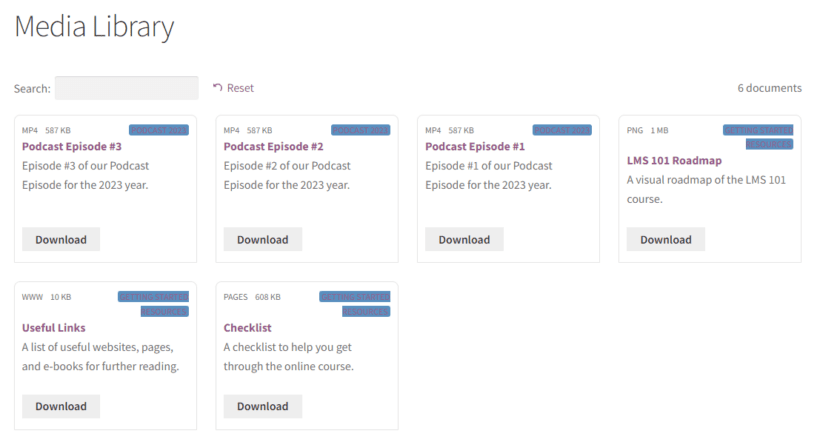
The plugin's grid layout is a great way to showcase multiple types of media files in a single place with large images and descriptions for easy navigation. Users can click on the download button to easily access the media files without having to navigate to another page:

Media Library grid layout

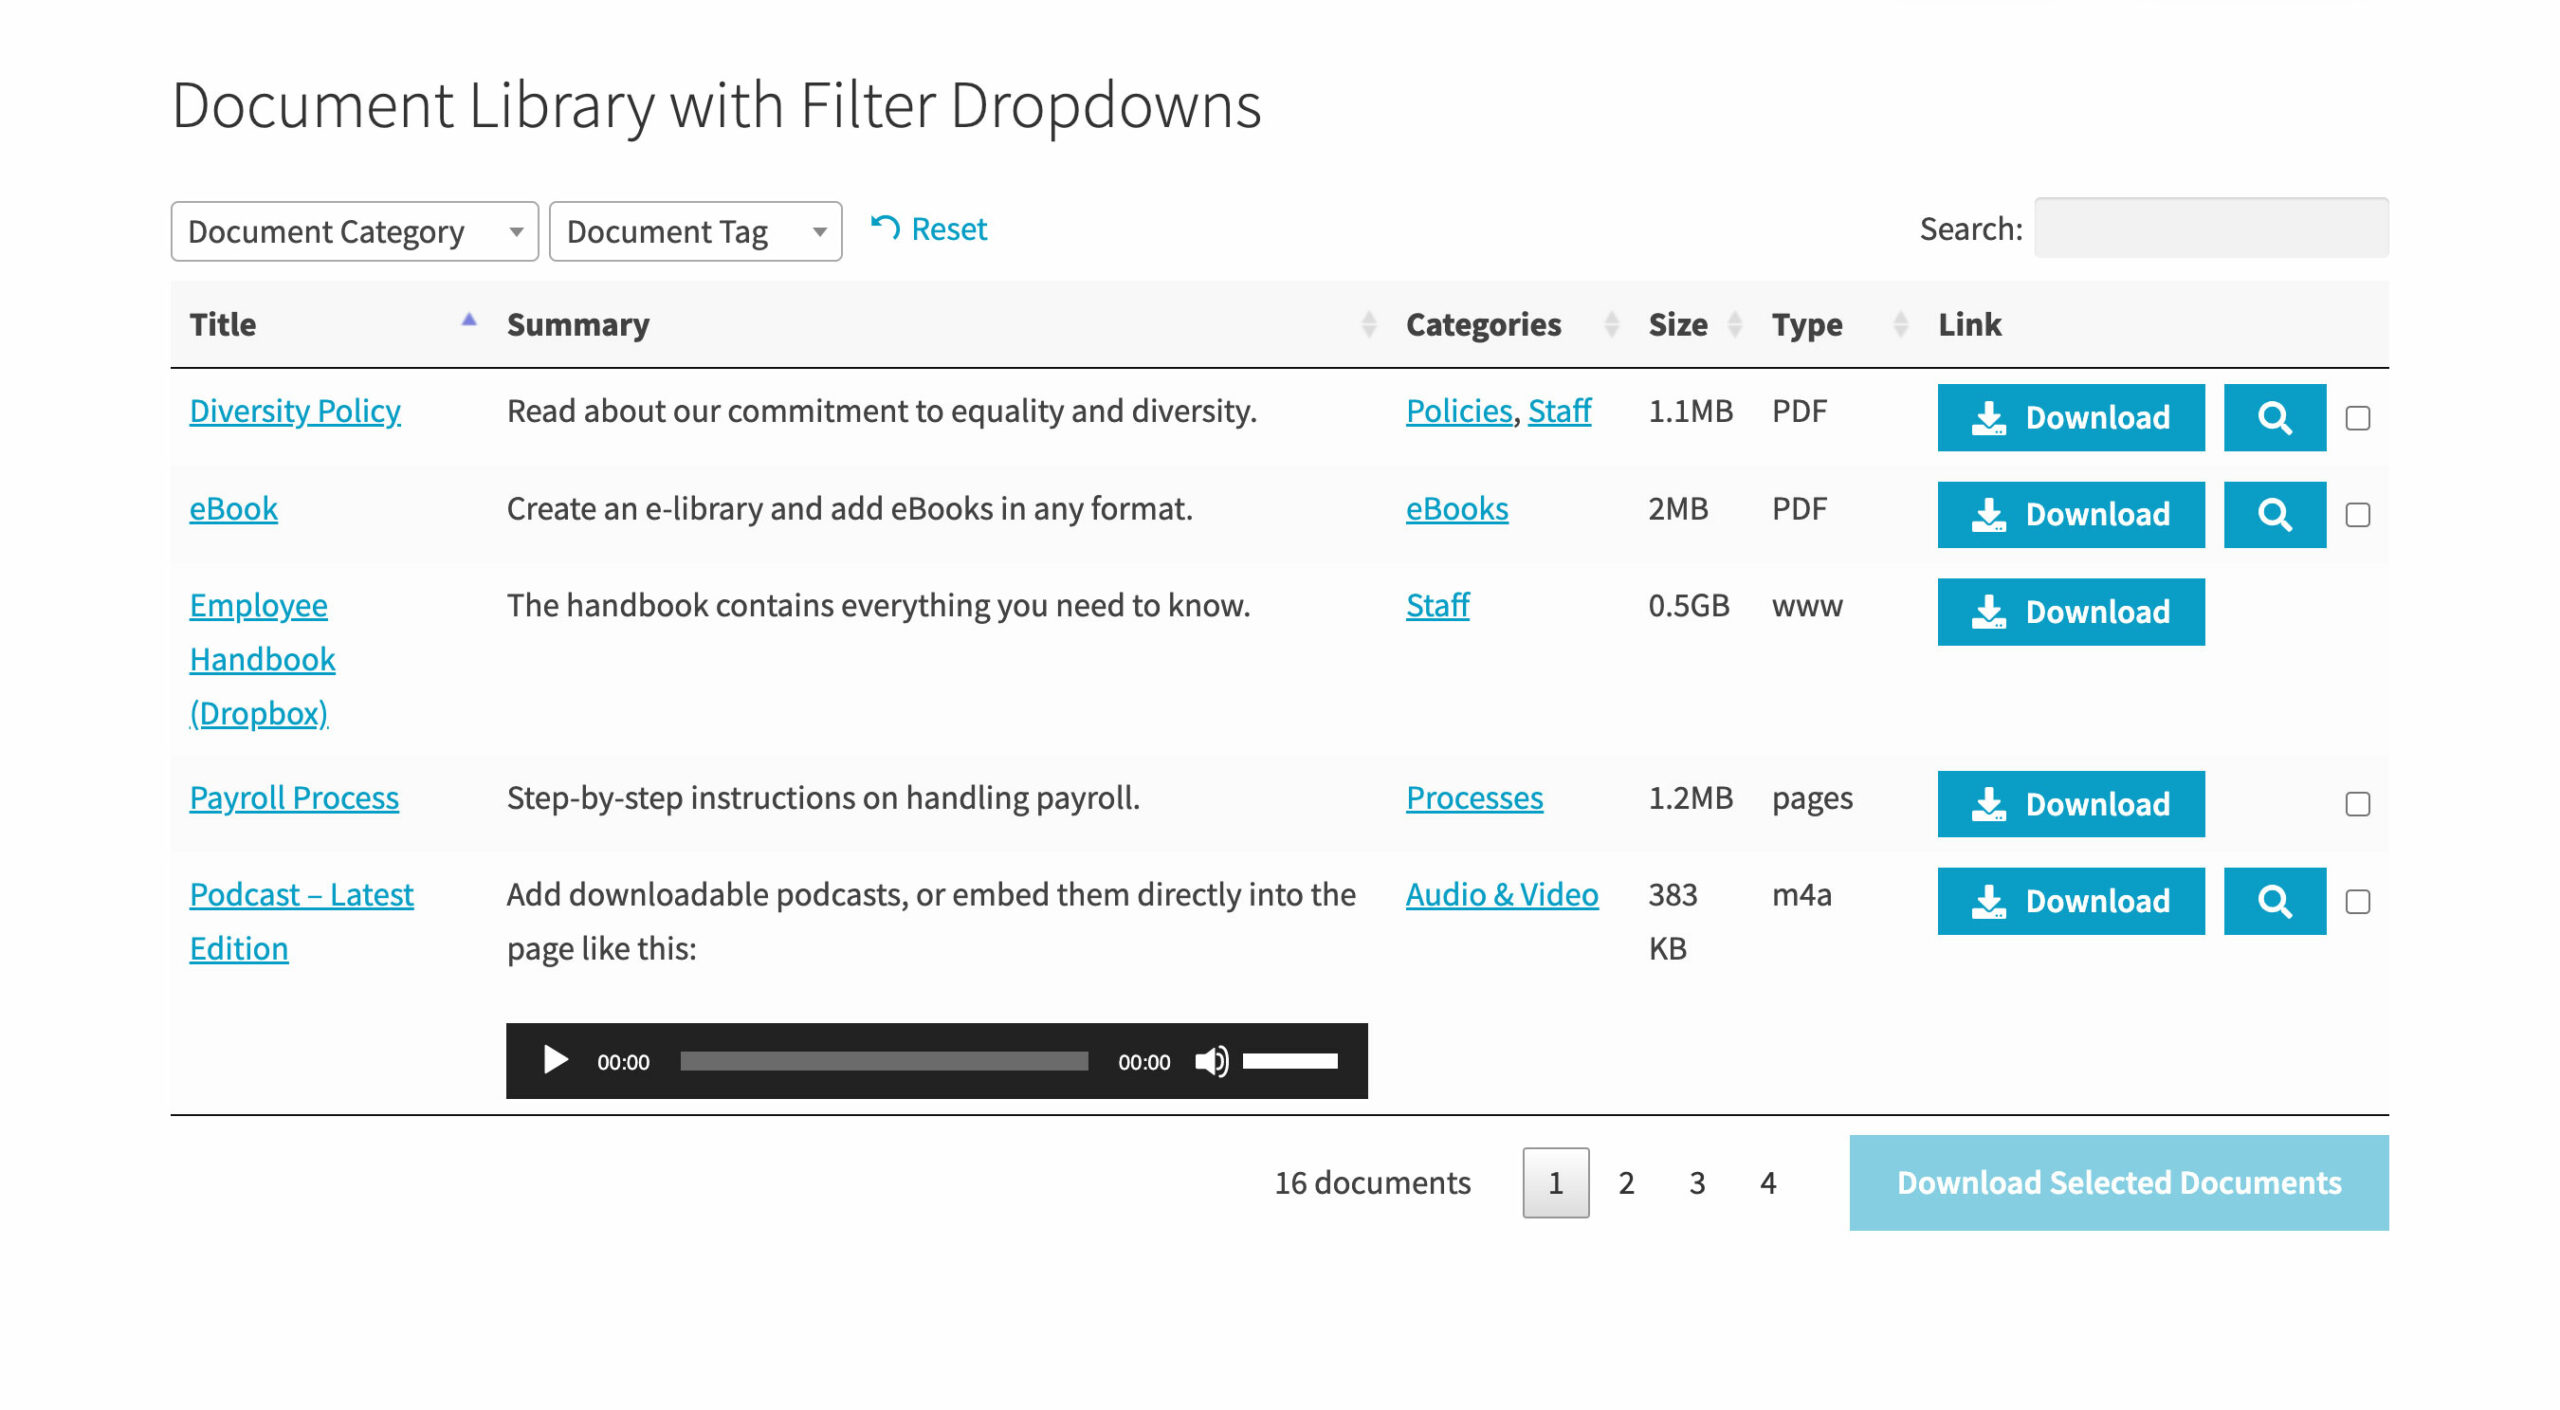
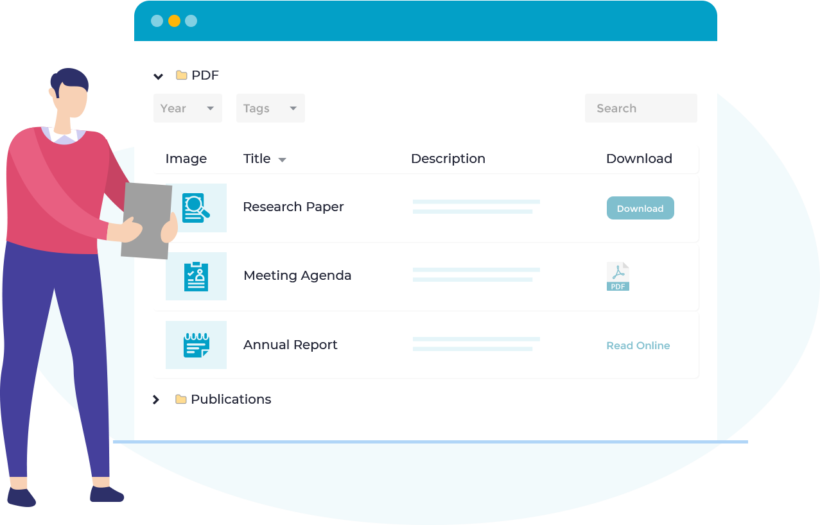
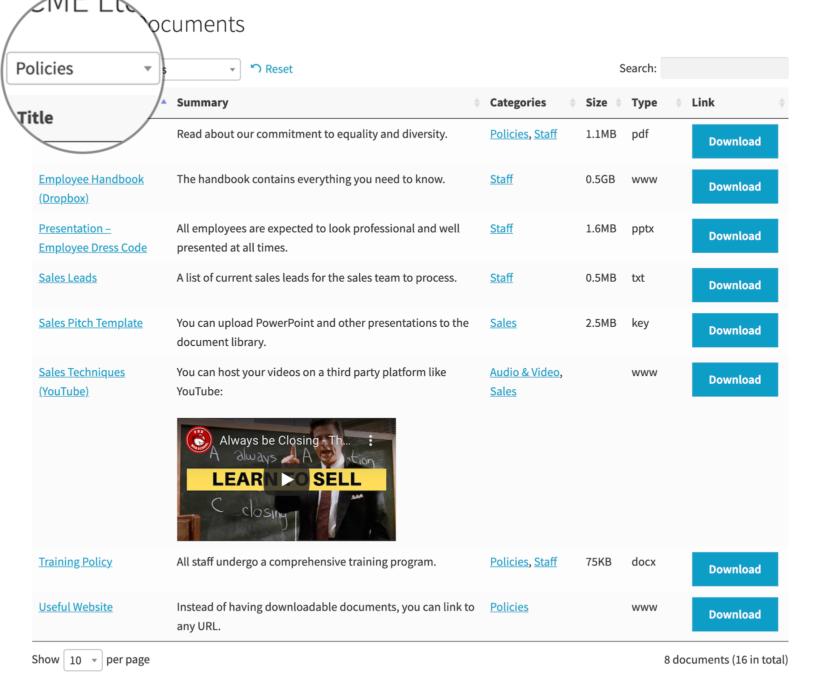
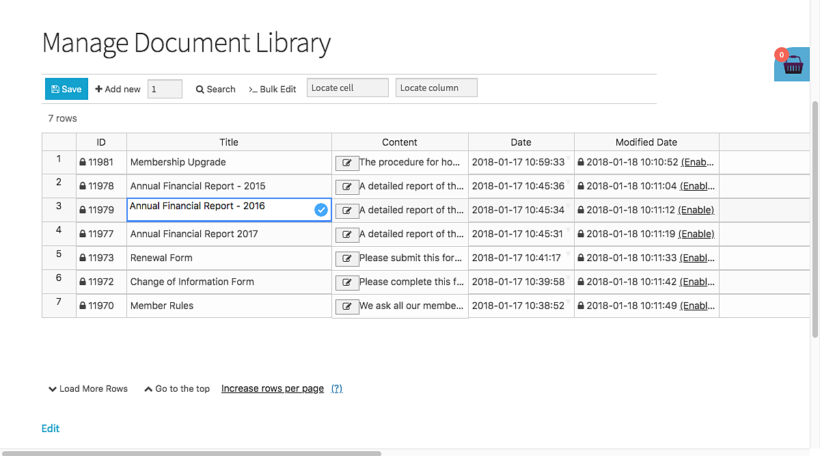
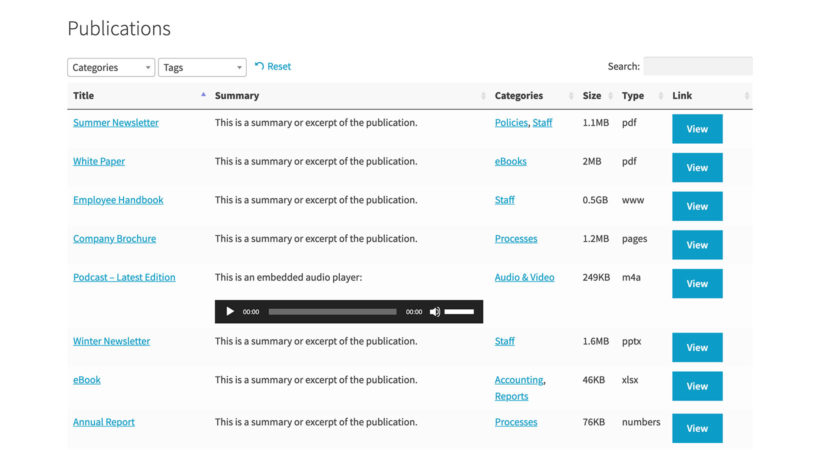
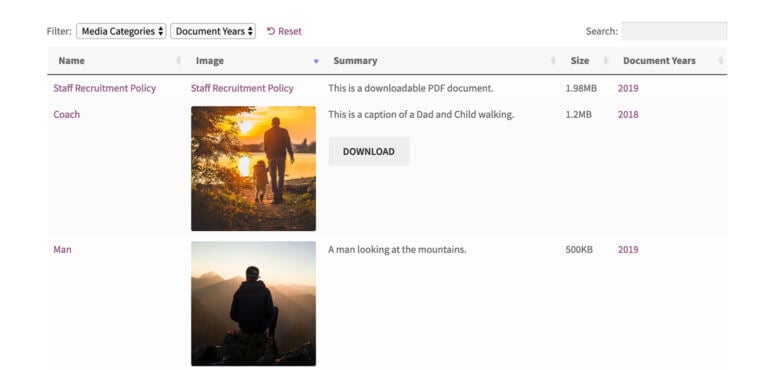
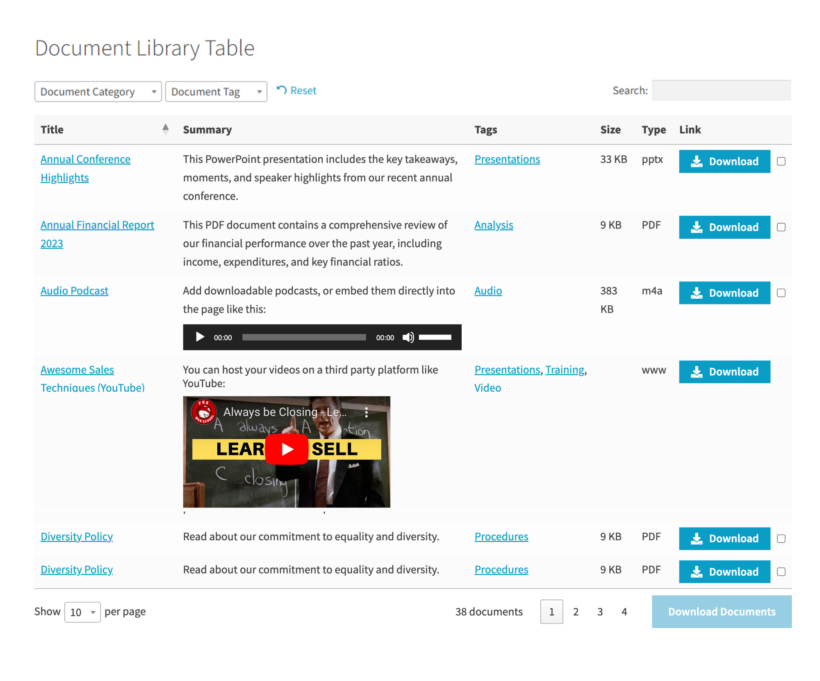
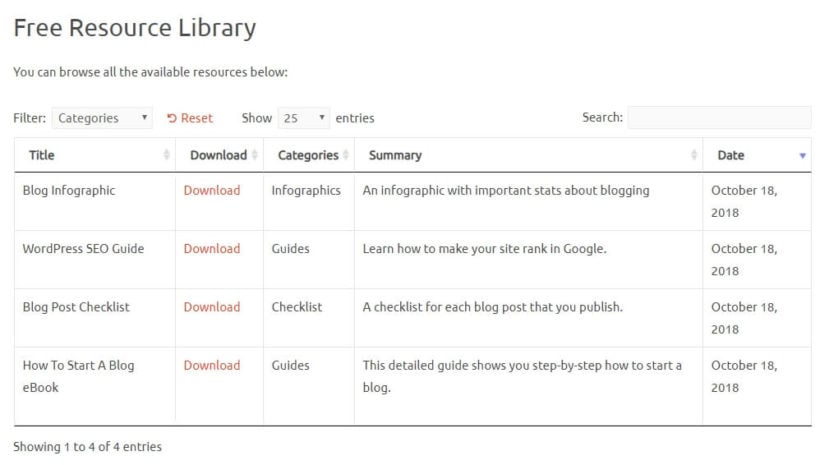
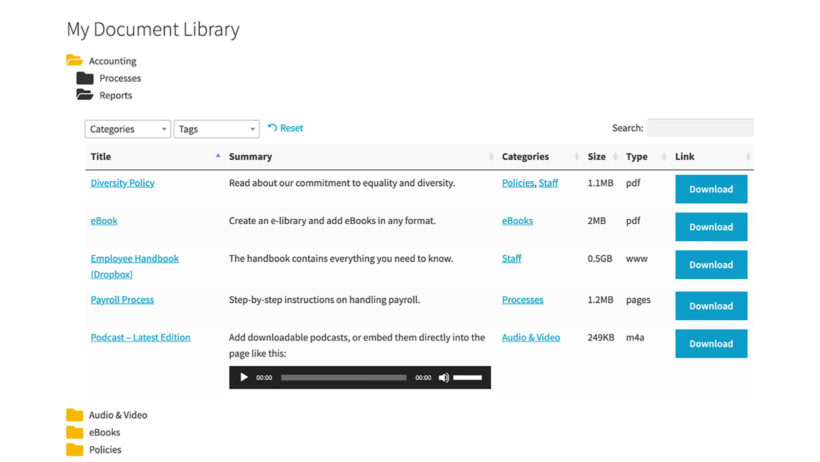
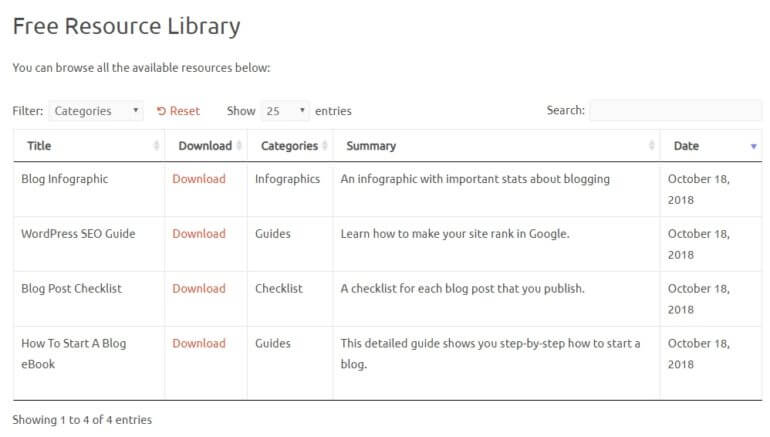
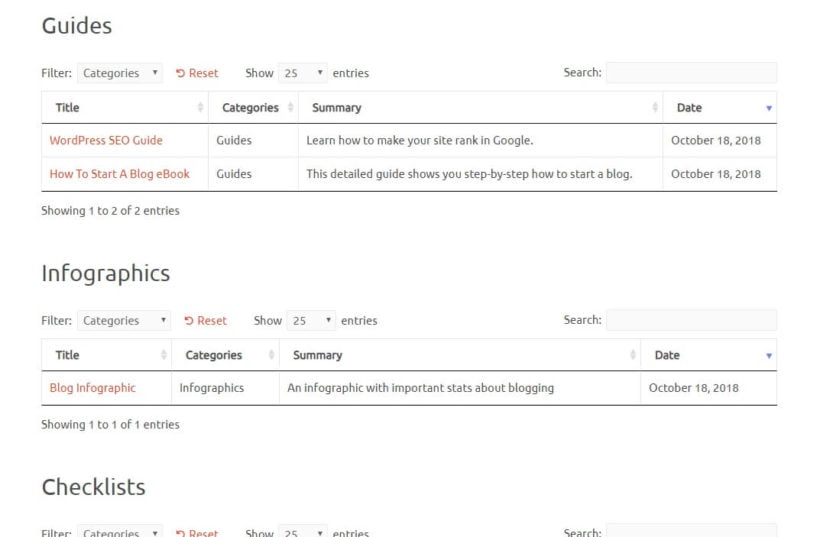
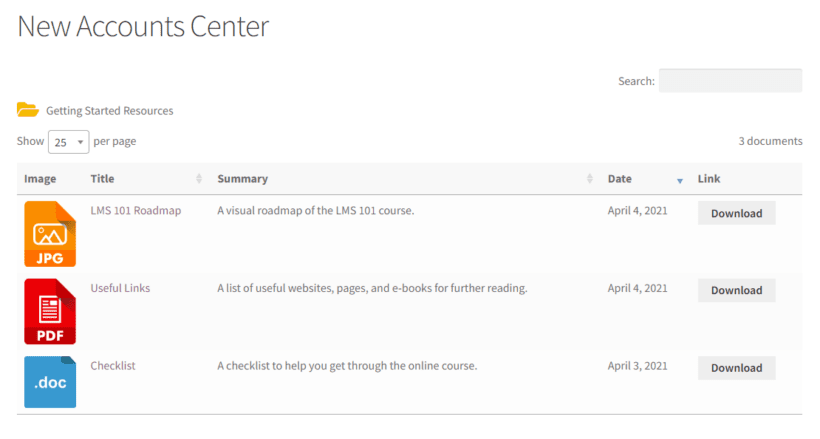
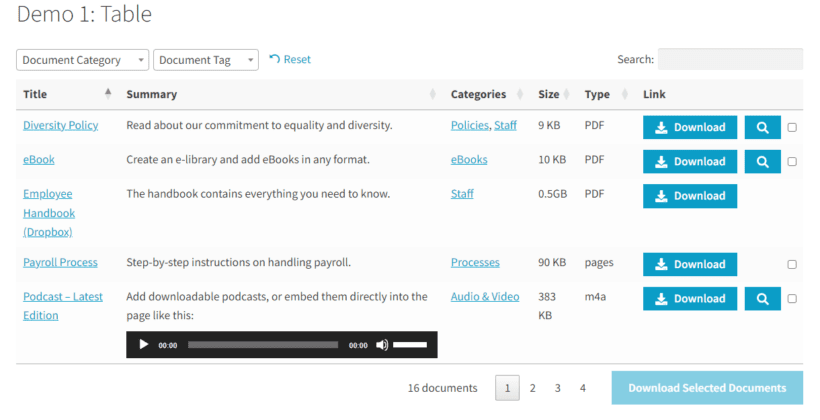
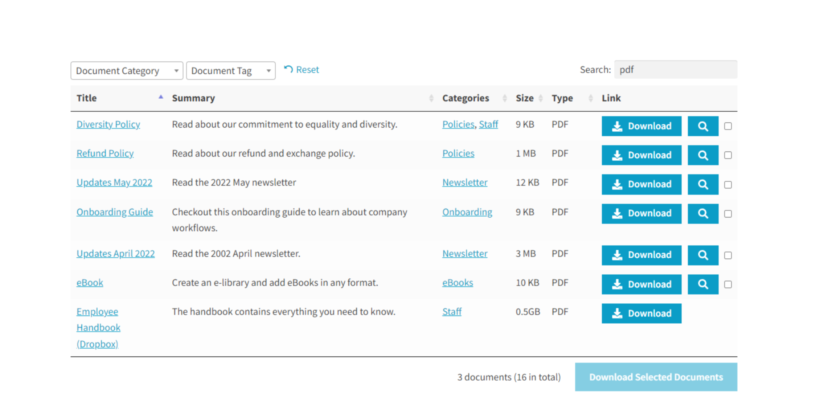
If you prefer, then you can choose a searchable table layoute:

Table layout for WordPress Media

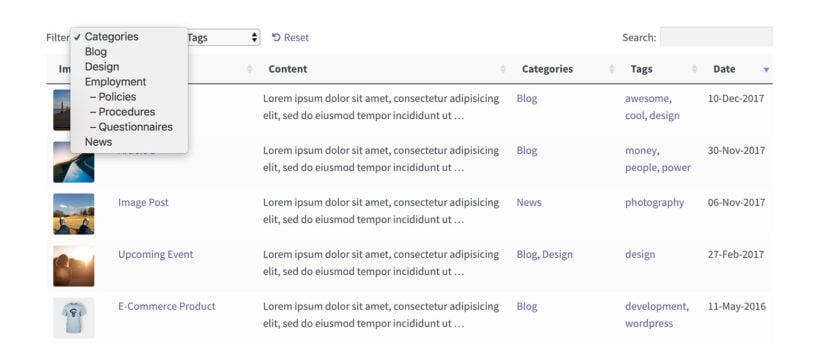
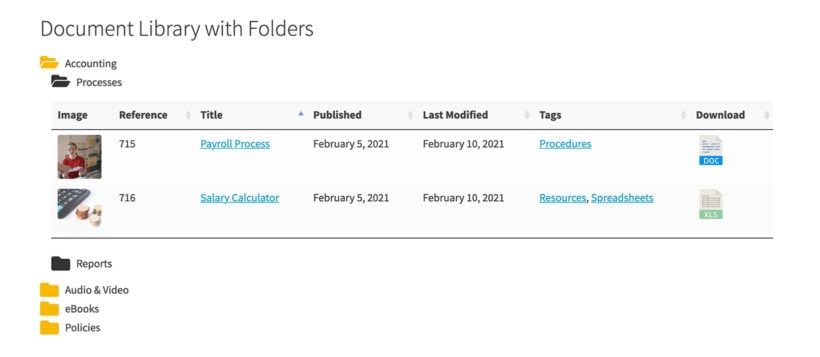
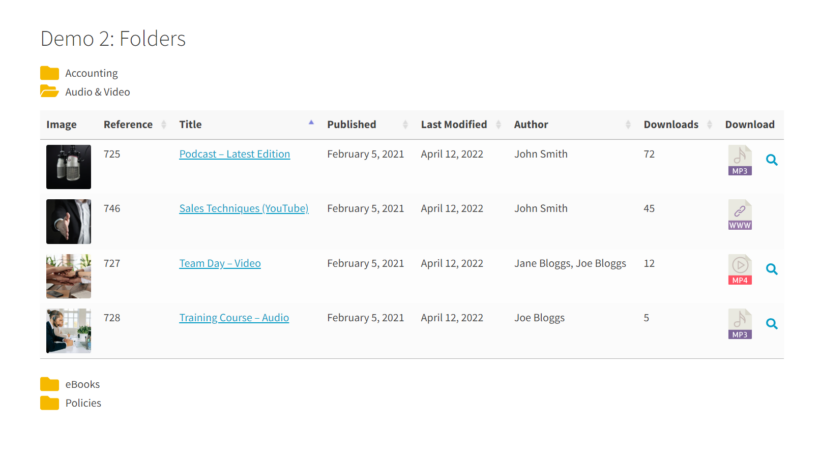
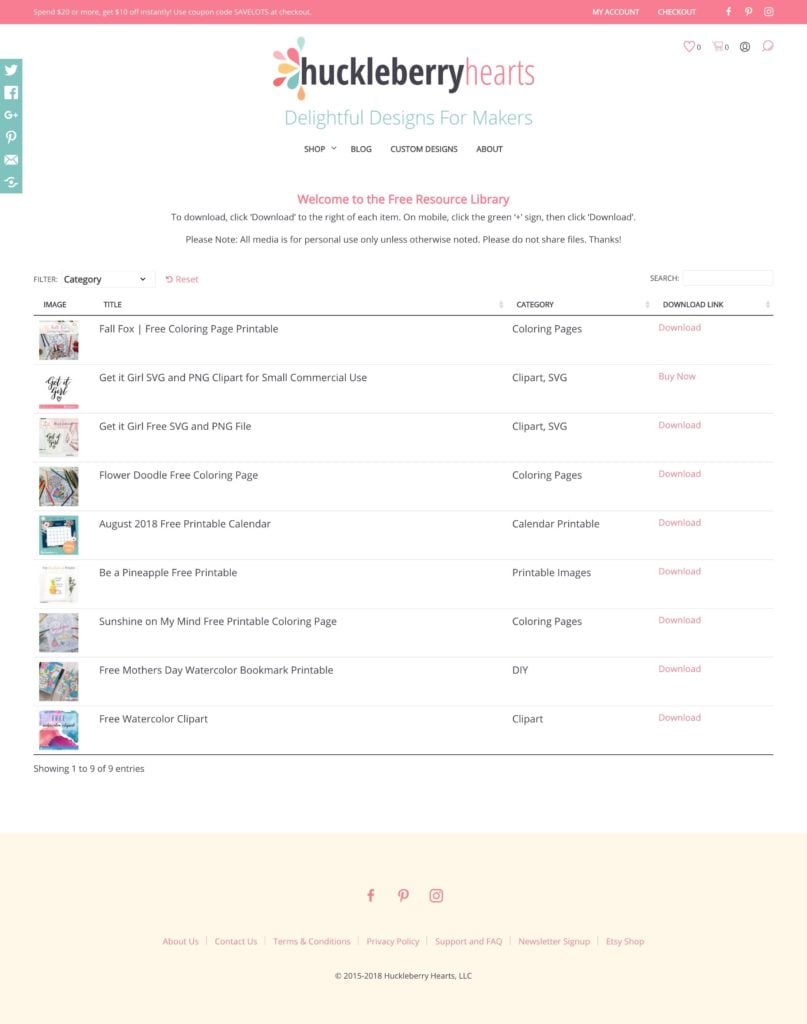
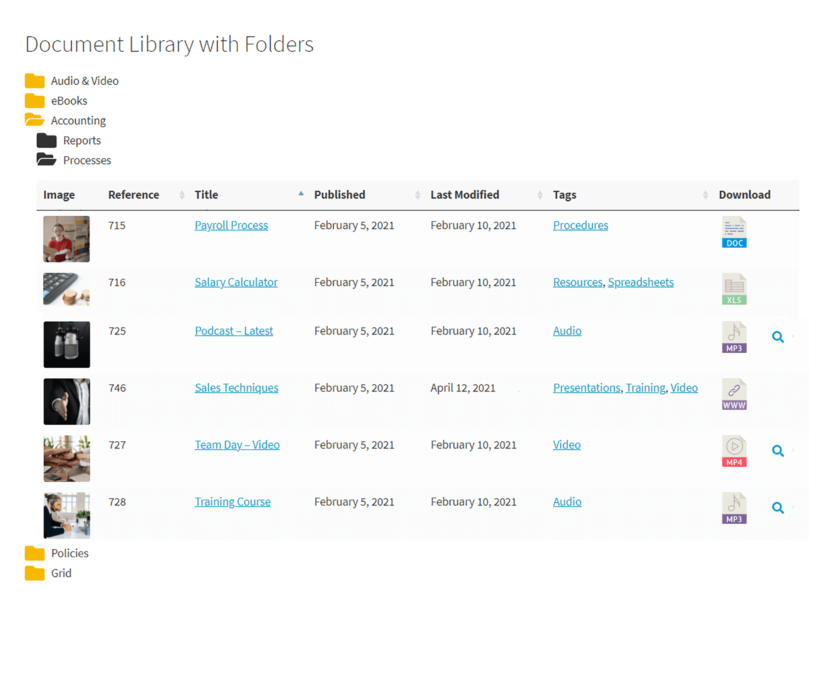
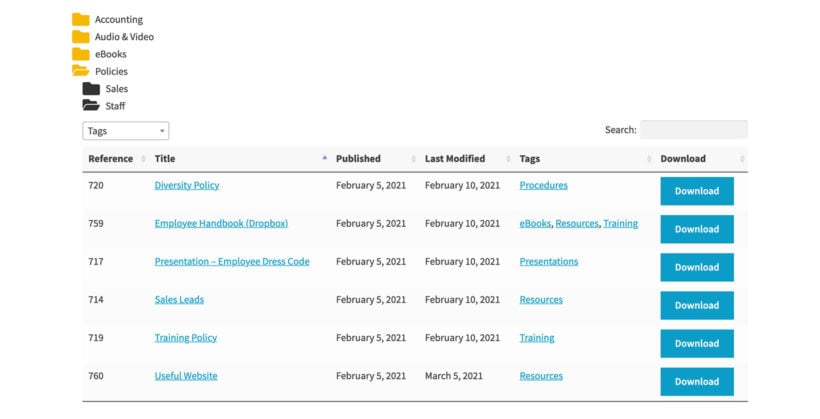
And either way, you can display media files in an organized manner by enabling the category-based folder view:

WordPress document library folders

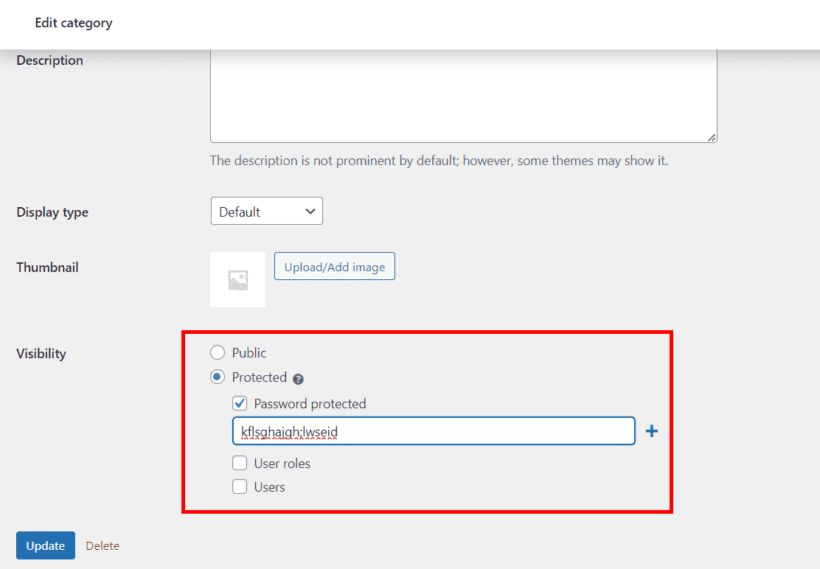
Control access to the media files

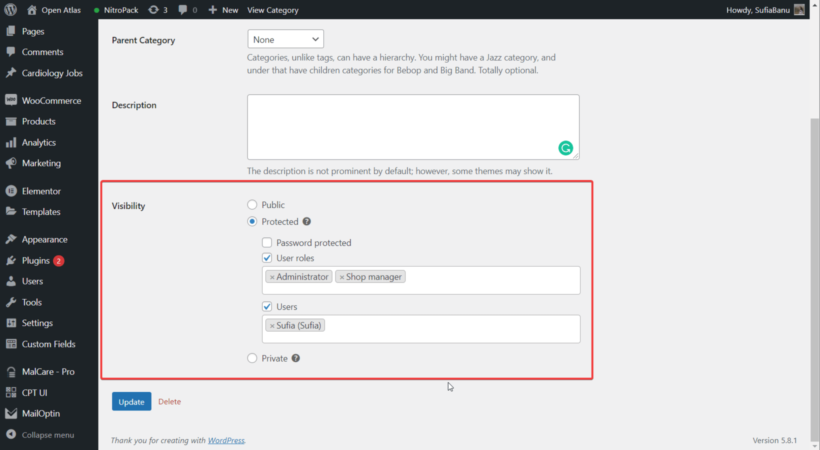
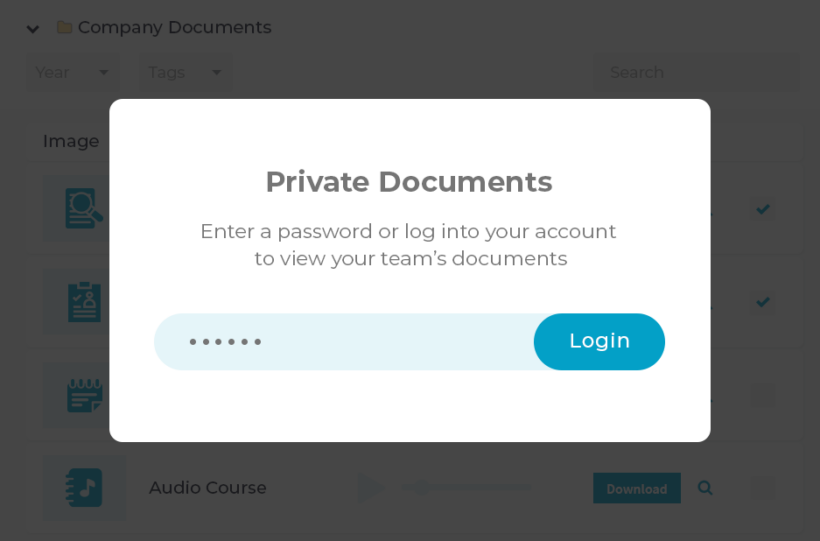
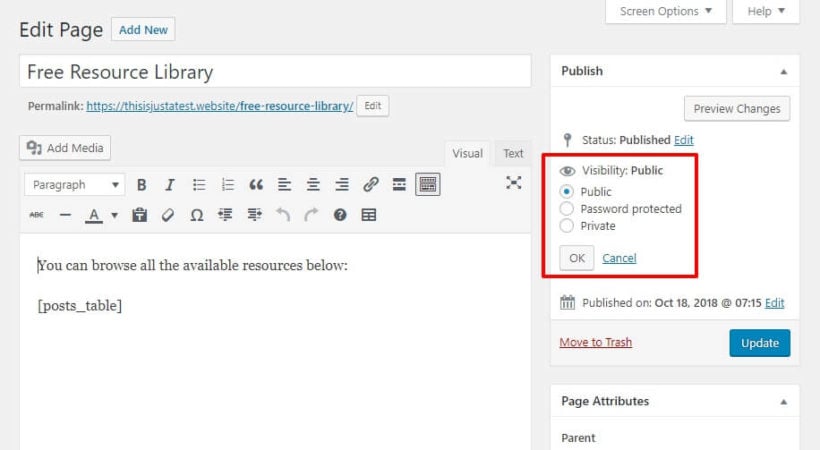
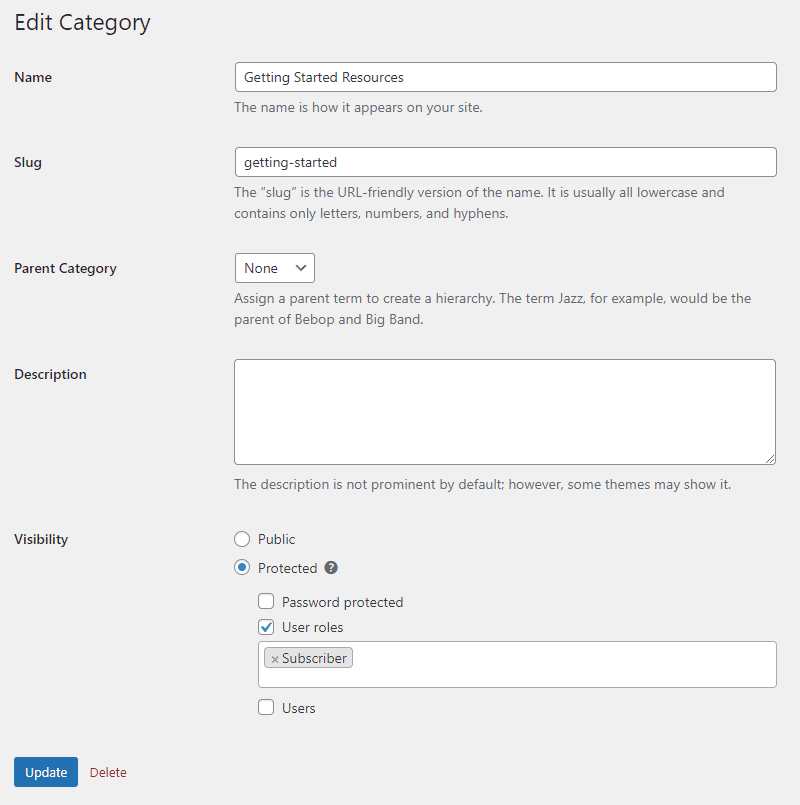
You can either make all the Media Library files publicly available, or restrict them using the Password Protected Categories plugin. This lets you choose who can access each media category:

Edit media library category

Structure media files into folders or categories

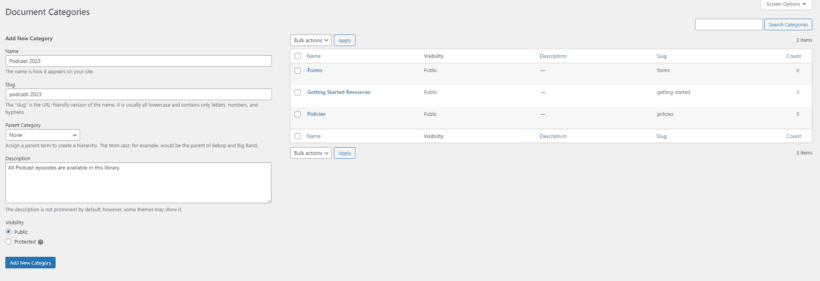
Document Library Pro makes it easier to structure the media items you upload on your WordPress site into virtual folders or categories. You can simply create or set up a new category just like you would for WordPress posts or WooCommerce products.

Document categories

This allows WordPress site owners to keep their media files properly organized and easily accessible.

The plugin also lets you create subfolders. To do this, simply create a child category and add the posts to it. It will appear in a subfolder on the front-end.

The front-end folder display is incredibly user-friendly. You can create unlimited folders and display them without any performance optimization problems. Either have all folders closed by default, or set it to open a specific folder when the page loads. Perfect!

Tagging and categorizing media files

The plugin also lets you tag and categorize your media files which makes it easier to find and group similar media files together.

WordPress media library with folders

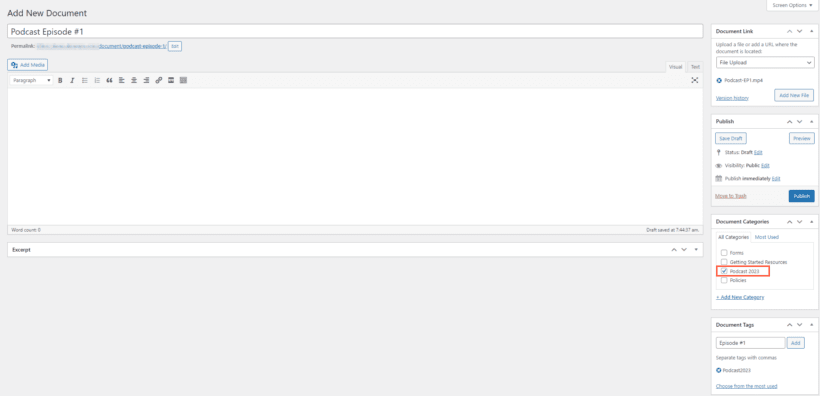
Let's say you want to upload 10 episodes for a podcast. You can group all of them into a separate “Podcast” category or add the “Podcast” tag to each one. This makes it easier to find older uploaded media files along with new ones in a single place. Each category translates to a new folder on the front-end. The category name appears as the folder name.

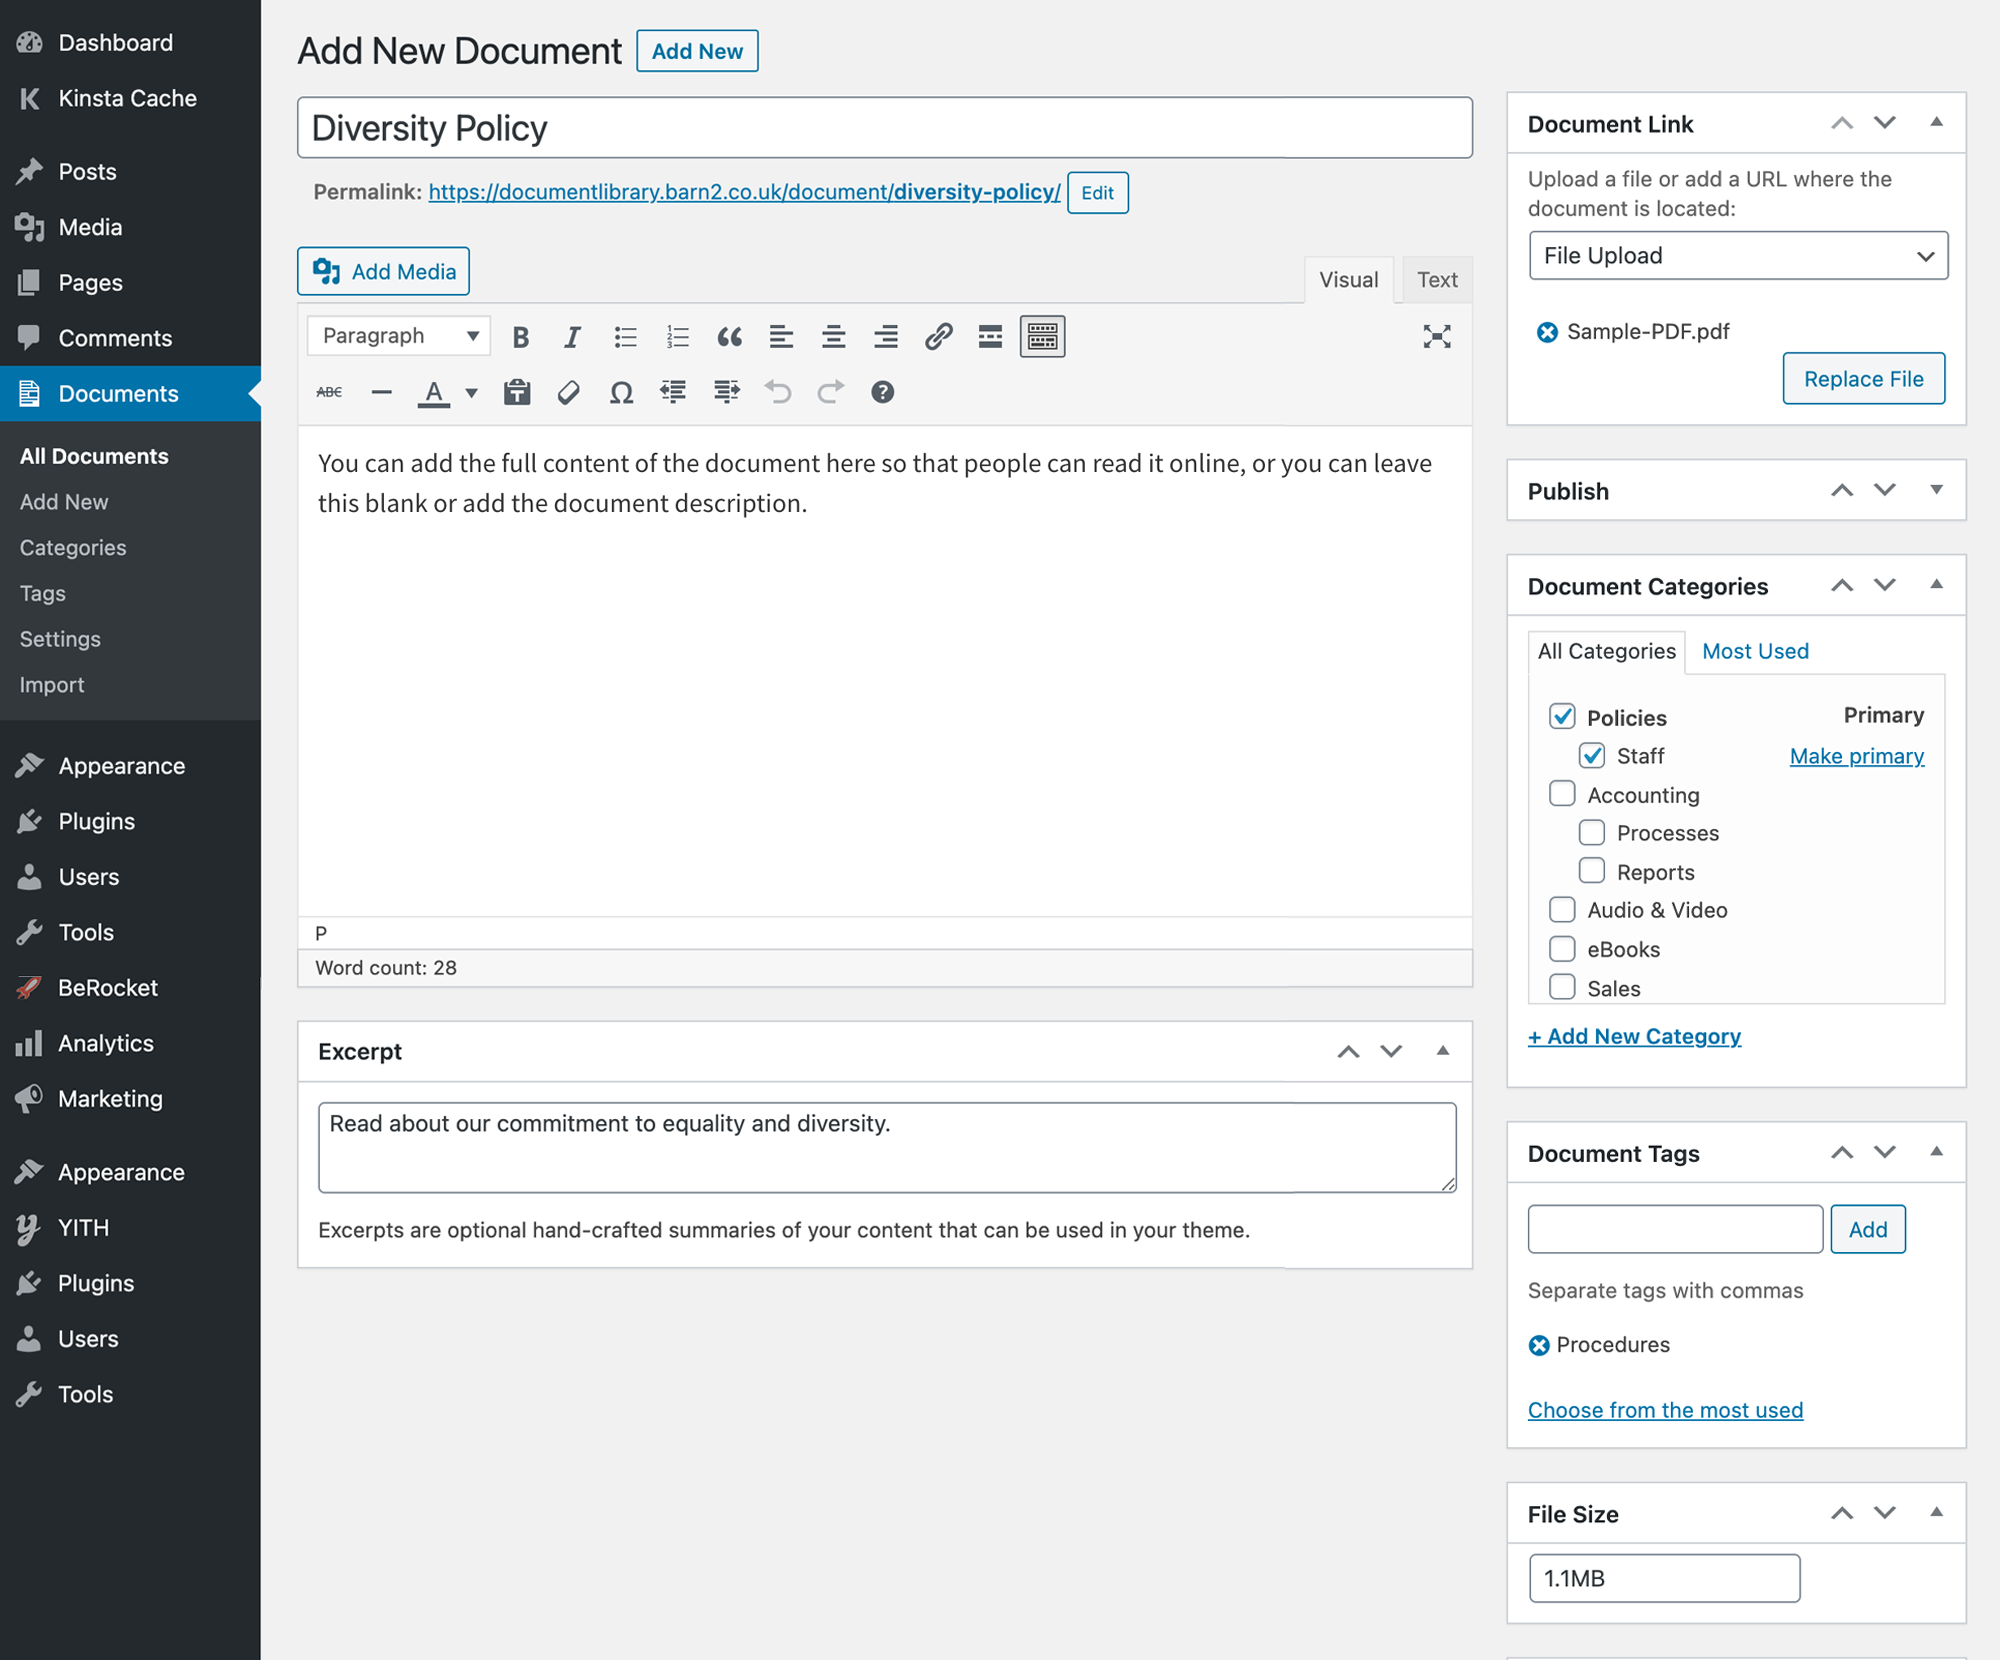
Store extra information about each media file

Document Library Pro also allows you to add extra information to the media files you upload using the robust plugin.

Author file size

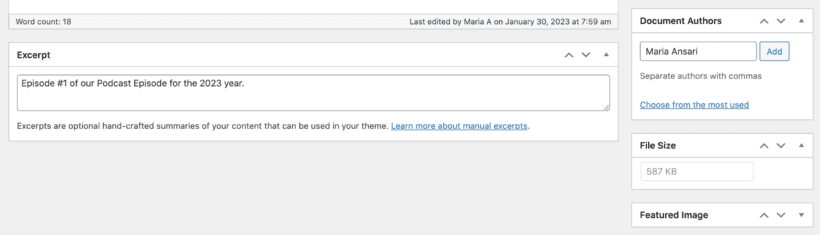
You can add a description and an excerpt explaining what the file is about when uploading it. This can make it easier for you and your site visitors to easily understand and identify each media file.

Access all your media files in a dedicated section

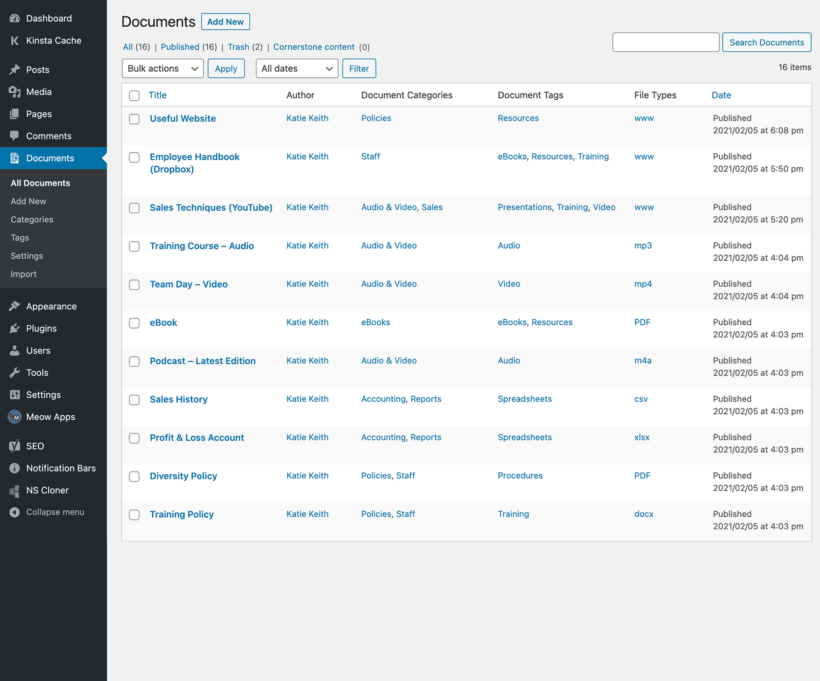
The great thing about the Document Library Pro plugin is that it gives you access to all the files you add to your Media Libraries in a dedicated section in the WordPress dashboard.

All documents

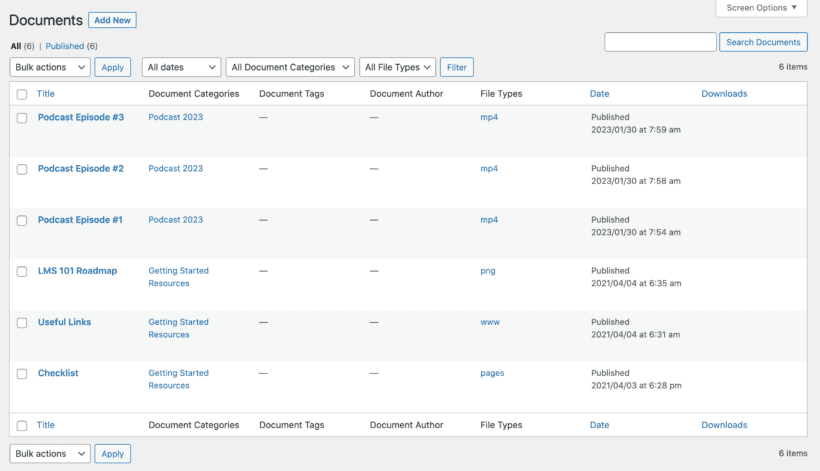
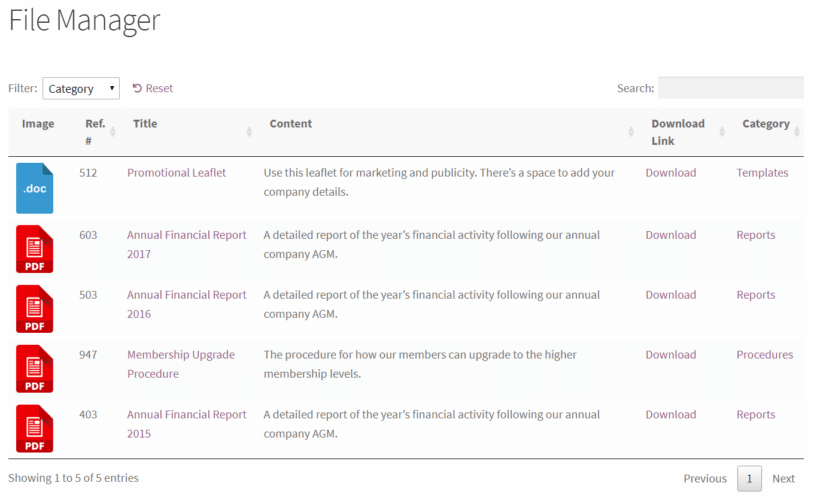
The All Documents section lists all of your uploaded media files through the Document Library Pro plugin. This makes it easier for you to manage and organize your files using a familiar interface. It works like a file manager for WordPress.

Improving navigation and searchability

Once you add a front-end Media Library to your WordPress site, it makes it easier for both you and your website visitors to navigate and search through your media files.

demo document library pro

Your site visitors can quickly find the media files they are interested in two ways:

  • Using the search bar.
  • By navigating through the media folders.

As a result, it helps refine the user experience and speeds up the user flow on your WordPress site.

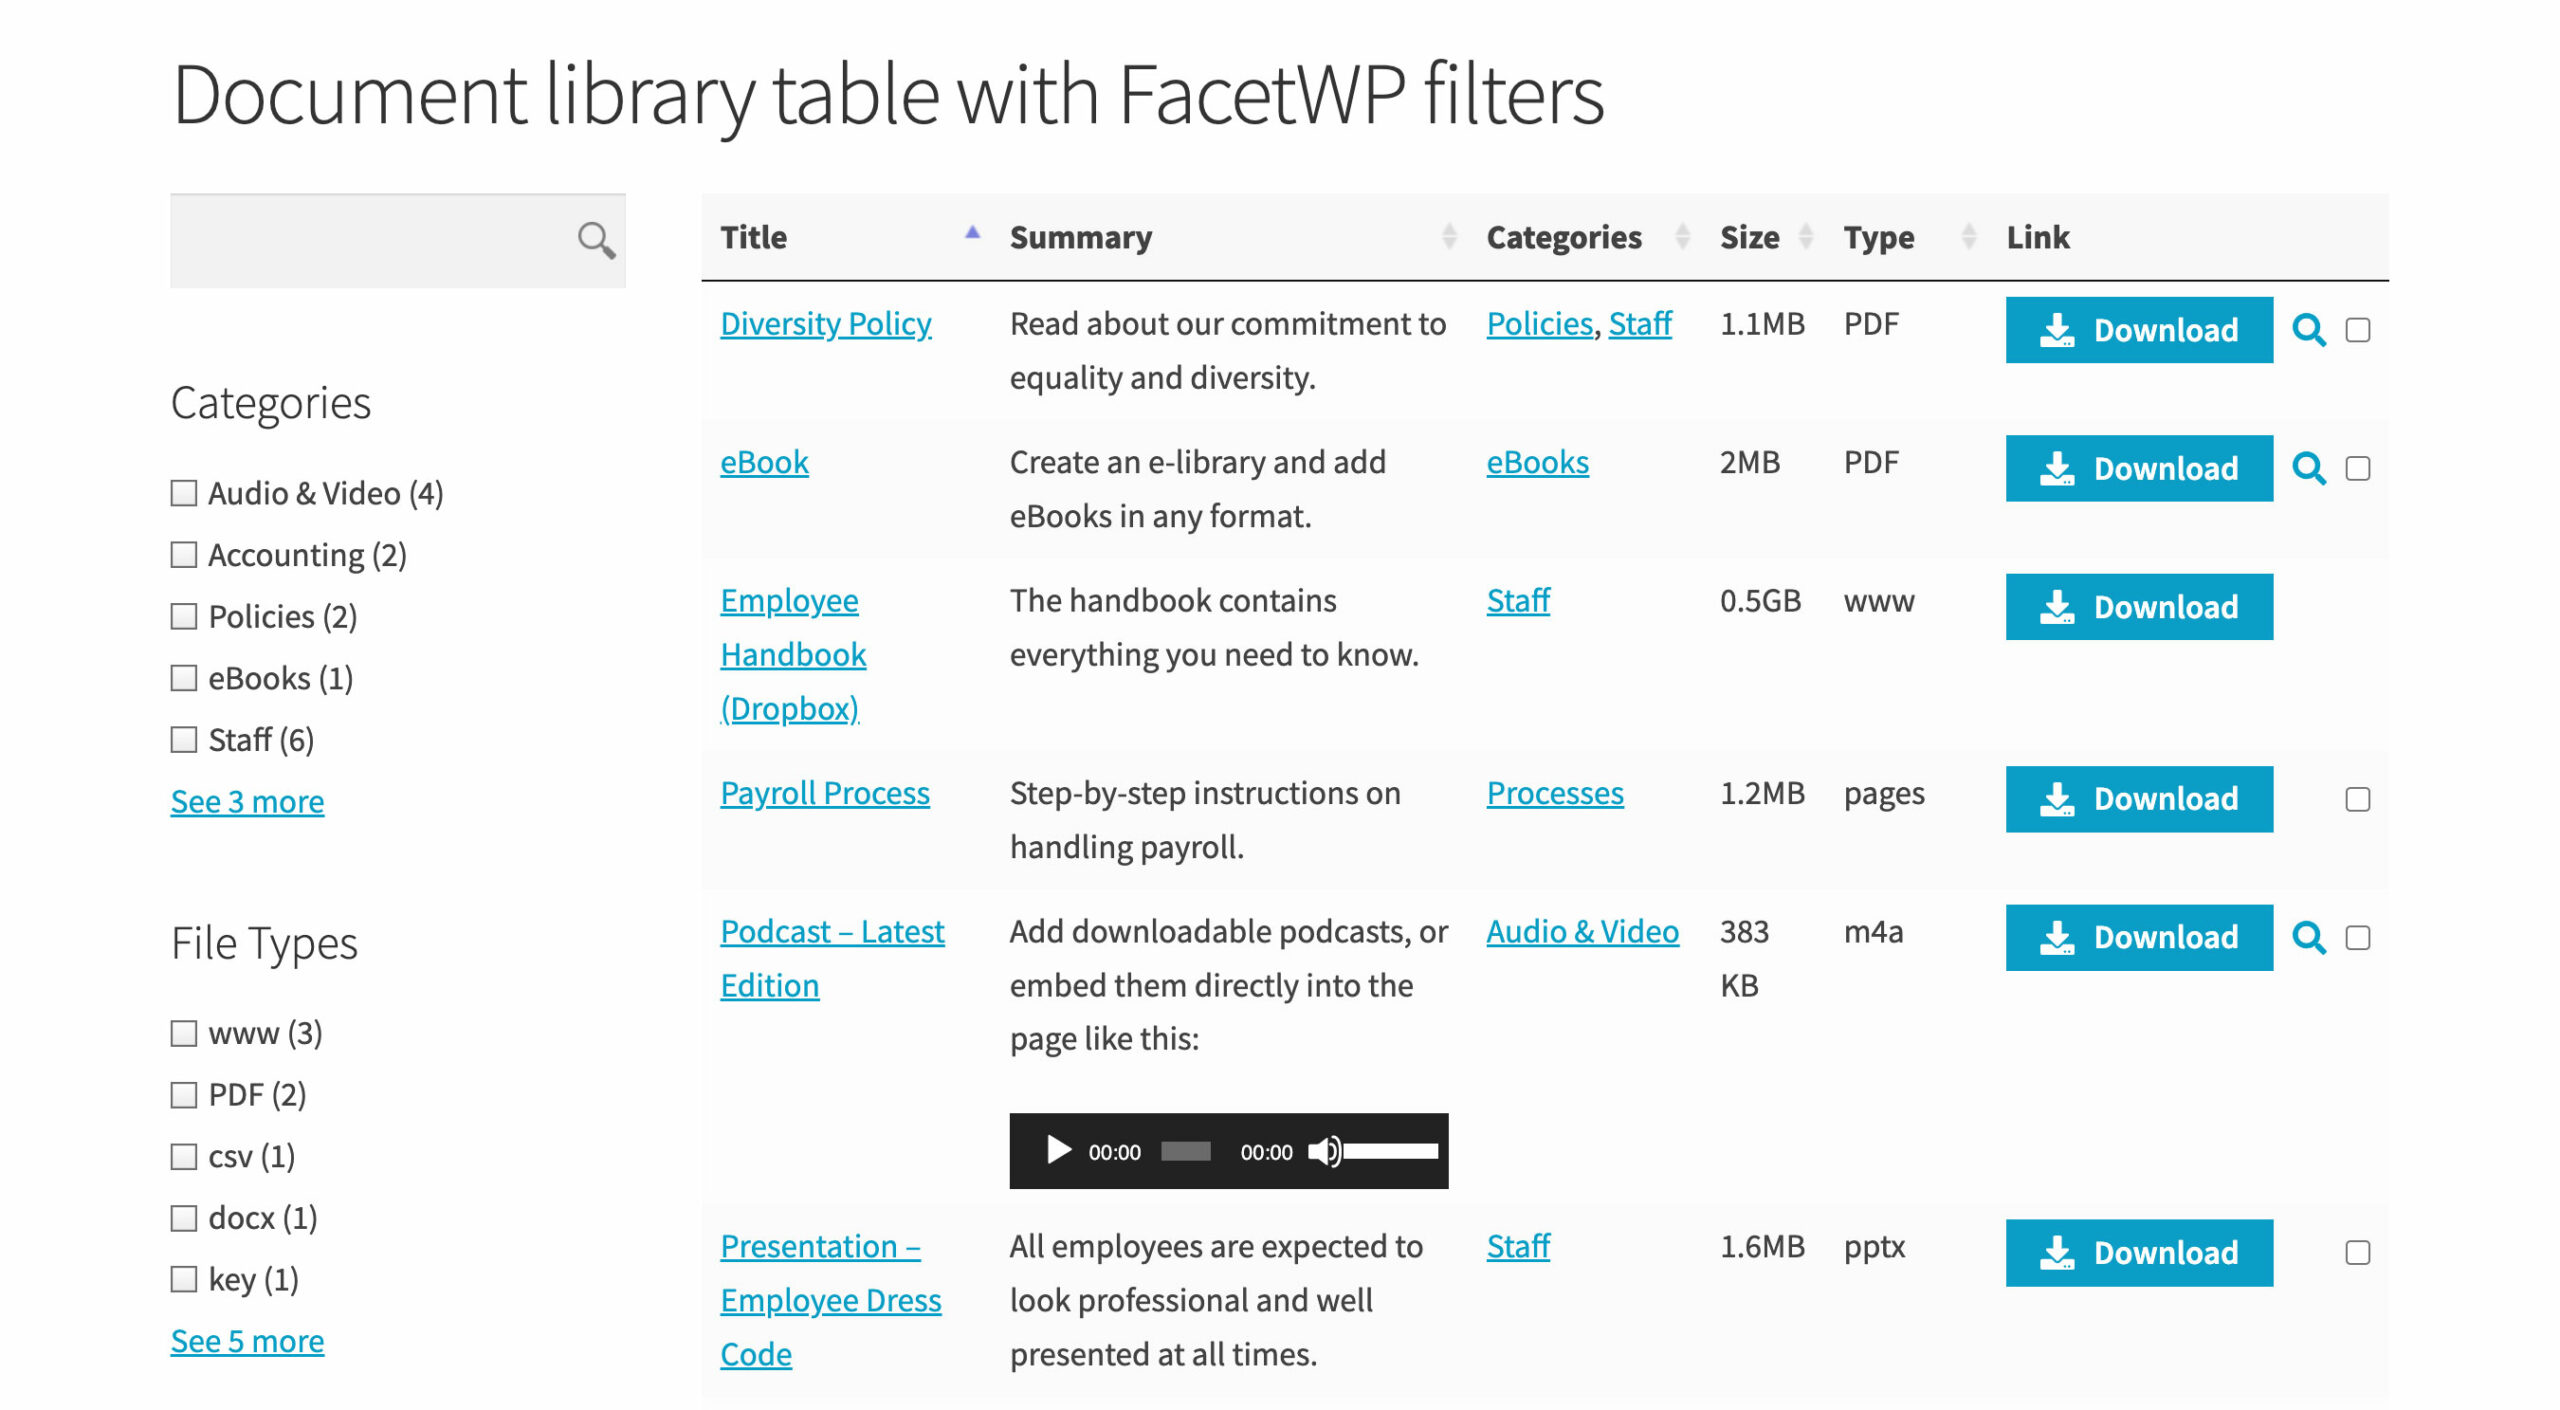
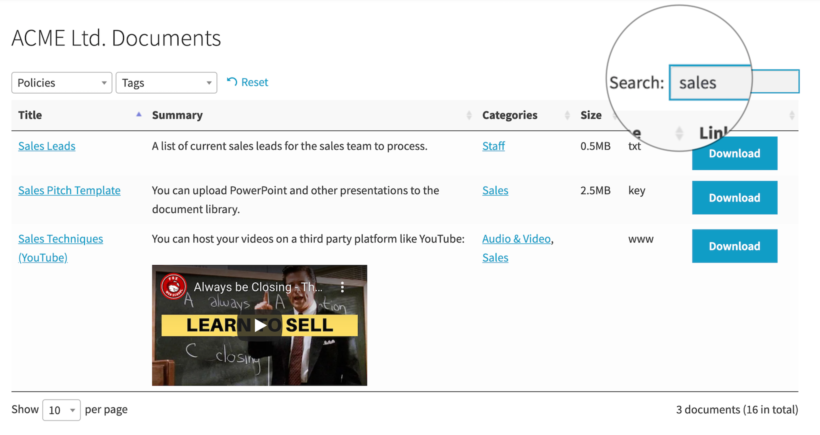
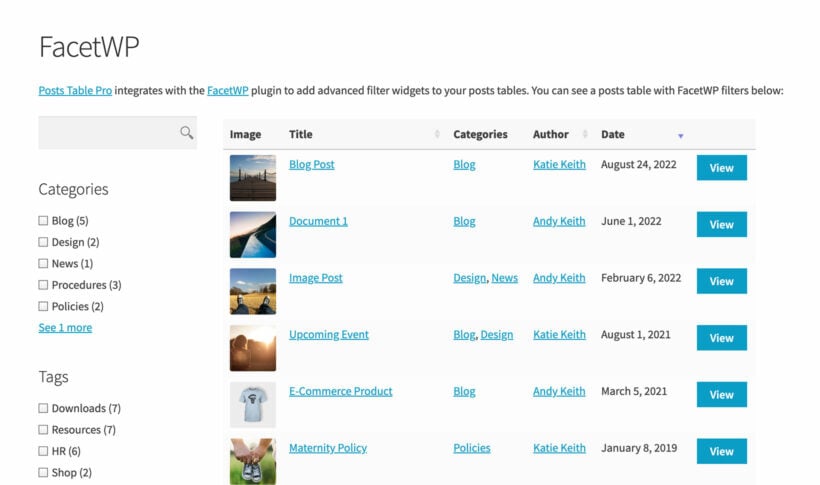
Search and filtering

The Document Library Pro plugin lets you showcase a search bar. It also lets site visitors and administrators sort media files by the column options.

Search and filter options

This makes it a breeze for all users on your WordPress site to access media files quickly. They'll be able to find the files they need within a few seconds. It improves the user interface and makes it easier for users to find the files they're looking for.

Enhancing the presentation of media files

The Document Library Pro plugin gives you full control over the presentation of media files on your WordPress site.

Customization settings

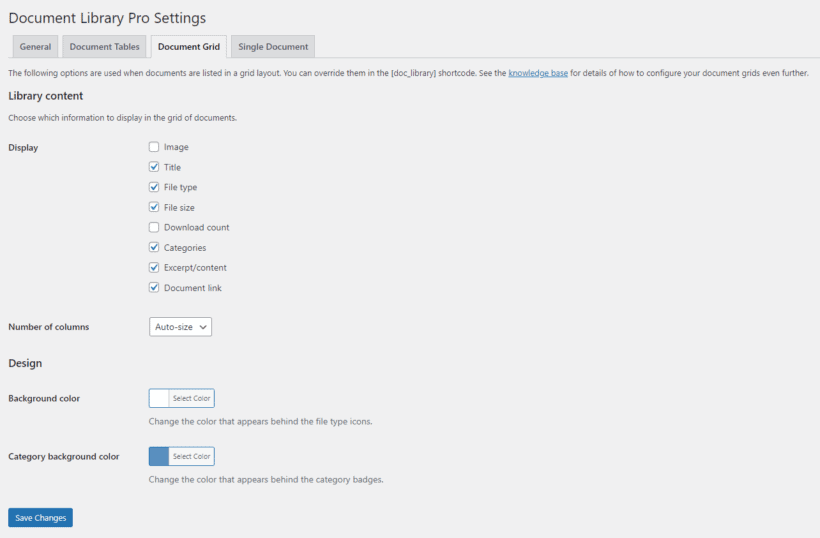
This means you have various options to display media files on the front-end. You can choose between a table layout or a grid layout as well as plenty of customization options. The plugin supports a variety of file types including image files, PDFs, docx, xlsx, mp4, mp3, gif, png, jpeg, and more.

Media Library preview

This helps you create a professional-looking front-end WordPress Media Library that’s visually-appealing and functional.

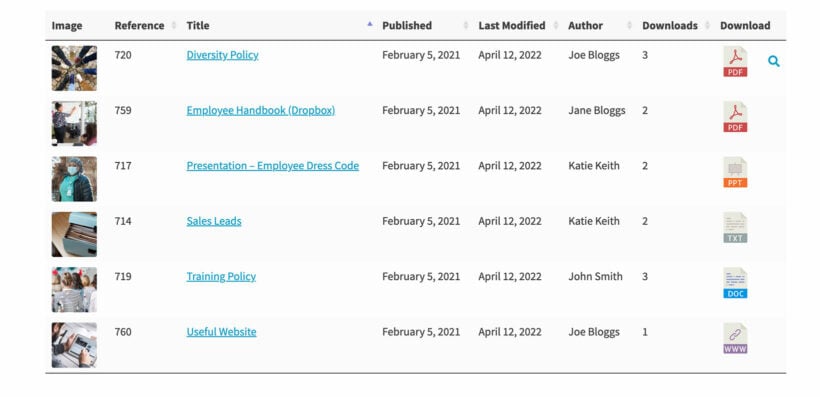
Adding extra details and information

The Document Library Pro plugin also gives you a few options for adding extra details and information about each file.

Author file size

It also lets you add media file authors, thumbnails, display the file size, and the upload date of the media file. This is great for taking media organization to the next level.

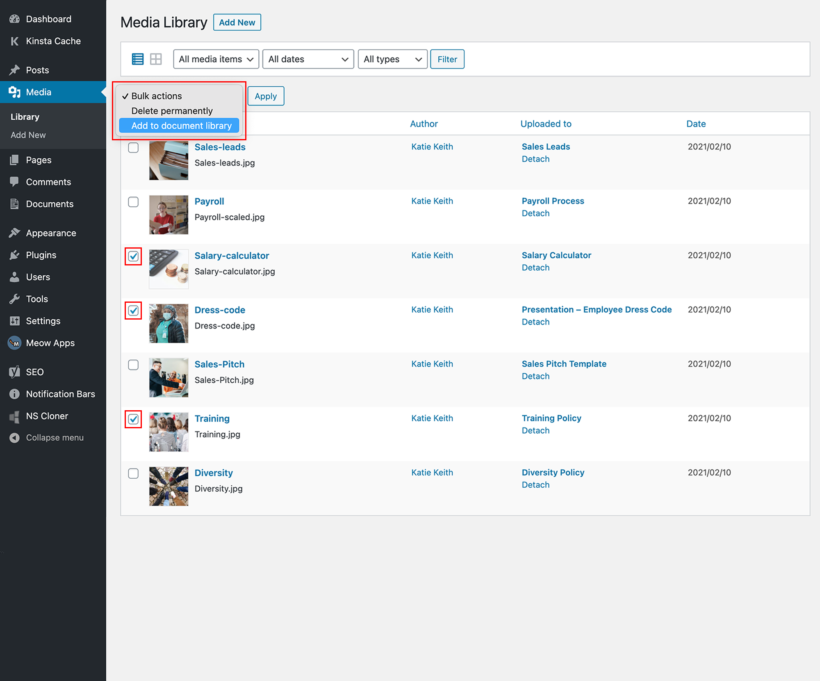
Easily add existing files from the Media Library to the front-end library

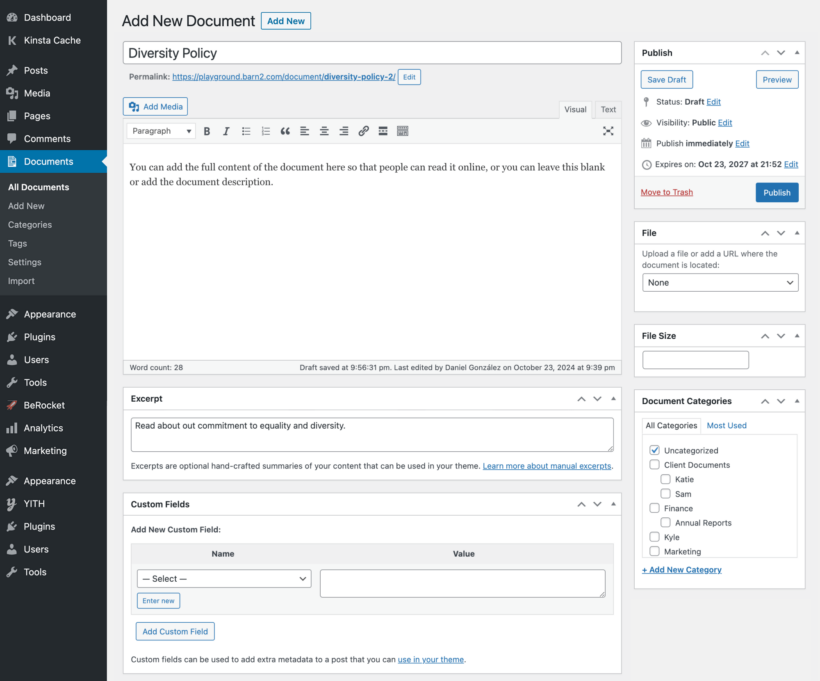
The best part about the Document Library Pro plugin is that it lets you convert existing media files in the default WordPress Media Library into “Documents”.

Select files

This lets you create a “Document” post in the Documents section of your WordPress admin panel. Like other WordPress custom post types, Documents have their own dedicated section in the Dashboard. Once that’s done, you can:

  • Add extra information about the media file. This is good for SEO because you can display this information on the front end Media Library.
  • Add links to the file.
  • Showcase it on the front-end of your WordPress site.

Other ways to organize your WordPress Media Library

Creating a front-end media library is one of the best ways to organize your WordPress Media Library. However, there are some other options you can try out.

Organize media library files in the back end only

FileBird media library plugin

So far, we've looked at how to use the Document Library Pro plugin to organize media files and display them on the front end of your website. Alternatively, the FileBird WordPress media library plugin allows you to create folders and subfolders to organize your media files in the . It also provides a number of other features to help you manage your WordPress media library more effectively, such as:

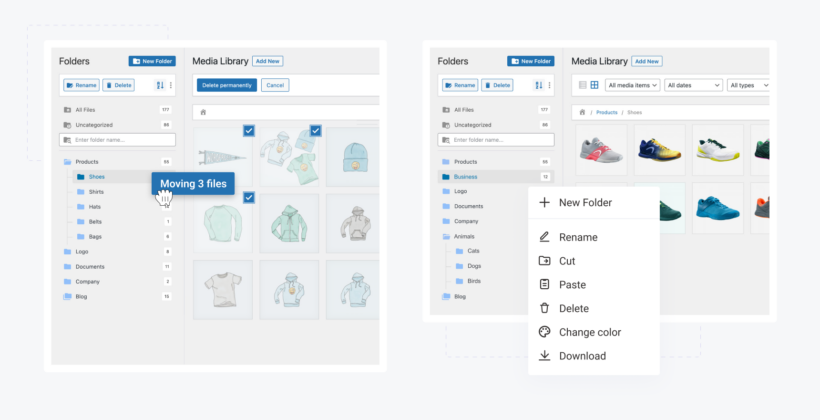
  • Drag-and-drop file management: You can easily drag and drop files to move them between folders, or to upload new files.
  • Bulk operations: You can perform quick operations on files and folders, such as moving, copying, renaming, or deleting multiple files/folders at once.
  • Advanced search and filtering: You can use FileBird's advanced search and filtering features to quickly find specific files or change the file location.
  • Smart galleries: You can create dynamic image galleries that automatically display the images from a specific folder or collection.

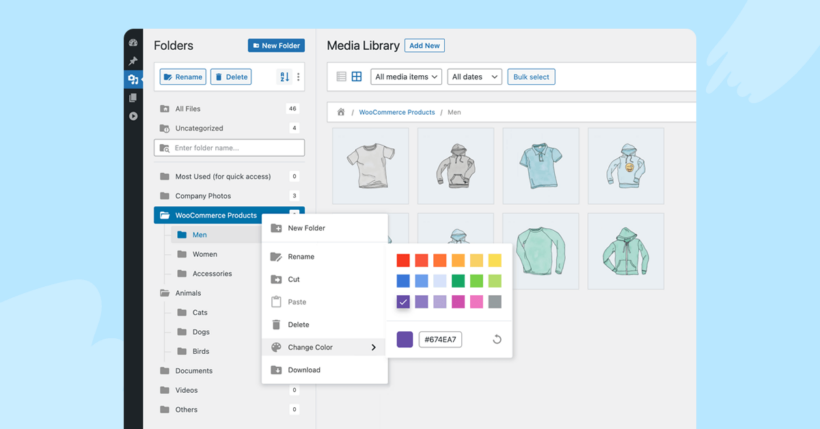
Moreover, you can even tweak the folder tree skin in the styles of Dropbox or Windows 11, and color-code your folders as needed.

Organize WordPress media library in dashboard

Creating folders to organize media

Creating different folders in your WordPress Media Library makes it easier to group similar media files and organize them. This way, you can find them later quickly. You can use a plugin like the Media Library Folders to create and manage folders in the default WordPress Media Library. Unlike Document Library Pro, these create Media Library folders in the WordPress dashboard - not the front end.

Using the plugin, you can label and organize your media files. All you have to do is drag and drop them into the right order or WordPress Media Library folder. This is essential for keeping all of your media files organized on your WordPress site. It's especially important when uploading new files to your site.

Using the built-in drag-and-drop interface is better than uploading files to WordPress via FTP. That's because the files are instantly added to the WordPress Media Library, whereas FTP only adds them to the file system and not the database.

Using tags and categories to group media

You can also use tags and categories to organize your WordPress Media Library better.

You can use a plugin like the Media Library Assistant for tagging and categorizing media files in your WordPress Media Library. This is a free plugin on wordpress.org. It doesn't have a pro version. It works by adding a taxonomy to the Media Library, which can be used to create categories.

Again, a free WordPress media library folders plugin is different from the tags and categories that you get with Document Library Pro. This is because they only organize things in the WordPress back end. In contrast, Document Library Pro lets you tag and categorize media files in the back-end. In addition, it allows users to use this data to find and filter files in the front-end.

Renaming media files for clarity

Another useful way to organize your default WordPress Media Library is by renaming media files. This makes it easier for you to search for specific media files using the default WordPress Media Library search settings.

Edit image screen

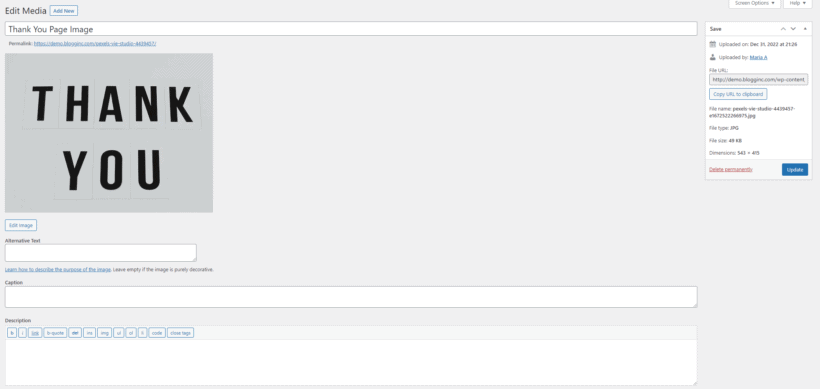
You can also click on the Edit link on the image you want to rename in your WordPress Media Library. Click on the Update button for the changes to take effect on your WordPress site.

Deleting unused media

Delete unused or duplicate files to make sure your WordPress Media Library is always organized. You can do this is by manually selecting and deleting each media file that’s not useful to you anymore.

However, a better way to delete unused media from your WordPress Media Library is using a plugin like the Media Cleaner plugin. This makes media management significantly easier in the back-end.

Tips on how to organize the WordPress Media Library

Always backup!

It’s also important to always keep a backup of your WordPress Media Library. This is essential for protecting valuable media files from getting deleted during maintenance. In addition to this, you don’t want to lose valuable media file data in case your WordPress site breaks down and you have to restore it to an older version.

This is why it’s important to regularly back up your Media Library in WordPress. While WordPress by default doesn’t offer any functionality that lets you do this, you can use a plugin like UpdraftPlus (free version available) for backing up your WordPress Media Library regularly.

Additionally, you can also upload or back up your WordPress Media Library to cloud storage. You can do this by using a WordPress plugin like Media Library Folders Pro or WP Cloud Storage. If you’re creating a front-end media library with Document Library Pro plugin then instead of uploading the files directly to the WordPress Media Library, you can add new files in the cloud and add the URL.

The Document Library Pro plugin will display a download button linking to where the file is hosted. This means that it works equally well for files which are hosted in the Media Library or elsewhere.

Version control the WordPress Media Library

Document Library Pro comes with built-in version control. This is a good way to organize the Media Library and save space on your hosting account.

When you want to replace old files, don't just upload files to replace them. Instead, use the version control to properly replace the old version with the new. In the plugin settings, you can choose whether to store or delete old files when you replace them.

Media library image SEO settings

When working with the WordPress Media Library, it's always important to consider SEO and accessibility. Luckily, you can use the same techniques make the media easy for both search engines and real users to access. For example:

  • Always add helpful alt text to every media file.
  • Set a readable URL for each file.
  • Keep file sizes to a minimum before uploading them to WordPress.

Organize your WordPress Media Library today!

Organizing the WordPress Media Library is important for ensuring you can easily and quickly find the media files you need. Instead of using the default WordPress Media Library, it’s much better to display an enhanced Media Library on the front-end of your WordPress site. This way, admins and site visitors can easily navigate and access the media library on your WordPress website.

Ready to start organizing the WordPress Media Library and creating a better-performing, easily manageable website? Get Document Library Pro today!

We've just released version 1.6 of our bestselling Document Library Pro plugin. Now your document libraries can benefit from a download count, document author column, and advanced AJAX filter widgets due to a new integration with FacetWP.

As one of our most popular plugins, we're always looking for ways to improve Document Library Pro. In fact, it's only a few months since we added a beautiful new grid layout to the plugin!

This time, we surveyed our customers to find out which extra features they want for their document libraries. As a result of their feedback, we've added lots of new features which are available now:

  • Integration with the FacetWP plugin so that you can add advanced filter widgets to your document libraries
  • Document count/analytics
  • Display the document author in the library
  • Change the number of columns in the grid layout
  • Sort options for folder view
  • Change the permalink for single document pages

Keep reading to learn more about them all.

New FacetWP document filter widgets

Document Library Pro has always had built-in filter dropdowns which you can display above the table of documents. However, these are only available for the table layout and not the grid view. In addition, they can only appear above the document library and not as sidebar widgets. We decided that our customers deserved an additional way to filter the document library.

FacetWP is an excellent WordPress filter plugin. Its filters work instantly using AJAX, and you can add filters for any type of data. As a result, we chose to integrate Document Library Pro with FacetWP so that our customers can use its filter widgets with their document libraries.

If you want to use Document Library Pro with FacetWP then the method for displaying documents on your website is slightly different. To help you with this, we have published a new documentation page about how to create document libraries with FacetWP filters. You can also see it in action on our demo pages:

Document count/analytics

Document library author and download count column
A document library with the new author and download count columns

Lots of people have asked us for analytics data so that you can see how many people have downloaded each document. This is now available and the download count appears:

  • On the main list of documents in the WordPress admin.
  • You can optionally add a download_count column to the front end document library. This is useful if you want your users to be able to see how many people have downloaded each document. For example, this is a useful way for people to see your most popular documents. You can even sort the document library by popularity (just order by download count in descending order)!
  • In addition, you can optionally show the download count on the individual document pages. Enable this at Documents → Settings → Single Document.

Display the document author in the library

Document Library Pro comes with the most popular fields built-in. People can create extra custom fields and taxonomies in order to add further fields.

Until now, if you wanted to display the document author in the library then you have to create a custom taxonomy. Quite a few customers told us that they would have preferred to have a built-in author column.

Your wish is our command! We have now built an author taxonomy into Document Library Pro. Simply add the author on the 'Add Document' screen, and choose whether to include the document_author in your list of columns.

Note: Power users will know that Document Library Pro already had an 'author' column. This refers to the WordPress user who added the document to your site. You can still display this if you like. However, the document author is generally different from the person who added the document, so you might find the new option more useful. 

Change the number of columns in the grid layout

For added flexibility in the document grid layout, you can now choose the number of columns.

The default option is still 'Auto-size', which means that the number of columns is determined by the screen size and the available space. In addition, you can select between 1 and 4 columns under Documents → Settings → Document Grid. 

Regardless of your settings, Document Library Pro will only ever display a number of columns that fits on the user's screen. This ensures that the library never looks broken. For example, if you set 4 columns then this will be used on wide monitors, and fewer columns will be used on smaller screens.

New sort option for folder view

WordPress document library folders
A document library structured into folders

The folders option is a popular way of structuring the document library. It displays the documents in a folder structure so that users click on a folder to view the documents within.

Until now, the folders were ordered based on how WordPress itself orders categories. We have now added a sort option so that you can choose other ways to order your folders, for example alphabetically.

And finally, we've given you more control over the URL structure of your individual document pages. Until now, documents always had 'document' in the permalink, for example https://documentlibrary.barn2.com/document/diversity-policy. You can now change this to anything else, such as https://documentlibrary.barn2.com/policies/diversity-policy.

To change the permalink, just go to Documents → Settings and change the document slug to anything you like.

Where to get the new features

If you're already using Document Library Pro then you can update to version 1.6 from the WordPress admin as usual. Alternatively, install the plugin and start creating professional document libraries today!

WordPress document management

If you have documents you want to share with your audience, customers, or employees, then implementing a WordPress document management system is the way to go. While this might sound like you need a team of developers, you’re in for a treat. Adding a WordPress document library to your website has never been easier. All you need is a WordPress document management plugin.

In this article, we’re going to take a closer look at how you can use WordPress for document management. Plus, we’ll walk you through how to do this with the WordPress document management plugin, Document Library Pro.

WordPress document management

A good file management system is hard to come by these days, which is why the best WordPress document management plugin needs the following to hit it out of the ballpark:

  • Help you manage your documents outright in your WordPress dashboard area.
  • Display the documents on the front end for your customers.
  • Have an easy way to search and find the documents.

The Document Library Pro plugin checks all of those marks. Not only that, but it will give you the flexibility you’re looking for to make it quick and easy for your customers to find the documents they need. Especially if you have a high number of documents on hand.

What does a WordPress document management plugin need?

WordPress document library

The best document management systems have a few things in common.

Easy and flexible to use

A good document management plugin makes it very easy to add documents. There are various methods of adding a document, depending on the type. With the Document Library Pro plugin, you have the flexibility to choose which method is the most effective for you.

Here are the ways you can add documents to your library:

  • Manually upload a single file.
  • Do a bulk import load (many files).
  • Drag and drop a file.
  • Select files from your Media Library.

Separate backend section

It’s easy to get lost in the WordPress admin area, especially if you have a lot of plugins installed, or custom enhancements.

You want your document library to be easy to view and manage, as well as have it separated from your other items in the WordPress Media Library. There’s nothing more frustrating than having to look for your documents and wasting time doing so.

Search function capability

Your customers are used to Googling all day long and expect their searches to be just as smooth on all other websites they land on.

With the Document Library Pro plugin, you’ll automatically have your documents displayed in a searchable library on the front end of your website. Giving your customers the experience they’re looking for.

Multimedia support

The reality is that everyone consumes content differently. Depending on your documents, or who your audience is, you want to be able to upload different file types successfully. Whether that’s a PDF, presentation, image, audio, video, etc.

The Document Library Pro plugin will add and store your documents in WordPress and then display them in a searchable document management system.

Auto-expire documents

Lots of documents need expiration dates when they will automatically be removed from your website. Each document in Document Library Pro has an option to add an expiry date, after which it will disappear.

Let’s see how it does this in action.

How to add document management and display to your WordPress site

Once you have your document management system set up and customized, all you need to do is maintain it.

But before we get to the maintenance portion, let’s go through the steps to add and display your documents on your WordPress site. Read the written instructions below, or watch this video:

Step 1: Install Document Library Pro

First, download the Document Library Pro plugin from the Barn2 website.

Once you’ve purchased it, you need to take the following steps:

  1. Go to Plugins → Add New → Upload Plugin.
  2. Choose the zip file you downloaded, upload, and then click Activate.
  3. Go to the newly visible Documents → Settings and enter your license key.

With the document management plugin now installed, we can move on to setting up your document management in WordPress.

Step 2: Decide how you want your document management system to look

You probably have an idea of what you want your document management system to look like. This is where we’re going to set up that look and feel for you.

Since you’re already in the Documents area, go ahead and click on the ‘Document libraries’ tab to start the personalization. There are over 50 options, so the document management system is completely customizable.

Document management system structure:

Layout - The most important decision is whether you want to display the documents in a grid or table layout. Choose grid if you want to make each document really prominent. Alternatively, choose table if you have a large number of documents and need the document management system to be easily searchable.

Folders - If you prefer your document management system to be structured in folders, instead of being displayed as a single list, go ahead and check this box. You’ll get one folder for each category you assign in your document management system.

Columns - Similar to a spreadsheet, you can assign the columns you want your audience to see. Examples of columns are document name, description, published date, file type, and download link. You can rename the columns at any time, should you want to.

WordPress document management

Document management system links:

  • Link style - For your download link column, you can assign it a button, a text link, or a file type icon depending on your personal preference.
  • Link text - In fact, the download link column doesn’t have to be a download. You can change the text to something else such as ‘View’ or ‘Read’ if that makes more sense for your document.
  • Clickable columns - Here you have the ability to assign each document its own individual page, whenever someone clicks on its link. If you don’t want to have an individual page for each document, then make sure this option is set to ‘none’.

Document preview - Enable a preview option for your audience to view the document online.

Search box - If you have a high number of documents in your document management system, you’ll want people to have an easy way to find what they’re looking for. Enable this option to add a keyword search box.

Document management system extras (table layout only):

Lazy load - Do you have more than about 20 documents in each table on your website? If so, enable the lazy load option to ensure a faster loading time.

Search filters - If you create categories, tags, or a custom taxonomy for your documents, you’ll want to be able to filter through them (go to Documents → Categories to create, edit, and delete categories, and Documents → Tags to create, edit, and delete tags). Add filter dropdowns to help your audience find the documents they’re searching for more easily.

Design - The document management plugin integrates directly with your theme and will fit in automatically on your website. If you do want to restyle it, you can do so in the design settings.

Document Library Pro design templates

Now that you’ve configured your WordPress document management system, and saved your changes, you can start adding documents to it.

Step 3: Add your documents

Before we add a document, let’s first define what a document means. A document in your library can be any of the following:

  • A (downloadable) file that’s uploaded in your WordPress Media Library section. This can be any file format you choose, such as PDF, image, or PowerPoint.
  • A (downloadable) file that you have on an external platform such as Dropbox or Google Drive.
  • A resource that’s readily available for reading directly on your website. It doesn’t have to be downloaded.
  • A resource that’s embedded directly on your webpage.
  • A link to a webpage (on your website, or a different one).

As mentioned previously, there are several ways to add a document.

Manually

Similar to adding a page or a post in WordPress, you can now add a document in this fashion.

Here are the steps to do so:

  1. Go to Documents → Add New.
  2. Add the name, description, and other relevant information you want to display.
    create document wordpress
  3. In the main content area, you can add the full document, write a description, or leave it blank.
  4. In the ‘Document Link’ section, choose one of these options:
    1. File Upload - Upload a file for your audience to download.
    2. Custom URL - Add the URL of the document’s location.
    3. None - Choose this if you’re embedding the document into the main content area instead of having it as a clickable link.
      upload document wordpress
  5. Click Publish to add the document to your document management system.

Drag and drop

If you have many files you want to add to the document management system at once, then you can use the drag and drop upload. Here’s how to do that.

  1. Go to Documents → Import.
  2. Choose the files you want to add from your desktop or folder.
  3. Drag and drop the files straight onto the page.
  4. Go to the ‘Documents’ section in your admin area to view them.
import documents wordpress

Bulk import

Add all your data and compile it into a CSV file to upload it to WordPress. This is useful if you have a large number of documents you want to add automatically. Here’s how to do that.

  1. Use a spreadsheet program such as Excel to add all of the information into a CSV file. (Download a sample CSV file).
  2. Go to Documents → Import.
  3. Follow the instructions on the screen to upload your CSV file. You can map your columns from your CSV file to the fields in the document management system to connect them.
csv import documents wordpress

Select from Media Library

If you’ve previously uploaded your documents to your WordPress Media Library, then you can select and add them in seconds. Here’s how to do that.

  1. In your admin area, go to the ‘Media’ section.
  2. Switch to the list view if you’re on the grid view (click the icons on the top left to switch).
  3. Select all the files you want to add to your document management system.
  4. Select ‘Add to document library’ from the bulk actions dropdown list.
  5. A link will appear to view your documents. Click on it.

All these methods support any file type (PDF, JPG, PNG, DOCx, etc).

bulk document management wordpress

Now that you’ve added all the documents to your WordPress document management system, you need to manage them.

Step 4: Easy WordPress document management

Now that your WordPress document management system is live, it’s important to manage and maintain it on a consistent basis. The Document Library Pro plugin makes WordPress document management a breeze to accomplish.

Given that your document management system lives on its own, separate from your WordPress Media Library, you can manage your documents in the back-end of your website easily. This is where you’ll be able to find and filter your documents before you make any changes.

There are several things you can do to manage your documents properly. Here are some best practices.

Updating a document - If you need to replace a document, go to the ‘Edit Document’ page (just like you’d edit any other WordPress page/post) and click on ‘Replace File’ on the top right-hand side of the screen. Follow the same steps as you did when you added a file to replace it.

If you make frequent changes to your documents, you might be better off overwriting the information. If that’s the case, then you’ll need to download and install the free Enable Media Replace WordPress plugin. This plugin also ensures that you don’t have duplicates on hand as it will overwrite the older version with the newer one (without changing the URL or breaking the link).

Displaying the version/modified date - For up-to-date information, add the latest version number to the document name. This way it will appear in the ‘title’ column on your WordPress document management system. You can also add/display a ‘date_modified’ column to your document to show the date when you last updated/saved it.

Update the categories/tags - If you’ve created categories or tags, keep track of them as the list grows bigger. Make sure the structure and hierarchy are still relevant as time goes by. Keep it organized and clean so that it makes sense for the documents you have available.

Now that you’ve added and managed your documents properly, let’s take a peek at what they look like on the front end of your website.

Step 5: View your documents

When you installed the Document Library Pro plugin, a page was automatically created and titled ‘Document Library’. That’s the page we’ve been tweaking, personalizing, and adding documents to. Let’s see what it looks like now.

  • Go to ‘Pages’ in your WordPress admin area.
  • Find the page ‘Document Library’.
  • Click on ‘View’.

This is your document library page where your documents are listed, according to the settings you chose in the ‘Documents’ section. As a reminder, this is what your audience sees, as it’s on the front-end of your website.

document library example wordpress

Or if you're using the grid layout then it might look like this:

Grid layout document library tiles

Here you’ll find the categories, filters, columns, and document links you chose to display. Depending on your preferences, you can now see if you want to make any changes to the layout or design of your document library.

If you do want to make tweaks to it, go back to your WordPress admin area, to the Documents → Settings section, and play with the options.

Lastly, if you want to make your document management system visible on your website’s menu, go to Appearance → Menus and add the ‘Document Library’ link to the navigation menu.

Now that you’ve added, managed, and viewed your documents with the Document Library Pro plugin, you’re officially done with the setup.

If you’re interested in learning about advanced settings and up-leveling your document management system for easier WordPress document management, then here are some extra bonus tips.

WordPress document management bonus tips

To take your WordPress document management system to the next level, here are some tips to do so.

Make your document management system private

If you want your document management system to be private or hidden (or parts of it), there are several things you can do to make that happen.

  • Create a private site for the document management system.
  • Password protect your document management system.
  • Restrict your document management system to certain users.

Let’s explore some of these options in more detail.

Create a private document management system

If you want to have a standalone document management system website that’s hidden from the world, you can make it completely private. Only people with the password can access the website. To password protect an entire website, you’ll have to either ask your hosting company if they have .htaccess protection or install a Password Protected plugin on your WordPress site.

With either option, people will have to enter a password to access your site as a whole.

Password protect your document management system

You have a few options to explore. You can:

  • Hide your document management system with the Password Protected Categories WordPress plugin.
  • Choose which documents you want to make private (and which ones are public).
  • Show different documents to different people.

Each one of these options can be achieved by password-protected one or more of your designated categories within your WordPress document management system. It’s only with a password that a user can unlock a category and view the documents.

Restrict your document management system to certain users

If you want maximum security on your documents, then this option might be more suitable for you. By restricting your document management system, you can hide all of your documents, just a few, or show different documents to each user.

You’re going to have to create a separate user account for each individual you want to give access to the document management system. The Password Protected Categories plugin allows you to restrict the categories to specific user roles (or individual ones if you want).

Update documents without replacing the title

If you want to replace a document, there are two ways to manage that without having to replace the title.

  • You can click on the ‘Replace File’ link and upload a new version of the document in the ‘Edit Document’ area
  • You can use the Enable Media Replace plugin to replace the original file in your Media Library with an updated version.

Track your document management system interactions

If you’re interested in tracking how your audience interacts with your documents, you can use Google Analytics to do that. With the Document Library Pro plugin, you can set up Google Analytics to track how your document downloads.

Automatically expire documents to save on manual management

To reduce the amount of time you spend managing your document management system, you can set an expiration date on your documents so that they get automatically removed.

While this is not a feature of the Document Library Pro plugin, you can achieve this with the free Post Expiration Date plugin.

Get to grips with WordPress document management

Having a WordPress document management system can help make your website more organized, efficient, and impactful for your audience.

With the Document Library Pro plugin, you can make this come to life with a few simple clicks.

Sharepoint vs WordPress

Discover who wins the Sharepoint vs WordPress debate, and how to set up a SharePoint-style document library in WordPress for a fraction of the cost. It's the best way to avoid the usual SharePoint problems.

When you're creating an intranet or document library for your company or organization, your main choices are likely to be Sharepoint vs WordPress. It's not an easy decision, because it affects multiple people across your organization and you're likely to remain with the same provider for many years.

In this article, I will explain:

  • Why WordPress is the most flexible and cost-effective choice for many intranets.
  • How to use WordPress to create an intranet with private content.
  • How to use the Document Library Pro plugin to add a searchable resource library to your WordPress SharePoint alternative.

Switching to WordPress is the perfect solution to your SharePoint problems, whether or not you already use WordPress for your main company website.

What is an intranet?

Before we get to the meat of the WordPress vs SharePoint debate, let's look at what people use SharePoint for.

Essentially, SharePoint is an enterprise-level intranet software platform. For those unfamiliar, an intranet is a private network that’s designed to support an organization’s employees enabling them to communicate and collaborate. Intranets serve a broad range of purposes for organizations depending on their objectives. Companies use it to share information and provide online tools for their employees and other internal personnel.

An intranet can be accessed from any computer or mobile device with an internet connection. However, it is hidden behind secure user login. As a result, only authorized people from your organisation can access the company intranet.

Intranets typically have certain features, although this depends on the organization. For example, most intranets include a document library area for sharing resources across the organization. An intranet might also have other tools such as staff directories.

SharePoint vs WordPress: Which intranet should you use?

While there are lots of platforms available for your company intranet, SharePoint and WordPress tend to be the main players. That's surprising because they are fundamentally different:

  • SharePoint is an enterprise platform by Microsoft. While you can hire a SharePoint developer to customize it for you, it is very expensive to set up and there is no free version. SharePoint is only suitable for large organisations with deep pockets.
  • In contrast, WordPress is an open source content management system. You can use it to build literally any type of website and - you guessed it - this includes a private internet. The basic version of WordPress is completely free to use, and you can extend it by installing a low-cost plugin to add extra features.

When choosing between SharePoint vs WordPress, we're not really comparing like-with-like. However, they both offer valid ways to build an intranet. Let's look at the pros and cons of each option next.

SharePoint pros and cons - unpicking SharePoint problems

SharePoint is an incredibly sophisticated system, designed around the needs of large organizations. Once set up correctly, it is very robust and stable, with good support from Microsoft.

SharePoint proprietary software i.e. it’s not open source and your developer won't have access to the actual source code. There are customizations they can make based on what SharePoint allows, but you don't have full control like you would with an open source platform.

You also need to consider the ethical considerations of using proprietary software compared to open source. Some people consider this a major problem of using SharePoint vs WordPress.

WordPress pros and cons

WordPress is the world's most popular content management system with a market share of over 40%. It’s huge just like SharePoint and Microsoft but in a less centralized, more democratic way.

Using WordPress, you can create a completely private intranet for your organization. WordPress is more like SharePoint Online than SharePoint Server or SharePoint Hybrid because it’s cloud-based and 100% online. The best part is that it doesn’t have any software for the end user to install. This ensures a frictionless user experience for your team and other users.

WordPress is completely free and open source. There are tens of thousands of plugins available to add extra features to a WordPress-powered site or intranet.

You can use WordPress to set up a SharePoint intranet or document library alternative yourself, with no technical knowledge. You own your data and aren't tied into anything long-term. A huge community of resources and developers are available to help you if you need it.

As an open source platform, WordPress is infinitely customizable and therefore much more flexible than SharePoint.

It's likely that you already use WordPress to power your main website. As a result, it makes a lot of sense to add an intranet and private document library to your existing site. That's far more efficient than starting from scratch with a separate standalone system. If you don’t already have a WordPress website, you can follow this tutorial to set up a basic website in a few steps.

Cost comparison: SharePoint vs WordPress

As I mentioned above, SharePoint is enterprise-level software. This means that it can have huge setup costs as well as a recurring monthly cost for every user. It's not suitable for growing businesses that are looking for a cost-effective SharePoint document library alternative.

If you need SharePoint for your organization then the costs are unavoidable - this is one of the main SharePoint problems. Microsoft recommends that you should budget at least 8x the cost of the software itself for successful deployment. You can expect to pay a lot of money for expensive SharePoint consultants to implement customized solutions for your organization. You can't even change your mind later because your documents are hosted on SharePoint, and you lose everything if you cancel.

In contrast, WordPress is completely free to use. You just need to budget for the cost of hosting, a domain name, and any plugins that you need to install (typically under $99 per year). If your company website uses WordPress then you're already paying these costs, so it doesn't cost any extra to add an intranet.

Even if you need to hire a developer to set it up or customize a WordPress intranet for you, WordPress developers charge significantly less per hour than SharePoint developers.

Why a WordPress intranet with document library is the perfect SharePoint alternative

Fix your SharePoint problems with a WordPress document library

Here, we’ll take a closer look at each of the main features on offer with SharePoint and how you can do the same (or better) with a WordPress-based SharePoint alternative. This is an excellent way to solve the main SharePoint problems, as it completely bypasses them for a better alternative.

If you already use WordPress for your main company website then you can easily add an intranet and document library (either publicly or privately). Alternatively, you can use WordPress to create a dedicated intranet site to host your document library.

Intranet

WordPress is the perfect solution for any intranet, and easily wins the SharePoint vs WordPress debate in this area. You can use WordPress with Advanced Access Manager to get full control over who can access each part of your website and intranet.

Let’s step through some examples:

  • You can use WordPress for your main company website with a private intranet area for staff members. This is ideal because it keeps everything in one place. SharePoint, while keeping your intranet separate from your public company website.
  • Free plugins like Password Protected make it easy to create a 100% private intranet website with no public area.
  • You can create an intranet that has sub-sites or separate areas for individual departments or teams. One way to do this is by using the free User Role Editor plugin to create additional user roles and Advanced Access Manager to control which user roles can access each area of the intranet. Or, you can use WordPress multisite to create websites within websites.
  • As well as the SharePoint document library alternative that we’ll cover later in this guide, you can store any type of information to share with your organization. For example, you can create pages, internal blogs, forums, or a knowledge base. You could create a staff directory with contact details for each team member in your organization.

Document management system or document library

Organizations use a document management system or document library to store and share documents, either for public viewers, for internal use, or both. You can use WordPress with the Document Library Pro plugin to list unlimited documents.

Let's take a look at the key features on offer with Document Library Pro.

Appearance and usability

Documents are listed in a table layout which makes it easy to see specific data about each one. This is much more user-friendly than the basic grid layout for documents in SharePoint and solves a lot of SharePoint problems. In addition to this, you have full control over which columns to include in the table. For example, you can include columns for data such as title, excerpt, author, modified date, file type, category, tags, and just about anything else you’d like.

Sharepoint vs WordPress recommendation

The Document Library Pro plugin also offers lots of options to make it easy for users to navigate and find specific documents. You can list documents in:

  • One long table
  • Multiple tables
  • Automatically structured into collapsible folders based on their categories.

This is much more flexible than SharePoint’s grid-based document library layout.

Sort, filter, and search documents

The document library filters make it easy for users to quickly find documents based on categories, tags, and any custom data you might have added. The Document Library Pro plugin also adds an instant AJAX-powered keyword search box above each list of documents.

Filter document library

Users can also click on any column in the document library to sort the documents by that data. For example, users can sort by the date columns to see the documents that were published or modified most recently.

Search document library

Supported formats

In addition, the Document Library Pro WordPress plugin supports all document formats plus online content. Each document can link to a downloadable file, a page directly on the website, or a third-party URL. It also supports a variety of other media files such as audio and video.

Sharepoint vs WordPress screenshot document library

The Document Library Pro plugin supports internal or external sharing of files and other content. Sharing can happen both within and outside the organization. By using the Document Library Pro plugin with Advanced Access Manager, you can easily choose which files are available for internal users only and which ones are available publicly.

If you use WordPress for your main company website, you can even have one document library or resource section in the public area and another in the private intranet area.

Collaboration system

If you’re looking to set up a SharePoint intranet alternative, you probably need a way to share information within the organization. WordPress offers many ways of doing this with multiple user roles. While SharePoint has collaborative and user management features too, they are probably equal in this part of the SharePoint vs WordPress debate.

Document Library Pro comes with a front end document uploader which allows employees to add resources without needing access to the WordPress admin. You can either add this straight to the library, or hold it for moderation by an administrator first.

Submit document to library WordPress plugin

For added flexibility, you can use WordPress with the WP Sheet Editor plugin to allow specific users or user roles to edit information from the front end without having to access or go through the WordPress admin. This adds a handy 'Edit' button above or below your document library (which you can show/hide based on user role) so that people can easily edit documents.

Fix SharePoint problems with WordPress front end intranet editing
Front end editing with WP Sheet Editor

Alternatively, allow users to submit documents to the library from the front end, without having to access the WordPress admin.

Version control

Like any good document management system, Document Library Pro has built-in version control. It stores previous versions of each resource in the library. That way, admins can easily see previous versions and restore and delete them as needed.

Read our complete guide on version control in WordPress.

Access from any device, not just the office

With WordPress, you can create responsive websites that are accessible from any device. Setting up an intranet on WordPress means that users will be able to access it from any device, not just the office. They just need a web browser - no need to install any apps.

If you're creating a private intranet then the plugins mentioned above let you make the intranet site accessible to users outside the local network.

100% customizable and scalable

With a SharePoint document library, you have to hire a SharePoint developer to customize the user interface. With WordPress, you can install any of the thousands of off-the-shelf themes that are available. WordPress themes allow you to upload your company logo, customize the colors, modify typography, and much more.

Alternatively, you can create your own WordPress theme with a completely custom design.

A WordPress document library solution is 100% scalable and can grow with your organization without increasing your costs, unlike SharePoint. Proprietary software, like SharePoint, offers subscription-based pricing plans. You pay a recurring fee per user and, therefore, can’t predict future costs.

How to set up a SharePoint intranet alternative with WordPress

For full instructions on how to create a WordPress intranet and private document library, use these tutorials:

Sharepoint vs WordPress: The verdict

In my opinion, WordPress is the clear winner of the SharePoint vs WordPress question. That's because it's 100% free and open source, infinitely customizable and extendible, and is supported by a huge community and massive market share. SharePoint's problems and the fact that it is hugely expensive proprietary software mean that it can't possible compete, except for a small number of very large organisations with even deeper pockets.

Instead of using SharePoint, most organization are better off using a SharePoint intranet and document library alternative. A great solution is using WordPress with the Document Library Pro plugin, which is:

  • Easy to use - no technical skills or knowledge needed.
  • Cheap to set up, and easy for your team to manage.
  • Supports downloadable or online documents.
  • 100% flexible and customizable.
  • Love it or your money back!

Ready to set up a SharePoint-like document library for your organization? Get Document Library Pro today!

WordPress search filters

Does your website store multiple levels of information about documents and files, members, recipes, or anything else? If so, then you might want to add WordPress search filters to help people to find information quickly and easily.

Here’s how dynamic filters – also known as a series of cascading filters – work:

When the user chooses content in one filter, the available options in a second filter update automatically. You can add cascading filters to your blog posts and pages as well as custom post types such as events, recipes, and documents.

In a hurry? Jump straight to the tutorial section.

Member directory dynamic filters

In this tutorial, we’ll explain step-by-step how you can add dynamic filters to your WordPress website in a few simple steps.

Why you need a powerful WordPress search filter

If you have lots of information to display on your WordPress site – whether these are blog posts, documents, or custom post types – your users will need a logical way to drill down to find what they’re looking for.

Here’s a real-world example from a customer:

For all projects, I will need to be able to use complex relationships, like for example if I have a plants post type, a compounds post type, and a diseases post type. I will need to be able to find plants that contain a particular compound that is known to remedy a particular disease. I need to be able to set up complex searches like that. Also, it would need to load with AJAX if there will be thousands of plants in the database.

For this, you can use dynamic filter dropdowns that are connected to one another.

Here’s a look at some other WordPress search filter examples for displaying lots of information and why they’re not ideal solutions:

Scenario #1

You could create a single filter dropdown which has multiple levels within a single list so that the options from the second filter are indented under the first. This option is available in both our Posts Table Pro and Document Library Pro plugins. It is useful for fairly short lists.

WordPress table plugin hierarchical category filters

However, if the list is likely to be very long it could potentially cause usability issues. In this scenario, it’s better to have a separate filter for each piece of data so that visitors can drill down one stage at a time.

Scenario #2

You could have several standalone filters for documents and files. The problem with this option is that when the user selects a file category, they’ll see all the file tags for all of the file categories in the next filter dropdown.

For example, if they select ‘Research papers’ then they expect the tags filter to update to list the years the research papers were published in instead of each year a document was published. The user would have to go through multiple filter combinations to find documents. No one wants this!

Scenario #3

Even if the different pieces of information that you’re allowing users to filter aren’t connected, it’s not ideal if visitors select an item from one filter and the other filters don’t update to show the relevant items.

For example, imagine that you’ve created a WordPress document library and the user selects a document category. They then try to select a document year and end up choosing a year that has no documents from their selected category. It would be better if the year filter had updated to only show years that had documents from the selected category.

Now that we have a better understanding of why traditional WordPress search filter options simply don’t cut it, let’s explore a more viable option.

The solution

If you want to add dynamic filters to your WordPress site then you can choose between these plugins:

  • Posts Table Pro - Use this plugin if you want to create a filterable list of blog posts, pages or any custom post type (e.g. members or events).
  • Document Library Pro - Use this plugin if you want to create a filterable document library.

Both plugins display the information in an AJAX-powered sortable, searchable table layout with dynamic, cascading filters. Users can choose from one WordPress search filter and the contents of the other filters will update automatically.

In addition to this, your site’s users can:

  • Use the smart filters to narrow down large volumes of content by categories and taxonomies.
  • Use the search tool to quickly find specific content.
  • Sort by any column you choose to include in the table including categories and taxonomies.
  • Use progressive filters without having to refresh the page thanks to the AJAX based table.

This way, you can empower users to find the exact post or document they’re looking for much faster.

Adding WordPress filter widgets

On their own, the Posts Table Pro and Document Library Pro plugins add AJAX-powered filter dropdowns above the list of items. If you'd like other types of faceted filter - for example filter widgets or checkboxes - then you can use them with the FacetWP plugin.

Together, you can create something like this:

WordPress table plugin with filter widgets checkboxes

The table is powered by Posts Table Pro/Document Library Pro, and the filters widgets come from FacetWP. The perfect partnership!

Comparing WordPress filter plugin options

There are several WordPress filter and search plugins available, each with different features depending on your site’s needs. Here’s a quick comparison of the most popular options:

  • FacetWPA powerful filtering plugin that adds faceted search to any content type. Works especially well when paired with custom post types or advanced custom fields.

  • Search & Filter ProOffers flexible filtering for posts, products, and custom content. You can add filters by category, tag, taxonomy, post type, and more.

  • Filter EverythingLets you filter any WordPress content, including WooCommerce products and custom post types. Also supports SEO-friendly URLs.

  • WP Grid BuilderA premium plugin with advanced grid layouts and AJAX-based filtering. Best for more visual content like portfolios or image-heavy blogs.

  • JetSmartFilters (Crocoblock)Built for Elementor users, this plugin offers filtering widgets for taxonomies, custom fields, and more.

  • SearchWPA powerful WordPress search plugin that enhances the default search by indexing custom fields, shortcodes, taxonomies, and more. Great for improving relevancy and pairing with filter plugins.

While all of these plugins have their place, Posts Table Pro and Document Library Pro remain ideal for sites that need lightning-fast tables with instant filtering – especially when paired with FacetWP for a more advanced faceted filter UI.

When to add dynamic filters to your WordPress website

If your WordPress website contains a large volume of information with multiple types of data, you need a way to display it in a user-friendly way. This way, users can easily find what they’re looking for. One simple way to do this is by adding dynamic filters to your site.

For example, let’s say you have a document library on your WordPress website. You can use WordPress search filter dropdowns to allow visitors to select a category and then a sub-category. Once they do that, they will see the available documents for that sub-category listed in the table. This is also how faceted search works in e-commerce stores.

For WooCommerce sites specifically, implementing search filters offers powerful functionality beyond basic WordPress filtering. Product-specific filters can include price range sliders, attribute filtering (size, color, material), variation display options, and enhanced product search capabilities. These specialized filters help shoppers narrow down product selections based on their specific needs, significantly improving conversion rates. When setting up filters for WooCommerce, ensure that product variations are properly configured to display in filter results, and consider implementing AJAX functionality to provide a seamless shopping experience without page reloads.

For example, the different options a user selects might be: Research papers2025 → Solar Energy Production or News articles2024Summer Olympics.

The best method for displaying this type of information is by creating a series of connected, cascading filter dropdowns.

Use cases

Here are some examples of use cases that are perfect for using WordPress search filters:

  • A directory of consultants based around the world. Let’s say you want to enable users to find a consultant in their particular area. For this, you can create a series of cascading filters that allow users to first select the country, then the area, then the city, and so on. For example, a user might select: USACaliforniaSan Diego to see a list of consultants in San Diego.
  • Staff intranet. Suppose your company’s intranet includes content that helps staff carry out their day-to-day tasks and access essential company information such as official documents, company policies, digital assets, information about products and services, and marketing material. You can easily organize all this information using dynamic filters. In this case, the ‘Company Documents’ dropdown would contain all the earlier mentioned essential documents. For example, when an employee selects ‘Marketing material’ from the dropdown filter, the corresponding filter will only show content related to marketing such as sales battlecards, banners, and lead generation strategies.
  • Business directory website. If you have an online directory of business listings similar to TripAdvisor or Yelp on your WordPress website, you should use cascading dropdowns to present the available options. This way, you can create a dropdown list containing the user’s location, industries, companies in their area, and services and products.

So, when a user selects a particular industry, for example, ‘Rugs’ then only areas that have stores that sell rugs will be displayed in the next dropdown. As a result, users will be able to quickly search for companies, services, and products in their particular area. It’s a great way to create a search form in WordPress.

How do I add a filter search in WordPress?

Posts Table Pro and Document Library Pro offer a number of options to help you add connected, cascading filters on pages, posts, and custom post types on your WordPress website.

To get started, you’ll need to create a front-end table layout of your documents and files or custom post types. You can add any type of file to it including PDFs.

Step #1: Install the filter plugin

Get the Posts Table Pro or Document Library Pro plugin and install it on your WordPress site. You’ll get a license key in the confirmation email. Paste it in the license key field on the plugin settings page in the WordPress admin.

The settings page also allows you to configure the front-end table layout. Check out the complete documentation for instructions.

Step #2: Add dynamic filters

To add search filters, scroll down to the Table controls section and choose either Show based on columns in table or Custom.

The Show based on columns in table option adds a filter for each relevant column in your table.

When implementing filters, you have several display options to enhance user experience. While the article focuses on dropdowns, modern WordPress filter systems also support checkboxes, radio buttons, multi-selects, sliders, color swatches, and various layout options including vertical and horizontal arrangements. These UI elements can be customized to match your site's design and improve mobile responsiveness. For example, a clothing store might use color swatches for visual filtering, while a real estate site might benefit from price range sliders.

The Custom lets you set the exact WordPress search filters you want to display above the table. All you have to do is enter the list of filters in the text box as a comma-separated list. You can filter WordPress posts by categories, tags, and custom taxonomies.

For example, categories,tax:country,tax:locality. In this example, ‘tax:’ is used to specify custom taxonomy filters.

Step #3: Preview

Finally, use the plugin documentation to create a page listing your posts or documents. Preview the page on your site’s front end. It should look something like this:

WordPress Publications Library

Users can set the AJAX WordPress search filter dropdowns to quickly narrow down their search. It's the simplest way to set up a powerful search form in WordPress.

Case study: Indiana Broadcasters Association

The Indiana Broadcasters Association uses our Posts Table Pro plugin to list stations in a neat, front-end table layout. The table includes details about each radio station’s title, frequency (channel), city, and phone number. Users can sort the table by title, frequency (channel), or city.

Indiana Broadcasters Association

In addition to this, the table has filter dropdowns above it that people can use to quickly find the station they’re looking for by Station Category. The available station categories are Radio and Television. This helps users narrow down their search. Users can also use the search box to find a station in their city, view only AM or FM stations, or search for a specific station by name.

The Indiana Broadcasters Association implements pagination – displaying 25 stations per page – to make it easy for people to browse stations. The station titles aren’t clickable meaning users can’t redirect to a single page from the station directory page.

The Indiana Broadcasters Association created a custom post type for the stations. They also used the Advanced Custom Fields plugin to add data about each station which is then displayed using the Posts Table Pro plugin.

Set up WordPress search filters today

Adding dynamic filters to WordPress is a great way to enhance the user experience of your website – especially if you need a way to present lots of information in a user-friendly way.

The Posts Table Pro and Document Library Pro plugins enable you to create a series of cascading filters that are perfect for websites containing large volumes of information. These dependent filters will allow users to narrow down their search in a logical way and find what they’re looking for, faster.

Ready to add dynamic filters to your WordPress website? Get the plugin today!

WordPress document library plugin

Discover the easy way to build a searchable WordPress document library with easy document management, support for any file type, and more.

A WordPress document library plugin presents your documents and other resources in an easy-to-find format. It allows you to keep things organized, share files publicly or with colleagues, and create a resource hub or a publications database.

It's surprisingly hard to find a good document library plugin. There are lots of file management and media library plugins available, but very few to create a searchable front-end WordPress document library. The ones that do exist have poor ratings, missing features, and a lot of negative feedback.

That's why we built Document Library Pro. We consulted thousands of WordPress users to find out exactly what they want. We used the results to design the best document management platform on the market.

In this tutorial, I'll explain how to create a document library in WordPress from start to finish. It's really easy and you don't need any technical knowledge.

What you'll need to create your WordPress document library

You need 3 things to build a document library in WordPress:

  • A WordPress website.
  • The Document Library Pro WordPress plugin.
  • The files that you want to list in the document library. You can host these in the WordPress Media Library, or literally anywhere else on the web (Google Drive, YouTube, SoundCloud, Dropbox, etc.).

The complete document library solution

Document Library Pro has everything you need to add and display documents:

  • Quickly add documents to WordPress - Either manually, using drag and drop, as a bulk CSV upload, or via a front end upload form for your users.
  • Store extra data about each document - Make the WordPress document library more accessible by adding extra information such as a title, excerpt and description. Other data is calculated automatically, such as file size, file type, date, and last modified date.
  • Instantly list documents in a searchable, sortable table with filters - or alternatively in a tiled grid layout.
  • Supports any file type - The WordPress document library plugin supports literally any file type that can be stored in the Media Library. If the documents are hosted externally then you can link them to any third-party website like Dropbox, Office 365, or YouTube.
  • Embed documents, audio, and video - Instead of (or as well as) download links, you can display documents directly on your website. You can even add embedded music and video players which people can play on the main document library page.
  • Flexible download links - Choose whether to show download buttons, text links, or file type icons on your main document library page. Also, choose whether to provide instant downloads or a separate page for each document.
WordPress document library plugin

How it works

To use the WordPress document library plugin, you simply add your documents to the WP admin. The plugin takes care of the rest and automatically displays them in a searchable document library in the front end. You can choose which columns of information to include, whether to structure the documents into folders based on their category and much more.

People can easily find the documents they're looking for and either read them online or download a file.

WordPress document library grid

What sort of documents can I display?

The document library plugin can list any type of document on a WordPress website. This includes:

  • Any document file typePDF, DOC, XLS, PPT, EPUB, Google Docs & Sheets, video, etc. This WordPress file manager plugin supports literally any file type.
  • Corporate documentsContact lists, data sets, documentation, financial spreadsheets, forms, how-to guides, handbooks, instructions, legal documents, license agreements, lists, manuals, policies and procedures, reports, stationery, templates, terms and conditions, white papers, worksheets.
  • Promotional documentsCase studies, flyers, leaflets, marketing materials, Keynote or PowerPoint presentations.
  • Industry-specific documentsBlueprints, manuscripts and sheet music, maps, signage.
  • Personal documentsDownloadable kids activities, leisure guides, nutrition guides, recipes, treasure hunts.
  • WordPress audio or video galleryYou can display photos, music, and videos in a WordPress audio library or video gallery, creating any type of resource or document gallery!

Step-by-step guide to building a WordPress document library

Document Library Pro circle cropped

Like what you see? Great! Next, I'll show you how to create a WordPress document library for your documents, publications, or any other type of resource.

I'll also share some bonus tips on how to add extra features to your WordPress document library. This includes how to make parts or all of the document library private, document management advice, and embedding multimedia content such as flip books, audio, and video. You'll be amazed at everything you can do with your document libraries 💪

First, watch Sam explain how to create a document library with WordPress and build your own along with him. Alternatively, keep reading for full written instructions:

1. Install Document Library Pro

Installing the WordPress document library plugin only takes a minute:

  1. Get Document Library Pro and download the plugin files from the order confirmation page or email.
  2. In the WordPress admin, go to Plugins → Add New and upload the plugin zip file that you just downloaded. Click 'Install' and then 'Activate'.
  3. Activate your license key in the plugin setup wizard.

2. Set up your document library

The Document Library Pro setup wizard will guide you through the main settings. You can then access more advanced settings at Documents → Settings.

First, use these options to set up your document libraries globally. Later, you can override these options for each individual list of documents as needed.

Recommended settings

  • Layout - Choose between a table or grid view. I recommend the table view if you have lots of documents, as it displays more per page. Use the grid view for smaller document libraries where you want to make each document more prominent.
    setup wizard document library pro
  • Folders - Tick this to automatically structure the document library into folders, instead of as a single list. There will be one folder for each document library category.
  • Content - Choose what data to display in your document library. There's a huge range of possible columns to choose from, including the document name, description, file size, file type, published date, modified date, and download link. You can rename the columns as needed.
  • Link style - Decide whether the document link field will display a download button, text link, or file type icon.
  • Link text - Change the word 'Download' to anything you like, such as 'View' or 'Read Online'.
  • Clickable columns - These link to an individual page for each document. If you don't want a page for each document, then set this option to 'none'.
  • Search filters - If you will have lots of documents in each table, then add filter dropdowns to help people find them more easily. You can have filters for your document categories, tags, or any custom taxonomy (see bonus tips).
    Filter document library

There are also lots of other settings to choose from. For example, you can optionally customize the document library's design:

Document Library Pro design templates
[/image_border]

3. Structure the document library

Document library categories

Before you start adding documents, it's important to plan the structure of the document library. This is an important part of organizing your document library.

The WordPress document library plugin provides 2 ways to organize documents:

  • Document categories - Create hierarchical categories and sub-categories, structured into unlimited levels.
  • Document tags - Add tags or labels to each document. For example, you could use tags for the document year, publisher, topic, type, or something else. (If you want multiple types of labels, then you can do this by creating custom taxonomies to use as well as tags.)

Your document library can display each file's category and tag. It can also include category and tag filters to help people to find documents more easily. You can even create multiple document libraries, each containing files with a specific category or tag.

4. Add documents to the library

Now it's time to start adding documents!

The Document Library Pro plugin is ultra-flexible and supports any type of 'document'. A document could be:

  • A downloadable file that is stored in the WordPress Media Library - e.g. a PDF, image, or PowerPoint presentation.
  • Any downloadable file that is stored on a third-party platform like Dropbox, Google Drive, Microsoft SharePoint, or Box.
  • A resource that is available for people to read directly on your website, without having to download anything.
  • Any resource that you embed directly into your website - e.g. a page-turning flip book or an embedded Google Drive document.
  • A link to a web page, either on your own website or on a different website.

As you can see, that's a pretty wide definition of a 'document'! Whatever type of document or resource you want to display, you can do it with Document Library Pro. Simply add or upload the document along with any extra data that you want to display about it. It will then be stored in a dedicated 'Documents' section of the WordPress admin.

This makes document organization really straightforward while keeping your documents separate from other website content and Media Library files.

5 quick ways to add documents

Now we know what the WordPress document library plugin can display, you can choose the best way to add your documents:

  1. Add documents manually - It's just like adding a page or post in WordPress!
  2. Select files already in the WP Media Library - Are your documents already in WordPress? Add them to Document Library Pro in seconds.
  3. Drag and drop file upload - Drag files straight into the document library.
  4. Bulk import documents from CSV - To import large numbers of documents to the library, add all the data to a CSV file, and upload it to WordPress.
  5. Front-end document submission - Allow users or team members to add documents without having to log into the WordPress admin.

All these methods let you choose what information to display in the document library (summaries, file type, file size, category, etc.), and add links to access or download the document. They all support every file type, including uploaded PDFs, JPG, DOCx, etc.

How to add documents manually
Add document to library

You can add documents one by one, in exactly the same way as you add pages and posts in WordPress:

  1. Go to Documents → Add New.
  2. Add all the information that you want to display about the document, such as the name and description. Ignore the file size option if it's a downloadable document because this will be calculated automatically.
  3. For the main content, either add a description, leave this blank, or add the full document. This might be the full text of the document (you can add thumbnail images etc. as required), an audio or video player, a Google Drive document embedded onto the page, or even a flip book plugin.
  4. Choose an option in the 'Document Link' section:
    1. File Upload - Upload any file type which users can download.
    2. Custom URL - Add the URL of where the document is located, e.g. a Dropbox or Office 365 link, or a third-party website.
    3. None - Choose this if you are embedding the document into the main content instead of as a clickable link.
  5. Click 'Publish' to instantly add the document to the library. You can optionally set a date when the document will expire and be removed from the library.
How to add Media Library files to the document library

Lots of people install Document Library Pro after using a different plugin. If your document library files are already in the WordPress Media Library then you can easily convert them into documents:

  1. Go to the 'Media' section in the WP admin.
  2. Make sure you're on list view rather than grid view (click the icons in the top left to switch).
  3. Tick the files that you're adding to the document library plugin.
  4. Use the bulk actions dropdown to select 'Add to document library'.
  5. Click the link that appears to view your documents. You might want to tweak some details like the name or add extra information about each document.
Add Media Library files to document library
How to add documents using drag and drop

If you want to add lots of downloadable files to the document library, then the draft and drop uploader provides a useful shortcut:

  1. Go to Documents → Import.
  2. Drag and drop the files onto the page.
  3. Go to the 'Documents' section of the WordPress admin to view them and make any changes.
drag and drop multiple PDF into Document Library
How to import documents from CSV

The WordPress document library plugin provides a fully automated way of importing documents in bulk:

  1. Use any spreadsheet program (e.g. Excel) to add all the information about your documents to a CSV file, including the URL of where it is currently located. For a useful starting point, download the sample CSV file from the document library plugin knowledge base.
  2. Go to Documents → Import.
  3. Follow the on-screen instructions to upload your CSV file. This includes a page where you choose which column from the CSV to map to each field in the document library.
csv import documents wordpress
Set up front-end document submission

A lot of websites list documents that users have submitted themselves. For example, you might allow people to submit resources which are then shared with the entire community. Or perhaps you want an easier way for employees to add documents to the library without accessing the WordPress admin.

The WordPress document library plugin comes with a front end document upload form. To use this, simply add [dlp_submission_form] anywhere on your site.

You can put the document upload form on a public or private page on your website. When new documents are submitted, you can either publish them immediately or hold them for moderation first.

Submit document to library WordPress plugin

5. Make the document library searchable and filterable

Above, I showed you how to add filter dropdowns above the library so that users can filter documents by category, tag, and so on.

For even more advanced filters, you can use Document Library Pro with the FacetWP plugin. This lets you add filter widgets like this:

Document grid with FacetWP filters

6. Creating custom download buttons/links

Document Library Pro lets you choose between 6 styles of button to link to your documents:

Think carefully about which button style will work best for your document library. For example:

  • If you're listing different file types in the same library, then the file type icon makes it clear which is which.
  • Where it's obvious what the button will do, a simple download icon is enough.
  • If the action isn't clear, then add button text to clarify what the button does. For example, if you're creating a WordPress audio library with files hosted on SoundCloud then you could change the button text to "Listen Now".

As well as (or instead of) the download buttons, Document Library Pro also provides preview buttons. These come with a similar choice of styles.

You can control all the the button styles on the settings page at Documents → Settings.

7. View the document library

Now it's time for the fun bit: seeing your WordPress document library for the first time.

When you installed the Document Library Pro plugin, it created a main document library page for you. This page lists all your documents in a beautiful document directory on the front end of your website. You can find this in the main list of 'Pages' in the WordPress admin.

Depending on your settings, the document library page may look something like this:

WordPress document library plugin folders
A document library with folders

Or this:

WordPress document library plugin with links
Document library without folders

Or even this:

Grid layout document library tiles
A document grid

8. Create additional document libraries (optional)

So far, you've learned how to display all your documents on the main document library page. If you prefer, then you can use a shortcode to add multiple document libraries.

Use the shortcode options to list different documents on different parts of your WordPress site. You can also change other details such as the table columns and whether to display download buttons or file type icons. This is a great way to make your document library more varied, tailoring each table to the type of documents you're listing.

Customizing access to the document library

Now, I'll tell you how to hide your entire document library or specific parts of it. We'll do this with the Password Protected Categories WordPress plugin. This easy-to-use plugin lets you customize access to each category of your document library. You can either password protect categories (no user login required), or restrict them to specific users or roles.

You can either:

  • Create a 100% private document library by restricting access to the top level document category. This will automatically protect all the documents and sub-categories, or;
  • Set different passwords to different document categories, while leaving other categories public if required.

The most cost-effective way to get Password Protected Categories is as a 2-plugin bundle when you buy Document Library Pro.

Password protecting certain documents or categories

The first way to customize access to your WordPress document libraries is to use simple password protection.

With this method, people must enter a correct password to unlock the category and view the private documents. Once they've unlocked a category, they can navigate within it and its sub-categories. They won't need to re-enter the password until it expires. (You can set the expiry time in the plugin settings.)

The benefit of this method is that you don't have to create a separate user account for everyone who accesses your document library. For example, let's say you're creating a private intranet for employees. There's no need for each person to have their own user account on your WordPress site. Instead, just give them a password. This unlocks the protected library without needing an individual login.

How to password protect the document library

  1. Purchase and install the Password Protected Categories plugin.
  2. Go to Documents  Categories.
  3. Find the 'Visibility' settings for the main category you want to protect. Select 'Protected' and enter 1 or more passwords in the 'Password protected' section.
    add password to woocommerce protected categories
  4. Now go to the main Documents list in the WordPress admin and categorize your documents as needed.
  5. Finally, create a login page for your users by adding the shortcode [category_login] to any page on your site. Or even better, add the shortcode to the top of your document library page. As soon as someone enters a correct password, the hidden documents will appear in the library!

Restricting access to specific user roles

If you'd rather create a separate user account for each person who accesses your document library, then that's fine too. The Password Protected Categories plugin also lets you restrict document categories to specific user roles - or even individual logged in users.

Use this method if you:

  • Want the most secure option.
  • Are prepared to create a separate user account for each person who accesses the document library.
  • Want to hide all your documents, just some of them, or show different documents to each user.

The instructions for this are similar to the instructions for creating password protected categories. But this time, use the 'User roles' or 'Users' options instead of 'Password protected':

password protected categories - user roles & users option

Tips

  • For more granular control, create multiple user roles and show different documents to different users. Your main document library page will automatically show the correct documents for each logged in user.
  • If you don't already have a user-friendly login page, use a free front end login plugin such as Theme My Login or Profile Builder.
  • Are you showing different documents to different people? If so, DO NOT tick the 'Caching' option on the document library plugin settings page. This will ensure that each user sees the correct documents rather than a cached version of the library.

Enhancing your WordPress document library

Next, I will share some tips on how to add even more features to your document libraries.

Add extra fields to the library

The document library plugin for WordPress comes with all the standard fields you're likely to need. It even automatically generates extra fields such as the file size and file type.

If you want to display additional information about your documents then you can add extra fields to the document library. For example, you might want to show the publication date or publisher. Maybe you want to display a unique document reference code or version number. You can store all this extra information in custom fields and taxonomies.

First, decide whether to store the extra data as a custom field or taxonomy:

  • Custom fieldsUse these to store unique data about each item in your WordPress document library. For example, if you're using your document library to store internal publications, each one might have a unique document number. You would store the document numbers as a custom field.
  • Custom taxonomiesTaxonomies are an opportunity to sort and organize data. Use these to store information that will apply to multiple documents in your library. For example, you might want people to be able to filter the document library to view documents from a particular year. To do this, you would create a taxonomy called 'Year' and assign each document to the appropriate year.

Our free Easy Post Types and Fields plugins let you add custom fields and taxonomies to the 'Documents' post type. These will appear on the 'Add/Edit Document' screen in WordPress, where you can add all the extra data for each document.

Display your extra document fields

Front end WordPress media library filters
A document library with custom taxonomies for Media Categories and Document Years

Once you've added your custom fields and taxonomies, you can start displaying them in your document library:

  1. Go to the WordPress document library plugin settings page (Document Library Pro Settings).
  2. Extend the content field to include your custom fields and taxonomies:
    • Custom field column - add cf: followed by the custom field name (e.g. cf:size)
    • Custom taxonomy column - add tax: followed by the custom taxonomy slug (e.g. tax:year)

For example, your list of columns might be: title,excerpt,cf:size,tax:document_year

This will create a WP document library like the screenshot above.

How to sell documents

So far, I've assumed that you want to provide free access to your WordPress document library. But what if you want to sell printed or digital documents online? Fortunately, you can do that too.

The easiest way to create an e-commerce document library is to use our other plugin WooCommerce Product Table, instead of Document Library Pro. The instructions for selling documents in this way are similar to the document library tutorial in the previous sections. The main differences are:

  1. Add each document as a WooCommerce product. This is instead of having a 'Documents' post type for storing documents or displaying files from the media library. In WooCommerce, choose the 'Downloadable' product type and upload the file that people will receive after purchasing the document. You can also add other information such as the price.
  2. WooCommerce Product Table has a different shortcode for listing your document products. You can read about all the options in this article.

Your WordPress document library will look similar to the other screenshots in this article. The difference is that they will actually be e-commerce products available for sale, with add-to-cart instead of download buttons.

Tips for managing your WordPress document library

After your document library goes live, you can sit back and relax knowing that people can easily access your documents. However, at some point, you'll need to add more documents or edit existing ones. Luckily, the Document Library Pro plugin makes ongoing document management easy for you.

You can easily view all documents in the 'Documents' section of the WordPress admin. Use this to find and filter documents before making changes.

Manage document library

You can also view the files which are attached to your documents. Just go to the 'Media' section of the WP admin and select 'Documents' from the 'All types' dropdown list.

Updating document files

Many document files need to be updated at some point. For example, you may need to replace a link to an old PDF with an updated one. There are several ways to do this:

  • Simply replace the file - You can delete an existing file and upload a new one on the 'Edit' screen for each document. To avoid duplication, install the free Enable Media Replace WordPress plugin. You can then overwrite old versions when you upload a new file, without changing the URL.
  • Enable version control - There's an option to enable version control on the Document Library Pro settings page. This lets you choose what happens to the old file when you upload a new one.

Making documents editable from the front-end

If you want colleagues to be able to edit documents from the front end, then we recommend a choice of 2 excellent plugins for this.

WP Sheet Editor adds 'Edit' buttons above or below your document library, which only appear for certain user roles. Users can click these to open an editable spreadsheet-style table with all the document data. We have a separate tutorial on how to set this up.

Edit spreadsheet with WP frontend editor

Alternatively, WPSyncSheets has an add-on for Document Library Pro which lets you edit documents via a Google Sheet:

WPSyncSheets edit documents front end spreadsheet

How to track document downloads

The Document Library Pro plugin has a Download Count column which you can include in the document library. This displays the number of times the document has been downloaded. You can either view the count in the WordPress admin, or display it on the front end like this:

Document library author and download count column

For more advanced tracking, you can also use Google Analytics to collect more advanced data about how people are using the WordPress document library. Moz have published an excellent tutorial on How to Track PDF Traffic and Links in Google Analytics. Use this as a starting point to track whichever types of links you're adding to your document library.

Alternatively, you can use Document Library Pro with the Download Monitor plugin. This lets you track and report on the number of people who download your documents, plus exactly which users downloaded which document:

Download Monitor see who downloaded document

Get started: Build a WordPress document library in minutes

Now you know how to create a fully functional document library for your WordPress site.

Document Library Pro is the ultimate solution for adding a searchable library of any type of file or resource to WordPress. It comes with everything to streamline your document-handling process:

  • 100% flexible.
  • Quick 5-minute setup.
  • Create unlimited document libraries.
  • Ideal for non-technical website owners and developers.
  • 30-day money-back guarantee - try it risk-free!

I hope you enjoy creating your document directory with the best WordPress document library plugin! Let me know how you get on in the comments below.

Best WordPress file manager plugin

Having a WordPress file manager system makes it easy to keep all of your files organized and accessible to your team. With the right WordPress file management solution, you can choose to keep it private and available to your team only - or share it publicly with your site’s visitors.

Although there are a number of WordPress file management systems, only a few allow you to create a WordPress file manager that’s accessible from the front end.

With this in mind, in this article, I’ll show you how to use the Document Library Pro plugin to create a professional WordPress file manager. You'll learn how to control who has access to the files and how users can upload them. I'll also show you how to sell files directly through the file management system.

Before we begin, let’s take a quick look at how a WordPress document management system can help you maximize productivity and stay organized.

What is a WordPress file manager plugin?

A WordPress file manager is a system for organizing and/or displaying files which are stored on a WordPress website.

This is a slightly different meaning of the phrase "File manager", which is more commonly used to refer to managing files on a computer hard drive. A file manager plugin in WordPress has two main purposes:

  1. Providing website administrators with a better way to organize files in the WordPress admin.
  2. Displaying files in an easy-to-find, structured format - either for the benefit of public website visitors or internal users.

The best WordPress file manager plugins meet both of these needs.

The best WordPress file manager plugin

WordPress file manager created using the Posts Table Pro plugin

The Document Library Pro plugin is a complete file manager solution for your WordPress website. It makes it easy to add and organize files in the WP Dashboard, while also providing a searchable front end WordPress file manager.

Let's look at what it can to do transform your WordPress fie management. Afterwards, I'll show you how to set it up.

Quickly add and import files 🗳️

The file management plugin provides a choice of 4 ways to add files to your WordPress website:

  • Add files individually (just like adding a blog post to WordPress, but with a downloadable file attached).
  • Select files which are already in the WordPress Media Library.
  • Drag and drop files directly into the WordPress admin.
  • Import files in bulk from a CSV.
Import files to WordPress file manager

Supports all file types (plus externally hosted files) 🌎

You can add literally any file type to your WordPress file manager. This includes PDFs, text files, presentations, spreadsheets, or any other type of file.

You can use this to enhance the user experience by enabling visitors to view PDFs directly on your site. Learn more about how to incorporate a WordPress PDF viewer into your file library.

This file manager plugin in WordPress also lets you add files from multiple sources. If you don't want to host your files in the WordPress Media Library, that's fine. Instead, you can host them anywhere you like on the internet - e.g. Dropbox, Google Drive, Microsoft OneDrive, and so on. The Document Library Pro plugin will display them in exactly the same way - the only difference is that when users click the 'Download' button, they will access the file from its third party location. 

Structure your files into categories, tags, and more 🗂️

File manager WordPress plugin with audio and video

One of the most important features of a WordPress file manager plugin is being able to keep files organized. After all, that's something that the Media Library does very badly on its own.

With Document Library Pro, you can create an unlimited number of categories and tags for your files. This gives you multiple ways to structure them in the back end, and to display them as a WordPress file manager front end directory.

File categories are particularly useful because they are hierarchical. This means that you can create complex structures of categories, sub-categories, and so on. You can easily view files by category, and if you like then you can even display them in a collapsible folder structure.

Keep files public or private 🔐

Private WordPress file manager

Used alone, the Document Library Pro plugin displays your files on the front end of your website for anyone to see. This is ideal when you want to share resources with your website visitors.

However, there are plenty of people who want to create a private WordPress file manager. To do this, you need to select the option to buy Document Library Pro as a 2-plugin bundle with its sister plugin, Password Protected Categories. This lets you restrict access to any or all of your file categories.

Instant search, sort and filter 🔎

File manager plugin in WordPress

The Document Library Pro file manager plugin makes it easy for people to find your files. It does this by adding an instant AJAX-powered search box above the file manager. The columns in the file manager are sortable, and you can even add category and tag filters above the list of files.

3 file manager layouts 📑

When you list files on your WordPress site, you can choose how to display them. The file management plugin comes with 3 professional-looking layouts:

  • Table layout, which displays files in a structured table with whichever columns of information you choose to include.
  • Grid layout, which displays files as attractive tiles.
  • A collapsible folder structure (which you can use with either the table or the grid layout).
Grid layout for file manager plugin in WordPress

Easy-to-use interface 😌

Of course, a WordPress file management system is only worth having if it's easy to use. With Document Library Pro, it's easy to add and manage files. It's also equally easy to choose how they are displayed in the front end file manager, if you choose to do this.

Everything is designed for beginners to be able to do in minutes. However, there are plenty of developer hooks and filters for more technical users who wish to customize the file manager.

100% flexible 🛠️

And finally, this WordPress file manager plugin is incredibly flexible. You can choose exactly what information to display about each file. For instance, you could display image thumbnails, the date the file was published, the author’s name, file type, last update, and/or download buttons.

And for even more flexibility, you can even add custom fields or taxonomies for storing custom data about each file.

Additional benefits of using a file manager

A WordPress file manager also provides a single location for all tasks related to file management, making it incredibly convenient and easy to use. With just a few clicks, you can perform a variety of actions: edit files, upload and download, delete files, zip, and copy and paste files and folders directly from the WordPress backend.

Another benefit is access control. You can set permissions for each user or group of users, ensuring that sensitive files are only accessible to those who need to see them. This helps you protect your confidential information and ensures that everyone is working with the right level of access.

Moreover, a WordPress file manager provides a single location for all file management tasks, eliminating the need to log in to the WordPress web hosting cPanel or FTP to access files, as all WordPress files and media can be accessed from within the WordPress file manager plugin.

How to use a WordPress file manager

Plugin file manager WordPress grid

Small and medium businesses use file managers on their WordPress websites to store all kinds of important files. These might be public, or they might be published on their private staff intranet. An internal WordPress file manager may include contracts, templates, and policies.

An online file manager is also an excellent way to create an internal knowledge base. You can use it to store training material and marketing collateral. Having an internal file system for your organization allows you to keep all of your important files in one place. This way, all staff members can access the latest version of each file whenever they need it - no more version control nightmares!

Now you know how you can use a WP file manager on your website and the benefits of using one. Next, let’s step through a quick tutorial on how to create a file management system on your WordPress website.

How to create a WordPress file manager

WordPress document library plugin folders

In this section, I’ll show you how to create a WordPress file manager for your files and other resources. We’ll cover:

  1. Install and activate the Document Library Pro plugin
  2. Add documents and files to your website

Watch the video, or scroll down for step-by-step written instructions:


Step 1: Install and activate the WordPress file manager plugin

Before we begin, you’ll need to purchase the Document Library Pro plugin if you haven’t done so already.

  1. Log in to your WordPress admin panel, head over to Plugins → Add New, and click the Upload Plugin button. Next, click Choose File and find the plugin zip file on your computer. Once it’s uploaded, click the Install Now button to install it to your WordPress website.
  2. Click the 'Activate Plugin' button on the following screen to activate the WP file manager plugin.
  3. Finally, navigate to Documents → Settings and enter your license key. Click on the 'Save Changes' button at the bottom of the page to proceed.

Note that there are three ways to install WordPress plugins: through the WordPress dashboard, the official WordPress Plugins directory, or manually. Now that we’ve installed and activated the WP file manager plugin, we need to add our files to WordPress.

Step 2: Add files to WordPress

There are 4 different methods you can follow to add files to your website. To help you choose, here's a summary of each method. Use these to decide which method is best for your WordPress file manager.

Method 1: Add files manually

Adding files is just like creating a normal page or post in WordPress. The only differences are that you do it in the 'Documents' section of the WordPress admin, and there are some extra fields for your WordPress file manager:

  1. Navigate to Documents → Add New.
  2. Add all the information about each file, such as the title and an excerpt or description. Ignore the file size because this will be calculated for you automatically.
  3. Go to the 'Document Link' panel and select the File Upload option. Use this to upload the file to the file management system.
  4. Click the blue 'Publish' button to finish adding it to the WordPress file manager.
  5. Repeat the process for each file.

Method 2: Add files already in the Media Library

Add Media Library files to plugin file manager WordPress

Perhaps your files are already in the WordPress Media Library. You can still use Method 1, which I described above - simply select the existing file instead of uploading a new one. However, it's easier to just convert your existing Media Library files into 'Documents':

  1. Open the WordPress Media Library (the 'Media' section of the WP admin).
  2. Make sure you're viewing the files as a list rather than a grid. There's an icon at the top left which lets you toggle between the two Media Library views.
  3. Use the checkboxes on the left to select the files that you want to display in the file management system.
  4. Open the 'Bulk actions' dropdown and click on 'Add to document library'.
  5. Now go to the 'Documents' section of the admin, and you'll see all the files listed. The filename has been added as the file title. You may wish to edit files to change the title to something more user-friendly and to add extra data such as an excerpt, categories, and tags.

Method 3: Drag and drop file upload

This is similar to Method 2, except that it is for files that aren't in the WordPress Media Library yet:

  1. Navigate to the Documents → Settings page in the WP admin.
  2. You'll see a drag-and-drop file upload area. Drag one or more files here, and wait for them to upload.
  3. As with Method 2, each file will be added to the 'Documents' section of the admin. Edit these are needed to add information about each file.

Method 4: Upload files from CSV

If you have a very large number of files to add to the WordPress file manager, then CSV upload is your best bet. It takes time to prepare the data but is then incredibly quick to add to WordPress.

To upload files via CSV, use the instructions in the WP file manager plugin knowledge base. These include a sample CSV file that you can download to make sure your data is in the right format.

Add file manager categories and tags

When you add files to Document Library Pro, you can structure them into categories and tags. This is an excellent idea if you're adding lots of files to the WordPress file manager. As well as allowing you to list files from different categories separately, visitors can filter the file manager WooCommerce by category or tag. This makes it much easier to find specific files.

You can do this in the 'Categories' and 'Tags' pages in the 'Documents' section of the WordPress admin. Once you've created the WordPress file manager categories and tags, you can select them for your files. Alternatively, you can just create them when you add or import files.

Create your WordPress file manager

Now you've added all the files to WordPress, it's time to display them on your website.

The good news is that this has already been done for you! To find your WordPress file manager page, go to the 'Pages' section of the WordPress admin and find the page called 'Document Library'. If you like, you can rename this to something else like 'File Manager'.

View the page and you'll see all your files listed in a searchable table or grid. It should look something like this:

WordPress file manager front end

Perfecting the file manager page

Now you've seen what the WordPress file manager looks like straight out of the box. It's incredibly flexible, so the next step is to customize it to your exact needs. For example, you can add filter dropdowns to help visitors to find files more easily. You can also change which columns of data are displayed about your files, add download buttons, and more. You can also spread the file manager WooCommerce across multiple pages or tabs, for example structuring them into folders or listing different categories on each page. (See a full list of WordPress file manager options here.)

Options for an effective WordPress file manager

To configure the page listing your files, go to Documents → Settings → Document Libraries and change the options as needed. There are lots of options, and I particularly recommend these ones for a WordPress file manager:

  • Folders - If you have created categories, then you might want to enable this option to display the WordPress file manager within folders. If you do this then the file manager WordPress page will be structured as a list of hierarchical folders, representing the structure of categories and sub-categories that you created in Documents → Categories. If you don't want this then leave it unticked, and all the files will be displayed in a single list. Visitors can still easily find files by category by using the filter dropdowns.
  • Columns - Choose which columns to include in the file manager. For example, you might want to add file_type and file_size columns. (The data in these columns will be generated automatically based on the file that you uploaded to the file manager WordPress plugin.)
  • Link style - Set this to either button or an icon. That way, visitors can either click on a button to download files; or they can click on a file type icon.
  • Filters - Set the Search filters option to Custom using the dropdown menu and add doc_categories, doc_tags. (Only do this if you have structured your WordPress file manager using categories and tabs.)

Once you're done, click the Save Changes button. Your WordPress front-end file manager should look something like this:

Preview of WordPress file manager front end

How to list items from a specific file manager category

So far, we've learned how to list the entire contents of your WordPress file manager automatically. The files will either be listed in a single searchable table or grid or structured into clickable folders based on their categories.

The Document Library Pro file manager plugin also comes with a shortcode to list files in more flexible ways. It's very flexible and you can use it to list specific files based on their category, tag, date, author, and much more. See the documentation for a full list of the possibilities.

For example, the following shortcode will list files from the 'Finance' category only:

[doc_library doc_category="finance"]

The shortcode method has lots of useful applications for your WordPress file manager:

  • Add multiple lists of files to the same page - for example, with a different heading between each one.
  • Create a multi-page file manager on your WordPress site and list different files on each page.
  • Use your page builder file manager plugin (e.g. Divi Builder or Elementor) to create tabbed layouts and list different files in each tab.
  • List files in relevant places throughout your website, for example by listing technical downloads on the product page on an e-commerce site.

What else can you do with a WordPress file manager?

To get even more value for money, read through our bonus tips to find out what else you can do with your WordPress file manager to improve user experience and make sales.

Bonus: See who has downloaded your files

Most WordPress websites use Google Analytics to track how people are using the site. You can use the instructions in this tutorial about how to track how many people are downloading your files.

Control who has access to the files

If you’re creating a WordPress file management system for your team members or staff (either public or internal), you might want the flexibility to control who has access to the files. Our WordPress Password Protected Categories plugin provides 2 easy-to-use ways to make them private:

  • One way to do this is by marking categories as Private. Private categories and their files can only be accessed by logged-in users with the correct role capabilities. By default, only Administrators and Editors are able to view private categories. If you want to make them available to other user roles then check out our tutorial on how to choose which roles can access the private content.
  • The other option available with this file manager plugin is to password-protect categories within your WordPress file management area. This way, only users with the correct password are able to view the files listed under the password-protected category.

Let users add files themselves

With Gravity Forms, you can let other users upload files and list them in the WordPress file manager with a frontend file upload form. It works something like this:

  1. You install and activate the Gravity Forms plugin on your website.
  2. Store the files which users submit as WordPress posts (or custom post types).
  3. Use Document Library Pro to display the files as a WordPress file manager front end plugin.

If this is something you’re interested in doing, check out our tutorial on how to accept user submissions and display them on the front end. You can even limit your frontend file upload form to specific user roles. For example, you might do this if you want employees within your organization to be able to upload files, but not the general public.

Advanced WordPress file management techniques

Advanced file management techniques can make managing files on a WordPress site much more efficient and streamlined. Here are some techniques that can help:

  1. Bulk uploading and downloading: If you have a large number of files to upload or download, you can use the bulk upload and download functionality of your WordPress file manager. This allows you to select multiple files at once and upload or download them all at the same time.
  2. Search functionality: Many WordPress file managers offer search functionality, which can be a powerful tool for finding specific files quickly. By using the search functionality, you can search for files by name, extension, or other criteria, and quickly locate the file you need.
  3. Folder organization: Another advanced file management technique is to organize your files into folders. This can make it easier to find specific files and keep your files organized. By grouping similar files together in a folder, you can quickly locate the files you need and avoid clutter in your file manager.
  4. Custom file naming: When uploading files to your WordPress file manager, it's important to use descriptive file names that accurately reflect the content of the file. This can make it easier to find specific files and avoid confusion when working with multiple files. By using custom file naming conventions, you can ensure that your files are easy to identify and locate.
  5. File versioning: Many WordPress file managers offer file versioning, which allows you to keep track of different versions of a file. This can be particularly useful when working on collaborative projects or when making changes to a file over time. By using file versioning, you can track changes to a file and ensure that everyone is working with the most up-to-date version.

Ongoing file management

The Document Library Pro plugin is easy to use, so it will be easy to keep your WordPress file manager updated. Also, any user with the role of Contributor or above can add and edit the files, so you don't need to worry about them breaking anything else on your site.

To update or replace files in the future, simply go to the 'Documents' area in the WordPress admin and make the changes. This normally means uploading a new file to replace the previous one.

It is also possible to overwrite the existing file so that the old one is no longer in the WordPress Media Library. To do this, install the free Enable Media Replace plugin. This adds a 'Replace' button to each file in the Media Library.

Where to get the plugin

Having a WordPress file manager on your website enables you to share resources within your organization through a front-end, user-friendly interface. It facilitates file management and makes it easy for team members and/or the wider public to access files.

I have shown you how to use the Document Library Pro plugin to create a file manager to display your files and files on your WordPress website. It has everything you need for easy file management:

  • Easily add, import, upload and manage files.
  • Supports all file types, plus externally hosted files.
  • Choice of attractive front end file manager layouts.
  • Instant searching, sorting and filtering to find files more easily.
  • No-risk 30-day money back guarantee.

Now you're ready to take things further:

What are some of the ways you use file managers on your WordPress website? Let us know by commenting below!

Looking for a user-friendly way to display documents or resources on your company website? The best WordPress resource library plugin can help you create a searchable, filterable resource library for any file type.

In this tutorial, we'll show you step-by-step how to create a flexible WordPress resource library. We'll use a WordPress resources plugin, so you won't have to write a single line of code.

Your finished resource library will look something like this:

WordPress resource library example

With the WordPress resource library plugin that we show you, you'll be able to create a PDF library, image library, or any other type of document library. Or maybe you want to create a modern take on a traditional 'Links' page, with extra information about each resource to boost your SEO.

Either way, your visitors will be able to sort, search, and filter all the resources in your library. The WordPress resources plugin helps them find exactly what they need.

And you'll also be able to divide resources into categories, password protect your resource library, and just generally create a library that's built for your unique needs.

Keep reading for more information and a step-by-step guide on how to create your own resource library today!

Why Document Library Pro is the best WordPress resource library plugin

WordPress document library grid

Document Library Pro helps you display any type of file or link in a flexible table or grid format. And you guessed it - "any type" includes resources.

Simply add, upload or import the resources to your WordPress site. The WordPress resources plugin automatically displays them in a searchable directory on the front-end.

This is the best way to create a WordPress resource library because you can:

  • Choose exactly what information to includeFor example, you can add a short excerpt to describe each file, include an image, or lots more.
  • Make it easy for visitors to find resourcesYou can let them search by keyword, give them filter drop-downs, and more.
  • Organize resources into different librariesIf needed, the WordPress resources plugin lets you create multiple resource libraries for different content/users.
  • Still use core WordPress functionalityFor example, it's easy to create a private WordPress resource library just by using the built-in WordPress Visibility settings.

WordPress resource library example - Huckleberry Hearts

WordPress resource library plugin case study

Huckleberry Hearts uses Document Library Pro as a WordPress resource library plugin to share free downloadables. Here's why Shanna chose the plugin for her resource library:

I'm a freelance graphic designer and artist and I sell my digital art on my website. I also have a blog, and since I offer a lot of free printables to my readers, it seemed logical to have a resource library. So once my members sign up for a free membership, they are given access to the library.

Fantastic!
This plugin has saved me so much time and energy, well worth the money I spent! I was worried it would be techy and difficult to figure out. But the video tutorial was easy to follow and in 30 minutes I had my resource library up on my website. Thank you for a great experience!

How to create your own WordPress resource library

Ready to create your own resource library? Over the next few sections, we'll show you step-by-step how to use Document Library Pro as a WordPress resources plugin for your content.

We'll start with a general guide for creating a simple resource library. Then, we'll share some additional tweaks that you can use to enhance your library.

What you'll need to create your resource library

To follow this guide, you'll need to have the Document Library Pro installed and activated on any WordPress website. You'll use this WordPress resources plugin to:

  • Add and manage the files or links in your resource library.
  • Display them in a resource library on the front-end of your site. The resources will be listed in a flexible, user-friendly table layout.

Once you've installed the plugin, here are the steps to set up your resource library. You can also watch our video tutorial below:

  1. Add or upload your resources
  2. View your WordPress resource library page
  3. Make your resource library private (optional)
  4. Enhance your resource library's navigation with tabs, subcategories, or other tweaks (optional)

Step 1: Upload resources to WordPress

Install the WordPress resources plugin

The first thing you'll need to do is install the Document Library Pro plugin. Get the plugin, download the zip file from the confirmation email, and upload it to WordPress via Plugins → Add New.

Next, go to the resource library plugin settings page at Documents → Settings. Paste in the license key from the confirmation email.

Now you're ready to start adding resources to the library!

Adding resources to WordPress

The next step is to upload all the files that you want to include in your resource library. Or if you're adding links rather than files, then you need to add them now.

Document Library Pro will let you add pretty much any type of resource, including:

  • PDF files
  • Images
  • Word documents
  • Spreadsheets
  • ZIP files
  • ...you name it!

You can also add resources and add them as actual web page content (e.g. by adding text and images directly to the resource in WordPress). It's even possible to link to resources which are hosted on third party websites. For example, perhaps you store your resources on sites like SharePoint, Dropbox, Box, or Office 365.

Wherever your resources are stored, you can display them in your WordPress resource library.

Uploading your first resource

To add your first resource, go to Docouments → Add New. There, you'll see an interface that looks a lot like the regular WordPress editor, with a few additions:

Add document to library
Adding a resource is just like adding a page or post

Add all the information about the resource, including any extra data that will be displayed on the resource library page. For example, you might add an excerpt describing it so that people can find it more easily.

Organize your WordPress resource library into categories and tags, just as you would with a regular WordPress post. Later, I'll show you how to add filter dropdowns so that users can quickly find searched by category or tag.

In the 'Document Link' section, either upload the resource file (e.g. a PDF or any other file type) or add a link to its location online (e.g. Dropbox).

If desired, you can include an excerpt that describes the file, as well as a featured image. You'll be able to display any/all of this information in the resource library.

Once you've entered the information, click the Publish button.

Adding resources in bulk

If you have lots of resources to add to the library, don't worry. The WordPress resource library plugin makes it quick and easy to add resources in bulk.

There are several ways to add multiple resources to the library:

  • Select existing files in the Media Library and use the 'Bulk Actions' dropdown to convert them to documents. They will then appear in the resource library.
  • Go to Documents → Import and drag and drop files straight to the resource library.
  • Also on Documents → Import, upload a CSV file containing all the information about your resources.

Easy!

Use custom fields or taxonomies to store more information (optional)

This step is optional - but if you'd like to store more information about each file in your resource library, you might want to use custom fields and/or custom taxonomies.

  • Custom fieldsThese help you store information that's unique to each individual item in your resource library. For example, you could create a custom field for each resource's document ID number. Both of those pieces of information will be unique to each resource.
  • Custom taxonomiesThese are basically categories and tags but unique to your downloads. They're a good option when more than one resource will fit into the same taxonomy. For example, you could create taxonomies for Year. Then, you can let visitors filter by these criteria.

To create custom fields and taxonomies, you can use the free Easy Post Types and Fields plugin. It comes with all the options to create custom post types, fields, and taxonomies to manage the website's content.

Step 2: Set up your WordPress resource library page

WordPress document library plugin

Once you've uploaded all the files to your WordPress resource library, the next step is to create the front-end resource list that your visitors will use.

The Document Library Pro WordPress resources plugin lists resources in a flexible way that makes it easy for visitors to find what they're looking for. 

Choose your resource library settings

To get started, head to Documents → Settings to configure the resource library plugin options.

First, choose what content you want to include in your resource library. The exact content that you include will depend on what data you have added for each resource. Each piece of data will be displayed separately in the resource library. There are lots of content options to choose from including title, excerpt, file size, file type, date, and download link.

Here's an example:

title,excerpt,file-size,link

WordPress document library settings
Control your document libraries globally or via a shortcode

If you want to include an image for each resource like the example from Huckleberry Hearts, then you can add an image column. This will display each resource's featured image:

image,title,excerpt,file-size,link

Choose your download link style

If you've included a 'link' column then people can click to access the resource - whether it's a downloadable file or an external URL.

The WordPress resource library plugin provides lots of options for the link column, so select the ones you require. For example, you can choose whether to display the links as basic text, as file type icons, or as styled buttons. Here are some screenshots of what each option looks like:

WordPress resource library example
A resource library with a 'Download' column containing text links
Document library with folders
Optionally structure the document library into folders

As you can see from the screenshot above, you can also structure the resource library into folders. To do this, enable the 'Folders' option on the settings page.

WordPress document library
List documents in a searchable, sortable table with filters

The WordPress resources plugin also lets you control details such as whether to open links in a new tab or the same tab.

Keep configuring your resource library

Next, continue and configure the other settings. Here are some of the most important settings to consider:

  • Shortcodes - if you want to embed audio or video in the content column, then tick this box so that the embedded media players will work.
  • Filters - if you want your visitors to be able to filter your resource library, you can choose what content is filterable with this setting. For example, if you add doc_categories,doc_tags, visitors will be able to filter resources by their category or tag. Learn more about filter options.
  • Search box - by default, the WordPress resources plugin will add a search box above your resource library. But you can disable this feature if desired.

View your WordPress resource library

Once you've configured the document library plugin settings, it's time to view the WordPress resource library.

  1. Go to the Pages section of the WordPress admin. You'll find a page called 'Document Library' which has been created for you.
  2. Rename the page to something like 'Resource Library'. You can also add regular text and other content elsewhere on the page if you'd like.
  3. View the page and you should see your working resource library.

And that's it! Visitors can now browse all your available resources and download them straight from your WordPress document list.

Now, let's cover a few ways to enhance your resource library, including:

  • Private resource libraries.
  • More complex navigation structures, like creating separate resource libraries for different types of files.
  • A tabbed interface to view different types of resources.

Create a private WordPress resource library

If you don't want anonymous visitors to be able to browse your resource library, you can use core WordPress functionality to either:

  • Require users to log in.
  • Make users enter a password.

Go to the page that houses your resource library and use the Visibility control to select your desired preference:

Private WordPress resource library

If you choose the Private option, only logged in users with the capability to read_private_pages will be able to see the resource library. By default, that's WP users with the roles of Administrator or Editor. If you'd like to change that, then you can use a free plugin like User Role Editor.

Of course, this only protects the main resource library page and not the actual resources. You can do that by using the Password Protected Categories plugin to set each resource category to private. That's much faster than manually setting each individual resource to private!

Create separate resource libraries

If you'd prefer to divide your resources into different libraries, you can use Document Library Pro's shortcode to list specific resources in each location.

You have a lot of flexibility here. You can choose which resources to include based on:

  • Category
  • Tag
  • Custom taxonomy
  • Custom field
  • Publish date
  • Author

Or, you can just manually choose which resources to include.

Learn how to include/exclude specific resources

By using these rules, you can create separate pages that each contain resource libraries with different information. Or, you can include multiple resource libraries on the same page and use headings to divide them.

Separate categories

Create a tabbed interface for different resource library categories

As another way to help users navigate your resources, you can also create a tabbed interface that lets users click on tabs to browse different types of resources (no page reload required). Here's an example of what we mean:

example of wordpress alphabetical index

To create this tabbed interface, you can use the free Shortcodes Ultimate plugin. Or if you're using a page builder plugin such as Elementor or Divi Builder, then use the tabs that come with that plugin.

Once you've installed the WordPress resources plugin, you can use Tab shortcode to create the interface. All you need to do is add the Document Library Pro shortcode in the tab's content.

Install the WordPress resource library plugin today!

The Document Library Pro plugin makes it easy to create a flexible WordPress resource library that you can adapt to your exact needs. Whether that's a PDF library, a document library, or any other type of file library, it's the easiest way to add and display resources.

  • 4 easy ways to add resources
  • Searchable, sortable resource lists for your users
  • Full documentation and expert support provided
  • Try it risk-free

Now buy Document Library Pro and install the WordPress resources plugin today:

Sales enablement tools help sales teams and channel partners convert leads and close customers by delivering the right message at the right time. As a result, organizations use sales enablement tools for providing sales support and sales training, developing customer journeys, identifying buying trends, measuring customer behavior, and so much more.

Content library for sales enablement.

In this tutorial, we’ll show you how to use the Document Library Pro plugin to create a WordPress sales enablement tool for your business that’s capable of providing just-in-time sales support to your sales team and channel partners.

We’ll set up a content library in WordPress that allows sales teams to get quick access to marketing collateral from a centralized platform. Finally, we’ll show you how you can use your bespoke sales enablement tool to view a complete document download history, restrict user access, and let users add documents.

Let’s get started.

What are sales enablement tools?

According to a recent study conducted by CSO Insights, nearly 60% of organizations have sales enablement in place as compared to ~20% of organizations in 2013.

For those unfamiliar, sales enablement is the process of providing sales teams and channel partners with the information and tools they need to engage prospective buyers and sell more effectively. These tools are designed to increase the sales team’s productivity and help them guide prospective customers through various stages of the sales cycle.

Here are some of the sales functions these tools can help with:

  • Provide sales support and sales training.
  • Gather customer feedback.
  • Carry out sales operations.
  • Manage projects and sales i.e. project/sales management.
  • Access and distribute content i.e. content management.

Traditionally, businesses would equip their sales teams with heaps of battle cards, presentation slides, and case studies. These were all essential to prepare them for making a sale. The problem with this approach is that the salesperson often ends up with a lot of information that they need to familiarize themselves with beforehand. Without doing so, they wouldn't be able to deliver the right message at the right time or prepare for any question the prospect might have.

Sales enablement tools provide sales teams with the information they can use in sales cycles in a neat and organized way. Hence, the key benefit of opting for a sales enablement tool for providing sales support and sales training is that it makes it easy to find and consume information.

Macbook on table.

How can you use WordPress sales enablement tools to increase sales

With the right sales enablement tool, you’ll be able to provide your entire sales team and channel partners with the right information, best practices, and tools and resources needed to achieve quota – directly from your company's WordPress website.

Here are just some of the ways you can use sales enablement tools to increase sales in your organization:

  • Provide just-in-time sales supportProviding sales teams with on-demand sales support when they’re engaging prospects throughout their buyer journey increases the likelihood of closing. This allows the salesperson to address the prospect’s unique concerns instead of giving them a generic sales pitch.
  • Offer content sharing and managementContent-focused sales enablement tools make it easy for businesses to organize, manage, and share the content sales teams use in their sales cycles. By doing so, they're able to update the information they’re delivering without having to worry about accessibility issues.
  • Build a publicly-facing site Having a publicly-facing site with a hidden section that sales teams can access on the go is pretty useful. It enables businesses to empower teamwork, make it easy for salespeople to find information, and seamlessly collaborate with the marketing department to harness collective knowledge. Later in this article, we'll show you how you can achieve this with your bespoke WordPress content library.
  • Increase sales team productivity A centralized content library that’s searchable, sortable, and filterable accelerates productivity through improved accessibility and ease of use.

Depending on your specific sales practices and cycles, having a content-focused sales enablement tool might benefit your business in other ways. Regardless of the type of business you’re running, the sales enablement tool you use should have some basic features and functionality.

What should you look for in a content-focused sales enablement tool

At the bare minimum, a sales enablement tool should help your sales team deliver the right message at the right time and engage prospective buyers. It needs these key features:

  • Accessibility. The tool should make it easy for the sales team to access marketing collateral and other important information on the go. We’d recommend going for a tool that lets you build a mobile-responsive interface that doesn’t take up too much bandwidth. This way, your sales team will be able to access documents and files from a mobile device on the go.
  • Ease of use. Sales enablement is all about getting the right information to your salesperson at the right time. Having all of this information in a centralized location that’s searchable, sortable, and filterable is essential.
  • Compatibility. Ideally, you’d want a tool that supports your business’ most-used file formats (documents, images, PDFs, audio tracks, etc...). This way, you won’t have to worry about integrating with third-party document or file hosting services.
  • Content consumption. Simply having all of your documents and files in one place just doesn’t cut it. Your sales team also needs to have multiple ways to be able to consume content. Opt for a sales enablement tool that allows users to preview documents live or download them to their devices.

By now we know what sales enablement tools are, how you can them one to increase sales, and what features and functionality to be on the lookout for. Next, we’ll walk through a step-by-step tutorial on how you can use the Document Library Pro plugin to create a bespoke, WordPress-based custom sales enablement system for your business.


How to use Document Library Pro as a sales enablement tool

In this section, we’ll show you how you can use the Document Library Pro plugin as a WordPress sales enablement tool for your organization. It lists your sales support and training materials in a tabular layout, with various navigation elements including filters and keyword searches.

Your sales staff can quickly find the sales enablement materials they're looking for. It improves their efficiency, so they can get on with selling your products and services - armed with the vital tools they need.

Once you’re done, your WP content library will look something like this:

Content library for sales enablement.

Here’s a quick breakdown of the step-by-step instructions:

  1. Install and activate the Document Library Pro plugin.
  2. Add documents and files to your website.
  3. Create a content library for sales enablement documents.

Step 1: Install and activate the Document Library Pro plugin

The first thing you need to do is install and activate the Document Library Pro plugin on your WordPress website. If you haven’t done so already, purchase a license for the plugin now.

  1. You’ll receive the plugin files and license key in a confirmation email. Download the plugin from the link provided in your order confirmation email. This will save a zip file to your computer.
  2. Then, go to your WordPress admin dashboard, then navigate to Plugins → Add New → Upload Plugin.
  3. Click the 'Choose File' button and select the document-library-pro.zip file you downloaded earlier.
  4. Once the file has finished uploading, click the 'Activate' button to enable the plugin.
  5. The Document Library Pro setup wizard will automatically open.

By now you should have the Document Library Pro plugin installed, activated, and ready to go. In the next step, we’ll begin adding sales material, documents, and resources to the website.

Step 2: Add sales enablement documents and files to WordPress

Now go to Documents → Add New and add each of your sales enablement files as a separate document.

From the Add New Document screen, enter your document’s information:

  • Give the document or file a title.
  • Either upload the file to the WordPress Media Library or enter the URL of wherever it's stored (e.g. a Dropbox or Google Drive link).
  • Add an excerpt or description, if required.
  • Select appropriate categories and tags for the document.
  • Optionally, upload a featured image.

Click the Publish button to continue. Repeat these steps to add all of the documents to your website.

Pro tip: You can create additional custom fields and taxonomies to display any further information about your downloads (such as file type, size, author, etc…). This is ideal if you need extra fields that don't come with the WordPress Download Manager plugin. 

Creating categories and tags for organizing your sales enablement tools

Since we’re creating a bespoke sales enablement tool, it’s a good idea to take a step back and plan out how you’d like to organize your files in the WordPress back end.

How you decide to organize your documents and resources on the back end may vary. It depends upon the type of business you’re running and what sort of content your sales teams or channel partners need. That said, it’s important to remember that your sales teams will use these categories and tags to sort and filter the sales enablement tools. As a result, it's important to keep it structured and organized from the outset.

Here’s a list of categories you might consider creating to organize content the sales team will use for sales enablement:

  • Sales training material.
  • Sales knowledge quizzes.
  • Downloadable overview sheets.
  • Competitor comparison matrices.
  • Sales support material e.g. how-to-sell pages.

Head over to Documents → Categories to create new categories for the documents you’ll be uploading to your WordPress website.

Categories screen in the WordPress back-end.

Similarly, you can head over to Documents → Tags to add tags.

Step 3: Create a WordPress content library for your sales enablement tools

By now we have all of our documents added to our WordPress website. Next, we’ll create a content library using the Document Library Pro as a sales enablement tool. We already installed the plugin in Step 1, so now we can quickly customize and add the content library to a page.

The plugin has already created a page called 'Document Library' listing all your sales enablement files. You can find this in the main 'Pages' menu in the WordPress Dashboard. View this page and change its name as required.

If you want to list different sales enablement tools on different pages then you can use the Document Library Pro shortcode to do this.

Either way, the content library will automatically be generated on your WordPress website's front end. It should look something like this:

Default content library preview.

Bonus: What else can you do with the WordPress sales enablement tool

Building a bespoke sales enablement tool using Document Library Pro with WordPress certainly has its advantages. For instance, you can extend its functionality to fit your business needs whenever you'd like.

View download history

Document Library Pro comes with a basic count so that you can see how many people have downloaded each document.

It integrates with a range of other tools to display more advanced analytical data. For example, perhaps you'd like to know exactly who downloaded each document.

Control who has access to the resources

With our Password Protected Categories plugin, you can easily control who has access to the documents in your WordPress content library. It gives you the option to restrict user access to specific categories. This makes them accessible only to logged-in users with the correct privileges.

Instead of buying Password Protected Categories separately, the best value option is to buy it in a 2-plugin bundle on the Document Library Pro sales page.

Let users add documents

Document Library Pro also comes with a front end document upload form. You can use this to allow team members and colleagues to add tools without needing access to the WordPress admin.

Front end document submission form uploader

Where to get the plugin

By setting up a custom content library as a WordPress sales enablement tool for your organization, your sales team can access the information they need without delay. The best part is that all of your sales material and marketing collateral will be in a centralized location that’s incredibly easy to use.

What are some of the features you find valuable in a sales enablement tool? Share your thoughts in the comments section below!