Filter posts by category in WordPress: Complete Guide

If you have loads of content on your website, adding WordPress category filters can significantly help your website visitors find the resource they are looking for. In this blog post, I’ll lay down a step-by-step guide to help you set up category filters so your website visitors can filter post by category in WordPress easily.
Navigation plays a big part in the website's UX. If your website visitors are not able to easily locate the page they are looking for, you probably need to improve your website’s navigation. One way to do this is by adding category filters or to filter post by category to WordPress.
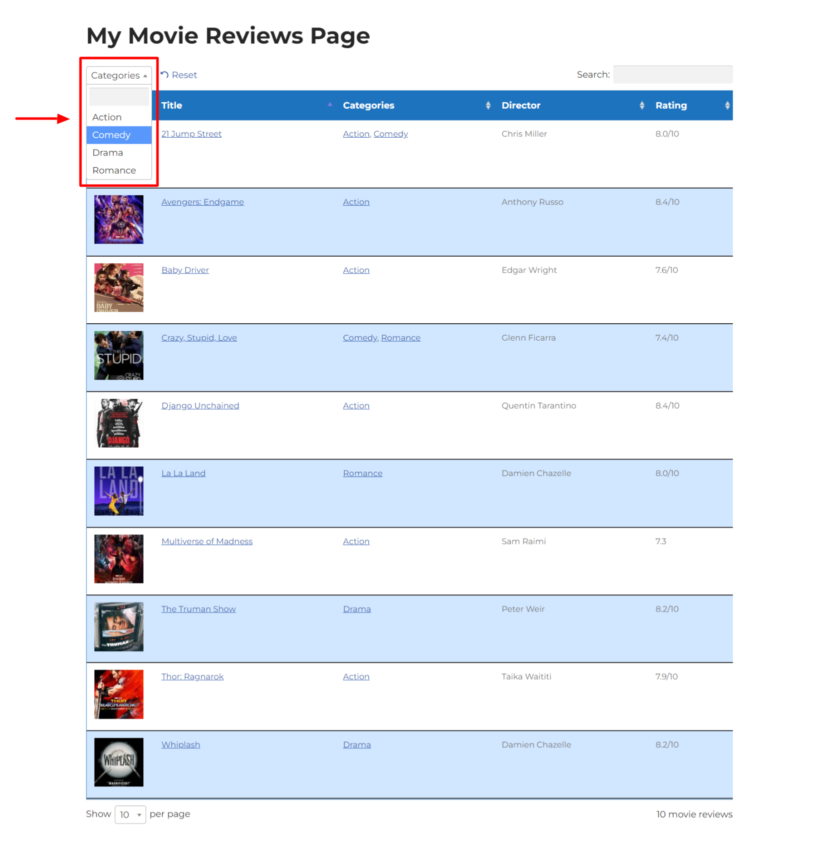
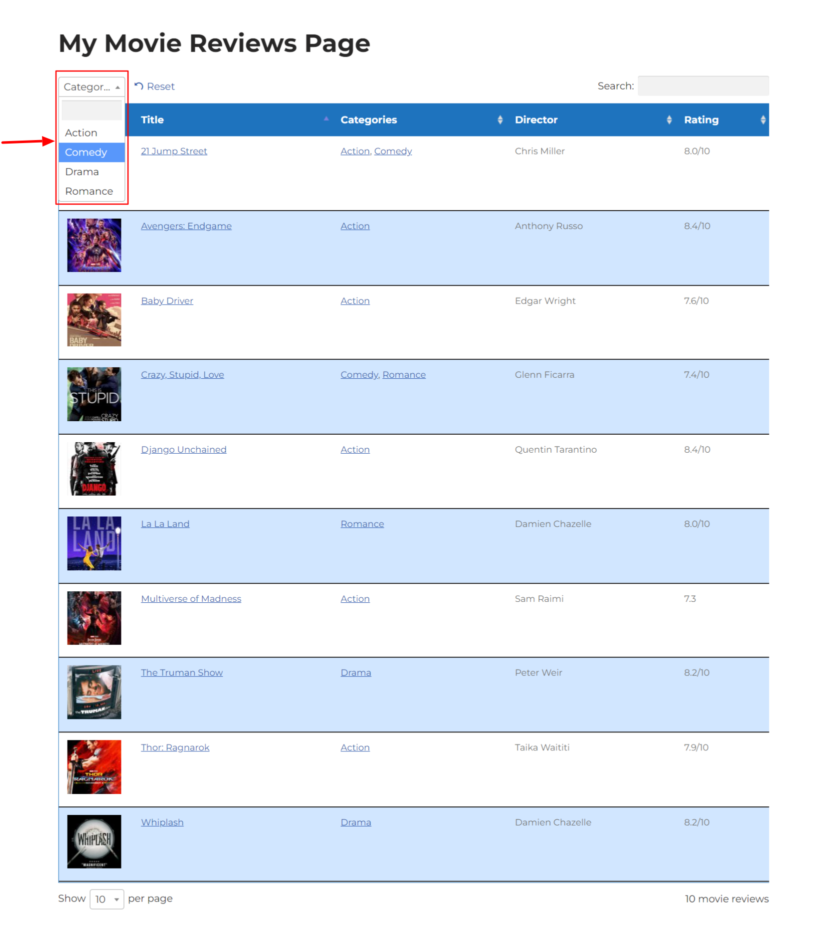
This article will help you add WordPress category filters to your blog with the Posts Table Pro plugin. By the end of this tutorial, you’ll be able to display your website content in structured tables with category-based filters like so:
And for those of you who prefer video tutorials, we made this one just for you.
How do you filter posts by category in WordPress?
Filtering posts by category in WordPress means letting visitors narrow a list of posts down to a single category, such as showing only camera reviews on a tech blog. WordPress has no built-in post filter, so most sites add one with a plugin. The Posts Table Pro plugin displays your posts in a searchable table and adds dropdown category filters above it. Each filter shows a count next to every option, and the table loads page by page so it stays fast with thousands of posts.
What are WordPress categories and why use them as filters?
WordPress categories are default taxonomies that come with every WordPress website. You can use categories to organize your content more effectively. For example, if you have a tech review blog, you can structure your articles in categories such as camera, PC, mobile, and so on.
If you have ever created a post on WordPress, you must have noticed that the ‘Uncategorised’ category is selected by default. You can change this to any other category. Or if you want, you can add new categories (more on this in the next section).
Since WordPress categories are used to bundle similar content on a website, it makes sense to use them as filters. This will allow your website visitors to filter post by category of a particular sub-topic by selecting the said category.
Categories are not used just to organize the content of website posts. You can use them to organize any WordPress post type, such as Products (WooCommerce plugin), Events (Events Manager plugin), or Templates (Page builder plugins such as Elementor). Basically, if there is any batch of content that can be structured more efficiently, you can do it with WordPress categories. And if the same content can be organized categorically, it can be used as a WordPress blog filter to help users refine their search.
Now that we know the purpose of WordPress categories and why they are perfect for filters, let’s see how you can add new categories.
How to add new WordPress categories?
WordPress categories are hierarchical taxonomies. You can create them to add sections and sub-sections for your content. If your new post has no fitting category, you can add one quickly. Here is how:
- First, log in to your WordPress admin dashboard.
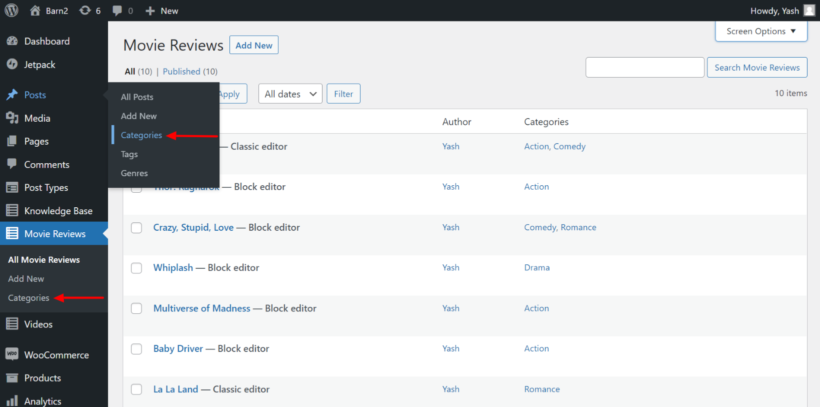
- Hover over the post type you want to customize and go to Categories. For example, if I want to add more categories to the Posts post type, I’ll go to Posts → Categories.
- In the Add New Category section, type in the name, slug, and description. You can also select a parent category if you want to add it as a sub-category.
- Click on the Add New Category button.
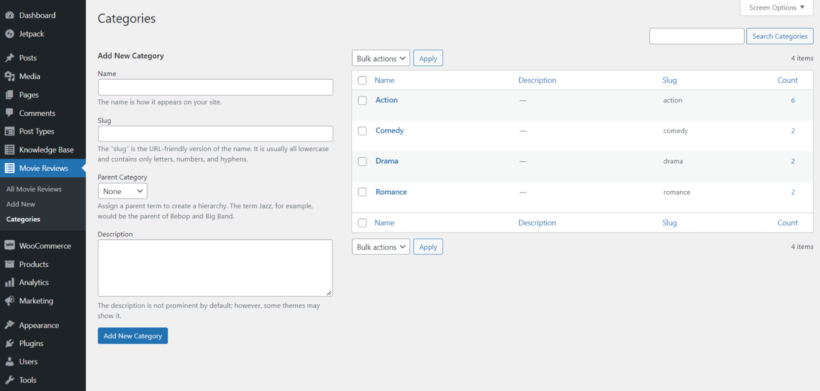
On the right, you can see each category with its description, slug, and post count.
Repeat these steps to add more categories to your post type. Once your categories are in place, return to your post and assign the new ones.
If you want to create an entirely new post type for your content, check out this detailed guide: Creating custom post types in WordPress.
How to filter blog posts by category in WordPress
Now let’s see how you can display the categories as filters for your website content. By default, there’s no direct way to do this. You can always take the code route but that will require you to work with the functions.php file and add functions such as add_function, get_terms, add_action, add_filter, and $args to create a category filter. If you are not a developer, here's another and much simpler method.
To display categories as WordPress blog filters, we will use the Posts Table Pro plugin. The posts table pro plugin lets you display any post on your website in the easiest way possible.
The plugin also allows you to add impressive navigation options. You get multiple options such as dropdown taxonomy filters, search bar, page navigation, etc. And you can make all the necessary changes even if you are not familiar with HTML, CSS, PHP, or any other web development languages.
Since we’ll be using the Posts Table Pro plugin to display categories as filters, you need to download it. If you do not have the plugin, you can get it here:
If you haven’t installed the plugin on your website, you can follow these steps:
- Make sure you have the latest version of the Posts Table Pro plugin. If not, you can get it here.
- In your WordPress admin dashboard, go to Plugins → Add New.
- Click on the Upload button and locate the Posts Table Pro zip file.
- Click on the Install button and click on the Activate button once the installation completes.
- Follow the setup wizard instructions to create your first table.
The Posts Table Pro plugin is now active on your website. Now we can set up category filters for any post type.
Setting up the Posts Table Pro plugin
Post Table Pro plugin provides an easy and intuitive way to create tables from your WordPress posts or pages. The table builder option involves selecting the content you want to display, customizing the table columns and filters, and choosing sorting options. The following numbered steps guide you through the process:
- Upon installing the plugin, a setup wizard opens automatically to guide you through creating your first table. Alternatively, you can create new tables anytime by going to Post Tables → Add New.
- Name your table and select the post type you want to display. If you don't have a content type yet, you can create one using the free Easy Post Types and Fields plugin.
- Choose the posts or pages you want to add to the table. The options you see will depend on which post type you selected on the previous page.
- To add a column, select the type from the dropdown and click 'Add'. Re-order columns by dragging the sort icon or column title. Change or hide table names with the pencil icon and remove columns with the X icon.
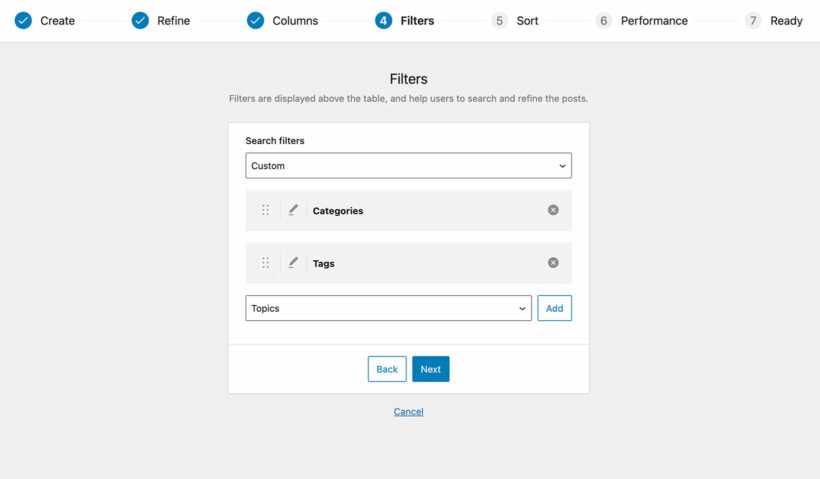
- You can make it easier for users to find what they want by adding filters to your table. These WordPress blog filters will display as dropdown menus above the table, and you have the freedom to add as many as you wish. Each filter accepts more than one value at a time, and shows a count beside each option so visitors can see how many posts match before they pick one. Available options on the page vary depending on the post type selected. WordPress blog posts can have filters for categories, tags, and custom taxonomies, while other post types list only custom taxonomies.
- Tables load page by page automatically, so the table stays fast even with hundreds or thousands of posts.
- Choose how to sort the table. You can set the default sorting option and the sort direction.
- The final page confirms that you have finished creating the table and provides instructions on how to insert it onto your site.
Displaying WordPress posts with category filters
Once your table is built, decide where to display it on your site. There are two ways to insert it:
- If you're using the Gutenberg block editor, you can select and add the table using the 'Post Table' block.
- Alternatively, you can copy the shortcode from the last page of the table builder or from the main Tables page in the Post Tables section of the WordPress admin, and paste it wherever you want the searchable database to appear on your site, regardless of the topic.
Here is what the posts table looks like after the changes above:
Related: Learn how to filter WooCommerce products by category with the WooCommerce Product Filters plugin.
Can I filter posts by category in WordPress without plugins?
WordPress comes with a 'Categories' widget which offers a basic way to filter posts by category without plugin. This is literally just a list of all your categories. Users can click on a category to view that category archive page, so it's not really a filter.
It's a lot of work to code your own category filter plugin with proper WordPress blog filters. That's why it's better to use a high quality filter plugin like Posts Table Pro.
What are the alternative methods of adding post filters to your WordPress site?
There's no built-in WordPress blog filter. The most popular alternative methods are to add the built-in widgets, such as the categories widget mentioned above, or a date-based widget.
What other popular tools are there for filtering posts in WordPress?
You can also consider other WordPress filter plugins such as FacetWP. These add filters to WordPress, but don't provide the structured table layout that you get with Posts Table Pro.
Are there any prerequisites for filtering posts in WordPress?
As with any plugin, if you're installing a plugin to filter WordPress posts by category then you should have up-to-date versions of WordPress, your theme, other plugins, and PHP. This will help to keep everything secure and working nicely together.
If you have a large number of posts on your blog then adding a category filter could potentially cause performance problems with some plugins. Posts Table Pro avoids this by loading the table page by page, so load times stay fast even with thousands of posts to filter through.
Start filtering posts by categories on your WordPress website
With the steps mentioned above, you can easily add category filters to any custom post-type content on your website and let your visitors filter posts in WordPress by category. However, if you want to create a new category or a custom taxonomy, you can do so with the free Easy Post Types & Fields plugin. The plugin will help you create a new custom post type, custom fields, or taxonomy in the easiest way possible. The plugin is available for free on wordpress.org.
If you want to create a custom taxonomy filter on your website, you can check out this detailed guide. It covers all the necessary steps, from creating a custom taxonomy to displaying the taxonomy as filters for your website visitors.
With the Posts Table Pro plugin, you can use your categories as filters. You can also display any content on your website in a tabular format. With the Posts Table Pro plugin, you can:
- Display custom post type content in searchable tables.
- Manage large quantities of content with AJAX lazy loading and filters.
- Display a table on any page on your website.
- Embed audio or video to create an audio or video playlist.
- Add quick search, sort, and filter options to help visitors refine their search.
- Take full control of how your content is displayed on the front end.
What do you think about the Posts Table Pro WordPress plugin? If you are looking for an easy way to display any post-type content with AJAX filters, Posts Table Pro is perfect for you!