A guide on how to upload files to WordPress

Looking for the best ways to accept WordPress file uploads? Keep reading to discover the 3 most effective methods for different types of WordPress site.
File uploads are an essential aspect of any website. After all, most websites are essentially a set of pages displaying text and uploaded files.
In WordPress, it's easy to upload files to the Media Library. However, there are several things that aren't so easy:
- While you can display individual files on the front end of your site, you can't display them to visitors in an easy-to-navigate library.
- There's no way to allow people who don't have admin access to submit or upload files to your WordPress site.
Many types of WordPress site need to do these things. For example, you may want subscribers and site users to upload their own files to your site. This comes in handy if you accept resumes, guest posts, or screenshots for customer support. Similarly, it makes sense to allow WordPress file uploads on certain ecommerce product pages, combined with dynamic pricing functionalities.
Whatever your WordPress file upload needs may be, this article will cover everything you need to know. I'll show you 3 highly effective methods that work for both you and your site users. Let's dive in!
What is a WordPress file upload?
A WordPress file upload is the act of adding a file, such as a PDF, image, spreadsheet, or document, to a WordPress site so it can be stored, managed, or shown to visitors. Site administrators upload files through the Media Library, while site visitors can submit files through a front-end form.
Organizations that share many documents, such as schools, healthcare providers, and local government teams, often pair uploads with Document Library Pro, which collects submitted files and displays them in a searchable, filterable library on the front end.
Method 1: Upload WordPress files in the admin dashboard
For this method, we'll focus on how site administrators can upload files to their site and then display them in a searchable file library on the front end of their site. For this, you'll need to log in to your WordPress dashboard and have at least an 'Author' user role.
Using the default Media Library uploader
It's easy to upload files to the WordPress Media Library. After logging into the WordPress Dashboard, go to Media → Add New. Click Choose File, select the file you want from your local storage, and click Upload.
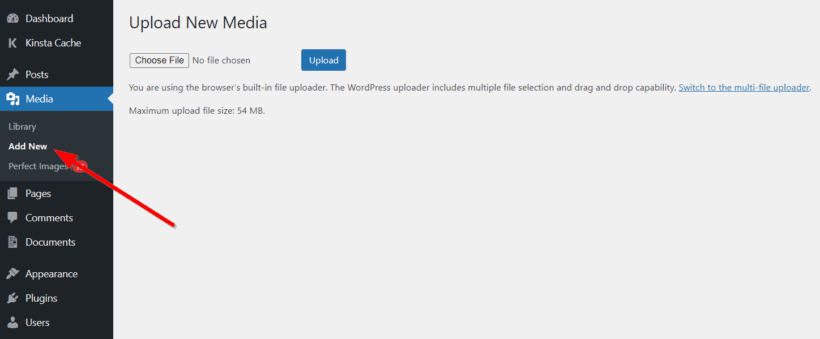
Use this method to upload one file at a time. To upload multiple files at once, click Switch to the multi-file uploader.
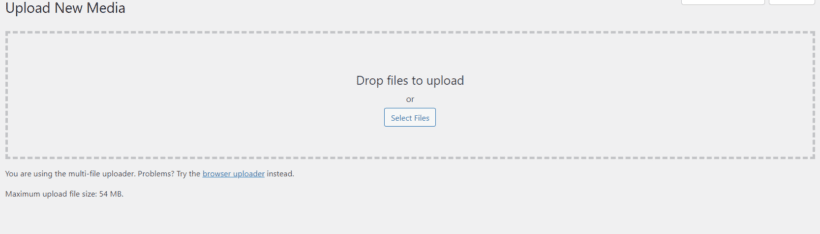
This uploader allows you to simply drag and drop files from your local storage. Alternatively, simply click Select Files.
This lets you upload files to your site. You can then display them individually in WordPress pages and posts using the Image or File blocks. This is pretty limited if you have lots of files, so next I'll tell you how to automate this by displaying you WordPress file uploads in a searchable front end file directory.
Using Document Library Pro to display files in a searchable library
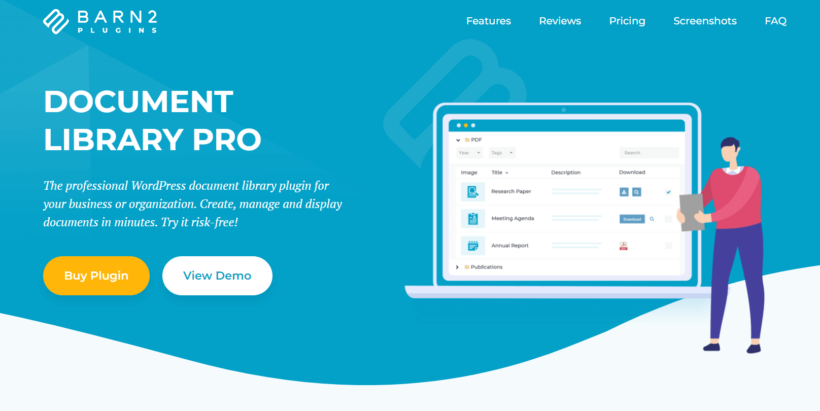
For the optimum user experience, the best way to upload and display files to WordPress is to use Document Library Pro. This file manager plugin makes it super easy to upload, manage, and display files in minutes.
Document Library Pro displays your uploaded files in a searchable front end media library like this:
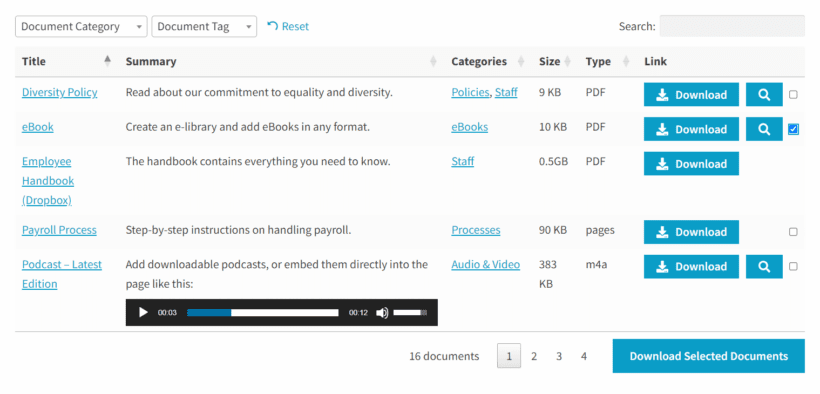
People visiting your website can quickly find files using the built-in search box, sortable columns and filter dropdowns. If you prefer, then you can add the document library to a hidden area of your site - for example, if you only want employees to access the files.
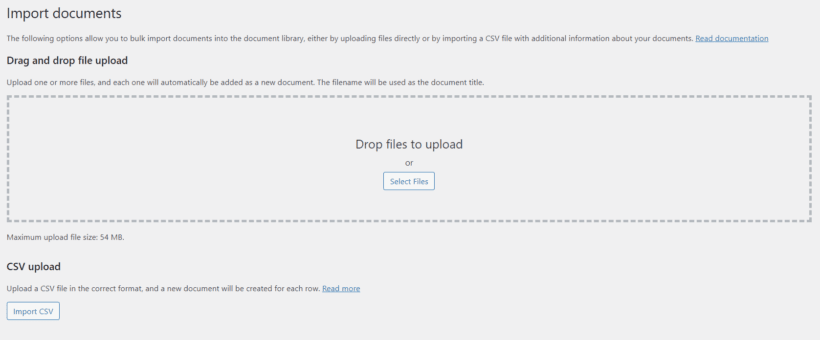
As well as being able to easily convert Media Library files into documents, you can upload them in bulk either via drag and drop or the bulk CSV file uploader supported by a drag-and-drop uploader.
You can either display them in a searchable download library. Or simply present them within a table. This increases the file library navigation significantly.
Setup instructions
To use this plugin, you need to first get your copy here. After that, you'll receive an email with a downloadable ZIP file and license key.
Next:
- Log into your WordPress admin area and go to Plugins → Add New → Upload Plugin.
- Select the plugin ZIP file. Click Install Now then Activate Plugin.
- Use the setup wizard to apply the basic settings and activate your license key.
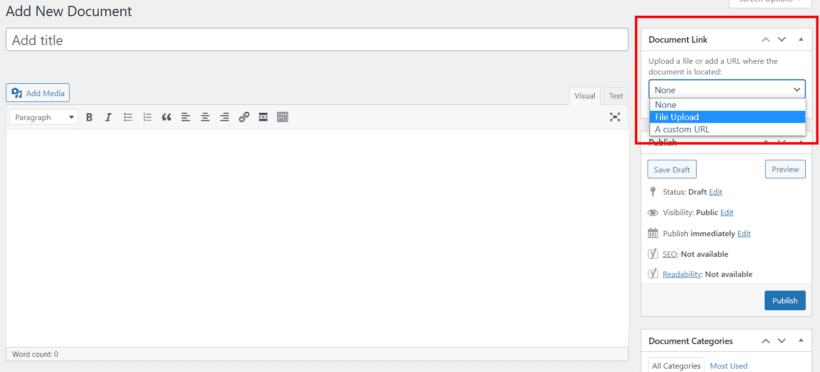
- Now, go to Documents → Add New and add a new document, including uploading a file for visitors to download.
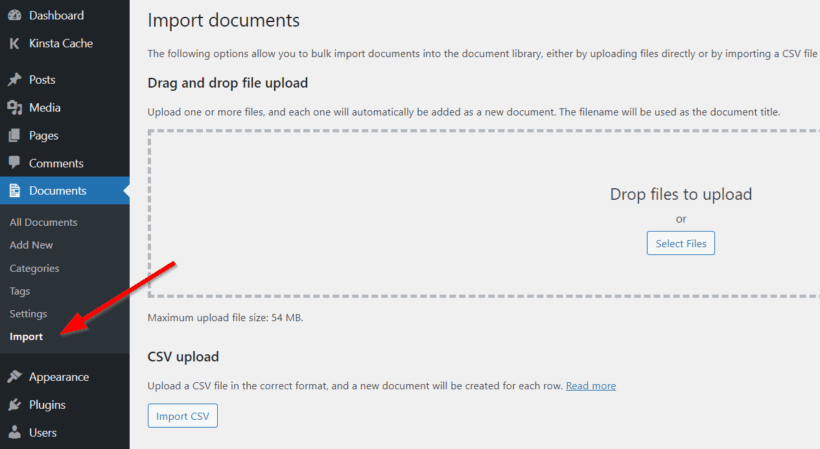
- Alternatively, go to Documents → Import and upload files to WordPress in bulk.
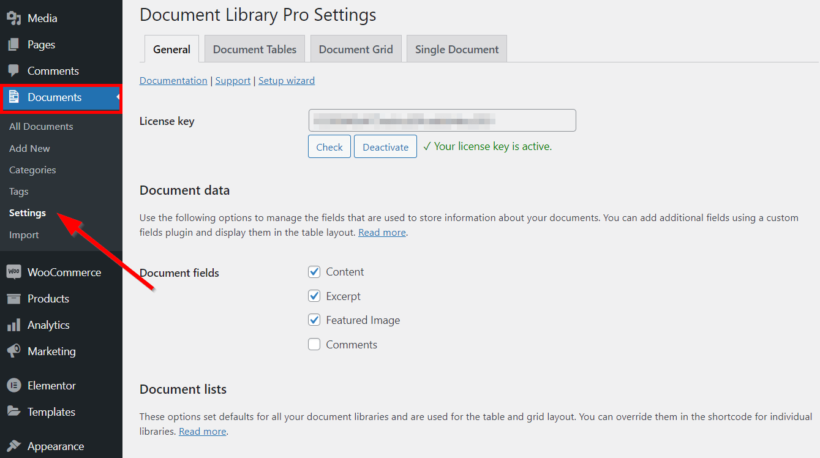
Next, go to Documents → Settings. This is where you set all the default options for your file libraries. For example, you can choose what information to display about each uploaded file, and much more.
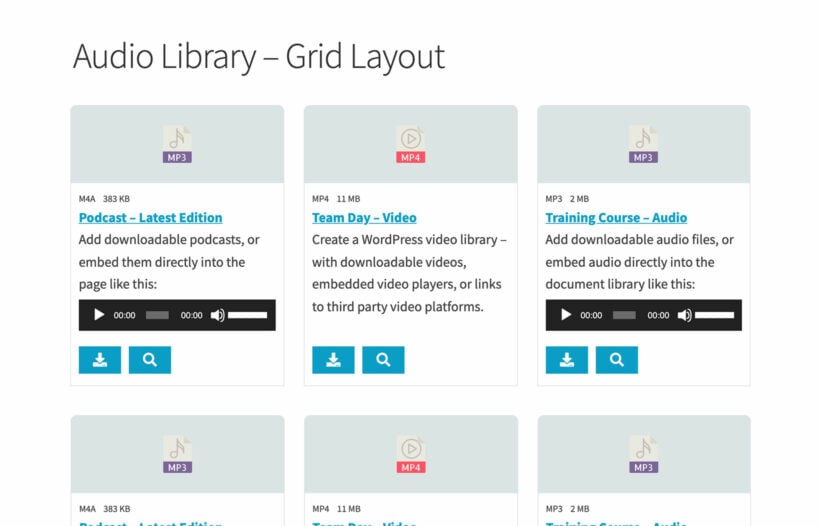
Now find the page on your site called 'Document Library'. Rename this to whatever you like, and then view it. Depending on the options you chose on the settings page, your upload files will appear either in a grid layout:
Or a table layout, complete with checkboxes to download all documents into a zip file:

Method 2: Upload files to WordPress from the front end
So far, we've learned how administrators can upload and display files in WordPress. But what if you want visitors to be able to upload files themselves?
Wondering how to create a file upload form in WordPress without a plugin? To be honest, you probably don't want to. Without a plugin, you'll need to write a lot of PHP code, or hire a WordPress developer just to accept WordPress file uploads. That will take more time and money than the cost of a plugin, while also bringing worse results.
There are two excellent plugins to consider, depending on your needs.
Let users upload files to WordPress without displaying them on the front end
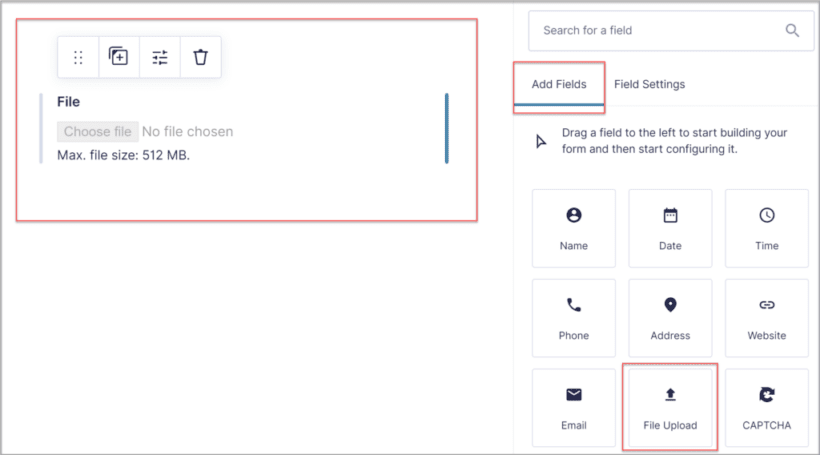
You can do this with a form builder plugin like Gravity Forms. The plugin makes it very easy to accept file submissions through your site forms. This is ideal for job boards, membership sites (profile photo upload), eLearning platforms, and online competitions.
All you have to do is get the plugin. Once you've set it up, go to Forms → New Form. In the editor, click Add Fields → Advanced Fields in the right menu. Then drag and drop the File Upload field into the form.
Let users upload files to WordPress and display them on your website
To do this, I highly recommend accepting file submissions with Document Library Pro. That's because as well as the back end file upload options we discussed earlier, it also allows your users to upload files before displaying them in the document library.
All you need to do is insert a 'Submit file' form anywhere on your website. To add the form, simply create a page and add the shortcode: [dlp_submission_form]
The form will contain all the fields which are enabled for your documents, such as the title, excerpt, author, and so on.
Finally, let's talk about ecommerce. I'll walk you through how to allow users to upload files when placing orders in a WooCommerce store.
Method 3: Allow users to upload WordPress files when ordering products online

WooCommerce Product Options is the best WordPress file upload plugin for ecommerce. The tool allows your customers upload almost any type of file, such as an image upload on the product page. This answers the question: "How do I upload only certain types of files to WordPress?" It is also beginner-friendly and in just a few clicks, you can enable submissions of certain file types in WooCommerce.
Product Options lets you to set a maximum file size and decide whether the upload field is required or not. Additionally, you can combine the file upload fields with several other extra product options. And there are lots more features to explore.
How to add file uploads to WooCommerce
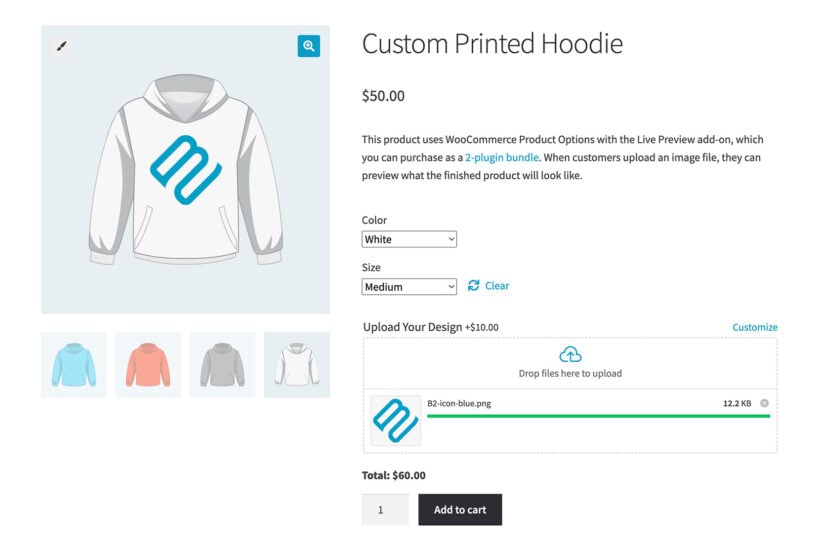
Once customers have uploaded a file, you can display a preview of their image on the finished product:
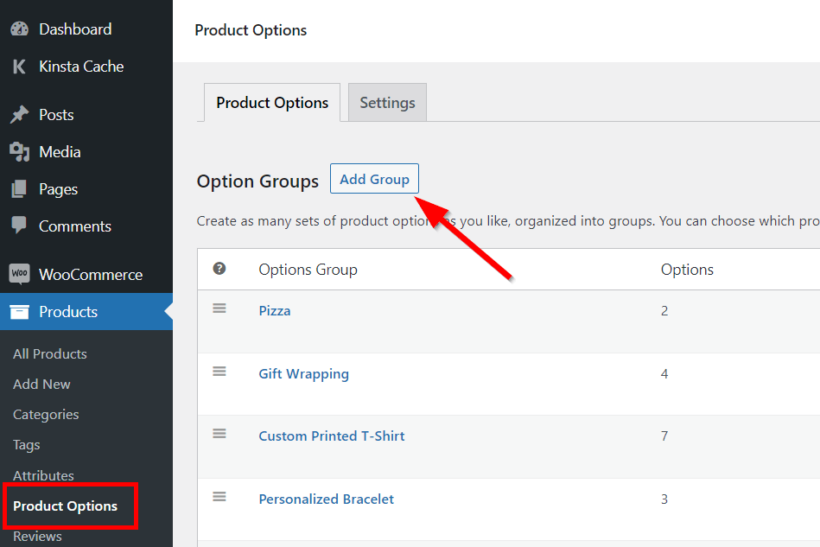
After you've installed and activated the plugin, go to Products → Product Options → Add Group.
On the next page, set the group name and select the products or product categories you want the product options to apply to. Then click Add option.
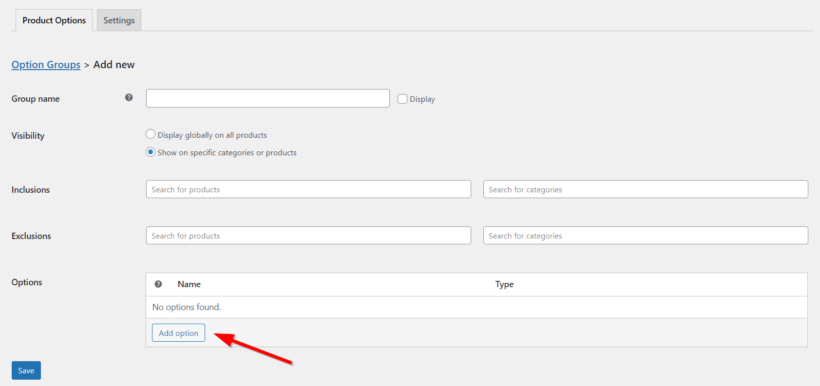
Add an options name and select File upload under the Type section.
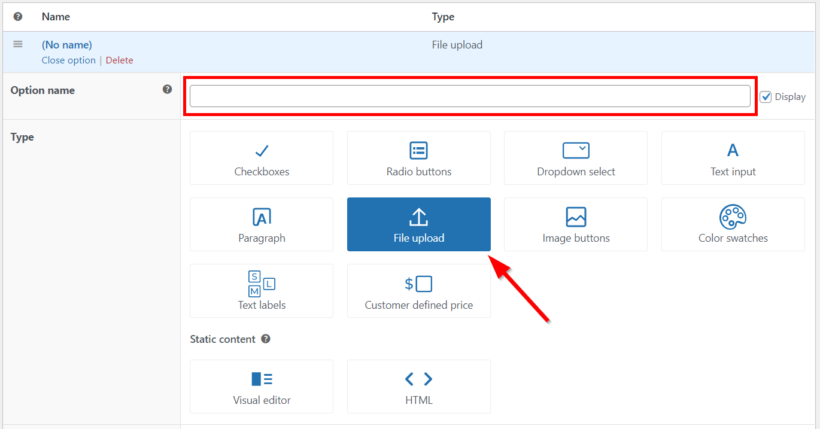
Next, scroll down to edit the file upload field settings. For example, the Label appears beside the WordPress file upload field on the store's front end.
You can also charge an extra fee for uploading a file to WordPress. This can be a fixed fee, a percentage increase or decrease, or you can charge by the number of files uploaded.
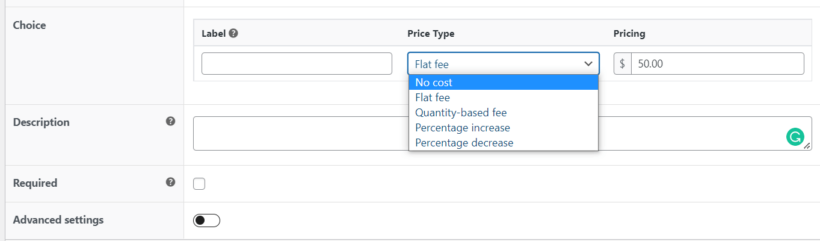
Pay attention to the Required box. Check this box to make the field required to be able to add the product to the cart.
Once you're satisfied with your selections, click Save.
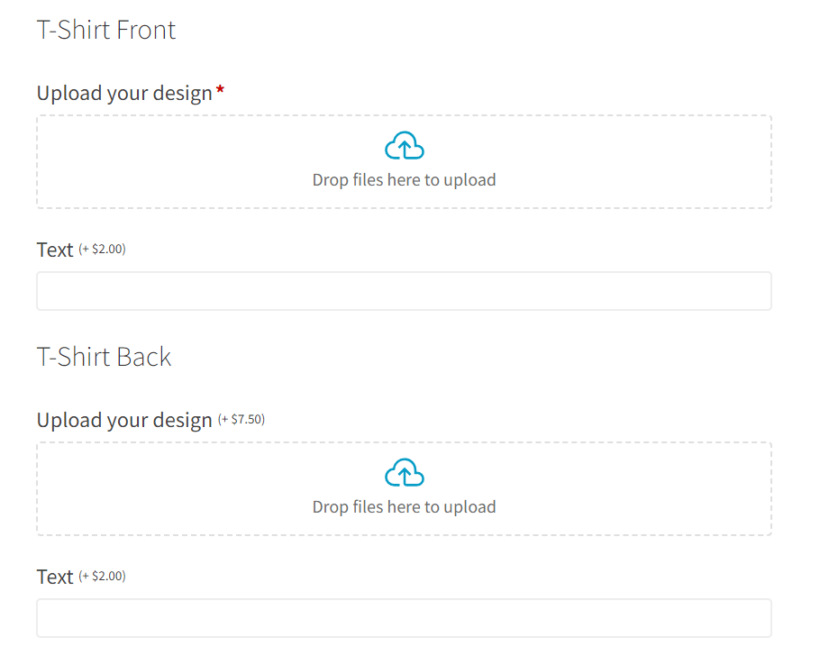
Now when you go to the WooCommerce single product page, you'll see your newly added file upload fields.
Enable live previews
If you bought WooCommerce Product Options with the Live Preview add-on, then live previews are automatically enabled for each file upload field. This means that you just need to set a printable area for each image.
To create printable areas for file upload fields:
- Go to the WordPress Media Library.
- Open a product or variation image.
- Click 'Set printable areas'.
- Add one or more printable areas, and choose the other options as needed.
For example, this product image of a backpack has 2 printable areas. One is a custom shape on the front of the bag, and the other is a rectangle on the front pocket.

View the file upload field in your ecommerce store
Now when a shopper uploads files on a product page, they'll see the files in their cart and during checkout.
After clicking Add to cart, the shopper will see a link to the uploaded file in their cart. They can click the link to review the file in a different tab.
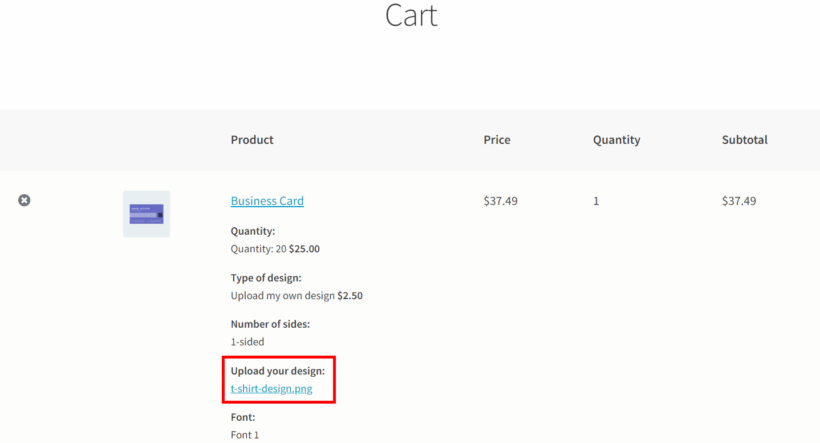
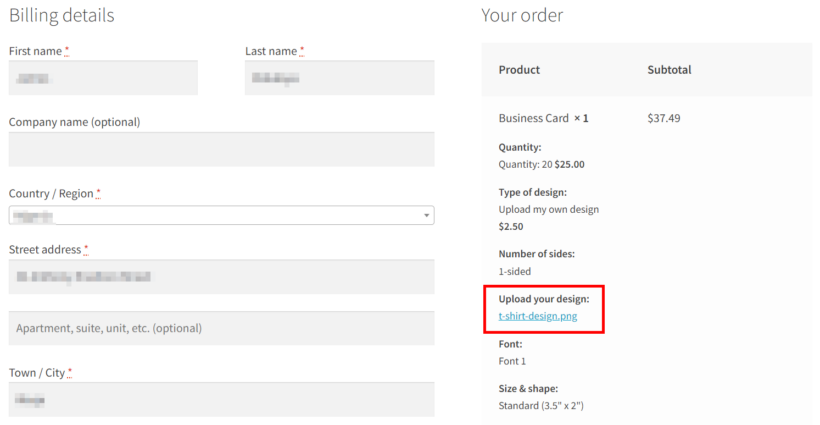
The link is also available on the checkout page and in their order confirmation email notification.
As the store owner, you can also find the file link on the individual order page by going to WooCommerce → Orders.
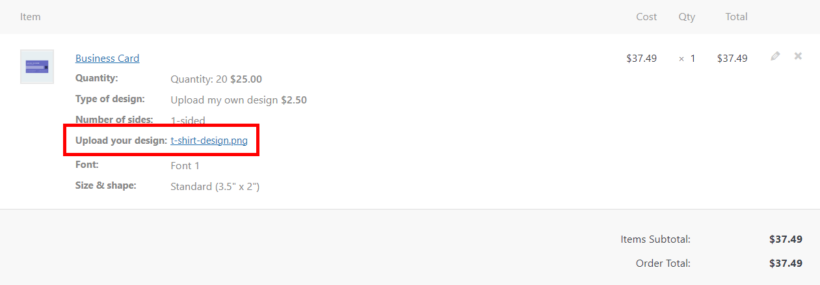
This makes it very easy to manage file uploads on your WooCommerce product pages and deliver the buyer's exact order.
Frequently asked questions
What kind of files can I upload to WordPress?
WordPress accepts most common file types out of the box, including images, PDFs, Word and Excel documents, audio, and video. Some file types, such as SVG, are blocked by default for security reasons. A plugin like Document Library Pro lets you upload these files and present them in a searchable library that visitors can browse and download.
Can I upload a PDF to WordPress?
Yes. You can upload a PDF through the WordPress Media Library in the same way you add an image. To make many PDFs easy to find, you can display them in a searchable document library with Document Library Pro, which adds filters, sortable columns, and download buttons for each file.
How do I let visitors upload files from the front end of my WordPress site?
You need a plugin, because WordPress has no built-in front-end upload feature. A form builder collects file submissions privately, while Document Library Pro accepts front-end submissions through a submission form and can publish approved files in a library that visitors can search and download.
Do more with WordPress file uploads
Uploading files to WordPress is a straightforward process. Whether you are uploading images, videos, or audio files, WordPress has got you covered. In this tutorial, we've shared some powerful tips for WordPress file uploads. With these tips, you can take full advantage of the media library and enhance the visual appeal of your website.
Of all the available upload methods, we discussed the easiest and most efficient:
- Upload files in the WordPress admin areaThis is the most common way to add files to WordPress. You can either use the Media Library, an FTP client, or the Document Library Pro plugin which comes with drag and drop file upload, plus CSV bulk import.
- Let users upload files to WordPress from the front endAgain, you can do this using Document Library Pro's front end file upload form, and then optionally display the uploaded files on your website.
- Accept file uploads on WooCommerce product pagesFinally, you can enhance your ecommerce products with file upload fields. WooCommerce Product Options is the best tool for achieving this.
Ready to add WordPress file uploads to your website? Then get your copy of Document Library Pro today.
We hope this detailed step-by-step guide has helped you to upload files to WordPress. Did you face any issues along the way? Kindly let us know in the comments section below!
Further reading: How to add file uploads to WooCommerce products