WooCommerce price list plugin

Lots of business owners waste time manually creating a WooCommerce price list for their website. While it's true that WooCommerce doesn't come with a built-in price list, this doesn't mean that you have to do it manually! 

In this tutorial, I'll show you how to use a WordPress price list plugin to create a dynamic price catalog listing the costs of all your products. You can choose whether to keep the pricing page public or hide it from public view.

What is a WooCommerce price list plugin?

WooCommerce price catalog plugin

A product price list is basically an easy-to-read catalog of product prices. It might list the pricing for all your products in a single list, or you might have different lists for each category.

If you have a printed catalog then it's often worth having a public or hidden price list for customers to view online. This saves having to re-issue a printed price list every time your pricing changes.

Or maybe you need to generate a reseller price list in WooCommerce, so that B2B buyers can see all the prices in one place.

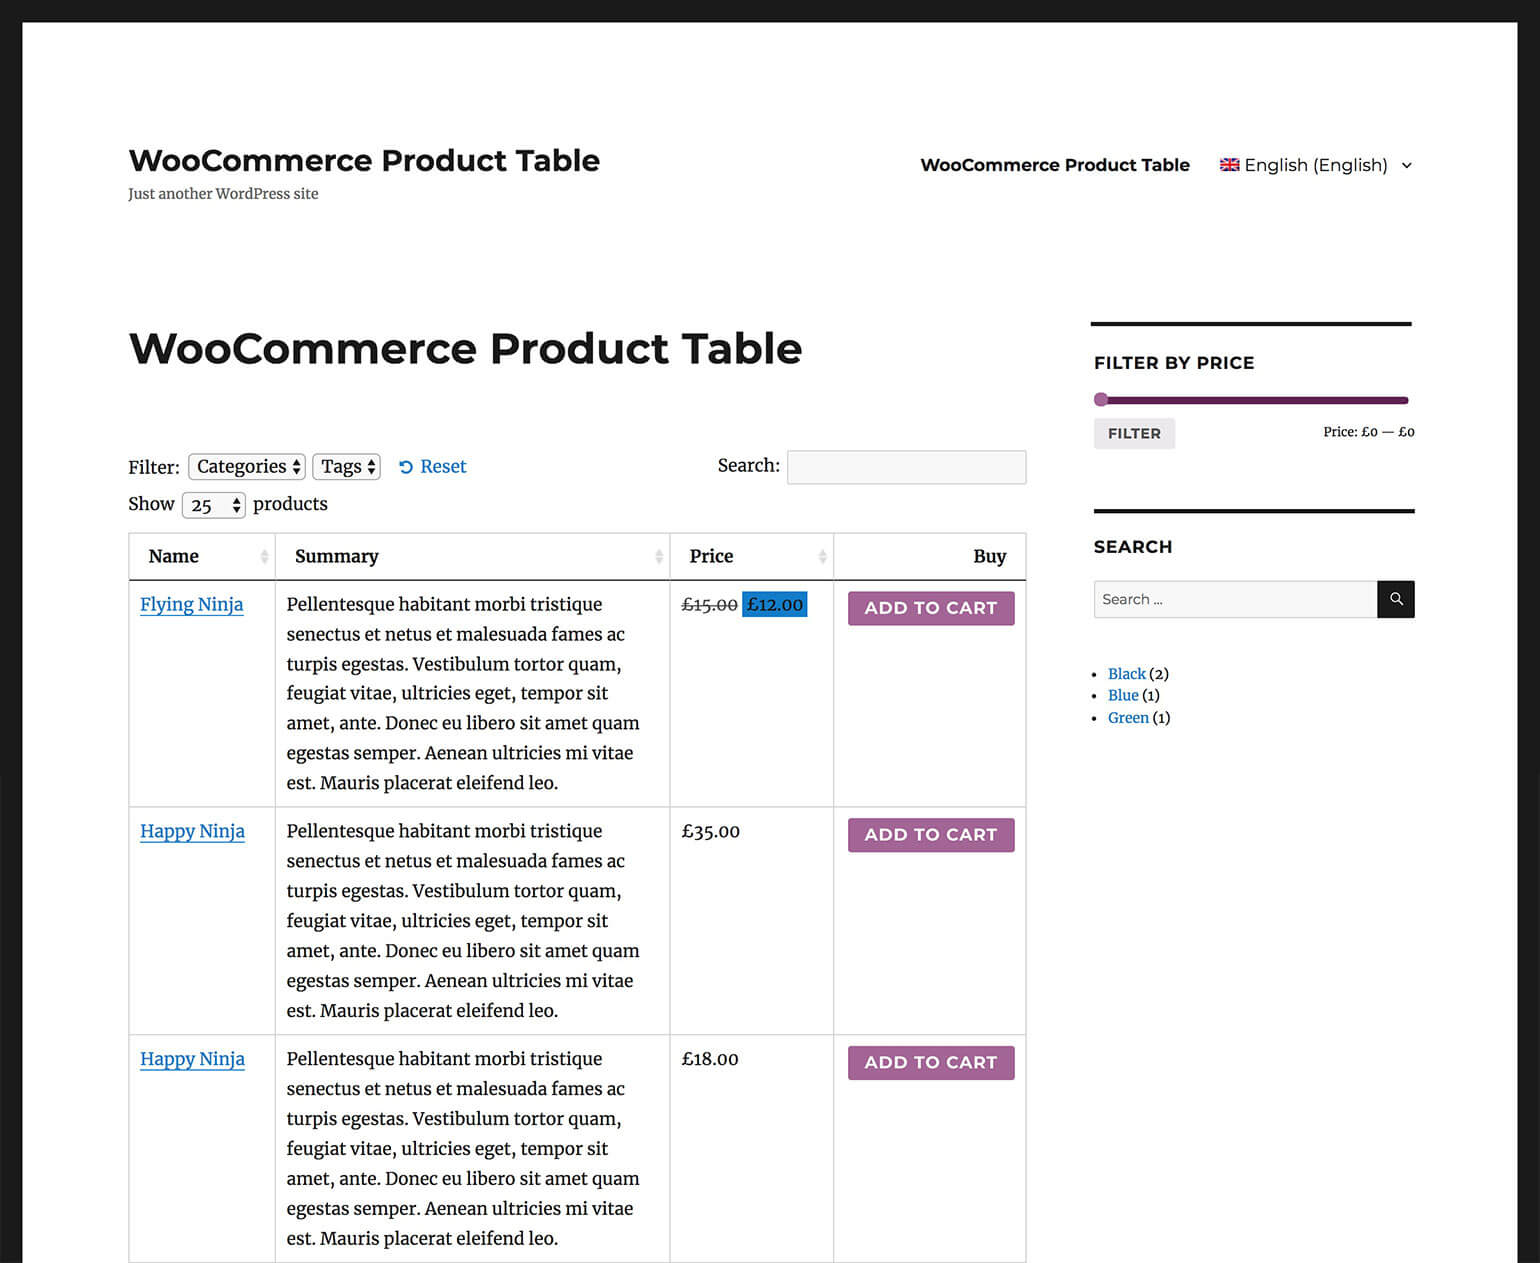
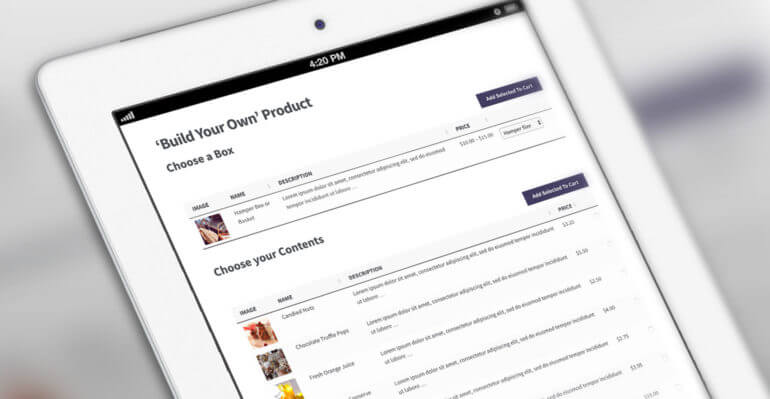
A WooCommerce price list plugin is normally quite simple, consisting of a product table view with 2 columns: Name and Price. This lets customers compare all your products alongside one another based on price.

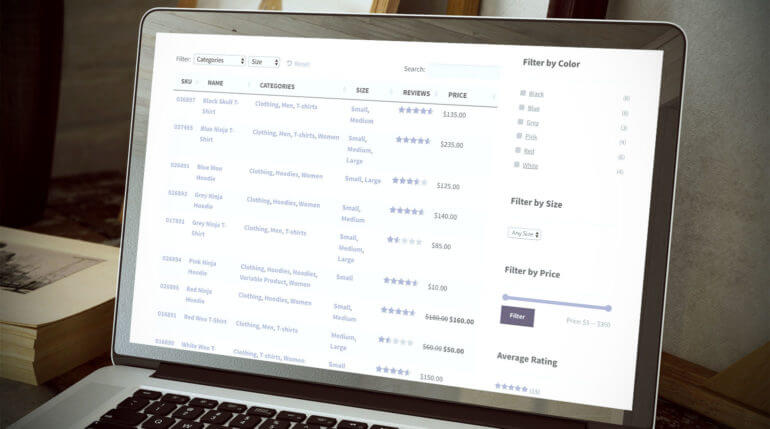
Ideally, a WooCommerce pricing table can be sorted by price so that customers can view the list starting with the lowest or highest cost products. You might also want to add extra columns of information (e.g. category or product attributes). Some price list plugins have extra features such as price filters or sliders. These let customers or resellers find specific products and refine the table to view prices.

As you can see, there are lots of different types of WooCommerce pricing table. You can create all sorts of product price list with the WooCommerce Product Table plugin, which I'll tell you about next.

See a demo of the WooCommerce price catalog plugin in action

WooCommerce Product Table - The ultimate price catalog plugin

WooCommerce Product Table is the bestselling WordPress plugin by ourselves at Barn2 Media. It instantly lists products in a simple or a more advanced table view. It's the perfect WooCommerce price list plugin because it creates flexible product price lists, with no need for manual data entry. You don't have to re-enter the prices or import from another program such as Excel - the plugin creates pricing tables instantly using information already stored in the WordPress database.

You can keep your pricing table simple with columns for product name and price, and no extra features. Or if you prefer, you can add columns of extra product data, plus extra features such as search box and filters. There are options to list all product prices or specific products only (for example, products from a certain category).

WooCommerce product table price catalog

First, I'll tell how how to use the Product Table plugin to create a simple price list and more advanced pricing tables. Later, I'll explain how to make this page available to the public, or to create a hidden price list which only certain people can see.

Create a simple WooCommerce price list

It only takes a few minutes to install WooCommerce Product Table and create a basic product price list:

  1. Get WooCommerce Product Table, then install the plugin.
  2. The product table builder will open when you activate the plugin. Use this to set up your product price list:
    • Select the option to add the table manually to a page.
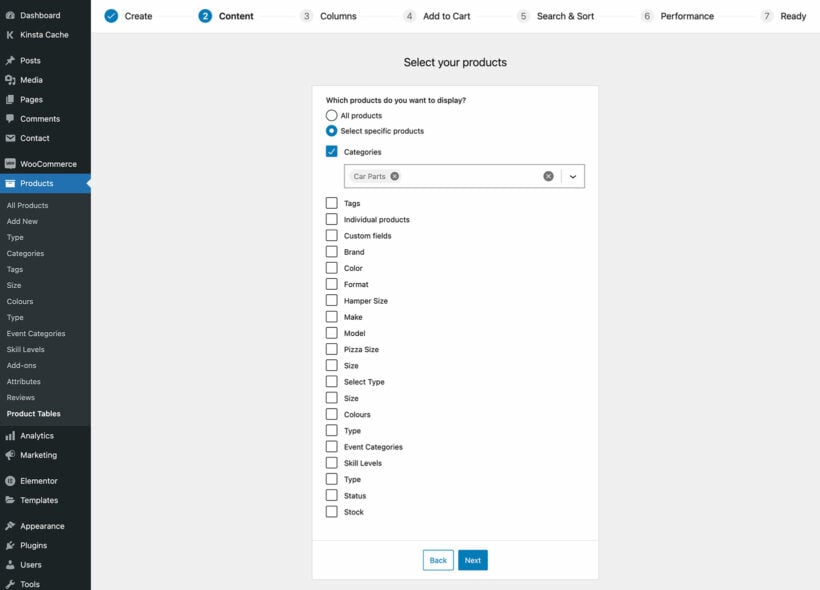
    • Choose whether to list all or some of your products.
    • To create a very simple WooCommerce price list, just add columns for name and price.
    • Sort the table by price in ascending order.
  3. Use Pages → Add New in the WordPress admin to create a page. Call it 'Pricing Catalog', 'Price List' or whatever you like.
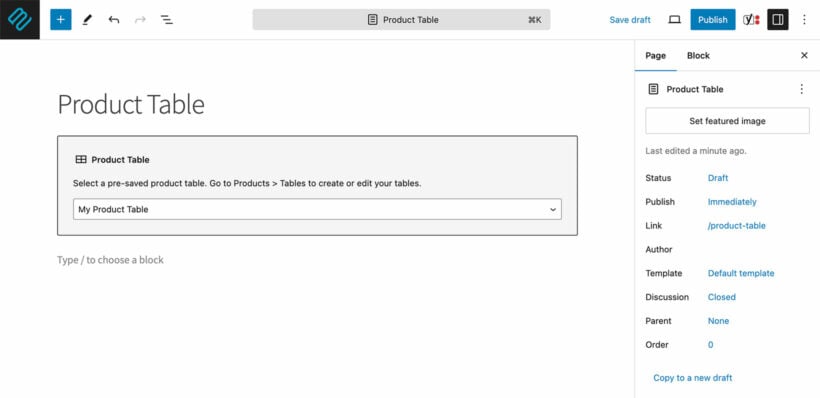
  4. Now either use the 'Product Table' Gutenberg block to insert the price list using the block editor, or insert the shortcode from the final page of the table builder.
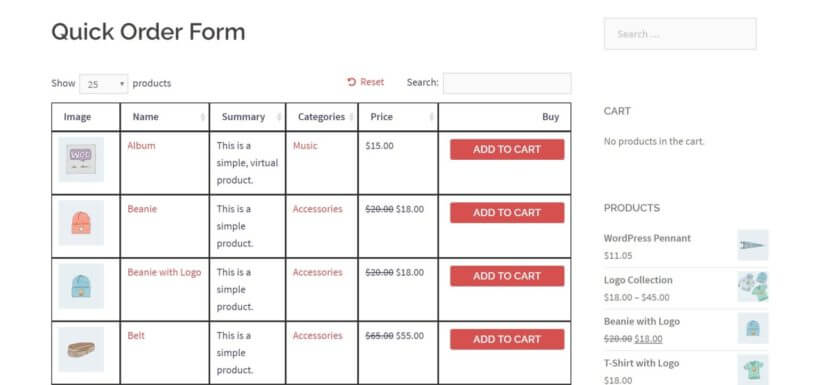
  5. Save the page and view it.
Simple WooCommerce price catalog plugin

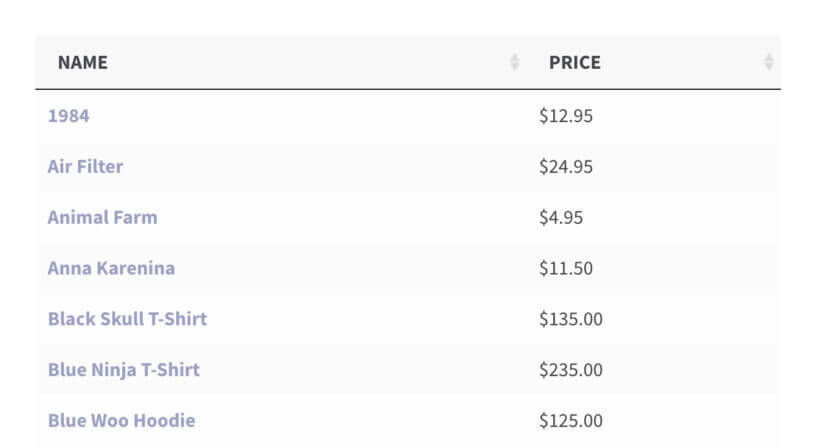
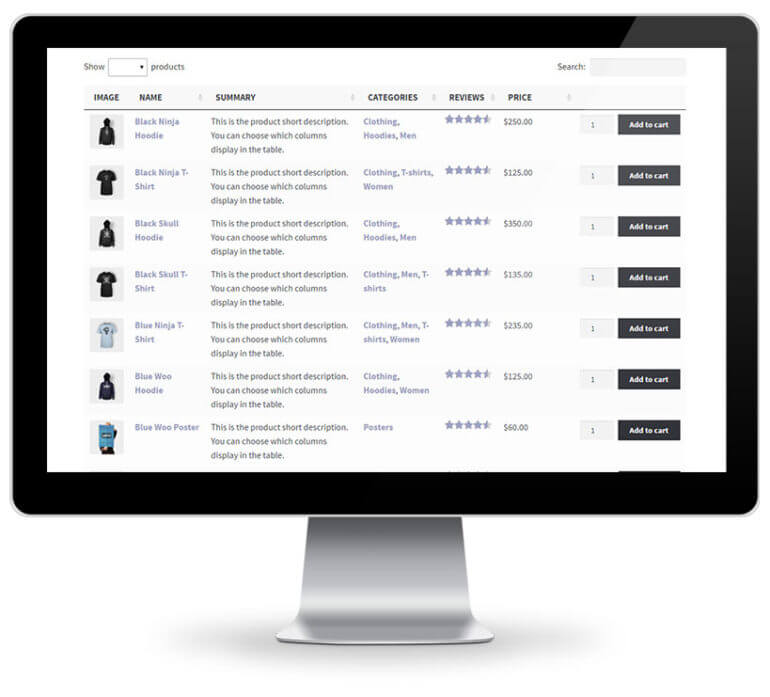
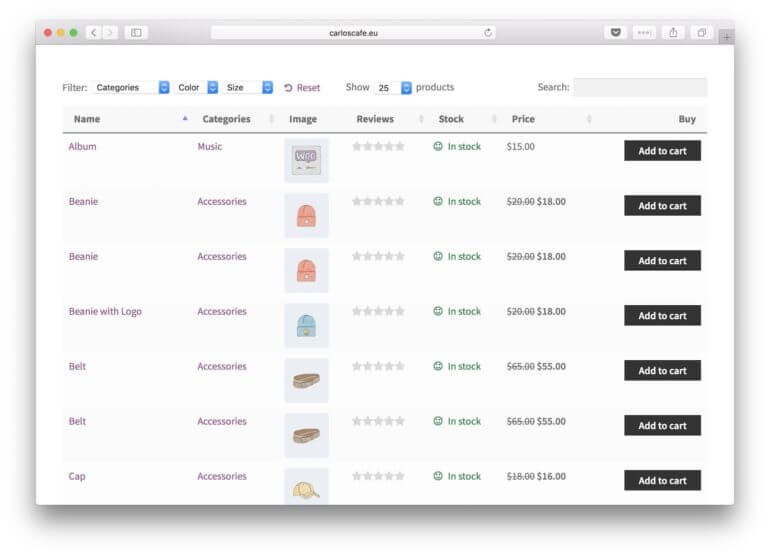
In just 4 steps, you created an instant WooCommerce price list. The plugin has listed all the products in your store in a dynamic table layout with columns for name and price. Customers can find products by typing in the search box, or click on the 'Price' column header to sort by price in ascending or descending order. Easy!

Create more advanced WooCommerce price lists

The simple price list in the previous section may be all you need. However, WooCommerce Product Table is a powerful plugin and you can also use it in more advanced ways. There are lots of options to configure your price catalog, add multiple pricing tables and much more. The plugin has dozens of options, but here's a summary of the most relevant ones for creating a WooCommerce price catalog.

Recommended options

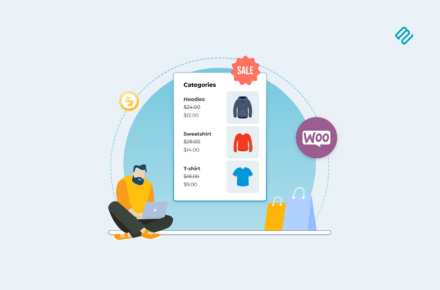
  • Create multiple price lists with different productsBy default, the WooCommerce price list plugin lists all the products from your store. Alternatively, you can create separate pricing tables - for example, one list for each category.
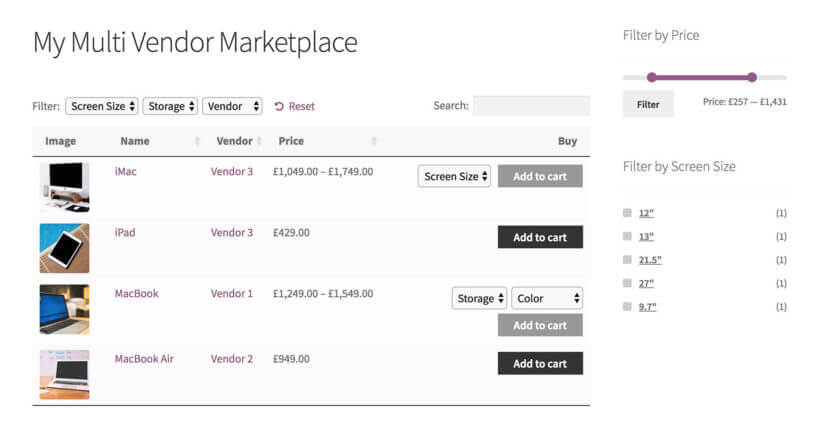
  • Add extra columns of product dataThe WooCommerce pricing table plugin supports all the built-in WooCommerce product data, plus extra fields such as custom fields and taxonomies. This lets you display extra product data in the pricing table. Think carefully about which products to include, and add whichever columns will help to increase sales! If you want customers to be able to buy directly from the price list then you can even include add to cart buttons or checkboxes.
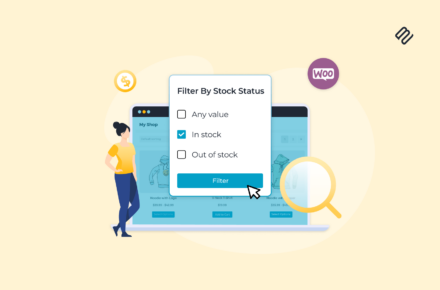
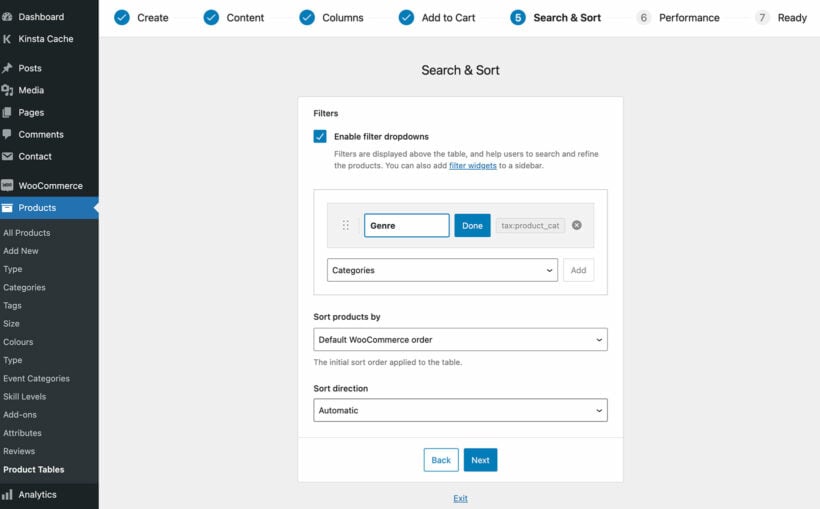
  • Add product filtersIf your price catalog contains lots of products, then you need to provide an easy way for customers to find what they want. As well as the (optional) search box above the table, you can add filter dropdowns above the pricing table, or filter widgets in a sidebar.
  • Fast-loading Lazy Load option WooCommerce Product Table is very quick to load, but if you have 100's of products (or more) then that's a lot to load all at once. You can improve performance for big price lists by activating the lazy load option, which loads 1 page worth of products and pricing at a time.

Advanced Woocommerce price list plugin

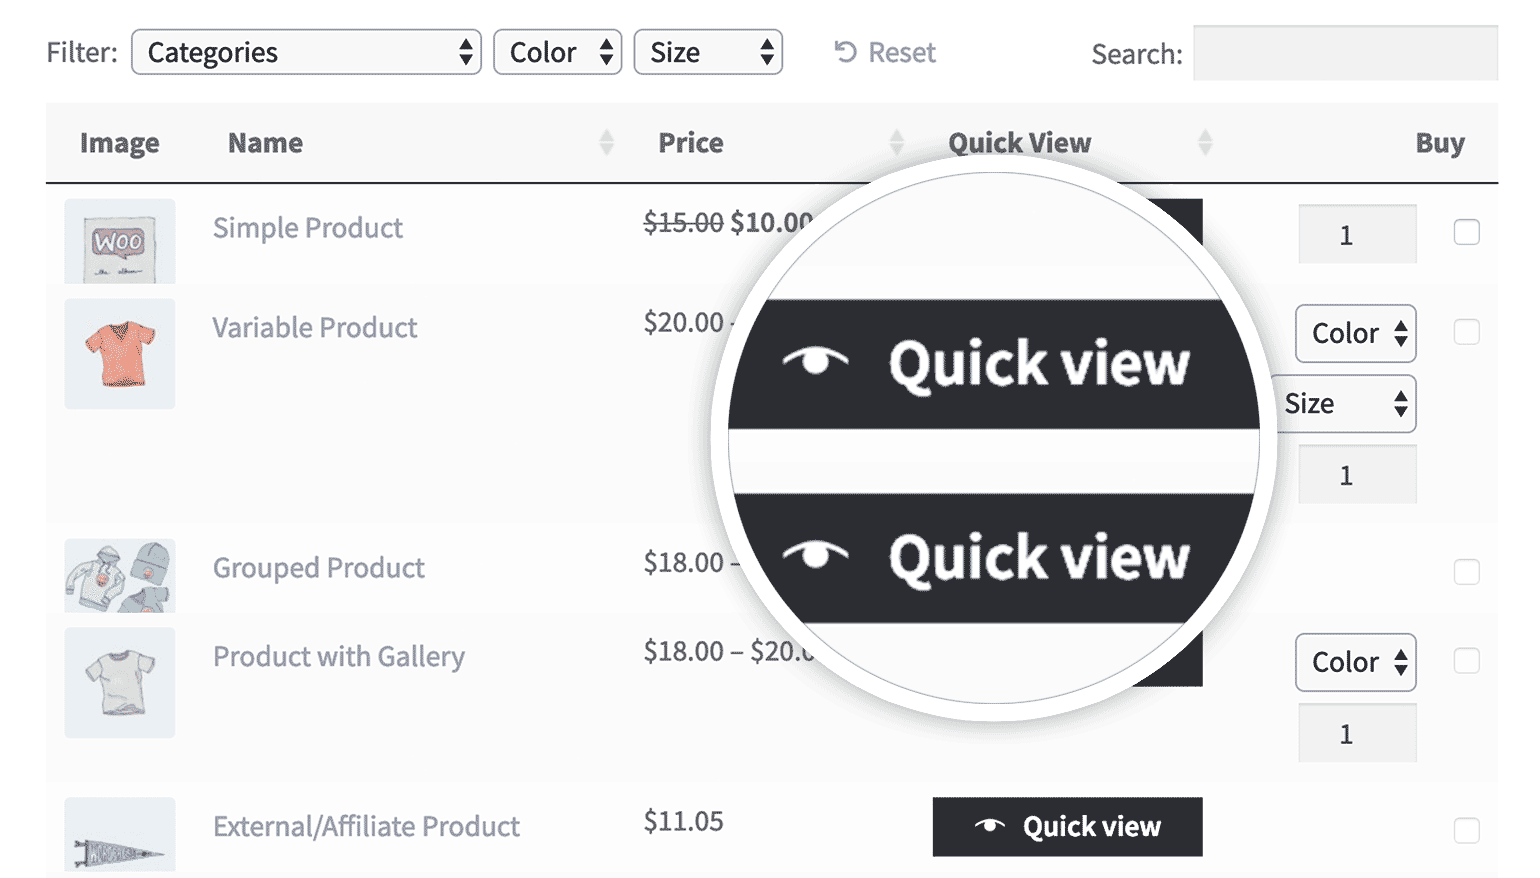
Add quick view to the WooCommerce price list

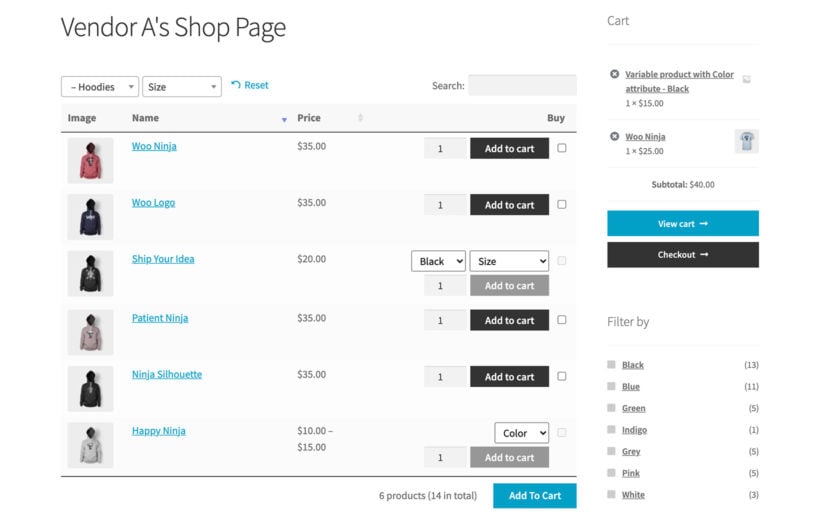
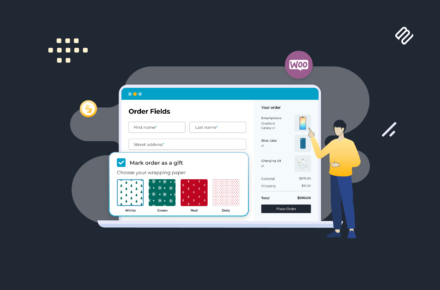
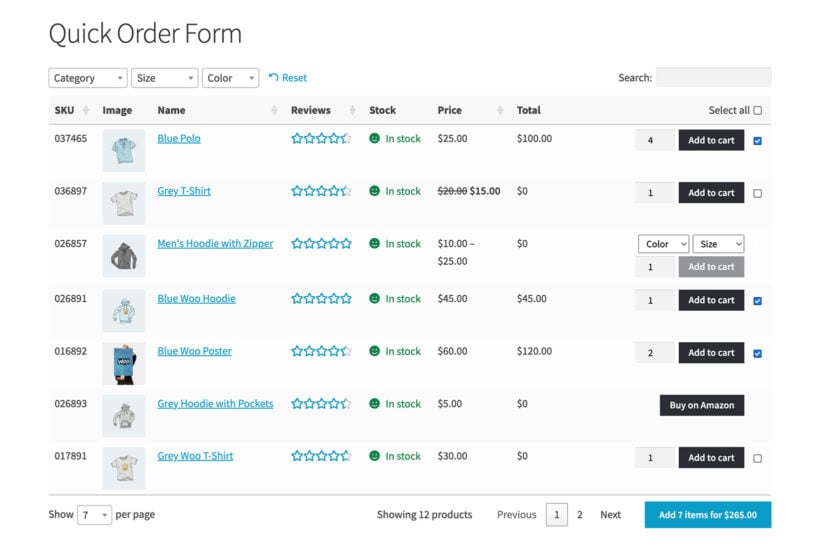
Lots of people like to create a WooCommerce price list that also acts as a one-page order form. The aim is that customers can view prices and order from one page, without having to visit a separate page for each product.

You can do this by including an add to cart column in the price list. Or if you have too much information (or too many product variations) to fit into a simple price list, then you can add quick view instead.

WooCommerce Product Table Quick View Magnifying Glass
Add quick view buttons or links to your WooCommerce price lists.

By using WooCommerce Product Table with its sister plugin, WooCommerce Quick View Pro, customers can open a quick view lightbox for each product. This allows for faster shopping than sending customers to individual product pages, as they remain on the price list page at all times.

You can choose what information to show in the quick view including product images, specific information, and add to cart options.

How to help people find your WooCommerce price catalog

It's easy to make your WooCommerce price list available for public view. You can link to the price list page in exactly the same way as any other link in WordPress. For example, you can link to the pricing list page from your navigation menu, or anywhere else on your site. You might want a 'Price List' link in the menu, or a button in a sidebar widget.

Or if you prefer, you might want to hide the price list and add to cart buttons from public view. I'll tell you how to do this next.

Create a hidden WordPress price list

So far, you've learned how to create a WooCommerce price catalog listing your product prices. But what if you want to keep your pricing private and hidden? Fortunately, there are a few ways to do this depending on the privacy level you need for your price lists.

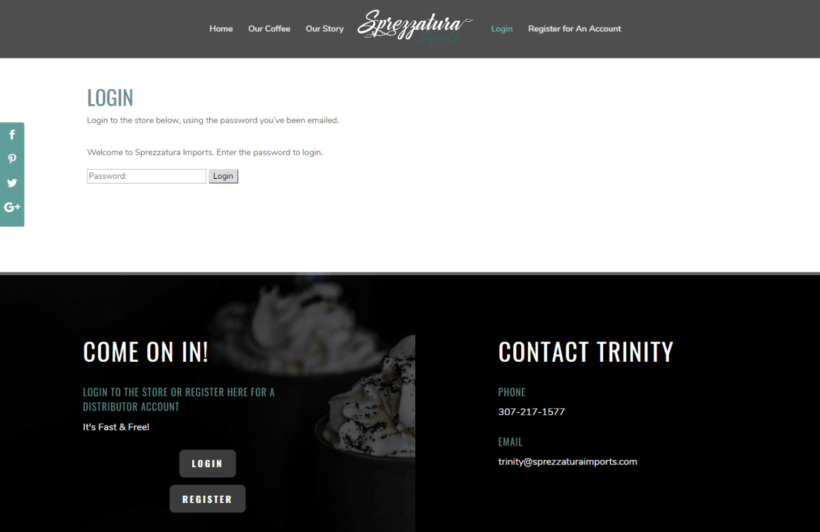
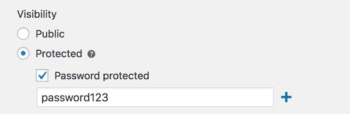
Option 1 - Password protect the price list page

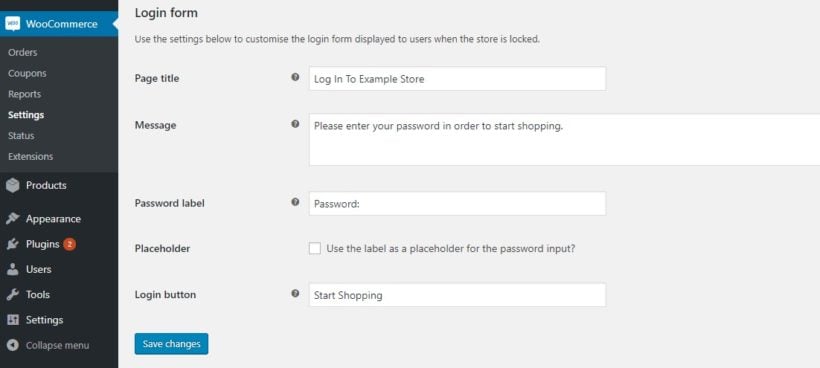
Choose this option if you want to hide the price catalog page from public view, while leaving the rest of your store (including the prices on normal product and category pages) public.

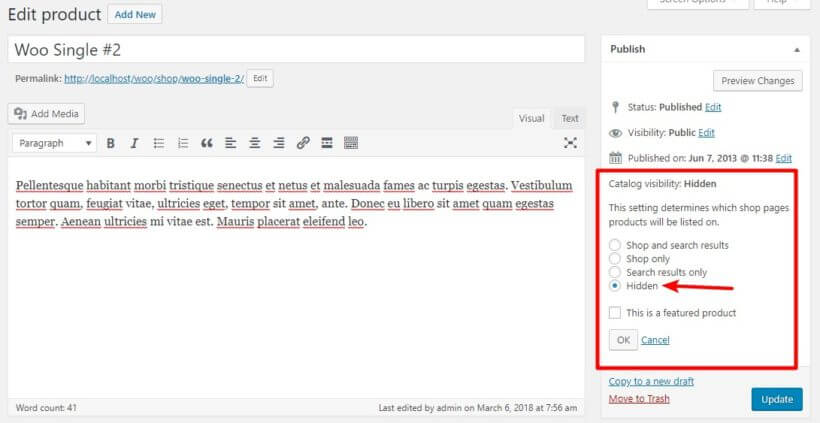
You can easily password protect the page where you're using the WooCommerce price list plugin. Simply choose the 'Password Protected' option from the catalog 'Visibility' settings in the 'Publish' box on the Edit Page screen. Only people with the correct password will be able to access your price lists.

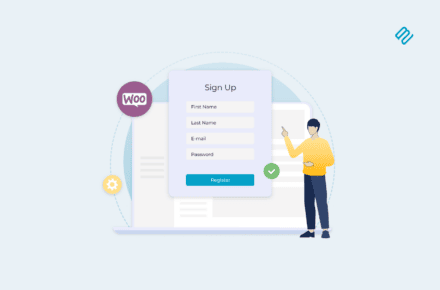
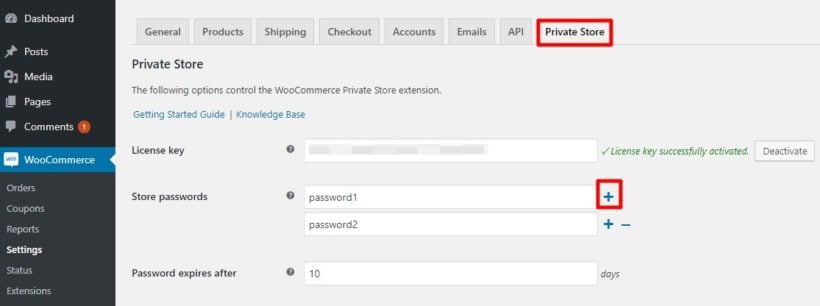
Option 2 - Hide prices from logged out users

WooCommerce Product Table integrates with the free Hide Price Until Login WordPress plugin. If you add this plugin, then the product prices on your price list AND elsewhere in your store will be hidden. They will then appear when the customer or reseller logs into their user account.

Option 3 - Hide prices for a specific group of products only

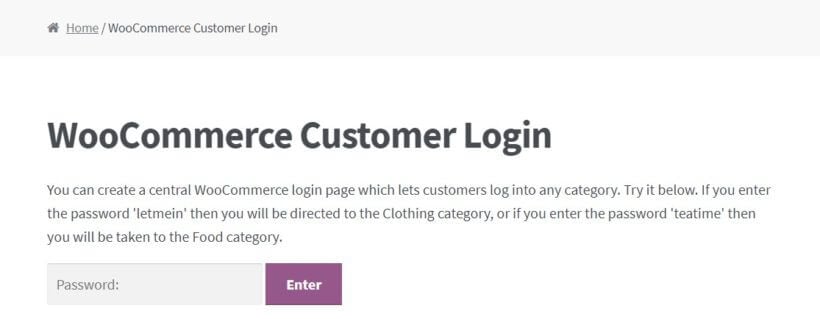
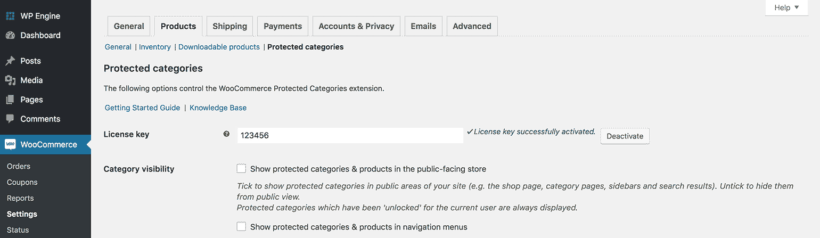
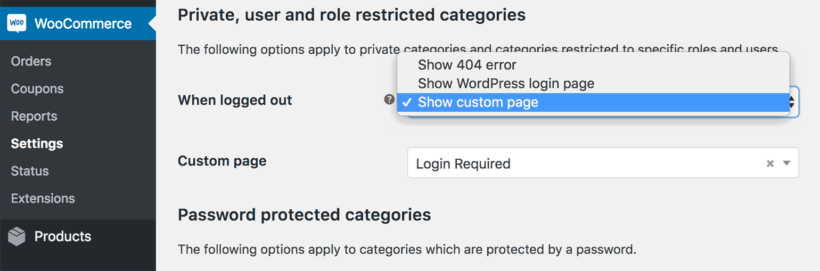
Perhaps you want a public store with prices, with a completely hidden area where both the products and price list are hidden. You can achieve this using the WooCommerce Password Protected Categories plugin.

This hide price WooCommerce plugin lets you create one or more password protected categories and protect them with one or more passwords. Password protected categories and their products can either be shown in the public parts of your store and price list. People must enter the password to access the single product page. Alternatively, you can hide password protected products from your public store and price list so that they only appear once someone has entered the password.

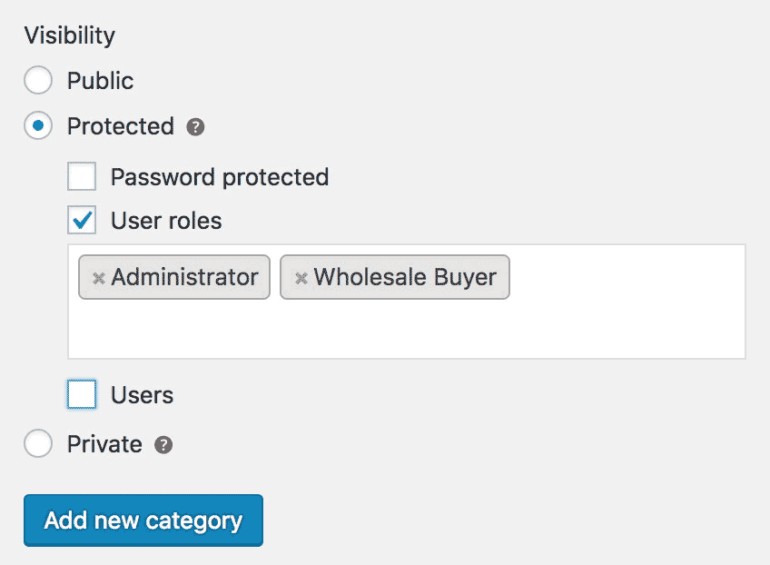
You can use the same WooCommerce hide price until login plugin to create private categories. Their products will only appear to logged in Editors and Administrators. (You can change which user levels private products are visible to with the User Role Editor plugin.) The products in private categories are hidden from everyone else. This is a good option if you want a single price list, with some product available to everyone and others only visible to specific user levels. You can create a single WooCommerce price list with public products visible to everyone, and private products which only appear for the correct user levels.

Can customers print the WooCommerce price list?

The WooCommerce Product table integrates perfectly with the free Print, PDF, Email by PrintFriendly plugin. This simple plugin can add Print or Save As PDF buttons to the top or bottom of your WooCommerce price catalogue.

The plugin settings page has options to automatically show the Print/PDF button at the top or bottom of every page or post on your website. If you don't want this, then you can just add it to your price list page using this shortcode: [printfriendly]

Create your own price list today!

By now, you've learned how to create a WooCommerce price list and how to customize it to suit your needs. You've also learned how to make it public or hide it from public view.

Now you can start creating dynamic price lists for your own products. Once you've set up your pricing tables, the prices will update automatically whenever you change your pricing. You don't need to worry about keeping the list up to date.

I'd love to hear how you get on. Please add your comments and questions below.

If you're looking to add an extra layer of security to your WooCommerce shop, password protecting it can be a great protection option. This is particularly useful for wholesale stores, membership sites, and other types of WordPress sites that require restricted access. Learn how to password protect your WooCommerce shop page and safeguard your online store with ease.

But, by default, WooCommerce doesn't provide any way to add a WooCommerce password to your entire shop. That means, as is the WordPress way, you're going to need a little help from a plugin.

To that end, I'm going to spend this post showing you how to password protect a WooCommerce shop page using a simple but effective plugin with just a few settings. I'll provide full written instructions plus a step-by-step tutorial video. When you finish, you'll know exactly how to get functionality like this for your shop using the WooCommerce Private Store plugin:

example of how to password protect a woocommerce shop

Importance of password protection for WooCommerce shops

Password protection for WooCommerce shop pages is essential for a number of reasons. Firstly, it can help to ensure that only authorized users are able to access certain areas of your entire store. For example, if you're running a wholesale store, you may want to restrict access to pricing information and other sensitive details to approved users only. Similarly, if you're running a membership site, you may want to ensure that only paying members are able to access premium content.

By using a WooCommerce password to protect your shop page, you can also add an extra layer of security to your online store. This can be especially important if you're dealing with sensitive customer data, such as credit card details and other personal information. WooCommerce password protection can help to prevent unauthorized access and potential data breaches, safeguarding your business and your customers' privacy.

In addition to these benefits, password protect WooCommerce plugin can also help you to create a sense of exclusivity and demand for your products. By making certain products or areas of your WooCommerce store password protected, you can create a sense of exclusivity and scarcity that can help to increase sales and drive customer engagement.

Now, let's look at a couple of real-life examples from companies that needed to password protect the WooCommerce shop page.

Case study #1: Sprezzatura Imports

Sprezzatura Imports is a wholesale coffee distributor in the US. They specialize in importing the Italian coffee brand ICAF and sell to distributors through a private password protected WooCommerce shop page. This is where our WooCommerce Private Store plugin comes into play.

Only distributors can access the price list and purchase single products, that’s why this area is locked away behind a login screen. To secure the private online shop, Sprezzatura Imports used our WooCommerce Private Store plugin. Everything Sprezzatura Imports want to hide from the public can be hidden in this secure area.

And to keep things simple, registered distributors can quickly access the WooCommerce orders password protected area as the login page has been added to the navigation menu.

Sprezzatura Imports login screen

Case study #2: Montana Medicinals

WooCommerce Private Store Case Study Montana Medicinals

Gecko Designs were building a ecommerce website for Montana Medicinals, which operates a medical marijuana dispensary in the State of Montana. For legal reasons, they needed to password protect their WooCommerce shop so that only pre-authorized customers could access it.

The developers achieved this in minutes using the WooCommerce Private Store plugin.

First, they used a sitewide WordPress age verification plugin to ensure that no one over age 18 can access the website at all. For added security, they used WooCommerce Private Store to password protect the WooCommerce shop.

When you click on the Shop link in the navigation menu, you are prompted for a password:

WooCommerce Private Store Case Study

If Montana Medicinals has given you the password, then you can unlock the WooCommerce shop and purchase the medicinal marijuana within. If you do not have a correct password, then you cannot unlock the shop to view password protect products or buy.

The developer was delighted with the plugin and wrote a glowing review:

Worked perfectly!
We used this plugin to comply with a US state law in Montana that required a medical marijuana dispensary password protect their WooCommerce catalog. It worked perfectly and was easy to configure!

How to password protect a WooCommerce shop

Beyond the obvious of having a WooCommerce store that actually needs password protecting, all you'll need to follow this guide is the WooCommerce Private Store plugin. WooCommerce Private Store lets you protect your shop with one or more passwords, as well as choose:

  • How long the store stays unlocked when a user enters the password
  • What page users can log in to the store from
  • Where to take users after they log in

When you use the plugin, every aspect of your shop is hidden until a user enters the password, including:

  • Shop pages
  • Navigation menu links
  • Sidebar widgets

While the store functionality is hidden until the user enters a password, the rest of your site will function like normal. By using the password protection visibility option for your WooCommerce shop, your website visitors will still be able to view your homepage, blog, and regular WordPress pages. Only the password-protected content will be hidden and accessible only to approved or logged-in users.

Features and benefits of the plugin for WooCommerce shops

The WooCommerce Private Store plugin is a powerful and flexible tool for password protecting your WooCommerce shop. Here are some of the key features and benefits of this plugin:

  1. Password Protection: The WooCommerce Private Store plugin allows you to password protect your entire shop or specific product categories, products, or pages. This helps to keep your products and pages private and secure and allows you to restrict access to specific user groups or individuals.
  2. Customization: With the WooCommerce Private Store plugin, you have full control over the design and functionality of your password-protected shop. You can customize the message displayed to users when they attempt to access your shop, and can also choose whether to hide or show product prices and checkout buttons.
  3. User Management: The plugin includes user management features that allow you to add, edit, and delete users with ease. You can also create user roles and assign specific permissions to different user groups, giving you granular control over who can access your shop.
  4. Security: The WooCommerce Private Store plugin includes several security features to help protect your shop and your customers' data. You can require strong passwords and enable two-factor authentication, and can also choose to log out inactive users automatically after a certain period of time.
  5. Integration: The plugin is fully compatible with other WooCommerce plugins and themes, allowing you to customize and extend the functionality of your shop as needed.

Step 1: Set up general settings

Once you've activated the plugin and entered your license key, go to WooCommerce → Settings → Private Store to set up the passwords that unlock your store, as well as a few other general options.

You can use a single password for everyone. Or, you can use the Plus icon to create multiple passwords that unlock your store.

Below the passwords, you should also enter a value for Password expires after. This plugin settings lets you control how long, in days, the store remains unlocked after a user enters the password:

how to password protect a woocommerce shop

Below that, you can use the Redirect URL field to redirect the user to a specific products page after they enter the password. If you leave this blank, visitors will just go to your normal shop page after they enter the password.

Finally, you can also choose whether or not to automatically unlock the store for Logged in users or specific user roles.

If you check this box, anyone who's logged in to your WordPress website will not need to enter the password in order to see the store:

how long to unlock store

Step 2: Configure login form

Below the general settings page, you can use the Login form section to configure the page where users log in.

The settings are all fairly self-explanatory:

login page details

How the plugin works in more detail

Once you have installed the password protect WooCommerce shop page plugin, all traces of your store will disappear from the front end of your site. All of your regular WP content will function normally, though:

regular site

If a user:

  • Goes to the store login page
  • Tries to access any WooCommerce page via a direct URL

They will see your login form like this:

store login page

And as soon as they enter a valid password, they'll instantly see all of your:

  • Store and product pages
  • Navigation menu items
  • Widgets
unlocked store

And that's all there is to it!

For a more surgical approach, you can also use the WooCommerce Password Protected Categories plugin to password protect a single product category, rather than your entire shop. You can also use our plugins to build a members-only WooCommerce store.

Protect your WooCommerce shop page today!

If you're running a WooCommerce shop, it's crucial that you take steps to ensure the security and privacy of your customers' data. One of the simplest and most effective ways to do this is by using a password protect WooCommerce shop page plugin.

By password protecting your WooCommerce shop page, you can restrict access to sensitive information and prevent unauthorized users from viewing or making purchases. This can help to safeguard your business and your customers' privacy, and prevent data breaches and other security issues.

Adding password protection for your WooCommerce shop page is easy and straightforward. There are many plugins and tools available to help you get started. Whether you're running a wholesale store, a membership site, or any other type of online store, password protected pages are an important consideration for enhancing the security and functionality of your shop.

So if you haven't yet implemented password protection for your WooCommerce shop page, we encourage you to take action today. With the right tools and resources, you can quickly and easily enhance the security of your online store, and provide your customers with the peace of mind they need to shop with confidence.

If you have any other questions about how to password protect a WooCommerce shop, leave a comment and we'll be sure to help out.

We've just released version 2.1 of WooCommerce Product Table. This contains some exciting new features that lots of our customers have asked for. There are various other changes and behind-the-scenes improvements (see Changelog). Here are the main headlines:

GET THE PLUGIN

Open product images in a lightbox

WooCommerce image lightbox plugin

An image lightbox has been the most in-demand item on our feature request list for a while. Now, when you click on an image in the product table, the image will open up in a lightbox.

The lightbox uses the in-built Photoswipe JavaScript library built into WooCommerce to display the enlarged product images. This is a great way for customers to see a bigger version of the image without having to click through to the single product page. It's especially important since a lot of our customers use WooCommerce Product Table as a one-page order form, disabling any links to the product detail pages.

New support for variation descriptions when using separate variations

We added support for separate variations back in version 1.7 (June 2017). This is where each product variation option is listed on its own row in the table.

If you're listing each product variation on a separate row in the table, the description for each individual variation will now appear in the 'description' column. (Previously, the main product description would appear here and it was not possible to display variation descriptions.)

If there is no variation description then the main product description will appear in this column, as before.

New language translations

The WooCommerce Product Table plugin now contains complete translations for English, French, Finnish, German and Polish. Please see our article about using WooCommerce Product Table in different languages for usage instructions.

We're currently awaiting full translations for Italian, Spanish, Dutch, Norwegian, Swedish, Danish, Hebrew, Greek and Romanian, and hope to add these shortly. (In the meantime, there are already partial translations for most of these.)

We're always interested to hear from anyone who is interested in translating the plugin into other languages.

How to update

Existing users of WooCommerce Product Table can update to the new version via Dashboard > Updates in the WordPress admin. If you get any errors, please see our knowledge base article on problems updating the plugin.

If you're not using the plugin yet, get it today and start taking advantage of the new features.

GET THE PLUGIN

What's next?

Next on the agenda are further improvements for using WooCommerce Product Table as a one-page order form. Watch this space for more new features...

WooCommerce order form plugin demo

If you want your WooCommerce store to succeed, it’s important to make the buying process as simple as possible. The easier it is for visitors to make a purchase, the quicker they’ll open their wallets. This means you need to find a way to streamline their experience.

One of the best solutions is to add a quick WooCommerce quick order form. Instead of visiting individual product pages, customers will be able to select the products they want and add them to their WooCommerce cart from one convenient location. What’s more, you can have customization options for your order form to make it as user-friendly as possible.

In this step-by-step tutorial, we’ll explain why you might need a WooCommerce quick order form, and talk about choosing the right tool for the job. Then we’ll show you how to create a WooCommerce quick order form using the WooCommerce Product Table plugin. Let’s take a look!

What is a WooCommerce Quick Order Form (and might you need one)?

Most WooCommerce stores provide dedicated lists or galleries where customers can see many items at once. They also display each product on its own page. This enables visitors to easily compare products, and find out more information about each one. In general, however, people are only able to purchase items one at a time. At most, they might be able to add products to the cart individually from the shop pages and category pages, but there's no way to choose quantities or specific variations.

This can be inconvenient for customers who want to buy multiple items at once. Fortunately, you can make their lives easier by creating a quick WooCommerce order form. This is simply a table listing out some or all of your products. Visitors can select all the products they want from the WooCommerce quick order form, and add them to the cart:

WooCommerce quick order form plugin

The Benefits of Adding a Quick WooCommerce Order Form

Aside from making the order process quicker and more streamlined, adding a quick WooCommerce order form provides a number of other benefits. For example:

  • Customers will be able to see lots of products at a glance.
  • It becomes very easy for people to compare similar products.
  • You’ll be using space more efficiently.

As with any feature, certain types of sites will benefit from implementing a WooCommerce quick order form more than others. This includes stores with lots of similar products, as well as those selling ‘simple’ products that can be understood at a glance (such as clothing and decorative items). A WooCommerce quick order the one-page shop will be handy if your customer base browses your store from mobile devices.

If you do decide to try out a quick order form on your WooCommerce site, you’ll find that the process is quite simple. All you need is the right WooCommerce quick order plugin!

How to choose a WooCommerce quick order form plugin

Since this is a very specific feature, you’ll need exactly the right WordPress order form plugin to implement it. Along with the basic criteria you should use when choosing any WooCommerce quick order plugin, you’ll want to look for a tool that:

  • Is customizable, so you can create a WooCommerce quick order form suited to your exact needs.
  • Offers filtering and sorting features, so customers can find what they want quickly.
  • Includes support for custom fields and taxonomies, so you can organize products however you’d like.
  • Lets customers select variations and quantities right from the order form, without needing to visit the actual product pages.
  • Is fully responsive on mobile devices.

Fortunately, our WooCommerce Product Table plugin includes all of these features and more:

This tool enables you to quickly build a product list or order form that is highly customizable. Plus, it’s designed to be used alongside WooCommerce, so customers will be able to order products right through the form.

With WooCommerce Product Table, you can easily build a one-stop shop, or create order form to be used alongside more traditional store pages. Let’s talk about how to get started now.

How to create a WooCommerce quick order form (in 3 steps)

The first thing you’ll want to do is purchase and install the WooCommerce Product Table plugin.

If you haven’t already installed and activated WooCommerce, you’ll need to do that as well. You’ll also want to ensure that you’ve created all the products you want to include in your quick order form. Then, you’re ready to begin!

Step 1: Create a quick WooCommerce order form

  1. Go to Products → Product Tables → Add New.
  2. Go through the steps to set up the order form. This includes:
    • Selecting which products to include in the order form.
      Select products page of table builder
    • Adding your order form columns. (Tip: Remember to include a 'Buy' column to allow customers to add to the cart from the order form.)
      WPT table builder columns
    • Customizing the add to cart buttons. (Tip: Enable the add to cart checkboxes for quicker ordering.)
      Add to cart page of WooCommerce product table builder
    • On the 'Add to cart' page, I also recommend selecting to show variations as dropdown lists. This will allow customers to choose variations from the quick WooCommerce order form, like the Hoodie in this screenshot:
      A WooCommerce quick order form with drop-down menus.
    • Adding filters to help customers to find products more quickly.
      WooCommerce music store filter by genre
  3. The final page of the table builder provides a shortcode for adding the quick order form to a page. Copy this (unless you're using the Gutenberg block editor, in which case you don't need to.)

Step 2: Add the quick WooCommerce order form to a page

  1. Create a page (Pages → Add New).
  2. Either insert the shortcode that you copied a minute ago, or insert the 'Product Table' Gutenberg block and select your table.

This will add the WooCommerce quick order form to the page like this:

A WooCommerce quick order form with images.

Customers will be able to add products to their carts and use the Ajax search form to find specific products.

Step 3: Add product quick view to the rapid order form (optional)

By creating a quick WooCommerce order form, customers can quickly click multiple products and add them all to the cart at once. This is ideal for selling simple products, or products with a small number of variations. But what if you have a large number of variations per product?

Obviously, you don't want to send customers to a separate page to buy each product. That defeats the purpose of a quick order form!

WooCommerce Product Table Quick View Magnifying Glass
Add quick view buttons or links to your WooCommerce quick order form.

The solution is to add quick view buttons to your WooCommerce order form. You can do this with the WooCommerce Quick View Pro plugin, which is designed to work with WooCommerce Product Table.

Install the plugin and use the settings page to choose what information to display in the quick view lightbox. Next, add a quick-view column to your list of product table columns.

This will add quick view buttons to the table (which you can rename to anything you like on the Quick View plugin settings page). Customers can click these buttons to view extra product information, product image gallery, and/or purchase options in a lightbox popup.

After adding the product to the cart, the lightbox closes and the customer remains at the same point on the quick order form, where they can continue adding more and more products to their cart.

Step 4: Optimize the checkout process (optional)

Before we wrap up, there’s one more element to consider. Along with optimizing your quick order form WooCommerce so that it’s user-friendly, you’ll want to do everything you can to speed up the ordering process. The more convenient it is to buy products, after all, the more likely customers will be to complete their purchases.

This step involves using a few additional tools. Here are the two most important features you’ll want to consider implementing:

  • Redirect users to the cart page after selecting one or more products. This encourages customers to buy right away and can be done easily using a WooCommerce setting and the free Redirection plugin.
  • Add more payment gateways to your e-commerce store. The more payment options you provide, the larger your potential customer base will be. WooCommerce itself offers a variety of ways to add new payment gateways.

At this point, take a moment to sit back and admire your handiwork. You have a fully-functioning quick order form WooCommerce that’s informative and easy to use – and the process of purchasing products through it couldn’t be simpler!

Where to get the plugin

It’s important to design your WooCommerce store to provide the best user experience possible for your customers. This means making it simple for them to see what products you offer, select the ones they want, and get right to the checkout screen. To do this, you can create a WooCommerce quick order form – either as a one-stop WooCommerce shop or to supplement your existing product pages. By using the Woo quick order table view, your customers will be able to select and buy the items they are after fast and without fuss.

Fortunately, the WooCommerce Product Table plugin makes this task incredibly easy. You’ll just need to:

  1. Create order form page.
  2. Customize your order form.
  3. Optimize the checkout process.

Do you have any questions about how to set up your WooCommerce quick order plugin? Ask us anything in the comments section below!

WooCommerce geolocation plugin

We're pleased to announce that our WooCommerce Product Table plugin works with a WooCommerce geolocation plugin. You can use this to show different content in your product tables depending on the customer's country.
WooCommerce Product Table Plugin Compatibility Logo

GeoTargeting Lite – WordPress Geolocation shows or hides completely different product tables depending on the customer's country. Each product table can show products from a different category or tag. Use this plugin to show different products to different countries, listed in an interactive product table layout. GeoTargetingWP has joined the official WooCommerce Product Table compatibility scheme.

How to use GeoTargeting Lite with WooCommerce Product Table

Next, I'll tell you how to create different product tables which appear depending on the user's country.

How the WooCommerce geolocation plugin works

The free WooCommerce geolocation plugin comes with 2 shortcodes:

  • [geot country="US"] USA only content [/geot]
  • [geot exclude_country="US"] Everyone except USA will see this [/geot]

You can use these to show or hide specific content anywhere on your website depending on the user's country. The geolocation plugin looks at their IP address to decide which country they're in.

You need to know the correct 2-letter alpha country code for the geolocation to work.

How to create country-specific WooCommerce product tables

Use the WooCommere geolocation shortcodes to create country-specific product tables. I'm assuming that you have already set up WooCommerce and added your products.

  1. First, you need to label your products based on the countries they should be visible to. You can use categories or tags for this. Or if you're already using categories and tags for something else, then create a WooCommerce taxonomy and use this instead. If you want a single product to appear for multiple countries, then it's ok to put them in more than one category/tag/taxonomy.
  2. Next, install WooCommerce Product Table and GeoTargeting Lite – WordPress Geolocation.
  3. Go to Products → Product Table and create a new table.
  4. In the product selection section, choose the category/tag/taxonomy for one of the locations you tagged in step 1. For example, you might select the 'Germany' category.
  5. Go through each step of the table builder to choose your product table columns, filters etc.
  6. Repeat steps 2-5 to create a different product table for each location.
  7. Now create a new page where you will be adding the country-specific product tables.
  8. Next, you need to use the geolocation shortcodes to create product tables that are only visible depending on the user's country. Put the [product_table id="1"] shortcode inside the geolocation shortcodes (replace the id parameter with the actual ID of your table). This will show or hide a product table to the correct country only, depending on which geolocation shortcode you're using.
  9. Add multiple WooCommerce geolocation shortcodes to the page, each showing or hiding product tables from one or more countries. Use the examples below as guidance on how to do this.

Tip: If you want a specific product table to be visible or hidden from more than one country, then you can add multiple country codes within a single shortcode, Just separate them with commas.

Geolocation example 1

The following combination of shortcodes will create a page containing 2 product tables: 1 showing products from a category called 'france-germany' to customers in France and Germany only, and 1 showing products from the 'UK' category to customers in the UK only:

[geot country="FR,DE"][product_table id="1"] [/geot]

[geot country="US"] [product_table id="2"] [/geot]

As you can see, I have added two product tables to the page. However, each customer will only ever see one product table depending on their location.

Geolocation example 2

This time, we'll use the exclude option to create a product table that will not appear for customers in the US. This assumes that you have tagged these products 'US':

[geot exclude_country="US"] [product_table id="1"] [/geot]

Geolocation example 3

In this final example, we'll use the include and exclude options together. This will create a product table that is visible to all countries except for Australia. It assumes that I have created a category called 'Australia' for the Australia-only products. It's a useful method if sell different products to a specific country in WooCommerce, e.g. for legal reasons.

[geot country="AU"] [product_table id="1"] [/geot]

[geot exclude_country="AU"] [product_table id="1"] [/geot]

All customers will see 1 product table on the page. Customers in Australia will see the products from the Australia category, and everyone else will see all your other products.

How to show and hide the country-specific products elsewhere on your site

The above instructions will only show or hide the products in your WooCommerce product tables.

You will need to use the geolocation plugin's other features to restrict the visibility of products elsewhere in your store, for example on the main shop pages, widgets and single product pages. To help with this, you can use the above shortcodes anywhere on your site and in template files.

If you want to restrict access to any of the default WooCommerce pages and direct people to your geolocation product table page, then the free Redirection plugin is perfect for this. Simply add a redirect from any unwanted pages such as the main Shop page, and users will be taken to your product tables page instead.

Do any other geolocation plugins work with WooCommerce Product Table?

Right now, this is the only WooCommerce geolocation plugins that we know works correctly in the product table view.

We also tested with Product Country Restrictions and found that it works with WooCommerce Product Table. However, that plugin is no longer actively updated or supported, so we wouldn't recommend it.

There are some geolocation plugins that definitely don't work with it, and we have included these on our list of incompatible plugins.

There are other geolocation plugins that we haven't tested with. Please let us know if you discover any more that work with WooCommerce Product Table, and we'd be happy to include them on this page.

Where to get the WooCommerce geolocation plugin

You can get WooCommerce Product Table from our website. GeoTargeting Lite – WordPress Geolocation is available free from WordPress.org.

In need of a WooCommerce product display plugin? You're in the right place! In this post, I'm going to introduce you to the best such plugin in the market, plus show you how to use it, step by step.

Here's what you can expect from the plugin in action:

table filter

But first:

Why do you need a WooCommerce product display plugin anyway?

WooCommerce is a great tool, it truly is. But like with most products, there are some chinks in its armor.

For instance, one area where WooCommerce falls a bit short are the available options when it comes to displaying your product catalog in full. Well, when I say "options" ... there actually aren't any.

What you do get is just one default view that you can customize only slightly via WordPress Customizer. Doing more in-depth modifications is basically a nightmare if you don't have any coding or WordPress/HTML knowledge.

This is that default view:WooCommerce default grid

In itself, it's a nice presentation for a standard retail store where each product should get a small portion of the spotlight. But it's not optimal for all business scenarios imaginable.

This is where the WooCommerce Product Table plugin comes into the picture.

What WooCommerce Product Table does better than default WooCommerce

Simply speaking, WooCommerce Product Table allows you to display products inside a searchable and sortable table view. Like this:

WooCommerce Product Display plugin

A couple of important notes about this WooCommerce product display plugin:

  • The plugin gives you an additional way of displaying your product catalog - it doesn't replace the default one. You can still use the old catalog view on your website as well.
  • The plugin doesn't alter the individual (single) product pages. However, you can add product tables to the single product pages if you wish to. Read here for more info.
  • You can put a product table on any post or page, and you can use multiple such tables.
  • It comes with a search field (which works as you type) and a filtering mechanism. You can also sort by any column.
  • It inherits the styling from your current theme, matching the rest of the website.
  • It's fully responsive and mobile-friendly.
  • It works on multilingual WordPress sites.
  • You can include/exclude certain products or product categories.

See the full feature list here.

Being able to display your product catalog this way opens up a handful of interesting possibilities:

When to use this alternative WooCommerce product display plugin

First off, the more products you have in your store, the more you'll enjoy WooCommerce Product Table.

Additionally, the plugin helps you handle all the product variations that you might have in your store.

For instance, you can display those variations as individual rows in the table. Tables are much better at showcasing similar products since they're much easier to scan through than a grid view. Not to mention that the buyer can filter through the variations with a couple of clicks (see the animated GIF above).

Here are some interesting ways in which the WooCommerce product display plugin can be used:

Use case #1: A wholesale catalog

Wholesale customers usually expect different things than retail customers. Most importantly, they don't want to be forced to have to scroll through pages upon pages of product listings. They also probably already know what they want to get, and how much of it. And finally, they want to get as quickly through the process as possible.

A product table works great for that. Everything is in one place, and the customer can buy multiple items at once.

We have a separate guide on how to build a WooCommerce wholesale store.

Use case #2: Use it to market to returning customers

A WooCommerce product display plugin is great when your customers are already familiar with your products and just want to get their hands on them as soon as possible.

This can happen when you're marketing to returning customers through an email campaign or social media ads.

With a customizable product table, you can pick the exact product category to display, put it on a certain page on your site, and then send people directly to that page.

Use case #3: Use it when products come back in stock

If you have certain products in your offer that often go out of stock (due to popularity), you can put all those products in a separate category and then display that category on a separate page inside a product table.

Since the products are already popular, your customers will probably not need any additional convincing why they should get them.

As an added bonus, the WooCommerce product display plugin lets you show stock as a separate column, which should help the cause as well.

in stock

Use case #4: Use it to sell supplies

Office supplies, workshop supplies, construction supplies, etc. If you're in a business like that, displaying all your products as a table can be much more efficient than using a grid display.

Let's face it, no one under the sun is particularly interested in looking at an individual sales/product page for some sticky notes or a pair of scissors.

The table display also makes things easier when buying multiple products - which usually does happen when we're talking supplies.

Use case #5: A configurator

Build Your Own Product Website WooCommerce

A table-based WooCommerce product display plugin can be an interesting alternative when selling anything that's made up of a number of individual elements that the customer can adjust/select.

We're basically turning that product table into a functional product configurator.

Think things like custom PC computer builds, or handmade furniture, or "make your pizza."

A pizzeria, for example, could use a separate webpage for online orders. On it, they can put a product table that lists pizza toppings (like pepperoni, tomato, olives, chicken, etc.). This lets the customer get their ideal tailor-made pizza.

Interested in building a configurator? Here's our step by step guide.

How to use WooCommerce Product Table

This WooCommerce product display plugin works much like any other WordPress plugin. Here's how to get started:

1. Get and install WooCommerce Product Table

Click this to get the plugin:

You will be able to download the plugin from your order confirmation page.

  • Save the ZIP file with the plugin to your desktop.
  • Take note of your license key.

Log in to your WordPress dashboard, go to Plugins → Add New, and click the Upload Plugin button that's at the top of the page.

Select the ZIP file of the plugin from your desktop, and click on Install Now. Then click on Activate to finalize the process.

2. Configure WooCommerce Product Table

When you first activate the plugin, the product display table builder will open. You can also access it at Products → Product Tables.

Use the table builder to create your first table. The step-by-step wizard helps you to configure exactly how you want the WooCommerce product display plugin to list your products.

WPT table builder columns
Choose which columns of product data to display

Visit the complete list of plugin options here. There are over 50 to choose from!

3. Add a product table to any post or page

If you selected the option to display the product table view on your shop page templates, then you don't need to add tables - they will just show up automatically. Alternatively, you can manually add the product display table to any page on your site.

To do this, either copy the table's shortcode from Products → Product Tablesor add a 'Product Table' Gutenberg block.

Product Table Gutenberg Block

Bonus tip: Add quick view to your WooCommerce product display

WooCommerce Product Table Quick View Magnifying GlassWooCommerce Product Table displays products in a tabular list. You can build on this by using it with its companion plugin, WooCommerce Quick View Pro. This lets you add quick view buttons and/or links to the list of products. Customers can click on them to view more information, the full product image gallery, and even choose variations and add to the cart from a quick view lightbox.

It's a big improvement if:

  • You want to display extra product information that doesn't fit within the table layout.
  • There are too many variations or options for each product to neatly fit into the product table.
  • You want to keep customers on the product list, instead of being taken to a separate page for each product. (This is a good way to increase the average value of each sale, as customers are likely to buy more products from you.)

Improve the display of your WooCommerce products

At the end of the day, WooCommerce Product Table presents a really interesting alternative to the default way in which WooCommerce handles the display of your product catalog. If you have enough products in your offer, you're very likely to enjoy it.

Just see what Mary had to say about the product display plugin:

Great Product + Great Service = #winning
We used WooCommerce Product Table to set up a quick ordering platform for customers. Worked like a charm. AND the customer service is quick, helpful, and kind. Great experience.

WooCommerce Product Table is easy to set up and comes with a full 3o-day money back guarantee. Try it on your site risk-free!

Hide WooCommerce products

Looking for a solution to hide WooCommerce products? Sometimes you don't want every single product available to the public, especially if you're running something like a B2B/wholesale or members-only store.

Offering exclusive access to products can create buzz and increase your brand’s desirability. So to set this up in WooCommerce you need a way to hide products from public access. In this step-by-step tutorial, I'll show you how to hide products in WooCommerce using different methods, depending on the level at which you want to hide your products. By the end of this article, you'll be able to hide:

  • A single product using WooCommerce to hide specific products from the shop page.
  • An entire category of products using the WooCommerce Protected Categories plugin (either by password, role, or individual user login).
  • Your entire store using the WooCommerce Private Store, (either by password or user login), which is a form of disabling WooCommerce for signed out or non-users.
An example of a category hidden with a password

Which way of hiding WooCommerce products is right for you?

These are the ways to hide products in WooCommerce:

  • Option 1 - Hide an individual productIf you only need to hide a few specific products, WooCommerce's built-in settings let you remove individual items from the shop page. This is a quick solution but can become tricky to manage for larger product collections.
  • Option 2 - Hide entire categoriesThe WooCommerce Protected Categories plugin lets you create some hidden products in an otherwise public store. Use it to hide or password protect products based on category.
  • Option 3 - Make specific products password-protectedWant to create an exclusive product offering? You can password-protect specific products, allowing access only to customers with the right access - perfect for limited releases or VIP items.
  • Option 4 - Show or hide products depending on user roleWith a user role-based approach, you can control product visibility based on customer type - like offering wholesale prices to B2B customers while hiding those items from regular shoppers.
  • Option 5 - Hide all of your store's productsWooCommerce Private Store is good if you want to make every single product hidden. You can use it to password protect your entire store or hide it from all logged out users (guests).
  • Option 6 - Password protect your entire WooCommerce storeThe WooCommerce Private Store plugin allows you to secure your entire store behind a password. This is great for private client portals, wholesale-only shops, or special event stores.
  • Option 7 - Limit access your store's hidden productsRestrict access to your store’s products exclusively to logged-in users. This method is ideal for membership-based stores, employee-only shops, or any store that requires user registration.

Further Reading: How to hide prices until login in WooCommerce.

Below, I'll take you through how to use each method to hide WooCommerce products. Or if you prefer, then you can watch this video:

Option 1: Hide WooCommerce products from your shop page individually

Our first method uses core WooCommerce functionality - no plugins needed. It hides products from the shop pages. However, if a user gets their hands on a direct link, they'll still be able to access the product.

For that reason, this method is not a good approach if you actually want to fully restrict access to the product - not just hide it.

Also, this method isn't very efficient if you need to hide multiple products, as you'll need to manually edit every single product. When it comes to hiding multiple products on WooCommerce, a more efficient approach is to assign them to a category in bulk and then hide that category using one of the methods for how to hide products in WooCommerce.

If you're ok with the product still being accessible by direct URL, then it's fine to use WooCommerce to hide products from your shop page.

You can do this by editing the Catalog visibility option under Publish and choosing Hidden:

woocommerce hide product

Option 2: How to hide an entire category of WooCommerce products

To get started, you'll need WooCommerce Protected Categories installed and activated on your hidden WooCommerce store.

Then, create a new product category for your hidden products. I'll give mine a creative name of "Hidden Products", but you can name yours whatever makes sense.

Once you have the category, assign the products that you want to hide to that category.

Now, you've come to the point where you need to make a choice about how you want to let people "unhide" the products in this category. You can:

  • Let users unhide the products by entering a password
  • Make the products automatically visible to certain users or user roles

Option 3: How to make specific products password-accessible

To add password protection, go to Products → Categories and edit the category that you created for your hidden products:

  • Scroll down to the WooCommerce product Visibility section
  • Select Protected → Password protected
  • Enter your desired password. You can also add multiple passwords to unlock the category if you want to give different users different passwords
  • Save changes
WooCommerce Protected Categories Password Protect

Then, you can configure how your password protected categories function by going to WooCommerce → Settings → Products → Protected Categories.

In this area, you'll want to:

  • Uncheck the two Category Visibility checkboxes to make your category 100% hidden
  • Select a Category Login Page where users can enter the password to see the WooCommerce hidden products/categories
WooCommerce Protected Categories Visibility Settings

You can also peruse the other settings to see if anything applies to your specific needs.

Option 4: How to show or hide products depending on user role

If you'd prefer to automatically give access to the WooCommerce hidden products to certain users or entire roles:

  • Go to Products → Categories
  • Edit the category that you created for your WooCommerce hidden products
  • Scroll down to the WooCommerce product Visibility section
  • Select Protected → Users and choose which users and/or roles can access your hidden WooCommerce products.
  • Save your changes
WooCommerce Protected Categories User Role Protection

Then, you can configure how your user and role protected categories function by going to WooCommerce → Settings → Products → Protected Categories. Here, you need to choose what happens when a logged out or guest user tries to access a hidden category or one of its products:

WooCommerce protected categories redirect for logged out users

Option 5: How to hide all products on your store from public view

Now it's time for the last, and most secure, way to hide WooCommerce products.

If you want to hide all of your products from the public, you'll need the WooCommerce Private Store plugin installed and activated.

Then, go to WooCommerce → Settings → Private Store to configure the plugin.

Just as with hiding specific categories of private products, you can hide your store in two different ways:

Option 6: Hide products by password protecting your WooCommerce store

To add a password:

  • Enter a password (or multiple passwords) in the Store passwords box.
  • Choose how long the password should unhide the store (in days) in the Password expires after the box.
  • Enter the product page you want users to be taken to after logging in using the Redirect URL box.
  • Configure the Login form options.
how to hide your entire woocommerce store

Option 7: How to only allow logged in users access your store's hidden products

If you want to automatically allow logged in users to see your hidden products, you just need to check the box for Automatically unlock the store for logged in users. Underneath, you'll find an option to choose which user roles to unlock the store for. This is handy if you only want certain user roles to have access, such as administrators and store managers.

You can also choose whether or not to Hide the login form… that displays for users who aren't logged in:

automatically unlock woocommerce store for logged in users

Master product visibility and take control of your WooCommerce store

Whether you need to hide a single product, one or more categories of products, or your entire WooCommerce store, one of the above methods should work for you.

Remember:

  1. To hide a single product, you can use the Hidden Catalog WooCommerce product Visibility option. Just remember that people can still see the product if they get a direct link - it's not actually private.
  2. If you want to hide an entire category of WooCommerce products, WooCommerce Protected Categories lets you do so via either password protection or specific logged in users or roles.
  3. To hide your entire WooCommerce store, WooCommerce Private Store lets you do so via either password protection or by automatically unhiding your store for logged in users.

Any other questions about how to hide WooCommerce products on your WordPress website and provide great user experience? Leave a comment and we'll try to help out.

WooCommerce Product Table WPML CompatibleWe're delighted to announce that WPML, the market leading WordPress multilingual system, have formally tested our WooCommerce Product Table plugin and confirmed that it is fully WPML compatible.

WOOCOMMERCE PRODUCT TABLE WPML

We have always tested our WordPress and WooCommerce plugins with WPML. However, this is the first time that we have submitted a plugin to them for formal testing and review. They were happy that WooCommerce Product Table works perfectly with WPML and have issued a certificate of compliance.

Note: Since publishing this article, WPML have discontinued their compatibility program. However, you can still use it with WooCommerce Quick View Pro.

What about Barn2 Media's other plugins?

Next, we plan to submit our other WordPress plugins to WPML for formal testing and certification.

In the meantime, we have already tested all our plugins with WPML so you can safely use them together for your multilingual websites.

GET WOOCOMMERCE PRODUCT TABLE GET WPML

WooCommerce multi-vendor plugin product table

Lots of people ask how to use our Product Table plugin with a WooCommerce multi vendor marketplace plugin. A multi vendor plugin lets multiple sellers upload and sell products in your WooCommerce store.

Product table layouts are the perfect way to list vendors' products, as you can show more products per page and choose which information to display about each product. A table view also makes it easier to find products, as you can add features such as keyword search and product filters.

What is a WooCommerce multi vendor plugin?

A product vendors plugin transforms any WooCommerce store into an online marketplace with multiple product vendors or sellers.

All multi vendor plugins work in similar ways, so read about them all and choose your favorite one that works with WooCommerce Product Table.

WooCommerce marketplace plugin with product tables

Sellers can register as a product vendor on your WordPress website, or you can add vendors manually. Each vendor can upload products to sell on your WooCommerce store. All the vendors' products are sold together in an online marketplace, similar to popular websites such as Etsy or Not on the High Street. Each vendor will have their own store page within your WooCommerce store, and you can also list products centrally.

You can choose how to pay your vendors. Most multi vendor marketplace plugins have built-in options for giving them commission and sharing profits.

Which WooCommerce multi vendor plugin should I use?

There are quite a few WooCommerce multi vendor plugins, such as YITH WooCommerce Multi Vendor, MultiVendorXDokan Multivendor Marketplace, and WooCommerce Product Vendors. I've tested them all and can tell you that the best plugin to use with WooCommerce Product Table is YITH WooCommerce Multi Vendor/Marketplace.

It's from a reputable company and integrates fully with WooCommerce Product Table. This means that you can build a fully functional multi-vendor marketplace, with the vendors' products listed in a user-friendly order form layout. As well as having a separate shop page for each vendor, you can create a central page listing all the products in the marketplace. Customers can easily filter by data such as vendor or product attributes to find what they're looking for.

As a result, I will mostly focus on YITH's in this tutorial. At the end I'll show you how to use other WooCommerce multi vendor plugins with WooCommerce Product Table - but there are some compromises involved.

If you're using a different WooCommerce multi vendor plugin, don't worry. I'll provide tips on how to use it with product tables later. But for the fullest integration with WooCommerce Product Table, use YITH WooCommerce Multi Vendor.

Keep reading to find out how!

What is WooCommerce Product Table?

WooCommerce Product Table is a WordPress plugin by ourselves at Barn2. It lets you list any type of WooCommerce product in a flexible table layout with search box, filters and any product data that you want to display. It's popular for creating a one-page order form layout for a WooCommerce multi vendor marketplace.

The plugin comes with over 50 options, so there are literally dozens of ways you can customize your product tables. For example,  you can create tables listing all the products in the marketplace, or products from a specific vendor only. I'll talk about the most popular options to use with a WooCommerce multi vendor plugin later.

Here's a video to explain how WooCommerce Product Table works:

How to use YITH WooCommerce Multi Vendor with Product Table

WooCommerce multi vendor plugin with product tables
Create an order form listing all products in the marketplace, or separate shops for each vendor

To get started, install WooCommerce Product Table and YITH WooCommerce Multi Vendor.

The multi-vendor plugin allows you to create multiple vendors and give them the ability to add products and manage their orders. The product table plugin creates better layouts for your multivendor store. This combination will get more sales for your sellers, and more commission for you - everyone wins!

Set them up now using the documentation for your chosen plugin. Add some products and vendors to get you started.

Set up your multi-vendor product tables

  1. Install WooCommerce Product Table.
  2. Navigate to Products → Product Tables and set up your multi vendor product table. In particular, you should:
    • Enable the option to display product tables on the Shop page, Vendor taxonomy, and anywhere else you want to use them.
    • Choose which columns of data you want to include about your marketplace products. For example, you might add columns for image, name, the 'YITH Shop Vendor' taxonomy (which you can rename to something else), price, and buy.
    • For the 'Add to cart buttons' option, select either 'Checkbox' or 'Button and checkbox'. This helps to increase conversions by allowing customers to add multiple products to the cart at once.
    • In the variations option, select 'Dropdown'. That way, vendors can select variations from directly in the product table.
    • Enable the 'Lazy load' option if the marketplace is likely to have a lot of products.
    • Use the 'Filters' option to add a 'YITH Shop Vendor' filter (which you can rename by clicking the pencil icon) if you're creating a central page for the whole marketplace. This will let customers filter to find products from a specific vendor. If each vendor will have their own shop page, then add other filters like categories and tags. This will add filter dropdowns above the table for the product categories and tags.

Viewing all products in the central marketplace

Now go to the 'Pages' section of the WordPress admin and find the page that is labelled 'Shop'. View the page, and you'll see a product table listing all the products in the multi vendor marketplace.

The table will have whichever columns you choose on the WooCommerce Product Table plugin settings page. If you enabled other features such as filters then these will show too. For example, you might have a filter dropdown above the table where customers can choose a specific vendor. Customers can also click on any vendor in the Vendors column to view products from that seller.

If any of your vendors sell variable products, then the variation options will appear as dropdowns in the add to cart column.

Individual vendor shop pages

Multi vendor shop page with product table

The best thing about using WooCommerce Product Table with YITH WooCommerce Multi Vendor/Marketplace is that you can also have a separate shop page for each vendor. That simply isn't possible with any other WooCommerce multi vendor plugins on the market.

The reason it's possible is because the YITH plugin creates a 'custom taxonomy' for each vendor. WooCommerce Product Table works perfectly with custom taxonomy archives. As a result, the taxonomy pages created using the multi vendor plugin will work with the product table layout.

I already showed you how to enable this in the previous section, when you enabled the table layout for the vendors taxonomy. Once you've done that, find the 'Vendors' section in the WordPress admin, and view the list of vendors. Click 'View' for one of them, and this will take you to their vendor shop page. You will see the vendor's products listed in a WooCommerce table.

Listing vendors' products manually

So far, you've learned how to automatically enable the order form layout on the central Shop page and individual vendor store pages. For even more flexibility, you can use a shortcode to list specific products on any page or post in your site. For example:

  • You can create pages listing products from specific categories.
  • To draw attention to specific marketplace products (e.g. Christmas products), you can publish blog posts. As well as writing in general about how perfect your marketplace is for a particular type of product, you can use WooCommerce Product Table to list relevant products.

To do this, create a table at Products → Product Tables. On the first page, choose the option to add the table to a page manually. On the next page, select the product vendors taxonomy and select which vendor you wish to display the products for.


How to use product tables with other WooCommerce multi vendor plugins

I mentioned earlier that  YITH WooCommerce Multi Vendor works best with WooCommerce Product Table. That's because it creates a taxonomy for each vendor and display the vendors' shop pages as a taxonomy archive - both of which work with WooCommerce Product Table.

However, it is possible to use other multi vendor WooCommerce plugins with WooCommerce Product Table. It's just slightly trickier to set up, and there are some compromises involved.

Product Vendors

The official Product Vendors extension does create a vendors taxonomy which you can display in the product table. It's just not our top recommendations because YITH's plugin is more feature-rich overall.

To use Product Vendors with WooCommerce Product Table, follow the instructions which I have provided above for the YITH plugin. The only change is that you should select the Product Vendor plugin's 'Vendor' taxonomy instead of YITH's. This will appear in the list of columns, filters etc. for you to choose from.

MultiVendorX

The next best option is MultiVendorX. With this multi vendor plugin, you can easily create a table of all your vendors, complete with a 'Vendor' column and 'Vendor' filter dropdown above the table. You can also use it to create a separate table of products for each vendor and manually add it to a page as needed.

The only downside with MultiVendorX is that there's no automated way to enable the product table layout on the individual vendor store pages. Instead, you have to create these pages manually and list the products using the 'Product Table' block or shortcode.

MultiVendorX does create a taxonomy for each vendor. That's why you can display and filter vendors in the product table. However, it uses a custom template to create the page for each vendor, which doesn't work with WooCommerce Product Table. Your developer could customize the template to allow this (post a job on Codeable if you don't have a developer). I've also provided instructions below on how to manually list products for a specific MultiVendorX vendor.

How to use MultiVendorX with WooCommerce Product Table

  1. Install WooCommerce Product Table and MultiVendorX in the usual way.
  2. Go to Products → Product Tables and set up your product tables, as described earlier in this tutorial. In particular, choose the option to insert the table manually and select the vendor whose products you wish to display.
  3. Create a page for each vendor and insert the table onto it.
  4. Finally, you need to redirect the default vendor pages that MultiVendorX has created, so that customers are taken to the product table page for each vendor instead. To do this, install the free Redirection plugin and set up the redirects.
  5. Repeat the above process for the other vendors as needed.

Dokan, WC Vendors, WCFM Marketplace and other multi-vendor plugins

Now we've got to the plugins that are a bit more difficult to use with WooCommerce Product Table. However, it's still possible and I'll show you how.

All of these plugins store the vendors in ways that WooCommerce Product Table can't work directly with. For example:

  • Dokan Multivendor Marketplace stores each vendor as a user and has its own custom called template store.php. One of our customers has also reported that WooCommerce Product Table is incompatible with the front end product submission in Dokan (although there is another method you could use).
  • WCMP/WCFM has its own custom template called wcfmmp-view-store-products.php.
  • WC Vendors uses the post author/WordPress user rather than storing the vendor information directly on the 'products' post type.

To enable these plugins to work with WooCommerce Product Table, you need to create your own custom taxonomy for 'Vendors'. Use this to manually tag each vendor's products. Once you've done that, then you can use the two plugins together with no limitations.

If you don't create a vendors taxonomy, then you can still use WooCommerce Product Table to list the products from your entire marketplace. It just won't be possible to add a vendor column, filter by vendor, or list products from specific vendors only.

How to create a vendors taxonomy

Use our tutorial to create a WooCommerce custom taxonomy. Manually add the vendor name as a taxonomy term for each product. This is similar to adding tags in WordPress. You'll find the taxonomy on the right hand side of the 'Add/Edit Product' screen.

Once you've created your Vendors taxonomy, you can:

  • Add a vendor column.
  • Add a vendors filter above the table.
  • Use WooCommerce Product Table to list the products from each vendor separately.

Improve your vendors' sales with WooCommerce quick view

WooCommerce Quick View Demo

As you have seen, a product table layout is ideal for listing multiple sellers' products in a WooCommerce multivendor marketplace. You can make it even more effective by combining it with the WooCommerce Quick View Pro plugin.

This adds quick view links or buttons to the product table view. Customers use these to see extra images, read more information, choose options and add to the cart from a quick view lightbox. It's a great way to keep customers on the product table page, as there's no need to direct them to a separate page to learn about each product.

After adding a product to the cart, the quick view lightbox closes. This brings the customer straight back to their current place on the list of products, where they can continue browsing. As a result, they're likely to buy multiple products and spend more in your marketplace store.

Create a multi seller marketplace with product tables

WooCommerce multiple product vendors plugin

WooCommerce multi vendor plugins are a fantastic way to transform your store into a complete marketplace with multiple sellers.

By adding WooCommerce Product Table to your multi vendor store, you can create improved layouts and increase sales. This benefits you and your product vendors, so get started today!

Use WooCommerce Product Table alongside YITH Multi Vendor Marketplace and list products from different vendors - the easy way.