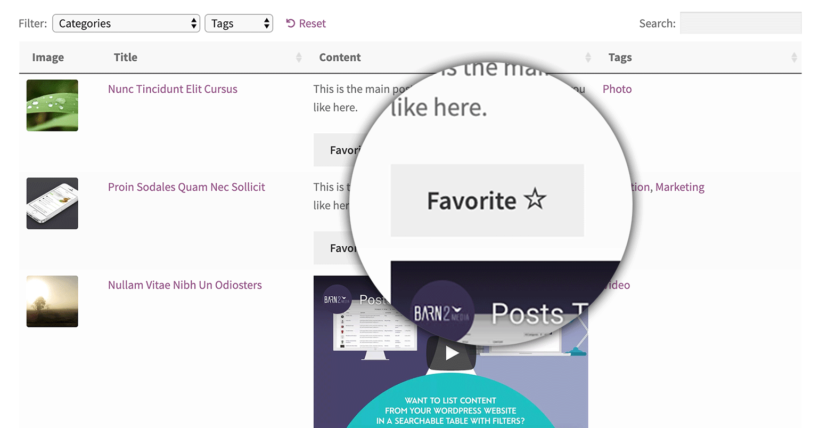
Today I'm going to tell you about a free plugin which adds Favorite buttons to your lists of WordPress posts, documents or custom post types. When used with our Posts Table or Document Library plugin, you can list WordPress content in a searchable table - complete with 'Add to Favorite' buttons.
Whatever your reason for needing favourite buttons on your website, you can use these instructions to add them to any list of WordPress posts, documents, or any custom post type.
You can use one of our table plugins to list your WordPress content in a table. Then, you can use the Favorite plugin to add Favorite buttons. Your visitors can select their favorite posts or documents and create a handy shortlist.
When a visitor comes back to your website, they will still be able to see their selections. If they're not logged in then their favorites are stored via browser session or a cookie. If they have an account on your website, then their favorites will appear even if they re-visit from a different browser or device.
How to add Favorite buttons to WordPress
First, use Posts Table Pro or Document Library Pro to list your WordPress posts, documents or any custom post type in a table view. Set up the plugin using the instructions in the knowledge base, with these settings:
Columns - include the 'content' column. The favorite button will appear here automatically.
Tick the 'Shortcodes' option. This makes sure the button appears in the table correctly.
Now go to Plugins→ Add New in the WP Dashboard.
Search for 'Favorites' and install the plugin by Kyle Phillips.
Now check the page where you've added the table. There will be a 'Favorite' button in the content column for each post or document in the table.
You can also add favorite buttons to other locations
The instructions above tell you how to add favorite buttons to the content/description columns the table. If you'd like to add them elsewhere - for example because you don't want this column in your table - then that's fine. Simply remove the content/description column and add the following shortcode to one of the other fields that you're displaying in the table (e.g. the excerpt or a text or Visual Editor custom field).
One of our WooCommerce Product Table plugin users recently asked how to email customers when they publish a new WooCommerce product. We were stumped for a minute, and then discovered 2 simple and effective solutions that works for any WooCommerce store.
For years, thousands of people have implemented the steps in our tutorial about how to use MailChimp to send new posts by email. It has been read by 34,740 people to date! We've received dozens of comments form people saying how useful it is in sending email alerts for new WordPress blog posts. However, I didn't realise until now that you can also use these methods to send new product alerts for WooCommerce!
To send email notifications of new WooCommerce products, follow these steps to get the information you need. You can then use our other tutorial to set it all up.
Method 1: Link MailOptin with your MailChimp account
MailOptin is a WordPress plugin that emails new products to your Mailchimp audience. You can choose whether to send the email as soon as each product is adde to your store, or as a daily, weekly and monthly newsletter roundup of new products.
MailOptin is very easy to set up and doesn’t require any coding knowledge.
To send email notification of new WooCommerce products, you’ll need the Pro or Agency plan. Get MailOptin, login to your WordPress site and install and activate it.
Step 1. Connect MailOptin to your Mailchimp account
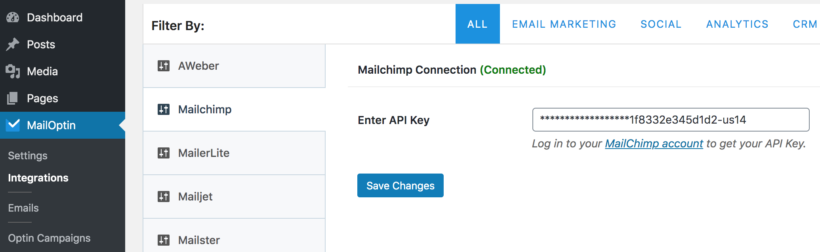
Go to ‘Integrations’ under the MailOption Dashboard menu.
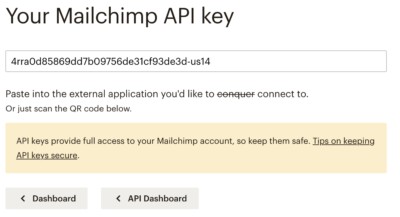
Click on the MailChimp tab to reveal the settings. Enter your API key and hit the ‘Save Changes’ button.
Step 2. Set up a new WooCommerce Product email automation
Next is to set up the email automation that will be responsible for emailing your MailChimp subscribers when you publish a new WooCommerce product.
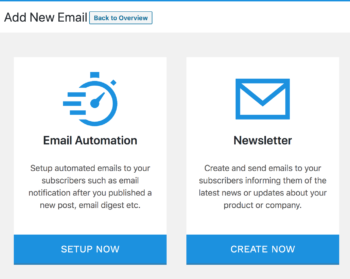
Click ‘Emails’ under the MailOptin Dashboard menu.
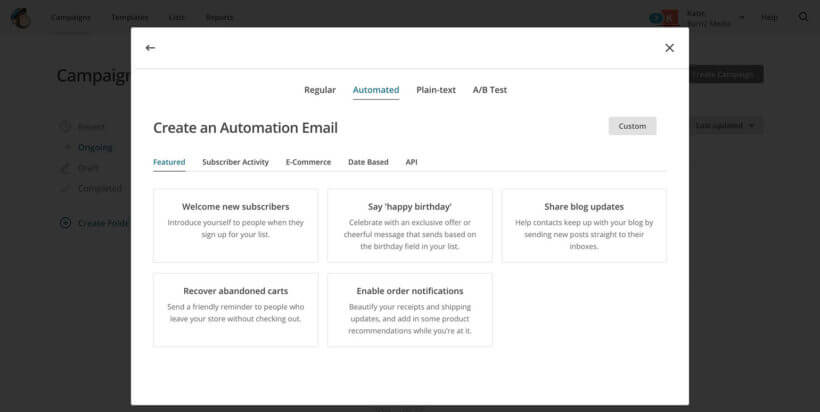
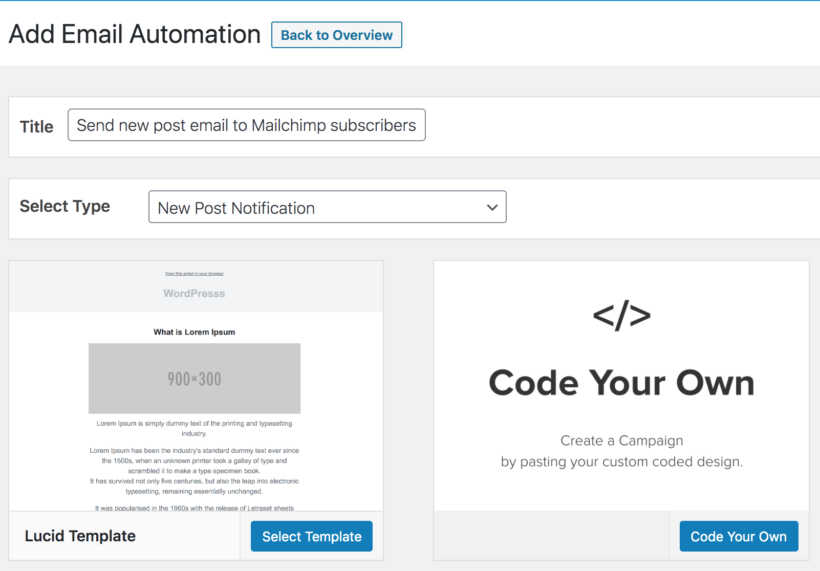
Click on the ‘Add New’ button at the top and select ‘Email Automation’.
Enter a title for the campaign and select a type:
Choose ‘New Post Notification’ to send the email as soon as a new product is added.
Select ‘Posts Email Digest’ to create a daily, weekly or monthly newsletter digest of products added.
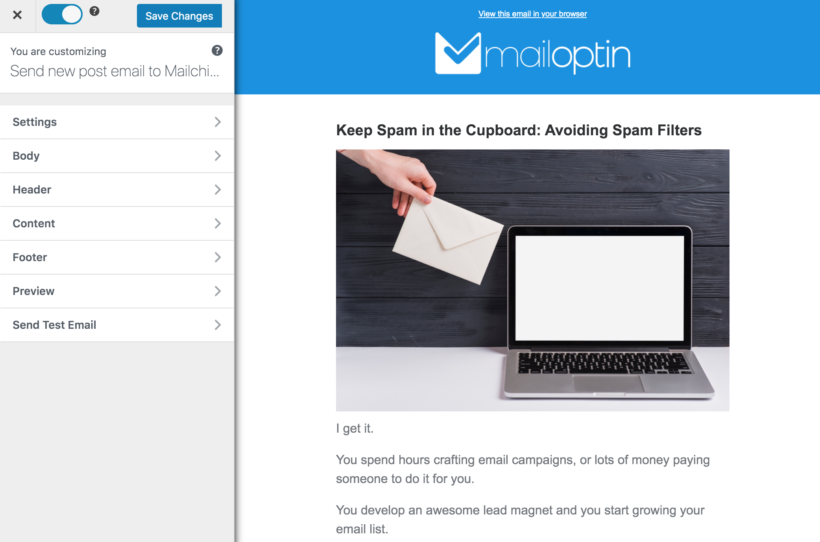
Now select a template. You will then be redirected to the email builder.
On the email builder, use the Body, Header, Content and Footer panels to customize the email template to your heart’s content. You have options to change colors, add a header image, add custom content and more.
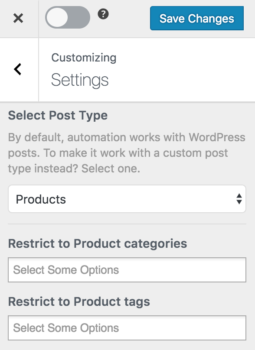
The Settings panel is where the actual setup is done. Open it to set up the email subject and the maximum content length. Most importantly, select “Products” as the custom post type.
You can also restrict the automation to specific product categories and tags. This is ideal if you want to send an email when products are added to a specific category in WooCommerce.
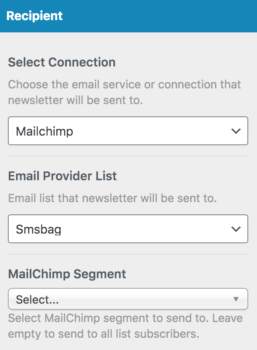
Next, scroll down to the ‘Recipient’ section, select ‘Mailchimp’ and choose which of your MailChimp audiences (i.e. lists) the email will be delivered to:
When you are done, click the ‘Save Changes’ button at the top right corner and then toggle the activation switch to the right to enable the automation.
Method 2: Use RSS to do it directly from MailChimp
The MailChimp method of sending email alerts for new products uses RSS. MailChimp regularly checks your WooCommerce products RSS feed (either for your entire store, or a specific category). When it spots a new product, it sends out an email alert listing all the new products. When there are no products, no email notifications are sent.
This is a good option if you don't want to install any extra plugins on your site.
Step 1. Get your WooCommerce RSS feed URL's
To get started, you need to know your WooCommerce products RSS feed URL. Fortunately, it's really easy to figure this out. Just add /feed to the end of the URL.
If you want to send email alerts for all new products, then you need the WooCommerce shop page RSS feed URL. This is the address for your main shop page followed by /feed. For example, if your WooCommerce shop page is at https://producttable.barn2.com/shop/ then the RSS feed URL is https://producttable.barn2.com/shop/feed/.
If you want to send email alerts for products in a specific category, then you need the category page RSS feed URL. Similarly, just get the category page address and add /feed to it. For example, if your category is https://producttable.barn2.com/product-category/clothing/ then the RSS feed URL is https://producttable.barn2.com/product-category/clothing/feed/.
Category-specific RSS feeds can be useful if you want customers to choose which category to sign up to receive alerts for.
How do I know I've got the right WooCommerce RSS feed URL?
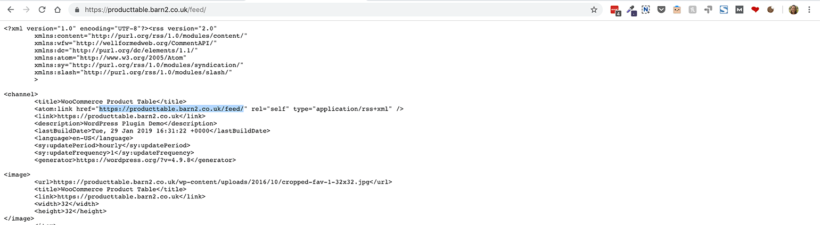
If you're unsure, then you can also find the RSS feed URL by visiting the page listing your products, right-clicking and choosing 'View Source'. This will open the source code for your page. Search for the word 'feed' and this will be the RSS feed URL for your WC products. For example, in this screenshot I have highlighted the correct URL for the WooCommerce product feed:
You can test the URL is valid by loading it in your browser. This will take you to an XML RSS feed listing all your products. It may look like gobbledegook, but this is what MailChimp needs to check so that it knows when you have added new products.
Step 2. Set up new product notifications in MailChimp
Armed with your WooCommerce product RSS feed URL (or URL's, if you're planning to send different alerts for different categories), it's time to set it up in MailChimp.
To do this, follow the instructions in our MailChimp tutorial. While it mostly focusses on how to send new blog posts by email, the instructions work equally for Woo products. Just make sure you use the RSS feed URL's that you saved in Step 1.
The tutorial covers everything you need to know including:
How to display product images in your 'New product' email alerts.
Setting up MailChimp and import subscribers.
Creating MailChimp autoresponder campaigns to automatically email subscribers when new products are published.
Adding 'New product alert' signup forms to your WordPress site - either for all products, or with tick boxes for each category.
How can I send email alerts for new products added to my product tables?
If you're using our WooCommerce Product Table WP plugin to list products in a table view, then this will work beautifully with both of the above methods.
Simply add products via Products → Add New in the WordPress admin in the usual way, and they will appear in your product tables. MailOptin will then send alerts of these new products to your customers.
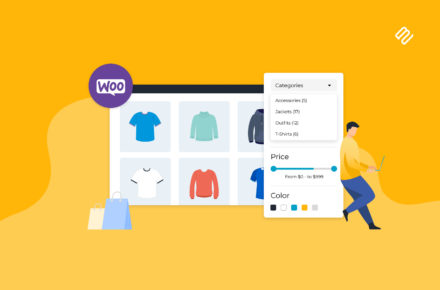
You can use product tables and quick view with plugins that restrict which products people can buy.
They want to restrict how many products their customers can buy; restrict quantities; or make products dependent on each other so that you can't buy one without the other. Others want to group products in specific ways, simplifying the buying process.
There are lots of plugins that you can use to add WooCommerce product restrictions to your one-page order form or quick view lightboxes. I'll list them below so that you can choose the right ones for your store.
Product dependencies and restrictions in WooCommerce empower merchants to create truly custom buyer experiences. By ensuring shoppers can only purchase items which are relevant to their other choices, you can streamline the purchasing journey, prevent errors, and offer a more intuitive and personalized shopping experience.
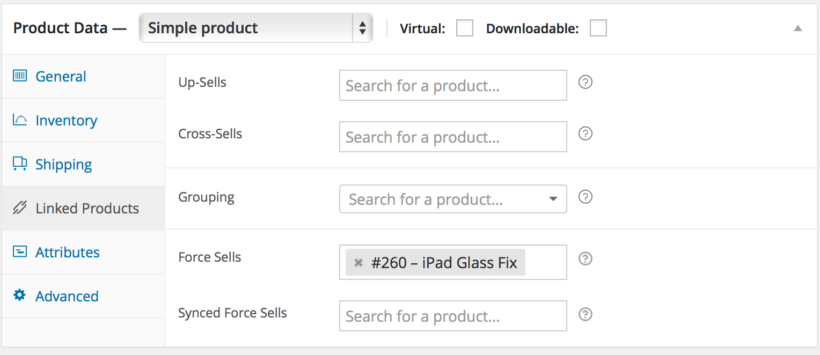
What it does: The official WooCommerce Force Sells extension automatically adds a product to the cart when the customer adds a specific product to their cart. The cost of the hamper will be whatever you have set as the price in WooCommerce.
Example: You're creating a build-your-own product website selling gift hampers. You want to force customers to buy a $50 hamper box when they add hamper contents (e.g. a box of chocolates or bottle of wine) to the cart. You can create a restriction rule using the Force Sells plugin to link the products so that whenever you add hamper contents products to the cart, a hamper is added too. The customer will pay the price for each of the hamper contents products they have added. They'll also pay $50 for the hamper product.
2. WooCommerce Chained Products
What it does:WooCommerce Chained Products is similar to Force Sells, but the linked product is given away as a gift, and is not chargeable. You can still sell the linked product separately and set a price for it. However, it will be given away free of charge when you use it as a chained product.
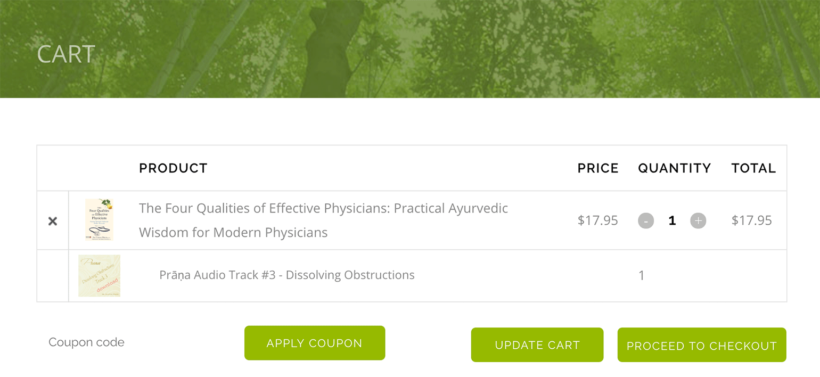
Example: The Dr. Claudia Welch website offers a free audio track whenever you add a book. They use WooCommerce Chained Products to automatically add an audio track to the cart (free of charge) whenever you buy a book. To test this out, try adding a book to the cart such as this one - you will see that a free audio track also appears in the cart as a gift. Customers can also buy and pay for the same audio track separately, if they prefer.
3. WooCommerce Product Dependencies
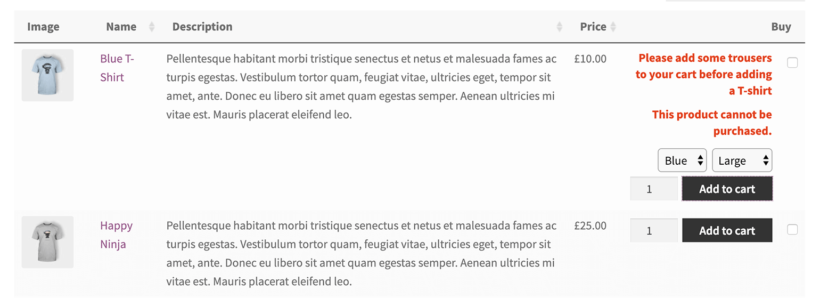
Woo Product Dependencies is a free WordPress plugin that works beautifully with WooCommerce Product Table and Quick View. It lets you create advanced WooCommerce product dependencies using various logical rules. You can restrict a product so that it can only be purchased if the customer has already bought another specific product, and/or has that product in their cart.
The plugin allows full customization of dependency error messages, helping you communicate requirements clearly to customers. You can set custom messages for different scenarios - whether a customer needs to purchase additional items, log in to verify ownership, or meet other dependency conditions.
Example: You're creating a website selling WooCommerce customizable products, with graduation gowns and hats. You wish to use a restriction rule on the hat products so that people can only buy them if they purchase a gown at the same time. This is a simple example of a product dependency.
4. WooCommerce Grouped products
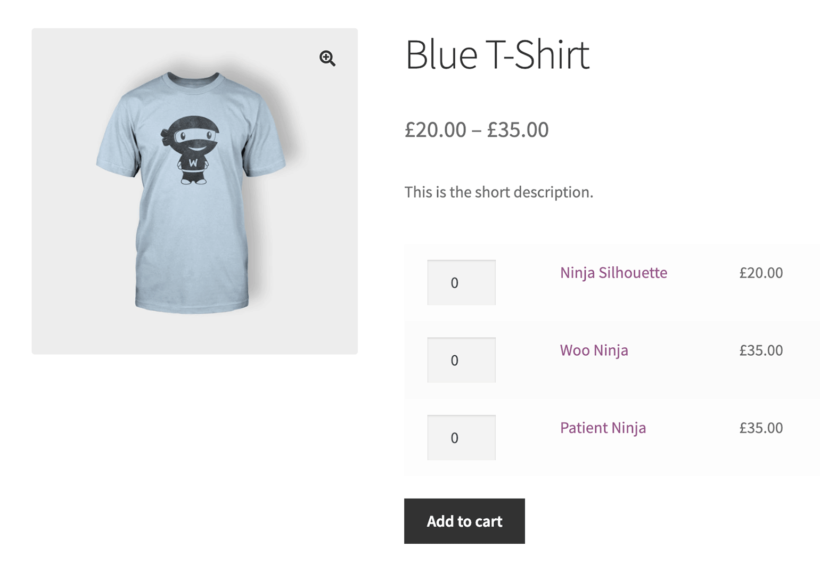
WooCommerce Grouped products are built into WooCommerce itself, and don't require any separate plugins. They offer a simple way to link basic (non-variable) products so that they appear together on the single product page or in a quick view lightbox. Customers can choose which ones to add to the cart, or even add them all at once.
Example: You're creating a WooCommerce music store and want to list all the songs from an album as separate products on the album page. To do this, you create a grouped product for the album, add each track as a product within the group, and they will all appear on the single product page. Customers can select one or more tracks and quickly add them to the cart.
Compatibility notes
If you wish to list Grouped products using WooCommerce Product Table then you'll need to use one of the options on this page to tag all the products in the group in a way that you can display using WooCommerce Product Table. That way, you can create a product table listing all the products from a specific group.
Alternatively, you can just add quick view to your product tables. List your grouped products using WooCommerce Product Table. Customers can click on the quick view links to view the products in the group. Then, they can add them to the cart from the quick view lightbox. WooCommerce Quick View Pro fully supports grouped products, so they will automatically work in the lightbox.
5. WooCommerce Product Bundles
The official WooCommerce Product Bundles extension lets you group products by offering them as a bundle for a combined price. You can also use it to sell individual products, with recommended products underneath for a discounted price.
The Bundles extension doesn't offer WooCommerce product restrictions in the same way as Force Sells, Chained Products and Dependencies. The bundles are presented as optional.
Example: You're selling bikes in WooCommerce and want to create a bundle where people can purchase the bike along with a helmet and lights for a discounted price.
Please note that Product Bundles doesn't currently integrate with WooCommerce Product Table. If you wish to list products in a table layout then you should use one of the other plugins recommended in this article or use the suggested workarounds in our knowledge base. Alternatively, you can list product bundles in the product table and allow customers to purchase them from a quick view lightbox, where there are no limitations.
6. WooCommerce Composite Products
WooCommerce Composite Products lists products in a more advanced, more configurable way than product bundles. It lets you create multi-stage product configurators, with each stage containing a selection of products to choose from.
Example: You're selling custom built cars and want to create a configurator where customers choose options such as wheels, colors, internals, storage and extras. This way, they can order composite products in a 5-step process.
Please note that Composite Products doesn't currently integrate with WooCommerce Product Table. If you'd like to list products in a table view then you should use a different plugin from this article or use the suggested workarounds in our knowledge base. You can also list composite products in a table and use WooCommerce Quick View Pro for the actual purchasing, because the quick view lightbox works perfectly with composite products.
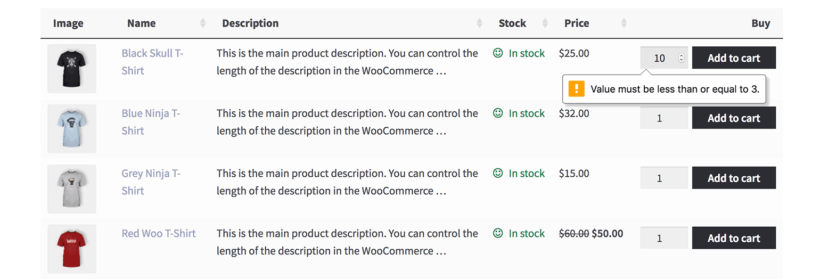
7. Minimum and maximum quantities
So far, we've looked at WooCommerce product restrictions that control which products people can buy. Maybe you'd rather restrict product quantities in WooCommerce instead?
A WooCommerce minimum and/or maximum quantity plugin lets you set restriction rules controlling how many of each product your customers can buy.
Example: You're creating a 'build-a-box' website selling custom cosmetics boxes, and want to force customers to buy between 5 and 10 items to go in their box. You can achieve this by setting a minimum quantity of 5 and a maximum quantity of 10.
Recommended plugin: You can set all types of quantity rules with our WooCommerce Quantity Manager plugin. This is designed to work with both WooCommerce Product Table and Quick View Pro. Use it to create global, category, product or variation-level quantity restrictions. For example, you can use it to force customers to purchase 5 products from the 'Box Contents' category.
How to choose a WooCommerce product dependency or restrictions plugin
As you can see, there are lots of ways to add restriction rules to your WooCommerce products. Read through the description and examples of each plugin. Then you can choose the one that fits best with the logic you need.
If you're not actively encouraging customers to share their purchase on social media, you're missing out on sales. Social media platforms are great for promoting your store, increasing brand visibility, and reaching a wider audience.
There are a number of different ways you can implement share purchase on social media functionality in WooCommerce. In this article, we’ll look at the best plugins for sharing WooCommerce products to social media. We’ll take a look at their key features and explain how to add them to your WooCommerce online store.
The best plugins for sharing WooCommerce products on social media
Although there are a number of WooCommerce product social share plugins out there, we’ve rounded up some of the best. Each of the plugins in this roundup offer some sort of functionality to let customers share WooCommerce products on social media.
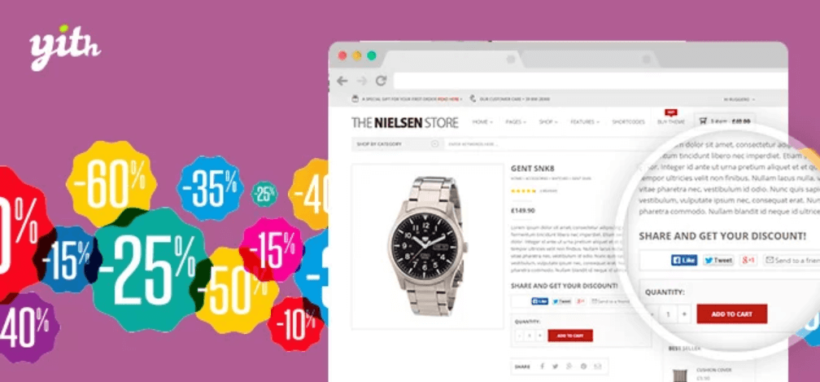
One of the most effective ways to encourage customers to share the products is by incentivizing them with discount codes.
With the YITH WooCommerce Share for Discounts plugin, you’re able to create customized coupons to share with your customers. For example, you could offer a 10% off your purchase discount code to customers who share a page. The discount would automatically be applied to the customer’s cart once they share your products with their social media following.
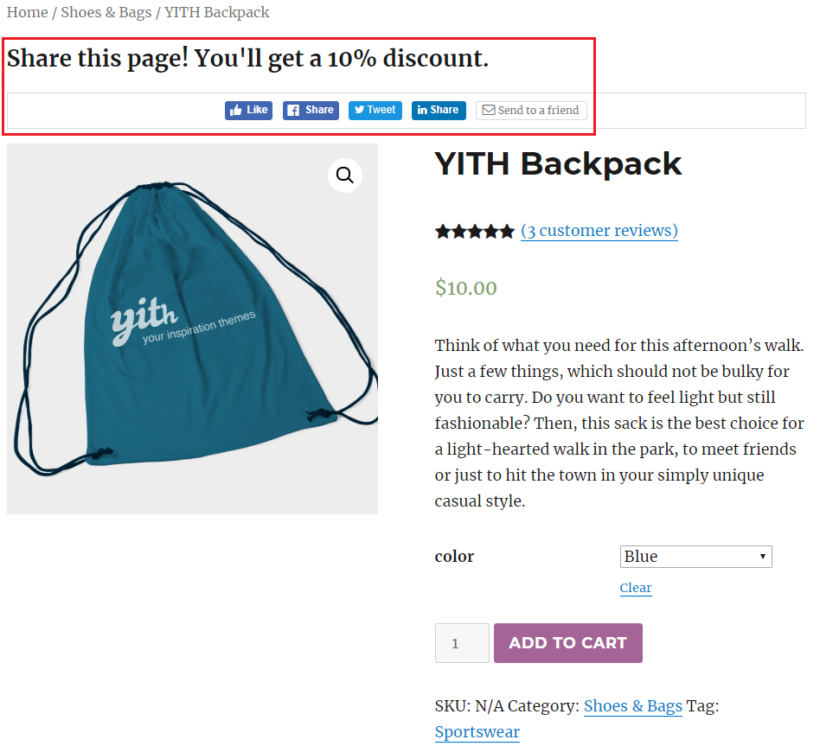
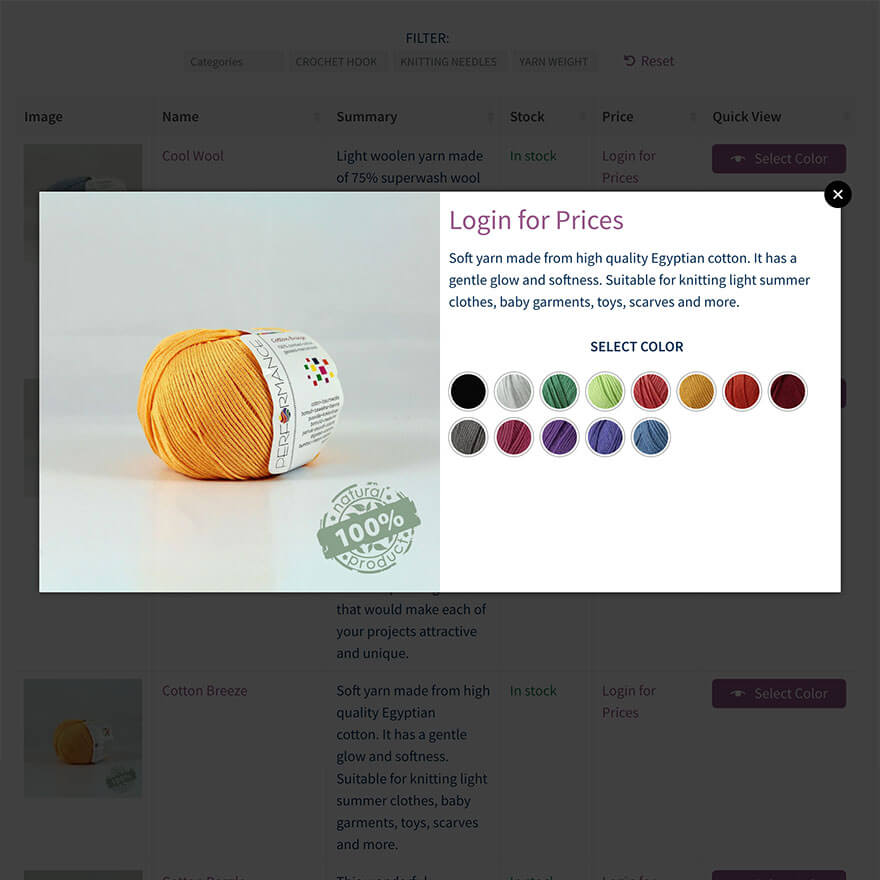
You’re able to decide which product pages you’d like your customers to share. You can also choose where to place the social share buttons they’ll use. It might look something like this on your WooCommerce store’s front-end:
You can also display the buttons on the checkout page and the shopping cart page. By displaying the social share buttons on the shopping cart page, your customers will be able to share the products they purchased with their social media followers.
The YITH WooCommerce Share for Discounts plugin lets customers share the products in your store on Facebook, Twitter, LinkedIn, and email.
Key features:
Lets you select a discount type e.g. a percentage discount.
Automatically applies the discount to the customer’s cart once they’ve shared your products.
Display social share buttons on WooCommerce product pages, the checkout page, the shopping cart page, or all three.
As an online store owner, giving prospective customers the option to create wishlists is a great way to enhance their experience and encourage them to come back.
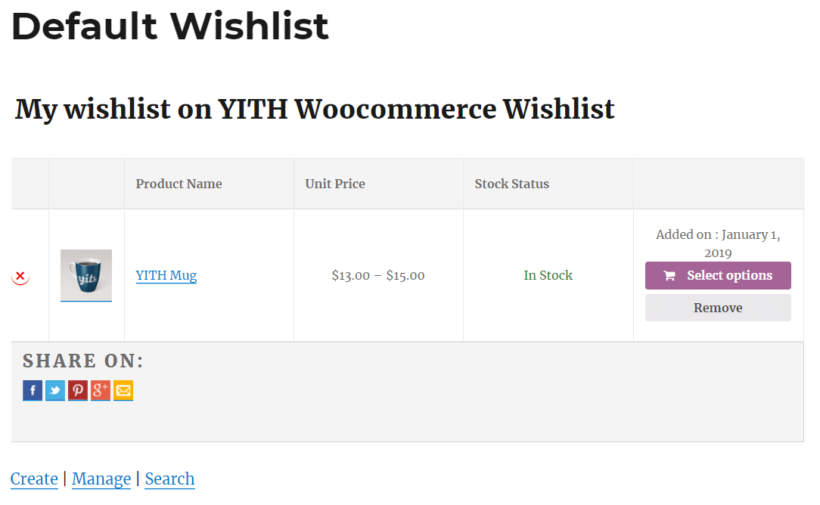
The YITH WooCommerce Wishlist plugin takes this powerful functionality a few steps further. With this plugin, you're able to let customers share their wishlist with their social media following. This functionality is especially useful for online stores that want to make gift/wedding registry options available to customers.
The plugin lets customers create multiple wishlists and set their privacy settings – public, private, or shared. In addition to this, there’s a built-in button that they can use to ask the store’s administrator for an estimate on the products they’re interested in purchasing.
The YITH WooCommerce Wishlist plugin lets you display social share buttons for all major social media platforms. These includ Facebook, Twitter, Google+, and Pinterest. In addition to this, you can also display a share button that allows customers to send wishlists via email. Once a customer creates a wishlist on your online store, it’ll look something like this:
Key features:
Store administrators are able to observe customers’ wishlists to gather data about which products are popular and offer discounts.
Users are able to select products from their wishlist and add them directly to their shopping cart.
You can use the data gathered from wishlists to display the most popular products on your online store’s front-end.
Using a WooCommerce social sharing plugin on your online store provides social proof that other customers have made a purchase from your store. It’s a great way to put your products in front of the customer’s social media followers and, potentially, drive traffic to your online store.
Let’s quickly recap the functionality on offer with the WooCommerce share product plugins we covered:
YITH WooCommerce Wishlist lets customers create a wishlist of products that are available in your online store and share it on social media.
You can combine either or both of these share product plugins to boost sales through social proof. Deciding which WooCommerce social sharing plugin is right for you will depend on your specific needs. Hopefully, you're in a good position now to make an informed decision.
What are some of the techniques you use to increase your online store’s visibility? We’d love to hear from you so let us know by commenting below!
Are you one of the 3,500+ people who are already using our WooCommerce Product Table plugin? If so, we'd love to hear how it has affected your sales.
WooCommerce Product Table is designed to improve conversion rates. It works best for products that aren't suited to a traditional store layout. This includes food products, wholesale products, non-visual products that don't require large images, and any product that benefits from quick one-page ordering.
We've had a plugin showcase for a while now, where you can see real-life examples of websites using WooCommerce Product Table. Now we're asking our customers how their sales and conversions have improved since they started using product tables in their store.
If you tracked your sales and/or conversion rates before and after installing WooCommerce Product Table, we'd love to hear from you.
Please complete the information below
Oops! We could not locate your form.
Thanks! We'll use this information to continue developing WooCommerce Product Table to help store owners to increase their sales even more.
Today, I'm going to tell you how to add variation swatches to your WooCommerce product tables and quick view lightboxes.
Our WooCommerce Product Table plugin offers a choice of ways to list product variations. You can list product variation swatches for WooCommerce as dropdowns in the add to cart column, or you can list each variation on a separate row in the table. It lets you do all of this without having to use HTML or CSS code.
On the other hand, our WooCommerce Quick View Pro plugin adds user-friendly buttons to your e-commerce store so that customers can read more and add to the cart from a quick view lightbox instead of having to go to the single product page. This prevents them from needing to visit a separate page for each product and simplifies the user flow.
You can use it with the default WooCommerce store layouts, or with customizable product tables.
But what if you want to make your variations more visual, so that customers can select variations by clicking on different swatch types, for example, a color swatch or image swatch? Now you can do this by using our plugins with the fabulous free WooCommerce Variation Swatches plugin.
What does the WooCommerce Variation Swatches plugin do?
WooCommerce Variation Swatches offers an image swatch-based way to select product variations. It makes the WooCommerce product variations more eye-catching, so that customers can see exactly what they're getting when they click on a variation.
This free WordPress plugin comes with a choice of options for adding different variation swatch types:
You can use it as a WooCommerce color variation plugin, with each option listed as a color swatch for customers to click on.
Create unique variation selectors by uploading your own product image or variation image for each variable product. For example, you can upload photos or other variation images to represent each product attribute.
Alternatively, you can list each available variation option as a button swatch. The attribute name appears as the button text.
If you're looking for WooCommerce color and label swatches, then this is the perfect WP plugin for you.
How does the variation color picker work in WooCommerce Product Table?
When you list variations using the WooCommerce Product Table plugin, there's an option to list variations as a dropdown in the add to cart column. If you use WooCommerce Product Table with the WooCommerce Variation Swatches plugin, then the color swatches, custom images, or buttons will appear underneath the dropdown for each variation in the table.
Create a product table at Products → Product Tables. Make sure you include a 'Buy' column in the table, as this will list the variation color picker.
You can then insert the table onto a page using the shortcode or Gutenberg block provided. Alternatively, enable the option to enable the table layout on your main shop pages.
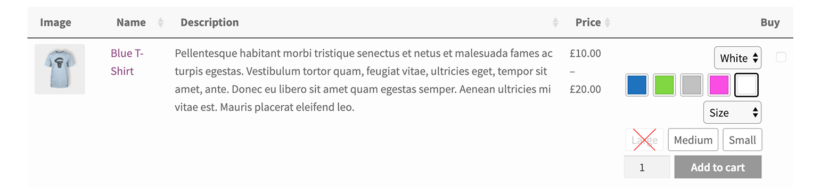
The finished table will look something like this on the front-end:
In this screenshot, you can see a WC product with 2 global attributes - the Color attribute and the Size attribute:
The 'color' dropdown has variation color swatches underneath so that customers can click a color instead of using the dropdown.
The 'size' dropdown has buttons underneath, making it easier for customers to choose their size.
When you click on a color or size swatch of a variable product, the correct variation is instantly selected in the dropdown i.e. it's an AJAX variation. It works beautifully with the built-in Woo stock control and inventory management. Plus, customers don't have to hover over the image to see the available variations. Out of stock variations are visually crosses out (e.g. 'Large' in the screenshot above), so you can instantly see which combinations are available. The stock indicators update as soon as you select a variation, for example if you select 'Pink' in the above example then Large might be shown as available even though it's out of stock in 'White'.
Once you have selected a variation that is in stock from the shop page, you can add it to the cart and purchase using the WooCommerce checkout.
Does it work with separate variations in the product table?
WooCommerce Product Table also comes with an option to list each variation on its own row in the table. This doesn't work with the variation color swatches plugin because each variation is already separated out onto individual rows. The customer simply needs to use the add to cart buttons to add each variation to the cart, and they don't need to use color swatches or buttons.
How do variation swatches work in WooCommerce Quick View?
When you use variation swatches and WooCommerce Quick View Pro together, the swatches automatically appear in the quick view lightbox. This replaces the default variation dropdowns, so the customer must click on a swatch button, color or image in order to select the variation. They can click the add to cart button as usual.
Do product tables and quick view work with other variation swatches for WooCommerce plugins?
We have tested with Woo Product Table and Quick View with a few other WooCommerce variation swatches plugins and this is the only one that we have found to work nicely in the product table – no HTML code or CSS styling needed.
We therefore recommend using WooCommerce Product Table with the free or premium versions of WooCommerce Variation Swatches, and not similar plugins from other companies. It's incredibly easy to configure the plugin's global settings and get started with.
It's compatible with WooCommerce themes (like Storefront, Divi, and Flatsome) as well as page builders like Elementor. Plus, your product tables will look great on mobile devices.
WooCommerce Quick View Pro also works with the WooCommerce Variation Swatches plugin by Get Woo Plugins, so you can use it with either of these.
Did you know that the single store on your WordPress site can be turned into a multi-vendor marketplace, without having to change the platform! It's the perfect way to give your customers access to multiple vendors, with a seamless experience. At the same time, you can convert more visitors into customers.
Benefits of the online multi-vendor marketplace
We all know what a marketplace is. It's a place where a number of sellers gather under one roof, with their products displayed to sell to customers. But we are not talking about the traditional marketplace - we're talking about an online marketplace.
You cannot deny the charm of running an online store. You can sell without having to leave your home, you don’t have to pay rent for a shop, etc. Now imagine the same carefree style with an online marketplace. You can turn a lot more visitors into customers without having to provide extra products.
Creating a WooCommerce marketplace
WooCommerce is a familiar name in WordPress. It is used to create a store on your site.
WooCommerce came into the market in 2011. It rose to popularity within a short span because of its easy installation process and endless customization facility. According to the latest statistics, 42% of all online stores use WooCommerce:The reason WooCommerce is so popular and still ruling the growth scale is due to its flexibility and ease of use. WooCommerce has grown with demand.
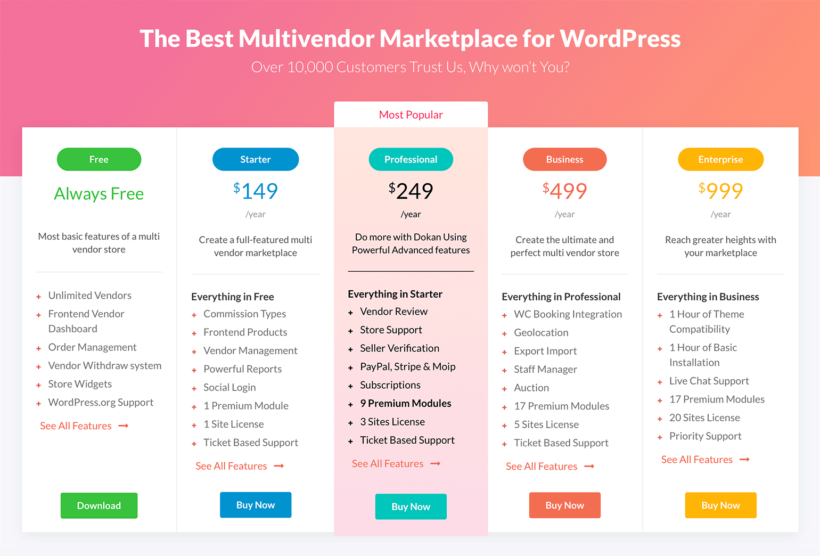
Taking WooCommerce as foundation, people can turn a store into a popular marketplace. Dokan is such a solution - it uses WooCommerce as its base to turn your store into a comprehensive multi-vendor marketplace.
Using Dokan to make WooCommerce a multi-vendor marketplace
Dokan is the first WordPress plugin to turn a store into a multi-vendor marketplace. It's compatible with any WordPress and WooCommerce themes. So you don’t need to worry about creating new a theme for your marketplace.
Unlike many other platforms, Dokan comes in a lite version. Facilities of this lite version work as a package for small business owners. You can run your business for free if you don’t feel like upgrading to the paid business version.
You can also check out its free demo if you want to test the user experience. Dokan also has a 14-day refund policy.
Requirements
You need to meet a few requirements to be able to use Dokan:
First of all, you will obviously need a website running the WordPress content management system. After all, Dokan is famous for being a WordPress marketplace platform.
Then you will need WooCommerce installed on your site - this is the base for Dokan.
Finally, you will have to install the plugin 'Dokan'.
Dokan features
Turning your simple store into a marketplace is a massive move for your business. You need to be sure of what you are doing, right? So check and double-check the features Dokan offers to ensure that it is worth your risk and investment.
Dokan has a 3-fold agenda. How? Well, it is a system that works to make the marketplace owner, vendors and customers happy. This is not an easy task to achieve.
Firstly, the dashboard is the main workhouse for vendors and admin in the marketplace. Dokan provides a separate dashboard for vendors and admin. Vendor dashboards in marketplaces such as Cs-Cart or Shopify can be a bit complex. But do vendors need a complicated dashboard? We all know the answer to that. Fortunately, Dokan offers its users a simplified and precise dashboard.
Vendors have freedom of uploading products. Dokan gives the vendor the option for quick editing of their products. Sellers now can add their blogs and run their own campaigns. But as the admin, you have the ultimate power and ownership of the marketplace.
And there's more!
You can add unlimited vendors and earn commissions from each sale. Not only that, Dokan add-ons let you have auctions. Auctioning products bring many benefits to vendors and admins, as the market sets the price.
As for customers, they can give product/store reviews and can view pick their desired product in one place. Since it is not a traditional marketplace, transparency may seem difficult in some stores. Dokan's customer review system proves the transparency of your marketplace.
With Dokan’s new module 'Follow Vendor Store', customers can follow the vendors they like and get regular updates of products from them. Moreover, Dokan Extensions allow customers to have invoices. Vendors, on the other hand, can get hands-on sales reports.
Dokan has a dedicated support team that is always ready to resolve customers' problems and any technical issues they may face.
Turn your single seller store into a marketplace with just a few clicks
Since you are here, we assume that you already have a WordPress site. It won’t be a surprise if you already have WooCommerce installed too. But we do not want to rely on any guesswork. So we are going to show you each and every step from the beginning of how to install WooCommerce and Dokan on your WordPress site.
Step-1
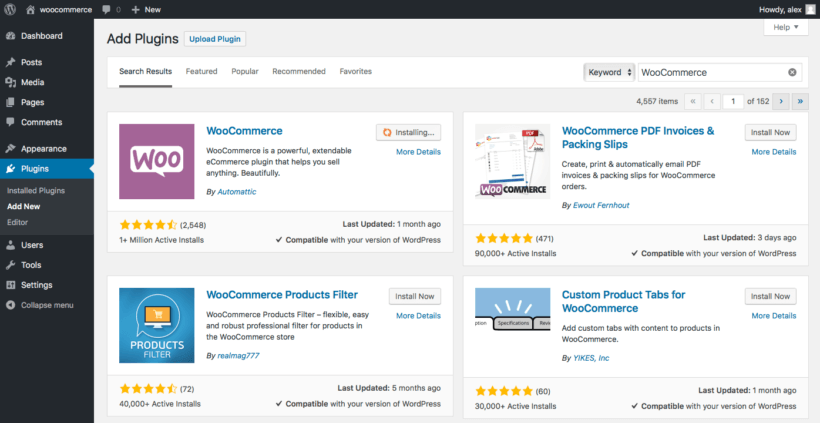
After you log in to your site, you need to install WooCommerce. For that navigate to Dashboard ->Plugins.
This will take you to a page with plugins in it. You can search for WooCommerce from the search bar there.
Install and activate the plugin.
Step-2
Repeat the previous steps, looking for Dokan from the search bar to install and activate it.
When you activate Dokan, you will get its dashboard automatically placed inside your WordPress admin.
Step-3
Remember how we talked about how anyone can be a vendor and there is no limitation to that? Now we have to configure that setting. For that, you have to go to your WordPress settings and enable the option.
WordPress admin → Settings → General
Step-4
Vendors will make it a marketplace. So the next step is to add vendors. You have to add vendors from the WP admin’s 'Users' section:
WordPress admin → Users → Add New
You will see the roles that you can assign to the vendors. As the admin, you have to fill in the fields while assigning the roles.
You are almost done once you have added new users with user roles.
After adding vendors, the vendors will add products.
Here it is, your multi-vendor marketplace is ready!
Choose the best layout for your marketplace products
Dokan lists each vendor's products in a grid layout, with a 3-column layout and large images plus add to cart buttons and links to the single product page. This is a brilliant way to sell lots of product types, such as clothing.
Other products can be listed more effectively in a product table layout. You can easily achieve this by using Dokan with WooCommerce Product Table.
There are lots of benefits to listing marketplace products in a table view:
List products from the entire marketplace in a single table.
Add filters to help customers to find products for a specific vendor.
Add quick buying options such as variation dropdowns and quantity selectors directly to the product listing view.
Ideal for displaying less visual products where large images aren't important.
Perfect for showing more information about each product, such as technical data or additional filters.
How to use Dokan with WooCommerce Product Table
Create a table listing all your marketplace products
It's easy to list the contents of your entire marketplace in a searchable table:
Create a page and add the shortcode [product_table].
This will list all products from all vendors in a table. If your vendors have uploaded variable products then customers can choose variations directly from the product table.
Add vendor information to the table
By default, your products will appear in a table without information about their vendor. Customers can click through to the single product page to find out who the vendor is.
If you'd like to create a 'Vendor' column in the table or allow customers to filter for products by a specific vendor, then this is possible. To do this, you need to create a custom taxonomy called 'Vendor' by following the instructions in this article. You can then add it like this:
Listing an individual vendor's products in a table
So far, you've learned how to list the products for all vendors in a table. If you have created a 'Vendor' taxonomy in the previous section, then you can also use this to create tables listing products for a specific vendor only.
This example shortcode will list products for 'vendor1':
[product_table term="vendor:vendor1"]
You can add this shortcode to any page on your site. You can also add multiple shortcodes to a page, for example, to list each vendor's products one at a time on the same page.
Use product table on vendor store pages
Dokan comes with built-in templates for each vendor's store page. If you'd like to include product tables on these too, then you can do this. It's a bit more technical and you will need to add the product table shortcode directly to the template file.
If you don't have a developer who can do this for you, then you can use our customization service.
Use WooCommerce quick view to increase sales in your Dokan marketplace
Whether or not you're using product tables, you can increase sales in your Dokan marketplace by adding quick view options.
The WooCommerce Quick View Pro button works beautifully with Dokan and adds quick view links to the vendors' shop and category pages.
It's a great way to speed up the buying process, as there's no need to visit a separate page for each product. Instead, customers can view extra product images, the short description, choose variations and buy directly from the quick view popup window.
Researchers say if you want to make it to the highest then you must be brave enough to take greater steps. Turning a store into a marketplace is that greater step with minimum chance of any loss. Especially when it is with Dokan, you can build your marketplace risk-free as you get to own a marketplace for 60% less cost than others. Check out Dokan's Pricing Plan to find out why it is known as one of the most cost-effective marketplace solutions for WordPress.
Besides that, it will be a better-earning source for all the marketplace owners as well. Multiple sellers will help you in better marketing, with a wide range of products.
This also lightens your burden of maintenance and gives you time to set up other strategies and grow your marketplace.
Analyzing all the benefits, it seems like turning a single seller store into a full-fledged marketplace is a win-win situation when you already have a store set up for yourself.
Get started
E-commerce is the most convenient way of shopping for people with the digitalization of the entire system. Just look at the profits e-Bay, Amazon, Alibaba make every year. Do you see their market going down? They don’t go down - rather new marketplaces add to the list as popular e-commerce marketplace with each passing day.
The great news is that you can create your own marketplace, without switching from WordPress! So just have faith in yourself and give your marketplace owning potentials a chance with Dokan.
Want to add WooCommerce frontend product submission to your store? This allows other people to add products from the frontend of your website. They never need to visit your WordPress admin dashboard.
Frontend product creation is great for any type of multi-vendor store. That's because most people will find it more convenient to work from the frontend. It can also come in handy for many other types of WooCommerce store.
In this post, you'll learn how to allow WooCommerce frontend product submission using Gravity Forms and then display those products using WooCommerce Product Table.
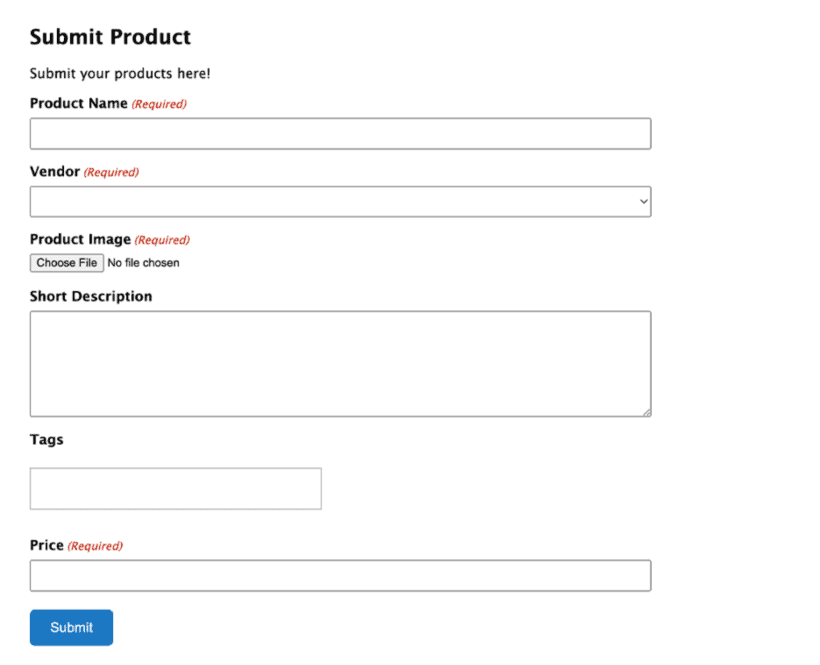
Thanks to Gravity Forms' flexibility, you'll have a ton of control over how your frontend add product forms look and where they appear. Here's an example of what you can build:
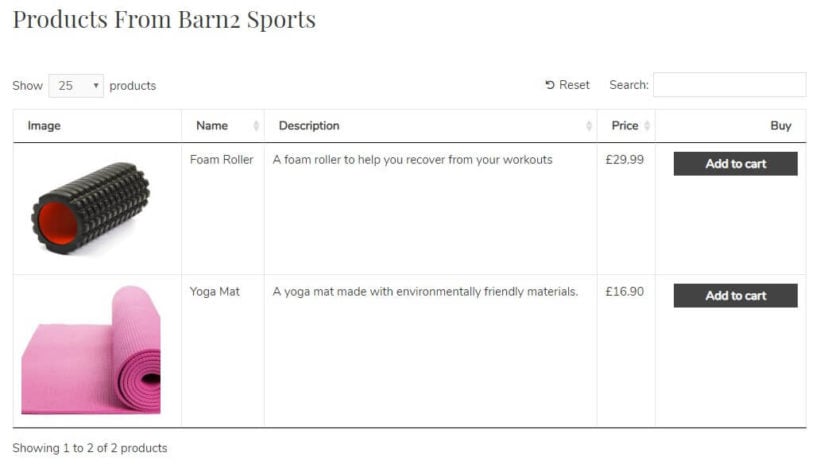
You can then display the user-submitted products in a table layout, like this:
Beyond that, we'll also share tons of tips for working more effectively with your frontend forms. This includes restricting access to the forms, assigning custom taxonomies for vendors, and displaying user-submitted products in a shopper-friendly manner.
Either read the article below, or watch this video:
What sorts of website need WooCommerce frontend product submission?
The biggest use case for frontend product submission is any type of WooCommerce multi-vendor store. That is, a situation where third-party users can add products from the frontend and sell them through your Woo store.
While there are quality full-service multi-vendor plugins, sometimes you don't need all that extra functionality for commissions, vendor reports, etc. This method is a much more lightweight approach.
For example, maybe you're creating a website for a food festival and you want to let each restaurant owner add their menu items as WooCommerce products. This method would make that easy, without bogging you down with a bunch of functionality that you don't need.
Beyond letting other people add their own WooCommerce products, you might find this method helpful even if you're the only one selling products.
For example, maybe you've hired an assistant to help with uploading new products. Rather than forcing your assistant to learn the WordPress backend, you can just have them work with a WooCommerce frontend add product form instead. Beyond being more user-friendly, this also helps keep things secure as you don't need to worry about which backend capabilities the user has.
What you'll need to follow this tutorial
To create your WooCommerce frontend product submission form, you'll need two plugins:
Gravity Forms - this is the core form builder that you'll use to build the structure of your form.
Gravity Forms + Custom Post Types - by default, Gravity Forms' form-to-post functionality creates a standard WordPress post. This free plugin lets you change the post type to a WooCommerce product instead.
Then, you'll also learn how to use the WooCommerce Product Table plugin to display the products submitted through your add product form.
We'll use WooCommerce Product Table to list the uploaded products in different ways. For example, you'll learn how to create a separate page for each vendor's products, or let shoppers filter products by a specific vendor:
As such, we'll divide this tutorial into two parts.
First, we'll cover building the form and mapping it to a WC product. Then, we'll cover how to take those product submissions and display them to potential shoppers.
Part 1: Create your frontend product form with Gravity Forms
Ok, so you want to let users add WooCommerce product from the frontend - great plan! To get started, you'll need to create the actual form that people will use to add products on the frontend. To do that, go to Forms → Add New.
Step 1: Map form submissions to WooCommerce product
Unlike most WordPress form plugins, Gravity Forms has a neat feature that lets you automatically create a WP post whenever someone submits a form.
To map form submissions to a post, Gravity Forms includes a special set of Post Fields. By default, these post fields create a standard WordPress post. The Gravity Forms + Custom Post Types add-on plugins let you change that and map fields to a WooCommerce product, instead. That's what transforms Gravity Forms into a WooCommerce frontend product uploader.
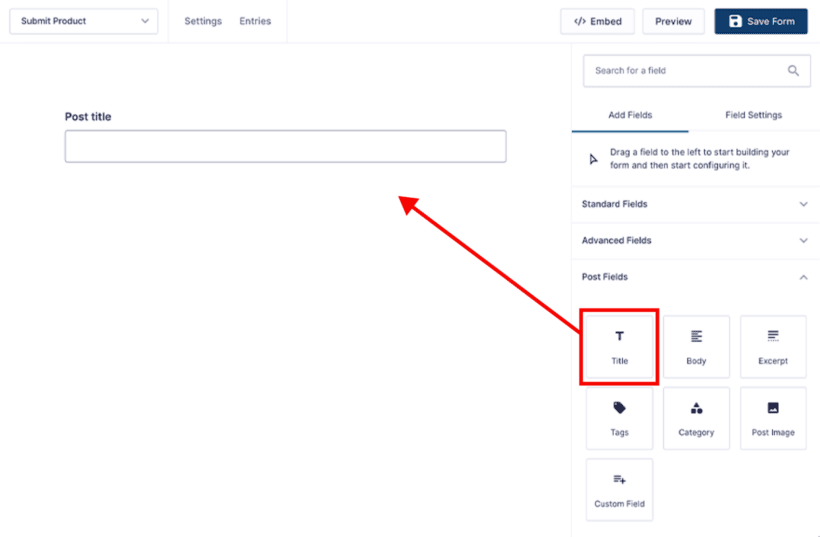
To set up this mapping, add the Post title field from the Post Fields area. Beyond letting users enter the name of the product, this Post title field also includes some important configuration options:
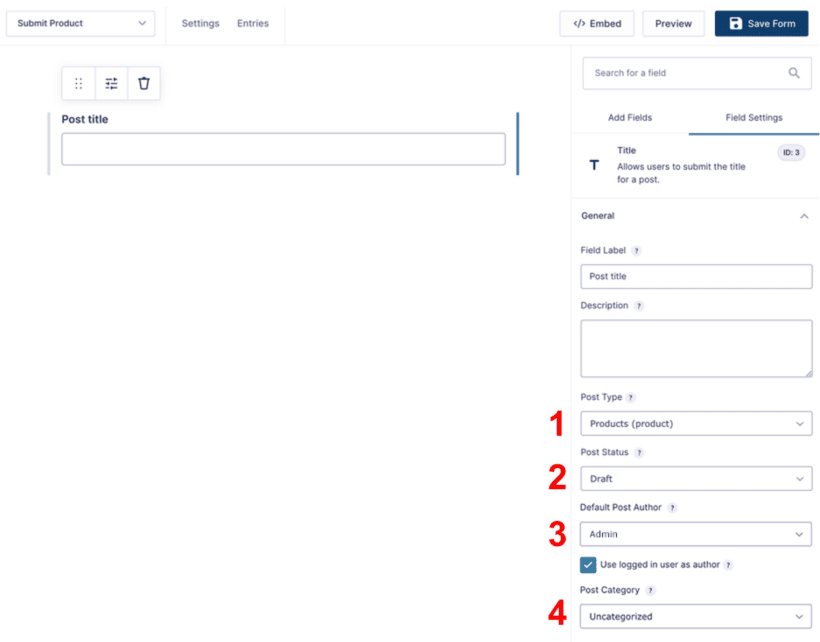
Once you've added the field, click on it to edit it. Here's what you'll need to configure:
Post Type - use the dropdown to select Products. If you can't see this, don't forget to install the free Gravity Forms + Custom Post Types plugin.
Post Status - we recommend leaving this as "Draft" or choosing the "Pending Review" option. This ensures that you're able to moderate all the submitted products before they're publicly available at your store. Alternatively, you can also choose "Published" to make products live right away without admin approval.
Default Post Author - WooCommerce products don't support authors by default, so this setting isn't relevant. We'll show you how to use a custom taxonomy to store vendor/author information later on.
Post Category - you can select the default category here. You'll also be able to let submitters choose their own categories and tags, if required.
And that's it! You're part way there. Now, a user can submit the form and Gravity Forms will add a new product.
But...you still need to collect some more information, right? What about prices, pictures, categories...you get the idea.
Step 2: Add form fields for WooCommerce product information
Next up, you need to add form fields for all the product information. Exactly how you do this depends on what type of information you're collecting, so bear with us here! There are four different approaches for:
Featured image
Description
Basic product information like price, stock status, etc.
Taxonomies (categories, tags, custom taxonomies)
We'll go through each approach in detail.
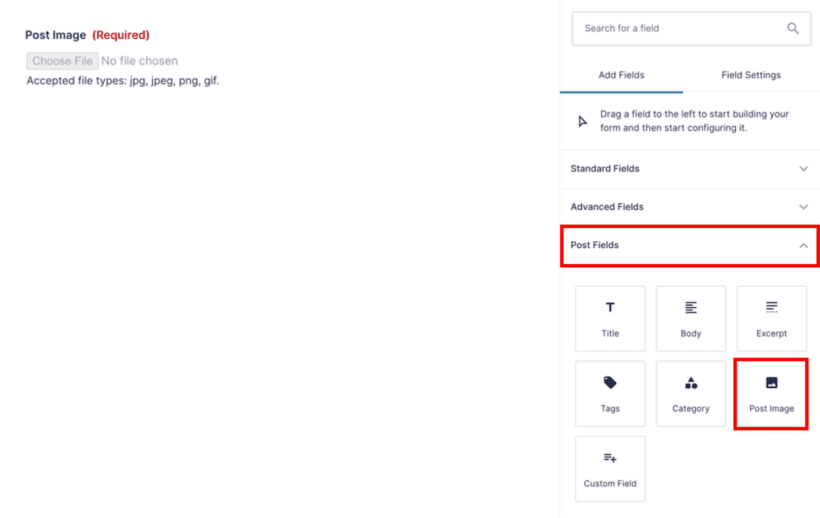
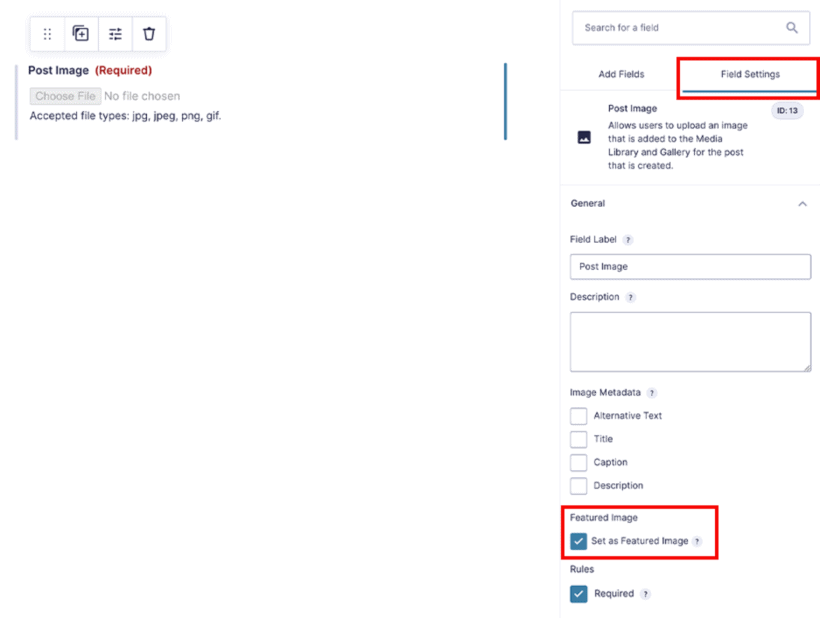
How to add the product image
To add the featured product image, drag over the Post Image field. Then, edit the field and check the box for Set as Featured Image. This will let the form submitter upload an image that will be used as the Product featured image:
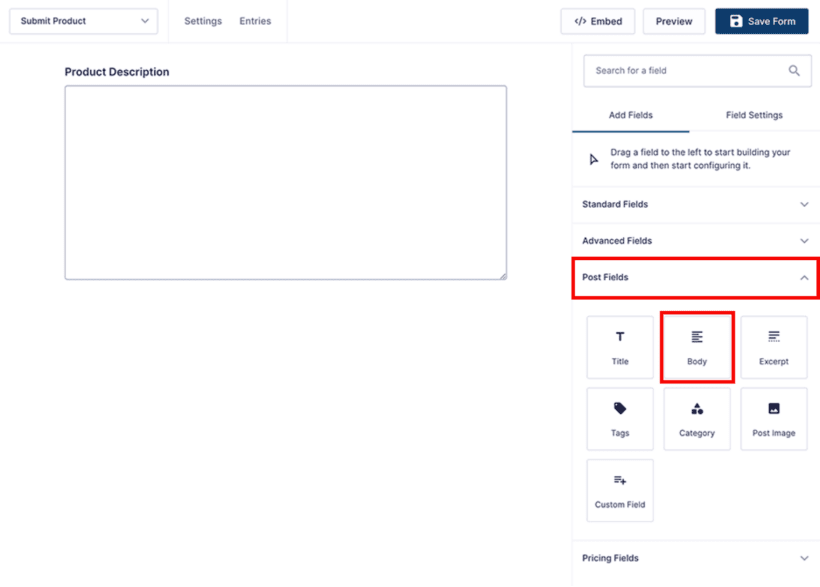
How to add the product description
To add a field for the product long description, use the Body field from the Post Fields area. In the field settings, you'll want to configure the basic information to be the same as the information you added in Step 1:
If you want to also add a separate Product short description, you can use the Excerpt field from the Posts fields area.
How to add prices, stock status, etc.
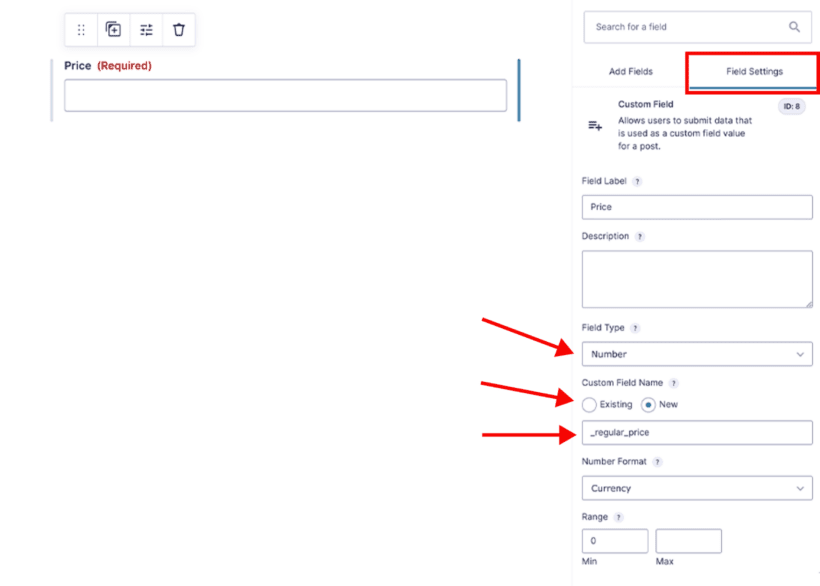
To add basic product information like price and stock status, you'll use Gravity Forms' Custom Field field from the Posts Field area.
This is the trickiest field to add, but we'll try to simplify the process as much as possible.
When you drag over the Custom Field field, the first thing that you'll want to do is choose the Field Type. This type depends on what type of information you're adding with this field, but for most of the fields, you'll use a Number. For example:
Price - Number
Shipping weight - Number
Etc.
Then, under the Custom Field Name, choose New (you're not really creating a new field - but Gravity Forms doesn't let you select most WooCommerce fields from the existing drop-down).
In the text box underneath, you need to enter the custom field ID. Here are the field IDs for the most relevant fields:
Price - _regular_price
Shipping weight - _weight
It should look something like this:
You might also want to add some other restrictions, like a minimum and maximum range.
Then, repeat the process for as much information as you want to collect.
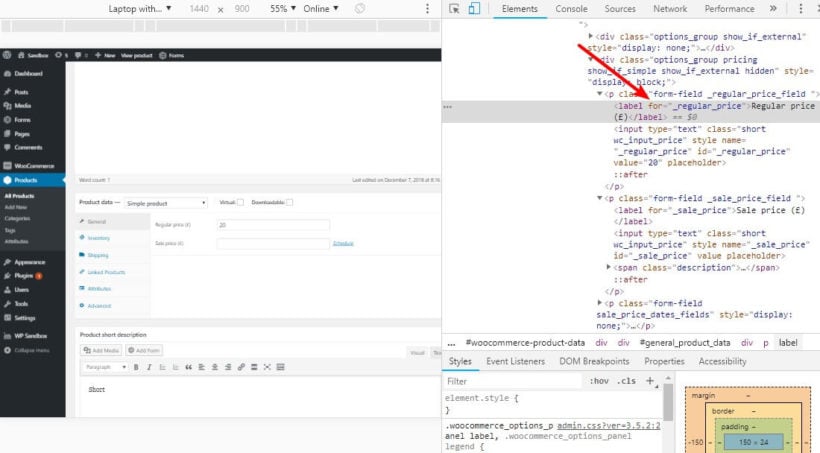
If you need to add other WooCommerce fields beyond price and stock status, a neat trick to find the field name is to use Chrome Developer tools on the edit product page and look at the label for ="FIELD NAME":
Finally, let's cover how to work with taxonomies like categories or tags (or your own custom taxonomies - more on this later).
For product categories (or other hierarchical taxonomies), you can let users choose one or more of your existing categories. And for product tags, you can also let users add their own tags.
Let's cover categories first…
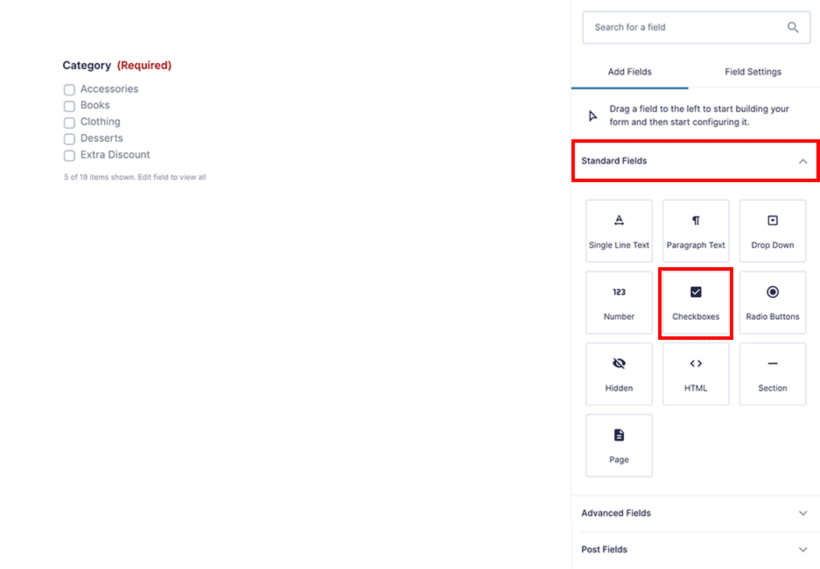
To let users select from your product categories, you can use one of these Standard Fields:
Drop-down - users will only be able to select a single category with this method.
Multi-select - users can select one or more categories using a multi-select box.
Checkboxes - users can select one or more categories using checkboxes.
Radio buttons- users will only be able to select a single category with this method.
You can choose whichever method works for you. No matter which one you choose, you'll first need to drag the relevant field over from the Standard Fields area.
Then:
Edit the field
Go to the Advanced tab
Check the box for Populate with a taxonomy
Select Product categories from the drop-down
For product tags (or other non-hierarchical taxonomies), you can use all the same field types. However, you also get a new option.
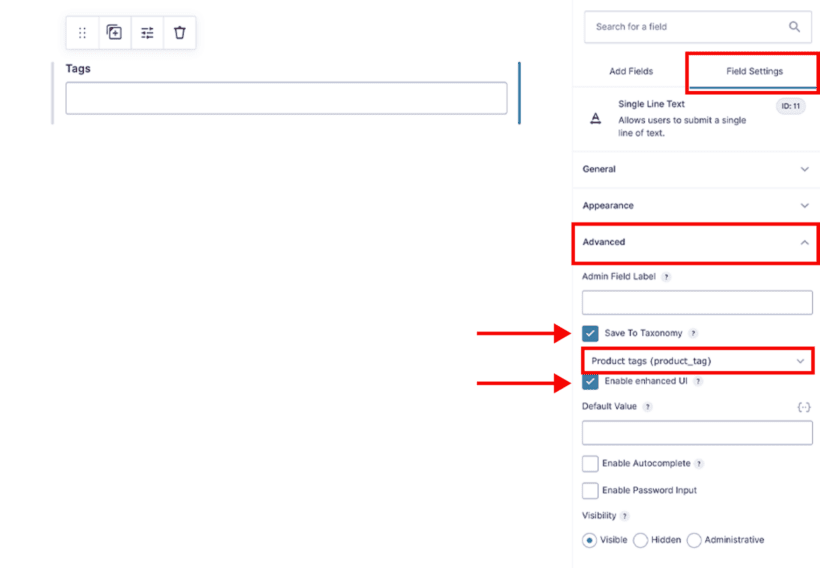
If desired, you can use a Single Line Text field. Then:
Edit the field
Go to the Advanced tab
Check the box for Save To Taxonomy
Select Product tags from the dropdown
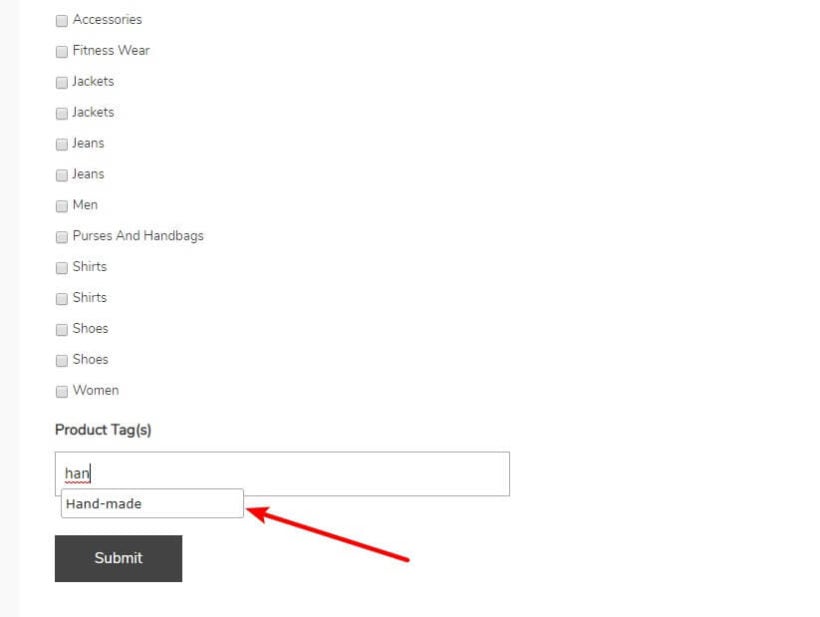
Check the box for Enable enhanced UI
The benefit of using this approach for tags over checkboxes or a multi-select field is that people submitting products will be able to use that same "autosuggest" style box that you get in the back-end. Here's an example of what we mean:
Step 3: Configure other basic form settings
Phew - that was a lot! If you made it through, you can be happy to know that pretty much all the hard work is done now.
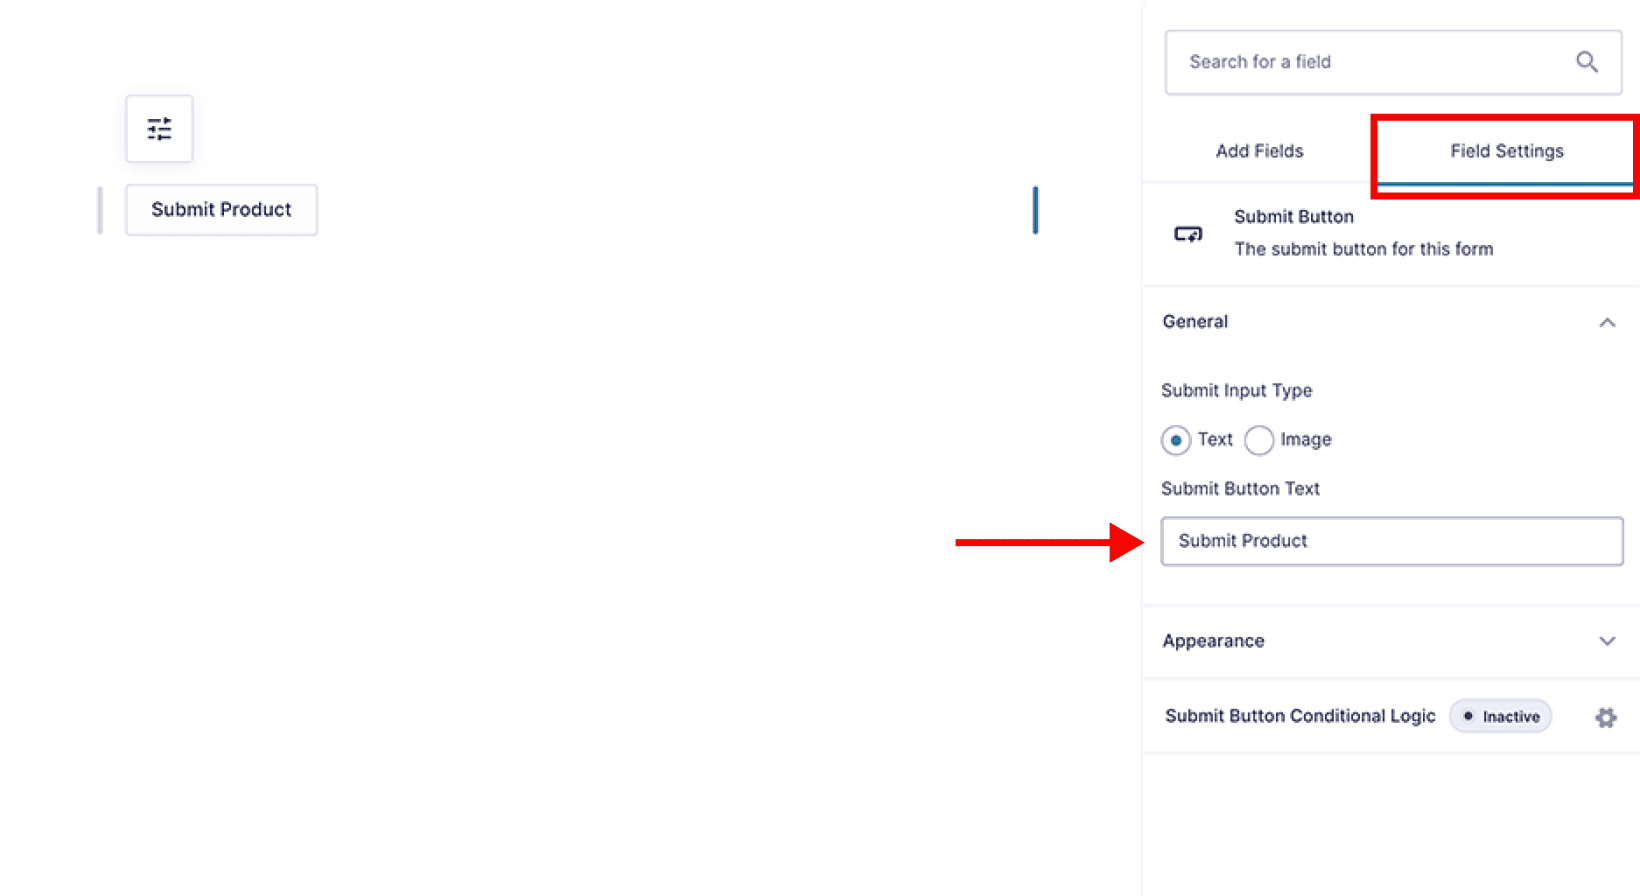
Next, you'll just want to go to the Settings and configure some things there. First, you'll want to consider these options in the Form Settings:
Button text - changing this to "Submit Product" or something more descriptive is good for UX.
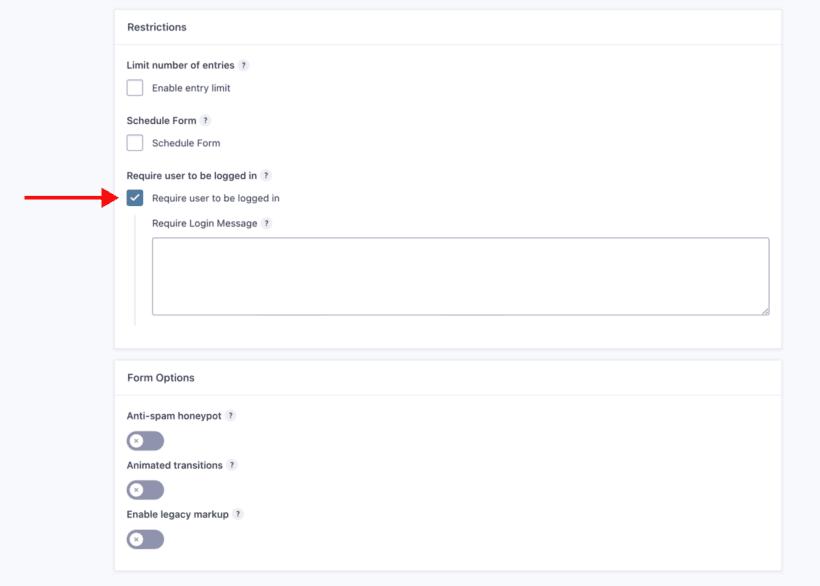
Require user to be logged in - you can check this box so that only logged-in users can add new WooCommerce products from the frontend.
Beyond that, you also might want to configure the Confirmations and Notifications so that they're more relevant to creating a product. For example, you can receive an email whenever someone adds a product from the frontend in WooCommerce.
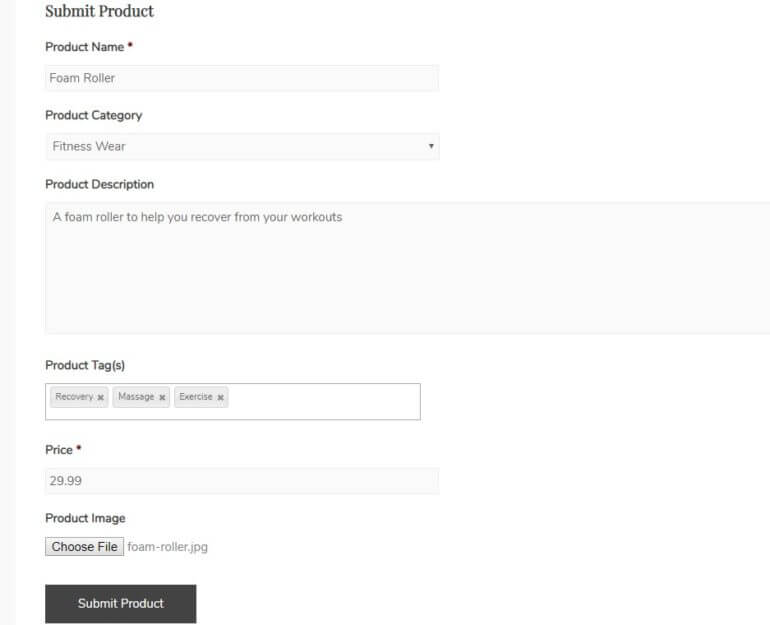
Putting it all together
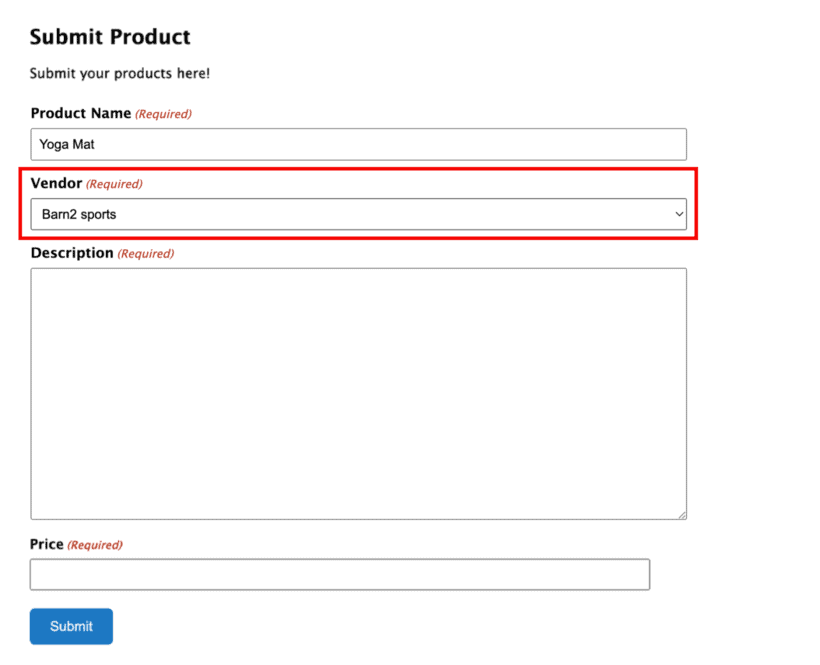
Ok, so here's what the finished form looks like on the frontend of our site. We've filled it out with some basic information:
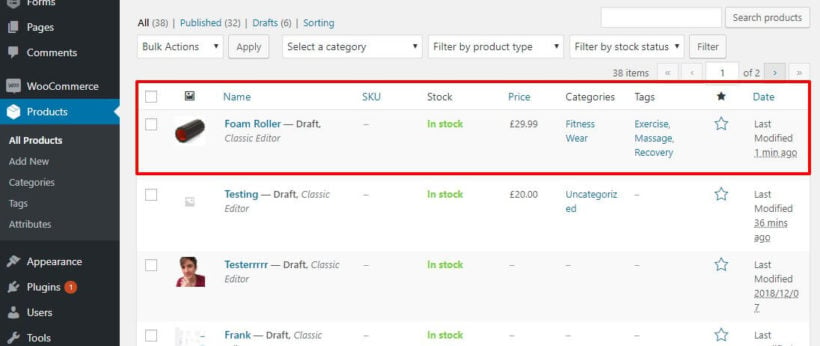
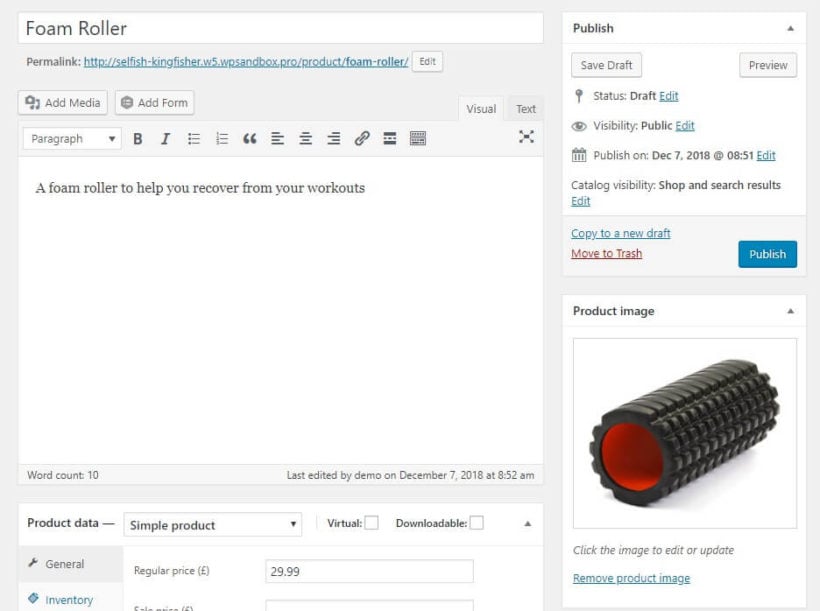
Now, when we submit that form, the product shows up as a draft when we go to the Products area in our dashboard:
And if we edit that product, you can see that it also includes both the product description and the product image:
Protect your frontend add product form with a password
One way to restrict access to your form is to use Gravity Forms' feature that requires users to be logged in.
However, maybe you don't want to create user accounts for each person. Maybe you don't want all registered users to be able to add WooCommerce products from the frontend. If so, then you can easily password protect the form.
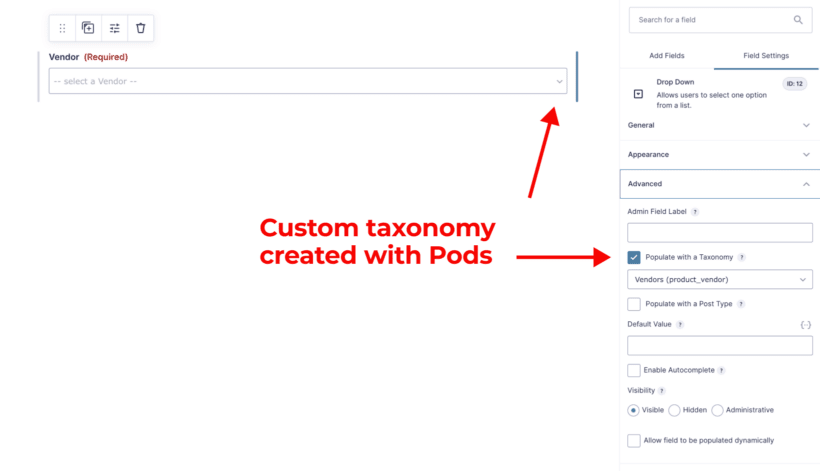
Then, you can add a field to your Gravity Forms form and populate it with information from your Vendors custom taxonomy, just like you did for your regular product categories. Here's what it should look like:
Then, form submitters can choose the vendor when they add a new product:
Part 2: Display WooCommerce frontend product submissions to shoppers
In Part 1, you learned how to create a WooCommerce frontend add product form. Now, let's cover how to take those frontend product submissions and display them in a shopper-friendly way at your store.
To do that, you'll use the WooCommerce Product Table plugin. WooCommerce Product Table takes all or some of your products and displays them in a searchable, sortable, and filterable table anywhere on your site.
Step 1: Configure basic settings
Once you've installed and activated the plugin, you can create your first table by going to Products → Product Tables.
1a: Choose where to display the tables
First, you'll want to decide exactly how and where you want to display the tables. There are two options for this:
Enable the table layout on your main shop and category page templates.
Manually add tables to pages using a Gutenberg block or shortcode. These tables can list all products, or specific products/categories/tags/etc.
So where can you add tables? Well, you have a few different options here. You can:
Create a single page and display all your products in one table
Create a single page and use multiple shortcodes with different include rules to create different sections on the page.
User separate pages and use the include rules to display different products on each page.
1b: Configure the product table
Also use the table builder to configure the settings according to your preferences. Pay special attention to these settings:
Columns - This lets you control what information displays in your columns. For example, you could include the product short description, a column for price, etc. Learn more about columns options.
Add to cart - This lets you control how the add to cart functionality works, including how product variations are displayed. Learn more about add to cart.
Table controls - These let you control filters, search boxes, etc. Depending on your implementation, you might want to use filters to let shoppers filter out products from specific vendors. Learn more about filters.
1c: View your finished table
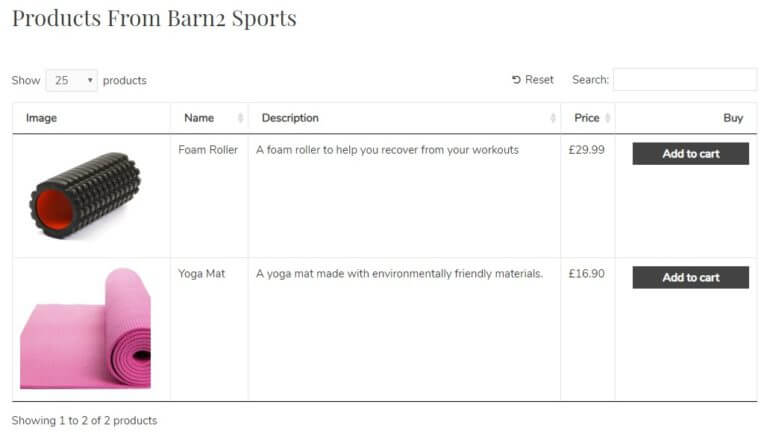
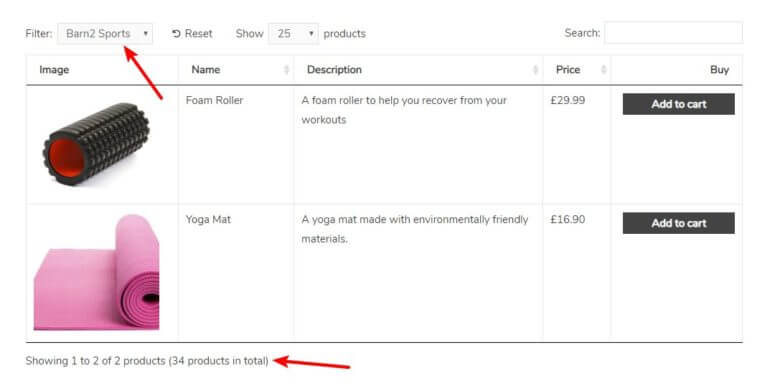
For example, here's what it looks like to create a separate page and populate it with only products that are tagged with a "Barn2 Sports" vendor custom taxonomy:
Alternatively, you could also use one table for all vendors and use WooCommerce Product Table's filter options to let shoppers filter by the Vendor custom taxonomy like this:
If desired, you could also display the vendor information as a column in your table.
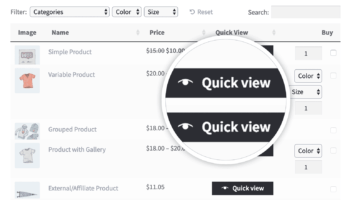
Bonus tip: Show extra information in a quick view lightbox
When you list products in a table layout, you can show information submitted by the user in the various columns.
If you'd like to show more information than will neatly fit into the table, then you can add the WooCommerce Quick View Pro plugin. This handy plugin adds quick view buttons or links to the product table. Or if you're not listing your user-submitted products in a table, then you can also use quick view with the default WooCommerce shop and category pages.
Either way, customers can click on the quick view links to view extra product information in a lightbox. This can include the product image, short description, price, and add to cart column. The customer can view this information and add the product to the cart without having to visit a separate page for each product.
It's an excellent option if you want to keep your product tables clean and simple, while still providing extra information about each product.
Can users add products in the frontend and then them?
You might want users to be able to edit the products in the table after they go live in your store. There are 2 ways to do this:
You can use WooCommerce Product Table with a frontend editor plugin and add an 'Edit' button above or below the table. Logged in users with the correct role can use this to access an editable spreadsheet, from which they can edit products without having to access the WordPress admin. If you just want users to edit their own products, then you can use the free User Role Editor plugin to edit the appropriate user role, adding the capability "edit products" and removing the capability "edit others products". (Read tutorial.)
You can allow them to edit information about your products using a WordPress frontend editor plugin such as Editus. Logged in users with the correct privileges would click through to the single product page to make changes. This is because Editus makes the single product page editable, but not the product table.
Create your own WooCommerce frontend product submission form today!
Click below to get started with WooCommerce Product Table, and leave a comment if you have any further questions.
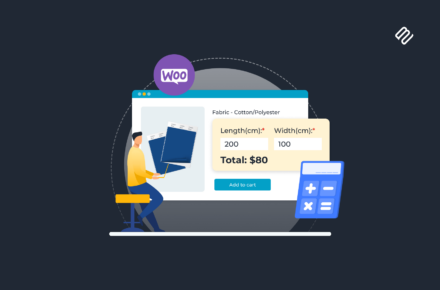
The Barn2 blog is famous for revealing how to achieve specific use cases in WordPress and WooCommerce. Today, I advised a colleague how to set up a WooCommerce booking system for a window cleaning company.
As well as being able to book available time slots, they needed a price calculator to work out the correct price, including any extras.
In this post, I will share my suggested solution so that you can set it up on your own WordPress site! We'll do it by combining two well-known WooCommerce extensions.
The brief - booking appointment system with calendar, integrated with an instant quote calculator and online payments
Phew, that sounds like a mouthful!
In a nutshell, my colleague wanted to build a booking appointment system for a window cleaner, which included a calendar range showing his current availability. He also wanted an online price calculator which would take information provided by the customer, and use it to generate an instant quote. Customers would then be able to book a window clean for an available time slot, and pay the correct amount online via PayPal.
If you want something similar for your own website, keep reading. I'll show you how to set up your WooCommerce booking system. It's a great solution whether you're a window cleaner, hairdresser, tutor, dog groomer, medical practitioner, or something else. You might even use it to sell bookable rooms or venues, such as hotel rooms or meeting rooms. All that matters is that you need a calendar-based booking system, with chargeable extras.
The challenge
There are plenty of WordPress and WooCommerce and booking plugins. These let you set your availability and sell time slots or sessions. However, they don't come complete with a price calculator where the customer can input their requirements and generate an instant quote, which they can then accept and pay for online.
There are also plenty of WordPress quote calculator plugins. You can even use Gravity Forms for this. However, these don't integrate with any WooCommerce booking calendar plugins.
If you are a developer (or are willing to pay for one) then you could integrate the two. Unfortunately, this isn't straightforward.
My colleague was building a website for a friend on a tight budget, so a bespoke integration wasn't realistic. Instead, I advised him of a compromise solution that would achieve a similar result straight out of the box.
The solution - combine 2 plugins to take WooCommerce bookings with an instant price calculator
As we've seen, it's complex to integrate a WordPress bookings plugin with a quote calculator plugin. As a compromise, you can achieve a similar result by combining two high quality plugins: YITH WooCommerce Bookings with Product Options. These are compatible with WPML.
How the booking system and quote calculator work
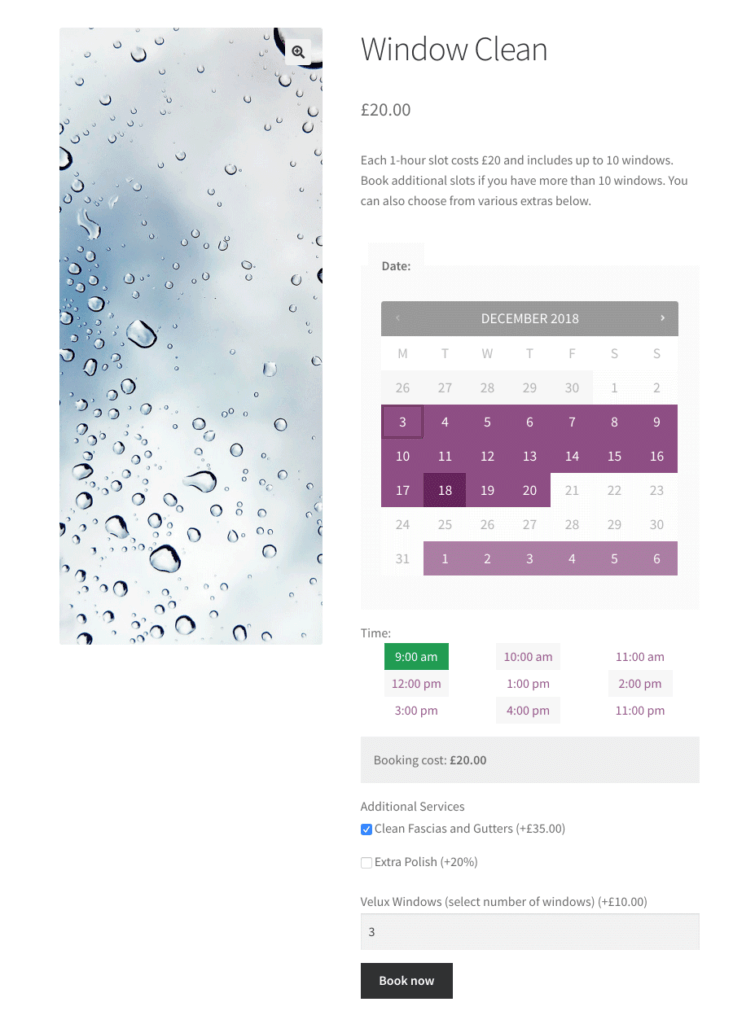
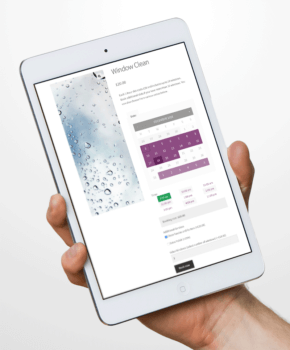
Your customers will visit your website and view a product page for the service that you are selling time slots for. They will choose an available date and time from the calendar.
Underneath, they will see a services of optional extras which they can select before adding their chosen time slot to the cart. While the total price isn't displayed on this page, the rice for each extra appears in brackets so that customers can make informed choices. Once they are happy with their selections, they can click 'Book now' to add everything to the cart.
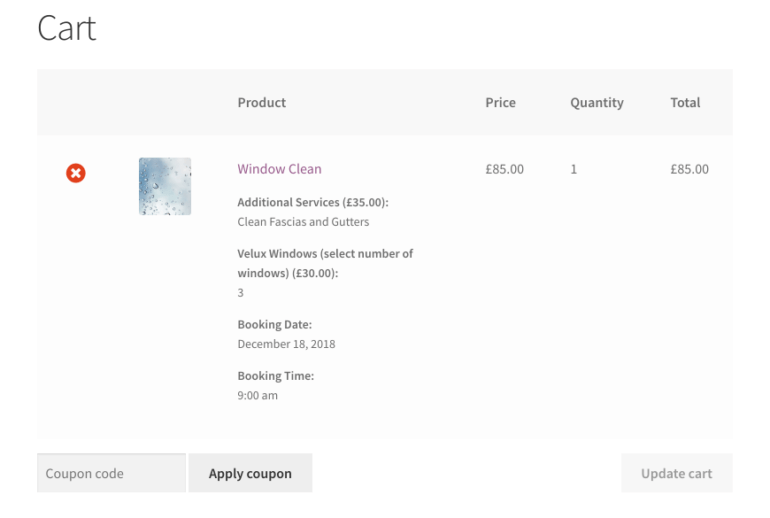
On the cart page, the customer can view the total cost for their booking:
As the Administrator, you will receive an order confirmation email with all the booking information, extras and price.
Before you start, I'm assuming that you already have a WordPress website with the free WooCommerce plugin set up. If you haven't already done so, do this now. You should also set up your chosen payment gateways and payment methods, such as PayPal.
Go to Products → Product Options and create as many add-ons as you require, each with their own price. At the top of the Add/Edit Option Group page, select which bookable product(s) or categories you want to display the extra add-on fields on.
Think carefully about how to set up your add-ons because there are plenty of options. For example, you can have checkboxes, radio buttons or dropdowns. You can have quantity input fields where the customer enters the desired quantity (e.g. 10 if they have 10 windows) and the price increases accordingly. There are even text fields where the customer can add any further information.
When the customer selects options, the total price will appear at the bottom.
Can I add my WooCommerce bookings to Google Calendar?
WooCommerce.com have helpfully provided an extension that lets you automatically add bookings to Google Calendar. This is a fantastic way to manage your time. It's much quicker (and more reliable) than having to manually add each booking to your calendar.
Wrapping up
Now you know how to use WooCommerce bookings to sell time slots alongside chargeable extras. It's a neat alternative to using an actual price calculator plugin. It's also much easier to set up than integrating a booking plugin with a full price calculator.
I hope you found it useful. Do you think it's a good compromise? Let me know in the comments below!


 The Barn2 blog is famous for revealing how to achieve specific use cases in WordPress and WooCommerce. Today, I advised a colleague how to set up a WooCommerce booking system for a window cleaning company.