Creating order bumps in WooCommerce: A simple how-to

WooCommerce order bump offers can boost your store's conversion rates, average order values, and overall revenue. Learn three simple ways to set up order bumps: on the product page, cart page, and checkout page.
Order bumps are a low-effort, high-impact marketing strategy. They require relatively low setup and maintenance but have the potential to significantly increase your bottom line.
In this step-by-step tutorial, I'll take you through setting up order bumps in three different ways:
- On the product page, using WooCommerce Product Options.
- In a popup cart, using WooCommerce Fast Cart.
- At the default checkout, using FunnelKit Funnel Builder.
I'll also show you tips on using WooCommerce order bumps to skyrocket your online store's sales and revenue.
But first, let's begin with the basics.
WooCommerce order bumps: An overview
In WooCommerce, an order bump is a marketing strategy designed to encourage customers to add complementary or related items to their carts during the shopping process.
To illustrate this with an example: Let's say your WooCommerce store sells electronic gadgets, and a customer is about to buy a camera. You can offer them extra camera lenses, a protective case, a tripod, a camera bag, or an additional memory card. Essentially, additional products directly related to the product the customer wants.
Traditionally, order bumps were additional items offered just before a customer completes their purchase on the cart or checkout page. However, conversion rate optimization (CRO) experts figured out that multiple order bumps can be equally effective when strategically presented to customers on other parts of the buying journey, like on the product page.
Order bumps vs upsells vs cross-sells
These three terms get mixed up constantly. An order bump is a small, low-friction offer for a complementary item added with one tick, usually at the cart, checkout, or product page (think: a screen protector tick-box next to a phone). An upsell is a nudge to upgrade to a more expensive version of what the customer is already considering, usually on the product page before the buying decision (the Pro model instead of the standard one). A cross-sell is a suggestion for a related but different product and can appear anywhere from the product page through to a post-purchase email.
The mechanics overlap, but the intent differs. Upsells trade up the main item; order bumps and cross-sells add to the order. This article focuses on order bumps, with brief notes on where the other two fit.
Benefits of promoting order bumps on your WooCommerce site
The most obvious benefit is the revenue lift. Order bumps pull more value from traffic you've already paid to acquire, and one added accessory per order compounds quickly across a month.
The less obvious benefit is the customer experience itself. Relevant suggestions help customers discover items they actually wanted but hadn't thought to search for, and a thoughtful complementary offer often reads as helpful rather than salesy. Done well, an order bump strengthens trust in the store, not just the order total.
Higher engagement and longer sessions also feed into the search signals that influence ranking. So while order bumps aren't an SEO play in any direct sense, the on-page behaviour they encourage doesn't hurt either.
What makes a great WooCommerce order bump plugin?
The single most important quality is targeting: a plugin that lets you offer relevant products based on what's in the cart, not the same generic suggestion to every customer. A phone case shown to someone buying a phone converts. The same phone case shown to someone buying a kettle doesn't.
After targeting, look for friction-free mechanics. The plugin should use Ajax for real-time cart updates so customers never see a page reload, and accepting the bump should be a single click or tick (a customer who has to re-enter payment details mid-flow won't bother).
The rest is hygiene: it should be mobile-responsive (most ecommerce purchases happen on phones), customizable enough to match your theme, and well-supported by clear documentation. None of those are negotiable, but they're table-stakes rather than differentiators.
How do I create a bump order in WooCommerce?
WooCommerce doesn't have a built-in feature that lets you offer order bumps. However, you can easily add this to your store's php template with custom code, editing a page builder template (like Elementor), or a plugin.
This is a beginner-friendly tutorial, so I'll show you how to add order bumps using the best plugins:
- The product page using the WooCommerce Product Options.
- The cart page uses the WooCommerce Fast Cart.
- The checkout page uses FunnelKit Funnel Builder.
Pro tip: Want to boost your store's revenue even further? Combine these plugins to add order bumps throughout the ecommerce funnel. This approach increases the number of conversion touchpoints and can lead to even better results.
1: Setting up product page order bumps with WooCommerce Product Options
WooCommerce Product Options is a popular order bumps plugin loved by thousands of WooCommerce sites. Most stores use it to:
- Add extra products (upsells and order bumps) to the product page.
- Add additional options and add-ons to allow shoppers to customize products while shopping.
Here's an overview of how it adds order bumps to the product page
Suppose you sell electronic gadgets like smartphones, laptops, tablets, etc., and want to display order bumps on the single product page. For example:
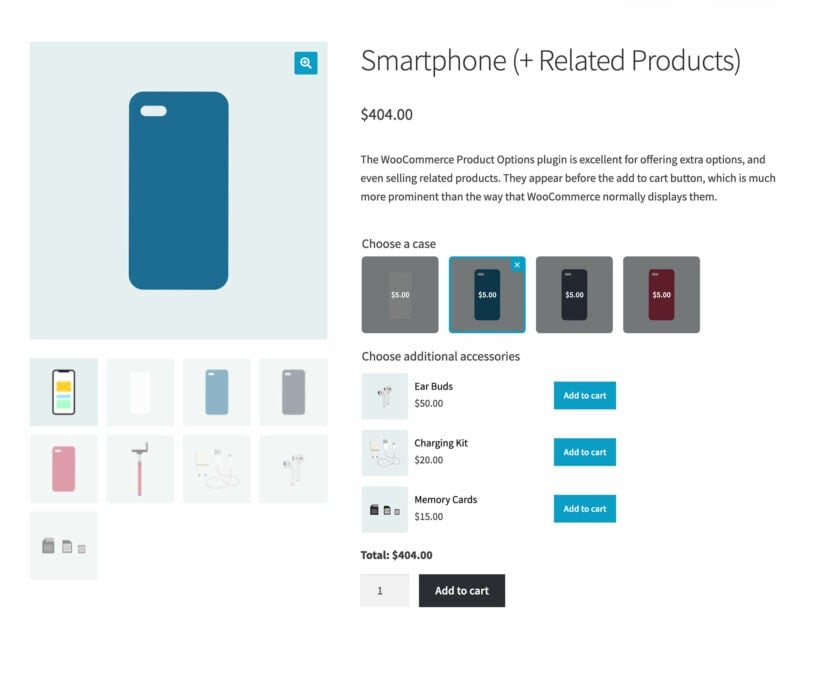
You can use the 'Products' option setting to display handpicked products or products from a particular category. This shows relevant product recommendations to customers. Shoppers can then add extra products to their carts from the same product page.
Steps to add order bumps on the product page
Step 1: Install and activate WooCommerce Product Options
- Get the WooCommerce Product Options plugin.
- Download the .zip file to your computer.
- Log into your WordPress admin dashboard and go to the 'Plugins' section.
- Select Add New → Upload Plugin and add the plugin zip file you previously saved on your computer.
- Click on Install Now → Activate.
- Add the license key to the plugin setup wizard, activate it, and complete the wizard.
Step 2: Create a new options group
- Navigate to Products → Product Options within your WordPress admin.
- Select 'Add group' to add a group of products to be displayed as order bumps or upsells on the product page.
- Enter a name in the 'Group name' field.
- Select 'Display globally on all products' if you want to show the same group of products as order bumps on all product pages (Note: This isn't recommended as order bumps are most effective when the recommended products are relevant).
- Select 'Show on specific categories or products' to set specific products and product category inclusions and exclusions.
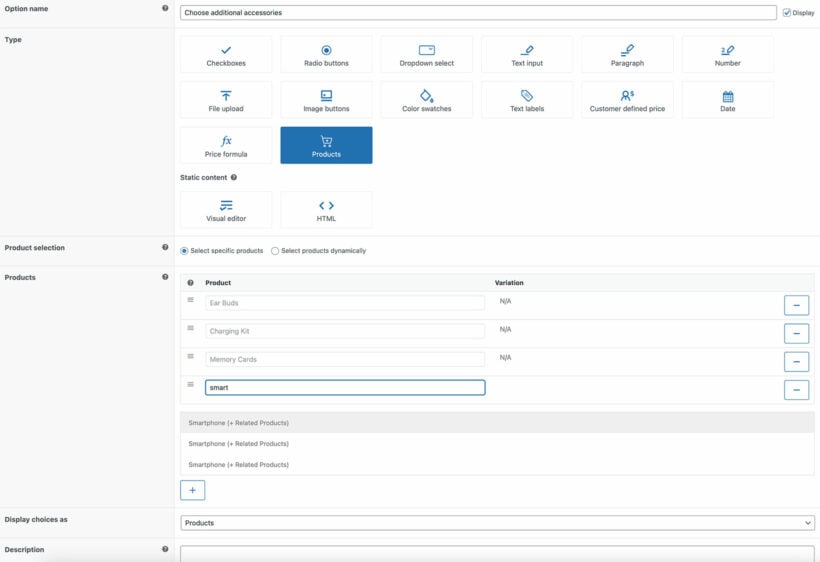
- Next, select 'Add option' from the 'Options' section.
- Enter the name for the group of products in the 'Option name' field.
- Select 'Products' from the 'Type' section.
- Tick the 'Select specific products' checkbox to handpick products to be displayed on the single product page or the 'Select products dynamically' to enable the plugin to display appropriate products from a specific category.
- Select 'Products' from the 'Display choices as' dropdown.
- Add a brief, persuasive description to 'sell' the products.
- Note: Don't tick the 'required' option.
- Save the settings.
That's it! We've successfully added order bumps to the WooCommerce product page. Head to the front-end to preview and test it before rolling it to customers.
2: Creating a popup order bump with WooCommerce Fast Cart
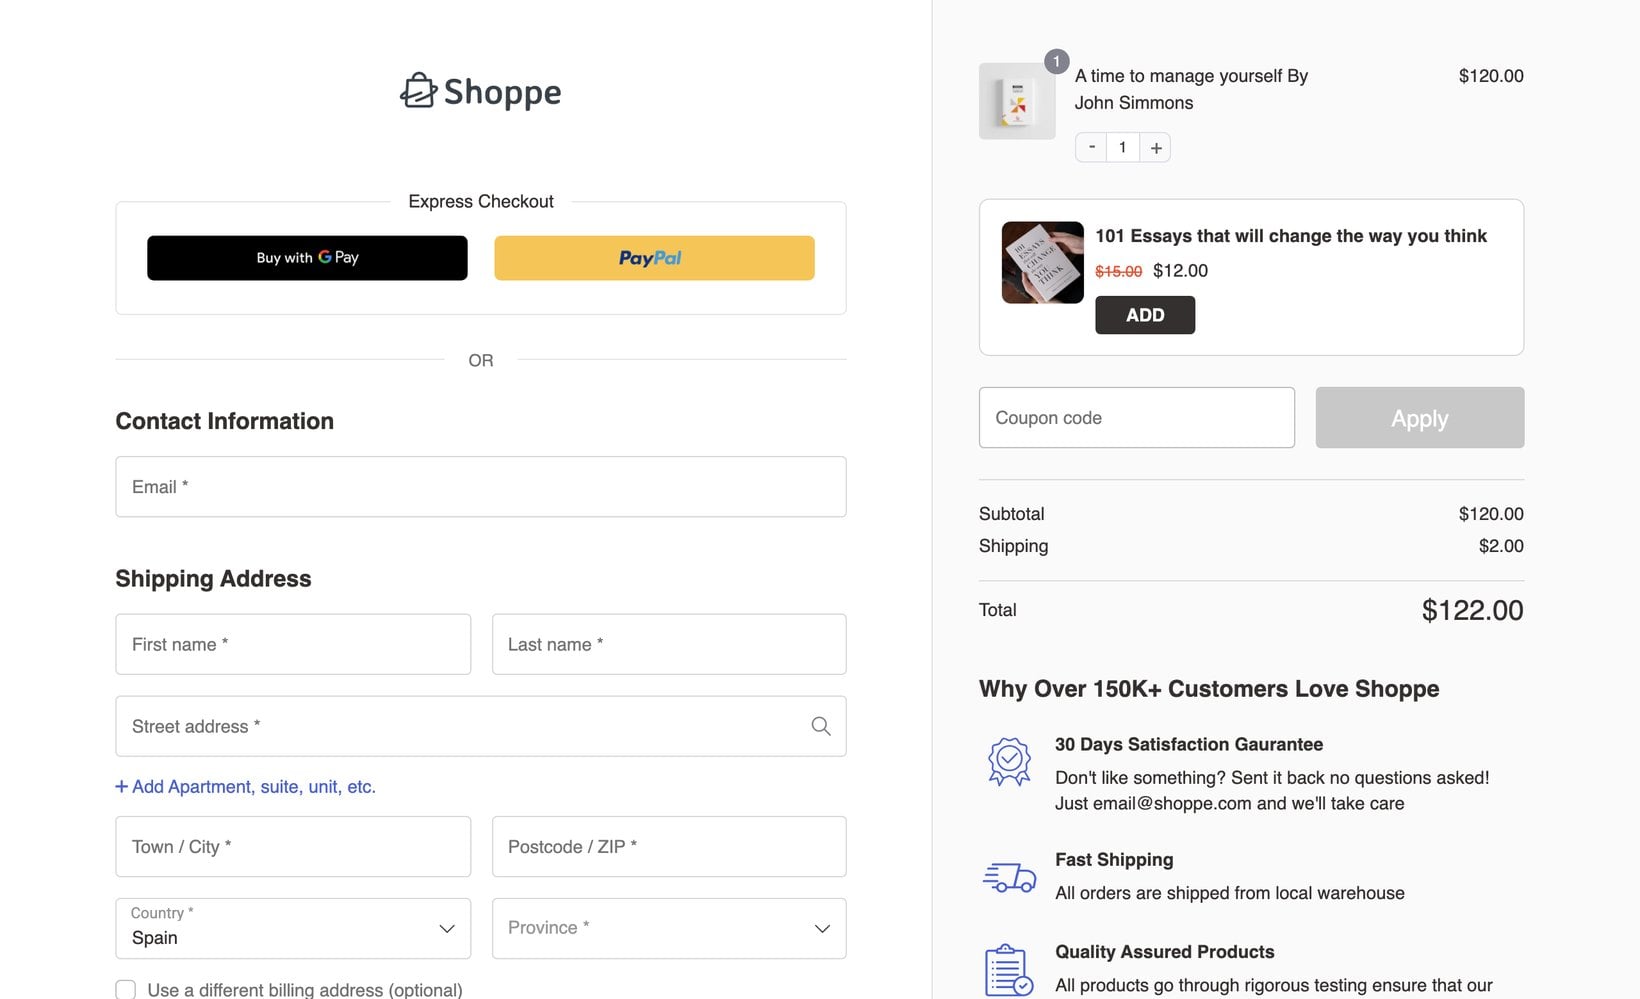
The WooCommerce Fast Cart plugin upgrades WooCommerce's default cart and checkout pages with a slick, user-friendly fast cart.
This WooCommerce upsell plugin adds a fast cart that automatically opens in a popup or a side widget when a customer adds an item to their shopping cart or selects the floating icon on the page so customers can complete their purchases in seconds from any page on your site.
Here's an overview of how it adds order bumps to the cart and checkout pages
Let's say a customer adds a hoodie to their cart. The fast cart opens up for them to quickly complete their purchase. They can select additional offer products from the 'You may be interested in...' section (as pictured below).
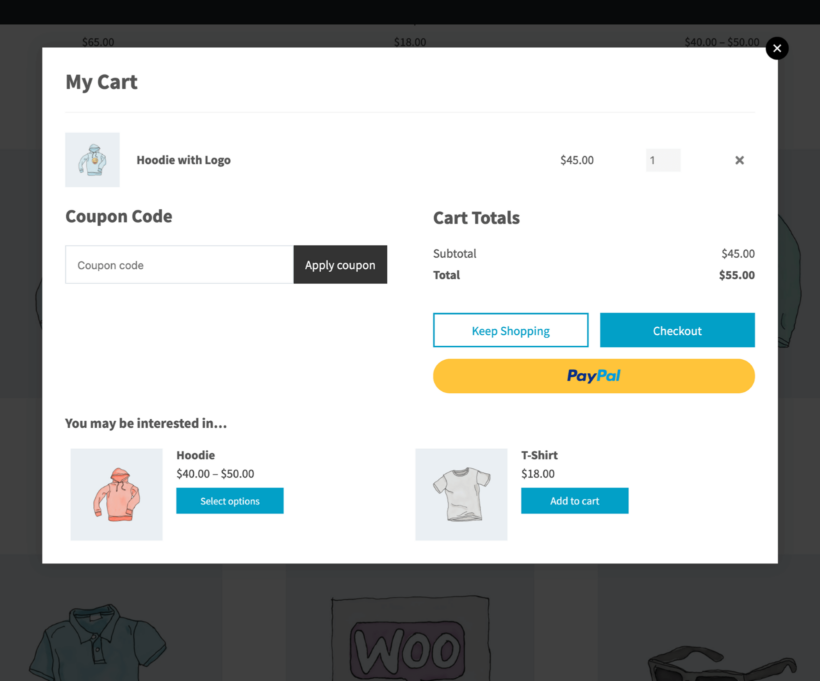
They can also update the product quantity, enter the coupon code, select the appropriate shipping options, etc.
Steps to add order bumps on the cart page
Let's first configure the WooCommerce order bump plugin. Then, we'll add related products to each item using WooCommerce's default options.
Step 1: Install and activate WooCommerce Fast Cart
- Get the WooCommerce Fast Cart plugin.
- Download the .zip file to your computer.
- Log into your WordPress admin section and go to the 'Plugins' section.
- Select Add New → Upload Plugin and add the plugin zip file you previously saved on your computer.
- Click on Install Now → Activate.

- Add the license key to the plugin setup wizard, activate it, and finish the wizard.
- Next, choose the display options:
- Layout: You can showcase the fast cart in a centered popup or as a side widget.

- Enable the 'Auto open' option if you want to open the fast cart as soon as a customer adds an item to their shopping cart.
- Decide where to showcase the floating cart icon on the page: top, bottom, or center. Select 'hidden' if you don't wish to use it.
- Specify whether you want to add the cart and checkout options (or both) to the fast cart.
- On the 'Cart contents' page, select the 'Show cross-sells' option to show related products in the fast cart. Select appropriate additional options (like the option to show product images, subtotals, prices, etc.), as you prefer.
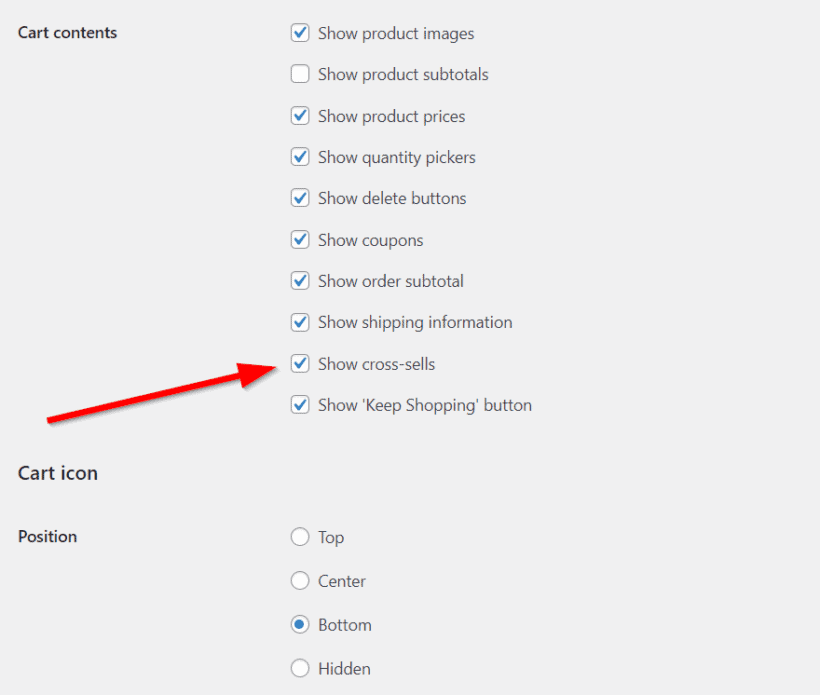
- Layout: You can showcase the fast cart in a centered popup or as a side widget.
Step 2: Add cross-sells to each product
Add cross-sells using WooCommerce's built-in options:
- Go to Products → All Products within your WordPress admin dashboard.
- Navigate to the product to which you want to add cross-sells and select 'Edit.'
- In the product editor, scroll down to the 'Product Data' section and look for the 'Linked Products' tab.
- Under the 'Linked Products' tab, you'll find the 'Cross-sells' field. Start typing the name of the products you want to cross-sell and select the product from the suggestions. (You can add as many cross-sells as you like).
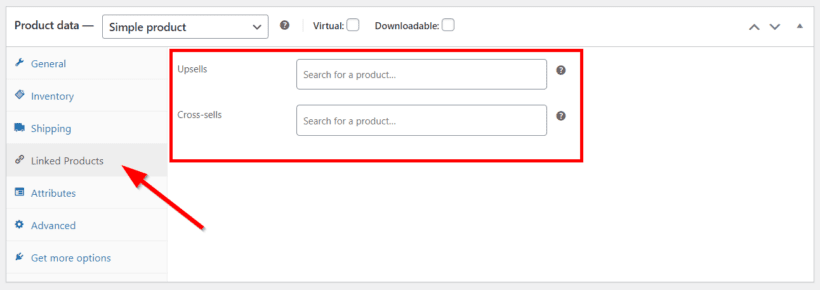
- After adding all the cross-sell products, scroll up and save your amends by clicking on 'Update'.
That's it! We've successfully added order bumps to the fast cart. Here's a preview of how it'll look on the front end.
3: Adding order bumps to the WooCommerce checkout page with FunnelKit Funnel Builder
If you wish to add order bump products at discounted prices to the default WooCommerce cart and checkout pages, this method is for you.
FunnelKit Funnel Builder lets you add one-time, discounted offers to the checkout page. You can display the offer on all products, or target specific items based on what's in a customer's cart. Customers can add the discounted item to their order with a single tick.
You can pick the discount type and position the order bump where it converts best. Common placements include before the order review section, around the cart contents, near the order total, or directly above the place order button.
FunnelKit also supports one-click post-purchase upsells. After checkout, customers see an additional offer they can accept without re-entering payment details.
Tips for using a WooCommerce order bump offer
Here are some tips for using order bump offers in your online store's upsell funnels:
- Select relevant products as order bumps - Choose products that complement the main item the customer is viewing or has added to their cart. For instance, if a customer is purchasing a camera, targeting them with offers like camera case or extra batteries will likely convert better than say, a microwave oven or electrical heater. The key is to offer items that naturally pair well with what the customer is already buying.
- Don't offer upsells on the cart and checkout pages - Customers on the cart and checkout pages have already decided to place their orders. Offering a more expensive variation of the same product at this stage (i.e., an upsell) can confuse them and lead to abandoned carts. The best place to suggest upsells is on the product page, before the customer decides on the product to buy. While on the cart and checkout pages, present additional items that add value to their current purchase, i.e. cross-sells.
- Position the cross-sell offer well - Place the order bump in a prominent and non-intrusive location on the product, cart, or checkout page. Use a contrasting color to highlight the add-to-cart button. Customers should notice the offer without it disrupting their shopping flow.
- Use one-click add-to-cart functionality - Eliminate unnecessary steps by enabling customers to add additional items to their cart with a single click and speed up the checkout process. Customers shouldn't have to navigate to a different page.
- Offer limited choices - Too many product options can overwhelm customers and lead to indecision. As a rule, don't add more than five order bump offers per product.
FAQs about using a WooCommerce order bump offer
Here are some common questions about adding order bump offers to WooCommerce:
What is a checkout bump?
A checkout bump is an additional offer presented to customers during the checkout process, specifically on the cart or checkout page. E-commerce stores use checkout bump offers to encourage customers to add extra, complementary items to their orders before completing their purchases.
For example, let's say a customer is buying a smartphone from an online electronics store. Offering a screen protector, extended warranty, or a phone case at a discounted price on the checkout page can 'bump up' their average order value and enhance their experience.
How do I display upsells on the product page in WooCommerce?
The best way to display upsells on the product page is by using Barn2's WooCommerce Product Options plugin.
WooCommerce Product Options lets you display upsells (and order bumps) below the 'Add to cart' button on the product page.
Should I show order bumps on the product page, the cart, or the checkout?
All three placements work, but they reach the customer at different points in the journey. The product page catches customers while they're still actively choosing, so it tends to convert best for genuinely complementary items. The cart and checkout catch customers who have already decided to buy, so order bumps there feel less like a sales pitch and more like a last-chance reminder. The strongest setup uses two placements (product page plus cart, or cart plus checkout) rather than stuffing every bump into one spot. For a wider comparison of placement options, see the cross-sell plugins roundup.
Add WooCommerce order bump offers to your site today!
Although order bump offers require minimal setup, they can yield high rewards. When implemented strategically, they can boost average order value, conversion, and customer satisfaction while reducing cart abandonment rates.
The best plugins to sprinkle in WooCommerce order bump offers throughout the shopping journey are:
- WooCommerce Product Options - To offer order bumps on the single product page.
- WooCommerce Fast Cart - To show order bumps in a fast cart.
- FunnelKit Funnel Builder - To offer order bumps on the default WooCommerce checkout page.
Get these plugins to add order bump offers to supercharge your store's revenue today!