Adding and displaying custom fields in WooCommerce orders

WooCommerce custom order fields enable you to personalize your site's shopping experience and enhance the checkout process. In this guide, I'll show you how to create, edit, reorder, remove, and display custom order fields in WooCommerce.
Want to customize your WooCommerce store's order fields but don't know how? This guide is for you. Here, I'll show you the quick and easy way to:
- Edit, hide/remove, and rearrange the default order fields.
- Add, edit, rearrange, and remove new custom order fields.
The best part? I'll cover the step-by-step instructions to tailor order fields on both the single product page and on the checkout page.
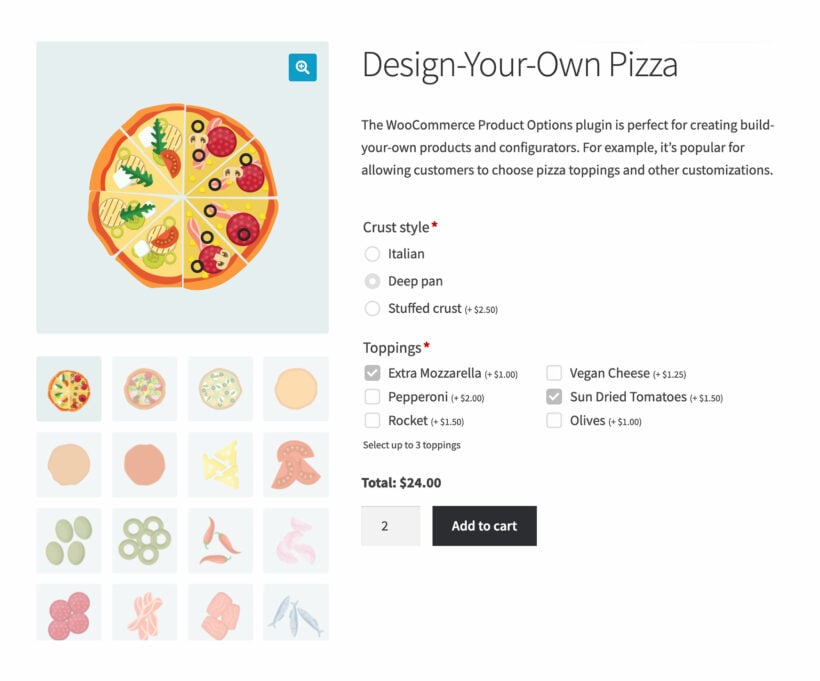
First, we'll learn how to collect custom order fields on the single product page using WooCommerce Product Options, like this:

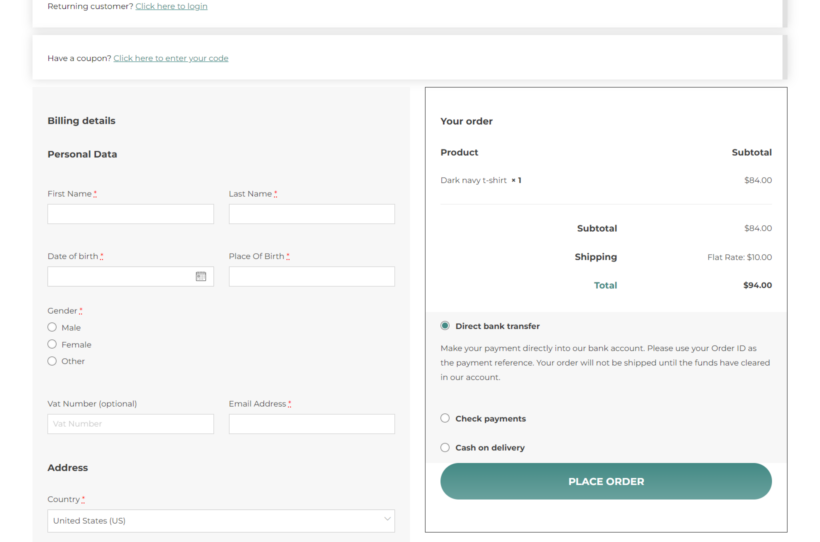
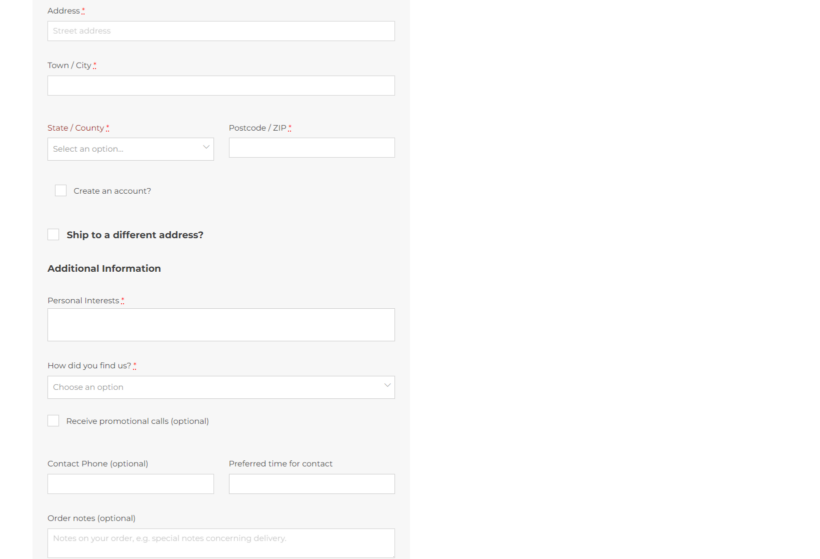
Then, we'll customize the order fields on the checkout page using the YITH WooCommerce Checkout Manager plugin, like this:
But first, let's address what WooCommerce custom order fields actually are.
What are WooCommerce custom order fields?
As a store owner, you know firsthand that the default order field options are functional. But they aren't flexible enough for most WooCommerce sites.
For instance, the order notes fields on the checkout page allow you to collect general customer data. However, there's no way to specify what additional data to collect and you can't make it a mandatory field. If you want to ask for specific order-related information, the default WooCommerce installation won't work for you.
That's where WooCommerce custom order fields come in.
Custom order fields allow you to gather extra customer information during the shopping and checkout processes and tailor the ordering experience for customers. Order fields are not limited to text inputs; they can include dropdowns, checkboxes, file uploads, and more.
In addition, customizing your store's order fields is not just about adding fields for extra information. You can also use them to reduce the number of fields at checkout or streamline how options are presented to customers. For instance, if you sell only digital products, you can hide the shipping address field permanently.
There are two ways to use custom order fields in your store:
- On individual product pages: You can use fields that enable customers to make personalized choices for the products they want to buy. For instance, if you sell customizable products like T-shirts, you can add radio buttons to let shoppers select their preferred colors or add a custom text field for custom messages. These fields allow customers to specify their preferences and make sure individual products align perfectly with their tastes or requirements.
- On the checkout page: These custom order fields enable you to capture data that may not be specific to individual products but is crucial for processing the overall order efficiently. For example, adding a "special instructions" field where customers can provide detailed delivery instructions. Another example is adding a date picker field to let shoppers choose their preferred delivery dates.
You can't add custom order fields using the default WooCommerce install, so you'll either need to (1) edit the functions.php file of your WordPress theme to add a custom code snippet or (2) use custom order field plugins.
This is a code-free tutorial, so I'll show you how to add custom fields and display them in WooCommerce orders using two top-notch custom fields plugins.
Benefits of using custom order fields in WooCommerce
Adding, editing, rearranging, and removing order fields can bring a plethora of benefits to your WooCommerce store:
- Personalized shopping experience: Customizing order fields enables you to tailor the shopping journey for your customers. For instance, if you sell customized jewelry, adding a text field for customers to share messages to be engraved on their jewelry lets them add personal touches to their purchases.

- Collect extra data for order fulfillment: You can add fields to collect additional data for processing orders accurately. This reduces errors and ensures you have all the essential information to fulfill customer requests promptly. For example, if you sell made-to-order curtains, you can add fields for dimensions to ensure you create the perfect-fit curtains.
- Gather marketing insights: The data collected through custom order fields can serve as a valuable source of market insights. For instance, adding a "How did you hear about us?" checkout field can help you gain insights into your most effective marketing channels. You can then use this information to guide your future marketing activities.
Step-by-step: How to manage and display WooCommerce custom order fields
As I mentioned earlier, there are two methods to create custom WooCommerce order fields:
- On the single product page: You'll need WooCommerce Product Options to add custom order fields for individual products. The information collected using this plugin will apply to specific products.
- On the checkout page: You'll need YITH WooCommerce Checkout Manager to manage order fields on the checkout page. The information collected using this plugin will apply to the entire order.
Note: While you can use each plugin on its own, many store owners like to combine them to add different types of custom fields in order to boost revenue further. Let's say you run a bakery that offers personalized cakes. You could use a custom 'input text' field on the product page for customers to enter their desired custom messages. And, on the checkout page, you might add a custom date and time picker field for customers to specify their preferred delivery date and timeframe.
Let's start adding the first type of custom order fields.
How to implement custom order fields for specific products in WooCommerce
Custom order fields on individual WooCommerce product pages are technically called "extra product options" or "product add-ons". However, many people refer to them as order fields because they're used to collect essential order-related details from customers. Use them to collect extra information relating to specific products.
WooCommerce Product Options is the best plugin to add custom order fields to your WooCommerce site's single product pages. It lets you add a huge variety of fields, including text fields, checkboxes, radio buttons, dropdowns, date and time pickers, and more. Plus, it gives you complete control over how the custom order fields work.
WooCommerce Product Options' key features
- Over 15 custom order fields.
- Add fields directly in the plugin, or select existing variations to display as checkboxes, images, radio buttons, etc.
- Grouped order fields.
- Advanced rules, such as default values, minimum and maximum quantity, required fields, and more.
- Upsells and cross-sells.
Let's look at each in detail
Over 15 order field types
There are a wide variety of types of order fields you can choose from, including:
- Text fields
- Dropdown lists
- Checkboxes
- Radio buttons
- Date and time pickers
- Price calculators
- HTML
- Static information, such as headings or text
- Color swatches
- Extra products for upsells and cross-sells (more on this later)
Grouped order fields
You can combine the custom order fields however you like (e.g., checkboxes, dropdowns, radio buttons, color swatches, text fields, etc.) and display them on an individual WooCommerce product page.
Once you've grouped multiple order fields, you can display the same set of options on specific products, specific product categories, or globally, i.e., the entire store.
Advanced rules
This feature enables you to set rules for specific custom order fields.
For example, you can:
- Set some fields as required to make it mandatory for customers to select them.
- Show some fields as 'default' to nudge customers to choose them.
- Set minimum and maximum character limits for text and paragraph fields.
- Control the minimum and maximum quantity shoppers must add for each product.
- Use conditional logic to show or hide order fields based on shoppers' previous selections.
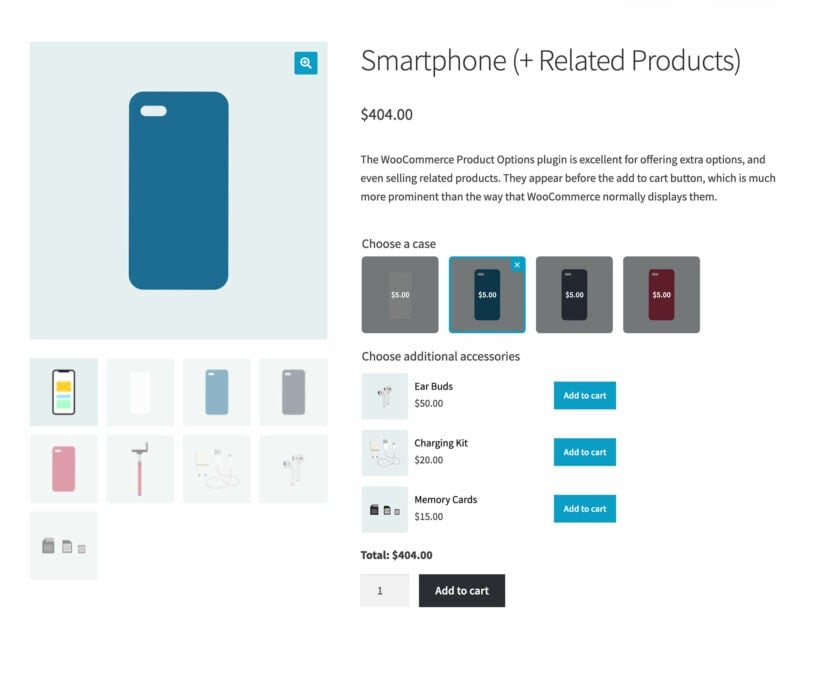
Upsells and cross-sells
You can add other products in the custom order fields to present them as upsells and cross-sells to customers. This helps increase your store's average order values (AOVs).
Steps to implement custom order fields for specific products in WooCommerce
1. Add WooCommerce Product Options to your site
The installation and setup steps are identical to those of any other WooCommerce plugin:
- Get WooCommerce Product Options.
- Save the plugin's zip files to a folder on your computer.
- Log into your WordPress admin area and go to Plugins → Add New → Upload Plugin.
- Select the 'Choose File' button, then add the WooCommerce Product Options zip file you downloaded earlier.
- Select Install → Activate.
- Activate the plugin license key (you'll get this from the purchase confirmation email from Barn2) in the setup wizard or at WooCommerce → Settings → Filters to complete the installation process.
2. Create custom order fields
You can start adding custom order fields once you activate the plugin. Follow these steps:
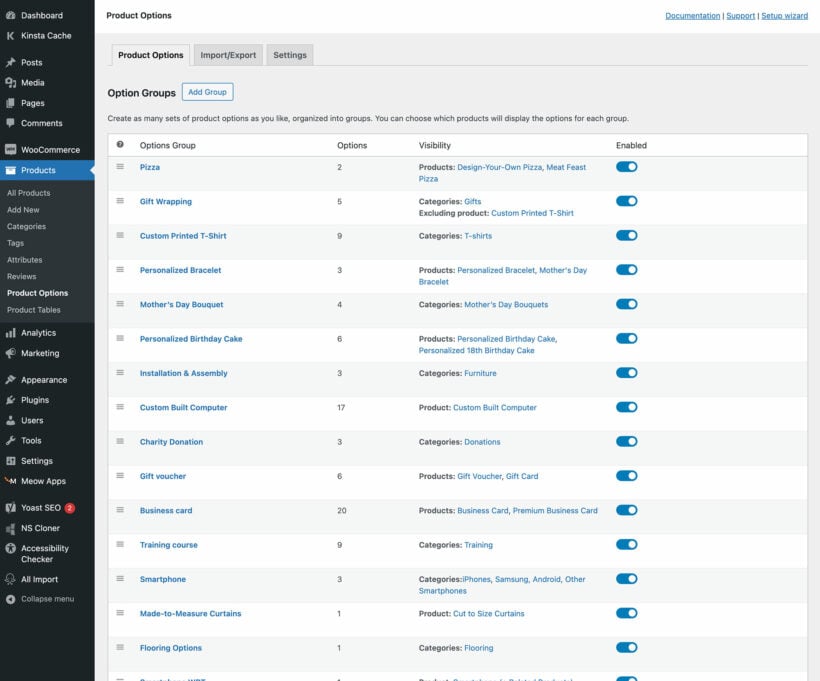
- Go to Products → Product Options in your WordPress dashboard.
- When you install the plugin, it automatically sets up a group of order fields to help you get started faster. Hover over the default group to edit or delete it. Select 'Add Group' if you'd like to create a new group of order fields from scratch.
- Name the custom order fields group.
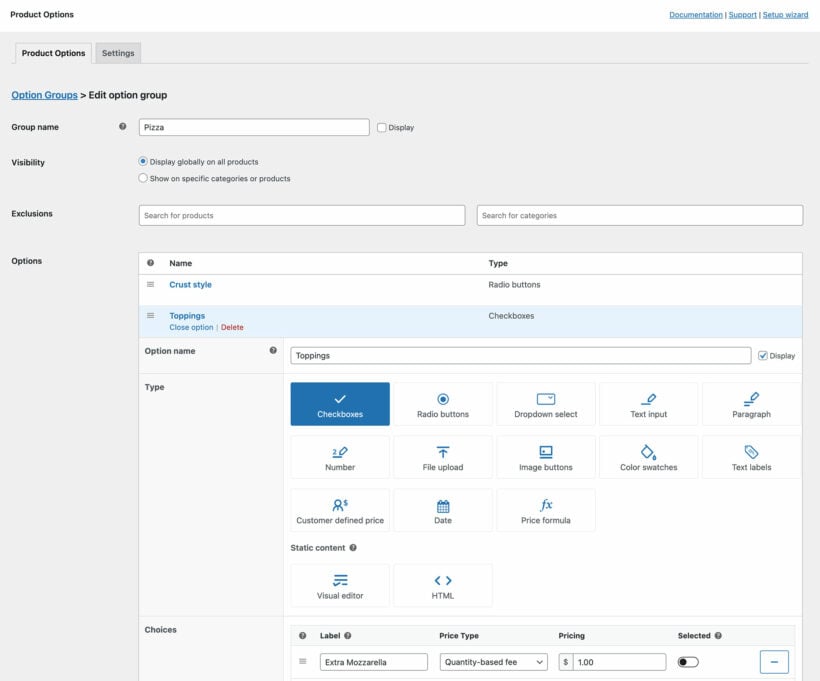 Choose from a wide range of custom field types and styles
 - Next, decide whether to display the order fields group. You have the following choices:
- Show the order fields globally, i.e. on all the single product pages.
- Show the order fields only on particular product categories or products.
- Exclude the order fields from appearing on specific products or categories.
- Click on 'Add Option' to create the order field and configure its settings. Here, I've chosen to add a checkbox.
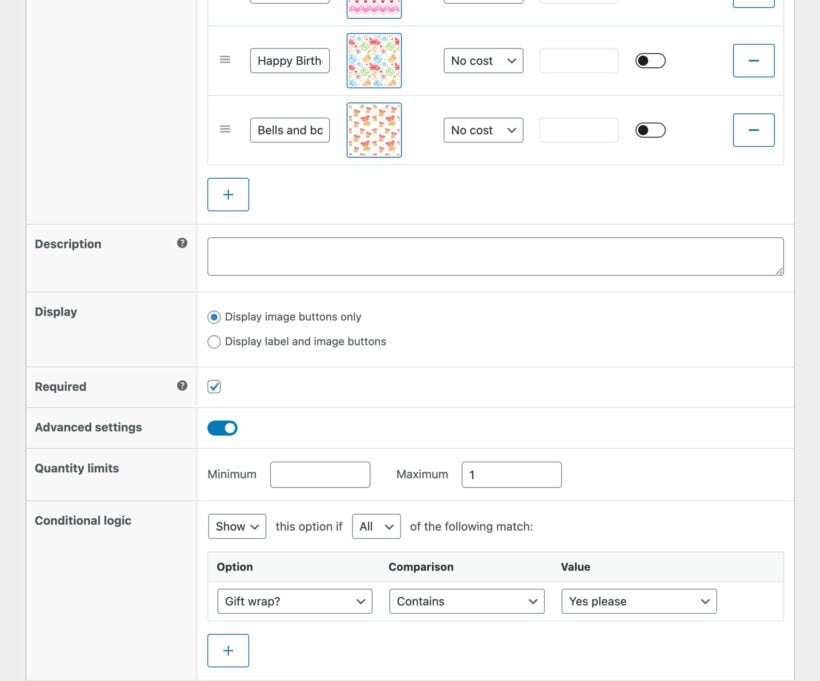
- Add a brief description for the custom order field group.
- Tick the 'Required' checkbox to make this order field mandatory. (Note: This is optional).
- Toggle the 'Advanced settings' button to set up quantity limits, conditional logic, and other advanced rules.
- Finally, select Add Option → Save Changes.
Repeat steps 5 to 9 to add more custom order fields to this group and create as many groups as needed.
How to manage and display custom fields with a checkout manager plugin
YITH WooCommerce Checkout Manager is a powerful plugin that lets you add, edit, and manage custom order fields on the checkout page. Use it to add custom order fields that apply to the entire order, rather than individual products.
With it, you can add new order fields, remove unnecessary ones, add extra information to fields using labels and tooltips, etc. It even lets you add conditional rules to show or hide order fields based on shoppers' previous selections and products added to their shopping baskets.
Key features
The YITH WooCommerce Checkout Manager plugin lets you:
- Create unlimited, new custom fields: Add checkboxes, radio buttons, multi-select fields, text fields, date and time pickers, etc., to the checkout page.
- Remove unwanted fields: Streamline the checkout form by removing or hiding fields that are not relevant to your ecommerce store.
- Reorder fields: You can easily rearrange default and new custom fields with its intuitive drag-and-drop interface.
- Add extra details to the order fields: It lets you add and edit the labels and tooltips to add additional information about each field.
- Add conditional logic rules: You can hide or show fields conditionally based on customers' cart contents, selected product categories, or previously selected fields.
- Verify important information during checkout: Javascript Field Validation is baked in to validate that the information entered into mandatory fields is correct and ask shoppers to correct it if necessary.
- Customize the style options of the order fields: You can change the colors and dimensions of the input field border, error messages, etc., to tailor the look and feel of the order fields.
Steps to manage and display custom fields with a checkout manager plugin
Follow these instructions to install and customize the plugin on your store.
1. Activate the YITH WooCommerce Checkout Manager plugin
The setup steps are similar to that of any other pro WordPress/WooCommerce plugin:
- Buy the YITH WooCommerce Checkout Manager plugin.
- Save the plugin's zip files onto your computer.
- Head to your WordPress admin area and access the Plugins → Add New section.
- Select the 'Upload Plugin' button, followed by Install Now → Activate to add the plugin's zip file to your site.
- Go to YITH → License Activation within your WordPress admin.

- Select the 'Checkout Manager' plugin, enter your email and license key, and click on 'Activate'.
General settings
Before we add new custom order fields, let's customize some essential general settings that define how default and new fields work.
- Access the YITH → Checkout Manager → Settings tab within your WordPress dashboard.
- Enable JavaScript field validation to add a notification for customers to fill in details on mandatory order fields.
- If you enable VAT JS Validation (EU), the plugin will automatically identify the VAT code based on the customers' selected country. (Note that this option will only apply to customers based in the EU.)
- Enable tooltips for the order fields. Tooltips appear to help guide customers when they click on required fields.
Add new custom order fields
Go to YITH → Checkout Manager → Checkout Fields in your WordPress dashboard.
- The plugin groups the WooCommerce checkout fields into three: billing, shipping, and additional fields. Go to the tab for the type of order field you wish to add.
- In this walkthrough, I'll select the 'Billing' tab.
- Type in the name for the field in the 'ADD NEW FIELD' box. Here, I entered 'Billing Address'.

- Next, choose the appropriate options for the custom checkout field:
- Name: You can amend the field name you entered earlier.
- Type: Choose the kind of field to add from the dropdown: text, big text area, radio choice, number, phone, checkbox, dropdown choice, multi-choice, date, time, password, or heading.
- Label: Add the title for the order field.
- Placeholder: Enter the default text customers will shown in the order field.
- Tooltip: Enter the text for this field's tooltip.
- Position: Choose where the order field is displayed on the list. If you select "First", it'll be displayed on the left, "Last" shows it on the right, whereas "Wide" will use up the entire line space.
- Class: Enter graphical CSS rules for the order field. (This is optional).
- Label Class: You can enter graphical CSS rules for the order field. (Also, optional).
- Validation: Set validation rules if required. (This is essential for order fields for VAT, phone numbers, country codes, email addresses, or zip codes.)
- Required: Make the order field mandatory.
- Clear row: If you entered this new order field as the first in position and if the last field follows it, you must check this option for the second field.
- Display in emails: Select whether to show this new custom field data in the order confirmation email templates or not.
- Display in order detail pages: Select whether to show this new field in the order meta data and on the summary section of the order page or not.
- Click on the 'Save' button on the bottom-right corner of the modal window.
Editing default and custom order fields, labels, and tooltips
You can use YITH WooCommerce Manager to as a checkout field editor for both default and new custom field values. Follow these instructions:
- Go to YITH → Checkout Manager → Checkout Fields from your WordPress admin.
- Select the tab for the type of order field: billing, shipping, or additional fields.
- In this walkthrough, I've chosen the 'Additional Fields' tab.

- Select the "Edit" button for the order field you wish to update to access the edit panel.
- Amend the appropriate option for the order fields:
- Name: Change the field name if you prefer.

- Type: Update the order field type to text, password, phone, number, radio choice, multi-choice, checkbox, big text area, dropdown choice, date, time, or heading.
- Label: Amend the title of the order field.
- Placeholder: Update the default text shown to customers in the field.
- Tooltip: Amend the text for the tooltip.
- Position: Modify where the order field is displayed on the list. If you select "First", it'll be displayed on the left, "Last" shows it on the right, whereas "Wide" will use up the entire line space.
- Class: Amend graphical CSS rules for the field (optional).
- Label Class: Amend graphical CSS rules for the label (optional).
- Validation: Update validation rules if required. This option is essential for VAT, country, phone numbers, email IDs, or zip code fields.
- Required: Make the order field mandatory.
- Clear Row: If this order field is the first in position and if the last field follows it, you must check this option for the second field.
- Name: Change the field name if you prefer.
- Click the 'Save' button from the bottom-right corner of the modal window.
Set up conditional logic rules
Conditional logic rules allow you to show or hide order fields based on:
- The contents in customers' carts.
- The product categories customers selected.
- The previously selected order fields.
Follow these instructions to add conditional logic to new or existing order fields on the WooCommerce checkout page:
- Go to YITH → Checkout Manager → Checkout Fields in your WordPress admin.
- Add a new order field or edit an existing field using the above instructions.
- Setup conditional logic by updating the following options:
- Field: Select the first criteria to apply the conditional rule to. For example, the order field or shopping cart contents.

- Condition: Specify the requirement for the order field.
- Value: Input the field's value to trigger the conditional behavior, e.g., product/category IDs, etc.
- Action: Select whether to hide or show the current order field if the condition is met.
- Required: Enable this if the current order field is mandatory.
- Field: Select the first criteria to apply the conditional rule to. For example, the order field or shopping cart contents.
- Select the (+) sign if you wish to add more conditional rules for this order field. If not, select 'Save' from the bottom right corner.
Hide or remove order fields
You can use YITH WooCommerce Manager to hide or remove default and new custom order fields. For instance, you might want to move the coupon code field nearer to the add to cart button or remove the order notes field.
Follow these instructions:
- Go to YITH → Checkout Manager → Checkout Fields within your WordPress admin.
- Select the tab for the order field you wish to hide or remove: billing, shipping, or additional field.
- Locate the order field you wish to get rid of.
- You can't delete default order fields; you can only hide them from non-admins view. Select 'Disable' or 'Remove' as relevant.

- Scroll to the bottom of the page and save your changes.
Rearrange the order fields
Follow these instructions:
- Go to YITH → Checkout Manager → Checkout Fields within your WordPress admin.
- Select the tab for the order field you wish to rearrange: billing, shipping, or additional field.
- Locate the order fields you want to reorder.

- Use the icon on the left side of the page to drag and drop the order fields.
- Drag and drop the order fields as desired using the icon on the left side of the screen.
- Scroll to the bottom of the page and save your changes.
Update the style options
Go to YITH → Checkout Manager → Settings → Style options within your WordPress admin dashboard. Here, you can update the following style options, including:
- Layout of the checkout style

- Input field height
- Input field border
- Input field border on focus
- Input field border(correct info) color
- Input field border (wrong info) color
- Error message color
That's about it! Head to the checkout pages on your site's front end to view the custom order fields.
Related: How to add custom fields to WooCommerce product variations.
Common use cases for custom order fields in WooCommerce
Virtually any kind of store can benefit from using WooCommerce custom order fields. Here are some typical examples:
- Jewelry stores can capture messages to be engraved and confirm customers' preferred font styles.
- Gift shops can add fields to capture personalized messages and confirm gift wrapping preferences for each order.
- Subscription box services can let customers specify dietary restrictions, product preferences, or customization options while shopping on the single product page.
- Catering service providers can add custom order fields to let customers select the date, time, and location to organize and coordinate each event.
- Made-to-order apparel stores (and any other store that sells custom products) can add fields to collect size information from customers, reducing the likelihood of returns and complaints due to size-related problems.
- Florists can let customers select preferred delivery dates and times to ensure their floral arrangements are delivered safely and on time.
- Gadget stores can offer product add-ons and upsells (e.g., for extended warranties, accessories, or tech support services) on the single product page.
Add and display WooCommerce custom order fields today!
The default order fields in WooCommerce are a decent start. But they're simply not ideal for most stores.
If you want to collect more specific information to fulfill orders or streamline the buying experience, you'll need custom WooCommerce order field plugins.
In this detailed guide, I've shown you how to edit the default order fields, add and edit new ones, rearrange and remove both default and custom order fields, and more using two stellar plugins:
- WooCommerce Product Options is the best plugin to present extra product options and collect information on the product page, which will apply to that specific product.
- YITH Checkout Manager lets you customize and manage order fields on the checkout page, collecting data which applies to the entire order.
You can use each plugin on its own or combine them to maximize your revenue.
Get started with YITH Checkout Manager and WooCommerce Product Options today!