The secret to successful tour booking setup with WooCommerce

Discover the best WooCommerce tour booking plugins and their features. I'll also show you step-by-step how to use them to create a fully functioning online booking website for your tour company or agency.
According to Statista, online booking will drive 76% of total revenue by 2028 for businesses in the tours and travel industry. So, if you run a tour or travel business, creating a site that advertises your company and accepts online bookings is a no-brainer.
In this step-by-step tutorial, I'll show you how to create a beautiful site that maximizes revenue for your tour business. We'll need these WooCommerce tour booking plugins:
- YITH Booking and Appointments for WooCommerce: This adds the booking calendar widget in which customers can select the date and time for their tour and enter their details.
- WooCommerce Product Options: To offer extra free options and paid add-ons - aka upsells and cross-sells - and to collect custom messages from customers while they are booking the tour.
What features should every tour booking WooCommerce website have?
Every tour operator provides a highly specialized service. This makes creating a website that showcases your offerings, accepts online bookings, and offers a great user experience tricky.
However, it's not impossible. Regardless of how unique your offerings are, here are the essential features every tour business's website should include:
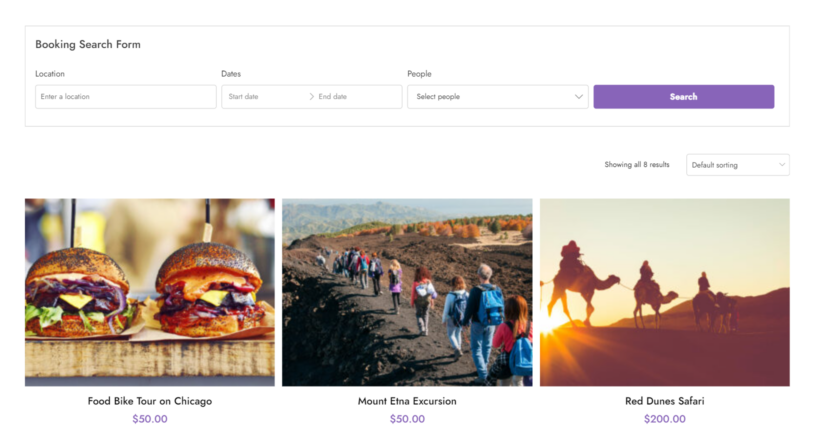
Customizable booking calendars
Booking calendars provide a visual representation of available dates and times for customers to easily choose suitable start and end dates for their tours. This way, customers can view the entire tour schedule at a glance and conveniently plan their trips.
If you offer multiple tours - for instance, imagine a tour company or travel agency offering various tours like hiking, sightseeing, and boat trips on one website - you should be able to create a separate booking calendar for each.
Real-time availability tracking
It's highly likely that multiple people will view a tour at the same time, especially if your company is also listed on third-party tour and travel booking websites.
Real-time availability tracking automatically updates the calendars based on bookings and cancellations. This only shows available time slots and prevents overbooking or double booking.
Customizable booking options and notes
Customizable booking forms streamline the reservation process by collecting specific details from each person.
You can tailor the tour booking page to gather essential information like personal details, special requirements, dietary preferences, etc. This makes it easier to plan tours and allows customers to add notes to personalize their preferences.
Add ons (upsells & cross-sells)
Offering upsells and cross-sells - aka upgrades and complementary products - during the booking process can help increase the average transaction value and further tailor guests' experience.
For instance, a wine-tasting tour business can offer add-ons of complementary products, such as cheese platters, souvenir wine glasses, personal guided vineyard tours, etc. A wildlife safari attached to a guest house can offer hotel booking options, airport pickup, and more.
User-friendly interface
People book tours for positive experiences and memories. Their perception about whether or not the tour is pleasant begins with their booking experience.
People should be able to navigate the site easily, find the information they need, e.g., relevant tour options, dates, and booking steps, and complete bookings without unnecessary complications.
Central admin dashboard
Site admins need an organized space in the backend to oversee bookings, track performance, and make necessary updates.
Having easy access to essential information and analytics like the number of bookings, available slots, revenue generated, etc., makes it easier to set up a proper bookings management system.
How do I integrate a tour booking system into my WooCommerce site?
You need these tour and travel booking plugins to create a fully functional booking system on your WordPress website:
- YITH Booking and Appointments for WooCommerce: This plugin adds a booking calendar with a date and time picker where guests can select the slot for their tour and gather their details.
- WooCommerce Product Options: This plugin lets you offer additional free and paid add-ons (upsells and cross-sells) and collect custom messages from people while they are booking the tour.
Both plugins are fully compatible with each other, and work fine with different WordPress themes. Now, let's look at the step-by-step process to integrate a WooCommerce booking system into your site.
Build tour booking pages with YITH Booking and Appointments for WooCommerce
YITH Booking and Appointments for WooCommerce is a versatile plugin that lets you accept and manage monthly, daily, hourly, and minute bookings for any type of tour and travel business.
Its modern interface is easy to use for WooCommerce newbies (you can easily set it up even if you don't have any coding knowledge) yet powerful for expert developers. Also, it looks pretty great on the front end and is responsive on all screen sizes: mobile phones, tablets, desktops, etc.
Here's a preview of how it looks on the front end of a demo WooCommerce site.
Key features
- Customizable booking calendar: Customers can view available time slots (monthly, daily, hourly, minutes) and make reservations.
- Real-time booking availability: You can sync the booking calendar on your website with third-party tours and travel booking platforms like Expedia, Thomas Cook, etc., that you are present on. It updates availability in real-time.
- Personalized booking forms: Design the form to collect necessary custom details, e.g., dietary preferences or special requests, during the reservation. Either create these extra options directly in the plugin, or select existing variations to display as checkboxes, radio buttons, buttons, etc.
- Pricing rules: Set tailored rules for specific slots. For instance, you can charge lower rates for weekday tours and higher rates for weekends and during peak seasons.
- Automatic email notifications: Send automated emails to notify customers and site admins/staff about booking confirmations, reminders, cancellations, etc.
- Admin dashboard: Monitor and manage bookings, access detailed analytics, and create comprehensive reports to optimize your tour business's operations from a central dashboard.
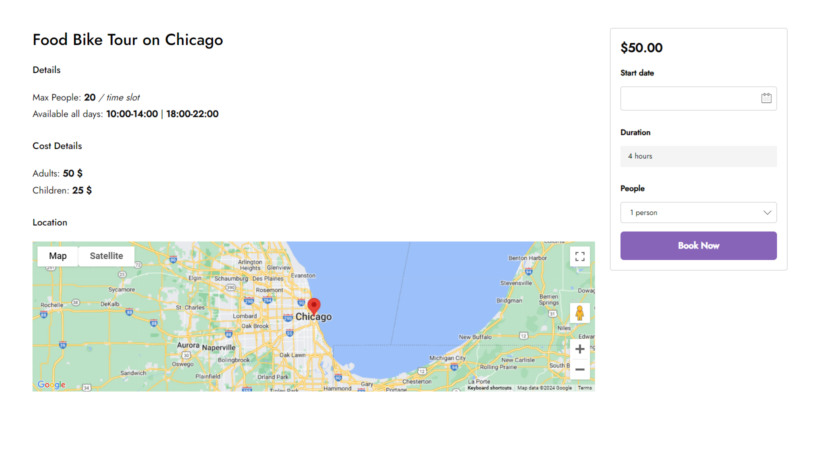
- SEO-friendly optimization: You can embed your location Google Maps into the tour booking page using a shortcode and add a dedicated page to cover frequently asked questions (faqs) to boost your presence on search engines.
Note: YITH Booking and Appointments for WooCommerce is a complete booking solution. These are the highlights of the feature list; go here to check out the complete details.
How to build tour booking pages with YITH Booking and Appointments for WooCommerce
Setting it up is pretty straightforward, just like any other WordPress plugin. Follow these steps:
1: Install and activate the plugin
- Purchase and download the YITH Booking and Appointments for WooCommerce plugin from their website.
- Log into your WordPress admin dashboard and navigate to the 'Plugins' section.
- Click on Add New → Upload Plugin, then upload the plugin zip file you saved to your computer earlier.
- Select Install Now → Activate.
- Head to YITH → License activation to enter your email ID and license activation key.
2: Create a bookable product
- Head into your WordPress dashboard and go to WooCommerce → Products → Add New to add a new product. This will create the landing page on your site for customers to book their tour.
- Locate the 'Product Data section' on the Add/Edit Product screen, select 'Bookable Product', and tick the 'Virtual' product checkbox.

- Within the 'Product Data' module, go to Booking Options → Settings to configure the settings for that specific tour further.
- Add the Booking duration (in minutes, hours, days, or months).
- Click on the calendar range selector to show the calendar in the booking form on this tour booking product page.
- Specify the default day to be shown on the booking calendar. You can either show the current day, the present day + one, the first available date, add a custom date, or leave the field blank.
- Toggle on the Full Day booking option. Note that if this is enabled, only one customer can book that specific tour per day; it'll show other customers that it's fully booked.
- Leave the allowed start day field blank to allow customers to book on any day of the week or select a specific day of the week on which booking can start.
3: Set up booking rules
- Next, go to Booking Options → Booking Terms within the 'Product Data' module.

- Optional: Specify the maximum number of bookings per unit. For example, if you can only accept a maximum of 5 bookings in an hour, set it to 5. Leave this blank if you don't want to set limits.
- Optional: Specify a minimum and maximum booking duration that customers can select. For example, if each tour lasts a minimum of two days. Leave this blank if you don't want to set limits.
- Optional: Specify a minimum or maximum advance reservation for the booking.
- Optional: Add buffer time between bookings. This can be useful if you need a pause between bookings, e.g., due to staff shift change, for equipment servicing, etc.
- Toggle on the 'Require confirmation' option if you wish to enable manual approval for each booking request.
- Toggle on the Allow cancellation option to allow customers to cancel bookings after reserving them. Note that if enabled, you can specify time limits in which customers can cancel after booking. For example, you can accept cancellation requests up to three days before the tour start date.
- Within the 'Product Data' module, go to Booking Options → Costs to set the price for that specific tour.
- Specify the base price for each slot, i.e., per hour/day/week.
- Optional: Specify the fixed base price for each slot.
4: Configure advanced pricing rules for off-season bookings
Setting different prices based on on- or off-season pricing can be a smart business move for tour providers for the following reasons:
- Fluctuating demand: For example, a tour company operating in a beach destination might charge higher prices during the summer months when tourists flock to enjoy the sun and sand. Conversely, when fewer people visit during the winter, they might offer discounted rates to attract guests seeking a break from colder climates. This approach keeps revenue flowing throughout the year.
- Fluctuating costs: The cost to operate a tour business often varies between on- and off-seasons. For instance, you might negotiate lower rates with vendors or reduce staffing levels. So you can adjust prices accordingly.
Steps to configure advanced pricing rules for off-season bookings
- Head into your WordPress dashboard, go to WooCommerce → Products, and select the specific tour booking page to add the pricing rules.

- Find the 'Product Data section' and navigate to the 'Costs' tab.
- To set pricing rules:
- Locate the 'Advanced Price Rules' section and click on the 'Add rule' button.

- Enter the name for the rule (e.g., 'Summer pricing') and select the condition "Custom date range."
- Add the date range using the 'From' and 'To' calendars.
- Enable the 'Rule changes the base price' or 'Rule changes the fixed fee' options to match the pricing system for the tour.
- Specify the appropriate price increase or decrease, e.g., by a specific amount or a percentage, multiply or divide the price, or set a new exact price for the off-season.
- Locate the 'Advanced Price Rules' section and click on the 'Add rule' button.
- Finally, click on the 'Add Rule' button, then scroll up and save the details.
5: Insert the booking form into the product page
You can add the booking form to your site's product page by inserting the 'Bookable product' form block (1) into the product page if you use a block theme or (2) into the sidebar on the product page.
You'll also find options to customize the form on the right section of the Add/Edit product screen. Here, you can select the elements to hide or show (e.g., product title, meta, rating, etc.) and add custom text and styling for the book button.
Finally, head over to the front end to make sure everything works as intended.
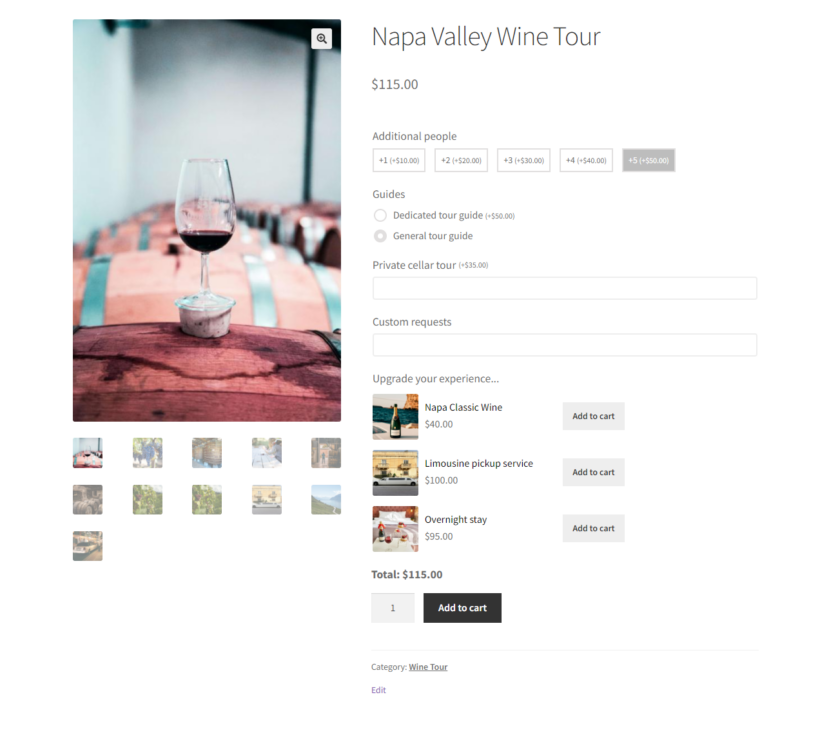
Personalizing the booking experience with WooCommerce Product Options
After you've added the booking calendar and form to your WordPress and WooCommerce site, it's time to enable customers to choose extra options to further personalize their tour experience. We'll need WooCommerce Product Options for this.
WooCommerce Product Options is a powerful yet lightweight plugin that lets you offer free options and paid add-ons to customers right on the tour booking page (checkout the live demo here).
Offering extra options and upsells on the main tour booking page instead of the checkout page is super convenient for customers, as they can add to their booking without having to navigate away from the page or go through a separate process (see below screenshot).
Key features
- There are 16+ field types to choose from, including checkboxes, dropdowns, radio buttons, color/image swatches, file uploads, text fields, date/time selectors, products, and more.
- You can price add-ons using a variety of price options, including a flat fee, character-based, quantity-based, percentage increase or decrease, and even create a custom price calculator.
- It lets you use advanced features like conditional logic to hide or show fields based on guests' previous selections on the tour booking page. For instance, it will display various vehicle options only if the customer has opted for pickup.
- You can make some fields required, specify default values, set minimum and maximum quantity limits, and add other advanced rules.
- You can recommend additional tours or additional products you sell to customers on the tour booking page.
Here are a few use-case examples to give you ideas of how to offer add-ons
- A city walking tour can offer to extend the length of each tour for $10 per person.
- A wine country bus tour can offer extras like exclusive access to private cellars, premium wine tastings, and a guided tour with the winemakers themselves.
- A wildlife safari tour can offer VIP upgrades like premium seats on a tour bus or private jeep.
- An eco-friendly adventure tour operator can upsell extras such as airport pickups, rental bookings such as bikes or segways, or special requests for the tour.
There's no limit to what you can offer as add-ons. Think creatively about which extra options most customers would appreciate and would happily pay for.
Benefits of offering extra options and add-ons on the tour booking page
- It boosts revenue: If you offer relevant add-ons, there's a good chance that a sizable number of customers will opt for them. This increases the average transaction cost and overall revenue for your business.
- Better value perception: Allowing customers to select their preferred options and add-ons helps tailor their experience. For instance, some tourists may want to elevate their tour package with options like guided photo sessions, exclusive access, or personalized itineraries. This level of personalization upgrades their impression of your services and enhances their satisfaction levels.
- It enhances customers' experience: Add-ons can improve the customer experience by offering them options they may not have thought of. This could include special access, additional activities, or luxury upgrades that make their tour more enjoyable and memorable.
- It simplifies the tour booking experience: Instead of overwhelming customers with a long list of add-ons, you can use the conditional logic feature to display only options that are directly relevant for each customer. This improves the overall user experience (UX) and enables customers to complete the booking without unnecessary distractions.
How to add extra options and add-ons to tour booking pages with WooCommerce Product Options
It only takes around 15 minutes to set up WooCommerce Product Options and add extra add-ons. Follow these steps:
- Purchase and download the WooCommerce Product Options plugin (pro version only).
- Install and activate it.
- Create product options using this guide. You can either add extra options directly to the tour product, or select other products which will be displayed as upsells on the tour page.

Enhance your WooCommerce tour booking experience today!
WooCommerce is the best ecommerce platform for all kinds of tour companies and agencies.
These WooCommerce tour booking plugins will help you create a custom, full-featured website that both looks good and accepts online bookings:
- YITH Booking and Appointments for WooCommerce: Add booking calendars and allow customers to select suitable slots.
- WooCommerce Product Options: Sell additional options and upsells to increase the amount that customers spend when they book a tour.
Get the plugins and set up your tour booking website today!