

As an online store owner, you might consider adding product quick view to improve search engine visibility, increase conversions, and boost sales.
The easiest way to do this is by using WooCommerce quick view shortcodes to add quick view buttons anywhere on your site. Use this guide if you need; quick view buttons on blog posts, product lists on custom pages, or advanced shortcode implementations.
Choosing a quick view plugin? See our comparison of best WooCommerce quick view plugins.

With this in mind, in this article, we’ll explain how to use a WooCommerce Quick View shortcode to add quick view buttons to on your product pages, normal pages, blog posts, widgets or anywhere else. We’ll also explore three different methods for showing quick view buttons outside of the main shop and category pages.
3 ways to show WooCommerce quick view buttons outside of the main shop page
Using WooCommerce quick view shortcodes to showcase products outside of your shop page and category pages is a great way to simplify the buying process and improve your customers’ shopping experience.
For the purpose of this tutorial, we’ll assume that you already have a WooCommerce store set up with some products added to it. Here, we’ll explore 3 ways to use shortcodes to display products with quick view buttons:
- Use the WooCommerce Quick View Pro shortcode to insert quick view buttons
- Use WooCommerce quick view shortcodes to display products (with quick view)
- Use WooCommerce Product Table to list products in a table (with quick view)
Read about each approach and choose the one that best fits your needs, or use the jump links above to skip directly to each section. You can also implement all three methods on your WordPress site at the same time!

Method 1: Use the WooCommerce Quick View shortcode to add quick view buttons
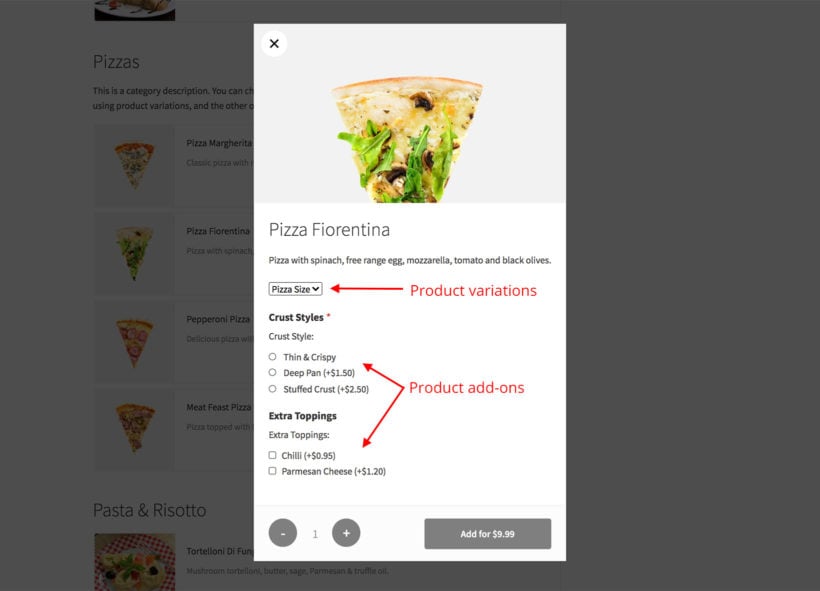
The WooCommerce Quick View Pro plugin comes with a shortcode that you can use to insert quick view buttons anywhere on your site. It adds a simply quick view button for a specific product, with whichever text you'd like to display in the button.
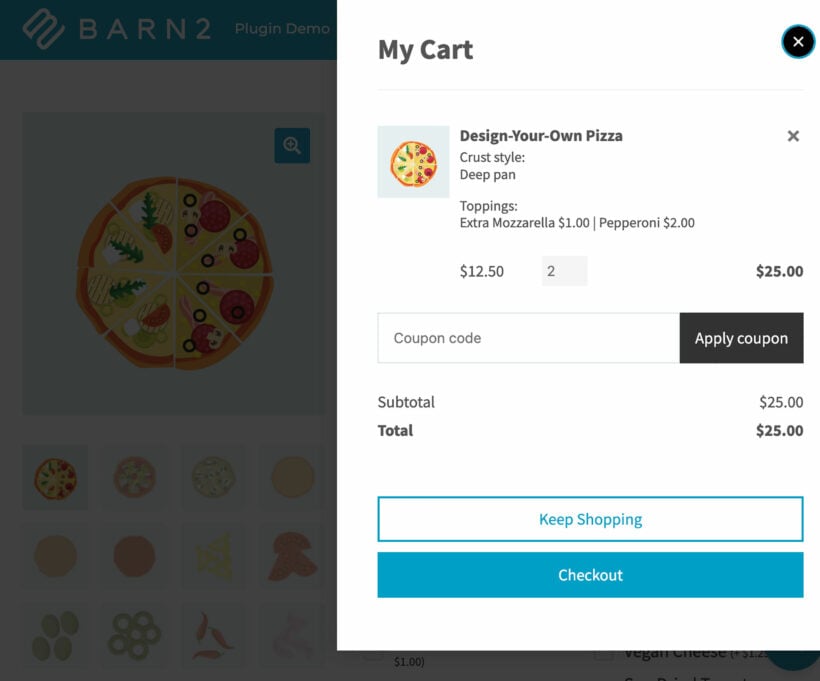
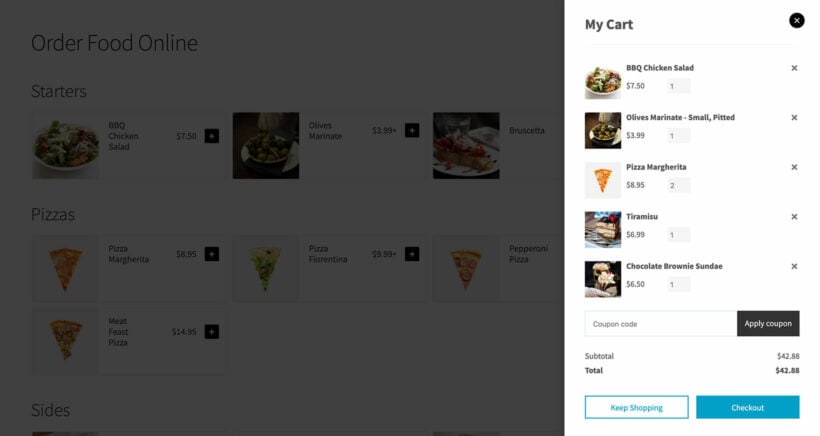
This is perfect for providing a quick way to buy a specific product, for example within a blog post. The customer uses the quick view button to view product details in a lightbox. They can choose quantities and variations, and add the product to the cart - all without leaving the page.
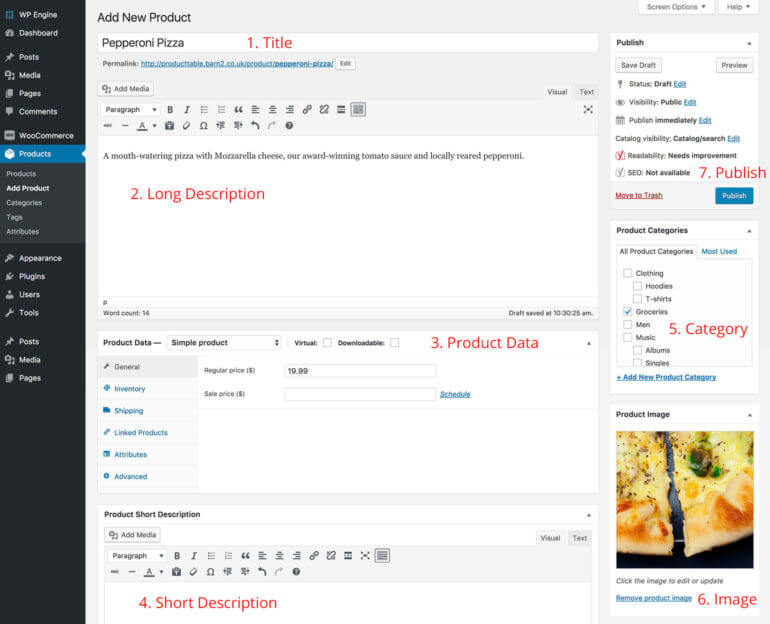
How to set it up
Step 1: Install WooCommerce Quick View Pro
- To get started, get the WooCommerce Quick View Pro plugin and install and activate it on your WordPress website.
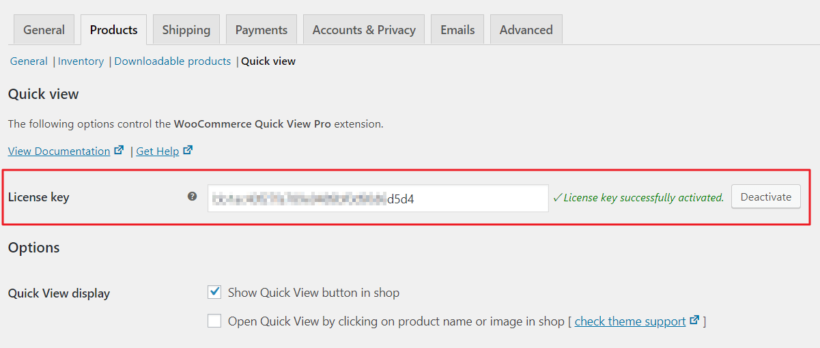
- Next, head over to WooCommerce → Settings → Products → Quick view to activate the plugin license.
- Click the Save Changes button at the bottom of the screen to proceed.
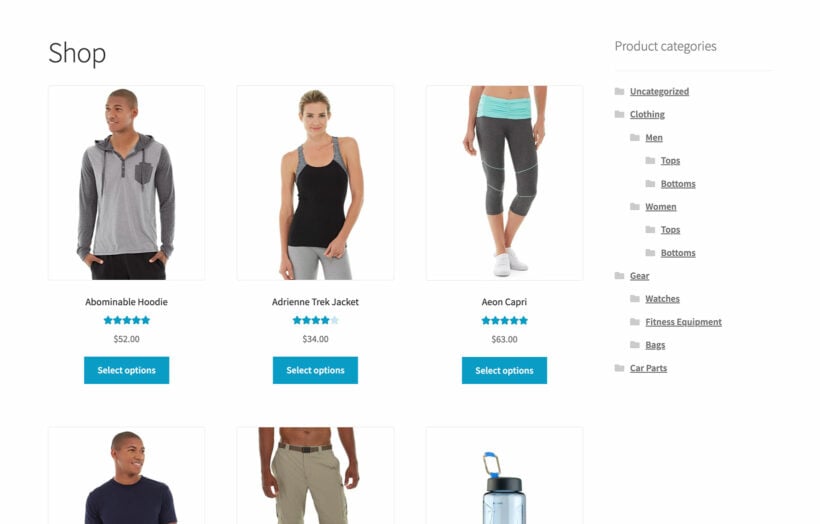
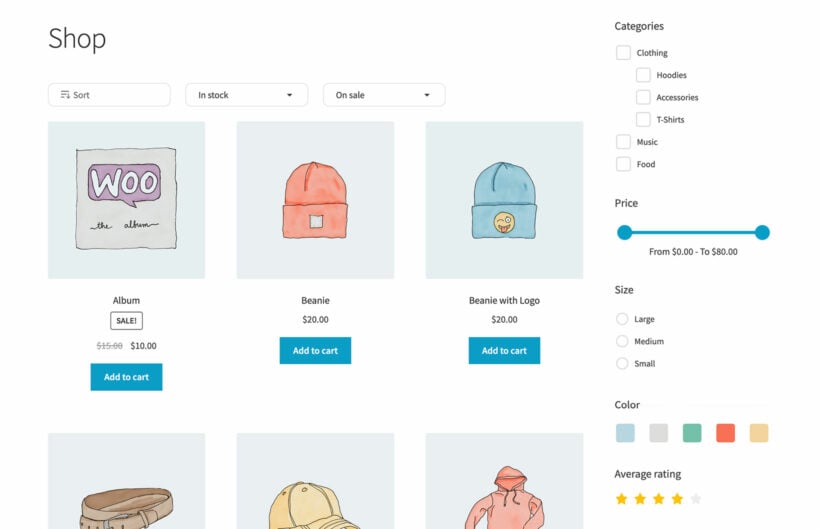
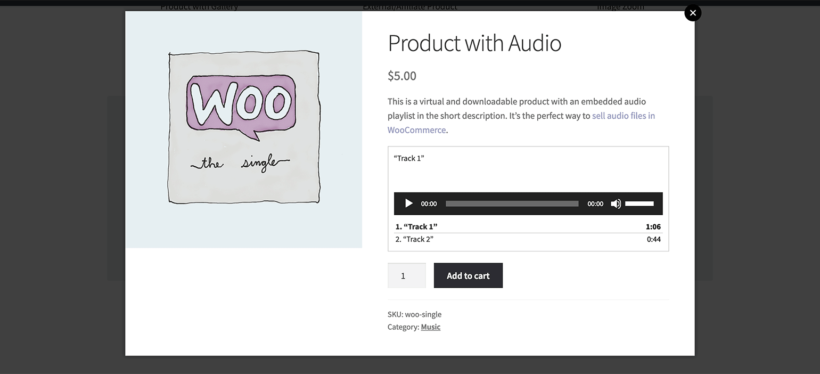
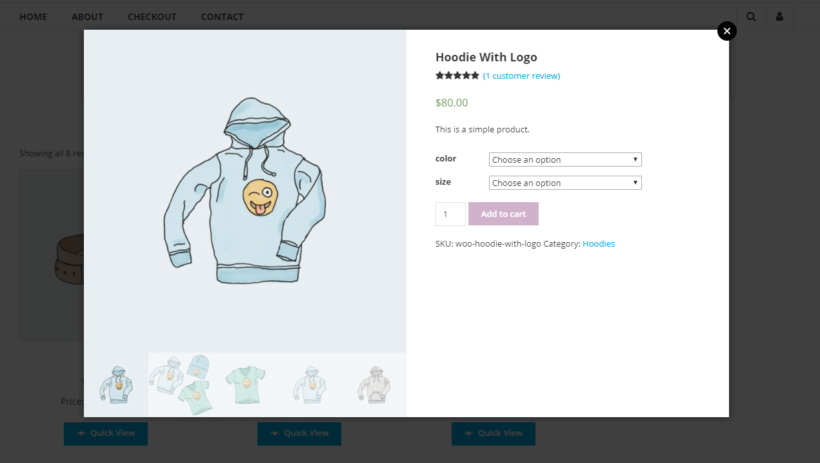
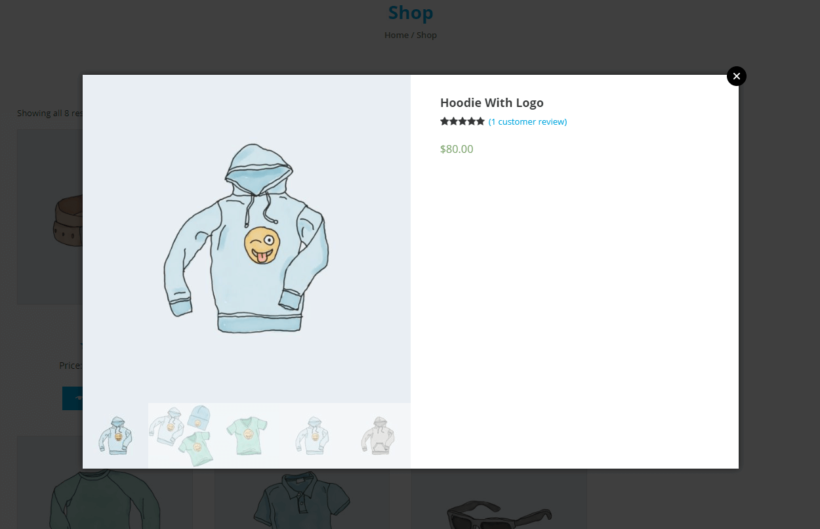
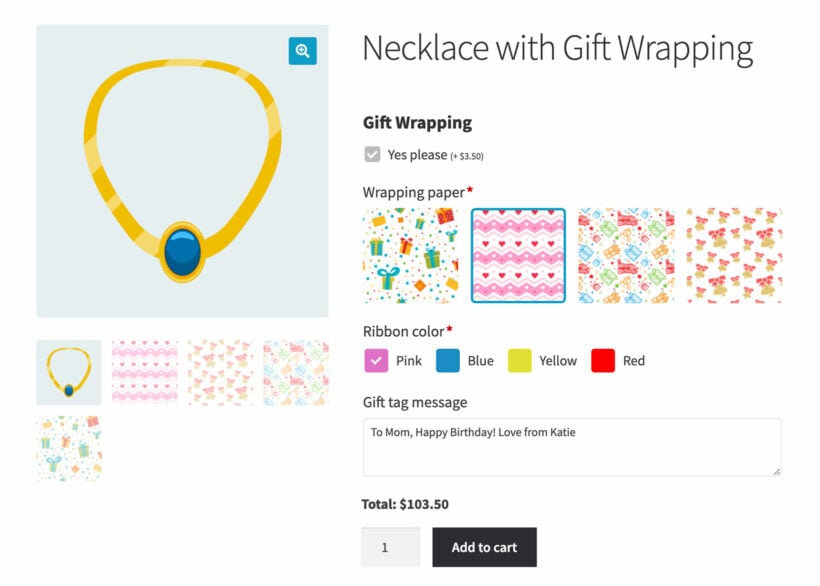
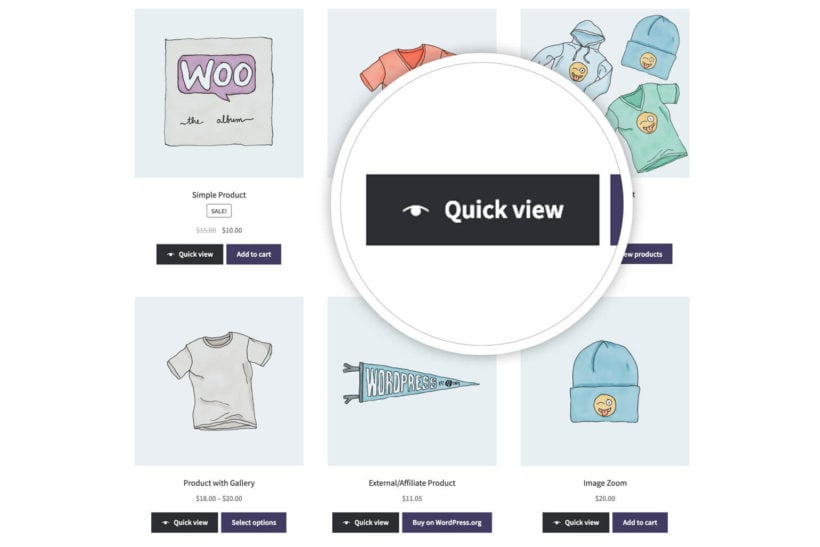
WooCommerce Quick View Pro automatically adds quick view buttons to your main shop page and category pages once you activate it. Whenever a customer clicks on the Quick View button, it will display each product in a quick view lightbox like this:

However, since we want to add quick view buttons elsewhere on our site, we’ll use the WooCommerce Quick View Pro product shortcode.
Step 2: Add the WooCommerce Quick View Pro shortcode
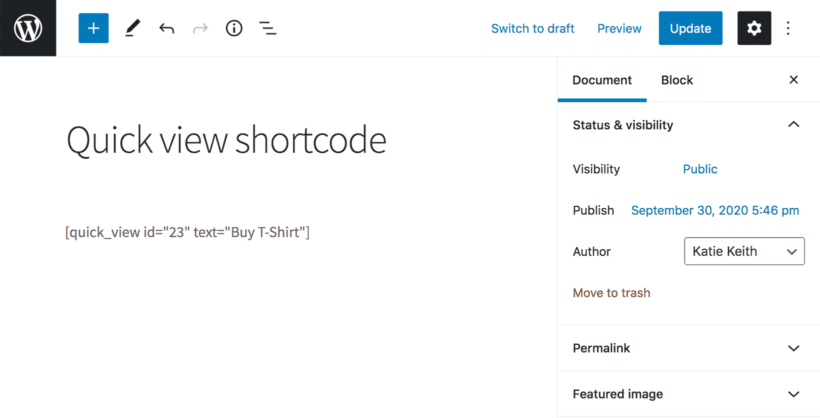
- Now, go to the page or post where you want to add a quick view button and add the shortcode
[quick_view id="123"]shortcode. - Replace "123" with the ID of the product (you can get this by hovering over a product in the main Products list in the WordPress admin).
- The button text will come from the Quick View plugin settings page. You can change this for each individual button by adding the text option to the WooCommerce Quick View Pro shortcode like this:
[quick_view id="123" text="Buy Hoodie"]
- Repeat steps 1-3 for each quick view button that you'd like to add. For example, if you're writing a blog post about 5 featured products then you would use the shortcode 5 times, each with a different product ID.
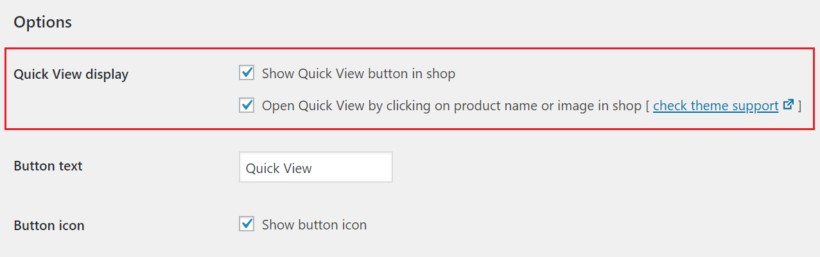
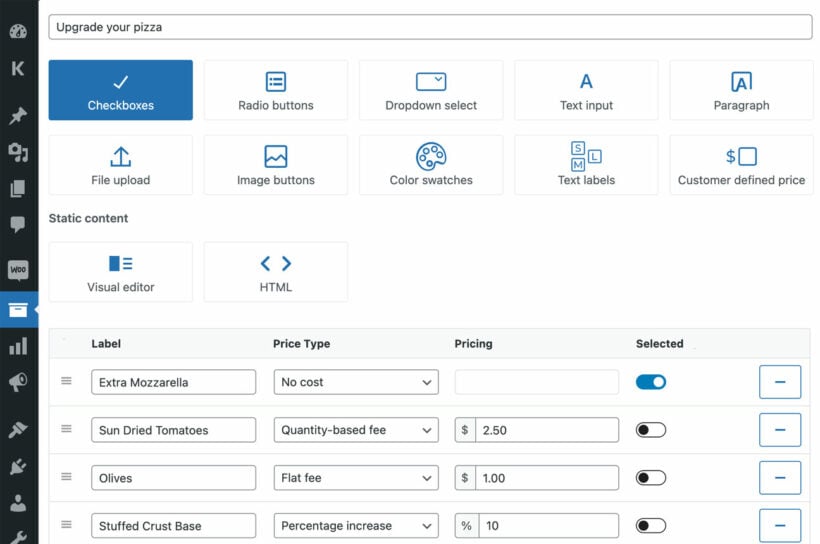
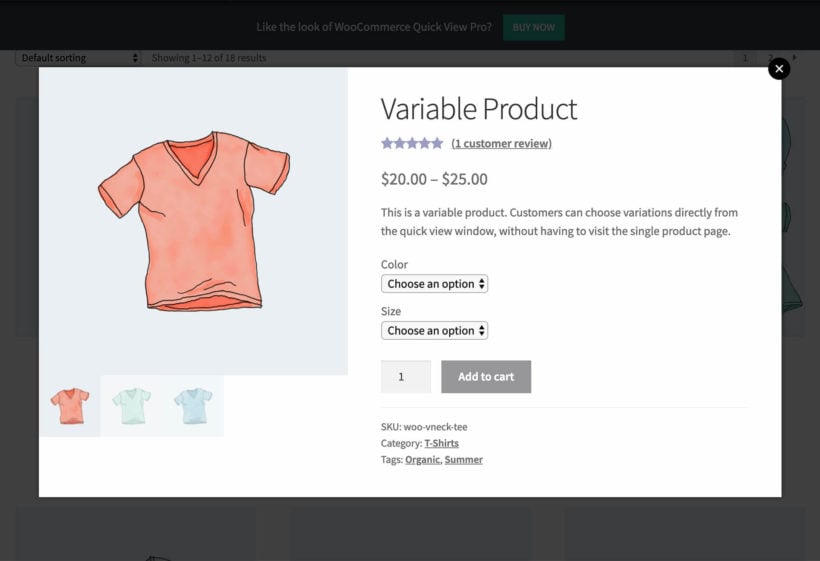
Step 3: Choose which product details to display in the quick view lightbox
With WooCommerce Quick View Pro, you can choose which product details to display in the quick view lightbox. Here’s how:
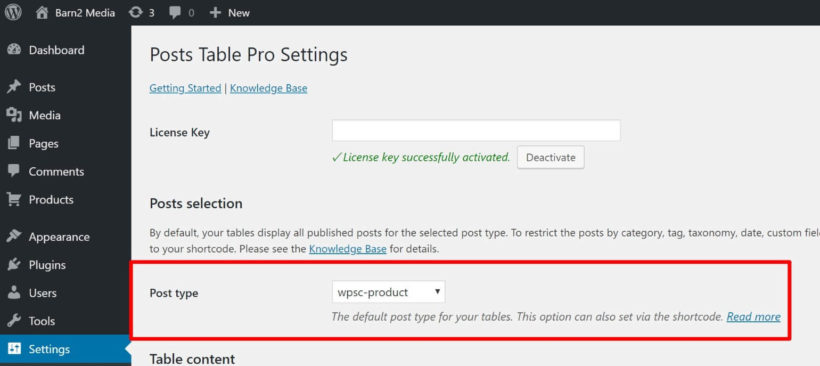
Navigate to the plugin’s settings screen (WooCommerce → Settings → Products → Quick view) and scroll down till you reach the Product details section.

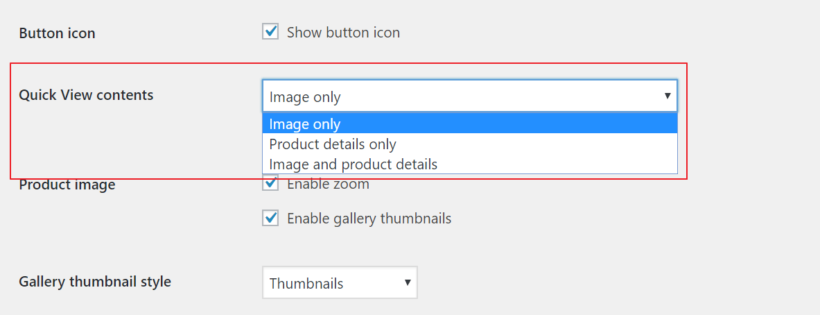
From there, you can choose to display any combination of product details in the quick view lightbox including:
- Reviews
- Price
- Short description
- Add to cart button
- Meta information (like product SKUs and categories)
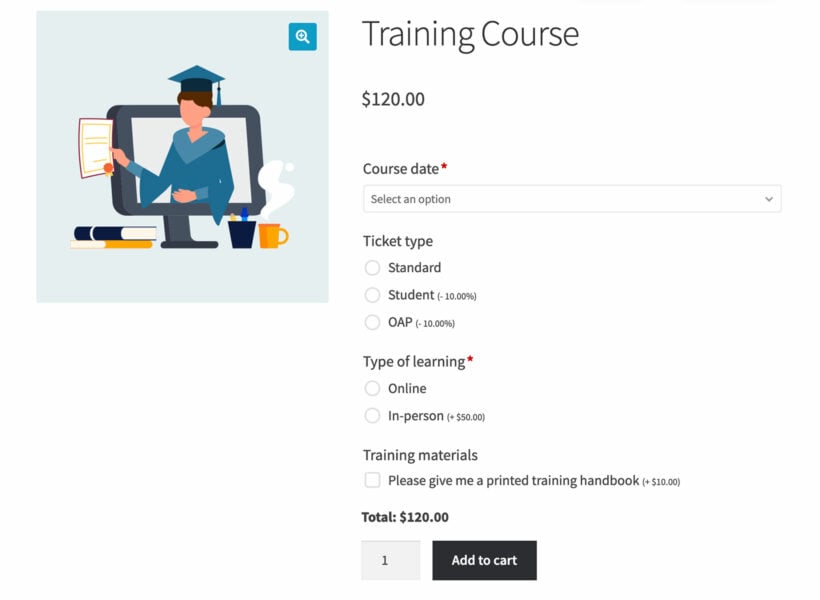
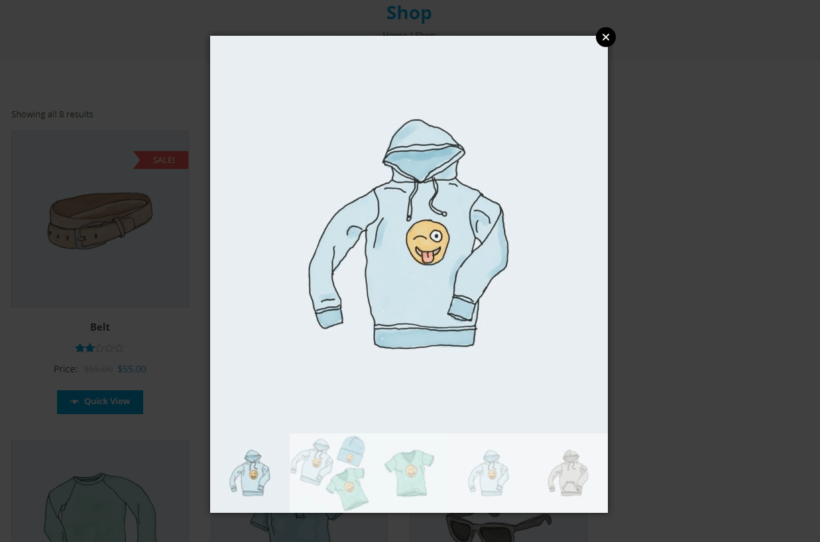
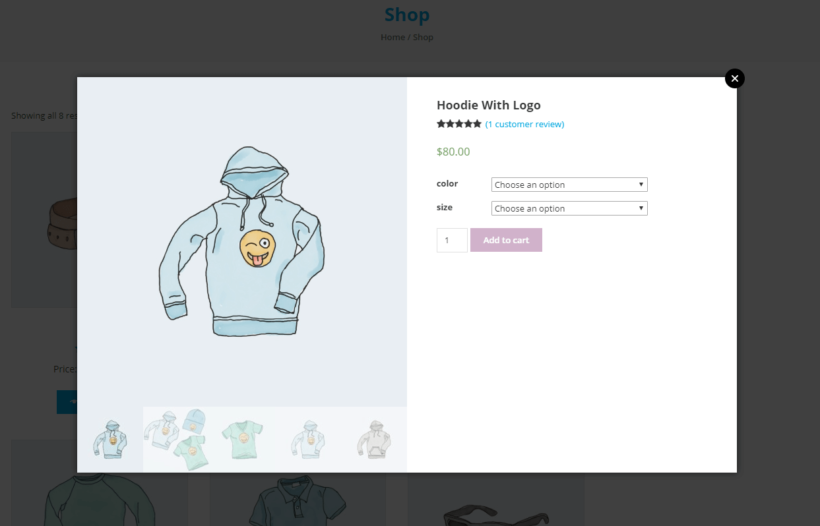
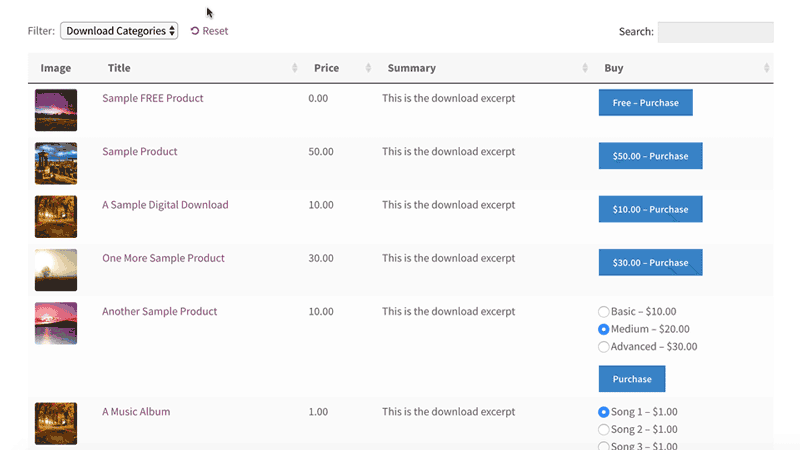
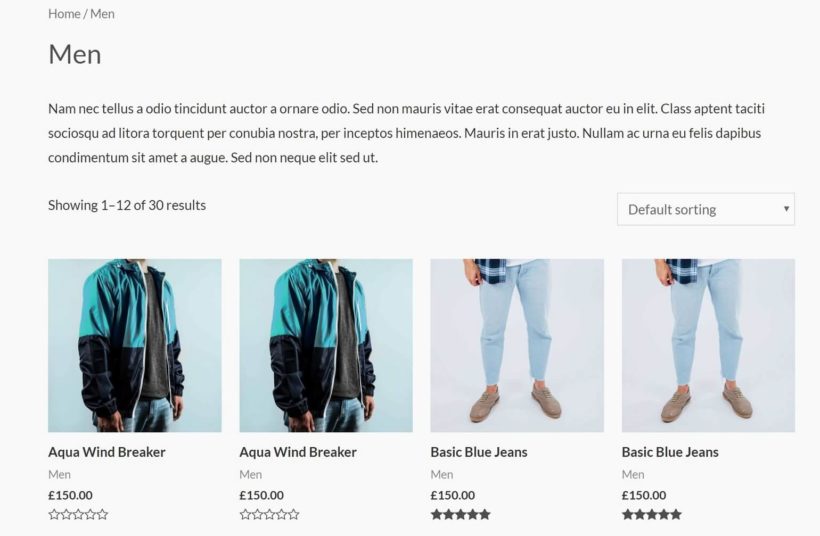
For example, if you only wanted to display the product’s price, variations, and add to cart button, your quick view lightbox would look like this:

Method 2: Using shortcodes to add products (with quick view) to any page or post
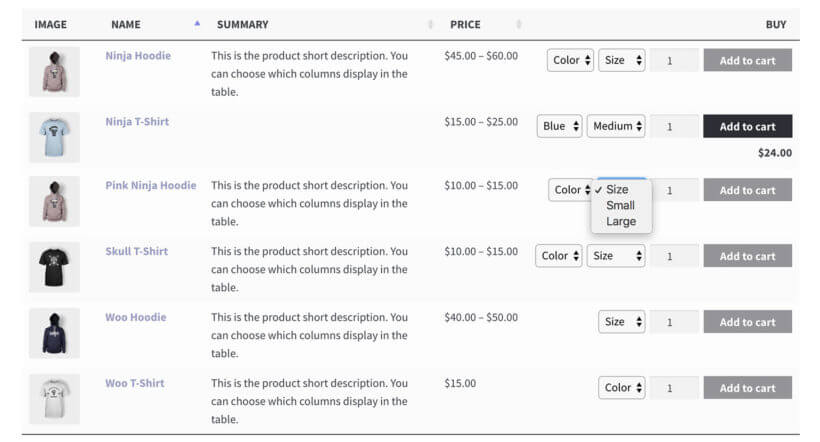
This method uses shortcodes to display WooCommerce products on product pages or anywhere on your online store.
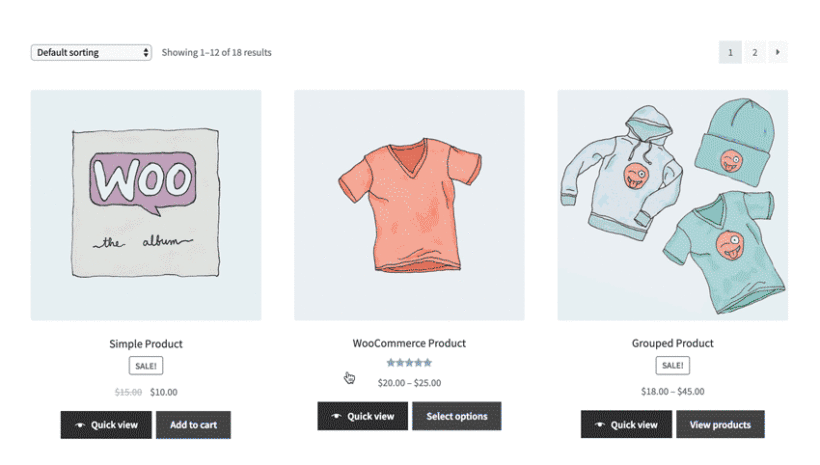
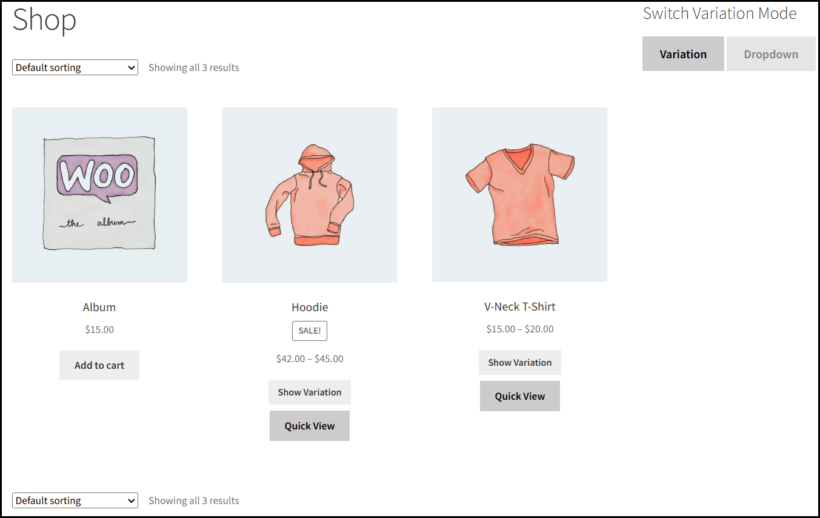
Unlike method 1, it displays extra information about each product including the featured image, name, price and add to cart button. If you use these shortcodes with WooCommerce Quick View Pro installed, then it will include a quick view button for each product. You can also use this method to list multiple products at once, each with its own quick view button.
How to set it up
First, install WooCommerce Quick View Pro on your site - as described in Method 1, above. Next, you can start listing products using the built-in shortcodes. If you've got the quick view plugin installed, then each shortcode will include quick view buttons as well as the product image, name and add to cart button:
- Open the page, post or widget that you want to add the selected product(s) to.
- Next, use the
[products]shortcode to display products by ID, SKU, categories, or attributes.
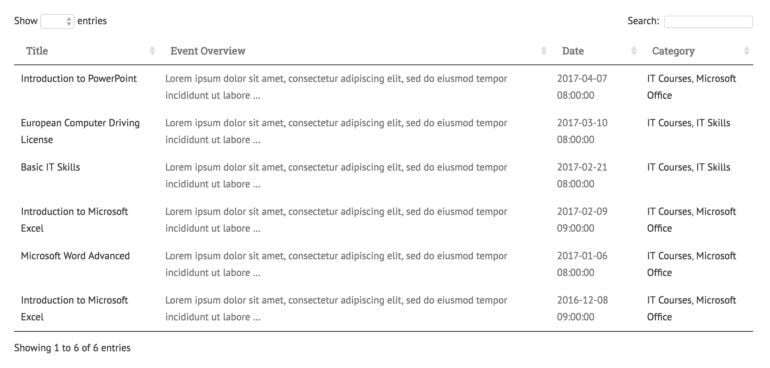
The [products] shortcode is pretty flexible, so let’s take a look at some examples:
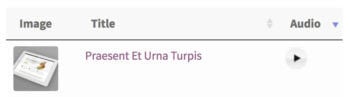
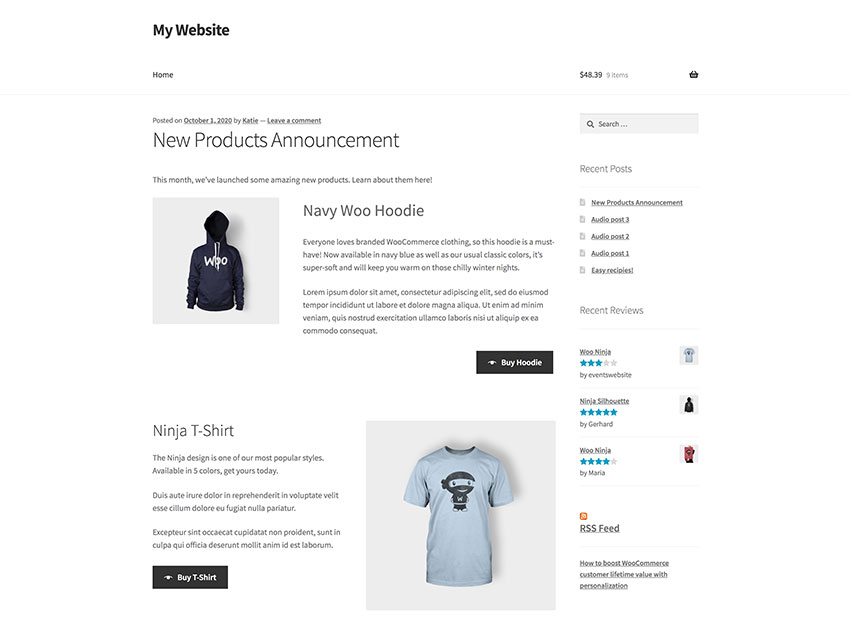
Example #1: Single product
If you want to showcase a specific product, you can use the product’s ID or SKU with the shortcode:
[products skus="woo-hoodie-with-logo"]
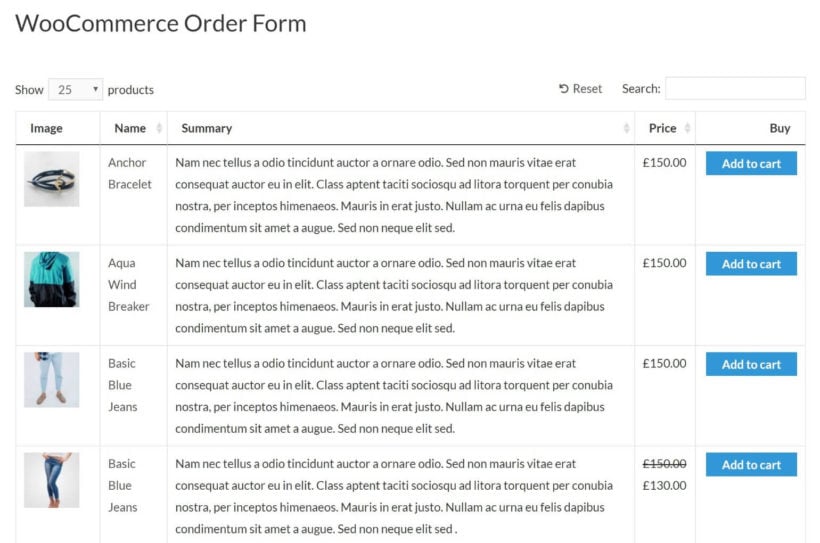
It would look something like this:

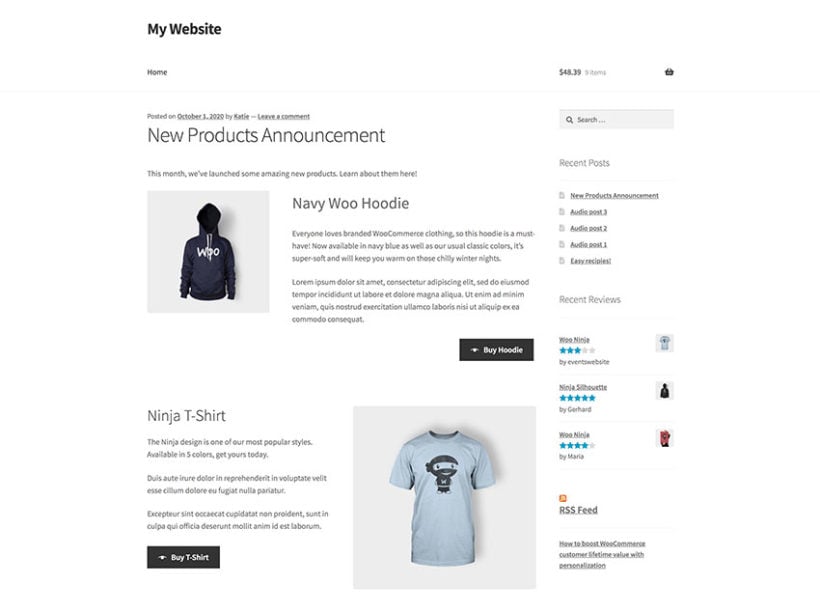
To list multiple products, just add the ID or SKU or multiple products, separated by commas, e.g.: [products skus="woo-hoodie-with-logo,blue-tshirt"]
Example #2: Featured products
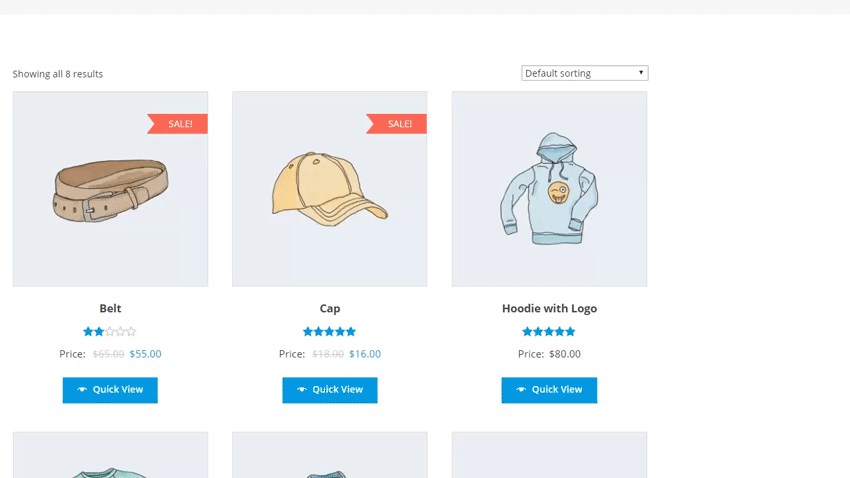
If you want to showcase featured products with quick view buttons, you can use this shortcode:
[featured_products per_page="3" columns="3"]
It would look something like this:

Example #3: Best-selling products
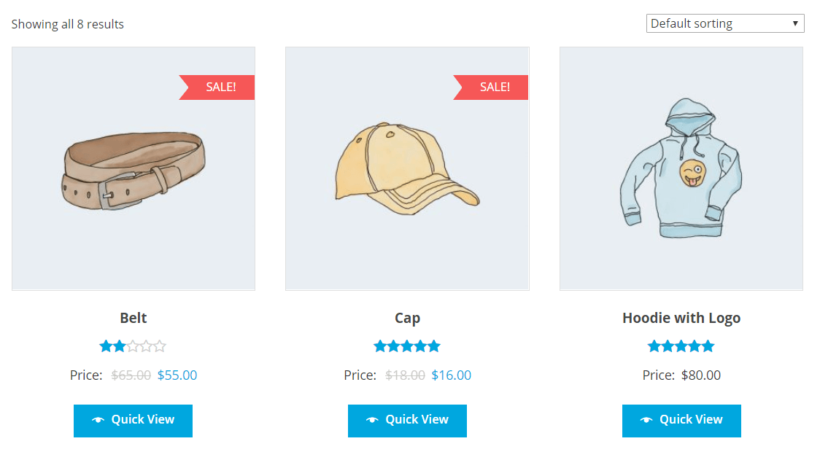
If you want to showcase your best-selling products, you can use this shortcode:
[best_selling_products per_page="3" columns="3"]
It would look something like this:

Example #4: Recent products
If you want to showcase your recent products, you can use this shortcode:
[recent_products per_page="3" columns="3"]
It would look something like this:

This WooCommerce quick view shortcode makes it easy for users to add products anywhere on their site. This way, whenever a customer lands on your blog post, they can use the Quick View button to launch the quick view lightbox and:
- View product details – including product name, description, reviews, price, and meta.
- Select variations and set quantities.
- View order details and add products to cart.
Further reading: Check out the official documentation for WooCommerce product shortcodes for more ideas! You could, for example, add your top rated products or related products to a blog post.
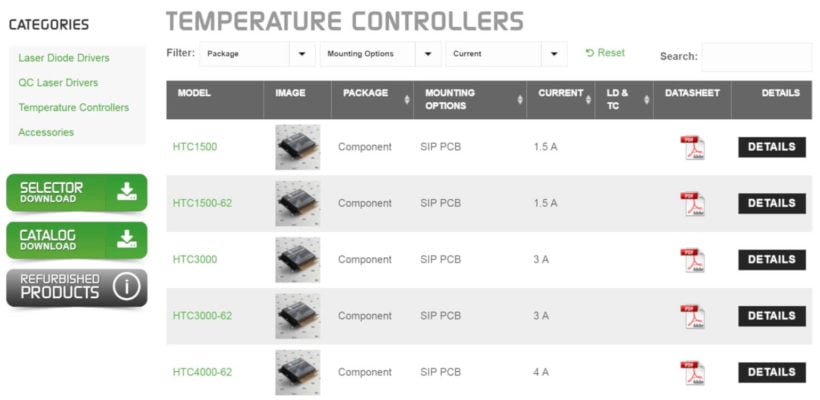
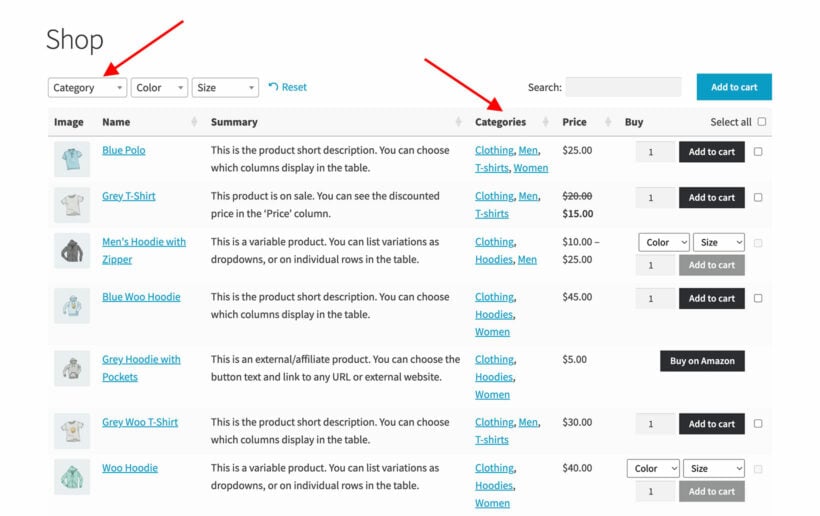
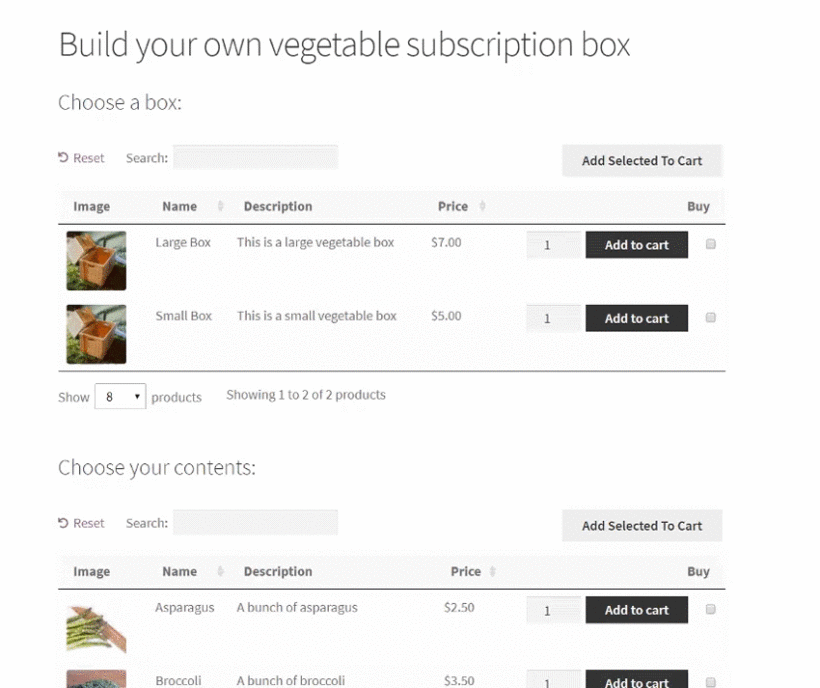
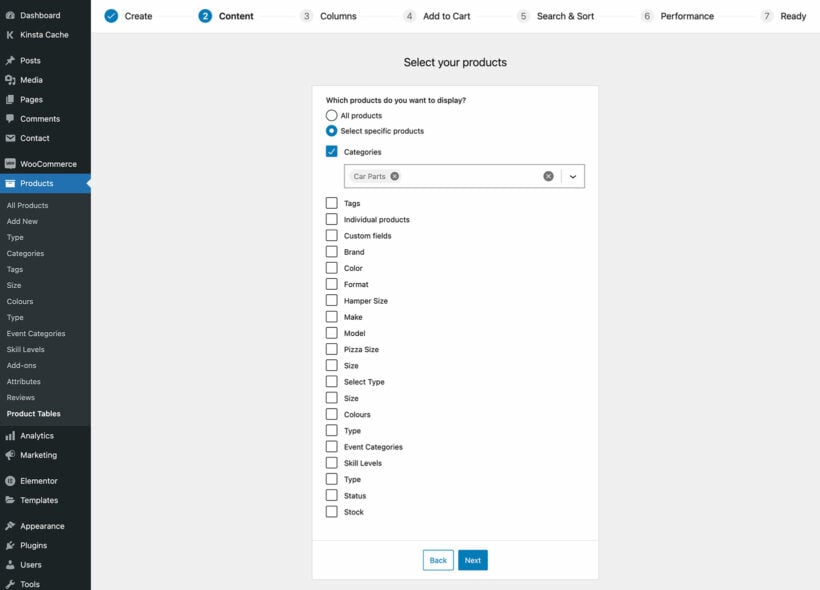
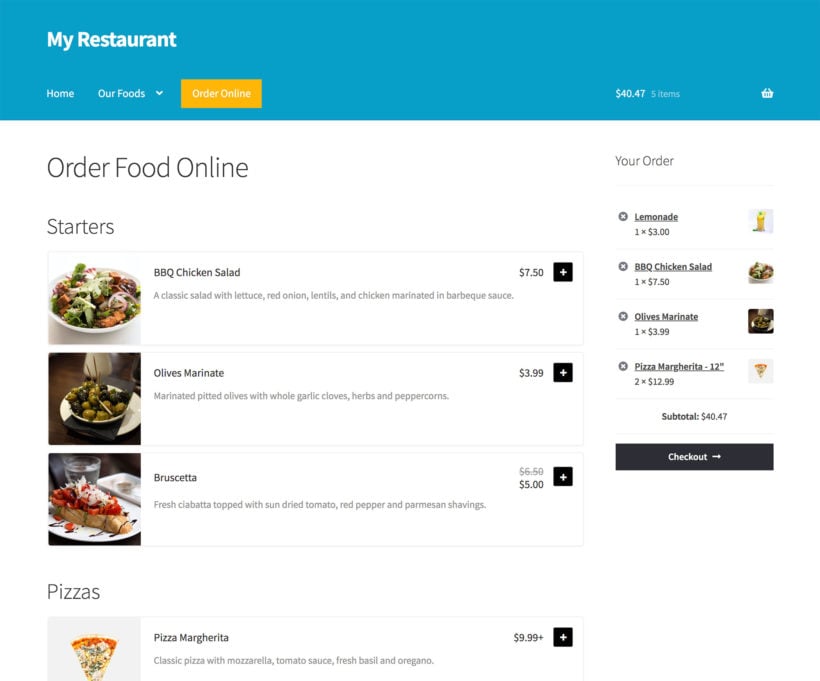
Method 3: Using WooCommerce Product Table to display products in a table layout on any page or post
By following the step-by-step instructions below, you’ll be able to list WooCommerce products in a table layout (with quick view) in blog posts and pages.
We’ll explain how you can add a product table to a blog post. However, you can follow the same steps to list products anywhere on your online store. For example, you might consider adding a product table shortcode to your WooCommerce checkout page (or WooCommerce cart page) or list sale products on a landing page.
Step #1: Install WooCommerce Quick View Pro and WooCommerce Product Table
To get started, get WooCommerce Quick View Pro and the WooCommerce Product Table plugin and install and activate both to your WordPress website. Next, head over to:
- WooCommerce → Settings → Products → Quick view (for WooCommerce Quick View Pro)
- WooCommerce → Settings → Products → Product tables (for WooCommerce Product Table)
… to activate the plugin licenses.
Click the Save Changes button at the bottom of the screen to proceed.
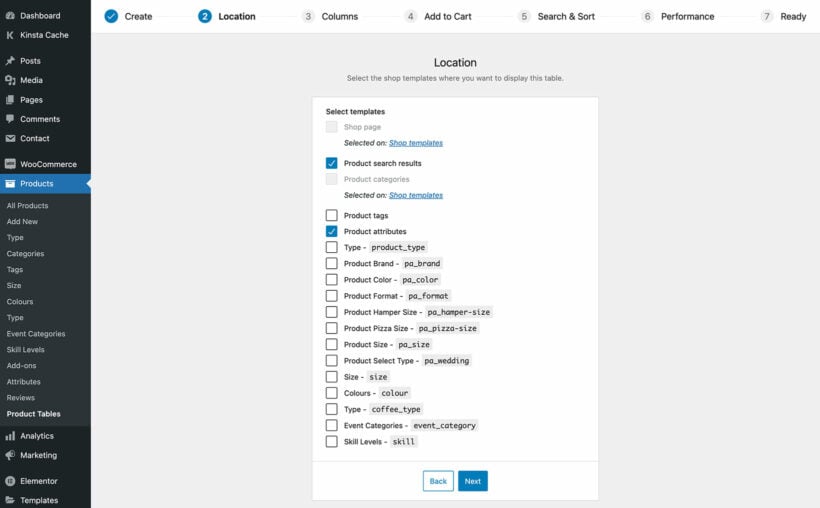
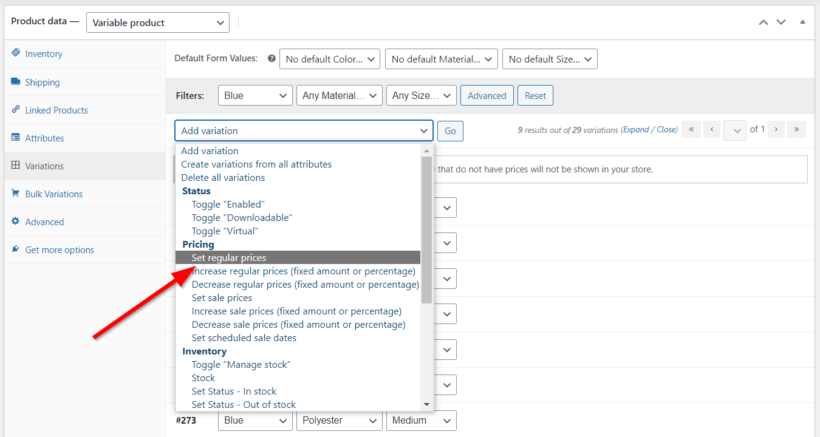
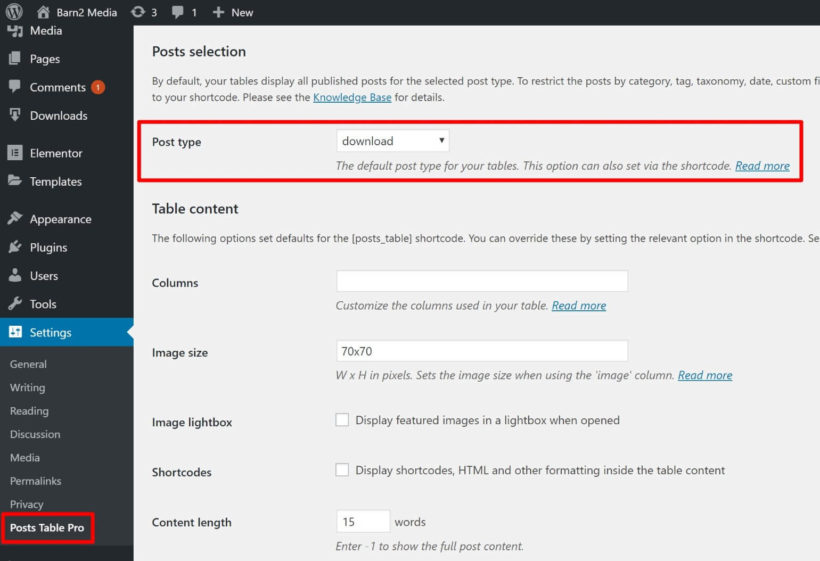
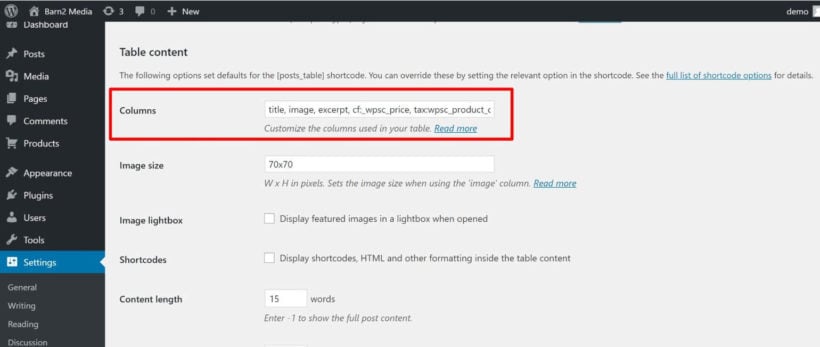
Step #2: Configure the product table settings
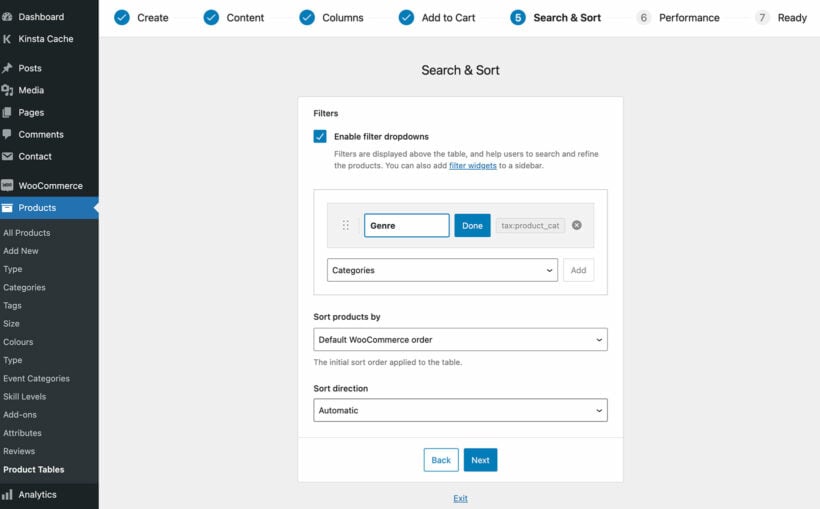
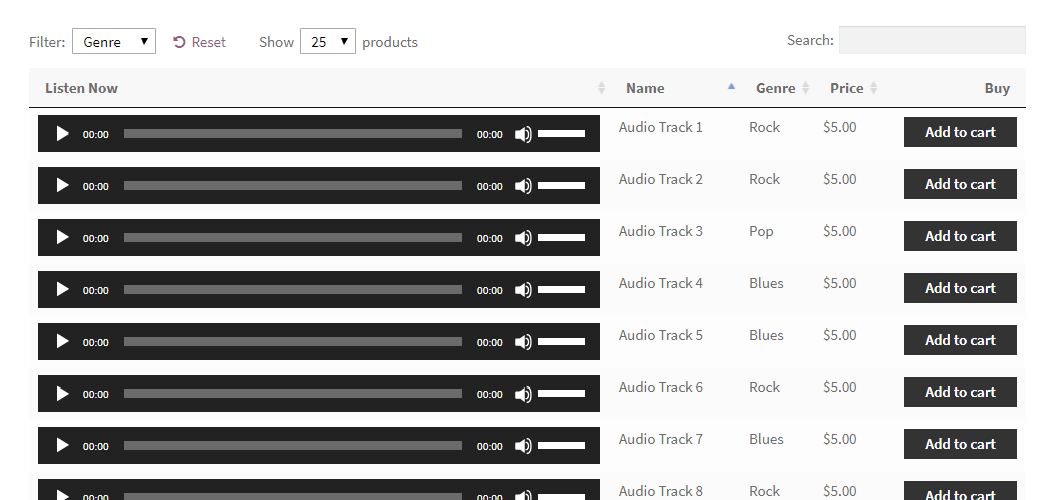
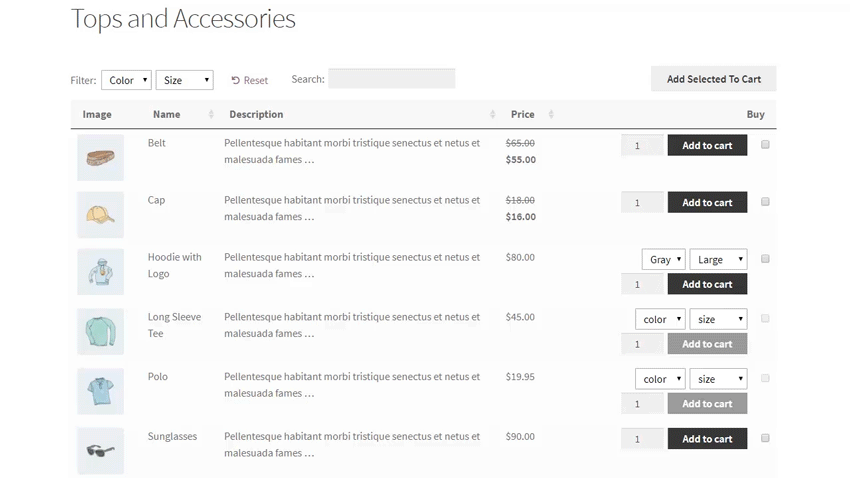
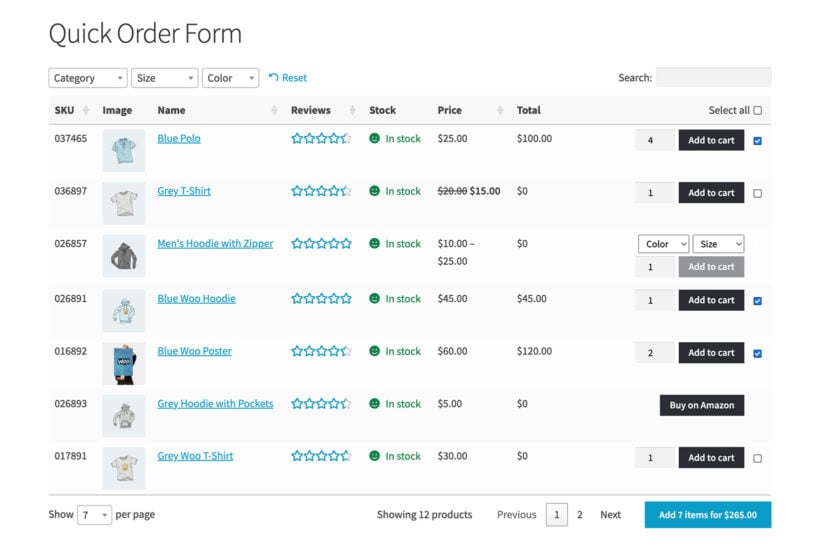
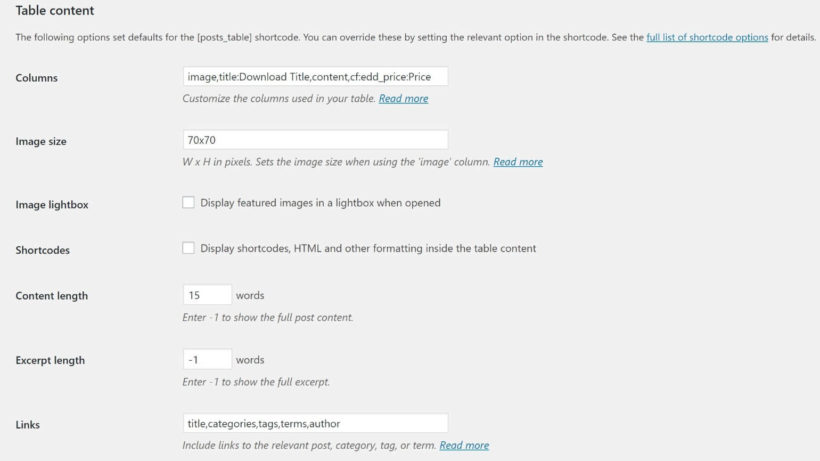
From the WooCommerce Product Table settings screen, scroll down till you reach the Columns option under Table content. Enter image,name,description,price,quick_view,add-to-cart into the Columns option. Make sure you include a quick_view column.
Check out the complete list of available column options to customize your product table! For example, you might want to include product categories as a column. This way, customers could sort the product table based on product category.
Optionally, you can scroll down to the Quick View Pro section on the same screen to replace all links in the product table with quick view links. All you have to do is tick the Product links checkbox.

Click the Save Changes button to continue.
Step #3: Add a product table
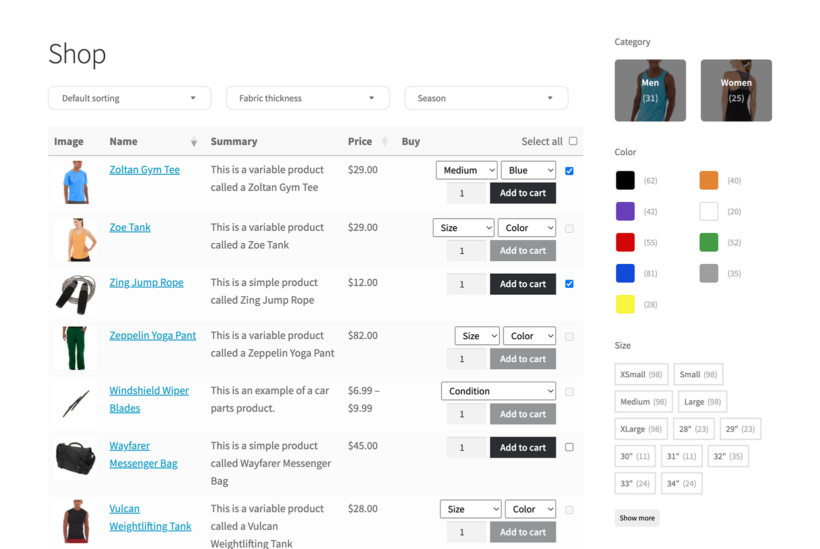
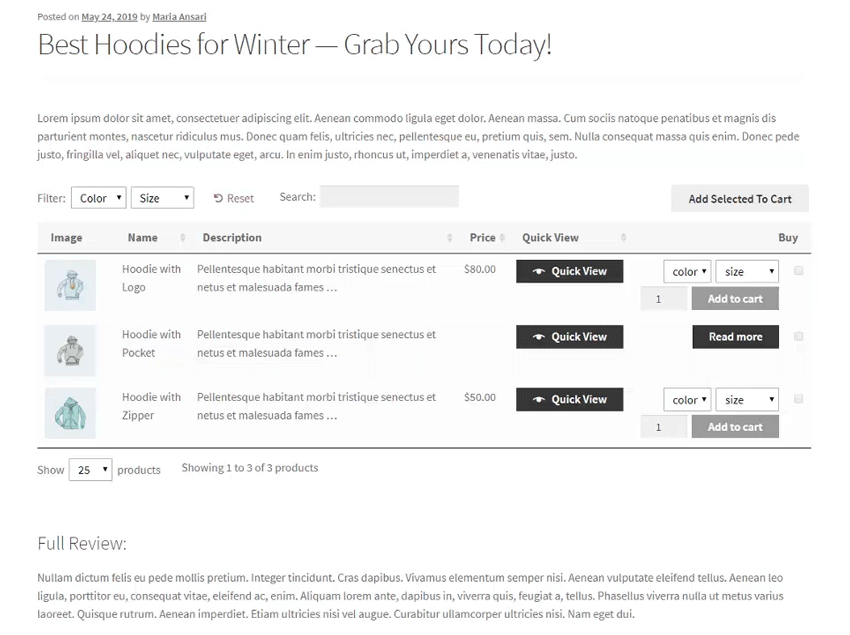
Open the page or post where you want to add the product table. Next, use the following shortcode to list products in a table layout:
[product_table]
This will list all your products. You can also edit the shortcode to list specific products only.

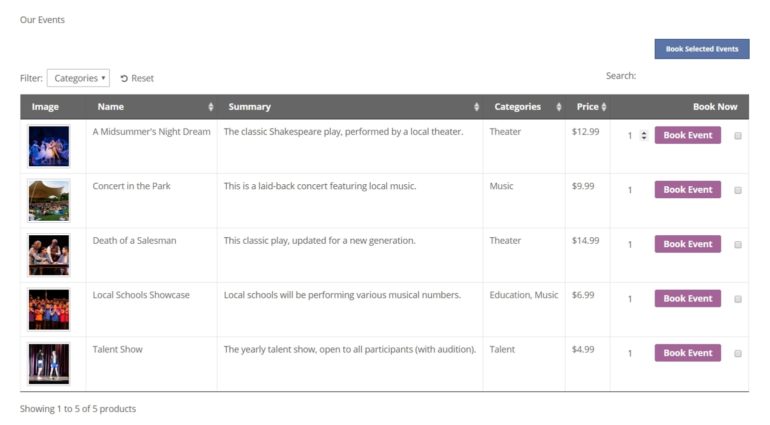
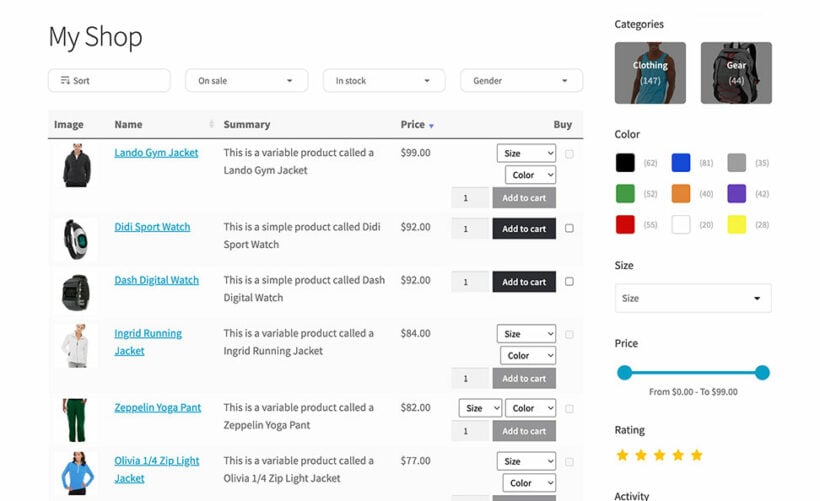
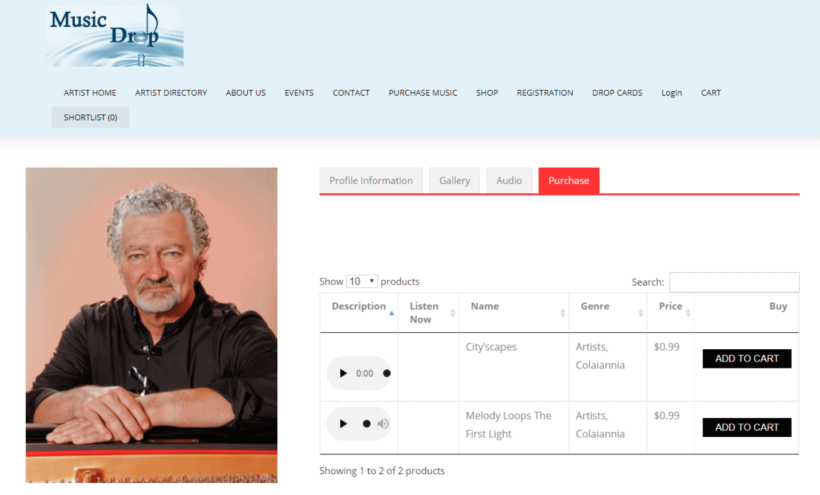
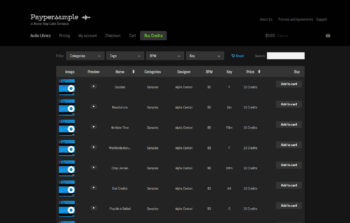
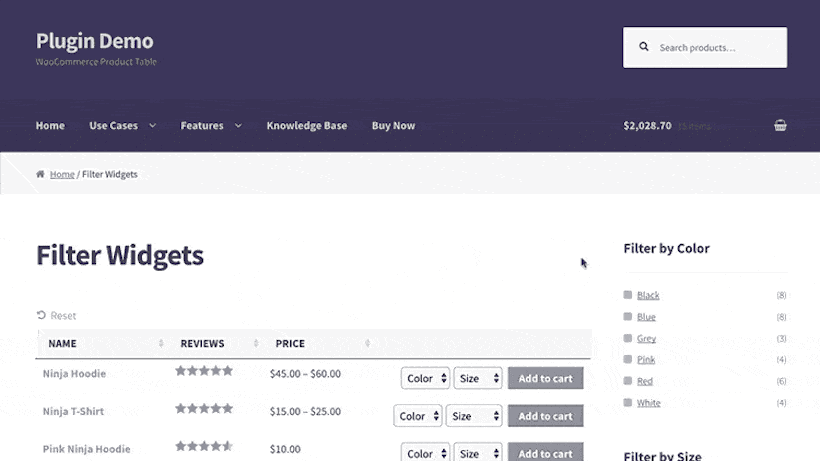
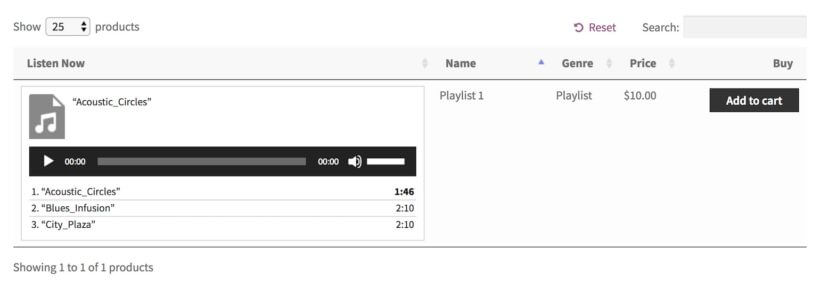
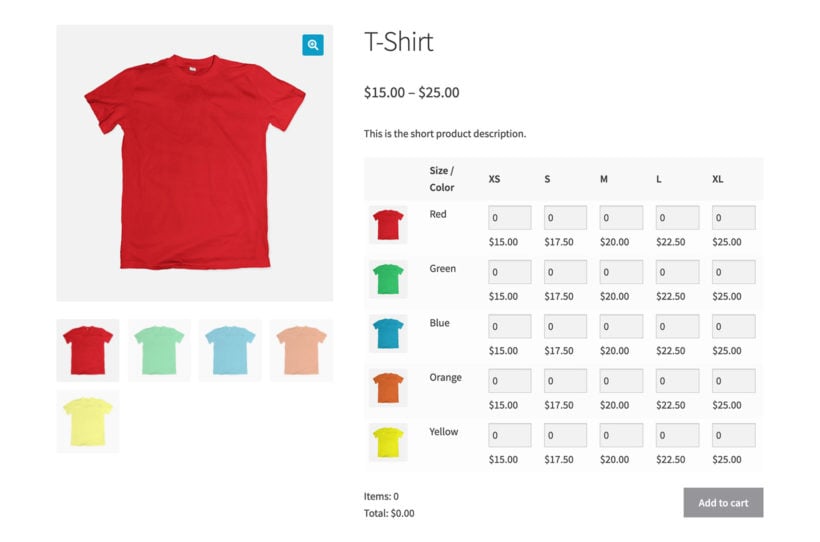
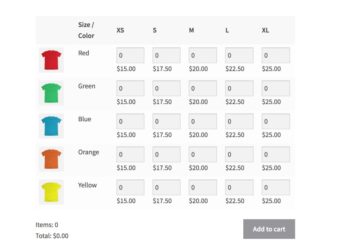
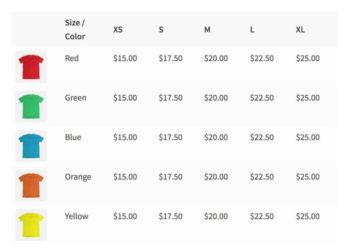
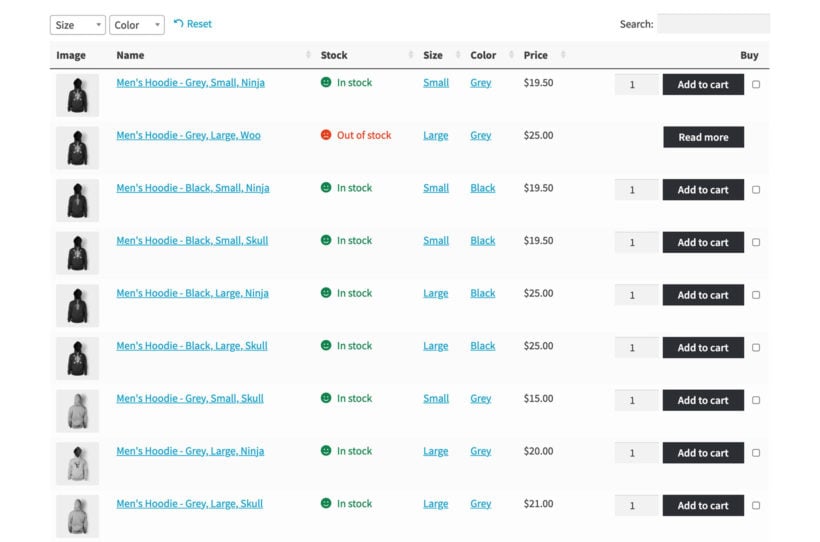
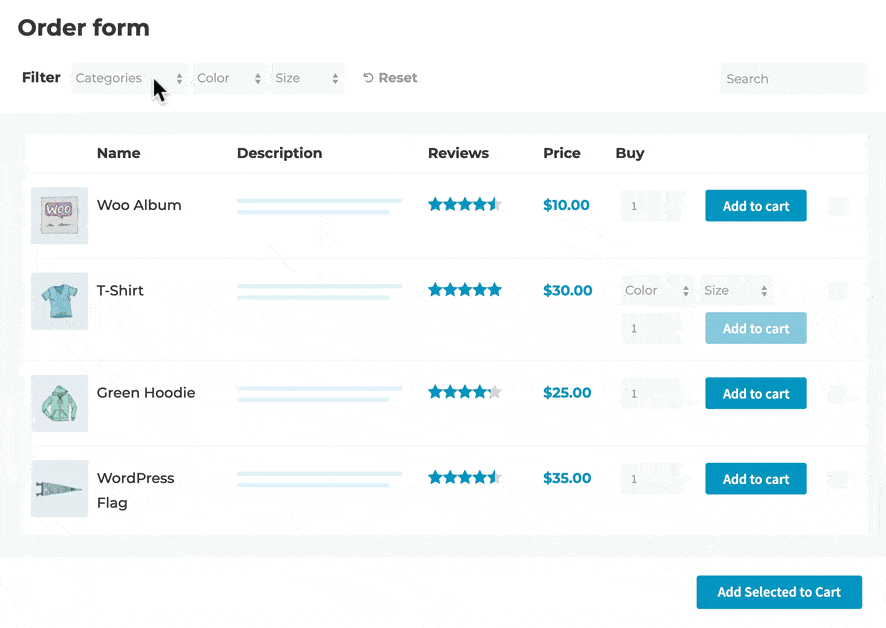
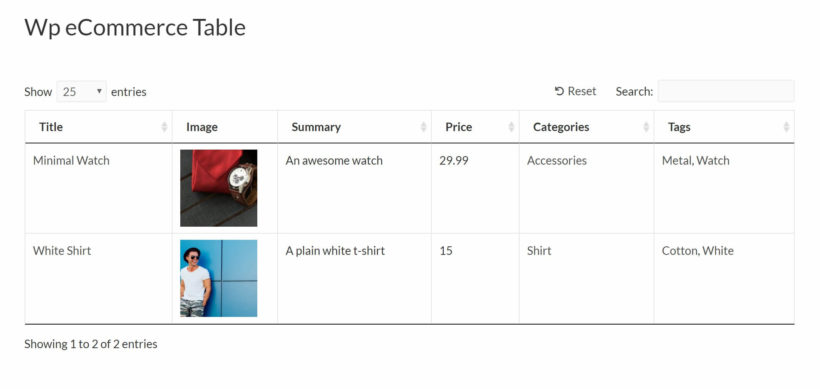
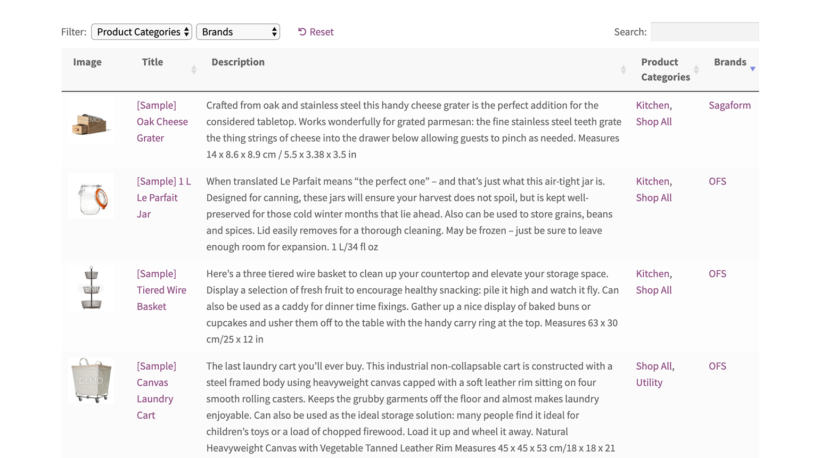
Finally, click the Publish button and preview it on your site’s front-end. It will look something like this:

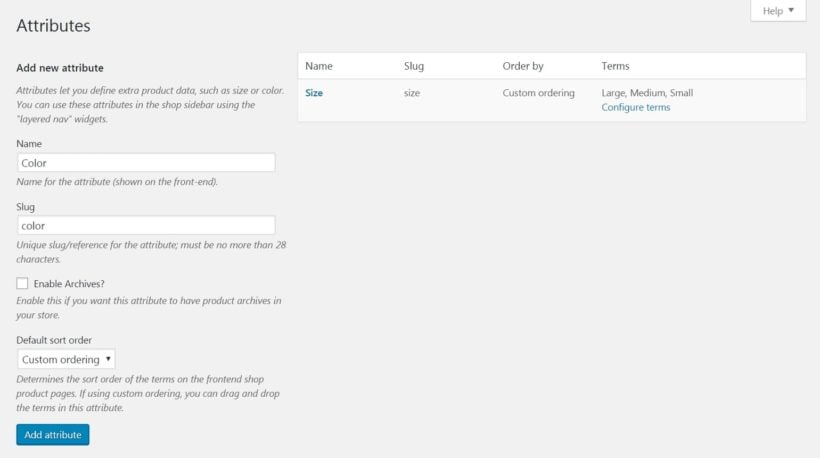
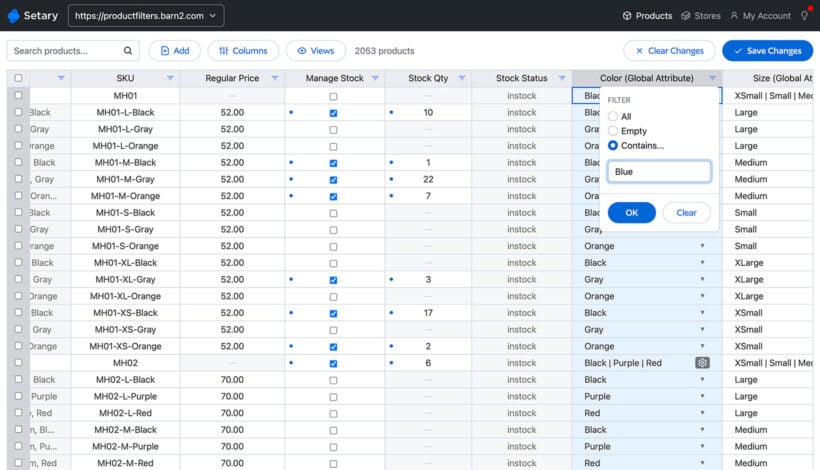
Customers can use the filter options above the table to view products based on product attributes such as color or size.
Further reading: For more ideas on how to use WooCommerce Quick View Pro, be sure to check out this in-depth guide!
Where to get the plugin
With a WooCommerce quick view shortcode, you can add featured products anywhere on your site and make it easier for customers to buy from you. Customers can learn about your products, choose variations, set quantities, and add products to cart without leaving the page (or post) they’re on.
Let’s quickly recap the two different options we covered above:
- If you simply want to insert quick view buttons for a specific product, then you can do so with the WooCommerce Quick View Pro shortcode provided in the plugin.
- Those of you looking to add featured products to pages, posts, widgets, or sidebars (with quick view) can use the built-in WooCommerce shortcodes with WooCommerce Quick View Pro.
- And if you’re looking for an easy way to showcase WooCommerce products in a table layout then you can use the WooCommerce Product Table plugin with WooCommerce Quick View Pro.
How do you want to use WooCommerce quick view shortcodes in your store? We’d love to hear from you so let us know in the comments section below!