UK VAT after Brexit

If you use our Easy Digital Downloads EU VAT plugin to charge VAT to your European customers, then you're probably wondering what happens now the UK has left the EU.

Brexit has caused a lot of uncertainty since Britain voted 'Leave' in 2016. A trade deal has finally been agreed, and it is now time for companies to start planning the changes to meet the new requirements.

This is our current understanding of how Brexit will affect our customers, and what you need to do about it. The below information assumes you are using our plugin, and you should read it alongside the following resources which are updated regularly:

We also recommend consulting your accountant for personalized advice on how Brexit will affect your own company.

What do I need to change?

The impact of Brexit on your VAT situation depends on where your company and customers are based.

UK companies

If your company is based in the UK then you must:

  • Continue charging UK VAT on digital products to businesses and consumers in the UK. This falls under domestic UK tax law rather than EU law, so nothing changes.
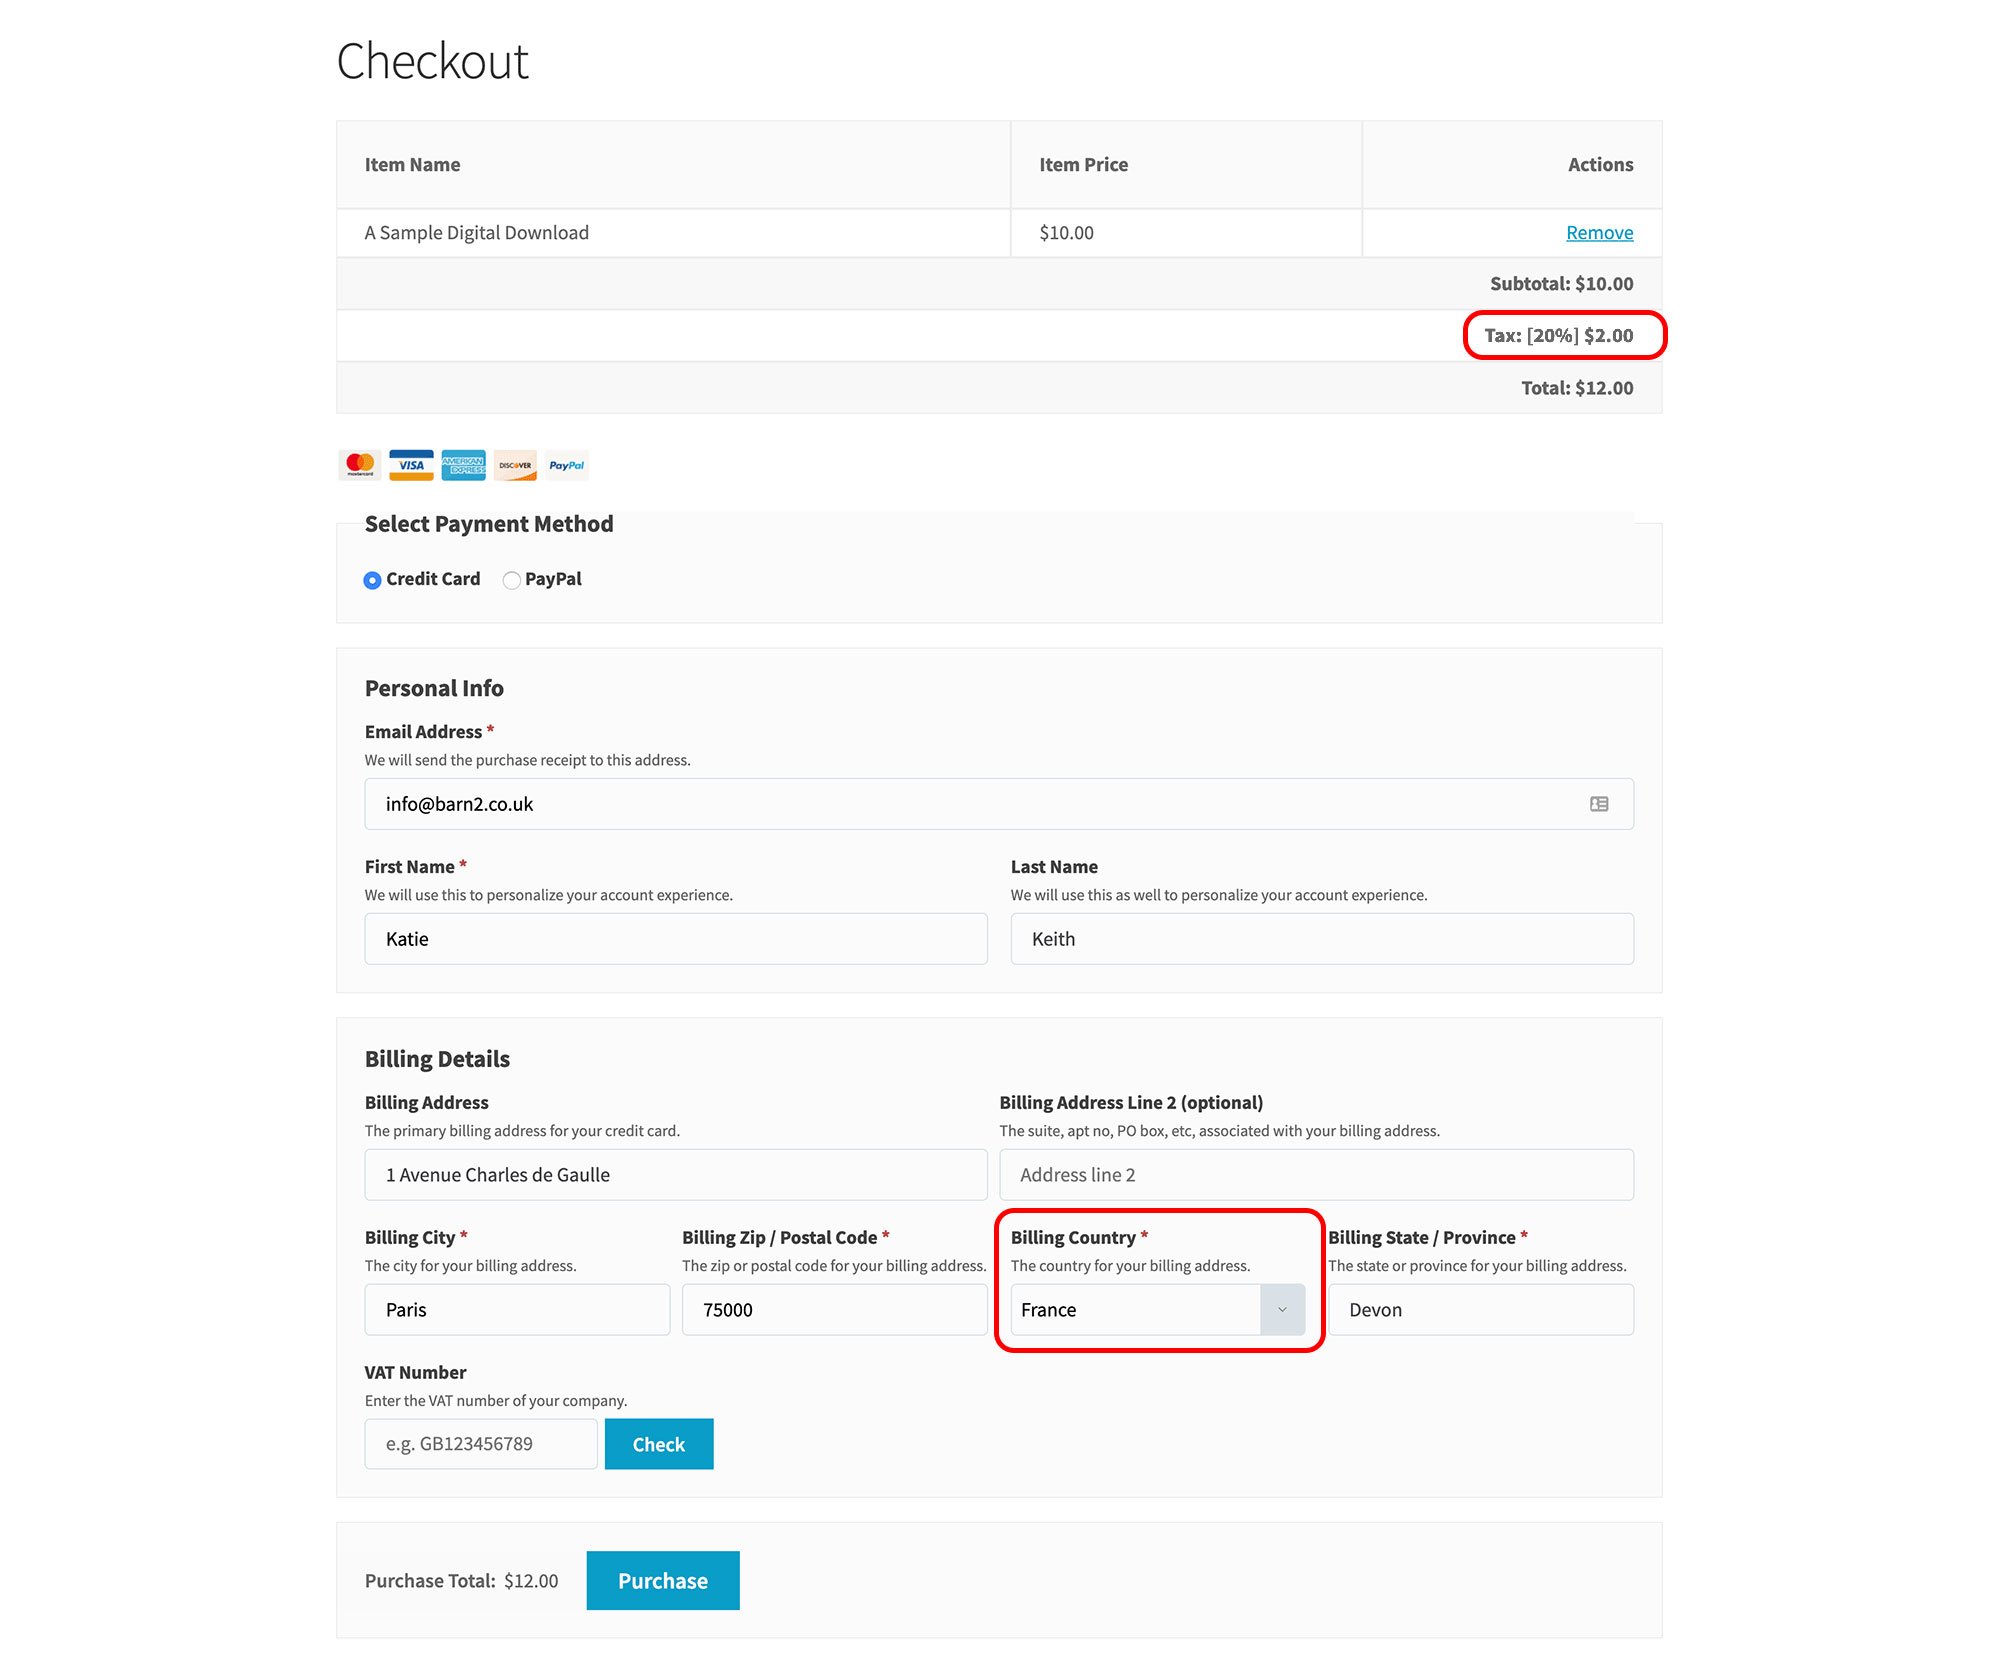
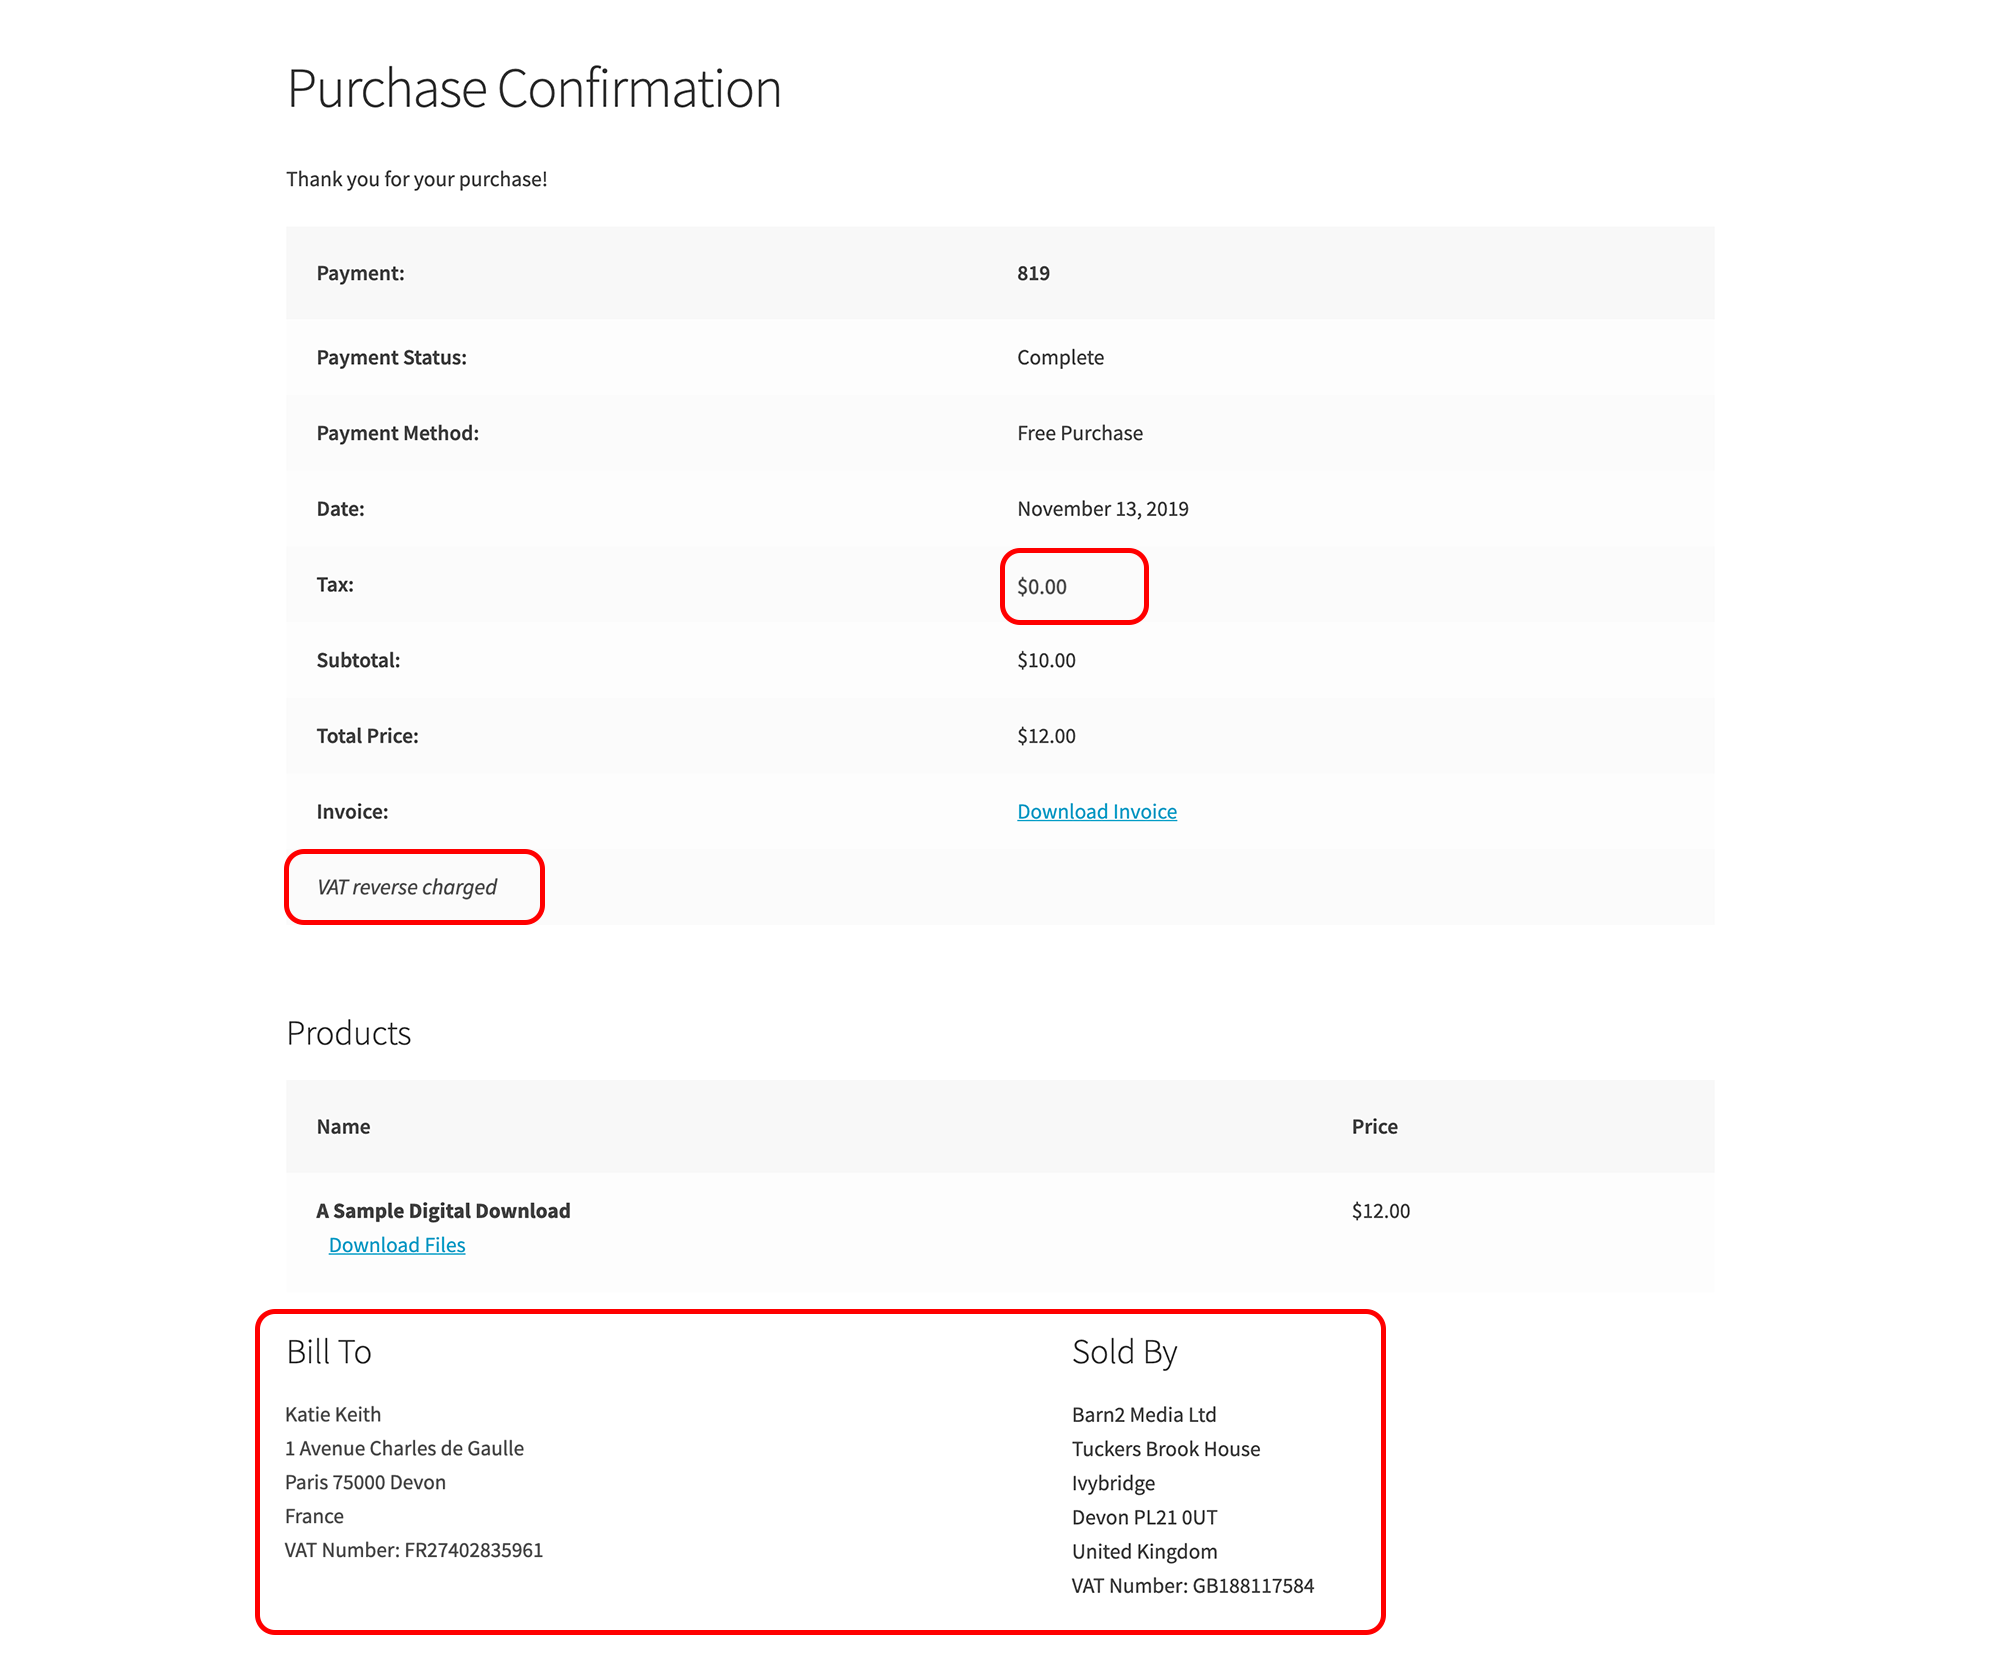
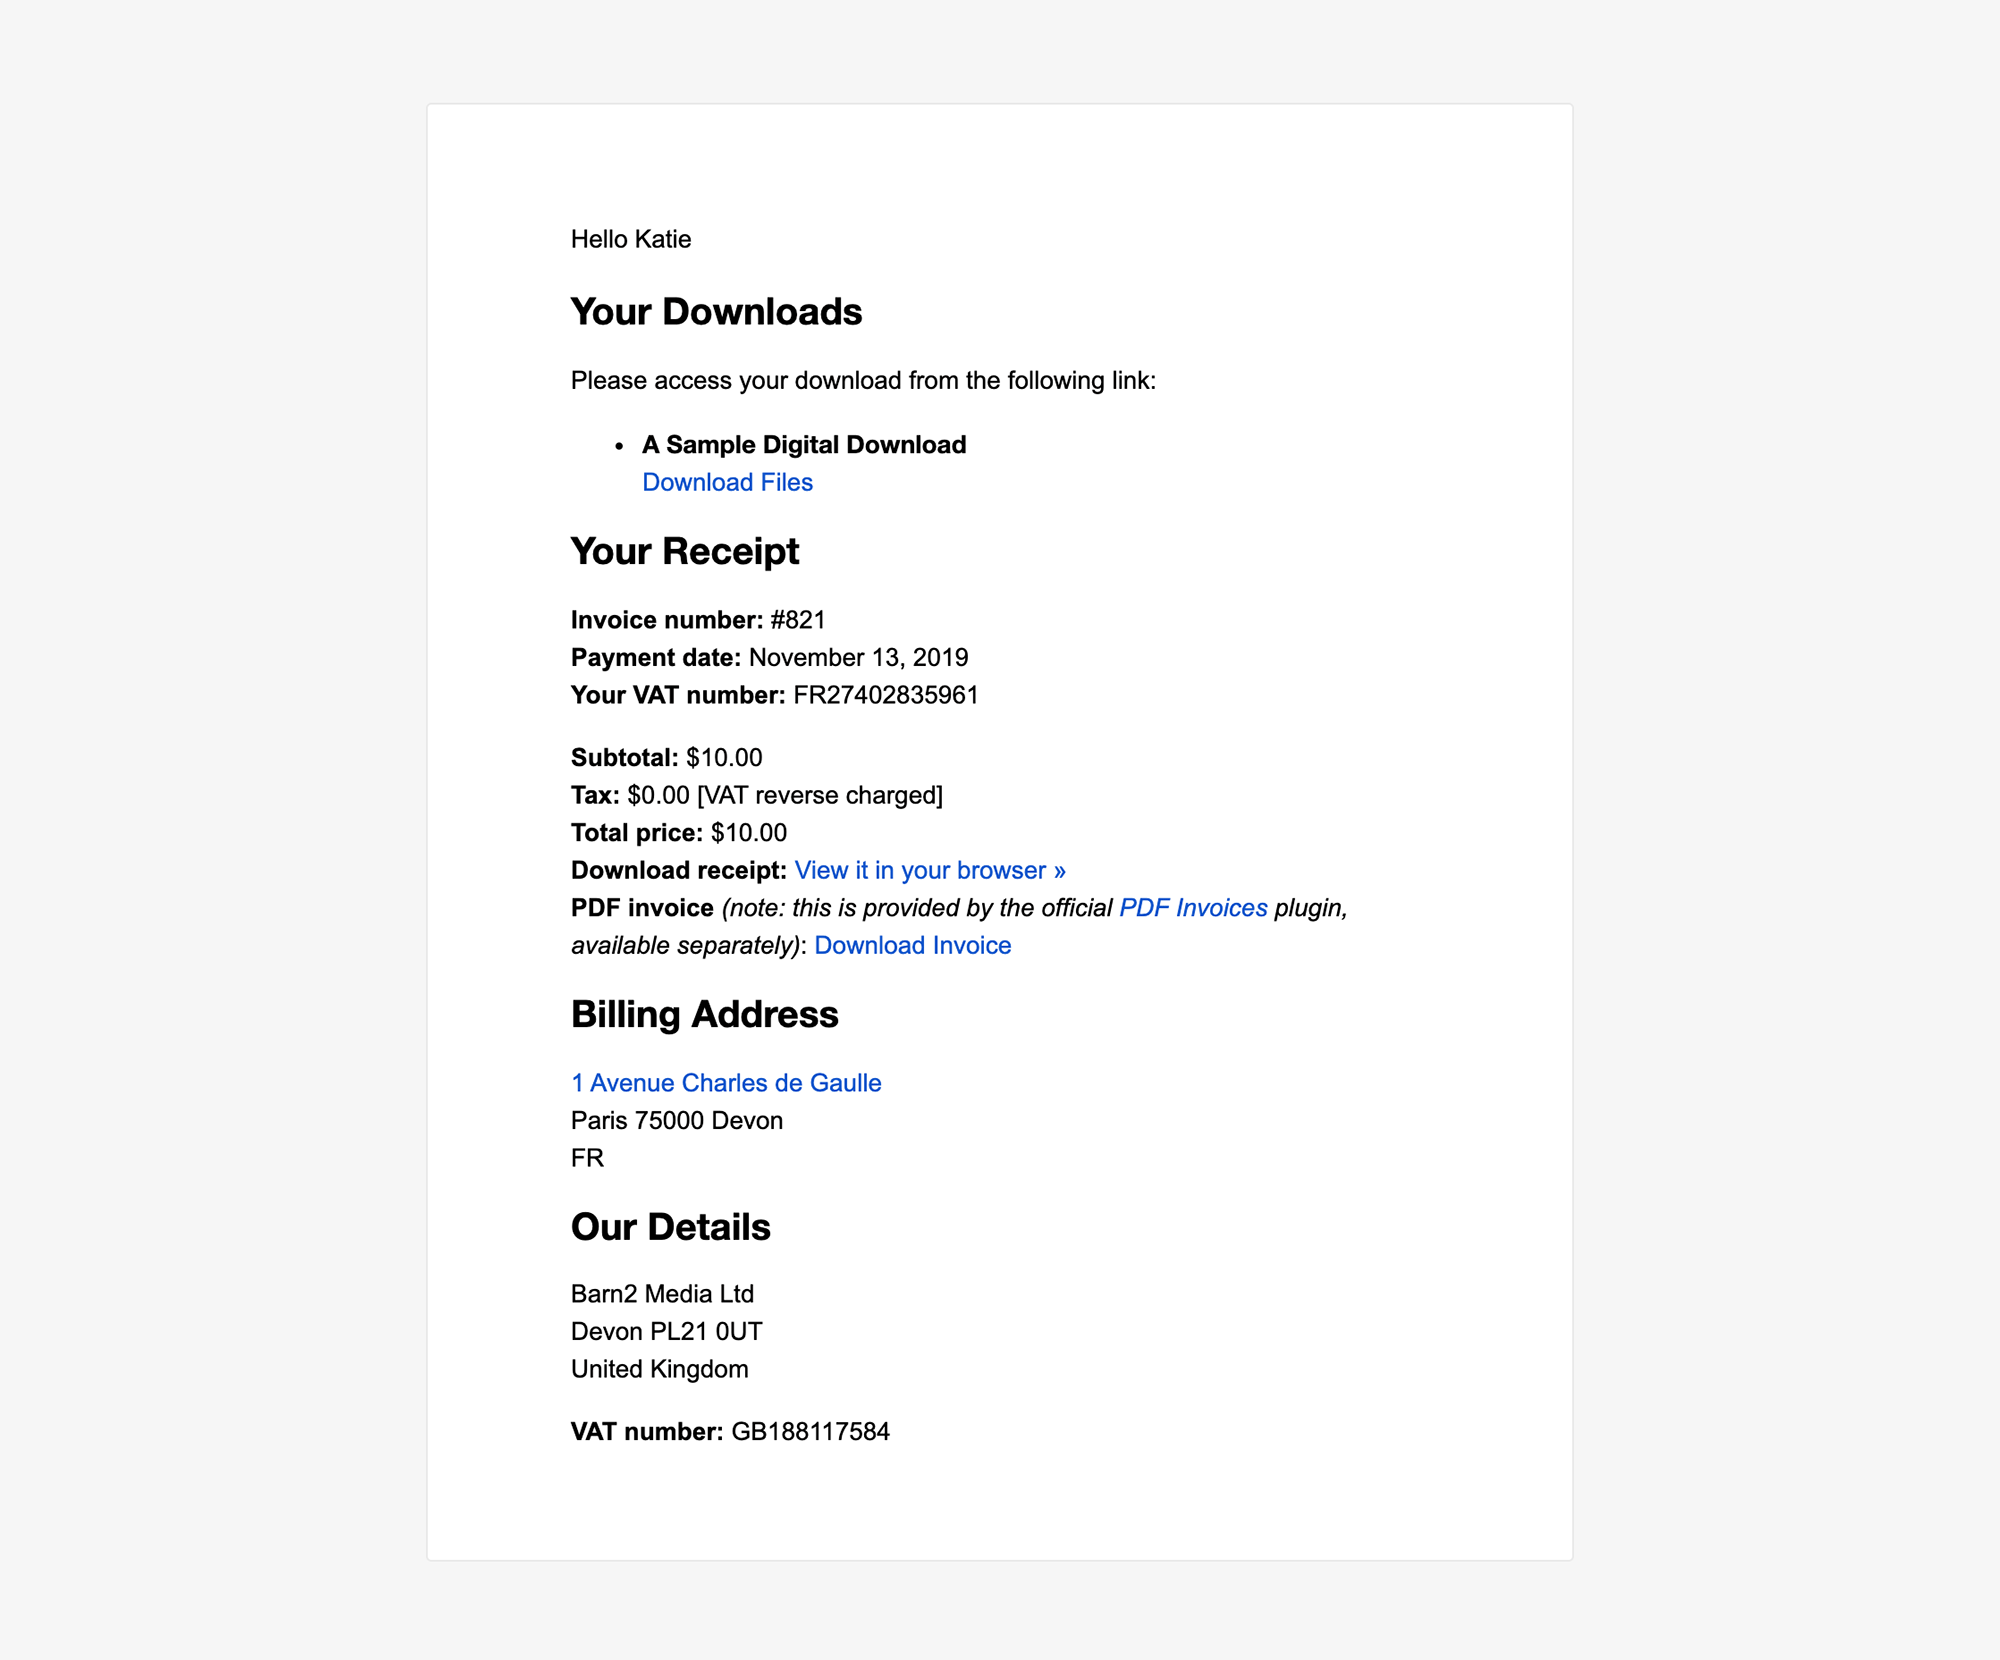
  • Continue charging the appropriate rate of EU VAT on digital products to consumers in the EU. This will continue after Brexit because EU law is about the customer's location rather than yours. If they have a valid VAT number then they can have the tax reverse charged (which they can enter on the Easy Digital Downloads checkout when you're using our plugin).
  • Re-register for EU VAT. If you previously registered for the UK MOSS scheme then this will cease to exist. Instead, you should either:
    • Register for VAT in each individual EU country (not recommended for obvious reasons!), or;
    • Register for the non-Union MOSS scheme in another EU country of your choice. You must do it before the 10th of the month after you start collecting EU VAT after this date. For example, if your first EU sale post-Brexit is on 15th January 2020 then you must register for a non-Union MOSS scheme by 10th February.
  • Register for EU VAT even if your EU sales are less than €10,000. When the UK was part of the EU, there was a threshold of €10,000 so that you only needed to collect EU VAT if your sales to EU countries were more than this amount. Now the UK has left the EU, there is no minimum threshold.

If you decide to register for the non-Union MOSS scheme in another EU country, then we generally recommend the Republic of Ireland because they have the same language as the UK. This is how to register for MOSS in Ireland:

  1. Go to this page on the Ireland Tax and Customs website.
  2. Scroll down to the 'Non-Union MOSS scheme registration' section and click on the link to the the MOSS registration portal.
  3. Click 'Register' on the next page. This will open a registration form for Ireland's MOSS scheme.
  4. Enter the required information, including your company details and UK VAT number. You might need to ask your bank for the international Account Number / IBAN and BIC / Swift Code for your UK bank account.

Companies based in the EU

If your company is based in an EU country (i.e. not the UK), then you must:

  • Sales to the UK:
    • Continue charging UK VAT on digital products to businesses and consumers in the UK. This is because while the UK has left the EU, our understanding is that the UK is adopting the 'place of supply' rules into UK law. This means that you must charge UK VAT to consumers based in the UK even if you are outside the UK. For more information, please see this link. Also see the below section about reverse charging VAT.
    • Register for UK VAT. The UK will no longer be part of the EU's MOSS scheme which provides a central point for VAT reporting and collection. As a result, if you are continuing to sell digital products to UK consumers then you must register for UK VAT. From 1st January 2021, you will need to submit quarterly reports of the UK VAT that you collected in the previous quarter, and pay the relevant amount to the UK.
  • Sales to the EU:
    • Continue charging the appropriate rate of EU VAT on digital products to consumers in the EU. If they have a valid VAT number (which they can enter on the Easy Digital Downloads checkout when you're using our plugin) then they can have the tax reverse charged.

Companies based outside the EU

If your company is based outside the EU - for example the US or Australia - then you must:

  • Sales to the UK:
    • Continue charging UK VAT on digital products to businesses and consumers in the UK. This is because while the UK has left the EU, our understanding is that the UK is adopting the 'place of supply' rules into UK law. This means that you must charge UK VAT to consumers based in the UK even if you are outside the UK and EU. For more information, please see this link. Also see the below section about reverse charging VAT.
    • Register for UK VAT. The UK will no longer be part of the EU's MOSS scheme which provides a central point for VAT reporting and collection. As a result, if you are continuing to sell digital products to UK consumers then you must register for UK VAT - and there is no minimum threshold. From 1st January 2021, you will need to submit quarterly reports of the UK VAT that you collected in the previous quarter, and pay the relevant amount to the UK.
  • Sales to the EU:
    • Continue charging the appropriate rate of EU VAT on digital products to consumers in the EU. If they have a valid VAT number (which they can enter on the Easy Digital Downloads checkout when you're using our plugin) then they can have the tax reverse charged.
    • Re-register for EU VAT. If you previously registered for the UK MOSS scheme then this will cease to exist (if you registered with a different EU state, such as France or Ireland, then you don't need to re-register). Instead, you should either:
      • Register for VAT in each individual EU country (not recommended for obvious reasons!), or;
      • Register for the non-Union MOSS scheme in another EU country of your choice. You must do it before the 10th of the month after you start collecting EU VAT after this date. For example, if your first EU sale post-Brexit is on 15th January 2020 then you must register for a non-Union MOSS scheme by 10th February.

What do I need to do differently after Brexit?

Charging tax

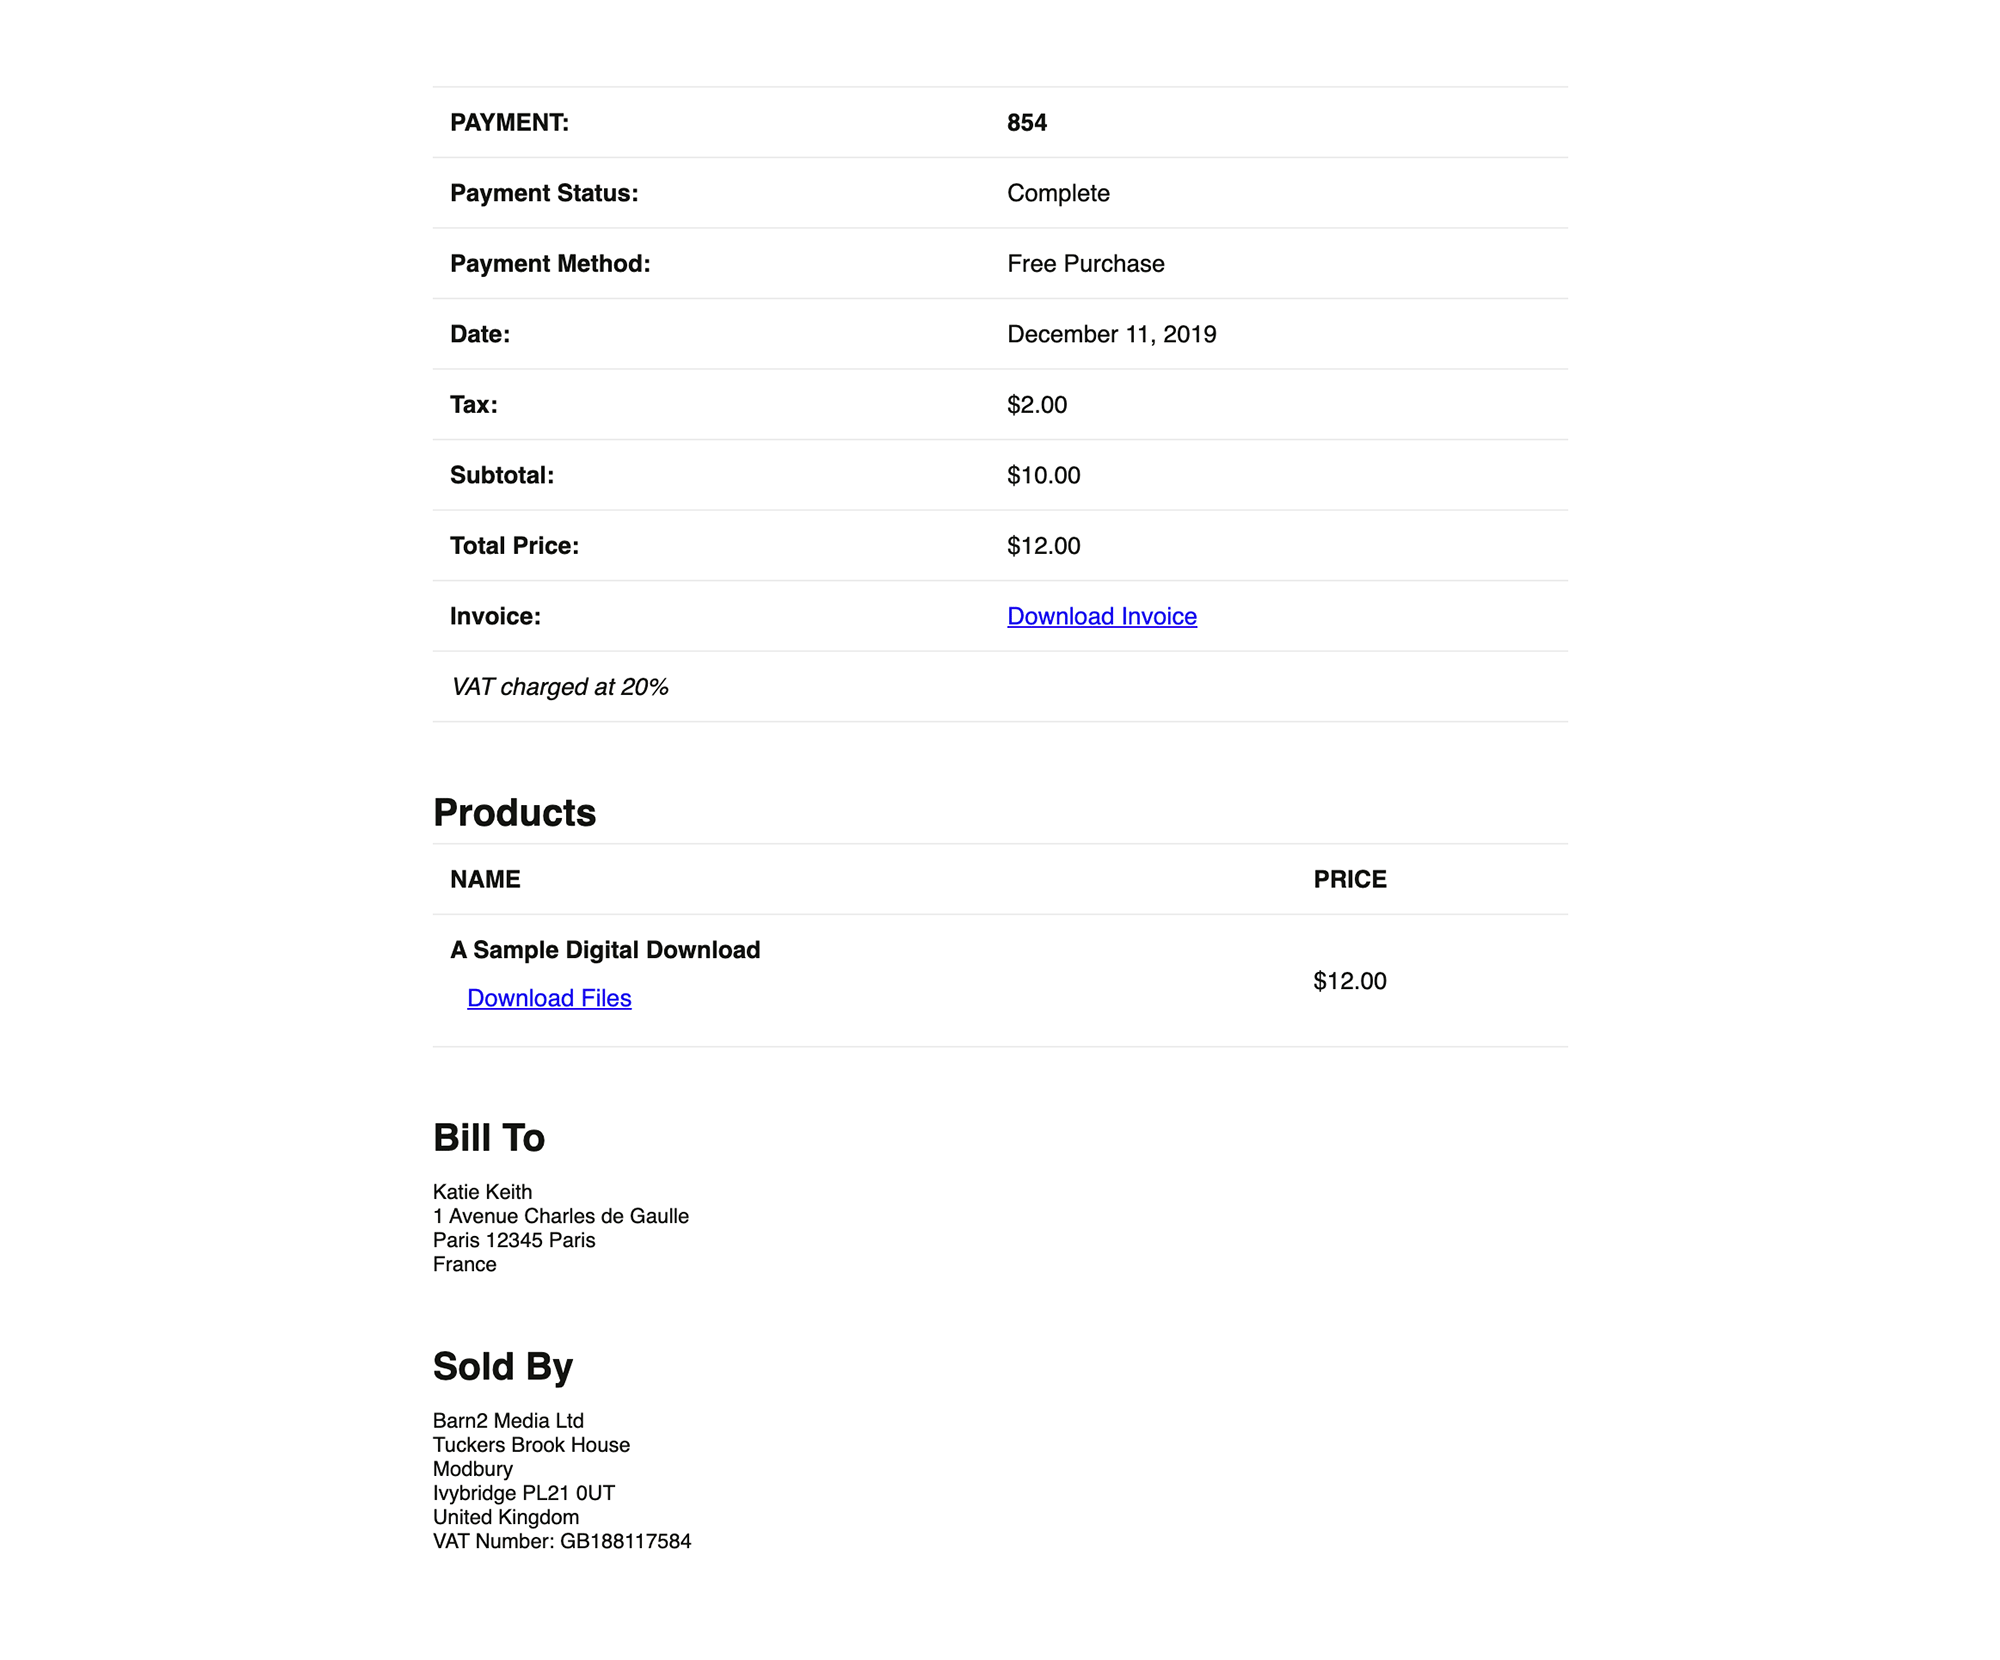
As you can see from the above, you do not need to make any changes to the EU or UK VAT that you charge your customers. As a result, you can continue using the Easy Digital Downloads EU VAT plugin to charge the correct rates to each customer, based on their location.

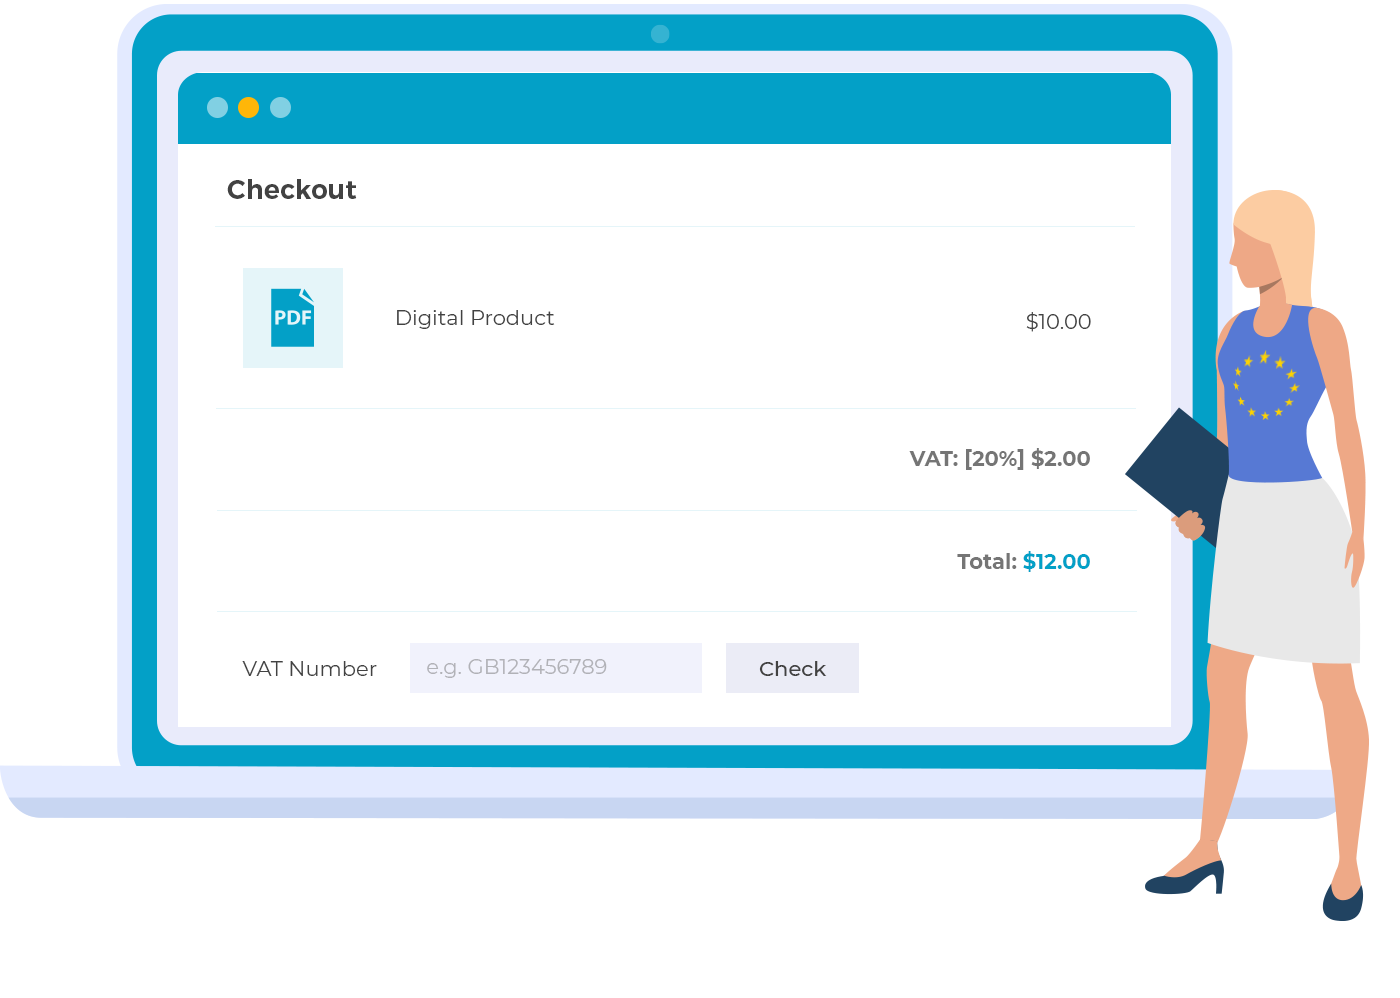
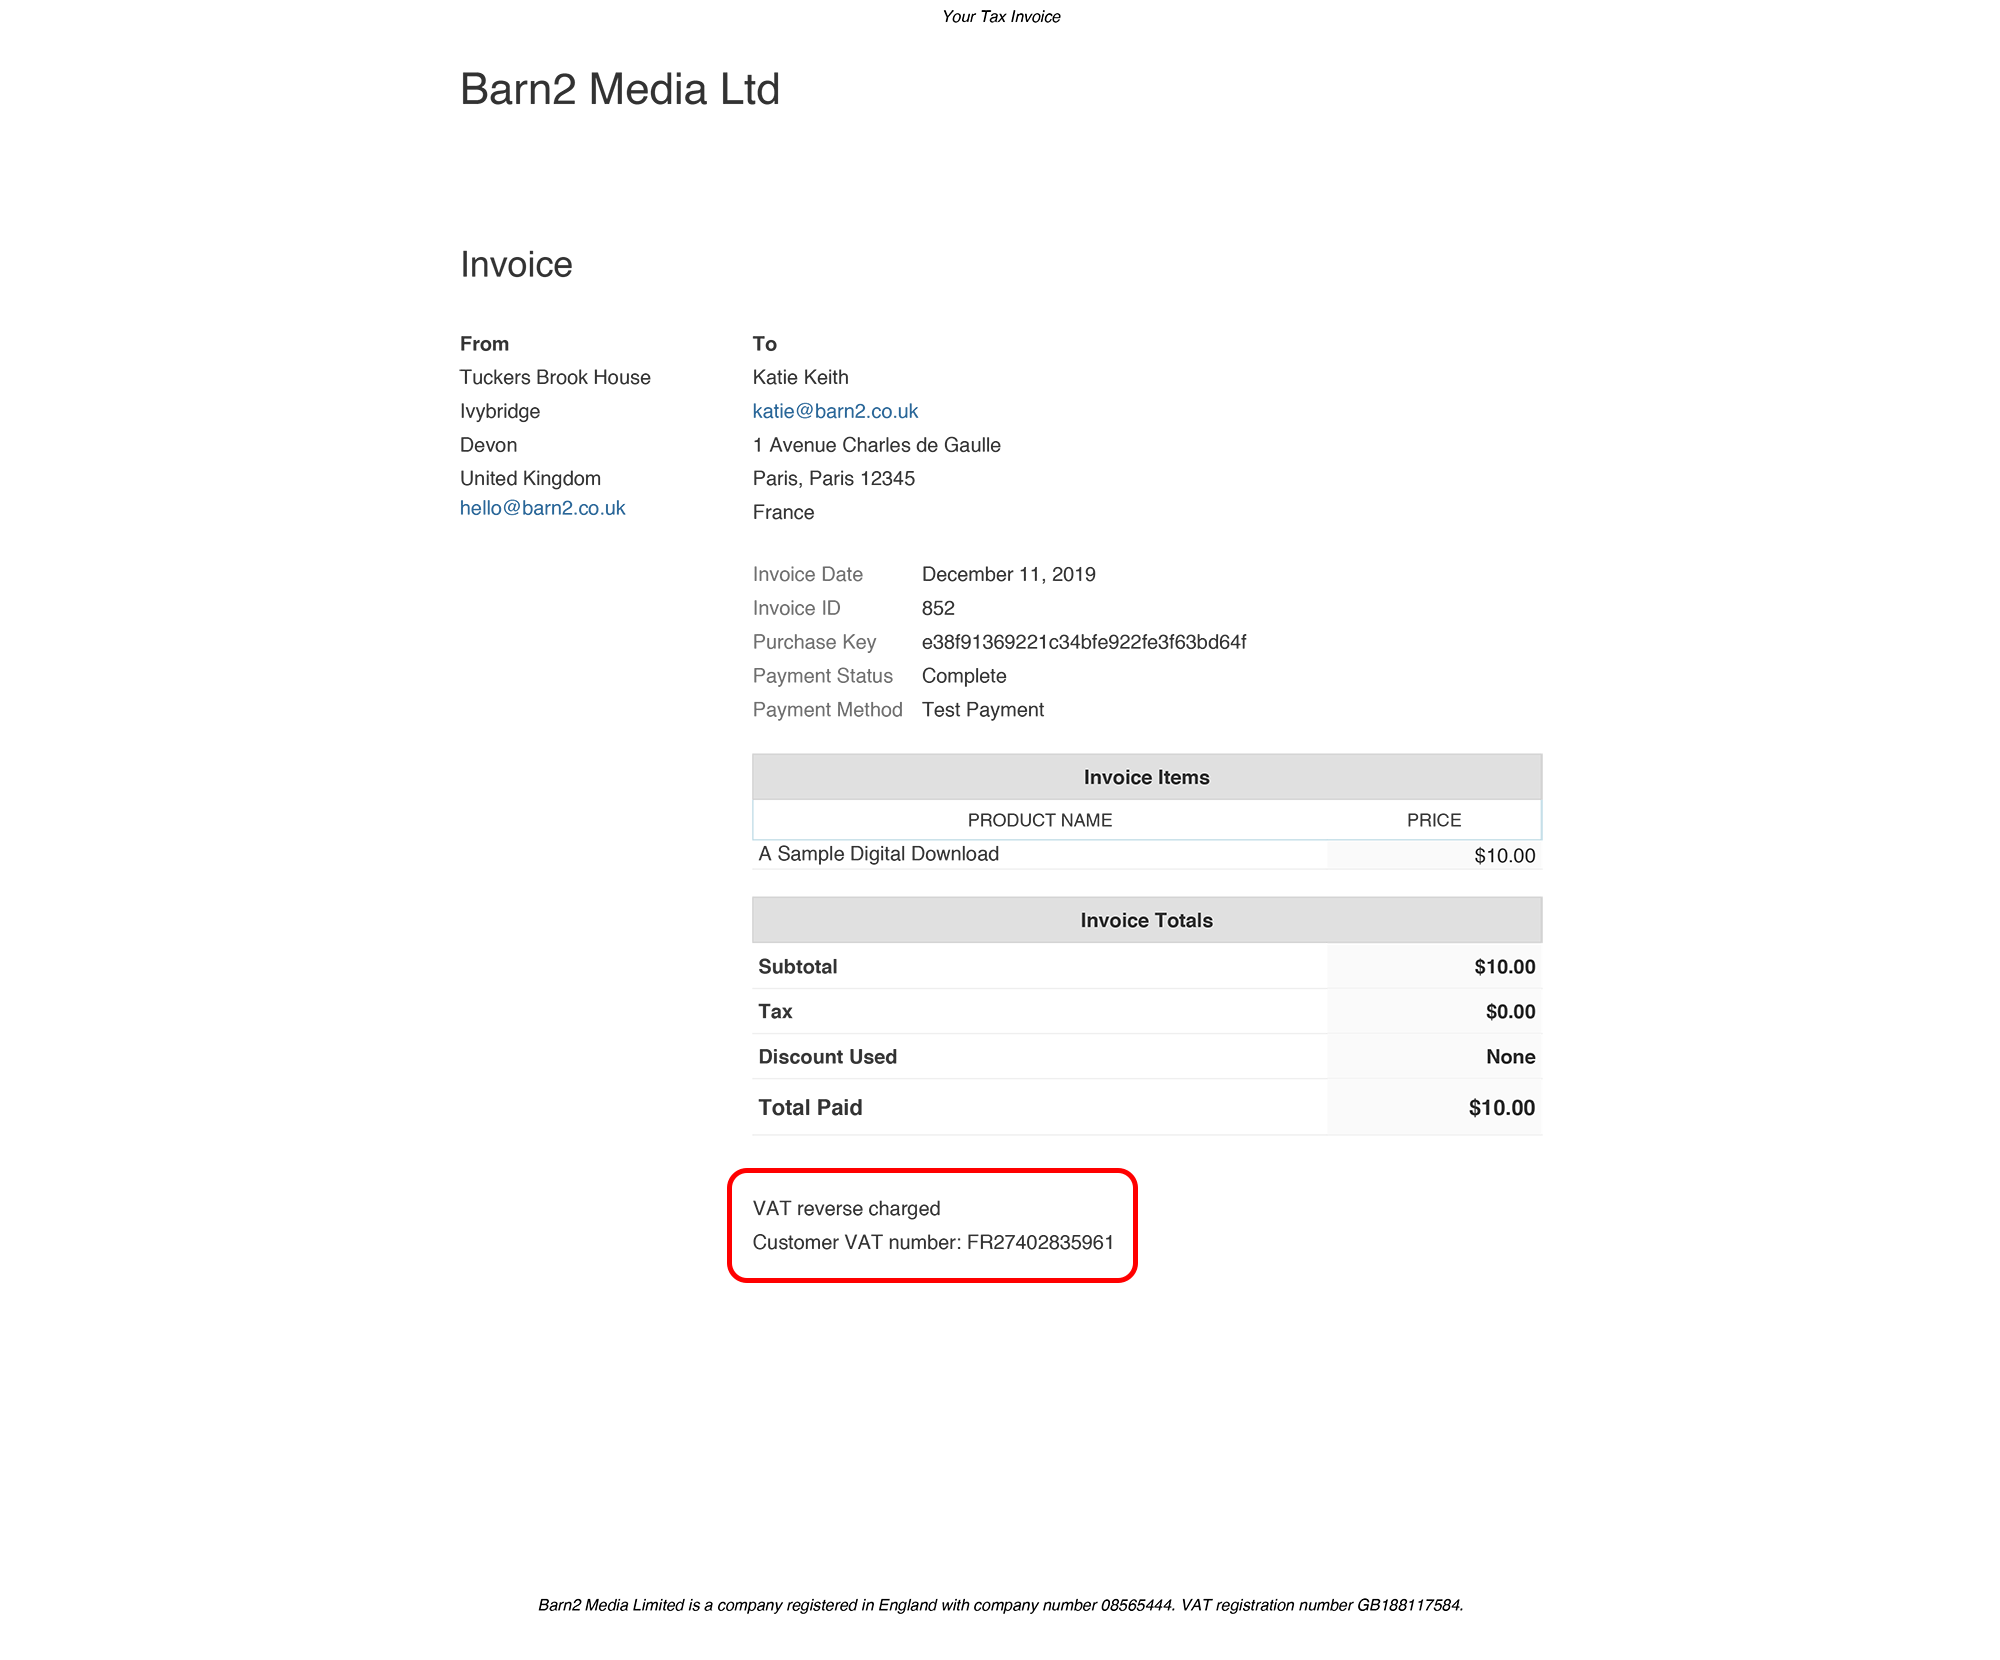
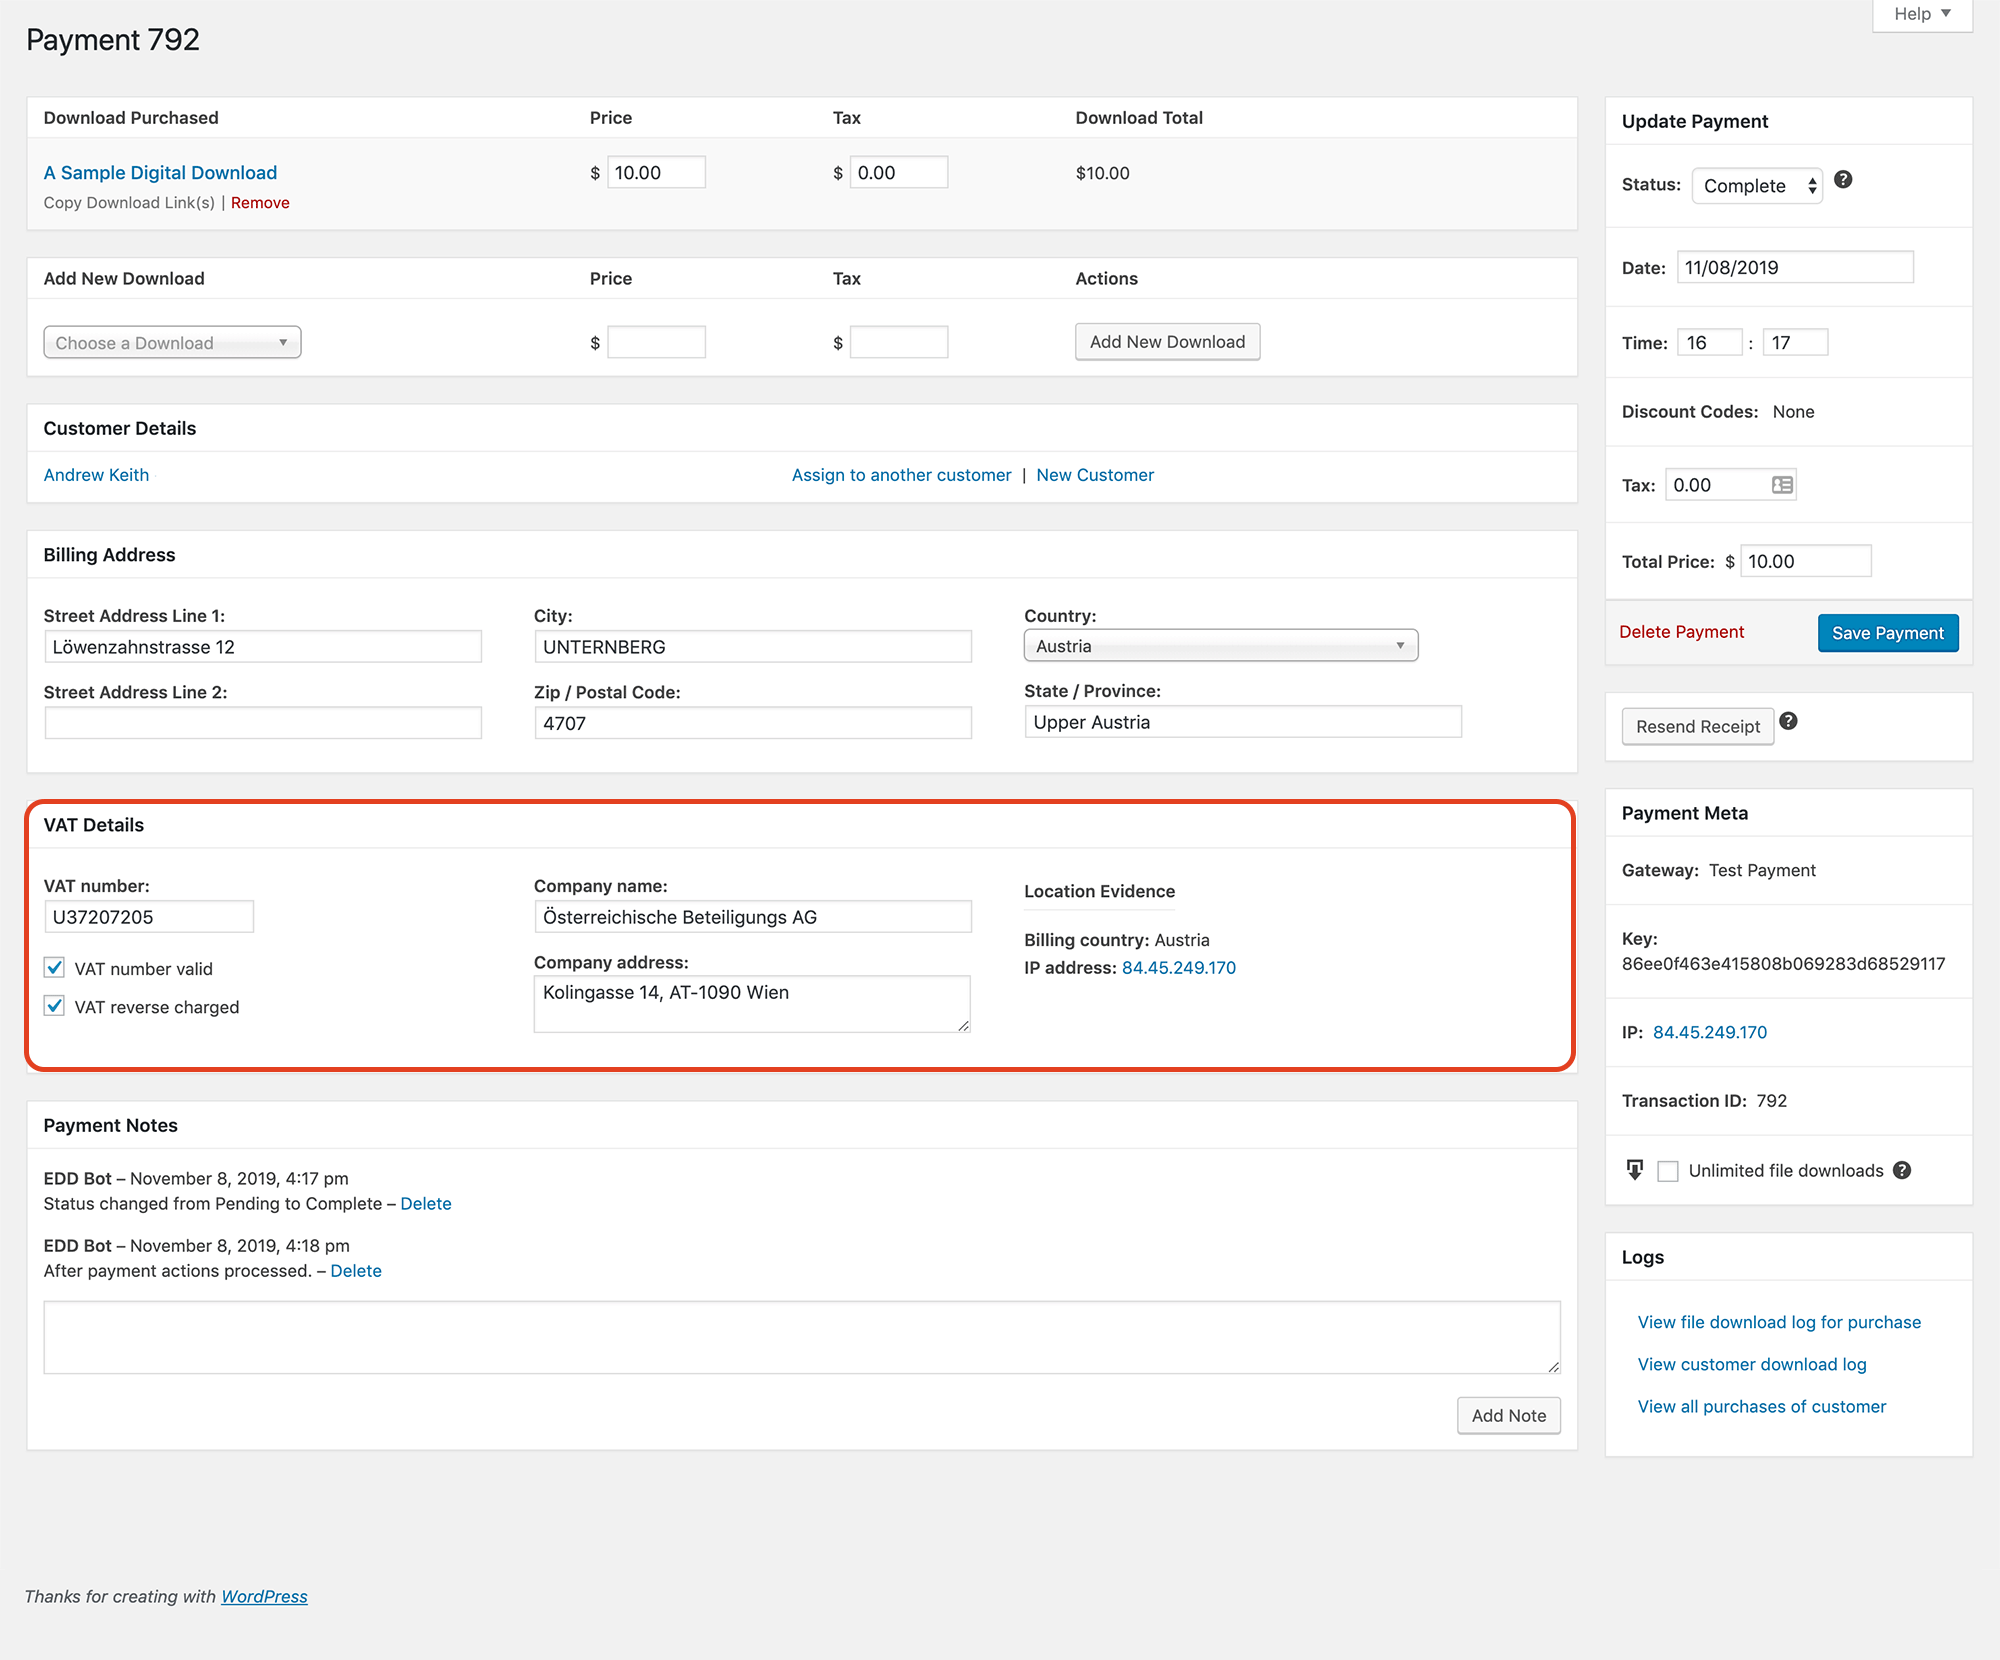
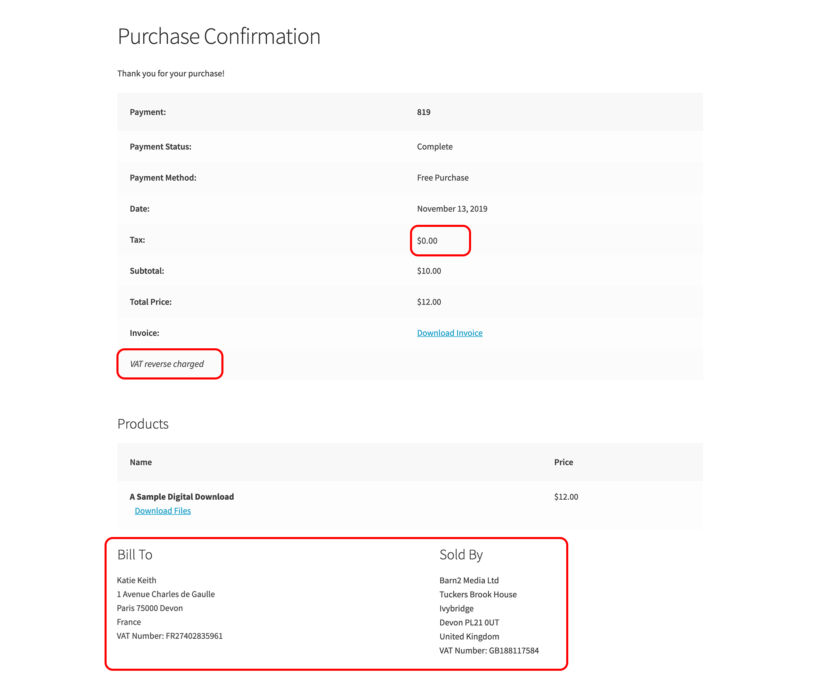
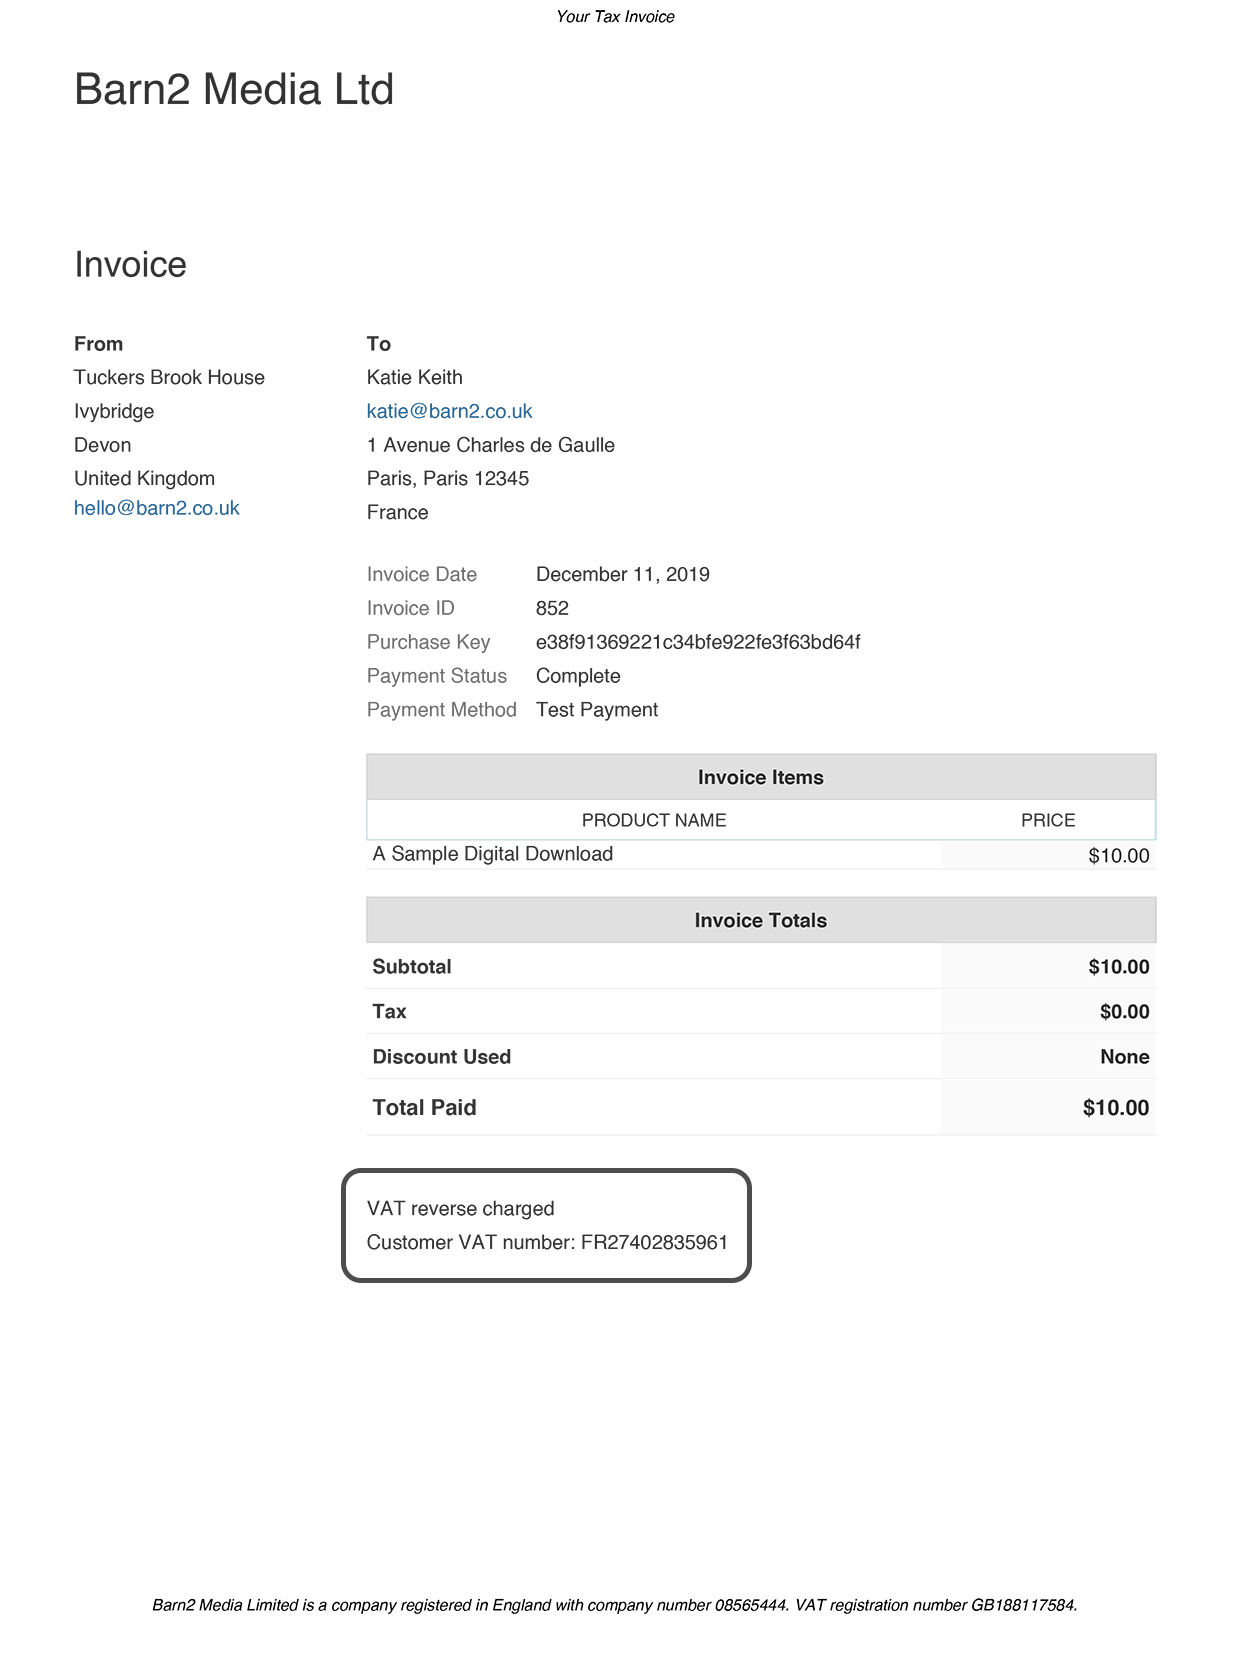
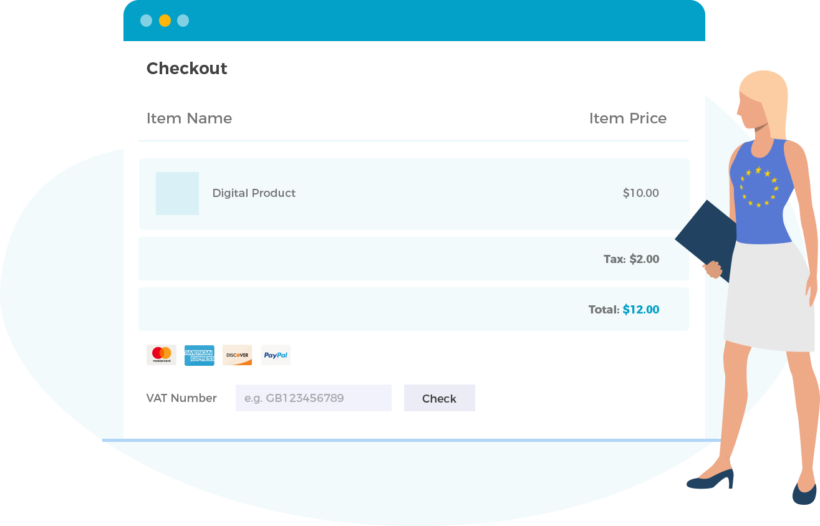
Reverse charge mechanism

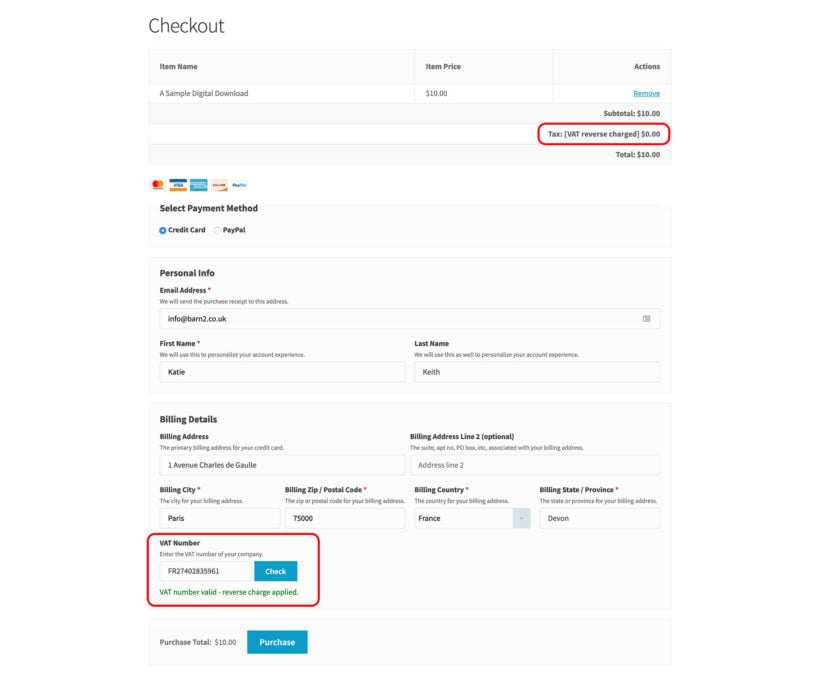
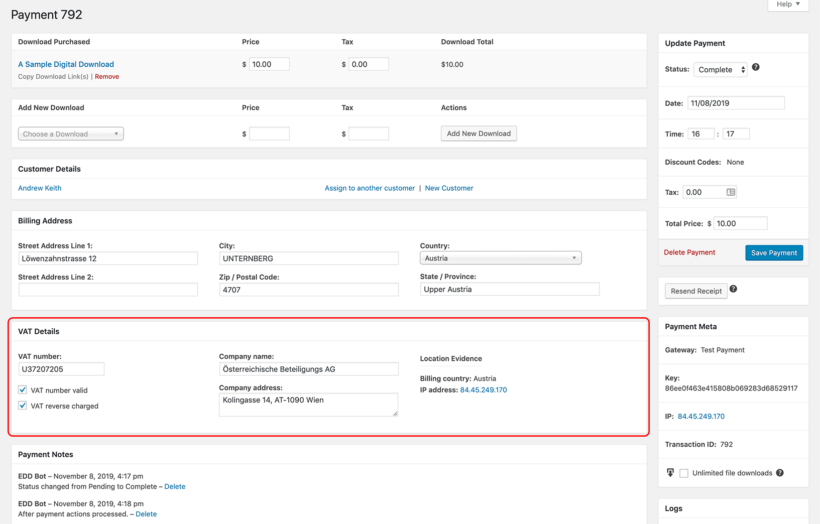
You can continue using our plugin to allow EU businesses to enter their VAT number and have their tax reverse charged. It is fully integrated with the EU's VIES database of VAT numbers, so businesses in all EU countries can validate their VAT number.

Now the UK has left the EU, it is no longer possible for UK businesses to validate their VAT number using the VIES database. In early December 2020, the UK Government revealed its new UK VAT number validation service. Unfortunately, the service is still quite limited and is in a very early beta phase, with some teething problems. In its current state, it is extremely difficult to integrate with and there is a complex process for website owners to get approval. As a result, there is currently no straightforward way for UK businesses to validate their VAT number on the Easy Digital Downloads checkout or to have the VAT reverse charged.

We recommend speaking with your accountant about the best way for your company to allow UK businesses to reverse charge their VAT. For example:

  • You can Manually check UK VAT numbers using the new system after the payment has been made, and refund the VAT they paid.
  • Alternatively, the UK company should be able to reclaim the VAT paid when they submit their own UK VAT return at the end of the quarter.

Reporting

Wherever you are in the world, you will need to submit two different tax returns from January 2021:

  1. UK tax return - this should be submitted to the UK's HMRC and must contain details of your sales to UK customers.
  2. EU tax return - this should generally be submitted to the centralized MOSS service, but you can also register for each EU country and report to them individually. This must contain details of your sales to each EU country.
  3. (Of course, you may also have to submit a domestic tax return for your country. That's outside the scope of this article.)

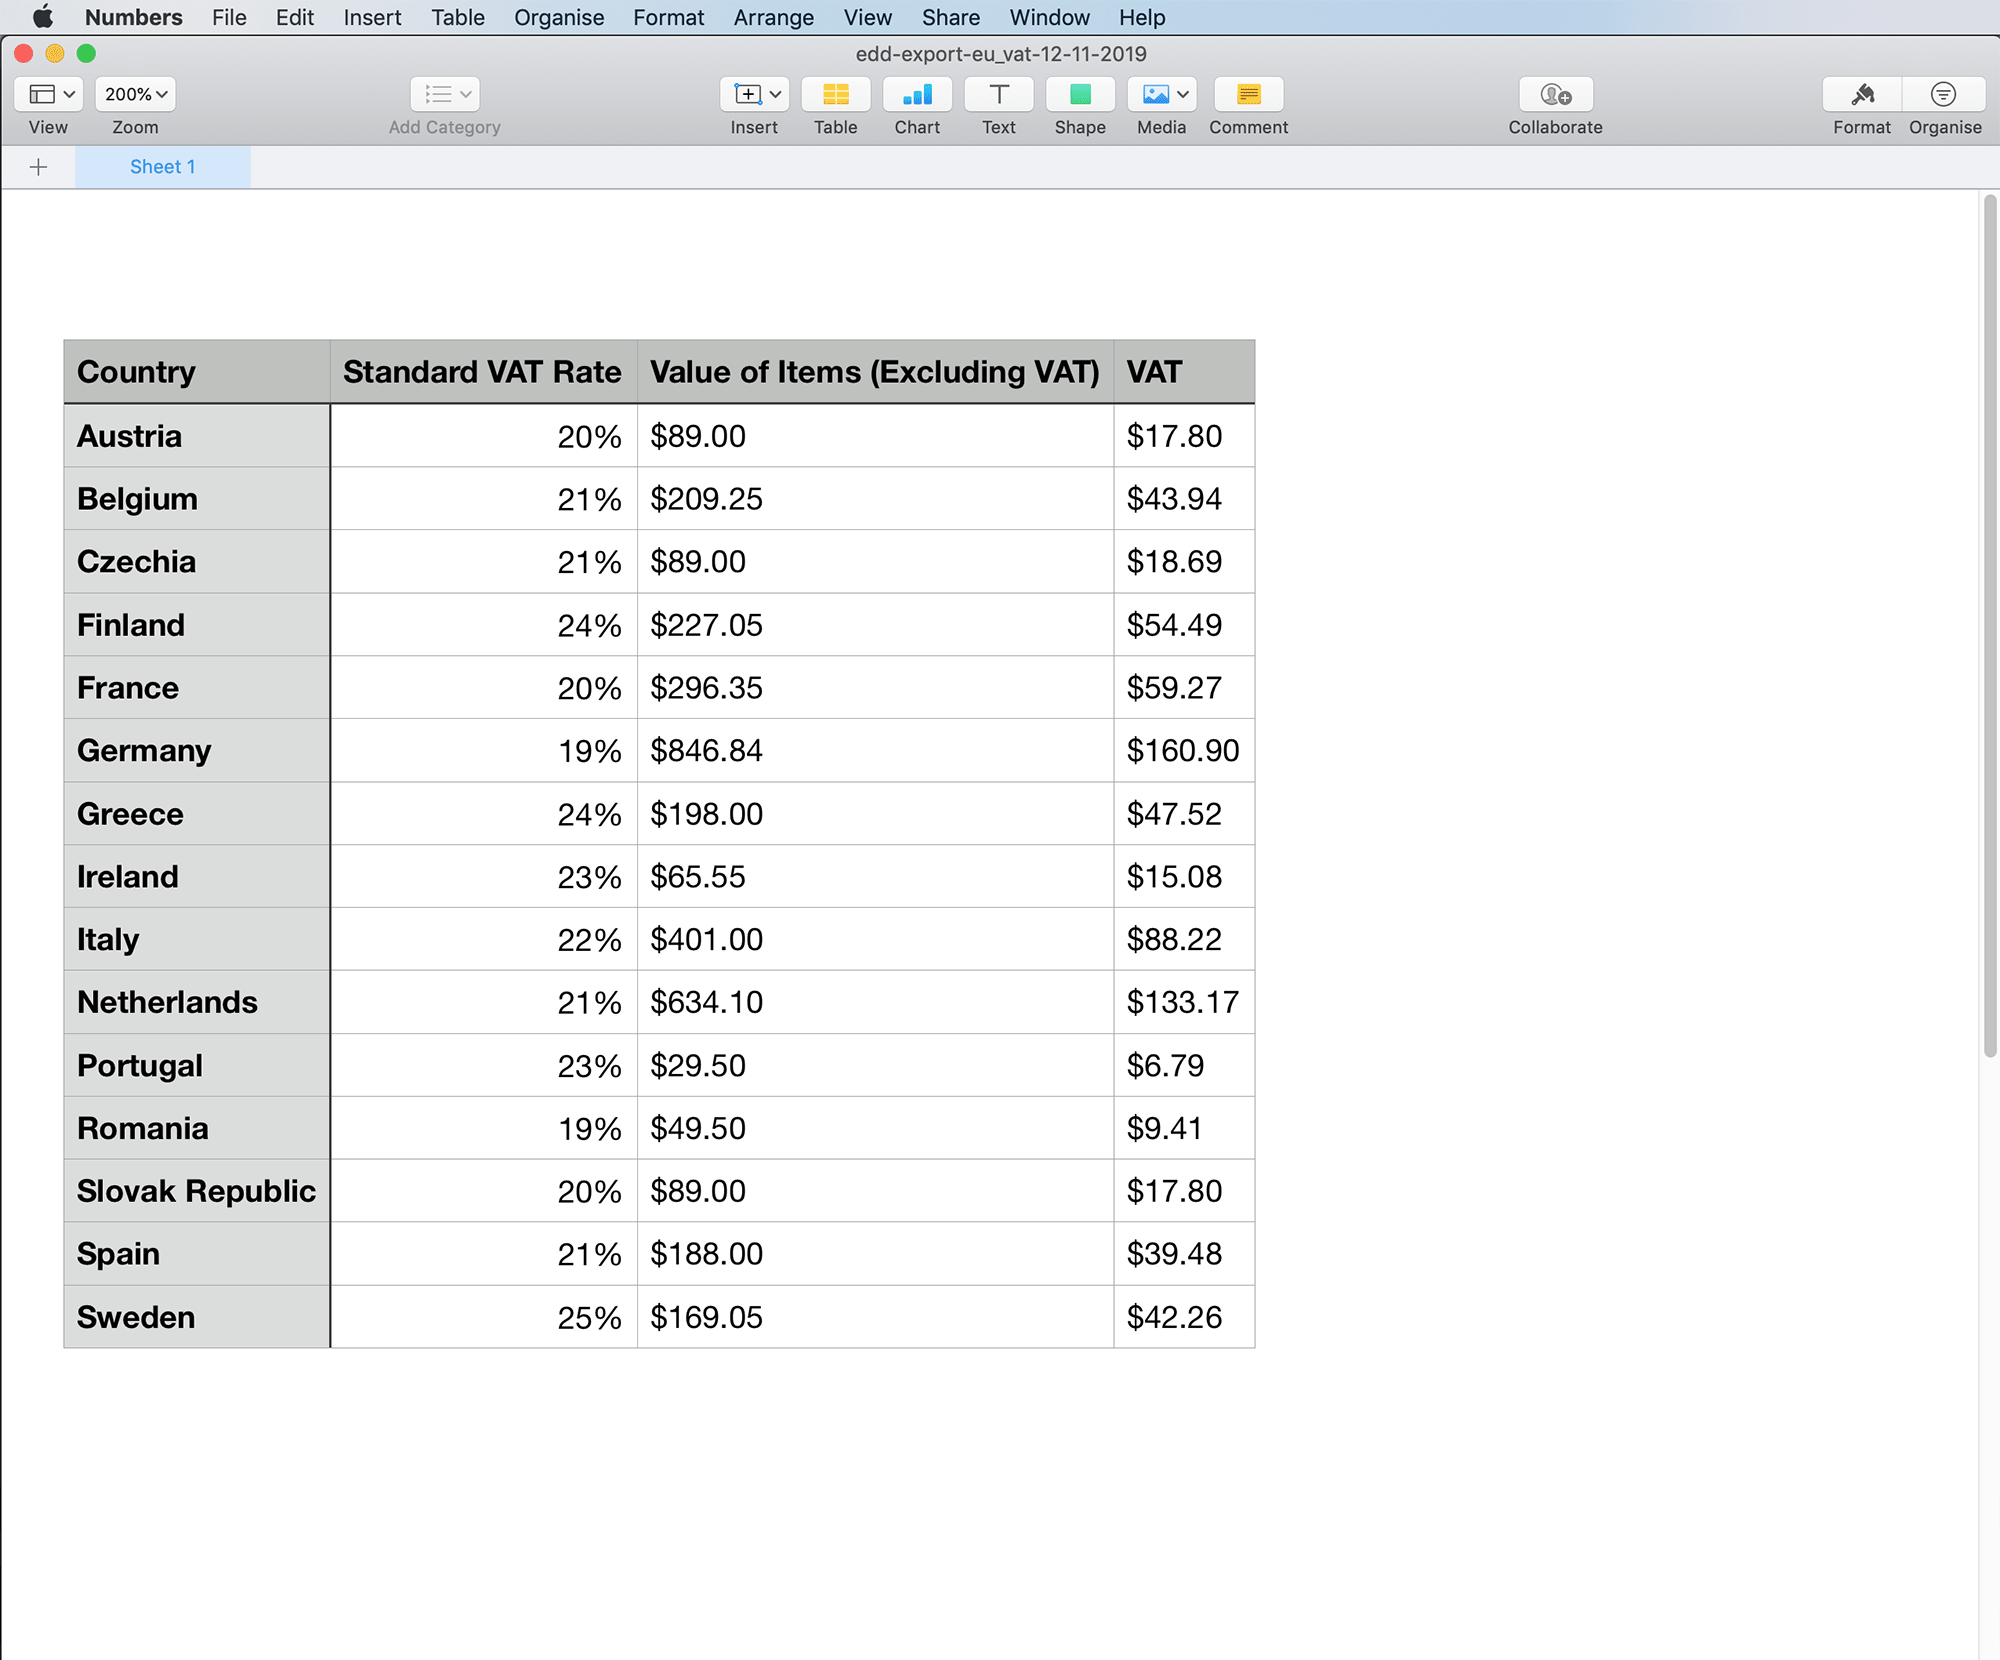
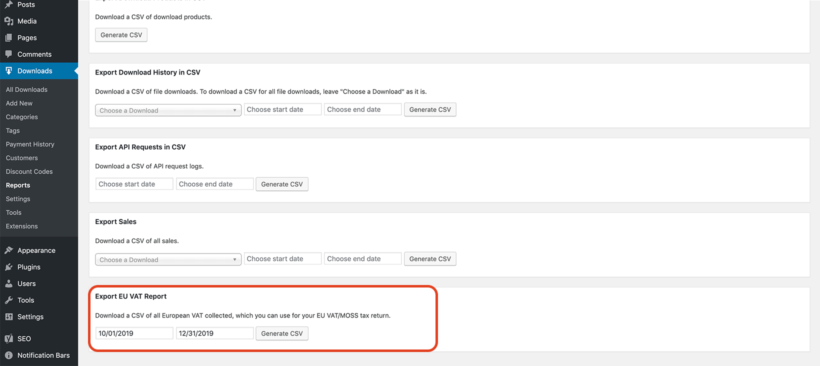
Our Easy Digital Downloads EU VAT plugin provides reports listing the tax that you collected for each EU country plus the UK. The information for each country is fully itemised, and you can use it as the basis for your UK and EU tax returns.

Seeking advice

The above information reflects our current understanding of the situation after Brexit. We are not accountants and recommend that you ask your accountant to confirm your personal situation regarding what changes you need to make, as they will be experts in the tax law for your country.

Our Easy Digital Downloads EU VAT plugin aims to make the process as simple as possible for you, and we will continue improving it as the advice about Brexit is updated.

Show hide VAT number field on Easy Digital Downloads checkout

It is well documented that the length of a form - including an e-commerce checkout - makes a big difference to conversions. With this in mind, we've added a conversion-boosting new feature to our Easy Digital Downloads EU VAT plugin. 

Since launching the Easy Digital Downloads EU VAT plugin, lots of you have asked for a way to hide the VAT number field from customers outside of the EU. That makes sense because there's no need for customers who don't pay tax to see this field on the checkout. We have listened to your feedback and released version 1.1 of the plugin, which includes this new feature.

How it works

EDD EU VAT plugin screenshot - reverse charge VAT

The new version of the plugin automatically hides the VAT number field if a non-EU country is selected on the Easy Digital Downloads checkout page.

When the customer selects an EU country, the VAT number appears underneath the address fields. They can use this to validate their VAT number and reverse charge the VAT.

Test drive the new feature

You can see this new feature in action by adding this product to the cart on our demo site. Try selecting different countries and you can see the VAT field appear and disappear.

Where to get the plugin

If you're already using the plugin, then you can update to version 1.1 from your WordPress Dashboard.

If you don't already have it, get Easy Digital Downloads EU VAT today and start charging the correct tax and validating VAT numbers - all easily, all automatically.

Looking to set up a WordPress shopping cart to accept payments on your WordPress site? There are all kinds of reasons you might want to add an eCommerce shopping cart to your site, but WordPress doesn't offer this as a built-in feature.

Thankfully, there are a number of free and premium WordPress plugins that you can use to add a shopping cart to your site.

In this post, we've collected eight of the best shopping cart plugins for WordPress.

After we explore each plugin, you'll also find a step-by-step guide on how to add a shopping cart to your WordPress eCommerce site using WooCommerce, the plugin that we consider to be the best shopping cart solution for WordPress.

Finally, we'll share some extensions that you can use to further enhance your WooCommerce shopping cart, like displaying your products in a shopper-friendly table layout:

WooCommerce product table layout example

Why you need a WordPress shopping cart plugin

While WordPress is the most popular way to make a website by a large margin, it doesn't come with any built-in shopping cart or payment processing features.

So while you can write about your products on a basic WordPress website or WordPress blog, you cannot sell them directly from your website. Your only options then are to use inconvenient workarounds, like having people send you money directly via PayPal.

A WordPress shopping cart plugin changes that, letting you sell products directly on your website. You'll be able to…

  • List one or more products for sale.
  • Let shoppers add one or more products to their "cart" and view those items on a dedicated shopping cart page.
  • Process credit card payments at your website checkout via a variety of payment gateways, including PayPal and Stripe.

Some shopping cart plugins go even further, with integrations for popular shipping couriers, detailed order management features, and lots more.

By using such a WordPress plugin on your site, you're able to create a much more user-friendly, personalized shopping experience for your visitors. When you make it more convenient for people to buy your products or services, you naturally increase the chances that visitors will make a purchase.

8 best WordPress shopping cart plugins

Below, we've collected eight of the best WordPress plugins that add shopping cart features to your site:

  1. WooCommerce
  2. Easy Digital Downloads
  3. BigCommerce
  4. WP EasyCart
  5. Ecwid Shopping Cart
  6. WordPress Simple PayPal Shopping Cart
  7. Cart66
  8. ThemeHunk All in One Woo Cart Plugin

1. WooCommerce

WooCommerce WordPress plugin

In our opinion, WooCommerce is the best WordPress shopping cart plugin for most people.

It'ss not only the most popular WordPress eCommerce plugin, but it's also the most popular way to make an eCommerce store of any platform according to BuiltWith.

WooCommerce is a free, open-source plugin that helps you sell both physical and digital products on your website. You can accept credit card payments via a number of different payment gateways, including Stripe, PayPal, Amazon Pay, Authorize.net, and many other options.

You can also offer offline payment options, like cash on delivery or check. And once an order rolls in, you get a convenient dashboard area to manage the status of your orders.

If you're selling physical products, you can connect to a number of shipping options, including USPS and FedEx.

WooCommerce will work with any WordPress theme, but the developer offers its own free Storefront theme, which is a great place to get started if you need a WordPress theme for your shopping cart.

Another great thing is its extensibility and customization options. Because it's so popular, you can find thousands of add-ons to add more features to your WordPress shopping cart.

For example, WooCommerce Product Table lets you list your products in a table view and Quick View Pro lets you add a quick view of your product to your store.

WooCommerce Product Table lets you list products in a quick order form

If needed, you can also make all or some of your store private, and you can also manage your store on the go, thanks to dedicated iOS and Android apps.

2. Easy Digital Downloads

Easy Digital Downloads shopping cart for WordPress

Easy Digital Downloads is a popular WordPress eCommerce solution for selling digital goods or services.

For example, it makes a good option for eBooks, photography, audio files, etc. But it doesn't make a good option for physical products.

You can connect Easy Digital Downloads to a range of payment gateways, including PayPal and Stripe. Shoppers will then be able to choose their preferred payment method when they check out.

Easy Digital Downloads doesn't have as many extensions, but you can still find helpful tools. For example:

3. BigCommerce

BigCommerce

BigCommerce is a popular standalone eCommerce platform. While it does use a hosted approach, BigCommerce is unique in that it still locally stores any products that you add via your WordPress dashboard, which makes it great for a WordPress eCommerce website.

This means you can still create a product table layout using the Posts Table Pro plugin, despite BigCommerce using the hosted approach.

BigCommerce is a bit pricey, though - the cheapest plan will still cost you $30 per month.

4. WP EasyCart

WordPress EasyCart shopping cart

WP EasyCart is a simple WordPress shopping cart plugin. It's not as feature-rich as something like WooCommerce, but it can make a good option if all you need is a simple shopping cart page.

There are two premium versions that add support for more payment gateways, a Mailchimp integration, shipping options integrations, and lots more.

5. Ecwid Shopping Cart

Ecwid shopping cart

Ecwid is a cloud shopping cart service that you can integrate into your site via a dedicated WordPress plugin. The setup process is easy and, once you connect your site, you can manage all of your products from inside your WordPress dashboard.

Still, it's important to remember that this is not a self-hosted WordPress shopping cart - Ecwid's servers are responsible for the checkout and payment features, not your own.

While this makes it easy to set up and start accepting payments, you are giving up some control in exchange for that simplicity.

6. WordPress Simple PayPal Shopping Cart

PayPal shopping cart

As the name suggests, WordPress Simple PayPal Shopping Cart can be a good option if you just need a very simple WordPress shopping cart and you're happy to exclusively use PayPal for payment processing.

The plugin lets you add your own physical or digital products and give visitors the option to buy them directly or add them to their carts. They can then view the items on a separate cart page and pay via PayPal at checkout.

Again, a good simple option, but it lacks the flexibility of many of the other eCommerce shopping cart plugins.

7. Cart66 Cloud

Cart66

Cart66 Cloud is a WordPress-specific cloud shopping cart that makes it super easy to get up and running because Cart66 handles payments and PCI compliance for you.

You can use it to sell both physical and digital products, as well as recurring payments like a subscription or a payment plan.

It also includes social media integrations to help you sell products on Facebook and Twitter and a Google Analytics integration to help you track what's happening on your store and measure your SEO efforts.

8. ThemeHunk All in One Woo Cart Plugin

The All in One Woo Cart Plugin by ThemeHunk is the ultimate plugin you need to add to your WooCommerce Store. This plugin will add a Floating Cart with some extra functionality to your website.

The plugin gives you many choices to style your cart just how you like it. You can choose colours for the Menu Cart, Fixed Cart, Floating Cart, and all the elements of the Side Cart Panel.

It has many features like animations, layouts, a down cart etc. The plugin also offers features like abandoned cart recovery, cross-selling, and upselling tools to help increase your store's revenue and conversions.

Whether you're a small business owner or a seasoned e-commerce professional, this plugin is a valuable addition to your WooCommerce toolkit. It has both pro and free versions.

How to set up a WordPress shopping cart with WooCommerce

Beyond being the most popular WordPress shopping cart plugin by a good margin, WooCommerce is also our recommended solution, which is why we've chosen it for this tutorial.

Below, we'll run through how to set up a shopping cart powered by WooCommerce on your WordPress site

1. Install WooCommerce and run the setup wizard

To get started, install and activate the free WooCommerce plugin from WordPress.org. As soon as you activate the plugin, you should see a prompt to launch the setup wizard:

WooCommerce setup wizard

This wizard helps you set up all the basics for your store, including your...

  • Core pages, like the shopping cart and checkout pages
  • Payment gateways
  • Shipping options

You can always change things later on, so don't stress too much about any of your choices.

2. Add your products

Once you've configured the basics of your WordPress shopping cart, you're ready to add the products or services that you want to sell.

To do this, go to Products → Add New.

Here, you'll see a lot of similarities to the regular WordPress editor. You can enter your product...

  • Title
  • Description
  • Categories and tags
  • Images
Add a product to your WordPress shopping cart

Then, to configure more product-specific settings, you can use the Product data box. This is where you enter information like…

  • Prices
  • Inventory status
  • Shipping details/measurements (if the product needs to be shipped)
Product data box

You can also set up attributes and variations, which let you sell different "versions" of a product. For example, different sizes or colors. Shoppers will be able to choose their preferred variant and you can charge different prices depending on what a shopper selected.

Another way to give your shoppers more choices is to offer product add-ons, which you can set up with the Barn2 Product Options plugin.

WooCommerce extra product options file upload
Use the Product Options plugin to add extra options to your products

3. Improve store navigation with product filters

Adding product filters to your store or products page can greatly help your customers narrow down their search and easily locate the product they are looking for. For this, I highly recommend setting up the Product Filters plugin on your website.

The plugin comes with powerful AJAX-based filters that can help your customers add filters to their search without reloading the page. You can smartly add custom filters that fit your store's needs. If you have various products in your store, you can filter by category, price, size, color, taxonomy, attributes, stock status, rating, etc.

WooCommerce product filter AJAX plugin screenshot

For mobile shoppers, you can display slide-in filters that do not take up space and can easily be applied to products. You can install and start using this plugin in barely minutes and once it's set up, it will continue to work its magic without the need for you to do any further upkeeping.

4. Enhance your WordPress shopping cart with a table layout

WooCommerce product table layout example

By default, WooCommerce lists your products in a layout that mimics most eCommerce stores, where you get a grid of product images, but not much detail about each product.

Depending on your needs, that could be what you want. But a lot of WordPress sites can benefit from using a table layout to list products because it lets you...

  • Display more information about each product.
  • Show more products in less space, which gets more eyeballs on your full product catalog.
  • Support "bulk add to cart" which lets shoppers choose multiple products to add to their shopping cart at the same time.

To add this table layout to your WordPress online store, you can use the Product Table plugin.

WooCommerce Product Table gives you full control over exactly what information displays in your table layout and also includes helpful features like:

  • Product search, sort, and filter options
  • The ability to only include products with specific categories, tags, attributes, etc.
  • Bulk add to cart

To get started, you'll need to install and activate the WooCommerce Product Table plugin. Then, you can go to WooCommerce → Settings → Products → Product tables to configure its settings.

Some of the important settings that you can configure here are…

  • Columns - choose exactly what information to display for each product.
  • Image size and Image lightbox - control how your product table handles images.
  • Add to cart button - lets you add checkboxes so that shoppers can bulk add products to their carts.
  • Variations - if you're using variable products, this lets you control how to display them in your product table.
  • Product filters - lets you add helpful product filters to your table, like letting shoppers filter by category, tag, or product attribute.
WooCommerce product table settings

Once you configure the plugin's settings, you can create your front-end product table layout by using the [product_table] shortcode.

By default, the shortcode will display every single product that you want to sell via your WordPress shopping cart. If needed, though, you can add shortcode modifiers to only display products from certain categories, tags, or other taxonomies.

For example, if you want to display products from the t-shirts category, you could use this shortcode:

[product_table category="t-shirts"]

If you want to add additional filter options, Product Table also comes with dedicated filter widgets that you can add to your sidebar.

5. Add product quick view to your shopping cart

WooCommerce quick view pro example

Another way to improve the usability of your WordPress shopping cart is with a product quick view.

With product quick view, you can let visitors view more details about a product without clicking through to the single product page.

To add a product quick view to your shopping cart, you can use the Quick View Pro plugin.

Quick View Pro works with both the "traditional" WooCommerce shop layout, as well as the table layout that you learned about in the previous section.

In your quick view, you have the option to display:

  • Product images and galleries
  • Reviews
  • Price details
  • Product description
  • Add to cart button
  • Product meta information (like categories and tags)

To get started, install and activate the WooCommerce Quick View Pro plugin. Then, you can go to WooCommerce → Settings → Products → Quick view to configure the plugin's settings:

Quick view settings

Quick View Pro activates itself on the traditional WordPress eCommerce layout by default.

If you're using Product Table to create a product table layout as you saw in the previous section, you can add a quick-view column to the Product Table settings to add a product quick view button to each item in your table.


Best Practices: How to generate more sales from your WordPress shopping cart

Once you have a functioning WordPress shopping cart in place, you can turn your attention to getting more sales via your new shopping cart system and optimizing your conversion rates. Here’s what we recommend:

  • Create a well-designed layout: Make sure that your product design and layout of the shopping cart offers all the details a customer might want to know while being precise and relevant. Use clear product images and make sure your page is optimized for mobile devices for the best customer experience.
  • Offer assistance: Show customers you care and help them make decisions easily by offering support. This could be something as simple as offering product tutorials (like a size guide), email or chat assistance for any queries, access to testimonials and social media etc.
  • Use product upsells and cross-sells: A quick and effective way to increase your online store sales is to show site visitors products related to their purchase. For example, a customer buying a guitar can be shown a guitar case, strings etc.
  • Have a fast, streamlined checkout process: Ensure that your checkout process isn’t tedious and supports all popular payment methods like PayPal and Stripe. Offering coupons and discounts at checkout can give customers that final push to purchase!
  • Increase the default product quantity: Another way to subtly encourage larger orders is to increase the default quantity using a plugin like Quantity Manager. Customers can still purchase a single product if they want, but by increasing the "anchor" in their mind, you can boost the chances that they purchase multiple products.
  • Simplify navigation with product filters: To improve your customers' shopping experience, you can add product filters to your store. You can do this with a plugin like Product Filters, allowing your customers to find their desired product seamlessly. If you have a large store with products in multiple categories, adding product filters can be a great addition to your store.

Finally, if you're using the product table approach we outlined above, there are also a number of techniques you can implement to increase the conversion rates for your product tables.

Get started with a WordPress shopping cart plugin today

If you want to sell products directly from your WordPress site, you need a WordPress shopping cart plugin.

While we've shared eight quality shopping cart WordPress plugins in this post, our overall recommendation for most people is WooCommerce. Again, we're not the only ones who like it - it's the most popular way to build an online store and powers 26% of the eCommerce stores in the top one million websites.

While the core WooCommerce plugin is great by itself, there's also a vibrant extension marketplace that you can use to further enhance your shopping cart. Three great options are:

  • Product Filters to help customers find products more quickly.
  • Product Table to display your products in a shopper-friendly table layout.
  • Quick View Pro to add product quick view to both the "standard" WooCommerce shop layout and the product table layout.

Do you have any questions about how to get started with your WordPress shopping cart? Let us know in the comments!

Did you know that if you use Easy Digital Downloads to sell to EU customers, then you must meet EU VAT rules - even if you're not based in the EU. And you can't comply with EU law using the tax settings that come with EDD - you need a separate plugin for that.

In this complete guide to EU VAT for EDD stores, I'll explain the legislation and the easy way for you to comply. I'll provide full step-by-step instructions on how any Easy Digital Downloads store can meet EU VAT law. And the good news is, it's surprisingly easy!

What is the EU VAT law and how does it affect my Easy Digital Downloads store?

Ask yourself these questions:

If you've answered 'Yes' to all these questions, keep reading because you're legally required to meet EU VAT law in your Easy Digital Downloads store.

What is EU VAT and who has to collect it?

European Union value added tax (more commonly known as EU VAT, or IVA in certain countries) is a tax that is added onto goods and services that are sold within the EU. It is paid by the customer when they make the purchase. The seller is responsible for collecting the tax and paying it to the correct authorities.

The law changed on 1st January 2015, forcing companies worldwide - including those outside of the EU - to handle EU VAT:

  • Before 1st January 2015 - If a company sells digital products to a consumer in an EU country, then the "place of supply" was the country where the seller is based - not the consumer.
  • After 1st January 2015 - If a company sells digital products to a consumer in an EU country, then the "place of supply" was the country where the consumer is based - not the seller.

As a result, the new law forces all sellers of digital products to collect and handle VAT at the consumers' local rate. So if you're outside Germany and sell a computer game to a consumer in Germany, then you need to charge German VAT to that consumer and pay it to the German tax authorities.

I know it sounds crazy that a company in - for example - America has to collect German VAT. However, that's the law.

Quaderno explain it very nicely in their guide.

Are B2B sales subject to EU VAT?

You only need to charge EU VAT when selling to consumers in EU countries. It's not required for business-to-business (B2B) transactions.

When an EU business with a valid VAT number buys from you, the VAT can be zero-rated - i.e. you don't have to charge them VAT.

However, you can't just take their word for it that they're a business. You actually need to validate their VAT number to confirm that they're a VAT-registered company, and store this information so that you can prove it later. Or if they're a small business without a VAT number, then you need to request and store some other sort of proof (e.g. a link to the customer’s business website or other commercial documents).

Even if you see yourself a a B2B supplier, in practice you probably sell to some EU customers who don't have a VAT number. As a result, your Easy Digital Downloads store must be able to handle EU VAT. Keep reading to learn how.

What about UK VAT?

The UK has now left the EU, but they have adopted the same legislation into UK law. This means that if you sell digital products to consumers in the UK then you must charge them UK VAT, wherever your company is based.

The Easy Digital Downloads EU VAT plugin fully supports UK VAT, which makes things easy for you. You can learn more about UK VAT here.

Easy Digital Downloads EU VAT MOSS plugin

Here's a summary of your legal obligations - whether or not your company is based in the UK:

  • Register for EU VAT You must register for a EU VAT number so that you can submit the quarterly tax returns and make payments.
  • Collect EU VAT Your Easy Digital Downloads store must check whether each EU sale is B2B or B2C, and charge the customer's local rate of EU VAT for B2C sales; and zero rate the VAT for B2B sales.
  • Provide valid VAT receipts Provide your customers with VAT invoices containing:
    • Your business’ name and address.
    • Your business’ VAT number.
    • Invoice date.
    • Invoice number.
    • Buyer’s name and address.
    • Buyer’s VAT number.
    • Rate of VAT applied. For reverse charged B2B sales, you should include the text "EU VAT reverse charged".
    • Amount of VAT charged.
    • Total price including VAT.
    • Store the invoices for 5 years.
  • Store evidence about your customers' location
    • You must store 2 pieces of evidence (or 1 piece of third party evidence for EU companies with under €100,000/year in cross-border sales of digital goods to the EU) to confirm the customer's location. While EU legislation lists various acceptable forms of evidence, the most realistic for an Easy Digital Downloads store are the customer's billing address and IP address.
    • Store this location evidence for 10 years.
  • Submit quarterly tax returns Every 3 months, you must submit a tax return showing the EU VAT you collected in the previous quarter, and pay the correct amount of tax.

This all sounds like a nightmare!

Of course, all of this sounds like a huge burden for any small business! Fortunately, there are two steps that you can take to make EU VAT less burdensome for your company:

  1. Use the best Easy Digital Downloads EU VAT plugin to handle the collection of VAT for your online sales automatically. We built this plugin to make it as easy as possible for any EDD store to meet European VAT law.
  2. Register for a service that lets you file a single quarterly tax return for all your EU sales, and make a single payment for all the EU VAT you have collected. This is much easier than having to register for VAT with each individual EU country.

Together, these two steps combine to make your Easy Digital Downloads store compliant with EU VAT legislation. It won't take up much of your time, freeing you up to focus on the most important task of growing your EDD store's sales. Keep reading to learn how.

If you don't use Easy Digital Downloads, then check out our guide on How to add a VAT number field to the WooCommerce checkout instead.

Common excuses to avoid meeting EU VAT law

A lot of e-commerce companies - particularly those outside of the EU - choose to stick their heads in the stand and pretend the EU VAT law doesn't apply to them. These are the most common excuses, and why they don't work!

Excuse #1 - My company is based outside of the EU

Unfortunately this isn't relevant. If your Easy Digital Downloads store sells to consumers in the EU, then you MUST charge them EU VAT/IVA. Don't be confused by the €10,000 annual sales threshold that applies to EU businesses. Businesses outside the EU must collect EU VAT for ALL their sales to European consumers, with no minimum threshold.

Excuse #2 - I only make B2B sales to the EU

While it's correct that you only have to charge EU VAT on B2C sales, you can't argue that your Easy Digital Downloads store is exempt because all your products are aimed at businesses. That's because both registered companies AND self-employed individuals make business-related purposes - and self-employed individuals in the EU have to pay EU VAT. 

You can only get out of charging VAT to EU customers if you have collected evidence that they are a registered business. This means that your Easy Digital Downloads checkout needs a way to check whether each customer is a business, and decide whether to charge VAT accordingly. 

The easiest way to do this is to add a VAT field to the EDD checkout, integrated with an official database of VAT numbers. The new Easy Digital Downloads EU VAT plugin (coming soon!) will do this automatically, so there's no excuse not to comply!

Excuse #3 - I'm in the UK and.... well... Brexit

The UK has now left the EU. UK companies selling digital products still have to meet EU VAT law. This is because the legislation applies to all companies who sell to EU countries - it doesn't matter whether your company is based in the EU. As a result, Brexit won't change the obligations for Easy Digital Downloads stores in the UK.

Excuse #4 - Nothing will happen if I ignore EU VAT

Regardless of which country you're in, there are potential penalties if you fail to meet your EU VAT obligations. This can include:

  • Financial penalties and fines
  • Years of backdated payments to cover the VAT you should have paid
  • Your seller account being shut down on marketplaces
  • Investigation by tax authorities

These consequences can be crippling for any e-commerce business. As a result, it's best to take simple steps to comply with EU VAT law, and collect the VAT from your customers whenever you sell to the EU - instead of having to cover the cost yourself in fines later on.

Why has it always been so difficult for EDD stores to comply with EU VAT?

We've been running Easy Digital Downloads on the Barn2 site ever since we started selling WordPress plugins. As a result, we've been on the journey to seeing the introduction of the new EU VAT law in 2015, right through trying different ways to implement it.

Until now, there were no good options for collecting EU VAT in Easy Digital Downloads. Straight out of the box, the built-in EDD tax settings don't have the required features to meet EU law. There is no official EDD extension for EU VAT. The only options were:

  • A free WordPress EU VAT plugin that is no longer supported and had poor ratings.
  • A premium plugin that hasn't been updated since 2015.
  • A premium plugin that isn't presented very professionally and when we sent an enquiry to the developer, their response was extremely rude and offensive! (As the owner of a WordPress plugin company, I feel particularly strongly about this because we work so hard to provide positive, helpful support to our own customers.)
  • A SAAS solution that integrates with Easy Digital Downloads, but costs $49-149 per month and has fewer than 20 EDD users. It also has more features than we need. (For example, it comes with complete reporting on EU VAT sales, which most people don't need because you can easily get the same information by exporting from EDD and/or an accounting system such as Xero.) You're tied in long-term because your tax evidence is stored on their servers and legally must be stored for 10 years. The total cost works out at $5,880-$17,880 per decade!

As a WordPress plugin company, we were perfectly placed to develop a better - and cheaper - solution. We got to work, and built our Easy Digital Downloads EU VAT plugin. As well as using it on our own Easy Digital Downloads store, we're releasing it to the public to help other EDD users to meet their EU VAT requirements.

The solution: The ultimate Easy Digital Downloads EU VAT plugin

Easy Digital Downloads EU VAT plugin

We've built the Easy Digital Downloads EU VAT plugin as the solution for all EDD stores who need to comply with European VAT law. This easy-to-use plugin will work straight out of the box, and comes with everything you need.

How it works

The Easy Digital Downloads EU VAT plugin is designed for any WordPress site that uses Easy Digital Downloads. It works like this:

  1. Charges the correct VAT to EU customers When the customer selects their country on the EDD checkout, the correct VAT is charged. If you have set the tax rate for each EU country in the Easy Digital Downloads settings then this is used; otherwise it will use the EU tax rates built into the plugin. This ensures that the customer is always charged the correct rate, regardless of their location.
  2. Removes the VAT for registered EU businesses The plugin adds a VAT number field to the Easy Digital Downloads checkout, which only appears for customers in EU countries. VAT-registered EU companies can enter their VAT number. The number is checked against the official VIES VAT register, and if it is valid then no VAT is charged on the sale.
  3. Collates customer location evidence It also adds a 'VAT Details' section to the payment screen in Easy Digital Downloads, so that the store owner can quickly check the evidence that was used for the VAT calculations. You can also export this evidence if you are ever audited.
  4. Provides legally valid tax receipts Converts the EDD purchase details screen into a full tax receipt with all the required information, and adds merge tags so that you can use the 'Purchase Receipt' email as a tax receipt too. If you're using the PDF Invoices extension then it adds extra information to this too.
  5. Easy VAT reporting Adds an EU VAT report to the Exports page in Easy Digital Downloads. You can use this to export all the data you need for your quarterly MOSS VAT returns.

The plugin builds on the features that are already built into Easy Digital Downloads to create complete solution to European VAT. Its in-depth documentation covers everything you need to manage EU VAT in Easy Digital Downloads, including:

  • How to provide legally valid VAT invoices to customers.
  • How you can export the EU VAT collected for your accounting software and quarterly tax returns.
  • Where to find the legally required pieces of evidence about each customers' location.
  • Further advice on how to make sure your company complies with EU VAT legislation.

Step-by-step - How to make your EDD store compliant with EU VAT

It's surprisingly easy to make your Easy Digital Downloads store meet EU VAT law. To comply, simply follow this two-step process:

  1. Register for EU VAT.
  2. Set up the Easy Digital Downloads EU VAT plugin.

1. Register for EU VAT

Since you'll be collecting EU VAT from consumers in EU states who buy your products, you need to be registered with a tax authority in the EU. You can either register for VAT in each EU country where you make sales, or register for Mini-One-Stop-Shop (MOSS).

MOSS is a centralized VAT scheme that enables you to submit a quarterly single tax return and make a single payment to cover the entire EU. Your online tax return will declare all the EU VAT you have collected, and you will then make a single payment which the MOSS service will then distribute to the relevant EU member states on your behalf.

Needless to say, nearly all companies running Easy Digital Downloads are better off registering for MOSS! It's free, and will save you a ton of time and paperwork.

How to register for MOSS

  • Union Scheme If your company is based in the EU, or has any establishments (e.g. an office) in an EU country, then you should register for MOSS with your local tax authority (for example, UK companies apply to MOSS via HMRC, which handles UK tax).
  • Non-Union Scheme Non-EU companies can choose to register for VAT with the tax authority for any EU member state. For English speaking companies, the Republic of Ireland is usually a good option because there's no language barrier and they have a good online system.

How to register for UK VAT

In addition to MOSS, you will need to register for UK VAT. This is because the UK has now left the EU, and is no longer part of the MOSS scheme - but non-UK companies must still charge UK tax to customers in the UK.

2. Set up the EDD EU VAT plugin (in 2 minutes!)

Now you're registered to start collecting EU VAT, it's time to add the necessary features to your Easy Digital Downloads store:

  1. Get the Easy Digital Downloads EU VAT plugin.
  2. Install the plugin on your WordPress website.

How much VAT to charge

Each EU country is free to choose its own rate of VAT. As a result, your EU VAT-compliant Easy Digital Downloads store must charge the correct tax rate to consumers in each EU country.

Fortunately, the Easy Digital Download EU VAT plugin makes this easy. It comes complete with the correct standard VAT rate for each EU country, and we'll regularly release updates whenever any of the rates change.

When you install the plugin, the current standard VAT rate will be charged to customers in each EU member state. You can override these rates in the general Easy Digital Downloads settings under Downloads → Settings → Taxes. For example, you might want to do this if you're selling products that allow you to charge a reduced rate, or if you have any other reason for not charging the standard VAT rate. This gives you complete flexibility over the tax rates.

VAT receipts and invoices

Easy Digital Download EU VAT integrates seamlessly with the payment receipt that comes with Easy Digital Downloads, EDD email, and the PDF invoice plugin. This gives you several options for providing EU customers with VAT receipts that they can use for accounting and tax purposes:

Order confirmation and customer account page

EDD EU VAT plugin screenshot payment confirmation page with tax charged

Logged in customers can access the Easy Digital Downloads Account page and view tax information for their orders. This is available by clicking the 'View Details and Downloads' link alongside any order. They all see this information on the confirmation page which loads as soon as they complete their order in Easy Digital Downloads.

The Easy Digital Download EU VAT plugin extends the EDD order confirmation and payment details pages to include all the information that is required by EU VAT law. This means that if you don't use any invoice plugins on your Easy Digital Downloads store, your customers can use this as their tax invoice.

Showing EU VAT in the EDD payment receipt email

EDD European VAT WordPress plugin screenshot email receipt

Easy Digital Downloads sends a payment receipt to each customer after purchase. You can manage this via Downloads → Settings → Emails → Purchase Receipts.

The Easy Digital Downloads EU VAT plugin comes with merge tags that you can use to add the required tax information to this email.

Alternatively, if you're using the Per Product Emails EDD extension to send a different email for each product (as we do for sending personalised setup information for our WordPress plugins), then you can add these merge tags and manage the emails under Downloads → Per Product Emails.

Either way, you can add payment and tax information to the EDD payment receipt email using the built-in email merge tags. Mix and match them to create the perfect email receipt.

Attach a PDF Invoice to the EDD order confirmation email

Easy Digital Downloads PDF Invoices with EU tax
Example of a PDF Invoice with EU VAT information
Easy Digital Downloads' PDF Invoices plugin is the most sophisticated way to provide your customers with VAT invoices. We have integrated the Easy Digital Downloads EU VAT plugin with PDF invoices to add the legally required information to the invoice.

As well as allowing customers to generate PDF invoices from the Account page, it comes with a merge tag that you can use to add a 'Download Invoice' link to your customer emails.

We use this plugin on the Barn2 site, and find that it's the easiest way to provide tax information. Customers can download their EU VAT invoice directly from the order email receipt. This is more convenient than having to log into their account and download it from there. It also saves them having to contact us to request a tax invoice.

Store your invoices for 5 years

EU law states that you must store your VAT invoices for a minimum of 5 years. Since you use Easy Digital Downloads, this is taken care of automatically. The invoices will remain available for you to download for as long as you continue using EDD.

Storing evidence of your customers' location

As we saw earlier, you're required to collect of evidence to confirm which country each of your customers are in. You have to store this for 10 years.

Again, the good news is that this is all handled for you! The Easy Digital Downloads EU VAT plugin collates all the customer location evidence and stores it in a single location, making it easy for you to find. When you install the plugin, you'll see a 'VAT Details' section on the screen for each payment in your store:

Easy Digital Downloads VAT Details Evidence

This displays:

  • Evidence 1 - Customer billing address Easy Digital Downloads stores the customer's billing address, which is entered on the checkout page.
  • Evidence 2 - Customer IP address Easy Digital Downloads collects the customer's IP address and stores it in the WordPress database. You can click on this in the 'VAT Details' section to see which country the IP address relates to.

Additional evidence

Most Easy Digital Downloads sites store additional evidence of the customer's location too. For example, your payment processor (e.g. Stripe or PayPal) might collect their own information, such as IP address, country code, and bank location. Each of these can count as additional pieces of evidence.

As an EDD store owner, you should look at all the evidence that is collected. Make sure that you have the correct amount of non-contradictory evidence to confirm your customers' locations. Remember - the more evidence, the better!

So long as you keep your Easy Digital Downloads store online, this evidence will always be available for you to access and report on.

How to report on customer location data

Easy Digital Downloads comes pre-built with an export facility, which you can use to download reports continuing your customer location evidence. For example, you might need to do this if you are ever audited by the tax authorities:

  1. In the WordPress admin, go to Downloads > Reports > Export. 
  2. Use the 'Export Payment History' tool to download all the payment records for the period you wish to report on.
  3. This will download a CSV file to your computer.
  4. Use any spreadsheet software such as Excel, Numbers or Google Sheets to edit the CSV file:
    1. Simplify the spreadsheet by deleting any columns you don't need.
    2. Find the Tax and Country columns and sort by them as required.

EU law states that the location data for each customer must be "non-contradictory". This means that both records of the customer's country should match. Normally, the records will match but there are occasions where this may not happen. For example, if the customer buys while they're abroad on holiday, then their IP address won't match their billing address country.

I recommend that you create a process to check the reports periodically. If you ever discover records that don't match, then you should contact the customer. Ask them to resolve the discrepancy between the two pieces of information. (More advice on this here.)

How to send quarterly EU VAT returns

Once your EDD store is up and running with the Easy Digital Downloads EU VAT plugin, you can sit back and relax until it's time to file your first EU VAT return.

Tax return deadlines

You must submit a EU VAT tax return and make a payment by:

  • Q1 - 20 April - covers the first quarter ending 31 March
  • Q2 - 20 July - covers the second quarter ending 30 June
  • Q3 - 20 October - covers the third quarter ending 30 September
  • Q4 - 20 January - covers the fourth quarter ending 31 December

Most EU tax authorities will email you shortly before the deadline, but I also recommend setting a reminder to make sure you don't forget!

Where to get the information

There are several ways to get the information for your quarterly MOSS return. The simplest is to use the EU tax report that comes with the Easy Digital Downloads EU VAT plugin. This lets you export details of all the EU tax collected during a specific period, divided by country.

Export EU VAT collected from Easy Digital Downloads report

The report exactly matches the data you need to provide for your MOSS tax return, making it as easy as possible for you.

Alternatively, if you use an online accounting system such as Xero, QuickBooks or Sage, then the accounting system can generate and submit your MOSS returns at the click of a button. First, you need to get the data into your accounting system. You can either export your sales from Easy Digital Downloads and then import them to your accounting system, or you can integrate your accounting system with EDD to import the data automatically.

Submitting the tax return

Log into the online system for whichever tax authority you registered for VAT with. For example, if you registered for MOSS in the Republic of Ireland then you should log into their online system.

The exact process depends on the country. Find the link to submit a MOSS VAT return, and follow the online instructions.

Making a payment

After submitting the MOSS return, you'll see the total amount of tax owed on the final page. You'll probably receive an email too. There will be instructions on how to make the payment, so use these to send the money.

At Barn2, we pay our EU VAT by making a bank transfer to the MOSS bank account. MOSS then distributes this to all the EU countries that we collected tax for. This is normally over 20 different countries, so the single payment saves us a lot of time!

What if I don't collect any EU VAT one quarter?

You must submit a tax return even if you didn't collect any EU VAT that quarter. When you create a MOSS return in the online reporting system, you'll see a tick box. Use this to confirm whether or not you made any taxable sales to EU countries in the previous quarter. If you didn't collect any VAT during that period, simply declare this and submit the return.

Where to get the plugin

The Easy Digital Downloads EU VAT plugin is available on our website. Get it today and start meeting European tax rules - the easy way!

Create a front-end WordPress download manager using Posts Table Pro

A WordPress download manager plugin enables you to organize files, make them available to team members or site visitors, and track downloads. You can also choose to restrict access to downloadable files so only certain people can access them or make them publicly available to your site’s visitors.

While there are several WordPress download manager plugins available, not many let you create a searchable front-end WordPress download manager with quick download links.

With this in mind, in this post, we’ll explain how you can create a fully-functional WordPress download count manager using the Document Library Pro plugin. We’ll also show you how to control user access to files, see who's downloaded files, start selling downloadable files, and much more.

What are WordPress download managers?

A WordPress download manager plugin allows users to control, manage, and track file downloads from within a WordPress site. In addition to this, some users might also need to be able to sell downloadable files online.

Although WordPress is a complete content management solution, it doesn’t come with a download manager out of the box. Fortunately, you can use a WordPress download plugin to add one to your WordPress site.

Here are some examples of businesses and individuals that can benefit from using WordPress download managers:

  • Site owners who offer downloadable files directly through their website (such as free resources and e-books or a WordPress document library).
  • Business owners that need to sell downloadable files directly through their website using e-commerce. For instance, software, music notes, or graphic design templates.
  • Businesses looking to track the number of file downloads through marketing campaigns.

Here are some real-world scenarios where you might need a WordPress download manager on your website:

  • Do you offer e-books, checklists, or other downloadable resources as lead magnets for generating qualified leads?
  • Are you an online course instructor looking for a way to sell audio (or video) online course lectures to students?
  • Do you need an easy way to make sales enablement documents available to your sales department through your website so they’re easy to access on-the-go?
  • Are you a developer/design agency that sells website templates or design files to customers?
  • Are you choosing between WordPress and other download manager platforms, such as SharePoint vs WordPress?

There are several WordPress download manager plugins available that are suited for specific purposes. They offer all kinds of neat features including file organization capabilities, download tracking, and team collaboration functionality. Of course, the download management solution you end up using will depend on your own needs and requirements.

Benefits of having a WordPress download manager

It’s fair to say that the WordPress’ native user interface gives you control over file management downloads to some extent. That said, it’s by no means the most efficient way to manage downloadable files or keep track of downloads.

With a full-blown WordPress download manager, you’ll be able to:

  • Password-protect files.
  • Track the number of downloads.
  • Manage downloadable files.
  • Restrict unauthorized users from accessing your WordPress files.
  • Organize and sell digital downloads from your site's front-end.

Best WordPress download manager plugins

Although there are various download manager plugins out there for WordPress, you’d be hard-pressed to find a solution that lets you set up a front-end download management system. Here, we’ll introduce Document Library Pro - a WordPress download manager plugin that lets site owners display downloadable files (along with important file management information and download links/buttons) in a searchable and sortable front-end table or grid layout.

Document Library Pro: The best WordPress download manager plugin

Document Library Pro circle cropped

The Document Library Pro plugin makes it easy to add downloadable files and display them in a searchable table or grid layout. The best part is that you can use it to list all sorts of downloadable files, including:

  • Downloadable audio files, lectures, and music.
  • Graphic design files such as PSDs, SVGs, and vectors.
  • E-books, checklists, forms, and manuals.
  • Digital images and photos.
  • Website templates.
  • Files hosted externally, e.g. on Dropbox or Office 365.

There are 4 easy ways to add downloadable files, including bulk import tools. Once added, your users can easily search and sort the downloads using filter dropdowns and the instant AJAX-powered search. They can choose to either quick access files online or download them to their machines.

Why Document Library Pro is the best WordPress download manager plugin

WordPress document library grid

Here are some of the main reasons why Document Library Pro is the perfect way to manage downloadable files on your WordPress site:

Reason #1: It’s incredibly easy to use

One of the reasons why Document Library Pro is best suited for all sorts of site owners is that it organizes all your download files in an easy-to-use, interactive table layout on the front-end. As a result, users can quick access and download files without involving the admin or creating a user account. The best WordPress download manager plugin also makes it easy for site owners to organize files using categories, tags, and custom taxonomies.

Reason #2: Advanced download manager features

While being easy to use, Document Library Pro has over 50 advanced features for customizing the download manager. Let’s take a look at some of the amazing features on offer:

  • 4 quick ways to add downloads to WordPress.
  • Display download links as buttons, file type icons or text links.
  • Integrates with the WordPress Media Library, while providing a separate section to manage your documents separately from your other media files.
  • Lets you easily create dynamic table and grid layouts for listing downloadable files in a neat and organized way.
  • You’ll be able to display multimedia content directly in the library including audio files, media playlists, video players, and images. This is great for providing a quick preview.
  • Search, sort, and filter options make it easy for users to quickly find the exact files they’re looking for. They can also filter the list of downloads to only view certain types of files.
  • You can create an individual page for each download, which works with any type of embedded content such as flipbooks and embedded Google Docs or PDF's.
  • It seamlessly integrates with Password Protected Categories and other membership plugins. This allows you to hide any or all of your downloads from public view. You can protect a specific download category, its sub-categories, and all of the digital files inside.

Reason #3: Premium support from the developers

Since Document Library Pro is a premium plugin, you can expect to receive support directly from our WordPress experts. In addition to this, you’ll have quick access to the knowledge base and tutorials (including video tutorials!).

Best WordPress download manager plugin for selling files

Easy Digital Downloads Audio Store Plugin

While Document Library Pro is the best plugin for displaying and managing downloads, there are some other good WordPress download manager plugins available which meet different requirements. You might need a different plugin if  if you have different requirements.

The main reason you would need a different download plugin is if you need a way to sell downloads online. If this applies to you, then the best plugins for your needs are Easy Digital Downloads with Posts Table Pro:

  • Easy Digital Downloads Table PluginEasy Digital Downloads - if you're looking to sell file downloads, Easy Digital Downloads provides a more heavy-duty approach to file management that also builds in full eCommerce support.
  • Posts Table Pro - you'll also need Posts Table Pro to list the downloadable products in a searchable table. This is Document Library Pro's all-purpose sister plugin, and lists any post type in a table - including Easy Digital Downloads products.

But for the purposes of this tutorial, we're looking at how to add a download manager to add files and display them on your website. Keep reading to learn how to do this with Document Library Pro.

How to set up a WordPress download manager on your WordPress site

Setting up a front-end WordPress download manager is incredibly easy with Document Library Pro. Follow these steps, and you'll be up and running in no time.

As a recap, your finished download manager will look something like this:

Front-end WordPress download manager created using Posts Table Pro and the WordPress Download Manager plugin

Step #1: Install and activate the Document Library Pro plugin

To get started, download the Document Library Pro plugin if you haven’t done so already.

  1. Log in to your WordPress admin panel, navigate to Plugins → Add New and click the 'Upload Plugin' button. Click the 'Choose File' button and upload the zipped Document Library Pro plugin folder to your website. When it’s done uploading, click on the 'Install Now' button to install it to your website.
  2. Next, activate the plugin by clicking on the 'Activate Plugin' button on the following screen.
  3. Finally, head over to Documents → Settings and enter your license key.

Click the Save Changes button at the bottom of the screen. By now, you’ve successfully installed and activated the download manager plugin.

Next I'll show you several methods for how to add downloadable files to your website.

Step #2: Quick add downloadable files to your website

There's a choice of 4 ways add downloadable files to your WordPress site and display them with Document Library Pro. Below, we’ll take a brief look at each method to help you decide which option is right for you:

Add downloads manually

This is exactly like adding pages or posts in WordPress. Go to Documents → Settings and add all the information that you want to display for the download. For example, you should add name, and can also add other information such as:

  • Content - you may wish to paste the full content of the downloadable file here, embed it into the page using a plugin such as Google Drive Embedder or a flip book embedder, or add embedded audio or video.
  • Excerpt - a brief summary of the download to encourage people to click on it.
  • Download link - either upload the downloadable file to the WordPress Media Library here, or add the URL of where the file is hosted externally (e.g. on Dropbox or SharePoint).
  • Categories and tags - use these to organize and manage your downloads.
  • Featured image - if you want to add an image to represent the download, such as a screenshot of the front page of a document.

Other data such as the file size and type is calculated automatically.

Drag and drop file upload

For a quick way to add multiple downloads to WordPress, go to Downloads → Import and use the drag and drop file uploader.

This will add each download to the 'Documents' section of the WordPress admin. Once they're listed there, you can edit each one as needed. For example, to change the name that appears in the list of downloads (which will be the filename by default).

Bulk CSV upload

To add a large number of downloads, you might want to prepare all the data in a CSV file and upload this. Again, you can do this in Downloads → Import.

The WordPress download manager plugin knowledge base provides a sample CSV file which shows you how to format the data before uploading it.

Select files already in the WordPress Media Library

Lots of website owners install a WordPress download manager as a way of organizing and displaying files which are already in the WordPress Media Library. Perhaps you have been listing downloads manually for a while, and need a more user-friendly solution now your site is bigger.

Don't worry, you don't have to start from scratch. Simply go to the 'Media' section in the WordPress admin and tick the checkbox to the left of all the files that you want to add to the download manager. Open the 'Bulk action's dropdown list and select 'Add to document library'.

After that, you can manage your downloads in the 'Documents' section of the WP admin. This keeps them nice and organized, away from your other Media Library files such as blog post images.

Step #3: Display downloads in a searchable table or grid

Now you know how to add downloads, it's time to add one or more download manager pages to your WordPress site. This allows people to access the downloads.

By default, the downloads will be visible to everyone who visits your website. Later in this tutorial, I'll tell you how to restrict access to that only certain people (e.g. your team members) can access them.

Click on the 'Pages' link to the left of the WordPress admin area, and open the page called 'Document Library'. You can rename this if you like, e.g. to 'Download Manager'. This page lists all your downloads in a searchable table or grid, depending on your settings.

Customizing the download manager display

To customize the way the downloads are listed, go back to the WP admin and go to Documents → Settings. Change the settings on the page as needed. For example, you can:

  • Switch between the table and grid/tiled layout.
  • Change the columns in the table.
  • Choose whether the download links are styled as buttons, text links or file type icons.
  • Add extra columns such as file type and file size.
  • Disable the links to the individual page for each download.
  • Add filter dropdowns so that people can quickly refine the list by category or tag.
  • Enable the 'Folders' option which creates a clickable folder structure for your downloads, instead of displaying them all in one big table.

You can also use the [doc_library doc_category="category-name"] shortcode to create more advanced structures for the download manager. For example, you can list different downloads on different pages of your WordPress site.

With over 50 options to choose from, you can keep tweaking the download manager until it's 100% perfect.

Managing downloads

Once your WordPress download manager is set up, it's easy to keep things organized over time. These are my top tips on managing your downloads:

  • Keep your download categories and tags organized and up to date so that people can find downloads easily.
  • Avoid version control issues by installing the free Enable Media Replace plugin. This adds a 'Replace' button to the WordPress Media Library so that you can overwrite old versions of downloads when you add new ones. It also helps to reduce space on your web hosting.
  • Consider adding a front end editor plugin so that your colleagues can manage downloads more easily.
  • For extra tools to manage the WordPress Media Library in the back end, you might also like to run WPFileo Pro alongside Document Library Pro. This is a fantastic plugin to manage thousands of images or other downloads in just a few clicks. It easily organizes text, images, videos, files, and folders. The plugin comes with advanced features that make the default media libraries more effective and user-friendly.

What else can you do with the Document Library Pro WordPress download manager?

One of the key benefits of using Document Library Pro as a WordPress download manager is that it integrates seamlessly with other WordPress plugins and add-ons. This way, it makes it easy to leverage advanced download management functionality.

Check out the full list of plugins that are tried and tested to work with Document Library Pro. In particular, here are some extra features that you can make the most of when using Document Library Pro.

Control file downloads through password protection

If you need to create a download manager for your organization, you‘ll likely need more control over who can access the downloadable files. Our Password Protected Categories WordPress plugin offers two easy ways to do just that. Here the plugin acts as an access management plugin.

One way to achieve this is by marking categories as Private. This will ensure that only logged in users with the correct role capabilities will have access to the downloadable files that fall under those categories. By default, only the WordPress user roles Editors and Administrators can see private categories. If you want to make them accessible to other user roles, we suggest that you check out our tutorial on how to manage user access to private content.

Another way to control user access to downloadable files is by password protecting categories. This will ensure that only users with the correct password are able to access password-protected downloadable files.

With these methods you're in complete control of file access and access control.

See who has downloaded files

If you're using Google Analytics to track how people are using your site, then you can extend this to track the number of downloads. For example, here's a tutorial about How to Track PDF Traffic and Links in Google Analytics.

Host files on cloud storage

You can upload and serve downloadable files from cloud storage platforms such as Google Drive and Dropbox instead of your website’s hosting server. This will enable you to save hosting resources such as storage space and bandwidth.

The benefit of cloud storage is that you can always recover your files in case your server crashes or your site gets hacked.

To select externally hosted file in the download manager, simply add the URL to the 'Document Link' section for each document. The 'link' section of the document library will then link to that URL.

Where to get the download manager plugin

A WordPress download manager enables you to make file versions available for downloading directly through your website, track the number of downloads, and manage user access.

Document Library Pro is the best WordPress download manager solution out there because it allows site owners to make downloadable files available to users directly from the front-end. In addition to this, the download plugin also makes it really easy to add downloads to WordPress. Install it today and start listing downloads in minutes:

Do you have any questions about how to set up an interactive, front-end WordPress download manager? Let us know in the comments section below.

Looking for a way to create a WordPress order form?

To create an order form in WordPress, you'll need an eCommerce plugin to manage products and process payments, plus a separate plugin to help you create a frontend order form for your visitors to interact with.

In this post, you'll learn how you can use your choice of three different eCommerce plugins to create a WordPress order form that looks something like the example below:

WooCommerce Product Table order form

The three eCommerce plugins that we'll cover are:

  1. WooCommerce
  2. Easy Digital Downloads
  3. WP eCommerce
  4. BigCommerce

You can pick your preferred plugin from the list, and you'll also have tons of options to customize how your WordPress order form looks and functions. I'll also tell you how to create a WordPress order form with any other eCommerce plugin.

What you need to create a WordPress order form (in more detail)

Before we get to the full WordPress order form tutorial, let's go more in-depth into what you'll need to follow along.

If you want to create a WordPress order form, you naturally need a way to accept and process payments.

However, WordPress doesn't include this functionality by default.

To add payment functionality to WordPress, you can use one of the many free eCommerce WordPress plugins. Yes - you can use these plugins even if you aren't planning to create a "traditional" eCommerce store.

However, these eCommerce plugins are still focused on creating that traditional eCommerce look (where you have a catalog and individual product pages).

So to create the front-end of your one-page WordPress order form, you'll use either the WooCommerce Product Table plugin (if you're using the WooCommerce eCommerce plugin) or the Posts Table Pro plugin (if you're using another eCommerce plugin).

WooCommerce Product Table Posts Table Pro

Both of these plugins are well-suited to creating user-friendly, customizable order forms:

Exactly what we were looking for, PLUS super-fast, awesome docs and support
We were looking for a product table with the ability to buy several things without being directed to the individual product pages and well, that's what this plugin does! :) I loved the clear and concise documentation, despite the multitude of different settings available. This plugin offers a lot of options and it's really wonderful to see that the documentation actually teaches you how to use it for the most specific cases. Also loving how quickly it loads - I was expecting something clunky and it seems like the plugin is coded extremely well. I don't know too much about coding plugins, but I've seen a lot of slow, ugly ones with much less functionality. Bravo!

In a nutshell, here's what will power your WP order form:

  • Your chosen eCommerce plugin will handle processing payments and managing whatever "products" you're selling via your order form.
  • WooCommerce Product Table or Posts Table Pro will help you take those "products" and display them in a customizable order form for shoppers to use.

Ready to get started with the more hands-on tutorial section? Here are all the eCommerce plugins that we'll cover in this post:

What we'll assume for this tutorial

For this tutorial, we're going to assume that you've already created a store with your chosen eCommerce plugin.

That is, if you want to create a WordPress order form with WooCommerce, you've already installed WooCommerce and added some products.

Similarly, if you want to use Easy Digital Downloads, you've already installed it and added some products.

If you haven't gotten that far yet, we've collected some getting started guides for the eCommerce plugins that we're covering in this post:

How to create a WordPress order form with WooCommerce

WooCommerce is the most popular WordPress eCommerce plugin by a large margin. As such, it makes for a great option to power your order form.

If you're interested in a more in-depth look at this application, we have an entire post on how to create a WooCommerce order form, as well as a printable order form.

To create a WordPress order form with WooCommerce, you'll need the dedicated WooCommerce Product Table plugin.

Once you've installed and activated the plugin, go to WooCommerce → Settings → Products → Product tables to configure the basics for your WordPress order form:

Access settings

In the Table content section, you can choose what product details to include in your order form using the Columns options. Learn about all the column options:

Configure columns

Further down, you can use the Add to cart column settings to control how the add to cart functionality works. For example, if you want to create a bulk order form, you might want to use checkboxes for each product rather than having a separate add to cart button for each product:

Configure other settings

Feel free to configure any of the plugin's other settings as well. For example, you can add product filters or a search box if you have a lengthy order form.

When you're finished configuring the plugin, you can use the [product_table] shortcode to add your WooCommerce order form anywhere on your site:

Add shortcode

Here's an example of what it looks like:

example of WooCommerce order form

If you just want to display specific products in the order form, then you can use the instructions on this page. For example, this is a good way to create a separate order form for each product category.

If you're selling a choice of options for each product then you can add them as variable products. The product variations will then appear as dropdowns in the add to cart column of the WordPress WooCommerce order form.


How to create an Easy Digital Downloads order form

Easy Digital Downloads Product Table Plugin

To create an Easy Digital Downloads order form, you'll use the Posts Table Pro plugin.

Once you've installed and activated the plugin, go to Post Tables → Settings to configure the plugin's settings.

First, select download from the Post Type drop-down to have Posts Table Pro display your Easy Digital Downloads products:

Easy Digital Downloads setup

Then, you can use the Columns options to control what product information to display. Learn more about columns.

Here are the values that you'll need to insert common Easy Digital Downloads product information:

  • title - the product title.
  • image - the product image
  • content or excerpt - display the product's long or short description
  • cf:edd_price - the product's price
  • tax:download_category - product's categories
  • tax:download_tag - the product's tags
Easy Digital Downloads columns

To add a "Buy Now" button, you can use the free Advanced Custom Fields plugin to add a new field to the Download post type. Then, you'll need to add the download's Purchase Shortcode to the custom field.

You can then add that custom field as its own column in the order form and have Posts Table Pro process the shortcode to display the buy now button.

If you need more detailed instructions, check out our full Easy Digital Downloads order form tutorial. This includes extra information, such as how to add product filters and how to display specific products only.

Once you've finished configuring the Posts Table Pro settings, you can display your Easy Digital Downloads order form by using the [posts_table] shortcode.

Tip: Don't ignore EU VAT rules!

Easy Digital Downloads EU VAT trimmed

If you're using the order form to sell any type of digital products to people in Europe, then you have to charge EU VAT - even if you're not in the EU yourself. It's the law!

You can meet EU tax rules with the Easy Digital Downloads EU VAT plugin, which makes it as easy as possible for you:

Get EDD EU VAT


How to create a WP eCommerce order form

WP eCommerce Form

To create a WP eCommerce order form, you'll also use the Posts Table Pro plugin.

Once you've installed and activated it, head to Post Tables → Settings to configure the plugin's settings.

First, use the Post Type drop-down to select wpsc-product. This tells Posts Table Pro to display your WP eCommerce products:

WP eCommerce setup

Then, you can use the Columns options to configure what product information to display. Learn more about columns.

Here are some common values to help you insert WP eCommerce product information:

  • title - the product title
  • image - the product image
  • content or excerpt - display the product's long or short description
  • cf:_wpsc_price - product price
  • tax:wpsc_product_category - the product's categories
  • tax:product_tag - product tags
WP eCommerce columns

Unfortunately, there's no easy way to add a Buy Now button for WP eCommerce products. Instead, shoppers will be able to click on the product name to go to the individual product page.

Once you've finished configuring the Posts Table Pro settings, you can display your WP eCommerce order form by using the [posts_table] shortcode.

Refining your WP eCommerce order form

By default, the WordPress order form will list all your WP eCommerce products. If you'd rather list products from a specific category only, then you can easily do this by adding term="wpsc_product_category:categoryslug" to the shortcode. (Just replace 'categoryslug' with the actual slug of your WP eCommerce category.) For example:

[posts_table term="wpsc_product_category:categoryslug"]

You can also add category or tag filter dropdowns above the order form. To do this, simply add the following to the 'Filters' option on the Posts Table Pro plugin settings page:

tax:wpsc_product_category,tax:product_tag


How to create a WordPress BigCommerce order form

WordPress BigCommerce Order Form Plugin

Unlike the other eCommerce platforms covered in this tutorial, BigCommerce isn't a WordPress plugin. Instead, it's a hosted eCommerce platform where you create an account on BigCommerce itself, and add your products that way.

However, BigCommerce have just released a free WordPress plugin. This acts as a bridge between BigCommerce and WordPress, allowing your BigCommerce plugins to appear in a store layout on any WordPress site.

The default store layout isn't really suitable as a one-page order form. However, you can easily list BigCommerce products in a quick order form with the Posts Table Pro plugin.

How to set it up

  1. First, head over to BigCommerce, create an account and add some products.
  2. Next, add the Posts Table Pro and BigCommerce for WordPress plugins to your WordPress website.
  3. Go to the Posts Table Pro settings page at Post Tables → Settings. Enter your license key and choose bigcommerce_product from the 'Post Type' dropdown.
  4. Now use the columns option to choose which information to include in the order form. Here are some examples of the data you can display about BigCommerce products:
    • title - the product title
    • image - the product image
    • content or excerpt - display the product's long or short description
    • tax:bigcommerce_category - product categories
    • tax:bigcommerce_brand - product brands

Finally add the shortcode [posts_table] to any page on your WordPress site to create the order form.

Customers can view your inventory in a BigCommerce product table and click on a product name to see prices and purchase from the single product page.

Refining your WordPress BigCommerce order form

The instructions above will list all your BigCommerce products in an order form on your WordPress website. If preferred, then you can list specific products only - either by brand or by category. To do this, you need to tweak the shortcode slightly. (Just replace '123456' with the slug for your category or brand.)

[posts_table term="bigcommerce_category:123456"] - List products from a specific category.

[posts_table term="bigcommerce_brand:123456"] - List products with a specific brand.

You can also add categories and brand filter dropdowns above the BigCommerce order form. To do this, add tax:bigcommerce_category,tax:bigcommerce_brand to the 'Filters' option on the Posts Table Pro plugin settings page.


Creating a WordPress order form with any other eCommerce plugin

Now you know how to create a WordPress quick order form using four major eCommerce plugins. If you're using a different eCommerce plugin, then that's fine too. You can list any type of WordPress eCommerce products with the Posts Table Pro plugin. You simply need to find out the following information about how your chosen plugin stores products so that you can display them in a frontend order form:

  • The name of the 'Products' post type created by the plugin - you can easily find this by reading through the 'Post Type' dropdown on the Posts Table Pro plugin settings page.
  • The name of the fields used by the eCommerce plugin to store information about the products. You'll use this information to create the columns in your WordPress order form table. Most of the product data will use the standard fields that come with WordPress itself, such as the title and content columns. You can read about these in the Posts Table Pro knowledge base article about choosing your columns. The eCommerce plugin will also create some custom fields of its own, to store extra information such as the price. You'll need to send the eCommerce plugin company a support request to ask for the name of these custom fields. You can then display them in your WordPress order form using Posts Table Pro.

Where to get the plugin

To recap, you need two plugins to create a fully-functioning WordPress order form.

First, you need an eCommerce plugin that can handle managing products and processing payments. One popular option is WooCommerce, but you can also use other WordPress eCommerce plugins like Easy Digital Downloads or WP eCommerce.

From there, you need a tool to create a frontend order form from your products. If you're using WooCommerce, you can use the dedicated WooCommerce Product Table plugin. Or, for any other eCommerce plugin, you can use the Posts Table Pro plugin.
p style="text-align: center;">WooCommerce Product Table Posts Table Pro

Get started today and create a customizable WordPress order form for shoppers at your site. And if you have any questions, leave a comment and we'll try to point you in the right direction!

As an online store owner, you might want to create a WordPress product catalog to showcase your products. The only problem is that most e-commerce plugins don't provide much flexibility in terms of how to display products.

One way to create a visually appealing, user-friendly product catalog in WordPress is by using a product table layout, with a simple WordPress plugin - WooCommerce Product Table. It makes it easy for customers to browse your product listings, view details, and act on your conversion goal – whether it’s to make a purchase or get in touch for a quote.

WordPress product catalog created using WooCommerce Product Table

In this article, we’ll start off by explaining in more detail what a WP product catalog table is. We’ll also walk you through a step by step tutorial on how you can create a WordPress product catalog – with or without a shopping cart.

What is a WordPress product catalog and who needs one?

Out of the box, most e-commerce plugins only let you display products in a standard format. Each product takes up a large amount of screen real estate. And while this creates a visually appealing layout, it’s not user-friendly – especially for WordPress online stores that sell more than a few products.

This is mainly because a grid layout makes it difficult for prospective customers to quickly browse through products or compare product details.

With a product table plugin, you can create a WordPress product catalog – with or without a shopping cart – to effectively display more products per page. In addition, it makes it easy for customers to search, sort, and filter products to find exactly what they’re looking for.

Who needs a WordPress product catalog?

Anyone who’s looking for a user-friendly way to showcase a lot of products can benefit from a WordPress catalog plugin. You can list products in a neat table (or grid) layout along with important details without the need for finicky custom CSS or complicated HTML.   As a result, customers can view more products per page.

E-commerce stores that sell products

Online stores that sell products directly through their website can also benefit from a product table layout. A product table layout makes it easy to display more products – with important product information and Add to Cart buttons – on a single page.

Since products are displayed in a table layout, this makes it easy for customers to make bulk purchases. For example, online stores that generally sell multiple products per transaction (such as wholesale suppliers or stationery shop) can benefit from using a product table to create a WordPress product catalog.

In addition to this, they generally include features that lets customers find specific products through search or sort and filter them based on different parameters (such as price).

Businesses wanting to showcase products without e-commerce

Some businesses need to be able to showcase products without letting customers purchase them directly from the website. Instead, they might want to create an online product catalog in WordPress that customers can browse, to make a selection.

These sorts of businesses generally want to take orders by phone or have customers request a quote. Therefore, using an e-commerce plugin with shopping cart functionality isn’t a practical solution.

However, a WordPress product catalog makes it easy for businesses to showcase their products on their website without having to display a price or enable shopping cart functionality.

Next, let's look at the WordPress product catalog plugins that are available for you to choose from. First, I'll talk about the best WooCommerce product catalog plugin. Then, we'll look at other options for WordPress sites not using WooCommerce. Finally, I'll tell you how to create a WP product catalog without needing an e-commerce plugin at all!


Introducing WooCommerce Product Table

The WooCommerce Product Table plugin lets you create a product catalog in WordPress to display products in a searchable, sortable, and filterable table layout.

This product catalog plugin is hugely beneficial to both businesses and e-commerce stores because:

  • Works with WooCommerce, the world's leading WordPress e-commerce platform.
  • Lets customers browse your entire product listing – or a curated selection of products – at a glance.
  • Makes it easy for customers to view important product information and compare products quickly.
  • Takes up less room on your website as compared to the standard format offered by most WordPress e-commerce plugins.
  • Simplifies the purchasing process by allowing customers to buy multiple products from a single page. In other words, they don’t have to visit individual product pages to add products to their shopping cart.
  • You can improve the buying process even further by using Product Table with its sister plugin, WooCommerce Quick View Pro.
Flawless
I've tried so many product table and list view plugins over the past year. None of them were supported well and often simply were non-functional. I recently discovered BARN2 and WooCommerce Product Table; it does everything I need for my store that I had been searching for. My large and growing product catalogue was becoming irritating to customers and having data readily in view helps tremendously. The plugin worked perfectly for my site, the documentation is thorough and helpful, its simple to setup, and I highly recommend it.

In addition, the WooCommerce Product Table plugin lets you decide which columns you’d like to display in your WordPress product catalog (and in what order). You also have the option to decide how customers can filter through products e.g. by product category.

How to list products in a catalog for e-commerce

If you’d like to give customers the option to buy products directly from your online store then you’d want to display Add to Cart buttons in your WordPress product catalog.

Below, we’ll show you how you can do this regardless of which WP e-commerce plugin you’re using.

For WooCommerce

To get started, you’ll need a WordPress website with the WooCommerce plugin installed and some products added. You’ll also need to purchase the WooCommerce Product Table plugin and install and activate it to your website.

Get WooCommerce Product Table

Step #1: Create a page for the WordPress product catalog

Log in to your WordPress admin panel and head over to Pages -> Add New to create a new page for the WordPress product catalog. Give your new page a name. For example, you might call it Our Product Catalog.

Create a new page for the WordPress product catalog

Alternatively, you can add the product catalog to an existing page by navigating to Pages > All Pages and opening it up in the Edit Page screen.

Step #2: Enter the product catalog table shortcode

Next, we’ll add the WooCommerce Product Table plugin’s shortcode to the text editor.

For Gutenberg:

  1. Click the (+) icon in the top left corner of the screen to add a block.
  2. Add a Shortcode block to the text editor.
  3. Enter the WooCommerce Product Table shortcode [product_table] to the shortcode input field.
For Gutenberg - add shortcode to display the WordPress product catalog

For the classic text editor:

Click the Insert Product Table icon in the toolbar. This will add the [product_table] shortcode to the text editor.

For the classic editor - add shortcode to display WordPress product catalog

Once you’re done, click the Publish… button and preview the page. The WordPress product catalog should look something like this:

Preview of the WooCommerce Product Table plugin on the front-end

You’ll see a dynamic product catalog in a table layout. At this time, the table layout displays the default columns. In the next step, I’ll show you how to display the columns that would be most relevant to your products.

Next, navigate to WooCommerce -> Settings -> Products -> Product tables to set the columns you’d like to have displayed in the front-end WordPress product catalog.

If you’d like to display Add to Cart buttons, enter image,name,description,categories,price,buy in the Columns field under the Table content options.

Step #3: Decide which columns to display in the WordPress product catalog

Navigate to WooCommerce -> Settings -> Products -> Product tables to set the columns you’d like to have displayed in the front-end WordPress product catalog. Be sure to check out the complete list of available columns and advanced options in the plugin knowledge base.

For example, you might consider displaying the product’s image, name, a description, price, ands add to cart buttons. To do this, you would enter image,name,description,categories,price,buy in the Columns field under the Table content options.

Now, when you preview the WordPress product catalog, it should look something like this:

WordPress product catalog created using WooCommerce Product Table with add to cart buttons

For complete instructions, be sure to check out this article on WooCommerce Product Catalog: Build a Product Table With or Without Online Purchasing.

Step #5: Add product quick view to your tables

Used alone, WooCommerce Product Table comes with an add to cart column where customers can choose variations, pick a quantity, and add to the cart.

Some stores find that they want to show extra information, without taking customers to a separate page for each product. They might want to show multiple product images. Or they might have too many variations to fit neatly in the product table.

WooCommerce Product Table Quick View Magnifying Glass
Add quick view buttons or links to the product catalog.

If any of this applies to you, then you can enhance your product tables by adding WooCommerce Quick View Pro. This plugin works alongside the table-based product catalog. It adds quick view links or buttons to the catalog pages.

Customers use the lightbox to view the full image gallery, read more information, choose variations and add to the cart.

Quick view is a great alternative to having a separate page for each product. Add it to your WooCommerce product catalog as follows:

  1. Install and activate the WooCommerce Quick View Pro plugin.
  2. Go to WooCommerce → Settings → Products → Quick view. Enter your license key and choose what you'd like to appear in the quick view lightbox.
  3. Return to the Product Table settings page (WooCommerce → Settings → Products → Product table) and add quick-view to the list of columns. If you want to disable the links to the single product page, scroll down to the Quick View settings on the same page, and enable this option.

For WP eCommerce, Easy Digital Downloads, or any other e-commerce plugin

If you’re using any other e-commerce plugin – such as WP eCommerce or Easy Digital Downloads – to power your online store, you can use the Posts Table Pro plugin to create a dynamic, functional WordPress product catalog.

The only condition is that the e-commerce plugin must create its own custom post type in WordPress for storing products. That's fine, as nearly all WordPress e-commerce plugins do this.

With the Posts Table Pro plugin installed and activated, simply select the products post type from your e-commerce plugin on the Posts Table Pro settings page. Then, enter the [posts_table] shortcode wherever you’d like to display the WordPress product catalog.

For complete instructions, check out this article on WordPress Product Table Plugin: Create a Table View for Any E-Commerce Plugin.


How to create a WordPress product catalog without a shopping cart

In some cases, you might want to create a WordPress product catalog without a shopping cart. In other words, you want to showcase your products in a product table layout with e-commerce functionality disabled.

Below, we’ve outlined the steps you need to follow to combine product tables with catalog mode while disabling the e-commerce functionality.

Strangely, I'm going to talk about WooCommerce again. Yes, I know it's an e-commerce plugin - but you can equally use it without offering an online ordering facility. I'll show you how this works, and I'll also tell you how to create a WordPress product catalog without installing any e-commerce plugin at all.

Create a WooCommerce product catalog without online ordering

Start off by following Steps 1 and 2 outlined in the previous section. The only differences are:

  • Do not include a buy column when you choose your product table columns.
  • When you add your products in WooCommerce, do NOT add prices. This is important because you're not selling them online. If you don't add prices then no add to cart buttons will appear. Or if you really want to show prices, then use the Catalog Visibility Options extension to hide product prices and add to cart buttons throughout your online store.

Your non-eCommerce WordPress product catalog will look something like this:

WordPress product catalog created using WooCommerce Product Table without add to cart buttons

Perfect!

Create a product catalog without an e-commerce plugin

Finally, I'll reveal how to create a WordPress product catalog without needing an e-commerce plugin at all! E-commerce plugins such as WooCommerce are fantastic, free of charge, and won't weigh down your site too much.

But if you really don't want one, then you can create your own custom post type and use this to store your products instead. This will add a 'Products' section (or whatever you want to call it) to the left of the WordPress admin.

Once you've added the products, use the Posts Table Pro plugin to them in a table-style WordPress product catalog on the front-end of your website.

For full instructions, please see our tutorial about how to create custom post types and display them using Posts Table Pro.


The perfect WordPress product catalog plugins

The WooCommerce Product Table and Posts Table Pro plugins let you create a functional, dynamic WordPress product catalog for your store – regardless of whether you simply want to showcase products or allow customers to buy them from your store.

WooCommerce Product Table Posts Table Pro

And the best part is that it gives you complete control over how your product listing appears on the front-end. You can choose to display the columns that are most relevant to your products, offer search, sort, and filter options, and allow customers to make bulk purchases.

Do you agree that creating a WordPress product catalog in a table layout enhances customer experience? Share your thoughts in the comments section below!

Selling services WordPress plugin

In today's online world, people expect to view and buy absolutely everything online. This goes way beyond ordering physical products. If you sell services then it's equally important to add a WordPress services list to your website. It's surprisingly easy to sell services online.

In this ultimate guide to selling service products, I'm going to teach you how to create a WordPress services list using a choice of plugins. We'll learn how to list and sell services on a WordPress e-commerce site with either WooCommerce or Easy Digital Downloads.

You'll discover how to sell services for a fixed one-off price, by the hour or day, or sell recurring services with ongoing subscription payments. Along the way, I'll provide useful tips on how your WordPress services list can upsell and sell more services to each customer.

Let's get started!

What is a WordPress services list?

A service is defined as "The action of helping or doing work for someone". This means that services are work that you provide manually for a person or organization. Selling services differs from selling products because you provide them directly to each customer. This may be face-to-face in person, or online. The key point is that you (or your employees/contractors) will be personally involved in providing services. In other words, you'll be service providers. A service cannot be fully automated, because if this happens then it becomes a product instead!

With this in mind, you might be wondering how to add a WordPress services list to your website. After all, a service is carried out manually and not online!

The answer is that you can create a WordPress services list by separating the sales and provision of the service. Services can be listed and sold online in a similar way to products. The difference is that once a customer has ordered a service online, you will carry out work for them manually instead of posting them a product. So you sell the service online, and carry it out in real life.

And of course, these days you can productize and automate services, too! For example, you might sell software-as-a-service (SAAS) on your website. The instructions in this article will work whether you carry out services manually or automatically. Either way, you'll learn how to create a WordPress services list with options and 'Buy' buttons.

How listing services in WordPress works

  1. Sell services WordPress pluginFirst, the customer visits your website and views WordPress services list This might be a simple list of one or more services, or you might provide variation options. You might sell one-off services for a fixed price, or charge by the hour. Perhaps you'll generate recurring revenue by selling subscriptions to your services? You might have a dedicated page for ordering service, or your WordPress services list might appear in an e-commerce order form directly on the pages describing your services.
  2. Second, the customer orders the service directly from the WordPress services listThey choose any options from the WordPress services list and adds the service to the cart. They then view the cart and checkout, including paying online with credit card/debit card or PayPal checkout. The customer receives a 'Thank you for your order' email, and you receive an email with the order information. You can use this option with either WooCommerce or Easy Digital Downloads, including with the option for extensions such as selling time-based bookings - I'll show you how to do all of these later.
  3. Finally, you contact the customer to arrange to provide the service This can be done outside of your WordPress website, or automatically depending on your setup. Either way, it will fit nicely into your usual working processes.

Do I need an e-commerce plugin to create a WordPress services list?

If you want to keep it really simple, then you might want a WordPress services list without the e-commerce side of things. However, you'd be missing out on many advantages of using e-commerce to sell services online.

Benefits of adding e-commerce to your list of services

  • Online payment for services By using a WordPress e-commerce plugin such as Easy Digital Downloads or WooCommerce, you can sell services and take payment online. There's a choice of payment gateways such as PayPal and Stripe. This saves you time compared to collecting payment offline and chasing invoices. It's also better for your service business' cash flow because customers pay upfront, before you provide the service.
  • List services more effectively When we get to the e-commerce section of this tutorial, I'll show you how to list services in a searchable pricing table with filters, buy buttons and extra information. This is vital if you're listing more than a couple of services.
  • Easier to upsellWordPress e-commerce plugins come with options to sell more services through up-selling and cross-selling. This can involve advertising one service on the sales page for another service. Or it can involve adding optional extras to encourage each customer to buy more. Either way, it's easier to do this if you link your WordPress services list with WooCommerce or Easy Digital Downloads.
  • Built-in recording and invoicing With a simple service order form that doesn't use e-commerce, your sales aren't recorded anywhere. You have to maintain manual records about the services provided. In contrast, an e-commerce plugin keeps records of all your sales and sends invoices or payment receipts. This saves you admin time. To save even more time, there are even WooCommerce and Easy Digital Downloads extensions to automatically send data to accounting software such as Xero and QuickBooks.
  • Reporting E-commerce plugins come with embedded analytics and reporting. You can see statistics on who has bought your services and which are selling best, directly in the WordPress Dashboard. This helps you to make your service business more successful, making ongoing improvements over time.
  • Offer appointments more efficientlyIf you're selling bookable appointments, you can save time and money by selling these services through WordPress. The easy of use should also drive more sales for you.

Some examples: Service products you can sell online

Service professions needing WordPress plugin to sell online

Before we start with the setup instructions, I'll share some examples of services that you can sell online. You can sell any type of service in WordPress, for example:

  • Professional services - architecture, conveyancing, document preparation and review, legal services, real estate advice, medical, will writing.
  • Design services - brand identity work, graphic design, image editing, infographics, online interior design, stationery (business cards, brochures, flyers, leaflets, print layouts)
  • Expert services - online business, copywriting, CV writing and resumes, career development, coaching, consulting, lifestyle, life coaching, love and relationships, marketing, photography, search engine optimization (SEO), social media, web analytics.
  • Technical services - printing, programming and software development, sound mixing, technical support.

As well as selling your time, you can package services into specific 'products' which people can select and order from you, such as website technical support, online training sessions or coaching webinars. For example, we had one web design client who used his WordPress website to sell remote Skype advice sessions. If you're a blogger or freelance writer, you might be interested in selling blogging services.

You can find more ideas for services to sell online on Google. For example, Amazon lets people sell professional services (such as assembling and installing products) through their site. Similarly, Fiverr is an online marketplace for freelance services. Whatever type of services you offer, keep reading to learn how to sell them online in WordPress.

Which e-commerce plugin is best for selling services in WordPress?

There are two main e-commerce plugins which are perfect for creating a WordPress services order form:

  • WooCommerce Developers LogoWooCommerce is the world's leading e-commerce plugin, powering over 44% of all online stores. While it does let you sell physical products, it also comes with virtual products that are perfect for selling WooCommerce services.
  • Easy Digital Downloads LogoEasy Digital Downloads is popular for selling virtual and digital products in WordPress. It's generally used to sell downloadable products such as WordPress plugins or ebooks. It's also ideal for selling services in Easy Digital Downloads.

Even better, both WooCommerce and Easy Digital Downloads are free WordPress plugins. I'll recommend some paid add-ons that will help you to sell services more effectively. However, the core e-commerce plugins are free of charge.

Choosing an e-commerce plugin for selling services online

Like I said, WooCommerce and Easy Digital Downloads are both good options for selling services in WordPress. So which one should you use?

A lot of service businesses sell using Easy Digital Downloads because it only deals with virtual products. This keeps it simple behind the scenes. WooCommerce comes with several shipping options (such as shipping rates, tax calculation, and shipping labels) many of which are on offer with WooCommerce Services plugin from Jetpack. However, the fact that WooCommerce can sell physical or virtual products isn't a disadvantage. If you disable the shipping options then these will disappear anyway, which keeps things nice and simple in the WordPress admin.

There are a few reasons to choose WooCommerce over Easy Digital Downloads:

  • If there's any chance that you might sell physical products and need to charge postage one day, then you should definitely choose WooCommerce. This simply isn't possible with Easy Digital Downloads.
  • It's also slightly easier to use WooCommerce to display the WordPress services list in a table. I'll show you how to do this with both plugins in the next sections. However, there's one extra step with Easy Digital Downloads that happens automatically with WooCommerce.
  • If you want to sell your time based on the number of hours or days, instead of charging a set price for each service, then WooCommerce is best.

If any of these points apply to you, then I'd recommend selling services in WooCommerce rather than EDD. Otherwise, they're both excellent options and you should read about each one to choose which is best for selling your services.

Tutorial 1: How to sell services with WooCommerce

1. First, set up WooCommerce

  1. In the WordPress admin, go to Plugins → Add New and search for 'WooCommerce'.
  2. Install the main WooCommerce plugin and activate it.
  3. After you activate WooCommerce, you'll be invited to run the Setup Wizard. Do this, and choose your store currency, tax settings, etc. When it asks "Will you be shipping products?", do not tick this box. You're selling services, so you won't need the shipping settings.
  4. On the payment gateways page, enter the email address that you use to log into PayPal to accept PayPal payments for services. I recommend Stripe for credit card and debit card payments (you'll need a Stripe.com account for this). Ideally, add your PayPal and Stripe account so that customers can choose how to pay for your services. If you want to give your customer base a 'Pay Later' option of paying manually offline too, choose the 'Check' payment option. You can then change the wording for this payment gateway as needed. (Tip - it doesn't need to say 'Check' at all - this is just a handy way of creating an offline payment method in WooCommerce.)
  5. At the end of the Setup Wizard, click the button to Create Your First Product.

For more in-depth tutorials on setting up WooCommerce, check out these guides.

2. Add service products to WooCommerce

  1. Add WooCommerce service subscription product
    You'll be taken to the Add Product screen. This is where you'll add the first service to sell in WooCommerce.
  2. Add a product title and description, plus categories and tags as required. Also upload a product image if you like, although this isn't essential for selling services with WooCommerce.
  3. Scroll down to the 'Product Data' section. Tick the 'Virtual' box and add a price for the service. (Note: Skip ahead for instructions on selling services by the hour or day, multiple options for each service, or ongoing service subscriptions.)
  4. Use the 'Inventory' tab to limit the number of each service that people can buy from you in WooCommerce. This is useful if you have limited capacity. There's also a box that you can tick to prevent customers from buying more than one of each service.
  5. Click 'Publish'.
  6. Go to Products → Add New and repeat these steps for each service that you want to sell in WooCommerce.

3. Create a WordPress services list of your WooCommerce products

Selling services in WooCommerce plugin table

Next, we need to display your service products on the front end of your website. This is essential so that people can view your services in WooCommerce and buy them online.

WooCommerce comes with some built-in layouts for displaying products. Unfortunately, these aren't at all suitable for selling services. You don't want your service website to look like a clothes shop!

Instead, you need to showcase your list of services in WordPress in a professional-looking table layout. You can do this using the WooCommerce Product Table plugin. Once you've added your services as WooCommerce products, the Product Table plugin will automatically list them in a user-friendly table layout.

Sell Services in WordPress listed on services page

Why is a table good for listing services in WordPress?

Services sell better in a WooCommerce table because:

  • This layout prioritizes information rather than images. (You can include a small thumbnail picture if you like.)
  • If you have lots of services, it's easier for customers to find the services they need via built-in filters and keyword search box. Customers can view prices, choose options and add services to the cart directly from this service pricing table layout. For more information (like testimonials), customers can simply click through to the single page.
  • The other benefit of displaying WordPress services in a table is that you can insert the table anywhere on your website, without using a website builder.

For example, a lot of WordPress sites have a 'Services' pages containing text describing their services. It's best to display the WordPress services list for purchase directly on the Services page, instead of linking customers to a separate shop page. You can add an e-commerce table of service products directly within the content of your service pages, keeping everything in one place.

How to show a WordPress services list in a WooCommerce table

  1. Install the WooCommerce Product Table plugin on your WordPress website and activate it.
  2. Header over to WooCommerce → Settings → Products → Product tables.
  3. Paste your license key from the confirmation email.
  4. Read through all the product table options, and choose the ones that will present your services most effectively.
  5. Next, create a page where you want to create a list of services in WordPress. Alternatively, edit an existing page on your website. For example, you might want to list the service options with prices and buy buttons directly on a page which already describes your services.
  6. Click the 'Insert product table' toolbar button to add the following shortcode to the page [product_table].
  7. This will show all your list of services on the page. If you'd rather list specific services only (e.g. based on their category or tag), then you can do this instead.

Your finished table of services might look something like this:

Selling WordPress services plugin example

Nice!

4. Use product variations to provide a choice of services

In step 2, I told you how to create a simple service product with a fixed price and no options. WooCommerce also supports variable service products.

The instructions to create a service with variation options are similar to the ones in section 2, above. However, when you go to the Product Data section, use the Product Type dropdown to select 'Variable Product'. You then need to create attributes on the Attributes tab, and select these to create variations on the Variations tab. For each variation, you need to add a price and tick the 'Virtual' box to use it to sell services.

In this example services list, I created a 'Legal Services' product with a 'Service Type' attribute. I used this to create variations for 'Conveyancing', 'Wills' and 'Divorce Services', each with their own service cost:

Sell service product with variations WooCommerce

If you select variation dropdowns on the WooCommerce Product Table plugin settings page, then the table will list 1 product per row. Each product will have a dropdown so that customers can choose variation options.

Alternatively, if you selected the separate variations option, then it might look something like this:

WooCommerce services with variation on each row separate
WooCommerce Product Table with each service variation on a separate row

Both are good options for selling options from the WordPress services list.

5. Use WooCommerce subscriptions to sell regular ongoing services

So far, we've talked about create a WordPress WooCommerce services list with a one-off price for each service. This may fit your business model, but most small business owners know that recurring revenue is the holy grail. With this in mind, you might want to sell ongoing subscription services via your WordPress website.

Fortunately, you can do this with the official WooCommerce Subscriptions extension. This will set up an ongoing payment plan or subscription for each service. The customer will be billed automatically at the correct intervals, using their chosen payment gateway.

Selling WooCommerce services subscription products

WooCommerce Product Table with Subscription Service Products
  1. First create a subscription on the plugin settings page.
  2. Next, instead of creating a Simple Product, you should select 'Subscription Product' from the 'Product Type' dropdown.
  3. Set an ongoing cost for your service, for example an initial setup fee followed by a regular monthly payment.

Both PayPal and Stripe support recurring subscription payments. This is much better than sending invoices for manual payment each month. No more chasing overdue invoices - it all happens automatically via your WordPress website and WooCommerce!

See it in action on our pet sitting services demo page with subscription products!

Please note that WooCommerce Product Table doesn't work with variable subscriptions. To use the plugins together, we recommend adding each subscription option as a separate product. Another option is to add the options as product add-ons instead of variations. The add-on options will appear in the add to cart column of the table of subscription services.

6. Use product add-ons to sell optional extras

Let's say you're selling website maintenance services. You might have created 3 service products: Weekly Maintenance, Fortnightly Maintenance, and Monthly Maintenance. But how can you sell more services to each customer?

The answer is the WooCommerce Product Options extension. This handy plugin lets you add a range of optional extras to your service products in WooCommerce. These appear alongside the add to cart button, offering a powerful incentive for customers to order more from you.

In the following example, I used Product Options to add tick boxes for extra dog grooming service options. As well as ordering a basic dog grooming session, customers can tick boxes to add different types of doggy haircut. The dog grooming products are displayed using the WooCommerce Product Table plugin with Product Options and Subscriptions. As you can see, this is a great way to significantly increase revenue, from the same number of customers.

Selling WooCommerce services with Product Add-Ons plugin
WooCommerce Product Table with the official Product Options plugin

How to sell services by the hour or day

You've learned how to use WooCommerce to sell services for a fixed price. But what if you want to sell your time, rather than a specific service? Luckily, you can do that too.

To sell critical services based on the amount of time, the instructions are similar to the ones I provided above. You'll just need to activate a few extra options on the WooCommerce Products Table settings page:

  1. Tick the 'Quantity' box to display a quantity picker in the add to cart column for each service.
  2. When you set your product table columns, use these instructions to customize the 'Buy' column heading. It needs to be clear that the service is priced by the hour or day.

For example, if your WordPress services list contains columns for name, short description and add to cart column, then you need to list the columns like this: image,name,summary,price:Price Per Hour,buy:Select Hours & Buy

WooCommerce selling services by the hour

Alternatively, if you're not selling all your services by the hour, then you can just add the unit to the product name. Here's an example of what this might look like when you list WordPress services:

WordPress sell services charge by time

Tip: Use quick view to provide more information

By now, you know how to display a list of services in WordPress in a table layout. Maybe you want to show extra information about each service, but don't want to send people to a separate page for each service. Maybe you have too many variations or add-on options to fit into the table view.

If this applies to you, then you can add the WooCommerce Quick View Pro plugin to show extra information and purchase options from a lightbox window:

WooCommerce Product Table Quick View Magnifying Glass

Get WooCommerce Quick View


How to sell services in Easy Digital Downloads

Next, I'll reveal how to use Easy Digital Downloads (EDD) to create a WordPress services list. This is similar to WooCommerce, so read about the two e-commerce plugins and choose the one that best suits your needs.

Easy Digital Downloads is nice because it's simple and only contains the features you need to sell virtual products such as services. There's nothing extra to weigh it down, such as shipping options which you don't need for listing services.

However, the downside of EDD is that it's less popular. That's not necessarily a bad thing, but it means that fewer companies have developed useful add-ons and extensions for it. For example, you can use EDD to create your WordPress services list - but you can't add the other handy plugins which I mentioned in the WooCommerce section above. For example, there's no Easy Digital Downloads quick view or product add-ons plugin.

But if EDD is the right e-commerce plugin for your WordPress services list, then this is how to set it up:

1. First, set up Easy Digital Downloads

  1. In the WordPress dashboard, head to Plugins → Add New. Type 'Easy Digital Downloads' into the search box.
  2. Install and activate the plugin.
  3. Navigate to Downloads → Settings and choose the settings that you'll use to sell services with Easy Digital Downloads.

2. Add your services in Easy Digital Downloads

Selling services Easy Digital Downloads
Now it's time to start adding your services as EDD products:

  1. Go to Downloads → Add New.
  2. Add your EDD service product name and description. You can also add categories and tags, plus an image if this will help to promote the service.
  3. Add the service price.
  4. Click Publish.
  5. Repeat these steps for each service that you want to sell using Easy Digital Downloads.

3. Use product variations to provide a choice of services

Like WooCommerce, Easy Digital Downloads also comes with a 'Variable Pricing' option. You'll see this when you add the price for your service in EDD. If you want to offer different options for a particular service, tick this box and add all the options. Set a price for each service option.

You can use this to provide quantity discounts to reward customers to buying more services, or for selling different service options at different prices.

Sell services Easy Digital Downloads variations

4. Create an Easy Digital Downloads WordPress services list

Next, we need to list your services for sale on the front end of your WordPress website.

Like other WordPress e-commerce plugins, the standard Easy Digital Downloads store layouts aren't ideal for selling services. This isn't surprising, because they're mainly designed to sell digital products such as ebooks and WordPress plugins.

You can showcase the WordPress services list more effectively with the Posts Table Pro plugin. This dynamic WordPress table plugin lets you list all sorts of content from your website in a table view. It's particularly popular for creating an Easy Digital Downloads product table.

Customers can view your WordPress services list anywhere on your website, see the price and any other data you choose to display, select options, and add services to the cart. They can then checkout and pay for their services online with Easy Digital Downloads.

How to list services in an Easy Digital Downloads table

  1. Install the Posts Table Pro plugin on your WordPress website and activate it.
  2. Go to Post Tables → Settings and activate your license key from the order confirmation email.
  3. Follow the instructions in this tutorial to list your EDD service products in a table. You can use Easy Digital Downloads to sell services via any page on your website. Just put the Posts Table Pro shortcode wherever you want to display your WordPress services list.

Your finished table of Easy Digital Downloads service products might look similar to this:

Selling Services Easy Digital Downloads Plugin

Perfect!

5. Sell service subscriptions with Easy Digital Downloads

Finally, you can install the EDD Recurring Payments extension to take regular payments for services. This automates the payment for regular services, so you don't need to worry about taking payment manually.

Selling bookable services with EDD bookings

You can also use the EDD Bookings extension to sell services using Easy Digital Downloads. This means that a client can pay for a service for a specific period of time. This can apply to doctor's appointments, yoga sessions, consultancies, hairdresser appointments and much more.

Once the extension is installed, you can set up Services, each with its own set of criteria.

Every service will have its own name, description and image, all of which are used when the client selects a service from the booking form. A service will also have one or more session types. For example, a consultancy could be offered as a 30-minute session or a 60-minute session. They would each have their own price.

The availability of a service is when it will be available for booking. As an admin, you can set up various rules to determine the dates and times your clients will see as bookable on the calendar in the booking form.

To list your bookable EDD products on your website, follow the instructions in the previous section to list them with Posts Table Pro. Instead of having purchase buttons directly in the table, use the 'Links' option to allow customers to click through to the single download page for each service. From there, they can complete the booking form and purchase the service.

As the business owner, you will be able to monitor all your bookings from a list or calendar view. You may also create bookings manually from the back-end, which works great for bookings that are requested in-person, on the phone or via email.

If you want customers to book specific times, then combining Posts Table Pro with EDD Bookings is the perfect solution.

Start selling services in WordPress!

Even though you carry out services manually, you can save time and get more customers by selling services in WordPress. Use the instructions above to display the WordPress services list and let customers order services online and pay manually, or automate the sales process for your services using WooCommerce or Easy Digital Downloads. Once you've added your list of services to WordPress as e-commerce products, use either WooCommerce Product Table or Posts Table Pro to display them in a user-friendly layout.

This is the best way to attract customers and sell more services. To take things to the next level, you can set up an email marketing and digital marketing strategy to promote your services.

If you've used any of the methods in this tutorial to sell and list your services in WordPress, please let me know how you get on. I'd love to add some case studies to this article (which will include a link to your website!). Please add your comments below.

WordPress ebook plugin

If you're looking for a WordPress eBook plugin, you've come to the right place. This is the complete guide to listing and selling digital eBooks in WordPress. I'll show you how to choose the right WordPress eBook plugin for your site - whether you want an eBook library plugin with downloadable PDF's, or an eBook store plugin with e-commerce.

In this article, I'll teach you about 3 methods for creating a WordPress digital eBook library. Each method uses one of our table-based WordPress eBook plugins, and I'll recommend the best plugin for your needs. The plugins are ideal for creating a WordPress eBook library (like Scribd) or eBook store. The eBooks are listed in a searchable, sortable table layout with filters.

WordPress ebook plugin e-commerce
Jump straight to the instructions for the method you need:
  1. Method 1 - Create an eBook library with downloadable or embedded books
    This is a non-ecommerce option, as people can read eBooks online or download the eBooks. You can add any eBook file type, such as PDF, EPUB, MOBI or Kindle. People can then add them to their e-readers (like Kindle or NOOK) or smartphone (Apple or Android device). It's suitable for lists of free eBooks, or eBook membership sites (i.e. an ebook subscription service) where you sell subscriptions giving access to your downloadable WordPress eBook library.
  2. Methods 2 and 3 - Build an e-commerce eBook library
    This is a full e-commerce option, where people can view your eBooks in a searchable table and purchase each one individually. They will then receive a protected eBook download link that they can add to their library e.g. in Amazon Kindle or Barnes & Noble NOOK ebook readers. You can choose between two popular WordPress eBook store plugins: WooCommerce and Easy Digital Downloads.
  3. Perfecting your eBook library
    Whichever method you follow, use this section to add the finishing touches that will make your eBook digital library a success. I'll show you how to create filters to make your eBooks easier to find, plus extras such as adding embedded audio players or flipbooks to a WordPress audiobook library. You'll even learn how to create a private members-only ebook library that is hidden from public view.

Choosing a WordPress eBook plugin

Our WordPress eBook plugins are ideal because you can list lots of digital books on each page. Users don't have to waste time scrolling through multiple pages. You can even include extra data about each eBook such as the author, blurb, image, publisher, year - whatever you like! This also improves search engine rankings in Google.

Your users can quickly search, sort and filter the list to find an eBook they're interested in. They can then either click to download a WordPress eBook PDF or other format such as EPUB or MOBI (depending on the device they're using such as a Kindle, NOOK, or an Apple/Android device like an iPad or iPhone). Or if you're using an e-commerce plugin, then they can add eBooks to the cart directly from the table of eBooks.

I'll recommend a suitable WordPress eBook plugin in the relevant sections of this tutorial. Read about the method you're interested in, and I'll tell you how to set it up and which WordPress eBook store plugins to use.

Let's get started!

What can you sell with a WordPress or WooCommerce eBook plugin?

People use the term 'eBook' to mean lots of different things. In a nutshell, an e-book refers to any book or other document that you download and read electronically, or read online. It doesn't refer to printed books, or web content that you read directly on a website.

This includes:

  • Type of book - fiction or non-fiction, science fiction, storybook, thrillers, textbooks.
  • Any non-fiction genre - autobiographies, biographies, creative writing, history, journalism, law, memoirs, philosophy, religion, self-help.
  • Reference books - user manuals and handbooks, DIY books, travel guides, recipe books.
  • Academic publications - commentary, critiques, downloadable essays, reports, scientific papers, white papers.
  • Other ebook formats - music manuscripts, poetry, songbooks.

It's a diverse list, but what they all have in common is that they are downloadable and read on a computer, table or smartphone. That's what makes them an eBook.

Now we know what we're talking about, let's dive right in and learn how to create a WordPress eBook library like Scribd.

Method 1 - Create a WordPress eBook library with downloadable eBooks

Method 1 is about creating a digital library of eBooks similar to Scribd. It uses our Document Library Pro plugin to create a searchable, filterable table listing your eBooks.

This method is ideal if you want to create a WordPress eBook library with downloadable eBook links. Users can find a digital book and click to download it as an eBook PDF or whatever format you decide to use. It's suitable for free digital eBook libraries, and WordPress membership sites where people are given access to a protected eBook library e.g. ebooks with DRM.

Method 1 is NOT suitable if you want to sell each eBook individually - you'll need a WordPress eBook store plugin as well as an e-commerce plugin for that. If this is what you need then jump to Method 2 instead.

Method 1 has two straightforward steps:

  1. Add your eBooks to WordPress
  2. Use the WordPress eBook plugin to list eBooks in a table

Step 1 - Add your eBooks to WordPress

First, install Document Library Pro and use it to add your eBooks to WordPress. This is really easy because the plugin creates a dedicated 'Documents' section to the WordPress admin. In your case, 'Documents' are actually 'eBooks'!

Add each eBook as a separate 'Document':

  1. Go to the Documents → Add New page.
  2. Use the 'Document Links' section to upload the eBook. Alternatively, if it's hosted elsewhere (e.g. on Amazon Kindle), then you can add the URL here. Either way, users can click on a button in the eBook library to access the eBook.
  3. Add the information that you want to display about each eBook:
    • Title - add the eBook title.
    • Categories and tags - add any categories or tags that will let people sort and filter the eBook in the digital library.
    • Featured Image - upload an image, if you're planning to include these in the WordPress eBook library. This will probably be an image of the eBook front cover or author, similar to how ebook retailers like Amazon (United States) or Kobo (Canada) do it.
    • Excerpt - Use this to add the eBook's blurb or description. The WordPress eBook plugin can include this as a column in the table.
    • Content - Use this to add any extra information that you want to display in the eBook library. In the bonus section later in this tutorial, I'll also show you how to embed eBooks directly into the content field so that people can read them online.

Adding eBooks in bulk

If you have too many eBooks to add manually, that's fine. Document Library Pro provides several ways to import eBooks in bulk.

Create any extra fields for your eBook library

If you need to include any additional fields in your eBook then you can do this by creating custom fields and taxonomies. As a general rule, use custom fields for storing unique data about each eBook such as ISBN number or barcode. Use taxonomies for filterable data such as topic, publisher, year or author. For example, you might create a taxonomy that marks bestsellers or ebooks with DRM. This way, customers can easily sort them by new releases, popular ebooks, or DRM-free ebooks.

Once you've created the extra fields for your eBook post type, you can add the data for each eBook. You can list all these extra fields in the digital library using the WordPress eBook plugin - which brings us to Step 2...

Step 2 - Use the WordPress eBook plugin to list eBooks in a table

By now, you've added your eBooks to WordPress. Great! Now comes the fun part - it's time to create your WordPress eBook library similar to the Kindle store.

Navigate to the 'Pages' area in the WordPress admin and find a page named 'Document Library'. Change the name and permalink to something related to eBooks, such as 'eBook Library'.

Next, view the page and you'll see the first draft of your WordPress eBook library.

WordPress eBook library plugin

It looks pretty good straight out of the box, and you can use the plugin settings page to fine-tune it as needed. For example, you can change how the download links work, and which columns appear in the table.

If you've structured the eBook library into categories, then you can also enable the 'Folders' option. This will list each eBook category separately. Users can click on a category name (i.e. a folder) to view the eBooks from that category.

That's everything you need for a professional-looking WordPress eBook library. If you want to make any further changes to it, skip to the section on Perfecting your eBook Library.

Sell membership access or add ebook subscription service to your WordPress eBook library

So far, I've shown you how to create a table of eBooks that is available for everyone to access. If you don't want this, then there are a few WordPress plugins to protect your eBook library and restrict it from public view. Here are 3 suggestions of how you can achieve this.

Hide the eBook library with Password Protected Categories

Our WordPress Password Protected Categories plugin lets you put all your eBooks in a category and password protect that category. This will password protect your eBook digital library so that only people with the password can access it.

Use Groups to restrict access to authorized users only

The free Groups WordPress plugin is an easy-to-use free WordPress membership plugin. It offers an easy way to create 'hidden' areas of your website that only logged in users with access to the appropriate 'Group' can access.

This method is useful to making a WordPress eBook library available to pre-approved people only similar to Kindle Unlimited. For example, you might want to make it available to members of your organization, employees, or book club. Each person needs to have a user account on your WordPress website. You need to give each person access to the eBook Library Group manually. (If you want to sell access to the eBook library then you can still use the Groups plugin - but you'll also need some extra plugins which I'll cover in the next section.)

Restricted eBook library pluginInstall the Groups plugin, create your eBook library as described above, and create a Group called 'eBook Library' or similar. Go to to the eBook library page with the product table and restrict it to members of the eBook Library Group.

To give people access to the eBook library, you need to add them as users in WordPress (Users → Add New). Select the eBook Library Group from the dropdown on the Add/Edit User page. When they log into their account, they will be able to access the protected eBook library.

Use the Groups plugin documentation to make further changes. For example, you can create a message that will appear when unauthorized users try to access the hidden eBook library.

Sell subscriptions to your WordPress eBook library

You can sell access to the eBook library using the WooCommerce plugin with the Groups for WooCommerce add-on - plus Subscriptions if you want to take regular payments. This builds on the 'Groups' method in the previous section by integrating the hidden eBook library with the world leading e-commerce plugin and the ability for people to subscribe online.

Some tips on which combination of plugins to use:

  • If you want people to make a one-off payment to your eBook library then you can do this using Groups, WooCommerce and Groups for WooCommerce. Sell access to the eBook Library Group as a product in WooCommerce, so that people can buy it on your website.
  • If you want people to make an ongoing subscription to the digital eBook library, then you'll also need the Subscriptions plugin. You still need to sell access to the eBook Library Group using WooCommerce, but buying this product will sign people up to an ongoing subscription.  This is similar to the Kindle Unlimited implementation. Payment will be taken regularly (e.g. using PayPal or Stripe) so that the customer can continue accessing the eBook library. If they ever cancel the subscription then their access to the Group will be revoked.

Method 2 - Build an e-commerce eBook library

Method 1 showed you how to create a downloadable eBook library - either public, or restricted to specific people. In Method 2, I'll tell you about WordPress eBook plugins for selling eBooks individually. With these plugins, people can view a table listing all your eBooks. They can then choose to buy specific eBooks from the list. This is a full e-commerce solution - customers can pay for their eBooks online and receive the downloadable eBooks via a secure link.

There are 2 free WordPress e-commerce plugins that are ideal for selling eBooks:

  • Easy Digital Downloads - EDD is famous for selling digital products such as eBooks. Coupled with a table-based plugin for displaying your eBooks, it's the perfect way to create an e-commerce eBook library.
  • WooCommerce - Powering over 41% of all online shops, you can use WooCommerce to sell anything online - including eBooks. Like Easy Digital Downloads, the default WooCommerce store layouts aren't really suitable for eBooks. However, you can use it with a table-based WordPress eBook store plugin to create the perfect layout, complete with Buy buttons.
  • You can also use other e-commerce plugins such as WP eCommerce. I haven't featured them all in this article, but they all work with Posts Table Pro for listing your eBooks.

I'll tell you how to create a WordPress eBook library using both of these e-commerce plugins. The method is slightly different for each, so we'll start with Easy Digital Downloads and then move on to WooCommerce.

Create an Easy Digital Downloads eBook store

Easy Digital Downloads Table PluginEasy Digital Downloads works perfectly with our Posts Table Pro plugin - use them together to build a fantastic eBook store. Your eBooks will be listed in a table layout with buy buttons.

People can read about the eBooks in the table, and add as many as they like to the cart. They can then click through to the Easy Digital Downloads checkout and pay online. Once the order is complete, Easy Digital Downloads will send them a secure link to download the eBook in whatever format you've uploaded (PDF, EPUB, MOBI etc.).

How to set it up

  1. First install the free Easy Digital Downloads plugin. Use the official documentation to set up payment methods, taxes and more.
  2. Add each eBook as a separate downloadable product via Downloads → Add New.
  3. Next, create a new page (Pages → Add New) which you'll use as your main eBook store page.
  4. Finally, follow the steps in our other tutorial about how to create Easy Digital Downloads table layouts. This covers everything you need to know to create an amazing eBook store layout using Posts Table Pro. You can create a single table listing all your eBooks, or multiple tables listing eBooks from different categories. There are over 50 options, so go through the tutorial and create the perfect eBook store.

Build a WooCommerce eBook store

As a WordPress website owner, another way to sell ebooks is through WooCommerce. You can use the WooCommerce plugin to create an ebook subscription site or ebook store. Paired with the right WooCommerce ebook plugin, this e-commerce plugin is perfect for selling digital products (or digital downloads) like ebooks.

WooCommerce Directory Plugin

To display the eBooks in a searchable, you'll need our WooCommerce Product Table plugin.

The way it works is that you'll add each eBook as a separate WooCommerce product. You'll then use the WooCommerce Product Table to list the eBooks in a searchable table with filters. As with the Easy Digital Downloads eBook store plugin, you can list all your eBooks in a single table or create separate tables for each category. Either way, it's easy for customers to find your eBooks, pay online, and receive a secure download link via email.

See it in action on our WooCommerce eBook plugin demo page.

How to set it up

  1. First install the free WooCommerce plugin. Use the WooCommerce setup wizard and documentation to set up your standard store pages, tax settings, payment gateways (e.g. PayPal and/or Stripe for credit and debit card payments), etc.
  2. Next, add each eBook as a product (Products → Add New). Choose the 'Downloadable' product type in the Product Data section of the page. This will open up some extra options for you to add the downloadable eBook file(s) in whichever format you choose. This might be PDF, MOBI, EPUB or similar.
  3. Finally, create a new page (Pages → Add New) which will be used for your eBook store. Use the WooCommerce Product Table knowledge base to list your eBooks in a table layout with all the information you want to display. It's really flexible and you can even store extra data about your eBooks using product attributes, custom fields and taxonomies. If you want to offer different price options then you can use variable products for this. Each price option will appear as a variation dropdown list next the add to cart button.

Install WooCommerce


Perfecting your eBook library

WordPress eBook store plugin

Whichever of the above WordPress eBook plugins you use, don't forget to add the finishing touches.

Adding filters to the eBook library

WordPress eBook plugin with filters

The most important extra features that you need to add are filters. You can add filter dropdowns above the eBook library for various options including categories, tags and any custom taxonomy.

If you're using WooCommerce Product Table then you can also add attribute/variation filters above the table, and filter sidebar widgets. All of these will increase your eBook sales by making them easier for people.

Embed eBooks to read online

So far, we've assumed that people will download the eBooks to their computer. Perhaps you don't want this - or perhaps you want to provide an online preview of the eBook before people download the eBook.

When you add the eBook - either as a document or an e-commerce plugin, depending on which method in this tutorial you've used - you need to embed it in the main content field/description.

There are lots of service that let you embed eBooks into WordPress, and they will all work with the plugins in this tutorial. For example:

  • Use the free Google Drive Embedder plugin to embed the eBook from Google Drive.
  • Use a flipbook plugin such as FlipSnack to embed a page turning flipbook.
  • Or use the free PDF Embedder plugin to embed a PDF in WordPress.

Either way, people will be able to view the eBook and read it online. However, they won't be able to download it unless you have separately provided a download link.

Add embedded audio and video players

WooCommerce Audio StoreIf you're selling audio books or have a promotional video, then you can embed media players directly into the main eBook library page. For example, you might be creating a WordPress audio book library and want to include MP3 players for your audio books.

To do this, add an embedded audio or video player directly into any of the text fields in your eBook library (such as the main content area or a custom field).

Go to the plugin settings page and tick the 'Shortcodes' option. This tells the WordPress eBook library plugin to render the embedded media player properly, instead of just as plain text.

Next, your visitors will be able to listen to audio tracks or watch video directly from the main eBook library page.

Add quick view buttons

WooCommerce Product Table Quick View Magnifying Glass
Add buttons to show extra images, the blurb, and more in a quick view lightbox.

If you're building a WooCommerce eBook store, then you can enhance your book lists with the WooCommerce Quick View Pro plugin. This handy plugin adds 'quick view' buttons (which you can rename to anything you like) to your eBook library pages. Customers click these buttons to view more information about your eBooks in a lightbox, without having to visit the single product page.

Here are some examples of how you can use quick view to improve your WooCommerce eBook library:

  • Upload multiple images to the product gallery, and display these in the quick view lightbox. Use the images to preview different pages from your eBook, just like Amazon's 'Look inside' feature or Kobo's 'Preview Now' feature.
  • Add the blurb from the back of your eBook to the product short description, and display this in the quick view.
  • Sell product variations (e.g. different eBook file formats or printed book options) in the quick view.

Get WooCommerce Quick View

The perfect WordPress or WooCommerce ebook library

These WordPress eBook plugins come with over 50 options for changing how the eBooks are listed in the library. Choose whichever plugin best meets your needs:

Think about which eBook plugin will help you list your eBooks even more effectively. Spend some time experimenting to find the right combination of options, and make your WordPress eBook library a big success.