New customers are the lifeblood of every business, that’s for sure, but finding a way to keep them coming back after their first purchase can be quite challenging.

On the other hand, stats say that it’s somewhere between 5 and 25 times more expensive to acquire a new customer than it is to keep an existing one.

So, it’s pretty self-explanatory why you can’t rely on a number of one-time purchases for growing your e-commerce.
Instead, building customer loyalty through a subscription-based model will get you far. It will bring much-needed recurring, predictable revenue.

The WooCommerce Subscriptions extension.You'll be able to plan your finances more effectively because you'll know when to expect the next round of payments.

Luckily, there are some handy WooCommerce plugins - especially the YITH WooCommerce Subscriptions extension - designed especially to help you build ongoing repeat income.

These plugins will back you up and help you tap into the power of recurring revenue.

The benefits of recurring revenue

It’s a no-brainer that you should go for a recurring-revenue business model, so let’s discuss a couple of its benefits:

  1. Better stability No matter what industry you’re in, the unpredictability of the next purchase is one of the most daunting things when you start a new e-commerce shop. This issue can stretch beyond your cash flow and hinder the growth of your business in the long run. Enter recurring revenue backed by subscription-based business model, and here you are with the prospect of a steady income. It gives you more time and energy to focus on growing your customer base and improving your marketing efforts.
  2. Improved retention Did you know that 80% of a company’s profits come from 20% of its loyal customers? The fact that your customers decide to get into a long-term business contract with you allows you to learn more about them and their needs. As a result, you’ll be able to additionally fine-tune and tweak your offers. Subsequently, you’ll improve their customer experience and boost your customer retention rate.
  3. Targeted marketing A subscription-based model can give you valuable insight into your customers’ behavior. It gives you a huge amount of data on their interests, needs, and demands. This way you’ll be able to leverage different targeted marketing strategies, such as upselling, cross-selling, and recommendations. For example, Beeketing is a useful WooComerce plugin which can help you capitalize on these marketing strategies. It offers your customers exactly what they want or need, based on their previous purchases or viewed products.

Types of products and services that can be offered on a subscription basis

Before you offer to deliver your goods on a regular basis, ask yourself whether you sell products or services that your customers will need month after month.

It’s true that a new batch of toys for your kids every month or a 3-pack of socks biweekly doesn’t make much sense. However, don’t get upset because you can still offer a bimonthly or quarterly subscription on these.

Now, let’s see some examples of products which are a perfect match for a subscription-based model.

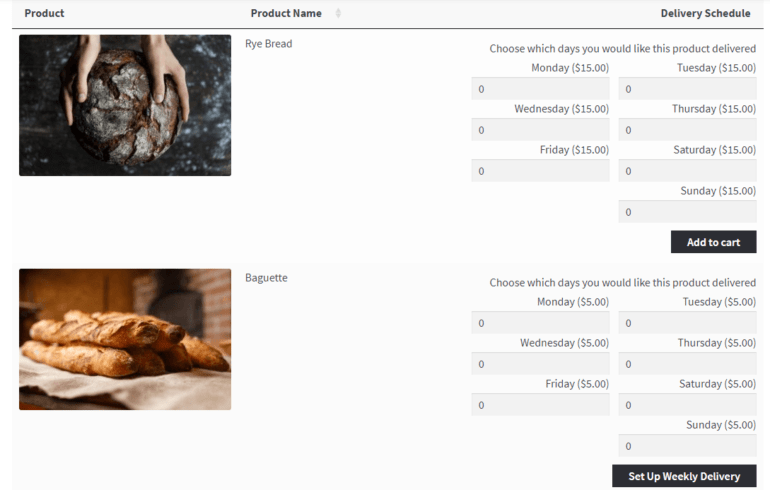
Baked goods make a great subscription product for WC. A pie of the month, a delivery of fresh croissants every weekend, or a box of pre-measured ingredients and instructions for your DIY baking challenge - what’s not to love?

A regular supply of pet food delivered to your door is a real time-saver, and it will help you avoid running out of treats for your beloved kitty or dog.

Office supplies, such as Xerox toner cartridges, ink cartridges, or paper, are needed on a regular basis, and you can bet that many people would find your subscription-model offer appealing and useful.

Cleaning supplies can be excellent for being offered on a regular subscription-based model because it’s hard to keep tabs on what cleaning product needs to be replenished. Just make sure to stand out by offering natural, chemical-free, or baby-safe products as many retailers provide this particular service.

Related tutorial: Complete Guide to Selling Services in WordPress and WooCommerce

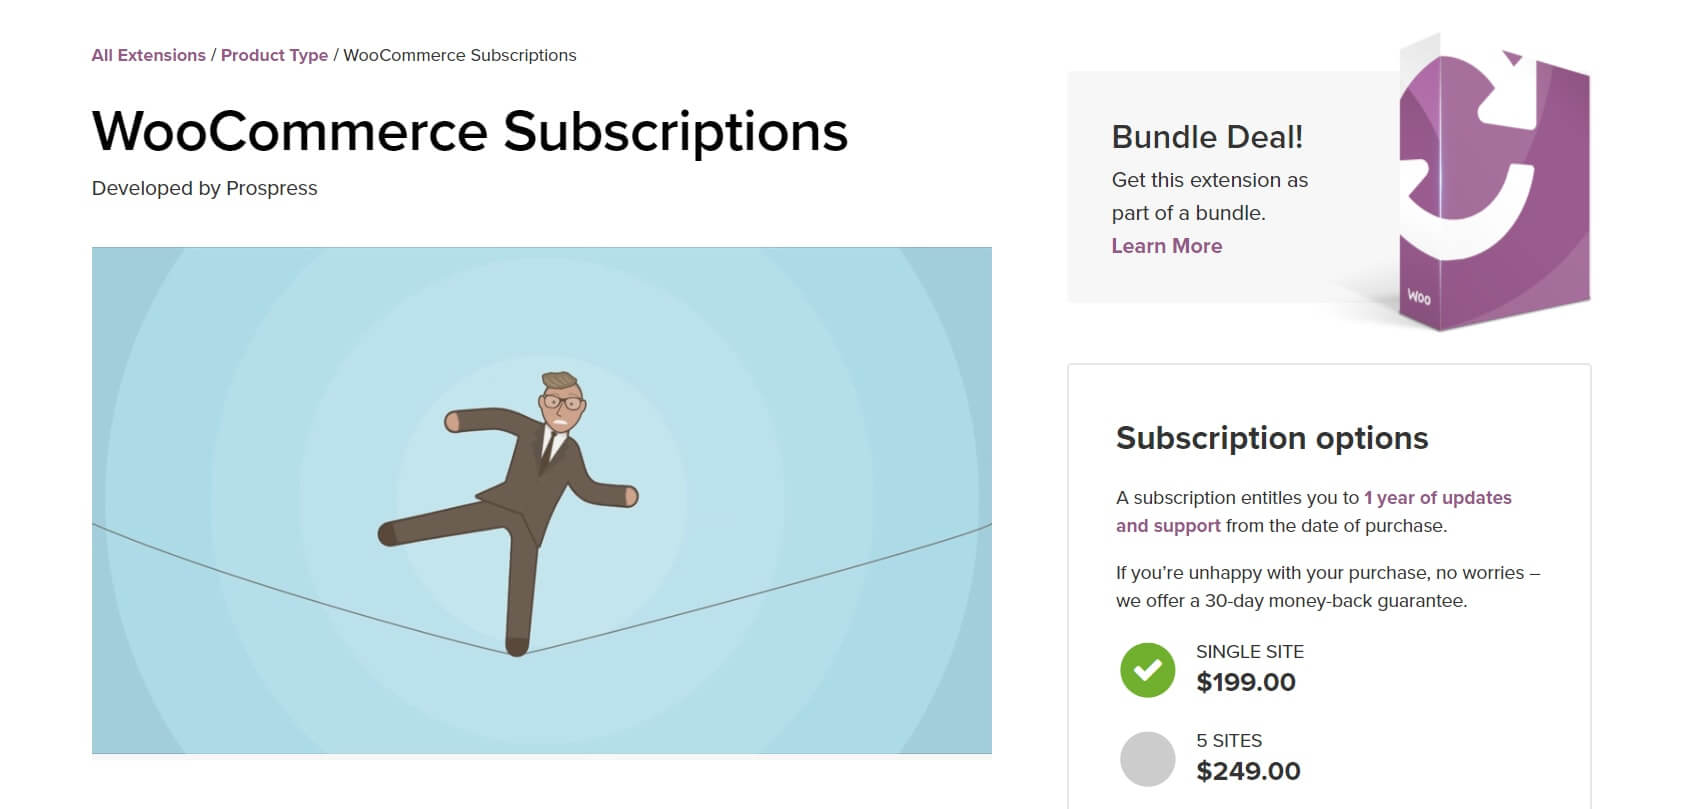
Introducing WooCommerce Subscriptions

WooCommerce Subscriptions Product Table

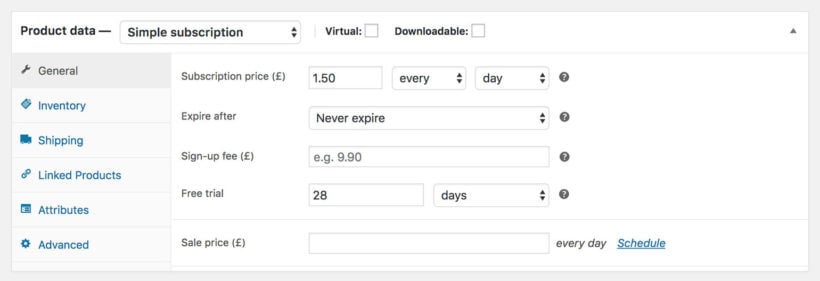
That’s where YITH WooCommerce Subscriptions comes in. This official plugin from woocommerce.com helps you set up different kinds of subscription plans and recurring model payments.

With this premium extension you’ll be able to sell both digital and physical products, offer various types of subscription frequencies-weekly, monthly, quarterly, annually, or any other interval you define. You can keep track of the performance of each plan and package, and project your monthly revenue.

It’s worth noting that WooCommerce supports 25 payment methods, including PayPal, Stripe, and Wirecard. This means that your customers from all over the world can easily make repeat payments.

How to set up a WooCommerce subscription-based website

Plugins such as WooCommerce and WooCommerce Subscriptions are designed for anyone who is familiar with WordPress to set up. They come with comprehensive documentation that is easy to follow.

Create WooCommerce subscription

However, if all this sounds too complex, maybe it’s a good idea to check out this list of reliable e-commerce companies. They can help you design and maintain your website, product pages, and brand identity, as well as keep your Woo e-store running smoothly.

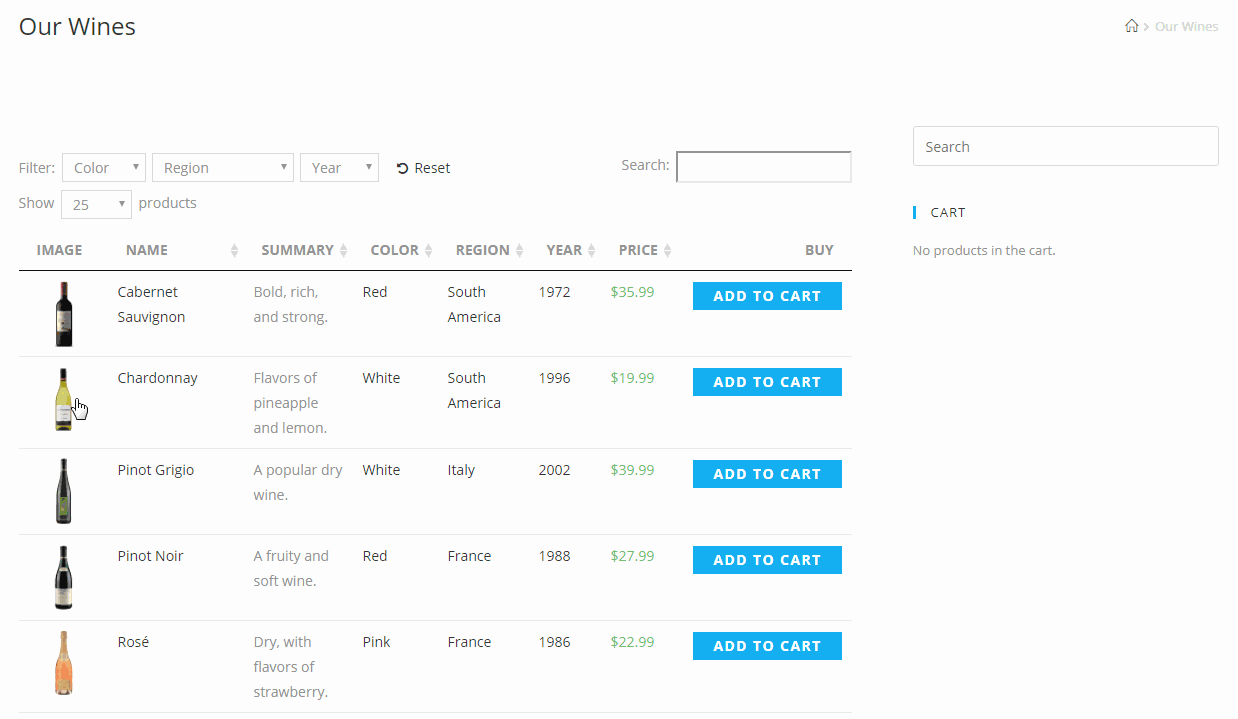
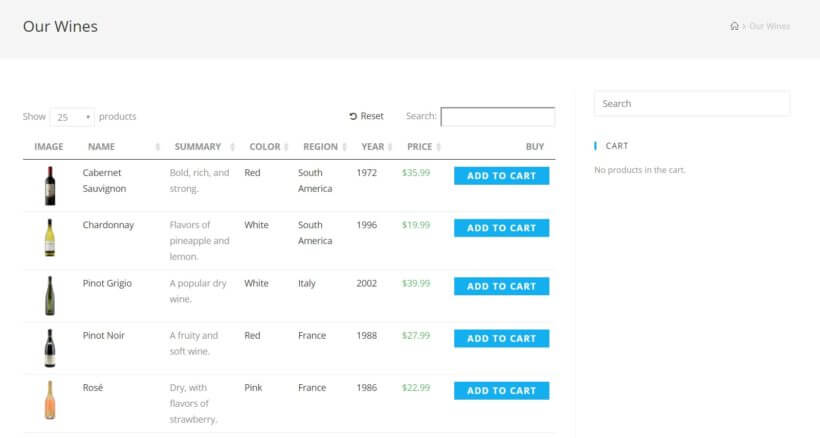
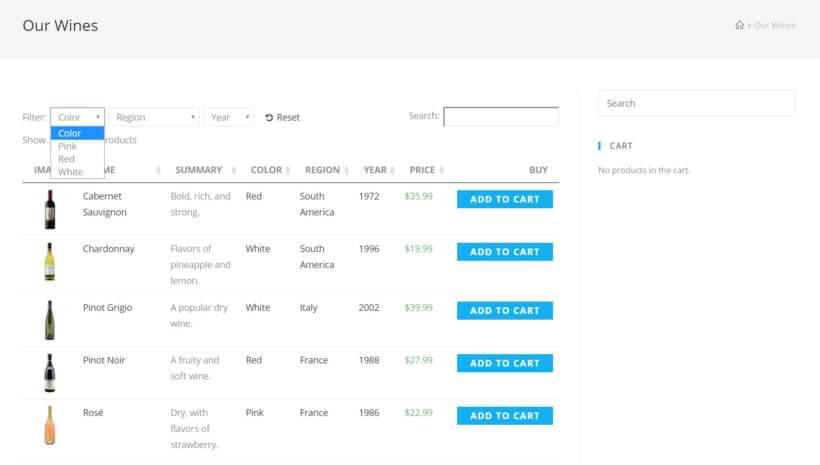
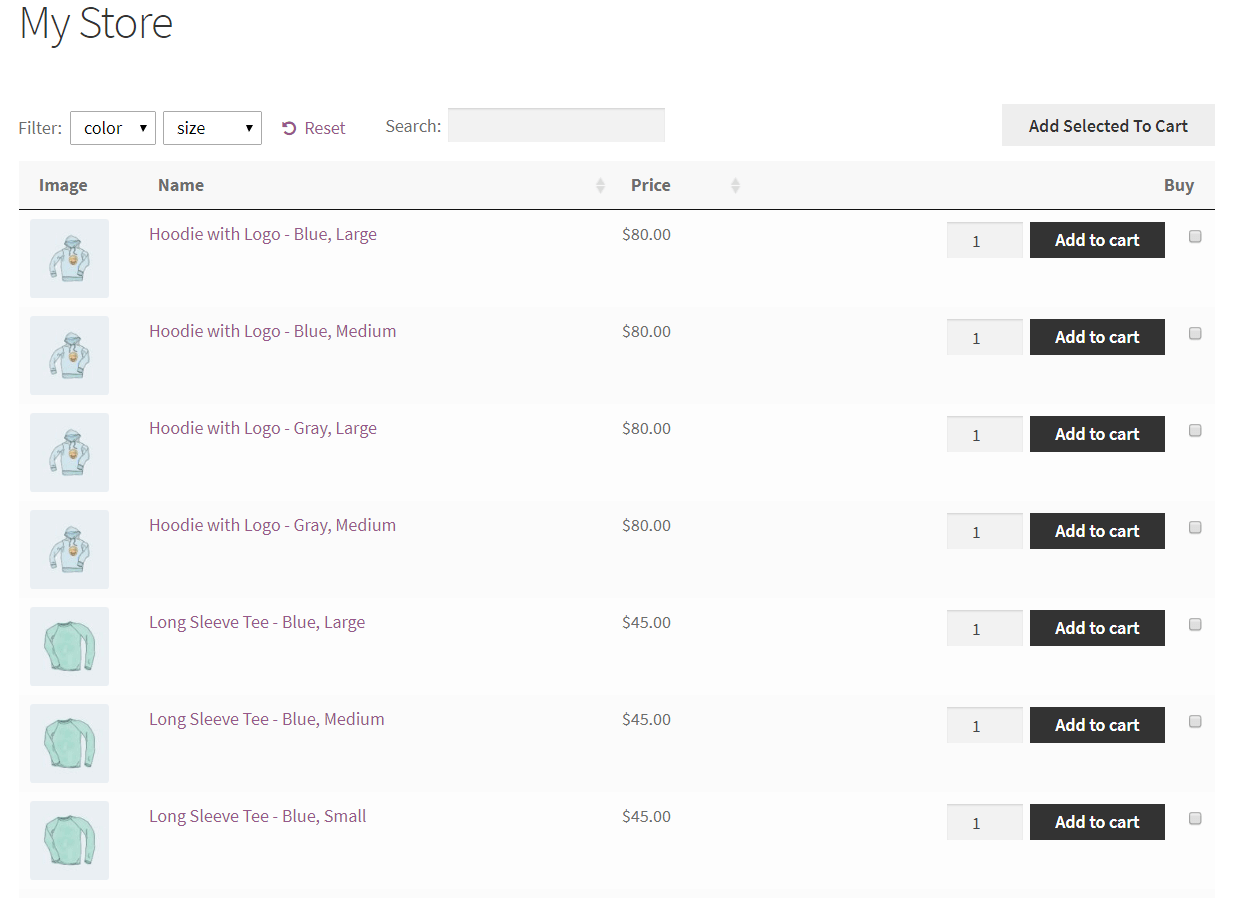
Related tutorial: How to list WooCommerce subscriptions in a searchable product table

Types of recurring payment plans

When it comes to deciding on the type of payment plan that you should offer to your customers, think about their needs and benefits, and try to align them with the kind of products or services you’re offering.

  • Membership plans are common for all kinds of online platforms, tools, or services. You can create monthly, annual, and three- or six-month membership plans, but don’t forget that your customers will expect a discount for a long-term commitment.
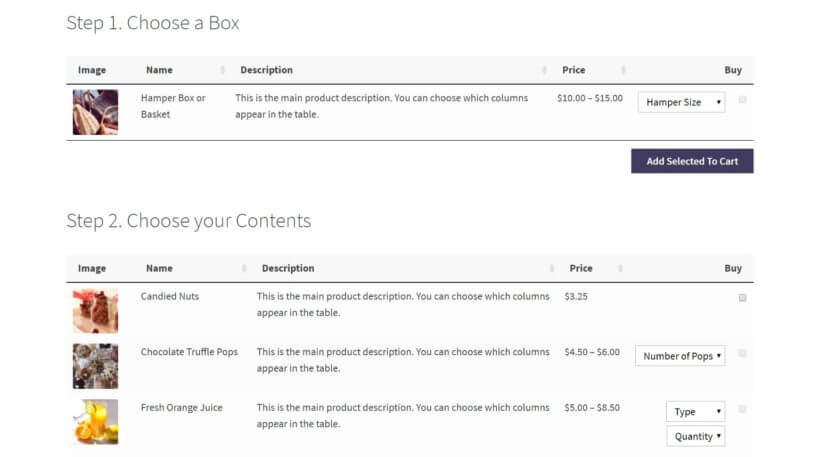
  • Subscription boxes are an interesting and fun way to promote new products and showcase them to customers by delivering them on a fixed schedule. All kinds of foods, snacks, cosmetics, and beauty products are suitable for this type of plan.
  • The Subscribe for discounts option allows your customers to obtain a discount on the products they purchase on a regular basis. This brings you more sales and revenue.

Other WooCommerce plugins for selling more subscription products

Apart from the Subscriptions plugin, there are countless other WooCommerce plugins to help you establish recurring revenue and boost conversions.

Managing subscription products in WooCommerce

WooCommerce-product table quick view services with subscriptions plugin
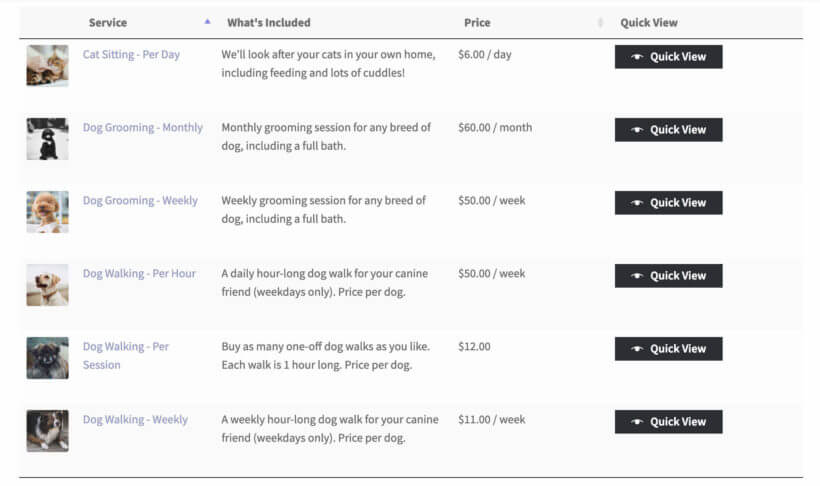
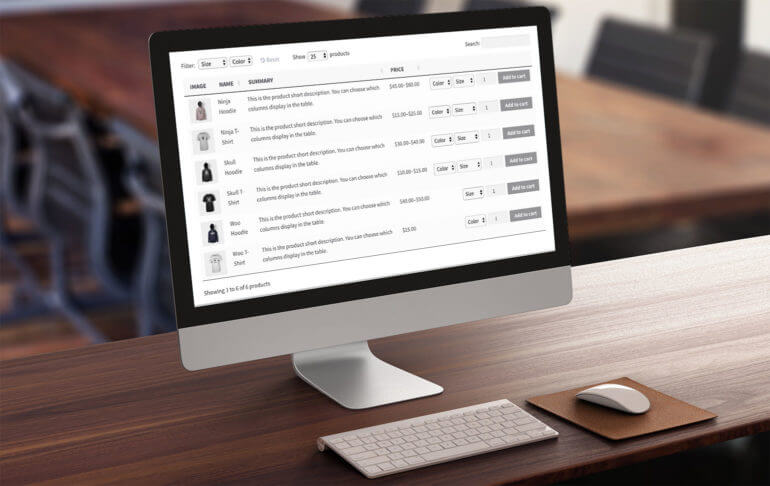
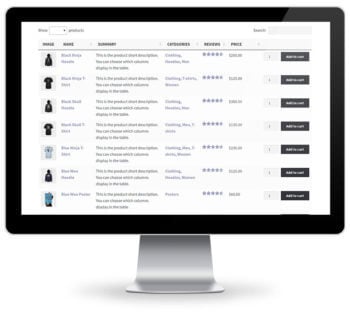
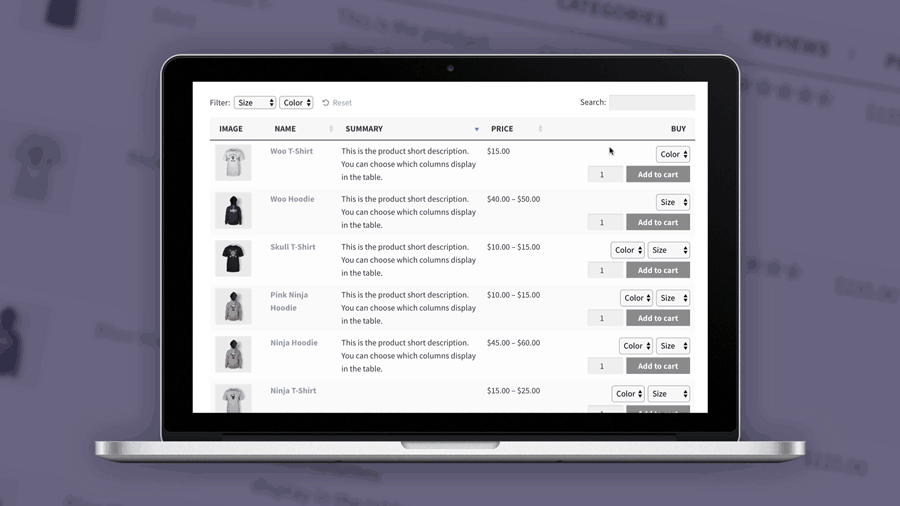
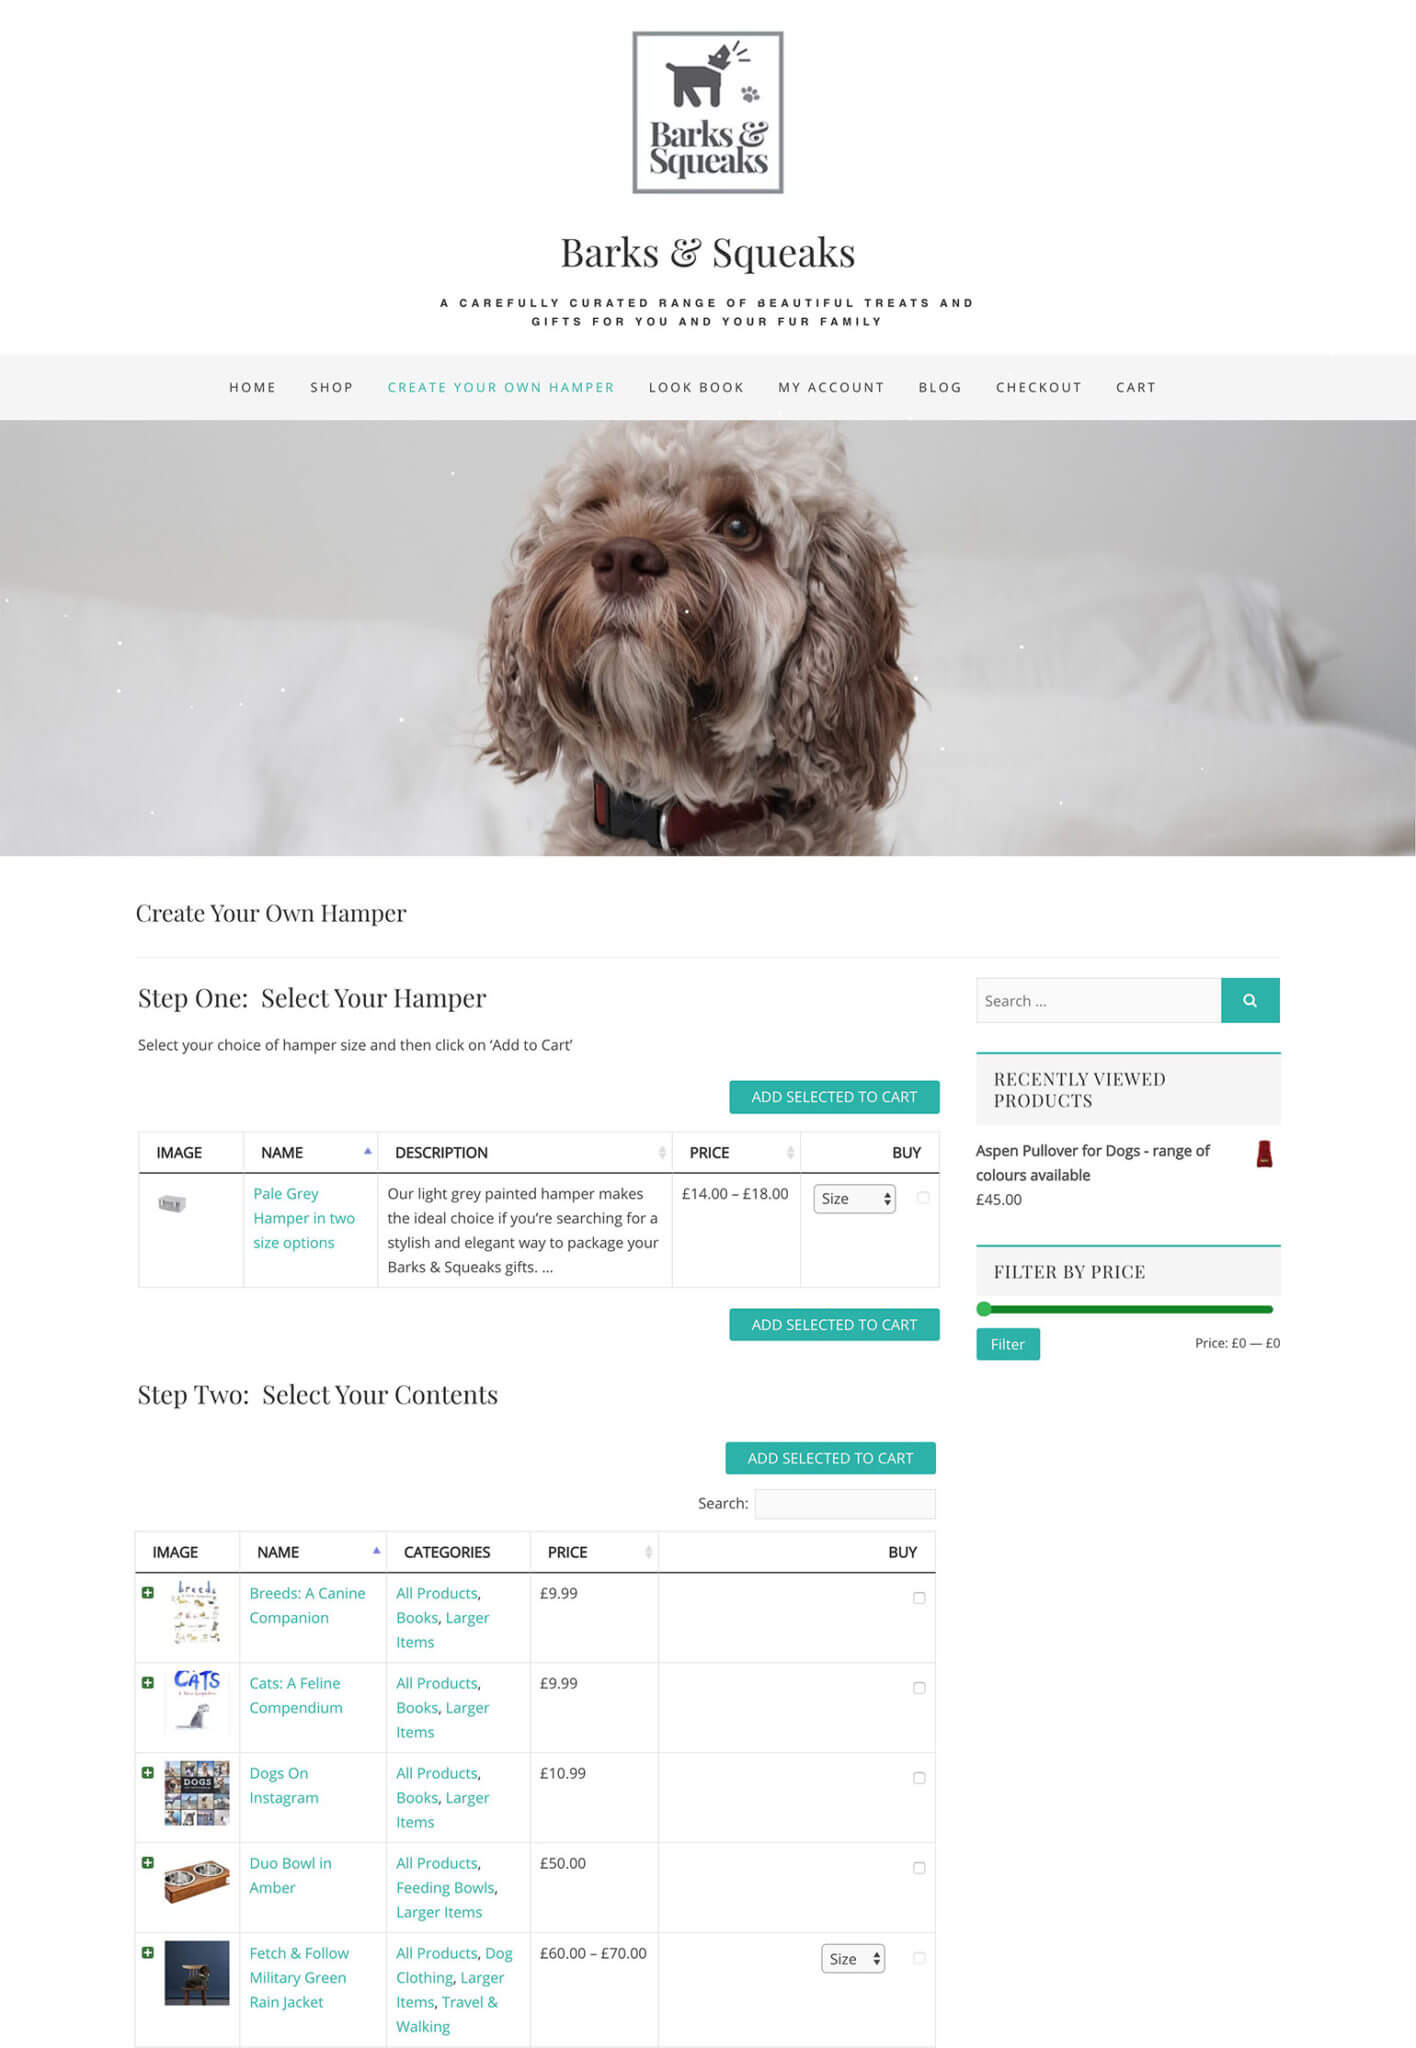
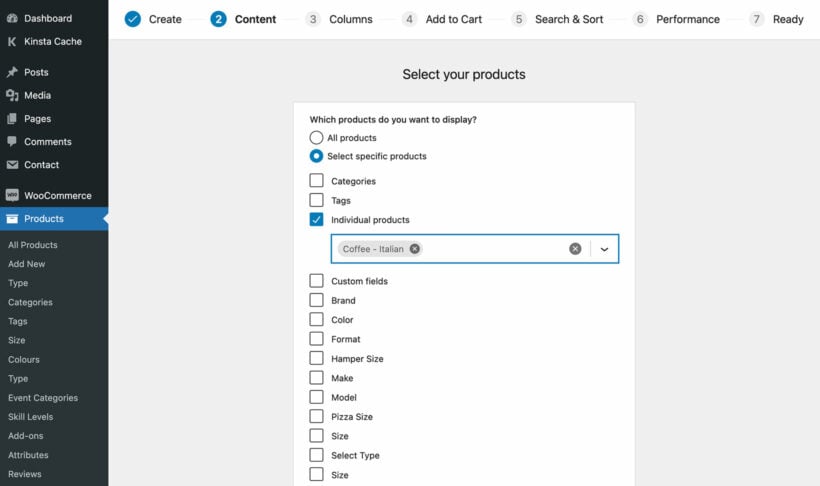
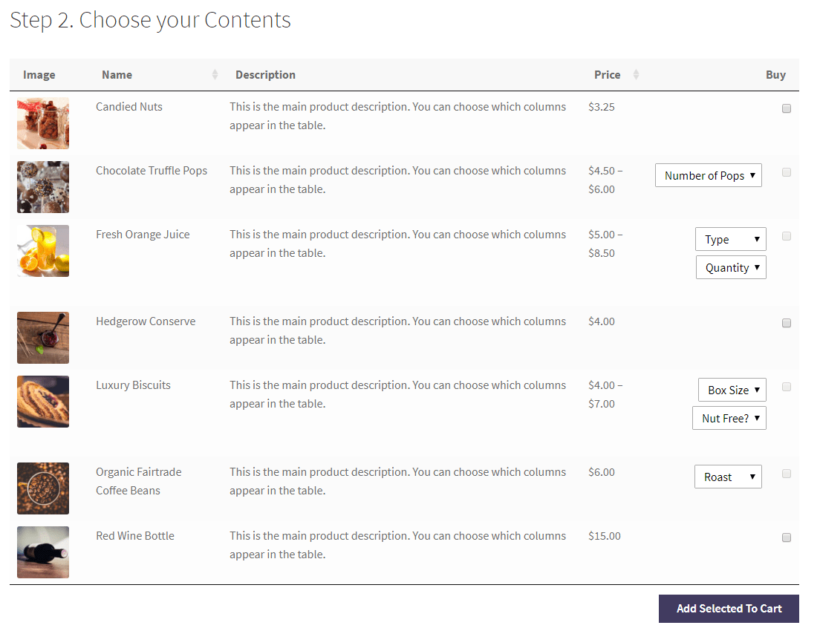
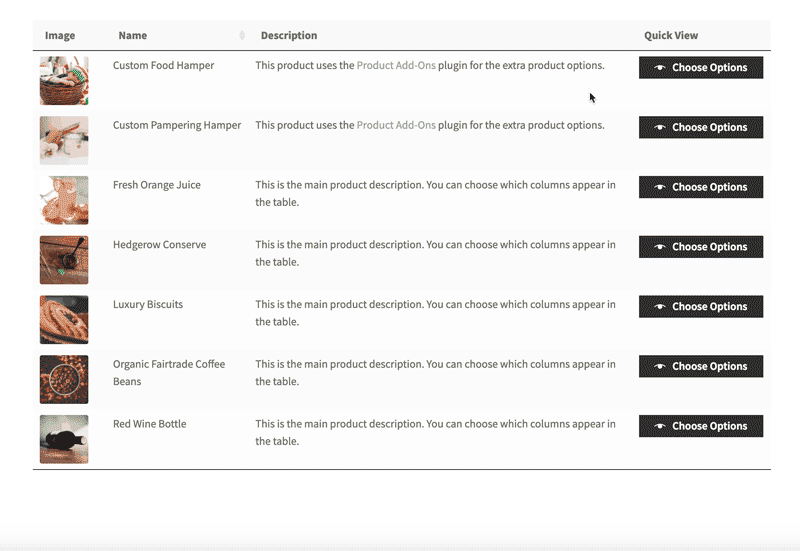
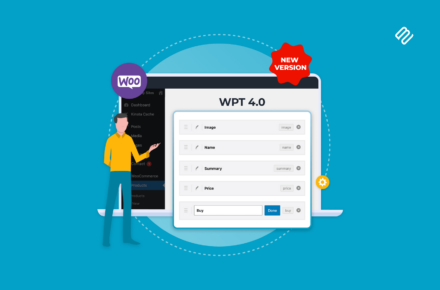
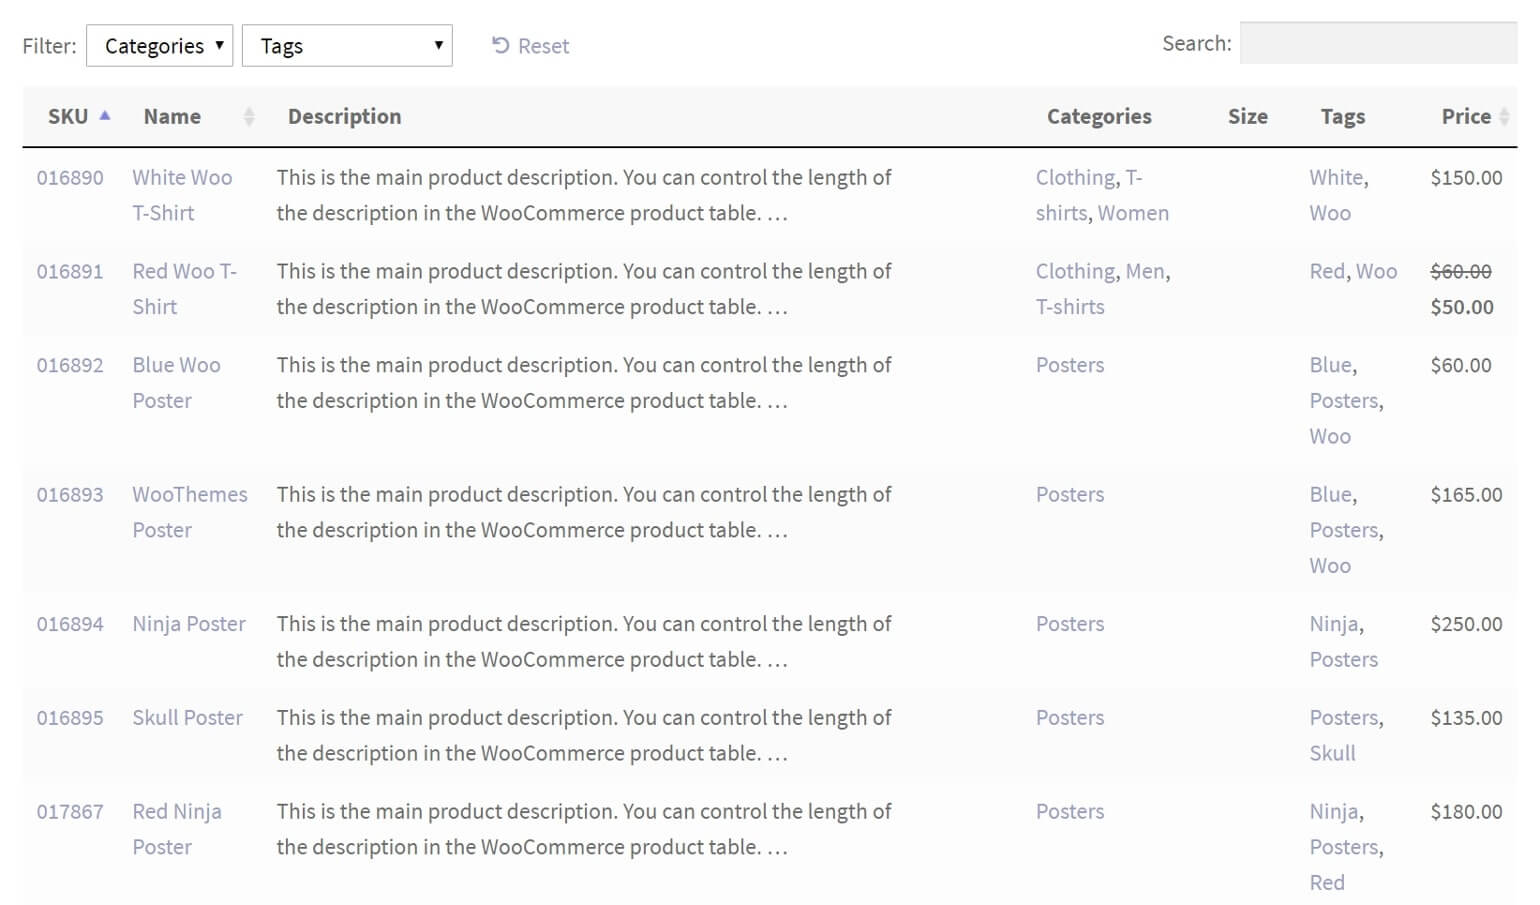
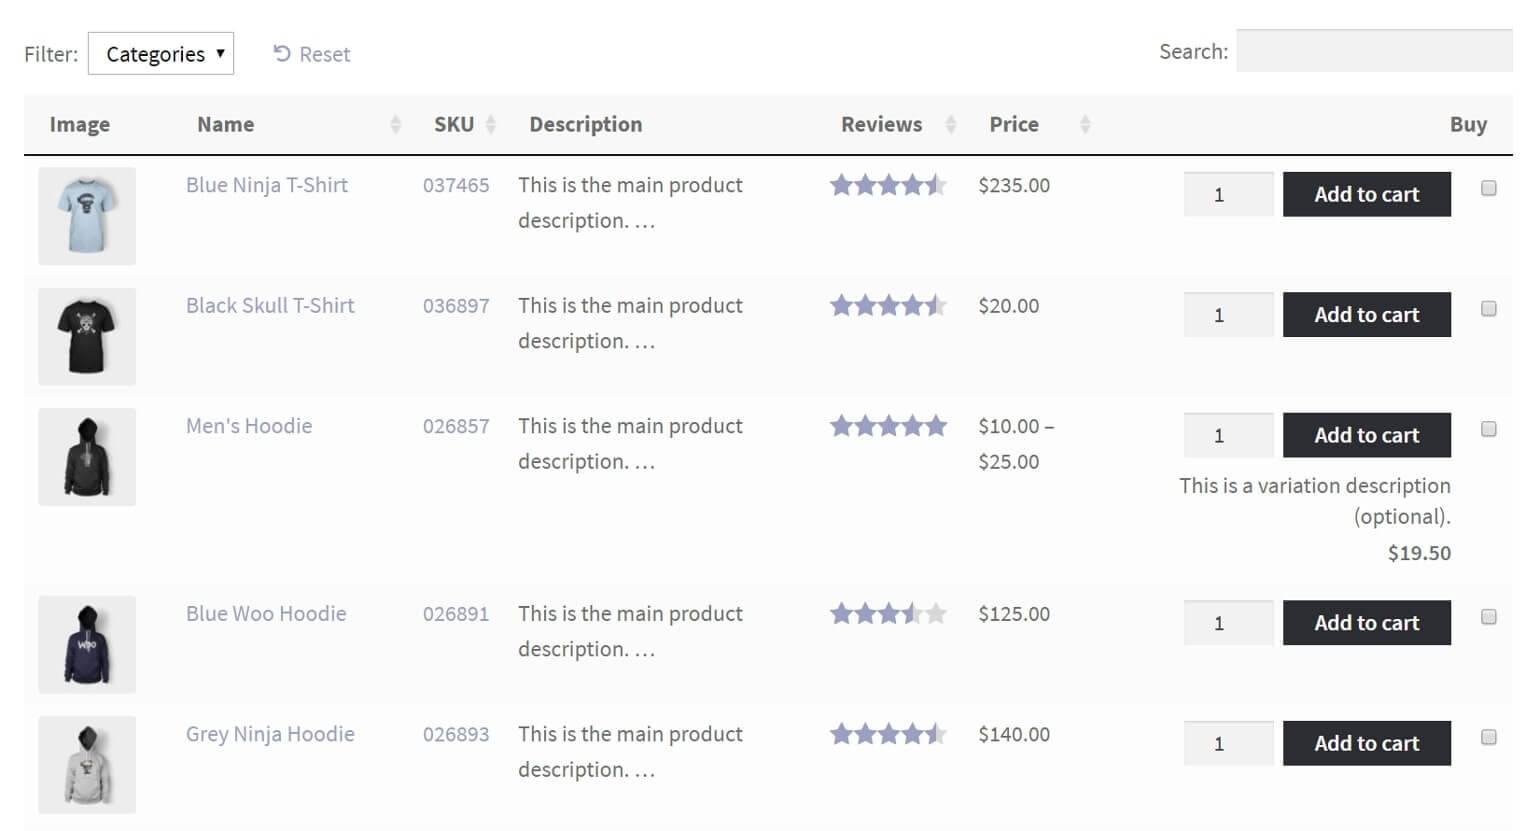
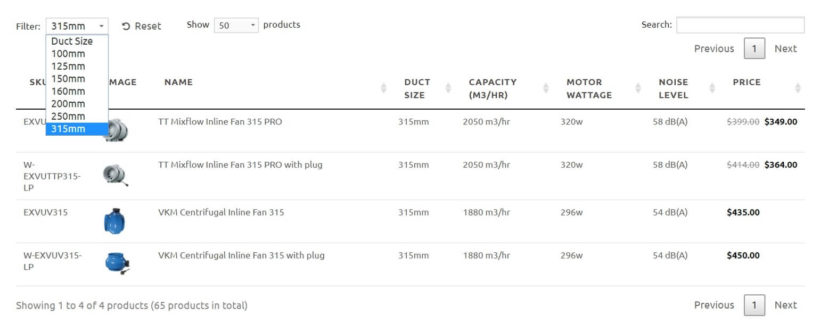
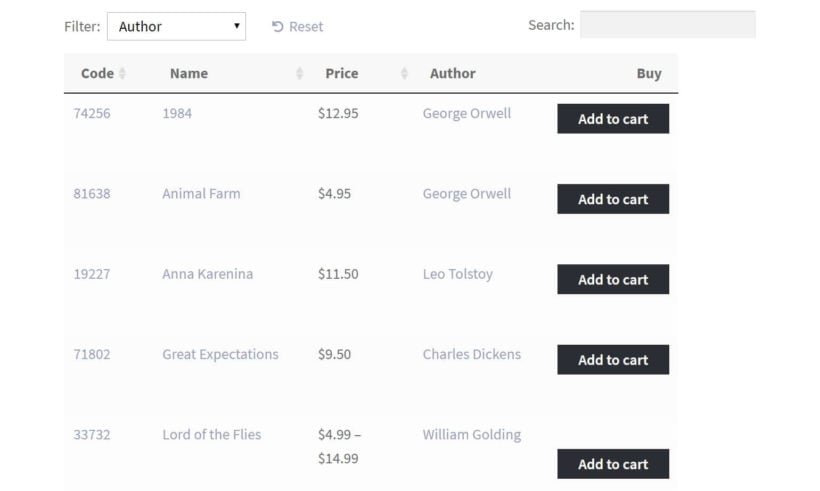
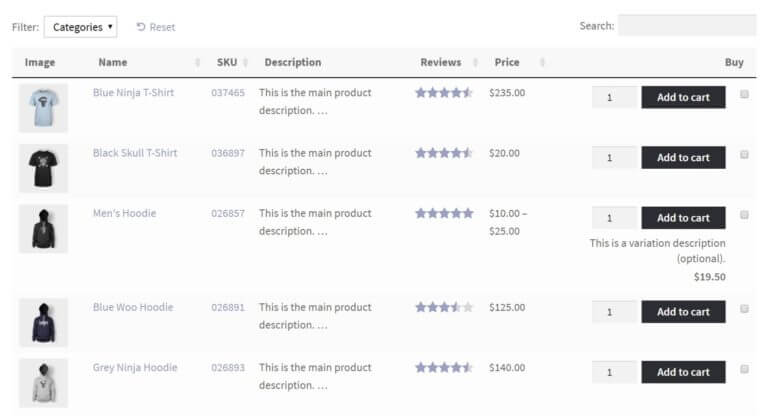
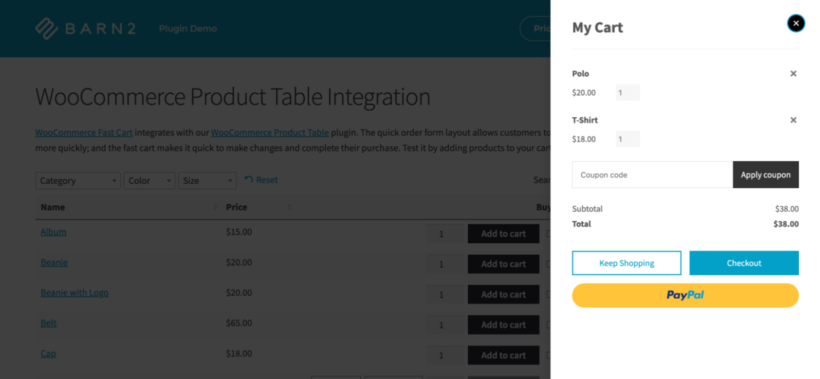
  • WooCommerce Product Table is our bestselling plugin at Barn2 Media. It works beautifully with WooCommerce Subscriptions, listing your subscription products in a searchable table layout.
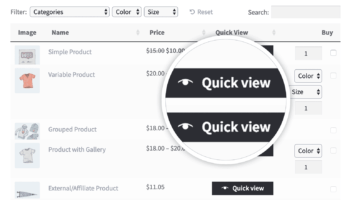
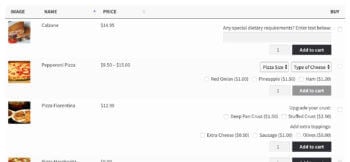
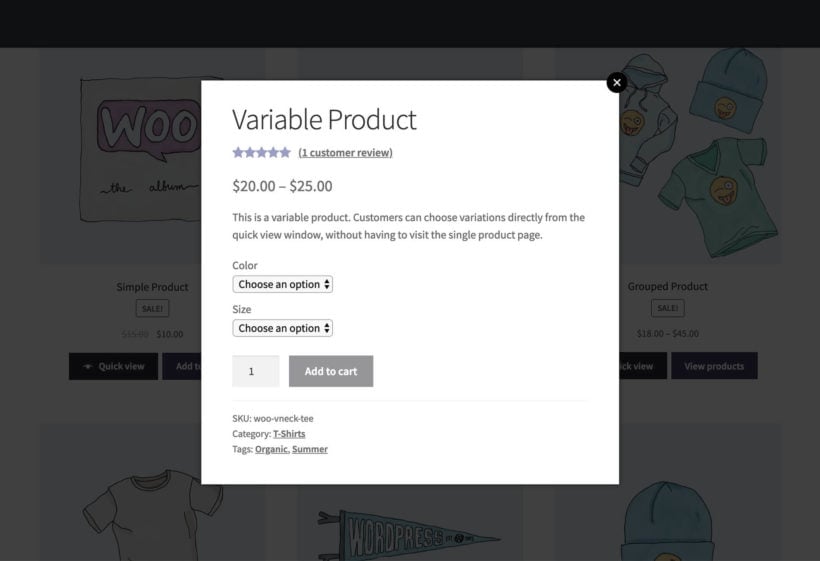
  • WooCommerce Quick View Pro adds user-friendly lightboxes to show extra product information and purchase options. You can use it on its own or with WooCommerce Product Table. Customers can buy subscriptions directly from the quick view lightbox.
  • WooCommerce Protected Categories is ideal if you want to sell subscriptions to a members-only discount club. List your subscription products in the public parts of your store, so that anyone can sign up. Then, use WooCommerce Protected Categories to create hidden categories that only logged in subscribers can access.
  • YITH Waitlist asks your customers for their email address in case that the product they’re interested in is out of stock at the moment so that you can notify them after it becomes available again. Even if they don’t make a purchase right away, you can still make good use of the collected information. For example, send prospects your newsletters and email promotions.

Maximising sales of subscription products

  • Abandoned Cart Lite targets customers who abandon items in their shopping cart and leave your e-store without converting. Given that the average online shopping cart abandonment rate reached almost 70%, this plugin will come in handy for bringing your prodigal customers back and pushing them gently towards the checkout.
  • Review Reminder is a useful plugin for leveraging the power of social proof. Consumers are more likely to trust their peers than brands when it comes to product descriptions and quality. As a result, it’s a good idea to ask happy customers to leave a product review. This plugin will remind them to do so after a predefined period of time.
  • WooCommerce Multilingual lets you localize your e-commerce website, translate your product pages in more than 60 languages, and allocate unique URLs for every version of the page. Besides that, you’ll be able to send emails to your customers in their native language. You can even express prices in different currencies. People are more willing to make a purchase if they see products and prices in their own language and currency. Therefore, this plugin removes language and psychological barriers. It's a great way to increase your sales and improve customer loyalty.

As you can see, the sky’s the limit. Use YITH WooCommerce subscriptions and related plugins to attract customers and keep them.

WooCommerce change default product image

Many WooCommerce online stores are highly visual by nature. You may have noticed that your page layouts place a lot of emphasis on WooCommerce product images. However, what if you don’t have access to high-quality photographs for your products? Keep reading to learn how to create a WooCommerce product list without images.

While displaying lots of media can be very valuable for some stores, it’s not always necessary. In some cases, a featured image for your storefront and WordPress theme may be more than enough.

However, there's no need to worry if you have a different vision for your shop, or are constrained as to what type of WooCommerce product images to use. There are alternative ways you can display your products in an attractive and compelling manner, such as in a dynamic table:

In this post, we’re going to talk about the reasons you might want to create a WooCommerce list view with no product images, or with small images. We’ll also show you some examples of this feature in action, and introduce you to a tool you can use on your own site – WooCommerce Product Table.

Let’s jump right in!

The benefits of creating a WooCommerce product list without images

There’s no denying the power of visuals. In many cases, people use images as a key part of their decision-making process when buying items online. That’s why you’ll see so many stores that put a significant focus on what each product looks like:

A regular WooCommerce product page.

However, the benefits of having large images only apply to certain types of product. Sometimes, you might want to avoid placing a lot of focus on product imagery. In fact, you may prefer to have no WooCommerce product images. Or you might want small product thumbnail product images, instead of high pixel imagery that takes over the page.

There are a lot of reasons your store might benefit from small product images, or no images at all:

  • Lack of high-quality WooCommerce product images. Quite rightly, you don’t want to shortchange your products by using photos that don’t represent them at their best. This also applies to developers building sites for clients who’ve provided less-than-stellar product imagery (or nothing at all). Let's face it, we've all been there and received blurry product images from clients 😅.
  • Your products are completely digital – such as ebooks, music albums, computer programs, or PDFs – and so there’s nothing to take images of.
  • While your products are physical, they’re very simple or not interesting to look at. For instance, maybe you’re selling machine parts, or other items where appearance isn’t a key factor. Here, you may only need thumbnail-size catalog images, or none.
  • Removing images places emphasis on your products’ details or specifications, rather than the way they look. It may be more important that your customers are able to compare a large number of items quickly, based on their sizes, materials, capacities, and so on.
  • A WooCommerce product list without images will make your store load faster. High-quality images, are, by nature, large image files. If larger images fill your product gallery, they may slow your website’s loading time and hurt your SEO performance.

To give you some real-life example, here are some quotes from our own customers who wanted to have no product images:

My client HAD to have the table layout. The grid layout just does not work for boring electronic parts.

I’m selling digital goods that require little more than a thumbnail image, excerpt, title, and price. The product details page is largely redundant.

Most of the products we sell do not have pictures, and a list looks cleaner than a blank thumbnail.

Ultimately, not all stores need or can benefit from including a lot of large, dominant WooCommerce images.

Which WooCommerce products sell best with no image?

By now, you have some idea of the reasons a WooCommerce store might not have product images (or only use small, simple photos). However, you may still not be sure whether this applies in your specific situation.

To answer that question, you’ll want to consider the types of non-visual products you’re selling. Of course, we can’t possibly list all the types of items that fall into one of the categories discussed above. However, here are some examples of products that don’t need to rely on images:

  • Lab products, scientific instruments, or medical devices
  • Machine parts, electronic parts, blueprint templates and similar items
  • Ground support equipment for airports
  • Instrument cases (and other types of containers)
  • Gift certificates
  • Any sort of digital products (music, games, files, etc.)
  • Pharmaceuticals
  • Modular furniture (for example, a selection of various cupboard doors)
  • Event tickets and registrations
  • Certain food and beverage items, such as wine or spices
  • Practical household items (such as fans)

Even if you do have access to images for these types of items, it can be a better choice to have no product images, or to keep them small. Customers are more interested in making comparisons and viewing details about your products than what they look like.

To further illustrate the point, let’s take a look at how having small WooCommerce product images might work in action.

Universal Fans: A case study of selling non-visual products in WooCommerce

As it turns out, there are a lot of e-commerce stores that have decided not to emphasize product imagery, and have found ways to do so successfully. For example, Universal Fans is a website selling – you guessed it – fans and similar products:

The Universal Fans website.

This store owner offers everything from ceiling fans to exhaust fans, and lists a wide range of products, parts, and options on its website. For some of those items, WooCommerce images do in fact matter. If you’re looking to buy a ceiling fan, for example, you probably care what it looks like:

A ceiling fan on the Universal Fans website.

Other types of fans are a lot less exciting to look at. For instance, there’s not much reason to include a single product image of an exhaust fan. What customers care about when searching for that type of product is its specifications, not its appearance.

The team at Universal Fans understand that fact, which is why they use product tables to display non-visual items:

A product table on the Universal Fans website.

This listing of exhaust fans does include WooCommerce product images, but they are small, simple, and basic thumbnail pictures. Instead, the focus is on the products’ key details, such as duct size, capacity, and wattage. Customers viewing this page can easily see all the different sizes and options on offer, make comparisons between them, and plan out exactly what they want to buy.

This is made even easier by the table’s dynamic design. Individual columns can be sorted, and there’s a handy search bar. Plus, you can use a dropdown menu at the top to filter the listing, and only include products with a specific duct size:

A WooCommerce product table filter.

You could even create a table like this with no product images at all. As you can see, it wouldn’t make a significant different to the listing’s usefulness.

It’s clear that Universal Fans knows what its customers are interested in, and how they shop. That’s why this business has tailored the design of its e-commerce store to focus on the elements that really matter – which isn’t always WooCommerce product images.

How to create a WooCommerce product list without images

By this point, you probably have a good idea of whether or not listing WooCommerce products with no images (or with small, simple photos) would benefit your store.

If you’re using Woo to run your store, this can be a little tricky. After all, WooCommerce is designed with product images in mind. Its layouts assume that everyone will want to display large, high-quality images on individual product pages. But as we’ve seen, this isn’t always the best approach.

That doesn't mean you can’t use WooCommerce, however. After all, it’s an easy and flexible way to set up an e-commerce shop. Instead, the solution is to pick up an additional tool as well – the WooCommerce Product Table plugin.

This WP plugin is designed to work right alongside WooCommerce. More specifically, it enables you to create a dynamic product listing with no product images or with small thumbnails:

An example of a product table without images.

While this plugin has many applications, it’s especially useful if you want to create a WooCommerce product list without images, or keep the photos understated. Let’s talk about why.

How WooCommerce Product Table can display your inventory more effectively

At first, WooCommerce Product Table may seem like a simple tool. Its goal is straightforward – helping you design a better product listing for your WooCommerce store.

Check out the Woo Product Table demo!

However, there are a lot more benefits to using this plugin than you might at first expect. Some of its key features include:

  • Enabling you to fully customize the information that appears in your product table.
  • Letting customers search, sort, and filter the table to find what they need quickly.
  • Keeping all your products and their key information organized.
  • Saving space by displaying everything on a single page.
  • Making it possible to list your store’s entire inventory in a single shop page, or to pick and choose. which items you want to include.

As one customer put it:

We sell relatively technical products, so it is really helpful for customers to be able to see products in certain categories and view them in a list format, which can be sorted by custom attributes.

What’s more, there are a variety of ways you can use WooCommerce Product Table to display products with no images, or to draw visitors’ focus to other key elements. Here are just a few of the ways you can customize your product table:

  • You can remove WooCommerce product images entirely, by simply not including them in your table.
  • Alternately, you can include a product image column, but keep the photos small.
  • You’re also able to customize the image dimensions in your table, so you have complete control over how prominent they are.

Instead of putting all the focus on images, the product image settings in WooCommerce Product Table help you display what is important about the items you’re selling. That helps to sell your products more effectively, leading to increased conversions.

How to get started with WooCommerce Product Table

At this point, all that’s left is to start using WooCommerce Product Table for yourself. Watch this video or follow the written instructions below:

  1. Get WooCommerce Product Table and install it on your WordPress site.
  2. Activate your license key in the setup wizard which opens automatically. You'll find the license key in your order confirmation email.
  3. Now follow the onscreen steps to create a product list without images. Choose the following options:
    • Shop page display - If you want to use the table layout on all your shop pages, select this option on the first page of the table builder. Alternatively, you can add the table manually by adding a block or shortcode anywhere on your site.
      Create page of table builder
    • Columns - Choose which columns to include in the table. Remove the default 'Image' column if you want to hide images from the shop pages.
      WPT table builder columns
    • WooCommerce product image size - If you're keeping the image column but want small single product images, then enter the desired size in pixels. Do this by clicking the pencil icon on the image column and enabling the 'Advanced' toggle to find the image size option.

Now view the page where you added the product table. This might be the shop page or wherever you added the shortcode. It should look something like this, if you opted to have small product images:

A WooCommerce product table with images.

Or maybe there's no product image column at all.

How do images in the table work?

By default, customers can click on the WooCommerce product images to open them in a lightbox. If you're working with poor-quality or blurry images, small resolution or image sizes, there's an option on the plugin settings page to disable the lightbox. That way, customers will only see the small version of each product image.

You can also disable the links from the product table to the single product page. This keeps the customer on the product table, where they can use it as a one-page order form. There's no need for them to access the product detail page, which will display a much bigger version of each WooCommerce product image.

For more information, you can take a look at the complete list of options in WooCommerce Product Table. With a little time and tweaking, you’ll find it easy to list WooCommerce products with no images.

Bonus tip - Add WooCommerce quick view without images

3 WooCommerce Quick View layout options: Image only, Product Details only, or both

As you can see, it's easy to list products in a table layout without images. You can build on this by providing extra product information and purchase options within quick view lightboxes - also with no product images!

To do this, you need to use WooCommerce Product Table with our other plugin - Quick View Pro. This adds a 'quick view' column to the product table, which customers can click to open extra information in a lightbox. You can choose what information to include in the quick view, including:

  • Whether to show product information with or without an image gallery. (If you're reading this tutorial, then you probably want the lightbox option without no product images!)
  • Product data such as the price, categories, tags and reviews.
  • Add to cart information including the quantity picker, variation dropdowns and add to cart button.

WooCommerce quick view is an excellent way of providing extra information about non-visual products. Use it to encourage customers to buy more and immediately return to the product list, without being taken to a separate page for each product.

Bonus tip #2 - How to change the default product image in WooCommerce

Changing the default placeholder image in WooCommerce is a simple process that helps your store look polished, especially if you have products without assigned images. Follow these steps to update it:

  1. Prepare your new placeholder image. Create or choose an image you want to use as the default. Ensure it’s the right dimensions and file size for your store to avoid layout issues or slow loading.
  2. Upload the new image to your media library. Go to your WordPress Dashboard, navigate to Media → Add New, and upload your new placeholder image. Take note of the image ID after uploading.
  3. Replace the default placeholder image.
    1. Once you have the image ID, you will then need to go to WooCommerce → Settings → Products → Placeholder Image.
    2. Update the image ID in the appropriate field.
  4. Save and check your changes. Click Publish or Save Changes, and preview your store to ensure the new image displays properly for products without individual images.
How to change default product image in woocommerce settings

Go Image-Free with a List View

If you prefer a streamlined, no-image look, you can use the WooCommerce Product Table plugin to display your products in a list view. This layout is perfect for stores where images aren’t essential, like for digital products or simple inventories.

To set this up:

  • Install and activate the WooCommerce Product Table plugin.
  • Configure the settings to display your products in a table format.
  • Remove the image column in the table settings to hide images entirely.

Disable Links to Product Pages

For a more direct shopping experience, consider disabling links to individual product pages. Instead, allow customers to add items to their cart directly from the list view. This minimizes distractions and makes browsing more efficient.

By customizing your WooCommerce store with these changes, you can improve the user experience and tailor your store’s design to better suit your products and branding.

Create a non-visual WooCommerce checkout

The next or the final step in an ideal buyer’s journey is the cart and checkout pages. The default WooCommerce cart page is designed to show the product images alongside the product list and there’s no option in the settings to disable the images. But, if you want to create a true non-visual shopping experience, this can be achieved by our WooCommerce Fast Cart plugin.

WooCommerce Fast Cart plugin is designed to increase conversions by providing a more seamless checkout experience by trimming down the long and tedious traditional WooCommerce checkout process.

The WooCommerce Fast Cart plugin features a custom popup cart and checkout window that comes with loads of customization options and one of those options is to remove product images from the cart page.

no image popup cart page

You can use this plugin in combination with the WooCommerce Product Table plugin to give your store visitors a complete non-visual shopping experience.

After installing and activating the WooCommerce Fast Cart plugin, go to WooCommerce → Settings → Fast Cart, and in the cart contents section, deselect the product image item and the product images will not be displayed on the cart page. Simple as that!

woocommerce fast cart no products

WooCommerce Fast Cart is perfect for giving your shoppers a more streamlined and swift checkout experience. Using it can reduce the cart abandonment rate by shortening the checkout process.

Product images matter - but not for every store!

WooCommerce is an excellent way to design and run an online store. At the same time, it isn’t perfect. It makes certain assumptions about the kind of shop you want to create. For instance, it provides few options for helping you build an e-commerce store that doesn’t rely on large, high-quality WooCommerce images.

If you don’t have product images or can only access low-quality photos, you’re in luck. The WooCommerce Product Table plugin makes it simple to design a WooCommerce product list with no images, or to display small images instead.

Do you have any questions about how to use WooCommerce Product Table on your own site? Let us know in the comments section below!

WooCommerce pay later balance plugin

Most online stores work by charging customers at the time they place their order. But what if you want customers to have a balance or virtual wallet, where they add credit and use this to pre-pay for their orders? Or what if you want customers to place orders online, and then pay later by paying off their balance at the end of the month?

Today, I'm going to show you how to use WooCommerce Product Table with some other plugins to create a WooCommerce pay later system for regular customers. We'll do it using off-the-shelf plugins, and you don't need any technical expertise or coding skills.

Let's get started!

Example use case - school website for parent ordering and payments

WooCommerce school plugin

Before we start, let's look at a typical use case that will benefit from WooCommerce pay later plugin. This is actually a real-life example, as one of our WooCommerce Product Table customers expressed an interest in a credit system for their store.

Many schools save time and reduce administrative costs by creating an online system for managing parents' payments and balances. Parents use the system to order school dinners, snacks, school uniform, and school trips. They can login and pay online, add funds, or top up their balance.

When a parent places an order for school dinners or snacks, they are not required to pay straight away. This is crucial because parents might order on a regular basis, and most schools prefer them to pay later or take payment from a pre-paid balance. That's what makes a WooCommerce pay later system different from a typical WooCommerce store.

As well as a credit-based pay later plugin, the school needs some other features that are different from other WP and WooCommerce websites.

WooCommerce Product Table plugin with product variations displayed on separate rows.
Since parents are ordering the same products (i.e. school meals and snacks) on a regular basis, a standard e-commerce store layout is not appropriate. They don't want to spend hours browsing through multiple pages and large images of each school lunch option! Instead, products should be listed in a structured table layout where parents can quickly make their choices and add to the cart.

Many WooCommerce pay later websites are also aimed at pre-approved customers only, such as parents of children at a school. As a result, they need a way to hide the ordering and payment pages from public view. The school might be using WordPress for their main website, but only parents should have access to the private parent area for ordering school dinners and making payments online.

What plugins will I need?

I'm going to tell how to achieve all of this by creating a WordPress WooCommerce plugin with 3 handy extensions. You will need:

  • A WordPress website.
  • The free Woocommerce plugin.
  • A WooCommerce pay later plugin for letting customers top up their balance and use it to pay for orders.
  • WooCommerce Product Table to list products in a space-saving order form that will help your repeat customers.
  • (Optional) A WooCommerce privacy plugin to create hidden, protected areas for your store.

Keep reading to learn how to choose the best plugins for your WooCommerce credit system, and how to set them up.

Step 1. Set up WooCommerce

The first step is to set up WooCommerce and add your products:

  1. Install the free WooCommerce plugin on your WordPress website. The WooCommerce Setup Wizard makes this easy. You can also use the official documentation for extra tips on getting started.
  2. Next, add a product for each item that you want parents to be able to buy. For example, if you're a school then you'll probably want to create 1 product called 'School Lunch', and another for 'Snack' or 'School Trip - London'. You can also add items of school uniform as individual products, with a variation for each size option.
  3. Use WooCommerce to set up payment gateways, depending on how you want customers to be able to pay and top up their balance. I recommend PayPal and Stripe, which are both very easy to set up. These payment gateways will cater for customers who like to use PayPal, and those who prefer to pay with credit or debit card.

Step 2. Add a WooCommerce pay later plugin

The next step is to transform your store into a WooCommerce pay later system where customers can add credit and use their balance to pay for their orders. To do this, you need to add a WooCommerce credit plugin.

Use the documentation to set it up.

WooCommerce balance pluginAccount Funds is an official WooCommerce extension available from woocommerce.com. It gives customers an online wallet on your WordPress website, where they can add funds, top up their balance, and pay for orders using their balance.

Account Funds works perfectly with YITH WooCommerce Subscriptions. This is ideal if you want customers to set up an automatic monthly payment to pay off a set amount each month. It's a good alternative to having to top up their balance manually every time.

Get Account Funds

Step 3. List your products in a table

WooCommerce order form plugin demo
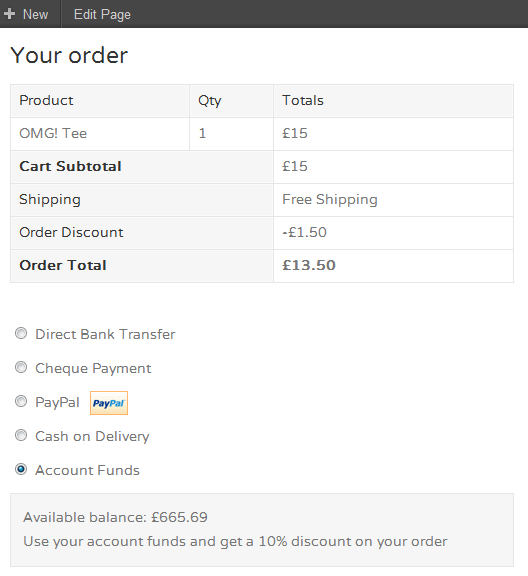
As I mentioned earlier, WooCommerce websites with credit systems and online balances are aimed at repeat customers. This means that the traditional WooCommerce store layout isn't suitable.

By default, your store will list products in a grid layout with about 3 products per row and large images. Customers will have to click through to a separate page for each product in order to choose quantities, variations, and add to the cart. Obviously, that's no use for customers who know what they want and need to order quickly.

WooCommerce product order form layout

Instead, you need a quick WooCommerce order form layout which lists products in a user-friendly table. You'll need the WooCommerce Product Table plugin for this:

WooCommerce Product Table takes the products that you added in Step 1, and lists them in a quick order form with quantity pickers, variation dropdowns, and more. This is a much better way to sell to regular customers who are already familiar with your product offering.

Collect extra information with each order

woocommerce daily order form example

The other good news is that WooCommerce Product Table integrates nicely with the Product Options plugin. Extra product field plugins like this are perfect for repeat ordering because they let you add extra fields where customers can provide additional information.

For example, if you're a school creating an online ordering and payments system for parents, then parents need a way to indicate which day of the week their child requires school dinners. If they have more than one child, then they'll also need to confirm which child the order relates to. You can easily do this with the Product Options add-on. For example, check out our separate tutorial about how to create a daily order form with WooCommerce Product Table and Product Options.

Alternatively, if you want to collect information for the entire order rather than each specific product, then you can do this with the WooCommerce YITH Checkout Manager plugin.

Step 4. Create private and hidden shopping areas

Some WooCommerce pay later websites are open to the public, and anyone can register and order. If that's you, then you can skip this step. Or if you only want specific people to be able to add credit and place an order, then keep reading.

I'm going to let you choose between 2 plugins for this bit. Which plugin you choose depends on whether you want to make your entire WC store private (e.g. a school selling exclusively to parents), or whether you want to show different products to different people (e.g. a university WordPress site with a public shop, a hidden staff store, and a hidden shop for alumni).

Related tutorial: How to use WooCommerce to Sell Protected Products to Schools

Plugin option 1 - WooCommerce Private Store

WooCommerce Private Store provides a ridiculously easy way to hide the shop parts of your WordPress site from public view.

The non e-commerce parts of your website will remain available for everyone for view. This is perfect if this is also your main company or school website.

All the WooCommerce-related content - such as the shop page, product pages, cart and account pages - will be hidden from public view. You can choose whether to let people unlock the store using a simple password, or whether the store will automatically unlock when they log into their individual user accounts.

For example, a school might be using WordPress for their main school website. They use Woo Private Store to create a hidden e-commerce area where parents can order school dinners and school uniform, top up their balance, and pay later on a monthly basis or whenever they choose.

Plugin option 2 - WooCommerce Protected Categories

If you need to sell different products to different people, or if you need to sell to the public as well as privately, then you'll need WooCommerce Protected Categories instead.

WooCommerce Protected Categories offers more fine-grained control over who can access different parts of your store. For example, you can use it to have a public shop and one or more private areas that are hidden from public view. You can use it to let anyone browse your shop, but require them to login or enter a password before they can make a purchase. You can also use it to create multiple hidden shops, for example a parents shop and a teachers shop.

Conclusion

WooCommerce credit plugin pay laterStraight out of the box, it's not possible to create a WooCommerce online shop with the ability for customers to manage their balance and pay later. However, you can easily achieve this by adding some extra plugins.

Choose the plugins that fit the specific needs of your website, and start setting it up today!

In this article, we've talked about how to create a WooCommerce pay later credit system for parents at a school. This is just one use case and I'd love to hear why you need a similar system for your own store. Please let us know in the comments below!

WooCommerce quick order form

Hello again! This week we’ve shown you some of the many variables affecting your ecommerce sales. We showed you some benchmark statistics, and then how to increase your conversion rate.

The key takeaway was this: to improve conversion rates, it’s vital you make the most of your website traffic, and remove any barriers getting in the way of your customers making purchases.

Our most popular plugin, WooCommerce Product Table, does exactly this in minutes.

Here’s a quick recap of just some of the ways it can increase your sales:

  • Table and list layouts make it easy for customers to view your products, without the need to navigate through lots of pages.
  • Using instant search, sort and filter, your customers can quickly find the products they want.
  • “Buy” buttons let your customers select and buy products all in one place.
  • It’s fully responsive, so your customers can buy on any device, including mobile.
  • Multiple product selection boosts the value of each transaction.
  • The auto-refreshing cart powered by AJAX reduces bounce rate by removing the need for page refreshes.

When you buy WooCommerce Product Table, there’s absolutely no risk in trying it for yourself, thanks to our full money back guarantee :)

Buy WooCommerce Product Table today and start increasing your conversion rate.

Buy Plugin

WooCommerce conversion rate optimisation

WooCommerce Table View

Hello! Yesterday, we introduced you to our bestselling plugin: WooCommerce Product Table.

This plugin helps increase the conversion rate of your WooCommerce store.

Today, we want to share more insight into overcoming the barriers affecting your conversion rate.

We'll show you how more than 3,500 e-commerce shop owners, just like you, have boosted their sales with WooCommerce Product Table.

Sell more products

John runs a WooCommerce store, and was struggling to increase the average order value of purchases. He added WooCommerce Product Table to his site, and has increased the average number of items per order by three times. Here’s what he has to say:

"Before I installed I was lucky to get orders with three items, now I AVERAGE ten products per order. Support is also really good too. I highly recommend this plugin." - John

WooCommerce Product Table helps you sell more products by letting you display as many products as you like in one easy to navigate table. This lets customers quickly sort to find the products they want – and helps you sell more, just as John did.

Increase conversions

Joe also runs a WooCommerce store, and was struggling to ensure his clients could sort through his products in order to find what they want. WooCommerce Product Table helps Joe’s clients quickly find what they’re after, increasing his conversion rate. Here’s what Joe has to say:

"I love how the products load fast to make it a smooth operation for my clients to find the products to add to their order. The display of the columns and the ability to filter the product categories is a great help." – Joe

You can enjoy the same boost to your conversion rate by adding WooCommerce Product Table to your site. Plus, it even works seamlessly on tablet and mobile :)

Outstanding customer support

If you need help, we’re here for you: we understand you’ll occasionally need help, and we’re on hand to promptly and efficiently get your issues fixed.

You shouldn’t just take our word for it. Here’s one of many gracious testimonials our current customers have left for us:

"Barn2 not only make fantastic plugins that just work very easily but the customer service is second to none. We will be using them for many future projects. There’s nothing better than a dependable product, well there is it’s dependable customer service — and they have that too." - Rob

We hope you’ll join our list of very happy customers, and be like Rob :)

More reviews and example websites

You can read dozens more reviews just like these on the WooCommerce Product Table reviews page. Read the full list of reviews, or search for reviews about your exact use case.

We've also published a plugin showcase, where you can see real-life examples of other WooCommerce stores who have improved their conversion rates.

Can we boost your conversion rate, and make your customers happier?

Now that you’ve heard how other WooCommerce store owners have benefited from our plugin, are you ready to join them?

WooCommerce Product Table comes with regular updates and personal support for 1 year. We think you’re going to love how quick and easy it is to setup and customize.

WooCommerce conversion rate course part 2

Hello! Yesterday, we told you about some of the factors affecting your WooCommerce conversion rate.

Today, as promised, we’re going to show you how to address these and increase your conversion rate.

Convert traffic into sales, quickly

On top of getting traffic to your site, it’s vital to remove any barriers which are getting in the way of users making a purchase.

To do this you’ll need to maximise the value proposition and present it in a way that appeals to your customers.

Your website’s usability is also a key factor – it needs to be intuitive, quick, and easy to navigate. Most store owners just use the default layouts that come with WooCommerce or your theme, but that may not be the best way to sell your products.

All this sounds like a lot of work – and that’s why we created a WordPress plugin to make this easy. We created WooCommerce Product Table for WooCommerce store owners just like you: it’s an easy way to display your products in a fully responsive, interactive grid on your website.

This allows your visitors to quickly get all the information they need to make a purchasing decision – and thus increases your conversion rate. I put together a list of ten ways the plugin does this in this post, which you can read for more detail :)

10 Tips: Increase Your WooCommerce Conversion Rate with Product Tables

Essentially, the plugin removes the barriers which get in the way of users buying your products. If you’ve got a lot of data or comparison points for your products, this is the plugin for you.

Get WooCommerce Product Table and increase your conversion rate in minutes

WooCommerce variations dropdown plugin

You can see WooCommerce Product Table on your website. Or, if you’d prefer: play around with the live demo here.

WooCommerce conversion rate

Hello! This is is a 4-part online course about how to improve your WooCommerce conversion rate. We'll publish a new lesson every day until the course is complete. By the end, you'll have everything you need to get more sales from the same number of visitors.

And the good news? It's disarmingly easy.

What is WooCommerce conversion rate?

Every WooCommerce website owner will be familiar with conversion rate: the percentage of users who take a desired action on a website.

While every website is different, the single most important conversion for every WooCommerce store is always going to be sales.

There could be any number of other tasks you consider conversions, including signing up to a newsletter or requesting a quote. But the primary goal is a user adding items to their cart, and clicking that ‘Buy Now’ button.

What is a ‘good’ conversion rate?

How do you know if your conversion rate is “good”? How do you know how well your store is doing versus the rest of your industry? How do you know how much you can realistically increase your conversion rate?

Here are some figures to help give you a sense of where things lie:

In Q1 2017, the average conversion rate for ecommerce sites worldwide was 2.48%.

This should be the benchmark you compare against: you want at least 2.48% of all visitors to buy from your WooCommerce site.

There are, inevitably, some caveats to be aware of. This is because a huge quantity of variables affects your conversion rate:

  • Tablet users convert at a much lower average of 1.25%.
  • Desktop users convert at a higher 3.63%.
  • First time purchasers will only convert at 1.60%.
  • Return customers will convert at 5.83%!

You get the picture: 2.48% should be your benchmark average, but there’s a reasonable range to be had either side, from just over 1% all the way up to nearly 6%.

Barriers to buying

If you’re already working hard to get people onto your WooCommerce website, it’s disheartening when all that traffic doesn’t convert into the sales you’d hoped for.

After all, even a (very high) 6% conversion rate leaves 94% of visitors do not buy. That’s a huge deal, and a huge missed opportunity!

But, with so many factors influencing your conversion rate – how can you even start to improve it?

The key is to focus on the variables you can control. Do your customers have access to all the information they need, for example? Are they able to quickly make a purchasing decision?

By making the buying process as painless as possible, you have the opportunity to positively influence your conversion rate.

Your task to increase conversion rates

With this in mind, I have a small task for you to do: take a really good look at your website and jot down any obvious barriers getting in the way of your customers buying your products.

What would you need to add to, or remove from, your WooCommerce website to make it easier for users to buy more?

If the solution is starting to sound like far too much work: don’t worry. Tomorrow, I'm going to show you how to fix your conversion rate in minutes.

Collection of wines on a counter.

Building a successful online store requires designing it around your specific niche. If you want to run a wine or beer store, for instance, you need to optimize your WooCommerce site to showcase your drinks perfectly. This means finding the right tool to sell wine online with WordPress and WooCommerce.

Fortunately, the WooCommerce Product Table plugin offers the perfect solution. It adds the layouts you need to sell wine and other alcoholic drinks from a user-friendly one-page order form.

A GIF of a wines product table.

In this post, we’ll talk about why WooCommerce Product Table is a smart way to create your wine store. Then we’ll walk you through the process of setting up your shop and start selling wine online in minutes. This simple method works equally well for selling wine, beer or any other type of food or drink. Let’s jump in!

Why WooCommerce Product Table is the perfect way to sell wine online

If you want to improve the way you display products in your WooCommerce store, you can’t go wrong with WooCommerce Product Table. This handy plugin helps you add a table listing out your wines, and summarizing their key features in an easy-to-scan format. Customers can sort and filter the table to find what they need quickly, and even place orders without leaving the page:

WooCommerce Product Table is an ideal way to sell wine, beer or spirits online. Building a successful online wine store requires designing it around your niche.  the unique requirements of your niche. For example, you’ll be selling a lot of drinks that are quite similar, distinguished only by attributes such as brand, year, or region. This means you need to find a way to organize all your wines clearly, and make it easy for customers to choose their favorites and order.

Fortunately, WooCommerce Product Table simplifies this process dramatically, since you can:

  • Include search, sort, and filter functionality, which means customers can use the product table to quickly find the wine they want.
  • Display product attributes right in the table, so people can see important information about your wines at a glance.
  • Add images, helping each variety or brand of wine stand out. Wines sell best with small thumbnail images, and WooCommerce Product Table offers the perfect layout for this.
  • Enable customers to make their choices quickly, and check out right away using convenient add-to-cart buttons.
  • Encourage customers to buy multiple bottles of wine through bulk discounts and multi-select checkboxes.
  • And to make your list of wines even more effective, you can add WooCommerce quick view and show extra information in a product lightbox.

At this point, you’re probably wondering how much work it is to start selling wines online with WooCommerce and WooCommerce Product Table. Fortunately, it's easy to set up and you won't need to hire a developer. Let’s walk through the process of setting it up and using it to sell wine online.

How to sell wine online using the WooCommerce Product Table WordPress plugin (in 4 steps)

Before we get started, there are a few things you’ll want to take care of if you haven’t already:

  1. Set up a WordPress website for your wine shop.
  2. Install the WooCommerce plugin, and add each wine as individual products. All all the data that you wish to display about each wine product - for example, as product attributes. (Via Products → Attributes and then select them for each wine.)

At this point, your wines will appear in the default WooCommerce layout which is not suitable for selling wine online. The next step is to transform your store into a customer-friendly wine shop! Keep reading and I'll tell you exactly how to do this.

1. Add age confirmation features to your store

In a moment, you’ll start creating your product table. First, however, you’ll want to add a few age confirmation features to your site. Since you’ll be dealing with alcohol, you need to make sure you aren’t unintentionally selling to minors.

There are a few ways to ensure that your clientele is of legal age to purchase alcohol products from your WooCommerce store. Read through each option, and choose the one that best fits your needs:

  1. Hide your entire WooCoommerce wine store behind age verification First, you can require age verification before people are even allowed to enter the e-commerce areas of your site. The WooCommerce Private Store plugin is perfect for the task , letting you require that visitors enter their age before accessing the store pages. (Your other pages such as the homepage, blog and other standard pages remain available for everyone to view, which is important for your SEO/search engine optimization.)
  2. Keep your store public, and add an age verification popup If you'd rather not hide your store from public view, then you can add a WordPress age validation popup plugin such as Age Gate. This will ask customers to confirm their age before they enter the store.

For even more security, you can also add an age confirmation feature to your checkout page. Using a custom field, you can ask customers to enter their age when making a purchase. To do this, you’ll need WooCommerce’s Checkout Field Editor extension:

The Checkout Field Editor WooCommerce extension.

Now that your WooCommerce wine shop is properly protected, let’s talk about how to display your wine products.

2. Install the WooCommerce Product Table plugin

The first thing you’ll need to do is purchase the WooCommerce Product Table plugin, and then install and activate it.

3. Create a product table listing your wines

Create a product table by going to Products → Product Tables.

First, you’ll want to decide where to add the table of wines. The easiest option is to enable the order form view on your main shop pages, so that you don't have to create a page to insert the table manually. You can do this on the first page of the table builder:

Create page of table builder

Next, use the Columns page to choose what information about your wines to include in the product table:

WPT table builder columns

To sell wine online with WooCommerce, we’d suggest including (at the least) the product name, as well as a featured image, description, price, and add-to-cart option. You may also want to include a categories column to help organize your wines. If you used product attributes to add extra data about each wine, then it's a good idea to add each of these as a column.

When you've finished, view your main shop page. Your WooCommerce wine shop will look something like this:

A product table displaying attributes.

4. Add product filters to the WooCommerce  wine shop

In addition, your visitors will often want to quickly search through your product table for wines that meet specific criteria. You can make this easy by adding filters. The WooCommerce wine plugin comes with 2 types of filters which customers can use to refine the list of wines:

  1. Filter dropdown menus that will appear above the table and enable customers to refine the list by product category, tag, attribute, and so on.
  2. Filter widget which appear in the sidebar of the page where you're listing wines in a product table. These are added via the 'Widgets' page in the 'Appearance' section of the WordPress Dashboard.
  3. And for even more advanced filters, you can use WooCommerce Product Table with a compatible AJAX filter plugin.

You can add filter dropdowns via the 'Search & Sort' page of the table builder, or by editing a table at Products → Product Filters. If you view your list of wine products now, you’ll see the new dropdown filters:

A wines product table with drop-down filters.

Add filter widgets to the wine shop sidebar via Appearance → Widgets.

At this point, you have an informative and fully-functioning WooCommerce wine store up and running. Customers can use it to view all the wines and beers you offer, search for specific varieties, and make easy purchases. Of course, you can continue to tweak your product table as much as you like! For example:

  • Encourage customers to buy more by choosing the 'checkbox' add to cart button style. They can quickly tick multiple wines and add them all to their cart together.
  • Add a sidebar to your page and add the WooCommerce Cart widget. Customers can see the contents of their cart and edit it alongside the list of wines.
  • Speed up your product tables by enabling the lazy load and caching options.

Bonus feature #1 - Sell ongoing wine subscriptions

There’s one more feature you may want to add to your wine store – subscriptions. Many customers will enjoy getting the same wine bottles or boxes delivered at regular intervals. This is a smart way to get recurring revenue from your store, keep customers loyal, and increase your average customer lifetime value.

Doing this will require another WooCommerce extension, aptly named YITH WooCommerce Subscriptions:

The WooCommerce Subscriptions extension.

With this tool, you can create whatever subscriptions you like, and enable customers to set up recurring payments. Then, it will simply inform you whenever a new order needs to be shipped. It's a fantastic way to increase the revenue from your WooCommerce wine store.

Bonus feature #2 - Speed up your wine shop with WooCommerce quick view

When you're selling wine in WooCommerce, it's best to keep customers on the list of wines. People tend to buy multiple wines at once, so you don't want to take them to a separate page for each wine. After all, they might not find their way back to the wine list!

WooCommerce Product Table Quick View Magnifying GlassIf you want to show more information about each wine than will neatly fit in a product table, then quick view is the answer. The WooCommerce Quick View Pro plugin is designed to work on its own or with WooCommerce Product Table. It adds quick view links or buttons to the table.

There are lots of reasons why quick view can improve your WooCommerce wine shop:

  • Show extra information without taking customers to a separate page.
  • Choose what information to show in the quick view lightbox. For example, this might be multiple product images (e.g. a glass of wine, the bottle, and a wine crate), the short description, reviews, and add to cart buttons.
  • Select variations and quantities directly from the lightbox.

Bonus feature #3 - Use bulk discounts to sell more wine online

By default, WooCommerce has a set price for each product. Given the high delivery costs associated with selling wine online, customers like to stock up on wine and buy a few months' worth in a single order. Volume discounts are a great way to encourage them to buy more wine from you.

You can easily set this up using the WooCommerce Discount Manager plugin. This lets you automatically calculate volume discounts based on the quantity in the customer's cart. It can also display a table of quantity-based discounts on the product page, encouraging people to buy more.

Start selling wine with WooCommerce today 🍷

If you want to sell wine online, you’ll need to design your e-commerce wine store thoughtfully. What's more, you’ll want to find a way to show off your wines in the best light, and make ordering as simple as possible. The WooCommerce Product Table plugin enables you to do both of these things, and much more.

To set up a store where you can sell wine online, follow these five steps:

  1. Add your wines to WooCommerce as products.
  2. Add age confirmation features.
  3. Install the WooCommerce Product Table plugin.
  4. Create a wine shop order form.
  5. Enable customers to purchase subscriptions.

Do you have any questions about how to sell wine online using WooCommerce Product Table? Let us know in the comments section below!

WooCommerce is an incredibly powerful and flexible e-commerce platform. You can use it to create just about any type of online store and offer all kinds of online shopping experiences. You can even use it to create a WooCommerce mix and match products website.

WooCommerce mix and match products

Whether you’d like to start selling custom gift hampers, assorted donuts, and pastries, or bespoke food boxes, WooCommerce makes it incredibly easy to get started.

Paired with the right plugins, WooCommerce is the perfect solution for selling bespoke mix and match products and taking customized orders. After ensuring compatibility and setting everything up, your customers will have the ability to place personalized orders on your online store. They can view items in a user-friendly, catalog-like list, choose options and tick the items they’d like to add to their order and place their customized order. All from a one-page WooCommerce order form.

In this article, we’ll cover everything you need to know about WooCommerce mix and match products. You'll learn how to add products in WooCommerce, as well as how enabling customers to personalize their orders can benefit your online shop and how people are utilizing this feature. We’ll also step through a quick tutorial to help you create your own WooCommerce mix and match online store using the WooCommerce Product Table plugin.

Let’s get started!

Some examples of WooCommerce mix and match products

Mix and match products work by allowing customers to select individual products they’d like to purchase and add them to a gift hamper, product box, or bundle items. Let’s take a look at some of the most popular types of WooCommerce mix and match products that you can sell with WooCommerce.

Crate with various food jars.

Example #1: Pizza, sandwich, and salads

Customizable food items such as pizzas, sandwiches, and salads are often sold using a mix and match system. For instance, a WooCommerce-based restaurant that allows customers to place orders online usually allows customers to choose toppings and filings to put together their own meals. This is just one of many mix and match products examples, where WooCommerce can be utilized to offer personalized and customizable options to customers, such as selecting ingredients for their pizza, sandwich, or salad.

Your WooCommerce mix and match products offering may vary slightly depending on what you're selling. However, the core concept remains the same. Essentially, you allow your customers to build their own meals. For instance, if you were selling pizzas then you’d let customers choose their base, sauce, toppings, and dips. They mix and match the pizza options to create their own customized pizza - all using WordPress and WooCommerce.

Example #2: Gift hampers

Buying a hamper as a gift is always more special when you can select the individual items you’d like to add to it. Whether you’re selling face and body products, wines and candles, decadent chocolate, corporate gifts, or gourmet products, you can create a personal gift experience by letting customers mix and match their own selection of items.

Learning how to add products in WooCommerce opens up several avenues for offering WooCommerce mix and match products on your online store. Some companies, for instance, sell custom meat or vegetable deliveries to customers on a subscription basis. With WooCommerce, you can easily offer this option on your online store, in addition to selling custom meat or vegetable packages on a subscription basis and other mix and match products examples. Keep reading to learn how to do this and more.

How do customers mix and match products in WooCommerce?

Create WooCommerce mix and match products order forms to let customers build their own customized products or create-your-own combo offers. It will look something like this:

An example of a build-your-own-product page.

This is how the WooCommerce mix and match products system works:

  1. You have a page on your online store where you list all of the products (and variations or other options) that customers can choose from Generally, the products are divided into several categories, each listed separately on the mix and match page. The categories should be based on how the customer would actually put together their mix and match product order.
  2. The customer chooses items to create their own unique mix and match products Standalone items appear on individual rows of a table, whereas mutually exclusive items appear as dropdown lists within a single row of the table. The customer simply ticks a checkbox next to each item they’d like to add to their mix and match product.
  3. Once they’ve picked out all of the items they’d like to purchase, they click the Add Selected to Cart button This adds all the selected items to the WooCommerce shopping cart.
  4. The customer views their cart and can make changes to it, if necessary Once they’re happy with the order, they can proceed to the Woo checkout page and make a payment.
  5. As the store owner, you’ll receive an email with the order details You can then build the customer's mix and match product, add the products they selected to it, and ship it to them.

Which WordPress plugins will I need?

Under the hood, the mix and match products system uses WordPress to power your overall ecommerce website. It requires a free WooCommerce plugin to create products and manage the checkout process. You'll also need the WooCommerce Product Table plugin to list your inventory in a table layout on the mix and match product order form.

Next, I'll tell you how to set up your WooCommerce mix and match plugin. But first, let's look at a real-life case study of a website with this exact setup.

Case studies - How other WooCommerce websites sell mix and match products

Inspire Cosmetics - selling mix and match cosmetics

Inspire Cosmetics has created a multi-step process for ordering mix and match make-up and cosmetics.

They used the Beaver Builder WordPress page builder plugin to create a series of four connected pages in tabbed layout options. Each tab contains a separate list of WooCommerce mix and match products, created using the WooCommerce Product Table plugin.

This makes it quick and easy for customers to choose a container, select the contents and place their order in WooCommerce.

Barks & Squeaks - selling mix and match pet hampers

Build your own hamper website WooCommerce

Barks & Squeaks use WooCommerce and WooCommerce Product Table to sell mix and match gift hampers for pets.

They list the items from each category on a single page. The customer chooses their container options first, then scrolls down to mix and match the contents.

Now you've learned all about how a WooCommerce mix and match plugin works. Next, I'll tell you how to set it up on your own WordPress website! Keep reading and we'll get started straight away.

How to create a WooCommerce mix and match products website

Letting customers put together their own product bundles using a product configurator can help you increase sales and make the customer feel special.

This tutorial assumes you already have WooCommerce installed on your WP website. If not, check out the fantastic guide on how to create a WooCommerce online store. When you're ready, continue this tutorial to transform it into a WooCommerce mix and match product configurator.

Here's a video on how to set it all up. You can also read our detailed written instructions below.

Step 1: Create the mix and match product categories

First, figure out how you’d like to design the mix and match products' user flow. Decide which categories you’d like to divide the WooCommerce mix and match ordering system into.

For example, if you wanted to let customers build their own gift hampers, you might consider creating a category for the container, the contents, and wrapping and filling:

WooCommerce mix and match products categories

It’s a good idea to create a logical category structure that takes the customer on a journey and helps them put together their WooCommerce mix and match product in an intuitive and user-friendly way. In the above example, customers would order using a three-step process:

  1. Select a container.
  2. Choose the items they’d like to add to the container.
  3. Configure padding and wrapping options.

This way, your customers can mix and match their own bespoke gift hampers.

Once you’ve settled on which categories you’d like to create, head over to ProductsCategories and create as many as you need.

Step 2: Plan out products and add them to your online store

Next, we’ll add the individual items we want to sell to our WC online store. The items that customers can mix and match to build their product should be added as WooCommerce products.

Following our example, here are some of the WooCommerce products you might add under each mix and match category:

Container/Hamper

  • Hamper
  • Box

Contents

  • Candied Nuts
  • Luxury Biscuits
  • Decadent Chocolates
  • Red Wine Bottle
  • White Wine Bottle

Packaging

  • Gift Wrap
  • Ribbon
  • Straw Filling
Items added as products in WooCommerce.

First, jot down all of the products you’d like to sell. Categorize them under one of the categories you created in the previous step. Once that’s done, you need to decide whether you’d like to create each item on your list as an individual product or group it into variations.

To decide whether a particular product needs to have variations, consider whether the customer would have to make an either/or choice. In the example outlined above, the customer would have to pick either the hamper or the container. Whereas in the second stage, they’d simply be asked to select all of the items they’d like to mix and match.

Add products and/or variations based on these principles:

  • For 'or' choices where the customer can only choose one option, create a WooCommerce variable product. Add each option as a variation.
  • For 'and' choices where the customer can choose multiple options, create a standalone WooCommerce product for each item.

Tip: If you want to add multi-select options to individual products, keep reading to learn how.

Step 3: Add products to WooCommerce

Once you’ve planned out your products, add them to your WooCommerce store by following these steps:

  1. Navigate to Products → Add New from the admin panel.
  2. Enter the WooCommerce mix and match the product’s details such as product title, description, and featured images.
  3. Assign categories and tags.
  4. From the Product Data section, choose a product type based on the format you’ve decided:
    1. Simple Product. For standalone products that customers can add to their mix and match product bundles without variations, select the Simple Product.
    2. Variable Product. Select Variable Product for all mutually exclusive items that customers can personalize before adding to their shopping carts. Follow these instructions to add variable products.
  5. Click the Publish button.

Follow these steps to add all of your products to your online store.

Step 4: Create a mix and match products page

Now we're getting to the fun part! This is where your WooCommerce mix and match products configurator comes to life.

By now we’ve added all of the products to our WooCommerce store and categorized them. Next, we'll list everything in a mix and match products order form. By doing so, customers will be able to mix and match products and build custom gift packages.

4a. First, create your mix and match product tables

  1. Purchase the WooCommerce Product Table plugin and install it on your WordPress website.
  2. Head over to Products → Product Tables → Add New.
  3. Use the table builder to create your first table of WooCommerce mix and match products as follows:
    1. On page 1 of the table builder, choose the option to
      Create page of table builder
    2. Use the next page to choose which products to display in the order form. When creating a WooCommerce mix and match site, you'd normally create multiple tables, each listing specific products or items from a different category. That way, you can structure the order form into multiple sections.
      WooCommerce table builder select individual products
    3. Add all the columns of product data that you want to include in the mix and match order form.
      WPT table builder columns
  4. Change the 'Add to cart method' to 'Checkbox' and change the variations option to 'Dropdown'.
    Add to cart page of WooCommerce product table builder

Repeat the above steps to create a separate table for each group of mix and match products that you want to list separately. To save time, duplicate an existing table at Products → Tables and edit which products are included.

4b. Create the mix and match products page

  1. Next, go to Pages → Add New to create a new page where we’ll list the WooCommerce mix and match products. Add any text that will appear above the order form, such as instructions or information about the ordering process.
  2. Divide the page into sub-headings. Each sub-heading will be based on the categories you created in Step 1. Following our example, the sub-headings might be Step 1 - Choose a Container, Step 2 - Choose your Contents, and Step 3 - Choose the Finishing Touches.
  3. Finally, insert a 'Product Table' block under each heading and select the relevant product table which you created earlier. If you don't use the WordPress block editor then instead, you can get a shortcode for each table from Products → Product Tables.

That’s it! Now hit the Publish button and preview your page on the storefront. It should look something like this:

Mix and match products order form on the front-end

Bonus tip #1 - Add extra mix and match product options

Variation Dropdowns with Addons in Product Table
Product add-ons appear in the add to cart column of the mix and match product configurator.
So far, you've learned how to use variations to add a choice of options for each mix and match products. This is fine for most WooCommerce mix and match configurators. However, variations aren't suitable if customers need to be able to select more than one option at a time.

Fortunately, you can easily do this with the WooCommerce Product Options plugin. This fantastic WooCommerce extension makes it easy to add extra options to your mix and match products. For example, you can add multi-select checkboxes to each product. You can even add text fields where the customer can enter a personalized message.

Bonus tip #2 - Too many options? Add quick view lightboxes

WooCommerce customizable product quick view

Some WooCommerce mix and match products websites end up with a large number of variations or options for each product. For example, look at the Pizza Fiorentina product in the screenshot above. This product has 2 rows of product add-ons, which isn't a huge number of options - and it's already taking up a fair amount of vertical space. As a result, you can easily imagine what would happen if you tried to list several dozen options per product!

WooCommerce Product Table Quick View Magnifying Glass
The solution is to remove the add to cart column from your mix and match products table, and replace it with quick view buttons. You can do this by adding the WooCommerce Quick View Pro WordPress plugin.

Customers click on the quick view buttons to view more product information and purchase options in a lightbox window.

There are lots of benefits from using quick view to sell WooCommerce mix and match products:

  • You can choose what information to include in the lightbox. For example, you may wish to show the full gallery of product images. Or you may wish to hide the images and just show extra product data or add to cart options. Alternatively, you can have both! Either way, there's no limit to the number of variations and options that you can offer in the lightbox.
  • Customers remain on the product table at all times and don't have to visit a separate page to purchase each better. That's why quick view is better than using the single product page to sell mix and match products.
  • WooCommerce Quick View Pro also supports other methods of selling mix and match products such as grouped products, Composite products, and Product Bundles. List the products in a table, and customers can create custom product marketing bundles from within the quick view lightbox.

Bonus tip #3 - Sell mix and match product subscriptions

Most mix and match WooCommerce products configurators sell products on a one-off basis, with a single payment.

If you prefer, you can create mix and match product subscriptions. The instructions are the same as above, but you need to add the YITH WooCommerce Subscriptions plugin to take repeat payments.

WooCommerce Subscriptions make it easy to accept free trials and regular payments for each product. You can choose whether to offer a free trial and whether customers will be billed weekly, monthly, or whatever frequency you like.

Bonus tip #4 - Restrict how many mix and match items the customer will order

So far, you've learned how to sell mix and match products by setting a fixed regular price for each product or variation. The total order cost is the sum of all the products that the customer selects and adds to their cart.

Some WooCommerce mix and match websites prefer to set a fixed cost for the entire product box. If you do this, then you'll need to add a product price for the container itself and set the price of the contents products as $0.00. (You can easily hide the item pricing column of the tables listing the mixed and matched contents.)

If you do this, then you'll want to restrict the number of products that the customer can order. You can easily do this with the WooCommerce Quantity Manager plugin. Its plugin lets you create a minimum and maximum quantity rules. The rules prevent customers from ordering the wrong amount - essential for selling fixed price mix and match products in WooCommerce.

For example,  you might set a minimum and maximum quantity of 1 for the container itself. You would then add a maximum quantity or value for the 'contents' category. This controls how many items can be added to the container.

Bonus tip #5 - Sell mix and match packages with quantity-based discounts

Perhaps you want to sell WooCommerce mix and match products with a choice of packages, with discounts based on the number of products ordered. This is a good way to give discounts based on the number of photos purchased, without having to restrict the number of products that each person can buy.

To do this, use the WooCommerce Discount Manager plugin to dynamically change the price based on the number of products in the cart.

Next, you need to display the information in the frontend in a format that will encourage people to buy more:

  1. At the top of the page, add information about the different packages and prices.
  2. Underneath, use WooCommerce Product Table to list your mix and match products.

Customers can choose as many photos as they like and they will automatically be charged the correct price for their package.

Where to get the plugins

Letting customers mix and match products to create personalized orders and gift hampers is a great way to deliver an exceptional customer experience. And the best part is that it’s incredibly easy to do with the WooCommerceWooCommerce Product Table, and Quick View WordPress plugins.

Now you know how to create your own WooCommerce mix and match product order form. Hopefully, you’re in a good position to take things further.

Also, be sure to check out our step by step tutorial on how to use WooCommerce to sell ‘build your own’ products for inspiration and detailed instructions!

How do you use mix and match products in your WooCommerce store? We’d love to hear from you so let us know by commenting below!