Over 100,000 WordPress sites run the free Pods plugin. It's a fantastic way to create custom post types, custom fields, and taxonomies - everything you need to store extra data. Keep reading to discover an easy way to install Pods and list the data in a searchable, sortable table.
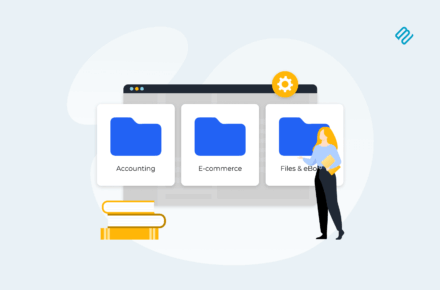
At Barn2, we love the WordPress Pods plugin because it makes it so easy to add extra content types to any WordPress website and has a list of premium addons. Instead of messing up your site by adding everything as pages and posts, you can create WordPress custom post types or CPT and create custom settings pages. Your new custom post types appear as separate sections on the left of the WordPress admin menu. They're perfect for storing articles, events, publications, members, directory listings, or something completely different. However, there is a problem.
While Pods is a wonderful and versatile plugin for creating custom post types, fields, and taxonomies in WordPress, it does have a limitation regarding displaying the custom data in the back end, which is great for storing and organizing information for internal use. However, it does not include any functionality to display the custom data on the front end, meaning that you will need to use additional tools or code to display the information on your website.
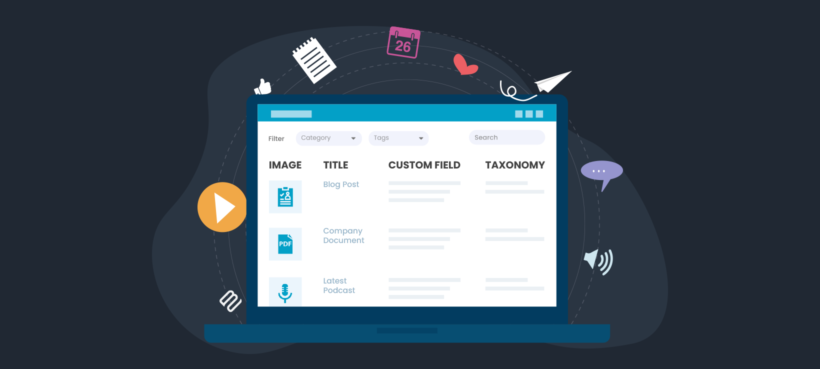
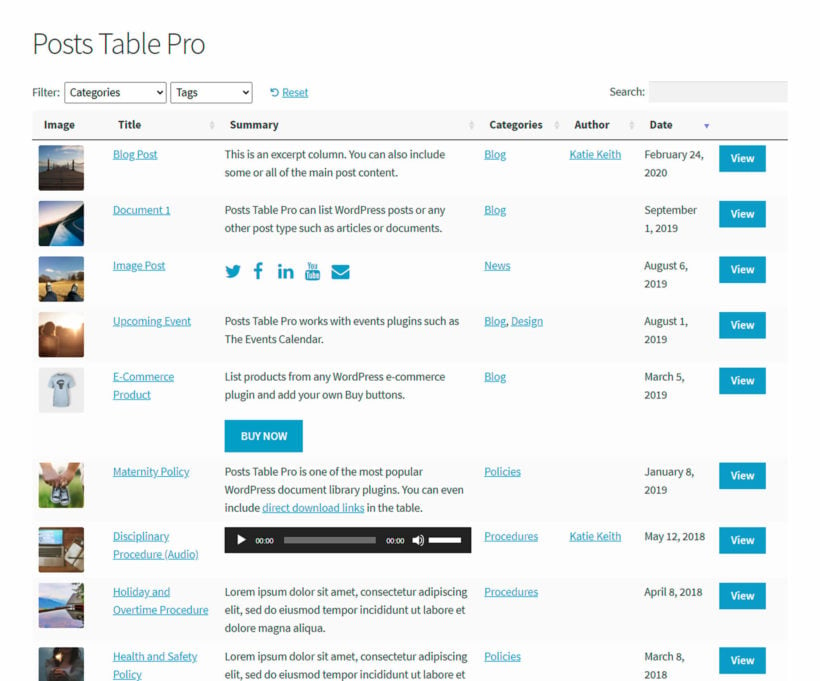
The solution is to use WordPress Pods plugins with the Posts Table Pro plugin. Posts Table Pro is a WordPress table plugin that displays your custom post types, fields, and taxonomies in a searchable, filterable table. It's the perfect way to show custom content.
Using Posts Table Pro to display custom data creating using Pods
This Pods WordPress plugin tutorial is the complete guide on how to use Pods to create WordPress custom post types, custom fields, and taxonomies. I'll show you how to create each of these extra content types. You'll also learn how to display them on your website using Posts Table Pro.
Either read the whole article or click straight to the section you need. Alternatively, you can watch us create and display a custom post type in this video:
What are Pods?
Pods is a powerful and feature-rich plugin for WordPress. Whether you're looking to add custom post types, custom taxonomies, or custom fields that are meta boxes added to your posts to input additional information, this plugin provides you with all the tools you need to do so. Pods - Custom Content Types and Fields make it easy to create custom content types and fields, even for those without technical expertise, thanks to its user-friendly function.
One of the standout features of Pods is the level of support that it receives from a team of well-known WordPress.org experts. This ensures that the plugin is always up-to-date and in line with the latest development in WordPress.
I've obviously had my head in the sand for the last 4 years because according to the plugin changelog, Pods was released back in 2014 - and it has been updated every few months since then. For some reason, I only heard of it recently when customers started asking if our plugins work with Pods.
I did some investigation and discovered that lo and behold, Pods is a fantastic way for creating the extra data that people need to display using our WooCommerce and WordPress table plugins.
There are various other plugins for creating WordPress custom post types, fields, and taxonomies. These include:
Advanced Custom Fields - Excellent for creating custom fields. There's a free and a Pro version. If you just need to create custom fields, then ACF is ideal for WooCommerce. ACF is compatible with Elementor, Gutenberg, WooCommerce, and WPML Multilingual plugin. But if you want custom post types and/or taxonomies too, then Pods is a better all-round plugin.
Toolset - This plugin is well-supported and from On the Go Systems, the company behind WPML. You can use it to create custom post types, fields, and taxonomies. I recommend Pods in this article because it's just as good as Toolset and completely free, but Toolset is a valid option too.
Custom Post Type UI - A free plugin for creating WordPress custom post types and taxonomies. I've used this a lot and it's a good option, but use Pods if you need custom fields too.
If you're using Posts Table Pro to list custom post types on your WordPress site, then you can equally create the data using any of the above plugins. However, we like Pods because you can use it to create custom post types, fields, and taxonomies. That way, you just need one WordPress plugin (Pods) to create and store the data, and another (Posts Table Pro) to display it on the front end.
How to create a WordPress custom post type with Pods
First, I'll show you how to use Pods to create a WordPress custom post type. I'm assuming that you have already installed the free Pods WordPress plugin. If you haven't done that yet, do it now.
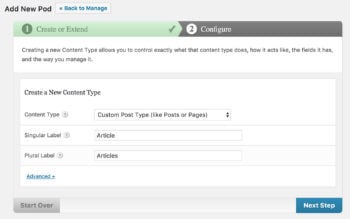
Navigate to Pods Admin → Add New → Create New.
On the 'Add New Pod' screen, choose 'Custom Post Type' from the 'Content Type (like Posts or Pages)' dropdown.
Add a Singular and Plural label. This is how your WordPress custom post type will appear in the admin. For example, if you're creating a 'Documents' custom post type for a WordPress document library, then the Singular Label would be 'Document' and the Plural 'Documents'.
Click 'Next Step'.
The next screen lets you add custom fields to your custom post type. We'll look at this in the next section. For now, click on the 'Advanced' tab and scroll down to the 'Supports' and 'Built-in Taxonomies' sections. Tick any extra fields that you want to be available for your custom post type.
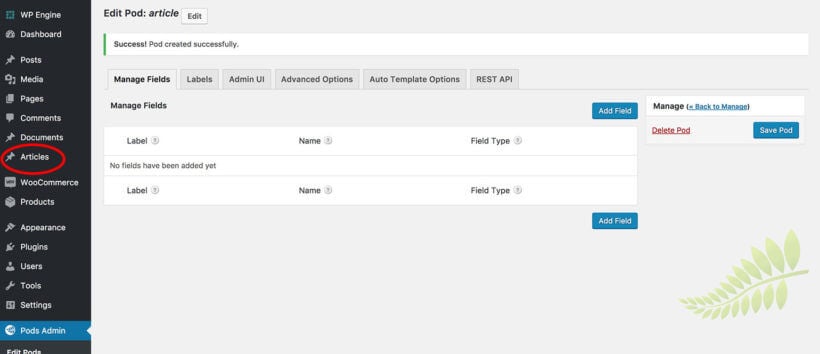
Click 'Save Pod' and you can start adding custom posts straight away!
Adding posts to your WordPress custom post type
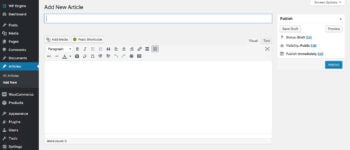
'Add New' custom post screen with default fields
If you look to the left of the WordPress admin, you'll see a new link with the Plural Name you just added. To add a post to the custom post type you just created, go to [custom post type Plural Name] > AddNew in the WordPress admin (e.g. Articles > Add New if your custom post type is called 'Articles').
The 'Add New' screen for your custom post type will look like my screenshot, plus any extra fields that you ticked in Step 5, above. Add all the data for your custom post and click 'Publish'.
Keep reading to learn how to create custom fields and taxonomies for storing extra data in WordPress. Or if you want to get started with displaying your custom post types on your website without any extra fields, skip ahead now.
Creating WordPress custom fields with Pods
In this section, we'll explore how to use Pods to create custom fields for any post type in WordPress, including post types created with Pods, standard blog posts, pages, WooCommerce products, events, portfolios, and more.
Before diving into the process of creating custom fields with Pods, it's important to understand the various field types available. Pods offer a wide range of custom field types, including text, date, file uploads, checkboxes, and more. In this section, I'll provide a comprehensive list of all the custom field types you can create with Pods, to help you make informed decisions about which fields to use for your specific needs.
Pods custom field types
Posts Table Pro lets you display these Pods custom field types:
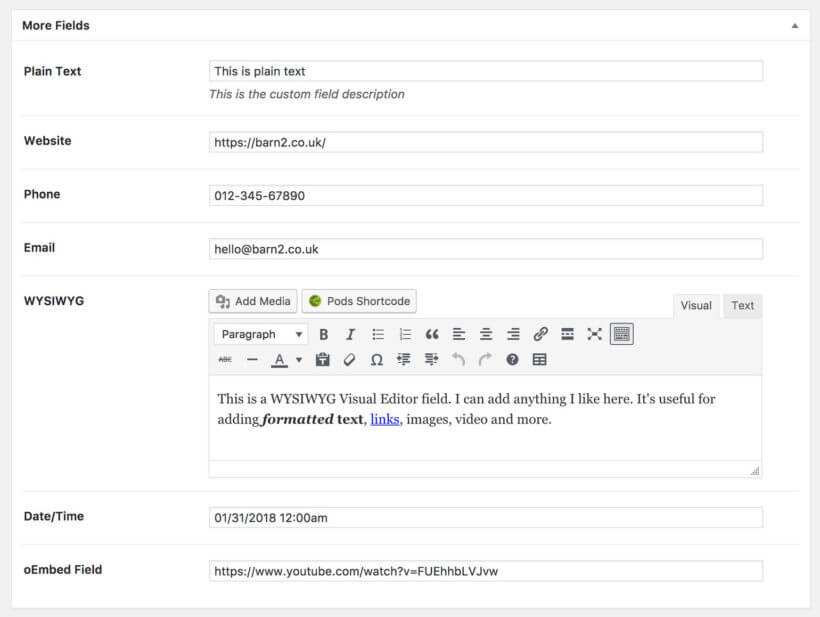
Plain Text - Unformatted text.
Website - A clickable link to any website or URL. Good for website links or downloads (e.g. in a WordPress document library).
Phone - Displays phone numbers. Use the 'Advanced' tab to select a format, and Pods will automatically add any dashes.
Email - A non-clickable email address. If you want to make it clickable, then I suggest adding it to a WYSIWYG field instead. That way, you can highlight the email address and add the link.
Plain Paragraph Text - Paragraphs of text with line breaks but no formatting.
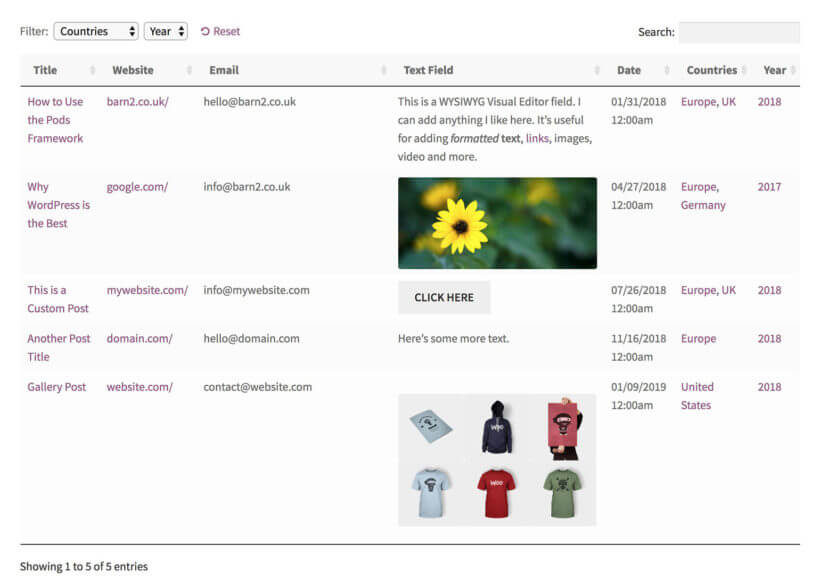
WYSIWYG (Visual Editor) - Probably the most useful field type, this adds a full WordPress visual editor to your custom field. You can add any type of content and format it using the WordPress toolbar. You can even add images, videos, audio files, galleries, etc.
Date/Time, Date & Time - These 3 fields display dates and/or times. Use the 'Additional Field Options' tab to choose the format. Pods will show a date/time picker when you add data to this custom field. It will then show it on your website in the correct format.
Plain Number - Use this to store any number with no special symbols or extra formatting.
Currency - This field lets you display a currency or price. Use the 'Additional Field Options' to choose the currency symbol etc.
oEmbed - Displays any of the oEmbeds supported by WordPress. For example, if you paste a YouTube video URL then WordPress will automatically display it as an embedded video player using Posts Table Pro. (Note: You can also insert oEmbeds into the WYSIWYG field type.)
I added data to various custom field types on a custom post
Posts Table Pro displays the same custom fields like this
Pods custom fields that work but are less relevant/useful
Color Picker - With this field type, Pods will display a color picker when you add a custom post. Posts Table Pro will then show the hexadecimal value of the color. Not sure why you'd ever want to do this, but it's there if you need it!
Yes/No - In theory this field does work with our plugins. However, if you select 'Yes' then it will just display as '1', which isn't very user-friendly! I'd recommend a different field type for displaying this sort of information.
Code - Useful for displaying shortcodes or source code on your website.
Custom field types that can't be displayed using our plugins
Password field - You can use this to add an encrypted password in the back end, but the password column will appear blank if you try to display it using Posts Table Pro. This is for security reasons.
File / Image / Video - If you need to add files, images, or videos, then you can easily add these to one of the other field types. For example, you can add images using the 'Add Media' button of a WYSIWYG Visual Editor field, add videos by pasting a YouTube link to a WYSIWYG Visual Editor field or use the oEmbed field type.
How to create WordPress custom fields
Alright, now that you're familiar with the various custom field types that are available to you, it's time for me to guide you through the process of creating custom fields. Whether you want to add custom fields to a post type created using Pods or an existing post type, such as blog posts, pages, WooCommerce products, events, and others, the instructions will vary. However, don't worry, I'll walk you through the process step-by-step to make sure you end up with the custom fields you want.
Adding custom fields to Pods custom post types
Go to Pods Admin > Edit Pods and click on the WordPress custom post type that you're creating custom fields for. This will take you to the 'Manage Fields' tab on the 'Edit Pod' screen.
Click 'Add Field' and enter the data for your custom field:
Label - This will appear above the custom field on the add/edit custom post screen.
Name - (Generated automatically when you add the Label.)
Description (Optional.)
Field Type - Choose a supported type of custom field from the list above.
Options - Choose whether this field is mandatory when you create and save a custom post, or whether you can leave it blank.
Click 'Save Field'.
Repeat steps 2 and 3 to create as many WordPress custom fields as you need.
Adding custom fields to other WordPress post types
To add extra fields to other post types such as posts, pages, products, or events, the instructions are the same as above. However, instead of Pods Admin > Edit Pods, you need to go to Pods Admin > Add New and click the 'Extend Existing' option. From there, you can add custom fields to any post type - not just those created in Pods.
Entering data for your Pods custom fields
As you move forward with creating or editing a post in your WordPress custom post type, you'll notice a section named 'More Fields' that displays all of your custom fields. This section is located just below the main content editor for the post.
Enter all the relevant information for your custom fields and proceed to publish or update the post. With Pods, you don't have to worry about formatting errors as it provides helpful warnings if you attempt to enter any information in an incorrect format.
Now that you know to add custom fields to your posts, I'll explain how you can create custom taxonomies using Pods. On the other hand, if you're eager to start showcasing the custom post types and fields directly on your website, feel free to move ahead.
How to create WordPress custom taxonomies
So far, you've learned how to create a custom post type using the Pods framework. You've also learned how to create custom fields for your custom post type. Next, I'll teach you how to create taxonomies for your post types.
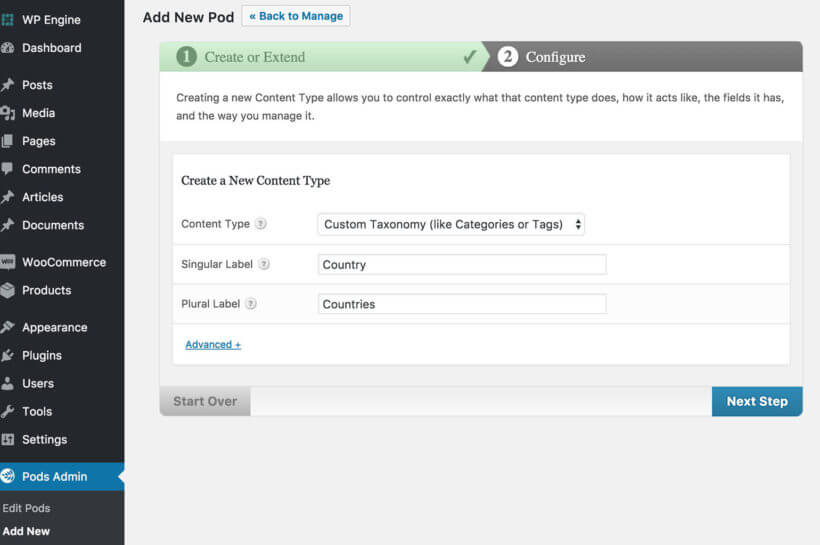
Go to Pods Admin > Add New and click the 'Create New' option.
On the 'Add New Pod' screen, select 'Custom Taxonomy (like Categories and Tags)' from the Content Type dropdown.
Add a Singular Label and a Plural Label. For example, if you need the custom taxonomy to store country data then the singular should be 'Country' and the plural should be 'Countries'.
Click 'Next Step'.
Most people reading this article won't bother adding fields to their taxonomies because (a) this is a niche case, and (b) they're not supported by our plugins. So go straight to the 'Advanced Options' tab and scroll down to 'Associated Post Types'. This is really important, as it's where you link WordPress taxonomy with the post type that you need to use it on. Choose a post type from the list. This could be normal WordPress pages or posts, or a custom post type.
Click 'Save Pod'.
How to add custom taxonomy terms in Pods
Now you've created a WordPress custom taxonomy for your post type, it's time to add data to it.
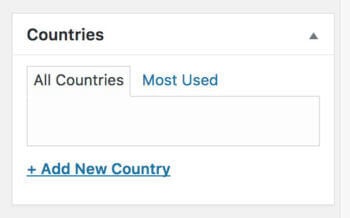
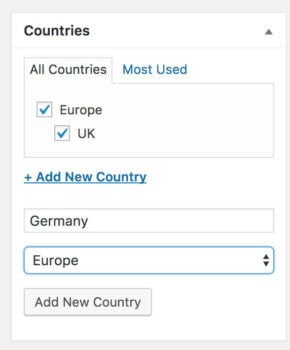
You can add categories and tags to your custom post type, allowing them to be displayed in multiple taxonomy archive pages and appearing on your home page or blog page. To do so, go to the "Add or Edit" page for the post type you want to apply the taxonomy to. Just like WordPress categories, you'll see the taxonomy option on the right side of the page.
At first, it will look something like this screenshot, as you haven't added any data yet. Click 'Add New Country' (or whatever you called your taxonomy) and add 1 or more terms. These will appear as checkboxes. You can make terms parents of each other to create hierarchical taxonomies in a nested structure:
Tip: You can also add, edit, delete and restructure your custom taxonomies centrally. Find the post type on the left of the WordPress admin, and hover over it to find the link for the taxonomy. This page will be just like the main 'Categories' page in WordPress, and you can use it to manage the taxonomy terms.
Displaying Pods content in the front end of your WordPress website
Pods is an excellent tool for creating custom post types, fields, and taxonomies that can store additional data in the backend of your WordPress website. However, displaying custom post types metadata on the front end can be challenging, especially for non-technical users who do not have the time or expertise to add custom code to their template files.
For those who want an easier solution, Posts Table Pro is a WordPress table plugin that can help display the Pods fields on the front end of your website without the need for complex coding. This plugin makes it easy for you to showcase the custom data stored in Pods in a dynamic and organized manner on your public-facing pages. So, whether you're a developer or a non-technical user, Posts Table Pro provides an accessible way to bring your Pods fields to life on your website.
What is Post Table Pro?
Posts Table Pro is a powerful WordPress plugin that provides an easy solution to display all types of WordPress content management system, including custom post types, custom fields, and custom taxonomies, in a table format. The Table is fully searchable and sortable, which makes it easier for visitors to find the information they're looking for.
Additionally, Post Table Pro offers a range of filter options, so you can choose to display only specific columns or items, making it a highly flexible solution for displaying data on your website. With it, you can create tables of custom post types and fields that are easy to navigate, making it the ideal choice for anyone who wants to display their Pods fields on the front end of their website.
You can also use the plugin to display WordPress custom post types, with each custom post appearing as a separate row in the table. It can also display custom fields as columns in the table. You can list custom taxonomies as columns in the table, and also as filter dropdowns above the table. With WordPress Pods, you can even create tables that list posts with a specific value for a custom field or a term for a custom taxonomy. You can then add custom taxonomy filters. Additionally, using the WordPress Pods get field value function, you can retrieve the value of a specific field for a post.
I'll show you how to do all this next.
How to list custom post types Plugin on a WordPress website
Set up Posts Table Pro using the instructions in the 'Getting Started' email.
Go to Pages > Add New and create a page that you'll use to list the custom post type.
Add the following shortcode: [posts_table post_type="your_post_type"]
Replace your_post_type with the label for the post type you want to display. If you created the post type using Pods then this will be the Singular Label you added earlier. If you added the Label as multiple words, then you need to add an underscore (not a hyphen) between each word, as I did in my example.
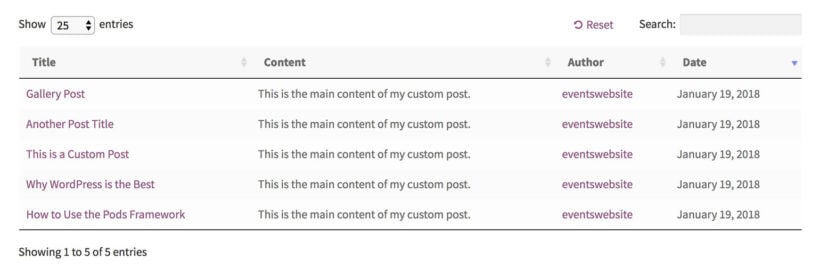
Now view your page, and you will see all the posts for that custom post type listed in a neat table layout.
At this point, your list of custom posts will look something like this:
You can use the Posts Table Pro knowledge base to show different columns, rename the columns, and much more.
How to list custom fields in the front end
Next, I'll show you how to list your Pods custom fields as separate columns in the table. Again, you'll need Posts Table Pro for this:
Create a table using Posts Table Pro, as per the instructions in the previous section. Extend your shortcode to something like this: [posts_table post_type="your_post_type" columns="title,cf:your_custom_field_1,cf:your_custom_field_2"]. Replace the blue text with the Singular Label of the custom fields you want to display. If the Singular Label consists of more than one word, then you need to add an underscore between each word. In my example shortcode, I have shown you how to add 2 custom field columns. You can add as many as you like - separated by commas, with cf: before each one.
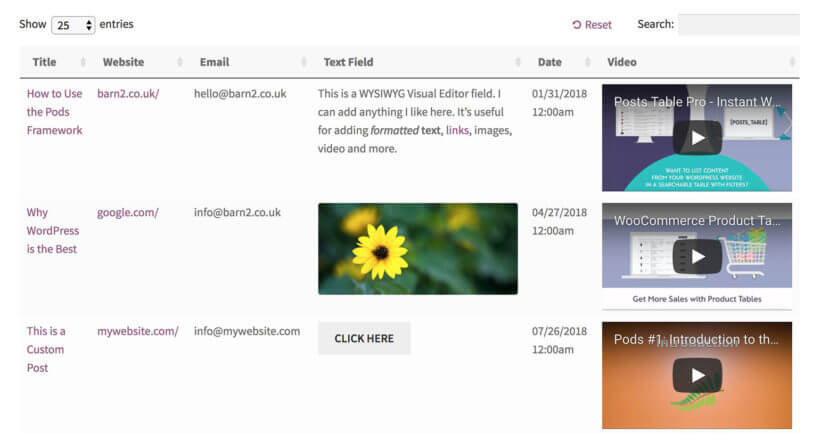
If you want to display formatted content (e.g. links, text formatting, HTML, shortcodes or video), then you should also add shortcodes="true" to the shortcode. For example: [posts_table post_type="your_post_type" columns="title,cf:your_custom_field_1,cf:your_custom_field_2" shortcodes="true"]
Now, your table will look something like this:
How to show custom taxonomies in the front end
By now, you've learned how to display WordPress custom fields in a table with extra columns for custom fields and other data. You should see new fields appear in the sidebar of your dashboard or the label you designated. Now, let's extend it by showing a custom taxonomy:
Use Posts Table Pro to create a table, as per the instructions in the previous two sections.
Extend your shortcode by adding tax: followed by the Pods custom taxonomy. For example: [posts_table post_type="your_post_type" columns="title,cf:your_custom_field_1,cf:your_custom_field_2,tax:country" shortcodes="true"]. This time, replace the text in green with the actual Singular Label (separated by underscores if it's multiple words) for your WordPress taxonomy. If you want to show multiple taxonomies, then just separate them with commas and make sure you add tax: before each one.
Save the page and view the table.
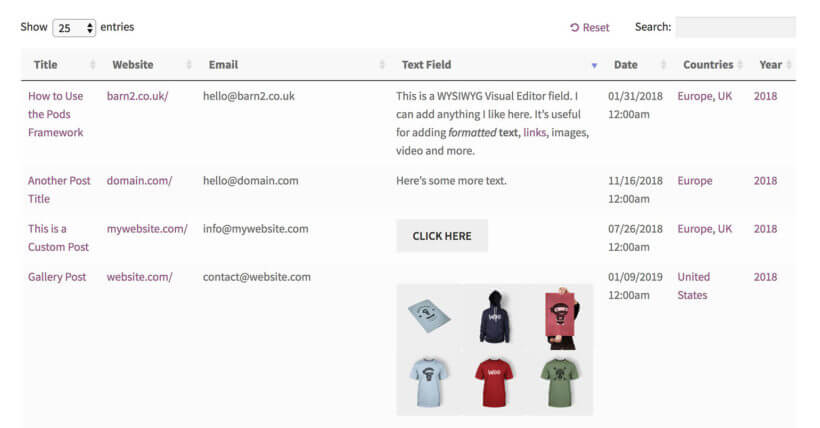
Your table will now contain the custom post title, custom fields, and custom taxonomies:
Nice!
People can click on any custom taxonomy in the table to filter by that term. Read on to discover how to add taxonomy filter dropdowns above the table too.
Now you know how to create WordPress custom post types, fields, and taxonomies, and to list them on your website. Let me show you how to create tables that display only those posts that have a specific custom field value or taxonomy. Additionally, I'll explain how to add custom taxonomy filters to help users easily find your posts. This can be done by using WordPress Pods get field value that provides access and display the custom fields and taxonomies of your posts. With this plugin, you can easily filter and sort posts based on their custom field value or taxonomy term.
How to list posts based on a custom field value
You can use Posts Table Pro to show posts with a specific custom field value. For example, if you have a custom field called 'Vegetarian' then you can create a table listing all posts with a custom field value of 'Yes'.
To do this, you need to add cf="<field name>:<field value>" to the posts table shortcode. To use my example with Posts Table Pro, this would be:
[posts_table cf="vegetarian:yes"]
How to list posts with a specific custom taxonomy term
It's also possible to use our plugins to show posts that are labelled with a specific custom taxonomy term. For example, if you have a custom taxonomy called 'Country' then you can create a table listing all posts with the term 'France'.
You can do this by adding term="<taxonomy_label>:<term slug or ID>" to the posts table shortcode. To use my example with Posts Table Pro, this would be:
[posts_table term="country:france"]
How to let your users filter by custom taxonomy
Finally, I'll tell you how to add custom taxonomy filters above the list of posts. The filter will appear as a dropdown list - 1 for each custom taxonomy. Users can refine the list of posts by clicking on the taxonomy terms in the dropdowns.
To do this, add filters="tax:<taxonomy_label" to your posts table shortcode. For example, this shortcode will list posts with filters for the country and year taxonomies:
[posts_table filters="tax:country,tax:year"]
How to password protect custom post types
Before we close, I'll quickly tell you how to hide your WordPress custom post types from public view. There are lots of reasons you might want to protect some or all of a custom post type. For example, you might be creating a private document library that only specific people can access. If you're a designer then you might need a private portfolio that is hidden from public visitors to your website.
There are 2 ways to do this:
Password protect categories within your custom post type
Create private custom post-type categories that are only visible to logged-in users based on their role
In conclusion, Pods is a top-notch plugin that offers a comprehensive solution for creating Pods - custom content types and fields, and taxonomies within the WordPress platform. You can also create custom content types and fields by writing code, but it requires a good understanding of the functions.php file and custom CSS codes. With its user-friendly interface, versatility, and support from a team of WordPress experts, Pods provides an efficient and effective way to enhance the functionality of your website.
Used alone, you need some technical know-how to display Pods custom fields on the front end of your WordPress website. However, that's not a problem because you can use Posts Table Pro to list your Pods data, without needing any technical expertise.
What do you think of Pods compared to other plugins for creating custom data in WordPress? Did you find this Pods WordPress plugin tutorial helpful? Please let me know in the comments.
WooCommerce comes with various fields for storing product data. There's the product name, long and short description, price, images, stock, weight, dimensions, etc. But what happens if you want to store and display extra product data, such as WooCommerce custom taxonomies?
In this article, I walk you through creating WooCommerce custom taxonomies for products. We'll look at the difference between WooCommerce custom fields and taxonomies. Also, we'll consider the different types of product data. You will also learn how to add custom taxonomies to store extra information about WooCommerce products.
At the end of this guide, you will have mastered how to:
Add WooCommerce custom taxonomies to your products. We'll use the free Easy Post Types and Fields plugin for this.
Display products with their taxonomies in a structured table layout on your website. We’ll do this with the easy-to-use WooCommerce Product Table plugin.
And remember, you can do all this without writing a single line of code!
Ready to start displaying products with custom fields & taxonomies? But before we dive in, let's quickly examine how to create and display a WooCommerce custom product taxonomy.
What is product taxonomy?
A product taxonomy is a means of structuring products into different groups and subgroups based on their features, attributes, and characteristics. It enables customers to find the products they want without wasting time. It also helps you as a seller organise your products, which makes it easier to manage your inventory, sales and marketing effort.
The categorization can be based on size, colour, style, materials, target market, price range, or anything else.
What is a WooCommerce custom taxonomy?
In WooCommerce, a custom taxonomy organizes and classifies products to show advanced custom fields beyond the standard product categories and tags. It allows you to group products based on specific product attributes using hierarchical or non-hierarchical groupings.
To create a custom taxonomy in WooCommerce programmatically, you might have to use a new set of labels. Besides, you'll have to register the taxonomy with the WordPress core and associate the taxonomy you wish to classify.
An easier option is to create a WooCommerce taxonomy using a WordPress plugin. You can use a plugin to create custom taxonomies such as brands, sizes, seasons, materials, and other relevant product data. Keep reading to discover the best WooCommerce taxonomy plugins for creating, displaying, and filtering taxonomies.
What are the benefits of using WooCommerce custom taxonomies?
Using WooCommerce custom taxonomies provides many benefits. These include better product organization, enhanced filtering, improved navigation, flexibility, and higher visibility. Integrating relevant keywords in your custom taxonomy terms enables more laser-focused product pages for better SEO.
What's the difference between WooCommerce custom fields and taxonomies?
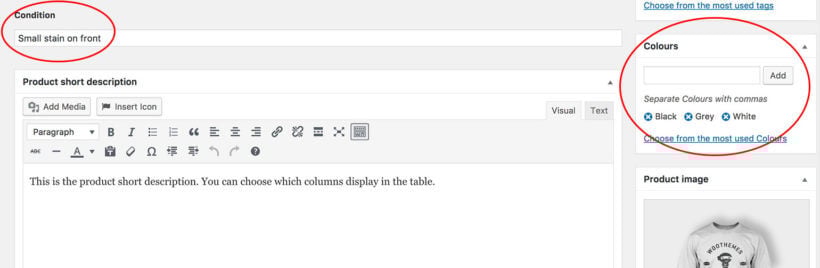
We usually use the phrases 'custom fields' and 'custom taxonomies' in relation to WooCommerce product data. However, many people don't know exactly what they are and their differences. WooCommerce custom fields are used to store arbitrary, one-off information about a product. On the other hand, custom taxonomy is used for grouping things together. This reflects in the way you add custom fields and custom taxonomies for products in the WordPress admin:
Custom fields appear in the main column of the Add/Edit Product screen. This is where you add other unique product data such as title, description, price, etc.
In contrast, custom taxonomies appear in the right-hand column under the product categories and tags. Each WooCommerce taxonomy term should be selected for multiple products like categories and tags.
When should I use custom fields & when should I use a WooCommerce taxonomy?
Once you understand the difference between a WooCommerce custom field and taxonomy, it becomes more obvious when to use each one.
As a rule of thumb, you can decide between custom fields and taxonomies by asking: "Is the data I am adding unique to each product, or does it apply to multiple products?" If the data is unique for each WooCommerce product, you need a custom field. However, if you want to select the same value for several products and use it to group them together (e.g., via a product filter), then you need a WooCommerce taxonomy.
Here are some examples to help you choose:
WooCommerce clothes store displaying the color of each product. If you're selling clothes in WooCommerce, you'll probably want customers to be able to find products by color. You'll have multiple products of each color. By creating a WooCommerce custom taxonomy called 'Colour', customers can filter the list of products to find the color they like. This wouldn't be possible with a custom field.
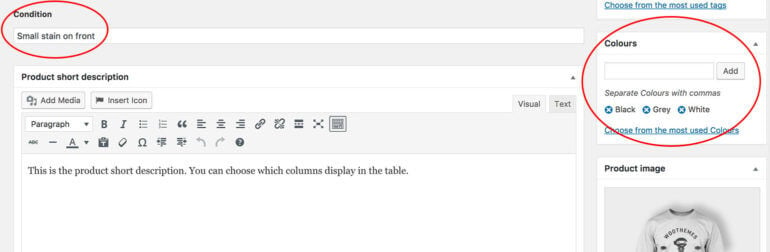
WooCommerce second-hand site storing 'condition' information about their used products. If you're selling used goods like eBay, you'll need a field to store details of any damage, etc. The description of each item's condition will be unique to that product, so you should create a WooCommerce custom field.
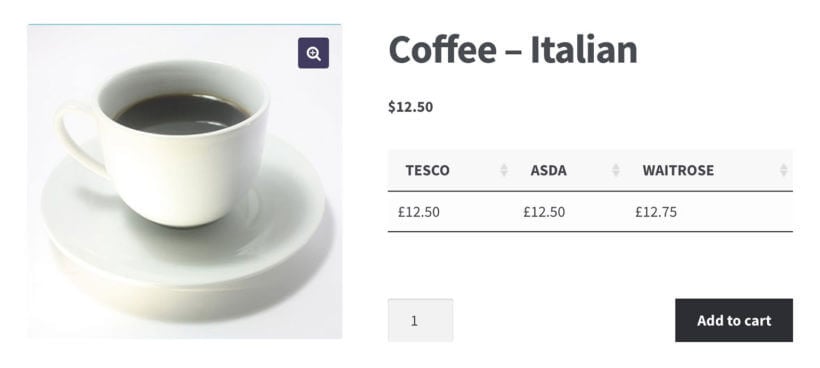
WooCommerce product directory with a large product database. WooCommerce directory-style websites with large numbers of products often list extra product data within the directory listings view. For example, a book directory might include data for author, publisher, and year.
Use custom fields and taxonomies together
To use the 2nd example above, a store selling used goods might want a WooCommerce taxonomy called 'Condition' AND a custom field called 'Condition Description'. The 'Condition' taxonomy would include the terms "New," "As New," and "Used," which apply to multiple products.
You could create product filters so customers can narrow their search based on the overall condition. The 'Condition Description' custom field would provide unique information about the exact condition of the product and any damage.
Easy Post Types and Fields is the best plugin for creating a custom taxonomy for WooCommerce products. It's 100% free and has everything you need to add extra taxonomies to your store.
WooCommerce products are custom post types in WordPress. That's why you need a plugin which lets you add taxonomies to a WordPress post type.
Other plugins like Advanced Custom Fields (ACF) let you create custom fields but not taxonomies. Easy Post Types and Fields lets you do both.
Next, I'll show you how to create WooCommerce custom taxonomies with the free Easy Post Types plugin. After that, you'll learn how to display them on the front end, and how to let customers filter by taxonomy.
Setup instructions
Here's how to use Easy Post Types as a WooCommerce custom taxonomy plugin:
Go to Plugins → Add New in the WordPress admin and search for 'Easy Post Types and Fields'.
Install and activate the plugin by Barn2. Skip through the setup wizard because you don't need to create a new post type.
Go to the 'Post Types' section on the left of the WordPress admin and click on the 'Existing Post Types' tab.
Find the 'Products' post type and click on the Taxonomies button for it.
Now set up your WooCommerce custom taxonomy:
Add the Taxonomy Slug (ideally 1 word, lowercase).
Add a plural and singular name (label). This will only appear in the WordPress admin.
Choose whether or not you want the custom taxonomy to be hierarchical. Hierarchical taxonomies are like product categories, where you can create multi-level nested structures with parent and child categories. Non-hierarchical taxonomies are like tags, which are flat and can't be structured.
Click to add the taxonomy to WooCommerce.
Now go to the Edit Product page, and you'll see the custom taxonomy on the right-hand side, under the categories and tags. Add one or more taxonomy terms for each product, just like standard product tags.
You'll also see a section for managing your new WooCommerce taxonomy under the 'Products' section of the WordPress admin. For example, if you created a taxonomy called 'Brand' then a 'Brands' link will appear there.
Displaying WooCommerce custom taxonomies on the front end
Editing the template files for your products' taxonomy archive pages is ideally the only way to display custom taxonomies for WooCommerce products. However, this involves a bit of coding knowledge.
But the good news is that there's a handy WordPress plugin to list products in a table and extra data, such as WooCommerce custom taxonomies. It's an ideal way to display products with extra information, as everything is presented in a structured tabular format. You can add product tables to any WordPress page, your main WooCommerce shop or product category pages, or even a single product page.
The WooCommerce Product Table WordPress plugin is one of the best for displaying custom taxonomies. This is because it supports all the usual WooCommerce product data, plus custom fields and custom taxonomies. Each item of product data is listed as a separate column in the table.
Customers can search or sort the table by any product custom taxonomy term. They can also filter by taxonomy via handy dropdown lists above the table. The WordPress plugin allows you to create WooCommerce tables with only products as a specific taxonomy term.
Comparatively, this is much easier than modifying your WooCommerce template files. Moreover, you get all the other benefits from product table layouts, such as improved conversion rates.
How to create product tables with WooCommerce custom taxonomies
Setting up a WooCommerce Product Table with all the extra product data is easy:
Get WooCommerce Product Table. Download the WordPress plugin using the link on the order confirmation page and email.
In the WordPress admin, go to Plugins → Add New. Upload the plugin files, and install and activate the plugin.
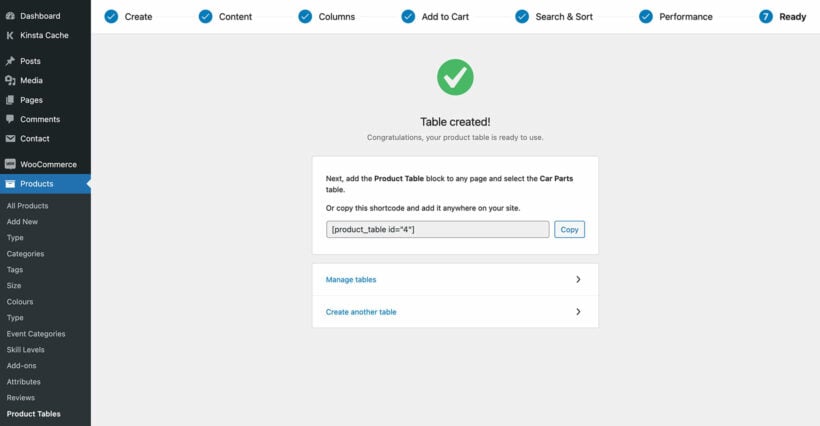
Navigate to Products → Product Tables and set up your first table.
Below, I'll tell you which settings to choose to display WooCommerce custom taxonomies in different ways.
Display custom taxonomies on the WooCommerce shop page or product category archive
The first page of the product table builder lets you choose which method you'll use to add the table. Select the "Display on a shop page (e.g. main storefront, category page, etc.)" option.
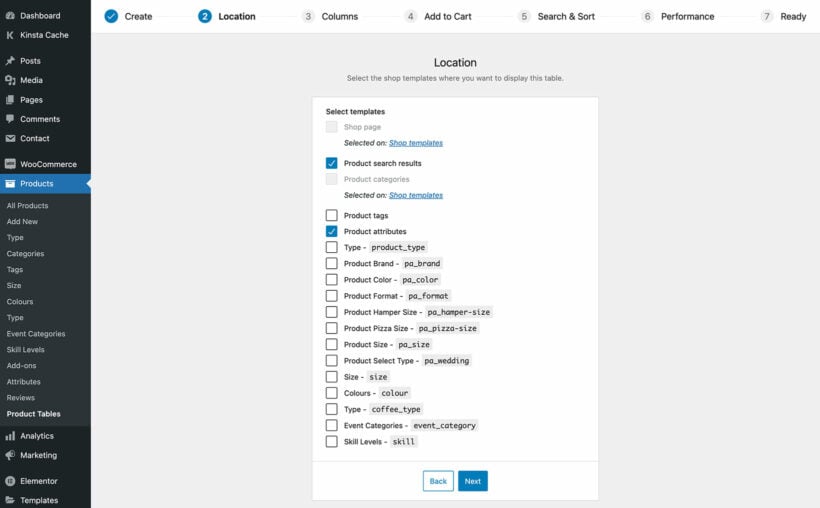
On the following page, choose which templates to display the custom taxonomies table on.
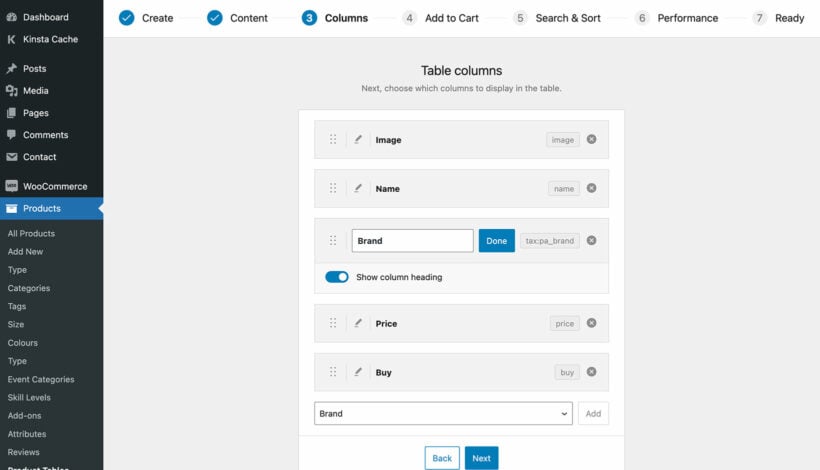
Use the 'Columns' page of the table builder to choose what product data to display. All the custom taxonomies for the 'Products' post type in your store will appear in the list of columns. Select as many as you need, and use the pencil icon to rename the column heading.
This will add the product table to your main shop page and whichever other template pages you selected. The list of products will include the WooCommerce custom taxonomies.
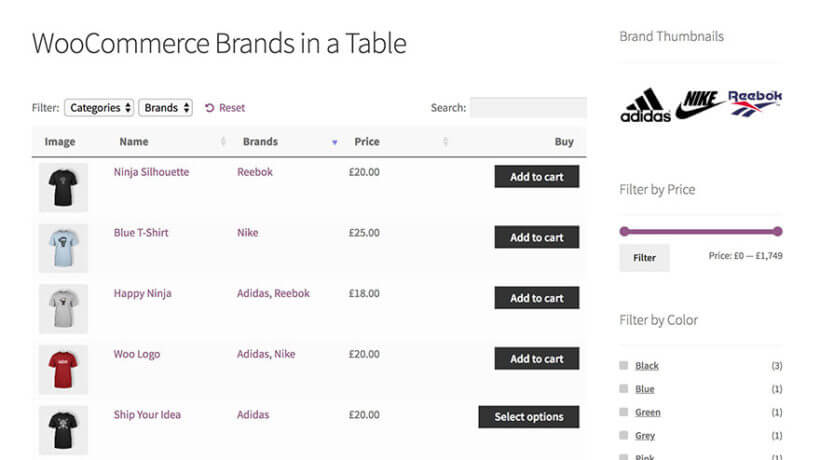
A product table on the WooCommerce shop page with a Brands custom taxonomy
How to list products with WooCommerce taxonomies on a standard page
Alternatively, you can add product tables to normal WordPress pages with custom taxonomy columns. This will look similar to the screenshot above, but won't affect your main shop pages.
The instructions for this are mostly the same as above. However, you should select "Add to a page using a block or shortcode" at the start of the table builder.
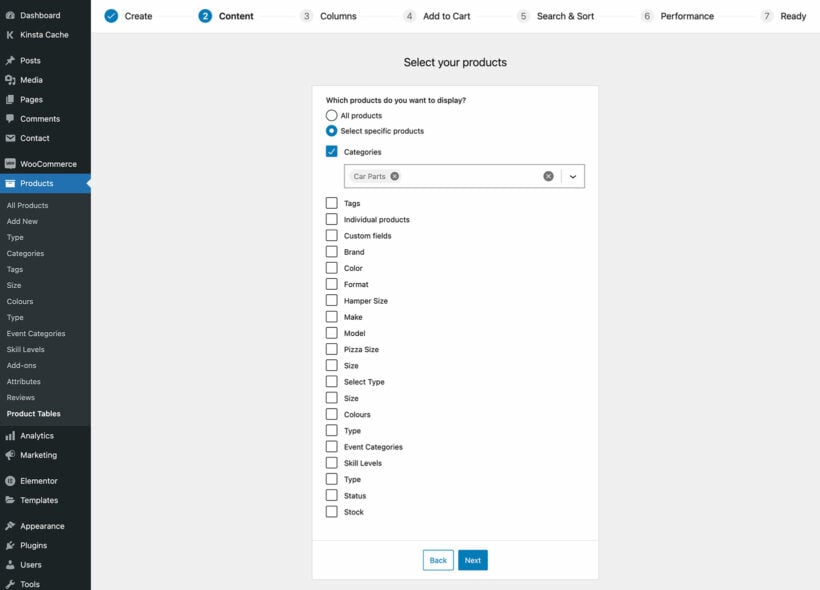
On the following page, either leave it set to "All products" or select which products you wish to list in the table.
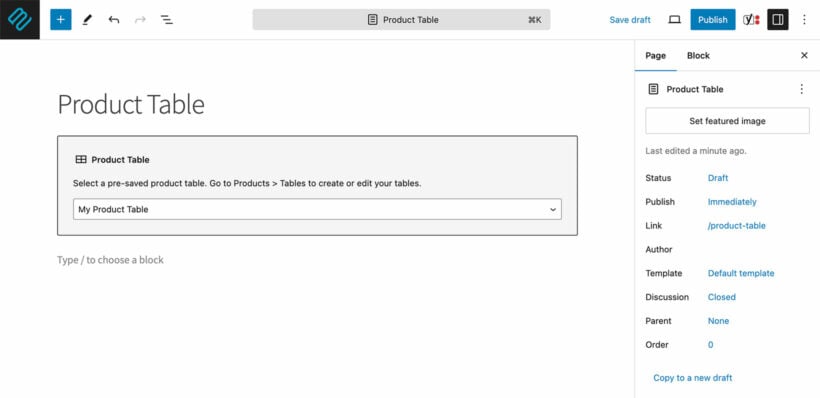
The final page of the table builder will provide a shortcode for adding the table to a page. Either insert this onto the page, or add a 'Product Table' Gutenberg block and select the table you just created.
The page will then display a product table complete with columns for the WooCommerce custom taxonomies.
How to show WooCommerce custom taxonomies on the single product page
You can also use the shortcode method described above to show custom taxonomies on the single product page. However, you need to do it a bit differently because we only want to show one product in each table.
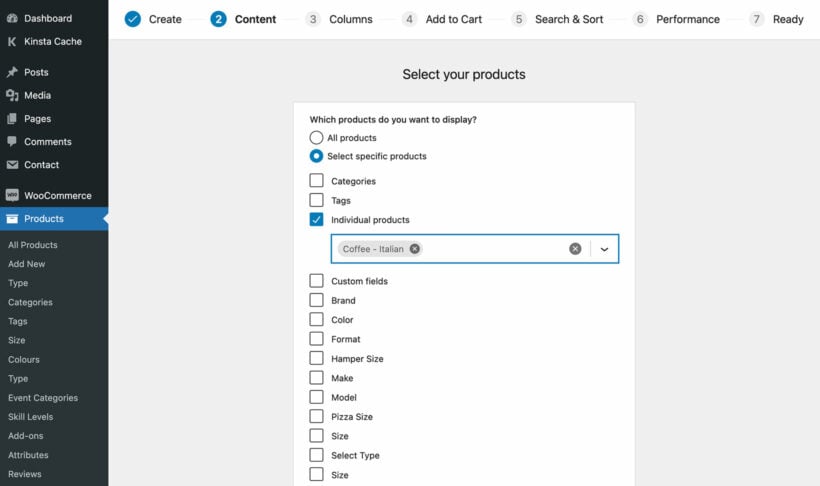
This time, use the 'Select products' page of the table builder to select which individual product you'll be displaying the WooCommerce custom taxonomies on.
On the 'Columns' page of the table builder, add custom taxonomy columns and don't bother with other columns like 'Name'. That's because this information is already present on the single product page.
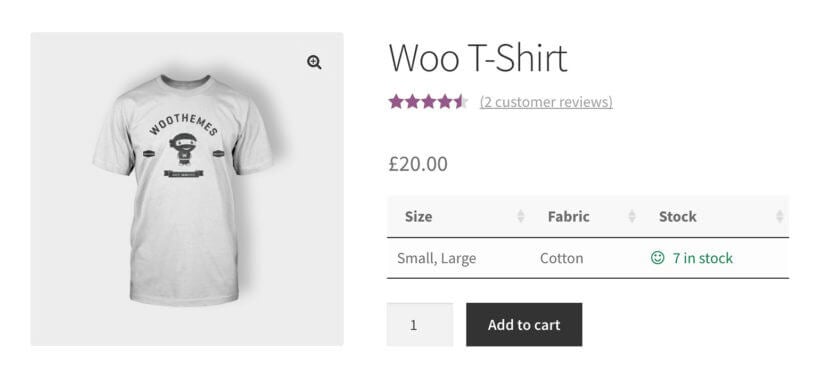
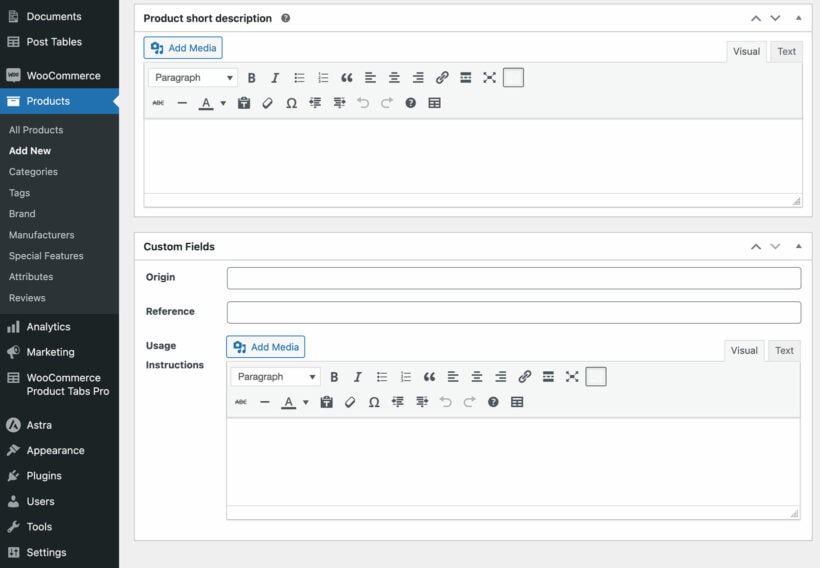
You can then paste the table's shortcode onto the single product page, for example in the short description field. This will display the WooCommerce custom taxonomies for the selected product. In this screenshot, there are columns for a custom field called 'size', a custom taxonomy called 'fabric', and a stock column. I have hidden elements such as the search box which aren't needed on the single product page (you can do this at Products → Product Tables → Settings).
List WooCommerce products with a specific custom taxonomy term
By default, your WooCommerce product tables will list all the products in a table. This is perfect if you plan to have a single table listing your entire WooCommerce inventory.
However, you can also create product tables listing products from a specific category, tag, custom field, or WooCommerce custom taxonomy term.
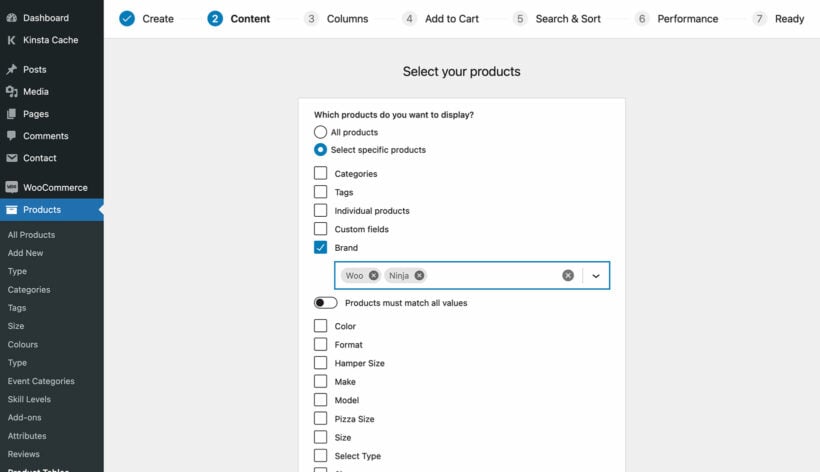
To do this, use the 'Select products' page of the table builder to select which taxonomy terms you want to display the products for. When you enable the 'Select specific products' option, the list will automatically include all the custom taxonomies for the 'Products' post type on your store. Select a taxonomy (e.g. Brand in the screenshot below) and then which term(s) you wish to display the products for ('Woo' or 'Ninja' in my example).
Let customers filter by WooCommerce taxonomy
So far, we've talked about how to display WooCommerce custom taxonomies on your website. In addition to this, your customers can benefit from being able to filter the list of products by taxonomy. Product filter by custom taxonomy allows customers to easily find whatever product they're looking for.
There are two ways to add taxonomy filters, depending on whether or not you're already using WooCommerce Product Table to display your taxonomies.
Use WooCommerce Product Table to add taxonomy filter dropdowns
WooCommerce Product Table comes with taxonomy filters which you can display as dropdown lists above the list of products. You can add a separate filter for each custom taxonomy (plus other data such as attributes, variations, categories and tags - instructions here). Customers choose a taxonomy term from the dropdown and use it to filter the list of products.
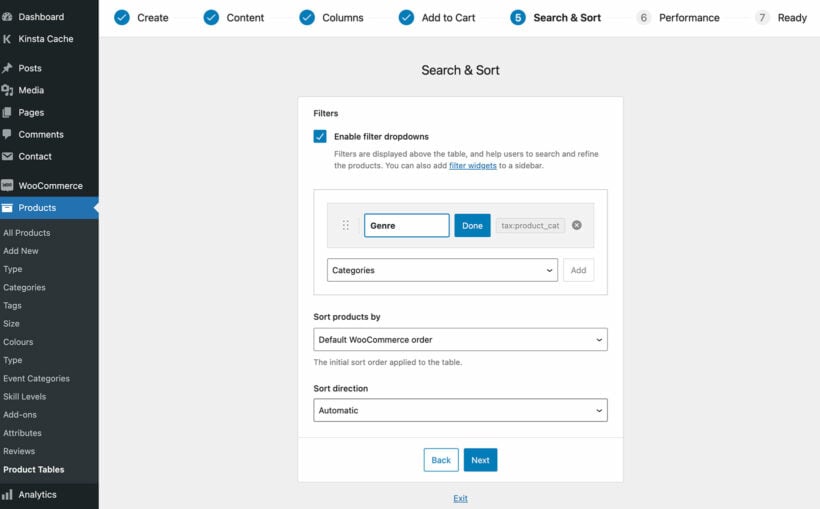
You can create WooCommerce product filter by custom taxonomy in the table builder. Your WooCommerce custom taxonomies will appear in the list of available filters. Add as many as you like.
This WooCommerce music store added a Genre custom taxonomy filter
Add advanced WooCommerce taxonomy filters with the Product Filter plugin
A WooCommerce shop with taxonomy filters for Gender, Color, Size, and Activity
For more advanced and flexible custom taxonomy filters, you can use the WooCommerce Product Filters plugin. This comes with many taxonomy filters, including checkboxes, radio buttons, clickable images, range sliders, and much more.
The WooCommerce Product Filters plugin offers a wide range of customization options for displaying taxonomy filters. You can choose from different styles such as checkboxes, dropdowns, images, image labels, or even color swatches. This means that you can create a taxonomy filter that matches your store's design and makes it easy for customers to find the products they are looking for.
For example, if you have a clothing store and want to allow customers to filter products by color, you could use color swatches as the taxonomy filter. This way, customers can easily click on the color swatch they want and see all the products available in that color.
Alternatively, if you have a store that sells products of different sizes, you could use a dropdown menu as the taxonomy filter. This would allow customers to select their preferred size and see all the products available in that size.
Add and edit custom taxonomies for products in bulk
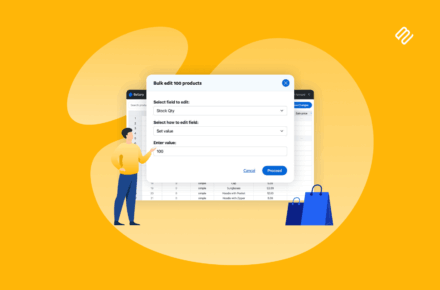
Finally, let's talk about what happens if you want to add lots of taxonomies to your products. It can be a pain to add and remove them from each taxonomy individually, but you can save time by using the Setary app.
Setary is a bulk product editor for WooCommerce. It lets you edit any type of product data, including - you guessed it - custom taxonomies. You can either do this from a spreadsheet-style interface, or by filtering to select certain products and bulk-applying the taxonomies to them. Either way, it's a huge time-saver if you need to add or remove taxonomies in bulk.
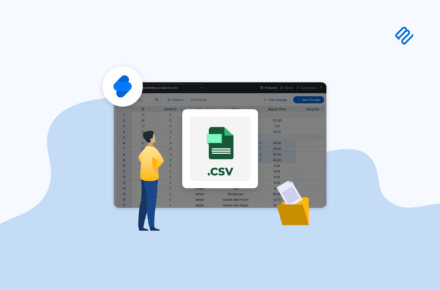
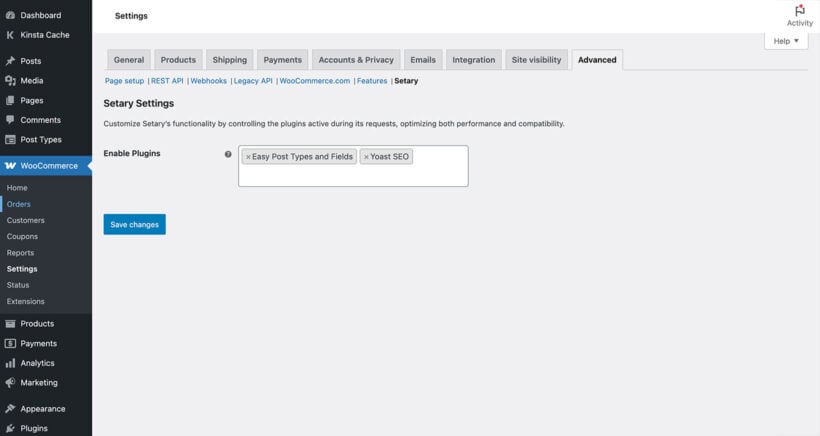
If you've used a separate plugin to add your taxonomies then you need to enable in Setary. To do this, go to WooCommerce → Settings → Advanced →Setary and select the plugin that you used to add the custom taxonomies to WooCommerce:
You can then select the taxonomies to include as columns in Setary's spreadsheet editor:
Take control over your WooCommerce product taxonomies
In this article, we have covered the best plugins for adding and displaying product taxonomies in your WooCommerce store:
The free Easy Post Types and Fields plugin makes it easy to add custom taxonomies to your WooCommerce products.
WooCommerce Product Table displays taxonomies on the front end of your website. You can do this on the single product page, your main shop pages, individual product pages, and list products by taxonomy.
The WooCommerce Product Filters plugin adds advanced filters so that customers can find products based on their taxonomy terms.
Setary App lets you add and remove custom taxonomies from WooCommerce products in bulk, saving hours of manual work.
Armed with these tools, you can add a wide range of custom data to your products and take your store to new levels of success. Mix and match the plugins to get the full benefits of WooCommerce custom taxonomies in your store. The possibilities are endless!
This is the complete guide on how to create and display WooCommerce custom fields. You'll learn how to show extra product data and sell extra product options on your website.
59% of shoppers are more likely to buy from a store that allows for product customization. WooCommerce comes with various types of data which you can add and display about your products. It also comes with a variable product type, with dropdown list fields to allow customers to select different options. But what if you want to create your own custom fields and display them in your ecommerce store?
Read on, or watch this video to find out!
In this tutorial, I'm going to reveal two easy ways to create WooCommerce custom fields and display them on the shop or product page:
Extra product option fields which allow customers to customize the product.
Custom fields for displaying extra data about the product.
Keep reading to learn more about each type of custom field in WooCommerce and how to set them up, step-by-step.
What are WooCommerce custom product fields?
When people talk about WooCommerce custom fields, they typically mean one of two things:
Selling extra product options, as an alternative (or enhancement) to variationsThis involves installing a WooCommerce custom product fields plugin which displays dropdown lists, checkboxes, radio buttons, text fields, etc. for the customer to complete before adding the product to their cart. You can either do this by displaying existing variations in more interesting ways, or by creating custom options using a plugin. Technically, extra product options aren't custom fields at all - they're better known as product add-ons! However, a lot of people refer to them as custom fields. They're perfect for adding a WooCommerce text field to the product page, and collecting other data and options from customers.
Adding extra information about the productThis is the classic use of custom fields. In WordPress, custom fields are used to add additional data to posts, pages, or products. You use these to store and display extra information on your website. For example, if you're already using all the built-in types of product data for other purposes then a WooCommerce custom field plugin can display additional text for you.
Continuing on, we will explore the steps involved in adding both types of custom fields to your WooCommerce products. You will also learn how to make the custom fields visible on the shop and product page.
By following the steps outlined in this guide, you will be able to effectively use custom fields in WooCommerce. This will enhance your store and improve the shopping experience for customers. Whether you're looking to add extra information about your products or offer additional options, WooCommerce custom fields are a powerful tool to help achieve your goals.
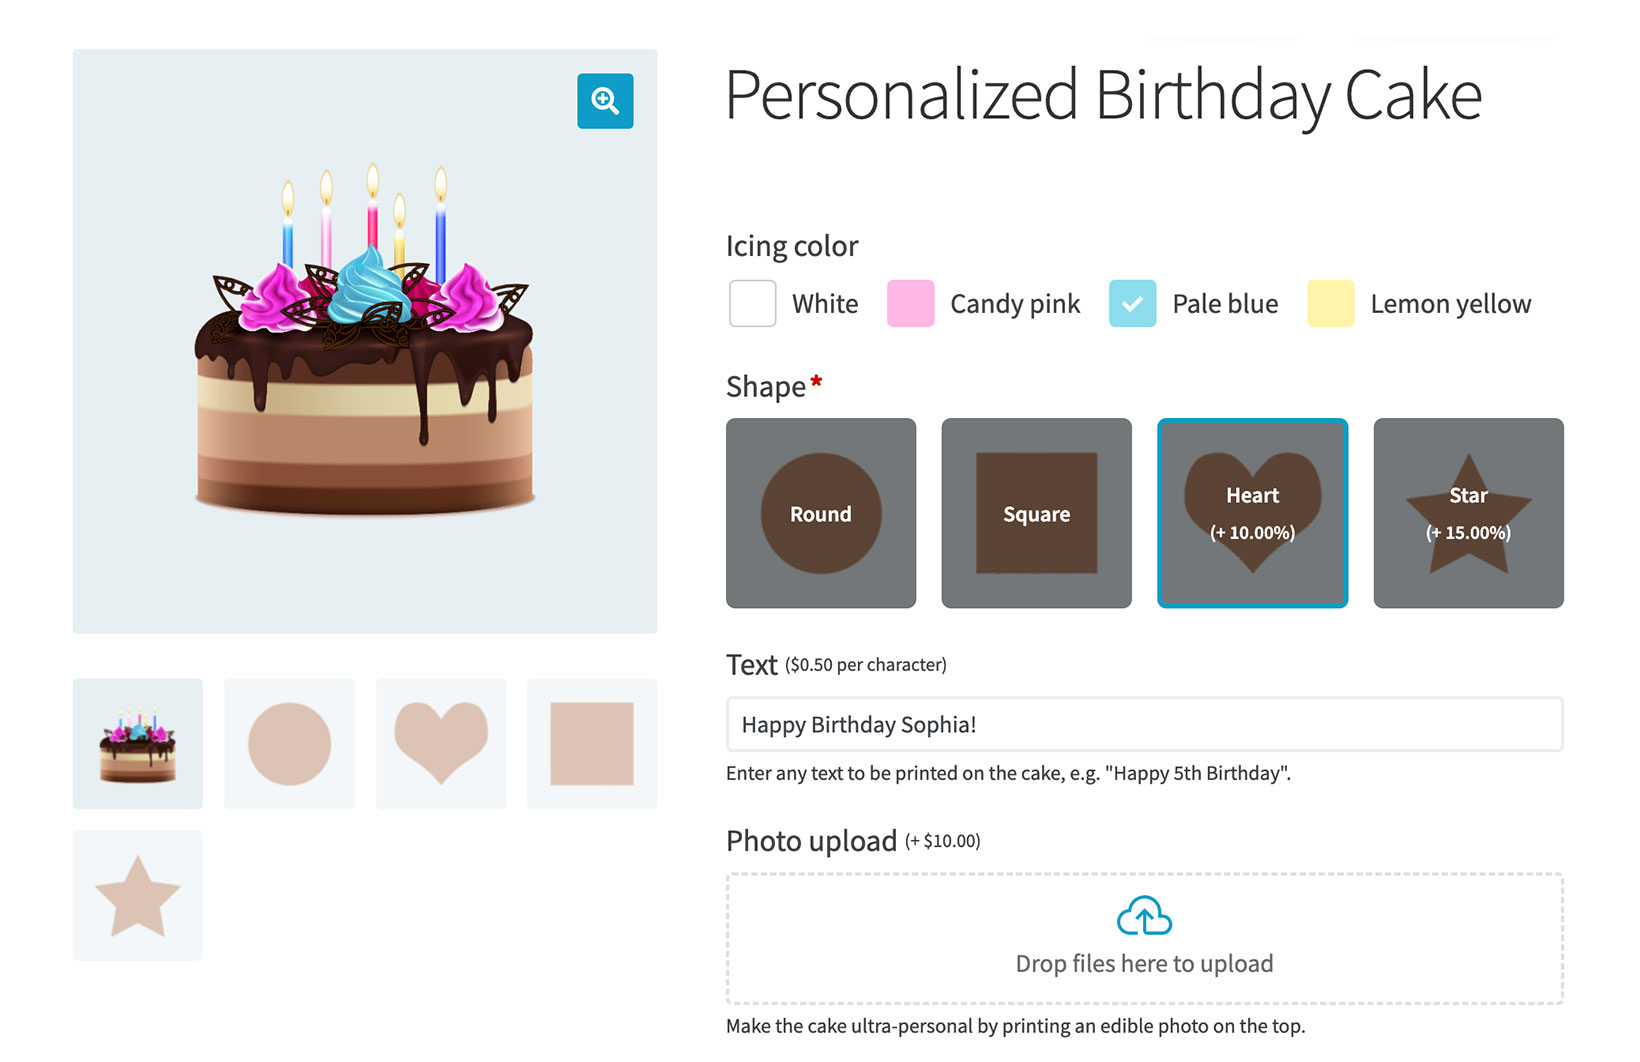
Using custom fields to provide options and collect information from customers
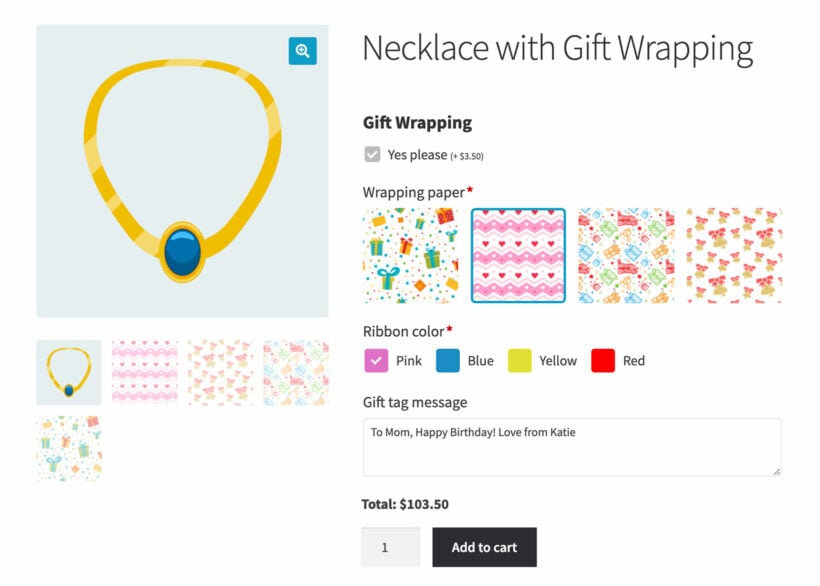
A product with various extra fields added, as an alternative to variations
First, we'll look at how to use custom fields in WooCommerce to show extra information about your products. This involves offering additional options to customers.
This type of custom field goes beyond merely displaying extra information about a product. It offers customers the option to select additional features before adding the product to their cart.
This method is a remarkable alternative or improvement to product variations. That's because it allows you to add a wide range of field types, including radio buttons, checkboxes, and text inputs - either as custom options, or by taking existing variations and displaying them in more interactive ways. By adding extra fields on the product short description page, customers can provide more choices and data that they can receive along with their orders. For example, adding a WooCommerce custom text field on the product page lets customers enter their own text to be submitted with their order.
Once the customer selects the custom fields from the product page, this is displayed as a custom order field in order notification emails etc. That way, the store owner knows which options the customer has chosen.
Radio button: A custom field which forces customers to select one option from a list.
Text: Let customers enter custom text, such as a personalized message or allergy information.
Text area: Collect entire paragraphs of information from the customer, suitable for longer messages.
File upload: Let customers upload files while placing the order. You can control details like the file types and maximum file size.
Number: Add a custom field to collect numeric information. This is useful for things like phone numbers, measurements or dimensions (especially when used with the price formula custom field type).
Color swatches: A more visual type of WooCommerce custom field, which lets customers choose from a choice of colors.
Dropdown: Let customers to choose an option from a dropdown list.
Customer-defined pricing: This custom field type provides a "Name your price" box where customers can enter an amount to be added to the product price.
Price formula: This is a more advanced WooCommerce custom field type. Use it to create a WooCommerce price calculator with a custom formula to calculate the price based on the information that the customer submits. This type of custom field is popular for creating a measurement price calculator for products priced by size, weight or area.
Date: Add a date custom field to the WooCommerce product page.
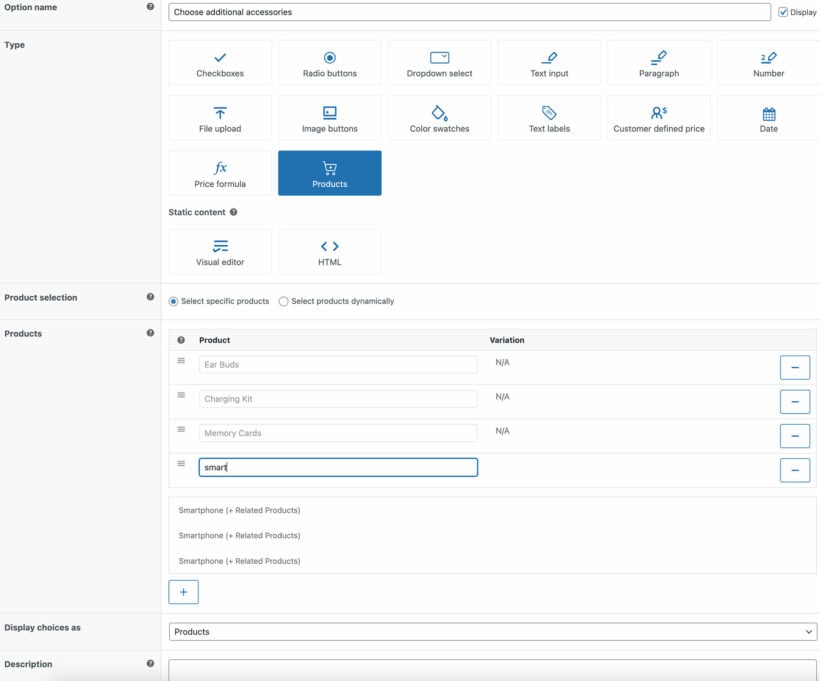
Products: This is less of a custom field than the other types. It displays selected products above the add to cart product and is a good tool for upselling additional products.
Visual editor: This is more like the classic definition of a custom field, which lets you display read-only data on the WooCommerce product page. Use this to enter static information such as headings or introductory sentences, instead of fields for the customer to fill in.
HTML: This custom field is like the visual editor field but more technical. You can use it to enter HTML that will appear as static information on the WooCommerce product page.
Introducing the Product Options plugin
There are several WooCommerce custom fields plugins available for adding extra product information to your store. However, when it comes to finding the best solution for letting customers select extra product options during checkout, we highly recommend WooCommerce Product Options. This plugin stands out as the best option for adding custom fields to your products and displaying them during the checkout process.
You can add a wide range of options that appear as custom fields for the customer to select. In fact, it supports all the custom field types listed above. Shoppers can complete these extra custom fields and add them to their cart from the following locations:
From a quick view lightbox, if you're using WooCommerce Quick View Pro. (Customers can access the lightbox from the main shop page or product category pages, so it's a quick way to select add-on custom fields without having to visit a separate page for each product.)
1a. How to create custom fields on product pages
Now we get to the tutorial part of this article. First, I'll tell you how to add custom fields to your WooCommerce products. Afterwards, I'll discuss the options for displaying custom fields on product pages and other shop pages.
The plugin setup wizard will open when you activate the plugin. Use this to activate your license key.
Next, go to Products → Product Options.
Click 'Add New' to create a new group of product options. This will be your group of WooCommerce custom fields. Name it whatever you like.
Use the onscreen instructions to add as many custom fields as you like. For each one, scroll down to configure additional options for each custom field. For example, you can use the price options to increase or decrease the product page based on the custom fields selected. Some field types can only be created directly in the plugin, and others also let you select existing variations to display.
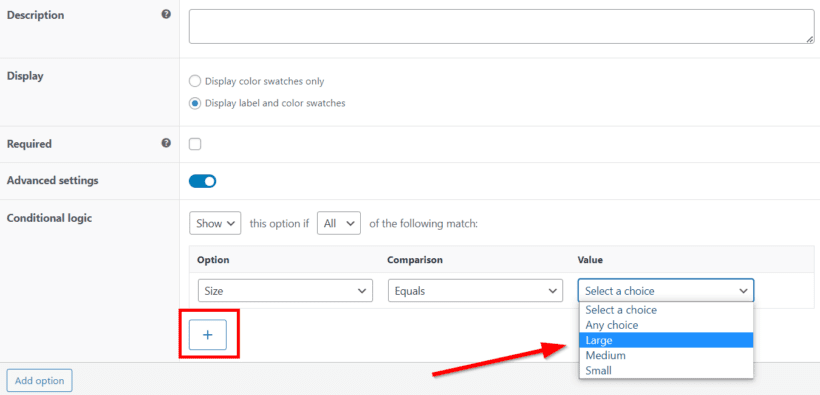
Use the 'Advanced' section to configure additional options. For example, you can add minimum and maximum quantities for some of the custom field types. You can also add conditional logic to your WooCommerce custom fields so that the fields appear conditionally based on the user's selections. This is good if - for example - you want customers to be able to tick a 'Customize this product' to reveal the hidden custom fields.
1b. How to set up custom fields on shop and category pages
As a front end plugin, WooCommerce Product Options seamlessly displays custom field data on the WooCommerce product page. Once you've added your custom product option fields and selected which products they will appear of, they will start appearing straight away.
However, this requires the customer to visit a separate page for each product they want to fill in custom fields for. That might work for your use case, or you might also like customers to be able to select custom fields on the shop page, category pages, and so on. There are 2 easy ways to do this. I'll tell you about these next.
Method 1 - Display WooCommerce custom fields on a shop page order form
You can use the WooCommerce Product Table plugin with WooCommerce Product Options to display the extra options on your main shop pages. This will replace your usual store layout with a structured product table view, complete with a 'Buy' column. The buy column contains all the purchase options for adding the product to the cart. This includes product variation dropdowns, product add-on custom fields, and a quantity picker.
Example of WooCommerce Product Table used with Product Options
Customers can quickly find the products they want, fill in all the custom fields, and add them to the cart - all from the shop and category pages. This is a good option if you want to add a custom field to a product category, which you can do by enabling the table view on category pages.
Use the plugin setup wizard to choose the main options for your product tables.
Select the option to display the product table layout on a shop page.
On the next screen, select which WooCommerce shop pages you want to display the order form with custom fields on.
When you choose your table columns, make sure you include a 'Buy' column. The custom fields that you added using WooCommerce Product Options will appear here.
And that's it! Your shop pages will now show product tables complete with WooCommerce custom fields.
Display product option custom fields in a quick view lightbox
Maybe you want customers to be able to fill in the custom fields without visiting individual product pages, but you don't want to change or clutter up the shop page. That's fine.
The solution is to use the WooCommerce Quick View Pro plugin to add 'Quick View' buttons to your shop and category pages. Customers will use these to launch a product lightbox containing the WooCommerce custom field options for that product. That way, they can easily fill in the custom fields and add to the cart, without having to visit the product page.
Example of Product Options used to display the custom fields in a WooCommerce Quick View Pro lightbox
Use the setup wizard to choose what you want to include in the quick view lightbox. Make sure you include the add to cart button, as the WooCommerce custom field options are attached to this.
And that's it! This will add quick view buttons to your shop pages, linked to lightboxes containing your WooCommerce custom fields.
Using custom fields to store extra product data
So far, we've learned how to add custom fields to the WooCommerce product page which the customer interacts with. This involves things like adding some text, selecting options, and so on.
But that's not really the technical meaning of the term 'custom field' in WordPress! A WooCommerce custom field actually refers to something different: a custom meta field which is attached to the 'products' post type.
In part 2 of this tutorial, we're going to focus on custom fields in the technical sense of the word. This is all about displaying extra data on your WooCommerce products, rather than providing editable fields for customers to interact with.
WooCommerce comes with a range of standard fields for storing and displaying information about your products. This includes data such as the product title, price, categories, tags, attributes, tags, dimensions, stock information, and so on. Here, we're talking about how to add a static WooCommerce text field on the product page. That's why it's different from adding custom fields for your customers to fill in.
However, sometimes the built-in WooCommerce product data isn't enough. When that happens, you need to install a WooCommerce custom fields plugin and add some additional fields.
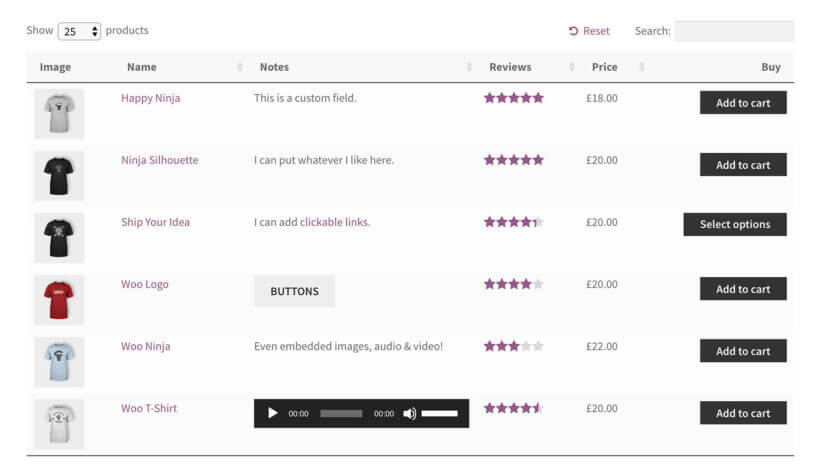
In this section, I'll show you how to use the best plugin to add custom fields to WooCommerce. I'll also show you how to display them on the front end of your shop and product pages like this:
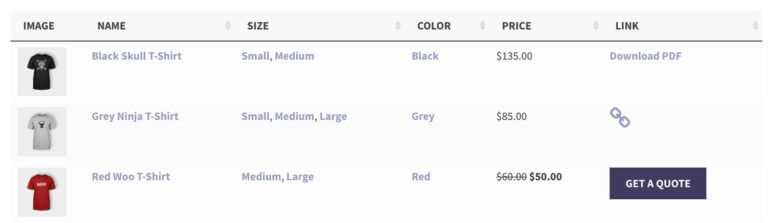
WooCommerce Product Table plugin displaying custom fields in the front end
But before we start, I'll explain the difference between custom fields and taxonomies to make sure that custom fields are actually what you need.
Custom fields or taxonomies?
Lots of people wonder "What is the difference between a custom field and a custom taxonomy"? It's a valid question because they're both ways of adding and displaying custom data about WooCommerce products. Understanding the differences between the two options is crucial in knowing which one best fits your specific requirements.
What are custom fields?
Custom fields, also known as post meta, are individual pieces of information that can be added to your products. They are flexible and be used to store a wide range of data, including text, images, and other media.
In short, custom fields add extra fields to the Add/Edit Product screen in WooCommerce. They're ideal for storing standalone data about products. Here are some examples of when you should use WooCommerce custom fields:
To store a unique product barcode, inventory, or reference number.
For adding extra ways for people to interact with your products. This might be by adding extra buttons (e.g. 'Enquire about this product), icons, or social sharing links.
To display multimedia content about the product, such as embedded video or audio tracks.
To store additional notes about the prices or alternate price options. For example, if you're using a bulk discount WooCommerce plugin and want to list the quantity-based discounts, then you can add this information to a custom field.
The idea of a custom field is that it stores unique information. Since the data stored in the field is unique, you can display it in the WooCommerce front end - e.g. on the product detail page, shop, or category pages. However, you wouldn't expect to use this data to group or filter products. If you want to filter by that type of data, then you need a custom taxonomy instead.
You can create WooCommerce custom fields using any custom fields plugin for WordPress. Once you've created the custom fields, it's easy to show them on your website using the WooCommerce Product Table plugin. Keep reading for full step-by-step instructions on how to do all this. First, I'll quickly tell you about WooCommerce custom taxonomies so that you can be sure you're choosing the most appropriate field type for your data.
What are custom taxonomies?
Like WooCommerce custom fields, taxonomies are a way to store and show extra product data. They are a way of grouping and organizing products into categories or tags. However, the difference is that they are designed to store reusable information which can be used to group and filter products. For example, you can create a dedicated archive page listing all products that share a specific custom taxonomy term. You can also use taxonomies to filter products using the WooCommerce Product Table plugin.
Custom taxonomies are very similar to WooCommerce product categories. In fact, WooCommerce categories are actually set up as a taxonomy under the hood. When you create a custom taxonomy in WooCommerce, it adds tick boxes/checkboxes to the right-hand side of the Add/Edit Product screen - just like categories.
Here are some examples of when you might use WooCommerce custom taxonomies:
A WooCommerce bookstore needs to store extra product data such as year of publication, author, and publisher. Since more than one book has the same year, author, or publisher, customers need to be able to sort and filter by this data. You can do this using WooCommerce custom taxonomies.
If your products relate to a specific geographical area, then you can use custom taxonomies to group products by area. For example, you could create a custom taxonomy called 'Area' and add a separate taxonomy term for each state or county. Customers can then filter by area, or view lists of products from a specific area only.
A WooCommerce clothes store can use custom taxonomies to store extra data such as brand names. Customers can then search and filter to find products with their favourite brands, as this field isn't built into WooCommerce as standard.
In summary
Custom field for 'Condition', custom taxonomy for 'Colours'.
When deciding between custom fields and taxonomies, it's important to consider the type of information you want to store and the way in which you want to organize your products. If you need to add unique or specific information to a product, custom fields may be the better choice. However, if you're looking to categorize and organize your products, taxonomies may be suitable.
Ok, now you know when to use custom fields. Next, I'll show you how to create advanced product fields for WooCommerce. It's surprisingly easy!
While many individuals opt to add custom fields programmatically, this tutorial is designed for non-developers. By reading on, you will learn how to add custom fields to your WooCommerce products without writing a single line of code. This makes it possible for you to display extra product fields wherever you desire, including on the product page, the shop page, and category pages.
Which custom field plugin?
In order to add custom fields to your WooCommerce products, you'll need to have a WooCommerce custom fields plugin installed. There are numerous high-quality and free plugins available for creating custom fields in WooCommerce, including Easy Post Types and Fields and Advanced Custom Fields (ACF). Each custom field plugin offers unique features and benefits, so you can choose the one that best fits your needs and preferences.
If you prefer, you can also opt for a dedicated WooCommerce custom fields plugin. These are specifically designed for adding custom fields to products in the WooCommerce platform. However, custom fields are essentially the same whatever WordPress post type you're adding them to. For that reason, there's no need to use a WooCommerce-specific plugin.
I'm going to show you how to create WooCommerce custom fields using Easy Post Types and Fields, and also Advanced Custom Fields. These are my two favorites.
However, the instructions are the same for most other custom field plugins for WordPress. If the custom fields don't show up on your site when you follow the later sections of this tutorial, make sure the plugin isn't adding extra characters to the start of the custom field name. (You might need to contact their plugin support to ask about this.) For example, Toolset automatically adds wpcf- to the start of the custom field name, so you need to know this.
Creating custom fields with Easy Custom Post Types & Fields
Easy Post Types and Fields is a free WooCommerce custom fields plugin. It makes it easy to add custom data fields to your WooCommerce products.
This plugin was designed to make it as quick and easy as possible to add custom fields. It comes with a choice of plain text and visual editor custom field types. Use it if you want a quick and straightforward way to add WooCommerce custom text fields to the product page.
How to add custom fields to WooCommerce products
Log into the WordPress dashboard and go to Plugins → AddNew.
Search for ‘Easy Post Types and Fields’, then install and activate the free plugin.
The setup wizard will open. Skip this and go to Post Types → Manage, then click on the 'Other Post Types' tab.
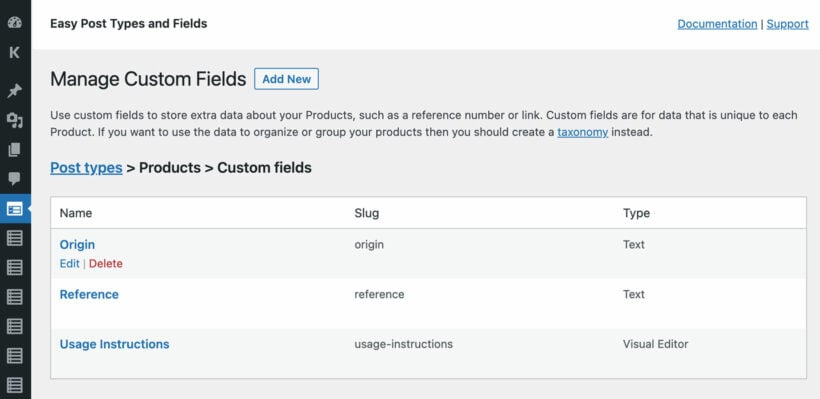
Find the 'Products' post type (this is added by WooCommerce) and click 'Custom Fields'.
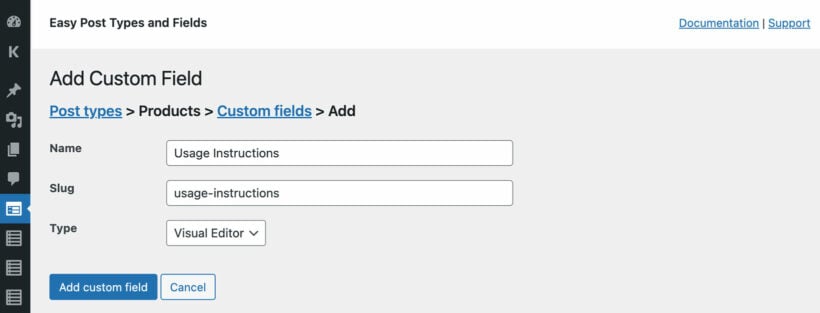
Click the button to add as many fields as you like to your WooCommerce products. Make a note of the name of each custom field - you'll need this to display it later in this tutorial.
Finally, edit your products. On the 'Edit Product' screen, you'll find the custom fields that you added in step 4. Fill in the data as needed.
How to create custom fields with the Advanced Custom Fields plugin
Advanced Custom Fields (ACF) is a popular WordPress custom fields plugin. Use it if you're willing to spend a bit more time on setup and want extra features such as additional field types:
Log into WordPress and find Plugins → Add New. Search for ‘Advanced Custom Fields’, then install and activate this free plugin.
Click ‘Custom Fields’ on the left-hand side of the WordPress dashboard.
Click the ‘Add New’ link by the ‘Field Group’ at the top of the page.
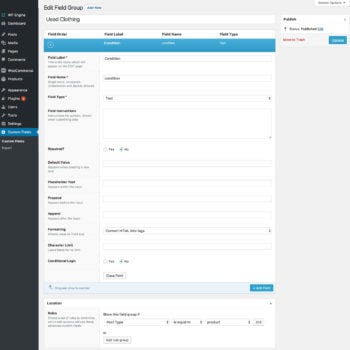
Next, you'll see the ‘Add New Field Group’ page:
First, add a name for the group of custom fields you're creating. (No one else will see this.)
Location – Choose Show this field group if Post Type is equal to Product. This tells Advanced Custom Fields to show the custom field on the Add/Edit WooCommerce product screen.
Press the blue ‘Add Field’ button. Now it's time to create the individual custom fields where you'll store the extra product data.
Add a Label for the custom field. This is how the custom field will be labeled on the Add/Edit Product screen.
Choose a Name for the custom field (this should be 1 word in lowercase). You'll need this to display the WooCommerce custom field on the front end of your website, later.
Choose a Field Type from the available types of a custom field. You can choose text, text area, numbers, checkbox, radio button, etc.
Complete any extra fields for the custom field such as adding a default placeholder value. Finally, click the blue ‘Publish’ button.
That's how to create WooCommerce fields. The next step is to add data to the custom field value for some or all of your products. To do this, go to the 'Edit' page for each product and you'll see the extra WooCommerce custom field(s) lower down the page. They'll be shown somewhere below the Product Data section. Edit the placeholder, enter values into the custom fields, and then save the product.
2b. How to display custom fields on shop pages
How to show custom fields on the shop page
A shop page product table with a custom field column
In the previous section, I showed you how to store new custom fields for your WooCommerce products in the back end. The next step is to display these fields on the front end of your WordPress website for customers to see. Of course if you're using custom fields simply as a way to store internal notes, then there's no need to display them. However, if you want to show your WooCommerce custom fields on your website, it's a simple process.
There are several ways to make custom fields visible on the front end of your website. This includes displaying custom fields on product pages, the shop page, and category pages.
The easiest way to show your extra product data is to install the WooCommerce Product Table plugin. This takes your products and lists them in a quick order form layout anywhere on your site. You can add product tables to any page you like. This might be normal pages, or your WooCommerce shop and category pages.
You can choose which columns to include in the product table. The great thing is that you can include WooCommerce custom fields in the table. This is more flexible than the default store layout, which just lists basic information such as the product name and price. It's a really easy way to display the extra product data that is stored in custom fields.
The product table builder will open. Activate your license key and choose the other settings for your first product table. For example, you can choose which products to include in the table. Alternatively, you can select which default shop pages you want to display the table with custom fields on.
In the Columns section, make sure you add your custom field columns. If you're using the Easy Post Types and Fields or Advanced Custom Fields plugins to create custom fields, then these fields will appear in the list of columns. For other custom field plugins, select 'Custom field' and enter the custom field name.
Now it's time to add product tables to a page. (You can skip this step if you selected the option to show product tables on your main shop pages.) To list products with custom fields anywhere, either use the shortcode from the final page of the table builder or insert a 'Product Table' Gutenberg block.
Next, view the page and see what it looks like! You will see a product table, complete with custom fields.
Make changes to how your custom fields are displayed
WooCommerce Product Table is a very flexible plugin. Choosing your columns is just one of over 50 options! Look at them all and configure your table to show whatever product data you need.
Have a play, and get your product tables and WooCommerce custom fields showing exactly as you need them.
How to display custom fields on the WooCommerce product page
So far, I've shown you several ways of displaying custom fields on WordPress pages, shop, or product category pages. It's also possible to show a WooCommerce text field on the product page (also known as the product detail page).
The WooCommerce product page is great, as it displays lots of product data such as product title, image gallery, short and long description, product category, product price, attributes and variations. However, there's no built-in way to add custom fields to custom product pages.
You can do this using the WooCommerce Product Table plugin that we looked at in the previous section. It can show custom field values anywhere on your site - including the WooCommerce product page. When used on the single product page, it looks like this:
A product table displaying custom field data on the WooCommerce product page
Setup tutorial
1. First, create the table of custom fields
Edit each product and add data to the custom fields as required.
When you activate it, a table builder will open guiding you through the main settings for your custom tables. You can also launch this later at Products → Product Tables.
On the 'Create a table' page, select the 'Add to a page using a block or shortcode' option.
On the 'Select your products' page, select the 'Individual products' checkbox and search for the product whose custom fields you want to display. (Don't worry if you want to show different custom fields on different products, as I'll show you how to do this in a minute.)
Select other options for the table, such as columns. If you're using the Easy Post Types and Fields or Advanced Custom Fields plugins for your custom fields, then these will appear in the list of columns. For other custom field plugins, choose 'Custom field' and add the custom field name.
Copy the shortcode from the final page of the table builder.
Now repeat Steps 3-8 for the other products that you want to display product custom fields on. You can quickly do this by duplicating an existing table and changing which product is selected.
Now go to Products → Product Tables → Settings. I recommend disabling elements such as the search box, product totals and reset button. That's because these are designed for listing large numbers of products in a table, and they're not relevant to displaying custom fields on the WooCommerce product page.
2. Next, add the table to the product page
Open the 'Edit Product' screen for the product where you want to add a table of custom fields.
Add a product table shortcode that you copied earlier to the Short Description field.
This is how it will look on the front end WooCommerce product page:
What if I don't want to show the custom fields for each product manually?
The instructions above tell you how to manually add a product table with custom fields for specific products. You can do this for as many products as you want to display custom fields.
If you want to show custom fields on all your WooCommerce product pages then you will need to do this globally by adding product tables to the single-product.php template. This is a bit technical and you can ask your developer to do this for you. If you don't have one then I recommend that you post a job on Codeable where one of their WordPress experts will send you a quote.
To get you started, we've provided an article with code snippets on how to automatically add product tables after the short description field on the single product page. The code snippet adds a table of the current product's variations, and you can change the [product_table] shortcode to add custom field columns, disable the variations option, and make any other changes you require.
Can I add custom fields to other sections of the WooCommerce product page?
Above, I showed you how to add custom fields to a table in the short description on the WooCommerce product page. This is a good option because most themes show the short description near the top of the page, under the product name and price.
If you'd rather show custom fields elsewhere on the single product page, that's absolutely fine. Simply add the product table shortcode to wherever you'd like to display the custom field values. For example, you could add it to the long product description instead.
What other extra data can I show on the WooCommerce product page?
Custom fields and taxonomies are just the tip of the iceberg. You can use WooCommerce Product Tables to show any type of product data in a table. This can include:
Product image, name, price
Short or long description
Categories and tags
Attributes and variations
Star rating from reviews
Embedded audio and video
This is a much more flexible way to show WooCommerce extra product data in the short description field. Customers can see all the relevant data from the neat table layout, instead of having to scroll down to the long description tabs.
Have a play with showing custom fields and other data on the WooCommerce product page. Think about what will best sell your products and maximize conversions. This is a great way to increase sales and make your e-commerce store an even bigger success.
Alternate method: Show a text custom field above the add to cart column
So far, you've learned how to add a table to the single product page, with each custom fields displayed in a column of the table. If that's not the layout you want, then I have an alternative suggestion for you.
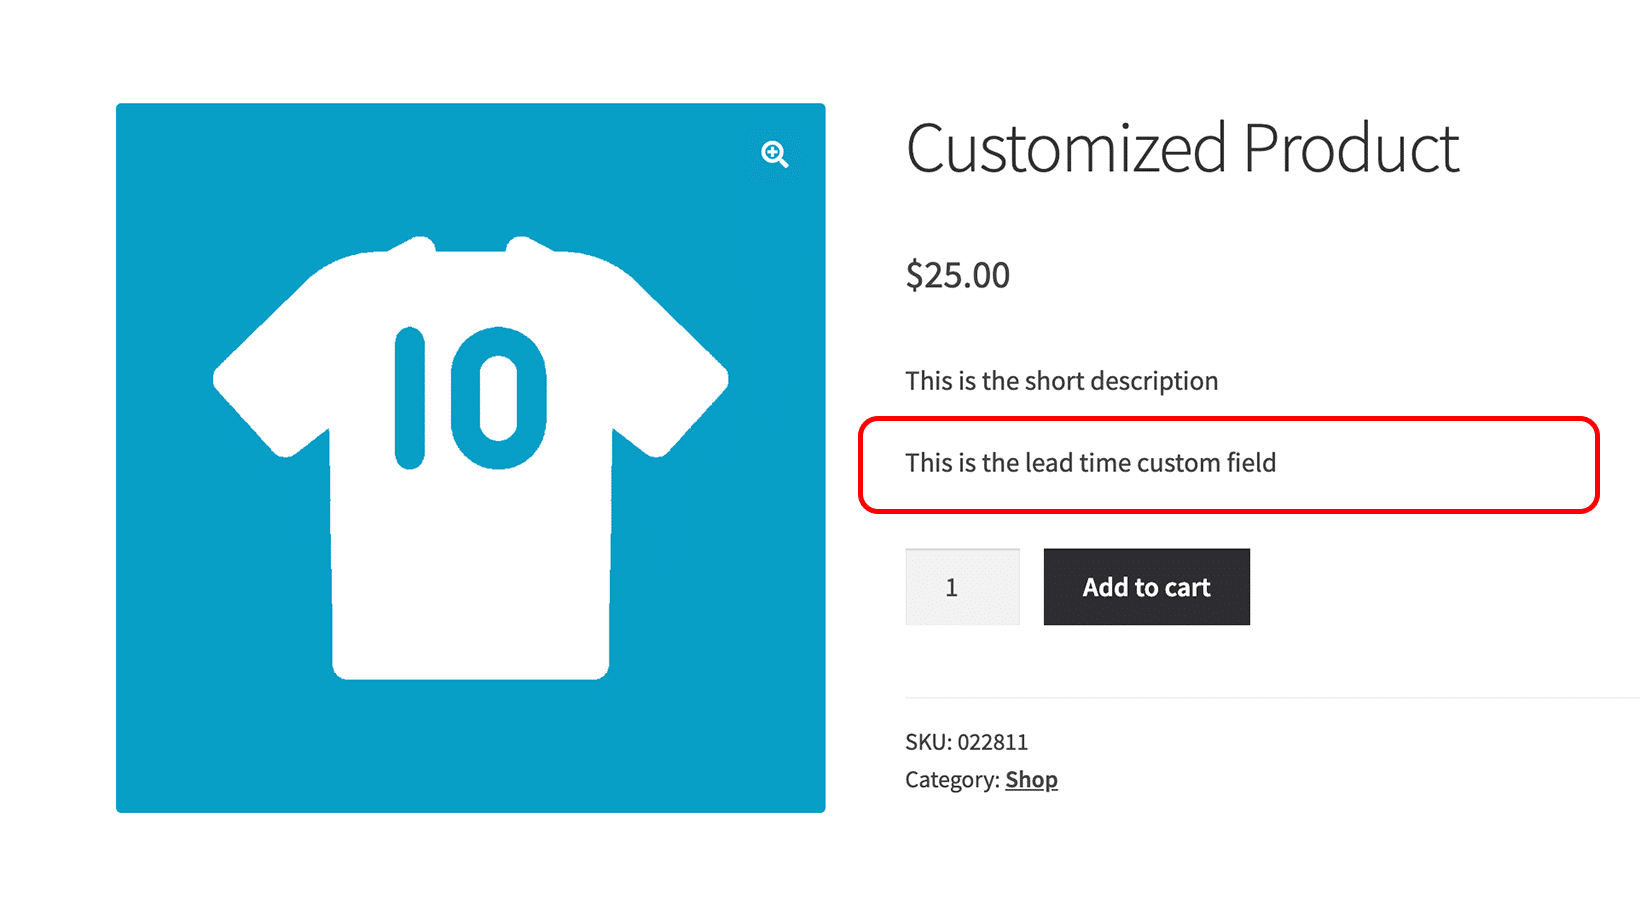
We're going to use a plugin called WooCommerce Lead Time. While the plugin is designed to display waiting times, it works by creating a WooCommerce custom field and showing it on the single product page, immediately above the add to cart button. As a result, you can use it to show any type of text-based information and not just lead times.
To set it up, simply install the plugin and add the information that you want to display to the 'lead time' field. The text you have added to the 'lead time' custom field will appear above the add to cart button, under the short description.
The other benefit of using WooCommerce Lead Time for your custom field is that you can choose whether to add the information individually for specific products only; or globally so that it appears on all product pages.
How to list WooCommerce products with a specific custom field value
Finally, I'll show you one more option for showing WooCommerce custom fields in the Product Table plugin.
As well as displaying custom field labels in the table layout, you can create tables containing products with a specific custom field value.
For example, imagine that you wanted to display products with a custom field value of 'June' (saved in a custom field called 'Month'). To do this, you could select 'Custom field' on the 'Select your products' page of the table builder and enter 'month' as the custom field name, and 'June' as the value.
How to add custom fields to product programmatically
If you're a developer, then you might be wondering how to add custom fields to a WooCommerce product programmatically. Can you even add custom fields to a WooCommerce product without plugins?
The answer is yes! WooCommerce allows you to programmatically add custom fields to products without installing any additional plugins. However, as you can imagine, the programmatic approach to creating custom fields for WooCommerce products involves programming!
With a programmatic approach, you can add custom information directly to your product metadata. You can also include your custom field(s) as part of the existing WooCommerce product data meta box.
Code sample 1
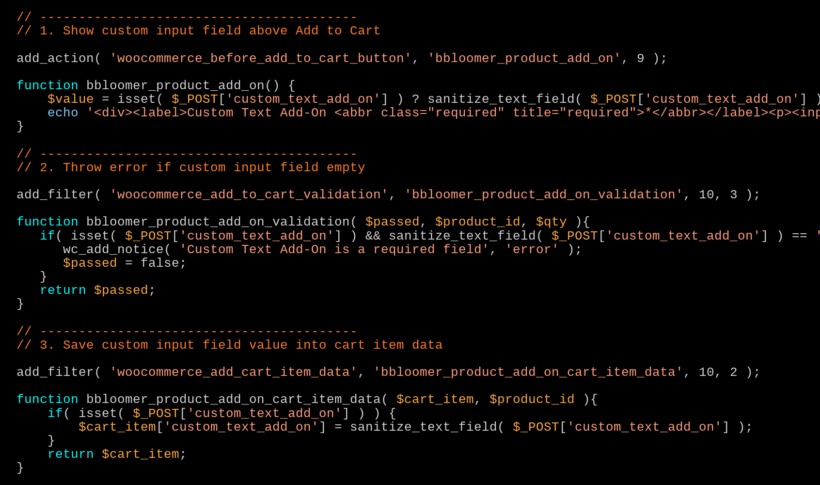
Your code will depend on the kind of custom fields you're looking to add to your products. Many product types only need a simple custom text field to let users enter some value. For such use cases, this custom text input field snippet by WooCommerce developer Rodolfo Melogli suffices:
As you can see, you’ll be using a bunch of core WooCommerce functions and hooks in the code. For example, you're using the WooCommerce hook "woocommerce_before_add_to_cart_button" to show your custom field on your product page. You're also using the woocommerce_add_order_item_meta hook to save your product input fields for Woocommerce into the order meta information. These can vary greatly depending on the custom fields you're trying to add.
When you take such input from your users, you should include it in your cart page summary (with your cart item details), your checkout, and also in your order's email. The snippet we just saw doesn't just let you allow your users to enter a text-based value inside your product page but also takes it over to your cart and checkout. Not just that, it adds the custom input to your order confirmation email too.
Code sample 2
Next, we'll share some example codes kindly published by Plugin Republic. You'll be adding these snippets to your WordPress child theme's functions.php file. You could use the code snippet below to register a custom field, display the input field in the General tab of the WooCommerce product data box, and save it as product metadata:
/**
* Displays the custom text field input field in the WooCommerce product data meta box
*/
function cfwc_create_custom_field() {
$args = array(
'id' => 'custom_text_field_title',
'label' => __( 'Custom Text Field Title', 'cfwc' ),
'class' => 'cfwc-custom-field',
'desc_tip' => true,
'description' => __( 'Enter the title of your custom text field.', 'ctwc' ),
);
woocommerce_wp_text_input( $args );
}
add_action( 'woocommerce_product_options_general_product_data', 'cfwc_create_custom_field' );
/**
* Saves the custom field data to product meta data
*/
function cfwc_save_custom_field( $post_id ) {
$product = wc_get_product( $post_id );
$title = isset( $_POST['custom_text_field_title'] ) ? $_POST['custom_text_field_title'] : '';
$product->update_meta_data( 'custom_text_field_title', sanitize_text_field( $title ) );
$product->save();
}
add_action( 'woocommerce_process_product_meta', 'cfwc_save_custom_field' );
Then, you could use WooCommerce's many hooks to display that field data on the front end of your e-commerce store at the spot where you want it to appear.
For example, this snippet displays the custom field data after the add to cart button on your single product page:
/**
* Displays custom field data after the add to cart button
*/
function cfwc_display_custom_field() {
global $post;
// Check for the custom field value
$product = wc_get_product( $post->ID );
$title = $product->get_meta( 'custom_text_field_title' );
if( $title ) {
echo get_post_meta($post->ID, 'custom_text_field_title', true);
}
}
add_action( 'woocommerce_after_add_to_cart_button', 'cfwc_display_custom_field' );
There are also other hooks that let you display information on the WooCommerce checkout page or the cart page.
Is It worth adding WooCommerce custom text fields programmatically?
While you don't need any plugins to programmatically add custom fields to WooCommerce using this method, you can end up with errors. Your custom code could have compatibility issues with the other WooCommerce extensions or WordPress site plugins that you might be running. You can also experience code validation errors.
As you can tell, using plugins is a much simpler way to add custom fields to product pages. While it is possible to display custom fields without the use of a plugin, it's really only accessible to developers. That's why the methods described above are a better option for most store owners.
2 easy ways to create and display custom fields
And that's it! I've shown you two easy ways to show custom fields on your website:
We've learned how to add custom product input fields for WooCommerce to collect extra information from customers. This uses the WooCommerce Product Options plugin.
Neither method for adding custom fields to WooCommerce products requires any special technical knowledge.
Follow whichever method in this tutorial interests you the most, and put it into practice on your own website. It's a fantastic non-technical way to store and display extra product data in WooCommerce.