Use WooCommerce wishlist plugins in your product tables
WooCommerce has no built-in wishlist, and a WooCommerce Product Table does not add one on its own. I've tested the best free and premium WooCommerce wishlist plugins to find the ones that put an 'Add to wishlist' button right in your table.
This guide helps you choose the right WooCommerce wishlist plugin to use with your product tables, with setup instructions for each one. All five have a free version on WordPress.org, plus a Pro version with extra features.
Quick verdict: the best WooCommerce wishlist plugins
In a hurry? Here are my top picks for using a wishlist with a product table.
- Easiest setup MC Wishlist and TI Wishlist add their buttons to your table automatically, with no shortcode. SaveTo Wishlist does too, after one shop-page setting.
- Best value WPC Smart Wishlist is a one-off $29 with lifetime updates.
- Best for remarketing MC Wishlist adds back-in-stock and price-drop emails and abandoned-wishlist recovery.
- Best for multiple lists SaveTo Wishlist lets each customer keep several named wishlists in the free version.
- Biggest free user base YITH and TI Wishlist are the most widely used.
Evaluating these wishlist plugins
I compared the five wishlist plugins on what matters when you pair one with a product table. That means whether the buttons appear automatically or need a shortcode, the price, what the free version includes, what real users say in reviews, and how actively each is maintained.
Our own WooCommerce Product Table plugin is the host in every example below. Three of them add their buttons to the table automatically, and two need a quick shortcode, which I have covered in the setup steps.
Comparing the best WooCommerce wishlist plugins
Here is how the five plugins compare at a glance.
| Plugin | Free version | Price from | Active installs | Works in a product table |
|---|---|---|---|---|
| MC Wishlist | Yes | $89/year | 9,000+ | Automatically |
| YITH Wishlist | Yes | ~$118/year | 400,000+ | With a shortcode |
| TI Wishlist | Yes | $79/year | 100,000+ | Automatically |
| WPC Smart Wishlist | Yes | $29 one-off | 100,000+ | With a shortcode |
| SaveTo Wishlist | Yes | $99/year | New plugin | Automatically |
MC Wishlist
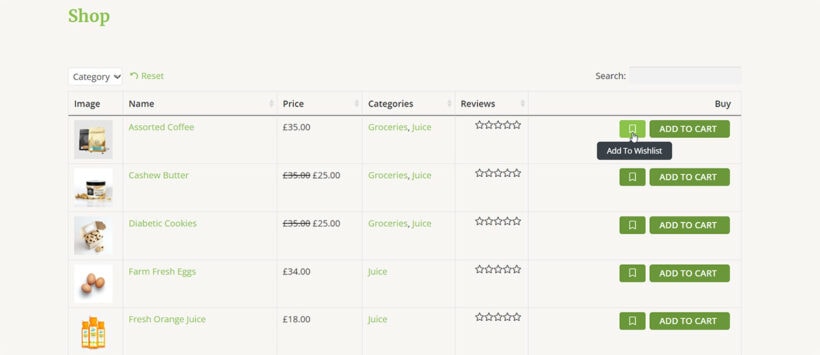
When you're building a product table, you want a wishlist plugin that just works, with no fiddly setup. The MC Wishlist plugin (by MoreConvert) integrates automatically with WooCommerce Product Table, so the wishlist buttons appear in your table without any extra work.
MC Wishlist also offers a free widget for Elementor and shortcodes for wishlist buttons, pages and counters that you can place anywhere. Its wishlist counter, popups and built-in marketing toolkit (back-in-stock and price-drop emails, abandoned-wishlist recovery) set it apart from a basic wishlist.
How it works with WooCommerce Product Table
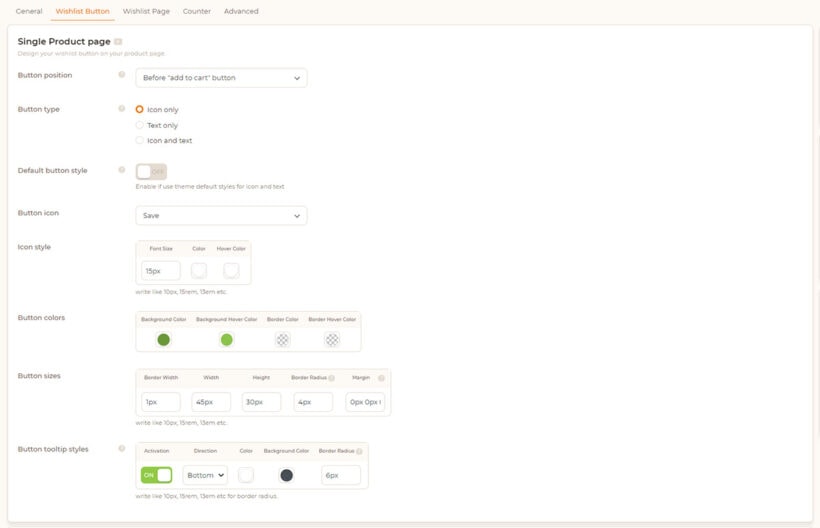
Due to its high flexibility, the MC WooCommerce Wishlist plugin works well with the table in both standard and lazy loading modes. All the settings related to the wishlist button, such as button text, icon, color and position, can be edited through this plugin’s settings, and it works in harmony with the table.
Also, when you click on the add to wishlist button, the plugin offers different modes, including pop-ups, which you can choose according to your needs.
How to set it up
- Install and activate the MC WooCommerce Wishlist and WooCommerce Product Table plugins, as per the documentation.
- After activating the MC wishlist plugin, you will enter the setup wizard. Here you can change the location (top, bottom, left, and right of the Add to cart button) and the text of the add to wishlist button. These choices can be changed from the wishlist settings.
- (If needed, you can use the
[wlfmc_add_to_wishlist]shortcode to put the wishlist button in your desired location. Note that you should use the single product page settings for this purpose.)
From the WooCommerce Product Table settings, add the table you want to a desired page (for example, the shop page). - Now go to the page where you added the table and see the result.
Pros
- The wishlist buttons appear in your product table automatically, with no shortcode to add.
- Built-in remarketing tools: back-in-stock and price-drop emails, plus abandoned-wishlist recovery.
- 4.9 stars from 119 reviews, and the most actively maintained plugin in this list.
Cons
- The marketing and conversion features that make it stand out are mostly behind the premium version, with fairly pushy upsells.
- A few recent reviews report stability issues after updates.
- A security flaw was found and patched in an older version.
YITH WooCommerce Wishlist Plugin
YITH's wishlist plugin is one of the most popular ways to add wishlists to WooCommerce, with over 400,000 active installs. You can use it with WooCommerce Product Table by adding the wishlist shortcode to a column, as I'll show below.
How it works with WooCommerce Product Table
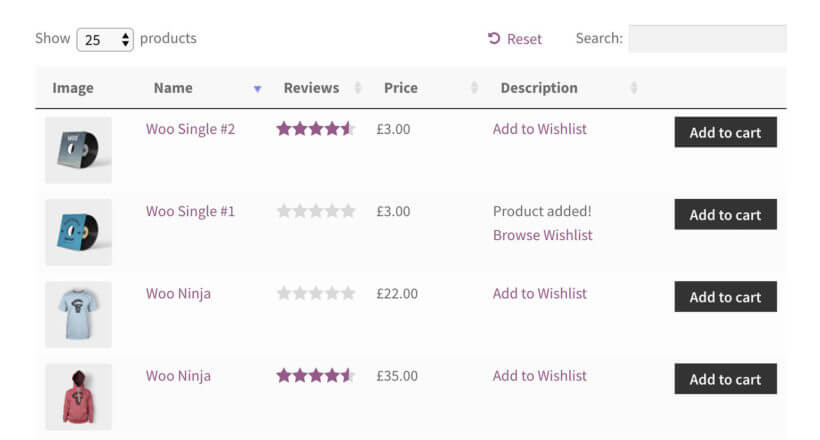
You can use the YITH WooCommerce wishlist plugin to add 'Add to Wishlist' text links in your product table. When you add a product to the wishlist, the text will change to "Product added! Browse Wishlist" (you can change this if you like), with a link to the wishlist page.
The plugin works fine with WooCommerce Product Table. However, you can't add the wishlist link within the add to cart column. You can add it to any other text-based column in the table. Or if you're a developer, then you can use the developer documentation to add a custom column containing the wishlist shortcode.
How to set it up
- Install the WooCommerce Wishlist and Product Table plugins, as per the documentation. Add product tables to your site as required.
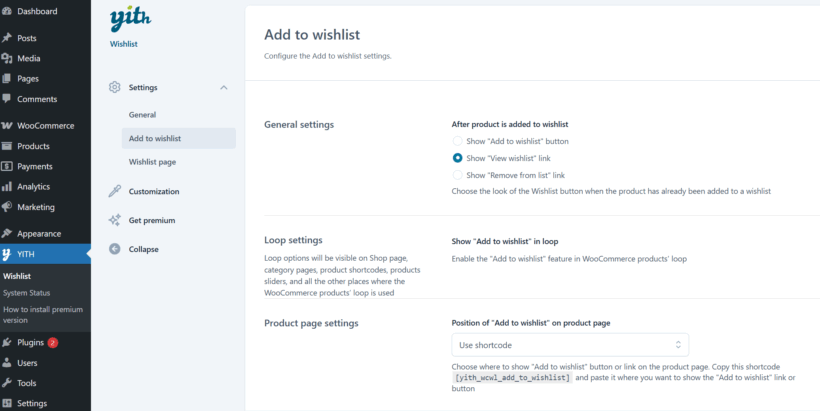
- On the YITH plugin settings page (YITH Plugins → Wishlist), from "Settings" tab, go to the "Add to wishlist" section and then select 'Shortcode' from the 'Product page settings' dropdown list. (If you select any of the other options then the 'Add to Wishlist' link will appear on the single product page, but not in the product table.)
- The next step is to paste the wishlist shortcode
[yith_wcwl_add_to_wishlist]into one of the fields that you're displaying as column in the product table. You need to do this for every product. You can either add the shortcode to the short description for each product, the main product description for each product, or a custom field (e.g. created using the Advanced Custom Fields plugin). - On the WooCommerce Product Table plugin settings page (WooCommerce → Settings → Products → Product tables), enable the 'Shortcodes' option. You should also use the columns option to ensure the field you added the wishlist shortcode to appears as a column in the table. For example, if you added it to the short description, your table must contain a
summarycolumn. - Now view the page where you added a product table in Step 1, and you will see the 'Add to Wishlist' buttons in the correct column:
Pros
- The most widely used wishlist plugin here, with over 400,000 installs and a track record since 2013.
- A genuinely useful free version, with plenty of styling control in premium.
- Integrates neatly with other YITH plugins if you already use them.
Cons
- You add a shortcode to a column for it to show in the table; it does not appear automatically.
- Rated 3.9 stars, with about a fifth of reviews at one star and recent complaints about updates breaking things.
- The premium licence is on the pricey side at around $118 a year.
TI WooCommerce Wishlist Plugin
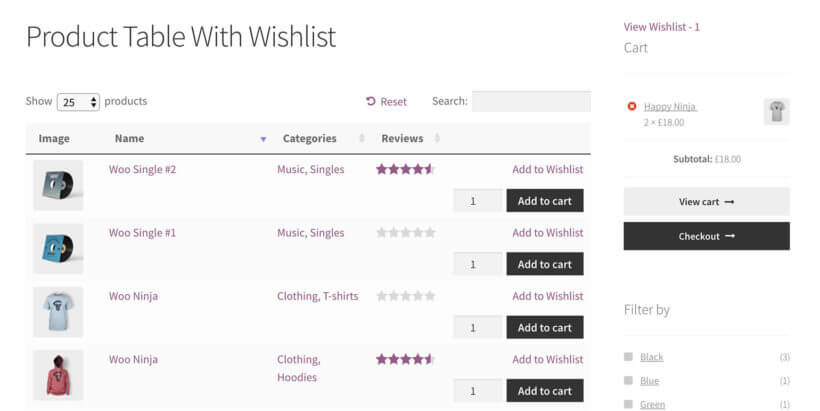
With around 100,000 active installs, TemplateInvaders' WooCommerce wishlist plugin is one of the most popular choices for WooCommerce stores. It works automatically with WooCommerce Product Table, so the wishlist links appear in your table with no shortcode needed.
The wishlist plugin comes with a widget which shows the number of items in the wishlist. It has a handy link to the main wishlist page.
How it works with WooCommerce Product Table
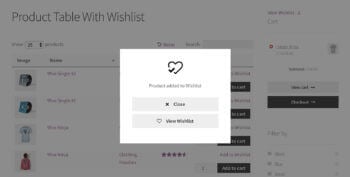
When you click on the 'Add to Wishlist' link for any product, a lightbox will appear confirming that the product has been added. You can either close the popup or click through to the wishlist page, where you can view the items, share them on social media, or buy using WooCommerce.
How to set it up
- Install the WooCommerce Wishlist and WooCommerce Product Table plugins, as per the documentation.
- Add a product table to any page on your site.
- When you activate the WooCommerce wishlist plugin, you'll be taken through a handy setup wizard where you can choose how your wishlist will work. You can choose to position the 'Add to Wishlist' button above or below the add to cart button, and both will appear correctly in the product table. Or if your product table doesn't have an add to cart column, then choose the 'Custom position with code' option and add the shortcode
[ti_wishlists_addtowishlist]to any other product field that appears in the table. For example, if you add this shortcode to the short description, long description or a custom field for each of your products, then it will appear in the table. - View the page with your product table, and you will see the Add to Wishlist links!
Tip: If you're using the 'Custom position with code' option, then you must add shortcodes="true" to your product table. You can either do this in the plugin settings page, or directly in the product table shortcode.
Pros
- Mature and feature-rich even in the free version, with around 100,000 installs and a 4.7-star rating from nearly 500 reviews.
- The wishlist links appear in your product table automatically, with no shortcode needed.
- Works across shop, product and category pages as well as your tables.
Cons
- Several recent one-star reviews complain about being auto-rebilled and refused refunds.
- Some features are locked behind the Pro version.
- Free support can be slow to respond.
WPC Smart Wishlist
WPC Smart Wishlist by WPClever is one of the most installed wishlist plugins on WordPress.org, and its free version is genuinely capable. Like YITH, it does not add its button to a product table automatically, but a quick shortcode does the job, as the steps below show.
How it works with WooCommerce Product Table
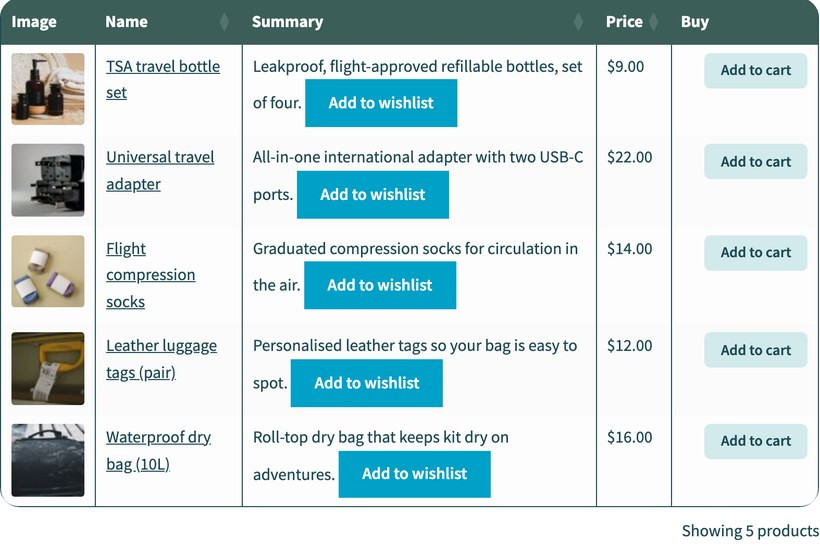
WPC Smart Wishlist adds its button with the [woosw_btn] shortcode. Place that shortcode in a field your table shows as a column, and the button appears next to each product, as in the screenshot above.
How to set it up
- Install the WPC Smart Wishlist and WooCommerce Product Table plugins, as per the documentation.
- Add the shortcode
[woosw_btn]to the short description of each product you want a wishlist button for (the short description usually appears near the bottom of the Edit Product screen). - In your product table, enable the Shortcodes option and include the short description as a column. You can do this on the settings page or by adding
shortcodes="true"to the table shortcode. - View the page with your product table, and the 'Add to wishlist' button appears in that column next to the add to cart button.
Pros
- One of the most installed wishlist plugins, with a capable free version.
- Premium is a one-off $29 with lifetime updates, rather than an annual renewal.
- 4.8-star rating, and AJAX buttons that update without a page reload.
Cons
- Like YITH, you add a shortcode to show it in the table rather than it appearing automatically.
- Deeper customization is gated behind the premium version.
- The review base is small relative to the install count.
SaveTo Wishlist
SaveTo Wishlist is the newest plugin in this list, built by Rymera, the developer behind Advanced Coupons. Like MC Wishlist and TI Wishlist, it can show its button in your product table automatically, so there's no shortcode to paste into a column.
Even the free version lets each customer keep several named wishlists, save items as a guest, and reorder lists by drag and drop. It also supports WooCommerce Blocks and gives you five button styles to choose from.
How it works with WooCommerce Product Table
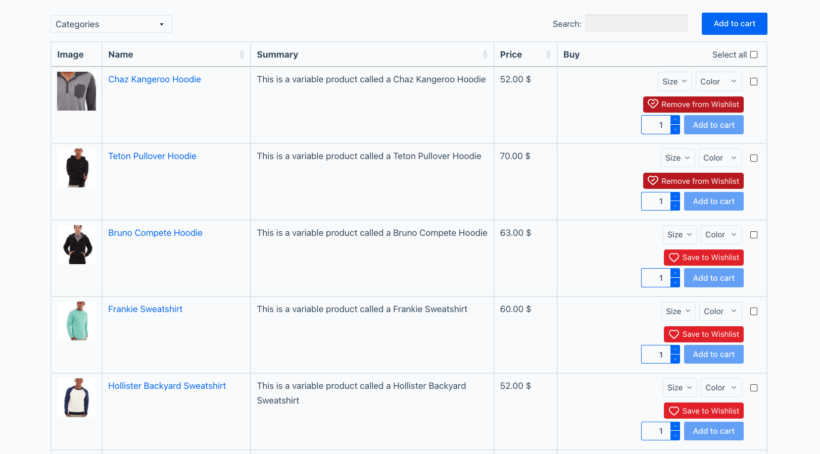
SaveTo Wishlist adds its 'Add to wishlist' button next to the add to cart button, so it sits in the same column when you display a product table. The button updates over AJAX, so clicking it saves the product to the customer's list without a page reload.
There is one setting that makes the integration work, which I've covered in the steps below.
How to set it up
- Install and activate the SaveTo Wishlist and WooCommerce Product Table plugins, as per the documentation.
- Open the SaveTo Wishlist settings and go to the 'Shop Page' section.
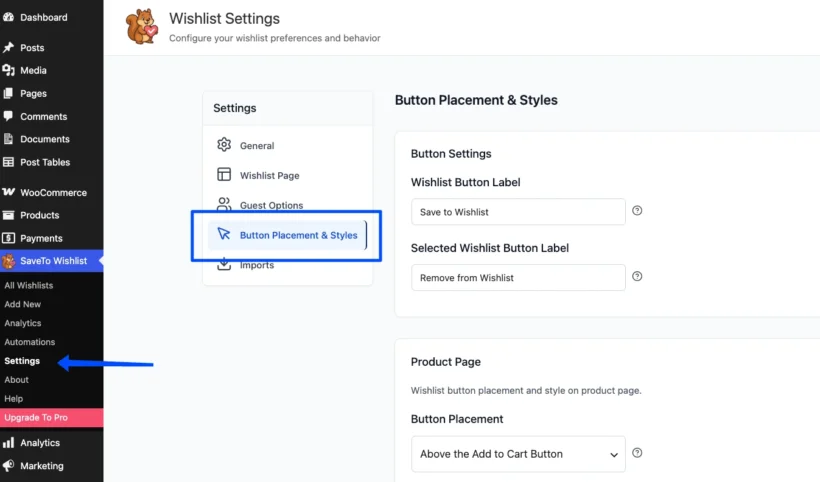
Set 'Button Placement' to 'Above the Add to Cart Button'. This is the setting that makes the wishlist button appear in your product table.

- Add a product table to any page on your site.
- View the page with your product table, and the 'Add to wishlist' button appears above the add to cart button in each row.
Pros
- The wishlist button appears in your product table automatically once you set the shop-page placement, with no shortcode to add.
- Even the free version supports multiple named wishlists per customer, guest wishlists and drag-and-drop sorting.
- Built by Rymera of Advanced Coupons, a long-established WooCommerce developer.
Cons
- It launched in late 2025, so the install base and review count are still small next to the others here.
- The remarketing features (price-drop alerts, back-in-stock notifications and automations) are Pro-only, much like MC Wishlist.
- Pro starts at $99 a year for a single site (currently half price as an introductory offer), so it renews annually rather than being a one-off.
Which is the best WooCommerce wishlist plugin?
All five plugins work well with WooCommerce Product Table, so the right one comes down to how you want to set it up and what extra features you need.
- For the simplest setup, where the buttons appear in your table automatically, choose MC Wishlist, TI Wishlist or SaveTo Wishlist.
- For built-in remarketing, like back-in-stock and price-drop emails and abandoned-wishlist recovery, MC Wishlist goes furthest.
- For multiple named wishlists per customer in the free version, SaveTo Wishlist stands out.
- For the largest, most battle-tested free user base, YITH or TI Wishlist are the safe choices.
- For a one-off price with no annual renewal, WPC Smart Wishlist is the best value.
If you do not mind adding a shortcode to a column, YITH and WPC Smart Wishlist both work well too.
Other WooCommerce wishlist plugins
If you're using WooCommerce Product Table with any other wishlist plugins, please let us know. We'd love to test them and publish the details of any more that are compatible. We might even be able to feature your website as a case study!
4 Comments
Hi, I am using the wishlist option included in the theme xstore (by 8themes). It it so far the smoothest and best wishlist I have come across. Do you support this one?
Hi, Martin. We've not tested using the wishlist option of the XStore theme by 8theme that you're using, albeit you can do so on your site completely risk-free, thanks to our full 30-day money back guarantee. This lets you buy our plugins and try them for up to a month, and get a full refund if you're unhappy with them or if they don't suit your needs. Should you have any questions or difficulty, just get in touch with our friendly support team and we'll either help you out until you get the results you need or give you a swift refund.
Do you provide or allow affiliation of products with different websites like AMAZON, ABABy etc?
Hi, Sabahat. Yes, you can use WooCommerce Product Table to display/list your Affiliate Product types and then display a button per product's Amazon affiliate link. Please see: Linking to third party or affiliate websites. Thanks.