WooCommerce account login and register page with social login buttons

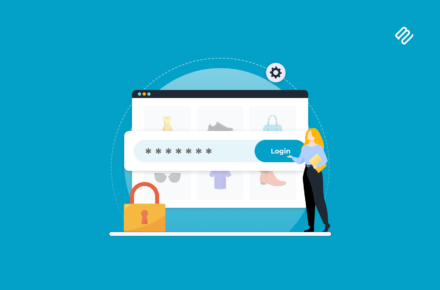
This ultimate guide contains everything you need to know about WooCommerce login for your customers. We'll look at the different ways you can let customers log into a WooCommerce online store, and why.

I'll tell you how to set up a WooCommerce login straight out of the box, with or without compulsory registration and social login. I'll also share some handy login plugins to create a hidden or private WooCommerce store that only logged-in customers can access. You will learn how to:

  • Add user login to your WooCommerce store (no plugin needed).
  • Make users log in before purchasing (no plugin needed).
  • Hide your entire store from logged-out users using the WooCommerce Private Store plugin.
  • Restrict specific products and categories to logged-in users using the WooCommerce Protected Categories plugin.
  • Send your customers WooCommerce auto-login links using the free URL-Based Login plugin.

Read on, or watch this video to see how each login method works.

Importance of a customer login for WooCommerce

  1. Personalized user experience: WooCommerce customer login allows you to provide a personalized experience to your customers. They can easily access their order history, saved payment methods, and shipping details, which can save them time and effort.
  2. Increased security: With a WooCommerce customer login, you can secure customer data by allowing access only to registered users. It also allows you to monitor and track user activity to prevent any fraudulent or suspicious activity.
  3. Targeted marketing: A WooCommerce customer login feature allows you to track customer behavior and preferences, which can be used to create targeted marketing campaigns. You can also offer personalized discounts and promotions to customers based on their purchase history.
  4. Improved customer engagement: WooCommerce customer login feature can help you create a loyal customer base. You can send personalized emails, update them on new products or services, and gather feedback on their experience.
  5. Simplified checkout process: When WooCommerce customers log in, they can save their payment and shipping details, making the WooCommerce checkout process faster and more convenient. This can increase customer satisfaction and encourage repeat business.

What are the different types of WooCommerce login?

By 'WooCommerce login', I'm talking about the process where customers log into your online store. It's quite a vague term and there are several ways to set it up. Which one you choose depends on how you want your store to work.

  1. Public WooCommerce store with guest checkout - This is the most common WooCommerce setup. Anyone can browse your products and there is no hidden WooCommerce content. Customers can buy products as a guest without having to log in, or they can optionally create a WooCommerce account during checkout.
  2. Public WooCommerce store with mandatory user accounts - Lots of WooCommerce stores can be browsed by anyone, but customers must register or log in to their WooCommerce account in order to purchase.
  3. Customer portal with protected product categories - Instead of (or as well as) individual customer accounts, you can password-protect parts of a WooCommerce store or restrict them to specific users or user roles. Anyone can buy from the public areas of your shop, while only customers with the right credentials can access your protected categories. Once a customer logs into your protected categories, they can view and buy the hidden products inside.
  4. 100% private WooCommerce store - Some websites want to hide a whole WooCommerce store from public view so that customers must log in or enter a password to access it.
  5. WooCommerce auto-login links - Let customers log in more easily by clicking on a personal login URL. No more usernames or passwords!

With nearly 2 million using WooCommerce sites according to the latest WooCommerce stats, there are plenty of people looking for all these login options.

Option 1 - Public WooCommerce store with guest checkout

Most WooCommerce stores let anyone view and buy their products, whether or not they're logged in.

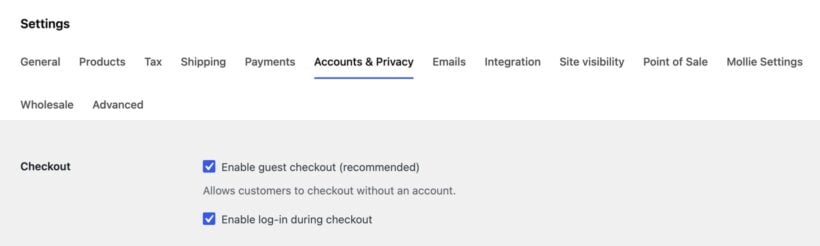
How to enable guest checkout in WooCommerce

  1. Log into the WordPress dashboard and navigate to WooCommerce → Settings → Checkout.
  2. You'll see a box with the label 'Enable guest checkout'.
  3. Tick this box and customers will be able to purchase without logging in or creating a user account.
WooCommerce Accounts and Privacy settings with the Enable guest checkout checkbox ticked

How to prevent user account creation in WooCommerce

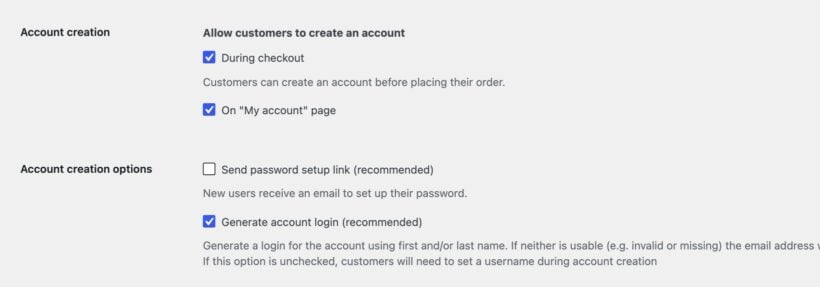
If you like, you can prevent customers from creating user accounts at all. To do this, go to WooCommerce → Settings → Accounts. Untick the boxes to enable registration on the Checkout and My Account pages. This will prevent customers from registering for your site at all, so you don't need to provide a login page.

WooCommerce Accounts and Privacy settings showing account creation checkboxes for checkout and the My Account page

Check out this free Helpie WooCommerce FAQ plugin which helps to create an FAQ section on your WooCommerce product page to easily answer customers' questions about the products.

Option 2 - Public WooCommerce store with mandatory user accounts

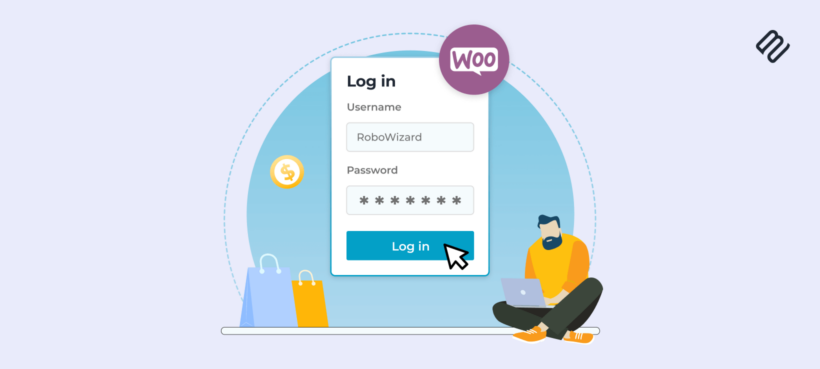
How to add a Register/Login page to WooCommerce

WooCommerce Account page with side-by-side login and register forms for customers to sign in or create an account

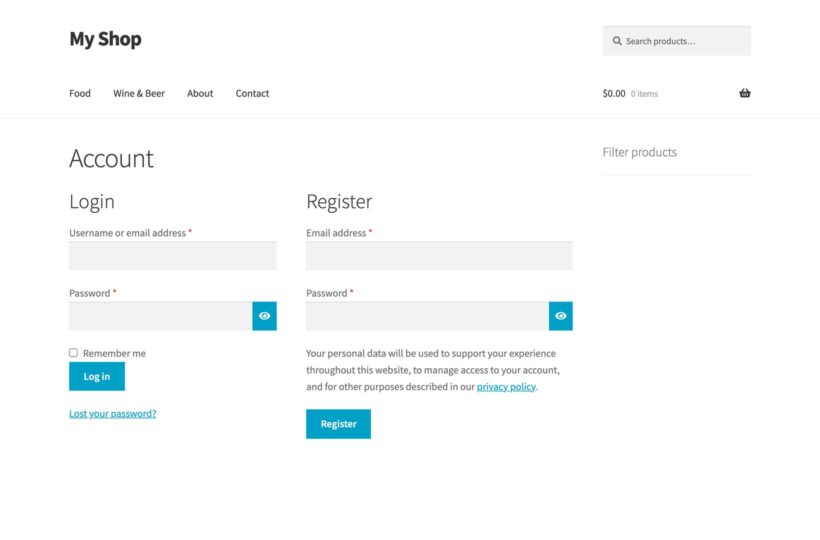
When you first install WooCommerce and run the Setup Wizard, there's an option to automatically create all the essential pages for your store. Do this, and you'll see a 'My Account' page in your list of pages (along with other new pages for shop, cart, and checkout).

The WooCommerce login shortcode [woocommerce_my_account] will appear on the page. You can use this page as your register/login page, for example by linking to it from your header or sidebar.

The WooCommerce login/register form works as follows:

  • Guest users will see the WooCommerce login form, possibly with a registration form. To include the registration form on the login page, go to WooCommerce → Settings → Accounts and tick 'Enable registration on the "My Account" page'.
  • Logged-in users will see their Account page, with their order history, profile, and other information.

You can add the WooCommerce login shortcode[woocommerce_my_account] anywhere else on your website to create extra login forms. There are other plugins available to do this such as Sidebar Login and Woocommerce Login / Signup Lite. These let you create more complex WooCommerce login forms. However, you only need an extra plugin if the built-in WooCommerce login shortcode isn't suitable for you.

Tip: If you want to control where users are redirected after they log in, try Peter's Login Redirect. It's easy to set up and we've used it on lots of our client's websites.

How to force WooCommerce customers to log in or register before they buy

  1. In the WordPress dashboard, go to WooCommerce → Settings → Checkout.
  2. Untick the 'Enable guest checkout' box. This will force users to create an account when they buy from your WooCommerce store.

You can further configure how user accounts are created in WooCommerce → Settings → Accounts. This WooCommerce page has several settings such as whether to include a registration form on the checkout page and whether to automatically generate WooCommerce customer login usernames and passwords.

There's also a box to display a login reminder on the checkout so that existing customers can log in. This is really useful if guest checkout is disabled, as you need to make it easy for customers to log in.

Note: If a customer completes checkout without logging in then an account will be created for them behind the scenes. They will receive the login details by email so that they can log in the next time they purchase from you.

WooCommerce social login

WooCommerce social login
As well as the standard WooCommerce login facility, you can let customers log in with their social media accounts. With WooCommerce's social login, you create a public store as usual so that anyone can browse your products. As part of the checkout, they can log into your website using their social media accounts.

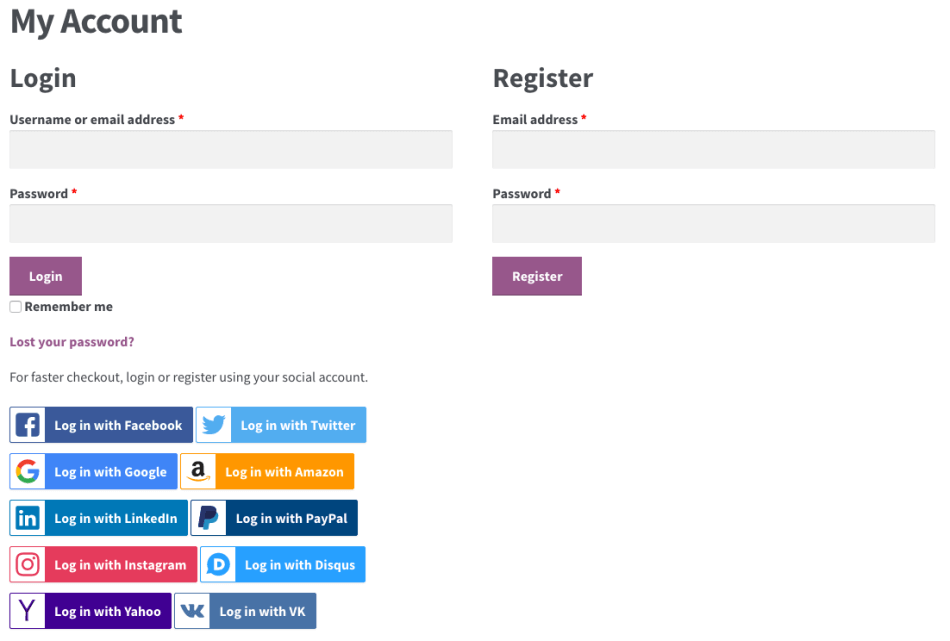
You might offer social login in addition to - or instead of - the option to register directly on your WooCommerce website.

Research suggests that over 77% of customers prefer to log into WooCommerce or other websites using social media. This is hardly surprising given that it saves them the hassle of creating a new WooCommerce account for your website and remembering their logins. (And of course, WordPress insists on secure passwords these days so they can't just log in with an easy-to-remember password!)

Back in 2014, I wrote about a 'deadly embrace' caused by WordPress social login plugins. At the time, the available plugins conflicted with built-in WordPress user accounts. Things have improved since then but if you're considering social login then I recommend you use the official WooCommerce extension. This offers the best chance of creating a user-friendly WooCommerce social login for your website.

How to add social login to a WooCommerce store

To add social login to your WooCommerce website, I recommend the official WooCommerce Social Login plugin. Once you've purchased the plugin, follow the instructions in the knowledge base to enter your license key and set it up.

Given the issues I previously identified with social login, I recommend thorough testing before it goes live. Make sure your WooCommerce login process works seamlessly. In particular, test the following aspects of the login process:

  • First time WooCommerce logins using each social network.
  • Repeat logins using the same social network.
  • Repeat logins using a different social network. (i.e. what happens if a customer forgets which social network they logged in with previously?)
  • Register using social login and then try logging in directly on the website using the Lost Password link.

Basically, try to break it and send a support request to WooCommerce if you discover any problems. Social login is a great idea but needs thorough testing to get right, as customers may forget how they previously logged into your WooCommerce store.

Get WooCommerce Social Login

Option 3 - Login portal with WooCommerce protected categories

Protected category shop page with a login box for customersOptions 1 and 2 are about letting customers log in to a public WooCommerce store. They might have to log in to purchase, but anyone can browse the store and see the products. You can also create a WooCommerce login system where customers have to log in or enter a password in order to see your products or other store content.

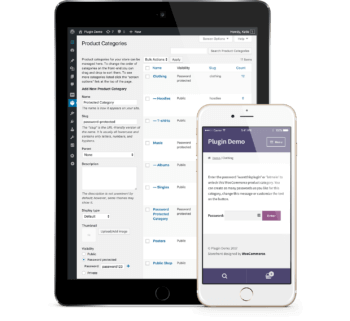
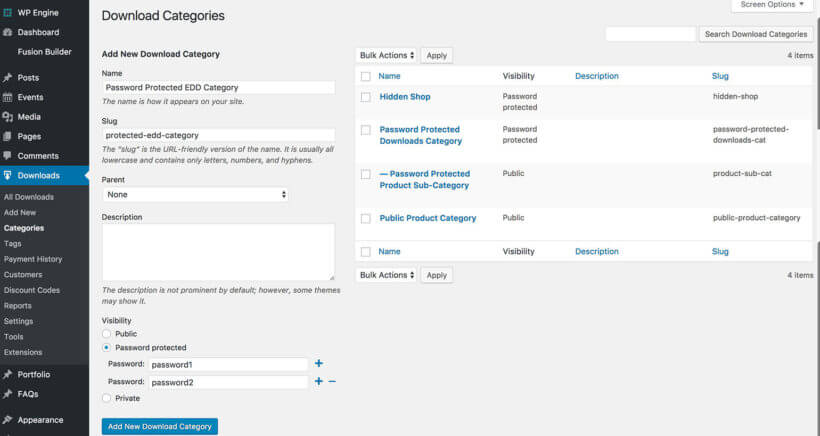
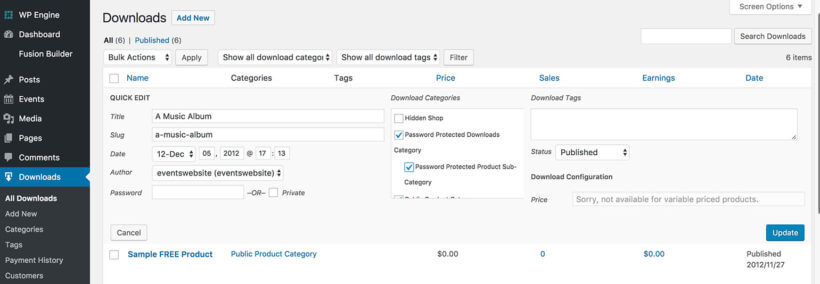
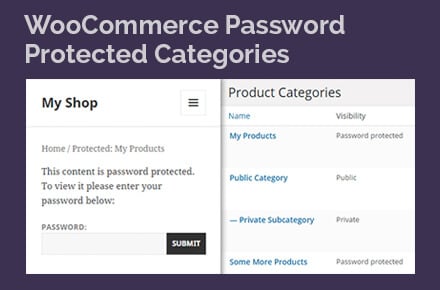
The WooCommerce Protected Categories plugin creates a login portal where different customers can see different products. It locks down one or more of your product categories so that no one else can see them. Customers must log into WooCommerce with the correct credentials to see the products inside their portal.

You can create separate categories for different groups of customers, and you can even create customer-specific products. Each customer logs in and views the restricted products that they have access to.

Who needs protected product categories?

You can use WooCommerce Protected Categories in several ways:

  • Show products from protected categories in the public areas of your store. When someone clicks a protected product, they must enter the password or login to view the single product page or purchase. This lets you display all products in the public store, while only pre-approved customers can buy protected ones.
  • Hide protected categories and products from the public store. Alternatively, you can hide protected WooCommerce categories and their products from public areas of your store. Authorized users can log in and be directed to the correct hidden category. This is perfect WooCommerce wholesale stores or customer-specific products where you sell different products to each customer.
  • Hide your entire WooCommerce store. Finally, you can put ALL your products within one or more protected categories. This way, customers have to log in before they can view your products or buy. (Tip: While it's possible to hide your whole store with this plugin, you might prefer Option 5, below. Both plugins let you create a WooCommerce hidden store)

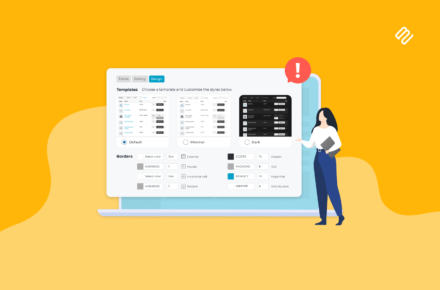
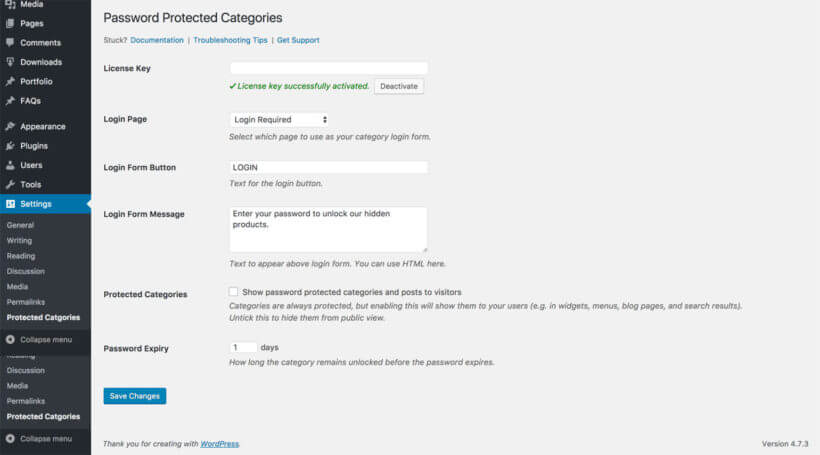
How to create protected categories in WooCommerce

You can read full setup instructions in the plugin knowledge base. Here's a quick guide to get you started:

  1. First, get WooCommerce Protected Categories.
  2. Install and activate the plugin.
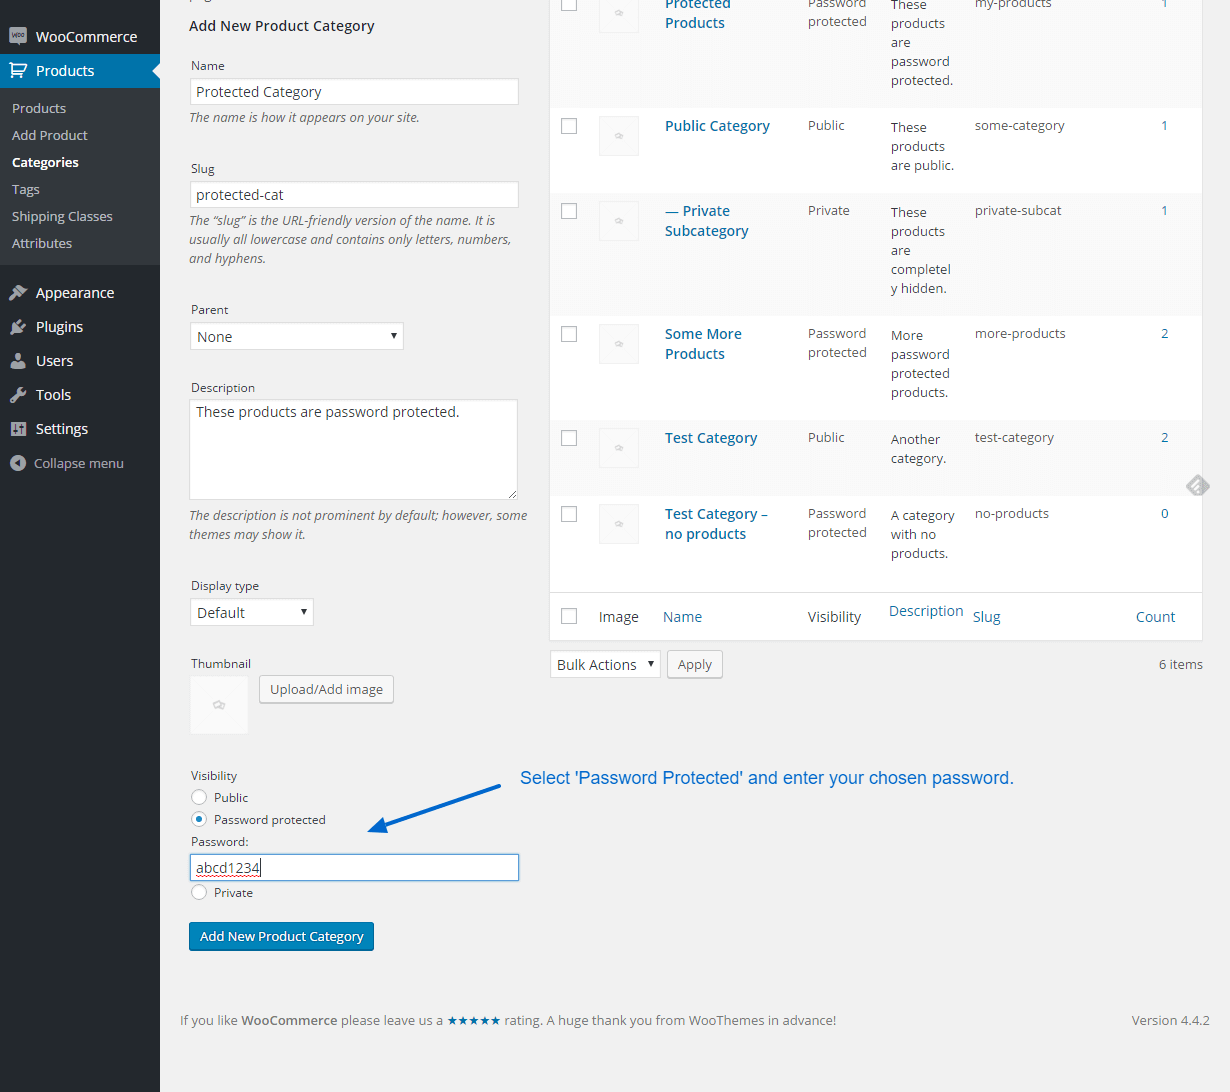
  3. Go to WooCommerce → Settings → Products → Protected Categories and enter your license key.
  4. Change any settings such as customizing the text on the password WooCommerce login page, and hide protected categories from the public areas of your store.
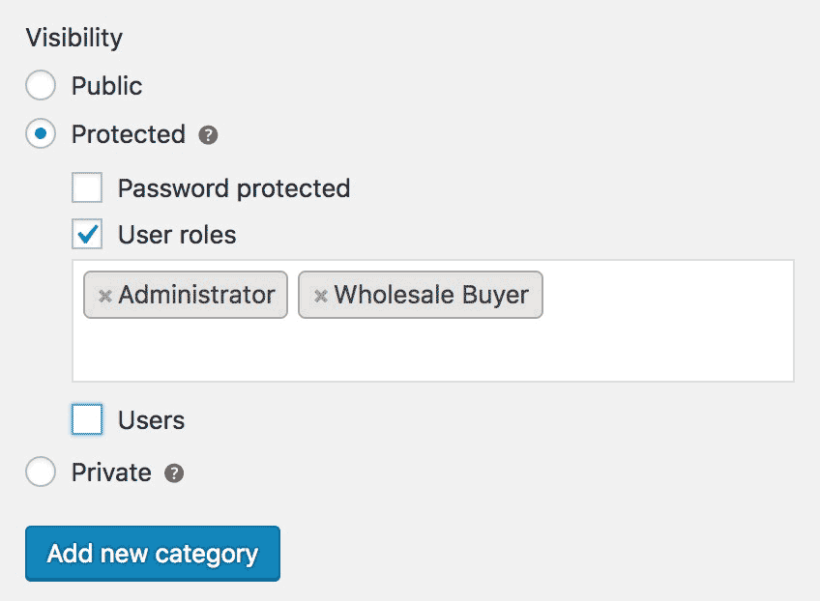
  5. Now, go to the product category that you want to hide behind the WooCommerce login page. You'll find this in Products → Categories. The plugin has added a new 'Visibility' section with options to password protect the category or make it private. Choose 'Protected' and either password protect the category, or restrict it to specific users or roles.
  6. Repeat step 5 for all the categories you want to protect.

Finally, test your WooCommerce protected categories from different customer login scenarios. For example, try it when you're logged in and out of the website. Also, try it before and after you log in to a category.

Option 4 - Create a login-only store

WooCommerce store login screen shown on a laptop and tablet

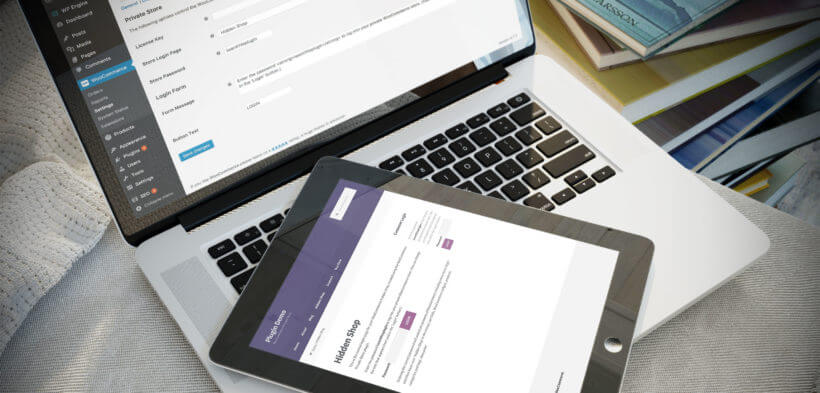
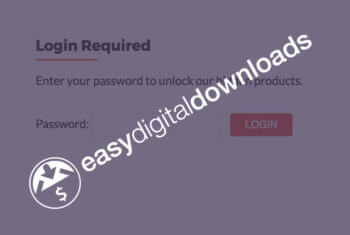
WooCommerce Private Store forces customers to log in to your WooCommerce store before they can see your shop page, products, categories, or any other store content. It's a simple but effective plugin to hide WooCommerce from public view, without affecting the public parts of your site.

By logging into their user account or entering a simple password on the WooCommerce private store login page, customers can unlock the store and access the products and other content inside. Your public users won't even know you have a WooCommerce store unless you decide to link to the WooCommerce login page. (In which case, they will be able to see the WooCommerce login page but none of the content behind it.)

How to hide your whole WooCommerce store behind password protection or a user login form

The plugin knowledge base contains full setup instructions for WooCommerce Private Store. I've also provided details below. Setting it up literally just takes a few minutes:

  1. Buy the plugin from https://barn2.com/woocommerce-private-store.
  2. Go to WooCommerce → Settings → Products → Private Store.
  3. Enter your license key and change any settings such as customizing the WooCommerce login form text. Either choose a password to password protect WooCommerce, or tick the 'Logged In Users' option to automatically unlock it for logged-in users or specific roles.

Once you've saved the settings page, your whole e-commerce store will be protected. Customers will have to log in or enter the password before they can see ANY WooCommerce content such as the main shop page, products, categories, etc. Your WooCommerce content will also be blocked from search engines, so it's a simple yet secure way to make WooCommerce private.

WooCommerce Protected Categories or Private Store?

I realize that the plugins mentioned in options 4 and 5 are quite similar. You can use them in similar ways but they can also be used very differently in terms of WooCommerce login options. Check out my article on which WooCommerce protection plugin to use.

Option 5 - WooCommerce auto-login by URL

Finally, you might want an easier way for your WooCommerce store's customers to log in.

WordPress and WooCommerce auto login plugins provide a dynamic link that automatically logs customers into their accounts. This saves customers from having to remember or store usernames and passwords. All they need is their personal auto-login URL.

You can use this option with options 1, 2, 4, and 5 listed above.

For full instructions, check out our separate step-by-step tutorial on how to set up WooCommerce auto-login URLs.

What type of WooCommerce login do you use?

As you can see, there are many types of WooCommerce login designed for different types of stores. I hope this guide has helped you to choose the right login method for your WordPress site and to set it up properly.

How do you allow customers to log in to your site? Are there good WooCommerce plugins I've missed? What pitfalls did you come across and what would you advise other WooCommerce users? Please add your comments below.

Password login screen protecting an Easy Digital Downloads category

With over 60,000 active users, Easy Digital Downloads is the third most popular WordPress e-commerce plugin. It has all the features that most e-commerce websites need to sell digital downloads online. However, it not obvious how to password protect parts of your downloads store or make it private.

This is the ultimate guide on how to do just that. I'll show you how to protect parts of your Easy Digital Downloads store or even your whole shop. There are written instructions and video tutorials to help you set it up.

Further Reading: How to sell digital & downloadable WooCommerce products

Why would I want to make Easy Digital Downloads private?

Most e-commerce stores selling digital products are available to the public so that anyone can buy the downloadable files. However, many stores need to be partly or completely private and hidden from public view. This might seem strange, as the whole purpose of an e-commerce website is to make as many sales as possible! But there are many reasons why an Easy Digital Downloads store might need password protected categories.

For example:

  • Public Easy Digital Downloads store with password-protected members area Lots of e-commerce websites have public and private areas. Perhaps you have a public store selling downloads that are available to anyone, and a private area for wholesale or trade users.
  • Client-specific products If you sell downloadable products which are unique to each customer then you could create a hidden password protected category for each client. This might be useful for a photographer selling digital prints of their images online after a photoshoot.
  • Members-only Easy Digital Downloads store You might want to create a completely hidden downloads store which is only available to your members.
  • Temporarily hide downloads from public view There are lots of occasions when you want to temporarily hide products from public view. For example, on the Barn2 EDD site, we use a password protected category to pre-launch certain products to specific people, before launching them to the wider public. We simply give the password to each pre-approved customer and then can buy the download before it's officially launched.
Excellent product/Excellent Customer Support
I have a website selling digital music downloads for primary education. I needed a private category for this which can only be accessed by users who have paid to download the educational material (song videos and worksheets). I am delighted to have been able to achieve this aim using this simple and effective plug-in. Simple as it may be, I am completely new to WP and support to help me achieve my goal was vital. I am delighted to say that help was at hand, quickly and was most professional. I highly recommend this plug-in to you.

Case study - How Lemony Fizz restrict downloads to their subscribers

Lemony Fizz is a craft company providing paper crafts, planners and printables. They use Easy Digital Downloads with the Free Downloads extension to provide free project downloads to their subscribers. The Password Protected Categories plugin restricts the downloads so that only registered subscribers can download them.

It works like this:

  1. People visit the Lemony Fizz printables library which lists all the downloads.
  2. If they are a subscriber then they can click on any download and enter a password to unlock it. Once they have done this, the entire library is unlocked for them.
  3. Non-subscribers can sign up using the form at the top of the page, which integrates with their mailing list software. After confirming their subscription via email, they receive a welcome letter containing the password to the downloads library.

Note: Lemony Fizz has chosen to list their protected downloads in public parts of their site, but require a password to access the single download page. If you prefer, then you can hide the protected downloads from public view so they are invisible until you unlock the protected area. 

As you can see, there are lots of reasons to password protect Easy Digital Downloads. Next, I'll talk you through 3 ways to make downloadable products private. I'm assuming that you already have an Easy Digital Downloads site with downloadable products and categories set up.

3 ways to protect Easy Digital Downloads

Here's a summary of the 3 methods described in this article. You can jump straight to the type of password protection best suited to your website:

  1. Password protect Easy Digital Downloads categories
  2. Create private EDD categories only visible to logged in customers, or specific users or roles
  3. Password protect an entire Easy Digital Downloads store

How to password protect categories in Easy Digital Downloads

Password protecting Easy Digital Downloads categories is a more user-friendly solution. Adding password protection to specific categories locks down the category page and all its downloads with a single password. (Or multiple passwords, if you'd rather have a unique password for each customer.) Once the customer has entered a correct password, they will have access to that category, its sub-categories and all the downloads within it.

You can achieve this with the Password Protected Categories WordPress plugin. This is a simple plugin that lets you password protect Easy Digital Downloads categories in just a few minutes.

1. Set up the Password Protected Categories plugin

  1. Install and activate the Password Protected Categories plugin.
  2. Go to Settings → Protected Categories in the WordPress admin and enter your license key. (Get this from the confirmation page or email after you buy the plugin.)
  3. Select a page for customers to log into the protected categories.
  4. Choose what text will appear on the 'Submit' button on the password login page.
  5. Add a custom message which will appear above the password entry form on the login page.
  6. Decide whether to tick the 'Show password protected categories and posts to visitors' box. If you leave the box unticked then your protected categories and their downloads will appear on the main Downloads page. They can also appear in your navigation menus, widgets and search results if you're using these. Ticking this box hides the protected categories from your public-facing website.
  7. Choose how many days will pass before a customer has to re-enter the password. For example, if you choose '3' days then when a customer logs into a password protected category, they won't have to re-enter the password again for 3 days. The aim is to get the right balance between user experience and security.
  8. Click 'Save Changes'.
Easy Digital Downloads password protected categories settings page

2. Create your password-protected EDD categories

  1. Once you've installed and activated the plugin, go to Downloads > Categories in the WordPress admin.
  2. Go to create a new category or edit an existing one.
  3. You'll see a new 'Visibility' option that wasn't there before. Choose 'Password Protected' and enter a password for your category. If you want multiple passwords, click the + icon to add more.
  4. Click 'Add New Download Category' or 'Update' (depending on whether you're adding or editing a category).
  5. If you want to add sub-categories, add these now. Choose your password-protected category as the 'Parent' and leave these set to 'Public'. They will automatically be protected with the same password as the parent category.
  6. Repeat steps 1-6 to create any other password-protected categories for your Easy Digital Downloads store.
Setting an Easy Digital Downloads category to password protected with two passwords

3. Add downloads to your protected categories

  1. Next, go to the Downloads page in the WP admin, where you'll see a list of all your downloadable products. If you don't have any yet, add them now.
  2. Tick the relevant boxes to put some of your downloads within your password-protected categories. You can either do this on the Add/Edit Download screen or use Quick Edit on the main Downloads page.
  3. Click 'Update'.
Adding an Easy Digital Downloads product to a password protected category via Quick Edit

4. Link to your password-protected categories (optional)

If you want, you can add links to your protected categories in the usual way. For example, you might want to link to your login page from the menu. This is completely optional and you can choose how to incorporate your protected categories into the overall structure of your website.

And that's it! You've password-protected your Easy Digital Downloads categories and protected the downloadable products within them! For more information, please see the plugin knowledge base.

Get Password Protected Categories


User and role protected categories in Easy Digital Downloads

Restricting a category to specific user roles, also available for Easy Digital Downloads

The Password Protected Categories WordPress plugin also includes options to restrict Easy Digital Downloads categories to specific users or user roles.

You probably noticed this when I showed you how to password protect categories in the previous section.

Private categories are different from password-protected categories because they only appear for logged in users with the right permissions. In contrast, password-protected categories are separate from WordPress users - anyone can enter the password, regardless of whether they have a user account on your website.

User and role protected Easy Digital Downloads categories are completely invisible and hidden from public view. They automatically appear to logged in customers depending on their role.

How to create user role and role restricted categories

Follow the steps in the previous section on creating password-protected categories in Easy Digital Downloads. The only difference is that instead of choosing 'Password Protected' when you add or edit a download category, select 'User' or 'Role'.

Easy!


Password protect an entire Easy Digital Downloads store

So far, we've covered the options to protect specific categories in Easy Digital Downloads. Finally, I'll tell you how to use these techniques to create a completely private or hidden Easy Digital Downloads store.

You can make your whole WP downloads store private using password-protected or role protected categories. The trick is to create one password-protected category and structure your entire e-commerce store within this category.

The simplest option is to put all your downloadable products within the hidden EDD category. Or if you like, you can use sub-categories to divide up your EDD store. If you choose your password-protected category as the 'parent', all the sub-categories and their downloads will automatically be protected with the same password. (Don't password protect your sub-categories - leave them set to 'Public' as this will happen automatically.)

Once you've done this, anyone who clicks on a link to your main store category or any of its downloads or sub-categories will be prompted for the password or login details. The rest of your WordPress website will remain public as usual.

Linking to your hidden Easy Digital Downloads shop

Once you've password protected Easy Digital Downloads, you need to decide how people will access it.

You can either keep it completely hidden and give the link to authorised customers, along with the password. Or if you prefer, you can add a link to your Easy Digital Downloads customer login page. You can call this 'Store Login' or similar and can add the link to your website header, footer, navigation menu or wherever you like.


How can I password protect other WordPress e-commerce plugins?

The techniques described in this article will work for Easy Digital Downloads or any other WordPress e-commerce plugin. The Password Protected Categories plugin is compatible with any plugin that uses categories.

There's also a dedicated WooCommerce version of the plugin - WooCommerce Protected Categories. This works in a very similar way to Password Protected Categories but is specifically designed for WooCommerce.

Want a better layout for your EDD product lists?

An Easy Digital Downloads product table shown on a laptopIf you like Password Protected Categories then you'll love our plugin to list your Easy Digital Downloads inventory in a product table.

Posts Table Pro takes your downloads and creates an instant table or one-page order form, complete with AJAX search form and quick filtering.

Meet European VAT laws

Easy Digital Downloads checkout collecting EU VAT on a download

If you sell any sort of digital products to people in the EU, then you're legally required to charge them the tax rate for their local country. You have to do this even if your EDD store isn't based in the EU!

The Easy Digital Downloads EU VAT plugin makes this easy. It automatically charges the correct VAT to each customer and provides everything you need for your EU VAT returns.

Get EDD EU VAT

How do you protect your Easy Digital Downloads store?

Now it's your turn. Do you have hidden areas within an Easy Digital Downloads store, and what do you use them for? Do you use Password Protected Categories or are there other solutions you'd recommend? Please leave your comments below.

Instant online quote calculator showing a live web design price estimate on a laptop

When we used to offer web design services (before we switched to selling plugins), our web design quote calculator was the most visited page on our website. Lots of people asked us how to create an instant online quote calculator for their own WordPress website. It's time for me to share the secret of how we did it, so that you can too!

The good news is that we used a widely available WordPress plugin for our instant quote calculator. With over a million users, Gravity Forms is the world's most successful WordPress forms plugin. Most people use Gravity Forms for straightforward enquiry forms like the ones in our own support center. However, you can also use it to create instant online quote calculators.

This is how we did it.

Getting Gravity Forms

First, you'll need to buy Gravity Forms. Install and activate it on your WordPress website.

To create an instant quote calculator like ours, their Personal License will be fine. If you want to sign people up to MailChimp when they submit the form, you'll need the Business License. Or if you want to take payment from people who submit the form (e.g. a PayPal deposit), you'll need their Developer License. Check out the Gravity Forms extensions to decide which license you need.

How to create an instant quote calculator with Gravity Forms

Gravity Forms provide excellent documentation on how to get started with creating online forms in WordPress.

I'll talk you through the specifics of using Gravity Forms to create an instant online quote calculator for your website. We'll base this on our own quote calculator. If you want something different then you can follow these steps in conjunction with the official documentation.

I've added a screenshot of our own price calculator so you can see how it looks in the WordPress admin. You can also download it directly here.

1. Add the quote calculator title and description

First, create a new form in the 'Forms' section of the WordPress admin. Add the form title and description. When you add the form to the page, you can choose to show or hide these. On our quote calculator, we show them at the top of the page.

2. Add headings

You can make your price calculator more user-friendly by adding sub-headings to divide up the form.

To do this, drag an HTML element from the right to the left - one for each heading. Add your heading content and format it as needed. This uses HTML which is a bit confusing for some people, so leave your headings as plain text if needed.

HTML elements are a good opportunity to add static information to your form which won't be part of the price calculations. So use it for headings, explanatory information, etc.

3. Add products

Adding a hidden product field with a price to the quote calculator formNow it starts to get a bit tricky!

Open up the Pricing Section Fields section on the right of the form editor screen. Drag a 'Product' from the right to your form on the left.

Choose 'Hidden' field as the product will just be used as a base price for your calculations.

In our calculator, we set the product price to £0 because we offer a free web design option and only charge for extras. You may want to add a base price here which will be added to all prices, even if your customers don't select any other options.

Most online quote calculators will just need 1 product, which is used for the base price.

We added 2 products because we use 1 product for the base price, and another to calculate the price for extra pages. To give you some background, our standard web design cost includes 4 pages and we charge a price-per-page for additional pages. To do this, we added a second 'Product' field in Gravity Forms to set the price per page. When we added the other options to the calculator (see step 4), we selected the Base Price product for most of the fields and the Price Per Page product for the extra pages field.

4. Add extra options

Next, drag some 'Option' fields from the Pricing Section Fields section on the right to your form on the left. Add one Option for each of the options you want to include in your instant quote calculator.

We added Option fields for:

  • Setting conditional logic on an option field in the quote calculator formBlog or latest news - this actually doesn't affect the cost so we set the price to £0
  • Online shop
  • Search engine optimisation (SEO)
  • Mailing list signup form
  • SSL certificate
  • Free website setup service - this is a bit more complicated because we have different prices depending on whether or not people want an online shop. To achieve this, we added 2 Options for 'Free website setup service', and used Conditional Logic to display the correct one depending on whether they have ticked the 'Online shop' Option. To use conditional logic, click the 'Advanced' tab when you edit the Option. You can show or hide the Option depending on which other Options have been selected. Have a play - it's really clever once you figure it out!

We also added extra pages as a Quantity field associated with a different Product (see step 3, above). This let us add an extra price depending on the number of extra pages people wanted for their website.

4. Display the total price quoted

Next, drag a 'Total' field from the Pricing Section Fields section into your form. This will automatically calculate all the other fields to create the total.

5. Bonus tip - monthly costs

Our requirements for the instant quote calculator are a bit complex as our quotes consist of one-off setup fees PLUS ongoing monthly pricing.

We used the 'Total' field (see step 4) for the one-off quote, which was fairly straightforward. We added a static HTML element to display the monthly pricing.

The monthly pricing changes depending on which options are selected in the form. To achieve this, we used conditional logic to display different HTML elements depending on the options selected. This is a bit of a workaround, but suited our purposes and is the only way to do it in Gravity Forms.

6. Add a 'Submit my quote' section

Once someone has calculated an instant quote on your website, you presumably want them to submit the quote to you and place an order!

You can do this by adding more fields to the end of the form - either on the same page or a different one. (To divide your form into multiple pages, drag a 'Pages' element from the `Standard Fields' section on the right.)

Add fields for name, email address, phone number etc. A Submit button will automatically be added to the bottom, which you can reword in the form settings tab.

7. Configure the form settings

Now go back to the top of the page and go through all the settings and notifications. Make sure the quotes will be sent to the correct address, the 'Success' message is relevant and professional, etc.

8. Add the form to a page

Finally, go to edit any page or create a new one via Pages > Add New. You'll see an 'Add Form'  button above the toolbar. Click this and insert your form into the page.

Save the page and start testing your form!

9. Test, test, test!

Online price calculators are complicated, with lots of possible options. Spend a long time testing every combination and make sure your sums are all correct. Make any tweaks to get it just right.

Styling the form

We did some custom styling to ensure the website quote calculator matches our overall branding and colour scheme.

Gravity Forms looks pretty good on most websites straight out of the box, so you may not need to restyle it. You can restyle your website quote calculator using CSS. If you don't know how to do it, I recommend posting a job on Codeable. Their panel of pre-approved WordPress experts will bid for the work so you can easily find a good developer for the right price.

Help, I'm stuck!

In this tutorial, I've explained how we created our own instant online quote calculator so that people can get web design prices online. Your needs will inevitably be different and the logic to get your pricing right can be quite complicated.

If you get stuck, your first port of call should be the Gravity Forms documentation. This contains a wealth of knowledge. You can also contact Gravity Forms support for help in getting your online price calculator just right.

Do you have an online quote calculator for your website?

Have you set up an instant quote calculator on your own website? Did you use Gravity Forms or is there another tool you'd recommend? Please let me know in the comments below.

WooCommerce shipping zones list for separate UK country regions

In WooCommerce, it's surprisingly difficult to charge different shipping costs to England, Wales, Scotland, Northern Ireland, Republic of Ireland and the Channel Islands.

It's all very well and good for countries like the US where you can set the shipping cost for each state individually. But WooCommerce treats UK countries such as England, Scotland and Wales as a single country, even though postage costs to each country can vary.

Sadly, there are no WooCommerce plugins to do this for you. This tutorial will teach you how to charge separate shipping rates for each UK country.

It's quite a fiddly process so if you can't be bothered to do it yourself, skip to the end of this article and sign up to be notified when we release a new WordPress plugin for WooCommerce shipping to different UK countries.

1. First, select which countries you sell to

The easy bit is to set up shipping for the Republic and Ireland and the Channel Irelands Jersey and Guernsey. The reason this is easy is because they're separate countries. This means that you don't have to set add postcode areas for each one.

  1. Go to WooCommerce > Settings in the WordPress admin and find the 'Selling Location(s)' option.
  2. If you sell to customers worldwide, set this to 'Sell to All Countries' or 'Sell to All Countries, Except for...'
  3. If you only sell to specific countries, enter them here. Make sure you enter United Kingdom, Republic of Ireland, Jersey and Guernsey as they're treated as separate countries in WooCommerce.
  4. Add the same information for the 'Shipping Location(s)' field below.
  5. Scroll down and click 'Save changes'.

This will tell WooCommerce which countries you accept orders from and where you will ship your products. Lots of people enter 'United Kingdom' thinking that it includes Jersey and Guernsey, not realising that people from the Channel Irelands can't order from them.

WooCommerce settings selling and shipping to specific countries including UK, Jersey and Guernsey

2. Add a Shipping Zone for each postage rate

Next, go to the Shipping tab in the WooCommerce settings. You need to create a separate shipping zone for each group of areas that will have its own postage costs. For example:

  • If postage to England & Wales is £10 and postage to the other countries is £20 then you should add 2 shipping zones - 1 for England/Wales and 1 for elsewhere.
  • If each country or region will have different postage rates then you should add each one as a separate shipping zone - e.g. England, Wales, Scotland, Northern Ireland, Republic of Ireland, Scottish Isles, Isle of Man, Channel Islands etc.

If any of these areas will have the same postage cost then you can group them into the same shipping zone. This keeps it simple - if England and Wales have the same shipping rate then there's no need to add them as separate shipping zones.

The below screenshot lets you charge different shipping rates for England & Wales, Scotland & North Ireland, the Scottish Isles & Isle of Man, and the Channel Islands and Southern Ireland - so we added 4 shipping zones.

WooCommerce shipping zones set up for UK regions by postcode

Now it's time for the complicated bit. You need to tell WooCommerce how to determine which customer is in which shipping zone. Unfortunately this doesn't happen automatically.

  1. Hover over a shipping zone and click 'Edit'.
  2. In the 'Regions' column, you will see a box titled 'Select regions within this zone'. This should only be used for entire countries that have a single shipping rate - for example if all Isle of Man postcodes will have the same shipping cost then select 'Isle of Man' here.
  3. Click in the box to view a list of all the countries that you ship to. Select the countries that should be used for that shipping zone. This puts that entire country within a single shipping zone, so DO NOT select any countries that you're dividing into multiple shipping rates. For example, if you are charging separate postage for England and Scotland then don't add United Kingdom into this box - instead, you need to add the individual postcode areas (see step 4).
  4. If you need to divide a country across multiple shipping zones then click the 'Limit to specific ZIP/postcodes' link. A box will appear underneath where you can add the postcodes for that shipping rate. At the end of this article, I've provided a list of UK postcodes divided by area/country. This will hopefully save you a lot of time.

Adding UK postcodes to a WooCommerce shipping zone region

3. Add your Shipping Methods

Once you've added your WooCommerce shipping zones, it's time to add all the shipping methods. Each shipping zone needs one or more shipping method.

To add a shipping method, click the + icon on the right of the shipping zone.

Adding a flat rate shipping method to a WooCommerce shipping zone

Select the type of shipping method and click 'Add shipping method'. This will add the method to the 'Shipping Method(s)' column on the WooCommerce Shipping Zones page.

Next, click on the shipping method you just created and fill in all the information to set it up.

WooCommerce flat rate shipping settings for an England and Wales zone

Repeat the process to create all the shipping methods for each zone.

4. Test your WooCommerce shipping rates

Finally, you need to thoroughly test your shipping rates. To do this, log out of your website and add a product to the cart. Go through to the checkout and use the shipping calculator to test the postage from various countries and postcode areas.

If something isn't working properly, it can be tricky to figure out what has gone wrong. Something must be wrong with the logic somewhere - for example you might have accidentally added the same area to 2 shipping zones.

Some common pitfalls:

  • If the customer's default location in WooCommerce > Settings is set to 'Geolocate' then it's hard to accurately test the postage as the website can detect your location. Switch off this setting to test it more accurately.
  • Are you using wildcards incorrectly? For example, you might have entered E* to cover all the East London postcode areas. If you do this then ALL customers whose postcode starts with an E will be charged the England postage, even if they're in a different shipping zone - e.g. Edinburgh, which is EH*. To solve this problem, you need to add the 2-digit version of all the 1-digit postcodes that share a first letter with a postcode in a different shipping zone. In this example, you need to add E1*, E2*, E3* instead of just E*.
  • If a customer in the Isle of Man (for example) selects their country as 'United Kingdom' then they will be charged UK postage. This is fair enough, as they quite rightly think of themselves as within the UK. If this happens, it's worth adding the postcodes for the other countries into the relevant shipping zone just in case. For example, you can select 'Isle of Man' AND add the Isle of Man postcode areas (IM*) to the Isle of Man shipping zone. This will allow you to charge the correct postage whether an Isle of Man customer selects their country as 'United Kingdom' or 'Isle of Man'.

5. Checklist - have you missed anything?

As you can see, it's quite fiddly to set up different shipping rates for each UK country/region. This checklist will help you ensure you haven't missed anything:

  • Have you added all the separate UK countries individually on the WooCommerce > Settings page?
  • Make sure you've created a separate shipping zone for each country/region that will have its own postage rate.
  • Have you accurately selected the correct countries and postcodes for each shipping zone?
  • Test the shipping costs from various countries and areas.

Would you like a plugin to set up shipping to different UK countries?

I completely understand that the process outlined in this article is very fiddly and difficult to get right. We're developing a WordPress that will do all this for you. If you're interested, please add your email address below and we'll let you know when it's available.

Or if you just want to charge different rates for each country, check out our tutorial on using WooCommerce to charge a different shipping rate per country.


List of postcode areas by UK country

To help you add your postcode areas, here's a list of UK postcodes divided into country.

We created this by collating the postcode lists on several Wikipedia pages and can't guarantee the accuracy, but hopefully it will save you time on defining the areas for your shipping zones. Please get in touch if you have any corrections to the list.

England and Wales postcode areas

AL*
B1*
B10*
B11*
B12*
B13*
B14*
B15*
B16*
B17*
B18*
B19*
B2*
B20*
B21*
B22*
B23*
B24*
B25*
B26*
B27*
B28*
B29*
B3*
B30*
B31*
B32*
B33*
B34*
B35*
B36*
B37*
B38*
B39*
B4*
B40*
B41*
B42*
B43*
B44*
B45*
B46*
B47*
B48*
B49*
B5*
B50*
B51*
B52*
B53*
B54*
B55*
B56*
B57*
B58*
B59*
B6*
B60*
B61*
B62*
B63*
B64*
B65*
B66*
B67*
B68*
B69*
B7*
B70*
B71*
B72*
B73*
B74*
B75*
B76*
B77*
B78*
B79*
B8*
B80*
B81*
B82*
B83*
B84*
B85*
B86*
B87*
B88*
B89*
B9*
B90*
B91*
B92*
B93*
B94*
B95*
B96*
B97*
B98*
B99*
BA*
BB*
BD*
BH*
BL*
BN*
BR*
BS*
CA*
CB*
CF*
CH*
CM*
CO*
CR*
CT*
CV*
CW*
DA*
DE*
DH*
DL*
DN*
DT*
DY*
E1*
E10*
E11*
E12*
E13*
E14*
E15*
E16*
E17*
E18*
E19*
E2*
E20*
E3*
E4*
E5*
E6*
E7*
E8*
E9*
EC*
EN*
EX*
FY*
GL*
GU*
HA*
HD*
HG*
HP*
HR*
HU*
HX*
IG*
IP*
KT*
L1*
L10*
L11*
L12*
L13*
L14*
L15*
L16*
L17*
L18*
L19*
L2*
L20*
L21*
L22*
L23*
L24*
L25*
L26*
L27*
L28*
L29*
L3*
L30*
L31*
L32*
L33*
L34*
L35*
L36*
L37*
L38*
L39*
L4*
L40*
L41*
L42*
L43*
L44*
L45*
L46*
L47*
L48*
L49*
L5*
L50*
L51*
L52*
L53*
L54*
L55*
L56*
L57*
L58*
L59*
L6*
L60*
L61*
L62*
L63*
L64*
L65*
L66*
L67*
L68*
L69*
L7*
L70*
L71*
L72*
L73*
L74*
L75*
L76*
L77*
L78*
L79*
L8*
L80*
L9*
LA*
LD*
LE*
LL*
LN*
LS*
LU*
M*
M1*
M2*
M3*
M4*
M8*
M9*
M11*
M12*
M13*
M14*
M15*
M16*
M17*
M18*
M19*
M20*
M21*
M22*
M23*
M24*
M25*
M26*
M27*
M28*
M29*
M30*
M31*
M32*
M34*
M35*
M38*
M40*
M41*
M43*
M44*
M45*
M46*
M60*
M61*
M90*
M99*
ME*
MK*
N*
N1*
N2*
N3*
N4*
N5*
N6*
N7*
N8*
N9*
N10*
N11*
N12*
N13*
N14*
N15*
N16*
N17*
N18*
N19*
N20*
N21*
N22*
N81*
NE*
NG*
NN*
NP*
NR*
NW*
OL*
OX*
PE*
PL*
PO*
PR*
RG*
RH*
RM*
S1*
S2*
S3*
S4*
S5*
S6*
S7*
S8*
S9*
S10*
S11*
S12*
S13*
S14*
S17*
S18*
S19*
S20*
S21*
S22*
S25*
S26*
S32*
S33*
S35*
S36*
S40*
S41*
S42*
S43*
S44*
S45*
S49*
S60*
S61*
S62*
S63*
S64*
S65*
S66*
S70*
S71*
S72*
S73*
S74*
S75*
S80*
S81*
S95*
S96*
S97*
S98*
S99*
SA*
SE*
SG*
SK*
SL*
SM*
SN*
SO*
SP*
SR*
SS*
ST*
SW*
SY*
TA*
TF*
TN*
TQ*
TR*
TS*
TW*
UB*
W1*
W10*
W11*
W12*
W13*
W14*
W2*
W3*
W4*
W5*
W6*
W7*
W8*
W9*
WA*
WC*
WD*
WF*
WN*
WR*
WS*
WV*
YO*

Scotland and North Ireland postcode areas

AB*
BT*
DD*
DG*
EH*
FK*
G1*
G2*
G3*
G4*
G5*
G6*
G7*
G8*
G9*
IV*
KW*
KY*
ML*
PH*
TD*

Scottish Isles postcode areas

HS*
KA*
PA*
ZE*

WordPress posts listed in a sortable table with filter dropdowns

Our sortable table WordPress plugin - Posts Table Pro - lets you display various types of content from your WordPress website in a searchable and sortable jQuery table.

Based on the jQuery DataTables plugin, your visitors can view your posts, pages, or other content from your website in a fully sortable table.

You can set up the WordPress table to sort by any column by default, and you can change the default sort order. Your visitors can click the column headers to sort the table as they wish. They can also search for a keyword or filter the table by category, tag, custom taxonomy, etc.

In this video tutorial, I explain how to install and configure Posts Table Pro, using the example of a staff directory to help you create a sortable table. If you prefer written instructions, please see below for a step-by-step written tutorial.

https://youtu.be/-TNgEAszFKwg

The best WordPress sortable table plugin

Posts Table Pro is the premium version of our free sortable table plugin for WordPress - Posts Table with Search & Sort.

The free plugin lets you display blog posts from your WordPress website in a searchable, sortable table. The Posts Table Pro plugin builds on this by adding support for custom post types, custom fields, and custom taxonomies. It has various other options to create more sophisticated sortable tables.

WordPress sortable table plugin

Posts Table Pro is perfect for many different use cases including:

As you can see, the Pro plugin lets you create sortable tables in WordPress for many use cases that aren't available with the free plugin.

How to set up the Posts Table Pro sortable table plugin

1. Install the plugin

  1. First of all, you purchase the plugin on our website and download the plugin.
  2. Then you go into your WordPress admin and go to Plugins → Add New.
  3. Then you click Upload → Choose File and select the file from the link in your order confirmation email. This will save a zip file to your computer.
  4. Once uploaded, click Activate.
  5. After activation, the Posts Table Pro setup wizard will automatically open and guide you through entering your license key.

Now we'll use the plugin to create a WordPress Staff Directory. It will add a simple staff list to your website with links to the staff profiles. The list will appear in a searchable, sortable table. You can use the plugin to display various types of content, so this is just an example.

2. Add the information to display in the WordPress table

Post Table Pro's role is to create a sortable table of content already on your website. It does not create custom post types or taxonomies or anything, it just displays them. So you would add those previously using whatever method you're using to set up your website and data. You then get Posts Table Pro to allow you to display that data within a table.

If you want a separate 'Staff' section in the WordPress admin to store your staff data, I recommend the Easy Post Types and Fields plugin to create a custom post type and any extra fields of information. I used this to create a Staff custom post type and add various data relating to the staff profiles. Once you've decided how to store your staff data, go ahead and add all your staff members to the website.

3. Create your sortable table in WordPress

Sortable WordPress staff directory table with search and contact columns
  1. Upon installing the plugin, an automatic setup wizard will initiate, guiding you through the process of creating your first table. The setup wizard takes you through a step-by-step process, making it easy for you to create a sortable table that suits your needs.
  2. To begin creating your sortable table, you'll need to provide a name for it and select the post type that you want to display. After that, you can choose the posts or pages that you wish to include in the table.
  3. The plugin allows you to choose from a range of options, including posts, pages, and custom post types. Suppose you're building a database and want to include documents. In that case, you can select the custom post type option and proceed accordingly.
  4. The plugin offers a wide range of customization options, allowing you to determine which columns to display and in what order. To add a new column, choose the column type from the dropdown menu and click "Add". You can also reorder columns by dragging and dropping the sort icon or column heading.
  5. You can also add filters to your table. Filters appear as dropdowns above the table, and you can add as many as you like.
  6. To customize the sorting options for your table, select the default sorting option and the sort direction that you prefer. This gives you complete control over the order in which your table is displayed.
  7. For a large amount of data, the table loads one page at a time, so even with hundreds or thousands of items it loads quickly and smoothly.
  8. Next, you can choose how to sort your database, setting the default sorting option and the sort direction that you prefer. With all these options, you can create a table that is functional, easy to use, and visually appealing to your users.
  9. Finally, once you have completed creating your sortable table using the Post Table Pro plugin, the setup wizard will confirm that you have finished and provide you with instructions for displaying the table on your WordPress site. You have two options for displaying the table: using the 'Post Table' block in the Gutenberg editor, or copying the shortcode from the table builder and pasting it anywhere on your site. This gives you the flexibility to place the table on any page regardless of its content.

Create sortable tables more easily

The Posts Table Pro plugin is a versatile and user-friendly tool for creating sortable tables on WordPress websites. With its easy-to-use setup wizard and customizable features, you can create sortable tables that suit your specific needs, whether it's for displaying blog posts, product listings, or other types of content.

The plugin's ability to add filters and customize sorting options makes it easy for users to navigate and find the information they need quickly. Overall, the Posts Table Pro sortable table plugin is a must-have for website owners who want to enhance their user experience and improve the organization of their content.

We have created a video tutorial explaining how to use our WordPress password protect plugin to protect a WooCommerce category. The plugin lets you add password protections to a category and its products, or restrict it to specific logged in users or roles. Watch this alongside reading the knowledge base.

Password protected WooCommerce category with a login formThe tutorial tells you how to create a WooCommerce password protected category and private category in WooCommerce. It also explains the logic behind the plugin and how once you have protected a category, it will automatically protect all its products and any sub-categories too.

Here's a written tutorial for those of you who don't like videos:

Written transcript of WooCommerce Password Protect Category video

Before we learn how to password protect a WooCommerce category, you need to get the plugin on our website. Download the file and install it in the usual way for a WordPress plugin (Plugins → Add New → Upload), and also add the license key from your confirmation email.

Once you've got that all set up, you should have WooCommerce and WooCommerce Protected Categories installed on your website. You need both these plugins in order for WooCommerce Password Protect Category to work.

How to password protect a category in WooCommerce

Next go to Products → Categories in the WordPress admin. This is the usual page where you can create a WooCommerce category. If you've got an existing website then you probably have categories on the right already - that's fine. The process for creating a WooCommerce password protected category is exactly the same whether it's a new category or an existing one.

Let's great a new category. In the 'Add New Category' section on the left, add the following:

  • Category name - e.g. 'Clothes'
  • Slug - this is the last part of the category URL, e.g. 'clothes'

If you scroll down, you'll see that there's a new section at the bottom called 'Visibility'. This is what the WooCommerce Password Protect Categories plugin has added and it's not there by default in WooCommerce.

To password protect a WooCommerce category, you simply tick the 'Protected' option and enter a password, which can be anything you like. You can also set the category to only be visible to certain logged in users or user roles. Then click 'Add New Product Category'.

Click the plus (+) icon to add multiple passwords for a category. This lets you give different passwords to different customers.

This will add your new category in the list of categories on the right. In the 'Visibility' column, you can see that it is labelled 'Password protected'.

You can also restrict categories to specific users or entire roles. That way, they can automatically see the hidden content as soon as they log into their account. They don't need to enter a separate password.

Password protect sub-categories

You can also add sub-categories. If you have a sub-category, it will automatically share the same password. You don't need to password protect it - it just happens automatically.

Let's do this now and create a new category called 'Shoes'. I'm going to select the Parent as 'Clothes', and mark it as Public as I don't need to password protect it. Because this is a child category of a password protected category, it will be password protected even though it doesn't have its own password.

The great thing about that is that if you give your customers a password for the parent category, they can use it to access any of the products in that category, the child category page and any of the products in the child category. Customers only need to enter the password once and that whole area of the website will be unlocked for them.

That's much better than password protecting each individual product, which would be a nightmare for the customer because they'd have to enter the password for every single product they want to view. Not ideal!

If you want to create more complex structures for a password protected category, you can add other protected categories with their own password. For example, you might have a 'Furniture' WooCommerce category which is separate from the 'Clothes' category. You would add a different password to protect the Furniture category. That will work alongside the Clothes category and each will have a completely different password to protect it. If you give the customers who buy your clothes the password for the Clothes category, they will be able to access the Shoes category because it's a child category of Clothes. However they cannot access the Furniture category which is protected separately.

This is a good way to lock down lots of different types of WooCommerce store. For example you might use a password to protect a Trade section of your WooCommerce website and give the password to your trade distributors. You could give them each their own category and their own password. Or whatever the use case for you.

WooCommerce Password Protected Category settings

There are various settings for the WooCommerce Password Protect plugin in WooCommerce → Settings → Products → Protected Categories. These let you control how your protected WooCommerce categories appear on the main Shop page and in navigation menus and widgets. You can also customize the text on the password entry page.

Wrapping up our WooCommerce password protect tutorial

So that's how you set up the plugin and password protect a WooCommerce category. Give the password to your customers and they can buy from the protected categories.

For more information, check out our tutorials on how to hide a whole WooCommerce store and make it private, and how to use it as a WooCommerce wholesale plugin. If you want to protect an entire store, it's also worth looking at our dedicated private shop WooCommerce plugin.

Or sign up as an affiliate and earn 30% commission for recommending the plugin!

In response to popular demand, we have launched a new WordPress plugin called WooCommerce Password Protected Categories. It's the only plugin which lets you password protect categories in WooCommerce. It's even possible to create a WooCommerce wholesale site or hide a whole WooCommerce store!

Note: Since launching this plugin, we have added extra functionality and renamed it 'WooCommerce Protected Categories'. You can still password protect product categories, but you can also restrict categories to specific roles or even individual users. This makes it the most complete WooCommerce category protection plugin on the market. 

Why password protect WooCommerce categories?

WooCommerce Password Protected Categories showing a password prompt and category visibility listThere are several reasons why you might want to password protect a category or create WooCommerce private products. Here are some popular examples:

Most WooCommerce websites are entirely available to the public. However with nearly 2 million websites using WooCommerce in 2017, there are also lots of stores that need protected, private or hidden areas.

Related tutorial: How to create WooCommerce private products.

What does WooCommerce Password Protected Categories do?

WooCommerce product categories admin showing password-protected categories set up with WooCommerce Password Protected CategoriesWooCommerce Protected Categories adds a password protection option to the WooCommerce Categories page (WooCommerce → Categories in the WordPress admin). It works in the same way as the password protection for pages and posts. You choose a password, and visitors must enter this password in order to access the category page.

Each WooCommerce product category can have one password. Alternatively, you can create multiple passwords for each category. This is useful if you want to create unique passwords for each category, for example.

The great thing about this plugin is that the password automatically protects all the products within the category you have protected. It also protects any sub-categories. This lets you divided up the protected area of your e-commerce store, creating a more complex navigation structure with as many products and sub-categories as you like - all protected by a single password.

The plugin also lets you mark categories as Private, so that only logged in Administrators and Editors can view them. Or if you prefer, you can restrict categories to specific logged in user accounts or user roles. These are all great ways to create WooCommerce private products within a single category.

What did people do before this plugin was released?

Previously, people wanting to create a hidden area for private products within a WooCommerce online shop would use one of the following methods.

Password protect or private WooCommerce products

You can password protect individual WooCommerce products in the same way as you can protect a standard WordPress post or page. You can also create individual WooCommerce private products. Do this via the 'Visibility' option in the 'Publish' section at the top right of the Add/Edit Product screen.

A password protected product will still appear on your main Shop page and category pages. If someone clicks on it then they will be prompted to enter a password before they can view the product.

With this option, you have to individually password protect every product that you need to hide. Or mark the product as private.

With password protected products, your customers will have to enter a password for every single product. Not very user-friendly.

With WooCommerce private products, they appear to logged in users with the correct privileges but it's a bit disjointed.

The WooCommerce Protected Categories plugin offers a more sophisticated solution because it includes a setting allowing you to hide products within private or password protected categories from the main Shop page. You can also hide private or password protected categories from your main list of categories. This means that people will only be able to find your protected products or categories if they have the link. (Or if they're logged in, with WooCommerce product categories.) This lets you have a private area of your WooCommerce shop without cluttering up your public shop pages.

Once a visitor has entered the password for a category, they will be able to view all the products within that category - and also within any sub-categories - without entering any further passwords. This is much more user-friendly than protecting each individual product.

Display products on a private or password protected page

Illustration of a tablet with a password field and padlock for private productsWooCommerce has lots of built-in shortcodes which can be used to display products within a page. Some themes also have options for displaying WooCommerce private products or categories on a standard page.

You can use this to create a standard page in WordPress and password protect it in the usual way or mark it as private. You can then insert the required products onto the page.

The problem with this option is that it's not very secure as there are various other ways that people can find your products. The 'hidden' products will still be visible on your main WooCommerce Shop page which lists all your products - and people can guess the address of this page even if you haven't added any links to it.

If your hidden products are in the same category as publicly available products then visitors will be able to see the hidden products on the category page. There are probably other loopholes, too.

Restrict content using a membership plugin

For a more fully featured solution, you can create a complete membership site using a WooCommerce membership plugin such as WooCommerce Memberships or Groups (with the Groups for WooCommerce add-on). With a membership plugin, each of your users will have their own login details - as opposed to a shared password for each category.

This is a good option if your users will have access to other protected content, for example a wider members area. It's also good if any of your WooCommerce categories are particularly sensitive and a shared password isn't secure enough. However it can be overkill if your requirements are more straightforward than this. WooCommerce-compatible membership plugins are also more expensive. And it's a pain to have to spend your time helping members who are having problems logging in (yes I know WordPress has a 'Lost Password' feature, but owners of membership sites still receive constant enquiries about this.)

If you really want each user to have a separate login then you can create private categories instead of a whole membership plugin. This will automatically unlock your private categories to logged in users depending on their role. It's much easier than a full membership solution.

If you need to create a private area of your shop then the WooCommerce Protected Categories plugin is a great option. It's quick and easy to set up, and automatically protects all the products within your private or password protected categories. Simple!

Create a WooCommerce age restricted store

Password Protected Categories is ideal as a WooCommerce age verification plugin. You can use a password protected category to require customers to verify their age before they can view the age restricted products within.

Is it easy to use?

Absolutely, you can literally create WooCommerce private products within a minute or two. You can read the full plugin documentation here. We've also provided a detailed video tutorial on using the password protection plugin and marking products as private.

Where can I get the WooCommerce private products plugin?

So you'd like to password protect your WooCommerce categories or make them private! You can buy the plugin from here. It's much cheaper than setting up a full membership solution and we hope it is useful for making WooCommerce private and protected.

Or if you'd rather protect your entire shop, check out our WooCommerce Private Store plugin instead.

We've also created an opportunity to earn money from recommending the plugin. Sign up to our WordPress affiliate scheme and get 30% commission for WordPress plugin sales on our site.

WordPress Comments admin screen showing the IP address beside each comment

A client recently asked how to find out the IP address of everyone who leaves a comment or submits a contact form on their WordPress website.

There's a simple answer to the question, but it's not one that most people know. The solution doesn't even involve installing any extra plugins (apart from the plugin you are already using for the contact form). I hope this post helps other people who have the same question about their website.

WordPress comments and IP addresses

If you want to find out the IP address of everyone who comments on your WordPress posts, don't bother looking for a plugin to do this. It's already built into WordPress.

Simply go to the 'Comments' section in the WordPress admin. The IP address appears in the left hand column (titled 'Author') immediately underneath the commenter's name and email address.

You've probably seen it dozens of time but never noticed.

Contact Form 7 and IP addresses

Contact Form 7 is the most popular free WordPress contact form plugin. It's actively used on over 1 million websites worldwide.

I remember Contact Form 7 being quite basic a few years ago. However since then, it has been actively developed. Many new features have been added, making it a highly sophisticated contact form plugin.

One of Contact Form 7's lesser known features is the Remote IP tag. Add the following shortcode anywhere within the Message Body section in the Mail tab in your contact form settings:

[_remote_ip]

Adding this shortcode will automatically insert the user's IP address into the email notification that the administrator receives whenever a new form is submitted on the website.

Warning: You do NOT need to add the [_remote_ip] shortcode to the actual form. You only need to add it to the 'Mail' tab so that the IP address is added to the email that you receive when someone submits the form.

How to track IP addresses using Gravity Forms

Gravity Forms is the world leading premium WordPress contact form plugin. As you would expect from a paid-for plugin used on over 1 million websites, it already has this feature built in.

To insert the user's IP address into the email notification to the administrator, add the following merge tag anywhere within the body for the email:

{ip}

You can read more on Gravity Forms' Merge Tags page.

Diagram of PayPal Adaptive Payments splitting one payment between two receiversOne of our WooCommerce clients recently asked us to set up her WordPress online shop to automatically pay a profit share to her business partner.

Most WordPress e-commerce websites accept payments to a single source only. Typically, a WooCommerce store will integrate with a single PayPal account, to which all payments received via the website are sent. This client wanted a percentage commission or profit share to be automatically paid to a second PayPal account for specific products only.

WordPress plugins for WooCommerce profit share or commission

We initially thought that this would involve some bespoke WordPress development work involving WooCommerce and the PayPal API. However we found several WordPress plugins that met the requirements exactly. I guess that's not surprising given that 2,500+ WooCommerce add-ons are available in 2017.

These plugins work using a feature called PayPal Adaptive Payments. It lets you split a PayPal payment (e.g. from a WooCommerce product order) to multiple recipients.

There are 3 main WordPress plugins for using PayPal to pay a profit share or commission from your WooCommerce orders:

All of these plugins do largely the same thing. They all integrate PayPal Adaptive Payments with WooCommerce. They all split PayPal payments to multiple recipients using a choice of methods. These are Chained Payments, Parallel Payments or Standard Simple Payments. (Read the plugin documentation for definitions, as it's quite complicated.)

Although all 3 plugins looked fine and had quite good reviews, we chose the official WooCommerce extension. This is because it's safer to purchase plugins from a single company. WooThemes developed both WooCommerce itself and the PayPal Adaptive Payments plugin, so if we had any problems then they would have to take responsibility and couldn't blame the other developer. This is always a possibility when you combine plugins by multiple developers. Price-wise, the official plugin was the middle of the 3 options.

Our solution

We purchased the PayPal Adaptive Payments plugin and read the documentation, which was quite complex. Chained Payments was the best method for our client as it allows the commission to be automatically sent to our client's business partner without the customer knowing that this is happening.

We set up the plugin to work with WooCommerce products in a specific category only. The customer would pay via PayPal. It would look like their PayPal payment was going a single recipient. But behind the scenes, a 'Chained Payment' effect would kick in. A percentage of the payment was sent to our client's PayPal account and a different percentage was sent to her business partner. Perfect!

What's the catch?

The only downside is that PayPal Adaptive Payments are complicated. The fact that there's a plugin available doesn't make it easy to set up. We had to do a lot of fairly technical work to set everything up correctly. This included creating a PayPal App and submitting it to PayPal for approval. There were also several hoops to jump through such as providing PayPal with details of our client's business plan. (Because they wanted to check the payments were being used suitably.)

If you have a WordPress website and want Adaptive Payments, you'll probably need a WordPress web developer or agency to set it up. It's a great option if you want to automate more complex payment arrangements with PayPal.