
So you've designed a new WordPress website and it's ready to go live. Congratulations!
Going live is an important part of the web design process. Over the years, we have developed a detailed checklist of essential steps for launching a WordPress website. Read this checklist before you launch a website into the big wide world, and give it the best possible start.
1. Set the date
There's a right and a wrong time to go live. For some reason our clients always want to go live on a Friday. Bad idea!
Schedule the launch of the website for as early in the week as possible. This leaves the longest possible time to complete the go-live checklist and fix any teething problems before the weekend, when your WordPress web designer may not be available.
2. Move the WordPress website to its final location
Some people develop their WordPress website directly on their web host. If so, you can skip this step.
Others develop websites elsewhere, for example on a separate staging server or stored locally on their computer. This means that you'll need to arrange to move the finished website to your hosting account. This can take a while, so schedule it for at least a day or two before go-live.
Tip: If you haven't chosen a web host yet, we highly recommend WP Engine - the fastest, most reliable WordPress host we have ever worked with.
3. Final checks before going live
Our go-live checklist includes a few quality control checks to make sure we haven't missed anything during the WordPress web design process:
- Test everything on the website and ensure it's working correctly. Leave no stone unturned!
- Make a final check of the Settings section in the WordPress admin. Ensure things like the time zone are correct.
- If you're using an off-the-shelf WordPress theme with a child theme, make sure no custom CSS has been added in the theme options. Custom CSS should be either in the theme options or the child theme, but not both.
- Look at the Pages list in the admin and make sure all the pages are in the correct order. If there are lots of pages to re-order, consider a plugin such as Swifty Page Manager. This is worth doing even if you use custom menus and the order of pages isn't reflected on the public-facing website, as it makes it easier to work with the pages in future.
- Ensure there's no demo content from the theme still on the website - e.g. pages, posts, custom posts, media files.
- Go to Appearance > Themes, delete un-used themes and just keep the active theme (if you're using a child theme, you'll need to keep the parent and child theme) and the most recent default theme (e.g. TwentyFifteen).
- Make sure all contact forms, admin emails etc. are set to the correct address - the WordPress designer's email address will often be used during the development process, so don't forget to change this before go-live.
- Run the WP-Sweep plugin to remove all the page revisions etc. from the development phase. Delete this plugin afterwards.
- Make sure none of the images are more than approx. 1,920 pixels wide, or bigger if you are using retina images. Use the Imsanity WordPress plugin to bulk-resize them if needed. Leave this plugin active to resize any huge images that are accidentally uploaded in future.
- Use an image optimisation plugin such as WP Smush to bulk-optimise all the images on the site. Leave this plugin active if images will be added to the website in future.
4. Set up caching measures for improved page load times
Caching is an important way to speed up a WordPress website. Most people don't use caching during the development process because it can interfere with your work, for example by preventing you from seeing your changes straight away. This means that you need to set up caching immediately before the website goes live.
Caching is most effective when applied at hosting level. If your host doesn't offer caching, install a caching plugin.
- If the site is hosted on WP Engine (our recommended WordPress web host), log into WP Engine and change the following settings:
- CDN > Enable (this isn't caching, but it also boosts performance if it's available on your plan)
- Utilities > Enable Object Caching
- If the site is hosted on SiteGround (our recommendation for smaller or personal websites) or another company that provides caching - set up caching using the instructions from your web host.
- Other hosting - install a caching plugin. Our favourite (if you're using an inferior web host that doesn't do their own caching!) is W3 Total Cache. To use it to its best effect, it ideally needs setting up by a WordPress professional as it requires quite a lot of knowledge to get right.
5. Set up automatic backups
Our recommended web hosts WP Engine and SiteGround have such good backups that we don't use backup plugins, unless a client has very specific requirements for storing backups. If you're using a web host with less good backups, or just want extra peace of mind, then it's worth adding a plugin.
Our favourite backup plugin is BackupWordPress and we also quite like BackWPup. For most websites, I'd recommend scheduling a weekly file backup and daily database backups. You will want more frequent backups if you're planning to make significant changes on a regular basis or if your website includes a lot of user-generated content.
Go through the settings for your backup plugin carefully and make sure it's not backing up anything non-essential such as the WordPress core and backup folders (don't backup your backups!). If you're running file and database backups at separate intervals, don't bother with a 'Full' backup as this will double up on other backups. Set your backups to auto-delete after a set period so they don't take up too much space.
The simplest option is to set your backups to save to a folder within your hosting account. For extra peace of mind (for example if anything happens to your web host), save your backups to a third party location such as a separate FTP account with a different host, Dropbox or Amazon storage.
Tip: Backup plugins use a lot more server resources than backups created directly on the server. This means that the website may slow down while a backup is being created using a plugin. Schedule the backups to take place in the middle of the night, and consider doing backups in some other way - particularly for very large websites.
6. Update your links
If you have been developing the website on a temporary URL, for example because your old website is still on your live domain, then you'll need to run a thorough 'search and replace' script to update all the links. Backup the database first in case anything goes wrong, then do a search and replace to replace all instances of the temporary URL with the finished URL.
Be aware that once you have done a search and replace, the website probably won't function correctly until you have updated the settings for the domain name (see step 7). This is because the website is pointing to the final domain but the domain isn't yet pointing to it. Don't worry about this - you should already have tested the website in step 3. If you have done the search and replace correctly, things should start working properly as soon as the domain settings update.
Tip: There are lots of different methods for running a search and replace script. If you do it by installing a PHP file on the server, ALWAYS remember to delete this immediately afterwards - this is really important for security.
7. Update the domain name
If you have been developing the website on the actual domain name then you can skip this step.
If you have been using a temporary URL - for example because the domain is currently pointing at the old website - then you will need to update the domain name to point to the new website.
You can set the nameservers to your web host, but this method isn't suitable if you use your domain name for anything else, for example if you use a different host for your email or if you have separate subdomains. The best method is to go into the Advanced DNS for your domain name and update the following records to use the IP address where the website is hosted:
-
- The root A record (this is usually indicated by a * or www)
- The WWW A record
Once updated, wait for the new records to propagate. This usually takes between a few minutes to 48 hours. A DNS propagation checker can tell whether new records have been propagated or not.
Note: Domain name settings are very complicated and if you don't know what you're doing, I recommend that you speak with your domain name register, your web host or a WordPress web designer. The above is a very basic guide and won't apply to all scenarios.
8. Wait!
If you have updated the nameservers in step 7 then the changes can take up to 48 hours to take effect. The changes populate slowly across the internet, so there might be a strange interim period where customers can see the old website (if you have one) and you can see the new one, or vice versa!
If you used Advanced DNS to update the domain then this usually happens quite quickly, depending on the domain name registrar - usually within a few hours although there are no guarantees. If you can see a field called 'TTL' in the Advanced DNS, try to decrease this to the smallest number it will accept - this means 'Time 'Till Live' and affects the length of time before the changes will take effect.
Please be patient - this stage is frustrating when you're excited about the new website going live. Unfortunately there's nothing you can do to speed it up.
9. URGENT! Unblock the website from search engines
As soon as the website goes live, log into the admin, go to Settings > Reading and untick the 'Discourage search engines' box. (I sincerely hope this was ticked during the development process!)
10. Submit to search engines
You should also submit the website to search engines, whether it's a new site or a redesign of an existing website. This encourages the main search engines to crawl the new website as soon as possible to index the new content.
11. Set up Google Analytics
Google Analytics is a powerful tool to track how many people are visiting the website and how they are interacting with it. In my experience, nearly all WordPress websites will benefit from having Google Analytics or a similar tool installed. This should be done as soon as the website goes live on the final domain.
- Log into Google Analytics and add the website as a new Property
- Install and set up the Google Analytics for WordPress plugin
Tip: I recommend using the above method even if the theme has a 'Google Analytics Tracking Code' box. This is because using a separate Analytics plugin means that you won't lose your tracking code if you ever switch theme.
12. Set up Google Webmaster Tools
Log into Google Webmaster Tools and add both the www and non-www versions (e.g. www.barn2.com and barn2.com) so that you can tell Google which is your preference. Verify it using your Google Analytics account, which you just set up in the previous step.
Look at the information in Google Webmaster Tools to make sure Google is able to crawl the site correctly. Fix any problems that are reported. (Webmaster Tools will also email you if it detects any major problems in future.)
Other search engines have their own version of Webmaster Tools which are specific to them. Our go-live process only includes Google Webmaster Tools because Google is the main search engine and the issues they are having will be relevant to other search engines too.
13. After go-live - Building traffic and keeping the website running smoothly
Once the new WordPress website has gone live, I hope you feel proud and start receiving positive feedback. But there's no time to relax - there's still lots of work to do! You need to build traffic to the website and keep it properly maintained.
Ongoing SEO
Your WordPress website may look beautiful, but it will only achieve its aims if enough people are visiting it. A good ongoing SEO (search engine optimisation) strategy is essential for this, in conjunction with effective social media marketing and adding regular content to the website.
Software and security updates
Within a few days of going live (I'm not exaggerating!), most WordPress website owners will start to see updates becoming available in Dashboard > Updates.
It's really important to keep WordPress itself, the theme (if you're using an off-the-shelf theme) and plugins on the website up to date. This is the main thing you can do to protect the website from hacking. It will also make sure your website is compatible with new versions of WordPress that are released in future. When WordPress is updated, theme and plugin authors usually release an update to achieve this so it's important to install them. This is especially important for websites with complex plugins such as e-commerce and membership.
Some WordPress web hosts will update WordPress automatically for you. This is great, but you're still responsible for updating the theme and plugins.
Future developments to your WordPress website
A well designed WordPress website should be able to grow with your company. Don't let it go out of date - keep the content fresh and add new pages and features over time. This will help it to achieve its potential so that it keeps working for you, both immediately after go-live and into the future.


 An example of how to use the plugin

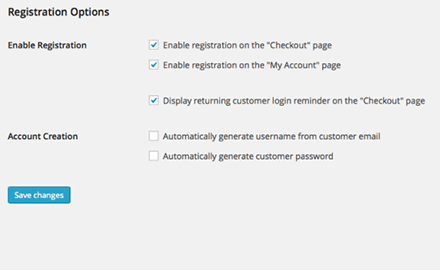 If you log into the WordPress admin and go to WooCommerce > Settings > Account, you can scroll down to a section called Registration Options. This allows you to tick a box called 'Automatically generate username from customer email'.